

Page 1

honestech
FOTOBOX™ PLUS
User Guide
Page 2

2. honesteh
End User License Agreement
IMPORTANT : READ THE FOLLOWING TERMS AND CONDITIONS
CAREFULLY BEFORE CONTINUING THIS INSTALLATION.
IF YOU DO NOT AGREE WITH THESE TERMS AND CONDITIONS,
PROMPTLY REMOVE THE SOFTWARE FROM YOUR COMPUTER AND
RETURN THE SOFTWARE, INCLUDING THE DOCUMENTATION, TO YOUR
SUPPLIER AND YOUR MONEY WILL BE REFUNDED. IF YOU
DOWNLOADED THIS SOFTWARE, PLEASE REMOVE THE SOFTWARE
FROM YOUR COMPUTER AND CONTACT YOUR SUPPLIER TO REQUEST A
REFUND.
In this license agreement (the “License Agreement”), you (either individual or an
entity), the purchaser of the license rights granted by this License Agreement, are
referred to as “licensee” or “You”. Honest Technology is referred to as the
“Licensor”. The current version of the accompanying software (“Software”) and
documentation (“Documentation”) are collectively referred to as the “Licensed
Product”. Licensor may furnish hardware with the Licensed Product (“Hardware”)
1. License
In accordance with the terms and conditions of this License Agreement, the
Software is the property of the Licensor and is protected by Copyright Law.
Page 3

3. F OTOBOX™ PLUS
While the Licensor continues to own the Software, the Licensor grants the
Licensee, after Licensee‟s acceptance of this License Agreement, the
Limited, non-exclusive license to use on copy of the current version of
Licensed Product as described below. The Software is “used” on a
computer when it is loaded into the temporary memory (i.e., RAM) or
installed into the permanent memory (e.g., hard disk, CD-ROM, or other
storage device) of that computer, except that a copy installed on a network
server for the sole purpose of distribution to another computer is not
considered “in use”. Except as may be modified by a license addendum
which accompanies this License Agreement, the Licensee‟s rights and
obligations with respect to the use of this Software are as follows:
You May,
1. Use the Software for commercial or business purposes in the
manner described in the Documentation.
2. Use the Software to share Internet connection, transfer data, files
and images among the computer in the manner described in the
Documentation.
You May Not,
I. Copy the documentation that accompanies Software.
II. Sublicense or lease any portion of the Software.
III. Make illegal duplication of the software.
Page 4

4. honesteh
2. Copyright and Trade Secrets. All rights in and to the Licensed Product
including, but not limited to, copyrights and trade secrets rights, belong to
Licensor, and Licensor holds title to each copy of the Software. The
licensed Product is protected by United States Copyright Laws and
international treaty Provisions.
3. Term. This License Agreement is effective until terminated. Licensee may
terminate this License Agreement if Licensee breaches any of the terms
and conditions herein. Upon termination of this License Agreement for any
reason, Licensee shall return to Licensor or otherwise destroy the Licensed
Product and all copies of the Licensed Product. Upon request of Licensor,
Licensee agrees to certify in writing that all copies of the Software have
been destroyed or returned to Licensor. All provisions of this Agreement
relating to disclaimers of warranties, limitation of liability, remedies, or
damages, and Licensor‟s proprietary rights shall survive termination.
4. Executable Code. The Software is delivered in executable code only.
Licensee shall not reverse engineer, compile or otherwise disassemble the
Software.
5. Limited Warranty
a. Licensor does not warrant that the functions contained in the
Licensed Product and Hardware will meet Licensee‟s requirements or
that the operation of the Software and Hardware will be uninterrupted
or error-free. Licensor does warrant that the media on which the
Page 5

5. F OTOBOX™ PLUS
Software is furnished and the hardware will be free from defects in
materials and workmanship under normal use for a period of thirty
(30) days from the date of delivery (“Warranty Period”). This Limited
Warranty is void of failure of the media on which the Software is
furnished has resulted from accident, abuse, or misapplications.
b. EXCEPT AS PROVIDED ABOVE, THE LICENSED PRODUCT IS
PROVIDED “AS IS” WITHOUT WARRANTY OF ANY KIND, EITHER
EXPRESS OR IMPLIED INCLUDING, BUT NOT LIMITED TO,
IMPLIED WARRANTIES OF MERCHANTABILITY AND FITNESS
FOR A PARTICULAR PURPOSE, AND THE ENTIRE RISK AS TO
THE QUALITY AND PERFORMANCE OF THE LICNESED
PRODUCT AND HARDWARE IS WITH LICENSE.
6. Limitation of Liability
a. Licensor‟s sole obligation or liability and licensee‟s exclusive remedy
under this agreement shall be the replacement of the defective media
on which the software is furnished and/or the hardware according to
the limited warranty above.
b. In no event will licensor be liable for any consequential, incidental or
indirect damages including, without limitation, any loss of data or
information, loss of profits, loss savings, business interruption or other
pecuniary loss, arising out of use of or liability to use the software or
Page 6

6. honesteh
documentation or any hardware, even if licensor has been advised of
the possibility of such damages, or for any claim by any third party.
7. General
a. Any Software and Hardware provided to Licensee by Licensor shall
not be exported or re-exported in violation of any export provisions of
the United States or any other applicable jurisdiction. Any attempt to
sublicense, assign or transfer any of the rights, duties or obligations
hereunder is void. This Agreement shall be governed by and
interpreted under the laws of the State of New Jersey, United States
of America, without regard to its conflicts of law provisions. Licensor
and Licensee agree that the U.N. Convention on Contracts for the
International Sales of Goods shall not apply to this License
Agreement.
b. This License Agreement may only be modified or amended by a
written license addendum that accompanies this License Agreement
or by written document that has been signed by both you and
Licensor. Site licenses and other types of enterprise licenses are
available upon request. Pleas contact Licensor or your supplier for
further information.
c. Any controversy or claim arising out of or relating to this Agreement,
or the breach of this Agreement, shall be settled by arbitration
administered by the American Arbitration Association in accordance
Page 7

7. F OTOBOX™ PLUS
with its Commercial Arbitration Rules and Judgment upon the award
rendered by the arbitrator may be entered in any court having
jurisdiction thereof. The arbitration shall be held in Taxas, United
States of America.
If you have any other questions concerning this License Agreement, or if you
desire to contact Licensor for any reason, please contact Honest Technology.
Copyright 2009~2010
Honest Technology Inc.
All Rights reserved.
Page 8

8. honesteh
Table of Contents
END USER LICENSE AGREEMENT……………………………………2
TABLE OF CONTENTS…………………………………………………….8
1. INTRODUCTION……………………………………………………..…9
What is honestech FOTOBOX™ PLUS…………………..……...9
Main Features………………………………………………..……...9
System Requirements……………………………..…….…..…….10
Contents……………………………………………………….…….12
honestech FOTOBOX™ PLUS has two modes:………….……13
2.PRODUCT REGISTRATION………………………………………..…..14
3. STARTING HONESTECH FOTOBOX™ PLUS………………….…..16
Easy Mode…………………………………………………………19
Advanced Mode……………………………………………………60
Publish……………………………………………..……..………..109
Page 9

9. F OTOBOX™ PLUS
1. Introduction
What is honestech FOTOBOX™ PLUS
honestech FOTOBOX™ PLUS allows you to create spectacular
photo slideshows using ready-made themes or custom building your
own to create that one of a kind memory. Using the latest in multimedia technology, you can add motion effects, transitions and text to
your images, along with background music and voice over narration.
When you are finished, upload your memories to YouTube, or burn
them to CD or DVD to give to your friends and family.
Main Features
SD Memory Card Reader Included
Supports SD, SDHC, MMC, MMC Plus, Mini SD*, Micro SD* (*
Requires SD adaptor).
No Software Installation
The program runs directly fro the FOTBOX™. Simply plug in and
Page 10

10. honesteh
start creating a slideshow.
Various Themed Templates
Create amazing slideshows with the help of ready-made themes.
Create Video Slideshow
Convert your favorite pictures into a slideshow DVD or movie files.
Edit Pictures
Add text or graphic effects to pictures with only a few clicks.
Add Background Music
Add music or voice over narration to your favorite pictures.
Add Transition Effects
Add transition effects in between the pictures or video clips.
System Requirements
Operating System:
Windows XP Service Pack 2/3
Windows Vista, Windows 7
USB 2.0 Host Controller/Port
Processor:
Page 11

Intel® Pentium® iV 2.4 GHz or higher
Pentium® D, Pentium® M 1.3GHz,
Pentium Core® Duo or
AMD® Ahtlon® Athlon 64 processor
Memory:
512MB of RAM
Free Hard Disk Space
10GB for DVD creation
Other:
DirectX 9.0 or higher
Windows Media Format SDK 9 (or higher)
Windows Media Player 7 (or higher)
CD Writer for VCD, SVCD
DVD Writer for DVD
Microphone for narration
11. FOTOBOX™ PLUS
Page 12

12. honesteh
Contents
FOTOBOX™ PLUS (SD memory card reader with built-in
256MB Flash memory)
USB extension cable
Neck Strap
Quick Start Guide
Page 13

13. FOTOBOX™ PLUS
honestech FOTOBOX™ PLUS has two modes:
1. Easy Mode
Simple three step process to turn your photos into
spectacular slideshows.
2. Advanced Mode
Users can control the transitions, effects and audio in detail.
The advanced mode is composed of the following 6 steps.
1) Import & Select Theme
2) Edit & Title
3) Add Background Music
4) Add Narration
5) Effects
6) Publish
Page 14

14. honesteh
2. Product Registration
Complete the registration form to receive exclusive information via
email, regarding product updates, patches, and discount coupons.
Page 15

15. FOTOBOX™ PLUS
To temporarily turn off the registration reminder, use the “Do not display
this message for… days” option at the bottom of the window.
Select the Cancel button to bypass registration and proceed into the
program. The registration reminder will be permanently deactivated
upon completion of registration.
Page 16

16. honesteh
3. Starting honestech FOTOBOX™ PLUS
Remove the SD memory card from your digital camera, and insert it
into the FOTOBOX™ PLUS. Then plug the FOTOBOX™ PLUS into
the USB port on your PC.
→
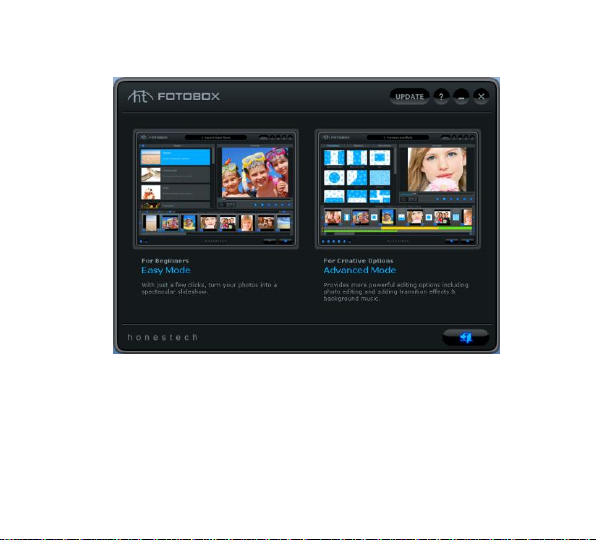
The following Menu screen will be displayed once the FOTOBOX™
PLUS is connected to your PC.
Page 17
17. FOTOBOX™ PLUS
The Easy Mode is recommended for those who wish to get started
quickly, have limited knowledge of photo software or do not require the
use of any editing tools. This mode will allow you to create a photo
slideshow, add a theme and allow you to burn your show to disc or
output to multiple file formats, YouTube, iPod and PSP.
Page 18

18. honesteh
The Advanced Mode is recommended for users who want more
control to shape their slideshow with photo editing capabilities, effects,
title options, adding background music and recording voice over
narration.
Page 19

19. FOTOBOX™ PLUS
Easy Mode
To open the Easy Mode, select “Easy Mode” from the main menu
screen.
Page 20

20. honesteh
The Easy Mode allows you to create amazing slideshows with the help
of ready-made Themes. The Themes included provide a specific mood
or atmosphere to your photos, giving your slideshows that extra
pizzazz. The process is kept simple to minimize any confusion and
allow you to still have fun in three basic steps:
1. Add photos
2. Select a Theme
3. Publish (CD/DVD, File Format, YouTube, iPod or PSP)
Page 21
21. FOTOBOX™ PLUS
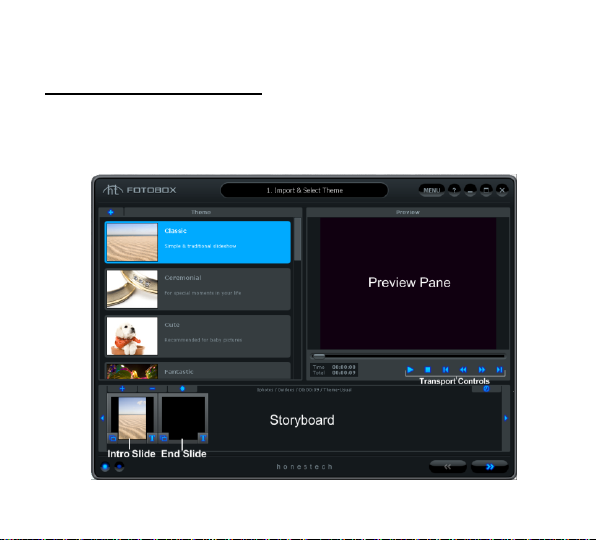
Import & Select Theme
The Easy Mode will open to the Import & Select Theme screen upon
selection from the main screen.
Page 22

22. honesteh
The Import & Select Theme screen is used to build your photo
slideshow. It provides several functions and task areas to make the
slideshow creation process as easy as possible. Below are
descriptions for some of the functions and areas found within the
Import & Select Theme screen.
Theme Selection – select the Theme you wish to use from the list of
available themes.
Preview Pane – used to preview your slideshow with or without a
theme selected. The Preview Pane displays your slideshow exactly
how it will appear once burned to disc or output to another format.
Storyboard – used to add and organize your photos and video clips.
Title Slide – an introductory slide added automatically by the program
that includes a text title. The Title Slide will change based on the
Theme selected.
Page 23

23. FOTOBOX™ PLUS
End Slide – an ending slide added automatically by the program that
includes a date stamp. The End Slide will change based on the Theme
selected.
Getting Started: Import & Theme Selection
There are four important steps to the Import and Theme Selection
screen:
Step 1 – Select Theme
Step 2 – Import
Step 3 – Organize
Step 4 – Preview
These steps are described in more detail below.
Page 24

24. honesteh
Step One – Select Theme
Before creating your slideshow, you can select a Theme from the
Theme list on the left side of the screen. Use the scroll bar to browse
the Theme listings and find a suitable theme for the type of slideshow
you want to produce.
Themes are designed to provide a specific mood or atmosphere to
your slideshow by combining specific transitions and motion effects to
a selection of images.
Page 25

25. FOTOBOX™ PLUS
Step Two – Import
Next, you will need to import your photos and any video clips to the
Storyboard.
If you have inserted an SD memory card into the FOTOBOX™ PLUS,
the photos from the SD memory card will be imported automatically.
You can also import photos and video clips manually. Use the Import
and Remove buttons at the left end of the Storyboard to add or remove
photos and video clips.
Page 26

26. honesteh
You can also drag and drop photo files directly into the Storyboard.
Regardless of where you drop your photo files, they will always be
added just to the left of the End Slide.
Note: Video clips added will be represented by a single slide frame in
the Storyboard.
Step Three – Organize
Once you have added all necessary photos and video clips to the
Storyboard, you can arrange them by dragging and dropping them to
the left or right.
A white highlight bar will
appear between two
slides indicating where
the moved slide will be
placed.
Page 27

27. FOTOBOX™ PLUS
Time – Use the Time button to adjust the Photo Time
(slide duration), and Transition Time (duration between slides) for all
photo slides in the Storyboard.
Note: Video Clips will not be affected by any Photo or Transition Time
adjustments.
You can change the duration of individual photo slides by right clicking
on one and accessing the „Set Duration‟ option from the pop-up menu
Page 28

28. honesteh
Tip: You can also delete or remove the motion effect from
individual slides using the pop-up menu.
Intro/End Slides – Use the Star button to add or
remove the Intro and/or End Slides from the Storyboard.
Remove Intro/End Title - Right click on the Intro and/or End Slides to
access the additional option to remove the text Title from either slide.
Page 29

29. FOTOBOX™ PLUS
Note: To add the text titles back to the Intro or End Slides, you must
select another Theme in the Theme List and then switch back again.
Page 30

30. honesteh
Step Four – Preview
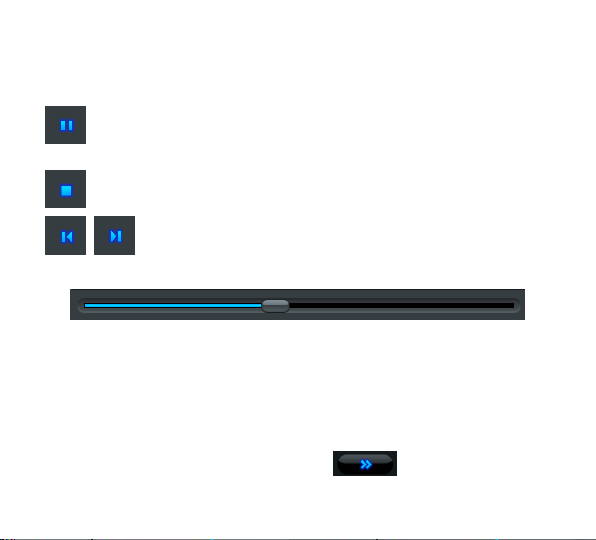
Use the Preview Pane to preview your slides in the Storyboard.
Use the transport controls at the bottom of the Preview Panel to
preview your slideshow.
Play: click to play your slideshow. (changes to the Pause
Page 31
31. FOTOBOX™ PLUS
button when playing)
Pause: click to pause your slideshow. (changes to the Play
button when paused)
Stop: click to stop the playback of your slideshow.
Jump: click to jump to the beginning or end of your
slideshow.
Playhead: indicates the preview location within your slideshow. The
playhead marker can be dragged left or right to adjust the preview
position of your slideshow in the Preview Panel.
When you are happy with your slideshow and ready to burn it to disc,
output to a file or other device, click the Next button at the
bottom right to proceed to the Publish screen.
Page 32
32. honesteh
Publish
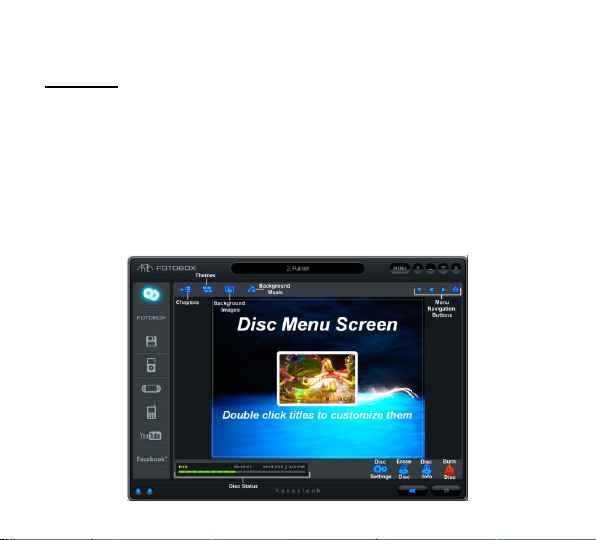
The Publish screen is used to create menus and write your slideshows
to disc, file or portable device. You can choose from a list of default
themes, or customize your own menu to include chapters, personal
background images, and background music. You can publish to
multiple disc types including DVD, SVCD, and VCD, multiple file
formats including MPEG 1, MPEG 2, AVI, DV-AVI and WMV, YouTube,
iPod and PSP formats also.
Page 33

33. FOTOBOX™ PLUS
Below are descriptions for some of the functions and areas found
within the Publish screen.
Menu Editors – (Chapters, Themes, Background Images, Background
Music) select from an assortment of ready-made themes and
backgrounds or customize your menu with chapters, personal images
and background music.
Burning Status Display – displays the burning status of your disc,
type of disc being burned, the burning timer, and the required /available
disc space.
Disc Menu Screen – displays a preview of the disc menu for DVD
burning.
Getting Started: Publish
There are four steps to Publishing:
Page 34

34. honesteh
Step 1 – Select Publishing Format
Step 2 – Settings
Step 3 – Customize Menu (optional)
Step 4 – Burn (optional)
These steps are described in more detail below.
Step One – Select Publishing format
From the right side of the Publish screen you can select the format you
wish to publish or output your slideshow in. Select the option that will
match your needs.
Burn to Disc – this option is selected by default and
will allow you to burn your slideshow to a DVD, VCD
(Video CD) or SVCD (Super Video CD).
Page 35
35. FOTOBOX™ PLUS
Save to File Format – this option allows you to save
your slideshow as an MPEG 1, MPEG 2, AVI, DV-AVI,
or WMV video file on your computers hard drive.
iPod – this option allows you to save your slideshow
as an MP4 file which can be transferred to an iPod.
PSP – this option allows you to save your slideshow as
a WMV file which can be transferred to a PSP.
Mobile Phone – this option allows you to save your
slideshow as an MP4 file which can be transferred to a
mobile phone.
YouTube – this option allows you to upload your
slideshow directly to the YouTube website.
Page 36
36. honesteh
Facebook – this option allows you to upload your
slideshow directly to the Facebook website.
Step Two – Settings
The setting options you will be given will depend on the publish format
you selected in step one. Locate your publish format below to view the
settings and their descriptions specific to that output option.
Burn to Disc
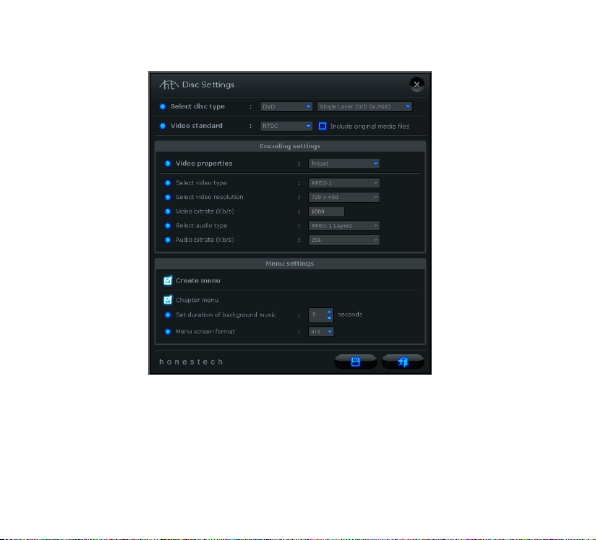
Click the Disc Settings button at the bottom of the
Publish screen to access the disc and menu settings.
Page 37
37. FOTOBOX™ PLUS
Select disc type – specify the type of disc format you want to
record your slideshow to. When selecting DVD, be sure to select
the size of your DVD from the drop down menu to the right.
Tip: To determine the best size DVD for your slideshow,
Page 38

38. honesteh
check the required disc space in the Burning Status Display.
Select region type – specify the video standard you want your
disc burned in, NTSC or PAL. *You will want to choose the
standard based on your geographical region. NTSC is the
common video standard for North America. PAL is typically used
in Europe and British Commonwealths.
Encoding Settings
Select encode type – specify your encoding settings. Unless
you prefer to make advanced encoding settings, it is
recommended that you choose “Fit to Disc” or “Preset”.
Otherwise, select “Custom” and adjust the remaining encoding
selections based on your needs.
Menu Settings
Create Menu – select this option if you would like to create a
main disc menu for your disc.
*If you unselect this option, your slideshow will begin playing
immediately after inserting the DVD into your DVD player. No
menu screen will appear.
Page 39

39. FOTOBOX™ PLUS
Chapter Menu – select this option if you want to include a
chapter menu for your slideshow. The chapter menu will allow
you to select from individual chapters made for your slideshow.
Motion Menu – select this option to create video thumbnail
menus instead of image thumbnails. Video thumbnails will loop a
small selection of the slideshow contained within them to provide
a sneak preview.
Set duration of background music – adjust this option if you
plan on adding background music to your main disc menu. The
music you select will play for the amount of seconds you choose
before looping again.
Menu screen format – select the screen aspect ratio for your
menu: 4:3 option for standard, non-HD video and 16:9 for
HDV/DV video.
Page 40
40. honesteh
Save to File Format:
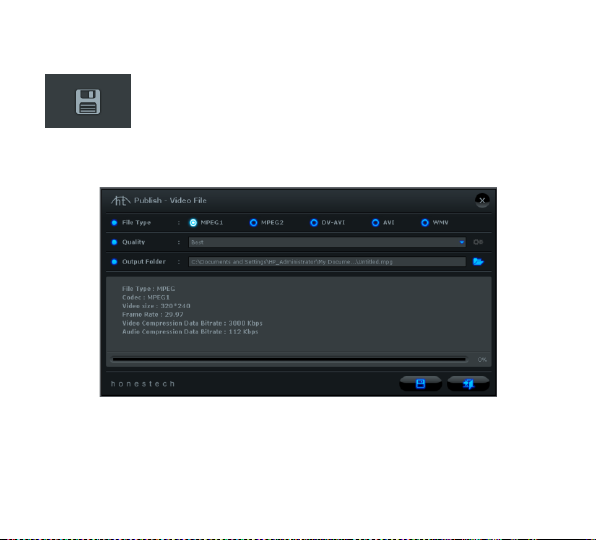
Choosing the File Format option will open the „Publish – Video File‟
screen.
File Type – select a file format for your slideshow.
MPEG 1 – standard video format that will work in most media
players. Can be used to create VCD and SVCD discs.
Page 41
41. FOTOBOX™ PLUS
MPEG 2 – standard file format for DVD discs. Higher quality
than MPEG 1.
DV-AVI – store digital video in an AVI uncompressed file format.
AVI – popular uncompressed video format for computers and
web use.
WMV – common compressed video format. Useful for web use
due to small size.
Quality – select a quality option that best meets your needs for the
file type you are publishing to.
Output Folder – this is the location on your computers hard drive,
where your slideshow will be saved in a video file format.
Click the Folder button on the right to change the output
folder location.
Click the Save button to complete the „save to file
format‟ process.
Page 42
42. honesteh
iPod Format:
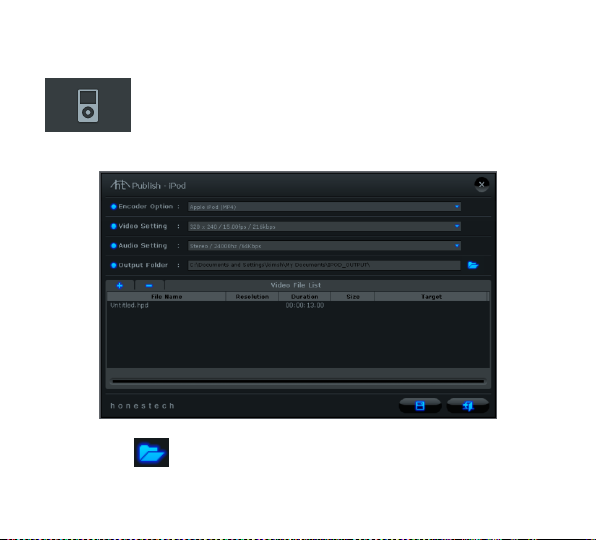
Choosing the iPod option will open the „Publish – iPod‟ screen.
Click the Folder button on the right to change the output
folder location.
Page 43
43. FOTOBOX™ PLUS
Click the Plus button to add additional video files to the
list for conversion to the iPod format.
Click the Minus button to remove any selected video files
in the list.
Click the Save button to complete the „save to iPod
format‟ process.
Page 44
44. honesteh
PSP Fotmat:
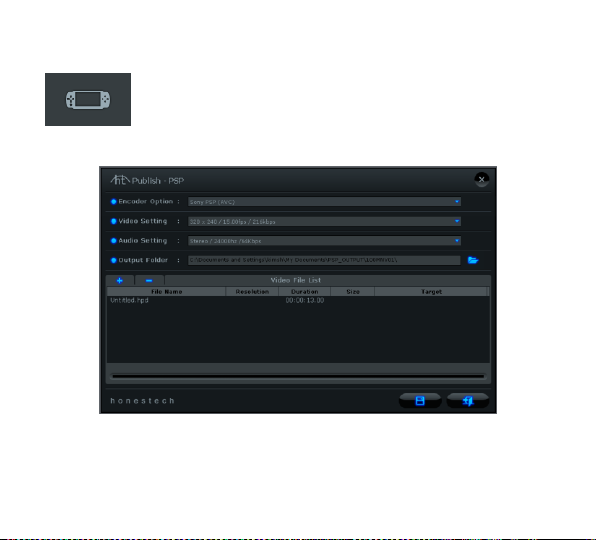
Choosing the PSP option will open the „Publish – PSP‟ screen.
Page 45
45. FOTOBOX™ PLUS
Encoder Option – select the format you wish to convert your
slideshow into for PSP compatibility: MP4 or AVC. See your PSP
documentation for more info.
Video/Audio Settings – select the Video and Audio settings for your
slideshow that best meet your PSP requirements.
Output Folder – this is the location on your computers hard drive,
where your slideshow will be saved in a video file format.
Click the Folder button on the right to change the output
folder location.
Click the Plus button to add additional video files to the
list for conversion to the iPod format.
Click the Minus button to remove any selected video
files in the list.
Click the Save button to complete the „save to iPod
format‟ process.
Page 46
46. honesteh
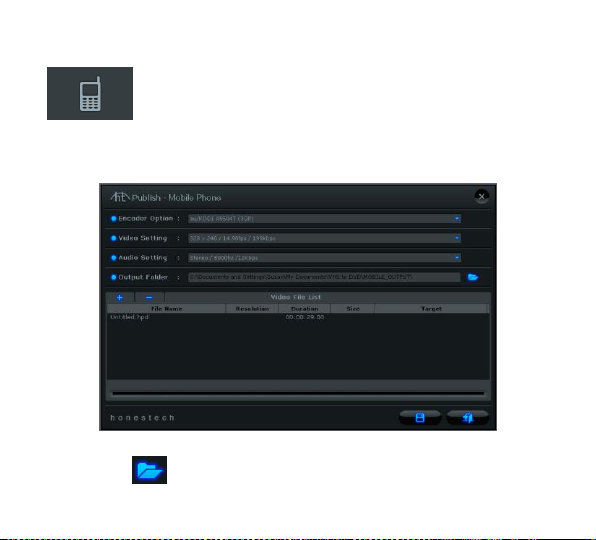
Mobile Phone
Choosing the Mobile Phone option will open the „Publish – Mobile
Phone‟ screen.
Click the Folder button on the right to change the output
Page 47
47. FOTOBOX™ PLUS
folder location.
Click the Plus button to add additional video files to the
list for conversion to the iPod format.
Click the Minus button to remove any selected video
files in the list.
Click the Save button to complete the „save to iPod
format‟ process.
Page 48
48. honesteh
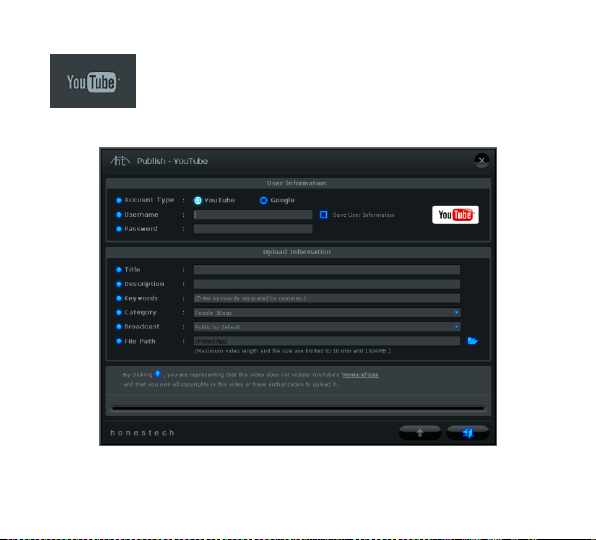
Upload to YouTube:
Choosing the YouTube option will open the „Publish – YouTube‟ screen.
Account Type – select your account type – YouTube or Google.
Page 49
49. FOTOBOX™ PLUS
Username/Password - enter your Username and Password for your
YouTube or Google account.
Upload Information – enter information about the slideshow you will
be uploading to YouTube, including Title, Description, Keywords
etc…
Click the Upload button to begin the video
conversion and upload to YouTube process.
The Video Conversion bar at the bottom of the screen will display the
conversion status.
Click the Stop button to halt the video conversion and
uploading process.
Page 50
50. honesteh
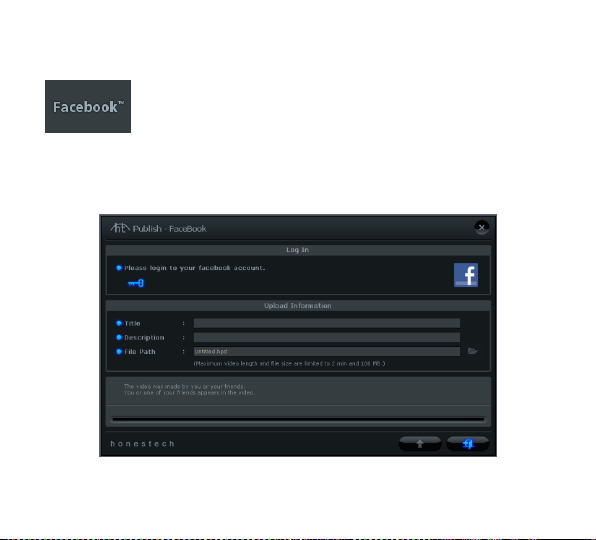
Facebook
Choosing the Facebook option will open the „Publish – Facebook‟
screen.
Page 51
51. FOTOBOX™ PLUS
Click the Key button to login into your Facebook account.
Upload Information – enter information about the slideshow you will
be uploading to Facebook, including Title and Description.
Click the Upload button to begin the video conversion
and upload to Facebook process.
The Video Conversion bar at the bottom of the screen will display the
conversion status.
Click the Stop button to halt the video conversion and
uploading process.
Page 52
52. honesteh
Step Three – Customize Menu (optional)
Use the following features to create and customize menus when
burning your slideshow to DVD. A disc menu functions as a visual table
of contents, and an introduction to your slideshow.
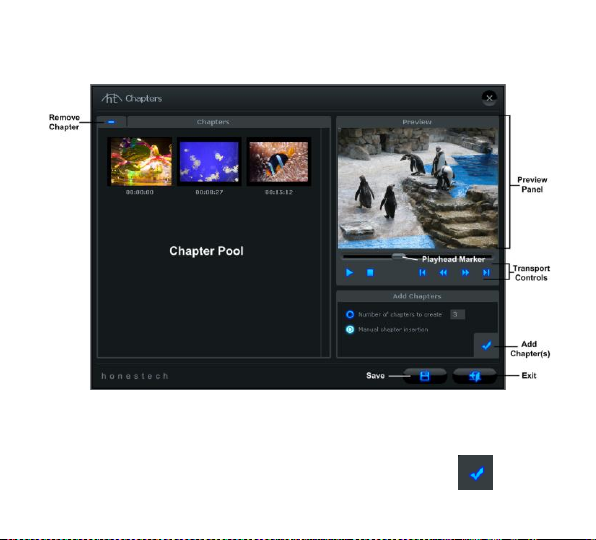
Chapters – Use the Chapter button to add chapter points to
your slideshow. A chapter screen will open, allowing you to add chapter
points for your clip manually, or auto space them based on the number
of chapters you require.
Tip: Chapter Points are invisible markers imbedded within
the slideshow that allow you to skip forward or back using
the skip or jump buttons on your DVD player. You can make
the chapter points visible for selection (like traditional DVD
chapter menus), by enabling the option for Chapter menu in
the Disc Settings section.
Page 53
53. FOTOBOX™ PLUS
To automatically add chapters evenly throughout your slideshow, select
the “Number of chapters to create” option, enter the amount of chapter
points you need, and then click the Add Chapters button .
Page 54
54. honesteh
To manually add chapter points, select the “Manual chapter insertion”
option, play your clip in the preview panel, and click the Add
Chapter button during playback.
A chapter point will be added to the frame currently visible in the
preview panel and will appear as a thumbnail image in the Chapter
Pool on the left. To remove a chapter point, select the chapter in the
Chapter Pool and then click the Minus button.
When you are finished creating your chapters, click the
Save button to save your chapters and exit the Chapter screen.
Themes – Use the Themes button to change the Theme
(background picture, buttons and clip frames) of your Disc Menu.
Background Image – Use the Background Image button to
change only the background picture of your Disc Menu. *You can also
Page 55
55. FOTOBOX™ PLUS
use a personal image from your own collection by clicking the „Add
photo(s)‟ button to add your own images to the list.
Background Music – Use the Background Music button to
add a short music loop to your Disc Menu. By default, the program will
extract the first 5 seconds from the music file you choose and loop it.
To adjust the amount of seconds extracted and the length of your loop,
access the „Set duration of background music’ option from the Disc
Settings button.
Menu Navigation – Use the Menu Navigation buttons listed below to
view your Chapter and Home Menus.
Chapter Menu: Click this button to view and make changes to
your Chapter Menu. (Only available when a Chapter Menu has been
created)
Home Menu: Click this button to view the main disc menu
screen.
Page 56
56. honesteh
Step Four – Burn (optional)
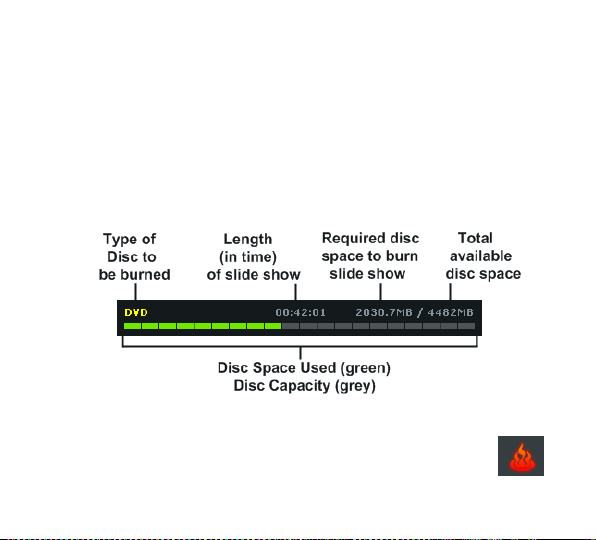
Before burning your slideshow to disc, you will want to verify that the
total, required size does not exceed the total available size of your disc.
To verify your slideshow does not exceed the disc size, check the Disc
Status in the bottom left corner of the Publish Screen.
When you are ready to burn your video clip(s) to disc, click the
Burn Disc button at the bottom of the Publish Screen.
Page 57
57. FOTOBOX™ PLUS
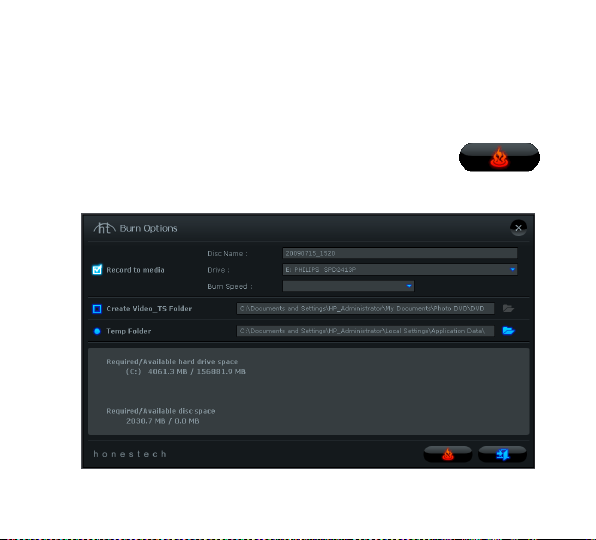
A Burn Options window will appear providing some additional disc
burning choices before you begin the actual burning process.
*Unless there is a specific need, the burn options can be left at their
default settings, and you can start burning by clicking the
Burn button.
Page 58

58. honesteh
Burn Options:
Disc Name – use this option to create a name for your disc. The name
will be visible when played on a computer or from the display interface
on supported DVD players.
Drive – use this option to select the disc drive that will burn your disc.
Burn Speed – use this option to specify the speed at which your disc
drive will burn your disc.
Tip: Slower burn speeds will typically yield better disc
results. If you encounter burning problems, try lowering the
burn speed. Speeds can then be raised incrementally with
each successful burn.
Create Video_TS folder – use this option to create a Video_TS folder
in the location specified. A Video_TS folder is the file structure or
directory typically burned to DVD discs which also contains the DVD
movie.
Page 59

59. FOTOBOX™ PLUS
Temp Folder – use this option to select the temporary folder used
during the burning process. The Advanced mode uses the temporary
folder to convert your video to disc format. Once burned to disc, the
converted video is purged from the temporary folder.
Burn Process:
Select the Burn Button to begin the burning process, made up of
automated steps which convert your slideshow to disc format, and then
burn the converted information to disc.
A finish message will appear when the burning is complete.
* Warning: Manually ejecting your disc before completion can
cause the disc to malfunction.
Page 60
60. honesteh
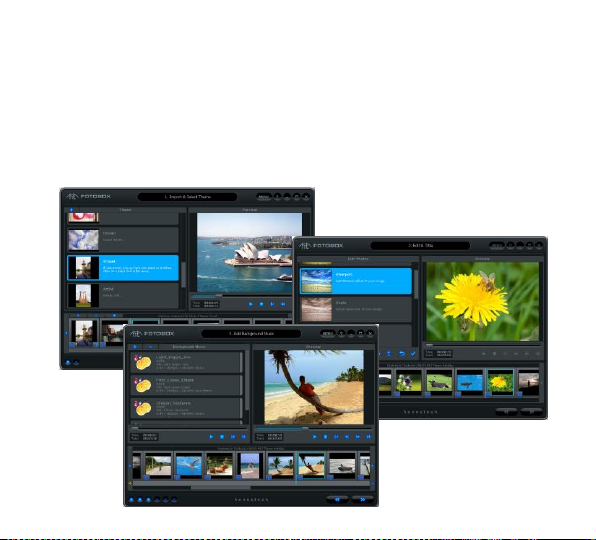
Advanced Mode
To open the Advanced Mode, select “Advanced Mode” from the main
menu screen.
Page 61
61. FOTOBOX™ PLUS
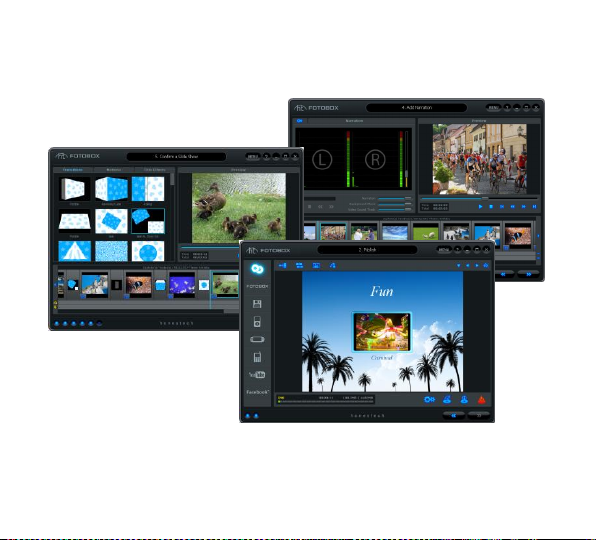
The Advanced Mode combines the same functionality of the Easy
Mode with additional control over the shaping of your slideshow and
Page 62

62. honesteh
the finer details.
You can use the Advanced Mode to perform many functions including:
Edit photos
Add text to any slide
Add background music
Add narration
Control audio levels for maximum effect
Add or change transitions
Add or change motion effects
Add effects to text titles
Burn your slideshows to DVD, VCD & SVCD
Save to file, iPod, or PSP format
Upload to YouTube
If you are looking for complete control over your slideshows, the
Advanced Mode will provide that and more.
Page 63

63. FOTOBOX™ PLUS
There are six steps to creating a slideshow in the Advanced Mode:
Step 1 – Import & Select Theme
Step 2 – Edit & Title
Step 3 – Add Background Music
Step 4 – Add Narration
Step 5 – Transitions & Effects
Step 6 – Publish
These steps are described in more detail next.
Page 64
64. honesteh
Import & Select Theme
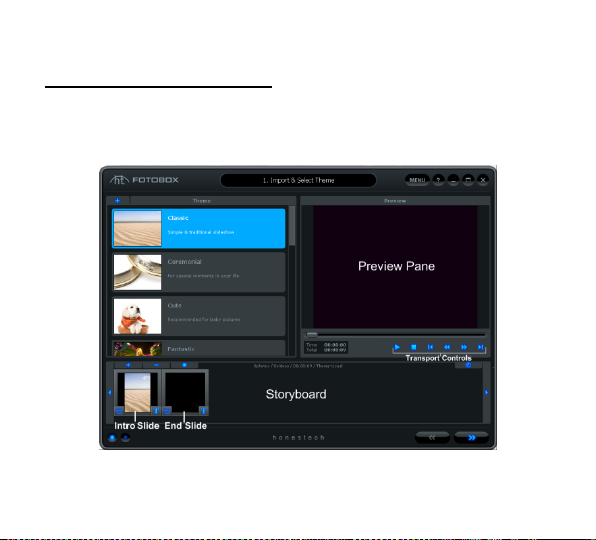
The Advanced Mode will open to the Import & Select Theme screen
upon selection from the main screen.
The Import & Select Theme screen is used to build your photo
Page 65

65. FOTOBOX™ PLUS
slideshow. It provides several functions and task areas to make the
slideshow creation process as easy as possible. Below are
descriptions for some of the functions and areas found within the
Import & Select Theme screen.
Theme Selection – select the Theme you wish to use from the list of
available themes.
Preview Pane – used to preview your slideshow with or without a
theme selected. The Preview Pane displays your slideshow exactly
how it will appear once burned to disc or output to another format.
Storyboard – used to add and organize your photos and video clips.
Title Slide – an introductory slide added automatically by the program
that includes a text title. The Title Slide will change based on the
Theme selected.
End Slide – an ending slide added automatically by the program that
includes a date stamp. The End Slide will change based on the Theme
selected.
Page 66
66. honesteh
Getting Started: Import & Theme Selection
There are four important steps to the Import and Theme Selection
screen:
Step 1 – Select Theme
Step 2 – Import
Step 3 – Organize
Step 4 – Preview
These steps are described in more detail below.
Step One – Select Theme
Before creating your slideshow, you can select a Theme from the
Theme list on the left side of the screen. Use the scroll bar to browse
the Theme listings and find a suitable theme for the type of slideshow
you want to produce.
Themes are designed to provide a specific mood or atmosphere to
your slideshow by combining specific transitions and motion effects to
a selection of images.
Page 67

67. FOTOBOX™ PLUS
Step Two – Import
Next, you will need to import your photos and any video clips to the
Storyboard.
Use the Import and Remove buttons at the left end of the Storyboard
Page 68

68. honesteh
to add or remove photos and video clips.
You can also drag and drop photo files directly into the Storyboard.
Regardless of where you drop your photo files, they will always be
added just to the left of the End Slide.
Note: Video clips added will be represented by a single slide frame in
the Storyboard.
Page 69
69. FOTOBOX™ PLUS
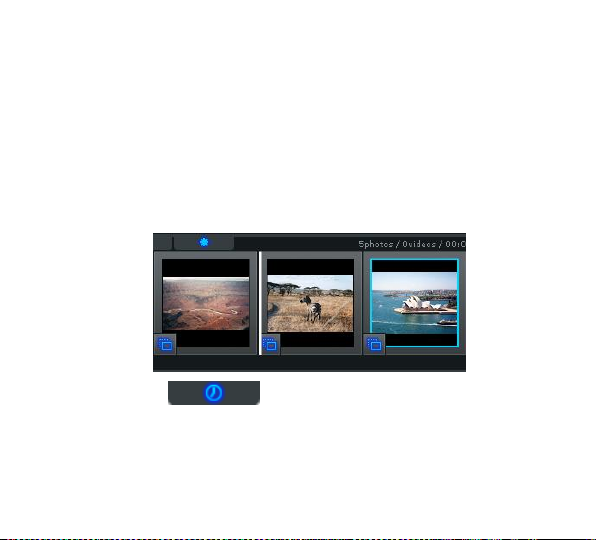
Step Three – Organize
Once you have added all necessary photos and video clips to the
Storyboard, you can arrange them by dragging and dropping them to
the left or right.
A white highlight bar will appear between two slides indicating where
the moved slide will be placed.
Time – Use the Time button to adjust the Photo Time
(slide duration), and Transition Time (duration between slides) for all
photo slides in the Storyboard.
Note: Video Clips will not be affected by any Photo or Transition Time
adjustments.
Page 70
70. honesteh
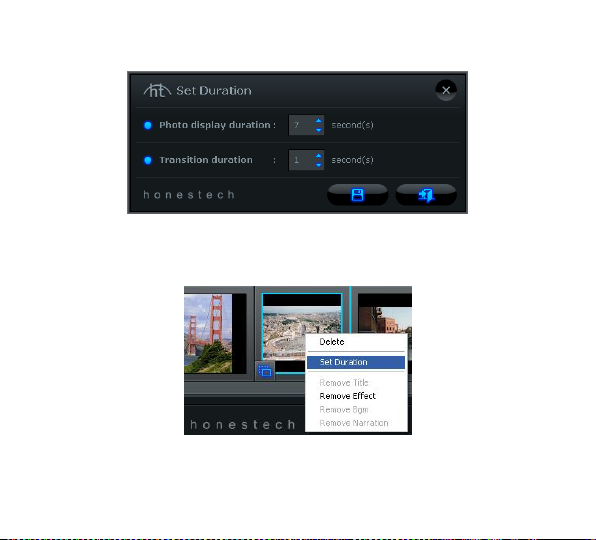
You can change the duration of individual photo slides by right clicking
on one and accessing the „Set Duration‟ option from the pop-up menu
Tip: You can also delete or remove the motion effect from
individual slides using the pop-up menu.
Page 71
71. FOTOBOX™ PLUS
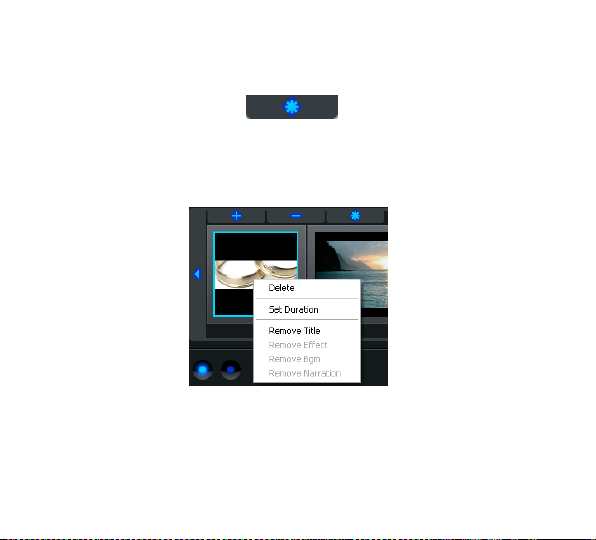
Intro/End Slides – Use the Star button to add or remove
the Intro and/or End Slides from the Storyboard.
Remove Into/End Title - Right click on the Intro and/or End Slides to
access the additional option to remove the text title from either slide.
Note: To add the text titles back to the Intro or End Slides, you must
select another Theme in the Theme List and then switch back again.
Step Four – Preview
Page 72
72. honesteh
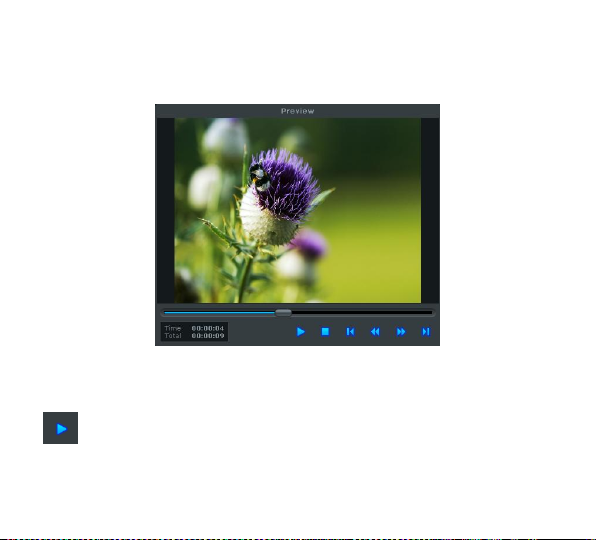
Use the Preview Pane to preview your slides in the Storyboard.
Use the transport controls at the bottom of the Preview Panel to
preview your slideshow.
Play: click to play your slideshow. (changes to Pause button
when playing)
Page 73
73. FOTOBOX™ PLUS
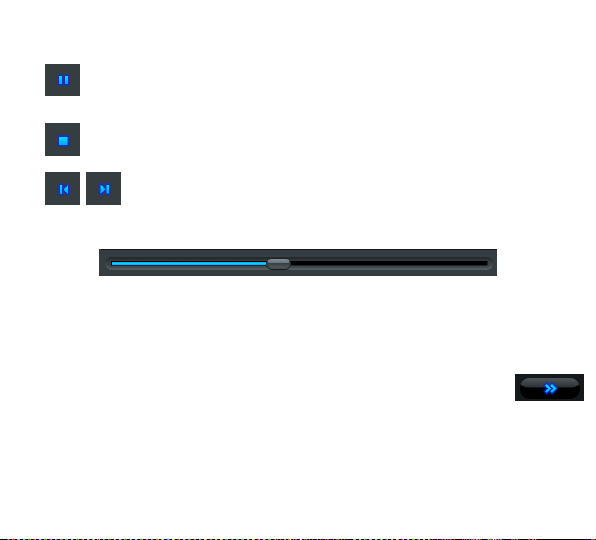
Pause: click to pause your slideshow. (changes to the Play
button when paused)
Stop: click to stop the playback of your slideshow.
Jump: click to jump to the beginning or end of your
slideshow.
Playhead: indicates the preview location within your slideshow. The
playhead marker can be dragged left or right to adjust the preview
position of your slideshow in the Preview Panel.
When you are finished importing your photos and videos, click the
Next button at the bottom right to proceed to the Edit & Title screen.
Page 74
74. honesteh
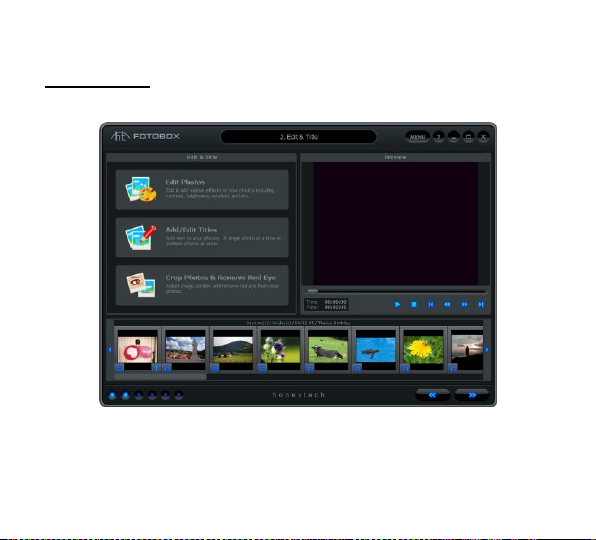
Edit & Title
In the Edit & Title screen, you can edit your photos by adjusting
brightness or contrast, or by adding one of the built-in effects such as
Page 75
75. FOTOBOX™ PLUS
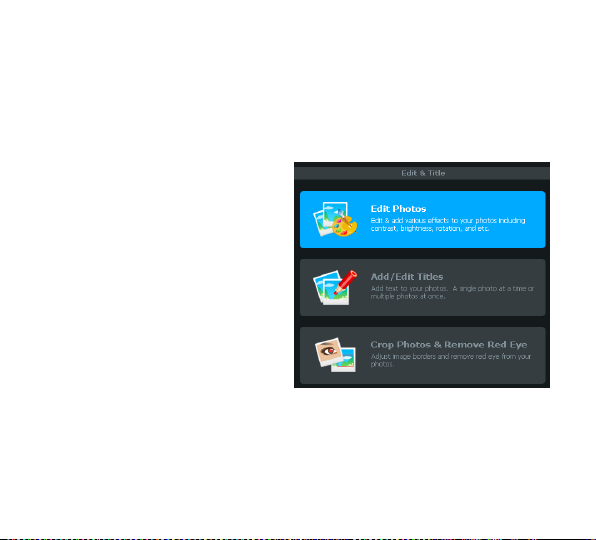
Sharpen, Blur, Negative, Grayscale etc… You can also add text titles to
individual or multiple slides.
Edit Photos
To edit a photo, select a slide in the
storyboard and choose the
„Edit Photos‟ option in the
Edit & Title panel.
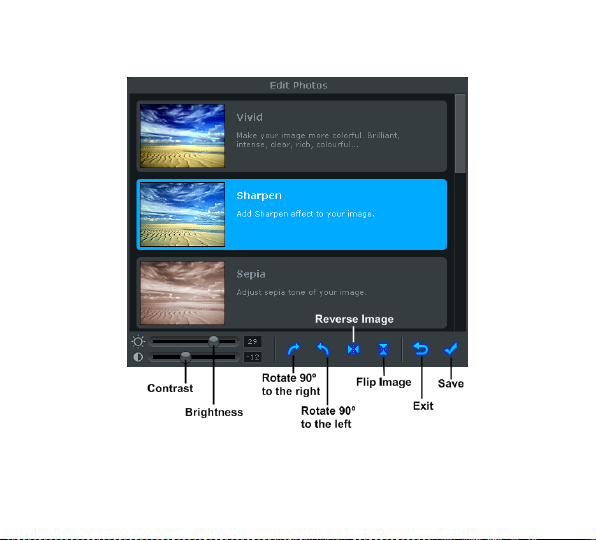
The Edit Photos panel will appear after choosing Edit Photos.
Page 76
76. honesteh
Effects - Use the scroll bar on the right to locate the built-in effects you
wish to use on your photo. Each Effect that you select will highlight in
Page 77

77. FOTOBOX™ PLUS
blue and a preview of the effect will appear in real-time in the Preview
Pane. To remove an effect, simply click the effect again to un-highlight
it.
Tip: Multiple effects can be selected and added to a single
photo by simply highlighting multiple effects in the panel.
Contrast / Brightness – use these slide controls at the lower left to
adjust brightness and contrast for your photos. Note: The brightness
and contrast controls can be used independently of, or in addition to
the built-in effects.
Rotate – use these buttons to rotate your photos in 90 degree
increments left or right.
Reverse Image – use this button to flip your photos horizontally.
Flip Image – use this button to flip your photos vertically.
Exit – use this button to exit the Edit Photos panel without saving any
changes or added effects.
Save – use this button to save all changes and effects you have added
to your photo.
Page 78
78. honesteh
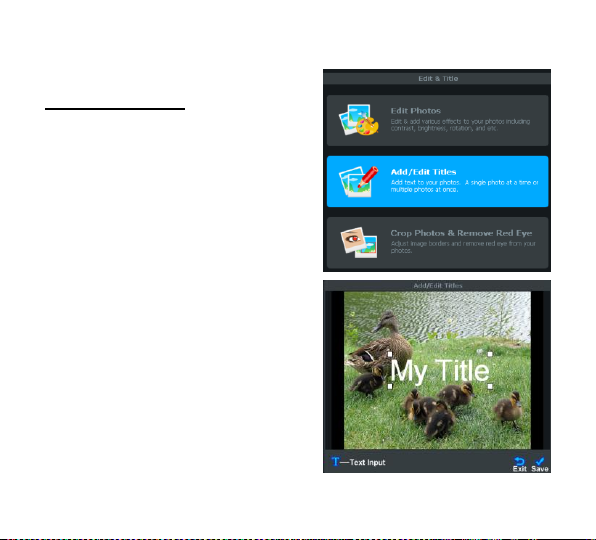
Add/Edit Titles
To add (or edit) titles to a photo,
select a slide in the storyboard and
choose the „Add/Edit Titles‟ option in
the Edit & Title panel.
The Add/Edit Titles panel will appear
after choosing Add/Edit Titles.
Page 79
79. FOTOBOX™ PLUS
Titles – click and drag your title to change its location or resize it by
dragging one of the corner boxes diagonally.
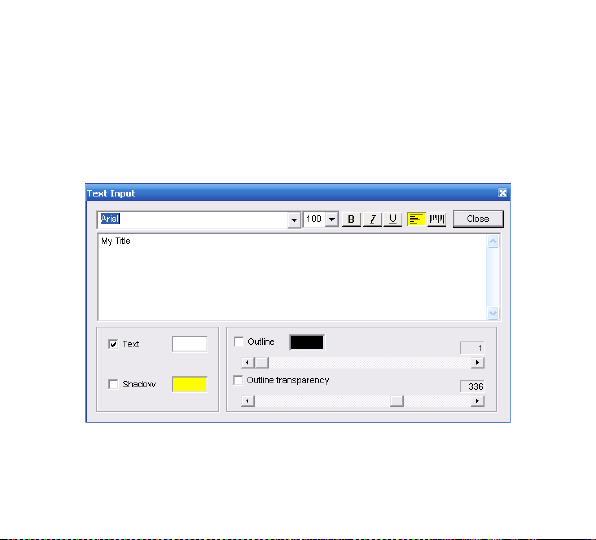
Text Input – use this button to open the Text Input window.
Use the Text Input window to personalize your titles, change fonts,
color, font size, and add shadows or outlines.
Page 80
80. honesteh
Exit – use this button to exit the Add/Edit Titles panel without saving
any changes.
Save – use this button to save all changes you have made to your text.
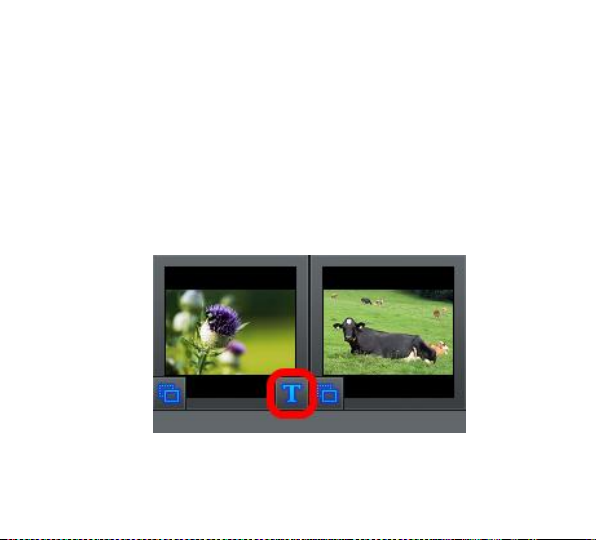
A boxed „T‟ will appear in the bottom left corner of any slide that you
add a Title to. This will help you identify slides with titles for future
reference.
Page 81
81. FOTOBOX™ PLUS
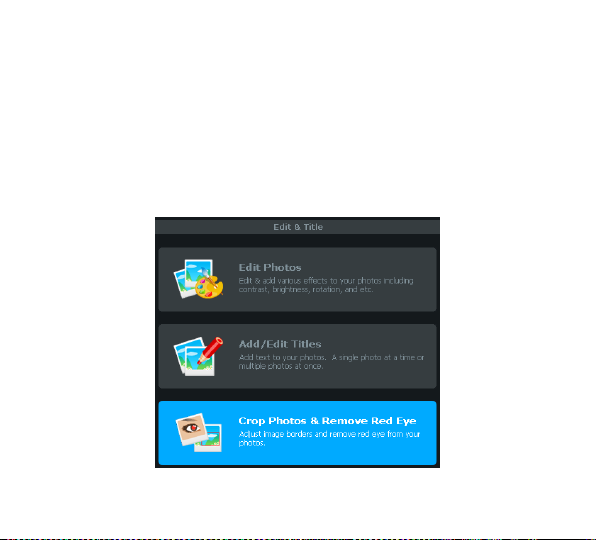
Crop Photos & Remove Red Eye
To crop photos or remove red eye from your photo, select a slide in the
storyboard and choose the Crop Photos & Remove Red Eye option
in the Edit & Title panel.
Page 82
82. honesteh
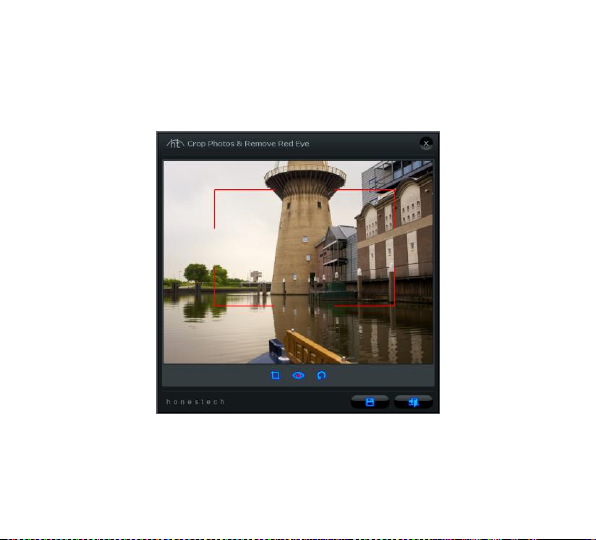
The Crop Photos & Remove Red Eye panel will appear after choosing
Crop Photos & Remove Red Eye option.
Crop – Position the mouse over one corner of the area to be cropped.
Hold down the left mouse button and drag to the opposite corner of the
desired rectangle. Then adjust the crop rectangle as needed by moving
Page 83
83. FOTOBOX™ PLUS
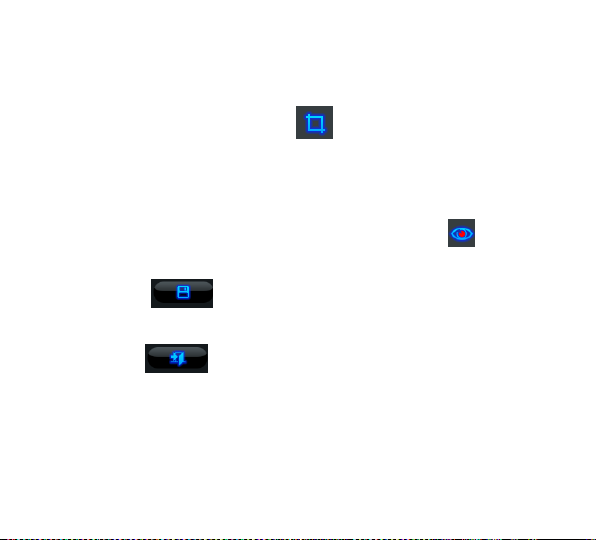
the mouse over one of the sides or corners and dragging that
edge/corner as desired. Then click button to crop the photo.
Remove red eye – To remove a red eye, you need to draw a rectangle
over the eye with red eye problem. Position the mouse over one
corner of the red eye. Hold down the left mouse button and drag to
the opposite corner of the desired rectangle. Then click button to
remove the red eye.
Save – Select button to save all changes (crop or remove red
eye).
Exit – Select button to exit the Crop Photos & Remove Red
Eye panel without saving any changes.
When you are finished editing your photos and titles, click the
Next button at the bottom right to proceed to the Add Background
Music screen.
Page 84
84. honesteh
Add Background Music
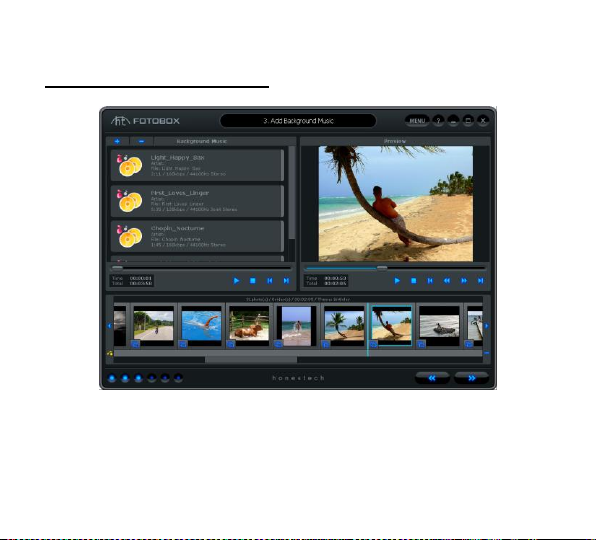
In the Add Background Music screen, you can add background music
file(s) to specific slides.
Page 85
85. FOTOBOX™ PLUS
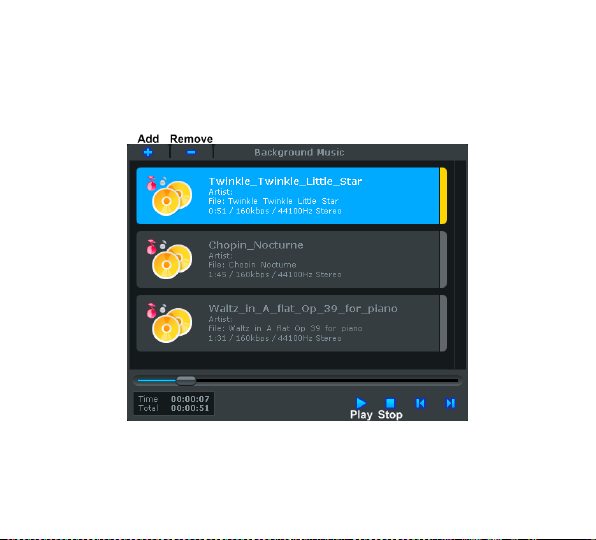
Use the Background Music panel to add, select, listen and remove
music files.
Add – use this button to add music files from your computer to the
Background Music panel.
Page 86

86. honesteh
Remove – use this button to remove the selected music file
(highlighted in blue) from the Background Music panel.
Play – use this button to play the selected music file (highlighted in
blue) in the Background Music panel.
Stop – use this button to stop playback of the selected music file
(highlighted in blue) in the Background Music panel.
Adding Background Music files to Slides
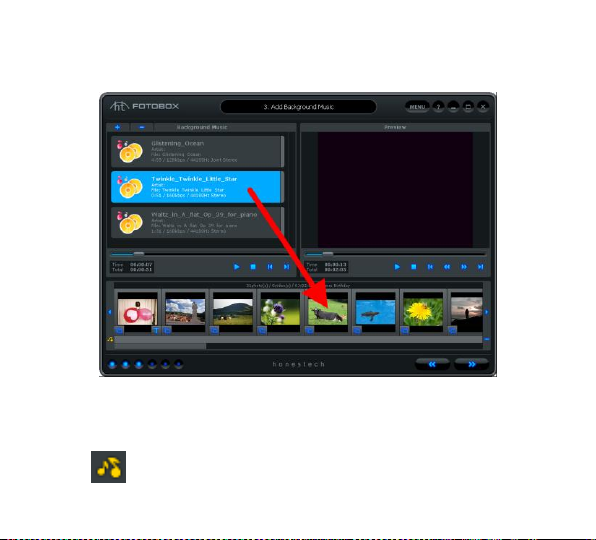
To add a music file to a slide, select a music file in the Background
Music Panel and drag and drop it on a slide in the Storyboard.
Page 87
87. FOTOBOX™ PLUS
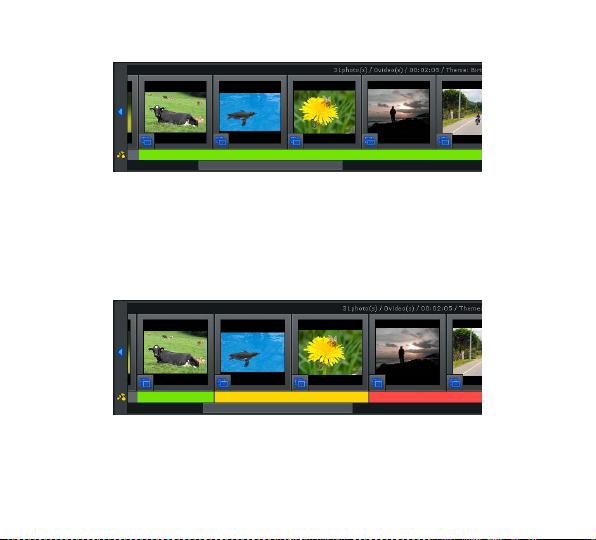
The added music file will be represented by a colored bar in the Music
Track below the Storyboard.
Page 88
88. honesteh
Depending on the length of the music file and slide, it is possible that
the background music file may play underneath several slides.
Each additional music file that is added to a slide in the Storyboard will
be represented by a different color in the Music Track.
Note: Adding a music file to a slide that already has music beneath it,
will cause that background music to be overwritten by the newest file
being added.
Page 89
89. FOTOBOX™ PLUS
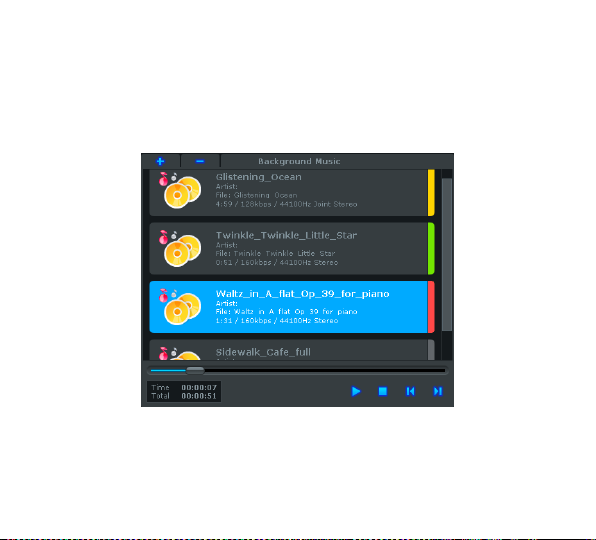
You can identify which music file is below each slide by matching the
color in the Music Track with the colored end of each music file in the
Background Music Panel.
Note: No color on the end indicates that particular music file has not
been added to the Storyboard.
Page 90
90. honesteh
Removing Background Music from Slides
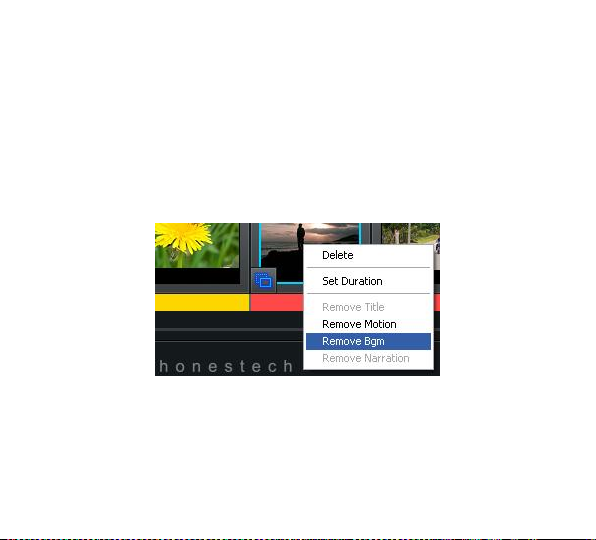
There are two ways to remove a music file from a slide.
1) Right click any slide with the music file color below it and select
„Remove Bgm‟ from the pop-up menu.
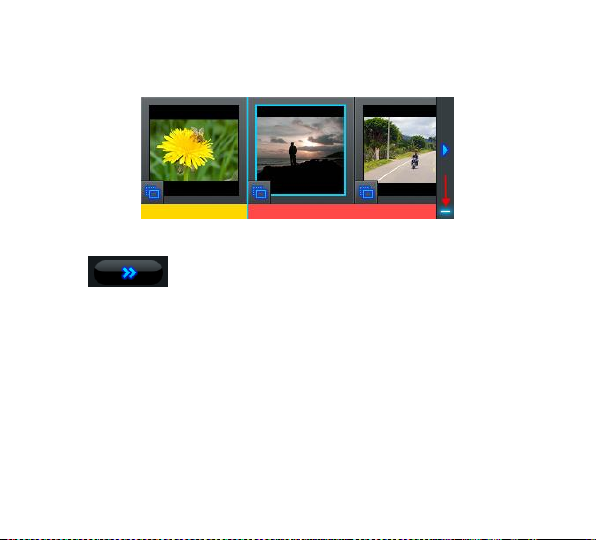
2) Select the slide that the music file was dragged to and click the
minus button at the right end of the Music Track.
Page 91
91. FOTOBOX™ PLUS
When you are finished adding background music to your slides, click
the Next button at the bottom right to proceed to the
Add Narration screen.
Page 92
92. honesteh
Add Narration
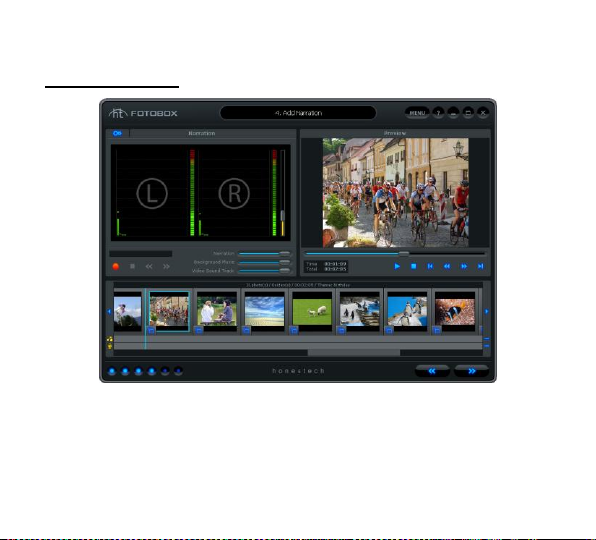
In the Add Narration screen, you can add audio narration or voice over
to specific slides.
Use the Narration panel to record voice over and adjust volume levels
for narration, background music and video sound tracks.
Page 93
93. FOTOBOX™ PLUS
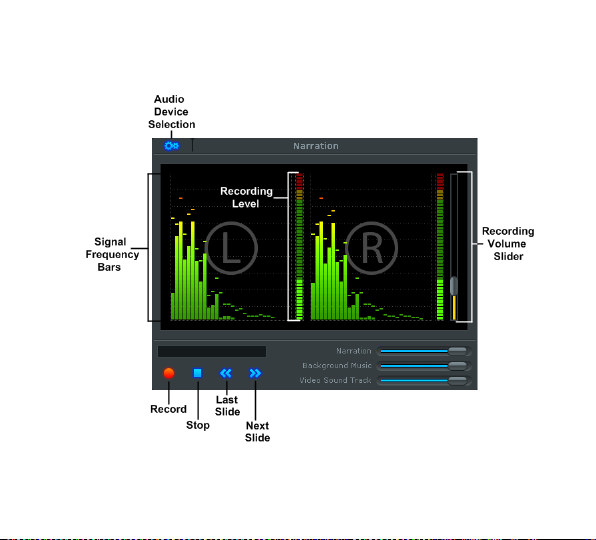
Record – use this button to begin recording voice over narration from
your microphone.
Page 94

94. honesteh
Stop – use this button halt voice over recording.
Last Slide – use this button to move to the previous slide while
recording.
Next Slide – use this button to move to the next slide while recording.
Recording Volume Slider – use this slider to adjust the recording
level of your microphone.
Recording Level – displays the volume level of your microphone
signal. The meters will rise as the recording volume increases. They
will display yellow warning bars if your volume level becomes
dangerously close to distorting (too loud), and Red bars when audio
distortion is eminent.
Signal Frequency Bars – displays the microphone signal detected by
the program from both Left and Right channels.
Page 95
95. FOTOBOX™ PLUS
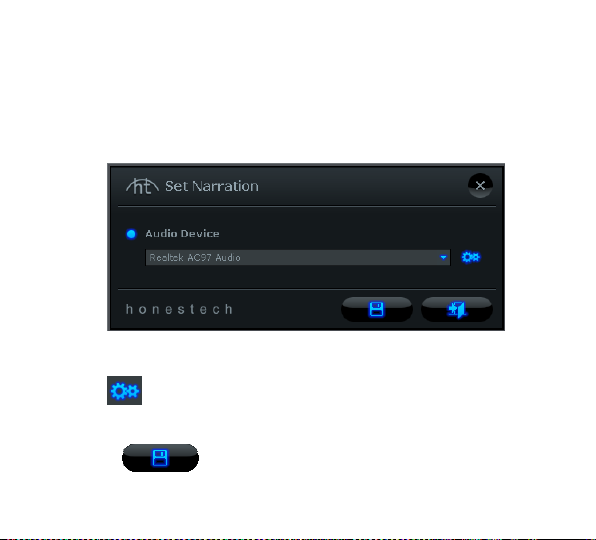
Audio Device Selection – use this button to select the audio device
you wish to record from. Typically you will want to select the sound
card or device your microphone is connected to.
Use the Audio Device Settings button to adjust specific level
settings for the Audio Device (Sound card) selected.
Click the Save button when you are finished making your
device selections.
Page 96

96. honesteh
Adding Narration to Slides
Before recording narration, it is recommended that you test your
Recording Levels by speaking into your microphone. If the Recording
Levels peak in the yellow or red areas, adjust the Recording Volume
Slider lower to avoid distorting your voice-overs.
Tip: For best recording volume, set the recording volume
slider so that the Recording Levels average within the top
third of the green area.
If your recording levels are satisfactory, select a slide in the Storyboard
and click the Record button to begin recording narration. Speak into
your microphone to add voice over narration.
Use the stop button to halt your recording.
Note: The narrated slide will automatically adjust it‟s duration to the
length of your narration.
Page 97
97. FOTOBOX™ PLUS
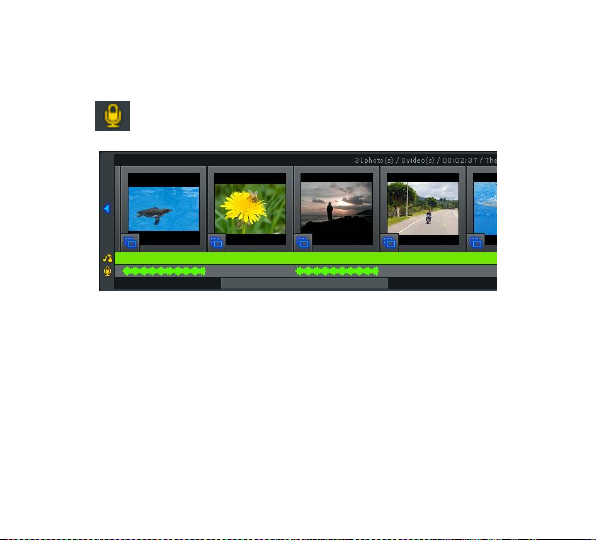
Added narration will be represented by wavy lines in the Microphone
Track below the Storyboard.
Removing Narration from Slides
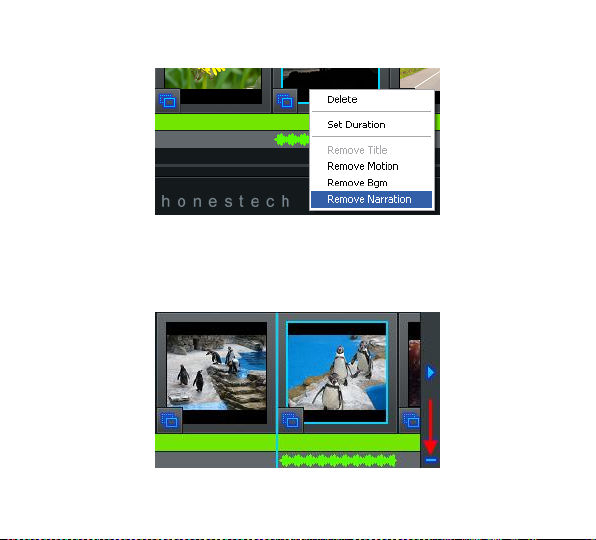
There are two ways to remove narration from a slide.
1) Right click the slide that narration was added to and select „Remove
Narration‟ from the pop-up menu.
Page 98
98. honesteh
2) Select a slide containing narration and click the minus button at the
right end of the Microphone Track.
Page 99
99. FOTOBOX™ PLUS
Adjusting Volume Levels for Narration, Background Music and
Video Sound Tracks
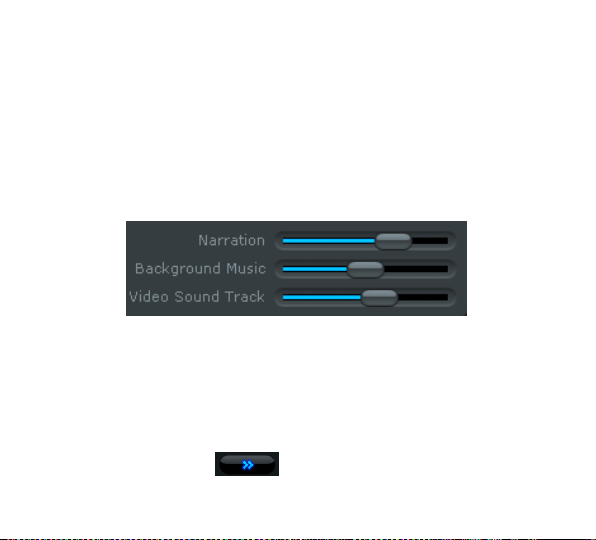
Use the Narration, Background Music and Video Sound Track volume
sliders located at the bottom right of the Narration panel to adjust the
levels within you slideshow.
Tip: Adjusting the volume levels can be particularly useful for
ensuring your voice over narration can be heard clearly over any
background music or video sound tracks.
When you are finished adding narration to your slides and adjusting the
volume levels, click the Next button at the bottom right to
proceed to the Add Effects screen.
Page 100
100. honesteh
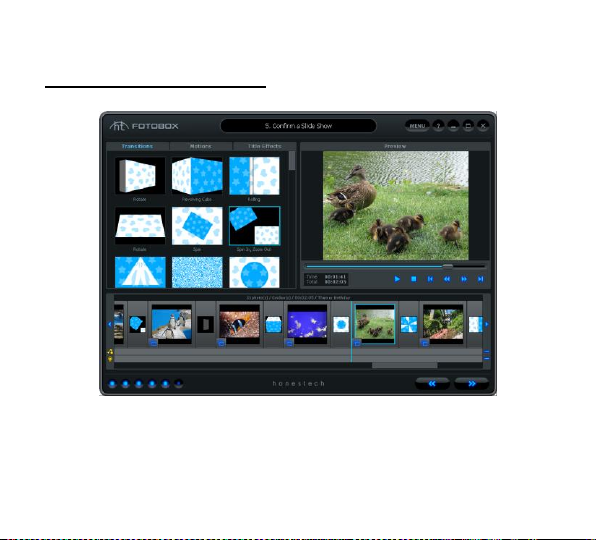
Transitions and Effects
In the Add Effects screen, you can add or change Transitions between
slides, Motion to individual slides, or Title Effects to slides with titles.
 Loading...