

Page 1

MY -IPTV&CAM Anywhere
User Guide
TM
Page 2

2. honestech
END USER LICENSE AGREEMENT
IMPORTANT : READ THE FOLLOWING TERMS AND CONDITIONS CAREFULLY BEFORE CONTINUING
THIS INSTALLATION.
IF YOU DO NOT AGREE WITH THESE TERMS AND CONDITIONS, PROMPTLY REMOVE THE
SOFTWARE FROM YOUR COMPUTER AND RETURN THE SOFTWARE, INCLUDING THE
DOCUMENTATION, TO YOUR SUPPLIER AND YOUR MONEY WILL BE REFUNDED. IF YOU
DOWNLOADED THIS SOFTWARE, PLEASE REMOVE THE SOFTWARE FROM YOUR COMPUTER AND
CONTACT YOUR SUPPLIER TO REQUEST A REFUND.
In this license agreement (the “License Agreement”), you (either individual or an entity), the purchaser of
the license rights granted by this License Agreement, are referred to as “licensee” or “You”. Honest
Technology is referred to as the “Licensor”. The current version of the accompanying software
(“Software”) and documentation (“Documentation”) are collectively referred to as the “Licensed Product”.
Licensor may furnish hardware with the Licensed Product (“Hardware”)
1. License
In accordance with the terms and conditions of this License Agreement, the Software is the property of
the Licensor and is protected by Copyright Law. While the Licensor continues to own the Software,
the Licensor grants the Licensee, after Licensee’s acceptance of this License Agreement, the Limited,
non-exclusive license to use on copy of the current version of Licensed Product as described below.
The Software is “used” on a computer when it is loaded into the temporary memory (i.e., RAM) or
installed into the permanent memory (e.g., hard disk, CD-ROM, or other storage device) of that
computer, except that a copy installed on a network server for the sole purpose of distribution to
another computer is not considered “in use”. Except as may be modified by a license addendum which
accompanies this License Agreement, the Licensee’s rights and obligations with respect to the use of
this Software are as follows:
You May,
I. Use the Software for commercial or business purposes in the manner described in the
Documentation.
II. Use the Software to share Internet connection, transfer data, files and images among the
computer in the manner described in the Documentation.
You May Not,
I. Copy the documentation that accompanies Software.
II. Sublicense or lease any portion of the Software.
III. Make illegal duplication of the software.
2. Copyright and Trade Secrets. All rights in and to the Licensed Product including, but not limited to,
copyrights and trade secrets rights, belong to Licensor, and Licensor holds title to each copy of the
Software. The licensed Product is protected by United States Copyright Laws and international treaty
Provisions.
3. Term. This License Agreement is effective until terminated. Licensee may terminate this License
Agreement if Licensee breaches any of the terms and conditions herein. Upon termination of this
License Agreement for any reason, Licensee shall return to Licensor or otherwise destroy the Licensed
Product and all copies of the Licensed Product. Upon request of Licensor, Licensee agrees to certify in
writing that all copies of the Software have been destroyed or returned to Licensor. All provisions of
this Agreement relating to disclaimers of wa rranties, limitation of liability, remedies, or damages, and
Licensor’s proprietary rights shall survive termination.
4. Executable Code. The Software is delivered in executable code only. Licensee shall not reverse
engineer, compile or otherwise disassemble the Software.
Page 3

3. MY-IPTV&CAM Anywhere™
5. Limited Warranty
a. Licensor does not warrant that the functions contained in the Licensed Product and Hardware
will meet Licensee’s requirements or that the operation of the Software and Hardware will be
uninterrupted or error-free. Licensor does warrant that the media on which the Software is
furnished and the hardware will be free from defects in materials and workmanship under normal
use for a period of thirty (30) days from the date of delivery (“Warranty Period”). This Limited
Warranty is void of failure of the media on which the Software is furnished has resulted from
accident, abuse, or misapplications.
b. EXCEPT AS PROVIDED ABOVE, THE LICENSED PRODUCT IS PROVIDED “AS IS”
WITHOUT WARRANTY OF ANY KIND, EITHER EXPRESS OR IMPLIED INCLUDING, BUT
NOT LIMITED TO, IMPLIED WARRANTIES OF MERCHANTABILITY AND FITNESS FOR A
PARTICULAR PURPOSE, AND THE ENTIRE RISK AS T O THE QUALITY AND
PERFORMANCE OF THE LICNESED PRODUCT AND HARDWARE IS WITH LICENSE.
6. Limitation of Liability
a. Licensor’s sole obligation or liability and licensee’s exclusive remedy under this agreement shall
be the replacement of the defective media on which the software is furnished and/or the
hardware according to the limited warranty above.
b. In no event will licensor be liable for any consequential, incidental or indirect damages including,
without limitation, any loss of data or information, loss of profits, loss savings, business
interruption or other pecuniary loss, arising out of use of or liability to use the software or
documentation or any hardware, even if licensor has been advised of the possibility of such
damages, or for any claim by any third party.
7. General
a. Any Software and Hardware provided to Licensee by Licensor shall not be exported or re-
exported in violation of any export provisions of the United States or any other applicable
jurisdiction. Any attempt to sublicense, assign or transfer any of the rights, duties or obligations
hereunder is void. This Agreement shall be governed by and interpreted under the laws of the
State of New Jersey, United States of America, without regard to its conflicts of law provisions.
Licensor and Licensee agree that the U.N. Convention on Contracts for the International Sales of
Goods shall not apply to this License Agreement.
b. This License Agreement may only be modified or amended by a written license addendum that
accompanies this License Agreement or by written document that has been signed by both you
and Licensor. Site licenses and other types of enterprise licenses are available upon request.
Pleas contact Licensor or your supplier for further information.
c. Any controversy or claim arising out of or relating to this Agreement, or the breach of this
Agreement, shall be settled by arbitration administered by the American Arbitration Association in
accordance with its Commercial Arbitration Rules and Judgment upon the award rendered by the
arbitrator may be entered in any court having jurisdiction thereof. The arbitration shall be held in
New Jersey, United States of America.
If you have any other questions concerning this License Agreement, or if you desire to contact Licensor for
any reason, please contact Honest Technology.
Copyright 2006
Honest Technology Inc.
All Rights reserved.
Page 4

4. honestech
Table of Contents
END USER LICENSE AGREEMENT ……………………..……………………………...…………………2
1. INTRODUCTION ………….……………..……………………………………………….…………………6
1.1. What is MY-IPTV & CAM AnywhereTM?
1.2. Features
1.3. System Requirements
2. MY-IPTV AnywhereTM INSTALLATION …….………………………………..…………..………………8
2.1. Check the following before you start
2.2. MY-IPTV AnywhereTM Installation
2.3. Install the h/w device driver for MY-IPBOX (capture device).
3. MY-IPCAM AnywhereTM INSTALLATION….……………………………..…………..……………..…20
3.1. Check the following before you start
3.2. MY-IPCAM AnywhereTM Installation
3.3. Install the h/w device driver for the TV tuner/capture device.
4. USER REGISTRATION ……….……………………………………….…………………………………30
4.1. Online registration at www.my-iptv.com
4.2. Log in Website
4.3. How to use the online features.
5. USING MY-IPTV AnywhereTM Server APPLICATION …………………………………….…………37
5.1. MY-IPTV Anywhere™ Server
6. USING MY-IPTV AnywhereTM Player APPLICATION ………………………………....….…………43
6.1. MY-IPTV Anywhere™ Player
Page 5

5. MY-IPTV&CAM Anywhere™
7. US IN G M Y-IP CAM An ywh e re
TM
……..….………………..……………………………………..………48
7.1. Log In
7.2. Screen Layout
7.3. Options
7.4. Schedule
7.5. Data Burning
8. UNINSTALL MY-IPTV AnywhereTM ……………………….…………….………………..….…………58
9. UNINSTALL MY-IPCAM Anywhere
TM
…………………….…….…….…………..………………..59
Page 6

6. honestech
1. INTRODUCTION
1.1. What is MY-IPTV & CAM Anywhere™?
MY-IPTV & CAM Anywhere™ combines the power to access your home TV programs and personal
video monitoring surveillance system from anywhere in the world where broadband internet is
available!
MY-IPTV A ny where™
The software allows you to deliver your home or local TV programs to anywhere in the world as long
as you have broadband internet access. Experience your local, hometown TV programs while
traveling to another city, state or wherever your travels take you. Your local, hometown TV
programs can be delivered to you using MY-IPTV Anywhere™'s built-in H.264 video compres sion
technology.
MY-IPCAM A ny where™
Provides a comprehensive personal video monitoring surveillance solution. With MY-IPCAM
Anywhere™, your PC becomes a powerful surveillance system. MY-IPCAM Anywhere™ records
video when motion is detected, and provides remote real-time monitoring function. Controls up to
three cameras at a time, send e-mail notices to specified email accounts, and schedule monitori ng
time slots. You can record and burn surveillance videos in MPEG format.
You can manage watching TV and monitoring personal surveillance from Honestech’s FREE online
membership, which also takes care of hassle-free per-to-peer connection to your PC from anywhere.
1.2. Features
1.2.1. MY-IPTV Anywhere™
• Channel Changing & Surfing
Switch and search TV channels away from your home or anywhere in the world.
• PVR and Scheduled Recording
Schedule and record TV programs with an intuitive Internet based TV programming tool.
• DVD Burning
Burn recorded TV programs onto a DVD (DV D burner requi red).
• Picture Quality
MY-IPTV Anywhere™ utilizes the latest H.264 / MPEG-4, which provides a rich video and
audio broadcast.
1.2.2. MY-IPCAM Anywhere™
• Basic Surveillance
Record video (in mpeg format) continuously or only when a motion is detected. You can also
specify motion from certain area within viewing area of PC camera to trigger the surveillance
system.
Page 7

7. MY-IPTV&CAM Anywhere™
• Email Notification
Send email notices to specified email addresses. * Compatible and supports MS Outlook
Express
• Scheduled Monitoring
Specify desired monitoring time slots for surveillance system to be active. (e.g..: once, daily, or
weekly)
• Multiple PC Cameras
Supports up to three PC cameras, and you select individual detection mode and response
action for each PC camera. In order to avoid conflict in device recognition by your PC, we
recommend that you use different brand or model for multiple PC camera operation.
• Data Backup/Burning
You can create backup video files on CD or DVD.
• File List Management
Easily manage the recorded video files with browsing and selection feature for watching or
burning.
1.3. System Requirements
• Designed for analog signals/channels only.
• USB 2.0 host controller
• Operating system : Windows XP SP2
• Processor : Pentium IV 1.8 GHz or higher
• Memory : RAM 256MB or higher
• HDD : 2GB or more
• DirectX 9.0 or later
• Windows Media Player 6.4 or higher
• Broadband Internet Connection Required
Optional Requirements
• CD/DVD Burner
• TV Signal Splitter
Page 8

8. honestech
2. MY-IPTV AnywhereTM INSTALLATION
2.1. Check the following before you start
2.1.1. It is recommended that you install Service Pack 2 for Windows XP.
2.1.2. USB 2.0 required.
You can check the version of the USB controller on your computer by going to
My Computer → System properties → Hardware (tab) → Device Manager → Universal Serial Bus
controllers: If it is an “Enhanced” host controller, then you have USB 2.0 host controller.
Attention : If you have a USB 2.0 host controller but do not see an “Enhanced” host controller,
please try again after installing the driver for the USB 2.0 host controller.
Page 9

9. MY-IPTV&CAM Anywhere™
2.2. MY-IPTV AnywhereTM Installation
2.2.1. Insert the installation CD into your CD/DVD drive.
2.2.2. Click [MY -IPT V ANYWHERETM SERVER INSTALL]
2.2.3. When the following welcome screen will appears, click [Next >] to continue.
Page 10

10. honestech
2.2.4. When the End-User License Agreement is displayed, please read and accept the agreement
by selecting “I Accept the terms of the license agreement” and click [N
ext >] to continue.
2.2.5. When the Choose Destination Location screen is displayed, accept the default setting or
change the installation directory by clicking [Browse…]. Click [Next >] to continue installing MY-
IPTV AnywhereTM Server.
Page 11

11. MY-IPTV&CAM Anywhere™
2.2.6. When the Select Program Folder screen is displayed, accept the default Program Folder or
choose/create your own Program Folder, and click [N
ext >] to continue.
2.2.7. The Setup Status screen is displayed to show the installation progress.
Page 12

12. honestech
2.2.8. Click [Finish] to complete the installation procedure.
2.2.9. MY-IPBOX (a capture device) installation will start automatically as described in step 2.3.
* For details, please refer to “2.3. Install the H/W device driver for MY-IPBOX (capture device).
Page 13
13. MY-IPTV&CAM Anywhere™
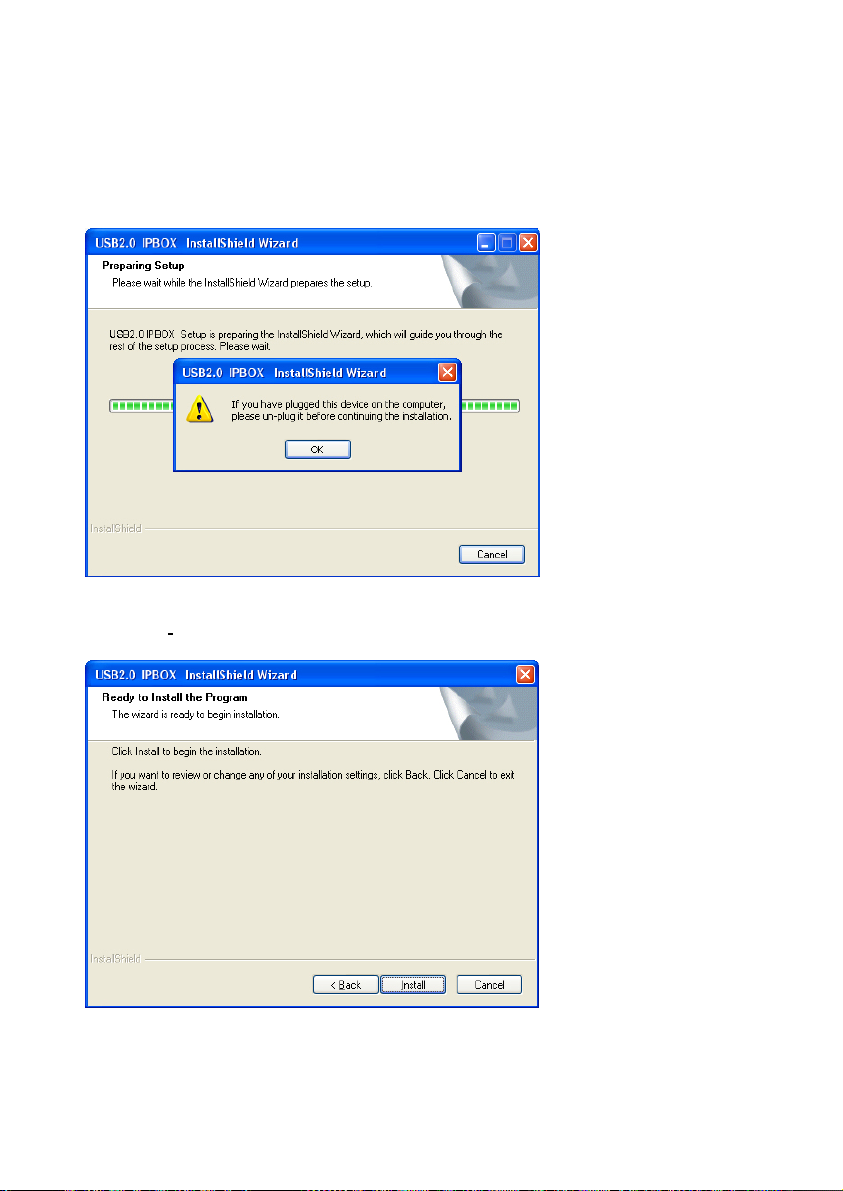
2.3. Install the h/w device driver for MY-IPBOX
2.3.1. Please DO NOT connect MY-IPBOX to your computer until you finish installing the h/w device
driver first. Please click [OK] to start installing the h/w device driver.
2.3.2. Click [Install] to start the installation.
Page 14

14. honestech
2.3.3. The Setup Status screen is displayed to show the installation progress.
2.3.4. Click [Continue Anyway] to continue. Although the h/w device driver has not been certified
by Microsoft, it is safe to install on your computer.
Page 15

15. MY-IPTV&CAM Anywhere™
2.3.5. Please click [Finish] to continue to next step.
2.3.6. When the following dialog box is displayed, please connect MY-IPBOX to your computer.
Your computer will detect MY-IPBOX and install the files automatically.
Page 16

16. honestech
2.3.7. Select “No, not this time” and click [Next >] to continue .
2.3.8. You Click [Next >] to continue with the installation.
Page 17

2.3.9. When the following dialog is displayed, click [Continue Anyway].
2.3.10. The installation is in progress. Please wait for completion.
17. MY-IPTV&CAM Anywhere™
Page 18

18. honestech
2.3.11. Please click [Finish].
2.3.12. During the last step of h/w device driver installation, your computer will install [USB Audio
Device]. The installation procedure will proceed automatically. Please wait for completion.
Page 19

19. MY-IPTV&CAM Anywhere™
2.3.13. Connecting Ports
1. USB port (for MY-IPCAM Anywhere
TM
)
2. Audio port (optional)
For Windows XP Users : If Service Pack 2 or later is NO T installed on your PC, connect Audio Cable.
Otherwise please DO NOT connect the Audio Cable.
3. USB port (for MY-IPTV AnywhereTM)
Install hw/ device driver first, and connect MY-IPBOX to the USB 2.0 port on your computer.
4. Composite/S-Video port (optional)
Please connect Composite/S-Video Cable of DVD/VHS player to this port.
5. TV port
Please connect TV Antenna or Cable to this port.
Page 20

20. honestech
3. MY-IPCAM AnywhereTM INSTALLATION
3.1. Check the following before you start
3.1.1. It is recommended that you install Service Pack 2 for Windows XP.
3.1.2. USB 2.0 required.
You can check the version of the USB controller on your computer by going to:
My Computer → System properties → Hardware (tab) → Device Manager → Universal Serial Bus
controllers: If it is an “Enhanced” host controller, then you have USB 2.0 host controller.
Attention : If you have a USB 2.0 host controller but do not see an “Enhanced” host controller,
please try again after installing the driver for the USB 2.0 host controller.
Page 21

21. MY-IPTV&CAM Anywhere™
3.2. MY-IPCAM AnywhereTM Installation
3.2.1. Insert the installation CD in your CD/DVD drive.
3.2.2. Click [MY -I PCAM ANYWHERETM INSTALL]
3.2.3. When the following welcome screen will appears, click [Next >] to continue.
Page 22

22. honestech
3.2.4. When the End-User License Agreement is displayed, please read and accept the agreement
by selecting “I Accept the terms of the license agreement” and click [N
ext >] to continue.
3.2.5. When the Choose Destination Location screen is displayed, accept the default setting or
change the installation directory by clicking [Browse…]. Click [Next >] to continue installing MY-
IPCAM AnywhereTM.
Page 23

23. MY-IPTV&CAM Anywhere™
3.2.6. When the Select Program Folder screen is displayed, accept the default Program Folder or
choose/create your own Program Folder, and click [Next >] to continue.
3.2.7. The Setup Status screen is displayed to show the installation progress.
Page 24

24. honestech
3.2.8. Click [Finish] to complete the installation procedure.
3.2.9. MY-IPBOX (a capture device) installation will start automatically as described in step 2.3
* For details, please refer to “2.3. Install the H/W device driver for MY-IPBOX (capture device).
Page 25

25. MY-IPTV&CAM Anywhere™
3.3. Install the h/w device driver for the TV tuner/capture device.
3.3.1. When the following screen is displayed, click [Next >] to continue.
3.3.2. Select a setup type, and click [Next >] to continue.
Page 26

26. honestech
3.3.3. Click [Install] to begin the installation.
3.3.4. The Setup Status screen is displayed to show the installation progress.
Page 27

27. MY-IPTV&CAM Anywhere™
3.3.5. Click [Continue Anyway] to continue. Although the h/w device driver has not been certified
by Microsoft, it is safe to install on your computer.
3.3.6. Click [Finish] to complete the installati on .
3.3.7. Please connect MY-IPBOX to your computer. Your computer will recognize the TV
tuner/capture device and install it automat ically.
Page 28

28. honestech
3.3.8. Click [Next >] to continue.
3.3.9. Click [Continue Anyway] to continue. Although the h/w device driver has not been certified
by Microsoft, it is safe to install on your computer.
Page 29

3.3.10. The installation is in progress. Please wait for completion.
3.3.11. Click [Finish] to complete the installation.
29. MY-IPTV&CAM Anywhere™
Page 30

30. honestech
4. USER REGISTRATION
4.1. Online registration at www.my-iptv.com
4.1.1. Launch a web browser
4.1.2. Go to www.my-iptv.com
4.1.3. Click “SIGN UP” to sign up for membership (you will be re-directed to the following page).
Page 31

31. MY-IPTV&CAM Anywhere™
4.1.4. Enter the required information to completing the form. You email address MUST be verified,
sp please use a valid email address
4.1.5. Email verification
Click on “To continue with your account registration, please click here” to continue with email
verification and comple te the registration process.
4.2. Log in Website
4.2.1. Launch a web browser
4.2.2. Go to www.my-iptv.com
4.2.3. Enter your User ID and Password
Page 32

32. honestech
4.3. How to use the online features.
4.3.1. MY-IPTV Anywhere™
When you log in successfully, the following Channel Surfing page will be displayed.
Page 33

33. MY-IPTV&CAM Anywhere™
The captured images from the available channels will be displayed on the Channel Surfing window.
Double-click on the channel that you want to watch, and MY-IPTV Anywhere™ Player will launch
automatically to with the selected channel on.
: Start Channel Surfing
: Stop Channel Surfing
: Launch MY-IPTV Anywhere™ Player and watch TV
: Turn on the computer where MY-IPTV Anywhere™ Server is installed and
launch MY-IPTV Anywhere™ Server application from a remote location
(TV client).
Requirement
• Wake-on-LAN feature must be supported by the motherboard of the computer where MY-IPTV
Anywhere™ Server is installed
• Wake-on-LAN feature must be supported by the LAN card of of the computer where MY-IPTV
Anywhere™ Server is installed.
• Wake-on-LAN feature must be supported by the internet router (if applicable).
: View TV Listings / EPG (Electronic Programming Guide)
Page 34

34. honestech
4.3.2. TV Listings
You can easily view the local TV schedule of the day or the week.
Use this TV Listings feature to watch T V, sche dule recording time, and more.
Currently playing TV programs are marked with
, you can use MY-IPTV Anywhere™ Player to
watch the TV programs. You can click the program title to see a brief summary on the TV program.
You can also schedule recording of a TV program by clicking on next to the TV program
title.
: Currently available programs. Use MY-IPTV Player to watch these TV programs.
: Easily schedule recording times
: Broadcasted in HD (high-definition)
Page 35

35. MY-IPTV&CAM Anywhere™
Click on the program title to see the information on the specific TV program
: Add the TV program to MY Listings
: Schedule a recording
Page 36

36. honestech
4.3.3. MY-IPCAM Anywhere™
Monitor your office while you are away from your office:
You can review the recorded video when you return to your office.
: Warning sound enabled.
: Warning sound disabled.
Refresh Rate : configure the video refresh rate.
Page 37

37. MY-IPTV&CAM Anywhere™
5. USING MY-IPTV AnywhereTM Server APPLICATION
5.1. MY-IPTV Anywhere™ Server
5.1.1. Start MY-IPTV AnywhereTM Server application
Or you may start the program through the Start menu button by clicking
Or you may start the application through Start menu:
5.1.2. Log in
You can start MY-IPTV AnywhereTM Server application by simply double-clicking on the icon.
START → ALL PROGRAMS → honestech → MY-IPTV AnywhereTM Server → MY-IPTV
AnywhereTM Server
Double-click on MY-IPTV Anywhere™ Server icon to start MY-IP T V AnywhereTM Server
application
START → PROGRAMS → honestech → MY-IPTV AnywhereTM Server (Folder) → MY-IPTV
AnywhereTM Server
• Enter your User ID and Password
• Save your login formation by checking Save User ID and Save Password.
Page 38

38. honestech
5.1.3. How to use MY-IPTV Anywhere™ Server.
Visit www.my-iptv.com
Log in
Change configuration
Help file
Minimize MY-IPTV Player
Close the application
Page 39

39. MY-IPTV&CAM Anywhere™
Right-click on the screen to see the menu box, and make necessary changes.
Hot-keys supported:
0 ~ 9 : Numeric keys : Enter Channel number
Å, Æ : left/right arrow key : Control volume
Up/Down arrow key : Up/Down arrow key : Change channels up / down
Page 40

40. honestech
5.1.4. Property setting
5.1.4.1. TV Setting
• Input source : Choose from TV, CATV, Composite, and S-Video
• Country : Select the country code
- Auto Detect : Use the default country code used on your MS Windows OS
- Select your country : Select a country code manually
• Operation method : Change channel controlling method
- By Channel Number : Change channels by entering numbers
- By Order Number : Change channels in sequence
• Using favorite channels : Select channels from your favorite channel list.
• Auto Scan : Search for all available channels
• CH : Type in the channel number of your choice and click ENTER.
Æ / Å Del : Add or delete a channel from the Channel List
• Add
• Double click the channel number on the channel list to change channels quickly
• You can assign names to the channels or change names by clicking CHANNEL NAME.
• Change the channel order : Change channel order in the channel list.
Page 41

41. MY-IPTV&CAM Anywhere™
5.1.4.2. Video setting
• Fine Adjustment : Adjust brightness, contrast, hue, and saturation
• Video Standard : Change Video Broadcast Standard setting
• Video capture device : Select capture device
• Video source : Configure the property of the device driver
• Using the internal audio streaming function : Check the box and restart your computer. (available
only if the device driver supports this feature)
• Mixer device setting : Select the sound card to be used
Device setting :
Playback Device: Select a playback device
Recording Device: Select a recording device
Channel setting:
Playback: Select channels supported by the playback device
Recording: Select chan nels supported by the recording de vice
• Audio Input : Control audio volume
Page 42

42. honestech
5.1.4.3. Etc Dialog…
• Auto login : You must check this box if you want to wake up your PC from outside your home.
• Auto Scan Mode : Check this box if the auto-scan feature does not work properly
• Burn setting :
Writable Drive: By clicking on this button, you can refresh the list of the writable optical drives
on your PC.
Working Directory: Change the Working Directory by clicking BROWSE
• Disk Drive Info: Displays the information about your hard disk drive
Page 43

43. MY-IPTV&CAM Anywhere™
6. USING MY-IPTV AnywhereTM Player APPLICATION
6.1. MY-IPTV Anywhere
6.1.1. Start MY-IPTV AnywhereTM Player application
Launch MY-IPTV AnywhereTM Player application by simply double clicking the icon.
Or you may start the application through the Start menu button by following:
START → PROGRAMS → honestech → MY-IPTV AnywhereTM Player → MY-IPTV AnywhereTM
Player
6.1.2. Login
TM
Player
After you enter your User ID and Password and click [Login], you can start watching your home TV
programs as shown below.
Page 44

44. honestech
6.1.3. How to use MY-IPTV Anywhere™ Player
[Operating button]
: Click to start Channel Surfing
: Start and stop re cor ding (on your server)
: Burn TV programs on CD/DVD (on your server)
: TV server control
: Reset player
: Shows the current speed of the network and streaming.
Page 45

45. MY-IPTV&CAM Anywhere™
[Control the main panel setting]
: Change channels
: Adjust bit-rate
: Mute function
: Control volume
: Select window size
: Help file
: Minimize window size
: Close
6.1.3.1 Channel Surfing Window
The captured images from the available channels will be displayed in the Channel Surfing Window.
Page 46

46. honestech
: Start Channel Surfing
: Stop Channel Surfing
: Displays Channel Surfing status
: Stop Channel Surfing and close the window
Double-click on the channel that you want to watch and MY-IPTV Anywhere™ Player will launch
automatically with the channel that you selected.
6.1.3.2 Recording.
You can start and stop recording of the selected TV programs on your computer where MY-IPTV
Anywhere™ Server is installed by using this function. The recorded contents will be saved on the in
the designated directory on the hard drive of the computer where MY-IPTV Anywhere™ Server is
installed. The recording button will blink while the recording is in process.
6.1.3.3 Burning Window.
You can burn the recorded video files on CD/DVD on your computer where MY-IPTV Anywhere™
Server is installed. In order to use this feature, you must have writable media (blank CD/DVD)
ready in the CD/DVD writer on your computer where MY-IPTV Anywhere™ Server is installed.
File lists.
All files will be listed in the working directory of the computer where MY-IPTV Anywhere™
Server is installed. Select one or more recorded files from the list that you want to burn on the
media. Each time you select or un-select a file, you will be able to see the total file size of
selected files under Selected File Size.
Page 47

47. MY-IPTV&CAM Anywhere™
The burning progress will be displayed under this section.
Click on this button to start burning process
If you want to cancel the burning process before it is completed, click on this button.
Click on YES when you are asked to confirm the canceling of burning process.
6.1.3.4 TV server control.
You can use this function to wake up your computer where MY-IPTV Anywhere™ Server is installed
[Shut down mode] option :
You can select “Stand-By Mode” or “Hibernation Mode”.
[Apply this setting] button :
If your computer where MY-IPTV Anywhere™ Server is installed does NOT support WOL (Wake On
LAN) feature, please use this function. Otherwise, you will not be able to wake TV Server up after
clicking on [Shut down TV server PC now] button.
[Shut down TV server PC now] button:
You can shut-down your computer where MY-IPTV Anywhere™ Server is installed by clicking here.
Page 48

48. honestech
7. USING MY-IPCAM Anywhere™
Launch MY-IPCAM Anywhere™ by double-clicking on icon.
Or you may start MY-IPCAM Anywhere™ through Start menu button:
• START -> PROGRAMS -> honestech -> MY-IPCAM AnywhereTM -> MY-IPCAM AnywhereTM
7.1. Log In
• Enter your User ID and Password
• Save your login formation by checking Save User ID and Save Password.
Page 49

7.2. Screen Layout
7.2.1. PC Camera control area
49. MY-IPTV&CAM Anywhere™
A. Sensor: adjust the sensitivity to detect motion (low sensitivity setting will only detect large motion
whereas high sensitivity setting detects small motion):
Press to increase and to decrease the sensitivity.
Sensor Response options:
• No Action: No action taken.
• REC: Start recording video when a motion is detected and stops when there is no motion
for at least 5 seconds. Resume recording if a motion is detected again.
• REC + Mail (Message): Record video and sends a text email message to pre-specified
e-mail account(s).
Page 50

50. honestech
• REC + Mail (Jpeg): Record video and send a snapshot of the video taken at the beginning
of the video recording to pre-specified e-mail account(s).
• REC + Mail (Clip): Record video and send the recorded video clip to pre-specified e-mail
account(s).
• Mail (Message): Send a text message when a motion is detected.
• Mail (Jpeg): Send a snapshot to pre-specified e-mail account(s) when a motion is detected.
B. Displays the input screen of the selected camera.
C. This scroll bar in the lower-r ight corner of the screen is used to specify a monitor ing area. A
rectangle appears in the camera screen indicating the currently monitored area. This area
indicator does not appear in the recorded screen.
D. : Start camera operation.
E. : Stop camera operation.
F. : Adjust the brightness of a camera.
7.2.2. Function area
Start/Stop monitoring
Schedule recording time
Option
Open File List window
Help file
Minimize the application window
Close the application
Page 51

7.2.3. File list window
Play selected file
Attach a selected file to an e-mail and send it out
Burn selected files to a CD/DVD disc
List the files using icons.
List the files by file names
Delete selected file
51. MY-IPTV&CAM Anywhere™
Page 52

52. honestech
7.3. Options
7.3.1. General :
• Format: Specify the format of the output file (MPEG / MPEG-VBR).
• Video Size: Specify the resolution of the output file (320*240 / 240*160 / 176*144)
• Video Quality: Specify the bitrate of the output file. “Low” setting will reduce the file
size of the output, but it will lower the video quality. “High” setting will increase the file
size of the output, but it will improve the video quality.
• Surveillance Video Recording:
o Motion Triggered: The recording will start when a motion is detected.
o Contiuous: The recording will continue regardless of whether a motion is
detected or not. Also the mail notification function will be unavailable when this
option is selected.
• View Time Indicator: The current time will be displayed on the screen.
• Select Motion Sensor Zone: You can specify a section within the viewing area of a PC
camera for motion detection to trigger the video surveillance system.
• Alar m ( Aud io n) : When this option is checked, the alarm will sound when a movement is
detected.
• [Default] button: Return to default setting.
Page 53

53. MY-IPTV&CAM Anywhere™
7.3.2. Advanced… :
• HTTP Server: Enable or disable the HTTP Server function. The HTTP Server allows you to
access your PC cameras via web browser.
• Port: Specify the port number to run the HTTP Server. This setting allows you to securely
bypass your internet router to access your PC cameras.
• Output Folder Location (Recording): Specify a directory where the recorded files will be saved
in. An output folder should be specified for each camera, but same folder can be used by
different cameras also.
Page 54

54. honestech
7.3.3. Mail Setting:
• From: Enter the sender's e-mail address.
• To: Enter the recipient's e-mail address.
• Subject: Enter the subject of the mail.
• Message: Enter text message.
• Send Notice per motion detection: Specify the frequency in which mail messages will be
sent out.
o Every Time: Send a mail whenever a motion is detected.
o Time Interval [ ] second: After sending an email, MY-IPCAM Anywhere™ will wait
for a specified period of time before rechecking for any motion.
• Video Clip Size [ ] MB for each notice: When sending a recorded video clip with an email,
this feature will reduce the file size of the recorded video clip before attaching to the email
(only if the file size of the recorded file is bigger than the file size limit specified.).
• Max. Total [ ] MB for accumulated email notices: If the total size of the emails sent
reaches this limit, no additional email will be sent. However, the recording will continue
depending on your setting.
Page 55

55. MY-IPTV&CAM Anywhere™
7.3.4. Change the [Name] of each camera or use the default names. You may type in any name of
your choice in the camera name box. You can also select video input [Device] such as your PC
cameras
Page 56

56. honestech
7.4. Schedule
You can specify when to automatically start and end the surveillance time slots.
7.4.1. Add: set up a new schedule.
• Select which camera(s) to activate at the scheduled hour.
• Specify the days of week and time to activate the monitoring system periodically.
• Specify a date and time to activate the monitoring system.
• Specify how long the monitoring system will be activated.
7.4.2. Delete: remove a selected schedule from the list.
7.4.3. Delete All: remove all schedules from the list.
7.4.4. Edit: Modify a selected schedule in the list by double-clicking on it.
7.4.5. OK: Register a schedule to the list.
7.4.6. Cancel: Delete the new item that was just added and perform the rest of the scheduled tasks.
Page 57

57. MY-IPTV&CAM Anywhere™
7.5. Data Burning
Burn selected file(s) on a writable CD/DVD.
• Drive: select a CD/DVD writer from the list of available drives.
• Total Size: total file size of the video clips selected for burning.
• Add: add video clips to be burned to this list.
• Delete: remove selected files from the list of video clips to be burned.
o Confirm with a dialog before file deletion: displays a warning message before
• After Burn:
• Eject Disc: eject the writable media (CD/DVD) from the CD/DVD writer
• Load Disc: close the tray on the CD/DVD writer.
• Erase Disc: erase the content on the media (rewritable media only).
• Burn: start CD/DVD burning
• Close: close the window
• Finalize Disc (Close session): no additional data can be added to the finalized disc.
deleting files.
o Do nothing: do not delete or move the video clips.
o Delete: delete the files that have been burned to the CD/DVD.
o Move to backup folder: move the files to a specified backup folder.
- Backup Folder: specify a directory which will be used as the backup folder.
Page 58

58. honestech
8. UNINSTALL MY-IPTV AnywhereTM
8.1. Go to: START → PROGRAMS → honestech → MY-IPTV AnywhereTM Server -> UnInstall
or START → PROGRAMS → honestech → MY-IPTV AnywhereTM Player -> UnInstall MYIPTV Anywhere Player
8.2. Click [Yes] to continue.
8.3. Uninstallation will start.
8.4. Uninstallation Completed
You will see a screen confirming successful completion.
Please click [OK] to finish the process.
Page 59

59. MY-IPTV&CAM Anywhere™
9. UNINSTALL MY-IPCAM Anywhere™
9.1. Go to: START –> PROGRAMS –> honestech –> MY-IPCAM AnywhereTM -> UnInstall MY-IPCAM
AnywhereTM
9.2. Click [Yes] to continue.
9.3. Uninstallation will start.
9.4. Uninstallation Completed
Please click [OK] to finish the process.
Page 60

60. honestech
English
Following information is only for EU-member states:
The use of the symbol indicates that this product may not be treated as household
waste.
By ensuring this product is disposed of correctly, you will help prevent potential
negative consequences for the environment and human health, which could otherwise
be caused by inappropriate waste handling of this product. For more detailed
information about recycling of this product, please contact your local city office, your
household waste disposal service or the shop where you purchased the product.
 Loading...