

Page 1

honestech
Fireman CD/DVD Burner
3.0
User Guide
Page 2

2. honestech
End User License Agreement
IMPORTANT : READ THE FOLLOWING TERMS AND CONDITIONS CAREFULLY BEFORE CONTINUING
THIS INSTALLATION.
IF YOU DO NOT AGREE WITH THESE TERMS AND CONDITIONS, PROMPTLY REMOVE THE
SOFTWARE FROM YOUR COMPUTER AND RETURN THE SOFTWARE, INCLUDING THE
DOCUMENTATION, TO YOUR SUPPLIER AND YOUR MONEY WILL BE REFUNDED. IF YOU
DOWNLOADED THIS SOFTWARE, PLEASE REMOVE THE SOFTWARE FROM YOUR COMPUTER AND
CONTACT YOUR SUPPLIER TO REQUEST A REFUND.
In this license agreement (the “License Agreement”), you (either individual or an entity), the purchaser of
the license rights granted by this License Agreement, are referred to as “licensee” or “You”. Honest
Technology is referred to as the “Licensor”. The current version of the accompanying software
(“Software”) and documentation (“Documentation”) are collectively referred to as the “Licensed Product”.
Licensor may furnish hardware with the Licensed Product (“Hardware”)
1. License
In accordance with the terms and conditions of this License Agreement, the Software is the property of
the Licensor and is protected by Copyright Law. While the Licensor continues to own the Software,
the Licensor grants the Licensee, after Licensee’s acceptance of this License Agreement, the Limited,
non-exclusive license to use on copy of the current version of Licensed Product as described below.
The Software is “used” on a computer when it is loaded into the temporary memory (i.e., RAM) or
installed into the permanent memory (e.g., hard disk, CD-ROM, or other storage device) of that
computer, except that a copy installed on a network server for the sole purpose of distribution to
another computer is not considered “in use”. Except as may be modified by a license addendum which
accompanies this License Agreement, the Licensee’s rights and obligations with respect to the use of
this Software are as follows:
You May,
1. Use the Software for commercial or business purposes in the manner described in the
Documentation.
2. Use the Software to share Internet connection, transfer data, files and images among the
computer in the manner described in the Documentation.
You May Not,
I. Copy the documentation that accompanies Software.
II. Sublicense or lease any portion of the Software.
III. Make illegal duplication of the software.
2. Copyright and Trade Secrets. All rights in and to the Licensed Product including, but not limited to,
copyrights and trade secrets rights, belong to Licensor, and Licensor holds title to each copy of the
Software. The licensed Product is protected by United States Copyright Laws and international treaty
Provisions.
3. Term. This License Agreement is effective until terminated. Licensee may terminate this License
Agreement if Licensee breaches any of the terms and conditions herein. Upon termination of this
License Agreement for any reason, Licensee shall return to Licensor or otherwise destroy the Licensed
Product and all copies of the Licensed Product. Upon request of Licensor, Licensee agrees to certify in
writing that all copies of the Software have been destroyed or returned to Licensor. All provisions of
this Agreement relating to disclaimers of warranties, limitation of liability, remedies, or damages, and
Licensor’s proprietary rights shall survive termination.
4. Executable Code. The Software is delivered in executable code only. Licensee shall not reverse
engineer, compile or otherwise disassemble the Software.
Page 3

3. Fireman CD/DVD Burner 3.0
5. Limited Warranty
a. Licensor does not warrant that the functions contained in the Licensed Product and Hardware
will meet Licensee’s requirements or that the operation of the Software and Hardware will be
uninterrupted or error-free. Licensor does warrant that the media on which the Software is
furnished and the hardware will be free from defects in materials and workmanship under normal
use for a period of thirty (30) days from the date of delivery (“Warranty Period”). This Limited
Warranty is void of failure of the media on which the Software is furnished has resulted from
accident, abuse, or misapplications.
b. EXCEPT AS PROVIDED ABOVE, THE LICENSED PRODUCT IS PROVIDED “AS IS”
WITHOUT WARRANTY OF ANY KIND, EITHER EXPRESS OR IMPLIED INCLUDING, BUT
NOT LIMITED TO, IMPLIED WARRANTIES OF MERCHANTABILITY AND FITNESS FOR A
PARTICULAR PURPOSE, AND THE ENTIRE RISK AS TO THE QUALITY AND
PERFORMANCE OF THE LICNESED PRODUCT AND HARDWARE IS WITH LICENSE.
6. Limitation of Liability
a. Licensor’s sole obligation or liability and licensee’s exclusive remedy under this agreement shall
be the replacement of the defective media on which the software is furnished and/or the
hardware according to the limited warranty above.
b. In no event will licensor be liable for any consequential, incidental or indirect damages including,
without limitation, any loss of data or information, loss of profits, loss savings, business
interruption or other pecuniary loss, arising out of use of or liability to use the software or
documentation or any hardware, even if licensor has been advised of the possibility of such
damages, or for any claim by any third party.
7. General
a. Any Software and Hardware provided to Licensee by Licensor shall not be exported or re-
exported in violation of any export provisions of the United States or any other applicable
jurisdiction. Any attempt to sublicense, assign or transfer any of the rights, duties or obligations
hereunder is void. This Agreement shall be governed by and interpreted under the laws of the
State of New Jersey, United States of America, without regard to its conflicts of law provisions.
Licensor and Licensee agree that the U.N. Convention on Contracts for the International Sales of
Goods shall not apply to this License Agreement.
b. This License Agreement may only be modified or amended by a written license addendum that
accompanies this License Agreement or by written document that has been signed by both you
and Licensor. Site licenses and other types of enterprise licenses are available upon request.
Pleas contact Licensor or your supplier for further information.
c. Any controversy or claim arising out of or relating to this Agreement, or the breach of this
Agreement, shall be settled by arbitration administered by the American Arbitration Association in
accordance with its Commercial Arbitration Rules and Judgment upon the award rendered by the
arbitrator may be entered in any court having jurisdiction thereof. The arbitration shall be held in
New Jersey, United States of America.
If you have any other questions concerning this License Agreement, or if you desire to contact Licensor for
any reason, please contact Honest Technology.
Copyright 2007
Honest Technology Inc.
All Rights reserved.
Page 4

4. honestech
Table of Contents
End User License Agreement ..................................................................................................... 2
Table of Contents ........................................................................................................................ 4
1. Main features of honestech Fireman CD/DVD Burner 3.0 ............................................. 6
1.1. honestech Fireman CD/DVD Burner 3.0 functions ............................................ 6
1.2. Minimum System requirements .......................................................................... 7
2. Installation and Un-installation of honestech Fireman CD/DVD Burner 3.0
2.1. Installing honestech Fireman CD/DVD Burner 3.0 ............................................. 8
2.2. Uninstalling honestech Fireman CD/DVD Burner 3.0 ...................................... 12
3. How to use honestech Fireman CD/DVD Burner 3.0 ................................................... 14
3.1. Main Page ........................................................................................................ 14
3.2. How to use honestech Fireman CD/DVD Burner 3.0 ....................................... 15
4. How to burn data files onto CD/DVD ............................................................................ 19
4.1. Creating Data CD/DVD .................................................................................... 19
4.2. Creating Audio Data CD ................................................................................... 22
4.3. Creating Bootable CD/DVD .............................................................................. 26
5. How to burn audio files onto CD/DVD .......................................................................... 30
5.1. Creating Audio CD ........................................................................................... 30
5.2. Creating MP3 CD/DVD .................................................................................... 33
5.3. Creating WMA CD/DVD ................................................................................... 36
5.4. Importing Audio from CD .................................................................................. 39
5.5. Creating Audio & Data CD................................................................................ 40
6. How to burn Video on CD/DVD .................................................................................... 44
............................... 8
6.1. How to create DVDs from DVD video folder .................................................... 44
Page 5

5. Fireman CD/DVD Burner 3.0
7. How to make a duplicate copy and create a backup file .............................................. 45
7.1. How to backup your data.................................................................................. 45
7.2. How to restore from backup files ...................................................................... 48
8. How to use the various utility tools ............................................................................... 51
8.1. Erase CD/DVD ................................................................................................. 51
8.2. View Disc Information....................................................................................... 52
8.3. Disc Label Maker ............................................................................................. 52
8.4. Photo Viewer .................................................................................................... 53
8.5. Creating Image File .......................................................................................... 55
8.6. Burning Image File ........................................................................................... 58
9. How to use honestech DVD Authoring Studio .............................................................. 59
9.1. Introduction ...................................................................................................... 59
9.2. Main features ................................................................................................... 59
9.3. Adding a Title .................................................................................................... 62
9.4. Editing a Title .................................................................................................... 68
9.6. Preview ............................................................................................................ 78
9.7. Burn Disc .......................................................................................................... 79
10. honestech Label Maker .............................................................................................. 80
10.1. Introduction .................................................................................................... 80
10.2. Main features ................................................................................................. 80
10.3. How to use Wizard mode ............................................................................... 80
10.4. How to use Creating Mode ............................................................................. 86
11. Lightscribe .................................................................................................................. 97
11.1. Introduction ..................................................................................................... 97
11.2. How to use ...................................................................................................... 97
Page 6

6. honestech
1. Main features of honestech Fireman CD/DVD Burner 3.0
1.1. honestech Fireman CD/DVD Burner 3.0 functions
Drag-and-Drop
Add data or audio files easily with a simple mouse click
Easier & Faster Burning
Improved burning engine provides faster and easier CD/DVD burning.
Disc
Add additional data to your disc later. You can also read data from unclosed disc.
On-the-fly Burning
No free space required on your hard drive.
Dual-Layer Support
Supports dual-layer DVD burning.
Video Burning
Create DVD, Video CD (VCD), and Super-Video CD (SVCD).
Create/Burn ISO Image
Create or burn ISO image on CD/DVD.
Backup
Create backup files and use them to restore your lost files.
Useful Tools
Erase your re-writable disc and view thte disc information.
Label Maker
Create your own disc label by printing the label or LightScribe technology.
Page 7

1.2. Minimum System requirements
Operating system
Windows 2000, Windows XP, Vista
Processor
Intel Pentium III 500M Hz (Pentium VI 1.6 GHz or higher recommended)
Memory
256 MB RAM
Writer
DVD-R/RW, DVD+R/RW, or DVD-ROM/CD-RW with 1394, USB2.0, ATAPI, SCSI, or
CardBus interface
Hard Disk Drive
60MB of free space
Media
CD-R, CD-RW, DVD-R, DVD-RW, DVD+R, DVD+RW, or DVD+R DL (8.5GB)
Screen Resolution
1024 X 768
7. Fireman CD/DVD Burner 3.0
Page 8

8. honestech
2. Installation and Un-installation of honestech Fireman CD/DVD
Burner 3.0
Note: To optimize performance of the product and your computer, defragmenting the
Hard Disk Drive (HDD) prior to installing honestech Fireman CD/DVD Burner
software is recommended. Also, if there is any security software on your PC that
may block or interfere with the installation or removal of the software, please disable
2.1. Installing honestech Fireman CD/DVD Burner 3.0
2.1.1. Insert the installation CD into your CD/DVD drive on your computer. The
installation should start automatically.
2.1.2. Click [Install] button to start installing honestech Fireman CD/DVD Burner 3.0.
2.1.3. Click [Next >] to start the installation.
it or turn it off prior to installing or uninstalling the software.
Note: If the installation does not start automatically, choose Run from the Windows Start
menu. Then enter “d:\autorun” (assuming the installation CD is in D drive) in the run
dialog box. You can also double-click on “Setup.exe” file on the installation CD to
being the installation.
Page 9

9. Fireman CD/DVD Burner 3.0
2.1.4. Read the License Agreement. Click [Next >] after accepting the License Agreement to
continue with the installation.
2.1.5. Click [Change… ] if you want to install the software in a different folder. Click [Next >]
to continue with the installation.
Warning: Please select a folder on your internal hard drive. It it strongly
recommended that you do NOT install the software on an external hard
drive or storage device.
Page 10
10. honestech
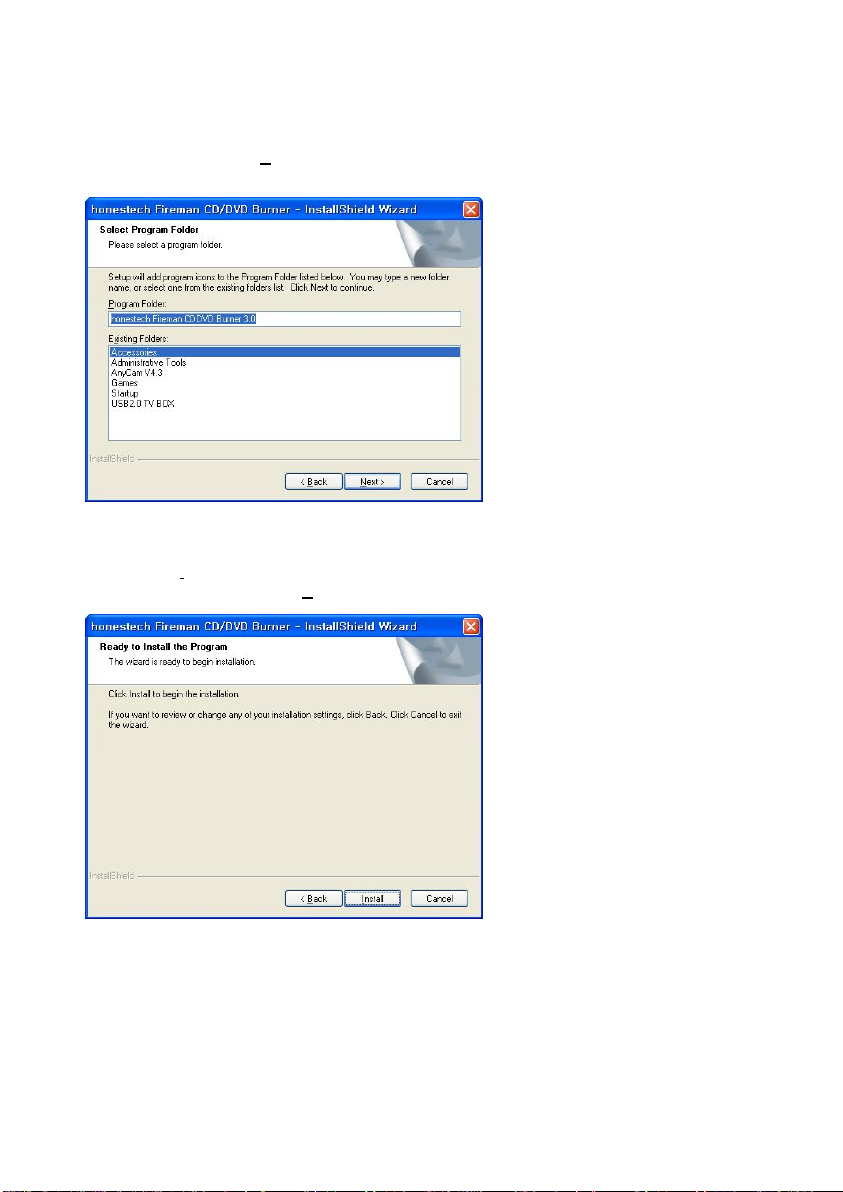
2.1.6. Accept the default program folder or create your own program folder by entering a new
folder name. Then click [Next >] to continue with the installation.
2.1.7. Click [Install] to start installing the software with the current setting. If you want to
change the setting, click on [< Back] to go back to the previous screen.
Page 11

2.1.8. The installation is in progress. Please wait for completion.
2.1.9. Click on [Finish] to complete the installation.
11. Fireman CD/DVD Burner 3.0
Page 12

12. honestech
2.2. Uninstalling honestech Fireman CD/DVD Burner 3.0
2.2.1. Uninstall honestech Fireman CD/DVD Burner 3.0 using its own uninstallation file or the
Add or Remove Programs in the Control Panel.
2.2.1.1. To uninstall using the uninstallation file: on the task bar, go to Start All Programs
honestech Fireman CD/DVD Burner 3.0 and click on Uninstall honestech Fireman
CD/DVD Burner.
2.2.1.2. To uninstall with Add or Remove P rograms: on the task bar, go to Start Control
Panel Add or Remove Programs. Select honestech Fireman CD/DVD Burner 3.0, and
click on Change/Remove button.
2.2.1.3. Click on [ Yes ] to confirm and uninstall the program.
Page 13

2.2.2. The uninstallation is in progress. Please wait for completion.
2.2.3. Click on [Finish] to complete and exit the uninstallation process.
13. Fireman CD/DVD Burner 3.0
Page 14

14. honestech
3. How to use honestech Fireman CD/DVD Burner 3.0
3.1. Main Page
Please select a type of disc that you want to create.
- Data Burning
Create data CD/DVD, audio & data CD, or bootable CD/DVD.
- Audio Buring
Create audio CD, MP3 CD/DVD, WMA CD/DVD, or audio & data CD and
import audio files from music CDs.
- Video Burning
Create video CD, super-video CD, DVD; and burn DVD-Video folder.
- Backup
Create backup files to restore data later from the backup files.
- Utilities
Erase CD/DVD, Disc Info, Make Label or Cover, Photo Viewer, Make Image,
Burn Image
- Help
About Fireman : Displays the product information
About honestech : Go to the the product website(internet access required).
Page 15

3.2. How to use honestech Fireman CD/DVD Burner 3.0
Main features
- : Help Menu
Help: View Help
Product registration
15. Fireman CD/DVD Burner 3.0
Registart your product online now: Click on [Register Online] to go to the
online product registration page. Register your product by entering your
product key and your email address to receive the product registration key
(on-screen and via email).
Page 16

16. honestech
Register your product via mail/fax: To register your product via mail or fax,
click on Product registration from buttons to download the product
registration form. You will receive your product registration key via email.
Register product registration key: Enter your product registration key to complete
the product registration process.
Online support: Go to support website.
Product upgrade: Check for any product upgrades available.
Check your computer spec: Check various specification of your computer.
About honestech Product…: Displays the general description of the product.
- : Minimize
- : Close Application
- : Move to next step
- : Move to previous step
- : Setting
- : Erase content on re-writable CD/DVD
- : Disc information
Page 17

17. Fireman CD/DVD Burner 3.0
3.2.1. How to configure the settings
Click on Setting to view the information on how to save the project.
- Open Setting: Select a folder on your hard drive where the temporary files will be saved.
- Save Project: Save your current work as a project file.
3.2.2. How to erase the content on re-writable CD/DVD
Erase content on the re-writable CD/DVD
- Quick Erase: Erases header information on the disc. (Quick method)
- Full Erase: Erases the content completely. (Long Format)
Page 18

18. honestech
3.2.3. How to view disc information
View detailed information on the disc.
- Disc Type: Displays the type of disc.
- Erasable: Displays whether the disc is erasable (re-writable) or not.
- Total Space: Total storage space on the disc.
- Free Space: Available free space.
- Sessions: Total number of sessions used on the disc.
Page 19
19. Fireman CD/DVD Burner 3.0
4. How to burn data files onto CD/DVD
With Data Burning, you can burn data onto CD/DVD, or create a CD with both audio and data
on it. Multi-session burning is allowed until the disc is finalized.
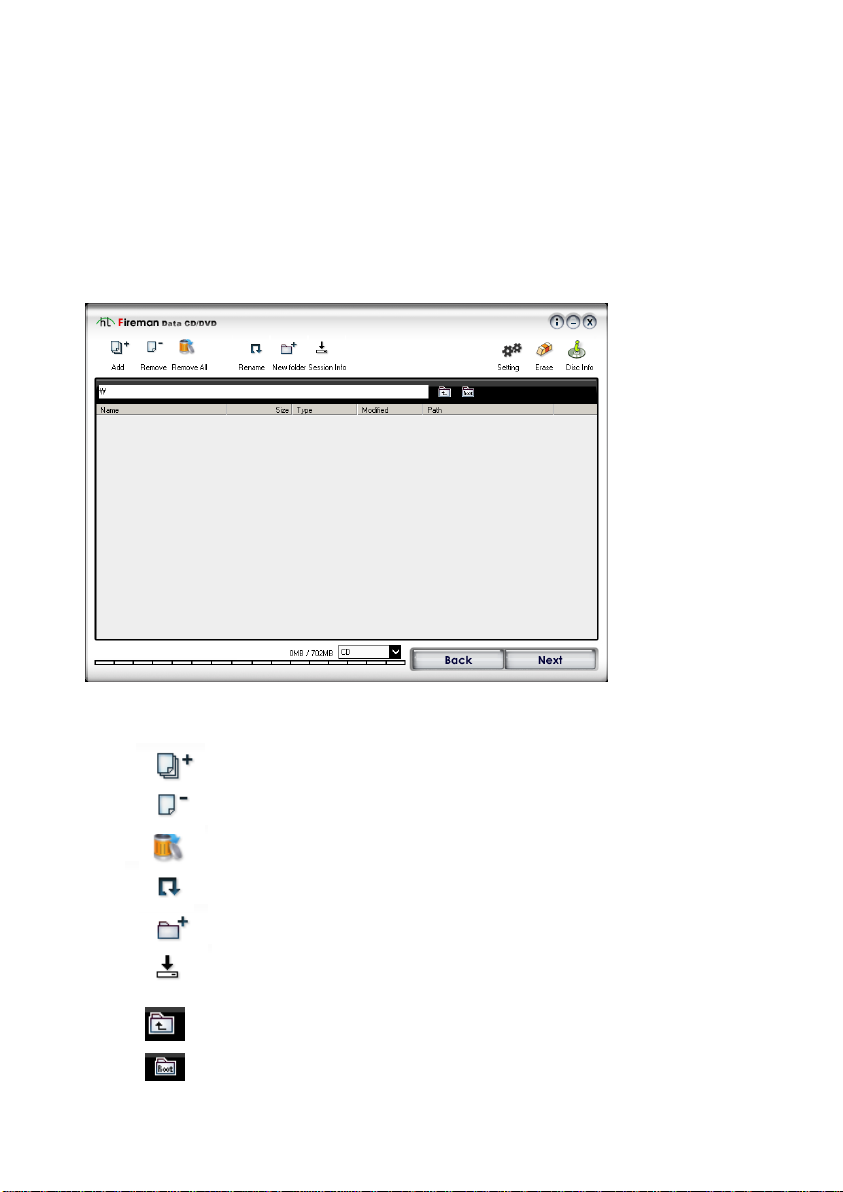
4.1. Creating Data CD/DVD
How to create a data CD/DVD
4.1.1. Main features
- : Add file/folder
- : Remove selected file/folder
- : Remove all files/folders
- : Rename
- : New folder
- : View previous sessions
- : Move to parent folder
- : Move to root folder
Page 20

20. honestech
4.1.2. How to add/modify files and folders
- View File/Folder: View files/folders that are added. File name, size, format, modified
time, and the path are displayed.
- Browse: Displays current location. Double-click on the folder of your choice and move
to that specific location.
- Add File
Drag-and-Drop: Easily add files to the list by drag-and-drop.
Add button: Click on [Add] button to open an Explorer to add files manually.
- Remove: Remove file(s) from the list. Click Yes to confirm and remove the file(s).
- Remove All: Remove all files in the list. Click Yes to confirm and remove the file(s).
- Rename: Rename a file/folder. If multiple files/folders are selected, the file/folder that
was selected last will be renamed.
- New Folder: Create a new folder.
- Session Info: View the files from the previous sessions (if available). Previous session
files are displayed in gray and cannot be modified.
- File Size: View the file(s)/folder(s) sizes that were added.
Page 21
21. Fireman CD/DVD Burner 3.0
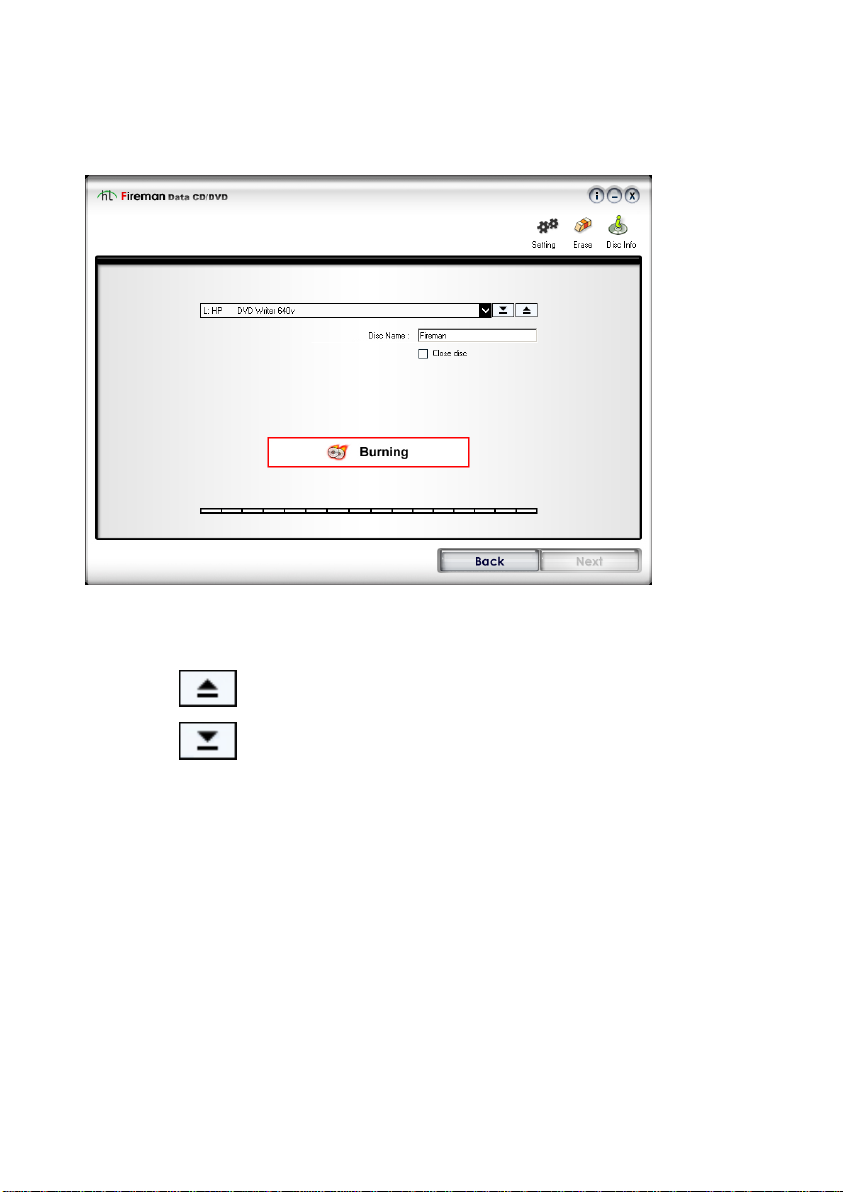
4.1.3. How to burn a data CD/DVD
- Select a writer: Select a CD/DVD writer from the list, and open/close the tray.
: Open tray.
: Close tray.
- Disc Name: Name your disc (16 characters max).
- Close Disc: Close/finalize disc to make disc readable by most players. Un-check this
box to add more files in the future (for multi-session).
- Burning: Start burning the data CD/DVD.
- Progress: View current progress on the burning progress bar.
Page 22

22. honestech
4.2. Creating Audio Data CD
How to create an audio & data CD.
4.2.1. Main features
- : Add file/folder
- : Remove selected file/folder
- : Remove all files/folders
Page 23

23. Fireman CD/DVD Burner 3.0
4.2.2. How to add audio files
- View audio files: View audio files that are added. File name, file size, and the path are
displayed.
- Add files: WAV and MP3 files can be added. Other file formats are NOT compatible.
Drag-and-Drop: Easily add files to the list by drag-and-drop.
Add button: Click on [Add] button to open an Explorer to add files manually.
- Remove: Remove audio file(s) from the list. Click Yes to confirm and remove the file(s).
- Remove All: Remove all audio files in the list. Click Yes to confirm and remove the
file(s).
- Track Up: Move the file up on the track list.
- Track Down: Move the file down on the track list.
Page 24

24. honestech
4.2.3. How to add/modify files and folders
- View File/Folder: View files/folders that are added. File name, size, format, modified
time, and the path are displayed.
- Add File
Drag-and-Drop: Easily add files to the list by drag-and-drop.
Add button: Click on [Add] button to open an Explorer to add files manually.
- Remove: Remove file(s) from the list. Click Yes to confirm and remove the file(s).
- Remove All: Remove all files in the list. Click Yes to confirm and remove the file(s).
- Rename: Rename a file/folder. If multiple files/folders are selected, the file/folder that
was selected last will be renamed.
- New Folder: Create a new folder.
- File Size: View the file(s)/folder(s) sizes that were added.
Page 25

25. Fireman CD/DVD Burner 3.0
4.2.4. How to burn an AudioData CD
- Select a writer: Select a CD/DVD writer from the list, and open/close the tray.
: Open tray.
: Close tray.
- Disc Name: Name your disc (16 characters max).
- Burning: Start burning the AudioData CD.
- Progress: View current progress on the burning progress bar.
Page 26

26. honestech
4.3. Creating Bootable CD/DVD
How to create a bootable CD/DVD
4.3.1. Main features
- : Add file/folder
- : Remove selected file/folder
- : Remove all files/folders
- : Rename
- : New folder
- : Move to parent folder
- : Move to root folder
Page 27

27. Fireman CD/DVD Burner 3.0
4.3.2. How to add/modify files and folders
- View File/Folder: View files/folders that are added. File name, size, format, modified
time, and the path are displayed.
- Add File
Drag-and-Drop: Easily add files to the list by drag-and-drop.
Add button: Click on [Add] button to open an Explorer to add files manually.
- Remove: Remove file(s) from the list. Click Yes to confirm and remove the file(s).
- Remove All: Remove all files in the list. Click Yes to confirm and remove the file(s).
- Rename: Rename a file/folder. If multiple files/folders are selected, the file/folder that
was selected last will be renamed.
- New Folder: Create a new folder.
- File Size: View the file(s)/folder(s) sizes that were added.
Page 28

28. honestech
4.3.3. How to add a bootable image
- Adding bootable image: Select a floppy disk drive where the bootable image already exists.
Only bootable floppy disk(s) can be used to create bootable image.
Page 29

29. Fireman CD/DVD Burner 3.0
4.3.4. How to burn a bootable CD/DVD
- Select a writer: Select a CD/DVD writer from the list, and open/close the tray.
: Open tray.
: Close tray.
- Disc Name: Name your disc (16 characters max).
- Close Disc: Close/finalize disc to make disc readable by most players. Un-check this
box to add more files in the future (for multi-session).
- Burning: Start burning the bootable CD/DVD.
- Progress: View current progress on the burning progress bar.
Page 30
30. honestech
5. How to burn audio files onto CD/DVD
In “Audio Burning”, you can create audio CDs, MP3 discs, or WMA discs. You can also create
audio & data discs.
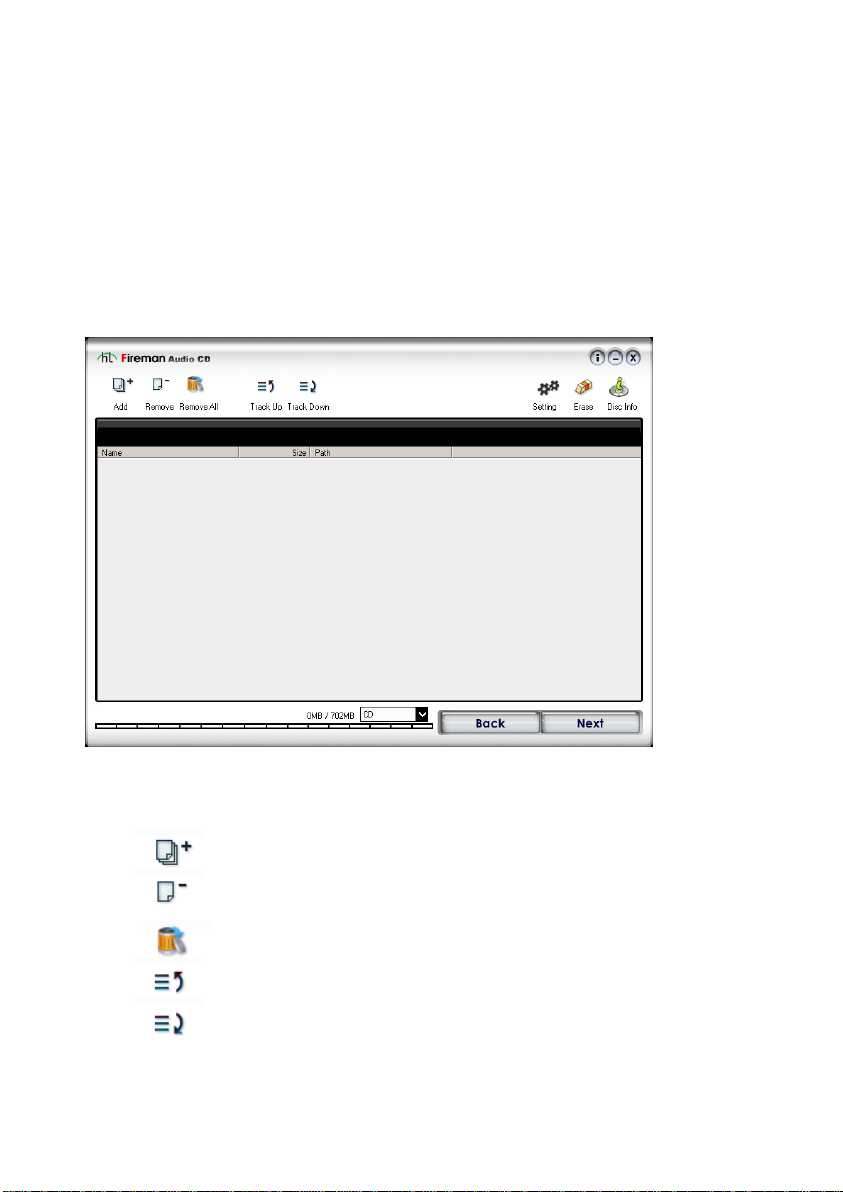
5.1. Creating Audio CD
How to create an Audio CD
5.1.1. Main features
- : Add file/folder
- : Remove selected file/folder
- : Remove all files/folders
- : Move up on the track list
- : Move down on the track list
Page 31

31. Fireman CD/DVD Burner 3.0
5.1.2. How to add/modify audio files
- View audio files: View audio files that are added. File name, file size, and the path are
displayed.
- Add files: WAV and MP3 files can be added. Other file formats are NOT compatible.
Drag-and-Drop: Easily add files to the list by drag-and-drop.
Add button: Click on [Add] button to open an Explorer to add files manually.
- Remove: Remove audio file(s) from the list. Click Yes to confirm and remove the file(s).
- Remove All: Remove all audio files in the list. Click Yes to confirm and remove the
file(s).
- Track Up: Move the file up on the track list.
- Track Down: Move the file down on the track list.
Page 32

32. honestech
5.1.3. How to burn an Audio CD
- Select a writer: Select a CD/DVD writer from the list, and open/close the tray.
: Open tray.
: Close tray.
- Disc Name: Name your disc (16 characters max).
- Burning: Start burning the Audio CD.
- Progress: View current progress on the burning progress bar.
Page 33

5.2. Creating MP3 CD/DVD
How to create an MP3 CD/DVD
33. Fireman CD/DVD Burner 3.0
5.2.1. Main features
- : Add file/folder
- : Remove selected file/folder
- : Remove all files/folders
- : Rename
- : New folder
- : View previous sessions
- : Move to parent folder
- : Move to root folder
Page 34

34. honestech
5.2.2. How to add/modify MP3 files and folders
- View File/Folder: View files/folders that are added. File name, size, format, modified
time, and the path are displayed.
- Add File: Add MP3 files. Other file formats are NOT compatible.
Drag-and-Drop: Easily add files to the list by drag-and-drop.
Add button: Click on [Add] button to open an Explorer to add files manually.
- Remove: Remove file(s) from the list. Click Yes to confirm and remove the file(s).
- Remove All: Remove all files in the list. Click Yes to confirm and remove the file(s).
- Rename: Rename a file/folder. If multiple files/folders are selected, the file/folder that
was selected last will be renamed.
- New Folder: Create a new folder.
- Session Info: View the files from the previous sessions (if available). Previous session
files are displayed in gray and cannot be modified.
- File Size: View the file(s)/folder(s) sizes that were added.
Page 35

35. Fireman CD/DVD Burner 3.0
5.2.3. How to burn an MP3 CD/DVD
- Select a writer: Select a CD/DVD writer from the list, and open/close the tray.
: Open tray.
: Close tray.
- Disc Name: Name your disc (16 characters max).
- Close Disc: Close/finalize disc to make disc readable by most players. Un-check this
box to add more files in the future (for multi-session).
- Burning: Start burning the MP3 CD/DVD.
- Progress: View current progress on the burning progress bar.
Page 36

36. honestech
5.3. Creating WMA CD/DVD
How to create a WMA CD/DVD
5.3.1. Main features
- : Add file/folder
- : Remove selected file/folder
- : Remove all files/folders
- : Rename
- : New folder
- : View previous sessions
- : Move to parent folder
- : Move to root folder
Page 37

37. Fireman CD/DVD Burner 3.0
5.3.2. How to add/modify WMA files
- View File/Folder: View files/folders that are added. File name, size, format, modified
time, and the path are displayed.
- Add File: Add WMA files. Other file formats are NOT compatible.
Drag-and-Drop: Easily add files to the list by drag-and-drop.
Add button: Click on [Add] button to open an Explorer to add files manually.
- Remove: Remove file(s) from the list. Click Yes to confirm and remove the file(s).
- Remove All: Remove all files in the list. Click Yes to confirm and remove the file(s).
- Rename: Rename a file/folder. If multiple files/folders are selected, the file/folder that
was selected last will be renamed.
- New Folder: Create a new folder.
- Session Info: View the files from the previous sessions (if available). Previous session
files are displayed in gray and cannot be modified.
- File Size: View the file(s)/folder(s) sizes that were added.
Page 38

38. honestech
5.3.3. How to burn a WMA CD/DVD
- Select a writer: Select a CD/DVD writer from the list, and open/close the tray.
: Open tray.
: Close tray.
- Disc Name: Name your disc (16 characters max).
- Close Disc: Close/finalize disc to make disc readable by most players. Un-check this
box to add more files in the future (for multi-session).
- Burning: Start burning the WMA CD/DVD.
- Progress: View current progress on the burning progress bar.
Page 39

39. Fireman CD/DVD Burner 3.0
5.4. Importing Audio from CD
Import audio tracks from your audio CD and create audio files.
- Select Drive: Select the optical drive that contains your audio CD.
- CD Track Display: Lists the track information on the audio CD.
Select all tracks: Press and hold [Ctrl] key, and then use your mouse to click the
tracks.
Track information: View information on the audio tracks. To listen to the audio
files, the CD/DVD drive’s audio-out cable must be connected to the sound card
on your computer.
- Ouput Folder: Select folder whether the audio files will be saved.
- File Name Structure: Select file-naming format.
- Import Tracks: Click on [Tracks to Audio File] button to import audio tracks into audio
file formats.
Page 40

40. honestech
5.5. Creating Audio & Data CD
How to create an audio & data CD
5.5.1. Main features
- : Add file/folder
- : Remove selected file/folder
- : Remove selected file/folder
Page 41

41. Fireman CD/DVD Burner 3.0
5.5.2. How to add audio files
- View audio files: View audio files that are added. File name, file size, and the path are
displayed.
- Add files: WAV and MP3 files can be added. Other file formats are NOT compatible.
Drag-and-Drop: Easily add files to the list by drag-and-drop.
Add button: Click on [Add] button to open an Explorer to add files manually.
- Remove: Remove audio file(s) from the list. Click Yes to confirm and remove the file(s).
- Remove All: Remove all audio files in the list. Click Yes to confirm and remove the
file(s).
- Track Up: Move the file up on the track list.
- Track Down: Move the file down on the track list.
Page 42

42. honestech
5.5.3. How to add/modify files and folders
- View File/Folder: View files/folders that are added. File name, size, format, modified
time, and the path are displayed.
- Add File
Drag-and-Drop: Easily add files to the list by drag-and-drop.
Add button: Click on [Add] button to open an Explorer to add files manually.
- Remove: Remove file(s) from the list. Click Yes to confirm and remove the file(s).
- Remove All: Remove all files in the list. Click Yes to confirm and remove the file(s).
- Rename: Rename a file/folder. If multiple files/folders are selected, the file/folder that
was selected last will be renamed.
- New Folder: Create a new folder.
- File Size: View the file(s)/folder(s) sizes that were added.
Page 43

43. Fireman CD/DVD Burner 3.0
5.5.4. How to burn an Audio & Data CD
- Select a writer: Select a CD/DVD writer from the list, and open/close the tray.
: Open tray.
: Close tray.
- Disc Name: Name your disc (16 characters max).
- Burning: Start burning the audio & data CD
- Progress: View current progress on the burning progress bar.
Page 44

44. honestech
6. How to burn Video on CD/DVD
You can create Video CD, Super Video CD, Video DVD, or Mini-DVD.
- Please refer to the section 9 for the detailed information on how to create Video CD,
Super-Video CD, and Video DVD
6.1. How to create DVDs from DVD video folder
- Select VIDEO_TS Folder: Browse and select a DVD video folder (When video files are
encoded to DVD format, the resulting folder is named “VIDEO_TS”. You can NOT
proceed if you have MPEG files that have not been encoded to DVD format).
- Select Temporary folder: Select a temporary folder to create Video DVD image file.
- Select a writer: Select a CD/DVD writer from the list, and open/close the tray.
-
: Open tray.
: Close tray.
- Disc Name: Name your disc (16 characters max).
- Burning: Start burning the video DVD.
- Progress: View current progress on the burning progress bar.
Page 45

45. Fireman CD/DVD Burner 3.0
7. How to make a duplicate copy and create a backup file
You can create backup files on your hard drives or onto CD/DVD. You can use these files
later to restore lost data.
7.1. How to backup your data
7.1.1. Select backup type: Choose whether to create a new backup file or modify existing
backup files.
Page 46

46. honestech
7.1.2. Select folder(s) that you want to backup.
7.1.3. Select target drive: Choose target (backup) drive and type of backup.
Page 47

47. Fireman CD/DVD Burner 3.0
7.1.4. Backup file name: Select the backup folder location and name the backup file.
7.1.5. Start the backup: Displays the backup information. Click on Start to begin backup.
Page 48

48. honestech
7.2. How to restore from backup files
7.2.1. Restore: Select backup file to use and its destination folder.
- Source path: Use backup files in this folder.
- Target path: The restored files will be placed in this folder.
7.2.2. Select destination folder: Select a folder to be restored from the backup file.
Page 49

49. Fireman CD/DVD Burner 3.0
7.2.3. Overwrite Rule: If a backup file with same file name already exists, you can select
backup condition.
- Never Overwrite: Existing files will NOT be overwritten.
- Compare by Dates: Keeps the files with the newest changes/files (Older files will be
replaced with newer ones).
- Always Overwrite: Existing files will be overwritten with backup files.
- Delete destination folder before restoring backup files: Deletes destination folder before
restoring backup files.
Page 50

50. honestech
7.2.4. Start restoring backup file: Displays the information on the backup file to be restored.
Click on Start to begin.
Page 51

8. How to use the various utility tools
Available Features :
- Erase CD/DVD
- Disc Information
- LabelMaker
- PhotoViewer
- Creating Image File
- Burning Image Files
8.1. Erase CD/DVD
How to erase the content on a re-writable CD/DVD
51. Fireman CD/DVD Burner 3.0
Erase content on the re-writable CD/DVD
- Quick Erase: Erases header information on the disc. (Quick method)
- Full Erase: Erases the content completely. (Long Format)
Page 52

52. honestech
8.2. View Disc Information
How to view disc information
View detailed information on the disc (currently in the CD/DVD writer).
- Disc Type: Displays the type of disc.
- Erasable: Displays whether the disc is erasable (re-writable) or not.
- Total Space: Displays total storage space on the disc.
- Free Space: Displays the available free space on the disc.
- Sessions: Displays the total number of sessions used on the disc.
8.3. Disc Label Maker
- See Chapter 11 (page 95) for details on Disc Label Maker
Page 53

8.4. Photo Viewer
How to use Photo Viewer and Slide Show
53. Fireman CD/DVD Burner 3.0
8.4.1. Photo Viewer
- : Select image to preview. Other images in same folder will also be viewable.
- : Previous image
- : Next image
- : Start Slide Show
- : Zoom out
- : Original size
- : Zoom in
Page 54

54. honestech
- : Mirror image
- : Upside-down image
- : Turn 90° (counter-clockwise)
- : Turn 90° (clockwise)
8.4.2. Slide Show
- :Start Slide Show
- : Pause
- : Previous image
- : Next image
- : Close Slide Show (return to Photo Viewer)
Page 55

8.5. Creating Image File
How to create image file
55. Fireman CD/DVD Burner 3.0
8.5.1. Main features
- : Add file/folder
- : Remove selected file/folder
- : Remove all files/folders
- : Rename
- : New folder
- : Move to parent folder
- : Move to root folder
Page 56

56. honestech
8.5.2. How to add/modify files and folders
- View File/Folder: View files/folders that are added. File name, size, format, modified
time, and the path are displayed.
- Add File
Drag-and-Drop: Easily add files to the list by drag-and-drop.
Add button: Click on [Add] button to open an Explorer to add files manually.
- Remove: Remove file(s) from the list. Click Yes to confirm and remove the file(s).
- Remove All: Remove all files in the list. Click Yes to confirm and remove the file(s).
- Rename: Rename a file/folder. If multiple files/folders are selected, the file/folder that
was selected last will be renamed.
- New Folder: Create a new folder.
- File Size: View the file(s)/folder(s) sizes that were added.
Page 57

57. Fireman CD/DVD Burner 3.0
8.5.3. How to create an image file
- Destination Folder: Select a folder where the image file will be saved. (Make sure that
there is enough hard drive space available in selected folder destination)
- Disc Name: Name your disc (16 characters max).
- Burning: Start creating the image file.
- Progress: View current progress on the burning progress bar.
Page 58

58. honestech
8.6. Burning Image File
How to burn image files
- Select Image File: Browse and select the source image file.
- Select a writer: Select a CD/DVD writer from the list, and open/close the tray.
: Open tray.
: Close tray.
- Disc Name: Name your disc (16 characters max).
- Burning: Start burning the image file onto CD/DVD.
- Progress: View current progress on the burning progress bar.
Page 59

59. Fireman CD/DVD Burner 3.0
9. How to use honestech DVD Authoring Studio
9.1. Introduction
You can use honestech DVD Authoring Studio to create DVD movies from various video files
on your computer system. You can also capture video from TV, VCR, or camcorder if you have
a video capture card/device installed on your computer. With the ultra-long DVD technology,
you can archive up to 16 hours of video on a DVD (up to 27 hours on dual-layer DVD).
honestech DVD Authoring Studio provides easy DVD authoring with a user-friendly interface.
9.2. Main features
Page 60

60. honestech
- 5-step process: 1) Adding Title, 2) Edit, 3) Create Menu, 4) Preview, and 5) Burn Disc.
: Move to next step
: Move to previous step
Refer to the help files in each step for additional instructions.
- Button
: Minimize window.
: Maximize window.
: Close
- Video Player
: Play (You can also double-click on the title to start playing the video)
: Pause
: Stop
: Move to beginning
: Previous Frame
: Next Frame
: Move to the end
: Video quality
: Change the screen size of video player
- : Video Encoding option
Page 61

61. Fireman CD/DVD Burner 3.0
When you click on the button, the following dialogue box will appear.
Media size: Displays available space on the blank CD/DVD.
Change bitrates of
All video formats excluding Ultra-Long DVD format
All video formats including Ultra-Long DVD format
Video bitrate: video bitrate will be adjusted automatically to fit the blank CD/DVD.
You can also manually change the bitrate.
Graphic aspect ratio : video screen ratio
Graphic resolutions : video resolution
Graphics stretch mode of video titles : gives you option to change the video
screen ratio
Graphics stretch mode of photo : gives you option to change the photo ratio
Sound format : select format of audio
Sound bitrate : select bitrate of audio
Page 62

62. honestech
9.3. Adding a Title
- Add a title
: Add a title by importing a video file on your hard drive.
: Add a title by importing photos from your hard drive.
: Add a title from a capture device (e.g. VCR, camcorder, and more).
TV or USB capture device
Camcorder
- Edit a title
: Edit out unwanted scenes
: Merge selected titles
: Split a title
: Remove title from the list
: Video information
: Configure photo title
Page 63

9.3.1. Add/modify a Photo title
63. Fireman CD/DVD Burner 3.0
- Click on to add photo(s) to
the list.
- Click on to assign photo
delay interval.
Photo delay interval: After this delay, the next photo will be displayed.
Apply to selected files: Apply the setting to the selected files only.
Apply to all files: Apply the setting to all files.
- You can use up 100 photos to each title.
Page 64

64. honestech
9.3.2. Video Capturing – TV
- : Select a video capture device.
- Setting
Profile: select the type of your video
Quality: select video quality (bitrate).
NTSC/PAL: select your video broadcasting standard (NTSC or PAL).
Split size: specify the split size for your media.
Temp Folder: select a temporary folder where the capture videos will be stored.
Maximum recording time: displays the maximum length of video that can be
captured (based on the available space of your hard drive).
- Timer Setting
Auto Timer: When selected, the video will be captured for the duration you select
(HH:MM:SS).
- Click on to start capturing.
- Click on to stop.
Page 65

9.3.3. Video Capturing – Camcorder
- Video Capturing
65. Fireman CD/DVD Burner 3.0
: Play
: Stop
: Pause
: Rewind
: Previous Frame
: Next Frame
: Fast Forward
Video Length: displays the length of the video being captured.
- Capture Setting
Profile: select the type of video being captured.
Quality: select video quality (bitrate).
Page 66

66. honestech
NTSC/PAL: select your video broadcast standard (NTSC or PAL).
Split size: specify the split size for your media.
Temp folder: select a temporary folder where the captured videos will be stored.
Maximum recording time: displays the maximum length of video that can be
captured (based on the available space of your hard drive).
- Timer setting
Auto timer: when selected, the video will be captured for the duration you select
(HH:MM:SS).]
- Click on to start capturing.
- Click on to stop.
Page 67

67. Fireman CD/DVD Burner 3.0
9.3.4. Edit
- Position the scroll bar to the beginning of the segment that you want to keep.
- Click on to mark the Start Edit Point.
- Position the scroll bar to the ending of the segment that you want to keep.
- Click on to mark the End Edit Point.
- Click on to apply the change.
Page 68

68. honestech
9.4. Editing a Title
Title Edit buttons:
- : Add Transiton Effects
- : Add Special Effects
- : Add Trim Effect
- : Add Text
- : Add Audio/Music
- : Add Chapter Points
Page 69

69. Fireman CD/DVD Burner 3.0
9.4.1. Transition Effects
- Position the scroll bar to the beginning of the segment where you want to apply the
trasition effect.
- Click on to mark the Start Edit Point.
- Position the scroll bar to the ending of the segment where you want to apply the
transition effect.
- Click on to mark the End Edit Point.
- Select a transitional effect from the list of available trasition effects.
- Click on to apply the change.
Page 70

70. honestech
9.4.2. Special Effects
- Position the scroll bar to the beginning of the segment that you want to apply the
special effect.
- Click on to mark the Start Edit Point.
- Position the scroll bar to the ending of the segment that you want to apply the special
effect.
- Click on to mark the End Edit Point.
- Select a special effect from the list of available special effects.
- Click on to apply the change.
Page 71

71. Fireman CD/DVD Burner 3.0
9.4.3. Video Cropping
- Position the scroll bar to the beginning of the segment that you want to apply the effect.
- Click on to mark the Start Edit Point.
- Position the scroll bar to the ending of the segment where you want to apply the effect.
- Click on to mark the End Edit Point.
- Use the slide bar to select the video cropping area.
- Click on to apply the change.
Page 72

72. honestech
9.4.4. Inserting Text
- Position the scroll bar to the beginning of the segment where you want to apply the text
effect.
- Click on to mark the Start Edit Point.
- Position the scroll bar to the ending of the segment where you want to apply the text
effect.
- Click on to mark the End Edit Point.
- Enter the text (which will be displayed in the video) in the text input box
- Drag the text to an area on the screen where you want it to be displayed.
- Click on to apply the change.
Page 73

73. Fireman CD/DVD Burner 3.0
9.4.5. Audio
- Position the scroll bar to the point where you want to begin the audio file.
- Click on to mark the Start Edit Point.
- Position the scroll bar to the point where you want to stop the audio file.
- Click on to mark the End Edit Point.
- Click on to select a background audio file.
- Click on to make changes.
Page 74

74. honestech
9.4.6. Chapter
- Position the scroll bar to the chapter point.
- Click on to create a chapter point
-
- Click on to create chapters automatically using the chapter interval
setting below.
Chapter interval setting: create new chapter after each specified time interval.
- You can create up to 100 chapter points for each title.
Page 75

9.5. Creating Menu Page
- Create menu screen or chapter menu.
75. Fireman CD/DVD Burner 3.0
Create Menu: Check this option to add a menu screen to your DVD.
Create Chapter Menu: Check this option to create chapter menu page.
- Menu Themes
: Lists available themes.
: Lists the video clips.
: Lists frames available.
Page 76

76. honestech
- Menu Screen Button
: Change the background image
Apply to the current page only: the background image change will be
applied to the current page only.
Apply to all pages in the current menu: the background image change will
be applied to all pages in the menu.
Apply to all menus: the background image will be applied to all pages in all
menus.
: Change the background music.
Apply to the current page only: the background music change will be
applied to the current page only.
Apply to all pages in the current menu: the background music change will
be applied to all pages in the menu.
Apply to all menus: the background music will be applied to all pages in all
menus.
: Menu Screen setting
Page 77

77. Fireman CD/DVD Burner 3.0
Show menu title
Show thumbnail number
Show thumbnail text
Show thumbnail frame
Show page number
Motion menu and duration time
Select the color of button
: Move to previous page.
: Move to next page.
Page 78

78. honestech
9.6. Preview
- Buttons
: Play
: Pause
: Stop (return to main menu screen)
: Previous chapter
: Next chapter
: Back to main menu screen
: Back to chapter menu
Page 79

79. Fireman CD/DVD Burner 3.0
Notice: Some home DVD players may not allow you to access Chapter Menu from the
main menu screen. You may have to access "Chapter Menu" after you start playing the
title.
9.7. Burn Disc
- Options
Disc name: Name your disc
Drive: Select your DVD writer
No. of copies: Number of DVD copies that you want to make
- Create MPEG: Save the video in MPEG format. Select a destination folder where the
MPEG file will be stored.
- Create DVD folder: Create DVD folder (VIDEO_TS folder). Select a destination folder
where the DVD folder will be saved.
- Create disc image file: Create a disc image file. Select a destination folder where the
image file will be stored.
- Temp folder: Temporary files are stored in this folder.
- : Start the process (disc burning or create image file or
creating DVD folder).
Page 80

80. honestech
10. honestech Label Maker
10.1. Introduction
Label Maker allows you to create labels for CD/DVD, case cover, and case inlay. There are two
different modes for Label Maker, Wizard Mode and Creating Mode. In Wizard Mode, you can
use Label Maker files to create labels easily. After adding text and images, you are able to
preview the labels before printing. If you do not find a design that you like using Wizard Mode,
you can always create your own design in the Creating Mode using the various tools available.
10.2. Main features
- Use existing Label Maker files to create labels easily.
- Create and save your Label Maker file for later use.
- Enter text (and circular text)
- Insert images
- Draw various shapes
- Zoom-in/zoom-out
- Add up to 3 different types and up to 8 labels on each Label Maker file.
- Create high quality CD/DVD label using LightScribe.
10.3. How to use Wizard mode
Easily create labels by using the files in the data/audio folder. You can also create your own
designs in the Creating Mode.
Page 81

81. Fireman CD/DVD Burner 3.0
10.3.1. Select a Label File
Select a label file for editing or printing
- : Select a folder
Select Data or Audio folder.
When you select a folder, available label files will be listed.
Select a label file to preview the label.
Select a file and click [Next] to edit the file.
If you do not find a label that you like, clicking on the Create button
( ) to enter the Creating Mode to design a label manually.
- : View label
View available label designs. You can add up to 3 different types (cover, inlay,
and disc) and 8 labels on each file.
Cover : front side of the CD jewel case
Inlay : back side of the CD jewel case
Disc : CD/DVD label
Page 82

82. honestech
- : Creating mode
Users can move to a labeling mode using a drawing tool.
- : Move to previous screen
Exit Label Maker and go back to the main screen
- : Move to next screen
Go to the next step (Edit Label)
- : Help Menu
- Help: View Help
- Online support: Go to support website.
- Check your computer spec: Check various specification of your computer.
- About honestech Product....: Displays the general description of the product.
- : Minimize
Minimize the screen.
- : Exit
Close and exit Label Maker, and go to the main screen.
Page 83

83. Fireman CD/DVD Burner 3.0
10.3.2. Edit Label
Make changes to the label file.
- : Display the disc label.
Select a label that you want to modify.
- Edit Text
Click on the text that you want to edit; you will see the text input box.
Enter your text and press the [Enter] key on your keyboard.
Move the text to different location by using the arrow keys on your keyboard.
- : Move to previous screen
Move back to the previous step (Label Selection).
- : Move to next screen
Move to the next step (Print Label).
- : Minimize
Minimize the screen.
- : Exit
Close and exit Label Maker, and go to the main screen.
Page 84

84. honestech
10.3.3. Print Label
Print selected labels.
- : Display the disc label.
Select a label that you want to print.
- Document : Adjust the margins (unit: 0.1mm)
: Width of the document.
: Height of the document.
: Adjust the margin on the left side of the
document.
: Adjust the margin on the right side of the
document.
: Setting the margin options.
Page 85

85. Fireman CD/DVD Burner 3.0
Auto Margin: detects your printer’s margin setting automatically.
You can also set the margin setting manually.
- Label Properties: Adjust label setting and its properties.
: Width of the label.
: Height of the label.
: Adjust the space between top and bottom labels.
: Adjust the space between the left and right labels.
: Number of labels to be printed on each document.
Maximum number will depend on the margin and space setting between each label.
: Print the label border (if checked).
When printing the label, the actual size of the border will be slightly bigger than how it
appears in the preview screen.
- : Move to previous screen
Move back to the previous step (Edit Label).
- : Print the label.
- : Minimize
Minimize the screen.
- : Exit
Close and exit Label Maker, and go to the main screen.
Page 86

86. honestech
10.4. How to use Creating Mode
How to design a disc label.
- Menu: Explains how to use the tool bar.
- Setting: Change default settings of documents and labels.
- Basic Features: Explains how to use the basic features of the tool bar to design and
create labels.
- Mouse Cursor: Display current location of mouse cursor.
- LightScribe: Create custom laser-etched CD/DVD labels with your own photos, artwork,
and text.
Page 87

87. Fireman CD/DVD Burner 3.0
10.4.1. Menu
Label Maker has 6 menus. You can access these menus by using your mouse, Hot-keys, or
the F10 key.
10.4.1.1. File Menu
Create, open, save, or print documents.
- New: Create a new Label Maker file. (Hot-key : Ctrl+N; Tool bar: )
- Open…: Open existing Label Maker files. (Hot-key : Ctrl+O; Tool bar : )
- Save: Save current Label Maker file. (Hot-key : Ctrl+S; Tool bar : )
- Save As…: Save current Label Maker file using a different file name. (Tool
bar : )
- Save in the folder : Save the created label in the data or audio folder shown in wizard
mode.
- Print: Print Label Maker file. (Hot-key : Ctrl+P; Tool bar : )
- LightScribe: Create laser-etched CD/DVD labels.
Both CD/DVD writer and blank disc must support Lightscribe.
- View Recent Documents: Easily access your recently opened files.
- Exit: Exit Label Maker.
Page 88

88. honestech
10.4.1.2. Edit Menu
Provides various editing features.
- Undo: Cancel the last change and return to previous phase. (Hot-key : Ctrl+Z; Tool
bar : )
- Redo: Redo the task that you just cancelled. (Hot-key : Ctrl+Y; Tool bar : )
- Copy: Copies an object. (Hot-key : Ctrl+C; Tool bar : )
- Cut: Cut an object. (Hot-key : Ctrl+X; Tool bar : )
- Paste: Paste the object that was last cut or copied. (Hot-key : Ctrl+V; Tool bar : )
- Delete: Delete an Object. (Hot-key : [Del] )
Page 89

89. Fireman CD/DVD Burner 3.0
10.4.1.3. Document Menu
Change default settings for documents and label.
- Setting: Change default settings for documents and label. (Hot-key : Alt+D)
- Change the size and margin of the document.
- Label is the unit that will be placed within the document. When printing, the number of
labels will be automatically caculated based on the size of document and label.
- You can adjust the size of label, spacing between each label, color, and inlay (for the
CD jewel case).
Page 90

90. honestech
10.4.1.4. Object Menu
Select design tools and organize various objects.
- Select: Select an object to be edited. (Hot-key : Alt+S; Tool bar : )
- Text: Enter text at 0, 90, 180, 270° angles. (Hot-key : Alt+T; Tool bar : )
- Circular Text: Create text in circular shape. (Hot-key : Alt+C; Tool bar : )
- Image: Enter an image. (Hot-key : Alt+I; Tool bar : )
- Line: Draw lines. (Hot-key : Alt+L; Tool bar : )
- Rectangle: Draw rectangles. (Hot-key : Alt+B; Tool bar : )
- Ellipse: Draw circles or ellipses. (Hot-key : Alt+E; Tool bar : )
- MoveFirst: Move the object layer to the top layer. (Hot-key : Ctrl+F; Tool bar : )
- MoveLast: Move the object layer to the bottom layer. (Hot-key : Ctrl+L; Tool
bar : )
- MovePrev: Move the object layer to the next higher layer. (Tool bar : )
- MoveNext: Move the object layer to the next lower layer. (Tool bar : )
Page 91

10.4.1.5. View Menu
Control zoom, toolbar, status bar setting.
- Original Size: Displays the image in original size. (Tool bar : )
- Zoom Out: Displays the image in smaller size. (Tool bar : )
- Zoom In: Displays the image in larger size. (Tool bar : )
- Toolbar: Displays the toolbar on the screen.
- Status Bar: Displays the status on the screen.
91. Fireman CD/DVD Burner 3.0
10.4.1.6. Help Menu
View help files.
10.4.2. Edit Setting
Configure settings for documents and labels.
In the Creating Mode you will see the Label design. The document may contain more than one
label. You can adjust the size and margins for documents, and adjust size, spacing, and inlay
for labels. You can use the Hot-key (Alt+D) or go to Document → Setting menu.
- Add/Delete labels
You can add up to 3 different types and 8 labels on each file.
Page 92

92. honestech
: Add label: Add labels including cover, inlay, and disc label.
: Delete label: Delete current label.
10.4.3. Edit Tools
How to use the tools to create labels.
10.4.3.1. Print Text
Print text (and circular text) at 0, 90, 180, or 270° angle.
- Select a text tool, draw a text box (using mouse drag-and-drop), and enter text.
- Double-click on the text to modify.
- Move the text or change the size of text/object using your mouse.
- : Print Text. Use Hot-key (Alt+T) or go to Object→Text menu.
Properties window
Font Color: Select the font color.
Font Style: Select the font style.
B: Bold face
I: Italic face
Angle: Text display angle (0, 90, 180, or 270° angle).
- : Print Circular Text. Use Hot-key (Alt+C) or go to Object → Circular Text
menu. You can change the angles of the object by moving the rectangles on each end
of object. (Hold Ctrl-key to apply changes faster – 2X.)
Page 93

93. Fireman CD/DVD Burner 3.0
Properties window
Font Color: Select the font color.
Font Style : Select the font style.
B: Bold face
I: Italic face
Ratio: Text size (height) vs. radius of the circle (select between 1/10 ~ 9/10).
10.4.3.2. Insert Image
Using this feature you can insert images.
- : Use the Hot-key (Alt+I) or go to Object → Image menu.
- Select an image and drag-and-drop it to the design screen.
- Double-click on the image to change the image.
- Drag the image to change the location of the image on the screen. You can also
change the size of the image by resizing the rectangle using your mouse.
- Select the image to change the image properties.
- Properties window
Change Label Size: adjust the size of the image to fit the label.
Page 94

94. honestech
10.4.3.3. Draw
Draw various objects including lines, boxes, and circles.
- Select a type of object and select an area on the design screen where you want to draw
the shape.
- Drag the image using your mouse to change the location of the image on the screen.
- Change the image property after selecting an image.
- : Draw line. Use Hot-key (Alt+L) or go to Object → Line menu.
Properties window
Line Color: Select color of the line.
Thickness: Select thickness of the line.
- : Draw box. Use Hot-key (Alt+B) or go to Object→Rectangle menu.
Properties window
Line Color: Select color of the line.
Thickness: Select thickness of the line.
Fill Color: Select background color.
Transparent: Make the background transparent.
Page 95

95. Fireman CD/DVD Burner 3.0
- : Draw circle. Use Hot-key (Alt+E) or go to Object → Ellipse menu.
Properties window
Line color: Select color of the line.
Thickness: Select thickness of the line.
Fill Color: Select background color.
Transparent: Make the background transparent.
10.4.3.4. Label Making
Labels can be printed on labeling paper or to the CD/DVD surface directly (using LightScribe
compatible media and writer).
: Print label on paper. Use Hot-key (Ctrl+P) or go to File → Print menu. Also
refer to Lable Maker Wizard for additional instruction.
- Create high quality CD/DVD label using LightScribe go to File → LightScribe menu.
Both media and writer must support LightScribe.
10.4.4. LightScribe
LightScribe technology uses laser etching on the label-side surface of CD/DVD. You no longer
have to print papers or hand-write on the CD/DVD for labeling. Adhesive paper labels or
permanent markers can damage the CD/DVD over extended period of time. * Your CD/DVD
writer and blank media must support LightScribe to use this feature.
Page 96

96. honestech
When using LightScribe, you must insert the CD/DVD with the label side down.
Steps:
- On the menu , click on button to create a
label for a disc.
- Use the design tool to create the content to be on the label.
- Click on File → LightScribe
- Select your CD/DVD writer and the quality setting.
- Click on [Print] to begin.
Page 97

97. Fireman CD/DVD Burner 3.0
11. Lightscribe
11.1. Introduction
Lightscribe allows you to personalize your Lishgtscribe-compatible CD/DVD disc with laser
etching (requires Lightscribe supported CD/DVD writer).
11.2. How to use
- To use the Lightscribe feature, click on the Create button ( )
to enter the LabelMaker Editor
Page 98

98. honestech
1. Select the Disc button ( ).
2. Use the drawing tools to add tezt and images to the disc.
A. Use the frame button ( ) to draw a square over the disc and
import an image.
3. Select Lightscribe from the File menu to etch your desing onto your disc.
Page 99

99. Fireman CD/DVD Burner 3.0
honestech Products
Page 100

100. honestech
honestech
VHS to DVD 3.0
honestech VHS to DVD 3.0 is a revolutionary
software that allows the easy and simple
production of DVD/CD movies. Now you can save
and keep your priceless home videos forever in
sharp and crystal clear DVD/CD.
Videotapes can deteriorate over time. Deteriorated
videos will have color bleed, white specks, and
other distortions. Don’t risk this happening to
YOUR home video collection!
Archive your home video collection with its
irreplaceable memories onto lasting DVD/CD with
honestech VHS to DVD 3.0.
Features
1. Adjustable Recording Time
Recording will be made for the duration of time
you set. With one click, you can capture and
burn it onto a media of your choice.
2. Various Effects and Menu Creation
Offers many different transition effects and
filters, and lets you create your own menus.
3. Convenient File Management
Movie clips are managed in a File Pool for ease
of viewing, editing, and deleting.
4. Supports Most Burning Devices
Supports CD-R/RW, DVD+/-R/RW, DVD+/-RW,
DVD+/-RW DL.
5. PSP and iPod Formats Supported
Capture and convert video into MPEG-4 format,
and watch it on your PSP, and iPod.
6. Audio Recording
Record audio from cassettes, LP records, and
video tapes; and create MP3 files or audio CDs.
System Requirements
• Capture Device:
TV/Video Capture Card or
USB Video Capture Box
• Operating system:
Windows XP
Windows Vista
(http://www.honestech.com/vista)
• Processor:
Pentium IV 2.0 GHz
or equivalent
• Memory:
256MB of RAM
• Video Output:
DVD,VCD, SVCD,AVI,WMV,
MPEG-4
• Other:
DirectX 9.0 or higher
Windows Media Player 6.4
(or higher)
CD Writer for VCD, SVCD
DVD Writer for DVD
 Loading...