

Honda GX140, GX110 Owner's Manual

Thank you for purchasing a Honda engine.
This manual covers the operation and maintenance of GX 110 and GX 140
engines. All information in this publication is based on the latest product information available at the time of printing.
Honda Motor Co., Ltd. reserves the right to make changes at any time
without notice and without incurring any obligation.
No part.of this publication may be reproduced without written permission.
This manual should be considered a permanent part of the engine and
should remain with the engine if it is resold.
Pay special attention to statements preceded by the following words:
rmm
life if instructions are not followed.
CAUTION: Indicates a possibility of personal injury or equipment damage
if instructions are not followed.
NOTE: Gives helpful information.
If a problem should arise, or if you have any questions about your engine,
consult an authorized Honda dealer.
mzm
vice if operated according to instructions. Read and understand the
Owner’s Manual before operating the engine. Failure to do so could result
in personal injury or equipment damage.
Indicates a strong possibility of severe personal injury or loss of
Honda engines are designed to give safe and dependable ser-
CONTENTS
SAFETY INSTRUCTIONS
1.
COMPONENT IDENTIFICATION
2.
BATTERY CONNECTIONS (for electric starter)
3.
4.
REMOTE CONTROL LINKAGE
PRE-OPERATION CHECK
5.
STARTING THE ENGINE
6.
7.
OPERATION
8.
STOPPING THE ENGINE
.
High altitude operation
MAINTENANCE
9.
10.
TRANSPORTING/STORAGE
11.
TROUBLESHOOTING
12.
SPECIFICATIONS
WIRING DIAGRAM
13.
WARRANTY SERVICE
14.
........................................................................
............. . .....................................................
.................................................................
.......................................................
..............................................
.................................................
.......................................................
........................................................
........................................................
.......................................................
...................................................
............................................................
...............................................................
...........................................................
..........................
3
4
5
6
7
13
16
18
19
20
30
31
33
34
36
2

1. SAFETY lNSTRU.KTlOMS
To ensure safe operation -
l
To prevent fire hazards and to provide adequate ventilation, keep the
engine at least 3 ft away from buildings and other equipment during
operation.
l
Do not place flammable objects such as gasoline, matches, etc., close
to the engine while it is running.
l
Refuel in a well-ventilated area with the engine stopped. Gasoline is
flammable and explosive under certain conditions.
l
Do not overfill the tank. There should be no fuel in the filler neck. Make
sure that the filler cap is closed securely.
l
If any fuel is spilled, clean it up completely before starting the engine.
l
Do not smoke or allow flames or sparks where the engine is refueled or
where gasoline is stored.
l
Exhaust gas contains poisonous carbon monoxide. Avoid inhalation of
exhaust gases. Never run the engine in a closed garage or confined area.
l
Operate the engine on a level surface. If the engine is tilted, fuel spillage
may result.
l
Do not place anything on the engine, as it may create a fire hazard.
l
A spark arrester is available as an optional part for this engine. It is illegal
in some areas to operate an engine without a spark arrester. Check local
laws and regulations before operating.
3

2. COMPONENT IDENTIFICATOON
MUFFLER
SPARK PLUG-
THROTTLE LEVER
AIR CLEANE
CHOKE LEVER
ENGINE SWITCH
SERIAL NUMBER AN
ENGINE TYPE
FUEL VALVE
FUEL FILLER CAP
I
RECOIL STARTER
S*ARTER GRIP
FILLER
CAP
DRAIN PLUG
OIL
3. BATTERY CONNECTIONS (for electric starter)
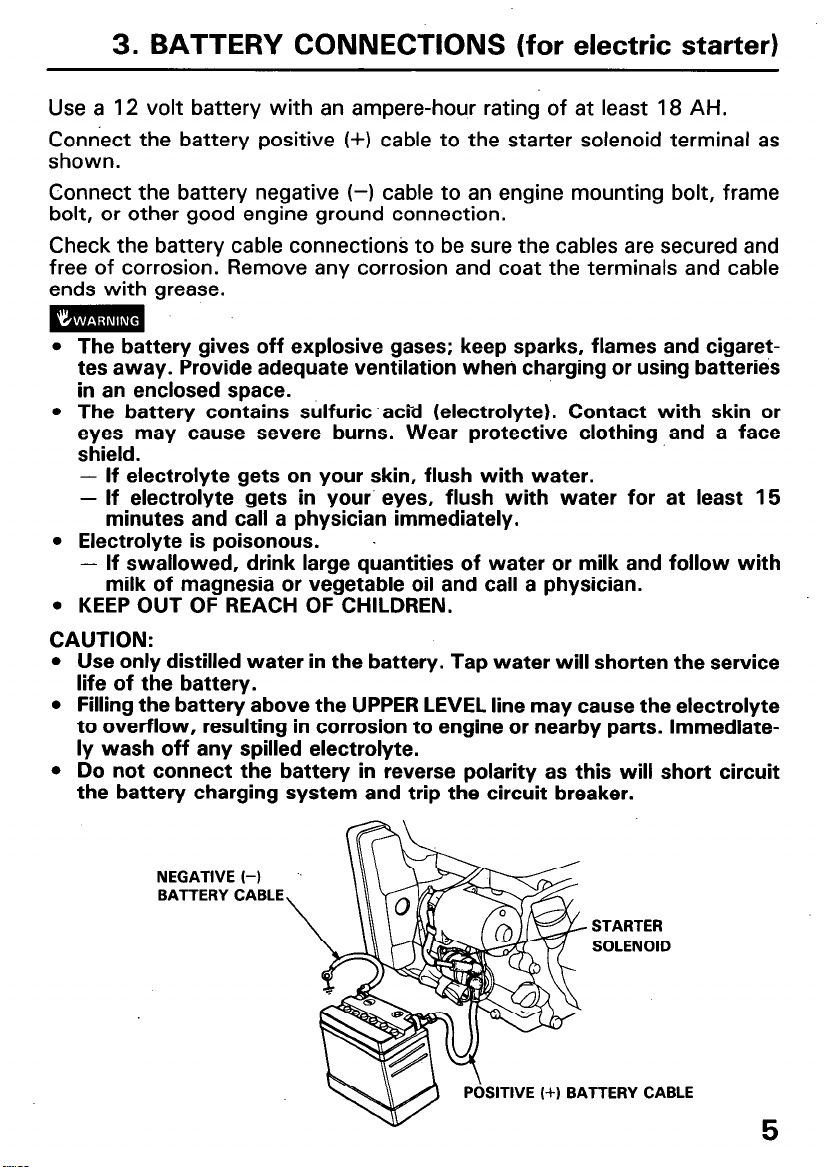
Use a 12 volt battery with an ampere-hour rating of at least 18 AH.
Connect the battery positive (+) cable to the starter solenoid terminal as
shown.
Connect the battery negative (-1 cable to an engine mounting bolt, frame
bolt, or other good engine ground connection.
Check the battery cable connections to be sure the cables are secured and
free of corrosion. Remove any corrosion and coat the terminals and cable
ends with grease.
m
l
The battery gives off explosive gases; keep sparks, flames and cigarettes away. Provide adequate ventilation when charging or using batteries
in an enclosed space.
l
The battery contains sulfuric -a&d (electrolyte). Contact with skin or
eyes may cause severe burns. Wear protective clothing and a face
shield.
- If electrolyte gets on your skin, flush with water.
- If electrolyte gets in your’ eyes, flush with water for at least 15
minutes and call a physician immediately.
l
Electrolyte is poisonous.
- If swallowed, drink large quantities of water or milk and follow with
milk of magnesia or vegetable oil and call a physician.
. KEEP OUT OF REACH OF CHILDREN.
CAUTION:
l
Use only distilled water in the battery. Tap water will shorten the service
life of the battery.
l
Filling the battery above the UPPER LEVEL line may cause the electrolyte
to overflow, resulting in corrosion to engine or nearby parts. Immediately wash off any spilled electrolyte.
l
Do not connect the battery in reverse polarity as this will short circuit
the battery charging system and trip the circuit breaker.
NEGATIVE (-1 .’
BATTERY CABLE
STARTER
SOLENOID
SITIVE (+) BATTERY CABLE
5

4. REMOTE CONTROL LBNMAGE
(for throttle’ and choke cables)
The throttle and choke control levers are provided with holes for optional
cable attachment. The following illustrations show installation examples
for a solid wire cable and for a braided wire cable. If using a braided wire
cable, add a return spring as shown.
It is necessary to loosen the throttle lever friction nut when operating the
throttle with a remote cable.
RETURN
SPRING
THROTTLE LEVER
PIVOT NUT
Flexible wire core
6
WIRE HOLDER
WIRE HOLDER
CHOKE LEVER

5. PRE-OPERATION CHECK
1. ENGINE OIL
CAUTION:
l
Engine oil is a major factor affecting engine performance and service life.
Non-detergent oils and vegetable oils are not recommended.
l
Be sure to check the engine on a level surface with the engine stopped.
Use Honda 4-stroke oil or an
equivalent high-detergent, premium
quality motor oil certified to meet or
exceed U.S. automobile manufac-
turer’s requirements for Service
Classification SE or SF. Motor oils
classified SE or SF will show this
designation on the container.
SAE low-40 is recommended for
general, all-temperature use.
Other viscosities shown in the chart
may be used when the average
temperature in your area is within the
indicated range.
-
-30 -20 -10 0 10
Ambient temperature
20 30 40°C
1. Remove the oil filler cap and wipe the dipstick clean.
2. Insert the dipstick into the oil filler neck but do not screw it in.
3. If the level is low, fill to the top of the oil filler neck with the recommended oil.
CAUTION:
l
Running the engine with insufficient oil can cause serious engine
damage.
l
Engine oil is a major factor affecting engine performance and service life.
Nondetergent oils, castor-based oils and 2-stroke engine oils are not
recommended because they have inadequate lubricating characteristics.

2. REDUCTION GEAR OIL
<l/2 reduction with automatic centrifugal clutch>
1. Remove the oil filler cap and wipe the dipstick clean.
2. Insert the dipstick into the filler neck but do not screw it in.
3. If the level is low, fill to the upper level mark with the same oil recommended for the engine (see engine oil recommendations on page 7).
Oil capacity: 0.5 e (0.53 US qt 0.44 Imp qt)
UPPER LEVEL
<l/6 reduction>
, DIPSTICK/FILLER CAP
DRAIN BOLT
\
1. Remove the oil level bolt.
2. Check the oil level; it should reach the edge of the oil level bolt hole. If
the oil level is low, remove the filler bolt, and add oil until it starts to flow
-out the oil level bolt hole. Use the same oil recommended for the engine
(see engine oil recommendations on page 7).
3. Install the oil level bolt and filler bolt. Tighten them securely.
Oil capacity: 0.15 e (0.16 US qt, 0.13 Imp qt)
.LER BOLT
8
OIL LEVEL
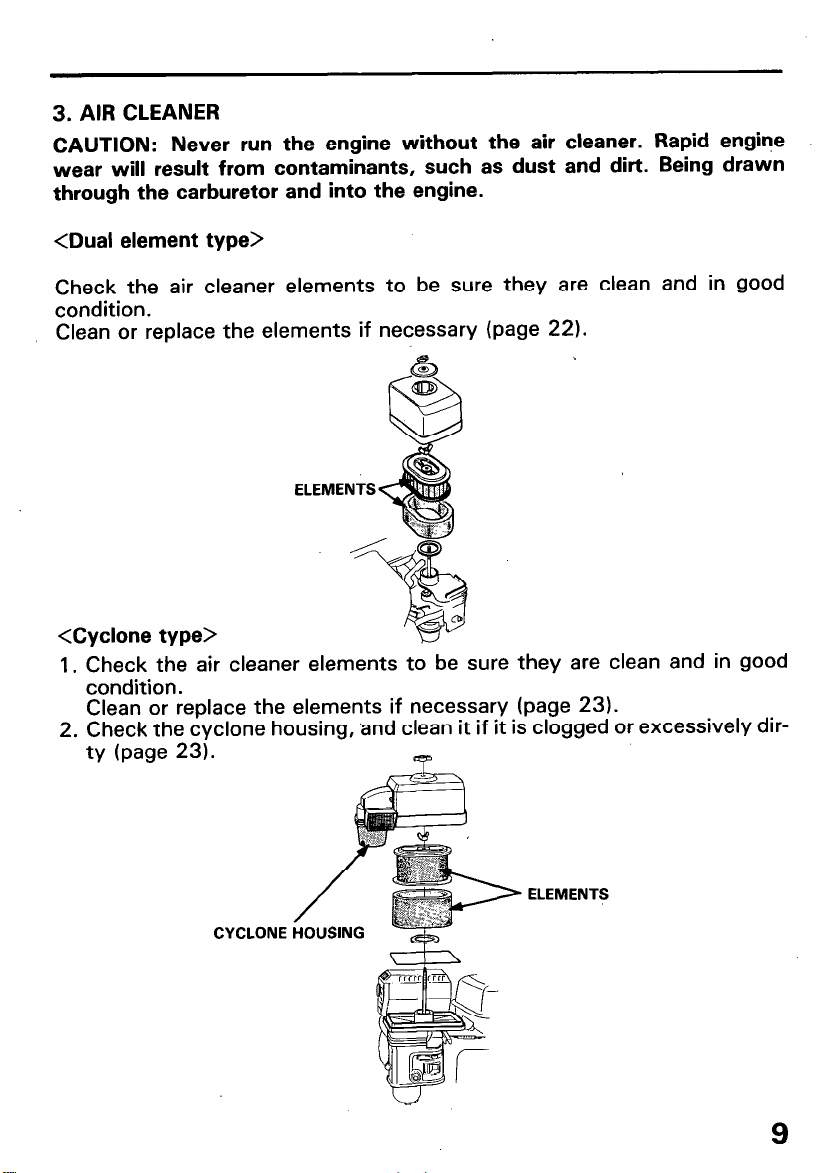
3. AIR CLEANER
CAUTION: Never run the engine without the air cleaner. Rapid engine
wear will result from contaminants, such as dust and dirt. Being drawn
through the carburetor and into the engine.
<Dual element type>
Check the air cleaner elements to be sure they are clean and in good
condition.
Clean or replace the elements if necessary (page 22).
<Cyclone type>
1. Check the air cleaner elements to be sure they are clean and in good
condition.
Clean or replace the elements if necessary (page 23).
2. Check the cyclone housing, and clean it if it is clogged or excessively dir-
ty (page 23).
CYCLONE
ELEMENTS
9

<Oil bath type>
1. Check the air cleaner element to be sure it is clean and in good condition.
Clean or replace the element if necessary (page 24).
2. Check oil level and condition.
OIL CEVEL
10

4. FUEL
Your engine ‘,” cJesigned to use any gasoline that has a pump octane
number (R ) of 86 or higher, or that has a research oc-
tane number if 91 or higher. Gasoline pumps at service station normally
display the pump octane number.
We recommend that you use unleaded fuel because it produces fewer
engine and spark plug deposits and extends the life of exhaust system
components.
Never use stale or contaminated gasoline or an oil/gasoline mixture. Avoid
getting dirt, dust or water in the fuel tank. Use of a lower octane gasoline
can cause persistent “pinging” or heavy “spark knock” (a metallic rapping
noise) which, if severe, can lead to engine damage.
CAUTION: If “spark knock” or “pinging” occurs at a steady engine speed
under normal load, change brands of gasoline. If spark knock or pinging
persists, consult your authorized Honda dealer. Failure to do so is considered misuse, and damage caused by misuse is not covered by Honda’s
Limited Warranty.
Occasionally you may experience light spark knock while operating under
heavy loads. This is no cause for concern, it simply means your engine is
operating efficiently.
l
Gasoline is extremely flammable and is explosive under certain
conditions.
l
Refuel in a well-ventilated area with the engine stopped. Do not smoke
or allow flames or sparks in the area where the engine is refueled or
where gasoline is stored.
l
Do not overfill the fuel tank (there should be no fuel in the filler neck).
After refueling, make sure the tank cap is closed properly and securely.
l
Be careful not to spill fuel when refueling. Spilled fuel or fuel vapor may
ignite. If any fuel is spilled, make sure the area is dry before starting the
engine.
l
Avoid repeated or prolonged contact with skin or breathing of vapor.
KEEP OUT OF REACH OF CHILDREN.
Fuel tank capacity: GXl lo.....
GX140 . . . . . 3.6 e (0.95 US Gal, 0.79 Imp Gal.)
2.5 &’ (0.66 US Gal, 0.55 Imp Gal.)
11
 Loading...