

Page 1

TECHNOLOGY
REFERENCE
GUIDE
2015 Honda Fit LX
31T5AA00 Technology Reference Guide
00X31-T5A-A001 ©2014 American Honda Motor Co., Inc. — All Rights Reserved Printed in U.S.A.
owners.honda.com
2015 Fit LX
Page 2
TECHNOLOGY REFERENCE GUIDE
INSTRUMENT PANEL p.2
This Technology Reference Guide is designed to help you
get acquainted with your 2015 Honda Fit LX and provide
basic instructions on some of its technology and
convenience features.
This guide is not intended as a substitute for the Owner’s
Manual. For complete information on vehicle controls and
operation, please refer to the respective sections in the
Owner’s Manual.
Images shown in this guide are examples and should be used for
demonstration purposes only.
BLUETOOTH
®
HANDSFREELINK®p.10
AUDIO p.14
iPod/USB p.14
Instrument Panel Indicators ...................................................................................2
Information Display..................................................................................................4
TM
Eco Assist
Tire Pre ssure Monitoring System (TPMS)...........................................................6
Auto Door Locks .....................................................................................................7
Rearview Camera .....................................................................................................8
One-Touch Turn Signal.............................................................................................9
................................................................................................................5
Auto Headlights with Wiper Integration.............................................................9
®
Bluetooth
iPod
Bluetooth
Honda Owners .......................................................................................................16
Safety Reminder......................................................................................................16
Fuel Information......................................................................................................17
HandsFreeLink®(HFL)........................................................................10
®
or USB Flash Drive .....................................................................................14
®
Audio......................................................................................................15
Page 3
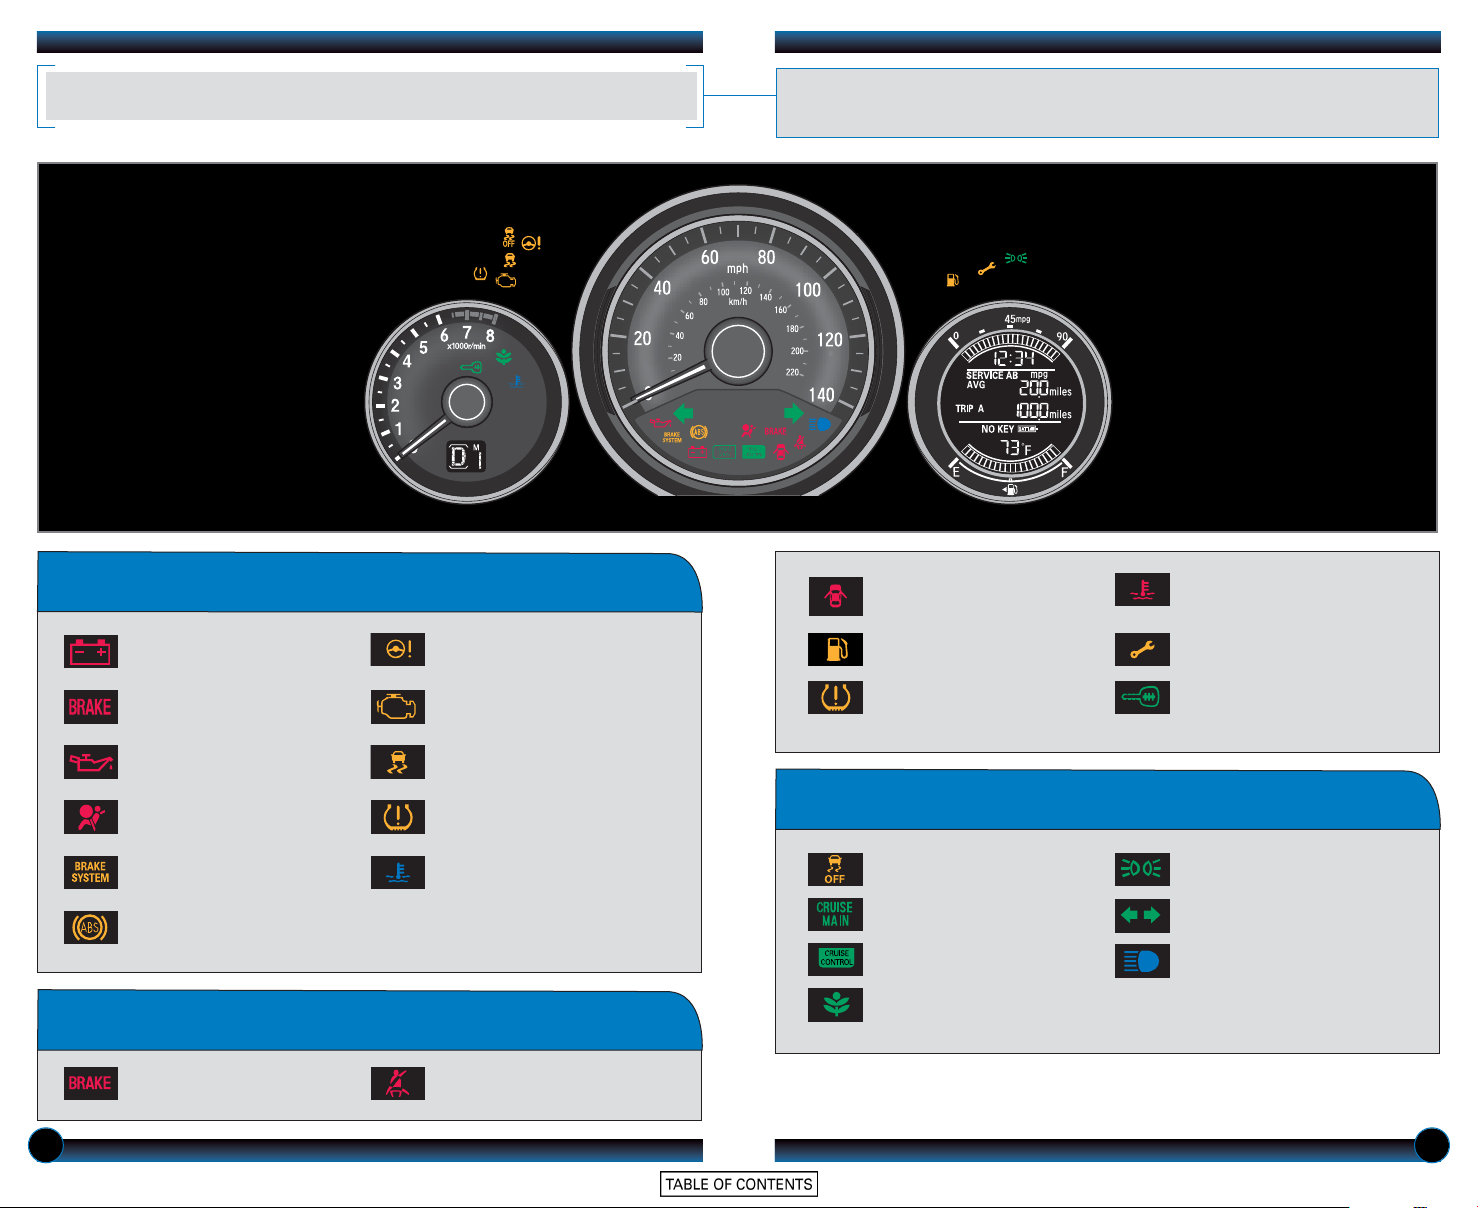
INSTRUMENT PANEL INDICATORS
Briefly appear with each engine start. Red and amber indicators are most critical.
Blue and green indicators are used for general information. See your Owner’s
Manual for more information.
If an indicator remains on, there may be a problem; see your dealer
Charging system
Low brake fluid, Brake system
Low oil pressure
Supplemental Restraint System
(SRS)
Brake System
Anti-Lock Brake System (ABS)
Electric Power Steering (EPS)
Malfunction indicator lamp
(check engine light)
Vehicle Stability Assist®(VSA)
Tire Pressure Monitoring System
(TPMS) (blinks and stays on)
Low temperature
Condition Indicators
Malfunction Indicators
Door/Tailgate open:
Close door(s) / tailgate
Low fuel:
Refill
Low tire pressure:
Add air
On/Off Indicators
VSA OFF
CRUISE MAIN on
CRUISE CONTROL on
ECON Mode on
High temperature:
Drive slowly or pull over
Maintenance minder:
Make dealer appointment
Immobilizer (blinks):
Use other vehicle key and
see dealer
Exterior lights on
Turn signals/hazards on
High beams on
Action is needed by driver
Parking brake on:
Release
Seat belt reminder:
Fasten seat belt(s)
2 3
Page 4

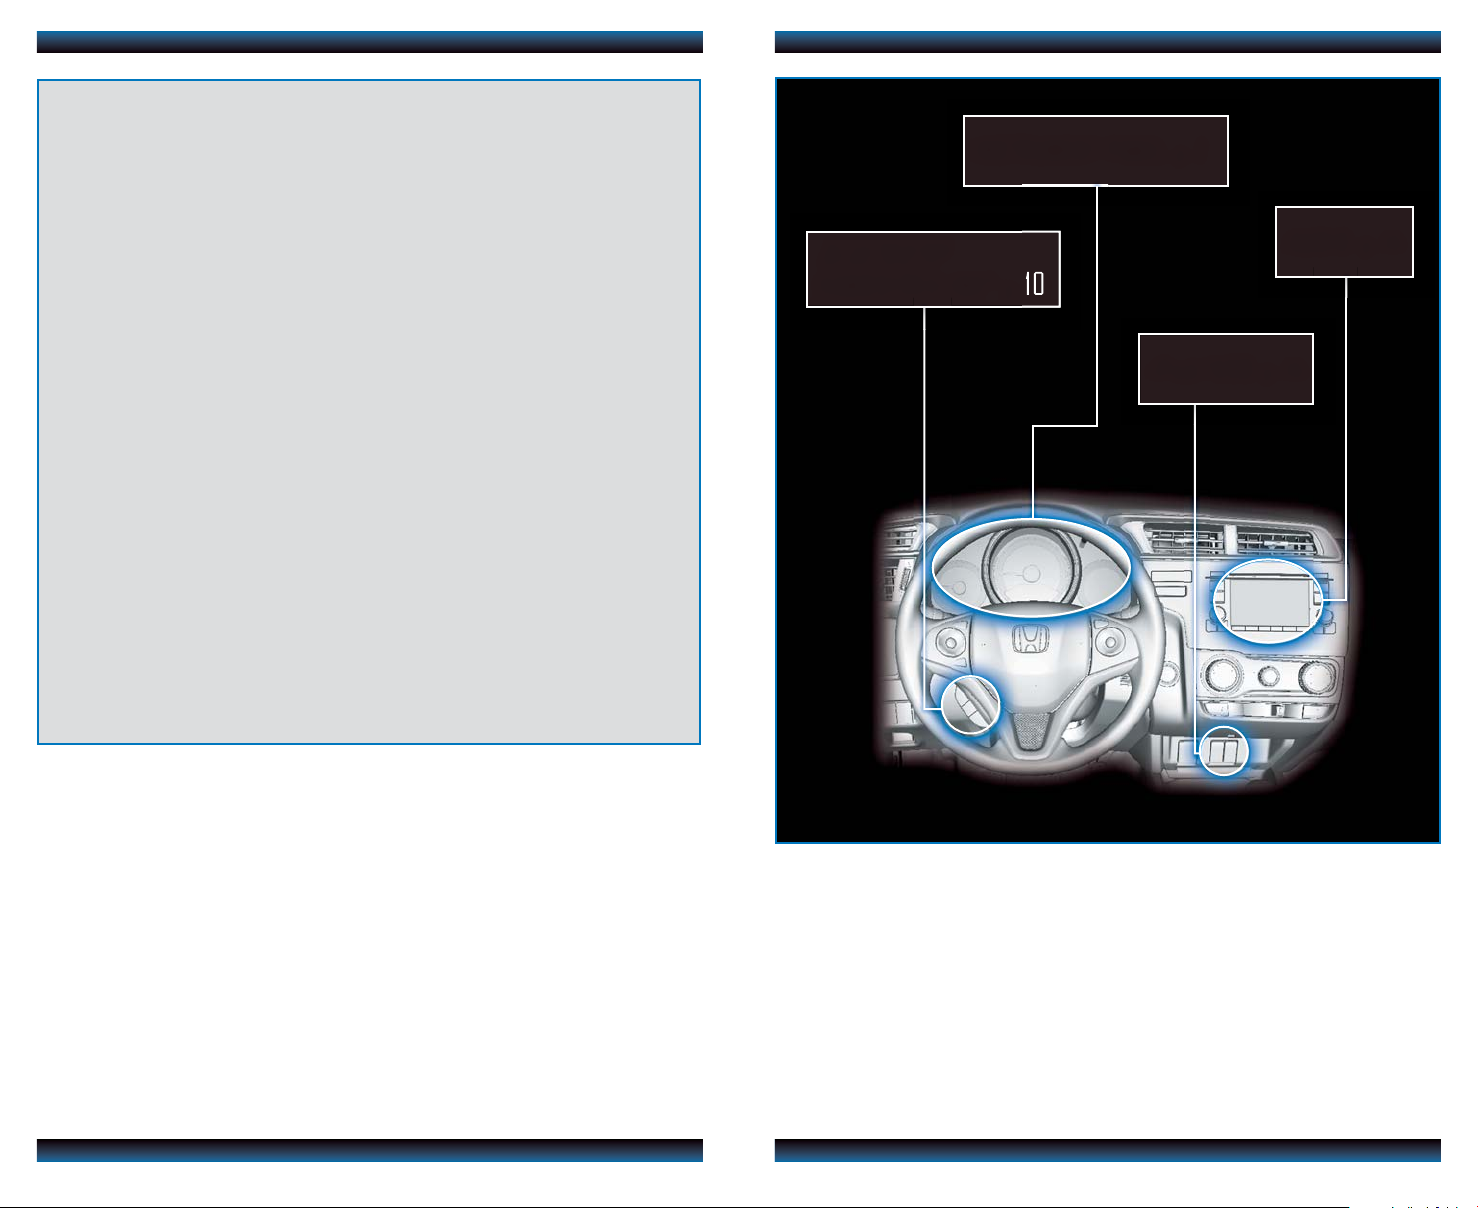
INFORMATION DISPLAY
ECO ASSIST
TM
Consists of several displays that provide you with useful information.
Reading the Display
These items are shown on each display.
Instant fuel
economy
Fuel gauge
Clock
Outside
temperature
Changing the Display
You can change the information in the middle display.
When turned on, performance of the vehicle’s engine, transmission, cruise control, and
air conditioning system are adjusted to maximize fuel efficiency.
ECON Mode
1. Press ECON to turn the
system on or off.
2. The ECON mode indicator
appears when the system is on.
Press the select/reset knob to
Odometer,
Trip meter A
Range,
Trip meter A
Average fuel
economy A,
Trip meter A
change displays.
Average fuel
economy B,
Trip meter B
Engine oil life
Clock
adjustment
Ambient Meter
Indicates real-time fuel efficiency using color-coded bars.
High fuel efficiency Moderate fuel efficiency Low fuel efficiency
4 5
Page 5

TIRE PRESSURE MONITORING SYSTEM (TPMS)
AUTO DOOR LOCKS
Monitors the vehicle’s tire pressures.
How It Works
When the tire pressure drops
significantly below recommended
levels, the low tire pressure
indicator comes on.
What to Do
1. Visually inspect the tires for damage.
2. Use a tire air pressure gauge to
check which tire(s) have low
pressure.
3. Inflate the tire(s), if necessary, to the
recommended pressures listed on
the label on the driver’s doorjamb.
4. Start TPMS calibration.
What to Do
Any time you inflate, change, or rotate one or more of your tires, you need to
recalibrate the system.
1. Make sure the shift lever is in
Park (P) or the parking brake is
applied and the vehicle is on.
2. Press and hold the TPMS
button until the low tire
pressure indicator blinks twice.
Calibration begins and will
finish automatically.
Program how and when the vehicle doors automatically lock and unlock.
Door Locks
Default Lock Setting
All doors are preset to lock when your vehicle
reaches about 10 mph.
Default Unlock Setting
All doors are set to unlock when the driver’s door
is opened.
Changing Settings
Program all doors to unlock when you shift to Park. See your Owner’s Manual for
other programmable settings.
1. Close the driver’s door. Shift
into Park (P) or apply the
parking brake.
2. Turn the ignition switch to
ON (II).
3. Press and hold the unlock
side of the master door lock
switch for about 10 seconds.
In that time, you will hear
three clicks.
4. Within 20 seconds, turn the
ignition switch to LOCK (0).
Note: The driver’s and front passenger’s door can be opened by pulling the inner front door
handle, regardless of the setting.
6 7
Page 6

REARVIEW CAMERA
ONE-TOUCH TURN SIGNAL
For added convenience, the area behind your vehicle is displayed to help you navigate
while backing up.
How It Works
• When you shift into Reverse (R), a real-time image of the area behind your vehicle
is shown in the display, along with yellow parking guidelines.
• The display turns off when you shift out of Reverse.
Wide (default) Normal Top down
Press the selector knob to toggle between views.
Use this quick and convenient method to signal a lane change.
How It Works
• Lightly push the turn signal lever up or down for a
three-blink sequence.
• For a continuous signal, push the lever up or down
until it locks into place.
AUTO HEADLIGHTS WITH WIPER INTEGRATION
For your convenience, your vehicle’s headlights automatically turn on when the
windshield wipers operate.
How It Works
Changing Settings
Turn the guidelines on or off. Use the selector knob to make and enter selections.
1. Press MENU/CLOCK.
2. Select Settings.
3. Select Rear Camera.
4. Select Camera Guidelines.
5. Select On or Off.
6. Press to exit the menu.
8 9
Make sure your headlights are in
the AUTO position.
Turn on your windshield wipers.
The headlights also turn on.
When you turn off the windshield
wipers, the headlights turn off
shortly after.
Page 7

BLUETOOTH
Place and receive phone calls through your vehicle’s audio system. Visit
handsfreelink.honda.com to check phone compatibility.
To reduce the potential for driver distraction, certain functions may be
inoperable or grayed out while the vehicle is moving. Stop or pull over to
perform the function.
®
HANDSFREELINK® (HFL)
How to Use HFL
Pick-Up button: Answer an incoming
call, or go to the phone screen.
Hang-Up/Back button: End a call,
decline an incoming call, or cancel a
selection.
Talk button: Make a call using a stored
voice tag.
Pairing Your Phone
Use this pairing method when no phone has ever been paired to the system. You
can pair your compatible phone only when the vehicle is stopped.
Use the selector knob to make and enter selections.
1. Press to go to the Phone screen.
A prompt appears. Select Yes.
2. Make sure your phone is in discovery
mode. Select OK.
3. HFL searches for your phone. Select
it when it appears on the list.
If your phone does not appear:
Select Phone Not Found, and search
for HandsFreeLink from your phone.
Connect to HFL.
4. HFL gives you a four-digit code. Enter
it on your phone when prompted.
The phone is now paired.
Use this pairing method when a phone has already been paired to the system, or
when you want to pair an additional phone.
Use the selector knob to make and enter selections.
1. Press to go to the Phone screen. If
a prompt appears asking to connect to
a phone, select No.
2. Select Phone Setup.
3. Select Bluetooth Setup.
Use these buttons to navigate through the HFL menus.
button:
Go directly to the Phone screen.
Selector knob: Rotate to scroll
through selections and press to make
a selection.
button: Press to cancel an
operation or return to the previous
screen.
4. Select Add New Device.
5. Select an empty location for the phone.
6. Make sure your phone is in discovery
mode. Select OK.
7. HFL searches for your phone. Select it
when it appears on the list.
If your phone does not appear:
Select Phone Not Found, and search
for HandsFreeLink from your phone.
Connect to HFL.
8. HFL gives you a four-digit code. Enter it
on your phone when prompted. The
phone is now paired.
10 11
Page 8

Dialing a Number
Using Speed Dial
Enter a 10-digit phone number to call. This feature is inoperable when the
ehicle is moving.
v
Use the selector knob to make and enter selections.
1. Press to go to the Phone
screen.
2. Select Dial.
3. Enter the phone number.
4. Select the green Dial icon to begin
the call.
Using the Phonebook
When your phone is paired, its entire phonebook is automatically imported to
the system. This feature is inoperable when the vehicle is moving.
Use the selector knob to make and enter selections.
1. Press to go to the Phone
screen.
2. Select Phonebook.
3. Scroll through the list to find the
name and number you want.
4. Select the entry to begin the call.
Store up to 15 numbers for quick calling.
Use the selector knob to make and enter selections.
1. Press to go to the Phone
screen.
2. Select Edit Speed Dial.
3. Scroll through the list to find the
entry you want.
4. Select the entry to begin the call.
When a speed dial entry is stored with a voice tag, you can make a call using
voice commands at any time. Press the Talk button and follow the prompts.
See your Owner’s Manual for more information.
Receiving a Call
A notification is heard and the following screen appears:
Press the Pick-Up button to
answer the call.
Press the Hang-Up/Back
button to end or decline the call.
12 13
Page 9

iPod®OR USB FLASH DRIVE
BLUETOOTH
®
AUDIO
Play audio files from your compatible iPod or USB flash drive through your vehicle’s
audio system. See your Owner’s Manual for a list of compatible devices.
Connecting Devices and Playing Audio
1. Connect an iPod cable or USB flash
drive to the USB port in the front
console.
2. Press CD/AUX until iPod or USB
mode appears.
Note: Connect your device only when your vehicle is stopped.
3. Press
(9) (:)
to change tracks.
iPod is a trademark of Apple , Inc .
Searching for Music
Play stored or streaming audio from your phone through your vehicle’s audio system. Visit
handsfreelink.honda.com to check phone compatibility.
Playing
1. Make sure your phone is on and
2. Press CD/AUX until BluetoothAudio
3. From your phone, open the desired
Bluetooth
paired to Bluetooth®HandsFreeLink
(see page 11).
mode appears.
audio player or app and begin playing.
Sound is redirected to the audio
system.
Make sure the volume on your phone
is properly adjusted.
Notes:
• You may need to enable additional settings on your phone for playback.
• Remote audio controls and the play/pause function may not be supported on all phones.
• Operate your phone only when your vehicle is stopped.
Audio
®
4. Press
(9) (:)
to change tracks.
Use the selector knob to make and enter selections.
1. Press the selector knob to enter
the iPod menu or USB folder list.
2. Select a search option or folder.
3. Select an item to begin playing.
14 15
Page 10

HONDA OWNERS
FUEL INFORMATION
Visit owners.honda.com and register to explore features and technologies specific to
your vehicle, obtain and update maintenance and service records, manage your
financial services account, and access other useful information. For added convenience,
Honda Owners can also be accessed on a mobile device.
SAFETY REMINDER
Your vehicle is equipped with airbags. Airbags do not replace seat belts; they add to
the protection offered by seat belts. Airbags can help protect you in some types of
collisions, but they do not provide protection in all collisions.
Use of unleaded gasoline of 87 octane or higher is recommended.
• Honda recommends TOP TIER Detergent Gasoline where available.
• Do NOT use gasoline containing more than 15% ethanol.
• Do NOT use gasoline containing methanol.
• Do NOT use gasoline containing MMT.
See your Owner’s Manual for more information.
Some gasoline in North America contains MMT, a manganese-based fuel additive.
Prolonged and consistent use of gasoline containing MMT can deteriorate your
vehicle’s performance, fuel economy, and the emission control system. Always use
MMT-free gasoline if available. Failures caused by use of gasoline containing MMT may
not be covered under your new vehicle warranty.
TOP TIER Detergent Gasoline (recommended) never contains MMT and has
detergent additives to keep your engine clean. For further information on fuel and
lubricants for your car and information on gasoline that does not contain MMT,
contact your dealer or visit owners.honda.com.
Always make sure you and your passengers wear seat belts, and that young children
are properly secured in a child seat or booster in the rear seat. Never place an
infant seat in the front passenger’s seat as the force of a deploying airbag can
seriously injure an infant.
See your Owner’s Manual for more information.
16 17
 Loading...