

Page 1

1999 CR-V Online Reference Owner's Manual
Use these links (and links throughout this manual) to navigate through this reference.
For a printed owner's manual, click on authorized manuals or go to www.helminc.com.
Owner's Identification Form
Introduction ......................................................................................................................................... i
A Few Words About Safety.................................................................................................................ii
Important Handling Information..................................................................................................... iii
Your Vehicle at a Glance.....................................................................................................................2
Driver and Passenger Safety .............................................................................................................. 5
Proper use and care of your vehicle's seat belts, and Supplemental Restraint System.
Instruments and Controls................................................................................................................. 51
Instrument panel indicator and gauge, and how to use dashboard and steering column controls.
Comfort and Convenience Features .............................................................................................. 97
How to operate the climate control system, the audio system, and other convenience features.
Before Driving..................................................................................................................................139
What gasoline to use, how to break -in your new vehicle, and how to load luggage and other cargo.
Driving ..............................................................................................................................................151
The proper way to start the engine, shift the transmission, and park, plus towing a trailer.
Maintenance.....................................................................................................................................183
The Maintenance Schedule shows you when you need to take you r vehicle to the dealer.
Appearance Care..............................................................................................................................241
Tips on cleaning and protecting your vehicle. Things to look for if your vehicle ever needs body repairs.
Taking Care of the Unexpected......................................................................................................249
This section covers several problems motorists sometimes experience, an d how to handle them.
Technical Information.....................................................................................................................275
ID numbers, dimensions, capacities, and technical information.
Warranty and Customer Relations (U.S. and Canada)................................................................289
A summary of the warranties covering your new Acura, and how to contact us.
Authorized Manuals (U.S. only)......................................................................................................295
How to order manuals and other technical literature.
Index...................................................................................................................................................... I
Service Information Summary
A summary of information you need when you pull up to the fuel pump.
Contents
Page 2
Introduction
Main Menu
▲
▼
Congratulations ! Your selection of a 1999 Honda CR-V was a wise
investment. It will give you years of driving pleasure.
One of the best ways to enhance the enjoyment of your new Honda is to
read this manual. In it, you will learn how to operate its driving controls and
convenience items. Afterwards, keep this owner's manual in your vehicle so
you can refer to it at any time.
Several warranties protect your new Honda. Read the warranty booklet
thoroughly so you understand the coverages and are aware of your rights
and responsibilities.
Maintaining your vehicle according to the schedules given in this manual
helps to keep your driving trouble-free while it preserves your investment.
When your vehicle needs maintenance, keep in mind that your Honda
dealer's staff is specially trained in servicing the many systems unique to
your Honda. Your Honda dealer is dedicated to your satisfaction and will be
pleased to answer any questions and concerns.
As you read this manual, you will
find information that is preceded by
a
NOTICE
symbol. This
information is intended to help you
avoid damage to your Honda, other
property, or the environment.
31S10620
Page 3
A Few Words About Safety
Main Menu
▲
▼
Your safety, and the safety of others,
is very important. And operating this
vehicle safely is an important
responsibility.
To help you make informed
decisions about safety, we have
provided operating procedures and
other information on labels and in
this manual. This information alerts
you to potential hazards that could
hurt you or others.
Of course, it is not practical or
possible to warn you about all the
hazards associated with operating or
maintaining your vehicle. You must
use your own good judgement.
You will find this important safety information in a variety of forms,
including:
Safety Labels — on the vehicle.
Safety Messages — preceded by a safety alert symbol and one of
three signal words: DANGER, WARNING, or CAUTION.
These signal words mean:
You WILL be KILLED or SERIOUSLY
HURT if you don't follow instructions.
You CAN be KILLED or SERIOUSLY
HURT if you don't follow instructions.
You CAN be HURT if you don't follow
instructions.
Safety Headings — such as Important Safety Reminders or Important
Safety Precautions.
Safety Section — such as Driver and Passenger Safety.
Instructions — how to use this vehicle correctly and safely.
This entire book is filled with important safety information — please read it
carefully.
Page 4

Important Handling Information
Main Menu
▲
▼
Your CR-V has higher ground clearance than a passenger vehicle designed for use only on pavement. Higher ground
clearance has many advantages for off-highway driving. It allows you to travel over bumps, obstacles, and rough
terrain. It also provides good visibility so you can anticipate problems earlier.
These advantages come at some cost. Because your vehicle is taller and rides higher off the ground, it has a high
center of gravity. This means your vehicle can tip or rollover if you make abrupt turns. Utility vehicles have a
significantly higher rollover rate than other types of vehicles. In a rollover crash, an unbelted person is significantly
more likely to die than a person wearing a seat belt. As a reminder, make sure you and your passengers always wear
seat belts.
For information on how to reduce the risk of rollover, read "Driving Guidelines" on page 152 of this manual and the
Off-Highway Driving Guidelines section on page 177. Failure to operate this vehicle correctly may result in loss of control
or an accident.
Page 5
Your Vehicle at a Glance
Main Menu
▲
▼
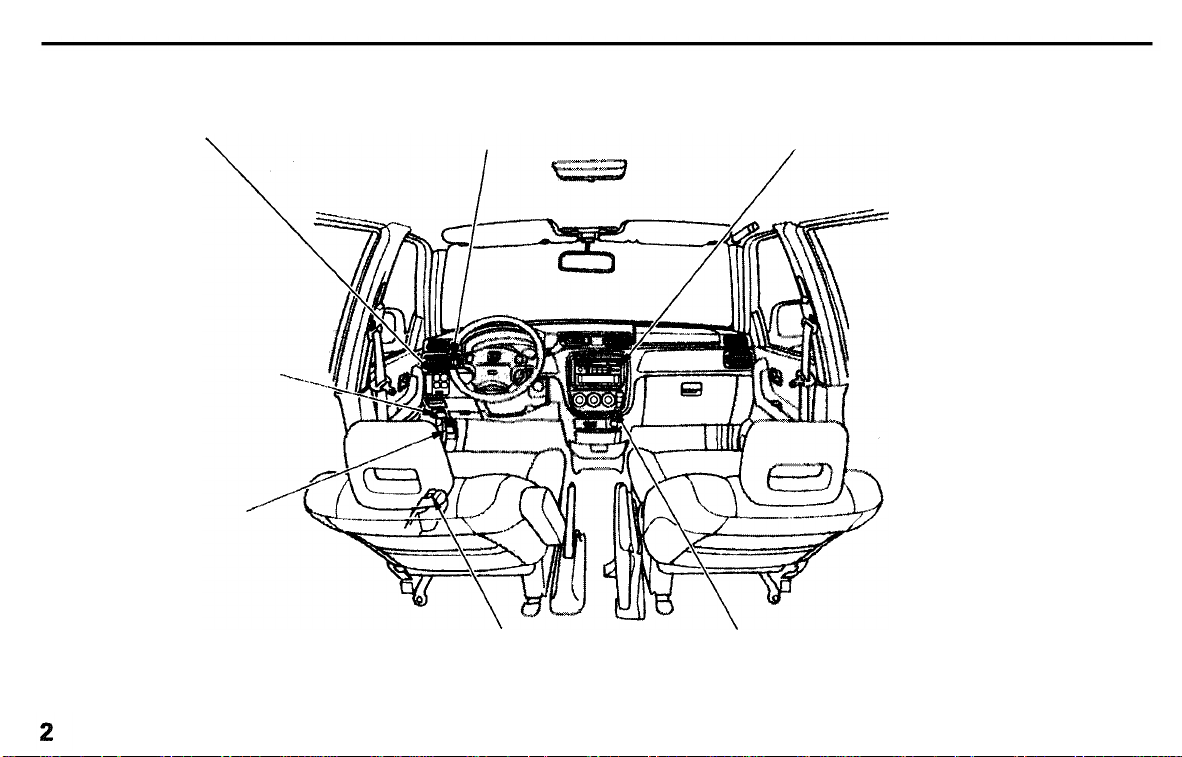
POWER WINDOW
SWITCHES
(P.84)
TAILGATE RELEASE
(P.75)
HOOD RELEASE
HANDLE
(P.142)
MIRROR CONTROLS
(P. 86)
FUEL FILL DOOR RELEASE
(P.141)
AUDIO SYSTEM
(P.
106)
HEATING/COOLING CONTROL
(P.98)
Page 6
Your Vehicle at a Glance
Main Menu
▲
▼
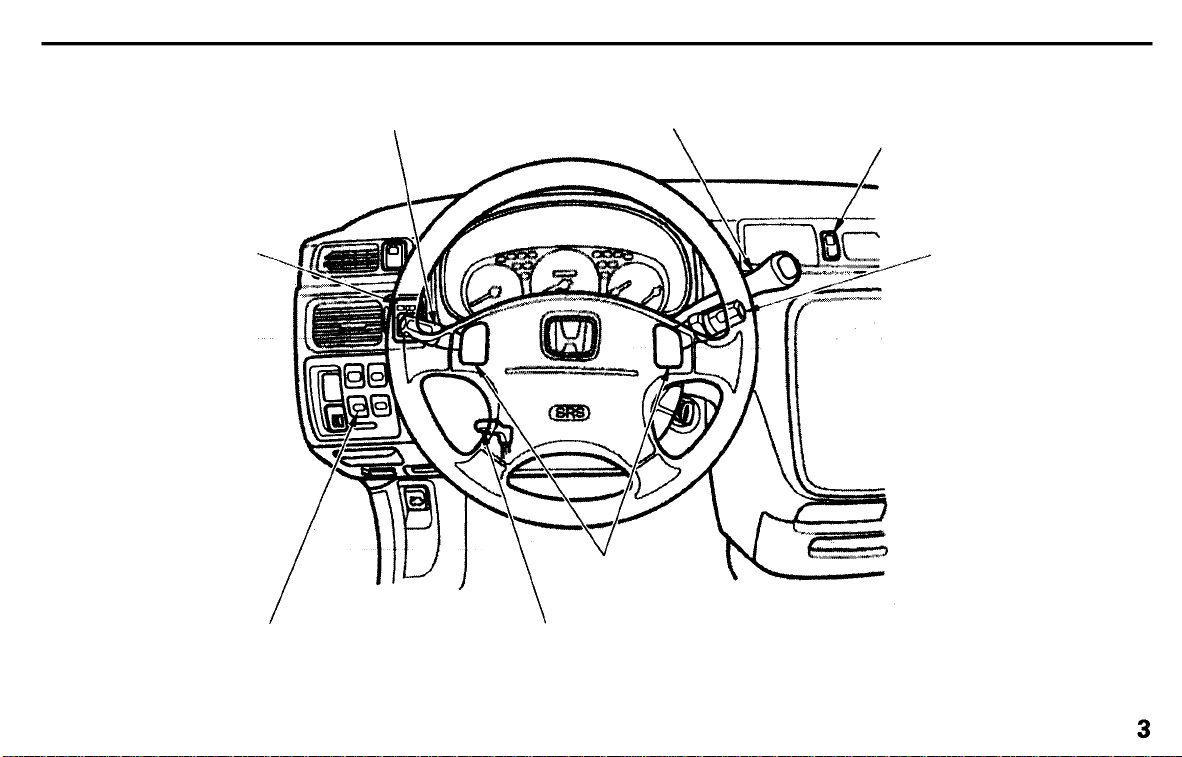
HEADLIGHTS/TURN SIGNALS
(P.60)
MIRROR CONTROLS
(P.86)
POWER WINDOW SWITCHES
(P.84)
SHIFT LEVER
(P.158)
HORN BUTTONS
TILT ADJUSTMENT
(P.64)
HAZARD WARNING LIGHTS
(P.63)
WINDSHIELD
WIPERS/WASHERS
(P.62)
Page 7

Driver and Passenger Safety
Main Menu
▲
▼
This section gives you important
information about how to protect
yourself and your passengers. It
shows you how to use seat belts
properly. It explains your Supple-
mental Restraint System. And it tells
you how to properly restrain infants
and children in your vehicle.
Important Safety Precautions.......... 6
Your Vehicle's Safety Features........ 7
Seat Belts........................................ 8
Airbags............................................ 9
Seats & Seat-Backs...................... 10
Head Restraints........................... 10
Door Locks................................... 10
Pre-Drive Safety Checklist......... 11
Protecting Adults.............................
12
1 . Close and Lock the Doors...... 12
2. Adjust the Front Seats............ 12
3. Adjust the Seat-Backs............. 13
4. Adjust the Head Restraints.... 14
5. Fasten and Position the Seat
Belts...................................... 15
6. Adjust the Steering Wheel..... 18
7. Maintain a Proper Sitting
Position................................. 18
Advice for Pregnant Women...... 19
Additional Safety Precautions.... 19
Protecting Children......................... 21
All Children Must Be
Restrained................................ 21
Children Should Sit in the Back
Seat............................................ 22
The Passenger's Airbag Poses
Serious Risks to Children....... 22
If You Must Drive with Several
Children.................................... 24
If a Child Requires Close
Attention................................... 24
Additional Safety Precautions.... 24
General Guidelines for Using
Child Seats................................ 25
Protecting Infants........................ 29
Protecting Small Children.......... 33
Protecting Larger Children........ 37
Using Child Seats with
Tethers...................................... 40
Additional Information About Your
Seat Belts.................................. 42
Seat Belt System Components... 42
Lap/Shoulder Belt....................... 42
Lap Belt......................................... 43
Seat Belt Maintenance................ 43
Additional Information About Your
SRS............................................ 45
SRS Components......................... 45
How Your Airbags Work............ 45
How the Automatic Seat Belt
Tensioners Work..................... 47
How the SRS Indicator Light
Works........................................ 47
SRS Service................................... 48
Additional Safety Precautions.... 48
Carbon Monoxide Hazard.............. 49
Safety Labels.................................... 50
Driver and Passenger Safety
Page 8

Important Safety Precautions
Main Menu
Table of Contents
▲
▼
You'll find many safety
recommendations throughout this
section, and throughout this manual.
The recommendations on this page
are the ones we consider to be the
most important
Always Wear Your Seat Belt
A seat belt is your best protection in
all types of collisions. Airbags
supplement seat belts, but airbags
are designed to inflate only in a
moderate to severe frontal collision.
So even though your vehicle is
equipped with airbags, make sure
you and your passengers always
wear your seat belts, and wear them
properly. (See page 15.)
Restrain All Children
Children are safest when they are
properly restrained in the back seat,
not the front seat. A child who is too
small for a seat belt must be properly
restrained in a child safety seat. (See
page 21.)
Be Aware of Airbag Hazards
While airbags can save lives, they
can cause serious or fatal injuries to
occupants who sit too close to them,
or are not properly restrained.
Infants, young children, and short
adults are at the greatest risk. Be
sure to follow all instructions and
warnings in this manual. (See page
7.)
Don't Drink and Drive
Alcohol and driving don't mix. Even
one drink can reduce your ability to
respond to changing conditions, and
your reaction time gets worse with
every additional drink. So don't drink
and drive, and don't let your friends
drink and drive, either.
Control Your Speed
Excessive speed is a major factor in
crash injuries and deaths. Generally,
the higher the speed the greater the
risk, but serious accidents can also
occur at lower speeds. Never drive
faster than is safe for current
conditions, regardless of the
maximum speed posted.
Keep Your Vehicle in Safe
Condition
Having a tire blowout or a
mechanical failure can be extremely
hazardous. To reduce the possibility
of such problems, check your tire
pressures and condition frequently,
and perform all regularly scheduled
maintenance. (See page 188.)
Driver and Passenger Safety
Page 9
Your Vehicle's Safety Features
Main Menu
Table of Contents
▲
▼
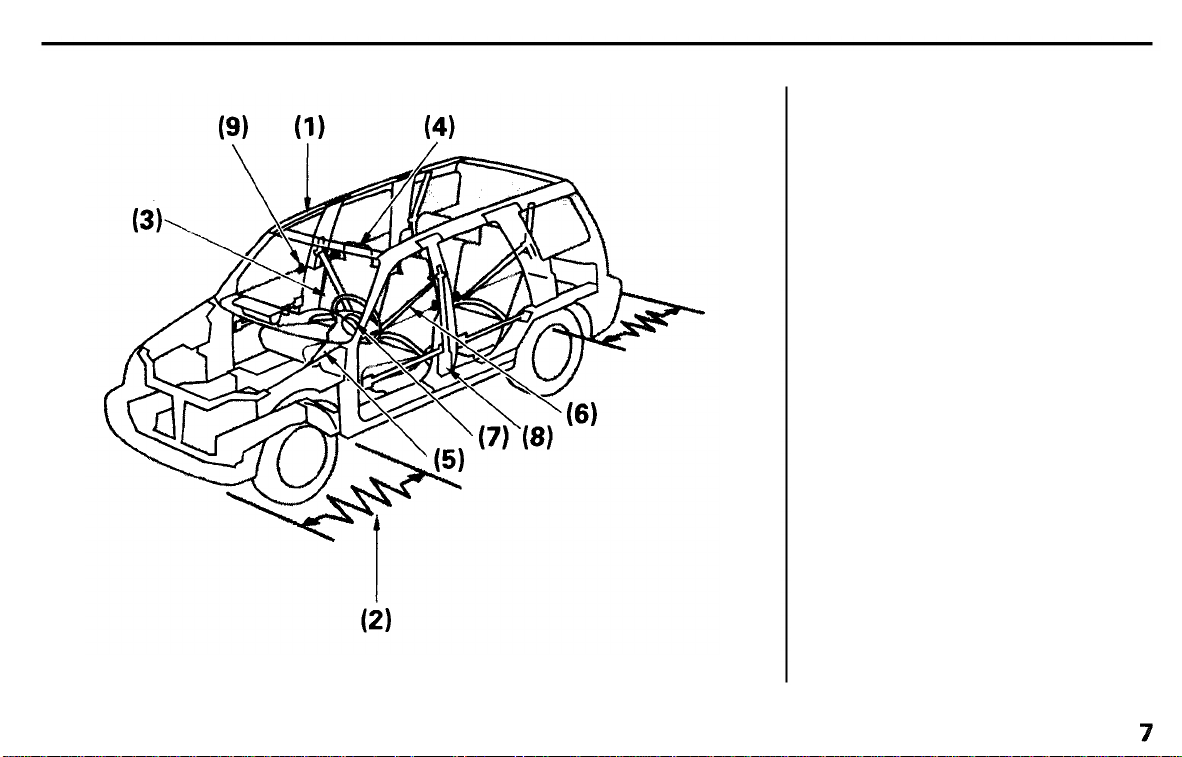
Your vehicle is equipped with many
features that work together to
protect you and your passengers
during a crash.
Some safety features do not require
any action on your part. These
include a strong steel framework
that forms a safety cage around the
passenger compartment; front and
rear crush zones that are designed to
crumple and absorb energy during a
crash; a collapsible steering column;
and seat belt tensioners that
automatically tighten the front seat
belts in the event of a crash.
(1) SaftyCarge
(2) Crush Zones
(3) Seats & Seat-Backs
(4) Head Restraints
(5) Collapsible Steering Column
(6) Seat Belts
(7) Airbags
(8) Seat Belt Tensioners
(9) Door Locks
These safety features are designed
to reduce the severity of injuries in a
crash. However, you and your
passengers can't take full advantage
of these safety features unless you
remain sitting in a proper position
and always wear your seat belts
properly. In fact, some safety
features can contribute to injuries if
they are not used properly.
Driver and Passenger Safety
Page 10
Your Vehicle's Safety Features
Main Menu
Table of Contents
▲
▼
Seat Belts
For your safety, and the safety of
your passengers, your vehicle is
equipped with seat belts in all seating
positions.
Your seat belt system also
includes a light on the
instrument panel to remind you and
your passengers to fasten your seat
belts.
Why Wear Seat Belts
Seat belts are the single most
effective safety device for adults and
larger children. (Infants and smaller
children must be properly restrained
in child seats.)
Not wearing a seat belt properly
increases the chance of serious
injury or death in a crash, even
though your vehicle has airbags.
In addition, most states and all
Canadian provinces require you to
wear seat belts.
Not wearing a seat belt properly
increases the chance of serious
injury or death in a crash, even
if you have airbags.
Be sure you and your
passengers always wear seat
belts and wear them properly.
Keep you connected to the vehicle
so you can take advantage of the
vehicle's built-in safety features.
Help protect you in almost every
type of crash, including side and
rear impacts and rollovers. (Your
airbag can only be helpful in a
moderate to severe frontal
collision.)
Help keep you from being thrown
against the inside of the vehicle
and against other occupants.
Keep you from being thrown out
of the vehicle.
Help keep you in a good position
should the airbags ever deploy. A
good position reduces the risk of
injury from an inflating airbag, and
allows you to get the best
advantage from the airbag.
Of course, seat belts cannot
completely protect you in every
crash. But in most cases, seat belts
can reduce your risk of serious
injury.
What you should do: Always wear
your seat belt, and make sure you
wear it properly.
Driver and Passenger Safety
Page 11
Your Vehicle's Safety Features
Main Menu
Table of Contents
▲
▼
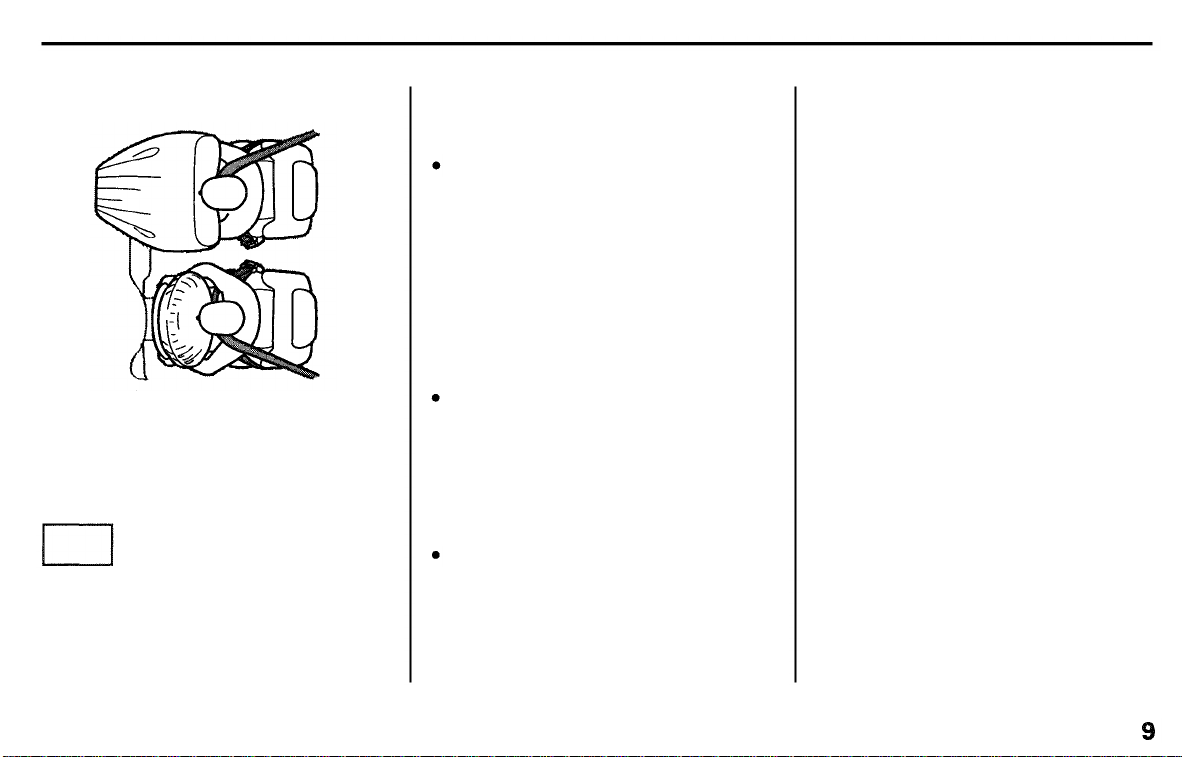
Airbags
Your vehicle has a Supplemental
Restraint System (SRS) with frontal
airbags to help protect the driver and
a front seat passenger.
SRS
This system also includes
an indicator light on the
instrument panel to alert you to a
possible problem with the system.
The most important things you need
to know about your airbags are:
Airbags do not replace seat belts.
The seat belts are the occupants'
primary protection in all types of
collisions. The airbags supplement
the seat belts by providing extra
protection for the head and chest
of each front seat occupant in a
moderate to severe frontal
collision.
Airbags offer no protection in side
impacts, rear impacts, rollovers,
or minor collisions. Airbags are
designed to deploy only during a
moderate to severe frontal
collision.
Airbags can pose serious hazards.
To do their job, airbags must
inflate with tremendous force and
speed. So while airbags save lives,
they can cause serious injuries to
adults and larger children who are
not wearing seat belts, are not
wearing them properly, are sitting
too close to the airbag, or are not
sitting in a proper position. Infants
and small children are at an even
greater risk of injury or death.
What you should do: Always wear
your seat belt properly, and sit
upright and as far back as possible
from the steering wheel or
dashboard.
Driver and Passenger Safety
Page 12

Your Vehicle's Safety Features
Main Menu
Table of Contents
▲
▼
Seats & Seat-Backs
Your vehicle's seats are designed to
keep you in a comfortable, upright
position so you can take full
advantage of the protection offered
by seat belts and the energy
absorbing materials in the seats.
How you adjust your seats and seatbacks can also affect your safety. For
example, sitting too close to the
steering wheel or dashboard
increases the risk of you or your
passenger being injured by striking
the inside of the vehicle, or by an
inflating airbag.
Reclining a seat-back too far reduces
the seat belt's effectiveness and
increases the chance that the seat's
occupant will slide under the seat
belt in a crash and be seriously
injured.
What you should do: Move the front
seats as far back as possible, and
keep adjustable seat-backs in an
upright position whenever the
vehicle is moving.
Head Restraints
Head restraints can help protect you
from whiplash and other injuries. For
maximum protection, the back of
your head should rest against the
center of the head restraint.
Door Locks
Keeping your doors locked reduces
the chance of being thrown out of
the vehicle during a crash. It also
helps prevent occupants from
accidentally opening a door and
falling out, and outsiders from
unexpectedly opening your doors.
Driver and Passenger Safety
Page 13
Your Vehicle's Safety Features
Main Menu
Table of Contents
▲
▼
Pre-Drive Safety Checklist
To make sure you and your
passengers get the maximum
protection from your vehicle's safety
features, check the following each
time before you drive away:
All adults, and children who have
outgrown child safety seats, are
wearing their seat belts and
wearing them properly (see page
15 ).
Any infant or small child is
properly restrained in a child seat
in the back seat (see page 21).
Front seat occupants are sitting
upright and as far back as possible
from the steering wheel and
dashboard (see page 12 ).
Seat-backs are upright (see page
13 ).
Head restraints are properly
adjusted (see page 14).
All doors and the tailgate are
closed and locked (see page 12).
All cargo is properly stored or
secured (see page 148).
The rest of this section gives more
detailed information about how you
can maximize your safety.
Remember, however, that no safely
system can prevent all injuries or
deaths that can occur in severe
crashes, even when seat belts are
properly worn and the airbags deploy.
Driver and Passenger Safety
Page 14

Protecting Adults
Main Menu
Table of Contents
▲
▼
Introduction
The following pages provide
instructions on how to properly
protect the driver and other adult
occupants.
These instructions also apply to
children who have outgrown child
seats and are large enough to wear
lap/shoulder belts. (See page 37 for
important additional guidelines on
how to properly protect larger
children.)
1. Close and Lock the Doors
After everyone has entered the
vehicle, be sure the doors and
tailgate are closed and locked.
Your vehicle has a tailgate
open indicator light on the
instrument panel to indicate when
the tailgate is not tightly closed.
For safety, locking the doors reduces
the chance that a passenger,
especially a child, will open a door
while the vehicle is moving and
accidentally fall out. It also reduces
the chance of someone being thrown
out of the vehicle during a crash.
For security, locked doors can
prevent an outsider from
unexpectedly opening a door when
you come to a stop.
See page 70 for how to lock the
doors.
2.Adjust the Front Seats
Any driver who sits too close to the
steering wheel is at risk of being
seriously injured or killed by striking
the steering wheel, or from being
struck by an inflating airbag during a
crash.
Driver and Passenger Safety
Page 15
Protecting Adults
Main Menu
Table of Contents
▲
▼
To reduce the chance of injury, wear
your seat belt properly, sit upright
with your back against the seat, and
move the seat as far back as possible
from the steering wheel while still
maintaining full control of the
vehicle. Also make sure your front
seat passenger moves the seat as far
to the rear as possible.
Sitting too close to an airbag
can result in serious injury or
death if the airbags inflate.
Always sit as far back from the
airbags as possible.
Most shorter drivers can get far
enough away from the steering
wheel and still reach the pedals.
However, if you are concerned about
sitting too close, we recommend that
you investigate whether some type
of adaptive equipment may help.
Once your seat is adjusted correctly,
rock it back and forth to make sure
the seat is locked in position.
See page 77 for how to adjust the
front seats.
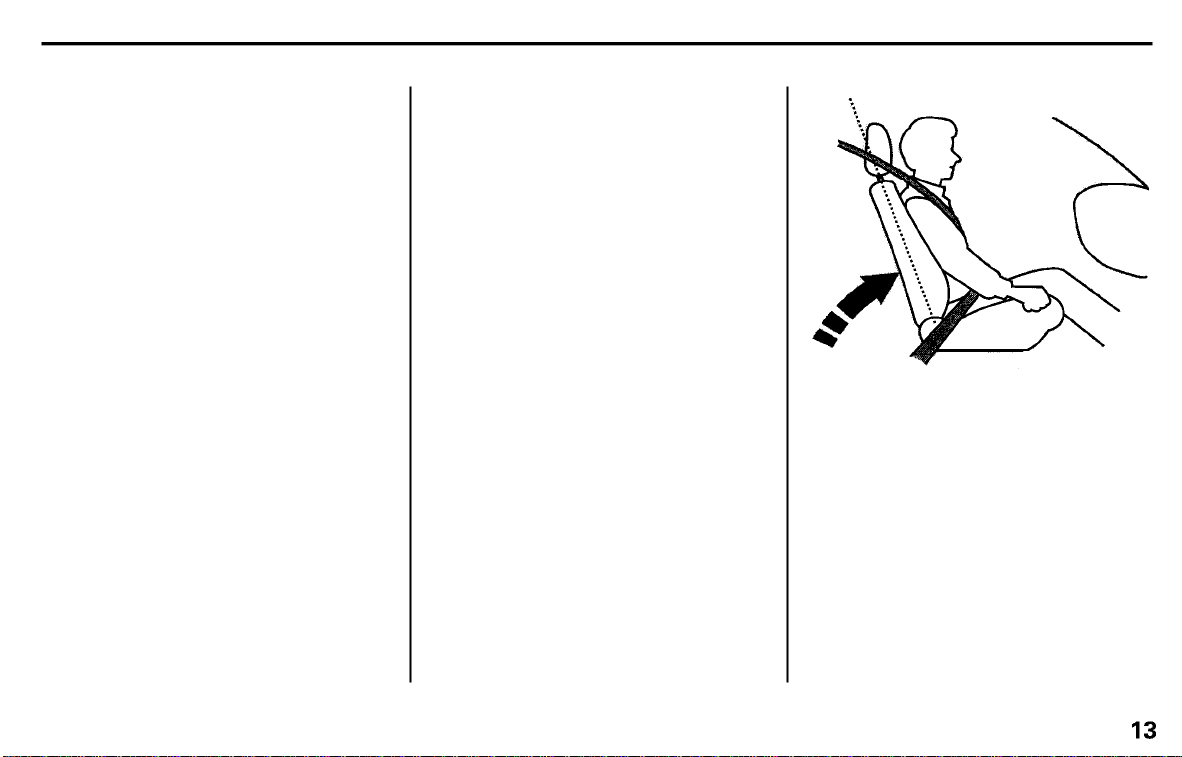
3.Adjust the Seat-Backs
Adjust the driver's seat-back to a
comfortable, upright position,
leaving ample space between your
chest and the airbag cover in the
center of the steering wheel. If you
sit too close to the steering wheel,
you could be injured if the airbag
inflates.
A front passenger should also adjust
the seat-back to an upright position,
but as far from the dashboard as
possible. A passenger who sits too
close to the dashboard could be
injured if the airbag inflates.
CONTINUED
Driver and Passenger Safety
Page 16
Protecting Adults
Main Menu
Table of Contents
▲
▼
Reclining a seat-back so that the
shoulder part of the belt no longer
rests against the occupant's chest
reduces the protective capability of
the belt. It also increases the chance
of sliding under the belt in a crash
and being seriously injured. The
farther a seat-back is reclined, the
greater the risk of injury.
Reclining the seat-back too far
can result in serious injury or
death in a crash.
Adjust the seat-back to an
upright position and sit well
back in the seat.
See page 78 for how to adjust seatbacks.
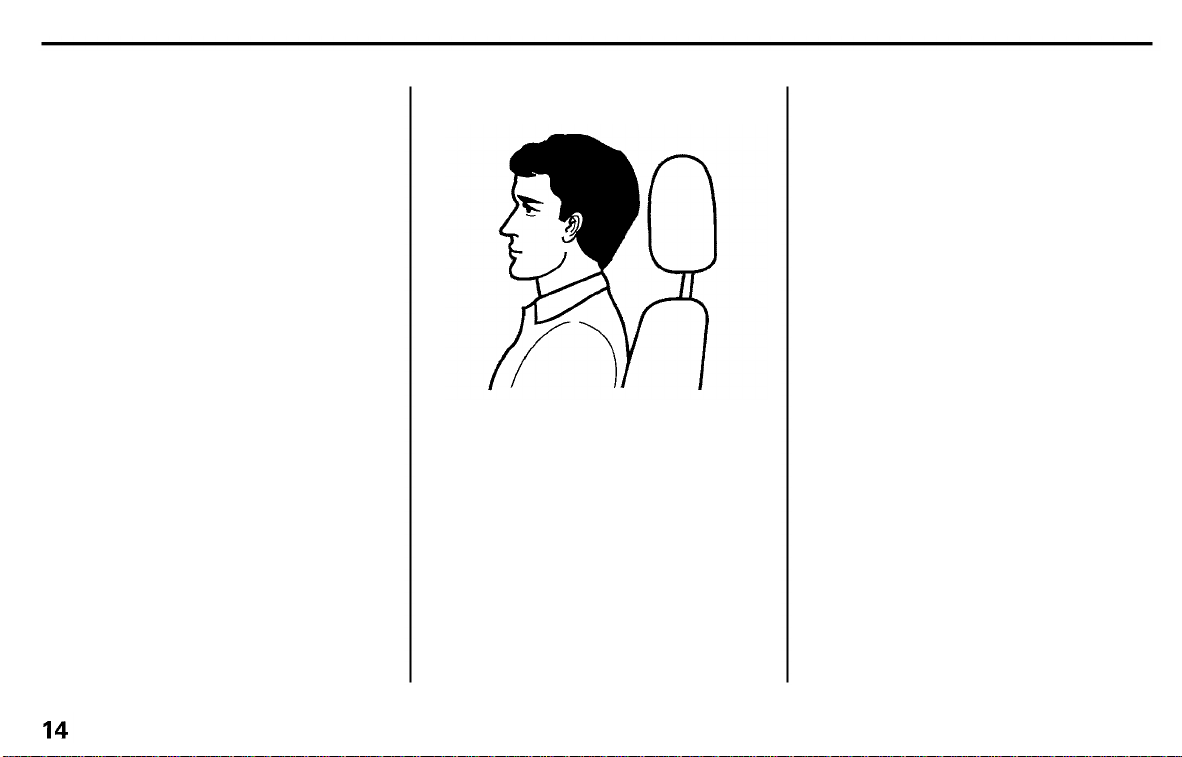
4.Adjust the Head Restraints
Before driving, make sure everyone
with an adjustable head restraint has
properly positioned the head
restraint. The restraint should be
positioned so the back of the
occupant's head rests against the
center of the restraint. A taller
person should adjust the restraint as
high as possible.
Improperly positioning head
restraints reduces their
effectiveness and you can be
seriously injured in a crash.
Make sure head restraints are
in place and positioned properly
before driving.
Properly adjusted head restraints
will help protect occupants from
whiplash and other crash injuries.
See page 79 for how to adjust the
head restraints.
Driver and Passenger Safety
Page 17
Protecting Adults
Main Menu
Table of Contents
▲
▼
5.Fasten and Position the Seat
Belts
Using a Lap/Shoulder Belt
Insert the latch plate into the buckle,
then tug on the belt to make sure the
belt is securely latched. Also check
that the belt is not twisted, because a
twisted belt can cause serious
injuries in a crash.
Position the lap part of the belt as
low as possible across your hips,
then pull up on the shoulder part of
the belt so the lap part fits snugly.
This lets your strong pelvic bones
take the force of a crash and reduces
the chance of internal injuries.
If necessary, pull up on the belt again
to remove any slack from the
shoulder part, then check that the
belt rests across the center of your
chest and over your shoulder. This
spreads the forces of a crash over
the strongest bones in your upper
body.
Improperly positioning the seat
belts can cause serious injury
or death in a crash.
Make sure all seat belts are
properly positioned before
driving.
CONTINUED
Driver and Passenger Safety
Page 18
Protecting Adults
Main Menu
Table of Contents
▲
▼
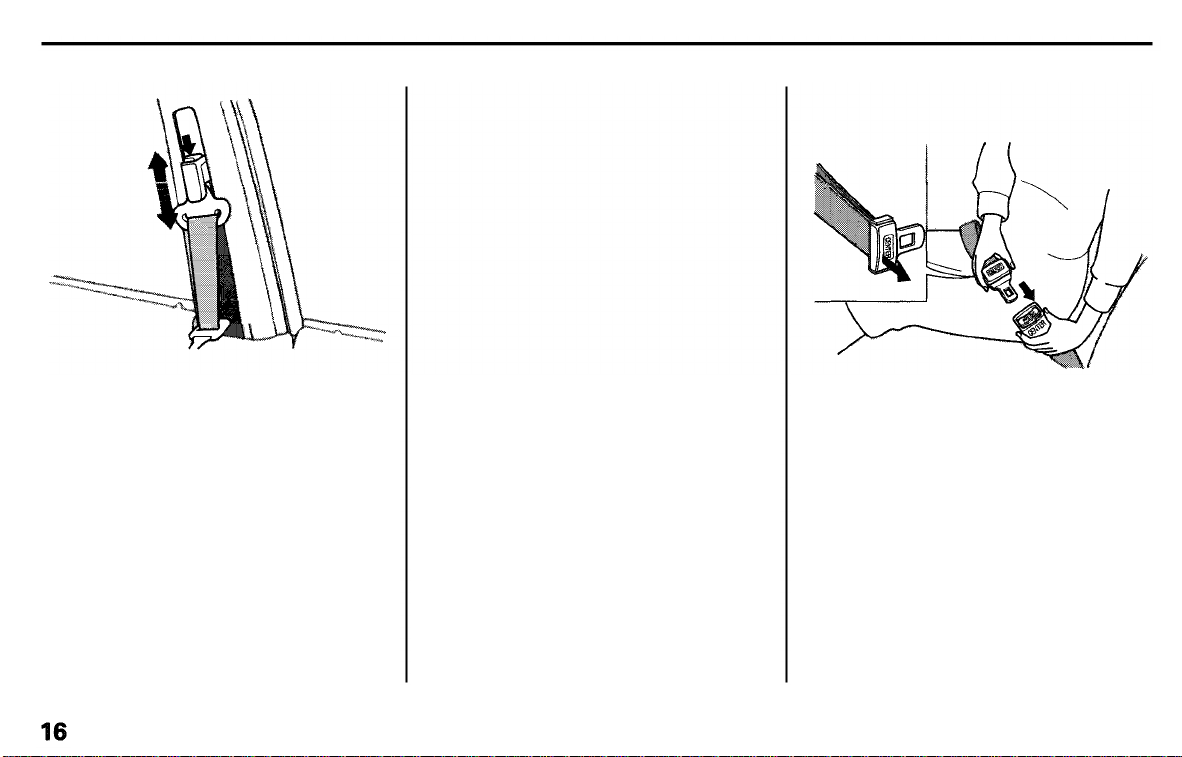
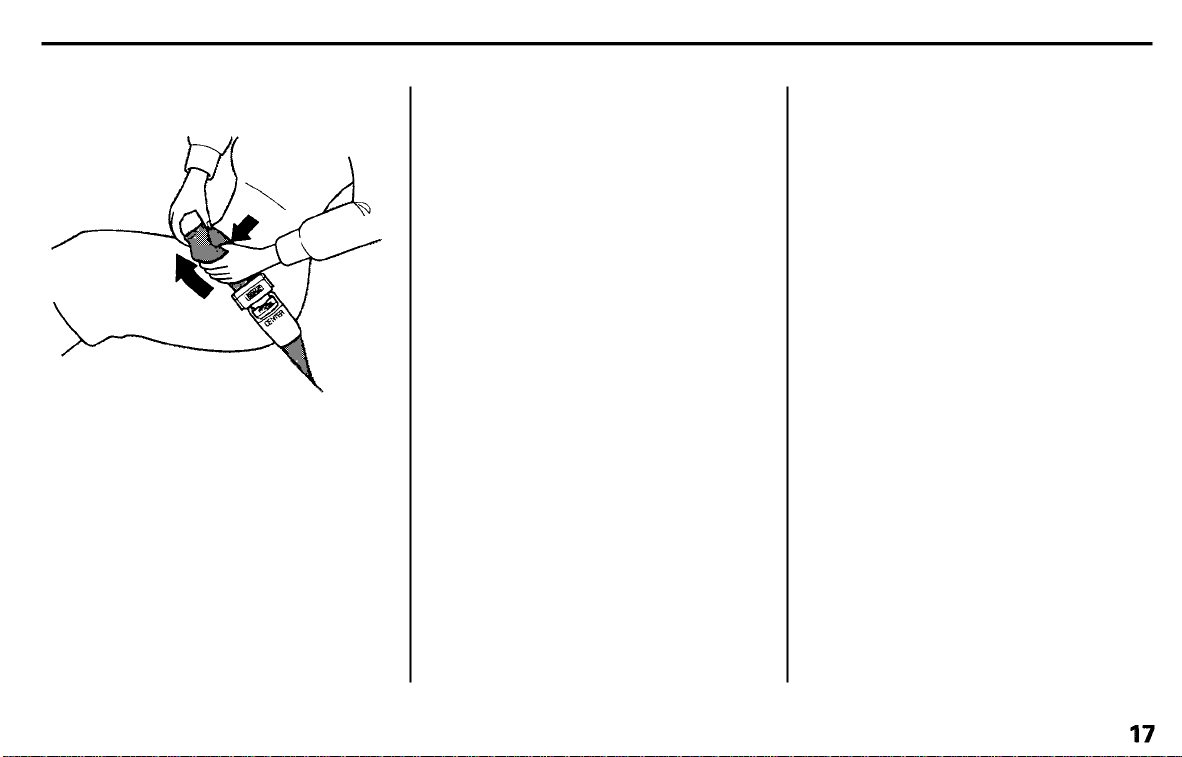
If the seat belt touches or crosses
your neck, or if it crosses your arm
instead of your shoulder, you need to
adjust the seat belt anchor height.
To adjust the height of a front seat
belt anchor, press the release button
and slide the anchor up or down as
needed (it has four positions).
Never place the shoulder portion of a
lap/shoulder belt under your arm or
behind your back. This could cause
very serious injuries in a crash.
Using the Lap Belt
Insert the latch plate into the buckle
marked CENTER.
If the belt is too short, hold the latch
plate at a right angle and pull on the
plate to extend the belt. Then insert
the latch plate into the buckle, and
tug on the belt to make sure the belt
is securely latched.
Driver and Passenger Safety
Page 19
Protecting Adults
Main Menu
Table of Contents
▲
▼
Position the belt as low as possible
across your hips. This lets your
strong pelvic bones take the force of
a crash and reduces the chance of
internal injuries.
Pull on the loose end of the belt for a
snug but comfortable fit.
If a Seat Belt Doesn't Work Properly
If a seat belt does not seem to work
as it should, it may not protect the
occupant in a crash. No one should
sit in a seat with an inoperative seat
belt. Anyone using a seat belt that is
not working properly can be
seriously injured or killed. Have your
Honda dealer check the belt as soon
as possible.
See page 42 for additional
information about your seat belt
system and how to take care of your
belts.
Driver and Passenger Safety
Page 20
Protecting Adults
Main Menu
Table of Contents
▲
▼
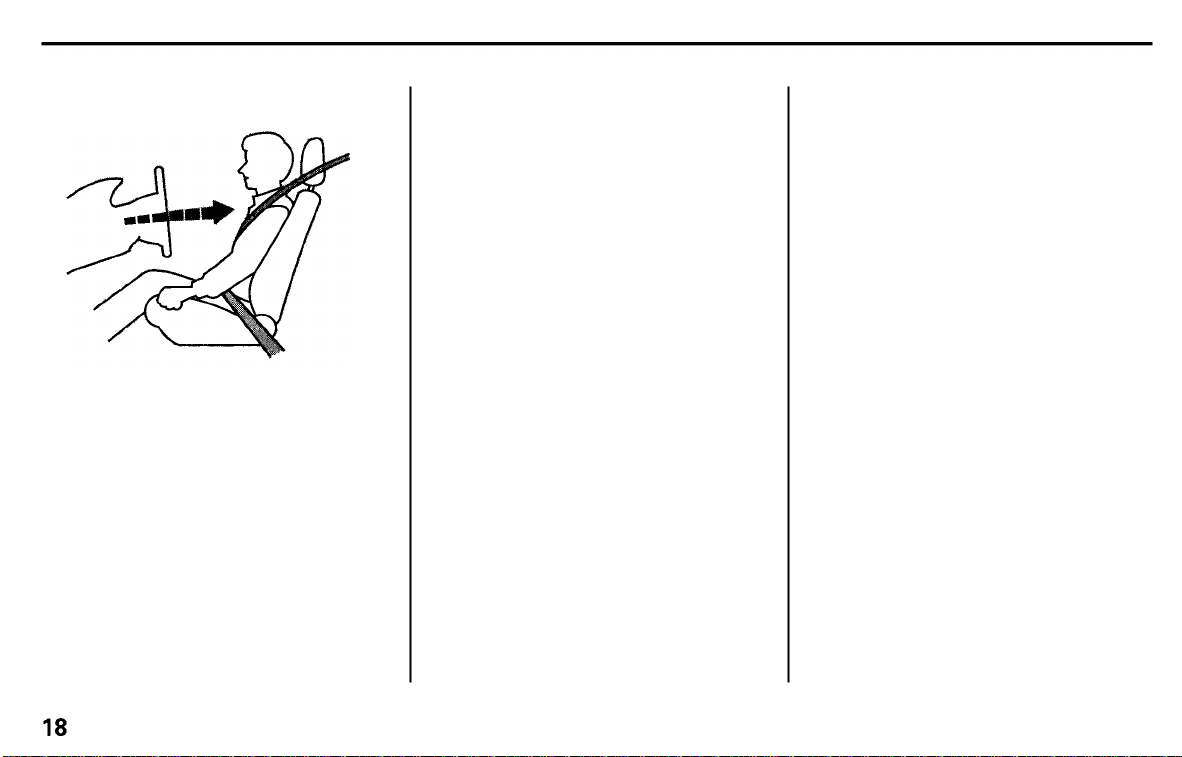
6.Adjust the Steering Wheel
Adjust the steering wheel, if needed,
so that the wheel points toward your
chest, not toward your face.
Pointing the steering wheel toward
your face decreases the protective
capability of the driver's airbag.
See page 64 for how to adjust the
steering wheel.
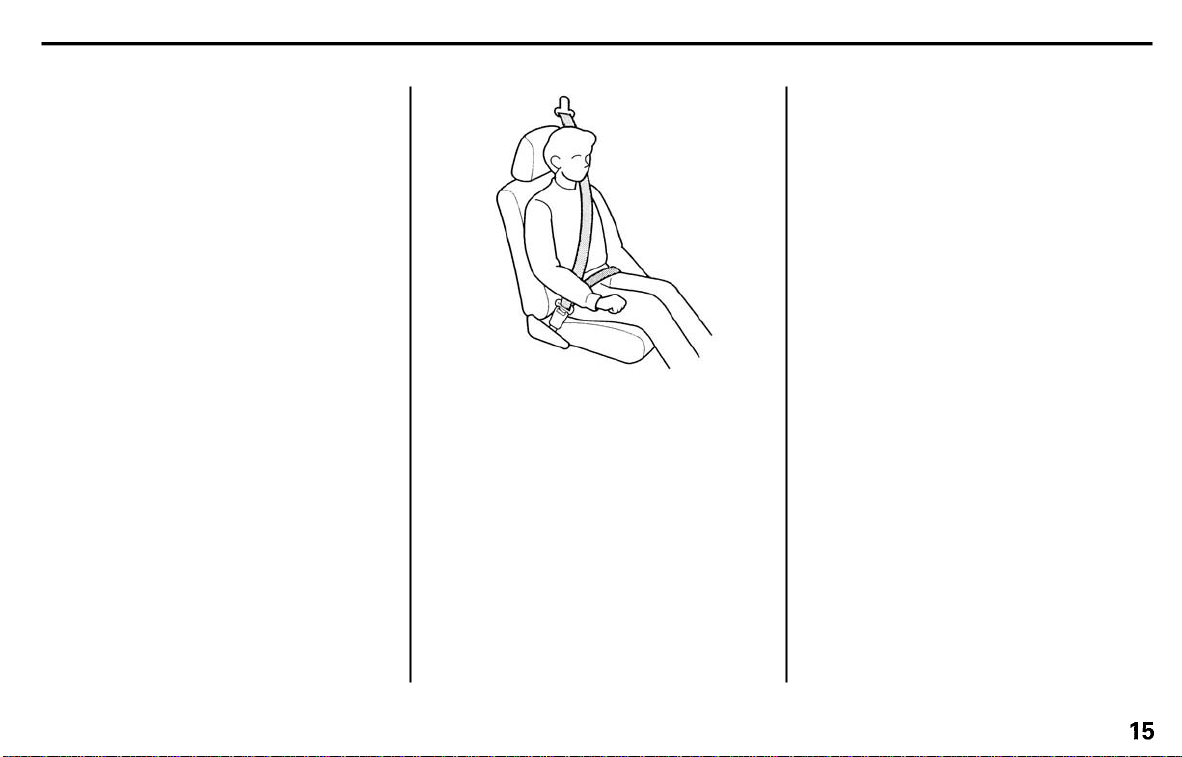
7.Maintain a Proper Sitting
Position
After all occupants have adjusted
their seats and put on seat belts, it is
very important that they continue to
sit upright, well back in their seats,
with their feet on the floor, until the
vehicle is parked and the engine is
off.
Sitting improperly can increase the
chance of injury during a crash. For
example, if an occupant slouches,
lies down, turns sideways, sits
forward, leans forward or sideways,
or puts one or both feet up, the
chance of injury during a crash is
greatly increased.
In addition, an occupant who is out of
position in the front seat can be
seriously or fatally injured by
striking interior parts of the vehicle,
or by being struck by an inflating
airbag.
Sitting improperly or out of
position can result in serious
injury or death in a crash.
Always sit upright, well back in
the seat, with your feet on the
floor.
Remember, to get the best
protection from your vehicle's
airbags and other safety features,
you must sit properly and wear your
seat belt properly.
Driver and Passenger Safety
Page 21
Protecting Adults
Main Menu
Table of Contents
▲
▼
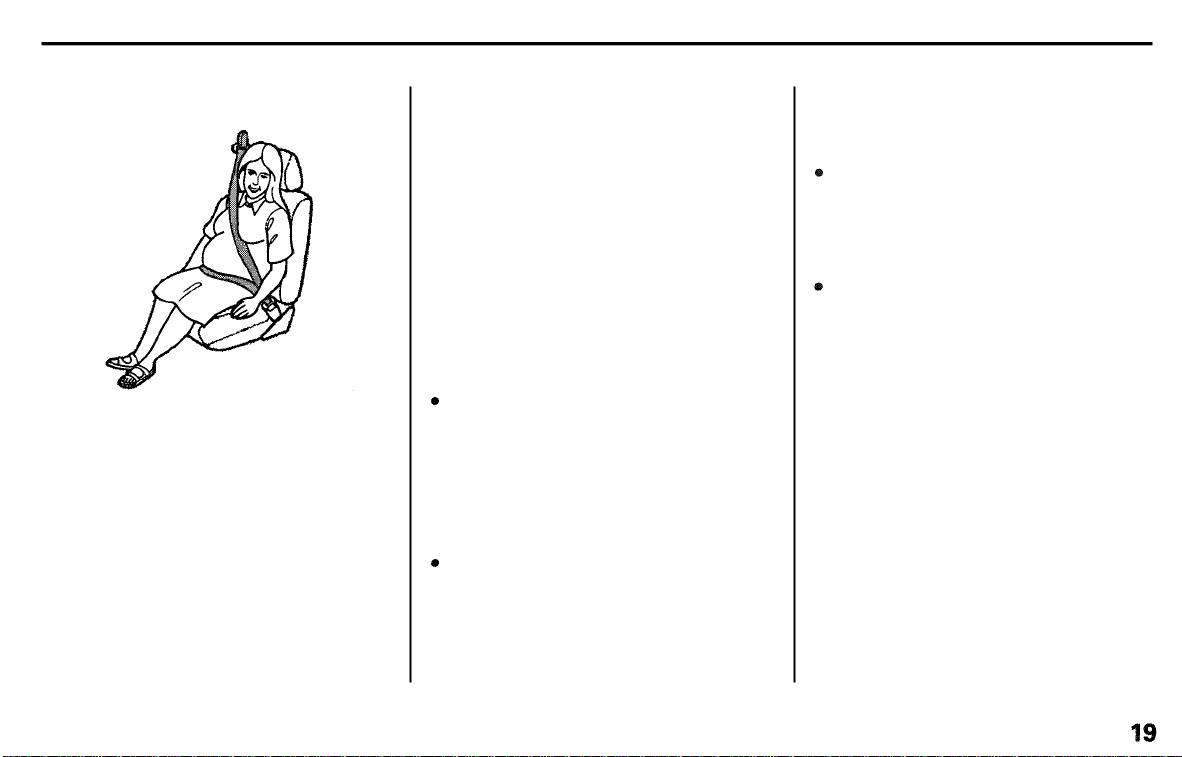
Advice for Pregnant Women
Because protecting the mother is the
best way to protect her unborn child,
a pregnant woman should always
wear a seat belt whenever she drives
or rides in a vehicle.
We recommend that pregnant
women use a lap/shoulder belt
whenever possible. Remember to
keep the lap portion of the belt as
low as possible across your hips.
Pregnant women should also sit
upright and as far back as possible
from the steering wheel or
dashboard. This will reduce the risk
of injuries to both the mother and
her unborn child that can be caused
by a crash or an inflating airbag.
Each time you have a check-up, ask
your doctor if it's okay for you to
drive.
Additional Safety Precautions
Never let passengers ride in the
cargo area or on top of a foldeddown back seat. All passengers
must sit in locked, upright seats
and be properly restrained by seat
belts.
Passengers should not stand up or
change seats while the vehicle is
moving. A passenger who is not
wearing a seat belt during a crash
or emergency stop can be thrown
against the inside of the vehicle,
against other occupants, or out of
the vehicle.
Two people should never use the
same seat belt. If they do, they
could be very seriously injured in a
crash.
Do not put any accessories on seat
belts. Devices intended to improve
occupant comfort or reposition the
shoulder part of a seat belt, can
severely compromise the
protective capability of the seat
belt and increase the chance of
serious injury in a crash.
CONTINUED
Driver and Passenger Safety
Page 22
Protecting Adults
Main Menu
Table of Contents
▲
▼
Do not place hard or sharp objects
between yourself and an airbag.
Carrying hard or sharp objects on
your lap, or driving with a pipe or
other sharp object in your mouth,
can result in injuries if your
airbags inflate.
Keep your hands and arms away
from the airbag covers. If your
hands or arms are close to the SRS
covers in the center of the
steering wheel and on top of the
dashboard, they could be injured if
the airbags inflate.
Driver and Passenger Safety
Page 23

Children depend on adults to protect
Main Menu
Table of Contents
▲
▼
them. However, despite their best
intentions, many parents and other
adults may not know how to properly
protect young passengers.
So if you have children, or if you ever
need to drive with a grandchild or
other children in your vehicle, be
sure to read this section.
Children who are unrestrained
or improperly restrained can be
seriously injured or killed in a
crash.
Any child too small for a seat
belt should be properly
restrained in a child seat. A
larger child should be properly
restrained with a seat belt.
Protecting Children
All Children Must Be Restrained
Each year, many children are injured
or killed in vehicle crashes because
they are either unrestrained or not
properly restrained. In fact, vehicle
accidents are the number one cause
of death of children ages 12 and
under.
To reduce the number of child
deaths and injuries, every state and
Canadian province requires that
infants and children be restrained
whenever they ride in a vehicle.
Any child who is too small to wear a
seat belt should be properly
restrained in a child seat. (See page
25.)
A larger child should always be
restrained with a seat belt. (See page
37.)
Driver and Passenger Safety
Page 24

Protecting Children
Main Menu
Table of Contents
▲
▼
Children Should Sit in the Back
Seat
According to accident statistics,
children of all ages and sizes are
safer when they are restrained in the
back seat, not the front seat. The
National Highway Traffic Safety
Administration and Transport
Canada recommend that all children
ages 12 and under be properly
restrained in the back seat.
In the back seat, children are less
likely to be injured by striking hard
interior parts during a collision or
hard braking. Also, children cannot
be injured by an inflating airbag
when they ride in the back.
The Passenger's Airbag Poses
Serious Risks to Children
Airbags have been designed to help
protect adults in a moderate to
severe frontal collision. To do this,
the passenger's airbag is quite large,
and it inflates with tremendous
speed.
Infants
Never put a rear-facing child seat in
the front seat of a vehicle equipped
with a passenger's airbag.
If the
airbag inflates, it can hit the back of
the child seat with enough force to
kill or very seriously injure an infant.
Small Children
Placing a forward-facing child seat in
the front seat of a vehicle equipped
with a passenger's airbag can be
hazardous. If the vehicle seat is too
far forward, or the child's head is
thrown forward during a collision, an
inflating airbag can strike the child
with enough force to kill or very
seriously injure a small child.
Larger Children
Children who have outgrown child
seats are also at risk of being injured
or killed by an inflating passenger's
airbag. Whenever possible, larger
children should sit in the back seat,
properly restrained with a seat belt.
(See page 37 for important
information about protecting larger
children.)
Driver and Passenger Safety
Page 25
Protecting Children
Main Menu
Table of Contents
▲
▼
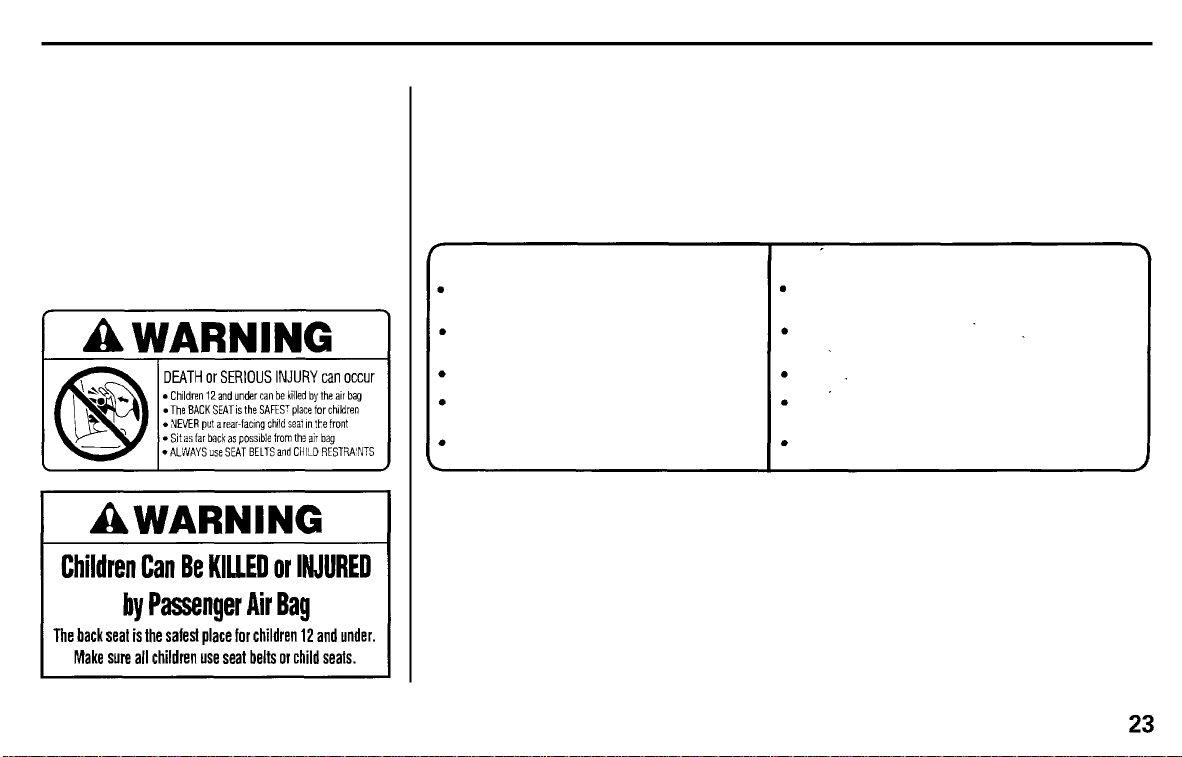
U.S. Models
To remind you of the passenger's
airbag hazards, and that children
must be properly restrained in a
back seat, your vehicle has warning
labels on the dashboard and on the
driver's and front passenger's visors.
Please read and follow the
instructions on these labels.
Canadian Models
To remind you of the airbag hazards,
your vehicle has warning labels on
the driver's and front passenger's
visors. Please read and follow the
instructions on these labels.
CAUTION
TO AVOID SERIOUS INJURY:
FOR MAXIMUM SAFETY PROTECTION IN
ALL TYPES OF CRASHES, YOU MUST
ALWAYS WEAR YOUR SAFETY BELT.
DO NOT INSTALL REARWARD-FACING
CHILD SEATS IN ANY FRONT
PASSENGER SEAT POSITION.
DO NOT SIT OR LEAN UNNECESSARILY
CLOSE TO THE AIR BAG.
DO NOT PLACE ANY OBJECTS OVER THE
AIR BAG OR BETWEEN THE AIR BAG
AND YOURSELF.
SEE THE OWNER'S MANUAL FOR FURTHER
INFORMATION AND EXPLANATIONS.
PRECAUTIONS:
POUR EVITER DES BLESSURES GRAVES:
POUR PROFITER D'UNE PROTECTIOON
MAXIMALE LORS D'UNE COLLISION BOUCLEZ
TOUJOURS VOTRE C EINTURE DE SECURITE.
NINSTALLEZ JAMAIS UN SIEGE POUR
ENFANTS FAISANT FACE A L'ARRIERE SUR
LE SIEGE DU PASSAGER AVANT.
NE VOUS APPUYEZ PAS ET NE VOUS ASSOYEZ
PAS PRES DU COUSSIN GONFLABLE.
NE DEPOSEZ AUCUN OBJET SUR LE COUSSIN
GONFLABLE OU ENTRE LE COUSSIN
GONFLABLE ET VOUS.
LISEZ LE GUIDE UTILISATEUR POUR DE
PULS AMPLES RENSEIGNEMENTS.
Driver and Passenger Safety
Page 26
Protecting Children
Main Menu
Table of Contents
▲
▼
If You Must Drive with Several
Children
Your vehicle has three seating
positions in the back seat where
children can be properly restrained.
If you ever have to carry more than
three children in your vehicle:
Place the largest child in the front
seat, provided the child is large
enough to wear a seat belt
properly (see page 37).
Move the vehicle seat as far to the
rear as possible (see page 12).
Have the child sit upright and well
back in the seat (see page 18).
Make sure the seat belt is properly
positioned and secured (see page
15).
If a Child Requires Close
Attention
Many parents say they prefer to put
an infant or small child in the front
passenger seat so they can watch the
child, or because the child requires
attention.
Placing a child in the front seat
exposes the child to hazards from
the airbag, and paying close
attention to a child distracts the
driver from the important tasks of
driving, placing both of you at risk.
If a child requires physical attention
or frequent visual contact, we
strongly recommend that another
adult ride with the child in the back
seat. The back seat is far safer for a
child than the front.
Additional Safety Precautions
Use childproof door locks to
prevent children from opening the
doors. Using this feature will
prevent children from opening the
doors and accidentally falling out
(see page 75).
Use the mam power window
switch to prevent children from
opening the rear windows. Using
this feature will prevent children
from playing with the windows,
which could expose them to
hazards or distract the driver (see
page 84).
Driver and Passenger Safety
Page 27
Protecting Children
Main Menu
Table of Contents
▲
▼
Do not leave children alone in your
vehicle. Leaving children without
adult supervision is illegal in most
states and provinces, and can be
very hazardous. For example,
infants and small children left in a
vehicle on a hot day can the from
heatstroke. And children left alone
with the key in the ignition can
accidentally set the vehicle in
motion, possibly injuring
themselves or others.
General Guidelines for Using
Child Seats
The following pages give general
guidelines for selecting and installing
child seats for infants and small
children.
Selecting a Child Seat
To provide proper protection, a child
seat should meet three
requirements:
1.The child seat should meet safety
standards. The child seat should
meet Federal Motor Vehicle
Safety Standard 213 (FMVSS 213)
or Canadian Motor Vehicle Safety
Standard 213 (CMVSS 213). Look
for the manufacturer's statement
of compliance on the box and seat.
2. The child seat should be of the
proper type and size to fit the child.
Infants: Children up to about one
year old should be restrained in a
rear-facing, reclining child seat. Only
a rear-facing seat provides the
proper support to protect an infant's
head, neck, and back. See page
29 for additional information on
protecting infants.
CONTINUED
Driver and Passenger Safety
Page 28
Protecting Children
Main Menu
Table of Contents
▲
▼
Small Children: A child who is too
large for a rear-facing child seat, and
who can sit up without support,
should be restrained in a forwardfacing child seat. See page 33 for
additional information on protecting
small children.
3. The child seat should fit the
vehicle seating position (or
positions) where it will be used.
Due to variations in the design of
child seats, vehicle seats, and seat
belts, all child seats will not fit all
vehicle seating positions.
However, Honda is confident that
one or more child seat models can fit
and be properly installed in all
recommended seating positions in
your vehicle.
Before purchasing a child seat, we
recommend that parents test the
child seat in the specific vehicle
seating position (or positions) where
they intend to use the seat. If a
previously purchased child seat does
not fit, you may need to buy a
different one that will fit.
Driver and Passenger Safety
Page 29
Protecting Children
Main Menu
Table of Contents
▲
▼
Placing a Child Seat
This page briefly summarizes
Honda's recommendations on where
to place rear-facing and forwardfacing child seats in your vehicle.
Airbags Pose Serious
Risks to Children
The passenger's airbag inflates
with enough force to kill or
seriously injure an infant in a
rear-facing child seat.
A small child in a forward-facing
child seat is also at risk. If the
vehicle seat is too far forward,
or the child's head is thrown
forward during a collision, an
inflating airbag can kill or
seriously injure the child.
If a small child must ride in the
front, follow the instructions
provided.
Front Passenger's Seat
Infants: Never in the front seat, due
to the passenger's airbag hazard.
Small children: Not recommended,
due to the passenger's airbag
hazard. If a small child must ride
in front, move the vehicle seat to
the rear-most position and secure
a front-facing child seat with the
seat belt (see page 34).
Back Seat
Infants: Recommended positions.
Secure a rear-facing child seat
with the seat belt (see page 30).
Small children: Recommended
positions. Secure a front-facing
child seat with the seat belt (see
page 34).
CONTINUED
Driver and Passenger Safety
Page 30

Protecting Children
Main Menu
Table of Contents
▲
▼
Installing a Child Seat
After selecting a proper child seat,
and a good position to install the seat,
there are three main steps in
installing the seat:
1. Secure the child seat to the vehicle
with a seat belt. All child seats
must be secured to the vehicle
with the lap belt or the lap part of
a lap/shoulder belt. A child whose
seat is not properly secured to the
vehicle can be endangered in a
crash. See pages 30 and 32 for
instructions on how to secure child
seats in this vehicle.
2. Make sure the child seat is firmly
secured. After installing a child
seat, push and pull the seat
forward and from side to side to
verify that it is secure.
To provide security during normal
driving maneuvers as well as during
a collision, we recommend that
parents secure a child seat as firmly
as possible.
However, a child seat does not need
to be "rock solid." In some vehicles
or seating positions, it may be
difficult to install a child seat so that
it does not move at all. Some side-toside or back-and-forth movement can
be expected and should not reduce
the child seat's effectiveness.
If the child seat is not secure, try
installing it in a different seating
position, or use a different style of
child seat that can be firmly secured
in the desired seating position.
3. Secure the child in the child seat.
Make sure the child is properly
strapped in the child seat
according to the child seat maker's
instructions. A child who is not
properly secured in a child seat
can be thrown out of the seat in a
crash and seriously injured.
Storing a Child Seat
When you are not using a child seat,
either remove it and store it in a safe
place, or make sure it is properly
secured. An unsecured child seat can
be thrown around the vehicle during
a crash or sudden stop and injure
someone.
Driver and Passenger Safety
Page 31

Protecting Children
Main Menu
Table of Contents
▲
▼
Protecting Infants
Child Seat Type
Only a rear-facing child seat provides
proper support for a baby's head,
neck, and back. Infants up to about
one year of age must be restrained in
a rear-facing child seat.
Two types of seats may be used: a
seat designed exclusively for infants,
or a convertible seat used in the rearfacing, reclining mode.
Placing a rear-facing child seat
in the front seat can result in
serious injury or death if the
airbags inflate.
Always place a rear-facing child
seat in the back seat, not the
front.
We recommend that an infant be
restrained in a rear-facing child seat
until the infant reaches the seat
maker's weight or height limit and is
able to sit up without support.
Rear-Facing Child Seat Placement
In this vehicle, a rear-facing child
seat can be placed in any seating
position in the back, but not in the
front seat.
Never put a rear-facing child seat in
the front seat. If the passenger's
airbag inflates, it can hit the back of
the child seat with enough force to
kill or seriously injure an infant. If an
infant must be closely watched, we
recommend that another adult sit in
the back seat with the baby.
Do not put a rear-facing child seat in
a forward-facing position. If placed
facing forward, an infant could be
very seriously injured during a
frontal collision.
CONTINUED
Driver and Passenger Safety
Page 32

Protecting Children
Main Menu
Table of Contents
▲
▼
Installing a Rear-Facing Child Seat
with a Lap/Shoulder Belt
The lap/shoulder belts in the outer
back seats have a locking
mechanism that must be activated to
secure a child seat.
The following pages provide
instructions and tips on how to
secure a rear-facing child seat with
this type of seat belt.
See page 32 for how to secure a rearfacing child seat in the center back
seat with the lap belt.
For tips on installing a rear-facing
child seat with either type of seat
belt, see page 32.
1. With the child seat in the desired
back seating position, route the
belt through the child seat
according to the seat maker's
instructions, then insert the latch
plate into the buckle.
Driver and Passenger Safety
Page 33

Protecting Children
Main Menu
Table of Contents
▲
▼
2. To activate the lockable retractor,
slowly pull the shoulder part of the
belt all the way out until it stops,
then let the belt feed back into the
retractor (you might hear a
clicking noise as the belt retracts).
3. After the belt has retracted, tug on
it. If the belt is locked, you will not
be able to pull it out. If you can pull
the belt out, it is not locked and
you will need to repeat these steps.
4. After confirming that the belt is
locked, grab the shoulder part of
the belt near the buckle and pull
up to remove any slack from the
lap part of the belt. Remember, if
the lap part of the belt is not tight,
the child seat will not be secure.
To remove slack, it may help to
put weight on the child seat, or
push on the back of the seat, while
pulling up on the belt.
5. Push and pull the child seat
forward and from side to side to
verify that it is secure enough to
stay upright during normal driving
maneuvers. If the child seat is not
secure, unlatch the belt, allow it to
retract fully, then repeat these
steps.
To deactivate the locking
mechanism and remove a child seat,
unlatch the buckle, unroute the seat
belt, and let the belt fully retract.
CONTINUED
Driver and Passenger Safety
Page 34

Protecting Children
Main Menu
Table of Contents
▲
▼
Installing a Rear-Facing Child Seat
with the Lap Belt
To install a rear-facing child seat in
the center back seat with the lap belt,
follow instruction number 1 on page
30 for routing and latching the seat
belt. Then pull hard on the loose end
of the belt to remove any slack (it
may help to put weight on the child
seat while pulling on the belt).
Finally, follow instruction number 5
on page 31 to verify that the child
seat is secure.
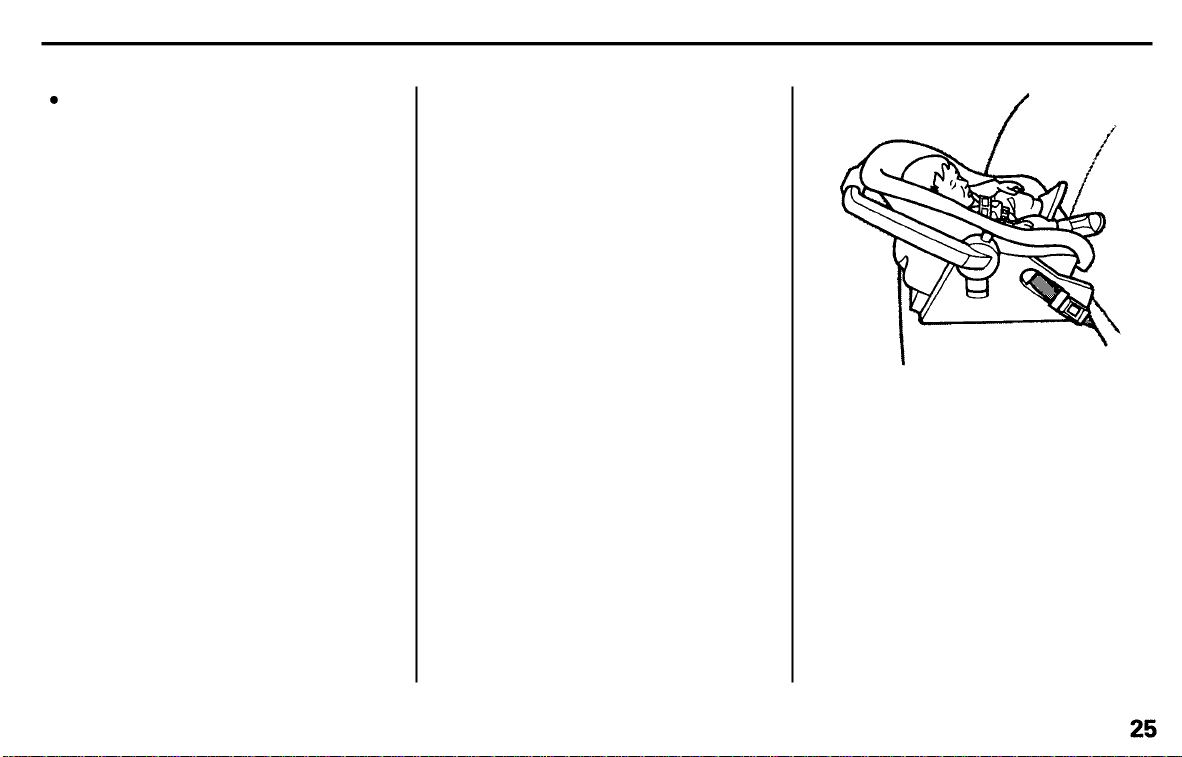
Rear-Facing Child Seat Installation
Tips
For proper protection, an infant must
ride in a reclined, or semi-reclined
position. To determine the proper
reclining angle, check with the baby's
doctor or follow the seat maker's
recommendations.
To achieve the desired reclining
angle, it may help to put a rolled up
towel under the toe of the child seat,
as shown.
When properly installed, a rearfacing child seat may prevent the
driver or a front-seat passenger from
moving the seat as far back as
recommended (see page 12). Or it
may prevent them from locking the
seat-back in the desired upright
position (see page 13).
In either case, we recommend that
you place the child seat directly
behind the front passenger seat,
move the front seat as far forward as
needed, and leave it unoccupied. Or
you may wish to get a smaller child
seat that allows you to safely carry a
front passenger.
Driver and Passenger Safety
Page 35

Protecting Children
Main Menu
Table of Contents
▲
▼
Additional Precautions for Infants
Never hold an infant on your lap,
If you are not wearing a seat belt
in a crash, you could be thrown
forward into the dashboard and
crush the infant.
If you are wearing a seat belt, the
infant can be torn from your arms.
For example, if your vehicle
crashes into a parked vehicle at 30
mph (48 km/h), a 20-lb (9 kg)
infant will become a 600-lb (275
kg) force, and you will not be able
to hold on.
Never put a seat belt over yourself
and an infant. During a crash, the
belt could press deep into the
infant and cause very serious
injuries.
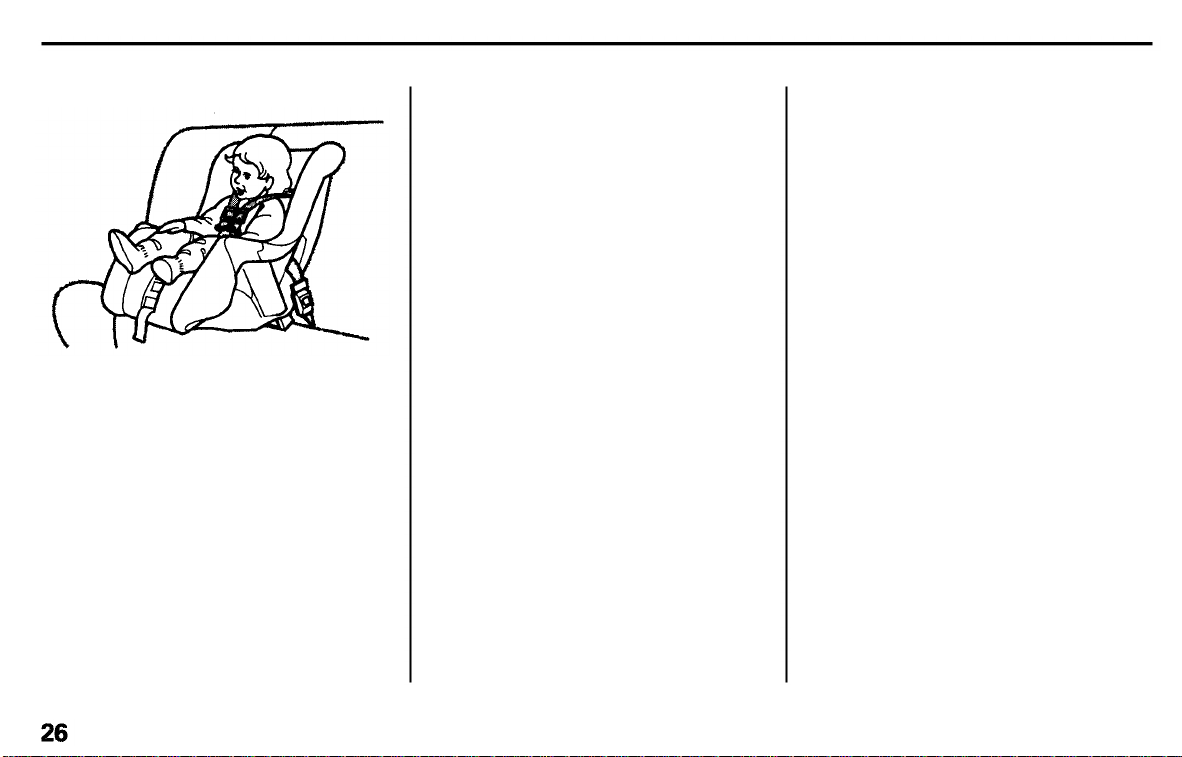
Protecting Small Children
Child Seat Type
A child who can sit up without
support, and who fits within the child
seat maker's weight and height
limits, should be restrained in a
forward-facing, upright child seat.
Of the different seats available, we
recommend those that have a fivepoint harness system as shown.
We also recommend that a small
child stay in the child seat as long as
possible, until the child reaches the
weight or height limit for the seat.
Child Seat Placement
In this vehicle, the best place to
install a forward-facing child seat is
in one of the seating positions in the
back seat.
Placing a forward-facing child seat in
the front seat of a vehicle equipped
with a passenger's airbag can be
hazardous. If the vehicle seat is too
far forward, or the child's head is
thrown forward during a collision, an
inflating passenger's airbag can
strike the child with enough force to
cause very serious or fatal injuries. If
a small child must be closely
watched, we recommend that
another adult sit in the back seat
with the child.
CONTINUED
Driver and Passenger Safety
Page 36

Protecting Children
Main Menu
Table of Contents
▲
▼
Improperly placing a forward-
facing child seat in the front
seat can result in serious injury
or death if the airbags inflate.
If you must place a forwardfacing child seat in front, move
the vehicle seat as far back as
possible and properly restrain
the child.
Installing a Child Seat with a Lap/
Shoulder Belt
The lap/shoulder belts in the outer
back and front passenger seating
positions have a locking mechanism
that must be activated to secure a
child seat.
The following pages provide
instructions on how to secure a
forward-facing child seat with this
type of seat belt.
If it is necessary to put a forwardfacing child seat in the front, move
the vehicle seat as far to the rear as
possible, be sure the child seat is
firmly secured to the vehicle, and
that the child is properly strapped in
the seat.
Driver and Passenger Safety
See page 36 for how to secure a
forward-facing child seat in the
center back seat with the lap belt.
1. With the child seat in the desired,
back, seating position, route the
belt through the child seat
according to the seat maker's
instructions, then insert the latch
plate into the buckle.
Page 37

Protecting Children
Main Menu
Table of Contents
▲
▼
2. To activate the lockable retractor,
slowly pull the shoulder part of the
belt all the way out until it stops,
then let the belt feed back into the
retractor (you might hear a
clicking noise as the belt retracts).
3. After the belt has retracted, tug on
it. If the belt is locked, you will not
be able to pull it out. If you can pull
the belt out, it is not locked and
you will need to repeat these steps.
4. After confirming that the belt is
locked, grab the shoulder part of
the belt near the buckle and pull
up to remove any slack from the
lap part of the belt. Remember, if
the lap part of the belt is not tight,
the child seat will not be secure. It
may help to put weight on the
child seat, or push on the back of
the seat, while pulling up on the
belt.
5. Push and pull the child seat
forward and from side to side to
verify that it is secure enough to
stay upright during normal driving
maneuvers. If the child seat is not
secure, unlatch the belt, allow it to
retract fully, then repeat these
steps.
CONTINUED
Driver and Passenger Safety
Page 38

Protecting Children
Main Menu
Table of Contents
▲
▼
To deactivate the locking
mechanism in order to remove a
child seat, unlatch the buckle,
unroute the seat belt, and let the belt
fully retract.
Installing a Child Seat with the Lap
Belt
To install a forward-facing child seat
in the center back seat with the lap
belt, follow instruction number 1 on
page 34 for routing and latching the
seat belt. Then pull hard on the loose
end of the belt to remove any slack;
it may help to put weight on the child
seat while pulling on the belt. Finally,
follow instruction number 5 on page
35 to verify that the child seat is
secure.
Additional Precautions for Small
Children
Never hold a small child on your
lap.
If you are not wearing a seat
belt in a crash, you could be
thrown forward into the
dashboard and crush the child.
If you are wearing a seat belt, the
child can be torn from your arms
during a crash. For example, if
your vehicle crashes into a parked
vehicle at 30 mph (48 km/h), a
30-lb (14 kg) child will become a
900-lb (410 kg) force, and you will
not be able to hold on.
Never put a seat belt over yourself
and a child. During a crash, the
belt could press deep into the child
and cause very serious injuries.
Driver and Passenger Safety
Page 39

Protecting Children
Main Menu
Table of Contents
▲
▼
Protecting Larger Children
When a child reaches the
recommended weight or height limit
for a forward-facing child seat, the
child should sit in one of the outer
back seats and wear a lap/shoulder
belt. A lap/shoulder belt provides
better protection than a lap belt.
If a child is too short for the shoulder
part of the belt to properly fit, we
recommend that the child use a
booster seat until they are tall
enough to use the seat belt without a
booster.
The following pages give
instructions on how to check proper
seat belt fit, what kind of booster
seat to use if one is needed, and
important precautions for children
who must sit in the front seat.
Allowing a larger child to sit
improperly in the front seat can
result in injury or death if the
airbags inflate.
If a larger child must sit in front,
make sure the child moves the
seat as far back as possible
and wears the seat belt properly.
Checking Seat Belt Fit
To determine if a lap/shoulder belt
properly fits a child, have the child
put on the seat belt. Follow the
instructions on page 15 . Then check
how the belt fits.
CONTINUED
Driver and Passenger Safety
Page 40

Protecting Children
Main Menu
Table of Contents
▲
▼
If the shoulder part of the belt rests
over the child's collarbone and
against the center of the chest, as
shown, the child is large enough to
wear the seat belt.
However, if the belt touches or
crosses the child's neck, the child
needs to use a booster seat.
Do not let a child wear a seat belt
across the neck. This could result in
serious neck injuries during a crash.
Do not let a child put the shoulder
part of a seat belt behind the back or
under the arm. This could cause
very serious injuries during a crash.
It also increases the chance that the
child will slide under the belt in a
crash and be injured.
Do not put any accessories on a seat
belt. Devices intended to improve
occupant comfort or reposition the
shoulder part of a seat belt, severely
compromise the protective capability
of the seat belt and increase the
chance of serious injury in a crash.
Two children should never use the
same seat belt. If they do, they could
be very seriously injured in a crash.
Using a Booster Seat
If a child needs a booster seat, we
recommend choosing a style that
allows the child to use the lap/
shoulder belt directly, without a
shield, as shown.
Whichever style you select, follow
the booster seat maker's instructions.
Driver and Passenger Safety
Page 41

Protecting Children
Main Menu
Table of Contents
▲
▼
A child may continue using a booster
seat until the tops of the ears are
even with the top of the seat-back. A
child of this height should be tall
enough to use the lap/shoulder belt
without a booster.
When Can a Larger Child Sit in Front
The National Highway Traffic Safety
Administration and Transport
Canada recommend that all children
ages 12 and under be properly
restrained in a back seat.
The back seat is the safest place for
a child of any age or size.
In addition, the passenger's airbag
poses serious risks to children. If the
seat is too far forward, or the child's
head is thrown forward during a
collision, or the child is unrestrained
or out of position, an inflating airbag
can kill or seriously injure the child.
Of course, children vary widely. And
while age may be one indicator of
when a child can safely ride in the
front, there are other important
factors you should consider.
Physical Size
Physically, a child must be large
enough for the lap/shoulder belt to
properly fit over the hips, chest, and
shoulder (see pages 15 and 37). If
the seat belt does not fit properly,
the child should not sit in the front.
Maturity
To safely ride in front, a child must
be able to follow the rules, including
sitting properly and wearing the seat
belt properly throughout a ride.
CONTINUED
Driver and Passenger Safety
Page 42

Protecting Children
Main Menu
Table of Contents
▲
▼
If you decide that a child can safely
ride up front, be sure to:
Carefully read the owner's manual
and make sure you understand all
seat belt instructions and all safety
information.
Move the vehicle seat to the rear-
most position.
Have the child sit up straight, back
against the seat, and feet on or
near the floor.
Check that the child's seat belt is
properly positioned and secured.
Supervise the child. Even mature
children sometimes need to be
reminded to fasten the seat belts
or sit properly.
Using Child Seats with Tethers
Your Honda has two attachment
points for securing a tether-style
child seat to the vehicle.
Since a tether can provide additional
security, we recommend using a
tether whenever one is required or
available. (Tethers are required in
Canada. U.S. owners may check with
the child seat maker to determine
whether a tether is available for a
particular child seat.)
Canadian
Models
Select the attachment point you want
to use and remove the plug with a
small flat-tipped screwdriver or metal
fingernail file.
U.S. Models
Instructions for accessing the
attachment points in your vehicle are
available from your Honda dealer.
Driver and Passenger Safety
Page 43

Install the anchor plate and
Main Menu
Table of Contents
▲
▼
mounting hardware. The hardware is
available for purchase from your
Honda dealer (part number 82410SE3-C01). For Canadian models, the
hardware is supplied with the vehicle.
All Models
When installing tether hardware,
make sure the toothed washer is on
the bottom of the bolt. Tighten the
bolt to:
16 lbf.ft (22 N.m, 2.2 kgf.m)
If a torque wrench was not used, see
your Honda dealer as soon as
possible to verify proper installation.
To attach the tether to the child seat,
follow the child seat maker's
instructions.
Protecting Children
If you are not sure how to install the
tether, or you need mounting
hardware, contact your Honda dealer.
Driver and Passenger Safety
Page 44

Additional Information About Your Seat Belts
Main Menu
Table of Contents
▲
▼
Seat Belt System Components
Your seat belt system includes lap/
shoulder belts in the front seats and
the outer back seats, and a lap belt in
the center back seat.
The seat belt system also
includes a light on the
instrument panel to remind you and
your passengers to fasten your belts.
If the driver's seat belt is not
fastened before the ignition is turned
ON (II), the light will come on and a
beeper will also sound. The beeper
will stop after a few seconds, but the
light will stay on until the driver's
seat belt is fastened.
Lap/Shoulder Belt
This seat belt has a single belt that
goes over your shoulder, across your
chest and across your hips.
To fasten the belt, insert the latch
plate into the buckle, then tug on the
belt to make sure the buckle is
latched.
To unlock the belt, push the red
PRESS button on the buckle.
Guide the belt across your body to
the door pillar. After exiting the
vehicle, be sure the belt is out of the
way and will not get closed in the
door.
All lap/shoulder belts have an
emergency locking retractor.
In normal driving, the retractor lets
you move freely in your seat while it
keeps some tension on the belt.
During a collision or sudden stop,
the retractor automatically locks the
belt to help restrain your body.
All the lap/shoulder belts except the
driver's have an additional locking
mechanism that must be activated to
secure a child seat. (See pages
30 and 34 for instructions on how to
secure child seats with this type of
seat belt.)
If the shoulder part of the belt is
pulled all the way out, the locking
mechanism will activate. The belt
will retract, but it will not allow the
passenger to move freely.
Driver and Passenger Safety
Page 45

Additional Information About Your Seat Belts
Main Menu
Table of Contents
▲
▼
To deactivate the locking
mechanism, unlatch the buckle and
let the seat belt fully retract. To
refasten the belt, pull it out only as
far as needed.
See page 15 for instructions on how
to wear the lap/shoulder belt
properly.
Lap Belt
The lap belt has one manually-
adjusted belt that fits across the hips.
To fasten the belt, insert the latch
plate into the buckle marked
CENTER, then tug on the belt to
make sure the buckle is latched.
To unlock the belt, push the red
PRESS button.
See page 16 for how to lengthen the
lap belt, and how to properly position
the belt.
Seat Belt Maintenance
For safety, you should check the
condition of your seat belts regularly.
Pull each belt out fully and look for
frays, cuts, burns, and wear. Check
that the latches work smoothly and
that the lap/shoulder belts retract
easily. Any belt not in good condition
or not working properly will not
provide good protection and should
be replaced as soon as possible.
U.S. Models
Honda provides a lifetime warranty
on seat belts. Honda will repair or
replace any seat belt component that
fails to function properly during
normal use. Please see your Honda
Warranty Information booklet for
details.
CONTINUED
Driver and Passenger Safety
Page 46

Additional Information About Your Seat Belts
Main Menu
Table of Contents
▲
▼
If a seat belt is worn during a crash,
you should have your dealer inspect
Not checking or maintaining
seat belts can result in serious
injury or death if the seat belts
do not work properly when
needed.
Check your seat belts regularly
and have any problem
corrected as soon as possible.
the belt, and replace it if necessary.
A belt that has been worn during a
crash may not provide the same level
of protection in a subsequent crash.
The dealer should also inspect the
anchors for damage and replace
them if needed.
For information on how to clean your
seat belts, see page 246.
Driver and Passenger Safety
Page 47

Additional Information About Your SRS
Main Menu
Table of Contents
▲
▼
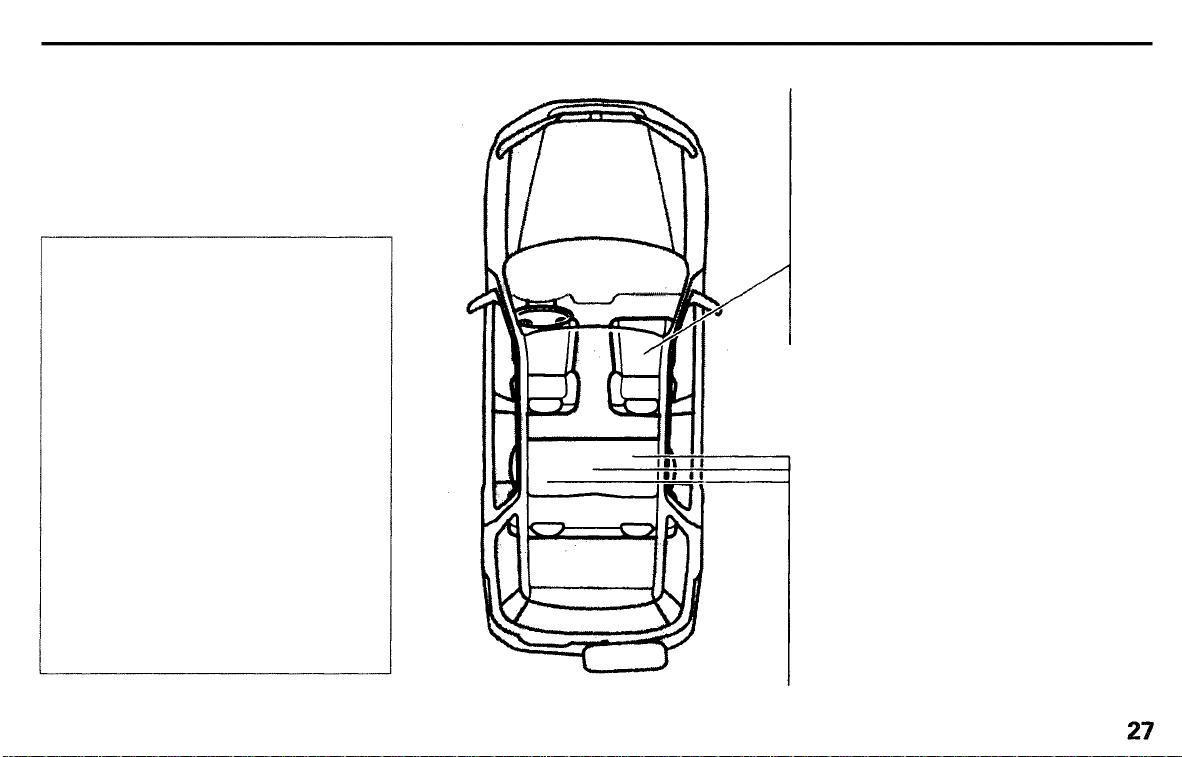
SRS Components
Your Supplemental Restraint System
(SRS) includes:
Two front airbags. The driver's
airbag is stored in the center of
the steering wheel; the front
passenger's airbag is stored in the
dashboard. Both are marked "SRS
AIRBAG."
Automatic seat belt tensioners
that tighten the front seat belts
during a moderate to severe
frontal collision.
Sensors that can detect a
moderate to severe frontal
collision.
A sophisticated electronic system
that continually monitors the
sensors, control unit, the airbag
activators, and all related wiring
when the ignition is ON (II).
An indicator light on the
instrument panel that alerts you to
a possible problem with the
system (see page 47 ).
Emergency backup power in case
your vehicle's electrical system is
disconnected in a crash.
How Your Airbags Work
If you ever have a moderate to
severe frontal collision, the sensors
will detect rapid deceleration and
signal the control unit to instantly
inflate the airbags and activate the
automatic seat belt tensioners.
CONTINUED
Driver and Passenger Safety
Page 48

Additional Information About Your SRS
Main Menu
Table of Contents
▲
▼
During a crash, your seat belt helps
restrain your lower body and torso,
while the tensioner tightens and
locks the seat belt to help keep you
in place. Your airbag provides a
cushion to help restrain and protect
your head and chest.
Since both airbags use the same
sensors, both airbags normally
inflate at the same time. However, it
is possible for only one airbag to
inflate.
This can occur when the severity of
a collision is at the margin, or
threshold, that determines whether
or not the airbags will deploy. In
such cases, the seat belt will provide
sufficient protection, and the
supplemental protection offered by
the airbag would be minimal.
After inflating, the airbags
immediately deflate, so they won't
interfere with the driver's visibility,
or the ability to steer or operate
other controls.
The total time for inflation and
deflation is approximately one-tenth
of a second, so fast that most
occupants are not aware that the
airbags deployed until they see them
lying in their laps.
After a crash, you may see what
looks like smoke. This is actually
powder from the airbag's surface.
Although the powder is not harmful,
people with respiratory problems
may experience some temporary
discomfort. If this occurs, get out of
the car as soon as it is safe to do so.
U.S. Owners
For additional information on how
your airbags work, see the booklet
titled SRS: What You Need to Know
About Airbags that came with your
owner's manual.
Canadian Owners
For additional information on how
your airbags work, ask your dealer
for a copy of the booklet titled SRS:
What You Need to Know About Airbags.
Driver and Passenger Safety
Page 49

Additional Information About Your SRS
Main Menu
Table of Contents
▲
▼
How the Automatic Seat Belt
Tensioners Work
Your Honda has automatic seat belt
tensioners for added protection
during a moderate to severe frontal
collision.
If your airbags inflate, the tensioners
immediately tighten the front seat
belts to help hold the occupants in
place. The belts will remain tight
until you unbuckle them in the
normal way.
How the SRS Indicator Light
Works
SRS
The purpose of the SRS
light is to alert you to a
potential problem with your
Supplemental Restraint System.
When you turn the ignition ON (II),
this indicator will light up briefly
then go out. This tells you that the
system is working properly.
However, if the light comes on at any
other time, you should have the
system checked by your dealer. For
example:
If the SRS indicator light does not
come on after you turn the ignition
ON (II).
If the light stays on after the
engine starts.
If the light comes on or flashes on
and off while you drive.
If you see any of these indications,
your airbags may not deploy or your
seat belt tensioners may not work
when you need them. See your
Honda dealer as soon as possible.
Ignoring the SRS indicator light
can result in serious injury or
death if the airbags do not
inflate when needed.
Have your vehicle checked by a
dealer as soon as possible if
the SRS light alerts you to a
potential problem.
Driver and Passenger Safety
Page 50

Additional Information About Your SRS
Main Menu
Table of Contents
▲
▼
SRS Service
Your Supplemental Restraint System
is virtually maintenance-free, and
there are no parts you can safely
service. However, you must have
your vehicle serviced if:
Your airbags ever inflate. The
airbags, seat belt tensioners, and
control unit must be replaced. Do
not try to remove or replace the
airbags yourself.
This must be done by a Honda
dealer or a knowledgeable body
shop.
The SRS indicator light alerts you
to a problem. Take your vehicle to
an authorized Honda dealer as
soon as possible. If you ignore this
indication, the airbags might not
inflate when you need them.
Additional Safety Precautions
Do not attempt to deactivate your
airbags. Together, airbags, seat
belt tensioners and seat belts
provide the best protection in a
moderate to severe frontal
collision.
Do not tamper with SRS
components or wiring for any
reason. Tampering could cause
the airbags to deploy, possibly
causing very serious injury.
See page 147 for further information
and precautions relating to your SRS.
Driver and Passenger Safety
Page 51

Carbon Monoxide Hazard
Main Menu
Table of Contents
▲
▼
Your vehicle's exhaust contains
carbon monoxide gas. You should
have no problem with carbon
monoxide entering the vehicle in
normal driving if you maintain your
vehicle properly.
Have the exhaust system inspected
for leaks whenever:
The vehicle is raised for an oil
change.
You notice a change in the sound
of the exhaust.
The vehicle was in an accident
that may have damaged the underside.
Carbon monoxide gas is toxic.
Breathing it can cause
unconsciousness and even kill
you.
Avoid any enclosed areas or
activities that expose you to
carbon monoxide.
High levels of carbon monoxide can
collect rapidly in enclosed areas,
such as a garage. Do not run the
engine with the garage door closed.
Even with the door open, run the
engine only long enough to move the
vehicle out of the garage.
With the tailgate open, air flow can
pull exhaust gas into your vehicle's
interior and create a hazardous
condition. If you must drive with the
tailgate open, open all the windows
and set the heating and cooling
system as shown below.
If you must sit in your parked vehicle,
even in an unconfined area, with the
engine running, adjust the heating
and cooling system as follows:
1. Select the Fresh Air mode.
2. Select the mode.
3. Turn the fan on high speed.
4. Set the temperature control to a
comfortable setting.
Driver and Passenger Safety
Page 52

Safety Labels
Main Menu
Table of Contents
▲
▼
These labels are in the locations
shown. They warn you of potential
hazards that could cause serious
injury. Read these labels carefully.
If a label comes off or becomes hard
to read, contact your Honda dealer
for a replacement.
HOOD
U.S. models
Canadian models
DASH BOARD
U.S. models only
SUN VISOR
U.S. models
Canadian models
SUN VISOR
U.S. models
RADIATOR CAP
Driver and Passenger Safety
Page 53

Instruments and Controls
Main Menu
▲
▼
This section gives information about
the controls and displays that
contribute to the daily operation of
your Honda. All the essential
controls are within easy reach.
Control Locations............................ 52
Indicator Lights................................ 53
Gauges.............................................. 56
Speedometer................................ 56
Tachometer.................................. 56
Odometer...................................... 56
Trip Meter.................................... 56
Fuel Gauge................................... 57
Temperature Gauge.................... 57
Maintenance Required
Indicator.................................... 58
Controls Near the Steering
Wheel........................................ 59
Headlights.................................... 60
Daytime Running Lights............. 60
Instrument Panel Brightness..... 61
Turn Signals................................. 61
Windshield Wipers...................... 62
Windshield Washers................... 62
Rear Window Wiper and
Washer...................................... 63
Hazard Warning........................... 63
Rear Window Defogger.............. 63
Steering Wheel Adjustment....... 64
Steering Wheel Controls................ 66
Cruise Control.............................. 66
Keys and Locks................................ 69
Keys............................................... 69
Ignition Switch............................. 69
Door Locks................................... 70
Power Door Locks....................... 71
Remote Transmitter.................... 72
Childproof Door Locks............... 75
Tailgate......................................... 75
Glove Box..................................... 77
Seats.................................................. 77
Front Seat Adjustments.............. 77
Driver's Seat Height
Adjustment............................... 78
Head Restraints........................... 79
Rear Seat-back Adjustment........ 80
Rear Seat Armrest....................... 80
Reclining the Front and
Rear Seat-backs....................... 81
Folding Rear Seat........................ 82
Power Windows............................... 84
Mirrors.............................................. 85
Adjusting the Power Mirrors..... 86
Parking Brake..................................
Digita
l Clock..................................... 87
86
Center Table..................................... 87
Beverage Holder.............................. 88
Built-in Table....................................
r Pocket.................................. 91
Cente
89
Storage Box...................................... 91
Cargo Floor Pockets........................ 92
Accessory Power Socket................ 92
Tailgate Pocket................................ 93
Cargo Hooks..................................... 93
Ashtrays............................................ 94
Interior Lights.................................. 94
Ceiling Light................................. 94
Spotlights...................................... 95
Cargo Area Light......................... 95
Ignition Switch Light................... 95
Instruments and Controls
Page 54

Control Locations
Main Menu
Table of Contents
▲
▼
POWER WINDOW
SWITCHES
(P.84)
TAILGATE
RELEASE
(P.75)
HOOD RELEASE
HANDLE
(P.142)
MIRROR CONTROLS
(P.86)
FUEL FILL DOOR RELEASE
(P.141)
AUDIO SYSTEM
(P.
106)
HEATING/COOLING CONTROL
(P.98)
Instruments and Controls
Page 55

Indicator Lights
Main Menu
Table of Contents
▲
▼
The instrument panel has many
indicators to give you important
information about your vehicle.
* The U.S. instrument panel is
shown. Differences for Canadian
models are noted in the text.
HIGH BEAM INDICATOR
CHARGING SYSTEM
INDICATOR
LOW OIL
PRESSURE
INDICATOR
SUPPLEMENTAL
RESTRAINT SYSTEM
INDICATOR
MALFUNCTION
INDICATOR LAMP
CRUISE CONTROL
INDICATOR
TAILGATE-OPEN INDICATOR
SEAT BELT
REMINDER LIGHT
LOW FUEL
INDICATOR
ANTI-LOCK BRAKE
SYSTEM INDICATOR*
PARKING BRAKE AND BRAKE
SYSTEM INDICATOR*
Instruments and Controls
Page 56

Indicator Lights
Main Menu
Table of Contents
▲
▼
Low Oil Pressure
Indicator
The engine can be severely damaged
if this light flashes or stays on when
the engine is running. For complete
information, see page 264 .
Charging System
Indicator
If this light comes on when the
engine is running, the battery is not
being charged. For complete
information, see page 265 .
Malfunction Indicator
Lamp
See page 266 .
U.S.
BRAKE
Canada
Parkin g Brake and
Brake System
Indicator
This light has two functions:
1. It lights as a reminder that you
have not released the parking
brake. Driving with the parking
brake applied can damage the
brakes and tires, and cause the
Anti-lock brake system to turn off
(see page 167 ).
2. If it remains lit after you release
the parking brake while the engine
is running, or comes on while
driving, it can indicate a problem
in the brake system. For complete
information, see page 267.
SRS
Supplemental Restraint
System Indicator
This indicator lights when you turn
the ignition switch ON (II). If it
comes on at any other time, it
indicates a problem in the
supplemental restraint system. For
complete information, see page 47.
Seat Belt Reminder Light
This indicator lights when you turn
the ignition switch ON (II). It is a
reminder to you and your passengers
to protect yourselves by fastening
the seat belts. A beeper also sounds
if you have not fastened your seat
belt.
If you do not fasten your seat belt,
the beeper will stop after a few
seconds but the light stays on until
you do. Both the light and the beeper
stay off if you fasten your seat belt
before turning on the ignition.
Instruments and Controls
Page 57

Indicator Lights
Main Menu
Table of Contents
▲
▼
U.S.
ABS
Only on models equipped with ABS (see
page 165)
Canada
Anti-lock Brake
System (ABS)
Indicator
This light normally comes on when
you turn the ignition switch ON (II)
and goes off after the engine starts.
If it comes on at any other time,
there is a problem in the ABS. If this
happens, take the vehicle to your
dealer to have it checked. With the
light on, your vehicle still has normal
braking ability but no anti-lock.
Low Fuel Indicator
This light comes on as a reminder
that you must refuel soon.
High Beam Indicator
This light comes on with the high
beam headlights. See page 60 for
information on the headlight
controls.
On Canadian models, this indicator
comes on with reduced brightness
when the Daytime Running Lights
(DRL) are on (see page 60).
CRUISE
CONTROL
Cruise Control Indicator
This lights when you set the cruise
control. See page 66 for information
on operating the cruise control.
Tailgate-open Indicator
This light comes on if the tailgate is
not closed tightly.
Turn Signal and Hazard Warning
Indicators
The left or right turn signal light
blinks when you signal a lane change
or turn. If the light does not blink or
blinks rapidly, it usually means one
of the turn signal bulbs is burned out
(see page 233). Replace the bulb as
soon as possible, since other drivers
cannot see that you are signalling.
When you turn on the Hazard
Warning switch, both turn signal
lights blink. All turn signals on the
outside of the vehicle should flash.
Instruments and Controls
Page 58

Gauges
Main Menu
Table of Contents
▲
▼
TACHOMETER
ODOMETER
TRIP METER
MAINTENANCE
REQUIRED INDICATOR
Speedometer
U.S.Models
This shows your speed in miles per
hour (mph). The smaller inner
numbers are the speed in kilometers
per hour (km/h).
Canadian Models
This shows your speed in kilometers
per hour (km/h). The smaller inner
numbers are the speed in miles per
hour (mph).
SPEEDOMETER
TRIP METER
RESET BUTTON
FUEL GAUGE
TEMPERATURE
GAUGE
Tachometer
The tachometer shows the engine
speed in revolutions per minute
(rpm). To protect the engine from
damage, never drive with the
tachometer needle in the red zone.
Odometer
The odometer shows the total distance your vehicle has been driven.
It measures miles in U.S. models and
kilometers in Canadian models.
It is illegal under U.S. federal law and
Canadian provincial regulations to
disconnect, reset, or alter the
odometer with the intent to change
the number of miles or kilometers
indicated.
Trip Meter
This meter shows the number of
miles (U.S.) or kilometers (Canada)
driven since you last reset it. To
reset it, push the trip meter reset
button.
Instruments and Controls
Page 59

Gauges
Main Menu
Table of Contents
▲
▼
TACHOMETER
TRIP METER
ODOMETER
Fuel Gauge
This shows how much fuel you have.
It is most accurate when the vehicle
is on level ground. It may show
slightly more or less than the actual
amount when you are driving on
curvy or hilly roads.
SPEEDOMETER
TRIP METER
RESET BUTTON
FUEL GAUGE
TEMPERATURE
GAUGE
The gauge stays at the same fuel
level reading after you turn off the
ignition. When you add fuel, the
gauge slowly changes to the new
reading after you turn the ignition
switch back ON (II).
Temperature Gauge
This shows the temperature of the
engine's coolant. During normal
operation, the pointer should rise
from the bottom white mark to about
the middle of the gauge. In severe
driving conditions, such as very hot
weather or a long period of uphill
driving, the pointer may rise to the
upper white zone. If it reaches the
red (Hot) mark, pull safely to the
side of the road. Turn to page 262 for
instructions and precautions on
checking the engine's cooling
system.
Instruments and Controls
Page 60

Gauges
Main Menu
Table of Contents
▲
▼
Maintenance Required
SLOT
Indicator
INDICATOR
This indicator reminds you that it is
nearing 7,500 miles (12,000 km)
since the last scheduled maintenance.
Refer to the Maintenance Schedules
for Normal and Severe Driving
Conditions on pages
188—192
.
When the distance driven since the
last scheduled maintenance nears
7,500 miles (12,000 km), the
indicator will turn yellow. If you
exceed 7,500 miles (12,000 km), the
indicator will turn red.
Your dealer will reset the indicator
when he performs the scheduled
maintenance. If someone else
performs the maintenance, reset the
indicator by inserting your key in the
slot beside the indicator.
Instruments and Controls
Page 61

Controls Near the Steering Wheel
Main Menu
Table of Contents
▲
▼
The two levers on the steering
column contain controls for driving
features you use most often. The left
lever controls the turn signals,
headlights, and high beams. The
right lever controls the windshield
washers and wipers.
The hazard warning switch is on the
dashboard between the center air
vents.
The controls near the left air vent
are for the power windows and
power mirrors.
The tilt adjustment lever on the
underside of the steering column
allows you to tilt the steering wheel.
HEADLIGHTS/TURN SIGNALS
(P.60)
MIRROR CONTROLS
(P.86)
POWER WINDOW SWITCHES
(P.84)
HAZARD WARNING LIGHTS
(P.63)
SHIFT LEVER
(P.158)
WINDSHIELD
WIPERS/
WASHERS
(P.62)
HORN BUTTONS
TILT ADJUSTMENT
(P.64)
Instruments and Controls
Page 62

Controls Near the Steering Wheel
Main Menu
Table of Contents
▲
▼
Headlights
The rotating switch on the left lever
controls the lights. Turning this
switch to the position turns
on the parking lights, taillights,
instrument panel lights, side-marker
lights, and rear license plate lights.
Turning the switch to the
position turns on the headlights.
If you leave the lights on with the
ignition switch in ACCESSORY (I)
or LOCK (0), you will hear a
reminder beeper when you open the
driver's door.
To change between low beams and
high beams, pull the turn signal lever
until you hear a click, then let go.
The blue high beam indicator will
light (see page 55 ).
To flash the high beams, pull the
turn signal lever back lightly, then
release it. The high beams will come
on and go off.
The high beams will stay on for as
long as you hold the lever back, no
matter what position the headlight
switch is in.
Daytime Running Lights
(Canadian Models)
With the headlight switch off, the
high beam headlights come on with
reduced brightness when you turn
the ignition switch to ON (II) and
release the parking brake. They
remain on until you turn the ignition
off, even if you set the parking brake.
The headlights revert to normal
operation when you turn them on
with the switch.
Instruments and Controls
Page 63

Controls Near the Steering Wheel
Main Menu
Table of Contents
▲
▼
Instrument Panel Brightness
The dial on the dashboard to the left
of the instrument panel controls the
brightness of the instrument panel
lights. Turn the dial to adjust the
brightness.
Turn Signals
TURN SIGNAL LEVER
Signal a turn or lane change with this
lever. Push down on the lever to
signal a left turn, and up to signal a
right turn. If you push it up or down
all the way, the turn signal continues
to blink even when you release the
lever. It shuts off automatically as
you complete the turn.
To signal a lane change, push lightly
on the turn signal lever in the proper
direction and hold it. The lever will
return to the center position as soon
as you release it.
Instruments and Controls
Page 64

Controls Near the Steering Wheel
Main Menu
Table of Contents
▲
▼
Windshield Wipers
The right lever controls the wind-
shield wipers and washers. The
rotary switch at the end of the lever
has three positions:
INT: intermittent
: low speed
: high speed
In intermittent, the wipers operate
every few seconds. In low speed and
high speed, the wipers run continuously.
To operate the wipers in mist mode,
push the control lever down. The
wipers run at high speed until you
release the lever. This gives you a
quick way to clear the windshield.
Windshield Washers
To clean the windshield, pull back on
the wiper control lever. The washers
spray until you release the lever.
The wipers run at low speed while
you're pulling the lever, then
complete one more sweep of the
windshield after you release it.
Instruments and Controls
Page 65

Controls Near the Steering Wheel
Main Menu
Table of Contents
▲
▼
Rear Window Wiper and Washer
The rear window wiper switch is
located next to the windshield wiper
switch.
To activate the rear windshield wiper,
turn the switch "ON". The wiper
operates intermittently. If you wish
to use the wiper and washer, turn
and hold the switch one position up
from "ON". To use the washer only,
turn and hold the switch one position
down from "OFF".
Hazard Warning
Push the red button between the
center air vents to turn on the hazard
warning lights (four-way flashers).
This causes all four outside turn
signals and both indicators in the
instrument panel to flash. Use the
hazard warning lights if you need to
park in a dangerous area near heavy
traffic, or if your vehicle is disabled.
Rear Window Defogger
The rear window defogger will clear
fog, frost, and thin ice from the
window. Push the defogger button to
turn it on and off. The light in the
button lights to show the defogger is
on. If you do not turn it off, the
defogger will shut itself off after
about 25 minutes. It also shuts off
when you turn off the ignition. You
have to turn it on again when you
restart the vehicle.
CONTINUED
Instruments and Controls
Page 66

Controls Near the Steering Wheel
Main Menu
Table of Contents
▲
▼
Make sure the rear window is clear
and you have good visibility before
starting to drive.
The defogger wires on the inside of
the rear window can be accidentally
damaged. When cleaning the glass,
always wipe side to side.
Steering Wheel Adjustment
See page 18 for important safety
information about how to properly
position the steering wheel.
Make any steering wheel adjustment
before you start driving.
Adjusting the steering wheel
position while driving may
cause you to lose control of the
vehicle and be seriously injured
in a crash.
Adjust the steering wheel only
when the vehicle is stopped.
Instruments and Controls
Page 67

To adjust the steering wheel upward
Main Menu
Table of Contents
▲
▼
or downward:
1. Push the lever under the steering
column all the way down.
2. Move the steering wheel to the
desired position, making sure the
wheel points toward your chest,
not toward your face. Make sure
you can see the instrument panel
gauges and the indicator lights.
Controls Near the Steering Wheel
3. Push the lever up to lock the
steering wheel in that position.
4. Make sure you have securely
locked the steering wheel in place
by trying to move it up and down.
Instruments and Controls
Page 68

Steering Wheel Controls
Main Menu
Table of Contents
▲
▼
Cruise Control
Cruise control allows you to maintain
a set speed above 25 mph (40 km/h)
without keeping your foot on the
accelerator pedal. It should be used
for cruising on straight, open
highways. It is not recommended for
conditions such as city driving,
winding roads, slippery roads, heavy
rain, or bad weather. You should
have full control of the vehicle under
those conditions.
Improper use of the cruise
control can lead to a crash.
Use the cruise control only
when traveling on open
highways in good weather.
NOTICE
The cruise control, as it operates,
moves the accelerator pedal. You can
damage your vehicle's accelerator
mechanism by resting your foot under
the pedal and blocking the movement.
Using the Cruise Control
1. Push in the Cruise Control Master
Switch to the left of the steering
column. The indicator in the
switch will light.
2. Accelerate to the desired cruising
speed above 25 mph (40 km/h).
Instruments and Controls
Page 69

Steering Wheel Controls
Main Menu
Table of Contents
▲
▼
RESUME/
accel
SET/decel
3. Press the SET/decel button on the
steering wheel. The CRUISE
CONTROL light on the
instrument panel comes on to
show the system is now activated.
The cruise control may not hold
the set speed when you are going
up and down hills. If your speed
increases going down a hill, use
the brakes to slow down to the
desired speed. This will cancel the
cruise control. To resume the set
speed, press the RESUME/accel
button. The CRUISE CONTROL
light on the instrument panel
comes on.
When climbing a steep hill, the
automatic transmission may
downshift to hold the set speed.
Changing the Set Speed
You can increase the set cruising
speed in any of these ways:
Press and hold the RESUME/
accel button. The car will accelerate. When you reach the desired
cruising speed, release the button.
Push on the accelerator pedal. Accelerate to the desired cruising
speed and press the SET/decel
button.
To increase your speed in very
small amounts, tap the RESUME/
accel button repeatedly. Each time
you do this, your vehicle will speed
up about 1 mph (1.6 km/h).
You can decrease the set cruising
speed in any of these ways:
Press and hold the SET/decel
button. The vehicle will decelerate.
Release the button when you
reach the desired speed.
To slow down in very small
amounts, tap the SET/decel
button repeatedly. Each time you
do this, your vehicle will slow
down about 1 mph (1.6 km/h).
Tap the brake pedal lightly with
your foot. The CRUISE
CONTROL light on the instrument panel will go out. When the
vehicle slows to the desired speed,
press the SET/decel button. The
vehicle will then maintain the
desired speed. CONTINUED
Instruments and Controls
Page 70

Steeling Wheel Controls
Main Menu
Table of Contents
▲
▼
Even with the cruise control turned
on, you can still use the accelerator
pedal to speed up for passing. After
completing the pass, take your foot
off the accelerator pedal. The vehicle
will return to the set cruising speed.
Resting your foot on the brake pedal
will cause the cruise control to
cancel.
Cancelling the Cruise Control
You can cancel the cruise control in
any of these ways:
Tap the brake pedal.
Press the SET/decel and RESUME/accel buttons at the same
time.
Press the Cruise Control Master
Switch.
When you tap the brake or clutch
pedal, or press the SET and RESUME buttons at the same time, the
CRUISE CONTROL light on the
instrument panel will go out and the
vehicle will begin to slow down. You
can use the accelerator pedal in the
normal way.
The system remembers the
previously-set cruising speed. To
return to that speed, accelerate to
above 25 mph (40 km/h) and press
the RESUME/accel button until the
CRUISE CONTROL light comes on.
The vehicle will accelerate to the
same cruising speed as before.
Pressing the Cruise Control Master
Switch turns the system completely
off and erases the previous cruising
speed from memory. To use the
system again, refer to Using the
Cruise Control
Instruments and Controls
Page 71

Keys and Locks
Main Menu
Table of Contents
▲
▼
Keys
MASTER KEYS
VALET KEY
KEY
NUMBER
PLATE
Your vehicle comes with two master
keys and a valet key.
The master key fits all the locks on
your vehicle:
Ignition
Doors
Glove box
Tailgate
The valet key works only in the
ignition and the door locks. You can
keep the glove box locked when you
leave your vehicle and valet key at a
parking facility.
You should have received a key
number plate with your set of keys.
You will need this key number if you
ever have to get a lost key replaced.
Keep the plate stored in a safe place.
When replacing keys, use only
Honda-approved key blanks.
Remote Transmitter
Some models also come with two
remote transmitters; see page 72 for
an explanation of their operation.
Ignition Switch
The ignition switch is on the right
side of the steering column. It has
four positions:
LOCK (0)
ACCESSORY (I)
ON (II)
START (III)
CONTINUED
Instruments and Controls
Page 72

Keys and Locks
Main Menu
Table of Contents
▲
▼
LOCK (0) — You can insert or
remove the key only in this position.
To switch from ACCESSORY to
LOCK, you must push the key in
slightly as you turn it. If your vehicle
has an automatic transmission, it
must also be in Park. The anti-theft
lock will lock the steering column
when you remove the key.
If the front wheels are turned, the
anti-theft lock may sometimes make
it difficult to turn the key from
LOCK to ACCESSORY. Firmly turn
the steering wheel to the left or to
the right as you turn the key.
Removing the key from the
ignition switch while driving
locks the steering. This can
cause you to lose control.
Remove the key from the
ignition switch only when
parked.
ACCESSORY (I) — In this position,
you can operate the audio system
and the accessory power socket.
ON (II) — This is the normal key
position when driving. All features
and accessories on the vehicle are
usable. Several of the lights on the
instrument panel come on as a test
when you turn the ignition switch
from ACCESSORY to ON.
START (III) — Use this position
only to start the engine. The switch
returns to ON (II) when you let go of
the key.
You will hear a reminder beeper if
you leave the key in the ignition
switch in the LOCK (0) or
ACCESSORY (I) position and open
the driver's door. Remove the key to
turn off the beeper.
Door Locks
LOCK TAB
Each door has a lock tab on the top.
Push the tab down to lock the door
and pull it up to unlock.
To lock any passenger's door when
getting out of the vehicle, push the
lock tab down and close the door. To
lock the driver's door, pull the
outside door handle and push the
lock tab down. Release the handle,
then close the door.
Instruments and Controls
Page 73

Keys and Locks
Main Menu
Table of Contents
▲
▼
The front doors can be locked and
unlocked from the outside with the
key.
Power Door Locks
MASTER DOOR LOCK SWITCH
The master door lock switch allows
control of all door locks from the
driver's door. Push the switch down
to lock all doors, and up to unlock
them.
All doors lock when you push down
the lock tab on the driver's door, or
lock the driver's door from the
outside with the key. Only the driver's
door unlocks when you use the key
or lock tab. To unlock the passengers' doors, use the master door lock
switch or the lock tab on each door.
Instruments and Controls
Page 74

Keys and Locks
Main Menu
Table of Contents
▲
▼
Remote Transmitter
LED
UNLOCK
BUTTON
LOCK
BUTTON
TAILGATE
RELEASE
BUTTON
PANIC
BUTTON
On EX model
You can lock and unlock your vehicle
with the remote transmitter. When
you push the LOCK button, all doors
lock.
When you push the UNLOCK button
once, only the driver's door unlocks.
The remaining doors unlock when
you push the button a second time.
The ceiling light (if the ceiling light
switch is in the center position) will
come on when you press the
UNLOCK button. If you do not open
any of the doors, the light will go out
in about 30 seconds and the doors
will automatically relock. If you
relock the doors with the remote
transmitter before 30 seconds have
elapsed, the light will go off
immediately.
You cannot lock or unlock the doors
with the remote transmitter if any
door is not fully closed or the key is
in the ignition switch.
To open the tailgate, push and hold
the TAILGATE RELEASE button
for approximately one second.
Horn Operation
The horn will sound when you push
the LOCK button twice within five
seconds after first push.
Instruments and Controls
Page 75

Keys and Locks
Main Menu
Table of Contents
▲
▼
Panic Mode
Panic mode allows you to remotely
activate your vehicle's security
system to attract attention. When
activated, the horn will sound for
about 30 seconds. To activate panic
mode, press and hold the PANIC
button for about one second.
To cancel Panic mode before 30
seconds, press any button on the
remote transmitter. You can also
turn the ignition switch to ON (II).
Panic mode will not activate if the
key is in the ignition switch.
Replacing the Battery
When the remote transmitter's
battery begins to get weak, it may
take several pushes on the button to
lock or unlock the doors, and the
LED will get dim. Replace the
battery as soon as possible.
Battery type: CR2025
Open
Close
To replace the battery, remove the
round cover on the back of the transmitter by turning it counterclockwise
with a coin.
CONTINUED
Instruments and Controls
Page 76

Keys and Locks
Main Menu
Table of Contents
▲
▼
BATTERY
ROUND
COVER
CUSHION
RING
Remove the old battery and note the
polarity. Make sure the polarity of
the new battery is the same (+ side
facing up), then insert it in the
transmitter.
Reinstall the cushion ring. Align the
mark on the cover with the
mark on the transmitter,
then set the cover in place and turn it
clockwise.
Transmitter Care
Avoid severe shock to the transmitter, such as dropping or throwing
it. Also, protect it from extreme hot
or cold temperatures.
Clean the transmitter case with a
soft cloth. Do not use strong
cleaners or solvents that could harm
the case. Immersing the transmitter
in any liquid will harm the transmitter and cause it to not function
properly.
If you lose a transmitter, you will
need to have the replacement
programmed to your vehicle's
system by your Honda dealer. Any
other transmitters you have will also
need to be reprogrammed.
As required by the FCC:
This device complies with Part 15 of the
FCC rules. Operation is subject to the
following two conditions: (1) This device
may not cause harmful interference, and
(2) this device must accept any
interference received, including
interference that may cause undesired
operation.
This device complies with DOC
standards in Canada.
Changes or modifications not expressly
approved by the party responsible for
compliance could void the user's
authority to operate the equipment.
Instruments and Controls
Page 77

Keys and Locks
Main Menu
Table of Contents
▲
▼
Childproof Door Locks
LEVER
LOCK
The childproof door locks are
designed to prevent children seated
in the rear from accidentally opening
the rear doors. Each rear door has a
lock lever near the edge. With the
lever in the LOCK position, the door
cannot be opened from the inside
regardless of the position of the lock
tab. To open the door, pull the lock
tab up and use the outside door
handle.
Tailgate
KEY
1. You can open the tailgate in two
ways:
Use the ignition key to open the
tailgate lock.
TAILGATE UNLOCK BUTTON
Push the tailgate unlock button
on the dashboard under the left
air vent
CONTINUED
Instruments and Controls
Page 78

Keys and Locks
Main Menu
Table of Contents
▲
▼
HATCH GLASS
2. The hatch glass will pop up
slightly.
3. Lift up the hatch glass fully.
HANDLE
DOOR
4. Pull the handle on the door and
pull the door open.
To close the tailgate, always close
the lower door first. Then, lower the
hatch glass and press on it until it
latches.
Make sure the door and the hatch
glass are locked securely before
driving.
STOP
To keep the tailgate door open on an
incline, use the stop in the tool kit.
The tool kit is in the right cargo floor
pocket. Put the stop on the support
strut as shown.
Instruments and Controls
Page 79

Keys and Locks, Seats
Main Menu
Table of Contents
▲
▼
Glove Box
Open the glove box by pulling the
bottom of the handle. Close it with a
firm push. Lock or unlock the glove
box with the master key.
An open glove box can cause
serious injury to your passenger
in a crash, even if the
passenger is wearing the seat
belt.
Always keep the glove box
closed while driving.
Front Seat Adjustments
See pages 12 — 14 for important safety
information and warnings about how to
properly position seats and seat-backs,
Make all seat adjustments before
you start driving.
CONTINUED
Instruments and Controls
Page 80

Seats
Main Menu
Table of Contents
▲
▼
Driver's Seat Height Adjustment
To adjust the seat forward and
backward, pull up on the lever under
the seat cushion's front edge. Move
the seat to the desired position and
release the lever. Try to move the
seat to make sure it is locked in
position.
Instruments and Controls
To change the angle of the seat-back,
pull up on the lever on the outside of
the seat bottom. Move the seat-back
to the desired position and release
the lever. Let the seat-back latch in
the new position.
The height of your driver's seat is
adjustable. Turn the front dial on the
outside of the seat cushion to raise
the front of the seat bottom and turn
the rear dial to raise the rear.
Make all seat adjustments before
you start driving.
Page 81

Seats
Main Menu
Table of Contents
▲
▼
Head Restraints
See page 14 for important safety
information and a warning about how to
properly position the head restraints.
The head restraints help protect you
and your passengers from whiplash
and other injuries. They are most
effective when you adjust them so
the back of the occupant's head rests
against the center of the restraint. A
taller person should adjust the
restraint as high as possible.
To remove a head restraint for
cleaning or repair, pull it up as far as
it will go. Push the release button
and pull the restraint out of the seat-
back.
RELEASE BUTTON
The head restraints adjust for height.
You need both hands to adjust the
restraint. Do not attempt to adjust it
while driving. To raise it, pull upward.
To lower the restraint, push the
release button sideways and push
the restraint down.
Instruments and Controls
Page 82

Seats
Main Menu
Table of Contents
▲
▼
Rear Seat-back Adjustment
See pages 12 — 14 for important safety
information and warnings about how to
properly position seats and seat-backs.
The angle of the rear seat-backs can
be adjusted separately. To change
the angle of the seat-back, pull up on
the knob on the top of the seat-back.
Move the seat-back to the desired
position, then release the knob.
Make sure the seat-back latches in
the new position.
Rear Seat Armrest
The rear seat armrest is located at
the center of the rear seat. Pivot it
down to use it.
Instruments and Controls
Page 83

Seats
Main Menu
Table of Contents
▲
▼
Reclining the Front and Rear
Seat-backs
You can recline the seat-backs on the
front and rear seats to make a large
cushioned area. To do this:
1. Remove the front seat head
restraint and put it in the pocket of
the seat-back.
2. Lift the lever and slide the front
seat forward as far as it will go.
Pull up the seat-back angle
adjustment lever, then pivot the
seat-back backward. Release the
lever when the seat-back is even
with the cushion on the rear seat.
EX model
3. Pull up the lever on the side of the
rear seat. Lift the rear edge of the
seat bottom until the seat latches.
CONTINUED
Instruments and Controls
Page 84

Seats
Main Menu
Table of Contents
▲
▼
Folding Rear Seat
4. Pull up on the knob on top of the
seat-back and pivot the rear seatback backward. Release the knob
when the seat-back is reclined as
far as it will go.
Instruments and Controls
Reverse this procedure to return the
seats to their upright positions.
Make sure you install the head
restraints, and that the seats are
locked securely in place before
driving.
The left and right halves of the rear
seat can be folded up separately to
create more cargo space.
1. Store the latch plate for the center
lap belt by rolling up the belt and
pushing it into the seat pocket.
Page 85

STRAP
Main Menu
Table of Contents
▲
▼
Seats
2. Pull the strap to release the seat
bottom. Pivot the seat bottom
forward.
3. Remove the head restraint and
pull up on the knob on the top of
the seat-back. Pivot the seat-back
forward.
Put the head restraint behind the
seat bottom as shown.
Pass the fastening strap in through
the hole of head restraint and fasten
it with the Velcro strap.
Reverse this procedure to return the
seat to the upright position. Make
sure that the seat is locked securely
before driving.
CONTINUED
Instruments and Controls
Page 86

Seats, Power Windows
Main Menu
Table of Contents
▲
▼
Make sure any items stored in the
cargo area are secured. Loose items
can fly forward and cause injury if
you have to brake hard.
Power Windows
Your vehicle's windows are electrically-powered. Turn the ignition
switch to ON (II) to raise or lower
any window.
Each door has a switch that controls
its window. To open the window,
push the switch down and hold it.
Release the switch when you want
the window to stop. Close the
window by pushing the switch up
and holding it.
DRIVER'S WINDOW SWITCH
MAIN SWITCH
There is a master power window
control panel on the dashboard. To
open any of the passengers' windows,
push down on the appropriate switch
and hold it down until the window
reaches the desired position. To
close the window, push up on the
window switch. Release the switch
when the window gets to the position
you want.
Instruments and Controls
Page 87

Power Windows, Mirrors
Main Menu
Table of Contents
▲
▼
Closing a power window on a
child's hands or fingers can
cause serious injury.
Make sure your children are
away from the windows before
closing them.
The master control panel also con-
tains these extra features:
AUTO — To open the driver's
window fully, push the window
switch firmly down and release it.
The window automatically goes all
the way down. To stop the window
from going all the way down, push
the window switch up briefly.
To open the driver's window only
partially, push the window switch
down lightly and hold it. The window
will stop as soon as you release the
switch.
The AUTO function only works to
lower the driver's window. To raise
the window, you must push the
window switch up and hold it until
the window reaches the desired
position.
The MAIN switch controls power to
the passengers' windows. With this
switch off, the passengers' windows
cannot be raised or lowered. The
MAIN switch does not affect the
driver's window. Keep the MAIN
switch off when you have children in
the vehicle so they do not injure
themselves by operating the
windows unintentionally.
Mirrors
TAB
Keep the inside and outside mirrors
clean and adjusted for best visibility.
Be sure to adjust the mirrors before
you start driving.
The inside mirror has day and night
positions. The night position reduces
glare from headlights behind you.
Flip the tab on the bottom edge of
the mirror to select the day or night
position.
CONTINUED
Instruments and Controls
Page 88

Mirrors, Parking Brake
Main Menu
Table of Contents
▲
▼
Adjusting the Power Mirrors
SELECTOR SWITCH
Adjust the outside mirrors with the
adjustment switch on the left side of
the dashboard:
1. Turn the ignition switch ON (II).
2. Move the selector switch to L
(driver's side) or R (passenger's
side).
ADJUSTMENT SWITCH
3. Push the appropriate edge of the
adjustment switch to move the
mirror right, left, up or down.
4. When you finish, move the
selector switch to the center (off)
position. This turns off the
adjustment switch so you can't
move a mirror out of position by
accidentally bumping the switch.
Parking Brake
PARKING BRAKE LEVER
To apply the parking brake, pull the
lever up fully. To release it, pull up
slightly, push the button, and lower
the lever. The parking brake light on
the instrument panel should go out
when the parking brake is fully
released (see page 54).
NOTICE
Driving the vehicle with the parking
brake applied can damage the rear
brakes and axles.
Instruments and Controls
Page 89

Digital Clock, Center Table
Main Menu
Table of Contents
▲
▼
Digital Clock
M
R (RESET)
H
The digital clock displays the time
with the ignition switch ON (II).
To set the clock:
1. Turn the ignition switch ON (II) to
display the time.
2. Press and hold the H button until
the hour advances to the desired
hour.
3. Press and hold the M button until
the numbers advance to the
desired minutes.
You can use the RESET button to
quickly set the time to the nearest
hour. If the displayed time is before
the half hour, pressing RESET
button sets the clock back to the
previous hour. If the displayed time
is after the half hour, pressing the
RESET button sets the clock forward to the beginning of the next
hour.
For example:
1:06 would RESET to 1:00.
1:52 would RESET to 2:00.
Center Table
To use the center table, pull up the
outside edge of the table until it
latches. To store it, pull the lever and
lower the table.
CONTINUED
Instruments and Controls
Page 90

Center Table, Beverage Holder
Main Menu
Table of Contents
▲
▼
Beverage Holder
Sitting on or getting under the table,
or putting heavy objects on the table,
may damage or deform it.
Do not put any items on the table
while driving. They may fall down or
fly around when you go around
corners or brake hard.
Instruments and Controls
Automatic Transmission model only
To use the beverage holder, pull on
the front. Push the holder all the way
in to close it.
The center table also has a beverage
holder.
Page 91

Beverage Holder, Built-in Table
Main Menu
Table of Contents
▲
▼
Built-in Table
There is another beverage holder on
each rear door for the rear seat
passengers. Pivot it down to use it.
Be careful when you are using the
beverage holder. A spilled liquid that
is very hot can scald you or your
passengers. Liquid can also spill
from the rear seat beverage holders
when you close the rear doors.
Spilled liquids can also damage the
upholstery, carpeting, and electrical
components in the interior.
The cargo area floor can be taken
out and used as a table.
CONTINUED
Instruments and Controls
Page 92

Built-in Table
Main Menu
Table of Contents
▲
▼
HANDLE
To remove the table, pull up the
carpet. Lift and pull on the handle to
slide the table out.
Instruments and Controls
Unfold the legs. Lock them in place
by pushing on the middle of the
locking arms. Make sure all four are
locked.
To fold the legs, pull on the middle
of each locking arm.
Page 93

Built-in Table, Center Pocket, Storage Box
Main Menu
Table of Contents
▲
▼
Put the projections on the table into
the holes in the cargo area floor.
Using the Built-in Table
Be sure to lock the legs of the
table.
Do not stand on the table.
Do not put a weight of over 44 Ibs
(20 kg) on the table.
Hot items such as pots, pans, or
kettles should not be placed
directly on the table.
Center Pocket
Automatic Transmission model only
Open the center pocket by pushing
the handle down. Close it with a firm
push.
Storage Box
A storage box is located under the
front passenger's seat. To use it, pull
upward slightly on the front center
edge of the box to disengage the
locking tabs then pull forward to
slide the box out.
Instruments and Controls
Page 94

Cargo Floor Pockets, Accessory Power Socket
Main Menu
Table of Contents
▲
▼
Cargo Floor Pockets
You can store small items in the
pockets located on both sides of the
cargo area.
Accessory Power Socket
There are two accessory power
sockets: one in the dashboard by the
front ashtray and the other on the
left side of the cargo area.
To use the accessory power socket,
pull down the cover. The ignition
switch must be in ACCESSORY (I)
or ON (II).
These sockets are intended to supply
power for 12 volt DC accessories
that are rated 120 watts or less (10
amps).
They will not power an automotive
type cigarette lighter element.
Instruments and Controls
Page 95

Tailgate Pocket, Cargo Hooks
Main Menu
Table of Contents
▲
▼
Tailgate Pocket
To use the tailgate pocket, turn the
knobs and remove the lid. Items
stored in this pocket can be secured
by the belts inside the pocket.
Cargo Hooks
HOOKS
The hooks on the floor of the cargo
area enable you to tie down items
stored in the back. Make sure all
stored items are secured before
driving.
The hook on the tailgate door pivots,
allowing items to be stored in
different ways. Make sure any items
put on this hook weigh less than 6.5
Ibs (3 kg), or you could damage the
hook.
Do not open or close the tailgate
door with cargo on this hook.
Instruments and Controls
Page 96

Ashtray, Interior Lights
Main Menu
Table of Contents
▲
▼
Ashtray
ASHTRAY
Open the front ashtray by pulling on
the bottom edge. Push it in to close it.
To remove the ashtray for emptying,
push down on the metal plate inside,
then pull the ashtray out completely.
NOTICE
Use the ashtray only for cigarettes,
cigars, and other smoking materials.
To prevent a possible fire and damage
to your vehicle, don't put paper or
other things that can burn in the
ashtray.
Ceiling Light
ON
DOOR ACTIVATED
The ceiling light has a three-position
switch. In the OFF position, the light
does not come on. In the center
position, the ceiling light comes on
when you open any door. In the ON
position, the ceiling light stays on
continuously.
Instruments and Controls
Page 97

Interior Lights
Main Menu
Table of Contents
▲
▼
Spotlights
Turn on the spotlight by pushing the
button next to each light. Push the
button again to turn it off. You can
use the spotlights at all times.
On Ex model
The ceiling light (with the switch in
the center position) also comes on
when you unlock the door with the
remote transmitter (see page 72).
Cargo Area Light
DOOR ACTIVATED
The cargo area light has a threeposition switch. In the OFF position,
the light does not come on. In the
center position, the light comes on
when you open the tailgate. In the
ON position, the light stays on
continuously.
Ignition Switch Light
IGNITION SWITCH LIGHT
The ignition switch light comes on
when you open the driver's door, and
stays on several seconds after you
close the door.
Instruments and Controls
Page 98

Comfort and Convenience Features
Main Menu
▲
▼
The heating and air conditioning
systems in your Honda provide a
comfortable driving environment in
all weather conditions.
The standard audio system has
many features. This section describes those features and how to
use them. (If you selected an
optional audio system, refer to the
operating instructions that came
with it.)
Heating and Cooling........................ 98
What Each Control Does............ 98
How to Use the System............. 100
To Turn Everything Off........... 105
Audio System................................. 106
Audio System
AM/FM/Cassette Stereo
Audio System (LX Model).... 107
Operating the Radio.................. 108
Adjusting the Sound.................. 111
Audio System Lighting............. 112
Operating the Cassette
Player...................................... 112
Operating the Optional CD
Player/Changer..................... 115
CD Changer Error
Indications.............................. 118
Audio System
AM/FM/CD Audio System
(EX Model)............................. 119
Operating the Radio.................. 120
Adjusting the Sound.................. 124
Audio System Lighting............. 125
Radio Frequencies..................... 125
Radio Reception......................... 125
Operating the CD Player.......... 127
Operating the CD Changer...... 129
Protecting Compact Discs........ 130
CD Player Error Indications..... 131
CD Changer Error
Indications.............................. 132
Operating the Cassette
Player...................................... 133
Tape Search Functions............. 134
Caring for the Cassette
Player...................................... 136
Theft Protection........................ 137
Comfort and Convenience Features
Page 99

Heating and Cooling
Main Menu
Table of Contents
▲
▼
Proper use of the Heating and
Cooling system can make the
interior dry and comfortable, and
keep the windows clear for best
visibility.
What Each Control Does
Fan Control Dial
Turning this dial clockwise increases
the fan's speed, which increases air
flow.
Temperature Control Dial
Turning this dial clockwise increases
the temperature of the air flow.
Air Conditioning (A/C) Button
This button turns the air condi-
tioning ON and OFF. The indicator
in the button lights when the A/C is
on.
MODE CONTROL DIAL
FAN CONTROL DIAL
TEMPERATURE CONTROL DIAL
Recirculation Button
This button controls the source of
the air going into the system. When
the indicator in this button is lit, air
from the vehicle's interior is sent
through the system again (Recircula-
tion mode). When the indicator is off,
air is brought in from outside the
vehicle (Fresh Air mode).
RECIRCULATION
BUTTON
AIR
CONDITIONING
SWITCH
Comfort and Convenience Features
Page 100

Mode Control Dial
Main Menu
Table of Contents
▲
▼
Use the MODE control dial to select
the vents the air flows from.
Air flows from the center
and corner vents in the dashboard.
Air flow is divided between
the vents in the dashboard and the
floor vents.
Air flows from the floor
vents.
Air flow is divided between
the floor vents and the defroster
vents at the base of the windshield.
Air flows from the defroster
vents at the base of the windshield.
When you select the system
automatically switches to Fresh Air
mode and turns on the A/C.
Heating and Cooling
Comfort and Convenience Features
 Loading...