

Honda CR85 Expert (2005), CR85RB Expert (2005) Owner's Manual
2005
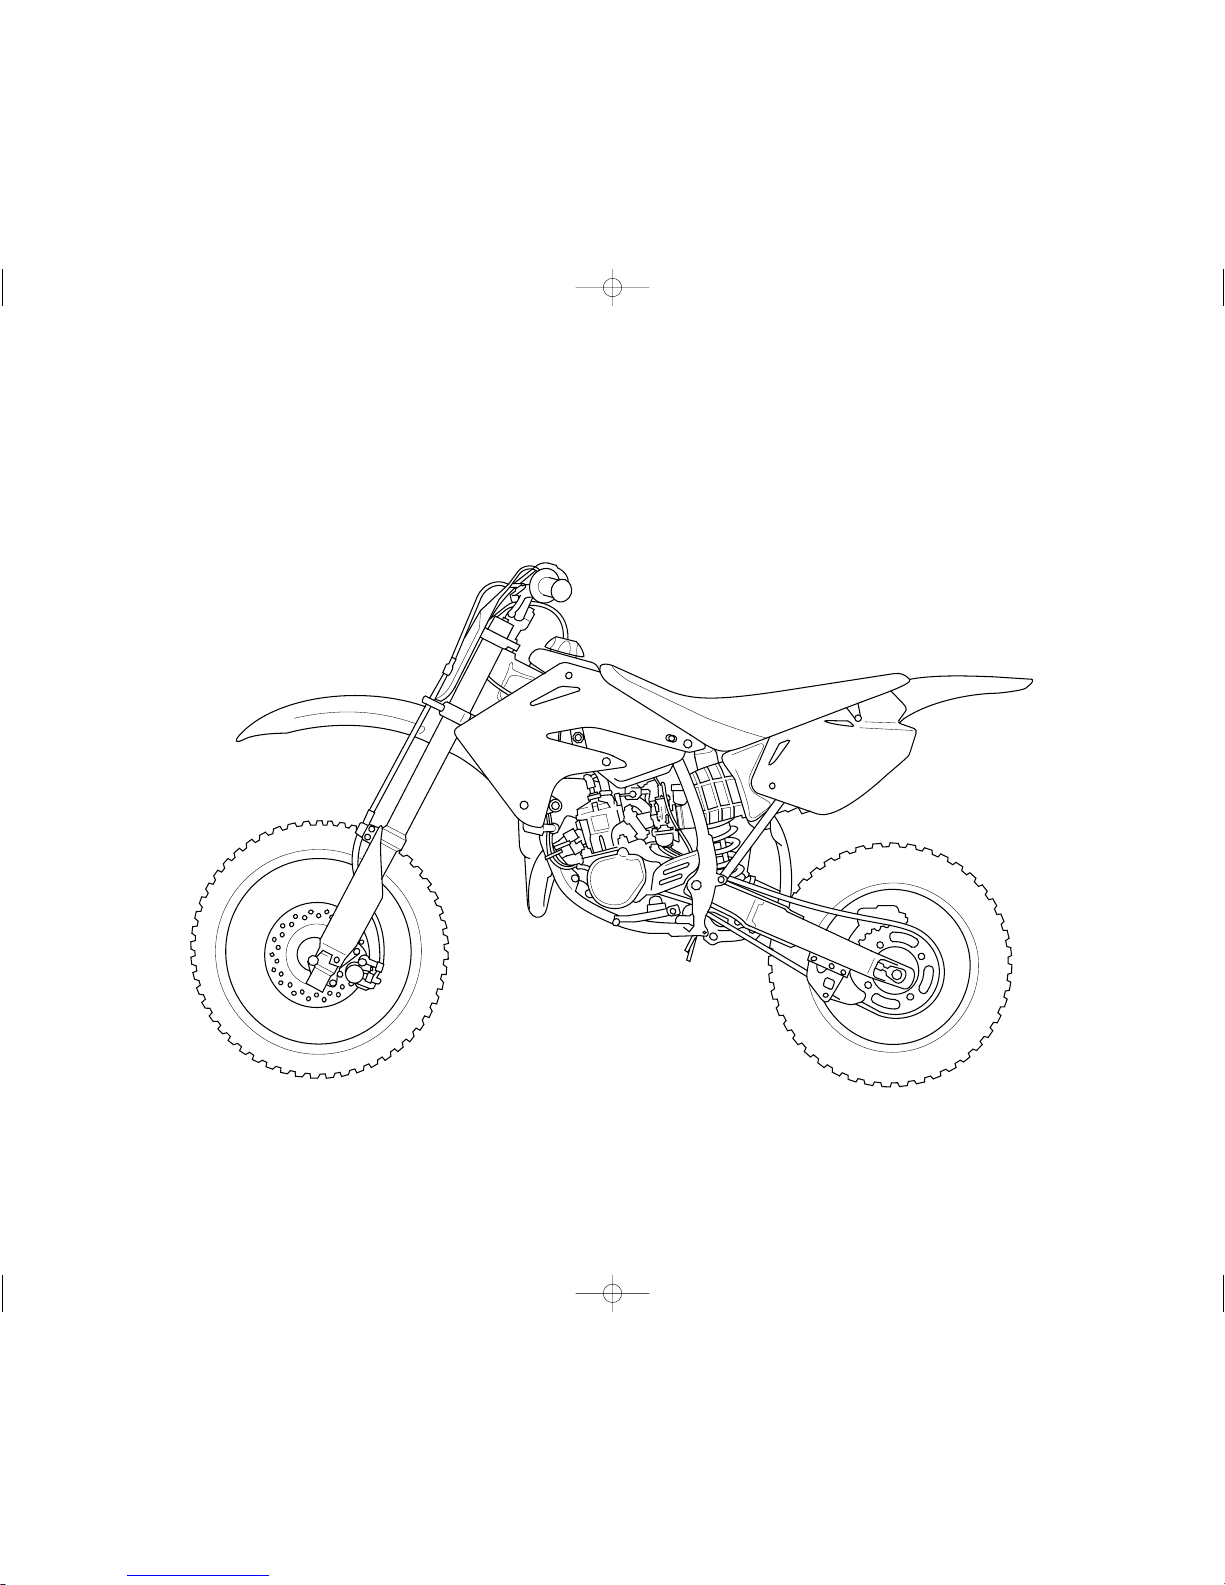
Honda CR85/85RB EXPERT
OWNER’S MANUAL & COMPETITION HANDBOOK
CR85/000-02304.12.1511:51AMページ1
Introduction
Congratulations on choosing your Honda CR
motocross motorcycle.
When you own a Honda, you’re part of a
worldwide family of satisfied customers-people
who appreciate Honda’s reputation for building
quality into every product.
Your CR is a high performance racing
motorcycle that utilizes the latest motocross
technology and is intended for competition use in
sanctioned, closed-course events by experienced
riders only.
Be aware that motocross is a physically
demanding sport that requires more than just a
fine motorcycle. To do well, you must be
excellent physical condition and be a skillful
rider. For the best results, work diligently on
your physical conditioning and practice
frequently.
Before riding, take time to get acquainted with
your CR and how it works. To protect your
investment, we urge you to take responsibility for
keeping your CR well maintained. Scheduled
service is a must, of course. But it’s just as
important to observe the break-in guidelines, and
perform all the pre-ride and other periodic checks
detailed in this manual.
You should also read the owner’s manual before
you ride. It’s full of facts, instructions, safety
information, and helpful tips. To make it easy to
use, the manual contains a table of contents, a
detailed list of topics at the beginning of each
section, and an index at the back of the book.
As you read this manual, you will find
information that is preceded by a
symbol. This information is intended to help you
avoid damage to your Honda, other property, or
the environment.
Unless you are mechanically qualified and have
the proper tools, you should see your Honda
dealer for the service and adjustment procedures
discussed in this manual.
The official Honda Service Manual for your CR
is available (page 120). It is the same manual
your dealer uses. If you plan to do any service
on your CR beyond the standard maintenance
procedures in this manual, you will find the
Service Manual a valuable reference.
If you have any questions, or if you ever need a
special service or repairs, remember that your
Honda dealer knows your CR best and is
dedicated to your complete satisfaction.
Please report any change of address or ownership
to your Honda dealer so we will be able to
contact you concerning important production
information.
You may also want to visit our website at
www.honda.com.
Happy riding!
NOTICE
Introduction
CR85/000-02304.12.1511:51AMページ2

A Few Words About Safety
Your safety, and the safety of others, is very important. And operating this motorcycle safely is an important responsibility.
To help you make informed decisions about safety, this manual contains a section devoted to Motorcycle Safety, as well as a number of Safety Messages
throughout the manual.
Safety Messages are preceded by a safety alert symbol and one of three signal words: DANGER, WARNING, or CAUTION.
These signal words mean:
You WILL be KILLED or SERIOUSLY HURT if you don’t follow instructions.
You CAN be KILLED or SERIOUSLY HURT if you don’t follow instructions.
You CAN be HURT if you don’t follow instructions.
Of course, it is not practical or possible to warn you about all hazards associated with operating or maintaining a motorcycle. You must use your own good
judgement.
Safety Messages
DANGER
WARNING
CAUTION
CR85/000-02304.12.1511:51AMページ3

Contents
MOTORCYCLE SAFETY................................1
Important Safety Information...............................2
Important Safety Precautions..........................2
Important Message to Parents ........................2
Accessories & Modifications ...............................3
Safety Label .........................................................4
OPERATING CONTROLS ..............................5
Component Locations ..........................................6
BEFORE RIDING..............................................7
Are You Ready to Ride?.......................................8
Is Your Motorcycle Ready to Ride?.....................9
Pre-ride Inspection..........................................9
BASIC OPERATING INSTRUCTIONS .......11
Safe Riding Precautions................................12
Starting & Stopping the Engine .........................13
Preparation ....................................................13
Starting Procedure ........................................13
Flooded Engine.............................................13
How to Stop the Engine................................14
Shifting Gears.....................................................15
Break-in Guidelines ...........................................16
SERVICING YOUR HONDA.........................17
Before You Service Your Honda
The Importance of Maintenance ........................18
Maintenance Safety............................................19
Important Safety Precautions........................19
Maintenance Schedule .......................................20
General Competition Maintenance ....................22
Before & After Competition Maintenance.........26
Between Motos & Practice Maintenance .....26
After Competition Maintenance ...................27
Service Preparations
Component Locations ........................................28
Seat Removal .....................................................29
Fuel Tank Removal ............................................30
Subframe Removal.............................................32
Service Procedures
Fluid & Filters
Fuel System........................................................34
Transmission Oil ................................................36
Coolant ...............................................................38
Air Cleaner .........................................................40
Engine
Throttle ...............................................................42
Clutch System ....................................................44
Spark Plug ..........................................................46
Cylinder System .................................................47
Chassis
Suspension..........................................................52
Brakes.................................................................57
Wheels................................................................61
Tires & Tubes .....................................................62
Drive Chain ........................................................64
Expansion Chamber ...........................................67
Additional Maintenance Procedures ..................68
Appearance Care ................................................69
ADJUSTMENTS FOR COMPETITION ......71
Front Suspension Adjustments...........................72
Rear Suspension Adjustments............................80
Suspension Adjustments for Track
Conditions ..............................................84
Suspension Adjustment Guidelines....................85
Carburetor Adjustments & Tuning Tips.............88
Chassis Adjustments...........................................95
Gearing ...............................................................96
Tire Selection for Track Conditions...................97
Personal Fit Adjustments ...................................98
TIPS ..................................................................99
Transporting Your Motorcycle .........................100
Storing Your Honda..........................................101
You & the Environment ...................................102
Troubleshooting................................................103
TECHNICAL INFORMATION...................105
Vehicle Identification .......................................106
Specifications ...................................................107
Torque Specifications.......................................109
High Altitude Carburetor Adjustment ..............111
Oxygenated Fuels.............................................112
Competition Logbook.......................................113
Optional Parts List............................................115
Spare Parts & Equipment .................................117
Wiring Diagram................................................118
CONSUMER INFORMATION....................119
Authorized Manuals .........................................120
Contacting Honda.............................................121
Your Honda Dealer...........................................122
The Honda Rider’s Club (USA only) ..............123
TABLE OF CONTENTS ...............................124
INDEX .............................................................126
QUICK REFERENCE
Contents
CR85/000-02304.12.1511:51AMページ4

Motorcycle Safety
This section presents some of the most important
information and recommendations to help you
ride your CR safely. Please take a few moments
to read these pages. This section also includes
information about the location of the safety label
on your CR.
Important Safety Information...............................2
Important Safety Precautions..........................2
Important Message to Parents ........................2
Accessories & Modifications ...............................3
Safety Label .........................................................4
Motorcycle Safety 1
CR85/000-02304.12.1511:51AMページ1

Important Safety Information
Important Safety Precautions
Your CR can provide many years of pleasure, if
you take responsibility for your own safety and
understand the challenges you can meet in
competitive racing.
As an experienced rider, you know there is much
you can do to protect yourself when you ride.
The following are a few precautions we consider
most important.
Never Carry a Passenger.
Your CR is designed for one operator only.
Carring a passenger can cause an accident in
which you and others can be hurt.
Wear Protective Gear.
Whether you’re practicing to improve your skills,
or riding in competition, always wear an
approved helmet, eye protection, and proper
protective gear.
Take Time to Get to Know Your CR.
Because every motorcycle is unique, take time to
become thoroughly familiar with how this one
operates and responds to your commands before
placing your machine, and yourself, in
competition.
Learn and Respect Your Limits.
Never ride beyond your personal abilities or
faster than conditions warrant. Remember that
alcohol, drugs, illness and fatigue can reduce
your ability to perform well and ride safety.
Don't Drink and Ride.
Alcohol and riding don't mix. Even one drink can
reduce your ability to respond to changing
conditions, and your reaction time gets worse
with every additional drink. So don't drink and
ride, and don't let your friends drink and ride
either.
Keep Your Honda in Safe Condition.
Maintaining your CR properly is critical to your
safety. A loose bolt, for example, can cause a
breakdown in which you can be seriously
injured.
Important Message to Parents
Your child's safely is very important to Honda.
That's why we urge you to read this message
before you let any young person ride this
motorcycle. Competitive riding can be fun. But
bad judgement can result in injury, and we don't
want that to happen. As a parent, you can help
prevent accidents by making good decisions
about when and how your youngster rides this
motorcycle.
• Remember, this CR is designed only for
competition use by experienced junior riders.
It is an operator only model, and the
maximum load capacity is 150 lbs. Rider
weight must not exceed this limit.
• The junior rider must be fall enough to hold
the motorcycle up while straddling it with
both feet on the ground. He or she must also
be strong enough to pick up the motorcycle if
it is on its side.
• The parent and junior rider must be fully
familiar with the motorcycle, the motorcycle
controls and control functions. Both must also
Fully understand everything in this manual
before riding begins.
• For your child's safely, be sure to make
pre-practice and pre-race inspections, and
impress on the junior rider the importance of
checking all the items thoroughly before
riding.
2
Motorcycle Safety
CR85/000-02304.12.1511:51AMページ2

Important Safety Information
Accessories & Modifications
Installing non-Honda accessories, removing
original equipment, or modifying your CR in any
way that would change its design or operation,
could seriously impair your CR’s handling,
stability, and braking, making it unsafe to ride.
Motorcycle Safety 3
WARNING
Improper accessories or modifications
can cause a crash in which you can be
seriously hurt or killed.
Follow all instructions in this owner’s
manual regarding modifications and
accessories.
CR85/000-02304.12.1511:51AMページ3

4 Motorcycle Safety
Safety Label
Read this label carefully and don’t remove it.
If the label comes off or becomes hard to read, contact your Honda dealer for replacement.
CR85/000-02304.12.1511:51AMページ4

Operating Controls 5
Operating Controls
Read this section carefully before you ride. It
presents the location of the basic controls on your
CR.
Component Locations ..........................................6
CR85/000-02304.12.1511:51AMページ5
6 Operating Controls
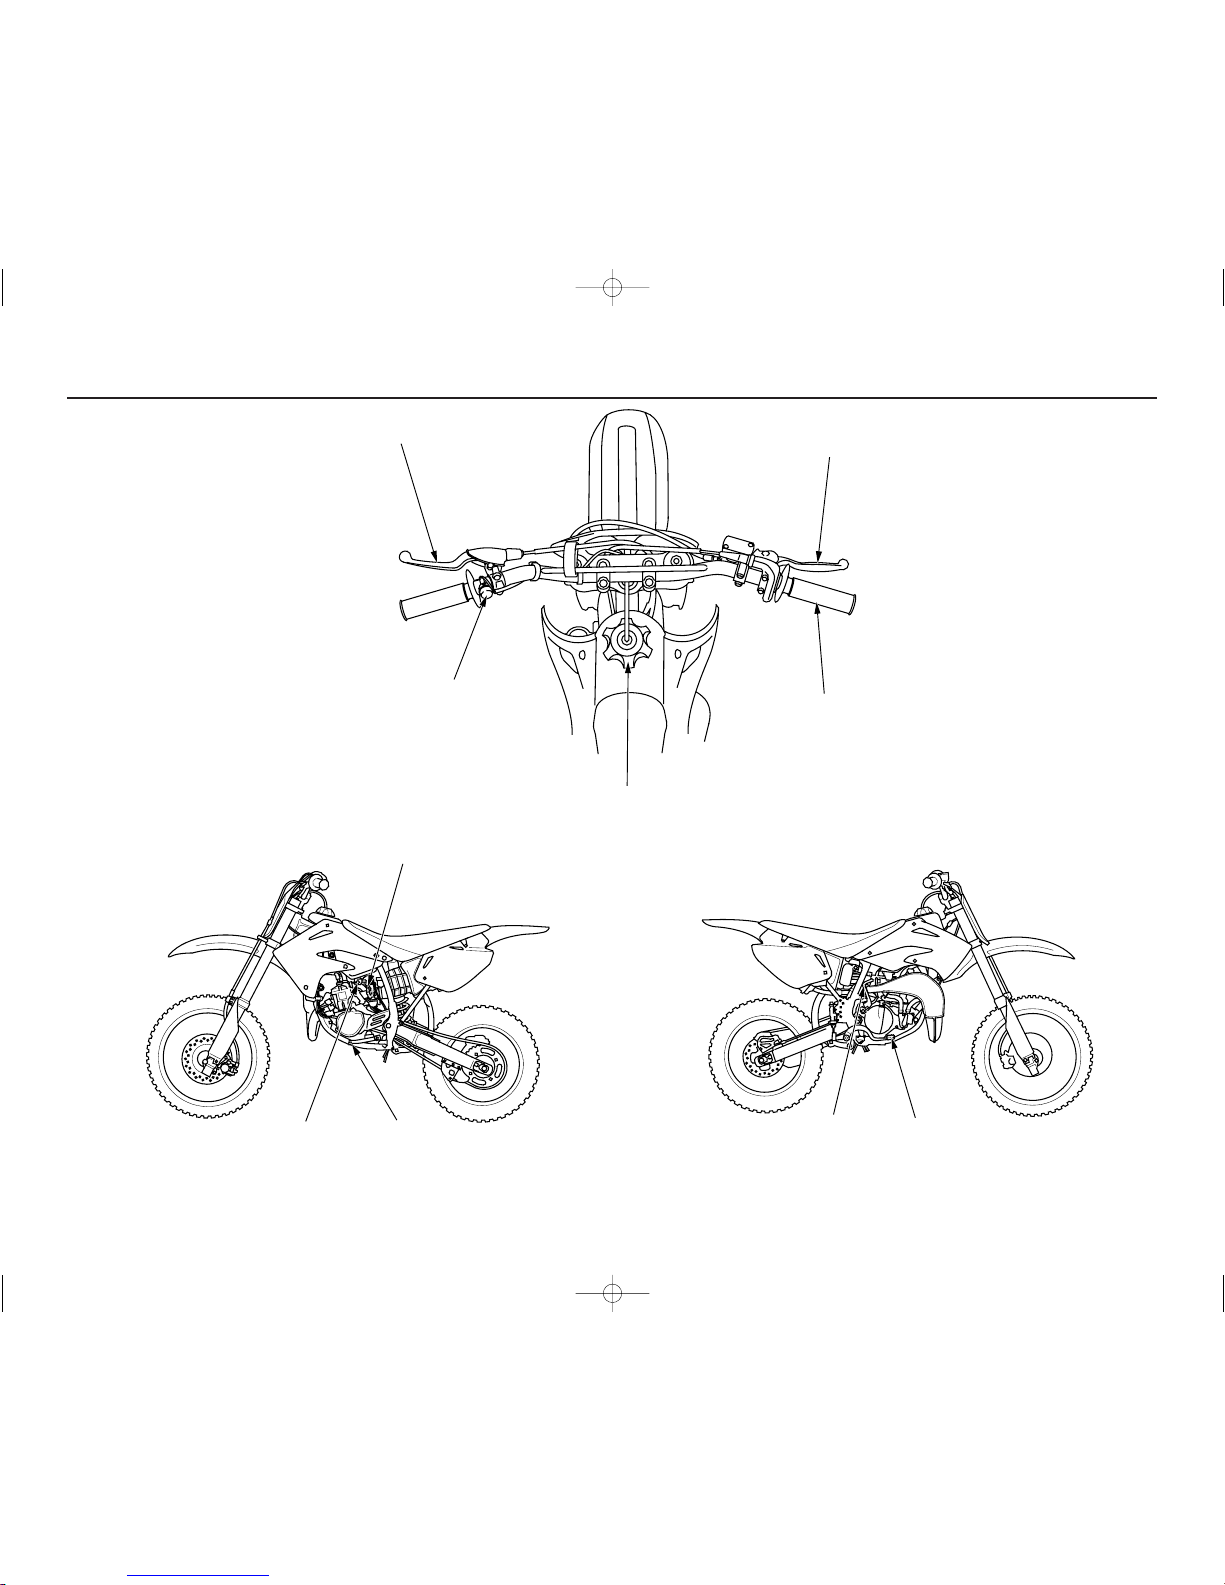
Component Locations
clutch lever
kickstarter
engine stop button
fuel valve shift lever
rear brake pedal
throttle grip
front brake lever
choke knob
fuel fill cap
CR85/000-02304.12.1511:51AMページ6

Before Riding 7
Before each ride, you need to make sure you and
your Honda are both ready to ride. To help get
you prepared, this section discusses how to
evaluate your riding readiness, and what items
you should check on your CR.
For information about suspension, carburetor,
and other adjustment for competition, see page
71.
Before Riding
Are You Ready to Ride?.......................................8
Is Your Motorcycle Ready to Ride?.....................9
Pre-ride Inspection .............................................9
CR85/000-02304.12.1511:51AMページ7
8 Before Riding
Are You Ready to Ride?
Before riding your CR for the first time,we
should also that you read this owner’s manual,
make sure you understand the safety messages,
and know how to operate the controls.
Before each ride, it’s also important to make sure
you and your CR are both ready to ride.
For information about suspension, carburetor,
and other adjustments, see page 71.
Whether you’re preparing for competition or for
practice, always make sure you are.
• In good physical and mental condition
• Free of alcohol and drugs
•Wearing an approved helmet, eye protection,
and other appropriate riding gear
Although complete protection is not possible,
wearing the proper gear can reduce the chance or
severity of injury when you ride.
WARNING
Not wearing a helmet increases the
chance of serious injury or death in a
crash.
Be sure you always wear a helmet, eye
protection and other protective apparel
when you ride.
CR85/000-02304.12.1511:51AMページ8
Before Riding 9
Is Your Motorcycle Ready to Ride?
Competitive riding can be tough on a motorcycle,
so it’s important to inspect your CR and correct
any problems you find before each ride. Check
the following items (page numbers are at the
right):
Pre-ride Inspection
Check the following before each ride:
•Transmission oil level...................................37
• Coolant for proper level................................38
• Cooling system and hoses for condition.......39
• Spark plug for proper heat range, carbon
fouling and high tension cord terminal for
looseness .......................................................46
• Air cleaner for condition and
contamination................................................40
• Clutch operation and freeplay.......................44
• Steering head bearings and related parts
for condition..................................................68
• Carburetor throttle operation ........................42
•Tires for damage or improper inflation
pressure ........................................................62
• Spokes for looseness.....................................61
• Rim locks for looseness................................61
• Front and rear suspension for proper
operation .................................................52, 53
• Front and rear brakes, check operation ........54
• Drive chain for correct slack and adequate
lubrication .....................................................64
• Drive chain guide, sliders and guide rollers
for damage or wear.......................................64
• Expansion chamber springs for damage or
lack of tension...............................................67
• Every possible part for looseness (such as
cylinder head nuts, carburetor insulator bolts,
engine mounting bolts, axle nuts, drive chain
adjusters, drive chain guide, handlebar holder
bolts, kickstarter mounting bolts and wire
harness connectors).......................68, 109, 110
WARNING
Improperly maintaining this motorcycle or
failing to correct a problem before riding
can cause a crash in which you can be
seriously hurt or killed.
Always perform a pre-ride inspection
before every ride and correct any
problems.
CR85/000-02304.12.1511:51AMページ9

10 Before Riding
CR85/000-02304.12.1511:51AMページ10

Basic Operating Instructions 11Basic Operating Instructions 11
Basic Operating Instructions
This section gives basic information on how to
start and stop your engine as well as break-in
guidelines.
Safe Riding Precautions .....................................12
Starting & Stopping the Engine .........................13
Preparation ....................................................13
Starting Procedure ........................................13
Flooded Engine.............................................13
How to Stop the Engine................................14
Shifting Gears.....................................................15
Break-in Guidelines ...........................................16
CR85/000-02304.12.1511:51AMページ11
12 Basic Operating Instructions12 Basic Operating Instructions
Basic Operating Instructions
Safe Riding Precautions
Before riding your CR for the first time, please
review the Important Safety Precautions
beginning on page 2 and the previous section,
titled Before Riding.
For your safety, avoid starting or operating the
engine in an enclosed area such as a garage.
Yo ur CR’s exhaust contains poisonous carbon
monoxide gas which can collect rapidly in an
enclosed area and cause illness or death.
CR85/000-02304.12.1511:51AMページ12
Basic Operating Instructions 13Basic Operating Instructions 13
Starting & Stopping the Engine
Always follow the proper starting procedure
described below.
Your CR can be kickstarted with the transmission
in gear by pulling in the clutch lever before
operating the kickstarter.
Preparation
Make sure that the transmission is in neutral.
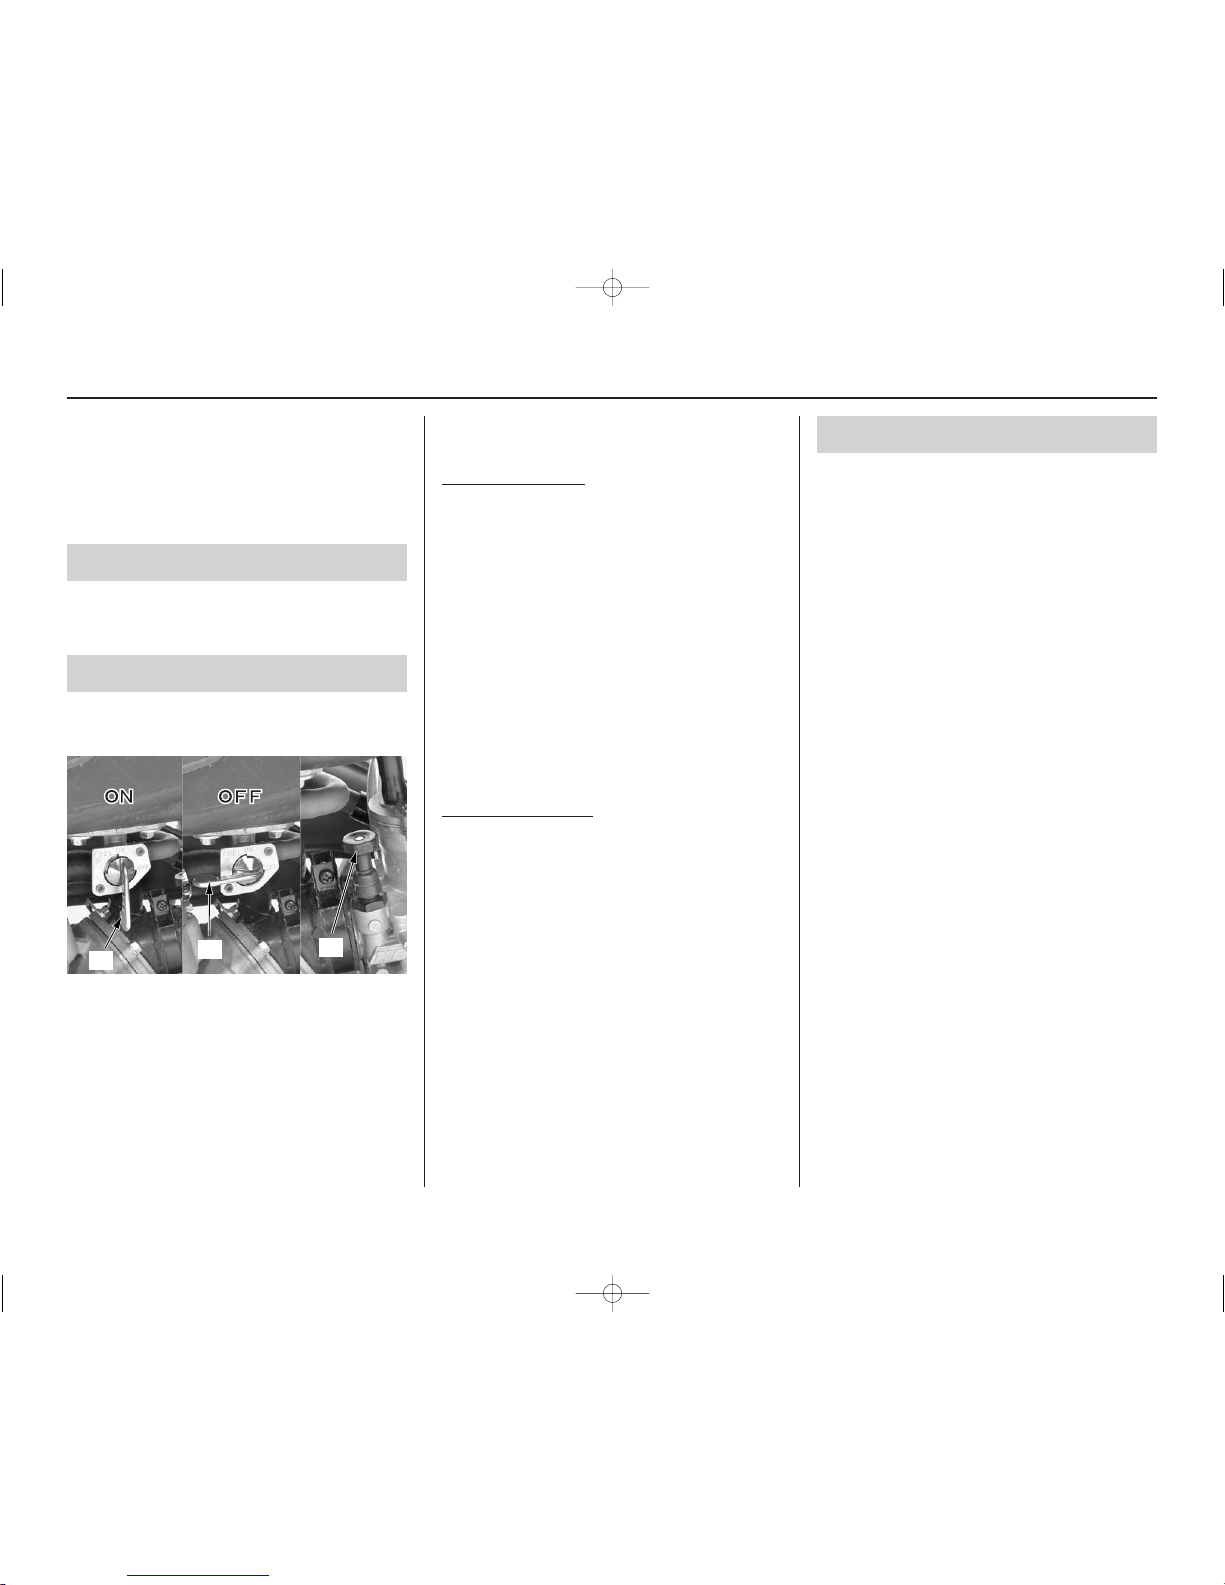
Turn the fuel valve ON.
Starting Procedure
Always follow the proper starting procedure
described below.
Check the transmission oil and coolant levels
before starting the engine (page 37, 38).
Cold Engine Starting
1. Turn the fuel valve (1) ON.
2. Shift the transmission into neutral.
3. Pull the choke knob (2) up.
4. With closed throttle, operate the kickstarter.
Starting from the top of the kickstarter stroke,
kick through to the bottom with a rapid,
continuous motion.
5. After the engine starts, the choke knob should
be pushed down as soon as possible to
prevent spark plug fouling.
6. Allow the engine to warm up for at least 2
minutes before riding off, preferably until the
side of the cylinder is very warm to the touch
through your riding glove. Slowly increase
rpm and don’t blip the throttle. Warming the
engine is important to prevent cold seizures.
W
arm Engine Starting
1. Turn the fuel valve ON.
2. Shift the transmission into neutral.
3. Push the choke knob down.
4. Open the throttle (1/8 – 1/4) and operate the
kickstarter.
Flooded Engine
If the engine fails to start after repeated attempts,
it may be flooded with excess fuel. To clear a
flooded engine:
1. Shift the transmission into neutral.
2. Push the choke knob down all the way to
OFF.
3. Open the throttle fully.
4. While pushing the engine stop button, crank
the engine several times with the kickstarter.
5. Release the engine stop button.
6. Follow the Warm Engine Starting procedure.
(1) fuel valve (2) choke knob
(1)
(1)
(2)
CR85/000-02304.12.1511:51AMページ13

14 Basic Operating Instructions
Starting & Stopping the Engine
14 Basic Operating Instructions
How to Stop the Engine
Normal Engine Stop
1. Shift the transmission into neutral.
2. Turn the fuel valve OFF.
3. Lightly open the throttle (1) 2 – 3 times, and
then close it.
4. Depress and hold the engine stop button (2)
until the engine stops completely.
Failure to close the fuel valve may cause the
carburetor to overflow, fill the crankcase with
fuel and result in hard starting.
Emer
gency Engine Stop
To stop the engine in an emergency, press the
engine stop button.
(1) throttle (2) engine stop button
(1)
(2)
CR85/000-02304.12.1511:51AMページ14
Basic Operating Instructions 15
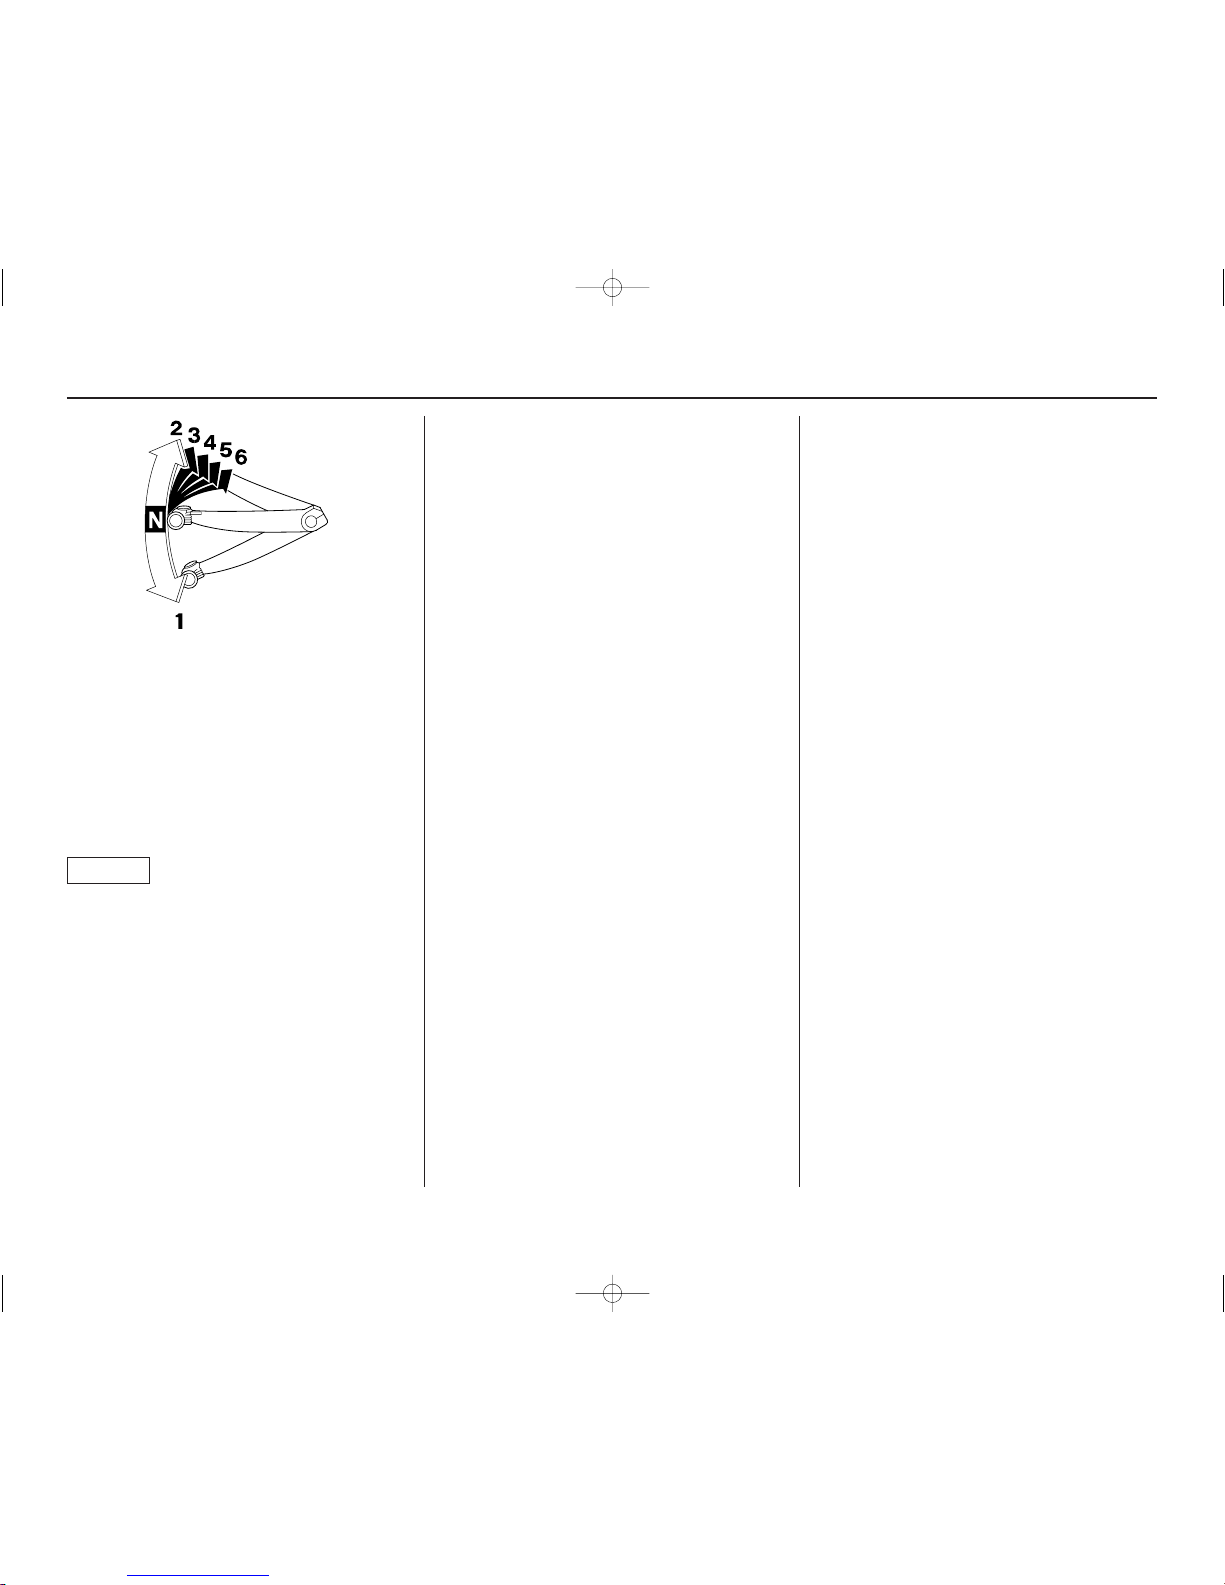
Shifting Gears
1. After the engine has been warmed up, the
motorcycle is ready for riding.
2. While the engine is idling, pull in the clutch
lever and depress the shift lever to shift into
1st (low) gear.
3. Slowly release the clutch lever and at the
same time gradually increase engine speed by
opening the throttle. Coordination of the
throttle and clutch lever will assure a smooth
positive start.
When moving off from a standing start, be careful
not to use too much throttle. The motorcycle may
"wheelie" over backwards.
4. When the motorcycle attains a moderate
speed, close the throttle, pull in the clutch
lever and shift to 2nd gear by raising the shift
lever.
5. This sequence is repeated to progressively
shift to 3rd, 4th, 5th, and 6th, (top) gear. Raise
the shift lever to shift to a higher gear and
depress it to downshift. Each stroke of the
shift lever engages the next gear is sequence.
The shift lever automatically returns to the
horizontal position when released.
NOTICE
CR85/000-02304.12.1511:51AMページ15

16 Basic Operating Instructions
Break-in Guidelines
Help assure your CR’s future reliability and
performance by paying extra attention to how
you ride during the first operating day or 15
miles (25 km).
During this period, avoid full-throttle starts and
rapid acceleration.
This same procedure should be followed each
time when:
• piston is replaced
• rings are replaced
• cylinder is replaced
• crankshaft or crankshaft bearings are replaced
CR85/000-02304.12.1511:51AMページ16
Servicing Your Honda 17Servicing Your Honda 17
Servicing Your Honda
Keeping your CR well maintained is absolutely
essential to your safety. It’s also a good way to
protect your investment, get maximum
performance, avoid breakdowns, and have more
fun.
To help keep your CR in good shape, this section
includes a Maintenance Schedule for required
servicing and step-by-step instructions for
specific maintenance tasks. You’ll also find
important safety precautions, information on oils,
and tips for keeping your Honda looking good.
An ICM (Ignition Control Module) system is
used on this motorcycle; consequently, routine
ignition timing adjustment is unnecessary. If you
want to check the ignition timing, refer to the
Honda Service Manual (page 122).
Before You Service Your Honda
The Importance of Maintenance ........................18
Maintenance Safety............................................19
Important Safety Precautions........................19
Maintenance Schedule .......................................20
General Competition Maintenance ....................22
Before & After Competition Maintenance.........26
Between Motos & Practice Maintenance .....26
After Competition Maintenance ...................27
Service Preparations
Component Locations ........................................28
Seat Removal .....................................................29
Fuel Tank Removal ............................................30
Subframe Removal.............................................32
Service Procedures
Fluids & Filters
Fuel System........................................................34
Transmission Oil ................................................36
Coolant ...............................................................38
Air Cleaner .........................................................40
Engine
Throttle ...............................................................42
Clutch System ....................................................44
Spark Plug ..........................................................46
Cylinder System .................................................47
Chassis
Suspension..........................................................52
Brakes.................................................................57
Wheels................................................................61
Tires & Tubes .....................................................62
Drive Chain ........................................................64
Expansion Chamber ...........................................67
Additional Maintenance Procedures ..................68
Appearance Care ................................................69
CR85/000-02304.12.1511:51AMページ17
18 Servicing Your Honda18 Servicing Your Honda
WARNING
Improperly maintaining this motorcycle or
failing to correct a problem before you
ride can cause a crash in which you can
be seriously hurt or killed.
Always follow the inspection and
maintenance recommendations and
schedules in this owner’s manual.
The Importance of Maintenance
Keeping your CR well-maintained is absolutely
essential to your safety. It’s also a good way to
get maximum performance during each moto.
Careful pre-ride inspections and good
maintenance are especially important because
your CR is designed to be ridden in off-road
competition.
Remember, proper maintenance is your
responsibility. Be sure to inspect your CR before
each ride and follow the Maintenance Schedule
in this section.
CR85/000-02304.12.1511:51AMページ18
Servicing Your Honda 19Servicing Your Honda 19
Maintenance Safety
This section includes instructions on how to
perform some important maintenance tasks.
Some of the most important safety precautions
follow. However, we cannot warn you of every
conceivable hazard that can arise in performing
maintenance. Only you can decide whether or
not you should perform a given task.
Important Safety Precautions
• Make sure the engine is off before you begin
any maintenance or repairs.
This will help eliminate several potential
hazards:
Carbon monoxide poisoning from engine
exhaust. Be sure there is adequate ventilation
whenever you operate the engine.
Burns from hot motorcycle parts. Let the
engine and exhaust system cool before
touching.
Injury from moving parts. Do not run the
engine unless instructed to do so.
• Read the instructions before you begin, and
make sure you have the tools and skills
required.
•To help prevent the motorcycle from falling
over, park it on a firm, level surface, using the
optional work stand or a maintenance stand to
provide support.
•To reduce the possibility of a fire or
explosion, be careful when working around
gasoline. Use only a non-flammable (high
flash point) solvent such as kerosene —not
gasoline— to clean parts. Keep cigarettes,
sparks, and flames away from all fuel-related
parts.
WARNING
Failure to properly follow maintenance
instructions and precautions can cause
you to be seriously hurt or killed.
Always follow the procedures and
precautions in this owner’s manual.
CR85/000-02304.12.1511:51AMページ19

20 Servicing Your Honda20 Servicing Your Honda
Maintenance Schedule
To maintain the safety and reliability of your CR,
regular inspection and service is required as
shown in the Maintenance Schedule that follows.
The Maintenance Schedule lists items that can be
performed with basic mechanical skills and hand
tools. Procedures for these items are provided in
this manual.
The Maintenance Schedule also includes items
that involve more extensive procedures and may
require special training, tools, and equipment.
Therefore, we recommend that you have your
Honda dealer perform these tasks unless you
have advanced mechanical skills and the required
tools. Procedures for items in this schedule are
provided in a service manual available for
purchase from your dealer (page 121).
Service intervals in the maintenance schedule are
expressed in terms of races and riding hours. To
avoid overlooking required service, we urge you
to develop a convenient way to record the
number of races and/or hours you ride.
If you do not feel capable of performing a given
task or need assistance, remember that your
Honda dealer knows your CR best and is fully
equipped to maintain and repair it. If you decide
to do your own maintenance, use only genuine
Honda parts or their equivalents for repair or
replacement to ensure the best quality and
reliability.
Perform the pre-ride inspection (page 9) at each
scheduled maintenance period.
Summary of Maintenance Schedule Notes and
Procedures:
Notes:
1. Clean after every moto for dusty riding
conditions.
2. Replace every 2 years. Replacement requires
mechanical skill.
3. Replace after the first break-in ride.
Maintenance Procedures:
I: inspect and clean, adjust, lubricate, or replace,
if necessary
C: clean
L: lubricate
R: replace
CR85/000-02304.12.1511:51AMページ20
Servicing Your Honda 21Servicing Your Honda 21
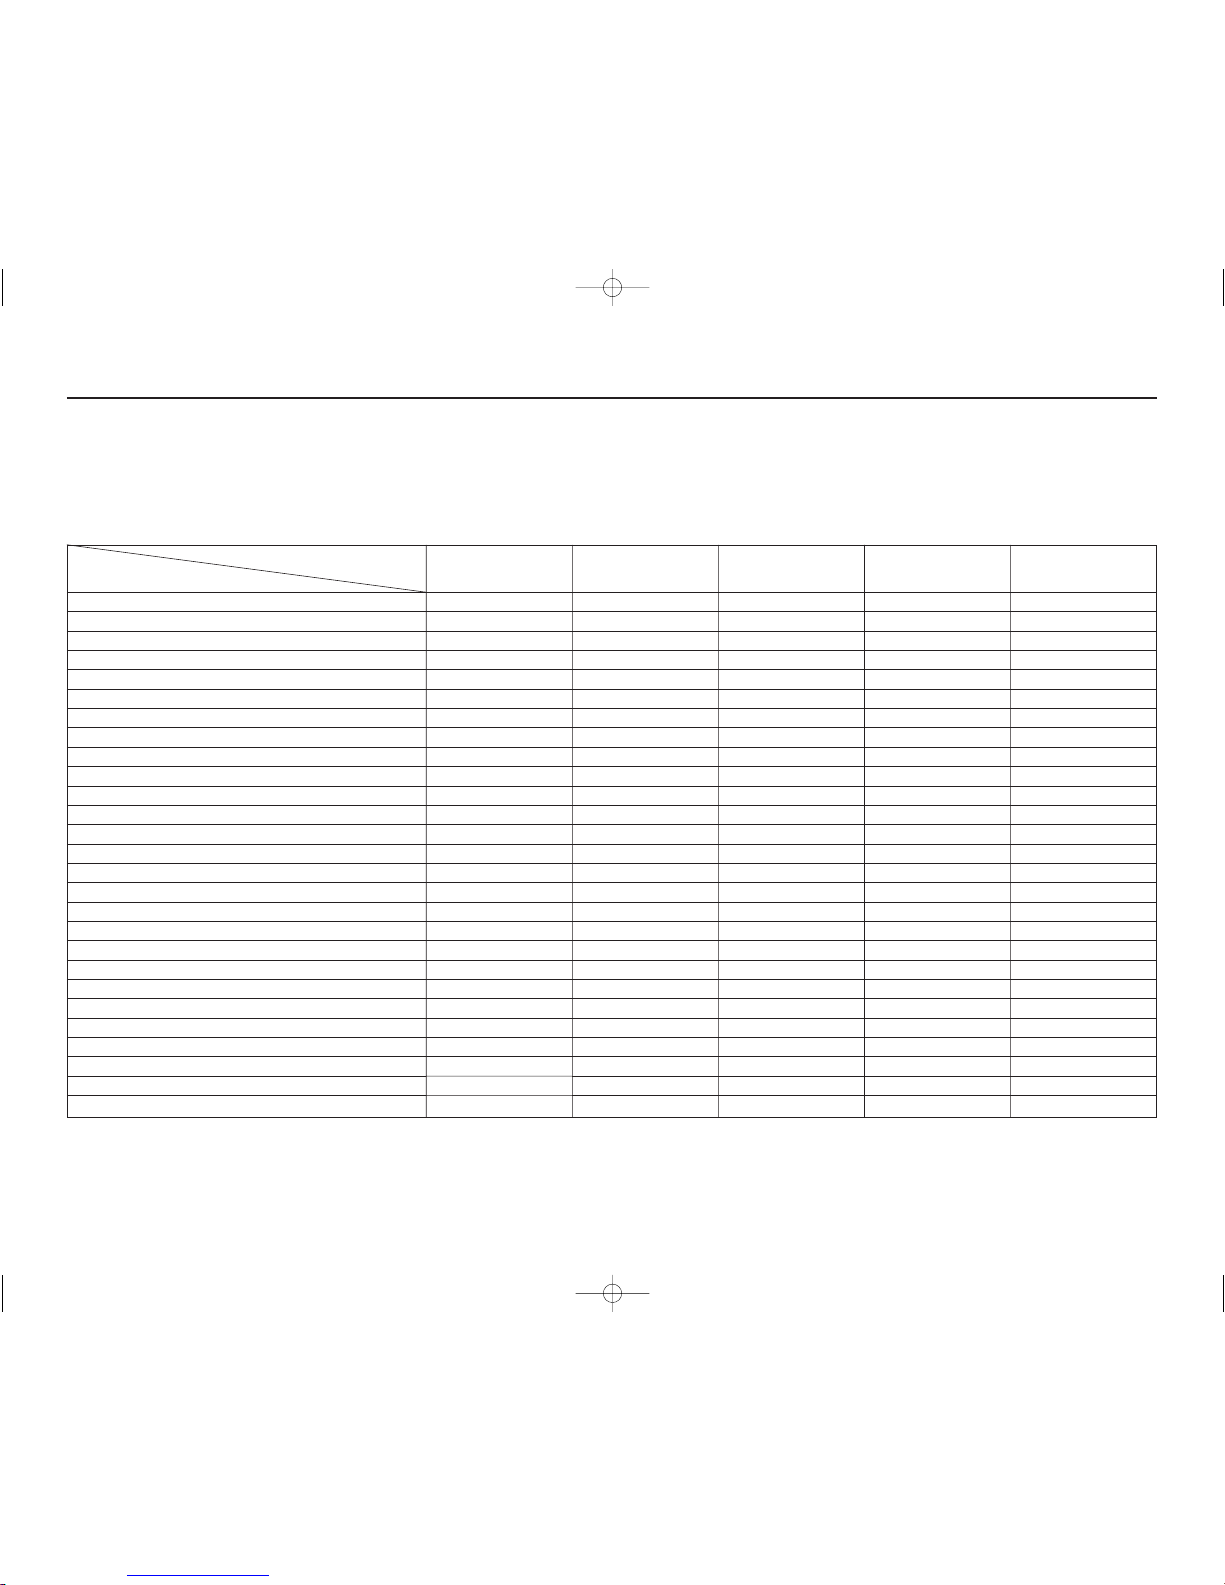
Maintenance Schedule
All items should be checked before each competition event. See your Honda dealer unless you are mechanically qualified and have the proper tools.
Damage from competition use is not covered by the Distributor's Limited Warranty on your Honda.
Perform the Pre-ride Inspection at each scheduled maintenance period.
I: Inspect and Clean, Adjust, Lubricate or Replace if necessary. C: Clean. L: Lubricate. R: Replace.
Frequency
Item
Throttle Operation
Air Cleaner
Spark Plug
Radiator Coolant
Cooling System
Cylinder Head Decarbonizing
Piston and Piston Rings
Piston Pin and Connecting Rod Small End Bearing
Reed Valve
Transmission Oil
Drive Chain
Drive Chain Sliders
Drive Chain Rollers
Drive Sprocket
Driven Sprocket
Brake Fluid
Brake Pad Wear
Brake System
Clutch System
Control Cables
Expansion Chamber/Silencer
Suspension
Swingarm/Shock Linkage
Fork Oil
Wheels/Tires
Nuts, Bolts, Fasteners
Steering Head Bearing
This maintenance schedule is based upon average riding condition. Machine subjected to severe use require more frequent servicing.
NOTE: 1. Clean after every moto (heat) for dusty riding conditions.
2. Replace every 2 years. Replacement requires mechanical skill.
3. Replace after the first break-in ride.
Ref. page
42
40
46
38
39
48
48
48
49
37
64 – 66
64
65
66
66
58, 59
60
57
44
68
67
52, 53
25, 53
54
61, 62, 63
68, 109, 110
68
Every 9 races
or about
22.5 hours
R
I
Every 3 races
or about
7.5 hours
R
C
R
R
R
R
L
R
Each race
or about
2.5 hours
I
C
I
I
I
I, L
I
I
I
I
I
I
I
I
I,L
I
I
I
I
Note
Note 1
Note 2
Note 2
Note 3
CR85/000-02304.12.1511:51AMページ21

22 Servicing Your Honda22 Servicing Your Honda
General Competition Maintenance
Perform maintenance on firm, level ground using
the optional workstand, or equivalent support.
Use genuine Honda parts or their equivalent
when servicing your CR.
Clean parts in non-flammable (high flash point)
cleaning solvent (such as kerosene) when
disassembling. Lubricate any sliding surface,
O-rings, and seals before reassembling. Grease
parts by coating or filling where specified.
After any engine disassembly, always install new
gaskets, O-rings, cotter pins, piston pin clips,
snap rings, etc. when reassembling. After
reassembly, check all parts for proper installation
and operation.
All Pre-ride Inspection Items
Refer to Pre-ride Inspection in your Owner’s
Manual, page 9.
CR85/000-02304.12.1511:51AMページ22
Servicing Your Honda 23
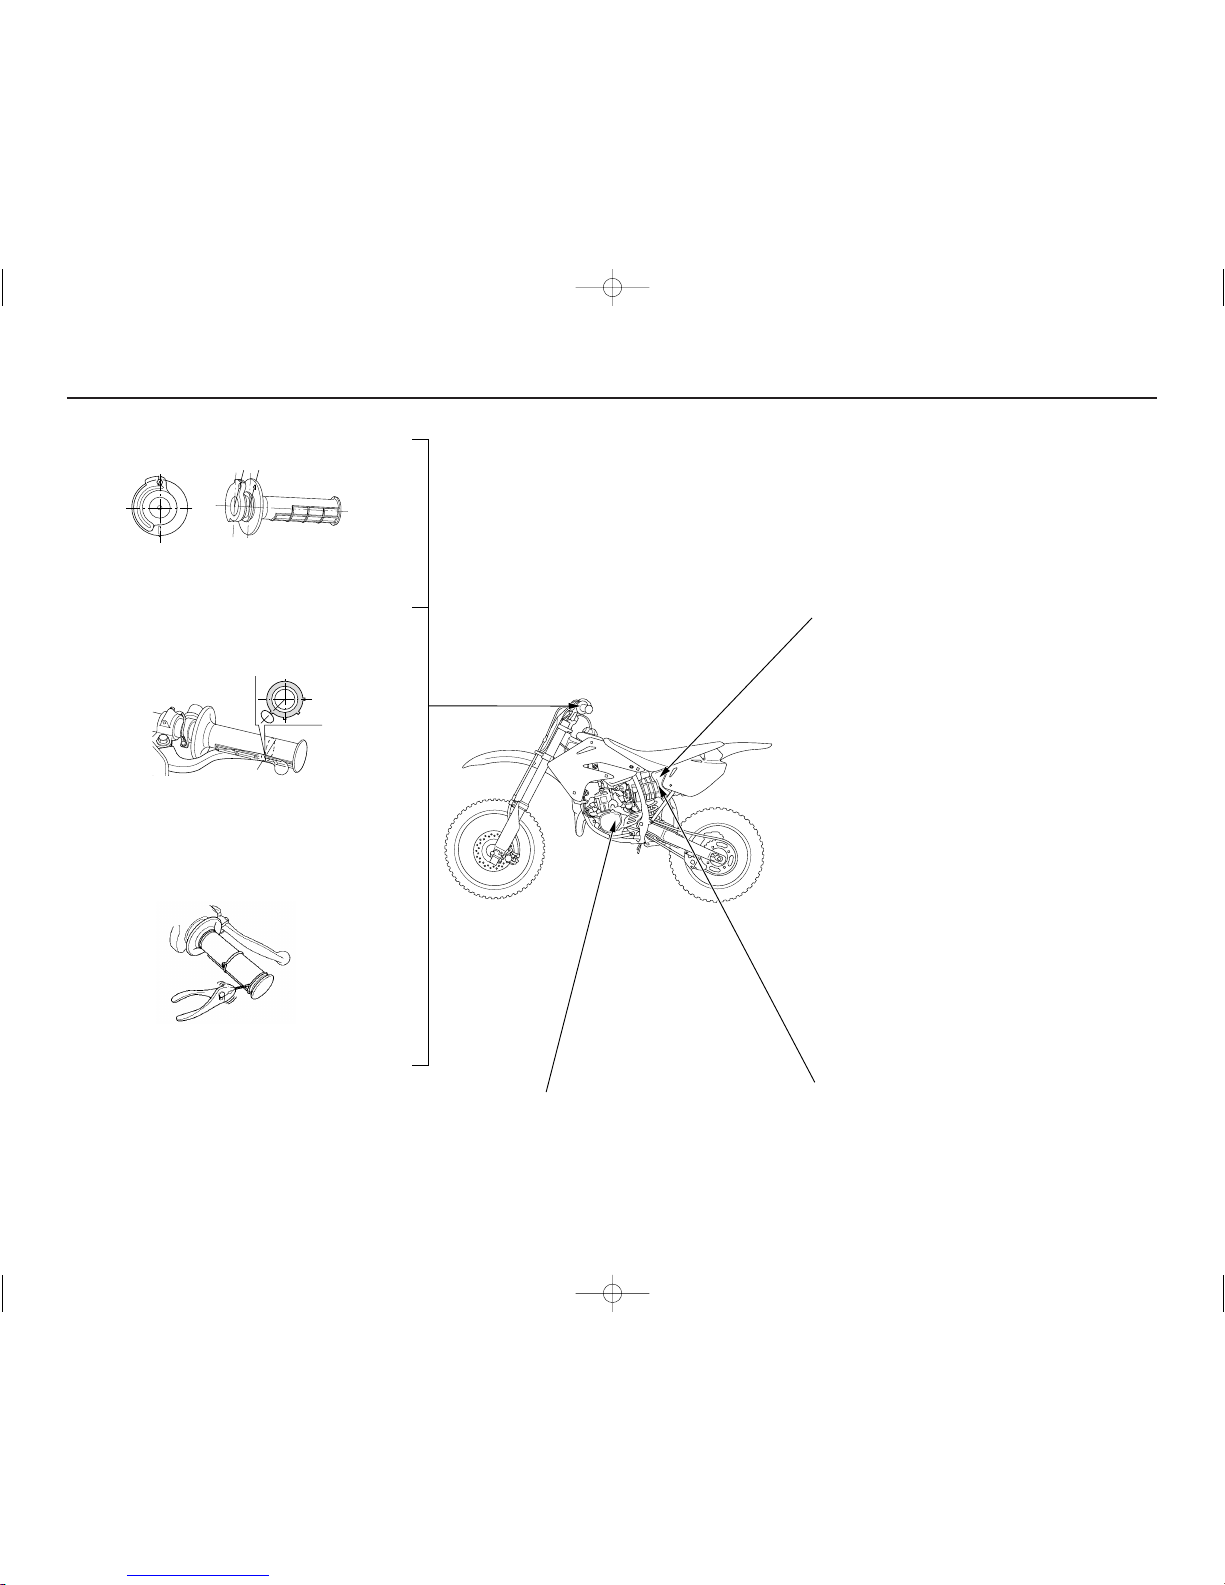
Handgrips
Always use Honda Hand Grip Cement (U.S.A only) or
Honda Bond A when replacing handgrips.
Throttle Grip
Align the “∆” mark on the throttle grip with the hole
of the throttle cable guide. Left handlebar grip: Align
the top of the waffle pattern on the grip with the
clutch lever as shown in the illustration.
Refer to the Service Manual for installation
instructions.
For added security, you may choose to safety wire the
hand grips to the handlebar and throttle to prevent the
possibility of them loosening. Position the twisted
wire ends away from your palms and be sure to bend
the wire ends well into the grip rubber so they will not
snag your glove.
Servicing Your Honda 23
General Competition Maintenance
Air Cleaner
Clean and oil your air cleaner regularly because the volume
of air able to pass through it has a great effect on
performance. Both engine performance and long term
durability may be affected by an air cleaner that has
deteriorated and allows dirt to pass. Inspect the air cleaner
closely each time it’s serviced for evidence of small tears or
seam separation. Keep a spare air cleaner oiled and ready to
install, sealed in a plastic bag. Riding in dusty conditions
may require servicing the air cleaner or replacing it with a
pre-serviced air cleaner between motos. Be careful not to
over oil the air cleaner. While it is important to oil the air
cleaner thoroughly, over oiling will cause an overall rich
running condition, probably more noticeable off idle and in
low rpm performance. Follow the servicing instructions in
the Maintenance section. Use Pro Honda Foam Filter Oil or
an equivalent. Be sure to grease the air cleaner flange
where it contacts the air cleaner housing. Honda White
Lithium Base Grease, or an equivalent, is handy for this
because any dirt that penetrates this sealing area will show
up clearly
(page 40).
Use the Honda genuine air cleaner or an equivalent air
cleaner specified for your model.
Using the wrong Honda air cleaner or a non-Honda air
cleaner which is not of equivalent quality may cause
Transmission Oil
Drain and replace transmission oil often to ensure the
greatest service life of the transmission and clutch. Frequent
oil changes will also assure consistent performance of both
shifting and clutch action (page 36).
Air Cleaner Housing Sealing
Remove and reseal the air cleaner housing boot where it
connects to the air cleaner housing with silicone sealer if
there is any doubt to its sealing integrity. Use Honda
Thread Lock or an equivalent on the attaching studs.
Inspect the air cleaner and air intake tract regularly for signs
of deterioration or dirt penetration.
Throttle Control
Remove the throttle control every few rides, clean the inside
of the drum and the handlebar thoroughly, and apply a light
coating of silicone lubricant. Inspect the cable carefully for
kinks or other damage that may restrict throttle control in
any way. Move the handlebar from lock to lock to be sure
there is no cable interference. Check to be sure the top of
the carburetor is screwed on tight. Make certain the throttle
operation is perfect after servicing and inspecting.
CR85/000-02304.12.1511:51AMページ23
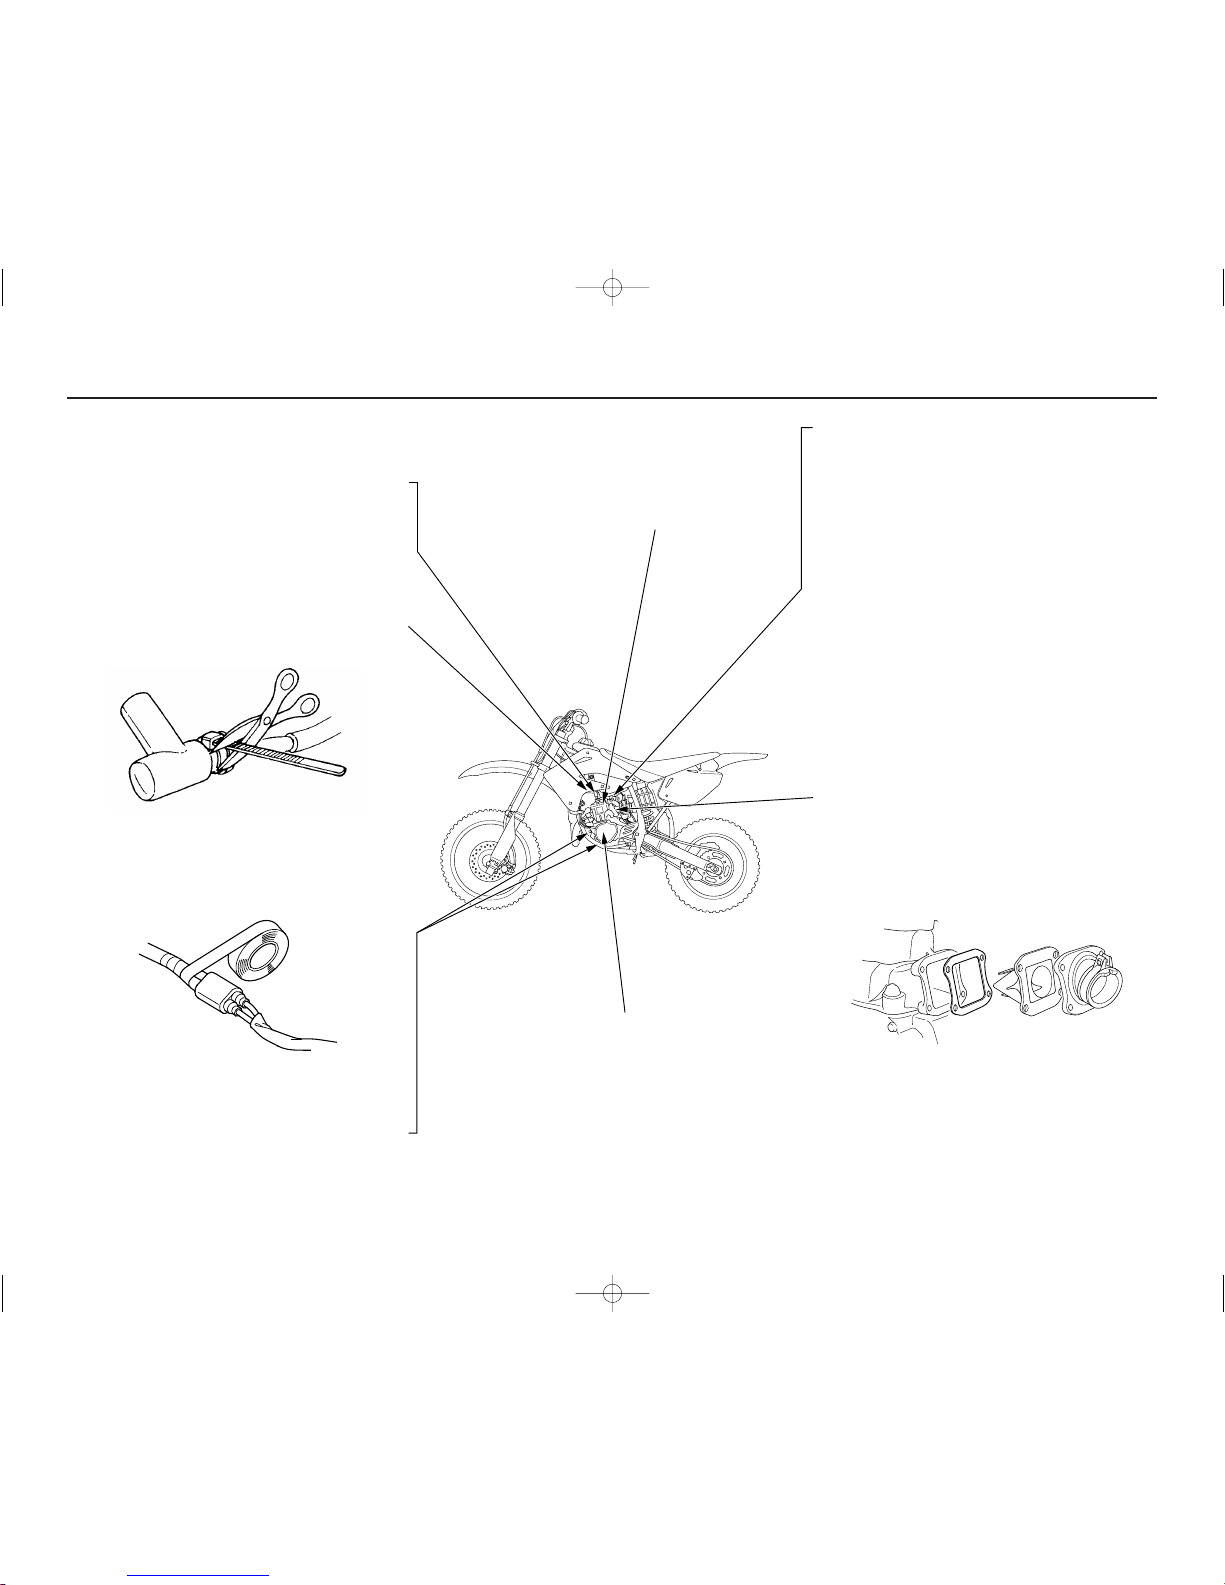
Fuel Filter
Periodically drain the fuel from the tank, remove and clean
the fuel valve/filter. Replace the fuel valve O-ring if there
are any signs of damage or deterioration (page 35).
Fuel Contamination
Periodically drain the float bowl and inspect the
carburetor for contamination from dirt (page 35).
Inlet Tract Sealing
Air leaks around the carburetor insulator and reed valve
assembly should be cured by disassembling, cleaning and
resealing with new gaskets and some sealing agent. Be
careful not to overtighten the mounting bolts — this is the
most common cause for leaks here. Inspect the mating
surfaces, for warpage due to over-torquing.
Pressure/Vacuum Leak-Down Test
Perform this test at regular intervals to minimize the
possibility of engine damage from air leaks.
24 Servicing Your Honda
General Competition Maintenance
Electrical Connectors
Clean electrical connectors and wrap them with electrical
tape to reduce the possibility of unwanted disconnections,
water shorts or corrosion. Additional corrosion protection is
offered by using Honda Dielectric Grease on all electrical
connections.
Engine Mounting Bolts
Make sure the engine mounting bolts are tightened to the
proper torque specification. For added peace of mind,
remove the nuts, clean the threads, and apply Honda Thread
Lock or an equivalent prior to torquing the nuts.
Gaskets
Always use new gaskets when reassembling components.
Cylinder Removal
Put a little grease on the cylinder mounting dowels to
prevent corrosion from dissimilar metals. The tolerances are
quite tight, so it’s important to keep these dowels absolutely
clean (page 47).
Ignition
Remove the alternator cover and keep it off for a few hours
after each washing to let condensation evaporate. Pull the
flywheel rotor every few rides and clean it and its crankshaft
mounting surface, the alternator stator, the ignition pulse
generator pickup and the entire ignition cavity thoroughly.
The presence of dirt between the ignition pulse generator
and the flywheel makes the ignition control module
compensate to maintain the ignition curve. Cleaning dirt
from the ignition side main seal helps to prevent premature
seal wear. Close inspection of this seal can reveal a leakage
problem before engine damage occurs.
Spark Plug
Some non-resistor plugs may cause ignition problems.
Refer to the recommendations elsewhere in this manual for
specific types so you will be sure to use the proper reach
and heat range. Replace periodically as specified in the
Maintenance Schedule (page 21).
Spark Plug Cap
Install a small plastic tie-wrap around the spark plug cap to
reduce any possibility of it loosening or of water
penetration.
CR85R/024-046 04.12.15 11:52 AM ページ24
Servicing Your Honda 25
Brake Fluid Replacement
Refer to Brake Pad Wear in your Owner’s Manual, page 60.
Brake Caliper Inspection: Be sure both the front and rear
calipers are able to move freely on the caliper bracket pins.
Check pad thickness periodically and replace when
minimum thickness is reached. If the brakes fade when they
are hot, inspect the pads for glazing or damage, and replace
if necessary.
Brake Fluid Replacement: Replace the hydraulic fluid in
the brake system every two years. Replace the fluid more
frequently if you subject your brakes to severe use. Heavy
braking heats the brake fluid and it may deteriorate sooner
than expected. Any type of riding, that requires frequent use
of the brakes, such as in tight woods, can shorten the service
life of brake fluid.
Water Pump Inspection Hole
After every race, check the inspection hole, located just
below the water pump cover on the right crankcase cover.
Clean away any clogged dirt or sand, if necessary. Look for
coolant or oil leakage. Leaking coolant indicates a worn or
damaged water seal. Leaking oil indicates a bad
transmission oil seal. If replacement is necessary, both seals
should be replaced.
General Competition Maintenance
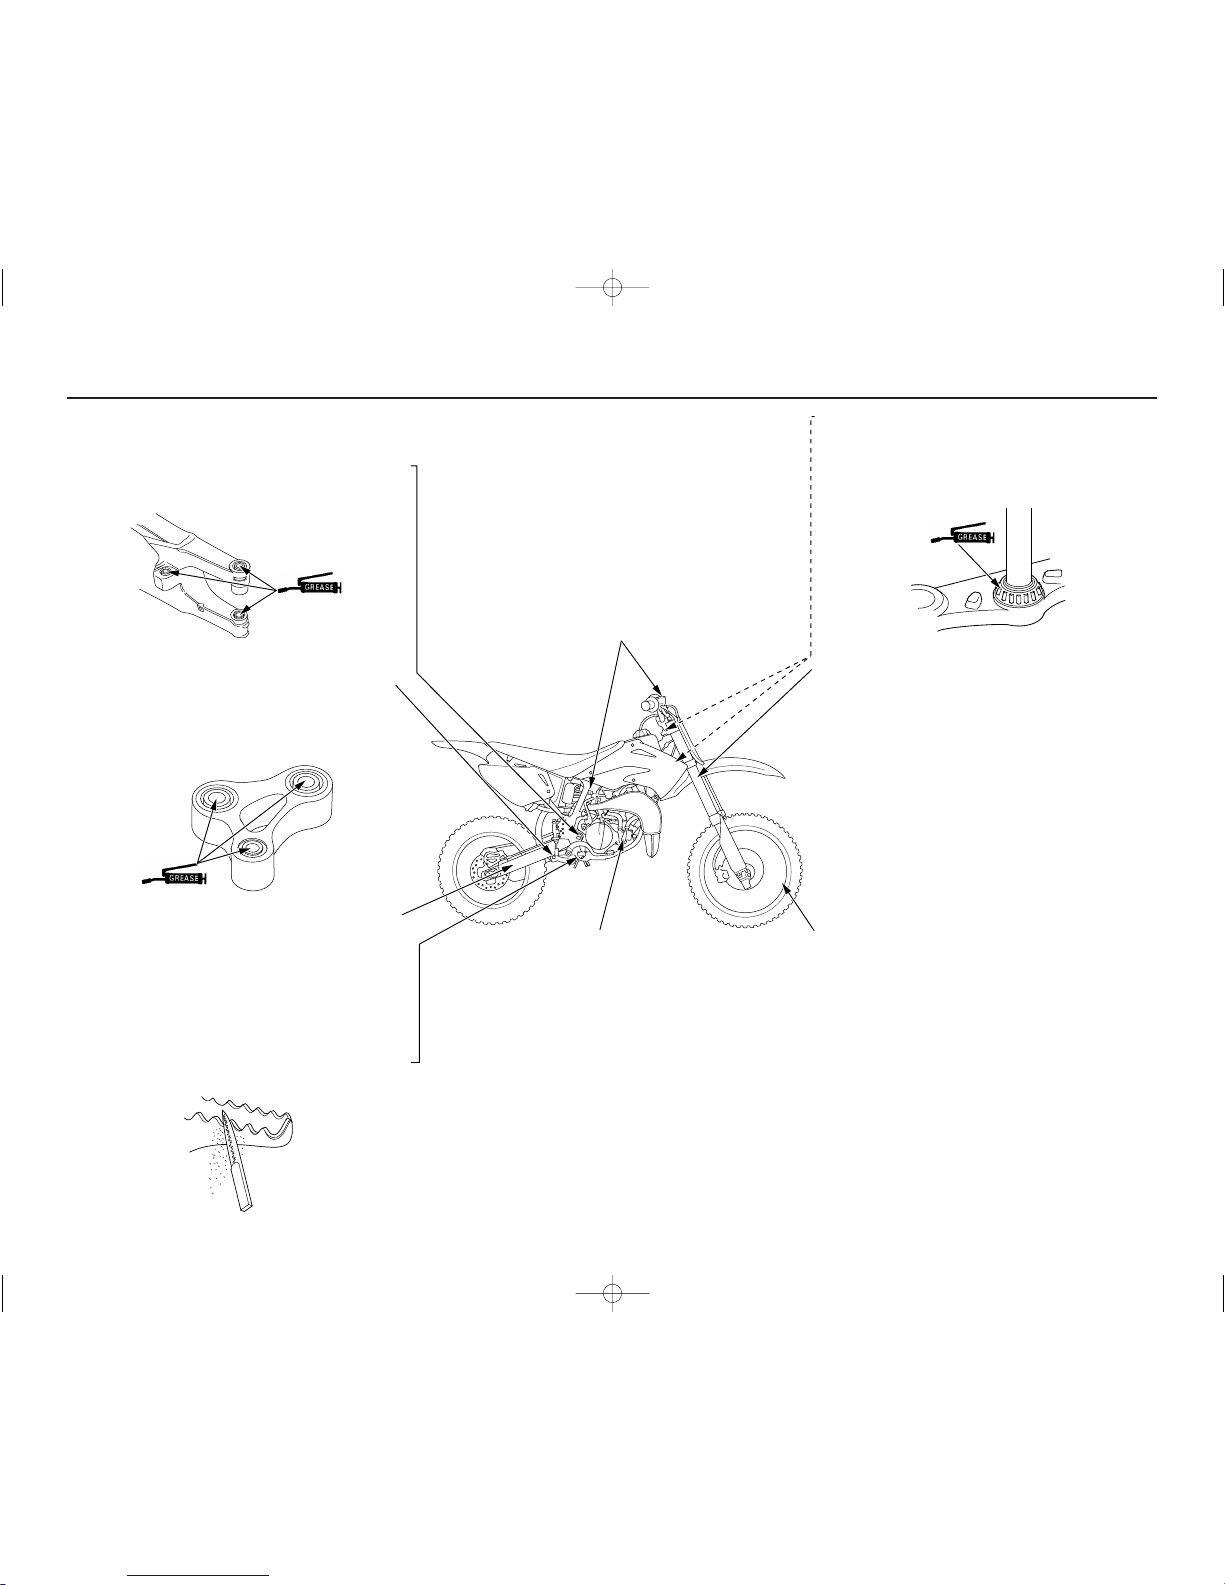
Swingarm Pivot Lubrication
Clean, inspect and lubricate when servicing suspension
linkage pivots. Be sure all of the suspension pivot seals are
in good condition. Use Honda Moly 60 paste (U.S.A. only)
or molybdenum disulfide paste (containing more than 40%
molybdenum disulfide additive).
Suspension Linkage Lubrication
Disassemble, clean, inspect and lubricate all pivot bearings
after each 7.5 hours of running time in order to maintain
proper suspension performance and minimize component
wear. Use Honda Moly 60 paste (U.S.A. only) or
molybdenum disulfide paste (containing more than 40%
molybdenum disulfide additive).
Swingarm
Do not attempt to weld or otherwise repair a damaged swingarm.
Welding will weaken the swingarm.
Footpegs
Worn footpeg teeth can be repaired by filing the grooves
between the teeth with a triangular-shaped file.
Be aware that filing them too sharp will reduce boot sole
lifespan. Sharpen only the points of the teeth. Filing the
grooves deeper will weaken the footpegs. Be sure the pegs
are free to pivot freely and that the pivot pin retaining cotter
pins are in good condition.
Steering Head Bearings
Periodically clean, inspect and regrease the steering head
bearings — especially if wet, muddy or extremely dusty
courses are encountered often.
Fork Oil/Performance
Disassemble, clean and inspect the fork and replace the oil
regularly. Contamination due to the tiny metal particles
produced from the normal action of the fork, as well as
normal oil breakdown, will deteriorate the performance of
the suspension. Refer to the Honda Service Manual. Use
only Pro Honda HP Fork Oil 5W (U.S.A. only) or
equivalent which contains special additives to assure
maximum performance of your CR’s front suspension.
Frame
Because your CR is a high-performance machine, the frame
should not be overlooked as part of your overall competition
maintenance program. Periodically inspect the frame
closely for possible cracking or other damage. It makes
good racing sense.
Spokes
Check spoke tension frequently between the first few rides.
As the spokes, spoke nuts and rim contact points seat-in, the
spokes may need to be retightened. Once past this initial
seating-in period, the spokes should hold their tension. Still,
be sure your race maintenance program includes checking
spoke tension and overall wheel condition on a regular basis
(page 61).
Nuts, Bolts, Etc
Application of a thread locking agent to essential fasteners
offers added assurance and security. Remove the nuts, clean
the threads of both the nuts and bolts, apply Honda Thread
Lock or an equivalent and tighten to the specified torque.
CR85R/024-046 04.12.15 11:52 AM ページ25
Between Motos & Practice Maintenance
After practice or between motos you have a
chance to make additional checks and
adjustments.
• Clean accumulated dirt from under the
fenders and off the wheels, suspension
components, hand grips, controls, and
footpegs. A stiff, nylon parts cleaning brush
works well.
• Check tire air pressure.
•
Check spoke tension and rim lock nut security.
• Check sprocket bolt and nut security.
• Clean the sides of the drive chain with a stiff,
nylon parts-cleaning brush. Lubricate and
adjust the chain as necessary.
Do not perform maintenance while engine is
running. Injury to your fingers or hands may
result.
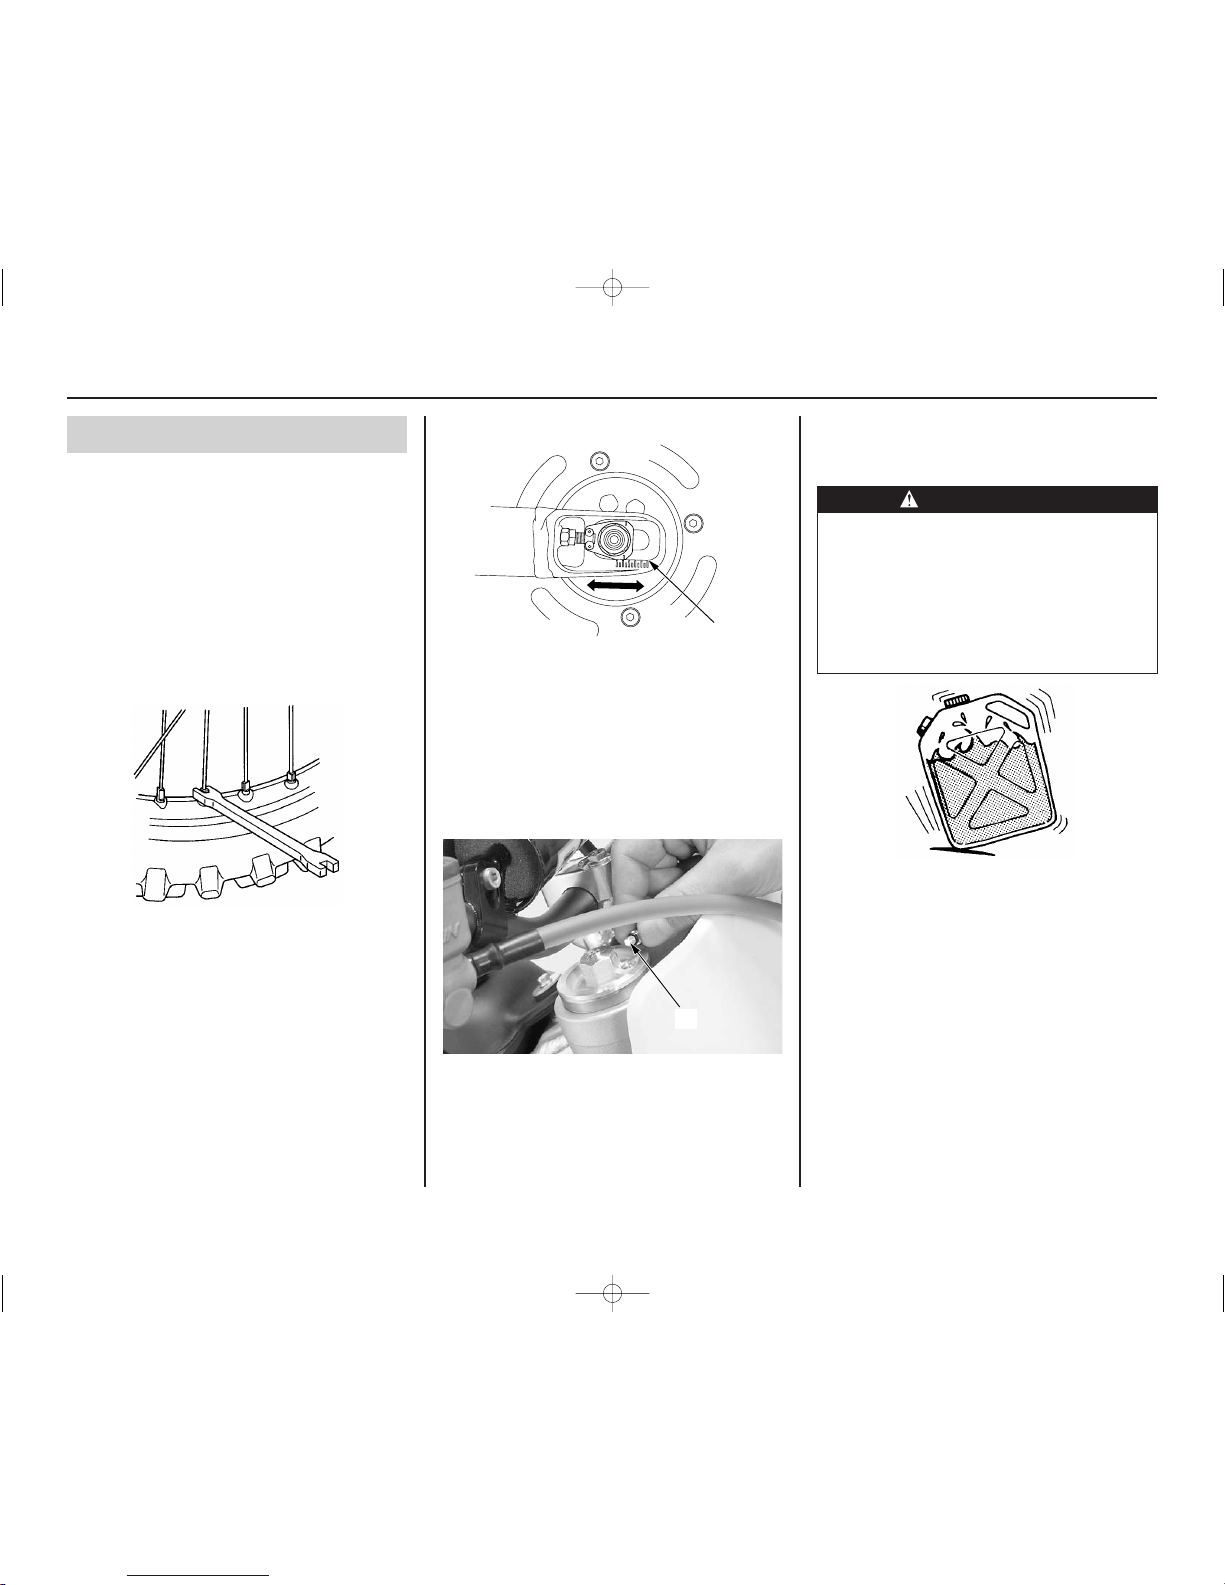
• After adjustment, check that the chain
adjuster index marks (1) are in the same
position on each side. This will ensure that
the rear wheel is in proper alignment and
allow maximum performance from the rear
disc brake. Maintaining proper wheel
alignment will also extend brake pad wear.
(1) chain adjuster index marks
• Suspend the front wheel above the ground and
use the pressure release screws (2) to release
the built-up pressure (in excess of normal
atmospheric pressure: 0 psi) in the fork tubes.
This pressure is caused by normal fork action
while riding. (If you are riding at altitude,
remember that fork pressure of 0 at sea level
will increase as elevation increases.)
(2) pressure release screws
• Be sure the fuel and oil is mixed well by
agitating it thoroughly before pouring pre-mix
into the fuel tank.
26 Servicing Your Honda
Before & After Competition Maintenance
(1)
(2)
WARNING
Gasoline is highly flammable and
explosive.You can be burned or seriously
injured when handling fuel.
• Stop the engine and keep heat, sparks
and flame away.
• Handle fuel only outdoors.
• Wipe up spills immediately.
CR85R/024-046 04.12.15 11:52 AM ページ26
 Loading...