

Honda CB UNICORN DAZZLER (2010) Owner's Manual

CB UNICORN DAZZLER
OWNER’S MANUAL
© Honda Motor Co., Ltd. 2010

IMPORTANT INFORMATION
• OPERATOR AND PASSENGER
This vehicle is designed to carry the operator and one passenger. Never exceed the
maximum weight capacity as shown on the accessories and loading label.
• ON-ROAD USE
This vehicle is designed to be used only on the road.
• READ THIS OWNER’S MANUAL CAREFULLY
Pay special attention to the safety messages that appear throughout the manual.
These messages are fully explained in the “A Few Words About Safety” section
which appears before the Contents page.
This manual should be considered a permanent part of the vehicle and should remain
with the vehicle when resold.

CB UNICORN DAZZLER
OWNER’S MANUAL
All information in this publication is based on the latest production information
available at the time of approval for printing. Honda Motor Co., Ltd. reserves
the right to make changes at any time without notice and without incurring any
obligation.
No part of this publication may be reproduced without written permission.

WELCOME
The vehicle presents you a challenge to master the machine, a challenge to adventure. You
ride through the wind, linked to the road by a vehicle that responds to your commands as
no other does. Unlike an automobile, there is no metal cage around you. Like an aeroplane,
a pre-ride inspection and regular maintenance are essential to your safety. Your reward is
freedom.
To meet the challenges safely, and to enjoy the adventure fully, you should become
thoroughly familiar with this owner’s manual BEFORE YOU RIDE THE VEHICLE .
As you read this manual, you will find information that is preceded by a NOTICE symbol.
This information is intended to help you avoid damage to your vehicle, other property, or
the environment.
When service is required, remember that your Honda dealer knows your vehicle. If you
have the required mechanical “know-how” and tools, your dealer can supply you an official
Honda shop manual on paid basis to help you perform many maintenance and repair tasks.
Accessories shown in the illustration are not part of the standard equipment.
For any query or assistance, please call Customer Care No.:
Toll Free No.: 1800 11 3434* (Toll free number for BSNL & MTNL users only)
0124-2291000
Pleasant riding, and thank you for choosing a Honda!
•The specifications may vary with each locale.

A FEW WORDS ABOUT SAFETY
Your safety, and the safety of others, is very important. And operating this vehicle safely is
an important responsibility.
To help you make informed decisions about safety, we have provided operating procedures
and other information on labels in this manual. This information alerts you to potential
hazards that could hurt you or others.
Of course, it is not practical or possible to warn you about all hazards associated with
operating or maintaining a vehicle. You must use your own good judgment.
You will find important safety information in a variety of forms, including:
•Safety Labels – on the vehicle.
•Safety Messages – preceded by a safety alert symbol
! and one of three signal words:
DANGER, WARNING, or CAUTION
These signal words mean:

• Safety Headings – such as Important Safety Reminders or Important Safety Precautions.
• Safety Section – such as vehicle Safety.
• Instructions – how to use this vehicle correctly and safely.
This entire manual is filled with important safety information–please read it carefully.
!
! WARNING
!
CAUTION
You WILL be KILLED or SERIOUSLY HURT if you don’t follow
instructions.
You CAN be KILLED or SERIOUSLY HURT if you don’t follow
instructions.
You CAN be HURT if you don’t follow instructions.
DANGER

CONTENTS
page
1 VEHICLE SAFETY
1 Important Safety Information
2 Protective Apparel
3 Load Limits and Guidelines
7 PARTS LOCATION
10 Instruments and Indicators
1 4 MAJOR COMPONENTS
(Information you need to
operate this scooter)
14 Suspension
15 Brakes
16 Clutch
17 Fuel
20 Engine Oil
21 Tyres
25 ESSENTIAL INDIVIDUAL
COMPONENTS
25 Ignition Switch
26 Right Handlebar Controls
27 Left Handlebar Controls
Page
28 FEATURES
(Not required for operation)
28 Steering Lock
29 Seat
30 Helmet Holder
31 Side cover
32 Document Bag
32 Storage Compartment
33 Headlight Aim Vertical Adjustment
33 OPERATION
33 Pre-ride Inspection
34 Starting the Engine
36 Running-in
36 Riding
37 Braking
38 Parking
38 Anti-theft Tips

Page
39 MAINTENANCE
39 The Importance of Maintenance
40 Maintenance Safety
40 Safety Precautions
42 Maintenance Schedule
45 Tool Kit
46 Serial Numbers
47 Colour code
48 Engine Oil
50 Crankcase Breather
50 Spark Plug
52 Valve Clearance
53 Idle Speed
55 Throttle Operation
55 Air Cleaner
57 Drive Chain
61 Drive Chain Slider
61 Front and Rear Suspension
Inspection
Page
62 Side Stand
63 Wheel Removal
66 Brake Pad Wear
67 Battery
69 Fuse Replacement
70 Stoplight Switch Adjustment
71 Bulb Replacement
74 CLEANING
7 6 STORAGE GUIDE
76 Storage
77 Removal from Storage
78 SPECIFICATIONS
81 CATALYTIC CONVERTER

1
VEHICLE SAFETY
IMPORTANT SAFETY INFORMATION
Your vehicle can provide many years of
service and pleasure - if you take
responsibility for your own safety and
understand the challenges that you can meet
on the road.
There is much that you can do to protect
yourself when you ride. You’ll find many
helpful recommendations throughout this
manual. Following are a few that we
consider most important.
Always Wear a Helmet
It’s a proven fact: helmets significantly
reduce the number and severity of head
injuries. So always wear an approved
vehicle helmet and make sure your
passenger does the same. We also
recommend that you wear eye protection,
sturdy boots, gloves, and other protective
gear (page 2 ).
Make Yourself Easy to See
Some drivers do not see vehicle because
they are not looking for them. To make
yourself more visible, wear bright reflective
clothing, position yourself so other drivers
can see you, signal before turning or
changing lanes, and use your horn when it
will help others notice you.
Ride Within Your Limits
Pushing the limits is another major cause of
vehicle accidents. Never ride beyond your
personal abilities or faster than conditions
warrant. Remember that alcohol, drugs,
fatigue and inattention can significantly
reduce your ability to make good
judgements and ride safely.
Keep Your Vehicle in Safe Condition
For safe riding, it’s important to inspect your
vehicle before every ride and perform all
recommended maintenance. Never exceed
load limits, and only use accessories that
2
!
have been approved by Honda for this
vehicle. See page 3 for more details.
Don’t Drink and Ride
Alcohol and riding don’t mix. Even one
choose proper gear. Drink can reduce your
ability to respond to changing conditions,
and your reaction time gets worse with every
additional drink. So don’t drink and ride, and
don’t let your friends drink and ride either.
PROTECTIVE APPAREL
For your safety, we strongly recommend
that you always wear an approved vehicle
helmet, eye protection, boots, gloves, long
pants, and a long-sleeved shirt or jacket
whenever you ride. Although complete
protection is not possible, wearing proper
gear can reduce the chance of injury when
you ride.
Following are suggestions to help you choose
proper gear.
WARNING
Not wearing a helmet increases the
chance of serious injury or death in a
crash.
Be sure you and your passenger
always wear a helmet, eye protection
and other protective apparel when you
ride.
Helmets and Eye Protection
Your helmet is your most important piece
of riding gear because it offers the best
protection against head injuries. A helmet
should fit your head comfortably and
securely. A bright-coloured helmet can make
you more noticeable in traffic, as can
reflective strips.
An open-face helmet offers some
protection, but a full-face helmet offers

3
more. Always wear a face shield or goggles
to protect your eyes and help your vision.
Additional Riding Gear
In addition to a helmet and eye protection,
we also recommend:
• Sturdy boots with non-slip soles to help
protect your feet and ankles.
• Leather gloves to keep your hands
warm and help prevent blisters, cuts,
burns and bruises.
• A vehicle riding suit or jacket for comfort
as well as protection. Bright coloured
and reflective clothing can help make
you more noticeable in traffic. Be sure
to avoid loose clothes that could get
caught on any part of your vehicle.
LOAD LIMITS AND GUIDELINES
Your vehicle has been designed to carry you
and one passenger. When you carry a
passenger, you may feel some difference
during acceleration and braking. But so long
as you keep your vehicle well maintained,
with good tyres and brakes, you can safely
carry loads within the given limits and
guidelines.
However, exceeding the weight limit or
carrying an unbalanced load can seriously
affect your motorcycle’s handling, braking
and stability. Non-Honda accessories,
improper modifications, and poor
maintenance can also reduce your safety
margin.
The following pages give more specific
information on loading, accessories and
modifications.
Loading
How much weight you put on your
motorcycle, and how you load it, are
important to your safety. Anytime you ride
with a passenger or cargo you should be
aware of the following information.
4
wish to secure a jacket or other small items
to the seat when you are not riding with a
passenger. If you wish to carry more cargo,
check with your Honda dealer for advice,
and be sure to read the information
regarding accessories on page 5.
Improperly loading your motorcycle can
affect its stability and handling. Even if your
motorcycle is properly loaded, you should
ride at reduced speeds and never exceed
130 km/h (80 mph) when carrying cargo.
Follow these guidelines whenever you carry
a passenger or cargo:
• Check that both tyres are properly
inflated.
• If you change your normal load, you
may need to adjust the rear suspension
(page 14).
• To prevent loose items from creating a
hazard, make sure that all cargo is
securely tied down before you ride
away.
!
WARNING
Overloading or improper loading can
cause a crash and you can be seriously
hurt or killed.
Follow all load limits and other loading
guidelines in this manual.
Load Limits
Following are the load limits for your
motorcycle:
Maximum weight capacity:
170 kg (374.8 lbs)
Includes the weight of the rider, passenger,
all cargo and all accessories
Maximum cargo weight:
9 kg (19.8 lbs)
Loading Guidelines
Your motorcycle is primarily intended for
transporting you and a passenger. You may
5
!
• Place cargo weight as close to the
center of the motorcycle as possible.
• Balance cargo weight evenly on both
sides.
• Do not attach large or heavy items
(such as a sleeping bag or tent) to the
handlebars, forks or fender.
Accessories and Modifications
Modifying your motorcycle or using
non- Honda accessories can make your
motorcycle unsafe. Before you consider
making any modifications or adding an
accessory, be sure to read the following
information.
WARNING
Improper accessories or modifications
can cause a crash in which you can be
seriously hurt or killed.
Follow all instructions in this owner’s
manual regarding accessories and
modifications.
Accessories
We strongly recommend that you use only
genuine Honda accessories that have been
specifically designed and tested for your
motorcycle. Because Honda cannot test all
other accessories, you must be personally
responsible for proper selection, installation
and use of non-Honda accessories. Check
with your dealer for assistance and always
follow these guidelines:
• Make sure the accessory does not
obscure any lights, reduce ground
clearance and banking angle, limit

6
suspension travel or steering travel,
alter your riding position or interfere
with operating any controls.
• Be sure electrical equipment does not
exceed the motorcycle’s electrical
system capacity
(page 80). A blown
fuse can cause a loss of lights or engine
power.
• Do not pull a trailer or sidecar with your
motorcycle. This motorcycle was not
designed for these attachments, and
their use can seriously impair your
motorcycle’s handling.
Modifications
We strongly advise you not to remove any
original equipment or modify your motorcycle
in any way that would change its design or
operation. Such changes could seriously
impair your motorcycle’s handling, stability
and braking, making it unsafe to ride.
Removing or modifying your lights, mufflers,
emission control system or other equipment
can also make your motorcycle illegal.

7
PARTS LOCATION/iqtksZa dh fLFkfr
Fuel filler cap
¶;wy fQy dSi
Ignition switch
bfXu“ku fLop
Horn button
gkuZ cVu
Steering
handle end
LVsfjax gSaMy
,aM
Front brake lever
ÝaV czsd yhoj
Throttle grip
FkzkSVy fxzi
Rearview mirror
fj;j O;w fejj
Clutch lever
Dyp yhoj
Starter button
LVkVZj cVu
Turn signal switch
VuZ flxuy fLop
Front brake
fluid reservoir
ÝaV czsd ¶ywbM fjt+okZ;j
Passing light
control switch
ikflax ykbV daVªksy
fLop
Headlight dimmer
switch
gSMykbV fMEej fLop
Choke lever
pksd yhoj
Tachometer
VSdksehVj
Rearview mirror
fj;j O;w fejj
Headlight switch
gSMykbV fLop
Select Button
lysDV cVu
Reset Button
jhlsV cVu
Speedometer
LihMksehVj
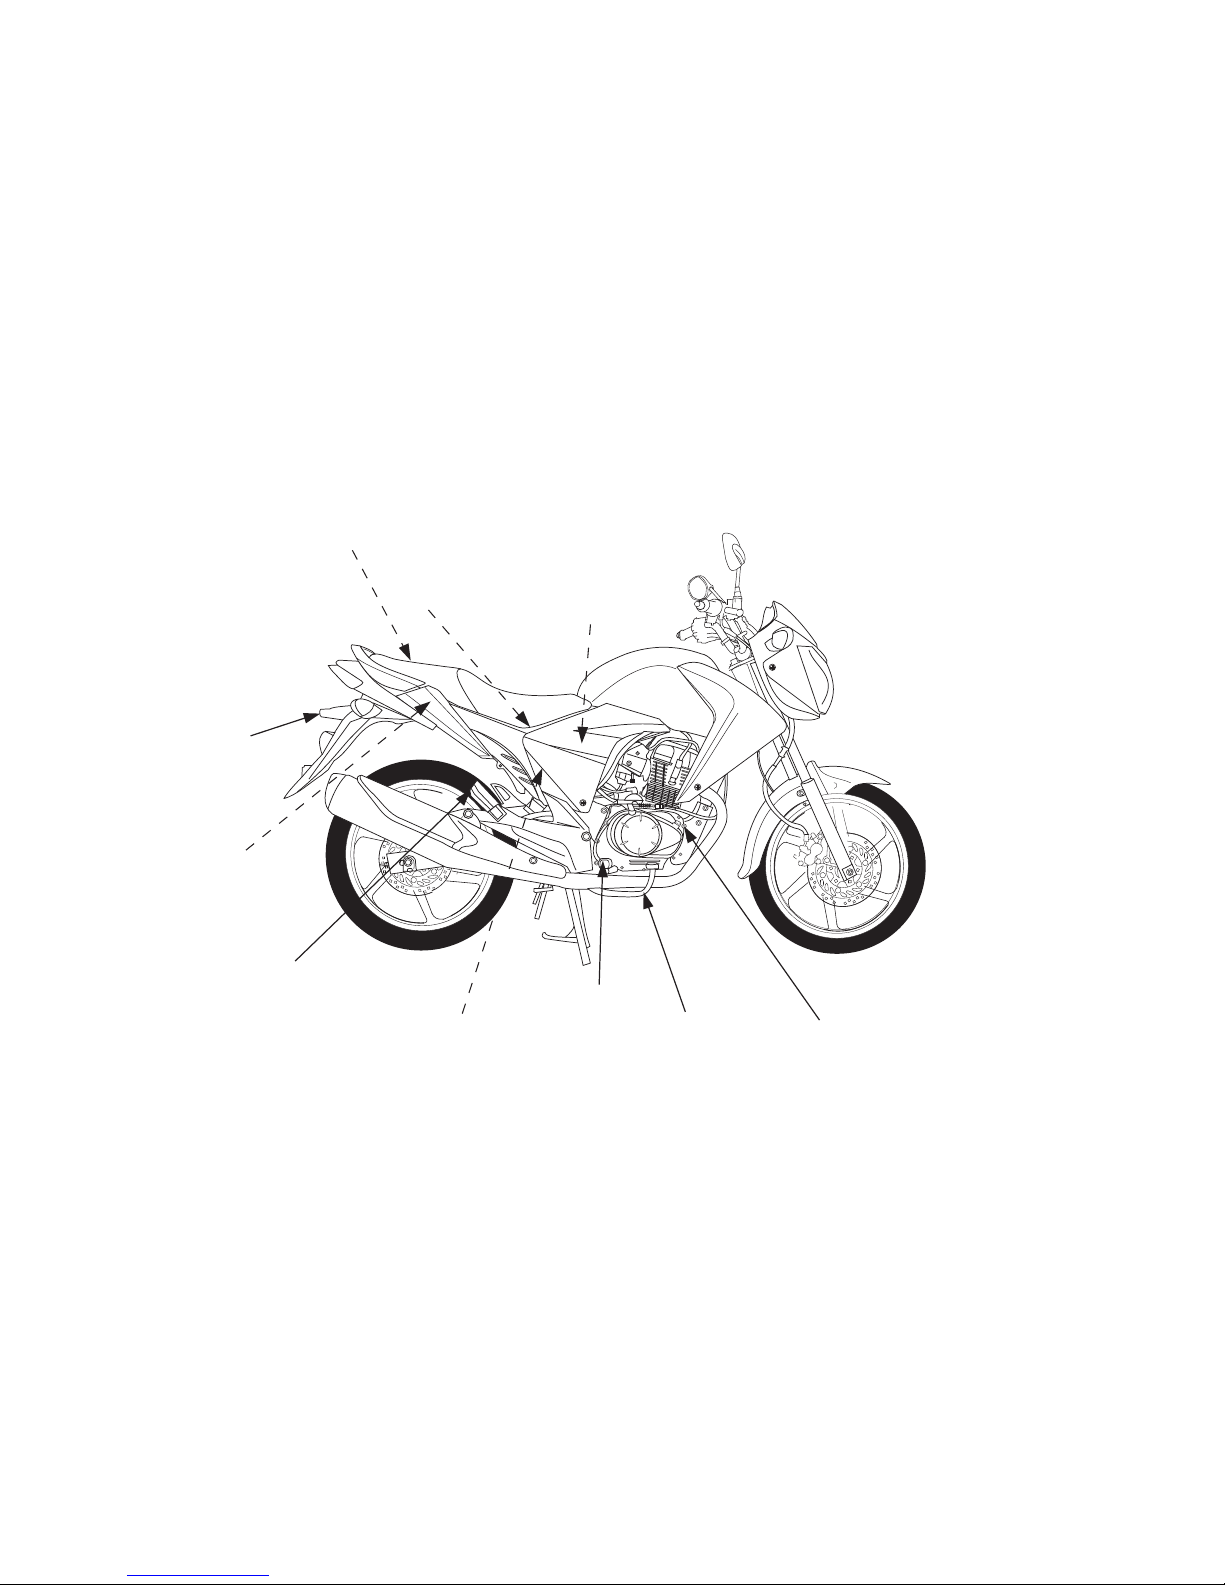
8
Footpeg
QqViSx
Passenger footpeg
;k=h QqViSx
Air cleaner
,;j Dyhuj
Battery
cSVjh
Storage compartment
LVksjst dEikVZesaV
Main fuse
eSu ¶;wt
Fuse
¶;wt
Rear brake pedal
fj;j czsd iSMy
Oil filler cap/dipstick
vkW;y fQyj dSi@fMifLVd
License Plate
Lamp
ykbZlsUl IysV ySEi

9
Helmet holder/ Seat lock
gsYesV gksYMj/ lhV ykWd
Passenger footpeg
;k=h QqViSx
Side stand
lkbZM LVSaM
Center stand
lSaVj LVSaM
Footpeg
QqViSx
Gearshift
pedal
fx;j f“k¶V iSM+y
Fuel valve
¶;wy okYc
License Plate
Lamp
ykbZlsUl IysV ySEi
10
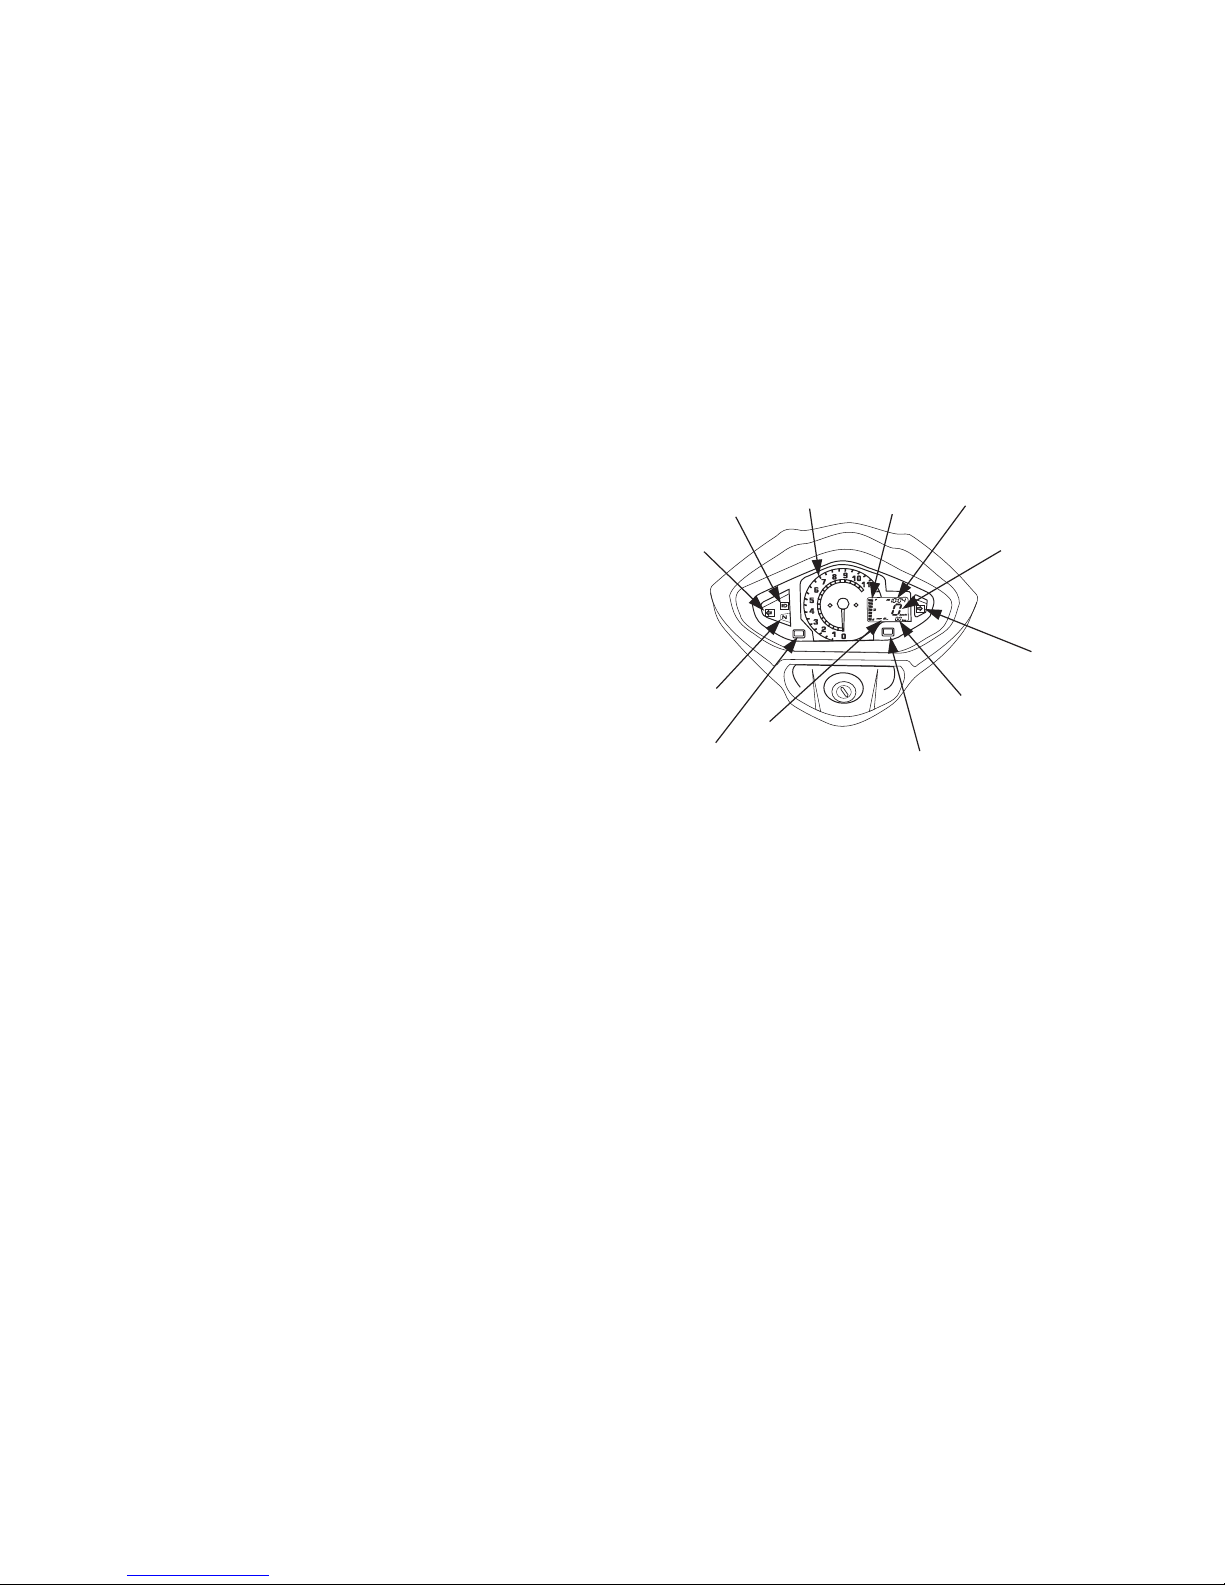
INSTRUMENTS AND
INDICATORS
The indicators are contained in the
instrument panel. Their functions are
described in the tables on the following
pages.
(1) Tachometer ¼VSdksehVj½
(2) Speedometer ¼LihMksehVj½
(3) Digital clock ¼fMftVy DykWd½
(4) Odometer ¼vkWMksehVj½
(5) Fuel gauge ¼¶;wy xst½
(6 ) High beam indicator ¼gkbZ che bafMdsVj½
(7 ) Turn signal indicator ¼VuZ flxuy bafMdsVj½
(8) Neutral indicator ¼U;wVªy bafMdsVj½
(9 ) Trip meter ¼fVªi ehVj½
(10) Select button ¼lysDV cVu½
(11) Reset button ¼jhlsV cVu½
(6)
(4)
(8)
(1)
(2)
(7)
(5)
(7)
(10)
(9)
(11)
(3)
11
(Ref.No.) Description Function
(1) Tachometer Shows engine revolutions per minute.
(2) Speedometer Shows riding speed.
(3) Digital clock Shows hour and minute.
(4) Odometer Shows accumulated mileage.
(5) Fuel gauge Shows approximate fuel supply available.
(6) High beam indicator (blue) Lights when the headlight is on high beam.
(7) Turn signal indicator (orange) Flashes when either turn signal operates.
(8) Neutral indicator (green) Lights when the transmission is in neutral.
(9) Trip meter Its shows distance traveled since the time it
was last reset to zero.
(10) Select button Use this button for the following purposes.
• To set mileage countdown
• To adjust time
(11) Reset button Use this button for the following purposes.
• To reset tripmeter
• To set mileage countdown
• To adjust time
12
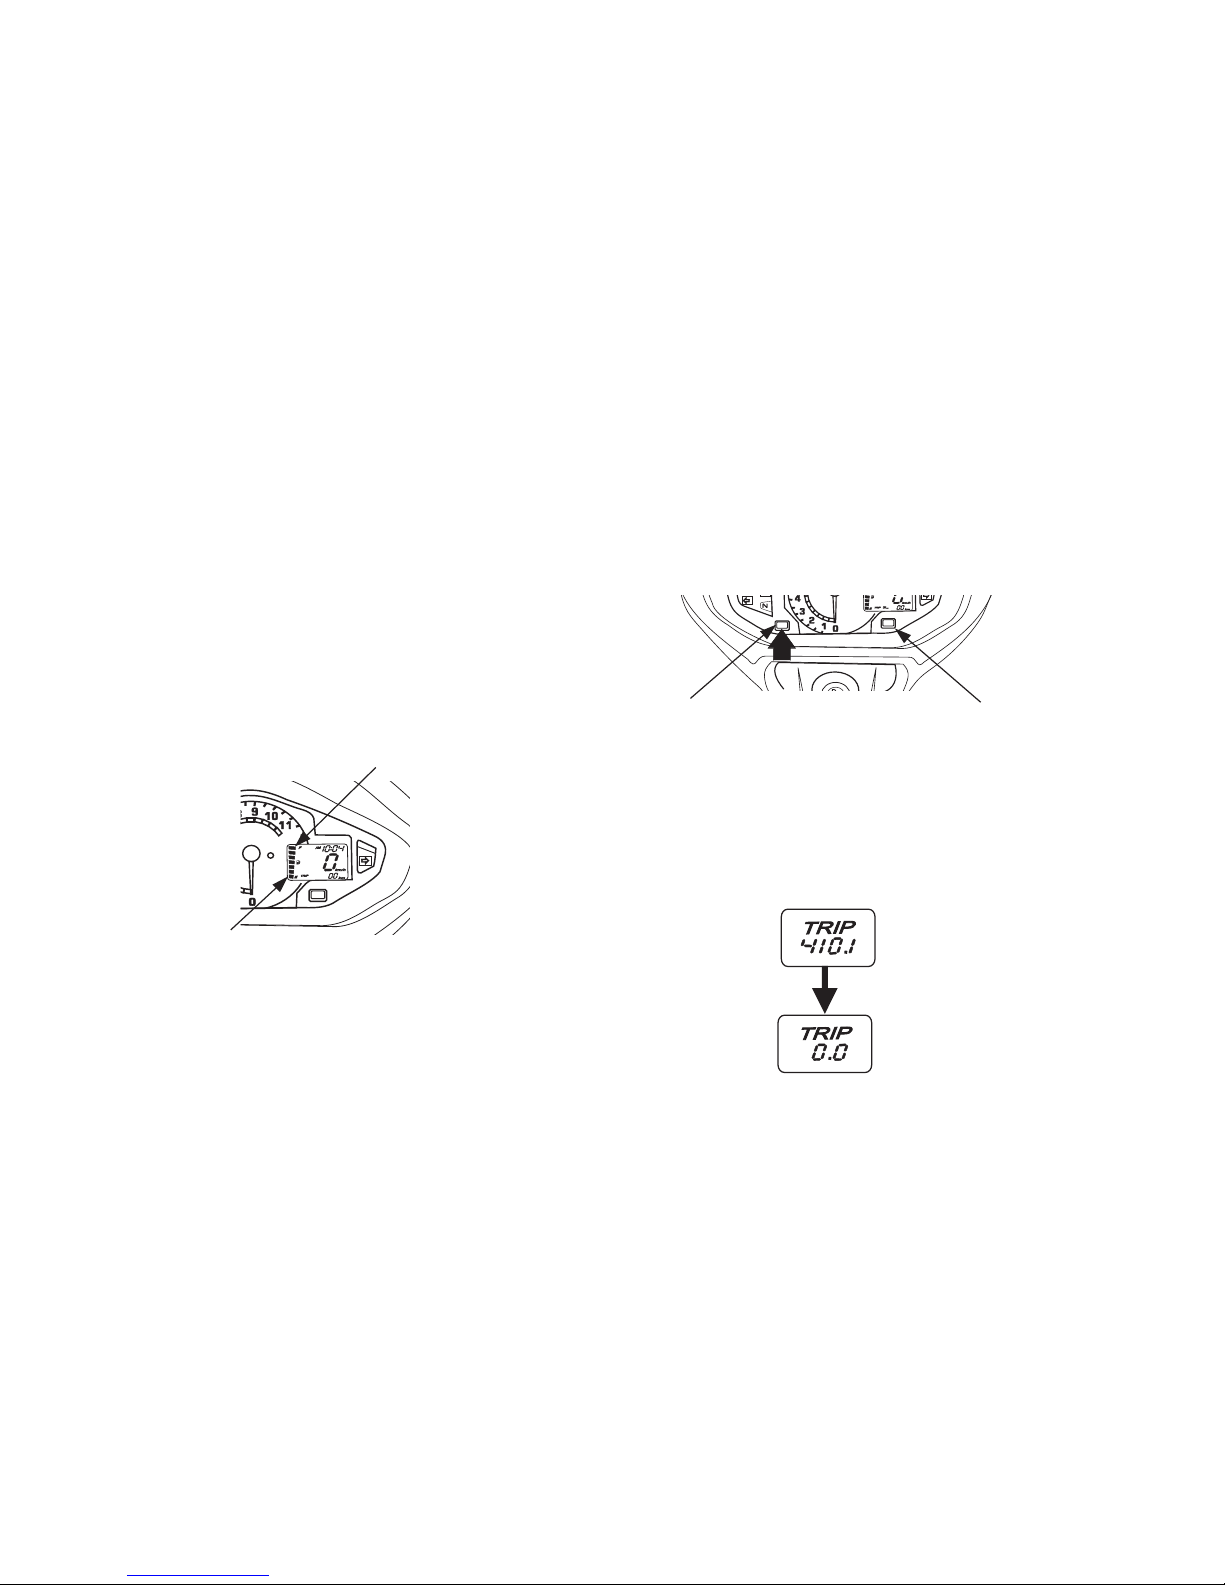
Fuel Gauge
When the fuel gauge display flashing and
enters the red band (2), fuel will be low.
Turn the fuel valve to the RES position and
you should refill the tank as soon as possible.
The amount of fuel left in the tank with the
vehicle set upright when the needle enters
the red band is approximately:
1.9 Ltr. (0.50 US gal , 0.41 Imp gal)
(1)
(2)
(1) Fuel gauge ¼¶;wy xst½
(2 ) Red band ¼jSM cSaM½
Tripmeter
To reset the tripmeter proceed as follows:
Press the select button to select Tripmeter.
To reset the tripmeter, press and hold the
reset button for more than 3 seconds when
the display is in the “Trip”.
(1)
(1 ) Reset button ¼jhlsV cVu½
(2 ) Select button ¼lysDV cVu½
(2)
13
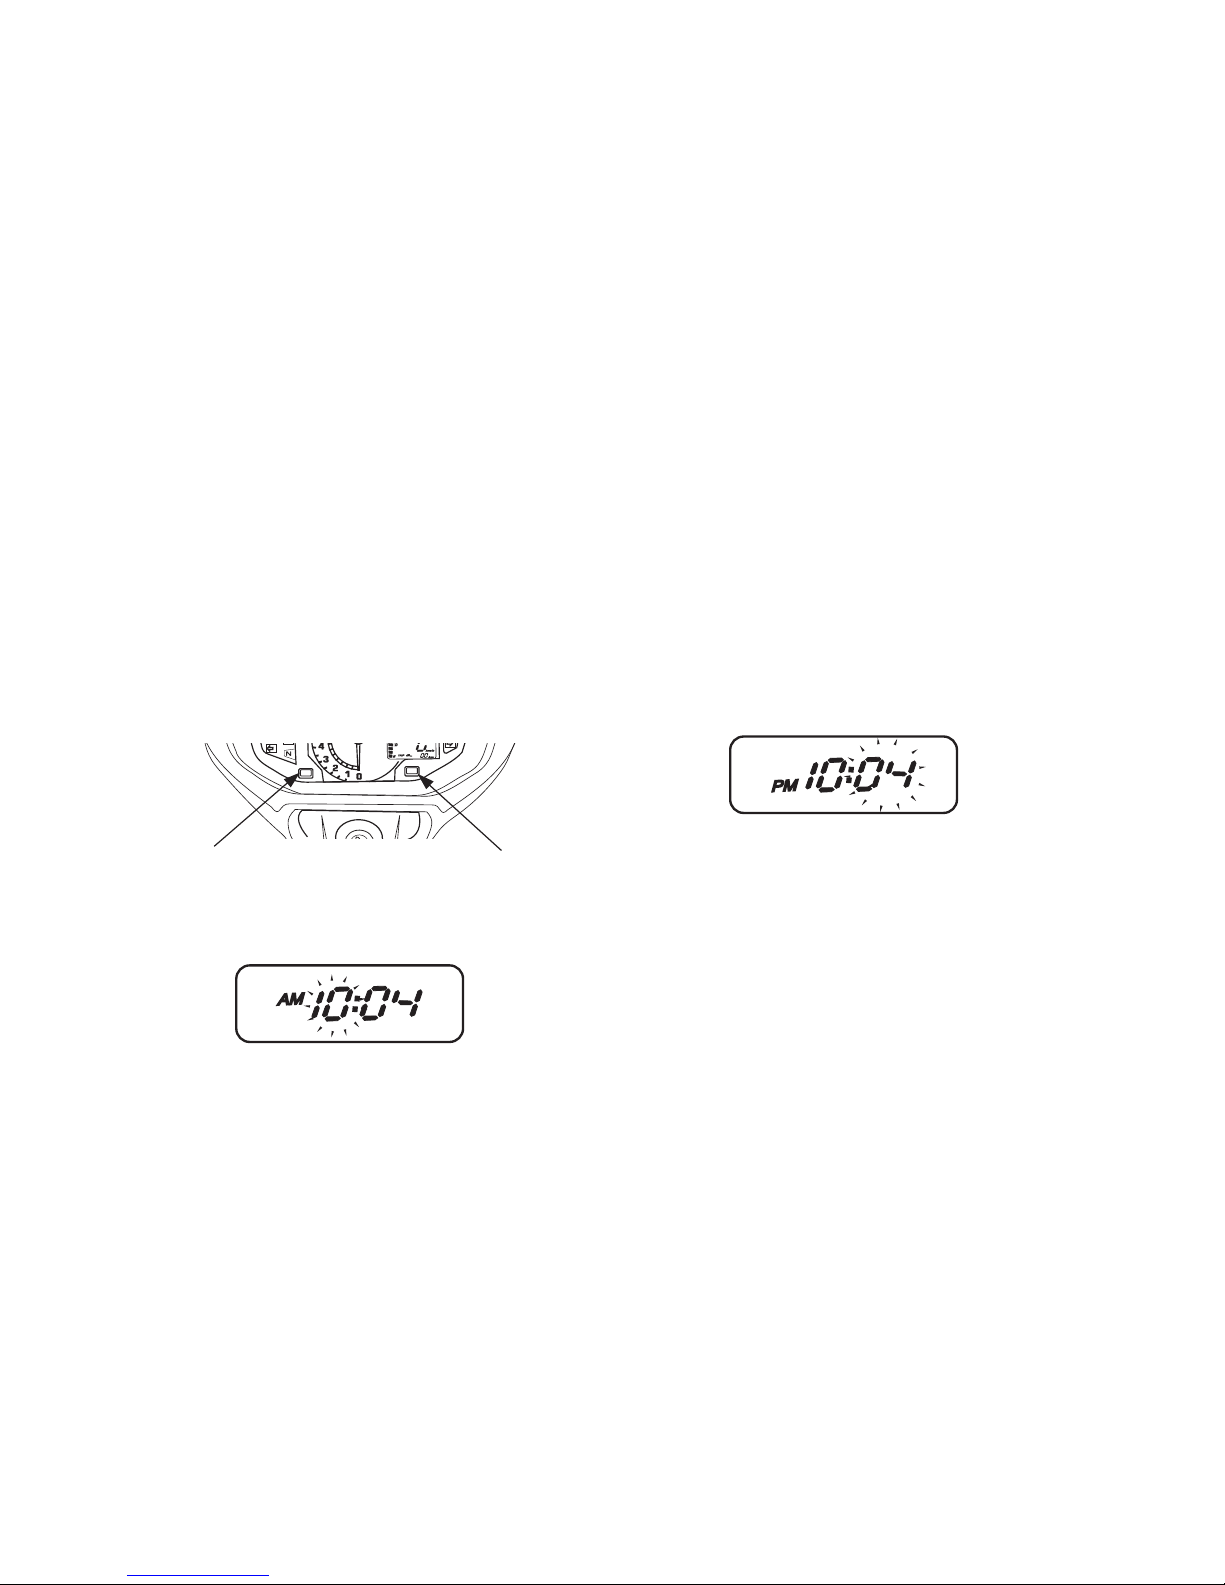
Digital Clock
The digital clock will show hours and minutes
up to 11:59 with "AM" and "PM".
To adjust the time, proceed as follows:
1. Turn the ignition switch ON.
2. Press and hold the both buttons (1) and
(2) for more than 3 seconds simultaneously.
The clock will be set in the adjust mode with
the hour flashing.
3. To set the hour, press the reset button
until the desired hour and AM/PM are
displayed.
• Quick setting - press and hold the reset
button until the desired hour appears.
4. Press the select button (1) when the
display reaches the desired hour.
The minute display will be flashing.
(1 ) Reset button ¼jhlsV cVu½
(2 ) Select button ¼lhysDV cVu½
(1)
(2)
5. To set the minute, press the reset button
until the desired minute appears.
• Quick setting - press and hold the reset
button until the desired minute appears.
6. Press the select button when the display
reaches the desired minute.
The display will stop flashing.
14
If the ignition switch is turned off or no
operation is performed for 30 seconds
during the time adjustment mode, the clock
will be reset.
The clock will be reset AM 1:00 if the battery
is disconnected.
MAJOR COMPONENTS
(Information you need to operate
this motorcycle)
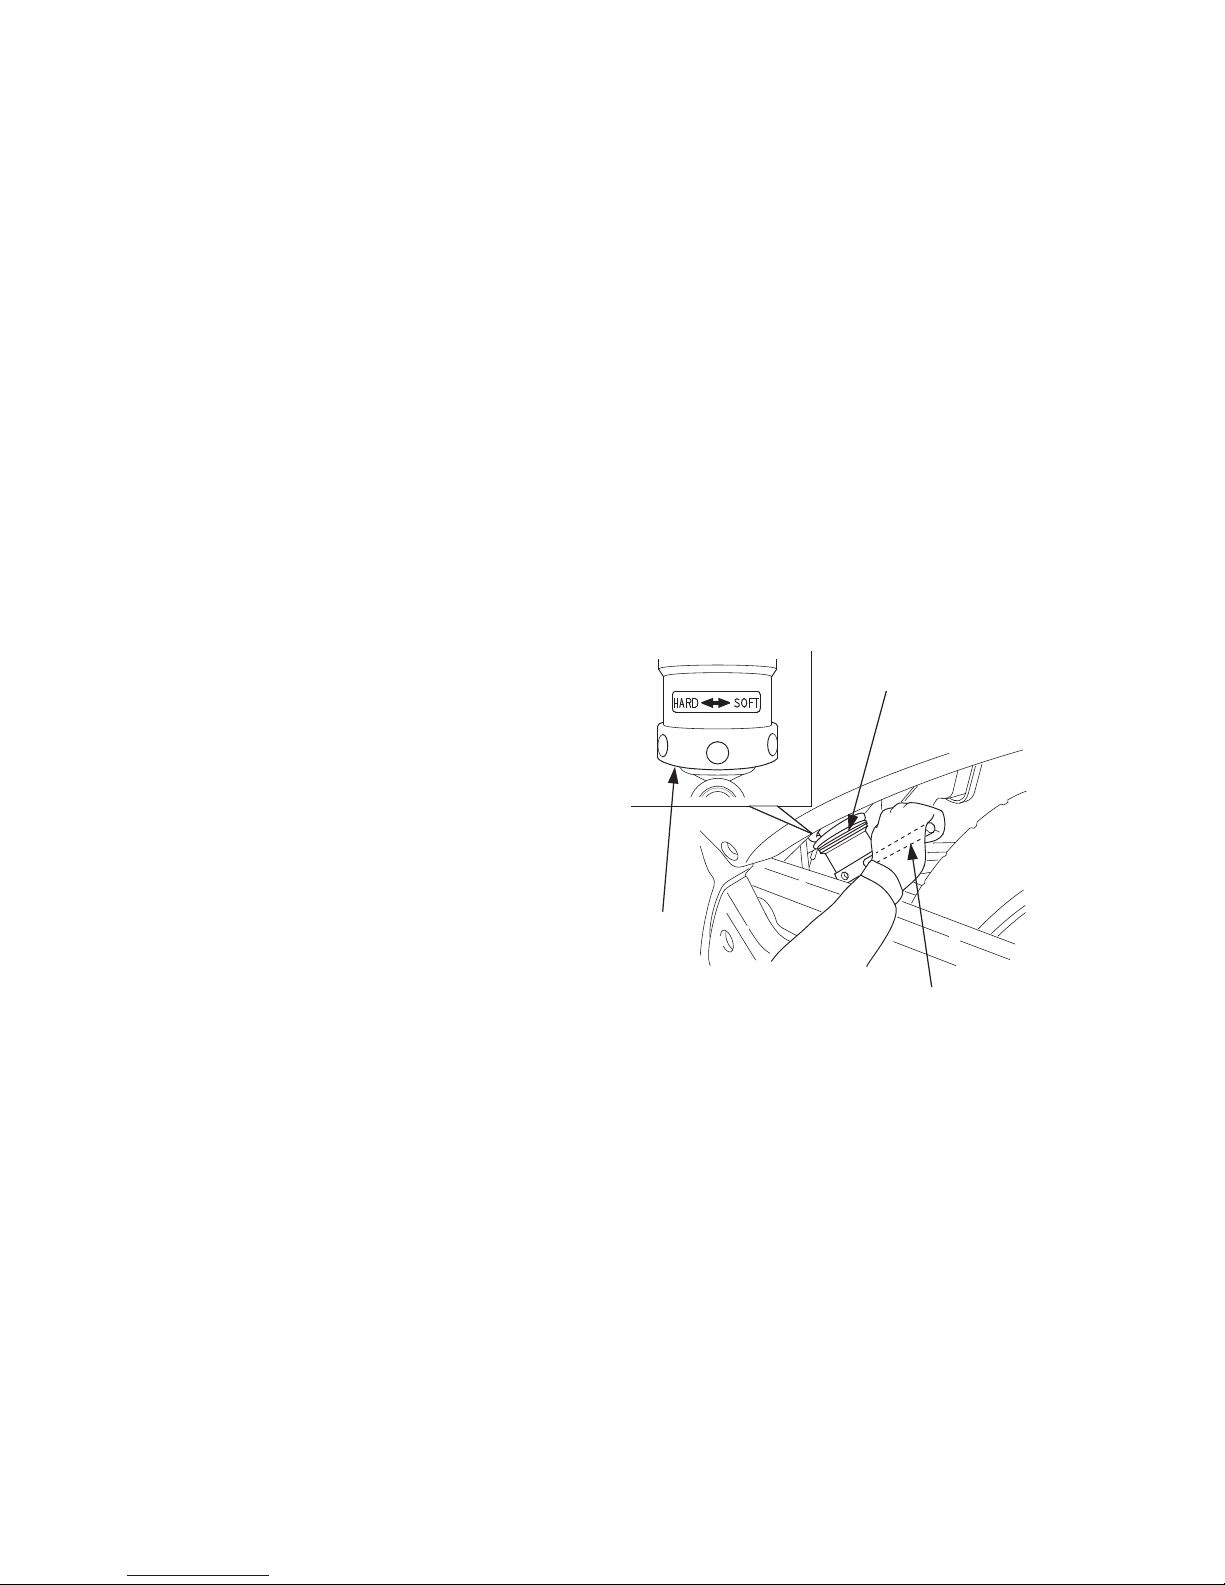
SUSPENSION
The shock absorber (1) has 3 adjustment
positions for different load or riding
conditions.
Use a handlebar (2) to adjust the rear
shock absorber. Turning the spring preload
adjuster (3) counterclockwise makes the
shock absorber firm, and turning clockwise
makes it soft.
Always adjust the shock absorber position
in sequence (1-2-3 or 3-2-1).
(1 ) Shock absorber ¼“kWkd ,ct+kcZj½
(2) Handlebar ¼gSaMyckj½
(3 ) Spring preload adjuster ¼fLizax izhyksM ,MtLVj½
(1)
(2)
(3)
Attempting to adjust directly from 3 to 1
may damage the shock absorber.
Positions 2 to 3 increase spring preload for
a stiffer rear suspension, and can be used
when the motorcycle is heavily loaded.
Standard position: 1
15
BRAKES
Front/Rear Brake
This motorcycle has a hydraulic front and
rear disc brake.
As the brake pads wear, brake fluid level
drops.
There are no adjustments to perform, but
fluid level and pad wear must be inspected
periodically. The system must be inspected
frequently to ensure there are no fluid leaks.
If the control lever free travel becomes
excessive and the brake pads are not worn
beyond the recommended limit (page 66),
there is probably air in the brake system
and it must be bleed. See your Honda dealer
for this service.
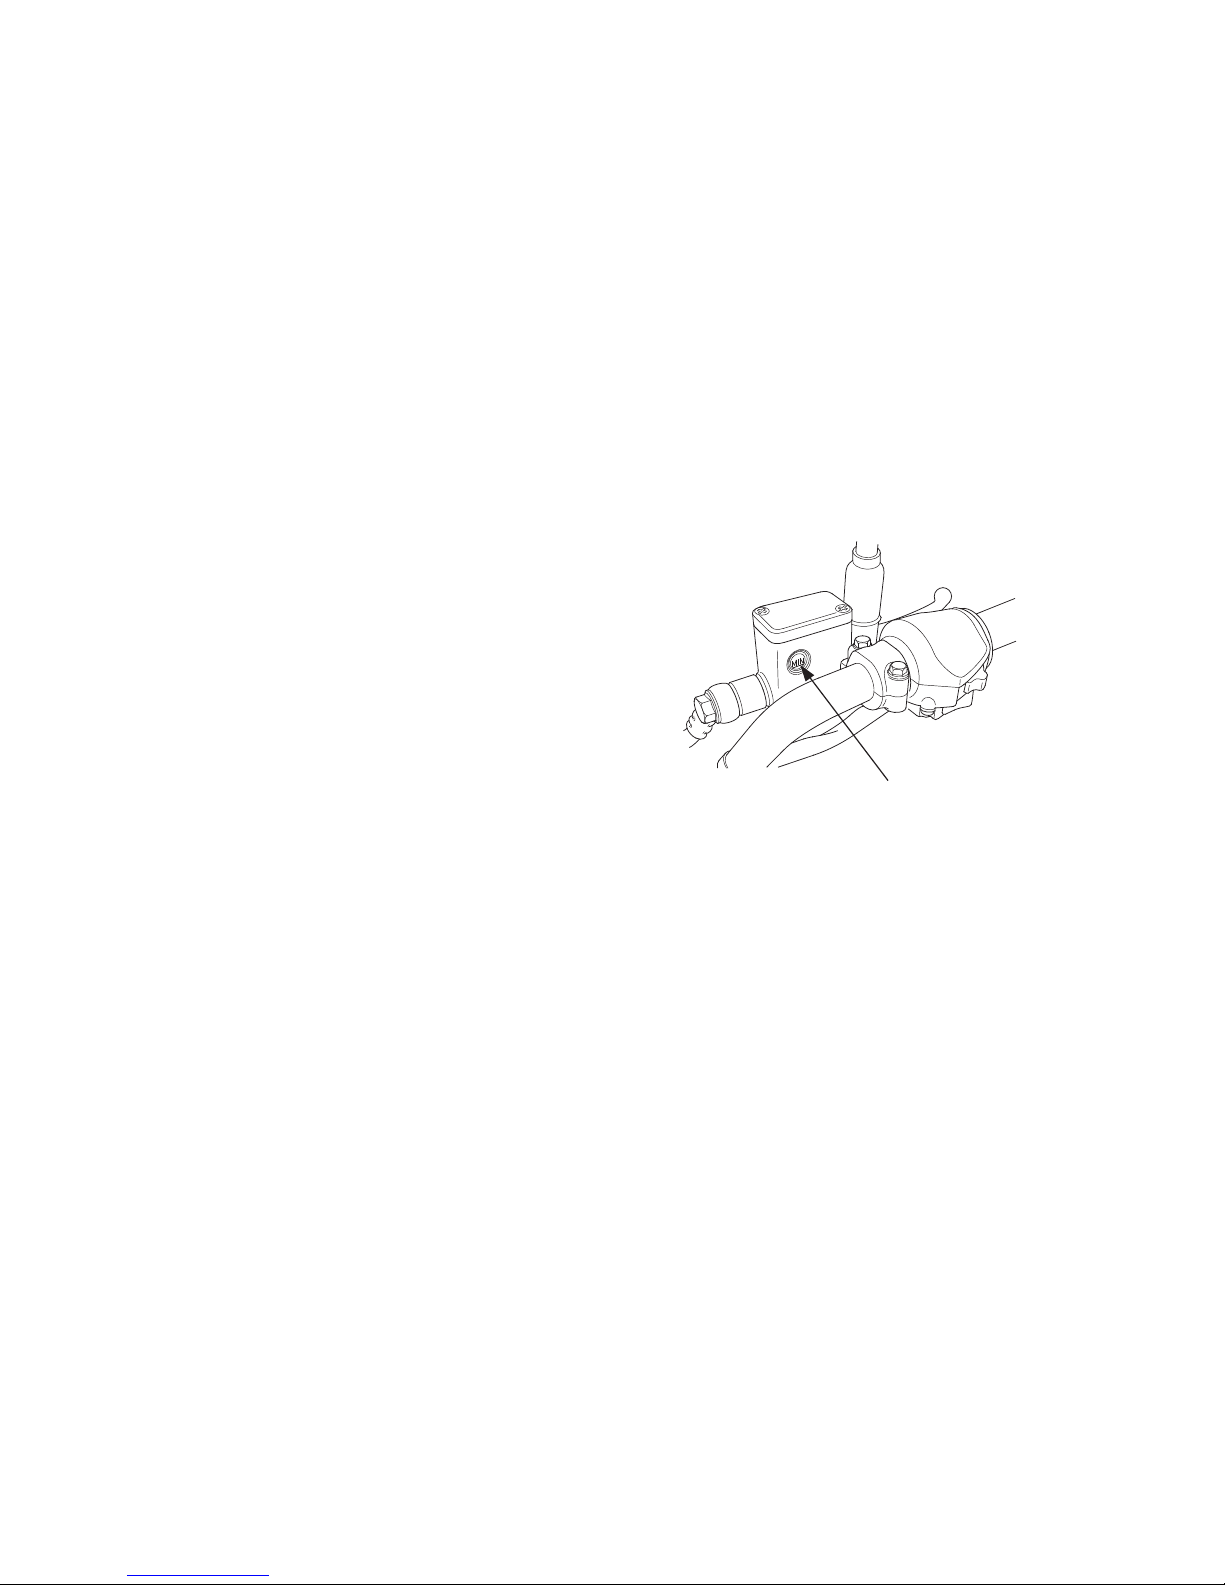
Front Brake Fluid Level:
With the motorcycle in an upright position,
check the fluid level. It should be above the
MIN level mark (1). If the level is at or below
the MIN level mark (1), check the brake
pads for wear (page 66).
(1) MIN level mark ¼U;wure ysoy ekdZ½
Rear Brake Fluid Level:
With the motorcycle in an side right position,
check the fluid level. It should be above the
MIN level mark (1). If the level is at or below
the MIN level mark (1), check the brake
pads for wear (page 66).
(1)
16
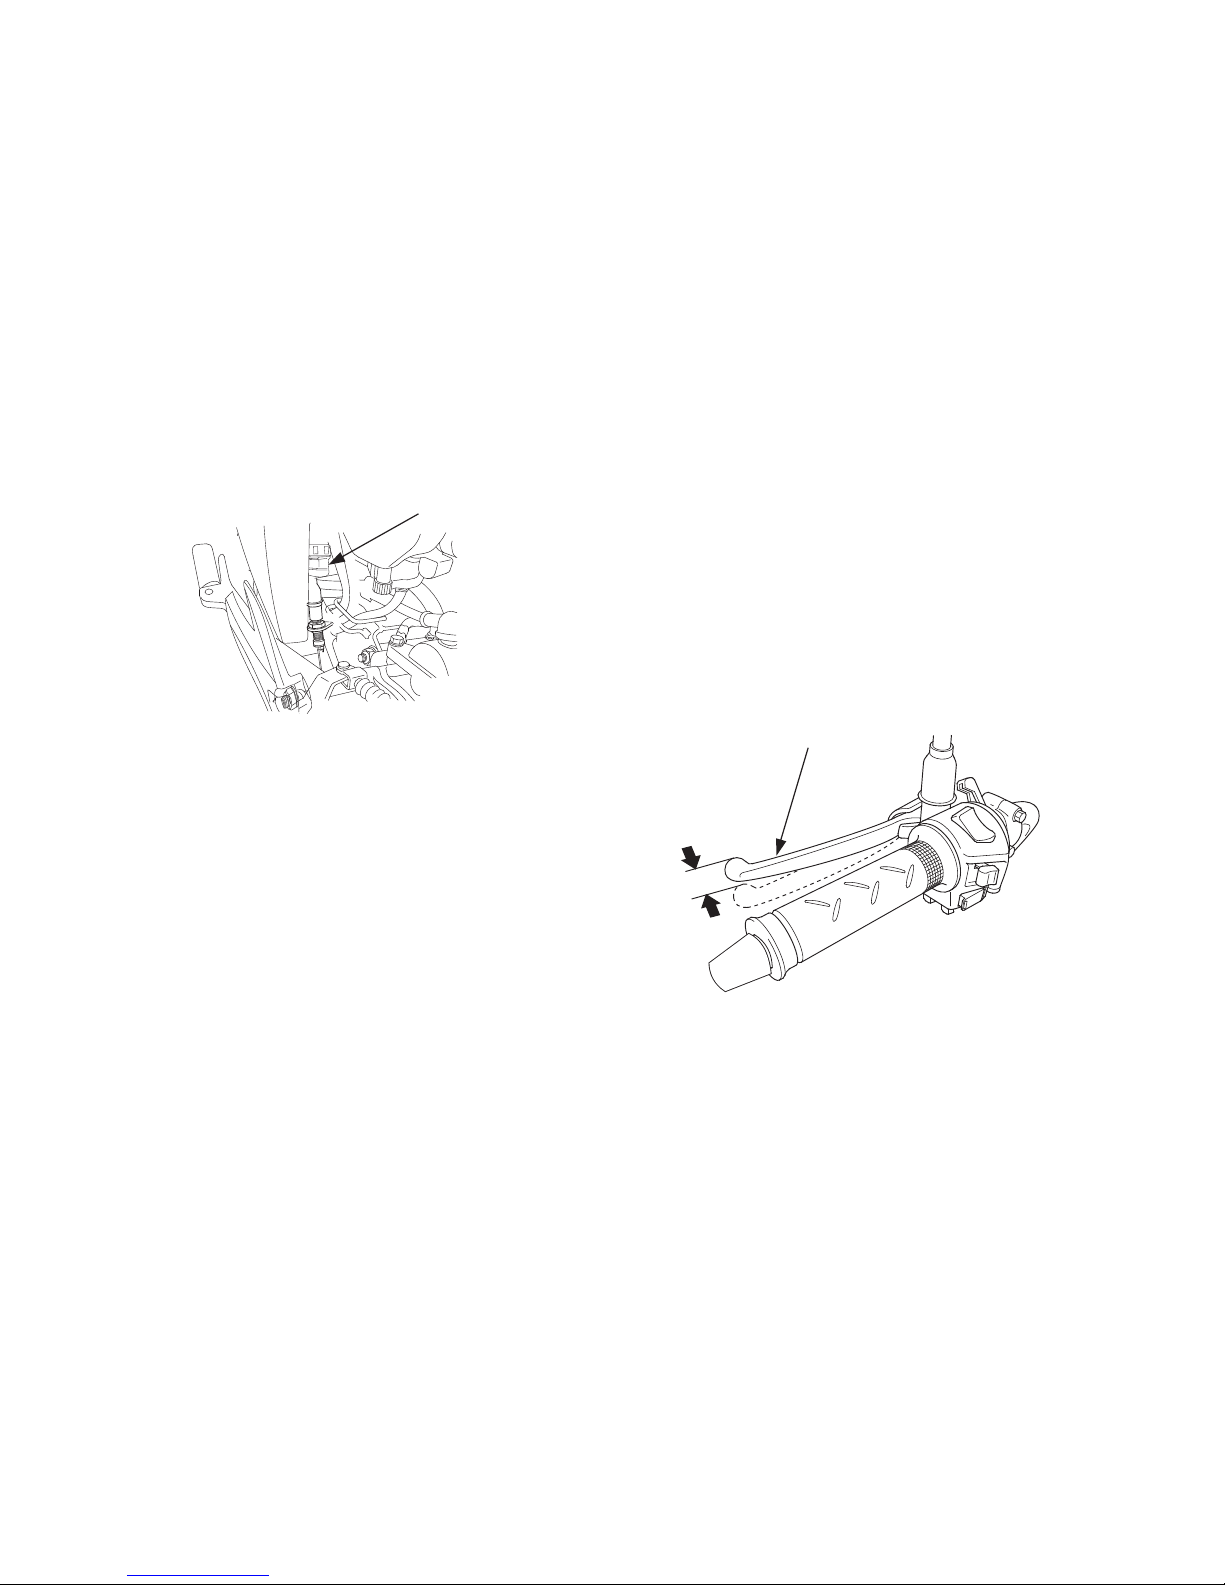
CLUTCH
Clutch adjustment may be required if the
motorcycle stalls when shifting into gear or
tends to creep; or if the clutch slips, causing
acceleration to lag behind engine speed.
Normal clutch lever free play is:
10 -20 mm(0.4 -0.8 in)
(1) Clutch lever ¼Dyp yhoj½
(1)
(1) MIN level mark ¼U;wure ysoy ekdZ½
Worn pads should be replaced. If the pads
are not worn, then brake system inspected
for leaks.
The recommended brake fluid is Honda DOT
3 or 4 brake fluid from a sealed container,
or an equivalent.
Other Checks:
Make sure there are no fluid leaks. Check
for deterioration or cracks in the hoses and
fittings.
(1)
17
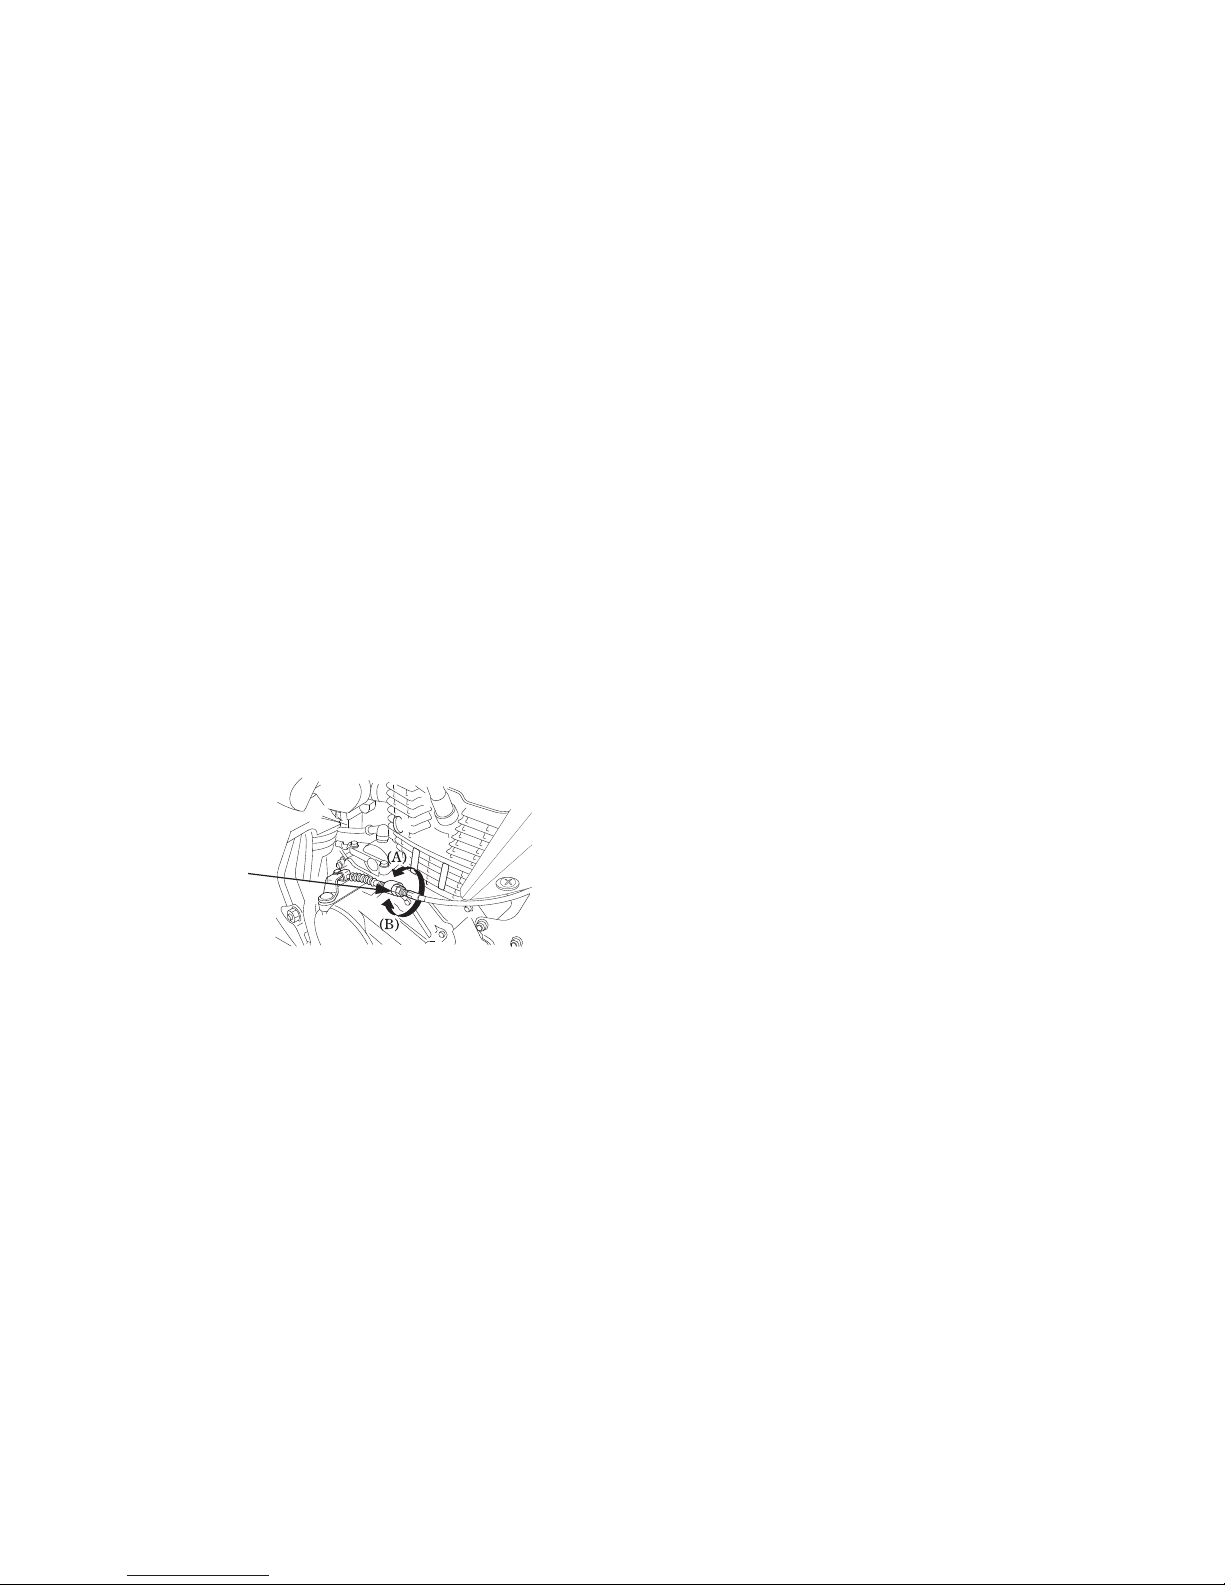
1. Loosen the lock nut (2) at the lower
end of the cable. Turn the adjusting nut
(3) to obtain the specified free play.
Tighten the lock nut and check the
adjustment.
2 . Start the engine, pull in the clutch lever
and shift into gear. Make sure the engine
does not stall and the motorcycle does
not creep. Gradually release the clutch
lever and open the throttle. The
motorcycle should begin to move
smoothly and accelerate gradually.
If proper adjustment cannot be obtained or
the clutch does not work correctly, see your
Honda dealer.
Other Checks:
Check the clutch cable for kinks or signs of
wear that could cause sticking or failure.
Lubricate the clutch cable with a
commercially available cable lubricant to
prevent premature wear and corrosion.
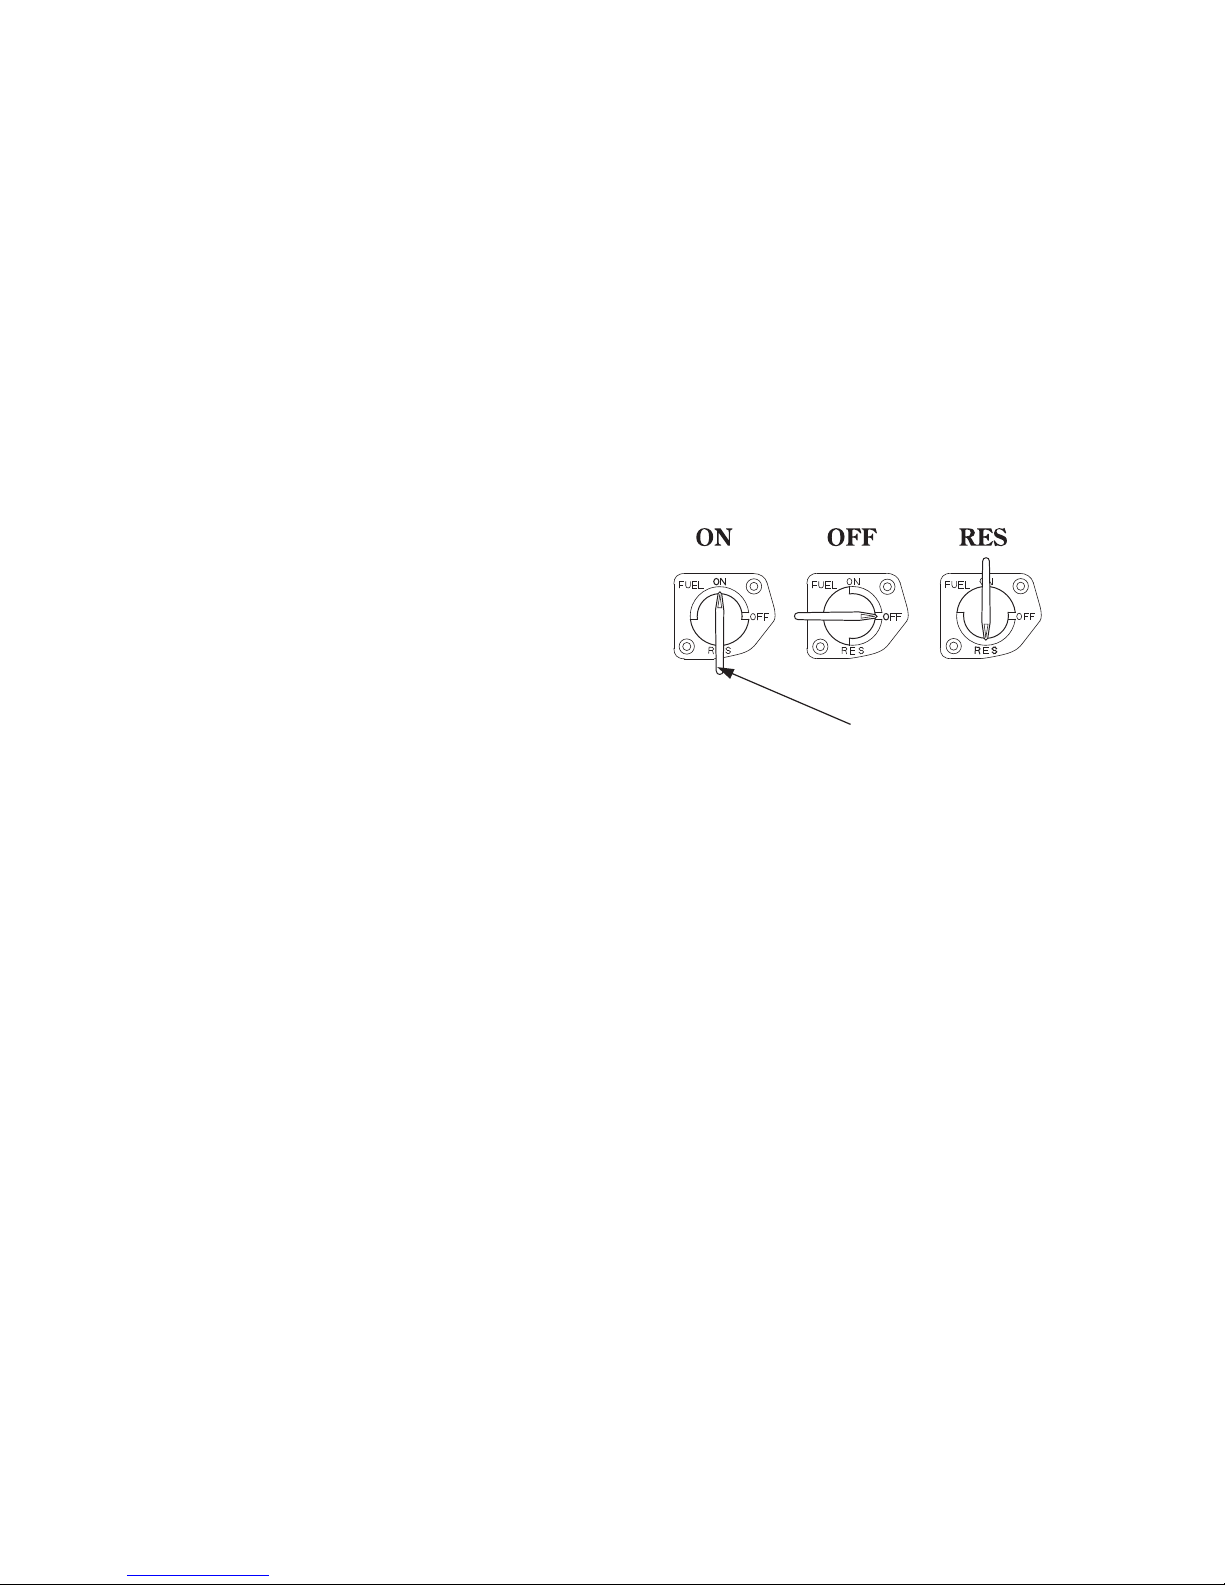
FUEL
Fuel Valve
The three way fuel valve (1) is on the left
side below the fuel tank.
ON
With the fuel valve in the ON position, fuel
will flow from the main fuel supply to the
carburetor.
(2) Lock nut ¼YkkWd uV½
(3) Adjusting nut ¼,MtfLVax uV½
(A ) Increase free play ¼Ýh Iys c<+k,sa½
(B) Decrease free play ¼Ýh Iys /kVk,sa½
(2)
18
OFF
With the fuel valve in the OFF position, fuel
cannot flow from the tank to the carburetor.
Turn the valve OFF whenever the motorcycle
is not in use.
RES
With the fuel valve in the RES position, fuel
will flow from the reserve fuel supply to the
carburetor. Use the reserve fuel only when
the main supply is gone. Refill the tank as
soon as possible after switching to RES.
The reserve fuel supply is:
1.9 Ltr. (0.50 US gal , 0.41 Imp gal)
Remember to check that the fuel valve is in
the ON position each time you refuel. If the
valve is left in the RES position, you may
run out of fuel with no reserve.
(1 ) Fuel valve ¼¶;wy okYo½
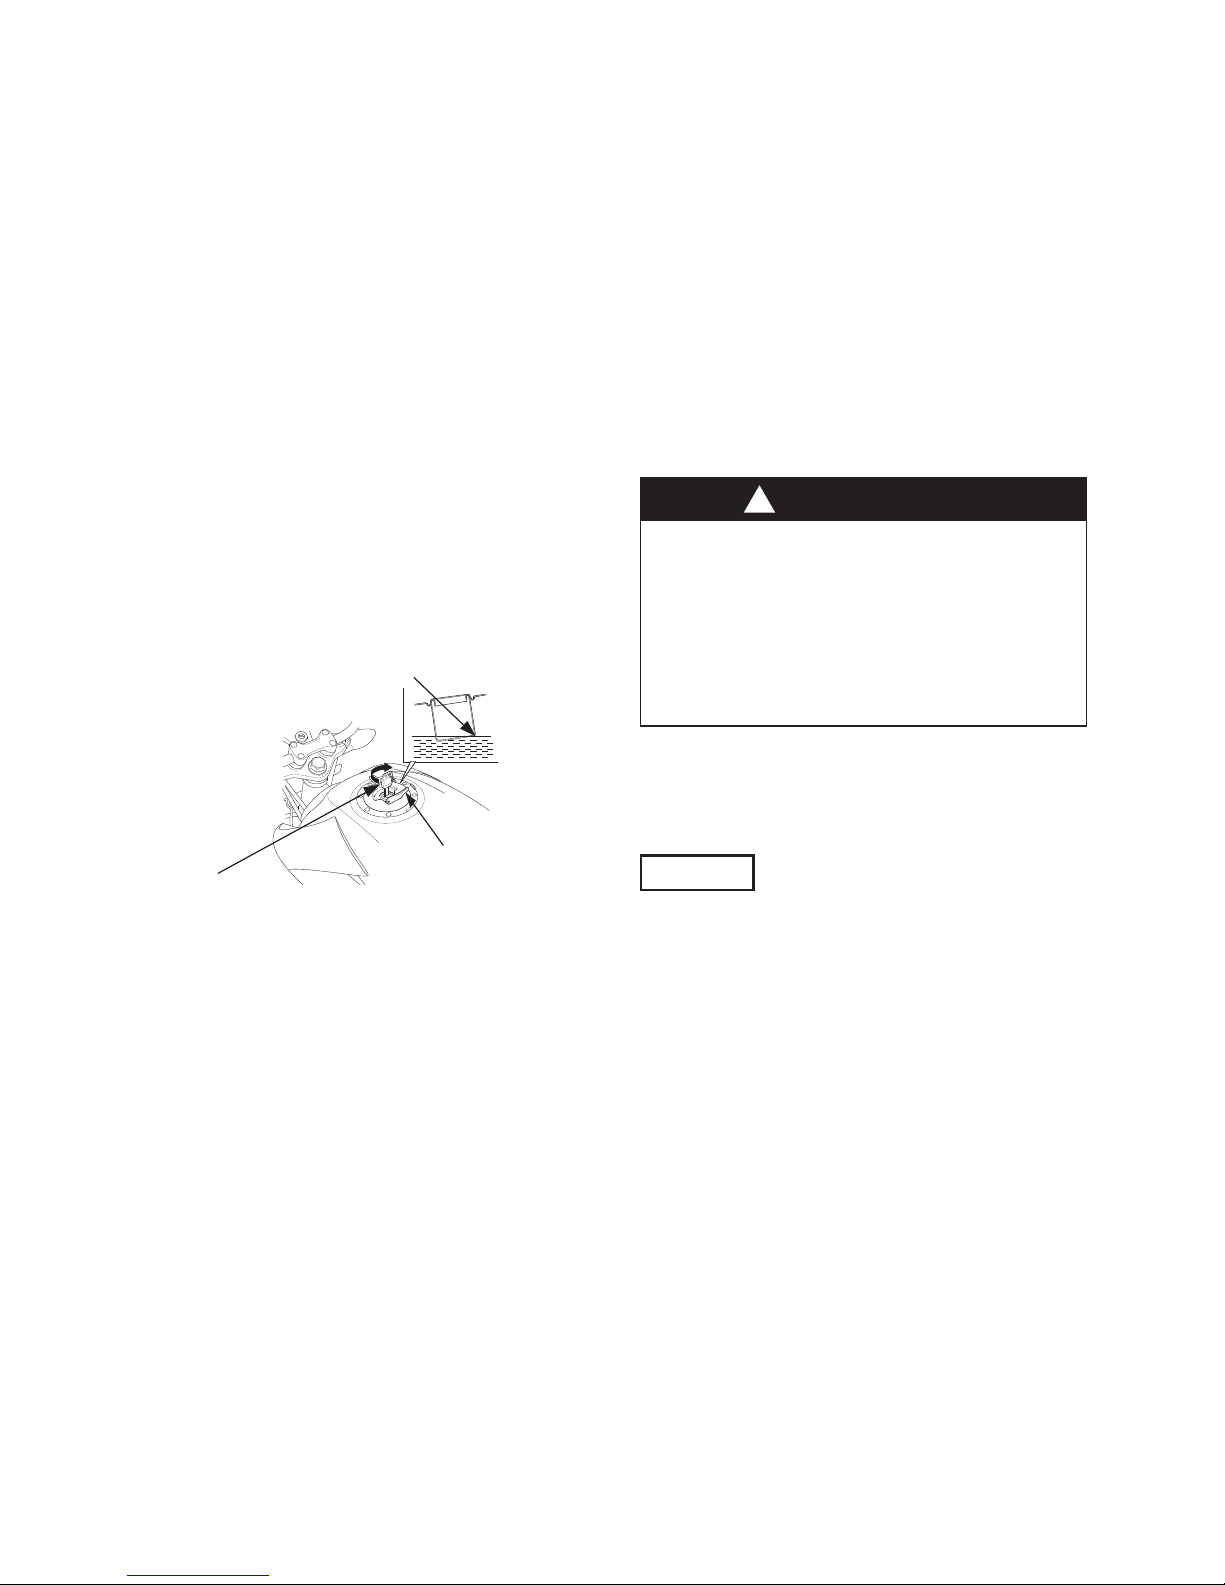
Fuel Tank
The fuel tank capacity including the reserve
supply is:
12 Ltr. (3.17 US gal , 2.63 Imp gal)
T o open the fuel fill cap (1), insert the ignition
key (2) and turn it clockwise. The fuel fill
cap will pop up and can be lifted off. Do not
overfill the tank. There should be no fuel in
the filler neck (3).
(1)
19
After refueling, to close the fuel fill cap, align
the latch in the cap with the slot in the filler
neck. Push the fuel fill cap into the filler neck
until it snaps closed and locks.
Remove the key.
!
WARNING
Petrol is highly flammable and
explosive. You can be burned or
seriously injured when handling fuel.
• Stop the engine and keep heat,
sparks, and flame away.
• Refuel only outdoors.
• Wipe up spills immediately.
(1 ) Fuel fill cap ¼¶;wy fQy dSi½
(2 ) Ignition key ¼bXuh“ku dh½
(3) Filler neck ¼fQyj uSd½
Use unleaded petrol with a research octane
number of 91 or higher.
The use of leaded petrol will cause
premature damage to the catalytic converter.
Notice
If ‘‘spark knock’’ or ‘‘pinking’’ occurs at a
steady engine speed under normal load,
change brands of petrol. If spark knock or
pinking persists, consult your Honda dealer.
Failure to do so is considered misuse, and
damage caused by misuse is not covered
by Honda’s Limited Warranty.
(3)
(2)
(1)
 Loading...