

Page 1
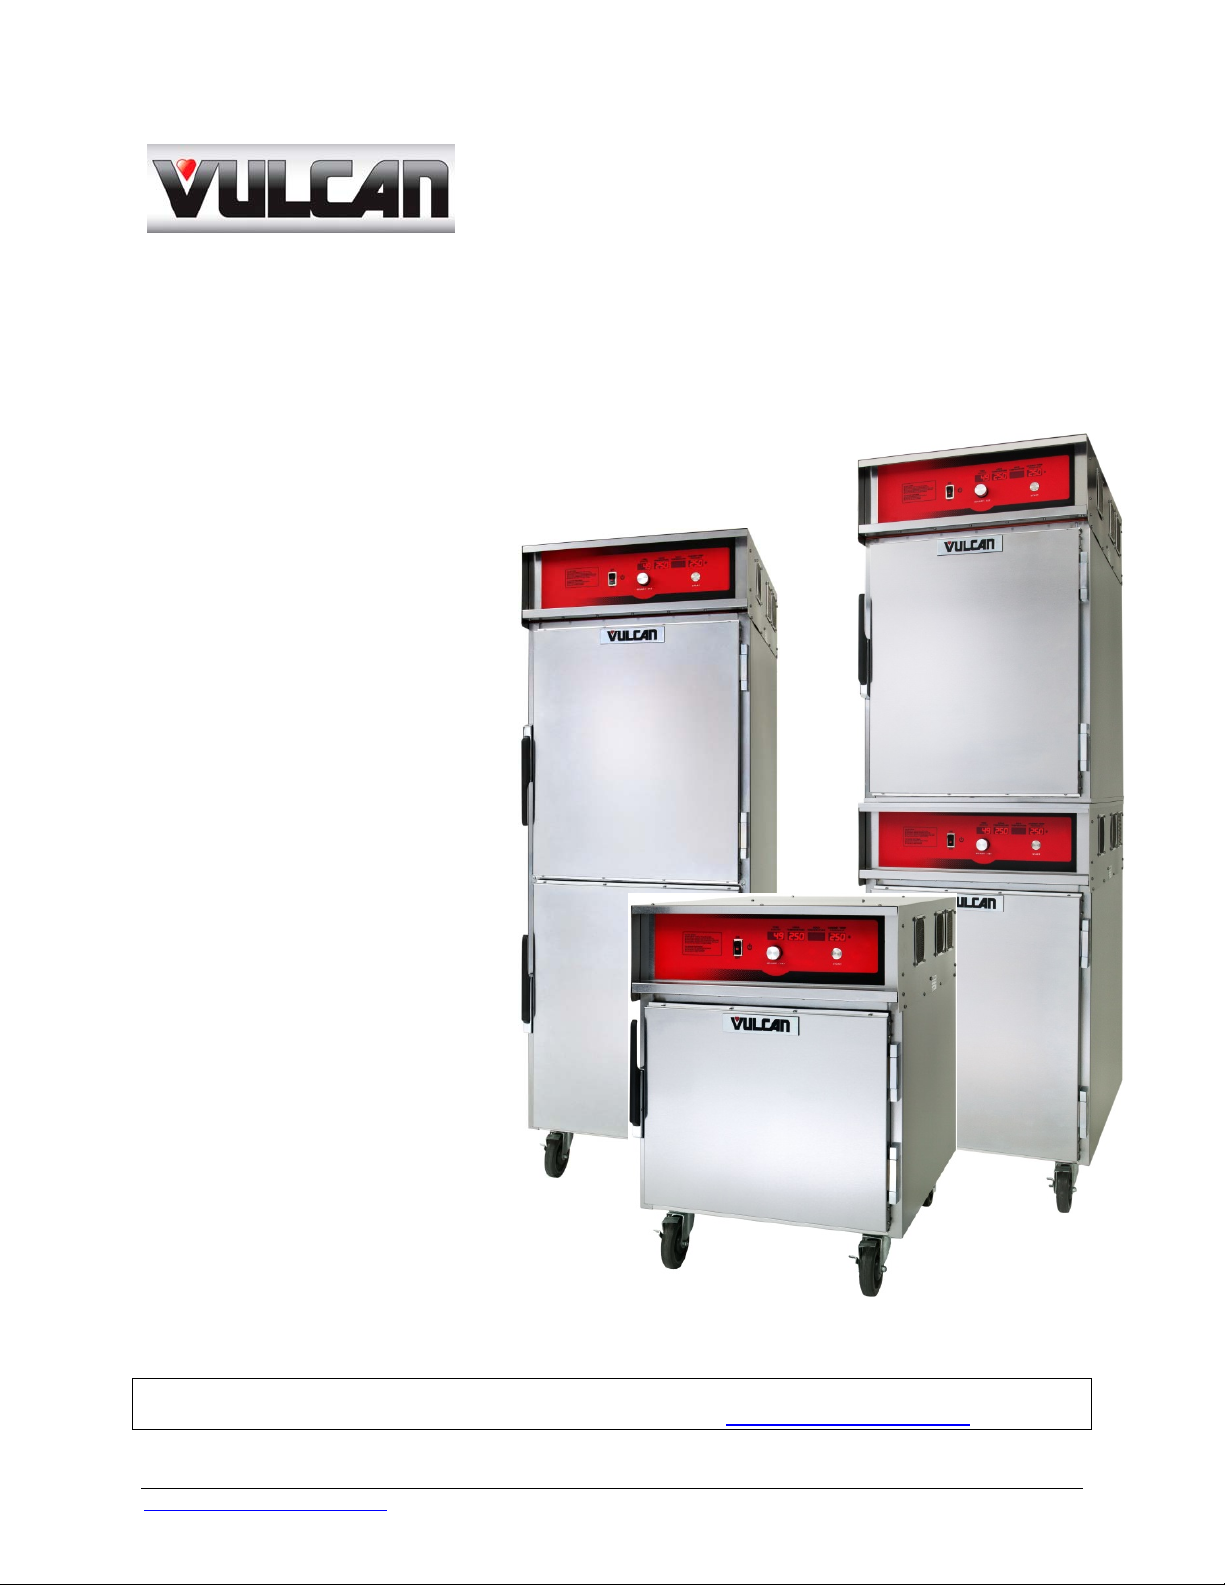
INSTALLATION &
OPERATION MANUAL
VCH SERIES
OVENS *
MODELS:
VCH5 ML-126365
VCH8 ML-126366
VCH16 ML-126367
VCH88 ML-126368
VRT SERIES
OVENS *
MODELS:
VRT32I ML-138024
*
Manufactured after 2010
For additional information on Vulcan-Hart or to locate an authorized parts
and service provider in your area, visit our website at www.vulcanequipment.com
VULCAN 3600 NORTH POINT BLVD.
DIVISION OF ITW FOOD EQUIPMENT GROUP, LLC BALTIMORE, MD 21222
www.vulcanequipment.com Vulcan ©2016 All Rights Reserved F-41162 (02-16)
Page 2

VCH & VRT SERIES OVENS F-41162 (02-16)
IMPORTANT FOR YOUR SAFETY
THIS MANUAL HAS BEEN PREPARED FOR PERSONNEL QUALIFIED TO INSTALL
ELECTRICAL EQUIPMENT, WHO SHOULD PERFORM THE INITIAL FIELD STARTUP AND ADJUSTMENTS OF THE EQUIPMENT COVERED BY THIS MANUAL.
FOR YOUR SAFETY
DO NOT STORE OR USE GASOLINE OR OTHER
FLAMMABLE VAPORS OR LIQUIDS IN THE
VICINITYOF THIS OR ANY OTHER APPLIANCE.
Improper installation, adjustment,
alteration, service, or maintenance can
cause property damage, injury, or death.
Read the installation, operating and
maintenance instructions thoroughly
before installing or servicing equipment.
IN THE EVENT OF A POWER FAILURE,
DO NOT ATTEMPT TO OPERATE THIS MACHINE
1
Page 3

VCH & VRT SERIES OVENS F-41162 (02-16)
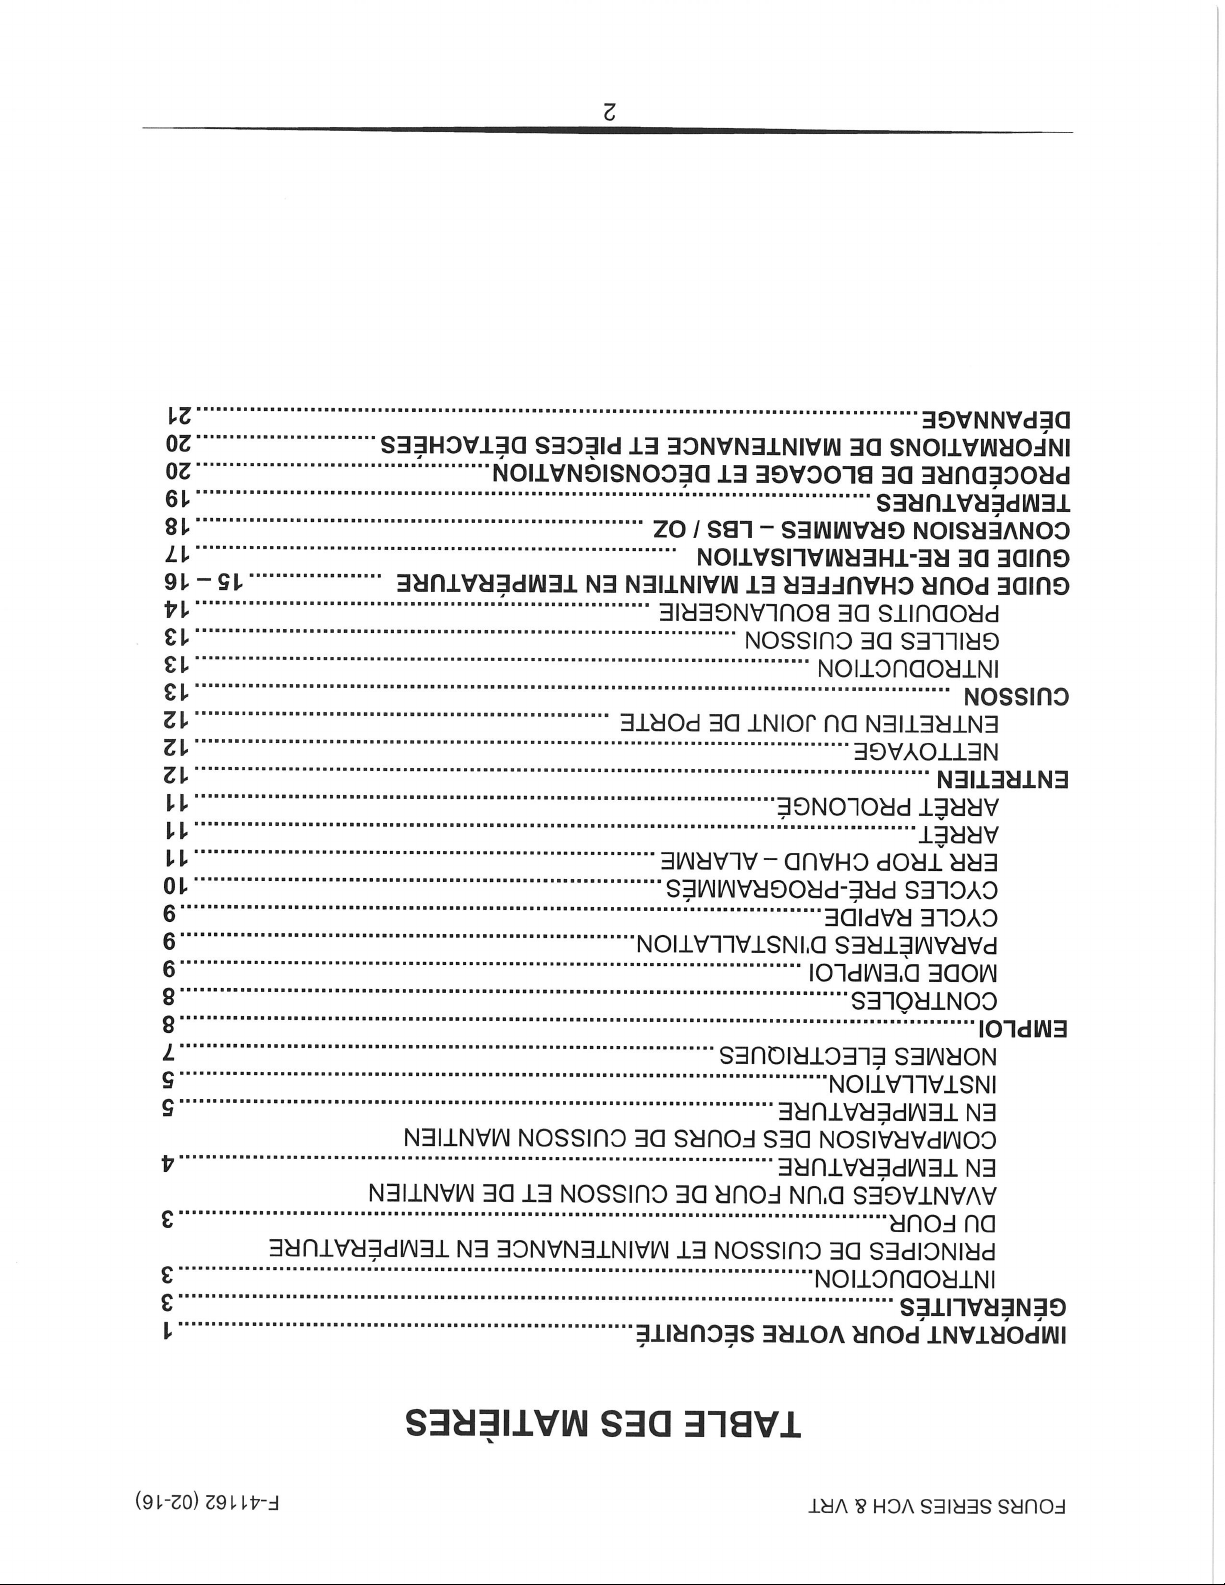
TABLE OF CONTENTS
IMPORTANT FOR YOUR SAFETY . . . . . . . . . . . . . . . . . . . . . . . . . . . . . . . . . . . . . . . . 1
GENERAL . . . . . . . . . . . . . . . . . . . . . . . . . . . . . . . . . . . . . . . . . . . . . . . . . . . . . . . . . . . 3
INTRODUCTION . . . . . . . . . . . . . . . . . . . . . . . . . . . . . . . . . . . . . . . . . . . . . . . . . 3
PRINCIPLES OF COOK & HOLD OVENS . . . . . . . . . . . . . . . . . . . . . . . 3
BENEFITS OF COOK & HOLD OVENS . . . . . . . . . . . . . . . . . . . . . . . . . . . . 4
COMPARISON OF COOK & HOLD OVENS . . . . . . . . . . . . . . . . . . . . . . . . 5
INSTALLATION . . . . . . . . . . . . . . . . . . . . . . . . . . . . . . . . . . . . . . . . . . . . . . . . . . 5
ELECTRICAL REQUIREMENTS . . . . . . . . . . . . . . . . . . . . . . . . . . . . . . . . . . . . . 7
OPERATION . . . . . . . . . . . . . . . . . . . . . . . . . . . . . . . . . . . . . . . . . . . . . . . . . . . . . . . . .8
CONTROLS . . . . . . . . . . . . . . . . . . . . . . . . . . . . . . . . . . . . . . . . . . . . . . . . . . . . . 8
MANUAL OPERATION . . . . . . . . . . . . . . . . . . . . . . . . . . . . . . . . . . . . . . . . . . . . 9
SETTING ADJUSTMENT. . . . . . . . . . . . . . . . . . . . . . . . . . . . . . . . . . . . . . . . . . . 9
QUICK CYCLE . . . . . . . . . . . . . . . . . . . . . . . . . . . . . . . . . . . . . . . . . . . . . . . . . . . 9
PRE-PROGRAMMED CYCLES . . . . . . . . . . . . . . . . . . . . . . . . . . . . . . . . . . . . 10
ERR TOO HOT – ALARM . . . . . . . . . . . . . . . . . . . . . . . . . . . . . . . . . . . . . . . . . 11
SHUTDOWN . . . . . . . . . . . . . . . . . . . . . . . . . . . . . . . . . . . . . . . . . . . . . . . . . . . 11
EXTENDED SHUTDOWN . . . . . . . . . . . . . . . . . . . . . . . . . . . . . . . . . . . . . . . . . 11
MAINTENANCE . . . . . . . . . . . . . . . . . . . . . . . . . . . . . . . . . . . . . . . . . . . . . . . . . . . . . . 12
CLEANING . . . . . . . . . . . . . . . . . . . . . . . . . . . . . . . . . . . . . . . . . . . . . . . . . . . . . 12
DOOR GASKET CARE . . . . . . . . . . . . . . . . . . . . . . . . . . . . . . . . . . . . . . . . . . . 12
COOKING . . . . . . . . . . . . . . . . . . . . . . . . . . . . . . . . . . . . . . . . . . . . . . . . . . . . . . . . . . . 13
INTRODUCTION . . . . . . . . . . . . . . . . . . . . . . . . . . . . . . . . . . . . . . . . . . . . . . . . 13
COOKING RACK . . . . . . . . . . . . . . . . . . . . . . . . . . . . . . . . . . . . . . . . . . . . . . . . 13
BAKERY PRODUCTS . . . . . . . . . . . . . . . . . . . . . . . . . . . . . . . . . . . . . . . . . . . . 14
COOKING AND HOLDING GUIDE . . . . . . . . . . . . . . . . . . . . . . . . . . . . . . . . . . . 15 – 16
RETHERMALIZATION GUIDE . . . . . . . . . . . . . . . . . . . . . . . . . . . . . . . . . . . . . . . . . . 17
GRAMS – LBS / OZ CONVERSIONS . . . . . . . . . . . . . . . . . . . . . . . . . . . . . . . . . . . . . 18
TEMPERATURES . . . . . . . . . . . . . . . . . . . . . . . . . . . . . . . . . . . . . . . . . . . . . . . . . . . . 19
LOCKOUT / TAGOUT PROCEDURE . . . . . . . . . . . . . . . . . . . . . . . . . . . . . . . . . . . . . 20
SERVICE & PARTS INFORMATION . . . . . . . . . . . . . . . . . . . . . . . . . . . . . . . . . . . . . . 20
TROUBLESHOOTING . . . . . . . . . . . . . . . . . . . . . . . . . . . . . . . . . . . . . . . . . . . . . . . . . 21
2
Page 4

VCH & VRT SERIES OVENS F-41162 (02-16)
GENERAL
INTRODUCTION
Vulcan-Hart Ovens are produced with
quality workmanship and material.
Proper installation, usage, and
maintenance of your oven will result in
many years of satisfactory performance.
The Vulcan Cook & Hold Oven is more
than just an oven – it’s a “System”;
precisely controlled heat, regulated to
retain ascorbic acid and maximize the
nutritional value, taste and eye-appeal
of food. In this environment, virtually
any food product can be prepared to
delicious perfection in just ONE oven!
“System” food preparation eliminates
the need for multiple ovens with
duplicate features.
This manual is provided to assist
persons responsible for the operation
and maintenance of the oven with a
simple, but comprehensive understanding of its proper use. We
recommend that you thoroughly read
this entire manual and carefully follow all
of the instructions provided prior to
placing the oven into operation.
As with any piece of food service
equipment, this oven system requires a
minimum of care and maintenance.
Recommended procedures are
contained in this manual and should
become a regular part of the operation
of the unit.
Vulcan Cook & Hold Oven is the right
choice for low temperature food
preparation.
PRINCIPLES OF
COOK & HOLD OVENS
Vulcan Cook & Hold Ovens are
designed and perfected for cooking at a
lower temperature. The principles of
Low Temperature Cooking and Holding
can be summarized into several
objectives: increased product yields,
increased profits from increased
yields, increased moisture retention,
increased tenderization, and
consistency of doneness.
When the Vulcan Cook & Hold Oven
finishes the cooking cycle, it
automatically switches to the hold cycle.
Throughout this manual we recommend
holding temperatures such as 140⁰F
3
(60⁰C). This temperature refers to the
oven’s hold temperature setting and not
to the internal temperature of the food
being roasted. The internal product
temperature will run below the hold
temperature. (For example: roast beef
held at 140⁰F will be about 130⁰F
internally or medium rare.)
All meat products contain enzymes.
These enzymes perform the
important function of tenderizing the
meat when they reach temperatures
of 100⁰F (38⁰C) to 140⁰F (60⁰C). As
these enzymes are heated, they break
Page 5

VCH & VRT SERIES OVENS F-41162 (02-16)
down the connective tissue that is
inherent in all red meat products.
The hold cycle allows this natural
tenderization process to proceed in an
orderly manner. As long as the internal
temperature of the meat does not
exceed 140⁰F, the process will continue.
Once the temperature reaches 140⁰F
the process will stop, because the
enzymes will be deactivated.
This tenderization process makes the
meat more flavorful. It is similar to aging
BENEFITS OF
COOK & HOLD OVENS
Superior Results: Low temperature
roasting has been recognized as the
best method for preparing meat and
poultry because of increased
tenderness, more even roasting, and a
juicer product.
Increased Sales: You will attract more
customers and have more repeat
business because you are now
producing a superior product in your
market area. All of your products will be
unique, from prime rib and chicken to
BBQ ribs, pork roasts, and even bakery
items!
Reduced Energy Costs: It costs
significantly less to run a Vulcan Cook &
hold Oven instead of a conventional
oven. Also, in most areas, no exhaust
hood is needed.
meat before it is sold. The longer the
hold, the higher degree of tenderization.
Each hour of holding is equal to one
day of aging.
VRT MODEL:
The Vulcan VRT Model is also a
“Rethermalization Oven System.” The
VRT Model is specifically designed to
retherm chilled/thawed food product as
well as prepared frozen food products
either in bulk or individually wrapped
and sealed packages.
Reduced Shrinkage of Product: You
can cut your percent of shrinkage from
25 to 30% down to 5 to 10%. This
means more servings to sell to your
customers! The Vulcan Cook & Hold
Oven can pay for itself in just months,
depending on your volume.
Reduced Labor Cost: Your cooks do
not have to come in early to put roasts
in or stay late to take them out of the
oven. Holding banquet foods in a
Vulcan Cook & Hold Oven reduces that
last minute party prep to almost nothing.
4
Page 6

VCH & VRT SERIES OVENS F-41162 (02-16)
COMPARISON OF
COOK & HOLD OVENS
“The Comparison Stops Here” –
more than a catchy slogan, it’s a fact.
Convection ovens, unlike Vulcan Cook
& Hold Ovens, blast high temperature
dry air over the product. The end result
with convection oven cooking is
excessive and unnecessary shrinkage.
Vulcan Cook & Hold Oven Systems:
1. Offer a lifetime heating element
warranty.
2. Provide a natural roasted
brown, caramelized product
without coloring agents.
“You can taste the difference.”
3. Can bake anything from meat,
poultry, fish, cakes, cookies, puff
pastries, and even popovers.
4. Are accurate, plus or minus
5⁰F.
5. Are easy to clean.
6. Have
inside and out.
stainless steel construction
INSTALLATION
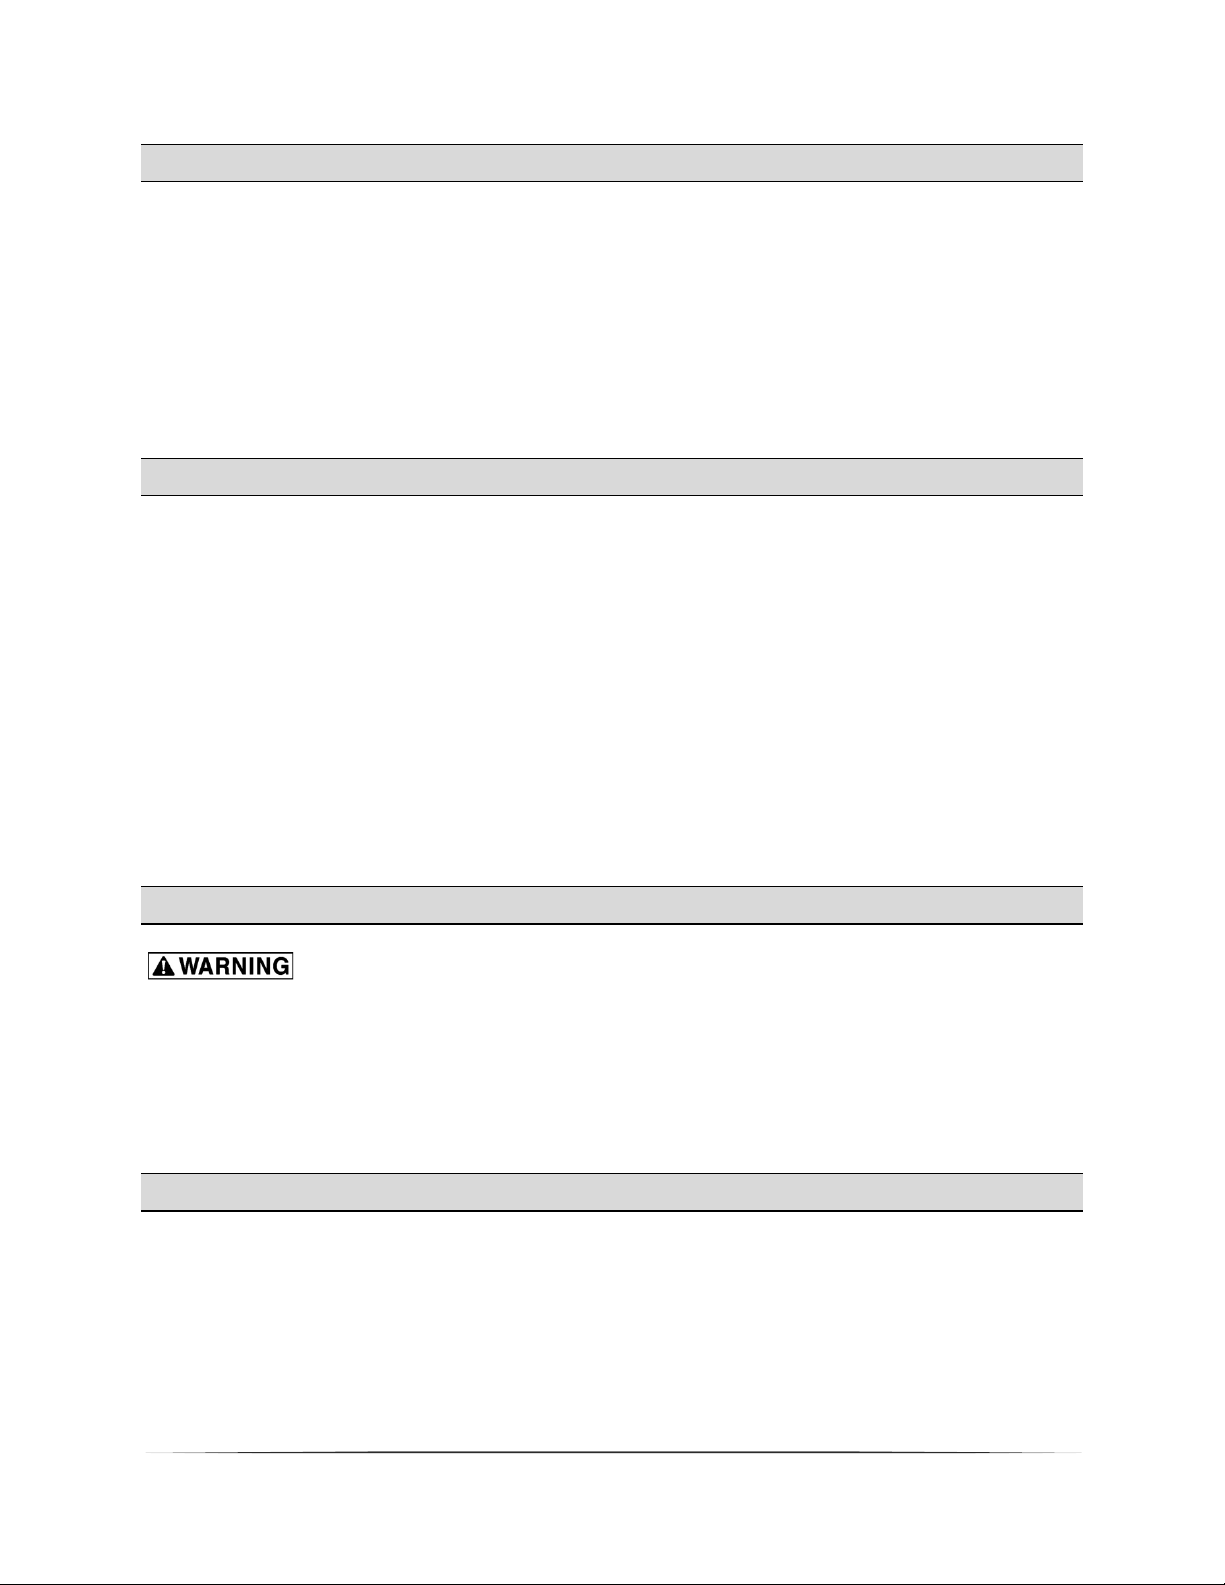
Before installing, verify that the
electrical service agrees with the
specifications on the rating plate
located on the lower back corner of
the oven. (Fig. 4) If the supply and
equipment requirements do not agree,
do not proceed with unpacking and
installation. Contact your Vulcan-Hart
Customer Service Department
immediately.
UNPACKING:
The oven was inspected before leaving
the factory. The transportation company
assumes full responsibility for safe
delivery upon acceptance of the
shipment. Immediately after unpacking,
check for possible shipping damage to
the oven.
If the oven is found to be damaged,
save the packaging material and
contact the carrier within 15 days of
delivery.
Carefully unpack and place in a work
accessible area as near the installation
position as possible.
1. Open oven door(s) and remove
packing material.
2. Check under oven or separate
package for racks, pans, etc.
3. Peel off vinyl protection film from
oven.
CLEANING:
The oven should be thoroughly cleaned
prior to putting into service. Refer to
cleaning instructions in this manual.
LOCATION:
For efficient oven operation, choose a
location that will provide easy loading
and unloading without interfering with
the final assembly of food orders.
The installation location must be
level and allow adequate clearances
for servicing and proper operation.
5
Page 7

VCH & VRT SERIES OVENS
F-41162 (02-16)
VCH88 Model:
The VCH88 is simply two (2) VCH8
ovens stacked on top of each other.
One (1) oven will come with casters and
VRT Models:
The Ramp Unit must be mounted to
the floor with supplied mounting
brackets and bolts, hard wired by a
certified electrician, and sealed to the
floor with NSF listed sealant.
(Fig.1 & 2)
a stacking assembly on top. The oven
without casters is placed inside the
stacking assembly. Each oven has its
own power cord.
MOUNTING BRACKETS (2 per side)
MOUNTING
BRACKETS VRT SIDE VIEW
VRT TOP VIEW
Fig. 1
Fig. 2
6
Page 8
VCH & VRT SERIES OVENS
ELECTRICAL REQUIREMENTS
ELECTRICAL CODES & STANDARDS:
The oven must be installed in
accordance with:
In the United States of America:
1. State and Local Codes.
2. National Electrical Code, ANSI/
NFPA-70 (latest edition.) Copies
may be obtained from: The
National Fire Protection
Association, 1Batterymarch Park,
Quincy, MA 02269.
1-617-770-3000 www.nfpa.org
In Canada:
1. Local Codes.
2. Canadian Electrical Code, CSA
C22.1 (latest edition.) Copies
may be obtained from: The
Canadian Standard Association.
www.csa.ca
F-41162 (02-16)
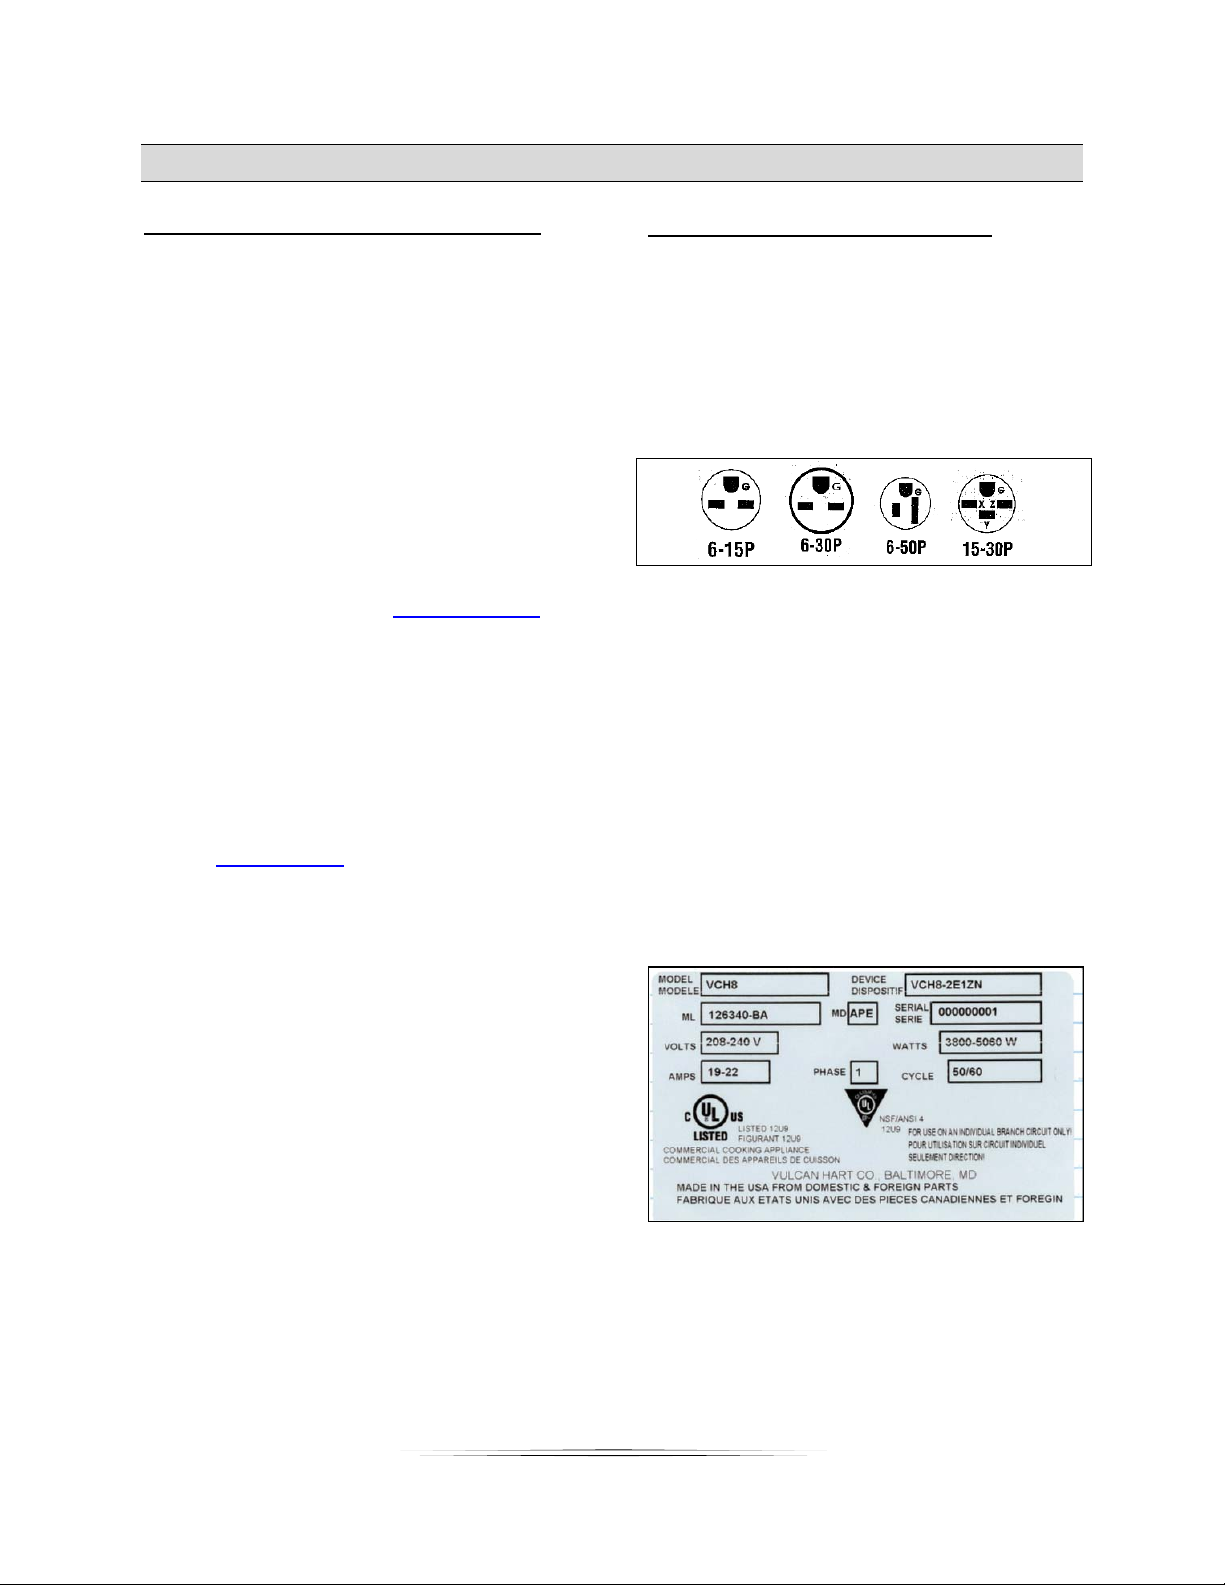
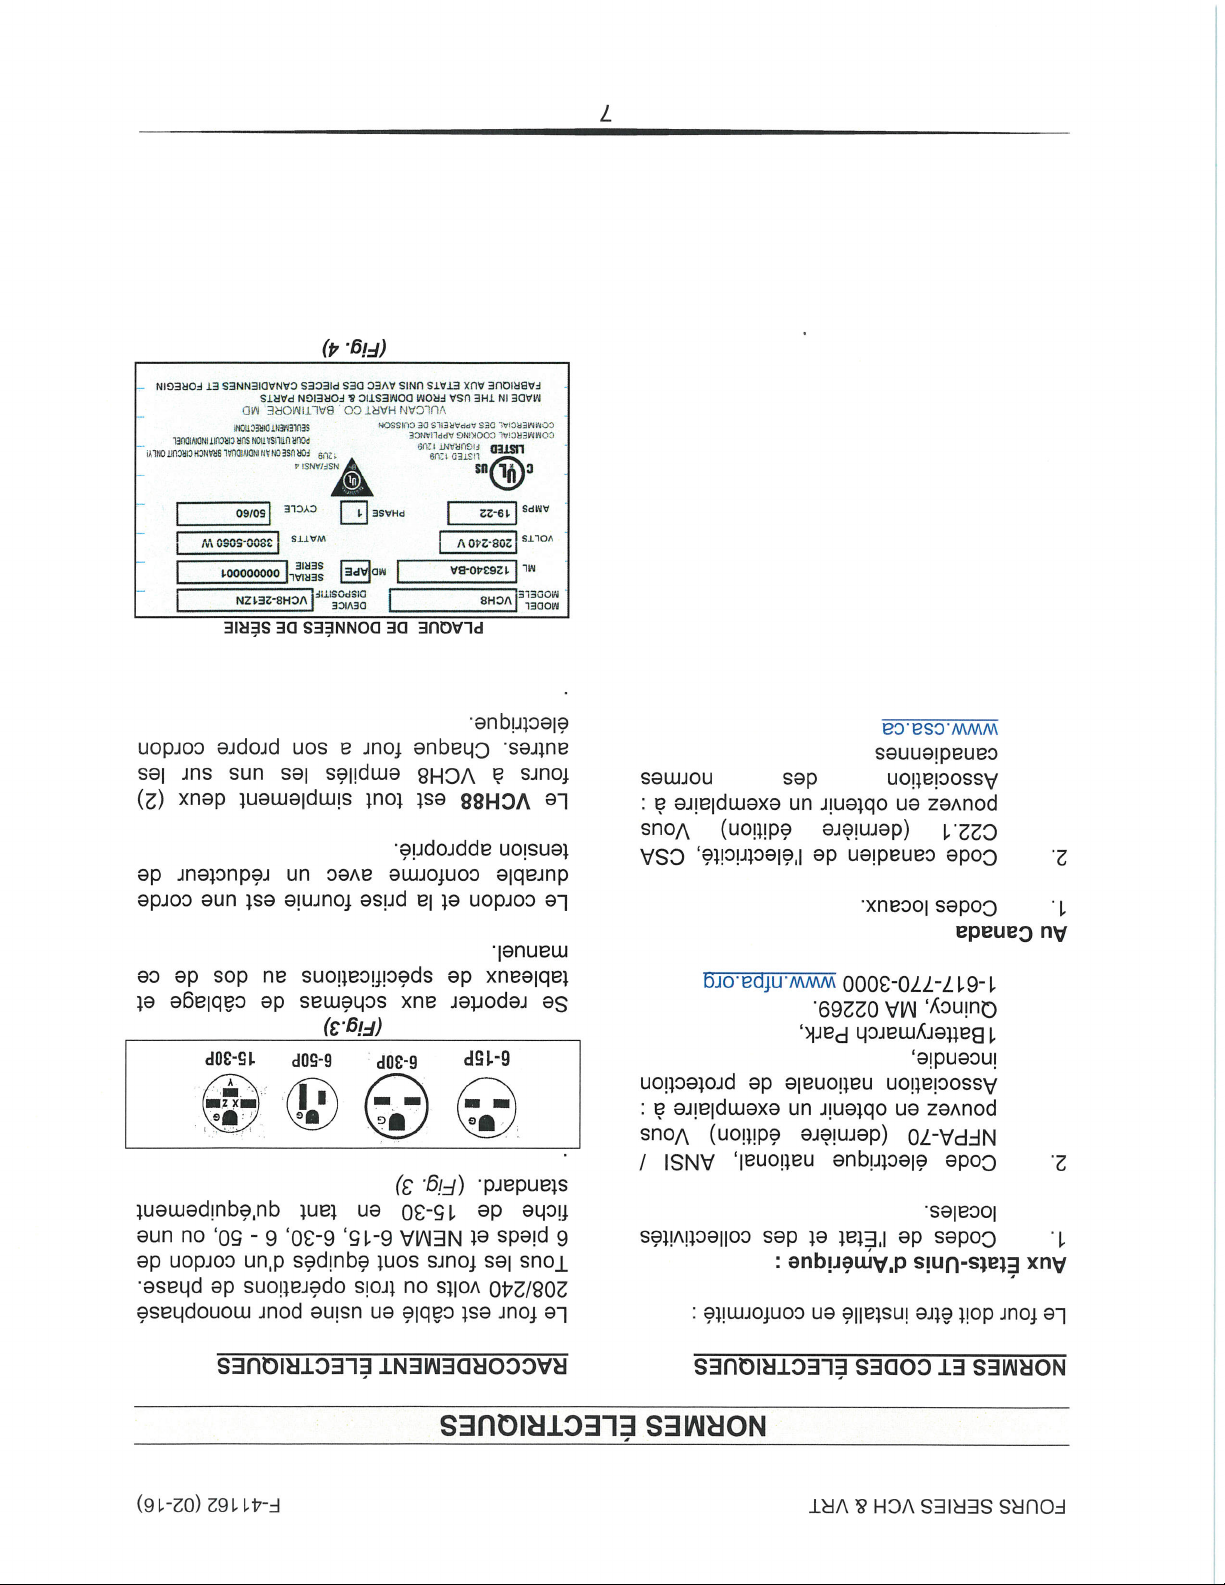
ELECTRICAL CONNECTIONS:
The oven is factory wired for single
phase 208/240 volt or three phase
operation. All ovens are equipped with
a 6 foot cord and NEMA 6-15, 6-30, 650, or a 15-30 plug as standard
equipment. (Fig. 3)
.
(Fig.3)
Refer to wiring diagrams and
Specification Chart in the back of this
manual.
The cord and plug supplied is a suitable
durable cord with a proper strain relief.
The VCH88 is simply two (2) VCH8
ovens stacked on top of each other.
Each oven has its own power cord.
.
SERIAL DATA PLATE
(Fig. 4)
7
Page 9

VCH & VRT SERIES OVENS F-41162 (02-16)
OPERATION
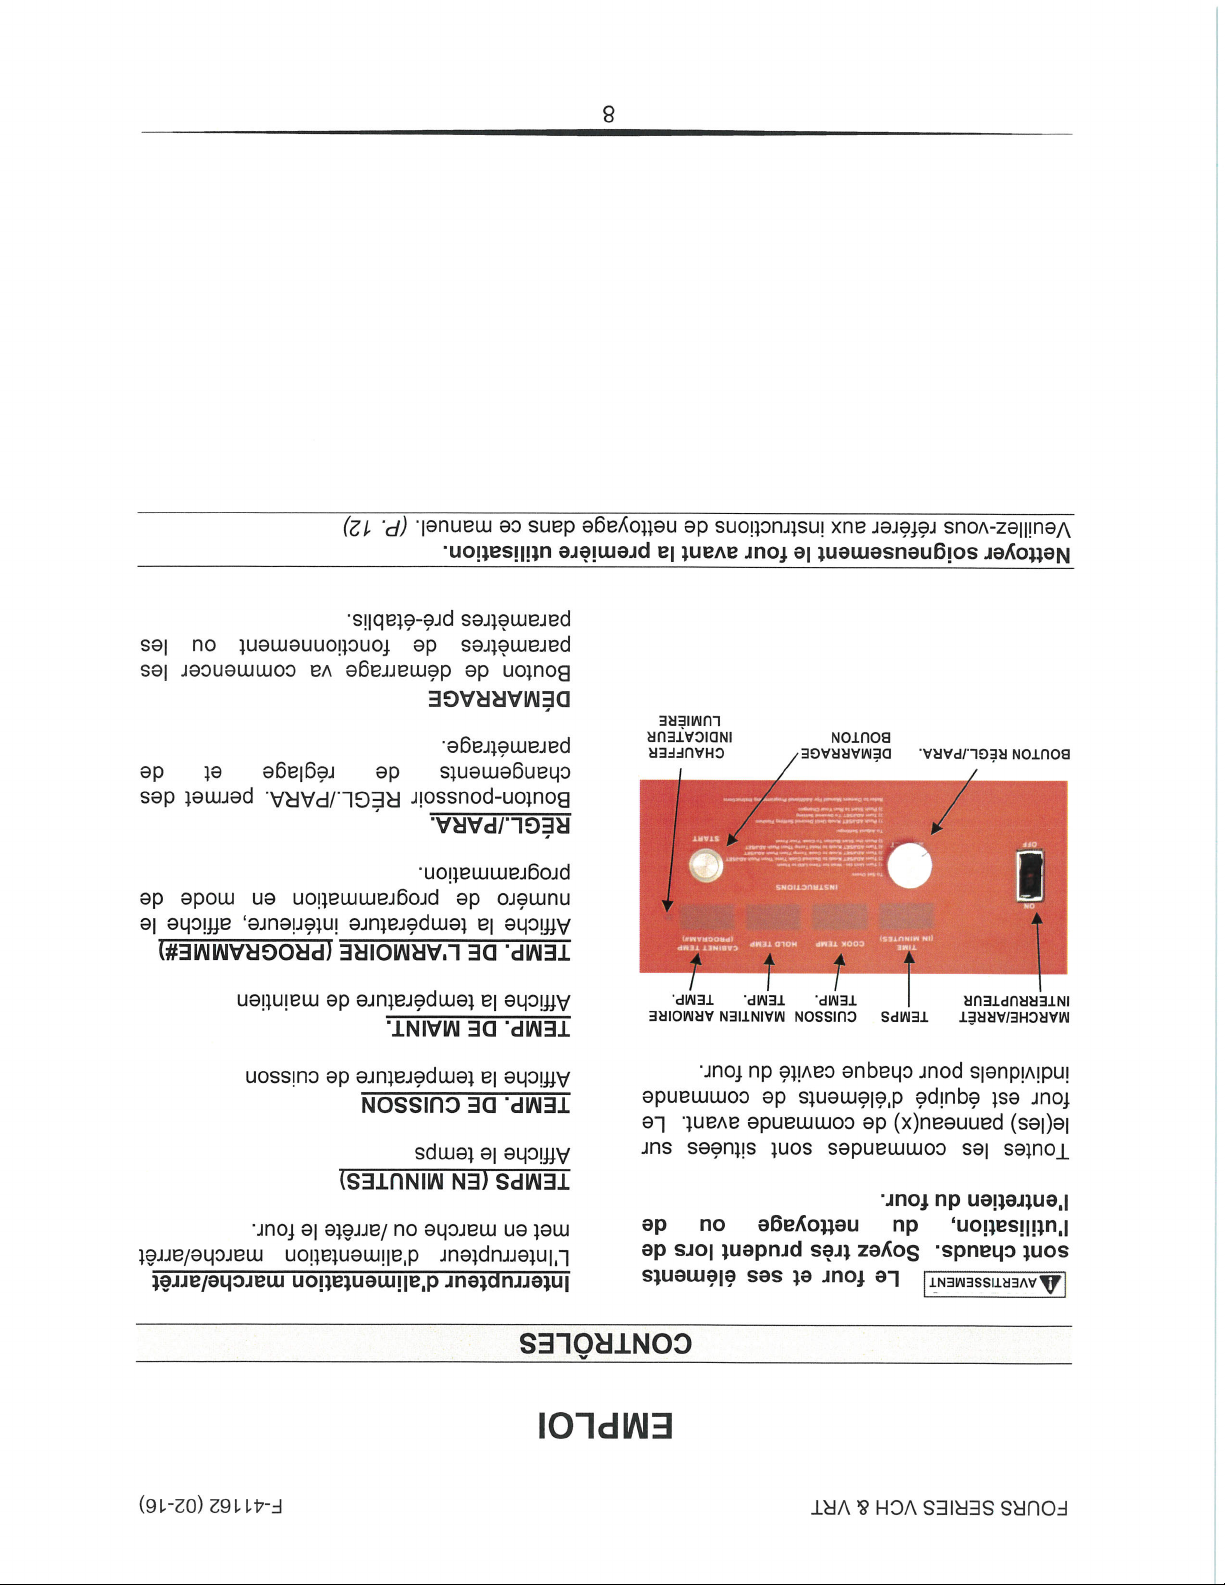
CONTROLS
The Oven and its parts
are hot. Be very careful when operating,
cleaning, or servicing the oven.
All operating controls are located on the
front Control Panel(s). The oven is
supplied with individual operating
controls for each oven cavity.
ON/OFF TIME COOK HOLD CABINET
SWITCH TEMP. TEMP. TEMP.
ADJ/SET KNOB START HEAT
BUTTON INDICATOR
LIGHT
Thoroughly clean the oven before initial use.
Please refer to the cleaning instructions in this manual. (Pg. 12)
Power On / Off Switch
The power On/Off switch turns the oven
on or off.
TIME (IN MINUTES)
Displays set time.
COOK TEMP.
Displays set Cooking Temperature.
HOLD TEMP.
Displays set Holding Temperature.
CABINET TEMP. (PROGRAM#)
Displays interior temperature, displays
programming number in programming
mode.
ADJ / SET
ADJ / SET Knob allows Adjustment and
Setting changes.
START
Start Button will start the operation or
pre-set settings.
8
Page 10

VCH & VRT SERIES OVENS F-41162 (02-16)
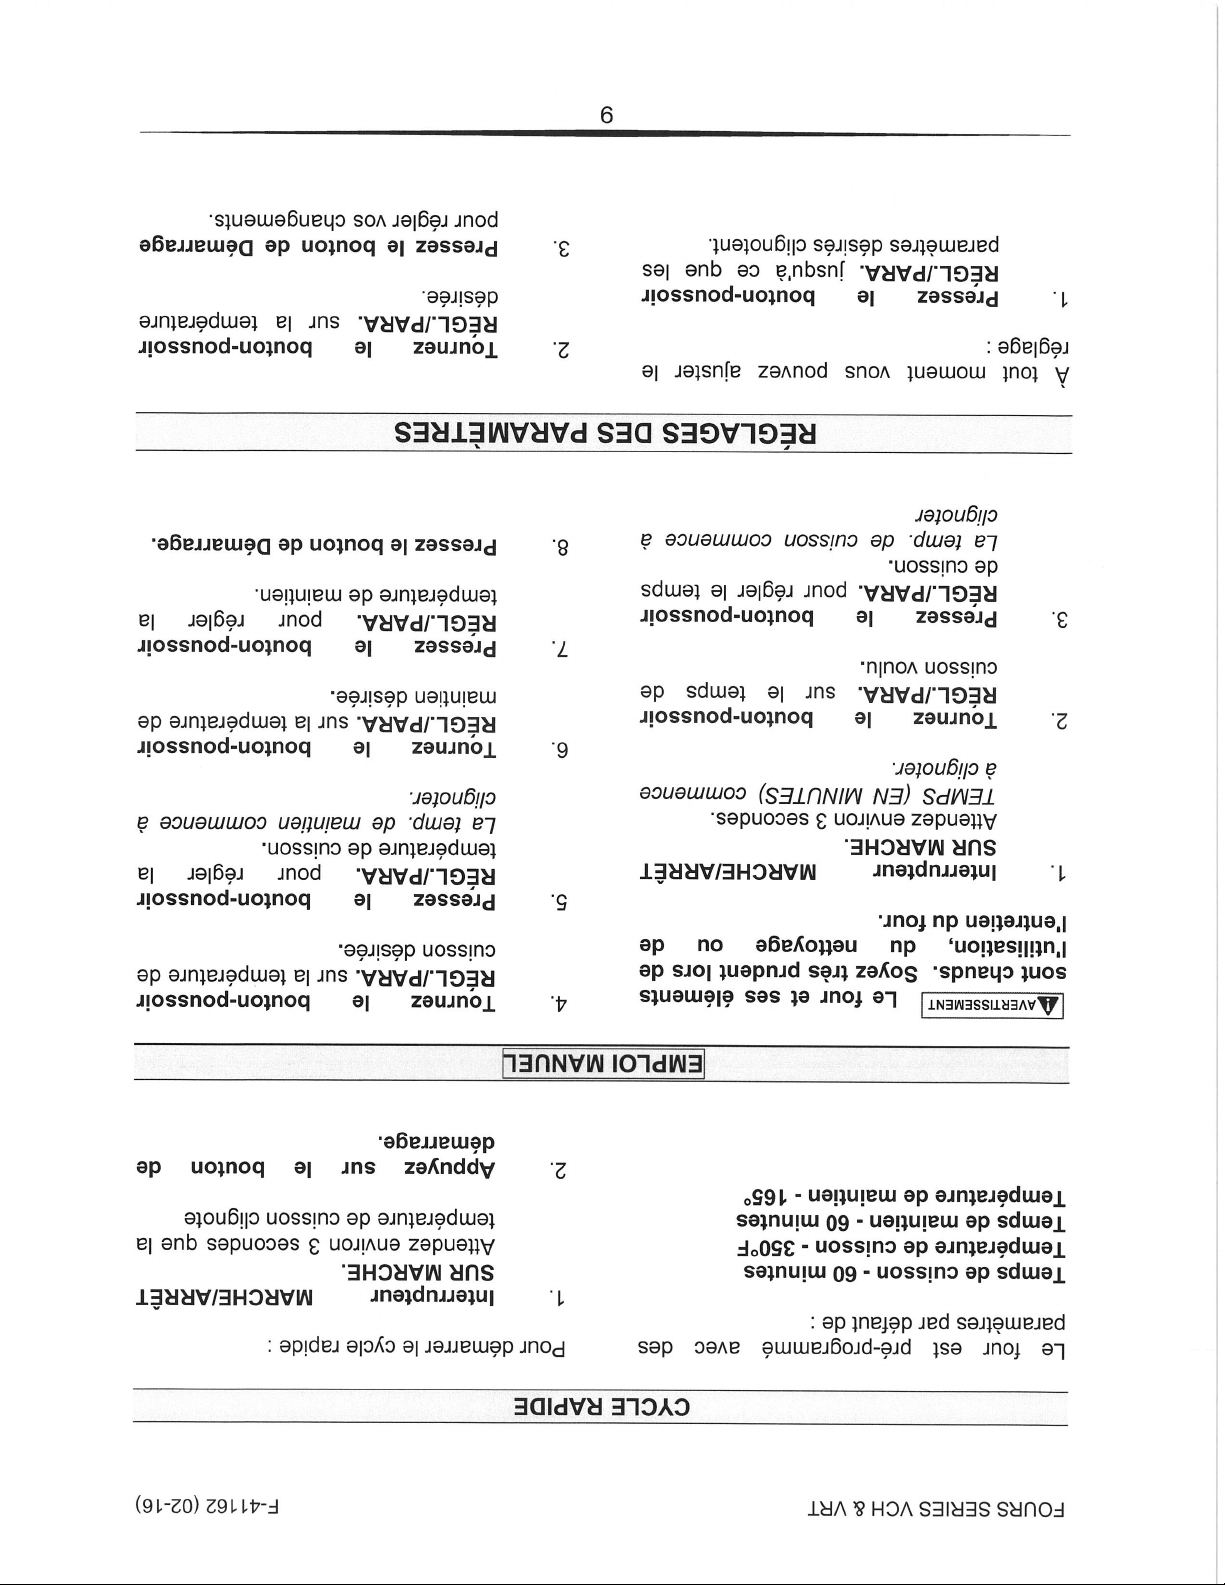
QUICK CYCLE
The Oven is pre-programmed with
default settings of:
Cooking Time - 60 minutes
Cooking Temperature - 350⁰F
Holding Time – 60 minutes
Holding Temperature - 165°
To start Quick Cycle:
1. Switch ON/OFF Switch to ON.
Wait approx.. 3 seconds until
Cook Temp. starts blinking.
2. Push Start Button.
MANUAL OPERATION
The Oven and its parts
are hot. Be very careful when operating,
cleaning, or servicing the oven.
1. Switch ON/OFF Switch to ON
position.
Wait approx. 3 seconds
TIME (IN MINUTES) starts blinking.
2. Turn ADJ/SET Knob to desired
cook time.
3. Push ADJ/SET Knob to set
cooking time.
Cook Temp. starts blinking.
4. Turn ADJ/SET Knob to desired
cook temperature.
5. Push ADJ/SET Knob to set
cooking temperature.
Hold Temp. starts blinking.
6. Turn ADJ/SET Knob to desired
holding temperature.
7. Push ADJ/SET Knob to set
holding temperature.
8. Push the Start Button.
SETTING ADJUSTMENT
At any time you can adjust the setting
by:
1. Push the ADJ/SET Knob until
the desired setting flashes.
2. Turn the ADJ/SET Knob to
desired time/temperature.
3. Push the Start Button to set
your changes.
9
Page 11

VCH & VRT SERIES OVENS F-41162 (02-16)
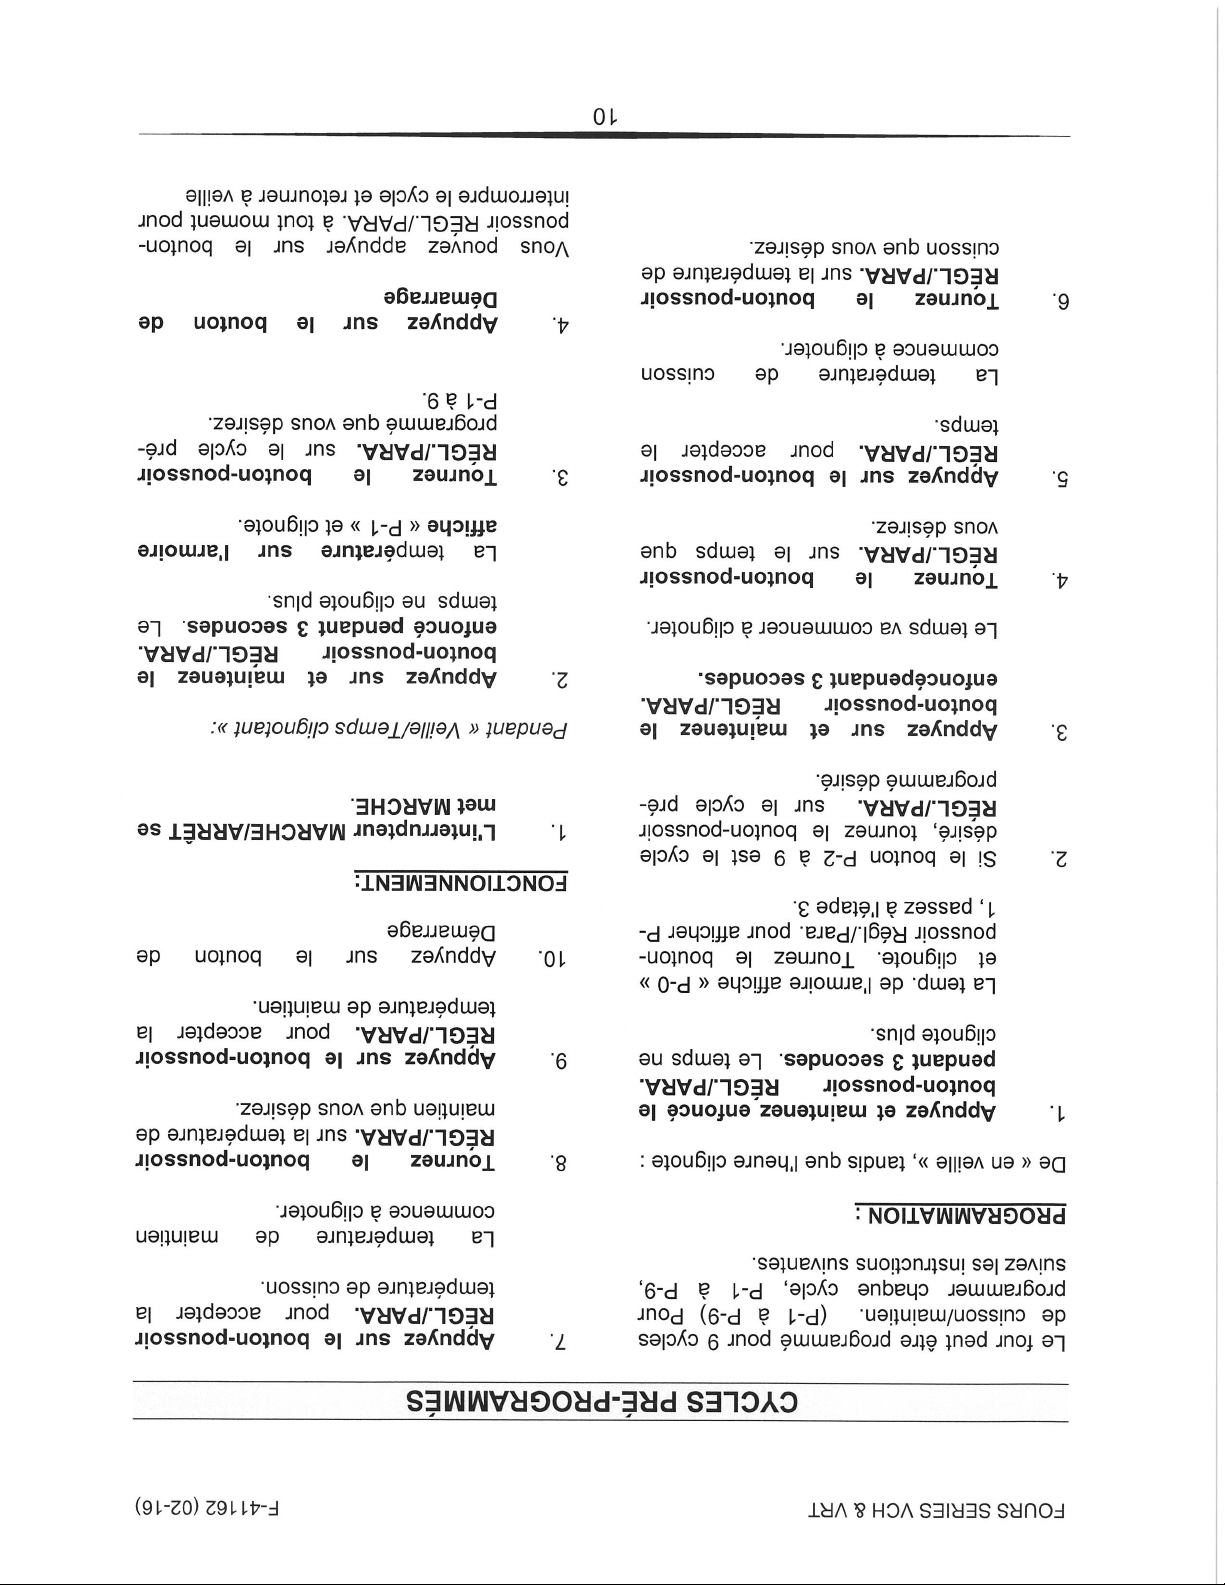
PRE-PROGRAMMED CYCLES
The Oven can be programmed for 9
cooking/holding cycles. (P-1 thru P-9)
To program each cycle, P-1 through P9, use the following instructions.
PROGRAMMING:
From the “Idle State” while the Time is
blinking:
1. Press and Hold the ADJ/SET
Button for 3 seconds. The time
will no longer blink.
The Cabinet Temp. will display
“P-0” and is blinking. Turn
Adj/Set knob to display P-1, go to
step 3.
2. If P-2 through 9 is the desired
cycle, Rotate the ADJ/SET
Knob to the desired pre-
programmed cycle.
3. Press and Hold the ADJ/SET
Knob for 3 seconds.
Time will start blinking.
4. Rotate the ADJ/SET Knob to
desired time.
5. Press the ADJ/SET Knob to
accept the time.
Cook Temp. will start blinking.
6. Rotate the ADJ/SET Knob to
desired cooking temperature.
7. Press the ADJ/SET Knob to
accept Cook Temp.
Hold Tem. will start blinking.
8. Rotate the ADJ/SET Knob to
desired holding temperature.
9. Press the ADJ/SET Knob to
accept Hold Temp.
10. Push Start Button
OPERATING:
1. Switch ON/OFF Switch to ON.
During the “Idle State/Time is blinking”:
2. Press and Hold the ADJ/SET
Knob for 3 seconds. The time
will no longer blink.
The Cabinet Temp. will display
“P-1” and is blinking.
3. Rotate ADJ/SET Knob to
desired pre-programmed cycle:
P-1 through 9.
4. Press Start Button.
You can push the ADJ/SET Knob any
time to abort the cycle and return to idle.
10
Page 12
VCH & VRT SERIES OVENS F-41162 (02-16)
VENTILATION HOOD REQUIREMENTS
The unit must be installed in accordance
with state and local codes, or in the
absence of state and local codes, with
the National Electrical Code
ANSI/NFPA-70 (latest edition) and
Standard for Ventilation Control and Fire
Protection of Commercial Cooking
Operations NFPA 96 (latest edition).
Both are available from The National
Fire Protection Association,
Batterymarch Park, Quincy, MA 02269.
In Canada refer to the Canadian
Electrical Code C22.1 Part 1 (latest
addition).
ERR TOO HOT – ALARM
The oven reports an “Over
Temperature Condition” any time the
oven temperature reaches 400⁰F or
higher.
When this condition exists, the oven will
sound an audible alarm by emitting a
triple beep (3 quick short beeps) every
2 seconds and it will flash the message
“Err too Hot” on the display to alert
nearby staff.
This audible alarm may be
temporarily cancelled for 3 minutes
by pushing the ADJ/SET Knob. After
the 3 minutes have expired, the alarm
will begin beeping again.
The error message on the display
cannot be cancelled. The proper
action when this alarm is present is to
Turn the oven OFF, unplug the unit,
and call for service.
SHUTDOWN
The Oven and its parts
are hot. Be very careful when operating,
cleaning, or servicing the oven.
1. Switch ON/OFF switch to OFF
position.
EXTENDED SHUTDOWN
1. Perform the Shutdown procedure.
2. Unplug the oven.
3. After oven has cooled down,
thoroughly clean the oven
2. Open door slightly to allow
ventilation and a cool down
period.
The oven’s cooling/exhaust fans located
at the left side of the unit will operate
until the thermostat sensor shuts them
off.
according to the Cleaning
Procedure in this manual.
4. Leave the oven door(s) slightly
open to allow ventilation and
preservation of door gasket(s).
11
Page 13

VCH & VRT SERIES OVENS F-41162 (02-16)
MAINTENANCE
CLEANING
The Oven and its parts
are hot. Be very careful when operating,
cleaning, or servicing the oven.
Always unplug
electrical power supply before
cleaning.
Avoid splashing water into upper
areas of the oven to prevent damage
to electrical components or
connections.
Never spray the unit with a hose.
Never use harsh chemicals or
abrasive pads to clean the oven.
HEAT TINT:
Darkened areas, called “heat tint,” may appear on stainless steel exposed to excessive
heat. Excessive heat causes the protective film to thicken. This is unsightly, but is not
a sign of permanent damage.
DAILY:
1. Unplug electrical power supply.
2. Allow oven to go through cool down period before cleaning.
3. Remove the Interior Side Racks
4. Take the Interior Side Racks to a
sink or dishwasher for a thorough
cleaning. Use a mild soap and
water solution to clean these
items.
5. Clean the interior of the oven with
a mild soap and a soft damp
cloth. Wipe dry with a soft dry
cloth.
6. Reassemble oven.
7. Clean the exterior of the oven
with a clean damp cloth.
DOOR GASKET CARE
DOOR GASKET:
At least once a week, thoroughly check
the door gasket for damage/wear. A
damaged gasket can cause inefficient
and unsatisfactory operation of the
oven.
If the gasket requires cleaning:
1. Gently wash gasket using a
moist cloth, a mild detergent
solution, and warm water.
2. Rinse with a fresh cloth
moistened in warm water to
remove all traces of detergent.
3. Gently wipe dry with a clean dry
cloth.
Never apply food oils, or petroleum
lubricants directly to the gasket(s).
Petroleum based solvents and
lubricants will reduce the gasket’s life.
12
Page 14

VCH & VRT SERIES OVENS
COOKING
INTRODUCTION
This cooking guide has been produced
for your Vulcan Cook & Hold Oven
System. It should be used as a handy
reference when using your oven. The
guide has been developed to help
answer questions which you may have
relating to product preparation as well
as making you familiar with the
operation of your Cook & Hold Oven.
When using your oven, experiment with
your own house specialties. The degree
of doneness varies based upon
individual preferences. These
preferences can be easily accomplished
by varying the recommended time
guidelines in this manual. The
guidelines which are presented in this
manual are suggested and have been
tested to insure product preparation as
indicated.
The concept of “Low Temperature
Cooking” is not a science, it is an art.
Chefs from around the world vary in
terms of the doneness and appearance
in the products which they prefer.
Therefore, we suggest first
understanding what your Oven System
will do for the multitude of applications
available to you.
COOKING RACK
Depending upon the size of the Cook &
Hold Oven, each unit is supplied with a
specially designed cooking rack(s). The
cooking rack must be used when
cooking food products to insure absolute
product quality and integrity.
F-41162 (02-16)
The cooking rack is simply placed inside
a standard 18” x 26” sheet tray (2/1
Gastronome) and the product which is
to be cooked and held is placed on top
of the cooking rack. When more than
one product is being prepared, the food
products should not be cramped
together onto one cooking rack.
Sufficient room should separate the
products on a single cooking rack to
insure proper circulation of air around
the product.
When loading the oven, an additional
18” x 26” sheet tray, in an inverted
position, (Fig. 5) should be placed
directly above the food product being
prepared. This creates the necessary
air flow pattern to produce highly
desirable carmelization and uniform
roasting of the product.
INVERTED SHEET TRAY
Fig. 5
A helpful hint when loading your food
product on the cooking rack is to either
line your 18” x 26” sheet tray with foil, or
spray with a quality vegetable oil. This
helps with easy clean up after use.
13
Page 15
VCH & VRT SERIES OVENS
F-41162 (02-16)
BAKERY PRODUCTS
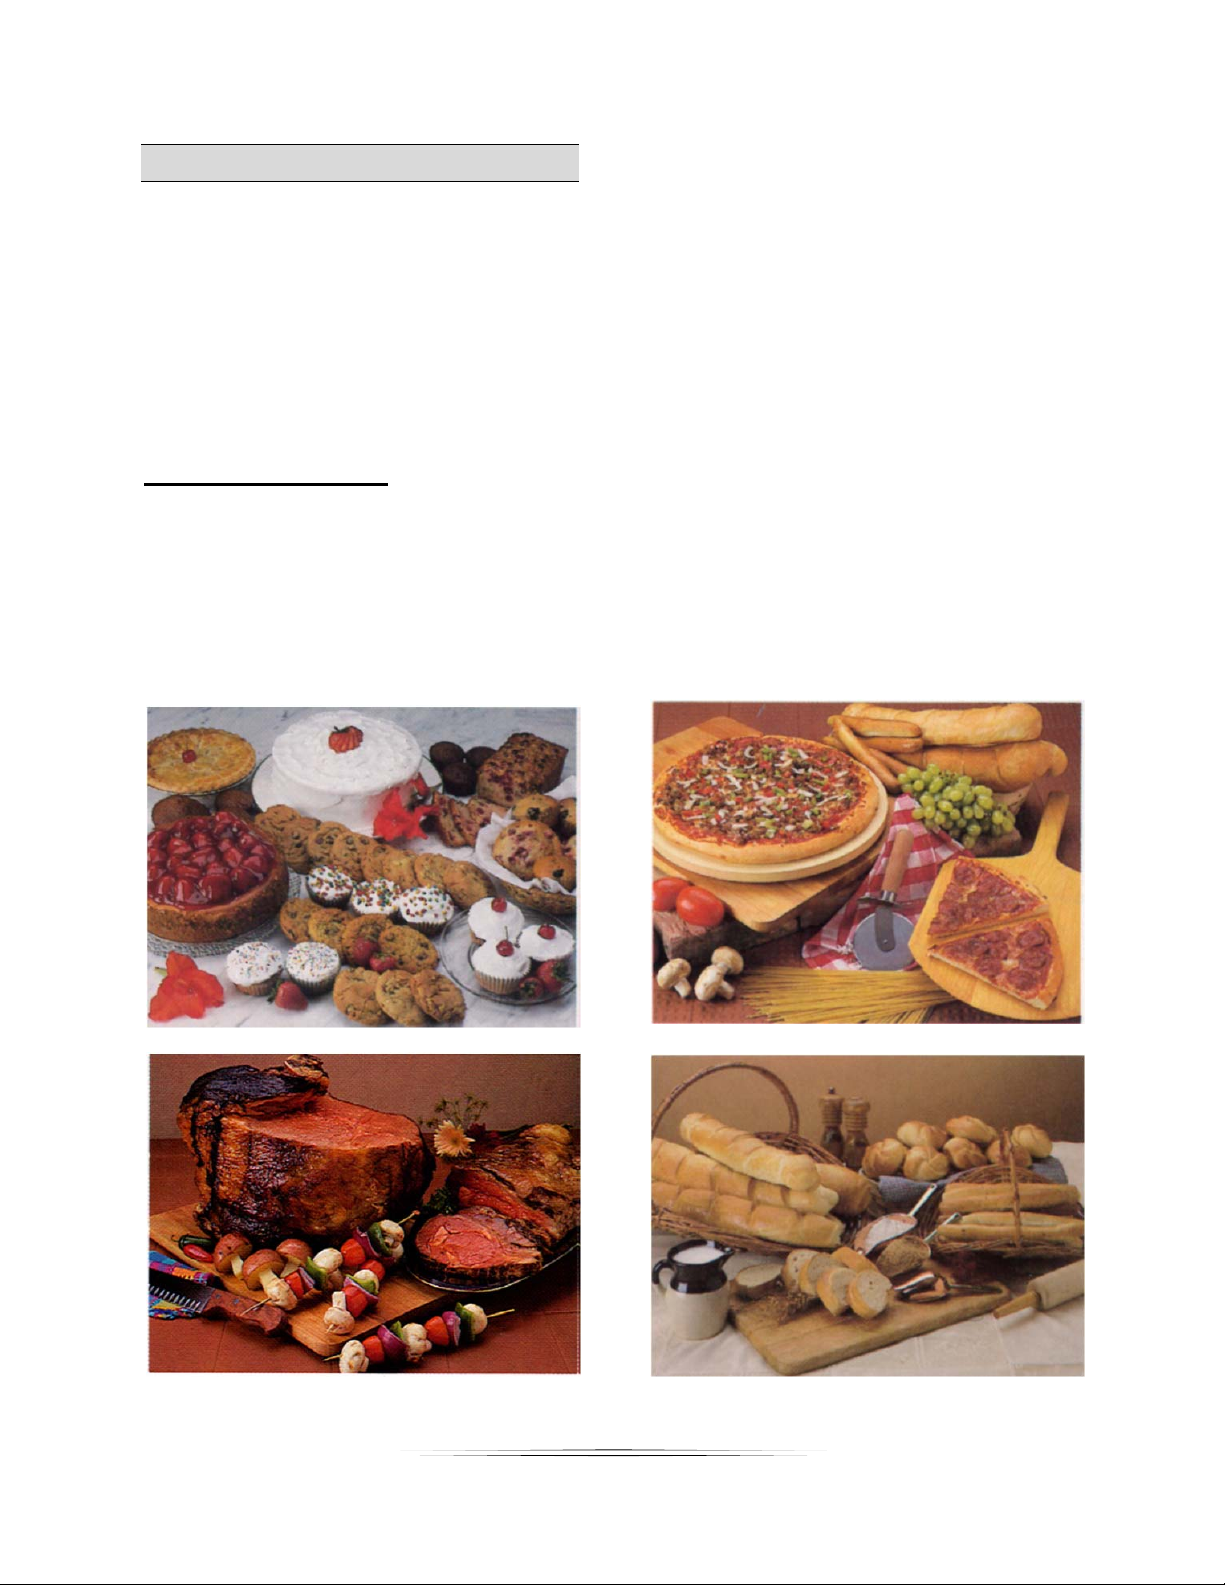
The Cook & Hold Oven System is much
more than a prime rib oven. Unlike our
competitors, you can do a full range of
bakery products. By observing a few
simple rules, you can bake: cakes,
muffins, cookies, pies, breads, puff
pastry, and even beautiful (light as a
cloud) popovers and cream puffs.
For Bakery Products:
1. Pre-heat oven before baking.
2. Observe proper loading
procedures.
3. Proof yeast products about 50%
less than usual.
4. Rotate pans, when product is
about ½ done, as you would with
any oven.
Baking time takes a little longer in the
Cook & Hold Oven, but the results are
worth the few minutes extra.
You are baking with about 6000
BTU’s compared to 60,000 to 80,000
BTU’s in a convection oven. During
the extra baking time, think about
how you want to invest your energy
savings.
14
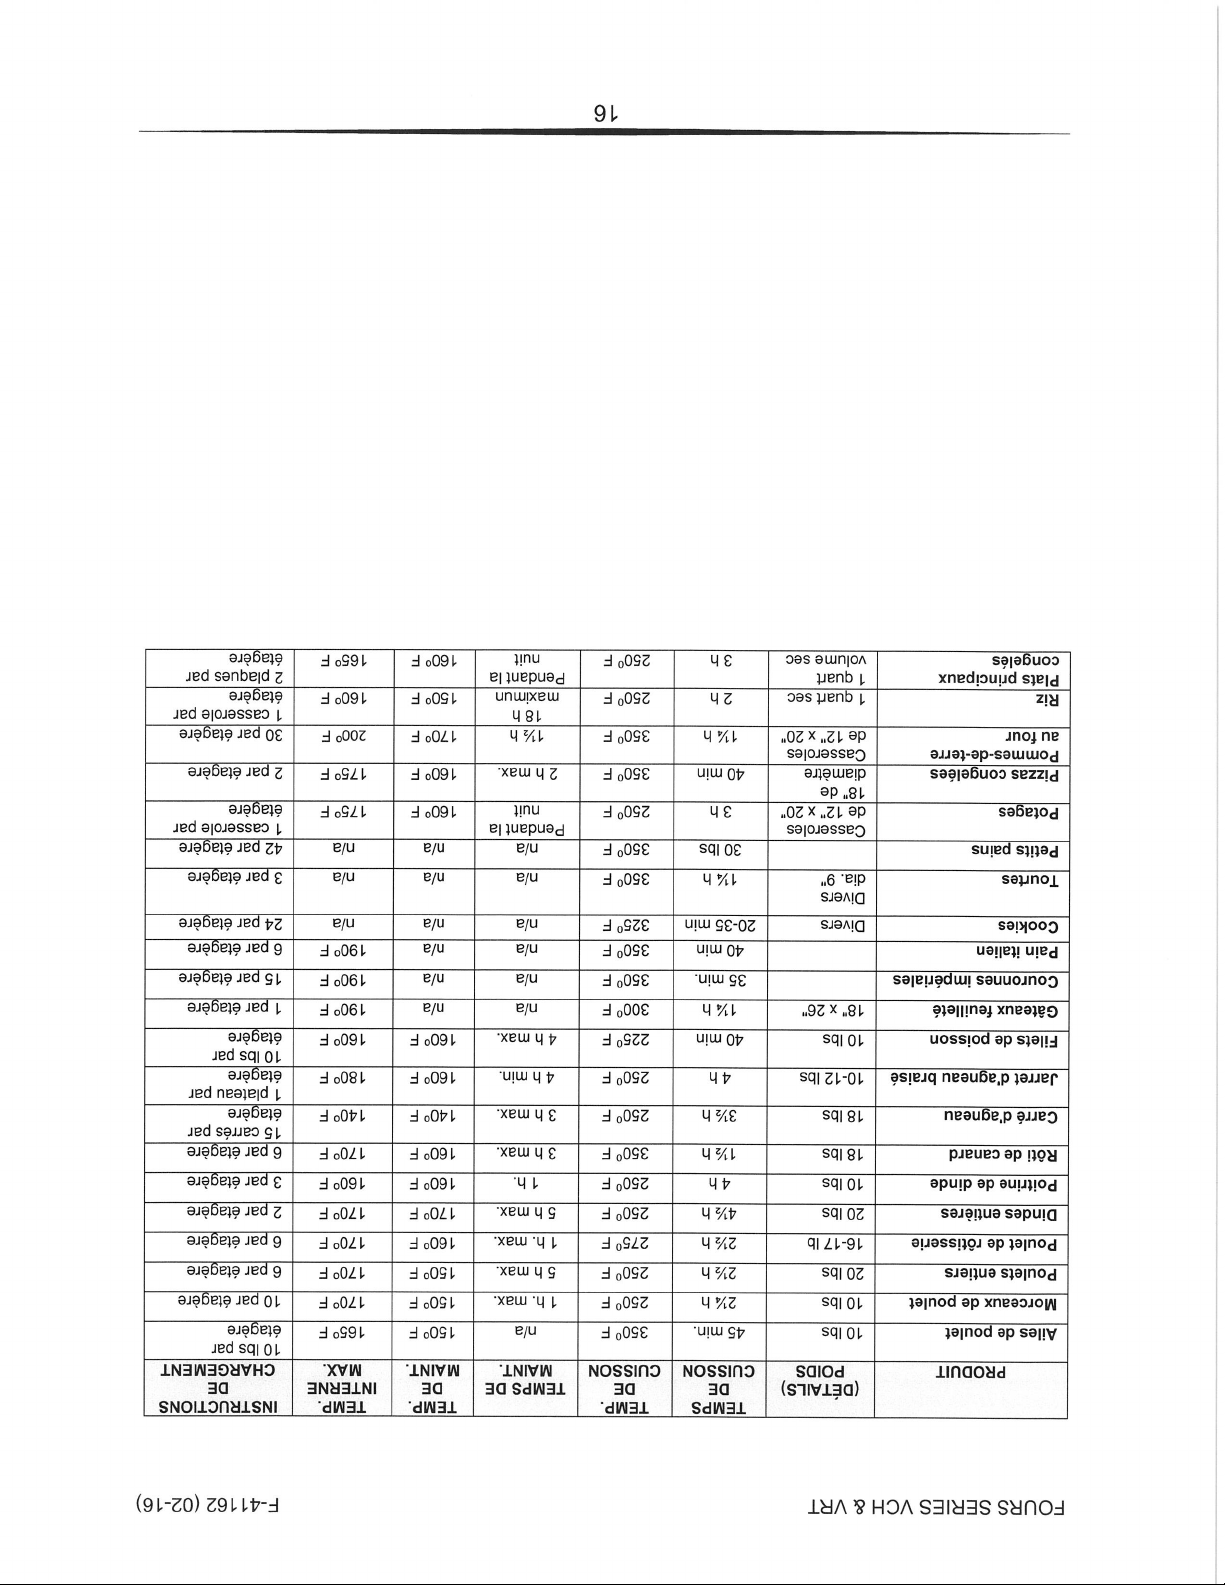
Page 16
VCH & VRT SERIES OVENS F-41162 (02-16)
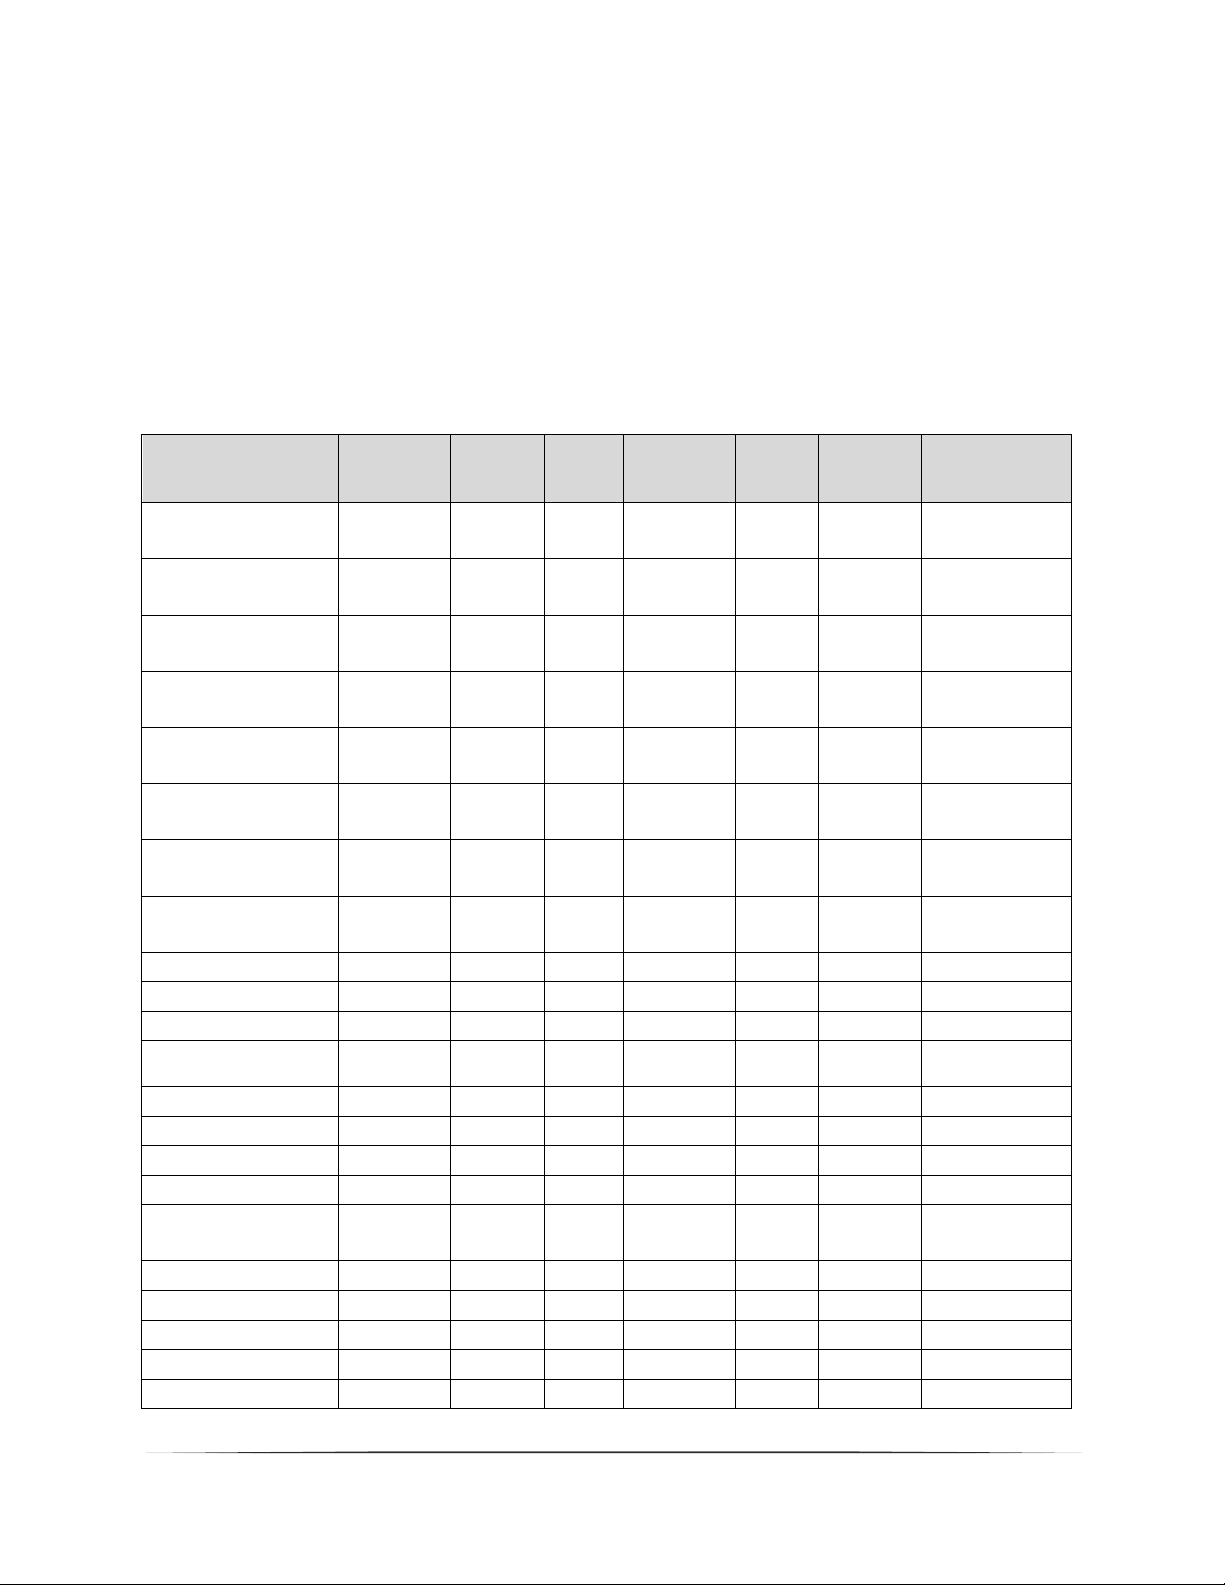
COOKING AND HOLDING GUIDE
Please note that as products vary, as well as other elements such as altitude, so
shall actual cooking times and temperatures. These should be adjusted as
needed based upon your actual experience. Finished product temperatures
should be verified manually, prior to serving, in order to insure food safety.
PRODUCT
Prime Rib
Boneless Rib eye
Top Round
Steamship Round
Bottom Round
Boneless Strip Loin
Whole Tenderloin
Top Sirloin Butt
Beef Short Ribs 10 lbs. 4 hrs.
Cubed Steaks 10 lbs. 4 hrs. 225⁰ F 3 hrs. min.
Beef Back Ribs 30 lbs. 6 hrs. 225⁰ F 4 hrs.
Beef Stew
Corned Beef 12 lbs. 4 hrs. 250⁰ F 4 hrs. min.
Frozen Burgers 7-8 lbs. 45 min. 225⁰ F 4 hrs. max
Fresh Ham 12 lbs. 6 hrs. 250⁰ F 4 hrs.
Cooked Cured Ham 12 lbs. 4 hrs. 250⁰ F 4 hrs.
Pork Back Ribs
Pork Spare Ribs 30 lbs. 4 hrs. 250⁰ F 4 hrs.
Fresh Sausages 10 lbs. 2 hrs. 225⁰ F 5 hrs. max
Pre-Cooked Sausage 10 lbs. 1¾ hr. 250⁰ F 5 hrs. max
Roast Suckling Pig 30 lbs. 6 hrs. 250⁰ F 3 hrs. min.
Bacon 40 min 350⁰ F n/a n/a n/a 36 slices per shelf
(DETAILS)
WEIGHT
(USDA
#109)
20 lbs. 5 hrs. 225⁰ F 4 hrs. min.
(USDA
#112A)
12 lbs. 3 hrs 225⁰ F 4 hrs. min.
(USDA
#168)
18-20 lbs. 4½-5 hrs. 225⁰ F 4 hrs. min.
(USDA
#160)
60 lbs. 10 hrs. 225⁰ F 4 hrs. min.
(USDA
#170)
20 lbs. 5 hrs. 225⁰ F 8 hrs. min.
(USDA
#180)
12 lbs. 3 hrs. 225⁰ F 4 hrs. min.
(USDA
#190)
10 lbs. 2½ hrs. 225⁰ F 2 hrs. min.
(USDA
#184)
12-14 lbs. 3 hrs. 225⁰ F 4 hrs. min.
(Stew Meat)
10 lbs. 4 hrs.
(USDA
#422)
10 lbs. 4 hrs. 250⁰ F 3 hrs. max.
COOK
TIME
COOK
TEMP. HOLD TIME
225⁰ F
225⁰ F
4 hrs. min.
6 hrs. min.
HOLD
TEMP.
140⁰ F 135⁰ F
140⁰ F 135⁰ F
140⁰ F 130⁰ F
140⁰ F 130⁰ F
140⁰ F 130⁰ F
140⁰ F 130⁰ F
140⁰ F 130⁰ F
140⁰ F 135⁰ F
155⁰ F 165⁰ F
160⁰ F 160⁰ F
160⁰ F 160⁰ F
150⁰ F 175⁰ F
150⁰ F 165⁰ F
150⁰ F 165⁰ F
160⁰ F 165⁰ F
160⁰ F 135⁰ F
160⁰ F 175⁰ F
160⁰ F 175⁰ F
160⁰ F 175⁰ F
160⁰ F 160⁰ F
160⁰ F 170⁰ F
MAX.
INTERNAL
TEMP.
LOADING
GUIDELINES
2 per shelf
3 per shelf
2 per shelf
1 per shelf
2 per shelf
3 per shelf
4 per shelf
3 per shelf
1 per shelf
1 tray per shelf
4 per shelf
1 tray per shelf
2 per shelf
24 per shelf
2 per shelf
2 per shelf
6 slabs per shelf
5 slabs per shelf
10 lbs. per shelf
10 lbs. per shelf
1 per shelf
15
Page 17
VCH & VRT SERIES OVENS F-41162 (02-16)
PRODUCT
Chicken Wings 10 lbs. 45 min. 350⁰ F n/a
Chicken Pieces 10 lbs. 2¼ hrs. 250⁰ F 1 hr. max.
Whole Chickens 20 lbs. 2½ hrs. 250⁰ F 5 hrs. max
Rotisserie Chicken 16-17 lbs. 2½ hrs. 275⁰ F 1 hr. max.
Whole Turkeys 20 lbs. 4½ hrs. 250⁰ F 5 hrs. max.
Turkey Breast₇
Roast Duckling 18 lbs. 1½ hrs. 350⁰ F 3 hrs. max
Rack of Lamb 18 lbs. 3½ hrs. 250⁰ F 3 hrs. max
Braised Lamb Shanks 10-12 lbs. 4 hrs. 250⁰ F 4 hrs. min.
Fish Filets 10 lbs. 40 min. 225⁰ F 4 hrs. max
Sheet Cakes 18" x 26" 1¼ hrs. 300⁰ F n/a n/a
Kaiser Rolls 35 min. 350⁰ F n/a n/a
Italian Bread 40 min. 350⁰ F n/a n/a
Cookies
Pies w/top crust
Dinner Rolls 30 min. 350⁰ F n/a n/a n/a 42 per shelf
Clear Soups
Frozen Pizzas 18" diameter 40 min. 350⁰ F 2 hrs. max
Baked Potatoes
Rice 1 Quart Dry 2 hrs. 250⁰ F 18 hrs. max
Frozen Entrees 1 Quart Dry 3 hrs. 250⁰ F Overnight
(DETAILS)
WEIGHT
10 lbs. 4 hrs. 250⁰ F 1 hr.
Various
Types
Various
Types
9" dia. 1¼ hrs. 350⁰ F n/a n/a n/a 3 per shelf
12" x 20"
pans 3 hrs. 250⁰ F Overnight
12" x 20"
pans 1¼ hrs. 350⁰ F 1½ hrs.
COOK
TIME
20-35
min. 325⁰ F n/a n/a n/a 24 per shelf
COOK
TEMP. HOLD TIME
HOLD
TEMP.
150⁰ F 165⁰ F
150⁰ F 170⁰ F
150⁰ F 170⁰ F
160⁰ F 170⁰ F
170⁰ F 170⁰ F
160⁰ F 160⁰ F
160⁰ F 170⁰ F
140⁰ F 140⁰ F
160⁰ F 180⁰ F
160⁰ F 160⁰ F
160⁰ F 175⁰ F
160⁰ F 175⁰ F
170⁰ F 200⁰ F
150⁰ F 160⁰ F
160⁰ F 165⁰ F
MAX.
INTERNAL
TEMP.
190⁰ F
190⁰ F
190⁰ F
LOADING
GUIDELINES
10 lbs. per shelf
10 lbs. per shelf
6 per shelf
6 per shelf
2 per shelf
3 per shelf
6 per shelf
15 racks per shelf
1 tray per shelf
10 lbs. per shelf
1 per shelf
15 per shelf
6 per shelf
1 pan per shelf
2 per shelf
30 per shelf
1 pan per shelf
2 pans per shelf
16
Page 18

VCH & VRT SERIES OVENS F-41162 (02-16)
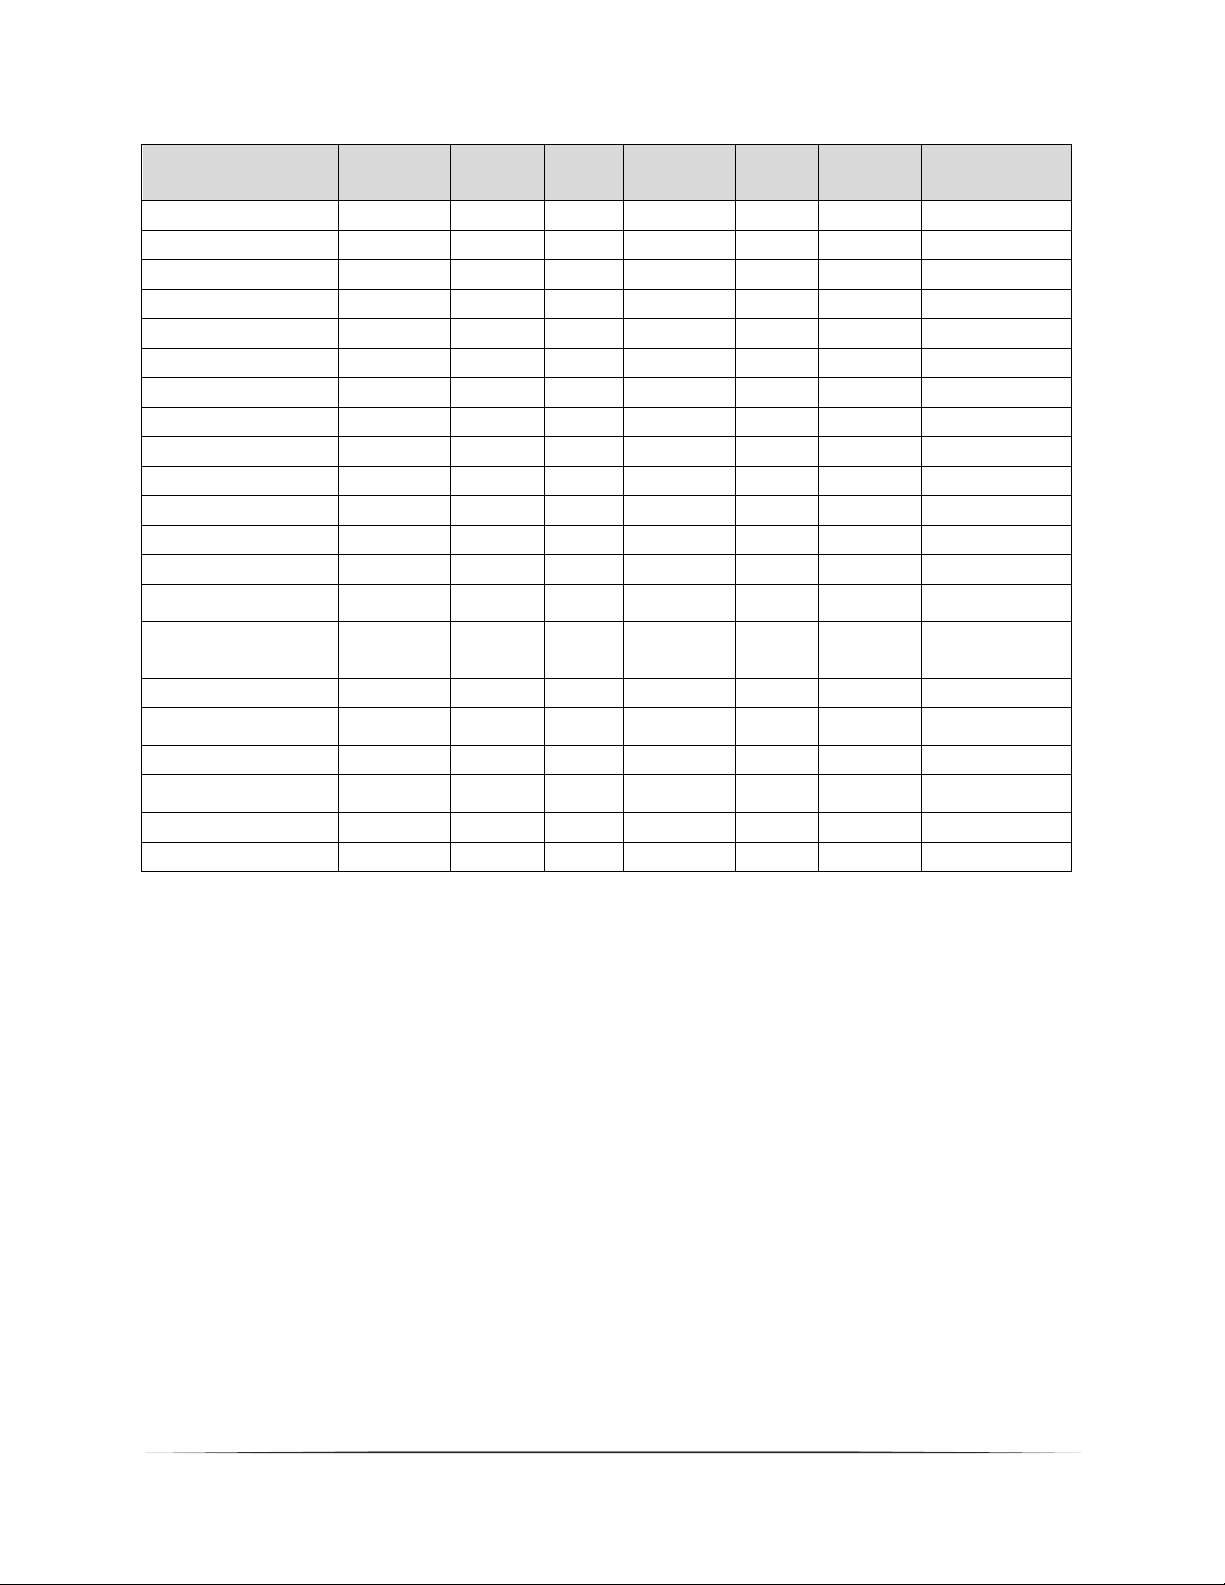
RETHERMALIZATION GUIDE
ENTRÉE
Baked Rotini
Beef & Noodles
Breaded Chicken Pattie on Bun
Burrito
Cheesy Bread/Italian Dunker Sauce
Cheesy Chili
Chicken & Noodles
Chicken & Rice
Chicken Dippers
Chicken Fryz
Chicken Leg
Chicken Nuggets
Chik'n O's, Zesty
French Toast/Sausage Links
Grilled Cheese Sandwich
Grilled Chicken on Bun
Ham & Cheese English Muffin
Hamburger on Bun
Hot Dog on Bun
Italian Spaghetti
Macaroni & Cheese
Mexican Cheese Sauce
Mini Corndogs
Pancakes/Sausage Links
Pizza Dippers
Pizza, Cheese
Pizza, Pepperoni
Pizza, Sausage
Ravioli
Sausage Mini Bites
Steak Nuggets
Taco Boat
Tacos
Turkey & Noodles
Turkey Manhattan
OVEN
TEMP.
225⁰F
225⁰F
225⁰F
250⁰F
200⁰F
225⁰F
225⁰F
225⁰F
225⁰F
225⁰F
225⁰F
225⁰F
225⁰F
225⁰F
200⁰F
225⁰F
200⁰F
250⁰F
225⁰F
250⁰F
225⁰F
200⁰F
225⁰F
225⁰F
225⁰F
200⁰F
200⁰F
200⁰F
250⁰F
225⁰F
225⁰F
225⁰F
225⁰F
225⁰F
225⁰F
REHEAT
TIME
60 min.
54 min.
60 min.
48 min.
54 min.
54 min.
54 min.
54 min.
54 min.
48 min.
60 min.
60 min.
54 min.
42 min.
42 min.
60 min.
54 min.
60 min.
54 min.
54 min.
48 min.
42 min.
54 min.
42 min.
54 min.
42 min.
54 min.
54 min.
60 min.
54 min.
60 min.
42 min.
42 min.
54 min.
54 min.
HOLD
TEMP.
160⁰F
160⁰F
165⁰F
160⁰F
155⁰F
160⁰F
160⁰F
160⁰F
160⁰F
160⁰F
155⁰F
160⁰F
160⁰F
160⁰F
155⁰F
165⁰F
160⁰F
165⁰F
160⁰F
160⁰F
155⁰F
155⁰F
160⁰F
160⁰F
160⁰F
160⁰F
160⁰F
160⁰F
165⁰F
160⁰F
160⁰F
160⁰F
160⁰F
160⁰F
165⁰F
MIN. HOLD
TIME
20 min.
20 min.
20 min.
20 min.
15 min.
15 min.
20 min.
20 min.
20 min.
20 min.
20 min.
20 min.
20 min.
15 min.
15 min.
20 min.
20 min.
20 min.
20 min.
20 min.
20 min.
20 min.
15 min.
15 min.
20 min.
20 min.
20 min.
20 min.
20 min.
15 min.
20 min.
20 min.
20 min.
20 min.
20 min.
17
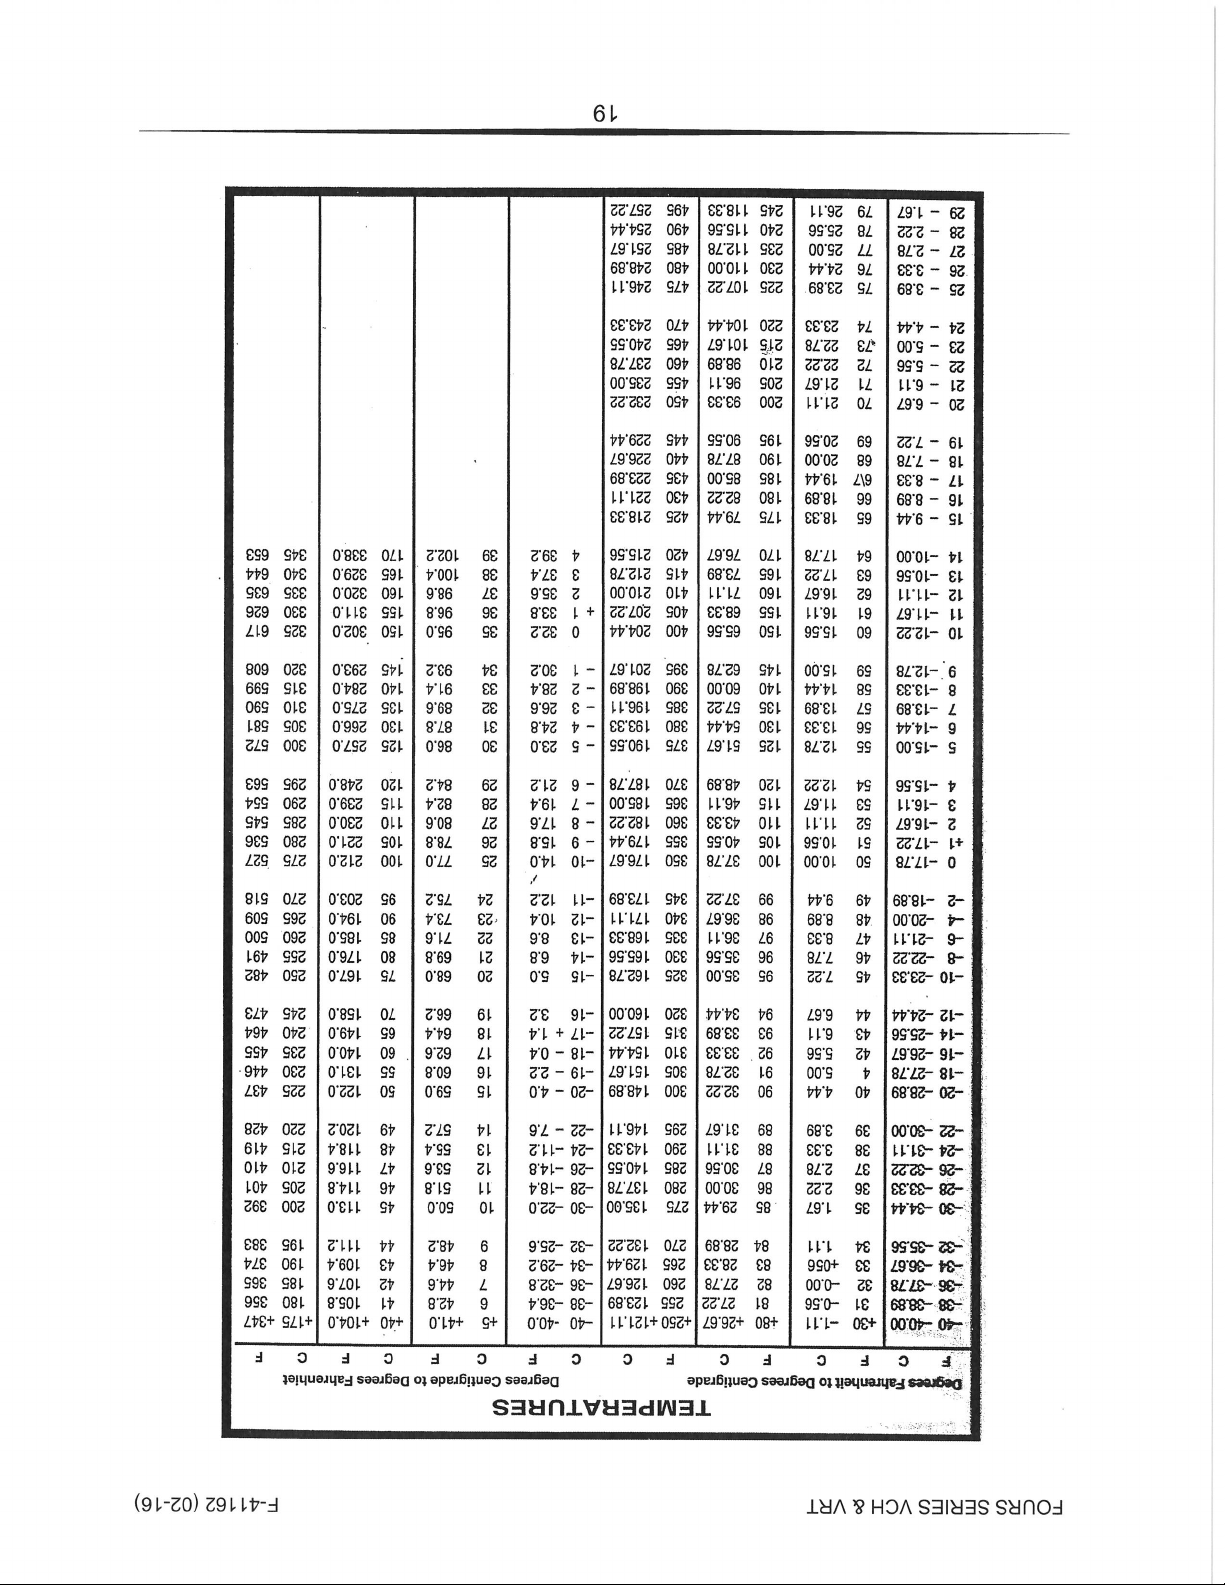
Page 19
VCH & VRT SERIES OVENS
F-41162 (02-16)
18
Page 20

VCH & VRT SERIES OVENS
F-41162 (02-16)
19
Page 21

VCH & VRT SERIES OVENS
F-41162 (02-16)
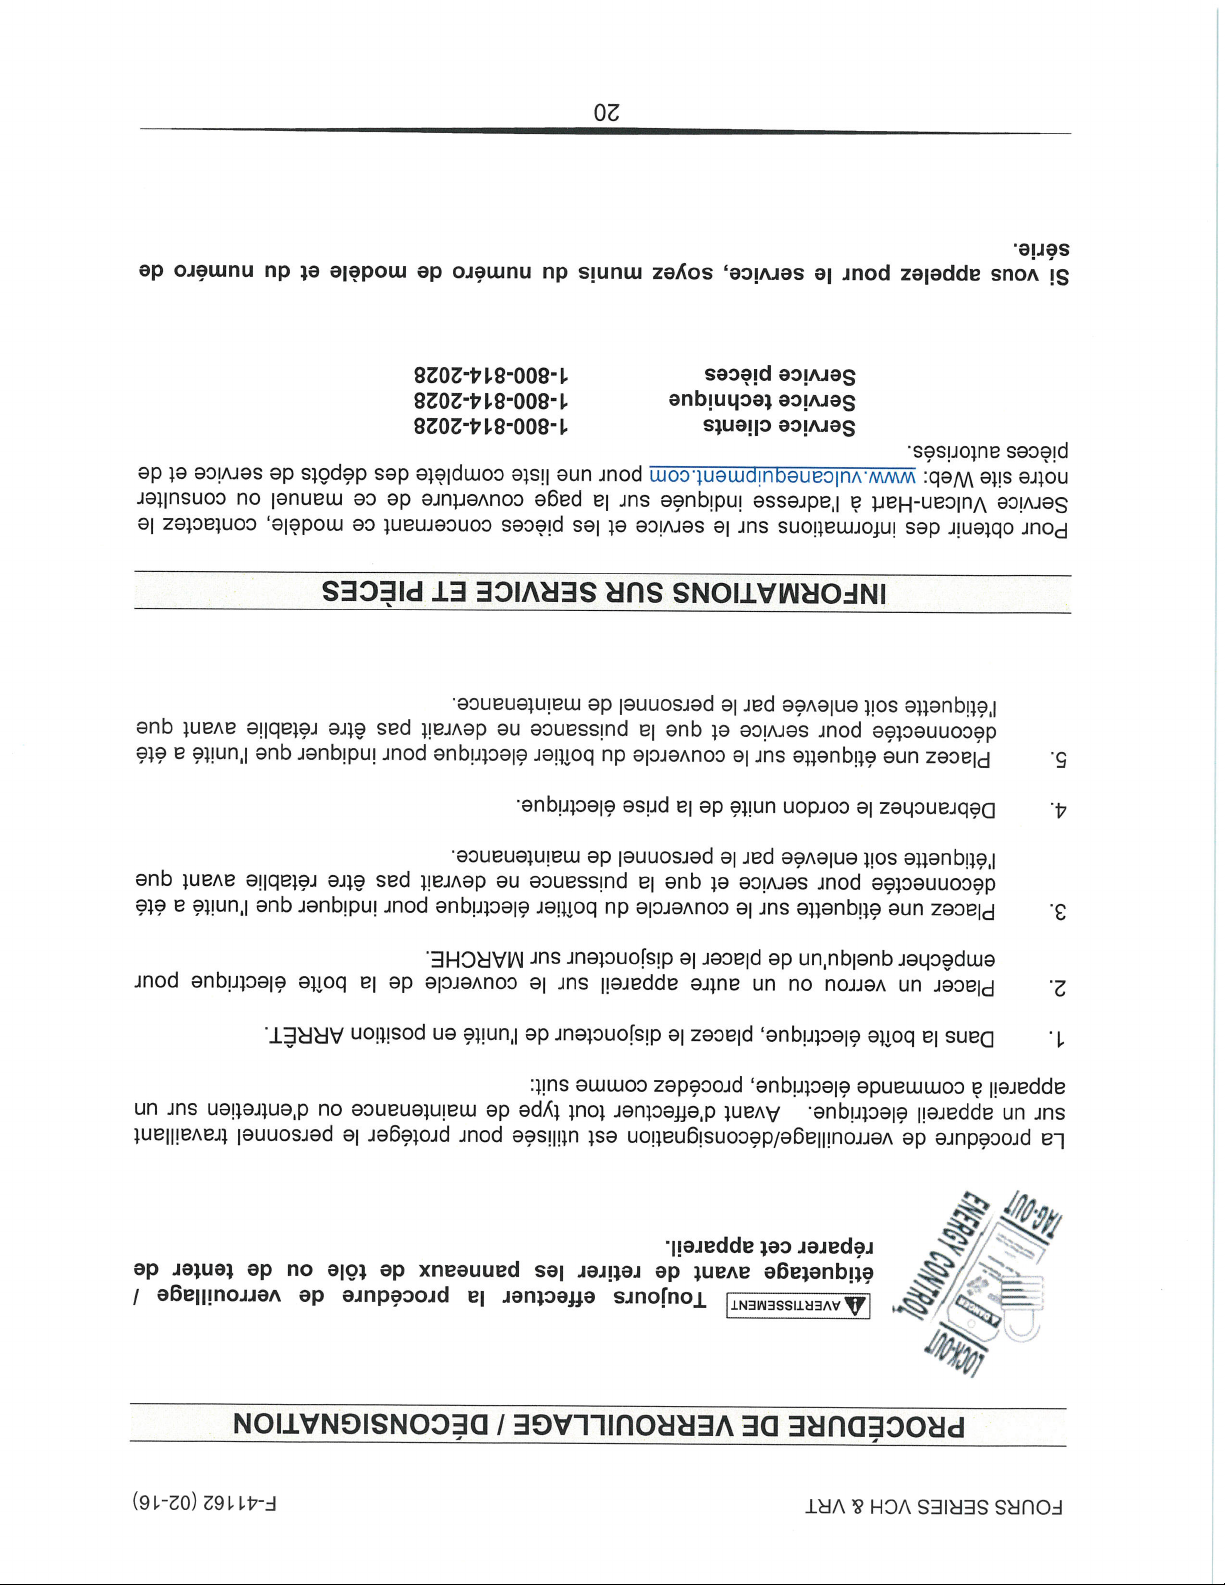
LOCKOUT / TAGOUT PROCEDURE
Always perform the Lockout / Tagout Procedure
before removing any sheet metal panels or attempting to service
this equipment.
The Lockout / Tagout Procedure is used to protect personnel working on an electrical
appliance. Before performing any type of maintenance or service on an electrically
operated appliance, follow these steps:
1. In electrical box, place unit’s circuit breaker into OFF position.
2. Place a lock or other device on electrical box cover to prevent someone from
placing circuit breaker ON.
3. Place a tag on electrical box cover to indicate that unit has been disconnected for
service and power should not be restored until tag is removed by maintenance
personnel.
4. Disconnect unit power cord from electrical outlet.
5. Place a tag on cord to indicate that unit has been disconnected for service and
power should not be restored until tag is removed by maintenance personnel.
SERVICE & PARTS INFORMATION
To obtain Service and Parts information concerning this model, contact Vulcan-Hart
Service Department at the address listed on the front cover of this manual or refer to
our website: www.vulcanequipment.com for a complete listing of Authorized Service
and Parts depots.
Customer Service 1-800-814-2028
Technical Service 1-800-814-2028
Service Parts 1-800-814-2028
When calling for service, have the model number and serial number available.
20
Page 22
VCH & VRT SERIES OVENS F-41162 (02-16)
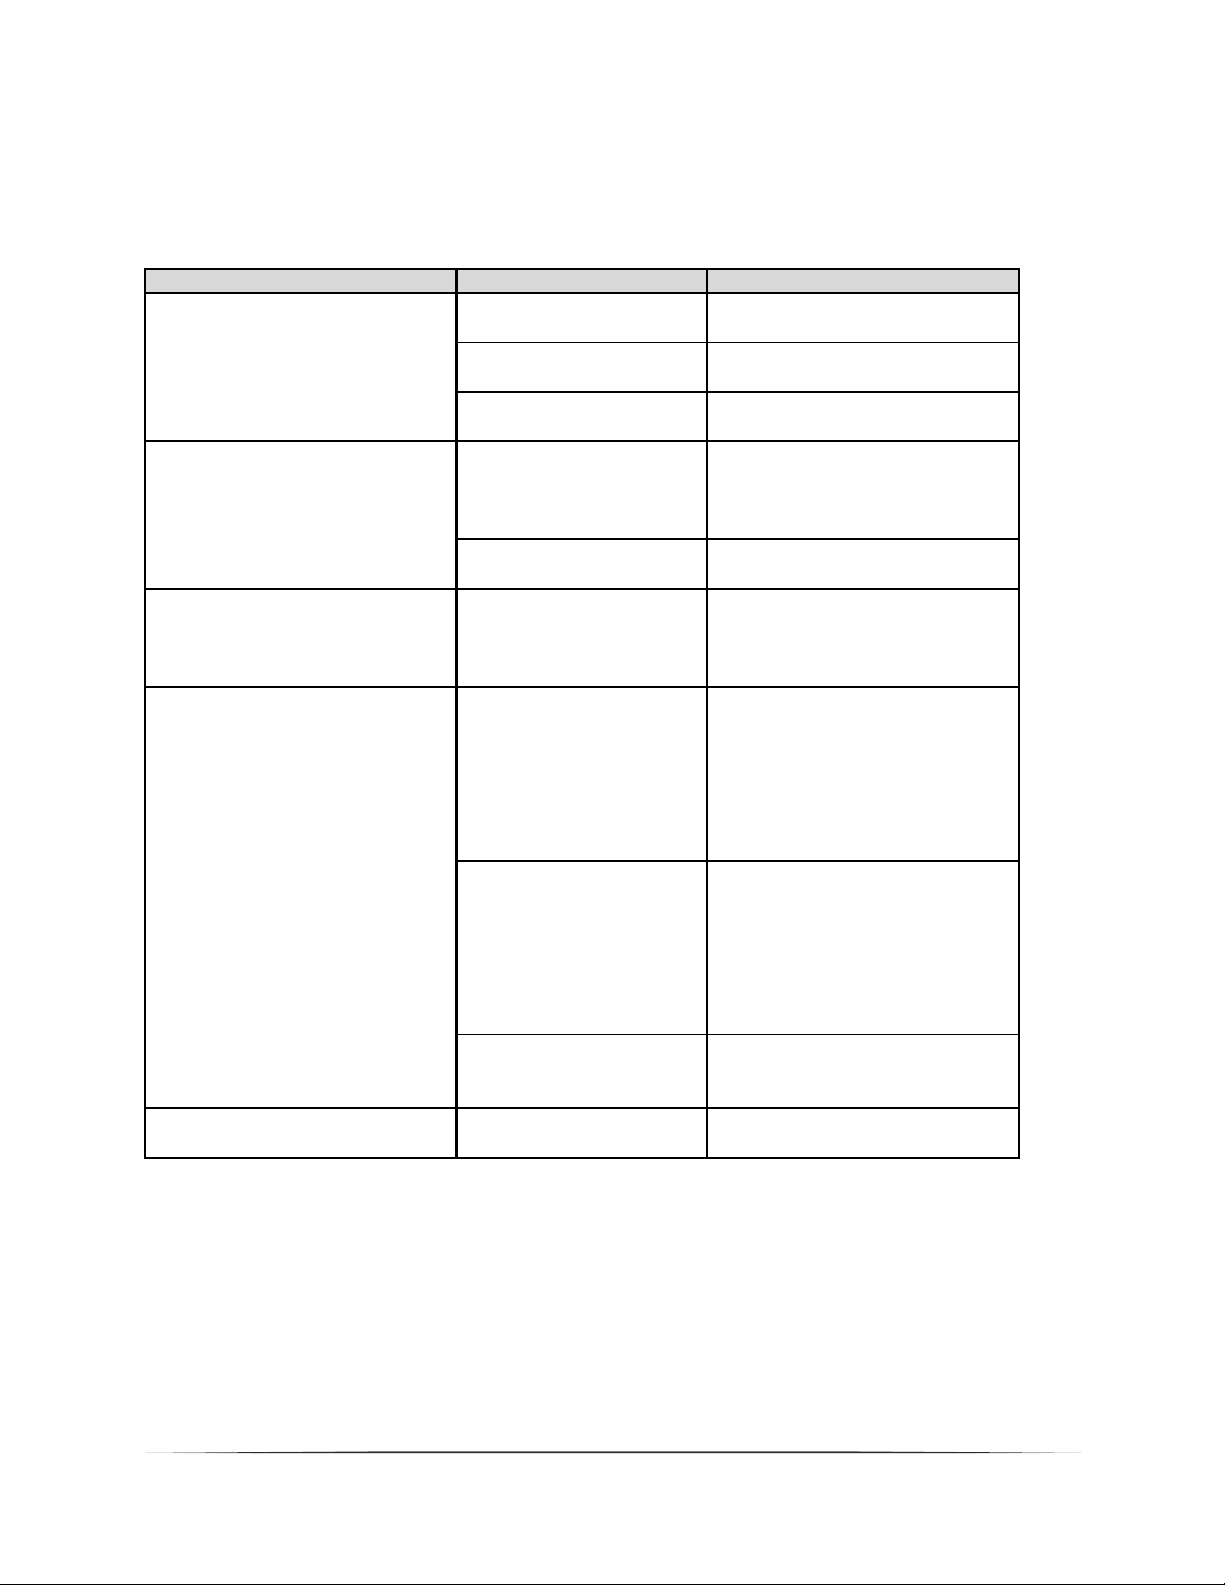
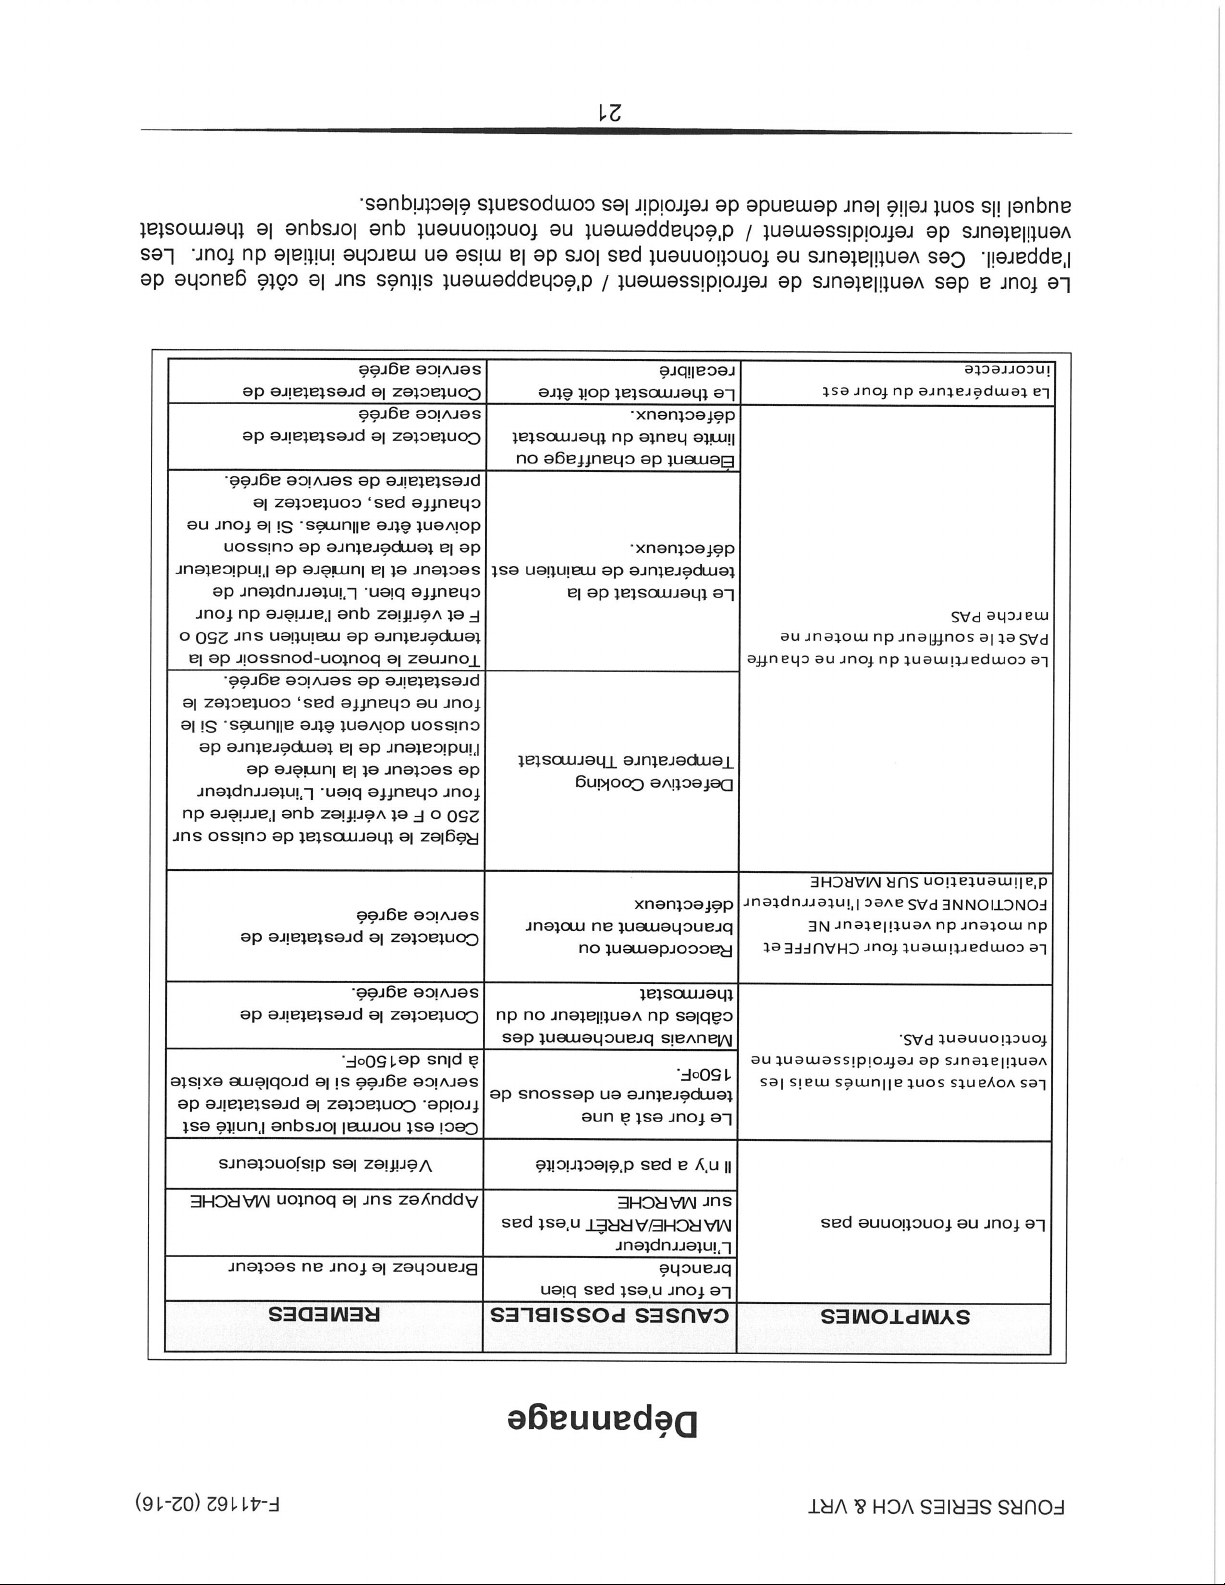
TROUBLESHOOTING
SYM PTO M S POSS IBL E CAUS ES REMEDY
Oven not operating
Oven not connect ed t o
power sourc e
ON/OFF switch not
ON
Connect oven to power
source
Press Power ON/OFF switch
to ON
Indi ca torLi ghts arelitbut
Cooli ngFan(s)areNOT
operating
OvencompartmentISheating
andBlowerMotorISNOT
operatingwi thPowerSwitch
ON
OvencompartmentISNOT
heatingandBl owerMotorIS
operatingwi thPowerSwitch
ON
Incorrectoventempera ture
No power
Oven is below 150⁰F.
Defecti ve: c onnect i on,
wiring, fan, t hermos t at
Defecti ve connec tion or
wiring to motor
Defec t ive Cooking
Temperature
Therm ostat
Defec t ive Holding
Temperature
Therm ostat
Defecti ve High-Limit
Thermost at or Heating
Element.
Thermost at (s) require
calibration
Check ci rcuit break er
This is normal when uni t is
col d. If unit i s above 150⁰F.,
Contac t A uthorized S ervice
Provider.
Contac t A uthorized S ervice
Provider
Contac t A uthorized S ervice
Provider
Set Cooking Thermostat to 250⁰F.,
wait several minutes and check
the rear of the oven for heating.
Both the Pow er Sw itch and
Cooking Temperature Indicator
Lights w ill be lit. If oven cavity
does not heat, Contact Authorized
Service Provider
Turn Holding Temperature knob to
250⁰F. and check for heat at rear
of oven cavity. Both the Power
Switch and Cooking Temperature
Indicator Lights w ill be lit. If the
oven cavity does not heat, Contact
Authorized Service Provider.
Contac t A uthorized S ervice
Provider
Contac t A uthorized S ervice
Provider
The oven has cooling/exhaust fans located at the left side of the unit. These fans may
not operate when the oven is first turned on. The cooling/exhaust fans only operate
when the thermostat to which they are connected requires them to cool the electrical
components.
21
Page 23
Page 24
Page 25
Page 26

Page 27

Page 28
Page 29

Page 30

Page 31

Page 32

Page 33

Page 34
Page 35
Page 36
Page 37
Page 38

Page 39
Page 40

Page 41

Page 42
Page 43

Page 44

 Loading...