

Hobart HFBMW2 Owner’s Manual
FlashBake® Microwave
HFBMW SERIES FLASHBAKE
MICROWAVE OVENS
MODELS
HFBMW2 ML- 126818
HFBMW3
®
701 S. RIDGE AVENUE
TROY, OHIO 45374-0001
937 332-3000
www.hobartcorp.com
FORM 34550 Rev. A (Jan. 2001)
P/N. 3828W5A1817

IMPORTANT SAFETY INSTRUCTIONS
When using electrical appliances, basic safety precautions must be followed, including the following:
WARNING: TO REDUCE THE RISK OF BURNS, ELECTRIC SHOCK, FIRE, INJURY TO PERSONS,
OR EXPOSURE TO EXCESSIVE MICROWAVE ENERGY:
1. Do not use metal utensils in this oven.
2. Read all instructions before using oven.
3. Read and follow the “Precautions to Avoid Possible Exposure to Excessive Microwave Energy”
on the next page.
4. This oven must be grounded. Connect only to a properly grounded outlet. See ELECTRICAL
CONNECTIONS.
5. Locate or install this oven only in accordance with the instructions provided.
6. Some items, such as whole eggs or sealed containers, may explode and should not be heated
in this oven. Example: Closed glass jars.
7. Use this oven only for its intended use as described in this manual. Do not use corrosive
chemicals or vapors in this oven. This type of oven is specifically designed to heat, cook, or dry
food. It is not designed for industrial or lab use.
8. As with any appliance, close supervision is necessary when used by children.
9. Do not operate this oven if it has a damaged cord or plug, if it is not working properly, or if it has
been damaged or dropped.
10. This oven should be serviced only by qualified service personnel. Contact your local Hobart
Service Office for examination, repair or adjustment.
11. Do not cover or block any openings on the oven.
12. Do not use this oven outdoors. Do not use this oven near water.
13. Do not immerse cord or plug in water.
14. Keep cord away from heated surfaces.
15. Do not let cord hang over edge of table or counter.
16. When cleaning, use only mild, nonabrasive soap or detergent applied with a sponge or soft cloth.
Refer to the CLEANING section in this manual.
17. To reduce the risk of fire in the oven cavity:
a. Do not overcook food.
b. If materials inside the oven should ignite, keep oven door closed, turn oven off, and disconnect
the power cord, or shut off power at the fuse or circuit breaker panel.
c. Do not use the cavity for storage purposes. Do not leave paper products, cooking utensils, or
food in the cavity when not in use.
d. Remove wire twist-ties from paper or plastic bags before placing in oven.
PLEASE KEEP THIS MANUAL FOR FUTURE REFERENCE
– 2 –

PRECAUTIONS
TO AVOID POSSIBLE EXPOSURE
TO EXCESSIVE MICROWAVE ENERGY
1. Do not attempt to operate this oven with the door open since open-door operation can result
in harmful exposure to microwave energy. It is important not to defeat or tamper with the safety
interlocks.
2. Do not place any object between the oven front face and the door.
3. Do not operate the oven if it is damaged. It is particularly important that the oven door close
properly and that there is no damage to the:
a. Door (bent).
b. Hinges and latches (broken or loosened).
c. Door seals and sealing surfaces.
4. The oven should not be adjusted or repaired by anyone except properly qualified service
personnel.
CAUTION
1. Do not attempt to tamper with or make any adjustments or repairs to the door, control panel
housing, safety interlock switches or any other part of the oven. Do NOT remove outer panel from
oven. Repairs should only be done by a qualified service person.
2. Do not operate the oven when it is empty. The microwave energy will reflect continuously
throughout the oven if no food or water is present to absorb energy.
3. If a fire occurs in the oven, press the ON/OFF key to shut the oven off. LEAVE THE DOOR
CLOSED. Disconnect the power cord, or shut off power at the fuse or circuit breaker panel.
4. Do not attempt to dry clothes, newspapers or other materials in the oven. They may catch fire.
5. Do not use recycled paper products, as they may contain impurities which may cause sparks
and/or fires.
6. Do not use newspapers or paper bags for cooking.
7. Do not hit or strike control panel. Damage to controls may occur.
8. Cooking trays and containers can become hot, oven mitts or pot holders should be used.
9. Do not store flammable materials next to, on top of, or in the oven. It could be a fire hazard.
10. Do not use the inside surfaces of the oven for direct food contact. Always use approved
utensils and cookware.
11. Before removing a tray or container from the oven, prepare a place to put it. Do not place
the hot tray on wood, plastic, formica, or other burnable surfaces.
– 3 –

TABLE OF CONTENTS
GENERAL. . . . . . . . . . . . . . . . . . . . . . . . . . . . . . . . . . . . . . . . . . . . . . . . . . . . . . . . . . . . . . . . . . . . . . . 5
INSTALLATION . . . . . . . . . . . . . . . . . . . . . . . . . . . . . . . . . . . . . . . . . . . . . . . . . . . . . . . . . . . . . . . . . . 5
Unpacking . . . . . . . . . . . . . . . . . . . . . . . . . . . . . . . . . . . . . . . . . . . . . . . . . . . . . . . . . . . . . . . . . 5
Location . . . . . . . . . . . . . . . . . . . . . . . . . . . . . . . . . . . . . . . . . . . . . . . . . . . . . . . . . . . . . . . . . . 5
Tip Bracket . . . . . . . . . . . . . . . . . . . . . . . . . . . . . . . . . . . . . . . . . . . . . . . . . . . . . . . . . . . . . . . . . 6
Installation Codes and Standards . . . . . . . . . . . . . . . . . . . . . . . . . . . . . . . . . . . . . . . . . . . . . . 6
Electrical Connections . . . . . . . . . . . . . . . . . . . . . . . . . . . . . . . . . . . . . . . . . . . . . . . . . . . . . . . 7
OPERATION . . . . . . . . . . . . . . . . . . . . . . . . . . . . . . . . . . . . . . . . . . . . . . . . . . . . . . . . . . . . . . . . . . . . 8
Controls . . . . . . . . . . . . . . . . . . . . . . . . . . . . . . . . . . . . . . . . . . . . . . . . . . . . . . . . . . . . . . . . . . 8
Setting the Clock . . . . . . . . . . . . . . . . . . . . . . . . . . . . . . . . . . . . . . . . . . . . . . . . . . . . . . . . . . . . 9
Start Cooking . . . . . . . . . . . . . . . . . . . . . . . . . . . . . . . . . . . . . . . . . . . . . . . . . . . . . . . . . . . . . . 9
Cooking Features . . . . . . . . . . . . . . . . . . . . . . . . . . . . . . . . . . . . . . . . . . . . . . . . . . . . . . . . . . 11
Repeat Last . . . . . . . . . . . . . . . . . . . . . . . . . . . . . . . . . . . . . . . . . . . . . . . . . . . . . . . . . 11
Resume . . . . . . . . . . . . . . . . . . . . . . . . . . . . . . . . . . . . . . . . . . . . . . . . . . . . . . . . . . . . . 11
Power Levels . . . . . . . . . . . . . . . . . . . . . . . . . . . . . . . . . . . . . . . . . . . . . . . . . . . . . . . 11
Recipe Options . . . . . . . . . . . . . . . . . . . . . . . . . . . . . . . . . . . . . . . . . . . . . . . . . . . . . . . . . . . . 13
Combi Cook . . . . . . . . . . . . . . . . . . . . . . . . . . . . . . . . . . . . . . . . . . . . . . . . . . . . . . . . . . . . . . 14
Microwave Cooking . . . . . . . . . . . . . . . . . . . . . . . . . . . . . . . . . . . . . . . . . . . . . . . . . . . . . . . . 15
Microwave Cooking Features . . . . . . . . . . . . . . . . . . . . . . . . . . . . . . . . . . . . . . . . . . . . . . . . 15
Timed Cooking . . . . . . . . . . . . . . . . . . . . . . . . . . . . . . . . . . . . . . . . . . . . . . . . . . . . . . . 15
Micro Express . . . . . . . . . . . . . . . . . . . . . . . . . . . . . . . . . . . . . . . . . . . . . . . . . . . . . . . . 15
Power Level . . . . . . . . . . . . . . . . . . . . . . . . . . . . . . . . . . . . . . . . . . . . . . . . . . . . . . . . . 16
Recipe Options . . . . . . . . . . . . . . . . . . . . . . . . . . . . . . . . . . . . . . . . . . . . . . . . . . . . . . . . . . . . . 16
Defrosting . . . . . . . . . . . . . . . . . . . . . . . . . . . . . . . . . . . . . . . . . . . . . . . . . . . . . . . . . . . . . . . . . 18
Cleaning . . . . . . . . . . . . . . . . . . . . . . . . . . . . . . . . . . . . . . . . . . . . . . . . . . . . . . . . . . . . . . . . . . 20
MAINTENANCE . . . . . . . . . . . . . . . . . . . . . . . . . . . . . . . . . . . . . . . . . . . . . . . . . . . . . . . . . . . . . . . . . 22
TROUBLESHOOTING . . . . . . . . . . . . . . . . . . . . . . . . . . . . . . . . . . . . . . . . . . . . . . . . . . . . . . . . . . . . 23
FLASHBAKE OVEN FOOD PRODUCT GUIDELINES . . . . . . . . . . . . . . . . . . . . . . . . . . . . . . . . . . . 24
– 4 –

INSTALLATION, OPERATION AND CARE OF
MODEL HFBMW FLASHBAKE
®
MICROWAVE OVEN
GENERAL
Your Hobart FlashBake® Microwave oven is a versatile oven that employs a revolutionary high quality,
high-speed cooking technology. This new technology cooks the outside of foods, while also penetrating
the surface so the inside cooks simultaneously. Foods cook evenly and fast, retaining their natural
moisture. Bread products brown and become crisp while vegetables retain their color and texture.
While halogen light is the primary source of power, a "microwave boost" is automatically added with
certain foods. The oven can also be used solely as a 950 watt microwave oven.
It is suggested that you thoroughly read this manual and carefully follow all of the instructions provided.
INSTALLATION
UNPACKING
Immediately after unpacking the oven, check for possible shipping damage. If this oven is found to be
damaged, save the packaging material and contact the carrier within 15 days of delivery.
Prior to installation, verify that the electrical supply agrees with the specifications on the data plate
located on the back of the oven. If the supply and specifications do not agree contact your local Hobart
Service Office immediately.
Peel the protective shipping film from the exterior of the oven before installation or use.
LOCATION
Locate the oven on a smooth, flat and stable surface. Do not place the oven in a hot or damp area, i.e.,
near a gas or electric range. The oven must not be located above or next to sources of excessive heat
or greasy air. There must be a 3" (76 mm) clearance on the sides and back of the oven for free air flow.
It is recommended that the oven be located so the housing can be removed for service. The housing
should NOT be removed by anyone except qualified service personnel.
Locate oven on a level counter surface. The counter must be 36
of supporting the 80 lb. (36 kg) ovenload.
Radio Interference
1
/2" (916 mm) or higher and capable
There is possibility of a small amount of interference with weak broadcast signals if the oven is too close
to a radio or TV or similar equipment. If interference is present, it may be reduced by:
1. Cleaning the door and sealing surface of the oven.
2. Increasing the separation of the oven from the receiving device.
3. Using an antenna to obtain stronger signal reception for the receiving device.
– 5 –
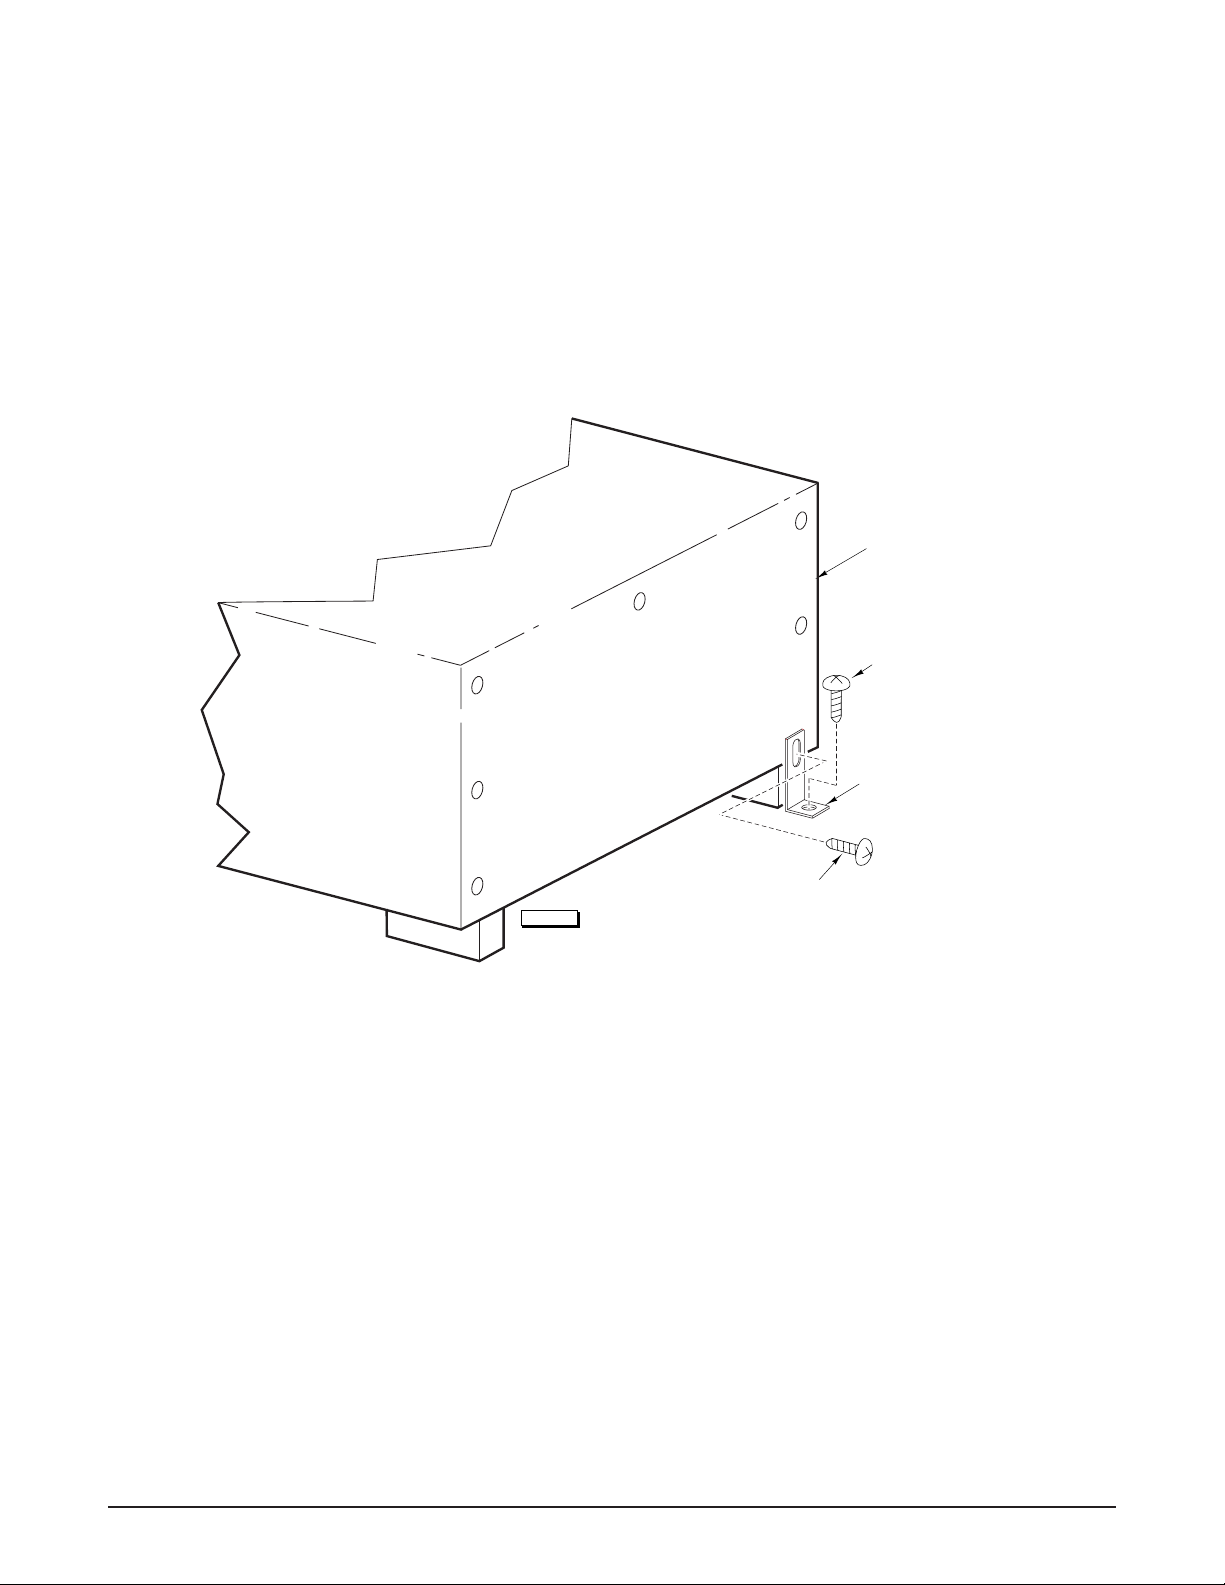
Tip Bracket
The tip bracket is a safety feature designed to help keep the oven stable when the door is open. Proper
installation is important!
• Position the oven in its final location.
• As you are looking at the back of the oven, position the tip bracket on the bottom back right side
of the oven (Fig. 1).
• Use the existing hole on the back of the oven to secure the tip bracket to the oven back.
• Anchor the bracket to the counter surface.
Oven Back
Screw(Tip Bracket to
Counter Surface)
Tip Bracket
Screw(Tip Bracket to oven)
PL-53582
Fig. 1
INSTALLATION CODES AND STANDARDS
The oven must be installed in accordance with:
In the United States of America:
1. State and local codes.
2. National Electrical Code, ANSI/NFPA-70 (latest edition). Copies may be obtained from The
National Fire Protection Association, Batterymarch Park, Quincy, MA 02269.
In Canada:
1. Local codes.
2. Canadian Electric Code, CSA C22.2 (latest edition). Copies may be obtained from The Canadian
Standard Association, 178 Rexdale Blvd., Etobicoke, Ontario, Canada M9W 1R3.
– 6 –
ELECTRICAL CONNECTIONS
WARNING: ELECTRICAL AND GROUNDING CONNECTIONS MUST COMPLY WITH THE
APPLICABLE PORTIONS OF THE NATIONAL ELECTRICAL CODE AND/OR OTHER LOCAL
ELECTRICAL CODES.
WARNING: DISCONNECT ELECTRICAL POWER SUPPLY AND PLACE A TAG AT THE DISCONNECT
SWITCH TO INDICATE YOU ARE WORKING ON THE CIRCUIT.
WARNING: APPLIANCES EQUIPPED WITH A FLEXIBLE ELECTRIC SUPPLY CORD ARE PROVIDED
WITH A FOUR-PRONG GROUNDING PLUG. IT IS IMPERATIVE THAT THIS PLUG BE CONNECTED
INTO A PROPERLY GROUNDED FOUR-PRONG RECEPTACLE. IF THE RECEPTACLE IS NOT
THE PROPER GROUNDING TYPE, CONTACT AN ELECTRICIAN. DO NOT REMOVE THE
GROUNDING PRONG FROM THIS PLUG.
The electrical diagram is located in an envelope behind the control panel.
For Hard-Wired Ovens
Have a qualified electrician wire the oven into a properly rated dedicated circuit, connecting to the wires
and conduit provided. Use appropriate conduit, strain relief, wire and connectors. Care should be
taken not to damage the wire when applying setscrew type connectors. If connecting to aluminum
wiring, properly installed connections listed for use with aluminum and copper wiring must be used.
For Cord-Connected Ovens
A short power supply cord is provided to reduce the risks resulting from becoming entangled in or
tripping over a longer cord. Do not use an extension cord.
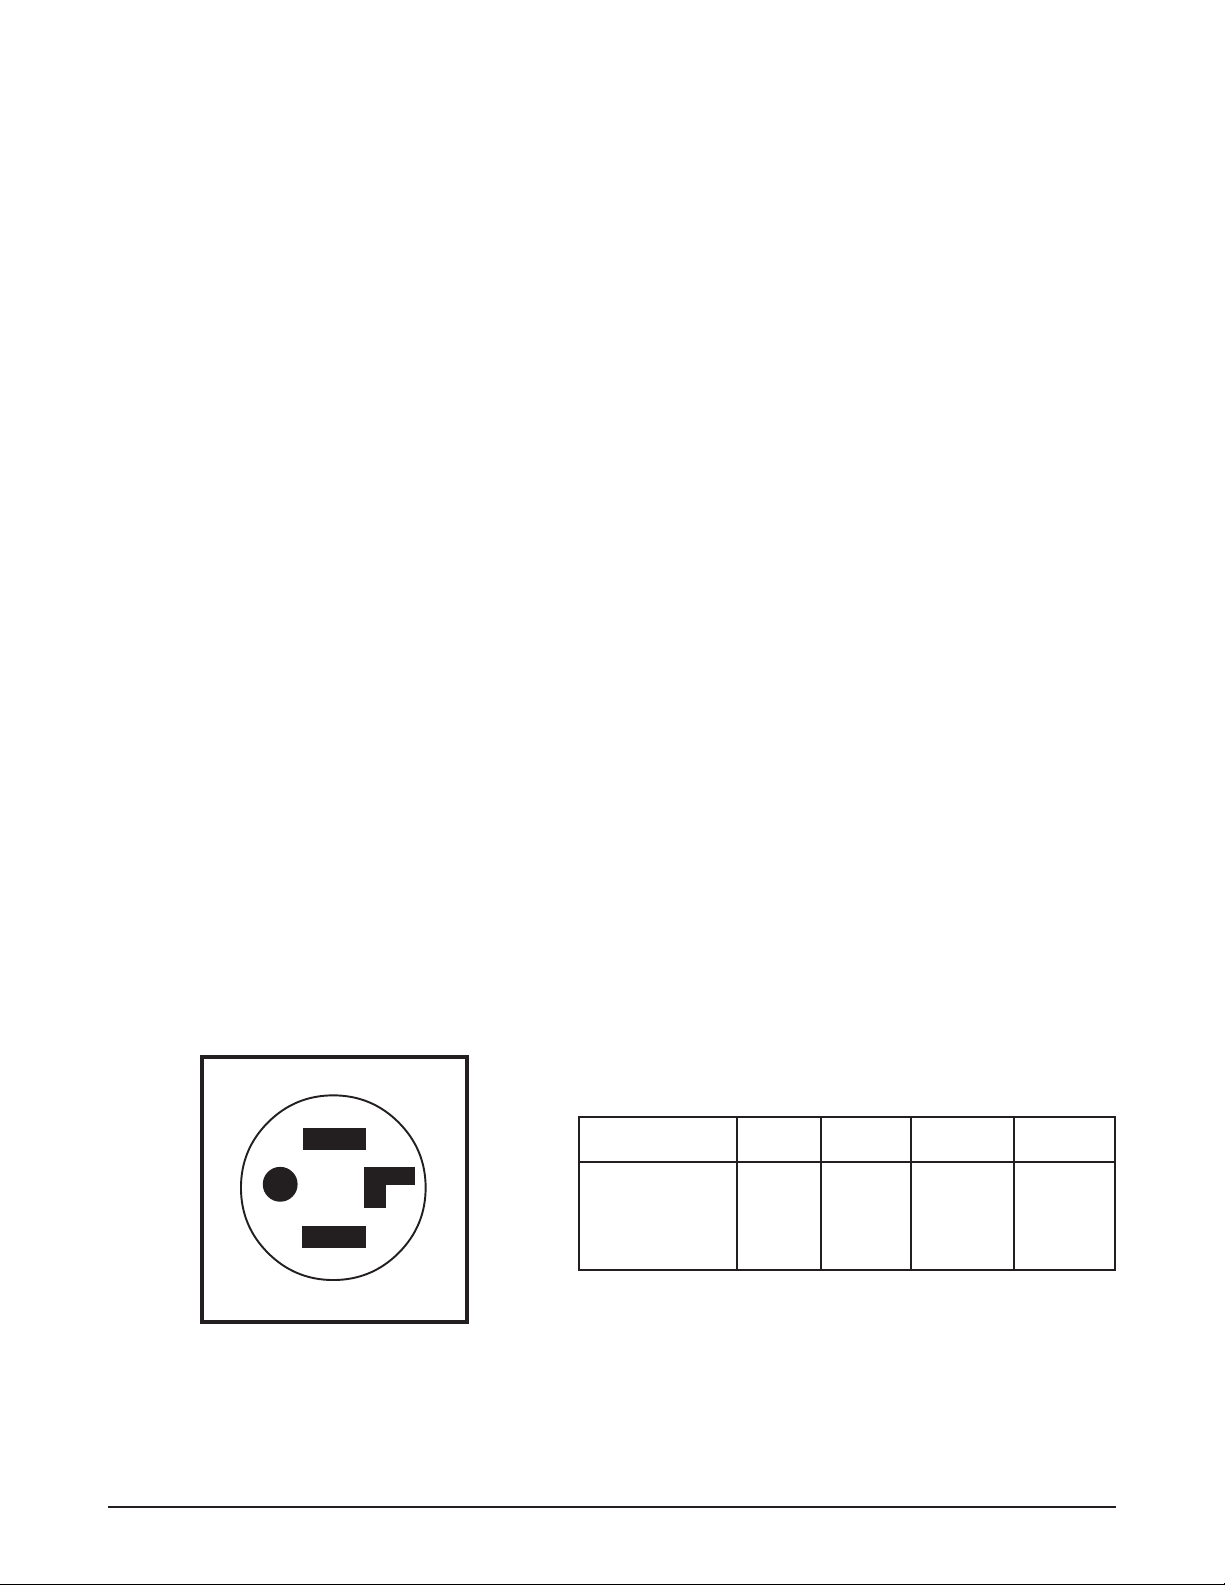
Plug the oven into a dedicated circuit outlet of the appropriate NEMA style and rating. The wall outlet
receptacle recommended for this appliance is NEMA 14 - 30R.
NOTE: Both hot legs must measure 120V to neutral. Do not connect this oven to a source using a
stinger
or
wild leg
.
Single Phase 4 Wire Ground with Neutral
ELECTRICAL DATA
Voltage Amp KW Cycles Phase
120/208-240 30 6.5 60 1
NEMA 14 - 30R Wall receptacle
30 Amp
– 7 –
OPERATION
CLEAR
EXPRESS
MICRO
RECIPE
SAVE
LEVEL
POWER
WARNING: THE OVEN AND ITS PARTS ARE HOT. USE CARE WHEN OPERATING,
CLEANING, OR SERVICING THE OVEN.
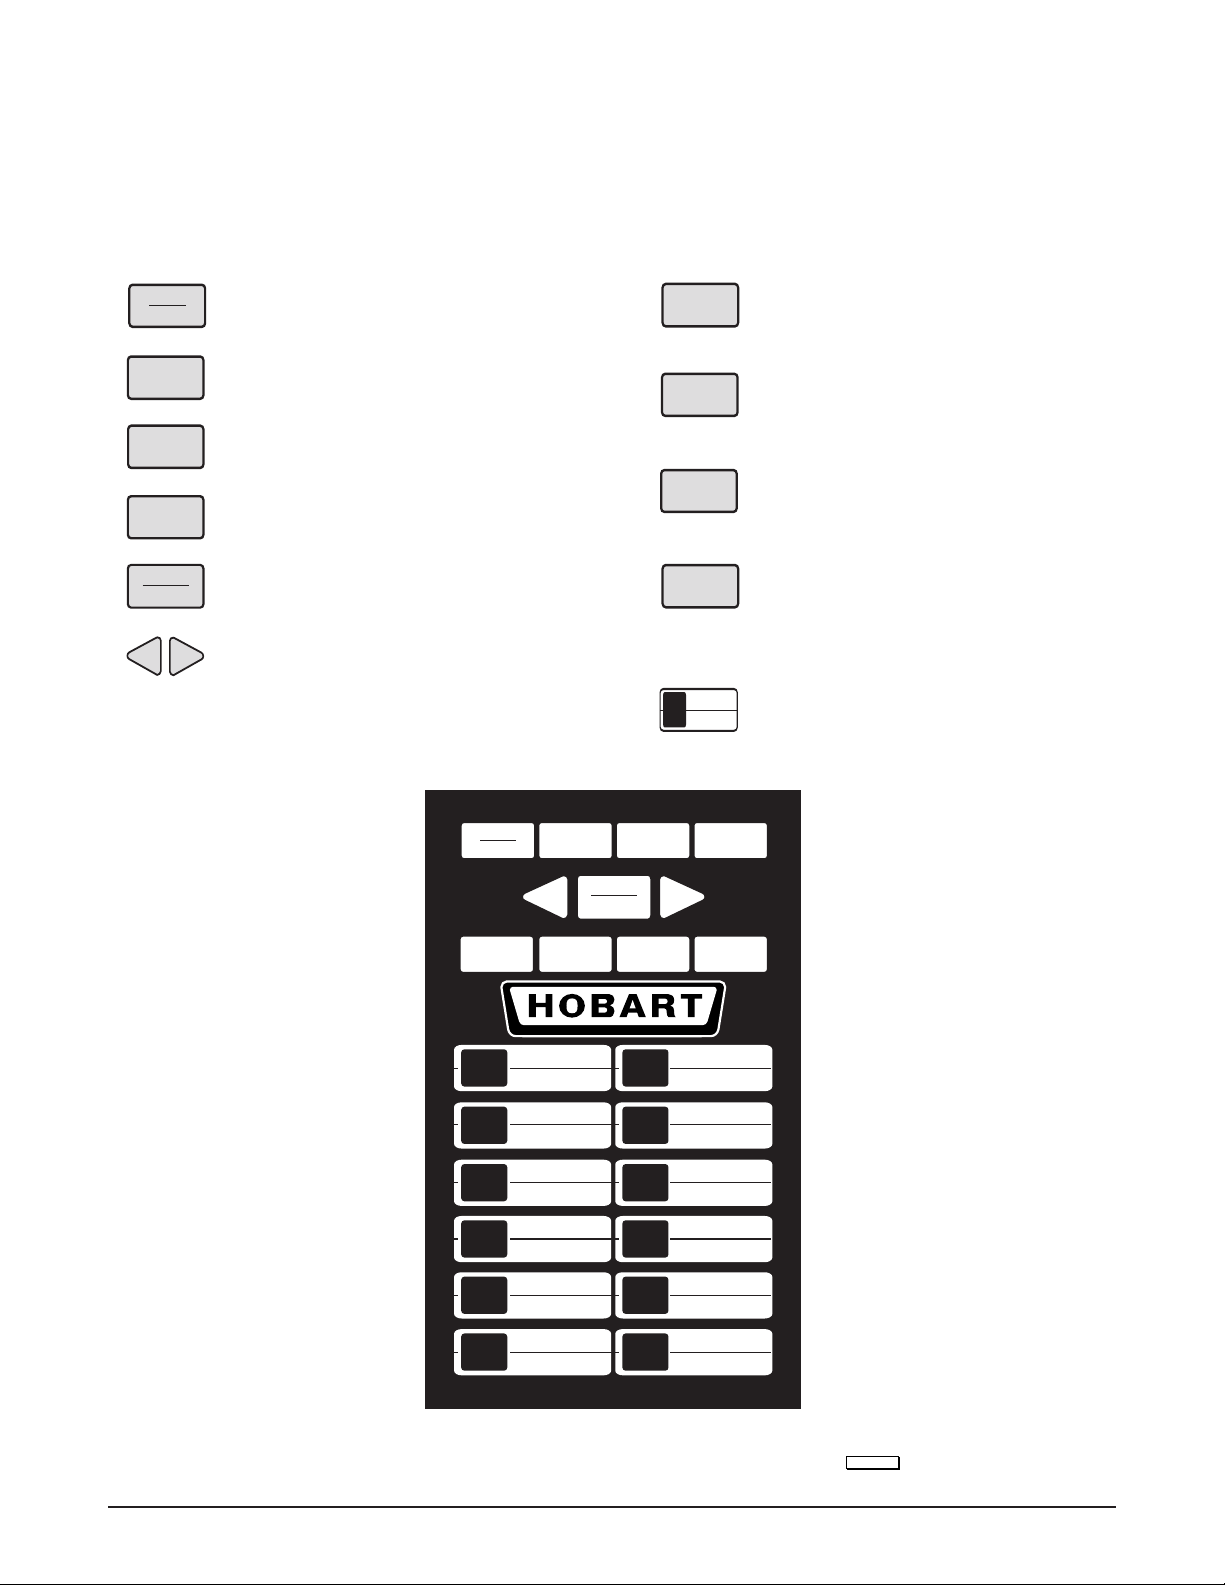
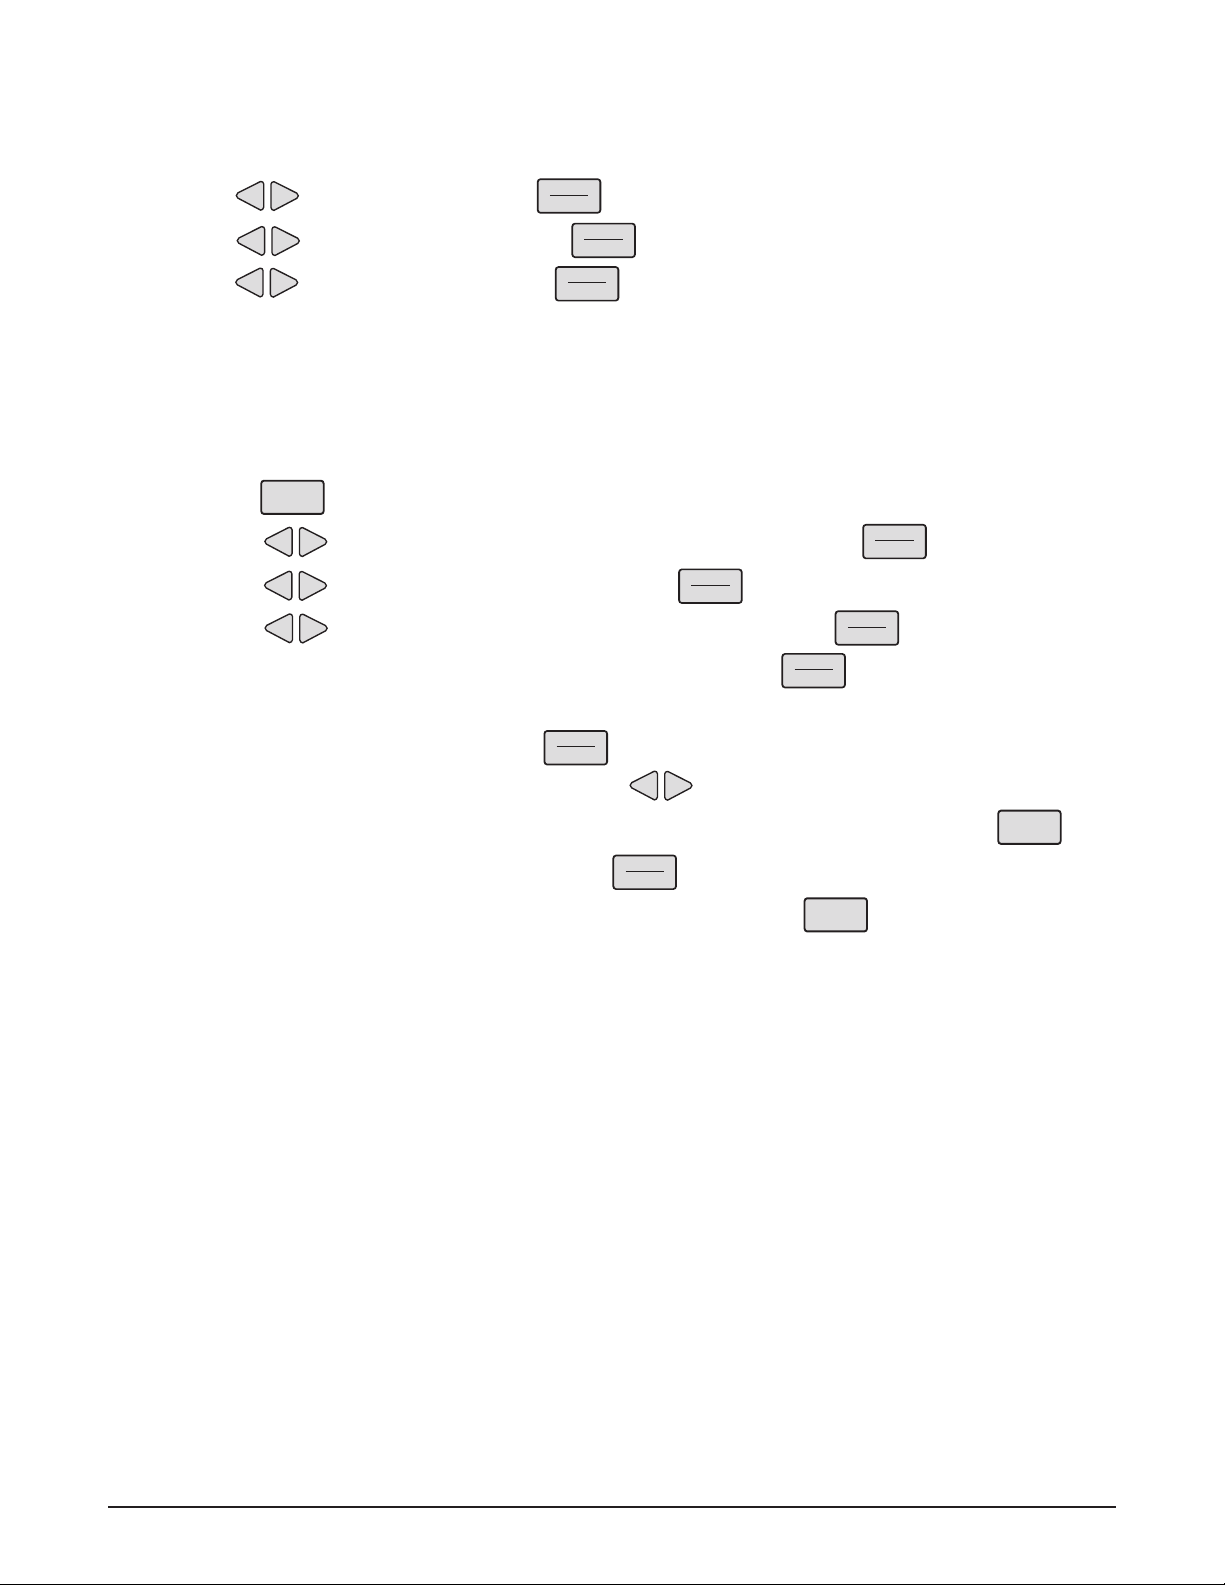
CONTROLS (Fig. 2)
ON
OFF
MICRO
WAVE
COMBI
COOK
MENU
COOK
ENTER
START
-- +
Press to turn the oven control pad on
and off.
Press to operate the microwave
cooking mode.
Press to set your own cooking
program.
Press to access the preset cooking
menu.
Press to enter food selections and
start cooking.
Press to scroll through menu
categories. Press to increase or
decrease cooking times and power
levels.
ON
OFF
MICRO
WAVE
COMBI
COOK
Press to change cooking power levels.
Press repeatedly for 30 second
increments of microwave cooking
time. The oven starts immediately.
Press to store custom recipes from
the COMBI COOK feature to the key
pad for one touch cooking.
Press during cooking to immediately
shut off all cooking power. Press to
clear out of cooking programs and go
back to the clock screen.
1
Press to quickly access custom
recipes for one touch cooking. Keys
1 through 12.
MENU
COOK
POWER
LEVEL
1
2
3
4
5
6
--
MICRO
EXPRESS
ENTER
START
Fig. 2
SAVE
RECIPE
7
8
9
10
11
12
+
CLEAR
PL-53574
– 8 –
SETTING THE CLOCK
When the oven is plugged in, the display will prompt you to set the clock. The clock must be set before
using the oven for the first time.
1. Press to set the hour. Press to enter selection.
2. Press to set the minutes. Press to enter selection.
3. Press to set AM or PM. Press to enter selection.
-- +
-- +
-- +
ENTER
START
ENTER
ENTER
START
START
4. The clock is set.
5. To change to clock setting, the oven must be unplugged then plugged back in.
START COOKING
Step 1: Press on the control pad.
Step 2: Press to select the type of food category you want. Press to enter selection.
Step 3: Press to select the specific food. Press to enter selection.
Step 4: Press to select amount, size, and/or doneness. Press after each selection.
Step 5: When the display reads ADJUST TIME or START, press to start cooking.
MENU
COOK
-- +
-- +
-- +
ENTER
START
ENTER
START
ENTER
START
ENTER
START
• If the door is opened during cooking, the oven will stop and PAUSE will appear in the
display. Close the door and press to resume cooking.
ENTER
START
• To adjust cook time during cooking, press to increase or decrease the time.
• To clear out of any function or program and go back to the clock screen, press .
• To review settings during cooking, press during cooking process.
• To stop the oven anytime during the cooking process press .
-- +
ENTER
START
CLEAR
CLEAR
• At the end of the cooking cycle, YOUR FOOD IS READY appears on the display.
• At the end of the cooking cycle, the automatic fan will continue to run for a short time to cool
internal components.
Preset Food Selections
For a detailed review of food selections and recipes, see the HFBMW FLASHBAKE
®
OVEN FOOD
PRODUCT GUIDLINES section starting on page 24.
• Appetizers and Snacks • Chicken • Pasta • Sandwiches
• Baked Goods • Fish & Seafood • Pizza • Side Dishes
• Breakfast • Meats • Recipe
– 9 –
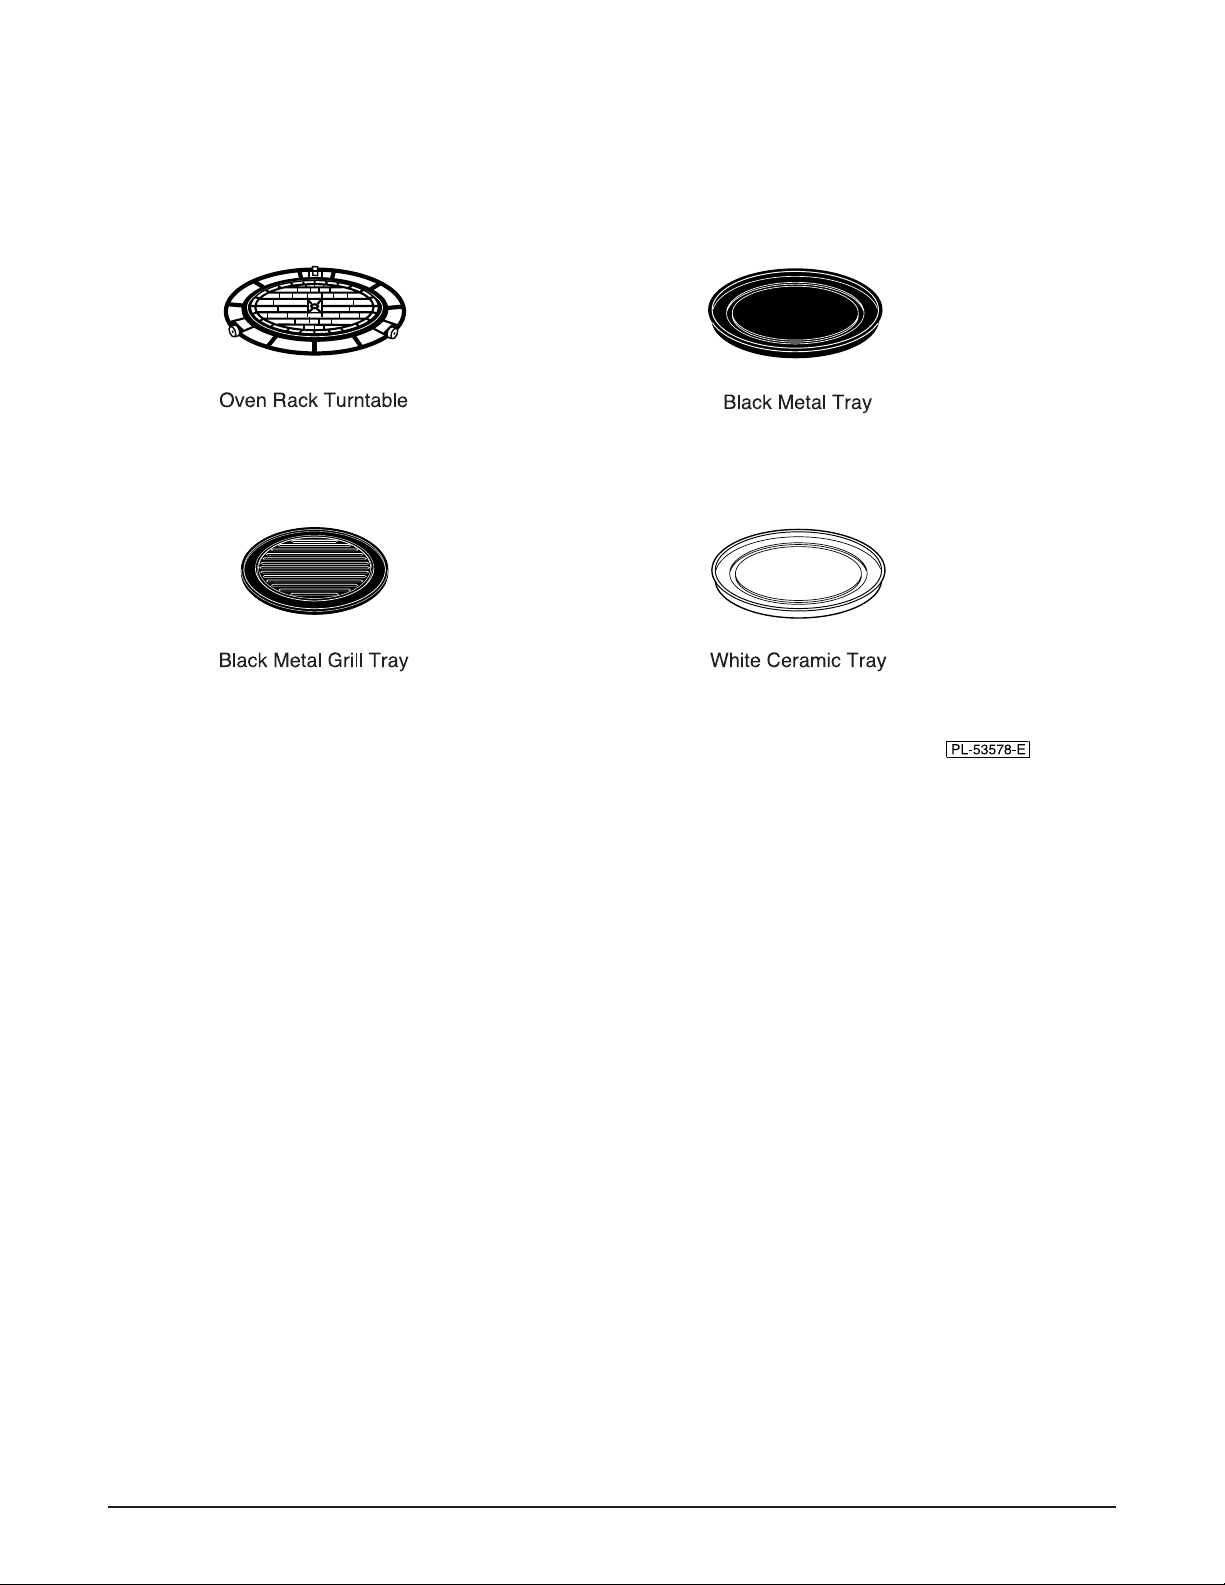
Cooking Trays (Fig. 3)
®
The HFBMW FlashBake
Microwave Oven is supplied with three cooking trays which are specifically
designed for use in this oven.
Fig. 3
• The oven rack turntable must be in place for all cooking. Be sure it seats securely over the square
spindle in the center of the oven.
• Place the selected tray or cookware directly on the oven rack turntable.
• Cooking trays and containers can become hot. Oven mitts or pot holders should be used.
• Food should be placed directly on the trays when cooking.
• Use the black metal flat tray in the same way you would use a shallow baking pan or baking tray.
• Use the black grill tray for foods that you would normally cook on the grill, such as steaks, fish
and poultry.
• Place the white ceramic tray on the oven rack turntable when using the microwave features.
Place food or microwave safe cookware directly on the tray.
• In addition to the cooking trays provided, you can use non-metal casserole dishes, pie plates and
other heat safe cookware. Make sure to select a size that will rotate easily.
• Do not use cookware or coverings made of paper, plastic, or foil.
– 10 –
 Loading...