


LCD COLOR TELEVISION
USER MANUAL
Thank you for purchasing this Hitachi product.
To obtain the best performance and safety, please read this user manual carefully.
Please keep this manual for future reference.
SERIES
LE32A04A
LE42X04A LE42X04AM
LE47X04A LE47X04AM
LE55X04A LE55X04AM
Pictures for illustration purposes only. Actual product may vary.

License
is a trademark of SRS Labs, Inc. TruSurround XT technology is incorporated
under license from SRS Labs, Inc.
HDMI, the HDMI logo and High-Denition Multimedia Interface are
trademarks or registrated trademarks of HDMI Licensing LLC.
DivX® certied to play DivX® video.
TruSurround XT® creates a truly immersive surround sound experience with rich bass and clear
dialog from only two speakers.

2
Important Safety Instructions 3-4
Common Phenomena of LCD Panel 5
Supplied Accessories 5
Anti-Tumble Measures
Positioning The TV Set 6
Securing To A Wall Or Pillar 6
Installation
Detaching the TV Stand for Wall Mount 7
Getting Started 7
Overview Of Controls
TV Front Panel 8
Rear Panel : AV Inputs (For 32” model only) 9
Rear Panel : AV Inputs (For 42”, 47” and 55” models only) 10
Basic Operations
Remote Control Keys For The TV Menu 11
Picture Size 12
Stereo/Bilingual Sound Selection 13
Input Source Selection 13
Teletext Operations 14
Menu Operations
Picture 15
Audio 16
Setup 17
Function 18
Advanced Setup 19
RGB Mode Setup 20
Media
Gentle Reminder When Using The Media Player 21
Media Playback Controls 22
Media File Playback Support 22
Video Menu 23
- Video Control Bar
Music Menu 24
- Music Player : Music Repeat Mode
- How To View Photos Or Reading Text File While Listening To Music
Photo Menu 25
- Photo Control Bar
Text Menu 26
- Text Reading View
Recommended Signal List
RGB Input Signal List 27
HDMI Input Signal List 27
Specications
Product Specication 28
Troubleshooting 29
CONTENTS

3
IMPORTANT SAFETY INSTRUCTIONS
1. Retain Instructions - The safety and
operating instructions should be retained
for future reference.
2. Heed Warnings - All warnings on the
product and in the operating instructions
should be adhered to.
3. Follow Instructions - All operating and use
instructions should be followed.
4. Cleaning - Unplug the product from the wall
outlet before cleaning. Do not use liquid
cleaners or aerosol cleaners. Use a dry
cloth for cleaning.
5. Attachments - Only use attachments/
accessories specied by the manufacturer.
6. Water and Moisture - Do not use the product
near water, for example, near a bath tub,
wash bowl, kitchen sink, or laundry tub, in
a wet basement, or near a swimming pool,
etc.
7. Accessories - Do not place the product on
an unstable cart, stand, tripod, bracket, or
table. The product may fall, causing serious
injury to a child or adult, and serious damage
to the product. Use only with a cart, stand,
tripod, bracket, or table recommended by
the manufacturer, or sold with the product.
Any mounting of the product should follow
the manufacturer’s instructions and should
use a mounting accessory recommended
by the manufacturer. The product and cart
combination should be moved with care.
Quick stops, excessive force, and uneven
surfaces may cause the product and cart
combination to overturn.
8. Ventilation - Slots and openings in the
cabinet are provided for ventilation and to
ensure reliable operation of the product and
to protect it from overheating, and these
openings must not be blocked or covered.
The openings should never be blocked by
placing the product on a bed, sofa, rug, or
other similar surface. The product should
not be placed in a built-in installation such
as a bookcase or rack unless proper
ventilation is provided or the manufacturer’s
instructions have been adhered to.
9. Power Sources - The product should be
operated only from the type of power source
indicated on the marking label. If you are
not sure of the type of power supply to your
home, consult your appliance dealer or
local power company.
10. Power Cord Protection - Power cords
should be routed so that they are not likely
to be walked on or pinched by items placed
upon or against them, paying particular
attention to cords at plugs, convenience
receptacles, and the point where they exit
from the appliance.
12. Lightning - For added protection for the
product during a lightning storm, or when it is
left unattended and unused for long periods
of time, unplug it from the wall outlet and
disconnect the antenna or cable system.
This will prevent damage to the product due
to lightning and power-line surges.
13. Power Lines - An outside antenna system
should not be located in the vicinity of
overhead power lines or other electric light
or power circuits, or where it can fall into
such power lines or circuits. When installing
an outside antenna system, extreme care
should be taken to keep from touching such
power lines or circuits as contact with them
might be fatal.
14. Overloading - Do not overload wall outlets
and extension cords as this can result in a
risk of re or electric shock.
15. Object and Liquid Entry - Never push
objects of any kind into the product through
any openings as they may touch dangerous
voltage points or short-out parts that can
result in a re or electric shock. Never spill
liquid of any kind on the product.
16. Servicing - Do not attempt to service the
product yourself as opening or removing
covers may expose you to dangerous
voltage or other hazards. Refer all servicing
to qualied service personnel.

4
IMPORTANT SAFETY INSTRUCTIONS
17. Repairing - Unplug the product from the wall
outlet and refer servicing to qualied service
personnel under the following conditions:
a. When the power cord or plug is
damaged.
b. If liquid has been spilled, or objects have
fallen into the product.
c. If the product has been exposed to rain
or water.
d. If the product does not operate normally
by following the operating instructions.
Adjust only those controls that are
covered by the operating instructions as
an improper adjustment of other controls
may result in damage and will often
require extensive work by a service
technician to restore the product to its
normal operation.
e. If the product has been dropped or
damaged in any way.
f. When the product exhibits a distinct
change in performance this indicates a
need for service.
18. Replacement Parts - When replacement
parts are required, be sure the service
technician has used replacement parts
specied by the manufacturer or have the
same characteristics as the original part.
Unauthorized substitutions may result in
re, electric shock or other hazards.
19. Safety Check - Upon completion of any
service or repairs to the product, ask the
service technician to perform safety checks
to determine that the product is in proper
operating condition.
20. Heat - Do not install the product near
any heat sources such as radiators,
heat registers, stoves, or other products
(including ampliers) that produce heat.
21. Installation Location - Place the product
on a rm and at surface. Avoid placing
the product in areas of direct sunlight,
heating radiators, closed automobiles, high
temperature, high humidity, excessive dust,
strong vibration, impact or strong magnetic
elds, as the internal parts may be seriously
damaged.
22. Hazards of Electrical Shock and Fire - Do
not touch the power cord with wet hands.
Hold the plug when disconnecting the power
cord. Do not pull the power cord. Unplug
the power cord from the wall outlet when the
product is not used for long periods of time.
23. Hearing Safety - Listen at a moderate
volume. Using headphones at high volume
can impair your hearing.
24. Be careful when handling the TV. Do not
drop, hit any objects or scratch the TV
acrylic frame or glass stand. These actions
may damage the TV frame and stand.

5
Check the supplied accessories before installation.
In case of missing or damaged item, please contact the dealer immediately.
Supplied Accessories
Defective Spots on Panel
The LCD panel is manufactured with highprecision technology. It consists of large
number of pixels. However, some of them may
appear constantly on the screen as black spots,
brilliant spots of light (red, green or blue) and/or
illuminated spots (pixel of white color).
Surface on Panel
The LCD panel displays images by blinking the
uorescent lamps internally. This could raise
the temperature of the display surface. The
LCD panel is made with ne processing glass.
Therefore do not impact strongly on the panel
surface as this may cause damage to the panel.
Residual Image
When a still image or On Screen Display menu
is displayed on the screen for a short time
(about a minute) and then switches to another
image, it may leave an “after-image” on the
screen. The residual image will disappear on
its own.
The Usage under Low Temperature
Environment
Due to the structural characteristics of the LCD
panel, the response speed of the the LCD panel
becomes slower when the ambient temperature
around the panel becomes too low. In some
cases, it may cause the residual image. The
residual image will disappear on its own as the
temperature goes up and back to normal.
The following are the common phenomena when operating LCD panel. This is a structural property
of the LCD that is adapted to the industry standards and will have no impact on the performance of
the product.
IMPORTANT SAFETY INSTRUCTIONS
Common Phenomena of LCD Panel
AV Cable x2
(For 32” only)
AV Cable x1
(For 42”, 47”, 55” only)
Audio Cable x1
(For 42”, 47”, 55” only)
USB Extension Cable x1
AAA Battery x2
Cap x1
Remote Control x1
User Manual x1
Screws x4
[For wall mount bracket installation]
Note:
- Please store the screws that are not used.
6
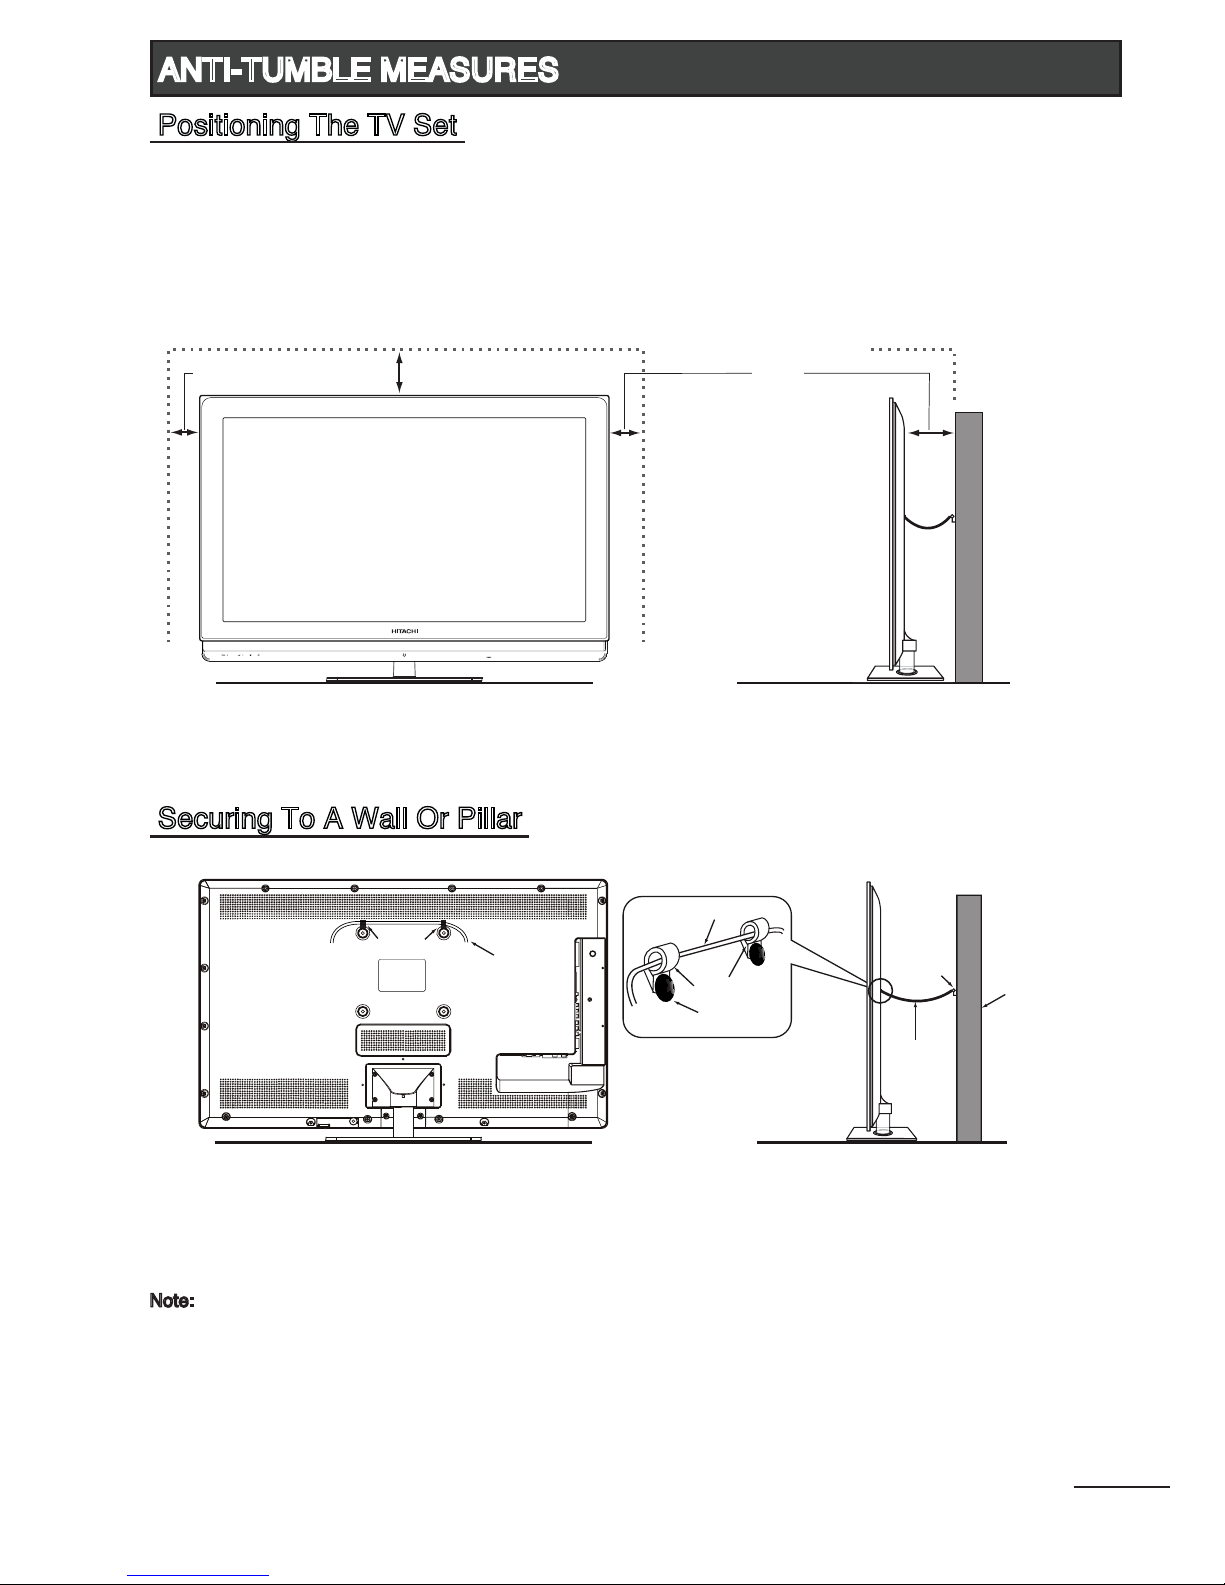
Install the TV in a stable place and implement safety measure against overturning. Using a
commercially available cord or chain, connect through the two hooks and secure the TV to a wall
or pillar.
Place the TV on a rm and at surface, leaving a space of at least 10cm around the set and 30cm
from the top of the set to the wall or cabinet. Ensure the TV is positioned close to the wall to avoid
it from falling when pushed.
ANTI-TUMBLE MEASURES
30cm
10cm
10cm
Securing To A Wall Or Pillar
Wall
or
Pillar
Clamp
Cord
or
Chain
Cord or Chain
Hook
Screw
Cord
or
Chain
Hook
Note:
- If you do not take the above safety measures, the TV could fall and result in personal injury or physical
damage.
- Remove the cord or chain from the TV before moving it. Moving the TV with the cord or chain still
attached might damage the area around the hooks.
Positioning The TV Set

7
INSTALLATION
Step 4
Set up the TV by following the instructions.
- Press [ ] to display the TV menu.
- Press [ ] / [ ] to select “Setup”.
- Press [ ] to select “Color System”
- Press [ ] / [ ] to select “Auto”.
- Press [ ] to select “Sound System”.
- Press [ ] / [ ] to select the correct sound
system according to local TV station.
- Press [ ] to select “Auto Tuning”.
- Press [ ] to start searching for all the available channels.
21
3
Main Power Switch
Select Adjust
Channel No.
Skip
Color System
Sound System
Manual Tuning
Fine Tuning
Auto Tuning
Channel Sorting
Volume Leveller
SETUP
1
Off
PAL
BG
175.25MHz
0
Detaching the TV Stand for Wall Mount
Step 1
Insert the batteries (supplied) into
the remote control unit.
Step 2
Connect the antenna cable to the
antenna input terminal at the rear
of TV.
Step 3
Plug in the power cord, then switch
on the main power switch.
Press [ ] on the remote control unit.
Getting Started
Before mounting the TV on the wall, the TV stand must be removed.
1
Carefully place the TV with its front side
facing down on a cushioned flat surface.
3
Remove the TV stand with two hands.
2
Unscrew and remove the 4 screws as shown.
4
Attach the cap as shown.

OVERVIEW OF CONTROLS
8
Ambient Sensor /
Remote Control Sensor
Power / Standby Indicator
• Lights up in Red at standby mode.
• Lights up in Blue when TV is switched on.
Touch Sensors
Main Power Switch
OFF
ON
The front panel buttons can be activated by touching them with your nger.
When lightly touched, blue LED will light up.
: Touch to select previous or next channel channels.
: Touch on the lighted area to adjust the volume.
: Touch on the lighted area to display an on-screen menu of your
TV’s features.
: Touch on the lighted area repeatedly to select the available input
sources.
Ambient Sensor : Detects the ambient lighting condition and adjusts the backlight
accordingly. Refer to “
Advanced Setup” on page 19.
Remote Control Sensor : Aim the remote control towards this area to operate the TV.
: Main power switch to switch the TV On and Off.
POWER
TV Front Panel
Note :
Main Power Switch > Depress to the left side to switch On the TV. (For 32”, 42” and 47” models only)
> Depress to the right side to switch On the TV. (For 55” model only)

9
OVERVIEW OF CONTROLS
Rear Panel : AV Inputs (For 32” model only)
1. HDMI1/HDMI2 Input terminal
Connect to equipment with HDMI output.
2. RGB Input terminal
Connect to PC.
3. AV2 Input terminals
Connect to equipment with component video output.
4. Antenna Input terminal
Connect to equipment with antenna output or wall antenna socket.
5. AV1 Input terminal
Connect to equipment with composite video output.
6. AV Output terminal
Connect to equipment with composite video input.
7. Media1/Media2 Input terminal
Connect USB storage devices to playback video, music, photo and text les.
8. Head Phone Jack
Connect to head phone.
Note :
- Please use the HDMI cable that support at least HDMI version 1.3. If your HDMI cable does
not support HDMI version 1.3, ickering or no screen display may result.
- To prevent any damage, do not connect to the mains outlet until all connections are completed.
- HDMI Input : Should not exceed 10(H) x 20(W)mm.
* Dimension of (H) should not exceed 10mm.
- AV Input : Should not exceed by 13(D)mm.
1
2 3 4
5
6
7
8
H
W
D

1. HDMI1/HDMI2 Input terminal
Connect to equipment with HDMI output.
2. RGB Input terminal
Connect to PC.
3. AV Output terminal
Connect to equipment with composite video input.
4.
Antenna Input terminal
Connect to equipment with antenna output or wall antenna socket.
5. AV2 Input terminals
Connect to equipment with component video output.
6. AV1 Input terminals
Connect to equipment with composite video output.
7. S/PDIF Output terminal
Connect to equipment with digital audio input.
8. Head Phone Jack
Connect to head phone
9. Media1/Media2 Input terminal
Connect USB storage devices to playback video, music, photo and text les.
10. HDMI3/HDMI4 Input terminal
Connect to equipment with HDMI output.
Note :
- Please use the HDMI cable that support at least HDMI version 1.3. If your HDMI cable does
not support HDMI version 1.3, ickering or no screen display may result.
- To prevent any damage, do not connect to the mains outlet until all connections are completed.
- HDMI Input : Should not exceed 10(H) x 20(W)mm. (Refer to illustration on page 9.)
* Dimension of (H) should not exceed 10mm.
- AV Input : Should not exceed by 13(D)mm. (Refer to illustration on page 9.)
10
OVERVIEW OF CONTROLS
Rear Panel : AV Inputs (For
42”, 47” and 55” models only)
1
2 3 4
7
8
9
10
5
6

11
11
12
13
14
16
15
17
18
19
20
21
3
4
5
7
6
9
1
2
8
10
Note :
Some buttons are only use in
Teletext mode, and other buttons
have different functions in Teletext
mode from that of TV mode. Those
buttons are indicated by [ ]. Refer to
“Teletext Operation” on page 14.
1.
Power On/Off ( )
Press to turn the TV from
Standby mode to On mode or
vice versa.
2.
Picture Size ( )
Press to select the desired
picture size.
3.
Auto ( )
Press to adjust the picture
automatically in RGB mode.
4.
Program Select [Page Select]
Press to select the TV
channel directly.
5.
Freeze [Hold] ( )
Press to freeze or unfreeze
the picture.
6.
Ch I/II ( )
Press to change audio
language or mono/stereo
mode.
7. Volume Up/Down ( )
Press to adjust the volume.
8.
Menu ( )
Press to enter or exit from the
TV menu.
9.
Up/Down/Left/Right Cursor
(
/ / / )
Press to select or adjust the
desired item on the menu.
10.
TV/VIDEO ( )
Press to select the desired
input source.
11.
Picture Mode ( )
Press to select the desired
picture mode.
12.
Sound Mode ( )
Press to select the desired
sound mode.
13.
Last Channel ( )
Press to return to previously
viewed channel.
14.
Program Select [Page Select]
(P+/P-)
Press to select the TV
channel directly.
15.
Mute ( )
Press to mute or restore the
volume.
16.
Sleep Timer ( )
Press to set the time to switch
the TV to standby mode.
17.
OK ( )
Press to conrm/execute the
selection.
18.
Recall ( )
Press to show input signal
status.
Digit (-/--)
Press to select one, two or
three digit channel number
input options.
19.
Media ( )
Press to access media les
from USB storage device.
20.
Media Control
Playback controls in media
mode.
21.
Teletext Control
Refer to “Teletext Operation”
on page 14.
BASIC OPERATIONS
Remote Control Keys For The TV Menu
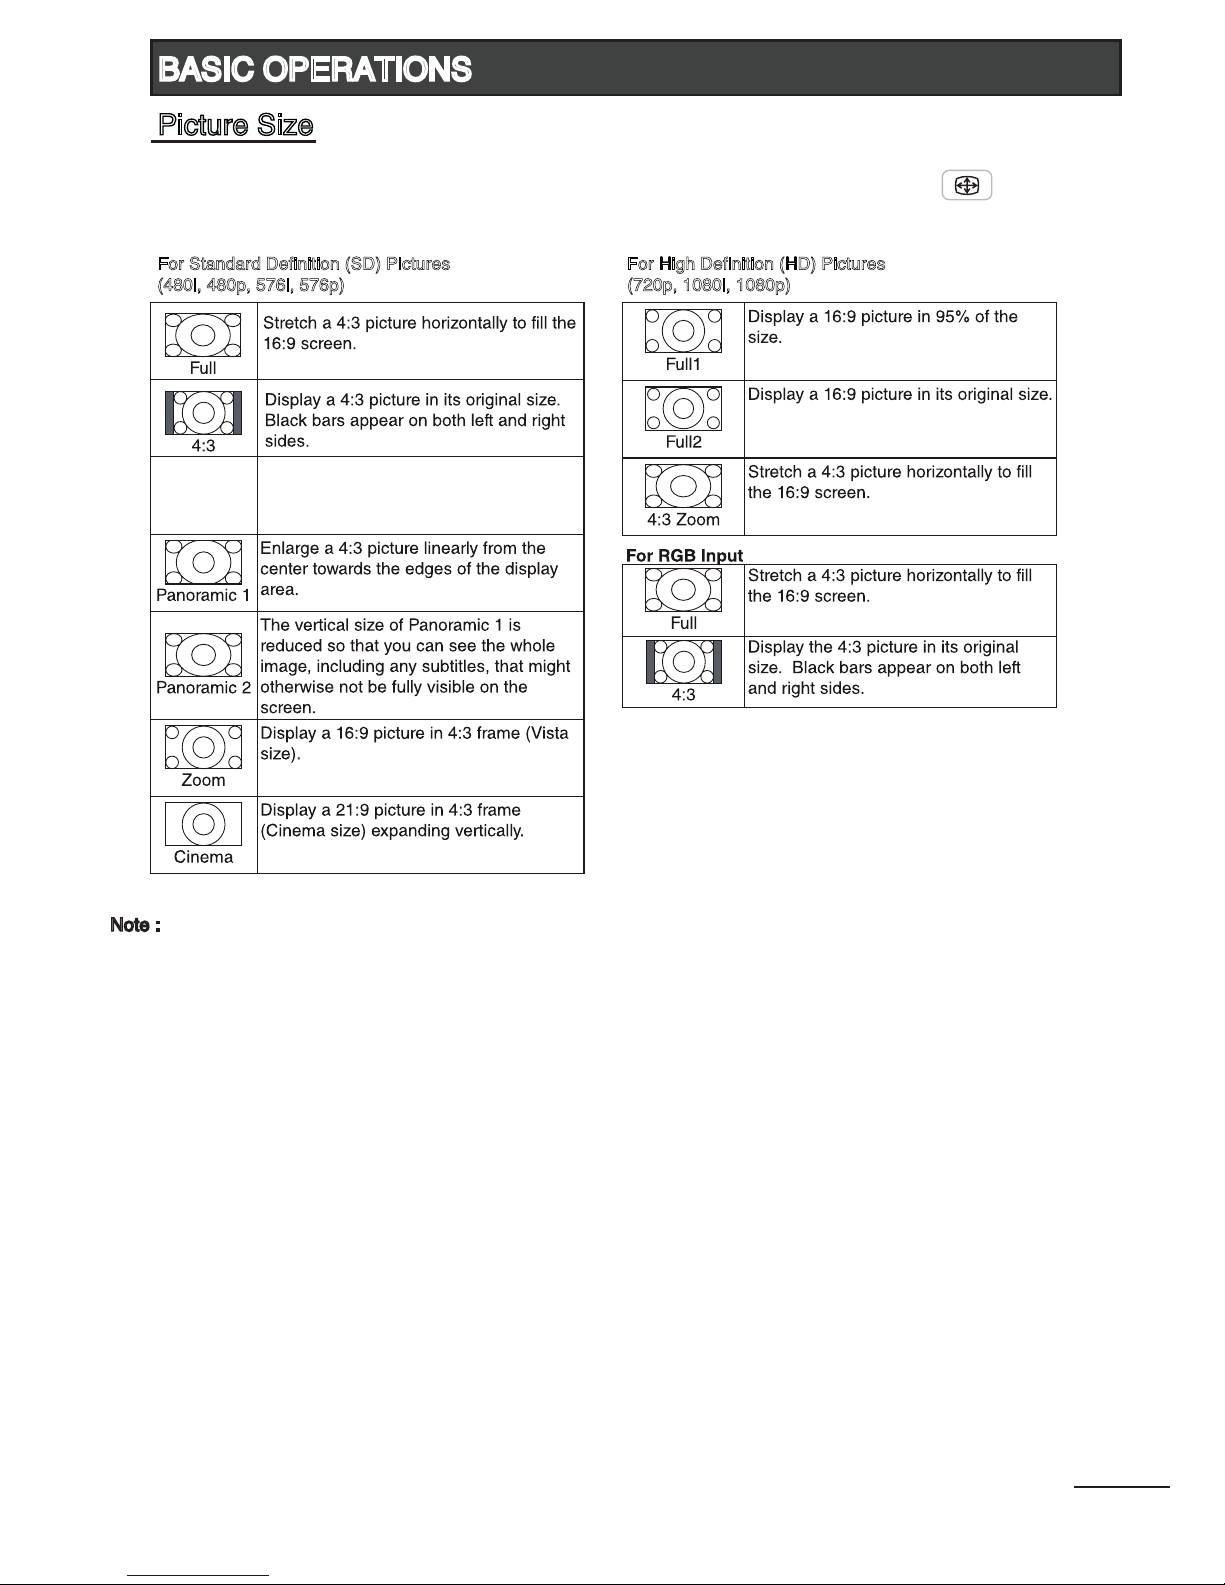
Depending on the input signal, you can select the desired picture size by pressing [ ]
repeatedly.
12
BASIC OPERATIONS
Picture Size
Auto
Automatically adjust the aspect ratio
based on the TV program signal.
1
For Standard Definition (SD) Pictures
(480i, 480p, 576i, 576p)
For High Definition (HD) Pictures
(720p, 1080i, 1080p)
Note :
1 Some broadcast stations transmit WSS (WideScreen Signalling) signals to identify the picture size of the
broadcast programs. This TV can detect the WSS signals transmitted and automatically switch to the correct
picture size. However, if WSS is not transmitted and detected, the TV will automatically set to “Full” picture size.

To select input source, TV, AV1, AV2, HDMI1, HDMI2, HDMI31, HDMI41, RGB, MEDIA.
Press [ ] on remote control or touch sensor located at bottom-left of the TV to select
the desired input source.
OR
Press [ ] and [ ] / [ ] on remote control to select the desired input source.
Press [
] to conrm selection.
Note :
1
Available for 42”, 47” and 55” models only.
When receiving stereo/bilingual sound system, you can select the sound output modes
by using [ ].
13
BASIC OPERATIONS
Input Source Selection
Stereo/Bilingual Sound Selection
Broadcasting Selection
NICAM Mono Mono
Stereo Stereo
Mono
Bilingual Main
Sub
Mono
Note :
- If the stereo sound is weak when receiving a stereo program, you can switch to “Mono”.
Stereo Stereo
Mono
Bilingual Main
Sub
A2

Page Select (Number button)
Press this button to select a Teletext page (Enter 3-digits)
Hold
( )
Press this button to hold the current Teletext page.
Press again the cancel the hold mode.
P
age Select ( P+ / P- )
Press this button to move to the next or previous Teletext page.
TV/
TEXT ( )
Press this button to enter Teletext mode.
Press again to exit Teletext mode.
Cancel ( )
Press this button to return to TV program temporarily while
searching for a Teletext page. When the search is done, the
page number will be displayed on the upper left of the screen.
Press again to return to the Teletext page.
Subtitle ( )
Press this button to access subtitle service directly
(if the channel has the subtitle service broadcasting).
Sub
Page
( )
Press this button to enter or exit subpage mode (if subpage is available).
Press Red / Green buttons to select the desired subpage.
Ind
ex ( )
Press this button to display index page.
R
eveal
( )
Press this button to display concealed information, such as
solutions to riddles or puzzles. Press again to remove the
information from the display.
UNL (Si
ze)
( )
Enlarge the teletext display:
Press this button once to enlarge upper half of the screen.
Press this button again to enlarge lower half of the screen.
Press this button again to resume to normal screen size.
TEXT/MIX ( )
Press this button to superimpose the teletext over the TV program.
Press again to return to normal teletext mode.
Color
buttons (Red / Green / Yellow / Blue)
Press these buttons that corresponds to the desired menu or page number.
1.
2.
3.
4.
5.
6.
7.
8.
9.
10.
11.
12.
14
BASIC OPERATIONS
Teletext Operations
Teletext function will only operate in countries where Teletext transmission service is
available. Select the channel that is broadcasting the desired Teletext program.
1
2
7
4
6
3
5
9
11
8
10
12

Adjust to brighten or darken the picture.
Adjust to increase or decrease the picture contrast.
Adjust overall color intensity from no color to fully saturated.
Adjust to obtain natural skin color.
Adjust picture detail and clarity.
Select the most suitable setting depending on your preferred color tone.
(Cool / Normal / Warm)
Select the most suitable setting to reduce noise in the picture due to weak
signal condition.
(Auto / Off / Low / Middle / High)
Note : Not available in RGB mode.
Select the most suitable picture mode according to your lighting condition.
(Dynamic / Natural / Cinema / Favorite)
Brightness
1
Contrast
1
Color
1
Tint
1
Sharpness
1
Color
Temperature
DNR
(Digital Noise Reduction)
Picture Mode
( )
Select Adjust
Brightness
Contrast
Color
Tint
Sharpness
Color Temperature
DNR
Picture Mode
PICTURE
50
50
50
50
50
Cool
Auto
Favorite
15
MENU OPERATIONS
Picture
Note :
1 All picture settings will be stored in Favorite Picture Mode.

Control the level of low-pitched sound.
Control the level of high-pitched sound.
Adjust the frequency bands of sound to suit the type of sound broadcast.
Control the audio balance between the right and left TV speakers.
Deliver immersive, high quality surround sound over the TV speakers.
(On / Off)
Boost the frequency range of the human voice so dialog is clearly
understood and heard above audio or surround effects.
(On / Off)
Enhance the perception of bass frequencies to provide deep, rich bass
response.
(On / Off)
Select the most suitable sound mode according to your watching contents.
(Movie / Music / Speech / Favorite)
Bass
1
Treble
1
Equalizer
1
Balance
1
SRS TSXT
Dialog Clarity
TruBass
Sound Mode
( )
Select Adjust
Bass
Treble
Equalizer
Balance
SRS TSXT
Dialog Clarity
TruBass
Sound Mode
AUDIO
50
50
0
On
On
On
Favorite
16
MENU OPERATIONS
Audio
Note :
“Dialog Clarity” and “TruBass” is only available if “SRS TSXT” is set to “On”
1 All audio settings will be stored in Favorite Sound Mode.

Set the channel number.
Select “On” to skip the current channel.
(On / Off)
Select the appropriate color system.
(Auto / PAL / NTSC / SECAM)
Select the appropriate sound system.
(BG / I / DK / M)
Tune each channel manually.
Fine tune the current channel.
Tune all the available channels automatically.
Change the order of the channels stored on the TV.
(Channel No. / Target Channel / Swap)
Adjust to its average volume level of each individual channel.
Channel No.
Skip
Color System
Sound System
1
Manual Tuning
Fine Tuning
Auto Tuning
Channel Sorting
Volume Leveller
2
17
Select Adjust
Channel No.
Skip
Color System
Sound System
Manual Tuning
Fine Tuning
Auto Tuning
Channel Sorting
Volume Leveller
SETUP
1
Off
PAL
BG
175.25MHz
0
Note:
1 You need to set to the correct “Sound System” according to local TV station before Auto Tuning.
The default setting is set at “BG”.
2
This function is only available in TV mode. The volume level of different channels may vary signicantly
due to different broadcast stations. You can adjust the volume of a channel to the same level as the
other channels to avoid having to adjust the volume each time you change channels.
MENU OPERATIONS
Setup

Select the on-screen display language.
(English / Simplied Chinese / Traditional Chinese / Russian / Arabic)
Automatically switch to the input source selected.
(Auto / TV / AV1 / AV2 / HDMI1 / HDMI2 / HDMI3
2
/ HDMI4 2 / RGB / MEDIA)
Select the switching mode when changing the TV channels.
(Freeze / Standard)
Select “On” to disable the operations of the touch sensors.
(On / Off)
Select the desired Teletext language.
(West Europe / East Europe / Russian / Arabic)
Select the appropriate color system of the VCD/DVD disc to ensure correct
picture display.
(Auto / PAL / NTSC / SECAM)
Language
Startup Source
1
Switch CH Mode
Lock Panel Keys
TXT Language
3
Color System
4
Note:
1
When the TV is switched on, it will automatically switch to the selected input source. Select “Auto”
to show the last input source when the TV turns on. If “
MEDIA” is selected, make sure that the USB
storage device(s) is/are connected to the MEDIA input terminal at the rear of the TV.
2
Available for 42”, 47” and 55” models only.
3
Available in TV mode only.
4
Available in AV1 mode only.
Select Adjust
Language
Startup Source
Switch CH Mode
Lock Panel Keys
TXT Language
Color System
FUNCTION
English
Auto
Freeze
Off
West Europe
Auto
18
MENU OPERATIONS
Function

Note : Not available for 32” model.
Note : Not available for 32” model.
Note:
1
Only available if “Backlight” is set to “Auto”.
Set “Backlight” to “Auto” and “Ambient Sensor” to “On” will auto adjust the backlight according to the
scene and ambient lighting condition.
2
When the “100/120Hz Scan” is set to “On”, it can reduce motion blur or judder during fast moving scenes.
Press [ ] twice to exit after selection.
* To prevent damage to the display panel, do not view demo mode for prolong period of time.
3
Only available if “100/120Hz Scan” is set to “On”.
Select Adjust
Backlight
Ambient Sensor
TV On/Off Melody
100/120Hz Scan
Scan Level
Audio Only
DivX Registration
DivX Deactivation
ADVANCED
SETUP
Auto
Off
On
Low
Display Off
19
MENU OPERATIONS
Advanced Setup
Backlight
Ambient Sensor
1
TV On/Off Melody
100/120Hz Scan
2
Scan Level
3
Audio Only
DivX Registration
DivX Deactivation
Adjust peak brightness of the backlight according to the scenes.
(Auto / Low / Middle / High)
Select “ ” to turn on the sensor to detect the ambient lighting
condition and adjust the backlight automatically.
(On / Off)
Select “ ” to play a melody sound when the TV is switched On or Off.
(On / Off)
Select “On” to reduce motion blur or judder during fast moving scenes.
(On / Off / Demo On Top
*
/ Demo On Right
*
)
(Low / Middle / High)
Select to switch off the TV display and output the audio only.
(Display On / Display Off)
Press [ ] to resume TV display.
With this registration number, movies can be rented or purchased at
www.divx.com/vod
Upon executing this function when DivX® VOD is registered, the current
DivX® VOD registration is deactivated.
ABOUT DIVX VIDEO: DivX® is a digital video format created by DivX, Inc. This is an ofcial DivX Certied device that plays DivX
video. Visit for more information and software tools to convert your les into DivX video.
ABOUT DIVX VIDEO-ON-DEMAND: This DivX Certied® device must be registered in order to play DivX Video-on-Demand
(VOD) content. To generate the registration code, locate the DivX VOD section in the Advanced Setup menu. Go to
with this code to complete the registration process and learn more about DivX VOD.

Adjust the screen position, clock and phase automatically.
Adjust the horizontal position.
Adjust the vertical position.
Adjust the picture width.
Adjust to remove the horizontal interference.
Auto Adjust
H Position
V Position
H Clock
Clock Phase
Note:
“Auto Adjust” may not work well with certain input signals. In such cases, manually adjust
“H Position”, “V Position”, “H Clock” and “Clock Phase”.
Select Adjust
Auto Adjust
H Position
V Position
H Clock
Clock Phase
RGB MODE
SETUP
50
50
50
50
20
MENU OPERATIONS
RGB Mode Setup

You can view video, music, photo and text les from your USB storage devices. Depending on which
media input terminal you connect rst, that particular USB port will be named as C:\ drive follow by D:\ .
1. Connect USB storage device to MEDIA1 / MEDIA2 input terminal.
2. Press [ ] to enter Media Player mode.
3. Press [ ] / [ ] to select the types of media modes.
(VIDEO, MUSIC, PHOTO and TEXT)
4. Refer to page 23 - 26 for more instructions.
1. Some USB storage devices may not be compatible to operate smoothly with this TV.
2. Back up all of the data in the USB storage device in case if data was lost due to unexpected
accident. We do not assume any liability for the losses by misuse or malfunction. Data backup
is consumer’s responsibility.
3. For large le sizes, the loading speed may be slightly longer.
4. The recognition speed of a USB storage device may depend on each device.
5. When connecting or disconnecting the USB storage device, ensure that the TV is not in MEDIA
mode otherwise the USB storage device or the les stored in it may be damaged.
6. Please use only a USB storage device which is formatted in FAT16, FAT32, NTFS le system
provided with the Windows operating system. In case of a storage device formatted as a different
utility programme which is not supported by Windows, it may not be recognized.
7. When using a USB Hard Disk Drive which requires electric power source, ensure its power does
not exceed 500mA.
8. An “Unsupported File” message will be displayed if the le format is unsupported or corrupted.
VIDEO Main Menu MUSIC Main Menu
TEXT Main Menu
PHOTO Main Menu
21
MEDIA
Gentle Reminder When Using The Media Player

CAUTION :
In situation whereby the cable insertion of USB storage device is restricted, you may use the
USB extension cable provided.
1. Media Input : Should not exceed by 7(H) x 18(W)mm.
* Dimension of (H) should not exceed 7mm.
Video Supporting File
Video Format : DivX, MPEG2, MPEG4, H264/AVC, RMVB
Resolution(max) : 1920 x 1080
Frame rate : under 30 frames / sec (1920x1080)
Audio format : mpeg, mp3
Music Supporting File : (*.mp3)
Photo Supporting File : (*.jpg)
Text Supporting File : (*.txt)
22
Button Action
Press to select a folder or media
file.
•
Press to open a folder.
Press to start playback.
•
•
In pause mode, press to resume
playing.
•
•
Press to start/pause the playback.
In search forward/backward mode,
press to resume playing.
•
Press to stop the playback.•
During the playback, press to
search forward.
•
During the playback, press to
search backward.
•
During the playback, press to skip
to the next track.
•
During the playback, press to skip
to the previous track.
•
Press to enter or exit TV menu.•
/
Press to adjust the volume of the
playback.
•
Button Action
Press to select types of media modes.
(VIDEO, MUSIC, PHOTO, TEXT)
•
Press to return to Media Player main
menu.
•
/
/
MEDIA
Media File Playback Support
Media Playback Controls
W
H

1. Press [ ] / [ ] to select VIDEO. Press [ ] to enter.
2. Press [ ] / [ ] to select the desired drive and press
[ ] to enter.
3. Press [ ] / [ ] to select the desired folder and press [ ] to open the folder;
or press [ ] / [ ] to select the desired video le and press [ ] to start playing.
4. Press [ ] to stop video playing and return to video list.
5. Press [ ] to return to the previous menu.
6. Press [ ] to return to Media Player main menu.
- Press [ ] to display Video Control Bar while playing the video.
- Press [ ] / [ ] to navigate.
- Press [ ] / [ ] to select the desired settings.
Select File : Select the video les stored in the USB storage device.
Select Chapter : Select the chapters in that video le. (if available)
Select Subtitle : Select the subtitle languages. (if available)
Audio Channel : Select the audio channel. (if available)
Repeat Mode : Select from All / None / Current.
Zoom Mode : Select from X1, X2, X4, 1/4, 1/2.
23
Select File
Video Trailer.mp4
[Resolution] 1920 x 1080
[Total Time] 01:30:00
[Current Time] 00:45:00
Select File
Select Chapter
Select Subtitle
Audio Channel
Repeat Mode
Zoom Mode
MEDIA
Video Menu
Video Control Bar

3. Press [ ] / [ ] to select the desired folder and press [ ] to open the folder;
or press [ ] / [ ] to select the desired music le and press [ ] to start playing.
4. Press [ ] to stop music playing and return to video list.
5. Press [ ] to return to the previous menu.
6. Press [ ] to return to Media Player main menu.
[Music Player] [Music Repeat Mode]
- Press [ ] to display Music Repeat Mode while playing the music.
- Press [ ] / [ ] to select the repeat mode from “All Tracks”, “Repeat None” and “Current Track”.
How To View Photos or Reading Text File While Listening To Music
1. Select music le to play, press [ ]. .
2. While music is playing, press [MEDIA] to continue playing all music les in the folder (or selected
le if the repeat mode is set to “Current”) and return to Media Player main menu.
3. Press [ ] / [ ] to select PHOTO or TEXT. Press [ ] to enter.
4. Press [ ] / [ ] to select the desired drive and press [ ] to enter.
5. Press [ ] to return to the previous menu (if necessary).
6. Press [ ] / [ ] to select the desired photo or text folder and press [ ] to open the folder; or press
[ ] / [ ] to select the desired photo or text le and press [ ] to start the slideshow or to read the
text le.
Note:
- This menu only show les with the mp3 le extension.
- Files with other le extensions are not displayed, even if they are saved on the same USB storage device.
- An over-modulated mp3 le may cause some sound distortion during playback.
- After 10mins of music playback without pressing any remote control buttons, the TV will enter screen saver
mode automatically. Press any buttons to exit screen saver mode.
- This TV supports lyrics display (English, Simplied Chinese and Traditional Chinese) with maximum number
of characters per line is 28.
- The lename of music and lyrics must be the same in order to display lyrics while the music is playing.
24
00:00:01
No Lyrics Available
Music 02
Music 03
Music 01
Music 01
MEDIA
Music Menu
Music Player : Music Repeat Mode
Music 02
Music 03
Music 01
00:00:01
Music 01
No Lyrics Available
All Tracks
1. Press [ ] / [ ] to select MUSIC. Press [ ] to enter.
2. Press [ ] / [ ] to select the desired drive and press
[ ] to enter.

3. Press [ ] / [ ] to select the desired folder and press [ ] to open the folder;
or press [ ] / [ ] to select the desired photo le and press [ ] to start the slideshow.
4. Press [ ] to stop slideshow and return to photo list.
5. Press [ ] to return to the previous menu.
6. Press [ ] to return to Media Player main menu.
- Press [ ] to display Photo Control Bar during photo slide show.
- Press [ ] / [ ] to navigate.
- Press [ ] / [ ] to select the desired settings.
Slide Time : Select slideshow time intervals of 1sec, 3secs and 5secs.
Rotate Photo : Select the rotating angle of 90, 180 and 270 degrees.
Press [ ] to continue the slideshow.
Repeat Mode : Select modes between “None” and “All”.
Zoom Mode : Select from X1, X2, X4, 1/4, 1/2.
In zoom mode, you can use [ ] / [ ] / [ ] / [ ] to pan the zoomed picture.
Press [ ] to continue the slideshow.
25
Slide Time: 1s
P1060951.JPG
[Resolution] 2592 x 1426
[Size] 491025 Bytes
Slide Time
Rotate Photo
Repeat Mode
Zoom Mode
MEDIA
Photo Control Bar
Photo Menu
1. Press [ ] / [ ] to select PHOTO. Press [ ] to enter.
2. Press [ ] / [ ] to select the desired drive and press
[ ] to enter.

1. Press [ ] / [ ] to select TEXT. Press [ ] to enter.
2. Press [ ] / [ ] to select the desired drive and press
[ ] to enter.
26
3. Press [ ] / [ ] to select the desired folder and press [ ] to open the folder;
or press [ ] / [ ] to select the desired text le and press [ ] to view it.
4. Press [ ] to return to text list.
5. Press [ ] to return to the previous menu.
6. Press [ ] to return to Media Player main menu.
- Press [ ] / [ ] to view previous or next text le.
- Press [ ] / [ ] to select previous or next page in the text le.
- Press [ ] to exit and return to the previous menu.
Note:
- It supports *.txt les. (English, Simplied Chinese and Traditional Chinese characters)
- Please ensure that the text le is saved in an encoding standard (eg. Unicode). This may
minimize the loss of characters in a multiple-language content.
Previous Next
Page Up
Page Down
Exit
I
I
II
III
[File Name]: Hitachi LED TV.txt
THE NEW HITACHI LED TV COMBINES THE BEST OF LED TECHNOLOGY
TO BRING UNMATCHED VIEWING PLEASURE TO YOUR HOME
The new Hitachi LED TV advances picture quality, design and power
eciency to bring unmatched viewing pleasure to your home.
Hitachi LED Ultra Slim Design
Beautiful designed, the new Hitachi LED TV goes perfectly well with
every modern space. Signicantly lighter and slimmer than CCFL TVs,
its sleek Crystal Cutting Edge design is a welcome addition to any room.
Intelligent Sensor
A smart light sensor, it can automatically adjust the picture according
to the viewing circumstance. So you always get the best images
regardless of room brightness, time of day or room layout.
Lower Power Consumption
Compared to standard CCFL LCD TVs, the new Hitachi LED TV uses
less power.
Cur Pg: 1 Total Pg: 2
TEXT
Media
Player
MEDIA
Text Menu
Text Reading View

27
- If the message “Unsupported Signal” appears on the screen, adjust the PC display setting as
in the above chart.
- Mode that are not listed in the above chart, may not be supported. For an optimal picture, it is
recommended to choose a mode listed in the chart.
- Sometimes, the image may be disrupted due to the frequency standard from the VGA card. This
is not an error. You may improve this situation by pressing the [ ] button or adjusting the
position, clock and phase settings in the RGB Setup menu manually.
- If you switch off the TV, interference lines may occur on the TV screen. This is normal.
RECOMMENDED SIGNAL LIST
HDMI Input Signal Chart
RGB Input Signal Chart

Model Name LE32A04A LE42X04A
LE42X04AM*
LE47X04A
LE47X04AM*
LE55X04A
LE55X04AM*
Panel Size 32” 42” 47” 55”
Resolution 1366 x 768 1920 x 1080 1920 x 1080 1920 x 1080
Power Requirement 105W 140W 160W 200W
Standby Power Less than 1W
Audio Output 2 x 8W 2 x 8W 2 x 8W 2 x 12W
Dimension(WxHxD) With Stand 788 x 561 x 196mm-1017 x 684 x 228mm
1009 x 680 x 228mm*
1129 x 747 x 228mm
1123 x 742 x 228mm*
1309 x 857 x 309mm
1302 x 852 x 309mm*
Without Stand 782 x 514 x 41mm-1017 x 641.5 x 40mm
1009 x 637.0 x 35mm*
1129 x 707 x 38mm
1123 x 702 x 35mm*
1309 x 816.5 x 39.5mm
1302 x 811.0 x 36.0mm*
Weight With Stand 11.7 kg
-
20.2 kg
19.7 kg*
23.1 kg
22.5 kg*
31.5 kg
30.9 kg*
Without Stand 9.3 kg
-
16.9 kg
16.5 kg*
19.8 kg
19.3 kg*
25.1 kg
24.5 kg*
Terminals/ Input
Signals
Analog PAL B/G, D/K, I
NTSC M
SECAM B/G, D/K
AV1 (Composite) PAL, SECAM, NTSC3.58, PAL60, NTSC4.43
AV2 (Component) 480i/p, 576i/p, 720p (50/60), 1080i (50/60), 1080p (50/60)
HDMI1, HDMI2 480i/p, 576i/p, 720p (50/60), 1080i (50/60), 1080p (24/50/60)
HDMI3, HDMI4 - 480i/p, 576i/p, 720p (50/60), 1080i (50/60), 1080p (24/50/60)
RGB (Analog) 640x480(60), 800x600 (60), 1024x768 (60), 1280x1024 (60)
MEDIA1, MEDIA2 USB Port
Terminals/ Output
Signals
AV Out (Monitor) CVBS
(Video and audio output are available only when the TV input source is set to TV or AV1 mode.)
Headphone Diameter 3.5mm Mini Jack
28
SPECIFICATIONS
Note:
- Weight and dimensions shown are approximate values only.

” in the “RGB Mode
Setup” menu.
29
TROUBLESHOOTING

30
NOTES

 Loading...