

Page 1

LCD HDTV
LCD HDTV
Modelo LE32LM206
Clase de 32” (80.0 cm Diagonal)
Guía del usaurio
Gracias por adquirir este producto Hitachi.
Lea detenidamente estas instrucciones.
“GARANTÍA LIMITADA” en la página 25.
Anote el nombre del modelo y el número de serie de la
TV LCD para referencia futura. Esta información está
ubicada en la parte posterior del televisor.
Conserve esta guía de usuario para futuras consultas.
Modelo LE42LS256
Clase de 42” (106.7 cm Diagonal)
Imagen Simulada de la TV
TABLA DE CONTENIDO
1-5 INSTRUCCIONES DE SEGURIDAD IMPORTANTES
6 INSTALACIÓN DEL SOPORTE TABLERO
13-18 PRIMEA VEZ QUE SE UTILIZA
19-21 OPERACIÓN DEL TV
22 CONEXIONES A OTROS EQUIPOS
23 DISTURBIOS DE RECEPCIÓN
26 SOLUCIÓN DE PROBLEMAS
24 ESPECIFICACIONES
25-26 GARANTIA LIMITADA
Para obtener asistencia adicional, por favor consulte.
NO de MODELO ________________________ NO de SERIE ___________________________
OGCover_Skyworth_Spa.indd 6 8/24/12 4:45:45 PM
Page 2

PRECAUCIÓN
RIESGO DE DESCARGA
ELECTRICA NO ABRIR
El símbolo del rayo dentro de un triángulo equilátero tiene por
finalidad alertar al usuario acerca de la presencia de tensión peligrosa
(sin aislación) en el interior del producto, que puede tener la intensidad
suficiente como para constituir un riesgo de descarga eléctrica.
AVISO
AVISO:
PRECAUCIÓN:
PARA REDUCIR EL RIESGO DE DESCARGA ELECTRICA, NO
:
RETIRE LA CUBIERTA (O POSTERIOR). EN EL INTERIOR DEL
APARATO NO HAY COMPONENTE ALGUNO QUE PRECISE
SERVICIO DE MANTENIMIENTO A CARGO DEL USUARIO.
SOLICITE CUALQUIER OPERACION DE MANTENIMIENTO A
PERSONAL DE SERVICIO CALIFICADO.
PARA REDUCIR EL RIESGO DE INCENDIO O DESCARGA ELÉC TRICA, NO EXPONGA ESTA UNIDAD A LA LLUVIA NI A LA HUMEDAD. PARA EVITAR
QUE SE PROPAGUE EL FUEGO, MANTENGA LAS VELAS O LAS LLAMAS VIVAS ALEGADAS DE ESTE PRODUCTO EN TODO MOMENTO.
PARA EVITAR QUE SE PRODUZCA UNA DESCARGA ELÉCTRICA, NO UTILICE ESTE ENCHUFE POLARIZADO CON UN CABLE DE EXTENSIÓN, RECEPTÁCULO U
OTRA TOMA, A MENOS QUE LAS CLAVIJAS SE PUEDAN INTRODUCIR COMPLETAMENTE, PARA EVITAR LA EXPOSICIÓN DE LA HOJA.
El signo de exclamación dentro de un triángulo equilátero tiene por
finalidad alertar al usuario de importantes instrucciones de operación
y mantenimiento (servicio) en la literatura que acompaña a este
aparato.
Este producto contiene plomo . No lo tire a la basura.
Deseche este producto de acuerdo a las leyes ambientales aplicables. Para información sobre reciclado y desecho del producto,
contacte su agencia gubernamental local o visite www.ecyclingcentral.com (en EE.UU.) o en www.epsc.ca
(en Canadá).
Lugar de la marca requerida
La hoja de especificaciones y las precauciones para
su seguridad están en la parte trasera del aparato.
ES
1
Page 3
INSTRUCCIONES DE SEGURIDAD IMPORTANTES
1) Lea estas instrucciones.
2) Conserve las instrucciones.
3) Tenga en cuenta todos los avisos.
4) Siga todas las instrucciones.
5) No utilice este aparato cerca del agua.
6) Limpie el equipo con un paño seco.
7) No bloquee las rendijas de ventilación. Instale el equipo según las instrucciones del fabricante.
8) No lo instale cerca de fuentes de calor, como radiadores, registros de calor, hornos o demás aparatos
(incluidos amplificadores) que produzcan calor.
9) No altere la función de seguridad de la clavija de tipo conexión a tierra. La clavija de tipo conexión a tierra tiene
dos patillas y una tercera patilla de conexión a tierra. La tercera patilla se incluye para su seguridad. Si la clavija
suministrada no encaja en la toma, póngase en contacto con un electricista para que actualice la toma obsoleta.
10) Proteja el cable de alimentación para que no se pise ni esté retorcido, especialmente en las clavijas, los receptáculos
y el punto por el que sale del aparato.
11) Utilice únicamente los accesorios especificados por el fabricante.
12) Utilice únicamente el carro, mueble, trípode, soporte o mesa especificado por el
fabricante o de venta con el aparato. Si utiliza un carro, tenga cuidado al mover el
aparato para evitar que se caiga y provoque daños personales.
13) Desenchufe el equipo durante tormentas eléctricas o cuando no lo vaya a utilizar durante periodos
prolongados.
14) Para tareas de mantenimiento, diríjase a personal cualificado. Será necesario recurrir a tareas de
mantenimiento si el aparato sufre daños de cualquier tipo, si el cable de alimentación o la clavija
están dañados, si ha caído líquido u otros objetos en el aparato o si éste ha sido expuesto a la lluvia o
humedad, si no funciona con normalidad o se ha caído.
15) El aparato no deberá exponerse a objetos que goteen o salpiquen ni a objetos con líquido, como jarrones.
16) Una antena exterior no deberá ser instalada en la cercanía de líneas de alimentación aéreas ni de otros circuitos de
iluminación eléctrica o potencia, o donde pueda caerse y hacer contacto con tales líneas o circuitos. Al instalar un sistema
de antena exterior, tenga mucho cuidado de no tocar tales líneas o circuitos de alimentación, ya que el contacto con ellos
podría ser fatal.
17) No sobrecargue los toma corrientes murales ni los cables de extensión, ya que esto podría causar incendios o descargas
eléctricas.
18) Nunca introduzca objetos de ningún tipo por las aberturas de la unidad, ya que podría tocar peligrosos puntos de alta
tensión o piezas de cortocircuito, provocando incendios o descargas eléctricas. Nunca derrame ni rocíe ningún tipo de
líquido sobre la unidad.
19) Si se conecta una antena externa o sistema de cable a la unidad, cerciórese de que el sistema de antena o cable está
conectado a tierra para darle protección contra sobre tensión y acumulación de carga estática.
20) Cuando sea necesario reemplazar piezas, asegúrese de que el técnico de servicio emplee las piezas de repuesto
especificadas por el fabricante, o piezas que tengan las mismas características que las piezas originales. Los cambios no
autorizados podrán causar incendios, descargas eléctricas y otros problemas.
21) Al finalizar cualquier servicio de mantenimiento o reparación de esta unidad, solicítele al técnico que efectúe
comprobaciones de seguridad para determinar si la unidad se encuentra condiciones óptimas de operación.
22) Cuando conecte el producto a otro equipo, desconecte la alimentación y desenchufe todos los equipos del tomacorriente.
Si no lo hace, puede provocar una descarga eléctrica y heridas graves. Lea cuidadosamente el manual de instrucciones del
otro equipo y respete las instrucciones al hacer las conexiones.
23) El sonido repentino a volumen alto puede causar daño al oído o a los altavoces. Cuando utilice audífonos (si la unidad está
equipada con entrada de audífonos) mantenga el volumen a nivel moderado. Utilizar audífonos en forma continua a
volumen alto, puede causar daño al oído.
24) No permita que el producto emita un sonido distorsionado durante un periodo de tiempo prolongado. Puede provocar un
calentamiento excesivo del altavoz que resulte en un incendio.
25) El enchufe debe estar instalado cerca de la unidad y ser de fácil acceso.
26) El cable se utiliza como dispositivo de desconexión y debe permanecer siempre disponible.
ES
2
Page 4

INSTRUCCIONES DE SEGURIDAD IMPORTANTES (continuación)
CONDENSACIÓN
Se condensará humedad en el interior del aparato si se lo trae de un lugar fresco a una habitación caliente o si la temperatura en la habitación
sube repentinamente. En este caso, se verán afectadas las prestaciones del aparato. Para evitarlo, deje el aparato a la nueva temperatura
durante aproximadamente una hora antes de conectarlo, o haga que la temperatura en la habitación suba gradualmente.
También puede condensarse humedad durante el verano si el aparato está expuesto a una corriente de aire del acondicionador de aire. En
estos casos, cambie el lugar donde está instalada la unidad.
CÓMO MANEJAR EL LA PANTALLA DE LCD
• No presione ni sacuda con fuerza el la pantalla de LCD. El cristal del la pantalla de LCD puede romperse y provocar lesiones.
• Si se rompe el la pantalla de LCD, asegúrese absolutamente de no tocar el líquido del panel. Éste podría provocarle una inflamación cutánea.
Si el líquido le entra en la boca, haga gárgaras inmediatamente y consulte a su médico. Asimismo, si el líquido entra en contacto con los ojos
o la piel, consulte a su medico tras enjuagar la zona con agua limpia durante al menos 15 minutos o más.
Posibles efectos adversos en la pantalla de LCD: Si una imagen se queda fija en la pantalla de LCD (sin moverse) durante largos periodos, la
imagen puede quedar grabada de forma permanente en la pantalla de LCD. Este tipo de daños NO ESTÁ CUBIERTO POR LA GARANTÍA. No deje
la pantalla de LCD encendida durante periodos prolongados con los siguientes formatos o imágenes:
• Imágenes fijas, como cotizaciones de bolsa, fondos de videojuegos, logotipos de cadenas de TV y sitios Web.
• Formatos especiales que no utilizan la pantalla completa. Por ejemplo, los medios de estilo buzón (16:9) en una pantalla normal (4:3) (barras
grises en la parte superior e inferior de pantalla); o los medios de estilo normal (4:3) visualizados en una pantalla panorámica (16:9) (barras
grises a izquierdo y derecho).
Los síntomas siguientes no indican mal funcionamiento sino una limitación técnica. Por tanto, no aceptaremos ninguna responsabilidad por estos
síntomas.
• Las pantalla de LCD están fabricadas con una tecnología de gran precisión; sin embargo, a veces hay partes de la pantalla en la que faltan
elementos de la imagen o tienen puntos luminosos.
No es un fallo de funcionamiento.
• No instale la pantalla de LCD cerca de un equipo electrónico que sea susceptible a las ondas electromagnéticas. Algunos equipos situados
muy próximos al equipo pueden causarle interferencias.
• Efecto en los dispositivos de infrarrojos: pueden producirse interferencias al usar dispositivos de infrarrojos, como auriculares inalámbricos.
Fuente de Energía
Este televisor de LCD esta diseñado para operar con corriente CA, 110 - 240 voltios 50 - 60 Hz. Inserte el cable de electricidad en un toma de
electricidad de 110 - 240 voltios a 50 - 60 Hz.
Para impedir descarga eléctrica, no utilice la clavija (polarizada) del televisor de LCD con una extensión, receptáculo u otro enchufe a menos
que los terminales y la puedan insertarse completamente para evitar que la terminal este expuesta.Nunca conecte el televisor de LCD a
corriente directa o cualquier otro voltaje que no sea el especificado.
Advertencia
Para reducir el riesgo de fuego o descarga eléctrica, no exponga el aparato a lluvia o humedad.
Precaución
Nunca quite la tapa trasera del televisor de LCD ya que esto puede exponerlo a voltajes muy altos y a otros peligros. Si el televisor no
funciona en forma apropiada, desenchufe el televisor de LCD y llame a su distribuidor o centro de servicio autorizado.
Ajuste solamente los controles que se incluyen en esta guía, los cambios inapropiados o modificaciones que no estén expresamente
ES
3
Page 5
AVISO DE SEGURIDAD PARA NIÑOS
ES
4
Page 6
PRECAUCIONES DE SEGURIDAD
La unidad emite calor cuando está en operación. No coloque cobertores ni frazadas sobre la unidad; ello puede causar sobrecalentamiento. No
obstruya los orificios de ventilación, ni instale cerca de radiadores. No la exponga a la luz solar directa. Cuando la coloque sobre una estantería,
deje 4 pulgadas (10 cm) de espacio libre alrededor de toda la unidad.
4 pulgadas
4
pulgadas
Notas para el montaje en la TV LCD
Si la unidad debe montarse en la pared, consulte al distribuidor que le vendió la pantalla de TV LCD, y haga instalar el equipo en forma profesional. Una instalación incompleta o inadecuada puede causarle lesiones o daños a Ud. y/o a la pantalla de TV LCD.
Debe usarse tornillo con rosca tipo ISO M6. La parte del tornillo que se enrosca deberá tener una longitud de 12mm a 16mm.
Si la parte del tornillo que se enrosca es menos de 12mm, el peso no se podrá mantener.
Si la parte del tornillo que se enrosca es mayor de 16mm, se creara una espacio entre el montaje de pared y la televisión.
(Parte del tornillo que se enrosca) = (largo del tornillo) - (espesor de las arandelas) - (espesor del metal en el montaje de pared)
Asegurar a una pared
1. Utilizando alambre metálico sujete la unidad al tornillo de sujeción en la parte posterior del TV LCD como se muestra abajo. (No proporcionado)
2. Mantenga el TV LCD a 4 pulgadas de distancia de la pared, excepto cuando sea montado usando el soporte de montaje de pared y asegure
a la pared como se muestra abajo:
4 pulgadas
Cable
LE42LS256
Abrazadera
Tornillo
Tornillo (M5X14)
Cable
Abrazadera
Tornillo
Tornillo (M6X14)
Cable
LE32LM206
INFORMACIÓN PARA EL MUEBLE DEL TELEVISOR
Si la unidad es colocada en un mueble más pequeño que la longitud del Televisor, puede dar como resultado una posición inestable y la unidad
puede caer, provocando un riesgo de heridas personales o posiblemente fatales. También, esto puede dañar seriamente la unidad. A propósito,
Hitachi no acepta responsabilidad o demandas causadas por heridas o daño de propiedad, causados por una instalación inadecuada.
Sí !!
NO !!
ES
5
Page 7
Cómo instalar el soporte
1. Por favor, saque la bolsa de accesorios del paquete, revise todas las partes
inferiores están completas y que nada falte, si falta algo, por favor póngase en
contacto con servicio al cliente.
Base Conector de Bracket Empaque de Plastico
(1 PCS)
(LE42LS256)
(LE32LM206)
Neck Tornillos Base Tornillos
M4 X10(4 PCS)
M4 X10(4 PCS)
M5 X22(4 PCS)
M4X10 (1 PC)
2. Por favor, saque el televisor de la caja, y poner cuidadosamente el televisor
con la parte frontal hacia abajo sobre una superficie plana con un mantel
o un cojín suave.
soporte
4. Conecte la Base de plástico y el conector BKT Assy con
los cuatro tornillos de M5X22 para LE42LS256, y un
tornillo de M4X10 paara LE32LM206.
(LE32LM206)
(LE42LS256)
5. Ensamble la base y el televisor como se muestra
en la imagen.
cojín suave
6.Por ultimo ensamble la base con tornillos M4 4pcs X10.
Atención: asegúrese que la base no caiga, asegúrese
de que los tornillos están bien fijados.
3. Instale el empaque de plástico, el conector de soporte y la base de cristal
en el orden correcto. (LE42LS256 solamente))
Cómo quitar el soporte
Cuando transporte este producto, retire la base y empaque contra la parte trasera de la unidad en la caja. Para quitar la base, realice
los pasos de arriba en orden inverso.
Para el montaje de pared, debe quitarse la base. Para quitar la base / soporte quite los 4 tornillos de la parte posterior.
Tornillos
6 ES
Page 8
Características
TV LCD a Color
Diseño único ahorra-espacio que combina un TV LCD a color de 32” / 42”.
• Sintonizador digital integrado - Podrá disfrutar de transmisiones digitales sin necesidad de utilizar un de TV digital.
• de leyendas con modo de texto completo - Muestra las leyendas de los textos o el texto del programa en pantalla
completa para las personas con problemas de audición.
• Ajustes de imagen utilizando el control remoto - La indicación en pantalla permite el ajuste precuso de BRIGHTNESS (brillantez), CONTRAST -
(contraste), COLOR, TINT (tinte) y SHARPNESS (nitidez), con el con el control remoto.
• Temporizador programable de TV - Puede ser operado con el control remoto y el TV puede ser programado hasta en 240 minutos para que se
apague automáticamente.
• Indicación en pantalla de 3 lenguas - Usted puede seleccionar una de 3 lenguas, inglés, español o francés por programación en pantalla.
• Parental Control - La función de prohibición para menores con Parental Control puede leer la
el programa tiene esta información. El Parental Control permite seleccionar el nivel de prohibición.
Este televisor LCD puede mostrar subtítulos para programas que contienen subtítulos al estilo - USA. ( o )
* HDMI, el logotipo HDMI, y la interfaz multimedia de alta definición son marcas comerciales o registradas de HDMI Licensing LLC en Estados Unidos y otros
países.
* Fabricado con la autorización de Dolby Laboratories. Dolby y el símbolo de doble D son marcas comerciales de Dolby Laboratories.
* VGA y XGA son marcas comerciales de la International Bussiness Machines Corporation.
* VESA es una marca registrada de la Video Electronics Standard Association.
de un programa de TV o película, si
Fuente de alimentación
PARA USAR LA ALIMENTACIÓN CA
1. Conecte la clavija del cable de alimentación de CA a la toma AC INPUT de la unidad.
2. Conecte el cable de alimentación de CA a una toma de CA.
Tomacorriente
de CA
Orificio y
hoja más
anchos
110-240V, 50-60Hz CA
Cable de alimentación de CA
(suministrado)
NOTA:
• Por favor asegúrese de insertar el cable tanto en la TV LCD como en el enchufe de la pared.
El cable de CA tiene un enchufe polarizado de linea CA
•
calificado.
AVISO:
• No conecte esta unidad a la red con un cable de alimentación distinto del suministrado. Se podría producir un incendio, una descarga eléctrica o
daños de otro tipo.
• No utilice el equipo con un voltaje distinto del indicado. Se podría producir un incendio, una descarga eléctrica o daños de otro tipo.
PRECAUCIÓN:
• Si no va a utilizar la unidad durante mucho tiempo (ej. si se va de viaje), por seguridad desenchufe la unidad de la toma de alimentación.
• No enchufe ni desenchufe el cable con las manos mojadas. Podría producirse una descarga eléctrica.
• Si necesita cambiar el adaptador de CA o el cable de alimentación suministrado, utilice el que se haya
distribuidor al que compró la unidad.
, Si el cable eléctrico suministrado no coincide con el enchufe de CA, llame a un electricista
Póngase en contacto con el
7ES
Page 9
Indice
Antes de utilizar su aparato
INSTRUCCIONES DE SEGURIDAD IMPORTANTES .............................................................................................................................................................. 2
AVISO DE SEGURIDAD PARA NIÑOS ....................................................................................................................................................................................... 4
PRECAUCIONES DE SEGURIDAD ........................................................................................................................................................................................ 5
Cómo instalar el soporte ............................................................................................................................................................................................................. 6
Cómo quitar el soporte ............................................................................................................................................................................................................... 6
Características ........................................................................................................................................................................................................................... 7
Fuente de alimentación ............................................................................................................................................................................................................... 7
Indice ................................................................................................................................................................................................................................................. 8
Ubicación de los controles - LE32LM206 ............................................................................................................................................................................... 9
Ubicación de los controles - LE42LS256 .......................................................................................................................................................................... 10
Control remoto .............................................................................................................................................................................................................................11
Conexiones de la antena ...........................................................................................................................................................................................................12
Operación del TV
Control de MENU .......................................................................................................................................................................................................................13
Control de USB ...........................................................................................................................................................................................................................16
Información adicional
Conexiones a otros equipos ............................................................................................................................................................................................. .... 19
Disturbios de recepción ........................................................................................................................................................................................................... 22
Solución de problemas .......................................................................................................................................................................................................................... 23
Especificaciones
GARANTIA LIMITADA ................................................................................................................................................................................................................. 25
......................................................................................................................................................................................................................... 24
ES
8
Page 10
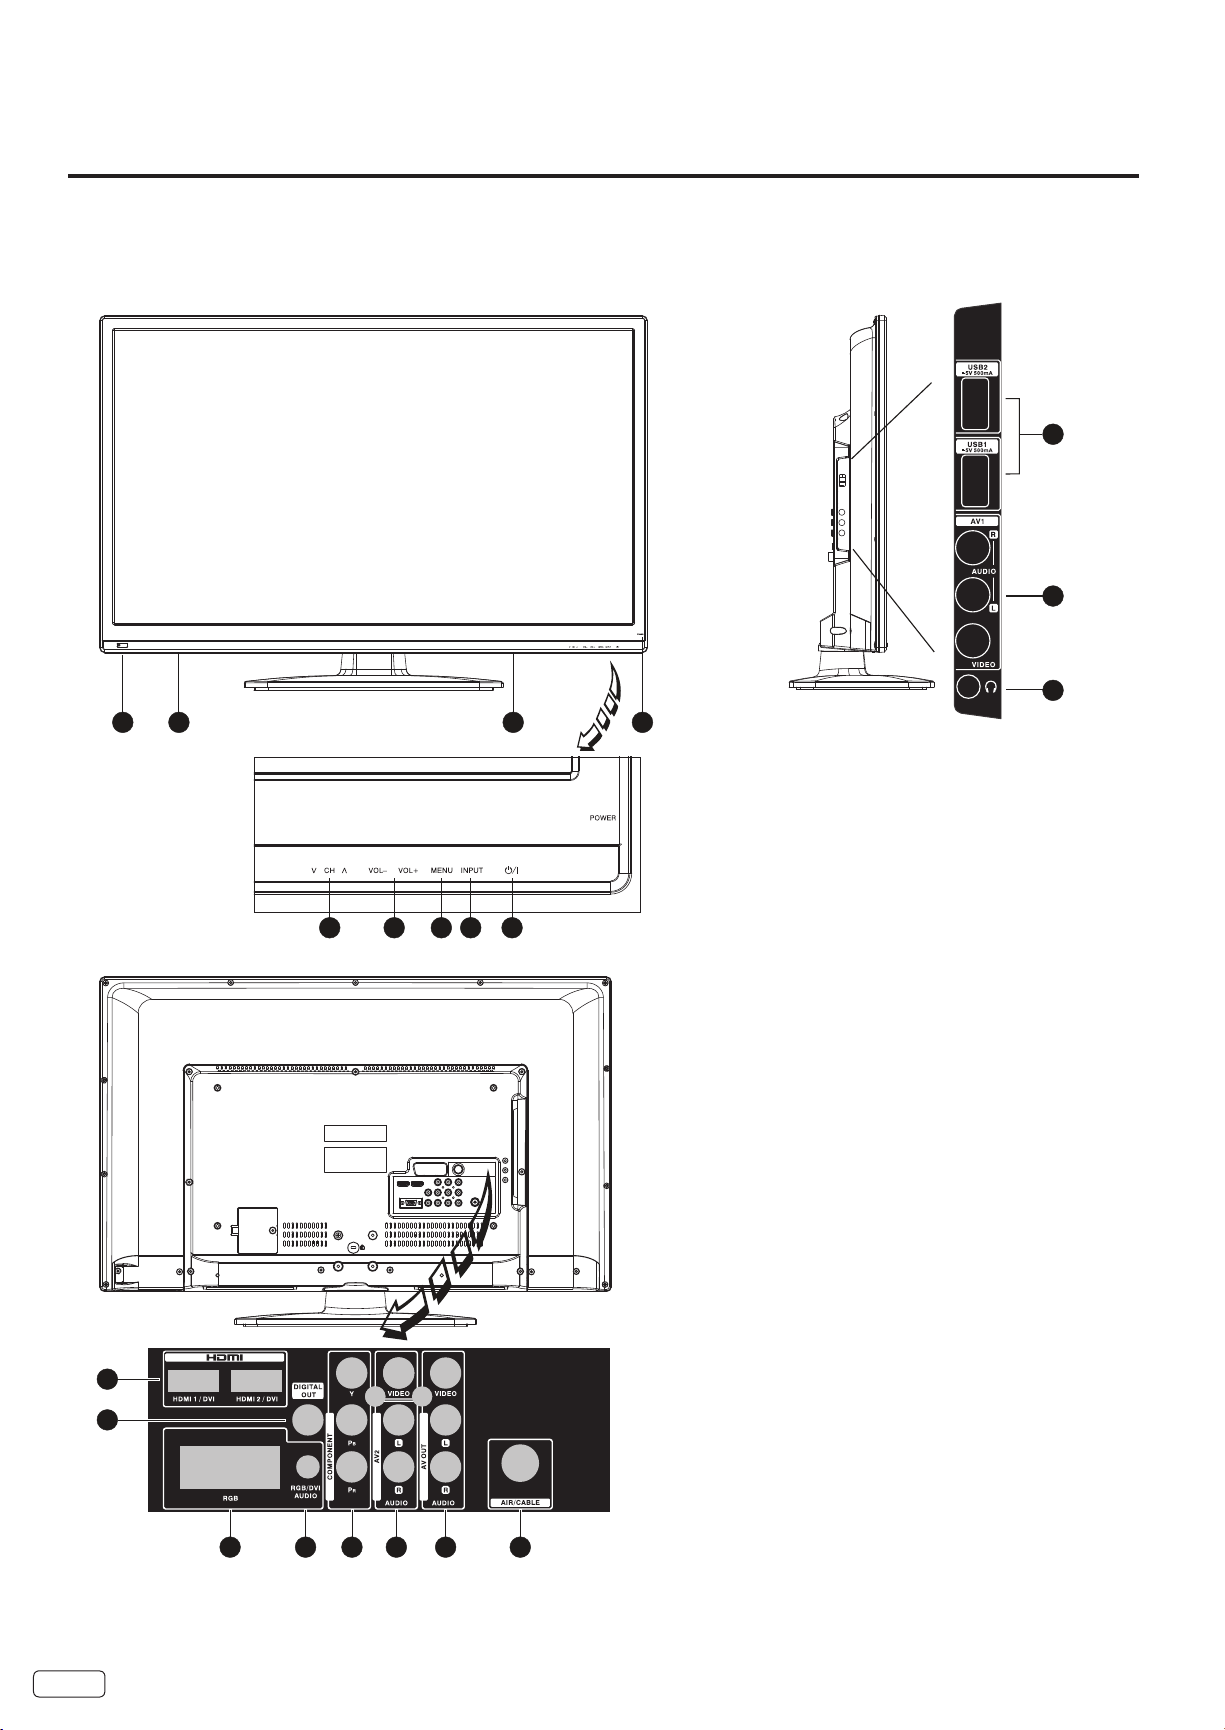
Ubicación de los controles
LE32LM206
Parte delantera
2 3 3 1
4 5 6 7 8
Lado izquierdo
9
10
11
1. Botón POWER
2. Indicador Power / Sensor de control remoto
3. Bocinas
4. Botones Canal arriba / abajo
5. Botones Volume arriba / abajo
6. Botón MENU
7. Botón INPUT
8. Botón Espera
9. USB1o USB2: Toma USB.
10. AV IN : Conecte en la fuentes de señal de
AUDIO y VIDEO , tales como DVD.
11. AURICULAR: Salida de audio, los altavoces se
silenciarán cuando los auriculares estan conectados.
12. HDMI1 o HDMI2: Conecte en la fuente de señal
HDMI, tales como DVD.
13. SALIDA COAXIAL DIGITAL de AUDIO
14. RGB: Conecte una PC mediante un cable VGA.
15. RGB / DVI AUDIO: Entrada de audio para PC y
audio para HDMI cuando la señal es del tiempo DVI.
ES 9
12
13
1514 16 10 17 18
16. COMPONENTE: Connecte la señal YPBPR , tales
como DVD. Comparte la entrada de audio con la
entrada AV.
17. AV OUT: conexión da salida de audio y vídeo sólo
ATV o DTV.
18. AIRE / CABLE: Conecte el cable coaxial
(comercialmente disponible) a la antena o cable en
la terminal.
Page 11
Ubicación de los controles
LE42LS256
Parte delantera
2 3 3 1
Lado izquierdo
9
10
11
12
13
14
4 5 6 7 8
1. Botón POWER
2. Indicador Power / Sensor de control remoto
3. Bocinas
4. Botón Espera
5. Botón INPUT
6. Botón MENU
7. Botones Volume arriba / abajo
8. Botones Canal arriba / abajo
9. COMPONENTE: Connecte la señal YPBPR , tales
como DVD. Comparte la entrada de audio con la
entrada AV2.
10. AV1 IN : Conecte en la fuentes de señal de AUDIO y
VIDEO, tales como DVD.
11. USB1 o USB2: Toma USB .
12. AURICULAR: Salida de audio, los altavoces se
silenciarán cuando los auriculares estan conectados.
13. HDMI1 o HDMI2: Conecte en la fuente de señal
HDMI, tales como DVD.
14. SALIDA COAXIAL DIGITAL de AUDIO
15. RGB: Conecte una PC mediante un cable VGA.
16. RGB / DVI AUDIO: Entrada de audio para PC y
audio para HDMI cuando la señal es del tiempo DVI.
17. AIRE / CABLE: Conecte el cable coaxial
(comercialmente disponible) a la antena o cable en
la terminal.
11 13 15 16 17
ES 10
Page 12
1
2
3
5
6
8
10
11
13
15 16
17
21
24
25
20
12
14
19
18
22
23
26
Control remoto
15. Botón EXIT - Pulse para salir del menú en pantalla.
16. Botón Info - Al pulsar este botón la pantalla muestra
la información actual.
4
7
9
17. Botón VOL (Vol+/Vol-) - Púlselo botón para aumentar + / - o
para disminuir el nivel de sonido.
18. Botones de CH (CH / ) - Presione para cambiar los canales
de la televisión.
19. Botón de mudo( ) - Para silenciar el sonido, pulse el
botón una vez. El TV LCD quedará en silencio y el símbolo “Mute”
aparecerá en la pantalla. La función de silencio se desactiva al pulsar
MUTE nuevamente o al pulsar VOL (VOLUME) + o –.
20. USB Pulse para entrar al canal USB1 o USB2.
21. Anterior ( ) - Pulse para reproducir la foto anterior o archivos de
texto en el modo USB.
22. Siguiente ( ) - Pulse para reproducir la siguiente foto o archivo
de texto en el modo USB.
23. Detener ( ) - Presione para detener la reproducción de archivos
de fotos o texto en el modo USB.
24. Reproducción y pausa ( ) - Presione para pausar la reproducción
en el modo USB, pulse de nuevo para continuar la reproducción.
25. Botón de Retroceso Rápido ( ) - Presione para retroceder
rápidamente en el modo USB.
26. Avance rápido ( ) - Presione para avanzar rápidamente en
el modo USB.
Antes de usar el control remoto deben instalarse las pilas.
CÓMO INSTALAR LAS PILAS
1. Abra la tapa del compartimiento de las pilas.
1. Espera ( ) - Presionelo para encender el televisor LCD
encendido / apagado.(Espera).
2. Botón Picture Mode ( P.MODE ) - Presione para seleccionar
el modo de Imagen.
3. Botón Sound Mode ( S.MODE ) - Presione para seleccionar
el modo de Sonido.
4. Botón ASPECT - Presione para cambiar el tamaño de la imagen.
5. Botones de selección directa de canal (0-9) - Permite acceso
directo a cualquier canal del TV LCD.
6. Botón LAST CH - Al pulsar este botón puede ir al canal
seleccionado anteriormente. Pulse nuevamente para volver al
canal que estaba viendo.
7. FREEZE -. Presione para congelar o descongelar la imagen.
Nota: Este botón no está disponible cuando utiliza una fuente USB.
8. Botón C.C. - Presione este botón para visualizar la pantalla
del menú de Closed Captions.
9. Botón SLEEP - Para programar el apagado automático de la
TV LCD pasado cierto tiempo utilice el botón SLEEP en el control
remoto.
10. Botón AUDIO - Púlselo para cambiar el idioma de audio.
11. Botón MENU - Presione este botón para indicar el menú de
función en la pantalla.
12. Botón INPUT - Presione para cambiar la entrada externa.
13. Botones CURSOR ( / / / ) - Se utiliza para navegar y
seleccionar las funciones del menú del televisor LCD.
Nota: En el modo USB, pulse " / / / " cursor puede
volver al menú anterior.
14. Botón SELECT - Pulse para entre o seleccionar funciones el
menú en pantalla.
2. Instale dos pilas “AAA” (suministradas).
3. Recoloque la tapa del compartimiento.
PRECAUCIONES PARA LAS PILAS
Se deben tomar las siguientes precauciones cuando se usan las pilas
para el control remoto:
Utilice solo el tipo y tamaño de pila especificado.
Asegúrese de colocar correctamente la polaridad como está señalado
en el compartimiento para pilas. Las pilas invertidas pueden causar
daño al control.
No mezcle distintos tipos de pilas (p.ej. alcalinas y carbono-cinc o
recargables) o pilas viejas con pilas nuevas.
Si Ud. no utiliza el control por un largo período de tiempo, saque las
pilas para prevenir daños por posible fuga de electrolito.
No trate de recargar las pilas que no son recargables; pueden
sobrecalentarse y reventar.
(Siga las instrucciones del fabricante de pilas.)
Tenga cuidado al introducir las pilas para evitar cualquier daño en
las mismas. Si el muelle del control remoto continúa en contacto
con un extremo de una pila dañada , puede producirse un
cortocircuito. Nunca utilice pilas dañadas ya que pueden calentarse
y ser muy peligrosas.
11 ES
Page 13
Conexiones de la antena
Si usted está utilizando una antena para interiores o exteriores, siga las instrucciones de abajo que correspondan a su sistema de antena. Si está
utilizando el servicio de TV por cable (CABLE), vea la “Conexiones de por TV cable”.
Toma de
antena
Cable
coaxial
de 75
ohmios
Conecte el cable de 75 ohmios de la antena combinada de VHF/UHF en el toma de la
antena.
Conexiones de TV por cable
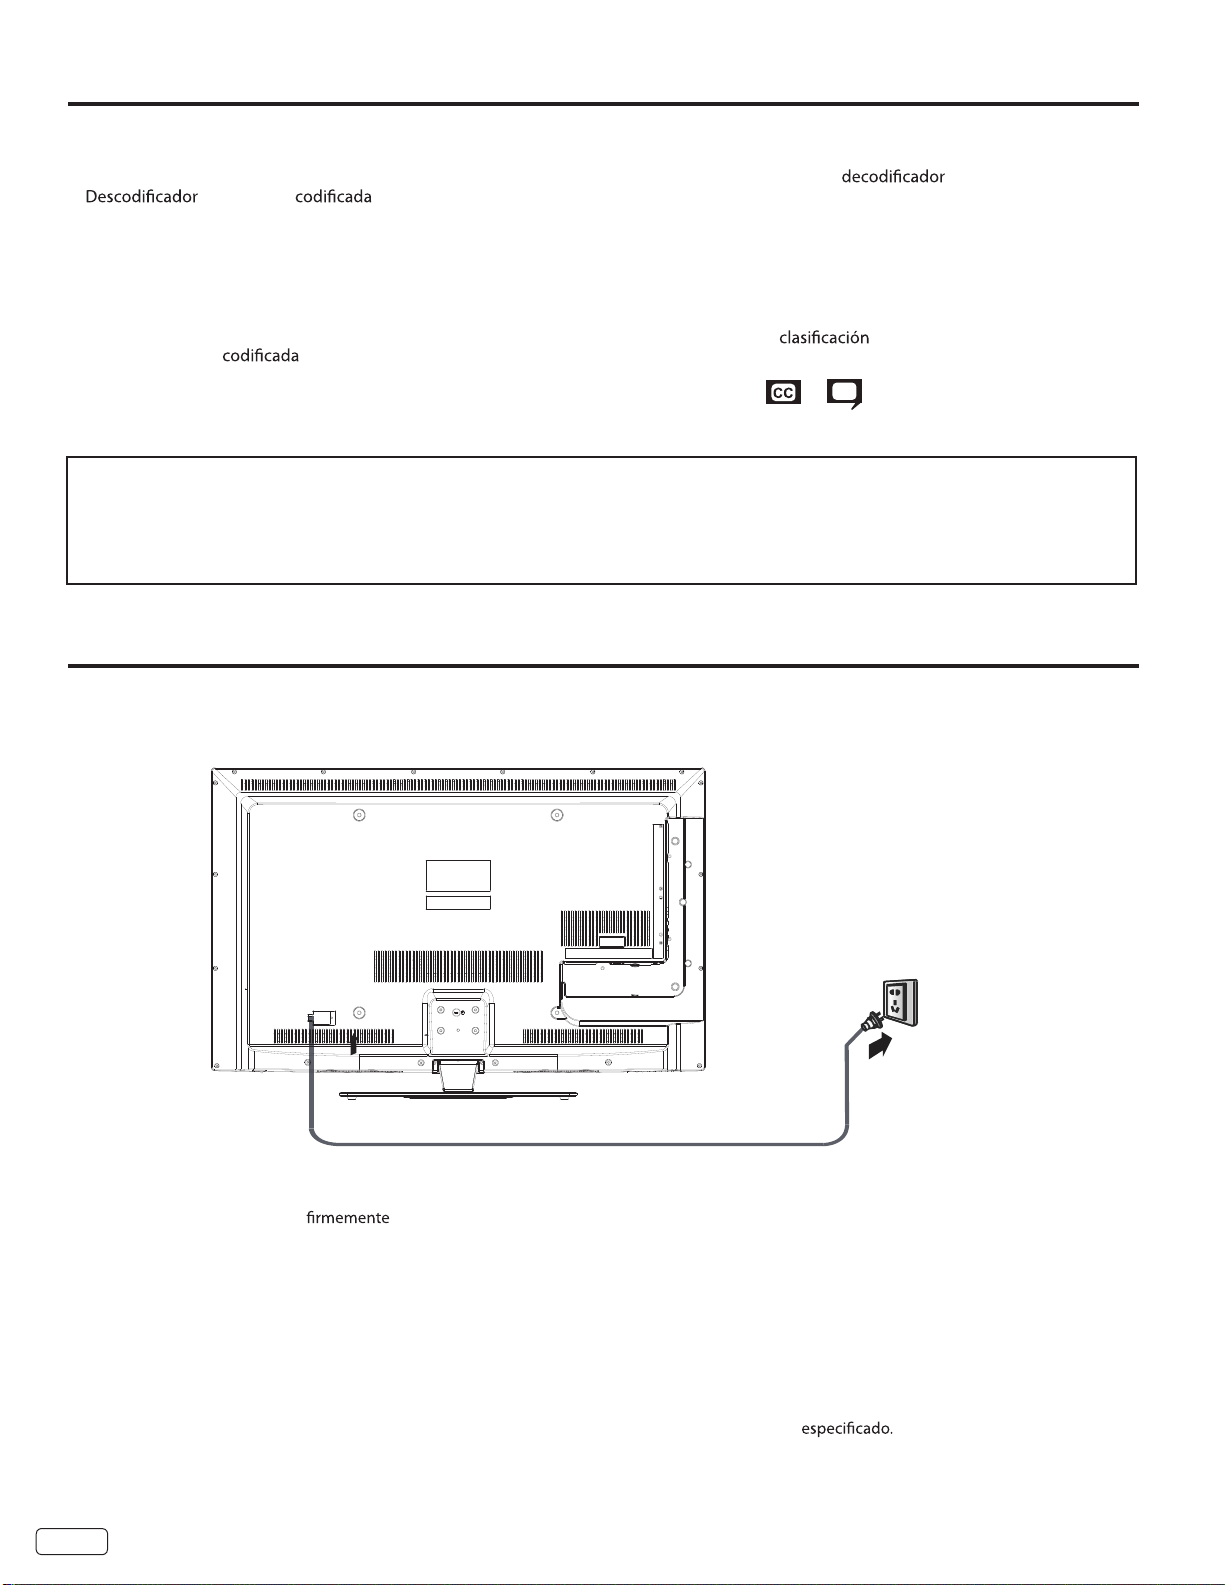
Este aparato posee amplios límites de sintonización y puede ser sintonizado a la mayoría de los canales TV por cable sin utilizar una caja
convertidora de TV por cable. Algunas de las compañías de TV por cable ofrecen “canales pagados premium” en los cuales la señal ha sido
codificada. La decodificación de estas señales para la recepción normal requiere el uso de un mecanismo decodificador que lo suministra
generalmente la compañía de cable.
Toma de
antena
Para el servicio básico TV por cable y cuando no es necesario un convertidor/caja
decodificadora, conecte el cable coaxial de 75 ohmios al toma de la antena en la parte
trasera del aparato.
Cable coaxial
de 75 ohmios
Para servicio de cable premier codificado.
Si usted es tiene a un servicio de TV por cable que requiere el uso de un convertidor/caja decodificadora, conecte el cable coaxial entrante
de 75 ohmios al convertidor/caja decodificadora. Utilizando otro cable coaxial de 75 ohmios conecte el toma de salida del convertidor/caja
decodificadora al toma de la antena del aparato.
Vea las conexiones mostradas abajo. Sintonice el aparato al canal de salida del convertidor/caja decodificadora (generalmente canal 3 ó 4), y
Cable entrante de 75 ohmios de
TV por cable
Cable de 75 ohmios el
Convertidor/Decodificador
Toma de
antena
Para al servicio de TV por cable básico no codificado con canales premium codificados
Si usted está tiene a un servicio de TV por cable en el cual los canales básicos no están codificados y los canales premium requieren el uso de
un convertidor/caja decodificadora, puede desear utilizar un divisor de señales y una caja de conmutación A/B (disponible en las compañías
TV por cable o en las tiendas de artículos electrónicos). Vea las conexiones mostradas abajo. Con el conmutador en la posición “B”, usted puede
sintonizar directamente cualquiera de los canales no codificados en su aparato. Con el conmutador en la posición “A”, sintonice su aparato a la
salida del convertidor/caja decodificadora (generalmente canal 3 ó 4), y utilice el convertidor/caja decodificadora para sintonizar los canales
Cable entrante
de 75 ohmios de
TV por cable
Convertidor/Decodificador
Divisor
Conmutador A/B
Cable de 75 ohmios el
A
B
Toma de
antena
ES
12
Page 14

Control de MENU
Esta sección explica los menús de su televisor. Cada menú se describe y detalla para ayudarle a sacar el máximo provecho de su TV.
Temp. color
Operacion Basica
1. Presione MENU. Aparece la pantalla del menú.
2. Pulse / y / para resaltar el menú deseado / artículo.
3. Pulse / para cambiar el ajuste.
4. Pulse MENU para guardar la configuración y volver al menú anterior.
Establezca esta opción en Alta para un color más frío
con más azul, establezca esta opción en Media para un
color más natural y establezca esta opción en Estándar
para un color más preciso.
Personalizado: El usuario puede personalizar la temperatura de color.
(Rojo / Verde / Azul) "
Nota:
Botón en el panel de teclas tienen las mismas funciones que los
botones correspondientes en el control remoto.
El esquema y la descripción está en el modo TV como muestra abajo,
habrá una nota si no hay excepción.
MENÚ VIDEO
Modo de imagen
Utilice esta función para elegir entre las configuraciones de imagen
predeterminadas para optimizar el rendimiento de la TV.
Brillo
Utilice esta función para cambiar el brillo general de las
áreas oscuras de la imagen.
Contraste
Utilice esta función para cambiar el contraste entre los
niveles negros y blancos de la imagen.
Color
Utilice esta función para ajustar el nivel de color de la
imagen.
Matiz
Utilice esta función para ajustar los tonos color carne a
fin de que tengan una apariencia natural.
Nitidez
Utilice esta función para ajustar la cantidad de detalles
finos de la imagen.
Video
Picture Mode
Brightness
Contrast
Color
Tint
Sharpness
Color Temperature
Custom
50
50
50
50
50
Video
Color Temperature
Red
Green
Blue
Custom
50
50
50
Modo Display
Utilice esta función para seleccionar el aspecto de
imagen del formato de imagen.
Reduccion Ruido
La función Reducción de ruido reduce automáticamente
el ruido notable de la imagen sin afectar la calidad de
ésta. Establezca Reducción de ruido en Off si aparecen
bloques individuales en la imagen.
Video
Aspect Ratio
Noise Reduction
16:9
Low
MENÚ AUDIO
Modo Audio
Seleccione el modo de audio que prefiera.
Bajos
Esta función controla el audio de frecuencia baja de las
bocinas.
Agudos
Esta función controla el audio de frecuencia alta de las
bocinas.
Balance
Esta función controla el balance del audio de las bocinas
internas izquierda y derecha y del conector para auriculares.
Volumen Perf.
Esta función ajustará automáticamente el volumen de tal forma
que cada canal y entrada posean aproximadamente el mismo
nivel de volumen.
Surround
El sonido y la presencia dinámica creados ofrece una experiencia
auditiva profundamente agradable.
Audio
Sound Mode
Bass
Treble
Balance
Perfect Volume
Surround
Custom
on
off
50
50
0
13 ES
Page 15
Control de MENU
MENÚ de CANALES
Nota: Estas opciones sólo están disponibles en el modo TV.
Source
Seleccione la fuente de señal de la TV. Seleccione Antena al utilizar
una antena interior o exterior. Seleccione Cable para utilizar un
sistema de cable.
Búsqueda Auto
Esta función almacenará automáticamente los canales analógos
y digitales activos en la lista de canales. Esta búsqueda eliminará
todos los canales previamente almacenados en la lista.
No. De Canal
Establece el No. canal TV recibió
Sis. color
Pulse / para seleccionar modo "Auto / NTSC / PAL M / PAL N".
Sintonización fina
Efecto en las imágenes de la señal de TV actual, no son satisfactorios,
puede utilizar esta función para ajustar.
Pase canal
Esta función permite agregar canales a la memoria de canales.
MENÚ de CONFIGURAR
Idioma del menú
Permite ajustar el idioma del menú OSD. Esta función le permitirá
seleccionar algunos de los tres idiomas diferentes para los menús
de visualización en pantalla.
Bloqueado
Cuando Bloquear Panel se encuentra activado, se desactivarán todos
los botones del panel frontal, a excepción del botón POWER
(Encendido/apagado).
Subtítulos
Los subtítulos son el diálogo, narración y/o efectos de sonido de un
programa de TV o video hogareño, que aparecen en la pantalla de
la TV. Su guía de programas de TV local indicará estos programas
con o .
Restaurar
La función Reset restaura a la configuración de fábrica.
Setup
Menu Language
Panel Lock
Closed Caption
Reset
English
Off
CC 1
Channels
Source
Auto Scan
Fine Tuning
:
TV
CH 4 56.00 MHz (Cable)
0 Channel
M E N U
Air
3Channel No.
AutoSignal System
60.25 MHz
OnChannel Skip
Control Paterno
Pulse el botón / para seleccionar el menú Avanzado, luego pulse
[SELECT] para entrar. Introduzca la contraseña para entrar, la
contraseña predeterminada es "0000".
Parental Controls
Set Password
Rating Block
TV-Rating
Movie-Rating
Canadian English
Canadian French
Block Unrated TV
Enter password
Clear Cancel
re e R e cord L im
Estab. Contraseña
Para configurar su propia contraseña, introduzca primero la
contraseña antigua, a continuación, introduzca la contraseña nueva
dos veces, después siga las indicaciones como se ilustra a continuación.
Enter Old Password
Enter New Password
Confirm Password
On
PG
C8+
G
No
Clear Cancel
re e R e cord L im
ES
14
Page 16
Control de MENU
MENÚ Control Paterno
Nota:
- Si no recuerda su contraseña, utilice el código de fábrica [8899]
para restablecer la contraseña nueva.
V-CHIP
Pulse / para activar o desactivar.
Clasicatión de TV
Para entrar en el menú clasicación de TV.
Pulse [OK] para bloquear o desbloquear la clasicación.
Película-Clasicatión
Pulse / para seleccionar Película-Clasicatión
(None / G / PG / PG-13 / R / NC-17 / X).
Inglés-Clasicatión
Pulse / para seleccionar Inglés-Clasicatión
(Empty / C / C8+ / G / PG /14+ / 18+).
Francés-Clasicatión
Pulse / para seleccionar Francés-Clasicatión
(Empty / G / 8ans+ / 13ans+ / 16ans+ / 18ans+).
Bloquear sin clasif.
Pulse / para ajustar la función Bloquear o Desbloquear
una señal sin clasicación ".
MENÚ PC
Nota:
Estas opciones sólo están disponibles en el modo PC.
Cuando conecte el cable VGA a los conectores de la PC y seleccione
la fuente de señal como "" PC "" el menú de pantalla se activará.
Puede utilizar la función para ajustar la conguración de pantalla
de forma automática o manual.
Auto Ajuste
Pulse ” / “ para ajustar automáticamente el tamaño y la
posición del PC.
Posición H
Pulse ” / “ para ajustar la Posición-H de la televisión.
Posición V
Pulse ” / “ para ajustar la Posición-V de la televisión.
Fase
Pulse ” / “ para ajustar la fase de la imagen.
Frecuencia
Pulse ” / “ para ajustar la frecuencia de actualización de la imagen.
TV-Y
TV-Y7
TV-G
TV-PG
TV-14
TV-MA
ALL
ALL FV
ALL
ALL
ALL
ALL
TV RATING
RGB
Auto Adjust
H Position
V position
Phase
Frequency
V
S
LLD
V
S
V
D
S
L
35
100
7
50
15 ES
Page 17

Control de U SB
MENÚ Menu
1. Pulse [ ] / [ ] para seleccionar PHOTO. Pulse [ SELECT ] para entrar.
2. Pulse [ ] / [ ] para seleccionar la unidad que desee y pulse [ SELECT ] para entrar.
3. Pulse [ ] / [ ] para seleccionar la carpeta deseada y pulse [ SELECT] para abrir la carpeta;
seleccionar el archivo de foto deseado con [ SELECT ] y pulse [ ] para iniciar la reproducción.
4. Pulse [ ] para parar la presentación de diapositivas de fotos y volver a la lista de fotos.
5. Usted puede volver al menú principal del reproductor USB, pulse [ USB ].
Return
Up Folder
Picture01.jpeg
Picture01.jpeg
Picture01.jpeg
Picture01.jpeg
Photo
C: \ 1/1
USB
Return
SET
Move Set
Resolution: 1024 X 768
Size: 983 KBytes
Date: ----/--/-Time: --:--:--
(LE32LM206) (LE42LS256)
Barra de control de Fotos
Pausea
Anterior Siguiente
Parar
Return
Up Folder
Picture01.jpeg
Picture01.jpeg
Picture01.jpeg
Picture01.jpeg
Photo
C: \ 1/1
Return Move Set
Modo de
reproducir
Lista
A
SET
Resolution: 1024 X 768
Size: 983 KBytes
Date: ----/--/-Time: --:--:--
Información
actual
Derecha
90 grados
Izquierda
90 grados
Zoom In
Zoom Out
Move
- Pulse [ INFO ] para mostrar la Barra de Control de fotografía durante la presentación de diapositivas de fotos.
- Pulse [ ] / [ ] para seleccionar la configuración deseada.
- Pulse [ ] para salir de la barra de información.
ES 16
Page 18

Control de USB
Control remoto
1. USB botón. Pulse para entrar en el menú USB.
2. Botón Retroceso rápido ( )
Retroceso rápido durante la reproducción.
3. Botón de avance rápido ( )
Un avance rápido durante la reproducción.
4. Botón Anterior ( )
Pulse para volver al capítulo / pista / imagen anterior.
Ir al archivo anterior.
5. Botón Next ( )
Pulse para pasar al siguiente capítulo / pista /foto.
Ir al archivo siguiente.
6. Botón de reproducción y pausa ( )
Presione para pausar o reproducir.
7. Botón Stop ( ) Pulse el botón stop para salir de la
reproducción de pantalla completa ,accesar a la pantalla de
vista previa.
Control de USB
Puede reproducir vídeo y música, ver fotos y archivos de texto desde los dispositivos
de almacenamiento USB.
1. Conecte dispositivo de almacenamiento USB al terminal de entrada USB.
2. Pulse el botón USB para acceder al modo USB.
3. Pulse [ ] / [ ] para seleccionar los tipos de modos de USB: foto y texto.
USB 2.0
PHOTO TEXT
17 ES
Page 19

Control de USB
MENÚ Text
1. Pulse [ ] / [ ] para seleccionar texto. Pulse [ SELECT ] para entrar.
2. Pulse [ ] / [ ] para seleccionar la unidad que desee y pulse [ SELECT ] para entrar.
3. Pulse [ ] / [ ] para seleccionar la carpeta deseada y pulse [ SELECT ] para abrir la carpeta;
seleccione el archivo de texto que desee con [ SELECT ] y pulse [ ] para visualizar el documento de texto.
4. Pulse [ ] / [ ] para ver archivo de texto anterior o siguiente.
5. Pulse [ ] / [ ] para seleccionar la página anterior o siguiente en el archivo de texto.
6. Pulse[ ] para volver a la lista de texto.
7. Usted puede volver al menú principal el reproductor USB.
Return
Up Folder
Text01.txt
Text02.txt
Text03.txt
Text
C: \ 1/1
USB
Return
SET
Move Set
(LE32LM206) (LE42LS256)
Please ensure that the text
file is saved in an encoding
standard (eg.Unicode). This
may minimize the loss of
characters in a multiplelanguage content.
Size: 983 KBytes
Return
Up Folder
Text01.txt
Text02.txt
Text03.txt
Text
C: \ 1/1
Return Move Set
SET
Please ensure that the text
file is saved in an encoding
standard (eg.Unicode). This
may minimize the loss of
characters in a multiplelanguage content.
Size: 983 KBytes
Barra de control de Texto
Retroceso rápido
Avance rápido Anterior Siguiente
Parar
Lista
Información actual
- Pulse [ INFO ] para mostrar la Barra de Control de fotografía durante la presentación de diapositivas de texto.
- Pulse [ ] / [ ] para seleccionar la configuración deseada.
- Pulse [ ] para salir de la barra de información.
Nota:
- Soporta archivos * txt (caracteres Inglés ).
- Por favor, asegúrese de que el archivo de texto este salvado en una codificación estándar.
Esto puede minimizar la pérdida de caracteres en un contenido en varios idiomas.
ES 18
Page 20

Conexiones a otros equipos
La instalación exacta a utilizar para hacer las conexiones de los distintos componentes de vídeo y audio en la unidad depende del
salidas de vídeo y de audio.
Para conectar entrada de AV a un VCR
Parte trasera del unidad
VCR
Cable de Vídeo/Audio
(no suministrado)
A entrada de
VIDEO/AUDIO
A salida de Vídeo/Audio
Para conectar a un reproductor de DVD con entrada de Video componente
A entrada de
Y
P b
P r
A entrada de
COMPONENT
NOTA:
La entrada de vídeo componente de esta unidad está prevista para su uso con dispositivos que emitan señales entrelazadas de •
480i/1080i y señales progresivas de 480p/720p.
AUDIO
A salida de Audio
Cable de Audio
(no suministrado)
Cable de vídeo componente
(no suministrado)
A salida de Componente
DVD
Y
P b
P r
ES 19
Page 21

Conexiones a otros equipos (continuación)
Para conectar el unidad a un HDMI o a un dispositivo DVI
La entrada HDMI recibe audio digital y vídeo no comprimido desde un dispositivo HDMI o vídeo digital no comprimido desde un dispositivo
DVI. Si se conecta un dispositivo DVI a un cable adaptador HDMI-a-DVI, sólo transfiere la señal de vídeo. Se requieren cables de audio
Parte trasera y Izquierdo del unidad
A entrada de
PC/DVI AUDIO
NOTA:
• Cuando use el HDMI1/DVI IN para conectar sus dispositivos HDMI o DVI, debe seleccionar la correspondiente fuente de entrada de audio
(HDMI o DVI) en la pantalla del menú (ver página 15). De otra forma, sólo verá la imagen sin sonido.
Cable de Audio (no suministrado)
Cable adaptador HDMI-a-DVI
(conector HDMI tipo A)
A entrada de HDMI
HDMI cable (type A connector)
(no suministrado)
(no suministrado)
A salida de DVI
Dispositivo DVI
o
Dispositivo HDMI
A salida de HDMI
Para conectar la TV a un PC (Computadora personal)
Antes de conectar la TV al PC, cambie el ajuste de la resolución del PC y la velocidad de actualización (60 Hz).
Conecte un extremo del cable VGA (macho a macho) a la tarjeta de vídeo del PC y el otro extremo al conector
de la parte posterior de la
de audio a las salida de audio del ordenador y al conector de AUDIO IN del toma PC/DVI AUDIO IN del TV. Puede también conectar la PC con el
cable HDMI. Si utiliza el cable HDMI, no tiene que conectar el cable de audio. Si utiliza el cable DVI-a-HDMI, por favor conecte el cable de audio
de la misma manera que con el cable VGA.
Presione INPUT en el control remoto para seleccionar el modo PC.
TV
. Fije los conectores con firmeza con los tornillos de la clavija.
En el caso de un equipo multimedia, conecte los cables
VGA del monitor PC MONITOR IN
Rear and Left of the unit
A entrada de HDMI
A entrada de
PC
MONITOR
NOTA:
• Las imágenes visuales en la pantalla tendrán aspecto diferente en el modo PC y en el modo otro.
• Si no existe señal de vídeo desde computadora cuando la unidad está en modo PC, la leuenda “No signal”, aparecerá en la pantalla del TV.
• Cuando el PC conectado a la terminal HDMI y resolución 1920x1080 (FHD) esté seleccionado, los extremos superior, inferior, derecho e
izquierdo de la imagen pueden aparecer ocultos en todos los aspect. En ese caso, se recomienda el uso de la PC MONITOR IN (cable VGA).
• Cuando la resolución del PC sea de 1920 x 1080/60 Hz (modo FHD), una señal diferente a la señal FHD, cuyo funcionamiento ha sido
confirmado
de ajuste de posición quizás no consigan corregir la posición de la imagen. Para solucionar este problema, cambie los ajustes del PC para
seleccionar otra resolución.
A entrada
de PC/DVI
AUDIO
en este televisor, puede aparecer dependiendo del PC utilizado. En ese caso, la función de “Auto Adjust” u otras funciones
Cable HDMI
(no suministrado)
Cable de Audio (no suministrado)
Cable VGA (no suministrado)
Modos de visualización del monitor
Modo Resolución Velocidad de
actualización
VGA 640x480 60Hz
VGA 720x480 60Hz
SVGA 800x600 60Hz
XGA 1024x768 60Hz
WXGA 1280x720 60Hz
WXGA 1360x768 60Hz
SXGA 1280x1024 60Hz
FHD 1920x1080 60Hz
Para volver al modo normal
Vuelva a pulsar INPUT.
ES
20
Page 22

Conexiones a otros equipos (continuación)
Para conectar la salida AV para VCR Recorder (LE32LM206)
Proporcionar señales de vídeo y audio jos que se utilizan para la grabación. Esto no da salida de vídeo por componentes,
HDMI / DVI o RGB ".
Parte trasera del unidad
Cómo conectar un amplicador AV.
Parte trasera del unidad
A entrada de VIDEO/AUDIO
Cable de Vídeo/Audio (no suministrado)
A salida de Vídeo/Audio
Altavoz
delantero
(izquierdo)
VCR
Altavoz de subgraves
TV
Altavoz
delantero
(derecho)
A salida de DIGITAL
AUDIO COAXIAL
Cable digital coaxial
(no suministrado)
A la entrada de audio
incorporado
digital coaxial
Altavoz
ambiental
(izquierdo)
Altavoz central
Altavoz
ambiental
(derecho)
ES
21
Page 23

Disturbios de recepción
RUIDO DE ENCENDIDO:
Pueden aparecer puntos negros o rayas horizontales, la imagen puede variar o moverse. Usualmente
causado por interferencia de un sistema de arranque de un auto, lámparas de neón, taladros eléctricos,
y otros aparatos eléctricos
IMÁGENES FANTASMAS::
Imágenes fantasmas son causadas por señales de televisión siguiendo dos rutas distintas. Una es
de incidencia directa y la otra es reflejada en edificios altos, montañas u otros objetos. Cambiando la
dirección o posición de la antena puede mejorar la recepción. Imágenes fantasmas también pueden
ser causadas por defectos del sistema de la antena tales como cables sin blindaje o al conectar varios
aparatos a la misma antena sin usar divisores múltiples de antena.
NIEVE::
Si su receptor esta ubicado en el límite de cobertura de una estación de TV donde la señal es débil,
su imagen puede estar empañada con la apariencia de pequeños puntos. Cuando la señal es
extremadamente débil, puede ser necesario instalar una antena especial para mejorar la imagen
INTERFERENCIA DE FREQUENCIAS DE RADIO:
La interferencia produce ondas o rayas diagonales, y en algunos casos, causa pérdida de contraste en la imagen.
PREVENCIÓN DE OBSTACULOS PARA RECEPTORES DE RADIO
Esta televisión ha sido diseñada conforme a las normas de la FCC para aparatos de Clase B. Esto para
prevenir problemas a los receptores de Radio. Si esta televisión causa problemas a un receptor de
Radio siga los siguientes pasos:
•
Mantenga la televisión lejos del Radio.
•
Ajuste la antena del Radio con el fin de no recibir interferencia.
•
El cable de la antena del Radio debe mantenerse lejos de la televisión.
•
Use cable coaxial para la antena.
Usted puede comprobar si esta televisión interfiere en los receptores de Radio apagando todos los
equipos excepto la TV. Si usted encuentra un problema al recibir el Radio al estar usando la television,
siga las instrucciones mencionadas arriba
IMAGEN OBSCURA:
Al recibir canales digitales usando una antena y esta señal sea muy débil, la imagen aparecerá
.
obscura, puede ser necesario mejorar su sistema de antena.
NOTA:
El Televisor puede generar distorsión de sonido en dispositivos externos tales como una radio. Favor de separar el equipo de radio del
•
televisor y ponerlo a una distancia considerable.
ES
22
Page 24

Solución de problemas
Consulte la siguiente lista de localización de errores si experimenta problemas con su TV LCD. Consulte con su concesionario local
o tienda de servicio si continúan los problemas. Compruebe que se han hecho correctamente todas las conexiones cuando utilice el
equipo con otros aparatos.
SÍNTOMA POSIBLE SOLUCIÓN
•
conectado.
El TV no
funciona.
Sonido de
baja calidad o
ausencia de
sonido.
Imagen de
baja calidad o
ausencia de
imagen.
Mala recepción
en algunos
canales.
de los colores
o ausencia de
color.
Pruebe con otro tomacorriente de CA.•
La alimentación está desconectada; •
el fusible o el interruptor automático.
Desconecte la unidad, y vuelva a •
conectarla al cabo de una hora.
La estación o el servicio de TV por Cable •
están con problemas; sintonice otra
estación.
•
o Mute).
Determine si hay posibles fuentes de •
interferencia.
La estación o el servicio de TV por Cable •
están con problemas; sintonice otra
estación.
•
en la memoria.
Revise las conexiones de la antena o •
sistema TV por Cable; reoriente la antena.
Determine si hay posibles fuentes de •
interferencia.
•
imagen.
La estación o el servicio de TV por Cable •
están con problemas; sintonice otra
estación.
•
en la memoria.
La señal de la estación es débil; reoriente •
la antena.
Determine si hay posibles fuentes de •
interferencia.
La estación o el servicio de TV por Cable •
están con problemas; sintonice otra
estación.
•
en la memoria.
•
imagen.
Revise las conexiones de la antena o •
sistema TV por cable; reoriente la antena.
Determine si hay posibles fuentes de •
interferencia.
revise
SÍNTOMA POSIBLE SOLUCIÓN
El idioma
deseado no se
muestra
No hay
recepción de TV
cable.
Aparecen
barras
horizontales o
verticales en la
pantalla.
La recepción no
es posible más
allá del canal
13.
El control
remoto no
opera.
El televisor se
apaga.
La función de
subtítulo cerrado
no está activada.
Seleccione el idioma apropiado en las •
opciones del menú
Revise todas las conexiones del sistema •
TV por Cable.
Ajuste la opción Air/Cable al modo Cable.•
La estación o el servicio de TV cable •
están con problemas; sintonice otra
estación.
Controle las conexiones de la antena, •
ajuste o redireccione la antena.
Determine si hay posibles fuentes de •
interferencia.
Asegúrese de que la opción de menú •
Source está en el modo apropiado.
Si está usando una antena, revise las •
conexiones de la antena de UHF.
Las pilas están débiles o agotadas, o han •
sido insertadas en forma incorrecta.
El mando a distancia está fuera del •
alcance, acérquese a la TV (15 pies).
Asegúrese de apuntar la unidad de •
control remoto hacia el sensor de control
remoto.
Asegúrese de que no hay obstáculos •
entre el mando a distancia y la TV.
•
esté conectado.
El temporizador de desactivación •
automática ha sido activado.
El suministro de energía se ha •
interrumpido.
Estación de TV está experimentando •
problemas o programa sintonizado no está
en modo de subtítulo cerrado. Pruebe en
otro canal.
La estación o el servicio de TV por Cable •
están con problemas; sintonice otra
La imagen
presenta
oscilación o
desplazamiento.
estación.
•
en la memoria.
El servicio TV por Cable está •
Ajustar antena.•
Si el problema no se puede solucionar con los procedimientos sugeridos, póngase en contacto
con HITACHI. Para obtener asistencia adicional, por favor consulte "GARANTÍA LIMITADA"
en la página 25. Por su seguridad, nunca intente reparar el producto usted mismo.
23ES
Page 25

LE32LM206 LE42LS256
GENERALIDADES
Fuente de alimentación AC 110-240V, 50-60Hz
Consumo de energía En funcionamiento : 65 Vatios
Peso 7.0 kg (15.4 libras) 17.0 kg (37.5 libras)
Dimensiones Anchura : 742 mm (29-1/4 pulgadas)
Temperatura de operación 5˚C - 35˚C
Humedad de
funcionamiento
TELEVISOR
Tipo
Tipo de pantalla Panel LCD en color TFT de transmisión
Número de pixeles 1366 (H) x 768 (V)
Sistema de transmisión
En espera : 0.3 Vatios
Altura : 506.8 mm (20 pulgadas)
Profundidad : 196 mm (7-11/16 pulgadas)
20% ~ 80% RH
800.3 mmV (32” class/31.51” diagonal)
NTSC
En funcionamiento : 120 Vatios
En espera : 0.3 Vatios
Anchura : 999.5 mm (39-3/8 pulgadas)
Altura : 670.2 mm (26-7/16 pulgadas)
Profundidad : 213mm (8-7/16 pulgadas)
1067.3 mmV (42” class/42.02” diagonal)
1920 (H) x 1080 (V)
Especificaciones
Canales de recepción VHF 2-13
UHF 14-69
CATV 14-36 (A)-(W)
37-59 (AA)-(WW)
60-85 (AAA)-(ZZZ)
86-94 (86)-(94)
95-99 (A-5)-(A-1)
100-135 (100)-(135)
01 (4A)
Tipo de sintonizador Frecuencia sintetizada
Entradas Video: 1.0 V (p-p),75 ohms
Audio: 0.5 Vrms/10k ohms
Vídeo de componentes : (Y) 1,0 V (p-p), 75 ohms
(Pb)/(Pr) 0,7 V (p-p), 75 ohms
HDMI: Compatible con HDMI (conector de tipo A)
Compatible con HDCP
Compatible con E-EDID
Velocidades de rastreo sugeridas: 480i, 480p, 720p, 1080i, 1080p
HDMI Audio: 2-channel PCM
velocidad de muestreo de 32/44,1/48 kHz
16/20/24 bits por muestra
Monitor del PC: Mini-Dsub 15pin
Antena : VHF/UHF In 75 ohms coaxial
Salida Audio (LE32LM206): 470 mVrms, 1k ohms
Video (LE32LM206 ): 1.0V (p-p), 75 ohms
Salida de Audio Digital: Coaxial
Terminal para Auricular: 3.5 mm Stereo
Potencia de salida de audio 5.0W + 5.0W
8.0W + 8.0W
El diseño y las especificaciones están sujetas a cambio sin aviso.
•
Para información sobre otros productos, por favor visite nuestro sitio web en www.hitachi.us•
ES
24
Page 26

Felicitaciones por su compra de un nuevo producto de pantalla Hitachi.
GARANTÍA LIMITADA:
Hitachi America, Ltd., Digital Media División garantiza este producto de acuerdo con los términos y condiciones aplicables a
los productos que se identifican a continuación:
Condiciones de la Garantía Limitada de Hitachi Este producto de pantalla Hitachi (el "producto") está garantizado contra
defectos en materiales y mano de obra desde la
los períodos aplicables especificados a continuación. Si el producto se encuentra defectuoso, Hitachi reparará o remplazará (a
opción de Hitachi) las pieza(s) defectuosa(s) sin cargo, sujeto a las condiciones de esta garantía limitada. Si el propietario
original rechaza, se niega o de lo contrario no acepta la oferta de Hitachi para reparar o remplazar las piezas
esta garantía limitada, esta garantía limitada será nula y de no más fuerza o efecto. Esta garantía limitada se extiende
solamente al propietario original y no es transferible, tal propietario debe proporcionar un recibo de venta para que el
producto califique para repuestos o servicio bajo esta garantía limitada. El propietario original debe notificar a Hitachi de una
reclamación de defecto llamando al n
propietario durante el período de garantía limitada para ser efectiva esta garantía limitada. Esta garantía limitada es válida
sólo en los Estados Unidos, Puerto Rico y países que se enumeran a continuación.
Hitachi producto: Televisores de pantalla plana LCD: PIEZAS: El período de la garantía limitada de piezas es un (1) año
desde la fecha d
defectuosa(s) con pieza(s) nueva(s) o reconstruida(s) (a opción de Hitachi) sin costo alguno para dichas piezas. Cualquier
pieza de repuesto se garantizará por el resto del período original de la garantía aplicable a la parte remplazada. LABORAL:
El período de garantía limitada de mano de obra es de un (1) año desde la fecha d
garantía limitada de mano de obra, Hitachi reparará o remplazará (a opción de Hitachi) piezas defectuosas sin cargo de
trabajo laboral. UBICACIÓN DEL SERVICIO: Servicio de garantía a domicilio, que incluye repa ración a domicilio o
libre recogida y entrega (a opción de Hitachi), seaplica a todos los productos de Hitachi excepto: (i) televisores de pantalla
plana LCD más pequeños de 42 pulgada
países enumerados a continuación; (iii) productos ubicados más de setenta y cinco (75) millas a conducción del más cercano
centro de servicio autorizado Hitachi en uno de los países enumerados a continuación. Si las anteriores cláusulas (i), (ii), (iii)
aplican, entonces el propietario del producto seráresponsable de traer/entregar el producto a un c
Hitachi, y recuperar el producto de tal centro de servicio autorizado.
Por favor llame al número gratuito a continuación según el país de residencia:
Costa Rica 0-800-052-1573
El Salvador 800-054-3030
Guatemala 1-800-835-0295
Nicaragua 001-800-226-0453
Panama 00-800-052-1397
Republica Dominicana 1-888-760-1340
Venezuela 0800-1006-196
IMPORTANTE: Antes de usar o instalar el producto, por
para sus registros. Esto le ayudará a facilitar la cobertura de la garantía adecuada.
NOMBRE del DISTRIBUIDOR FECHA de COMPRA
DIRECCIÓN del DISTRIBUIDOR
ESTADO CIUDAD
e compra original. Durante el período de garantía limitada de piezas, Hitachi remplazará la(s) pieza(s)
úmero de servicio al cliente a continuación correspondiente al país de la residencia del
fecha de compra por el propietario original y continuando por la duración de
s; (ii) productos que se encuentran fuera de los Estados Unidos, Puerto Rico o los
favor complete este formulario y adjunte su recibo y guárde las
defectuosas bajo
e compra original. Durante el período de
entro de servicio autorizado
NO de SERIE NO de MODELO
ES
25
Page 27

Limitaciones de la garantía: Esta Garantía Limitada de Hitachi no cubre: A. Cualquier producto que haya sido
modificado o reparado de manera no previamente auto rizada por Hitachi por escrito. B. Cualquier producto cuyo número de
serie ha sido retirado, alterados, remplazado, desfigurado o resulta ilegible. C. Cualquier defecto, mal funcionamiento o fallas
causadas por o resultantes de servicio inadecuado o no autorizado, mantenimient
abuso, mal uso, maltrato, negligencia o daños causados por la exposición a ambientes hostiles de funcionamiento tales como
áreas con polvo o humo. E. Daños causados por sobrecargas eléctricas, accidentes, catástrofes naturales o cualquier otro
evento o circunstancia fuera del control de Hitachi. F. Cualquier producto utilizado en cualquier forma incompatible con la
configuración aceptable, uso, co
producto. G. Cualquier producto utilizado para propósitos o aplicaciones, o sometidos a condiciones de funcionamiento,
distintos de los identificados como aceptable en el manual de funcionamiento del producto. H. Reparaciones al producto
(incluyendo cualquier producto cuyo caso ha sido abierto), o sustitución de piezas proporcionado o instalado por cua
persona que no sea un representante de un centro de servicio autorizado Hitachi. I. Inadecuada desembalaje, configuración,
instalación o cualquier mal ajustes causados por los controles operados por el usuario. J. Mano de obra o costos asociados
con la eliminación del producto desde un armario personalizado o en otra instalación de productos especializados que impide
la remoción directa e inmediata del producto de inst
propietario). K. Gabinetes de producto, piezas de gabinete, perillas, baterías o accesorios. L. Producto con pantallas que se
han limpiado por cualquier método, excepto como se especifica en el manual de funcionamiento del producto. M. El uso
normal, brillo degradado causado por efectos de envejecimiento o celda de retroiluminación o desgaste normal, incluyendo,
sin limitación
N. Cualquier producto devuelto para servicio que est á dañado debido a mal embalaje, manipulación o enví o.
(IMPORTANTE: al enviar cualquier producto a un centro de servicio autorizado de Hitachi, el dueño del producto debe
empaquetarlo firmemente en el embalaje original o equivalente para evitar daños. E
gastos de envío pre pagados y comprobante de compras incluidas en el contenedor de envío. Falta de empacar correctamente
tal producto durante tal envío anulará todas las garantías.) O. Cualquier producto comprado o reparados fuera de los países
mencionados anteriormente, Estados Unidos o PuertoRico. P. Cualquier producto que se ha utilizado con fines comerciales.. .
, rayas o marcas en la pantalla del producto, del gabinete o la aparición de píxeles de pantalla brillante u oscuro.
nfiguraciones de seguridad o instalación identificadas en el manual de funcionamiento del
alaciones del propietario (debe ser organizado y pagado por el
o o reparación. D. Daños causados por
lquier
l producto debe ser devuelto con los
NINGUNA PERSONA, AGENTE
ESTÁ AUTORIZADA A CAMBIAR, MODIFICAR O ENMENDAR LOS TÉRMINOS DE ESTA GARANTÍA
LIMITADA EN MODO ALGUNO. SALVO LO PREVISTO EN ESTA GARANTÍA LIMITADA, HITACHI NO
OTORGA NINGUNA GARANTÍA EXPRESA CON RESPECTO A ESTE PRODUCTO DE HITACHI. ADEMÁS,
TODAS GARANTÍAS IMPLÍCITAS RELATIVAS A CUALQUIER PORCIÓN DE ESTE PRODUCTO, INCLUYENDO
CUALQUIER GARANTÍA DE COMERCIABILIDAD
ESTÁN LIMITADAS A LA DURACIÓN ESPECIFICADA BAJO ESTA GARANTÍA LIMITADA. NO SERÁ
RESPONSABLE AL COMPRADOR O A CUALQUIER OTRA PERSONA POR NINGÚN DAÑO INCIDENTAL O
CONSECUENTE O PÉRDIDA DE GANANCIAS O PRODUCTO RESULTANTE DE CUALQUIER DEFECTO EN, O
MAL FUNCIONAMIENTO O FALLA DE ESTE PRODUCTO DE HITACHI. PORQUE LAS LEYES DE ALGUNAS
JURISDICCIONES O ESTADOS NO PERMITEN LIMITACIONES
IMPLÍCITA, O LA EXCLUSIÓN DE DAÑOS INCIDENTALES O CONSECUENTES, LAS LIMITACIONES
ANTERIORES PUEDEN NO APLICARSE A USTED, Y CIERTOS DERECHOS LEGALES PUEDEN ESTAR
DISPONIBLES PARA USTED QUE SON ESPECÍFICOS PARA SUJURISDICCION. ESTA GARANTÍA LE CONFIERE
DERECHOS LEGALES ESPECÍFICOS, INCLUYENDO ALGUNOS OTROS DERECHOS QUE PUEDEN VARIAR
DEPENDIENDO DE SU JURISDICCIÓN.
, DISTRIBUIDOR, CONCESIONARIO, SERVICIO INSTALACIÓN, O LA EMPRESA
O IDONEIDAD PARA UN PROPÓSITO EN PARTICULAR,
EN CUÁNTO DURA UNA GARANTÍA
ES
26
Page 28

triangle is intended to alert the user to the presence of uninsulated
dangerous voltage within the product's enclosure that may be of
CAUTION: TO REDUCE THE RISK OF ELECTRIC
SHOCK, DO NOT REMOVE COVER
(OR BACK). NO USER-SERVICEABLE
PARTS INSIDE. REFER SERVICING TO
QUALIFIED SERVICE PERSONNEL.
The exclamation point within an equilateral triangle is intended
to alert the user to the presence of important operating
and maintenance (servicing) instructions in the literature
accompanying the appliance.
WARNING: TO PREVENT FIRE OR SHOCK HAZARD, DO NOT EXPOSE THIS APPLIANCE TO RAIN OR MOISTURE.
TO PREVENT THE SPREAD OF FIRE, KEEP CANDLES OR OPEN FLAMES AWAY FROM THIS PRODUCT AT
ALL TIMES.
CAUTION: TO PREVENT ELECTRIC SHOCK, DO NOT USE THIS POLARIZED PLUG WITH AN EXTENSION CORD,
RECEPTACLE OR OTHER OUTLET UNLESS THE BLADES CAN BE FULLY INSERTED TO PREVENT BLADE
EXPOSURE.
Lead Notice
This product contains lead. Do not put in trash. Recycle or dispose of
according to applicable laws. For product recycling and disposal information, contact your local government agency or visit www.
ecyclingcentral.com (in USA) or www.epsc.ca (in Canada).
Location of the required Marking
The rating sheet and the safety caution are on
the rear of the unit.
1
Page 29

IMPORTANT SAFETY INSTRUCTIONS
1) Read these instructions.
2) Keep these instructions.
3) Heed all warnings.
4) Follow all instructions.
5) Do not use this apparatus near water.
6) Clean only with dry cloth.
7) Do not block any ventilation openings. Install in accordance with the manufacturer’s instructions.
8)
that produce heat.
9) Do not defeat the safety purpose of the polarized or grounding-type plug. A polarized plug has two blades with
one wider than the other. A grounding type plug has two blades and a third grounding prong. The wide blade or the
replacement of the obsolete outlet.
10) Protect the power cord from being walked on or pinched particularly at plugs, convenience receptacles, and the point
where they exit from the apparatus.
11)
12)
apparatus. When a cart is used, use caution when moving the cart/apparatus combination to avoid injury
from tip-over.
13) Unplug this apparatus during lightning storms or when unused for long periods of time.
14)
way, such as power-supply cord or plug is damaged, liquid has been spilled or objects have fallen into the apparatus,
the apparatus has been exposed to rain or moisture, does not operate normally, or has been dropped.
15)
be placed on the apparatus.
16) An outside antenna system should not be located in the vicinity of overhead power lines or other electric light or power
circuits, or where it can fall into such power lines or circuits. When installing an outside antenna system, extreme care
should be taken to keep from touching such power lines or circuits, as contact with them might be fatal.
17)
18) Do not push objects through any openings in this unit, as they may touch dangerous voltage points or short out parts
19) If an outside antenna or cable system is connected to the unit, be sure the antenna or cable system is grounded to provide
some protection against voltage surges and built-up static charges.
20)
or those that have the same characteristics as the original part.
21) Upon completion of any service or repairs to this unit, ask the service technician to perform safety checks to determine that
the unit is in proper operating condition.
22)
outlet. Failure to do so may cause an electric shock and serious personal injury. Read the owner's manual of the other
equipment carefully and follow the instructions when making any connections.
23) Sudden high volume sound may cause hearing or speaker damage. When you use headphones, (if the unit is equipped with
a headphone jack) keep the volume at a moderate level. If you use headphones continuously with high volume sound, it
may cause hearing damage.
24) Do not allow the product to output distorted sound for an extended period of time. It may cause speaker overheating and
25) The socket-outlet must be installed near the unit and easily accessible.
26) The mains plug is used as the disconnect and shall remain readily operable.
2
Page 30

IMPORTANT SAFETY INSTRUCTIONS (continued)
CONDENSATION
Moisture will form in the operating section of the unit if the unit is brought from cool surroundings into a warm room or if the temperature
of the room rises suddenly. When this happens, unit's performance will be impaired. To prevent this, let the unit stand in its new
surroundings for about an hour before switching it on, or make sure that the room temperature rises gradually.
Condensation may also form during the summer if the unit is exposed to the breeze from an air conditioner. In such cases, change the
location of the unit.
HOW TO HANDLE THE LCD PANEL
Do not press hard or jolt the LCD panel. It may cause the LCD panel glass to break and injury may occur.•
If the liquid gets in your mouth, immediately gargle and consult with your doctor. Also, if the liquid gets in your eyes or touches your
skin, consult with your doctor after rinsing for at least 15 minutes or longer in clean water.
can become permanently engrained in the LCD Panel and cause subtle but permanent ghost images. This type of damage is NOT
COVERED BY YOUR WARRANTY. Never leave your LCD Panel on for long periods of time while it is displaying the following formats or
images:
Fixed Images, such as stock tickers, video game patterns, TV station logos, and websites.•
Special Formats that do not use the entire screen. For example, viewing letterbox style (16:9) media on a normal (4:3) display (black •
bars at top and bottom of screen); or viewing normal style (4:3) media on a widescreen (16:9) display (black bars on left and right
sides of screen).
The following symptoms are not signs of malfunction but technical limitation. Therefore we disclaim any responsibility for
these symptoms.
LCD Panels are manufactured using an extremely high level of precision technology, however sometimes parts of the screen may be •
missing picture elements or have luminous spots.
This is not a sign of a malfunction.
Do not install the LCD Panel near electronic equipment that produces electromagnetic waves. Some equipment placed too near this •
unit may cause interference.
•
•
Power source
This LCD television is designed to operate on 110 -240 volts 50 - 60 Hz, AC current. Insert the power cord into a 110 - 240 volts 50 - 60 Hz outlet.
To prevent electric shock, do not use the LCD television’s (polarized) plug with an extension cord, receptacle, or other outlet unless
the blades can be fully inserted to prevent blade exposure.
Never connect the LCD television to direct current, or anything other than the specified voltage.
Warning
Caution
Never remove the back cover of the LCD television as this can expose you to very high voltages and other hazards. If the television
does not operate properly, unplug the LCD television and call your authorized dealer or service center.
Hitachi could void the user’s warranty.
3
Page 31

CHILD SAFETY NOTICE
4
Page 32

SAFETY PRECAUTIONS
The unit emits heat when in operation. Do not place any covers or blankets on the unit, this may cause overheating. Do not block
ventilation holes, or set up near radiators. Do not place in direct sunlight. When placing on a shelf leave 4 inches (10 cm) free space
around the entire unit.
4 inches
4 inches
Notes when mounting the LCD TV on a wall
If the unit is to be mounted on the wall, contact the retailer where you purchased the LCD TV for advice, and have the equipment professionally installed. Incomplete or improper installation may cause injury to you, and/or damage to the LCD TV.
The screws ISO M6 thread type should be used. The insertion length must be within 12 - 16mm.
If the insertion length is less than 12mm, the weight can not be maintained.
If the insertion length is more than 16mm, a space is created between the Wall Mount Bracket and the Television.
(Insertion Length) = (Screw Length) - (Washers Thickness) - (Mounting Bracket Thickness)
Securing to a Wall
1. Using metallic wire fasten the set to the clamping screw on the rear of the LCD TV as shown below.
(Not Provided)
2. Keep the LCD TV 4 inches away from the wall except when mounted using the wall mount bracket and secure to the wall as shown
below:
4 inches
Wire
LE42LS256
Wire
Clamp
Screw
Screw (M6X14)
Wire
Clamp
Screw
Screw (M5X14)
LE32LM206
NOTICE FOR TV CABINET
If the unit is to be mounted on a cabinet smaller than length of the unit, it could result in an unstable location and the unit may tumble
over, making a risk of personal, possibly fatal injury. Also, this would damage the product seriously. Accordingly, Hitachi accepts no
responsibility or liability for any injuries or property damage resulting from the improper installation.
YES !!
NO !!
5
Page 33

How to attach the stand
1. Please take out the accessory bag from the package, check all the parts below are
complete with nothing missing, if not please contact the agency.
Base Conector Bracket Plastic gasket
(1 PCS)
(LE42LS256)
(LE32LM206)
Neck Screws Base Screws
M4 X10(4 PCS)
M4 X10(4 PCS)
M5 X22(4 PCS)
M4X10 (1 PC)
2. Please take the TV set out, and carefully put the TV set with its front side
facing down on flat surface with table cloth or other soft cushion.
support
soft cushion
4. Connected the glass base and the connector bracket
with four M5x22 screws for LE42LS256, and one
M4x10 for LE32LM206.
(LE32LM206)
(LE42LS256)
5. Assembly the base assy and the TV set as the image.
3. Install the plastic gasket, the connector Bracket and the glass base
in proper order. (Only LE42LS256)
perform the above steps in reverse order.
For wall mounting, the base must be
removed. To disconnect the base/stand remove the 4 screws from the back.
6. Lastly attach the base assy with 4pcs M4 X10 screws.
Attention: Be sure that the base assembly does not fall
and make sure the screws are fastened securely.
How to remove the stand
Screws
6
Page 34

Features
LCD color TV
Unique space saving design combines a 32 /42 ” ” class LCD color TV.
Closed Caption Decoder With Full Text Mode - • Displays text captions or full screen text on the screen for hearing impaired viewers.
Picture Adjustments Using The Remote Control - • The On-Screen display allows precise remote control adjustment of BRIGHTNESS, CONTRAST,
COLOR, TINT and SHARPNESS.
Programmable TV Sleep Timer - •
automatically.
On-Screen 3 Languages Display - • You can select one of 3 Languages, English, Spanish or French for on-screen programming
Parental Control -• The Parental Control function can read the rating of a TV program or movie content if the program is encoded
with this information. Parental Control will allow you to set a restriction level.
This LCD television receiver can display closed captions for programs containing U.S.-style caption content
* HDMI, the HDMI Logo, and High-Definition Multimedia Interface are trademarks or registered trademarks of HDMI Licensing LLC
in the United States and other countries.
* VGA and XGA are trademarks of International Business Machines Corporation.
* VESA is a registered trademark of the Video Electronics Standard Association.
or
Power source
TO USE AC POWER
Connect the AC cord plug into this unit’s AC INPUT jack.1.
Connect the AC cord into an AC outlet.2.
NOTE:
Please make sure to insert the cord securely at both the LCD TV and the wall outlet.•
•
Connect the antenna cable into the antenna input terminal at the rear panel and wall antenna socket.
•
WARNING:
•
damage.
•
CAUTION:
When this unit is not used for a long time, (e.g., away on a trip) in the interest of safety, be sure to unplug it from the AC outlet.•
Do not plug/unplug the AC cord when your hands are wet. This may cause electrical shock.•
•
the unit from.
AC cord
7
Wider Hole
and Blade
AC Outlet
AC 110-240V, 50-60Hz
Page 35

Contents
Before using your unit
IMPORTANT SAFETY INSTRUCTIONS ....................................................................................................................................................................................... 2
CHILD SAFETY NOTICE ................................................................................................................................................................................................................. 4
SAFETY PRECAUTIONS ................................................................................................................................................................................................................. 5
How to attach the stand .............................................................................................................................................................................................................. 6
How to remove the stand ............................................................................................................................................................................................................ 6
Features ............................................................................................................................................................................................................................................. 7
Power source .................................................................................................................................................................................................................................... 7
Contents ............................................................................................................................................................................................................................................ 8
Location of controls - LE32LM206 ........................................................................................................................................................................................... 9
Location of controls - LE42LS256 .................................................................................................... ......................................................................................10
Remote control .............................................................................................................................................................................................................................11
Antenna connections .................................................................................................................................................................................................................12
TV operation
MENU Control .............................................................................................................................................................................................................................13
USB Control ..................................................................................................................................................................................................................................16
Additional information
Connections to other equipment..................................................................................................................................................................................... .... 19
Reception disturbances ............................................................................................................................................................................................................ 22
Troubleshooting .......................................................................................................................................................................................................................... 23
s ................................................................................................................................................................................................................................ 24
LIMITED WARRANTY ................................................................................................................................................................................................................... 25
8
Page 36

Location of controls
LE32LM206
2 3 3 1
Left sideFront
9
10
11
12
13
4 5 6 7 8
1. Power Button
2. Power Indicator/Remote sensor
3. Speakers
4. Channel Up/Down Buttons
5. Volume +/- Buttons
6. Menu Button
7. Input Button
8. Standby Button
9. USB1 or USB2: USB ports.
10. AV1 IN or AV2 IN: Connect AUDIO and VIDEO
input signal from signal source such as DVD players.
11. HEADPHONE: Audio output, speakers will be
muted when earphone are plugged.
12. HDMI1 or HDMI2: Connect HDMI input signal
from signal source such as DVD.
13. DIGITAL AUDIO COAXIAL OUT jack
14. RGB: Connect a PC via a VGA cable.
15. RGB/DVI AUDIO: Audio input for PC and audio
input for HDMI when the signal is DVI timing.
16. COMPONENT: Connect Y P
signal sources such as DVD players. AUDIO input
is shared with AV2 IN.
17. AV OUT: Provides fixed audio and video of antenna and
AV1, AV2 input. Only support analog inputs.
18. AIR/CABLE: Connect the coaxial cable
(commerically available) to the AIR or
CABLE IN terminal.
B PR signal from
1514 16 10 17 18
9
Page 37

LE42LS256
Location of controls
Left sideFront
9
10
11
2 3 3 1
4 5 6 7 8
12
13
14
1. Power Button
2. Power Indicator/Remote sensor
3. Speakers
4. Standby Button
5. Input Button
6. Menu Button
7. Volume +/- Buttons
8. Channel Up/Down Buttons
9. YPBPR IN(Component input):
Connect Y P
AUDIO input is shared with AV IN.
10. AV IN : Connect AUDIO and VIDEO
input signal from signal sources such as DVD players.
11. USB1 or USB2: USB ports.
12. HEADPHONE: Audio output, speakers will be
muted when earphone are plugged.
13. HDMI1, HDMI2 or HDMI3: Connect HDMI input signal
from signal source such as DVD.
14. DIGITAL AUDIO COAXIAL OUT jack
B PR signal from signal source such as DVD.
11 13 15 16 17
15. RGB: Connect a PC via a VGA cable.
16. RGB/DVI AUDIO: Audio input for PC and
audio input for HDMI when the signal is DVI timing.
17. AIR/CABLE: Connect the coaxial cable
(commerically available) to the ANTENNA
or CABLE IN terminal.
10
Page 38

Remote control
1
2
3
5
6
8
10
11
13
15 16
17
21
24
25
12
20
14
19
18
22
23
26
17. Volume Up/Down (Vol+/Vol-) - Press to adjust the volume.
18. Channel Up/Down (CH / ) - Press to select the previous/next channel.
4
19. Mute( ) -Press to mute or restore the volume.
20. USB -Press to enter the USB1 or USB2 input.
21. Previous ( ) -Press to display the previous photo or text file in
USB mode.
22. Next ( ) -Press to display the next photo or text file in USB mode.
23. Stop ( ) -Press to stop viewing photos or text files in USB mode.
7
9
24. Play & Pause ( ) -Press to pause playback in USB mode, press
again to continue playback.
25. Fast Backward Button( ) -Press to fast reverse in
USB mode.
26. Fast Forward ( ) -Press to fast forward in USB mode.
HOW TO INSTALL BATTERIES
1. Open the battery compartment cover.
1. Standby( ) - Press to turn the TV on or off(standby).
2. Picture Mode ( P.MODE ) - Press to select the desired picture mode.
3. Sound Mode ( S.MODE ) - Press to select the desired sound mode.
4. ASPECT - Press to change the picture size.
5. Program Select (0-9) - Press to select the TV channel directly.
6. LAST CH - Pressing this button allow you to go back to
the previous channel selected. Press this button again to
return to the channel you were watching.
7. FREEZE - Press to freeze or unfreeze the picture.
Note: This button is not functional in the USB input.
8. C.C. button - Press to select or turn off CCD.
9. SLEEP -Press to set the sleep timer.
10. AUDIO Button - Press to change the audio language.
11. MENU - Press to enter or exit the TV menu.
12. INPUT Button - Press to change the TV’s input.
13. Up/Down/Left/Right Cursor
( / / / ) - Press to select or adjust the desired item
on the menu.
Note: IN USB mode, Press " / / / " cursor button to
return to the previous menu.
14. SELECT - Press to confirm and execute the selection.
15. EXIT button - Press to exit the On-Screen menu.
16. INFO -Press to display relevant information such as
screen format, source, etc.
2. Install two “AAA” batteries (supplied).
3. Replace the battery compartment cover.
BATTERY PRECAUTIONS
These precautions should be followed when using batteries in this
device:
Use only the size and type of batteries specified.
Be sure to follow the correct polarity when installing the batteries
as indicated in the battery compartment. Reversed batteries
may cause damage to the device.
Do not mix different types of batteries together (e.g. Alkaline,
Carbon-zinc or Rechargeable) or old batteries with fresh ones.
If the device is not to be used for a long period of time, remove
the batteries to prevent damage or injury from possible battery
leakage.
Do not try to recharge batteries not intended to be recharged;
they can overheat and rupture. (Follow battery manufacturer’s
directions.)
Please use caution when inserting batteries to avoid battery
damage. If the spring terminal in the remote control remains in
contact with a side of a damaged battery it can cause a short
circuit. Never use damaged batteries as they can become very
hot and are dangerous.
11
Page 39

Antenna connections
Antenna
Jack
Antenna
Jack
If you are using an indoor or outdoor antenna, follow the instructions below that correspond to your antenna system. If you
are using a Cable TV service, see Cable TV connections.
Combination VHF/UHF Antenna (Single 75 ohm cable)
Connect the 75 ohm cable from the combination VHF/UHF antenna to the Antenna
Jack.
75 ohm
Coaxial
Cable
Antenna
Jack
Cable TV connections
This TV has an extended tuning range and can tune most cable channels without using a Cable TV Converter box. Some
viewing requires the use of a descrambler device which is generally provided by the Cable TV company.
For subscribers to basic Cable TV service
For basic Cable TV service not requiring a Converter/Descrambler box, connect the
Antenna
Jack
75 ohm
Coaxial Cable
75 ohm Coaxial Cable directly to the Antenna Jack on the back of the TV.
For subscribers to scrambled Cable TV service
If you subscribe to a Cable TV service which requires the use of a Converter/Descrambler box, connect the incoming 75 ohm Coaxial
Cable to the Converter/Descrambler box. Using another 75 ohm Coaxial Cable, connect the output jack of the Converter/Descrambler
box to the Antenna Jack on the TV. Follow the connections shown below. Set the TV to the output channel of the Converter/Descrambler
box (usually channel 3 or 4) and use the Converter/Descrambler box to select channels.
Antenna
Incoming 75 ohm Cable TV Cable
Converter/
Descrambler
75 ohm Cable to TV
Jack
For subscribers to unscrambled Cable TV service with scrambled premium channels
If you subscribe to a Cable TV service in which basic channels are unscrambled and premium channels require the use of a Converter/
Descrambler box, you may wish to use a signal Splitter and an A/B Switch box (available from the Cable TV company or an electronics
supply store). Follow the connections shown below. With the switch in the “B” position, you can directly tune any nonscrambled channels
on your TV. With the switch in the “A” position, tune your TV to the output of the Converter/Descrambler box (usually channel 3 or 4) and
use the Converter/Descrambler box to tune scrambled channels.
Incoming
75 ohm
Cable TV
Cable
Splitter
Converter/
Descrambler
A/B Switch
75 ohm Cable to TV
A
B
Antenna
Jack
12
Page 40

MENU CONTROL
This section explains the menus of your TV. Each menu is outlined and detailed to help you
get the most from your TV.
Basic Operation
Custom: The user may customize the color temperature.
(Red/Green/Blue)
1. Press MENU on the remote control or on the TV key
panel to display the main menu.
2. Press / and / to highlight the desired menu/item.
3. Press / to change the setting.
4. Press MENU to save setting and go back to last menu.
Note:
Button on the key panel have the same functions
as the corresponding buttons on the remote control.
The scheme and description are in TV mode as below,
there will be a note if there is exception.
Video Settings
Picture Mode
Use this function to choose from preset picture settings to optimize
your TV’s performance.
Brightness
Use this function to change the overall brightness of the dark areas
of the picture.
Contrast
Use this function to change the contrast between black and white
levels in the picture.
Color
Use this function to adjust the level of color in the picture.
Tint
Use this function to adjust flesh tones so they appear natural.
Can be done under the TV/AV/COMPONENT/HDMI inputs.
Sharpness
Use this function to adjust the amount of fine detail in the picture.
This function is not available in PC mode.
Video
Color Temperature
Red
Green
Blue
Custom
50
50
50
Aspect Ratio
Use this function to select the Picture Format Aspect Ratio.
Noise Reduction
The Noise Reduction function automatically reduces conspicuous
noise in the picture without degrading picture quality. Set Noise
Reduction to Off if you see
individual blocks in the picture.
Video
Aspect Ratio
Noise Reduction
16:9
Low
Audio Settings
Sound Mode
Select the sound mode you like.
Bass
This function controls the low frequency audio to the speakers.
Treble
This function controls the high frequency audio to the speakers.
Balance
This function controls the left to right audio balance of both the
internal speakers and headphone jack.
Perfect Volume
This function will automatically adjust volume so each channel and
input has the same average volume level.
Video
Picture Mode
Brightness
Contrast
Color
Tint
Sharpness
Color Temperature
Custom
50
50
50
50
50
Color Temperature
Adjusts the color temperature of the picture, to select the option
: as you desired.
Press SELECT button to enter the color temperature sub
menu. High, Medium, Standard, Custom.
Set to High for cooler color with more blue, set to Medium for a more
natural color or set to Standard for accurate color.
13
Surround
The dynamic presence and sound created offers a thoroughly
enjoyable listening experience.
Audio
Sound Mode
Bass
Treble
Balance
Perfect Volume
Surround
Custom
on
off
50
50
0
Page 41

MENU CONTROL
Channels Settings
Note: These settings are only available in TV mode.
Source
Select the Source for the TV. Select Air for using an indoor
or outdoor antenna. Select Cable for using a cable system.
Auto Scan
This feature will automatically store active Analog and
Digital channels to the Channel list. This scan will erase all
channels previously stored in the list.
Channel No.
Sets the received TV channel No.
Signal System
Press" / "button to select “Auto /NTSC /PAL M/ PAL N” Mode.
Fine Tuning
Fine tuned the channel frequesncy.
Channel Skip
This function allows you to add channels to the channel
memory.
Channels
Source
Auto Scan
Channel No.
Signal System
Fine Tuning
Channel Skip
Air
3
Auto
60.25 MHz
On
Setup Settings
Menu Language
Sets the Language of the Menu OSD. This feature will allow you to
select any one of three different languages for the on-screen displays.
Panel Lock
When Panel Lock is turned On, all buttons on the front panel, except
the POWER button, will be deactivated.
Closed Caption
Select the type of CCD (CC1 ~ CC4, Text1 ~ Text4).
Reset
The Reset function returns your settings to the factory settings.
Setup
Menu Language
Panel Lock
Closed Caption
Reset
English
Off
CC 1
Parental Controls
Press / button to select Advanced menu, then press [SELECT]
button to enter. Input password to enter, default password is” 0000 ” .
Parental Controls
Set Password
Rating Block
TV-Rating
Movie-Rating
Canadian English
Canadian French
Block Unrated TV
On
PG
C8+
G
No
:
TV
CH 4 56.00 MHz (Cable)
0 Channel
M E N U
Enter password
Clear Cancel
re e R e cord L im
Set Password
To set your own password, first enter the old password,
and then enter your new password twice, following the
prompts as illustrated below.
Enter Old Password
Enter New Password
Confirm Password
Clear Cancel
re e R e cord L im
14
Page 42

MENU CONTROL
Parental Controls PC Settings
Note:
- If you forget your passowrd, use the factory code [8899] to reset
your new password.
Rating Block
Press / to set on or o.
Note: These settings are only available in PC mode.
when you connect VGA cable to the jacks of PC and select the
signal source as "PC" the screen menu will be activated.
You can use the function to adjust the display setting
automatically or manual.
TV-Rating
to enter the TV Rating menu.
Press [SELECT] button to set rating block or unblock.
Movie-Rating
Press / to select the Movie Rating
(None / G / PG / PG-13 / R / NC-17 / X).
Canadian English
Press / to select the Canadian English Rating
(Empty / C / C8+ / G / PG /14+ / 18+).
Canadian French
Press / to select the Canadian French Rating
(Empty / G / 8ans+ / 13ans+ / 16ans+ / 18ans+).
Block Unrated TV
Press / to set the function Block or Unblock
the unrated signal.
TV RATING
ALL
TV-Y
ALL FV
TV-Y7
ALL
TV-G
TV-PG
TV-14
TV-MA
ALL
ALL
ALL
V
S
LLD
V
S
V
D
S
L
AUTO ADJUST
Press ” / “ button to auto adjust PC size and position.
H Position
Press ” / “ button to adjust the H-Position of thetelevision.
V Position
Press ” / “ button to adjust the V-Position of thetelevision.
Phase
Press ” / “ button to adjust the phase of the picture.
Frequency
Press ” / “ button to adjust the updating frequencyof the picture.
RGB
Auto Adjust
H Position
V position
Phase
Frequency
35
100
7
50
15
Page 43

Photo Menu
1.Press [ ] / [ ] to select PHOTO. Press [ SELECT] to enter.
2.Press [ ] / [ ] to select the desired drive and press [SELECT ] to enter.
3.Press [ ] / [ ] to select the desired folder and press [ SELECT ] to open the folder;
select the desired photo file using [ SELECT ] and press [ ] to start playing.
4.Press [ ] to stop photo slide show and return to Photo list.
5.You may return to USB Player main menu by pressing [ USB ].
USB CONTROL
Return
Up Folder
Picture01.jpeg
Picture01.jpeg
Picture01.jpeg
Picture01.jpeg
Photo
C: \ 1/1
USB
Return
SET
Move Set
(LE32LM206) (LE42LS256)
Photo Control Bar
Pause
Counterclockwise
90 Degrees
Previous Next
Resolution: 1024 X 768
Size: 983 KBytes
Date: ----/--/-Time: --:--:--
Zoom In
Zoom Out
Stop
Return
Up Folder
Picture01.jpeg
Picture01.jpeg
Picture01.jpeg
Picture01.jpeg
Photo
C: \ 1/1
Return Move Set
Play Mode
A
Move
SET
List
Resolution: 1024 X 768
Size: 983 KBytes
Date: ----/--/-Time: --:--:--
Current
Information
Clockwise
90 Degrees
- Press [ INFO ] to display Photo Control Bar during photo slide show.
- Press [ ] / [ ] to select the desired settings.
- Press [ ] to exit from Info bar.
16
Page 44

USB CONTROL
Remote Control
1. USB button. Press to enter USB menu.
2. Fast Backward button( )
Fast reverse while playback.
3. Fast Forward button( )
Fast forward while playback.
4. Previous button( )
Press to return to the previous
chapter/track/photo. Skip to previous file.
5. Next button( )
Press to skip to the next chapter/track/
photo. Skip to next file.
6. Play & Pause button( )
Press to pause or play.
7. Stop button( )
Press the stop button to exit full-screen
playback, access to the preview screen.
USB Menu
You can view photo and text files from you USB storage devices.
1. Connect USB storage device to USB input terminal.
2. Press USB button to enter USB mode.
3. Press [ ] / [ ] and ]to select the types of USB modes: PHOTO and TEXT.
USB 2.0
17
PHOTO TEXT
Page 45

Text Menu
1. Press [ ] / [ ] to select TEXT. Press [ SELECT ] to enter.
2. Press [ ] / [ ] to select the desired drive and press [ SELECT ] to enter.
3. Press [ ] / [ ] to select the desired folder and press [ SELECT ] to open the folder;
select the desired text file using [ SELECT ] and press [ ] to display the text document.
4. Press [ ] / [ ] to view previous or nexttext file.
5. Press [ ] / [ ] to select previous or nextpage in the text file.
6. Press [ ] to return to Text list.
7. You may return to USB Player main menu
USB CONTROL
Return
Up Folder
Text01.txt
Text02.txt
Text03.txt
Text
C: \ 1/1
USB
Return
SET
Move Set
(LE32LM206) (LE42LS256)
Please ensure that the text
file is saved in an encoding
standard (eg.Unicode). This
may minimize the loss of
characters in a multiplelanguage content.
Size: 983 KBytes
Return
Up Folder
Text01.txt
Text02.txt
Text03.txt
Text
C: \ 1/1
Return Move Set
SET
Text Control Bar
Fast Reverse
Fast Forward Previous Next
Stop
List
Current Information
- Press [ INFO ] to display Text Control Bar while reading the text.
- Press [ ] / [ ] to select the desired settings.
Please ensure that the text
file is saved in an encoding
standard (eg.Unicode). This
may minimize the loss of
characters in a multiplelanguage content.
Size: 983 KBytes
- Press [ ] to exit from Info bar.
Note:
- It supports *.txt files.(English character)
- Please ensure that the text file is saved in an encoding standard. This may minimize the loss of
characters in a multiple-language content.
18
Page 46

Connections to other equipment
The exact arrangement you use to interconnect various video and audio components to this unit is dependent on the model and features
of each component. Check the Owner’s Manual provided with each component for the location of video and audio inputs and outputs.
To connect AV Input to a VCR Player
Rear of the unit
Video/Audio cord (not supplied)
To VIDEO/AUDIO IN
To connect Component Video Input to DVD Player
To AUDIO IN
Y
P b
P r
Audio cord (not supplied)
To Video/Audio OUT
To Audio OUT
VCR
DVD
NOTE:
Component Video input of the unit are for use with a device which output 480i/1080i interlaced signals and 480p/720p progressive •
signals.
To COMPONENT IN
Component video cord
(not supplied)
To Component OUT
Y
P b
P r
19
Page 47

Connections to other equipment (continued)
To connect a HDMI or a DVI device to the unit
The HDMI input receives digital audio and uncompressed video from a HDMI device or uncompressed digital video from a DVI device.
When you connect to a DVI device with a HDMI-to-DVI adapter cable, it transfers only video signal. Separate analog audio cords
required.
Rear and Left of the unit
To PC/DVI AUDIO IN
Audio cord (not supplied)
To DVI output
HDMI - to - DVI adapter cable
(HDMI type A connector)
To HDMI IN
HDMI cable (type A connector)
NOTE:
When using HDMI1/DVI IN to connect your HDMI or DVI devices, you must select the corresponding audio input source •
(HDMI or DVI) on the menu screen (see page 15). Otherwise you will only see the image with no sound.
(not supplied)
(not supplied)
To HDMI output
or
DVI device
HDMI device
To connect the TV to a PC (Personal Computer)
BEFORE YOU CONNECT THIS TV TO YOUR PC, CHANGE THE ADJUSTMENT OF YOUR PC’S RESOLUTION AND REFRESH
RATE
Connect one end of a (male to male) VGA cable to the video cord of the computer and the other end to the
IN on the rear of the
cord to the audio output of your Multimedia computer and to the AUDIO IN connector of the PC/DVI AUDIO IN jack of the TV. You can
also connect the PC with HDMI cable. If you use HDMI cable, you don’t have to connect the audio cord. If you use DVI-to-HDMI cable,
please connect audio cord as same way as VGA cable.
Press INPUT on the remote control to select PC mode.
Switch on the computer. The TV can operate as the computer monitor.
Z
TV In case of a Multimedia computer, connect the audio
Rear and Left of the unit
To PC
MONITOR
IN
To
PC/DVI
AUDIO
IN
To HDMI IN
HDMI cable (not supplied)
Audio cord (not supplied)
VGA cable (not supplied)
VGA connector PC MONITOR
Monitor Display modes
Mode Resolution Refresh rate
VGA 640x480 60Hz
VGA 720x480 60Hz
SVGA 800x600 60Hz
XGA 1024x768 60Hz
WXGA 1280x720 60Hz
WXGA 1360x768 60Hz
SXGA 1280x1024 60Hz
FHD 1920x1080 60Hz
To return to normal mode
Press INPUT again.
NOTE:
•
If there is no video signal from the PC when the unit is in PC mode, “No signal” will appear on the TV-screen.•
When the PC connected to the HDMI terminal and 1920x1080 resolution (FHD) is selected, the top and bottom, right and left edges of •
the picture may be hidden on all aspect. In this case, use the PC MONITOR IN jack (VGA cable) is recommended to connect.
•
functions may fail to correct the image position. To solve this problem, change the PC settings to select another resolution.
20
Page 48

Connections to other equipment (continued)
To connect AV Output to VCR Recorder (LE32LM206)
Provide xed Audio and Video signals which are used for recording. This does not output component video, HDMI/DVI or RGB.
Rear of the unit
To VIDEO/AUDIO OUT
Connect an AV amplier as shown below.
Rear of the unit
To Video/Audio IN
Video/Audio cord (not supplied)
Front
Speaker
(Left)
TV
VCR
Subwoofer
Front
Speaker
(Right)
To DIGITAL AUDIO
COAXIAL OUT
Coaxial digital cable
Digital Audio Input
decoder
(not supplied)
To Coaxial
Surround
Speaker (Left)
Center Speaker
Surround
Speaker
(Right)
21
Page 49

Reception disturbances
IGNITION NOISE:
from automobile ignition systems, neon lamps, electrical drills, and other electrical appliances.
GHOSTS:
Ghosts are caused by the television signal following two paths. One is the direct path and the other
antenna may improve reception. Ghosting may also be caused by defects in the antenna system such
as unshielded leads or connecting several sets to the same antenna without using multiple antenna
couplers.
SNOW:
If your receiver is located in the fringe area of a television station where the signal is weak, your
picture may be marred by the appearance of small dots. When the signal is extremely weak, it may be
necessary to install a special antenna to improve the picture.
RADIO FREQUENCY INTERFERENCE:
The interference produces moving ripples or diagonal streaks, and in some cases, causes loss of
contrast in the picture.
NOTE:
The TV set can generate sound distortion in external devices such as a radio. Please separate radio equipment from the TV set to a •
considerable distance.
PREVENTION OF AN OBSTACLE TO RADIO RECEIVERS
This television has been designed pursuant to the FCC class B Rules. This is to prevent a problem to
Radio receivers. If this television causes a problem to Radio receivers, then take the following steps:
•
Keep the television away from Radio.
•
Adjust Radio antennas in order for the television not to receive interference.
•
The antenna cable of Radio should be kept away from the television.
•
Use a coaxial cable for antenna.
mentioned above.
BLUE SCREEN:
When using an antenna, weak signals will display a blue screen. It may be necessary to upgrade your
antenna.
22
Page 50

Troubleshooting
Use the following checklist for troubleshooting if you have problems with your LCD TV. Consult your local dealer or service outlet if
problems persist. Be sure all connections are properly made when using with other units.
SYMPTOMS POSSIBLE SOLUTIONS
TV does not
operate.
Poor sound
or no sound.
Poor picture
or no picture.
Poor
reception on
some
channels.
Poor color or
no color.
Picture
wobbles or
drifts.
Make sure the power cord is plugged in.•
Try another AC outlet.•
•
Unplug unit for an hour, then plug it back in.•
Station or Cable TV experiencing problems, •
tune to another station.
Check sound adjustments (Volume or Mute).•
Check for sources of possible interference.•
Station or Cable TV experiencing problems, •
tune to another station.
Make sure channels are set into memory.•
Check antenna or Cable TV connections, •
adjust antenna.
Check for sources of possible interference.•
Check picture control adjustments.•
Station or Cable TV experiencing problems, •
tune to another station.
Make sure channels are set into memory.•
Station is weak, adjust antenna to receive •
desired station.
Check for sources of possible interference.•
Station or Cable TV experiencing problems, •
tune to another station.
Make sure channels are set into memory.•
Check picture control adjustments.•
Check antenna or Cable TV connections, •
adjust antenna.
Check for sources of possible interference.•
Station or Cable TV experiencing problems, •
tune to another station.
Make sure channels are set into memory.•
Cable TV company is scrambling signal.•
SYMPTOMS POSSIBLE SOLUTIONS
TV is not
shown in your
language
No CATV
reception.
Horizontal
or diagonal
bars on
screen.
No reception
above
channel 13.
No Remote
operation.
Closed
Caption is
not activated.
Select proper language in the menu options•
Check all Cable TV connections.•
Set Air/Cable menu option to the Cable mode.•
Station or Cable TV system problems, try •
another station.
Check antenna connections, adjust or re-•
direct antenna.
Check for sources of possible interference.•
Make sure Source option is in the appropriate •
mode.
If using antenna, check UHF antenna •
connections.
Batteries are weak, dead or inserted incorrectly.•
Remote is out of range, move closer to TV •
(within 15 feet).
Make sure Remote is aimed at sensor.•
•
Remote and the TV.
Make sure the power cord is plugged in.•
Sleep Timer is set.•
Power interrupted.•
Station or Cable TV experiencing problems, •
tune to another station.
23
If the problem cannot be solved with the suggested procedures, contact HITACHI.
For additional assistance please refer to the “LIMITED WARRANTY” on page 25.
For your safety, never try to repair the product yourself.
Page 51

LE32LM206 LE42LS256
GENERAL
Power supply AC 110-240V, 50-60Hz
Power consumption
Weight 7.0 kg (15.4 lbs) 17.0 kg (37.5 lbs)
Dimensions Width: 742 mm (29-1/4 inches)
Operating temperature 5˚C - 35˚C
Operating humidity 20% ~ 80% RH
TELEVISION
Type
Display method Transmission TFT color LCD panel
Number of Pixels 1366 (H) x 768 (V)
Broadcasting system
Operation : 65W
Standby : 0.3W
Height: 506.8 mm (20 inches)
Depth: 196 mm (7-11/16 inches)
800.3 mmV (32” class/31.51” diagonal)
NTSC
Operation : 120W
Standby : 0.3W
Width: 999.5 mm (39-3/8 inches)
Height: 670.2 mm (26-7/16 inches)
Depth: 213mm (8-7/16 inches)
1067.3 mmV (42” class/42.02” diagonal)
1920 (H) x 1080 (V)
Receiving channels VHF 2-13
UHF 14-69
CATV 14-36 (A)-(W)
37-59 (AA)-(WW)
60-85 (AAA)-(ZZZ)
86-94 (86)-(94)
95-99 (A-5)-(A-1)
100-135 (100)-(135)
01 (4A)
Tuner type Frequency synthesized
Inputs Video: 1.0 V (p-p),75 ohms
Audio: 0.5 Vrms/10k ohms
Component video: (Y) 1.0 V (p-p), 75 ohms
(Pb)/(Pr) 0.7 V (p-p), 75 ohms
HDMI: HDMI compliant (type A connector)
HDCP compliant
E-EDID compliant
Suggested scan rates: 480i, 480p, 720p, 1080i, 1080p
HDMI Audio: 2-channel PCM
32/44.1/48 kHz sampling frequency
16/20/24 bits per sample
PC Monitor: Mini-Dsub 15pin
Antenna: VHF/UHF In 75 ohms coaxial
Outputs Audio (LE32LM206): 470 mVrms, 1k ohms
Video (LE32LM206 ): 1.0V (p-p), 75 ohms
Digital Audio: Coaxial
Headphone: 3.5 mm Stereo
Audio output power 5.0W + 5.0W
8.0W + 8.0W
•
For information on our other products, please visit our website at • www.hitachi.us
24
Page 52

Congratulations on your purchase of a new Hitachi display product.
LIMITED WARRANTY:
Hitachi America, Ltd., Digital Media Division warrants this product in accordance with the terms and conditions applicable
to the products identified below:
Conditions of Hitachi Limited Warranty This Hitachi display product (this “Product”) is warranted to be free from defects
in materials and workmanship beginning on the date of purchase by the orig
applicable time periods specified below. If the Product is found to be defective, Hitachi will repair or replace (at Hitachi’s
option) defective parts at no charge, subject to the conditions of this Limited Warranty. If the original owner rejects, refuses
or otherwise does not accept Hitachi’s offer to repair or replace such defective parts under this Limited Warranty, this
Limited Warrant
and is not transferable, and such owner must provide a dated sales receipt for the Product to qualify for parts or service under
this Limited Warranty. The original owner must notify Hitachi of a defect claim by calling the customer service number
listed below corresponding to the owner’s country of residence during
Limited Warranty to be effective. This Limited Warranty is valid only in the countries listed below.
Hitachi Product: LCD Flat Panel Televisions: PARTS: The Limited Warranty period for parts is 1 year from the date of
original purchase. During the Limited Warranty period for parts, Hitachi will replace defective parts with new or rebuilt parts
(at Hitachi’s option) at no charge for su
warranty period applicable to the part replaced. LABOR: The Limited Warranty period for labor is 1 year from the date of
original purchase. During the Limited Warranty period for labor, Hitachi will repair or replace (at Hitachi’s option) defective
parts without charge for labor. SERVICE LOCATION: In-home warranty service, which includes either in
free pick-up and delivery (at Hitachi’s option), applies to all Hitachi products except: (i) 42-inch and smaller LCD Flat Panel
Televisions; (ii) Products located outside the below-listed countries; (iii) Products located more than seventy-five (75)
driving miles from Hitachi’s nearest Authorized Service Facility in one of the below-listed countries. If the foregoing clauses
(i), (ii), (iii) apply, then the Product o
Service Facility and, following warranty service, retrieving the Product from such Authorized Service Facility.
Please call the toll free number below according to the country of residence:
Costa Rica 0-800-052-1573
El Salvador 800-054-3030
Guatemala 1-800-835-0295
Nicaragua 001-800-226-0453
Panama 00-800-052-1397
Republica Dominicana 1-888-760-1340
Venezuel
IMPORTANT: Before using or installing your Product, please complete this form and attach your sales receipt and retain them
for your records. This will help facilitate proper warranty coverage.
DEALER ADDRESS
Warranty Limitations: This Hitachi Limited Warranty does not cover: A. Any Product that has been modified or
repaired in a manner not previously authorized by Hitachi in writing. B. Any Product who
altered, replaced, defaced or rendered illegible. C. Any defect, malfunction, or failure caused by orresulting from improper
or unauthorized service, maintenance or repair. D. Damage resulting from abuse, misuse, mishandling, neglect or damage
caused by exposure to hostile operating environments such as areas containing dust and/ or smoke. E. Damage caused by
power surges, accidents, natural disas
in any manner inconsistent with the acceptable set-up, usage, safety or installation configurations identified in the Product’s
y shall be void and of no further force or effect. This Limited Warranty extends to the original owner only
ch parts.Any replacement part will be warranted for the remainder of the original
wner will be responsible for bringing/delivering the Product to a Hitachi Authorized
a 0800-1006-196
SERIAL NO. MODEL NO.
ters or any other events or circumstances outside Hitachi’s control. F. Any Product used
inal owner and continuing for the duration of the
the applicable Limited Warranty period for this
DATE OF PURCHASE DEALER NAME
-home repair or
se serial number has been removed,
25
Page 53

Operating Guide. G. Any Product used for purposes or applications, or subjected to operating conditions, other than those
identified as acceptable in the Product’s Operating Guide. H. Product repairs (including any product whose case has been
opened), or part replacements provided or installed, by any person other than an Authorized Hitachi Service Facility
Representative. I. Improper uncrating, set-up or installation or any mi
labor or costs associated with removing the Product from a custom cabinet or other specialized product installation that
impedes direct and immediate removal of the Product from the owner’s premises (must be arranged and paid by the owner).
K. Product cabinets, cabinet parts, knobs, batteries or accessories. L. Product screens that have been cleaned by any method
other tha
and/or cell defects or ordinary wear and tear, including, without limitation, scratches or marks on the Product’s screen,
cabinet or the appearance of bright or dark screen pixels. N. Any Product returned for service that is damaged due to
improper packaging, mishandling or shipping. (IMPORTANT: When shipping any Product
Facility, Product owner must package it securely in the original shipping container or its equivalent to prevent damage. The
Product must be returned with the shipping charges prepaid and proof of purchases included in the ship ping container.
Failure to properly package such product during such shipment will void all warranties.) O. Any Product purchased or
serviced outside one of the a
NO PERSON, AGENT, DISTRIBUTOR, DEALER, SERVICE FACILITY, OR COMPANY IS AUTHORIZED TO
CHANGE, MODIFY OR AMEND THE TERMS OF THIS LIMITED WARRANTY IN ANY MANNER WHATSOEVER.
EXCEPT AS PROVIDED IN THIS LIMITED WARRANTY, HITACHI MAKES NO EXPRESS WARRANTY
REGARDING THIS HITACHI PRODUCT. FURTHER, ANY AND ALL IMPLIED WARRANTIES RELATING TO ANY
PORTION OF
WARRANTY. HITACHI SHALL NOT BE LIABLE TO THE PURCHASER OR TO ANY OTHER PERSON FOR ANY
INCIDENTAL OR CONSEQUENTIAL DAMAGES OR LOSS OF PROFIT OR PRODUCT RESULTING FROM ANY
DEFECT IN, OR MALFUNCTION OR FAILURE OF, THIS HITACHI PRODUCT. BECAUSE SOME JURISDICTIONS’
LAWS VARY, THE ABOVE LIMITATIONS MAY NOT APPLY TO YOU, AND CERTAIN LEGAL RIGHTS MAY BE
AVAILABLE
n as specified in the Product’s Operating Guide. M. Normal usage, degraded brightness caused by backlight aging
bove-listed countries. P. Any Product that has been used for commercial purposes.
THIS PRODUCT ARE LIMITED TO THE DURATION SPECIFIED UNDER THIS LIMITED
TO YOU THAT ARE SPECIFIC TO YOUR JURISDICATION.
sadjustments caused by user-operated controls. J. Any
to a Hitachi Authorized Service
26
 Loading...