

Page 1
日立牌電圓鋸
CIRCULAR SAW
C 7U
使用說明書
Handling instructions
使用前務請詳加閱讀
Read through carefully and understand these instructions before use.
Page 2
12
1
3
2
4
34(A)
Max. 3 mm
最大 3 毫米
Max. 3 mm
最大 3 毫米
7
6
8
5
6
2
2
4(B) 5
9
2
1
9
0
Page 3
6(A) 6(B)
B
A
C
A
78
F4 G H
E8
D
8
910
I
K
2
L
43
6 mm
17 mm
2
J
Page 4
11
M
1
Lumber
2
Base
3
Work bench
Saw blade
4
5
Handle
Knob
6
Riving knife
7
8
Hexagonal-head bolt
Wing-bolt
9
Guide
0
Marking-off-line
A
Front scale when not inclined
B
Front scale at 45° incline
C
Lock lever
D
Box wrench
E
Washer (B)
F
Washer (A)
G
Spindle
H
Wear limit
I
No. of carbon brush
J
Square
K
Set screw
L
Dust collector
M
鋸木
底座
工作台
鋸片
手柄
旋鈕
分料刀
六角頭螺栓
蝶形螺栓
導向器
標志線
無傾斜時的前部尺度
45 度傾斜時的前部尺度
鎖緊杆
套筒扳手
墊圈(B)
墊圈(A)
主軸
磨損極限
炭刷號
直角尺
螺絲
集塵器
3
Page 5

作業上的一般注意事項
警告﹗當使用電動工具時﹐為了減少造成火災﹑電擊
和人身傷害﹐必須時刻遵守基本注意事項﹐以及
下述操作注意事項在操作本機之前﹐請通讀本說明書﹐並予以妥善
保管-
安全操作注意事項︰
1. 工作場所應打掃乾淨﹐清理妥當﹐雜亂無章將導
致事故-
2. 確保妥適的作業環境-電動工具不可任其風吹雨
打-不得在潮濕的地方作業-工作場所需保持充
分的亮度-請勿在有可能造成火災或爆炸的地方
使用電動工具-
3. 謹防觸電事故-應避免身體同大地或接地表面不
可讓訪客觸摸電動工具或延伸線纜接觸(例如︰
管道﹑散熱器﹑爐灶﹑冰箱等)
4. 不可讓孩童靠近工作場所-與作業無關的訪客也
必須保持安全距離-
5. 不使用的電動工具應存放到乾燥而孩童伸手不及
的高處﹐並加鎖保管-
6. 不得使勁用力推壓-電動工具需按設計條件才能
有效而安全地工作﹐絕不可勉強-
7. 妥選使用工具- 不可用小型工具或附件去幹重
活-不可用於規定外的作業-舉例說﹐用圓鋸進
行伐木打枝或原木鋸切作業-
8. 工作時衣服穿戴要合適-不要讓松散的衣角和寶
石類卷入轉動部份-屋外作業時﹐最好手戴橡膠
手套﹐腳穿防滑膠鞋-同時要戴上能夠罩籠長髮
的工作帽-
9. 絕大多數的電動工具作業時﹐均需戴安全眼鏡進行粉塵飛揚的切削作業時﹐需戴防塵面罩-
10. 連接除塵設備
如果提供連擊除塵和集塵的設備﹐請確認是否已
經連接好並且使用正常-
11. 不要拿電線提起電動工具﹐也不得拉扯電線從電
源插座拆除插頭-電線需從熱源和油液隔開﹐並
避免與銳利的邊緣接觸-
12. 作業以安全第一為原則-工件要用夾具或臺鉗卡
緊-這樣做﹐比用手按壓更為可靠﹐也能夠讓雙
手專心操作-
13. 作業時腳步要站穩﹐身體姿勢要保持平衡-
14. 工具應維護妥善﹐經常保持鋒利﹑清潔才能充分
發揮性能﹐落實作業安全的要求-應按規定加注
潤滑脂﹑更換附件-線纜應定期檢查﹐如發現損
傷應即委託專業性的服務單位加以修復-延伸電
纜如有損傷應予更換-手柄要保持乾燥﹐並防止
沾附油脂類-
15. 不使用時﹐維修前以及更換附件(如:刀具﹑鑽
頭﹑鋸具等)之前﹐都必須拆卸電源插頭才行-
16. 開動前務必把調整用鍵和扳手類拆除下來-這一
點與安全有關-應養成習慣﹐嚴格遵守-
17. 謹防誤開動-插頭一插上電源插座﹐指頭就不可
隨便接觸電源開關-插接電源之前﹐應先確認:
開關是否切斷-
18. 屋外延伸線纜的使用-屋外作業時﹐必須使用專
用的延伸線纜-
19. 保持高度警覺﹐充分掌握情況﹐以正常的判斷力
從事作業-疲憊時切不可開動電動工具-
20. 檢查損壞部件-在繼續使用電動工具之前﹐應詳
細檢查各部零件以及防護裝置有無損壞﹐以便判
斷具能否正常工作﹐能否發揮正常效能-檢查轉
動部份的對準﹑空轉﹑各零件有無異常﹐安裝是
否妥善以及其它足以給工作帶來不良影響的情
況如防護以及其它零件損傷了-除非本說明書中已
有記載否則應即委託服務中心進行妥善修理或更
換-開關一發現缺陷﹐應即委託服務中心加以更
換-如開關不能正常地接通或切斷﹐絕不可使用
該電動工具-
21. 警告
使用非本說明書中的推薦的附件可能有發生人身
損害的危險-
22. 本工具必須委托有資格的維修人員進行維修本電動工具滿足相關的安全要求-維修必須由專
業人員使用純正配件來進行-否則有可能會給用
戶造成人身損害-
4
Page 6

使用電圓鋸時應注意事項
1. 請勿使用破損或變形的鋸片-
2. 請勿使用高速鋼製造的鋸片-
3. 請勿使用不符合本說明書規定特性的鋸片-
4. 請勿按壓圓盤側面停止鋸片操作-
5. 經常保持鋸片鋒利-
6. 確保安全蓋移動順暢自如-
7. 請勿在電圓鋸的安全蓋被固定在打開位置的狀態
下使用電圓鋸-
8. 確保防護系統的收回機製正確操作-
9. 鋸片本身必須比分料刀薄﹐鋸割寬度或切口(鋸
齒)必須比分料刀的厚度大-
10. 請勿在鋸片轉向前面或轉向側面的狀態下使用電
圓鋸-
11. 確保工件上無鐵釘等任何異物-
12. 除了在插入工件中間時以外﹐應一直使用分料
刀-
13. 鋸片寬度應在 185 毫米至 170 毫米之間-鋸片盤
面厚度 1.4 毫米﹐鋸齒厚度 2.0 毫米-
14. 保証分料刀調節到其與鋸片齒圈之間的距離不超
過 3 毫米﹐齒超出分料刀下緣不大于 3 毫米-
15. 不得使用任何砂輪-
規 格
電壓(按地區)* (110 伏﹑220 伏﹑230伏﹑240伏)
鋸切深度
輸入功率* 1150 瓦
空載轉速 5,500 / 分
重量(不含線纜) 4.0 公斤
*當須改變地區時應檢查產品上的銘牌-
標 準 附 件
90 度 65 毫米
45 度 47 毫米
用 途
(1) 套筒扳手 ..................................................................... 1
(2) 導向器.......................................................................... 1
(3) 蝶形螺栓 ..................................................................... 1
標準附件可能不預先通告而徑予更改-
選購附件(分開銷售)
(1) 集塵器裝置(D)
(2) 墊圈(A) ........................ 16 毫米(鋸片的內徑)
........................ 20 毫米(鋸片的內徑)
........................ 30 毫米(鋸片的內徑)
選購附件可能不預先通告而徑予更改-
5
䡬 鋸割各種木材
作 業 之 前
1. 電源
確認所使用的電源與工具銘牌上標示的規格是否
相符-
2. 電源開關
確認電源開關是否切斷-若電源開關接通﹐則插
頭插入電源插座時電動工具將出其不意地立刻轉
動﹐從而招致嚴重事故-
3. 延伸線纜
若作業場所移到離開電源的地點﹐應使用容量足
夠﹑鎧裝合適的延伸線纜﹐並且要盡可能地短
些-
注意:損壞和導線一定要更換或修理-
Page 7

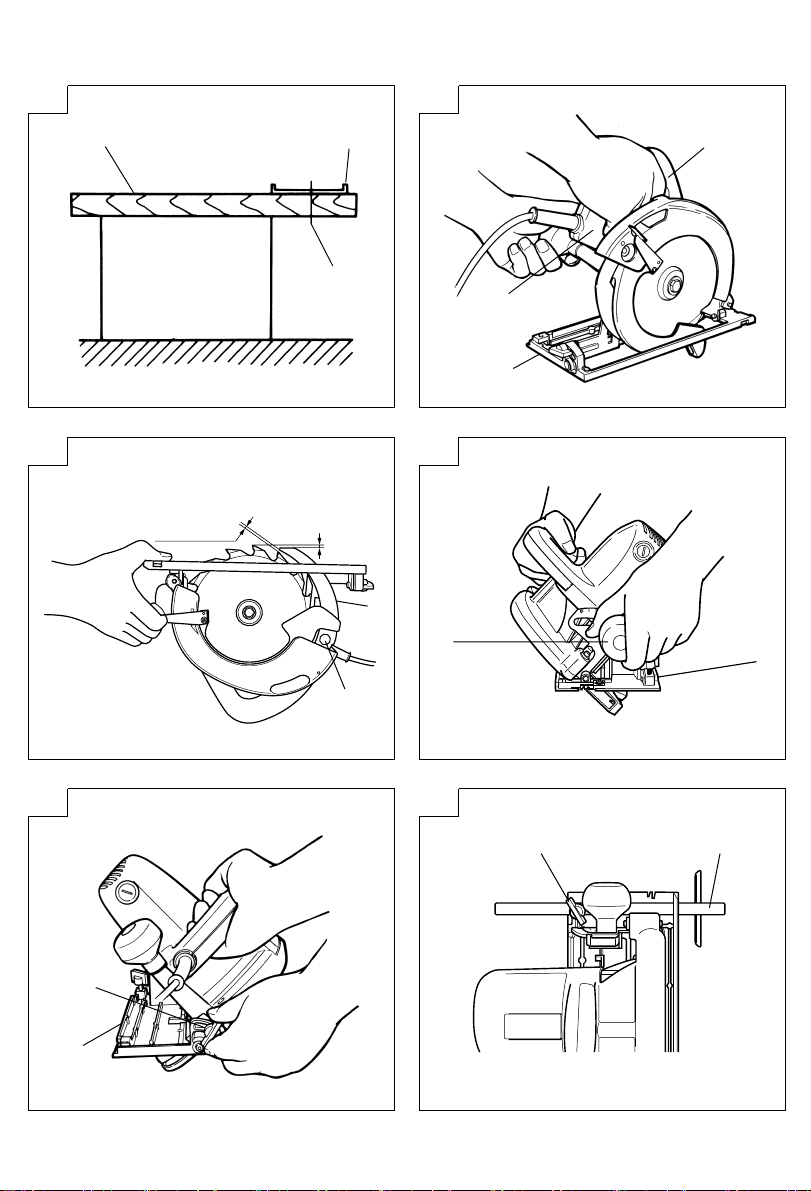
4. 製備木質工作台︰(見圖 1)
鋸片將露出鋸木下面﹐所以鋸割時﹐應將鋸木放
在工作台上-若用方木塊作為工作台﹐則應選擇
平坦地面﹐以保持穩定-使用不穩定的工作台﹐
工作時非常危險-
注意︰為避免可能發生的事故﹐鋸割后的鋸木剩余
部分栓住放妥-
使用前調整電動工具
注意︰
䡬 在開始鋸割之前﹐先確認鋸片以達到全速轉
速-
䡬 工作中若鋸片停止下來或發出異常噪聲﹐應立
即關掉開關-
䡬 隨時注意不要讓第一線靠近轉動的鋸片-
䡬 鋸片朝上或朝側面使用電圓鋸是非常危險的-
這種不正常的用途應予避免-
䡬 鋸割材料時﹐務請戴上護目鏡-
䡬 完成作業時﹐應將插頭從電源插座拔出-
1. 調整鋸割深度
如圖 2 所示﹐用一只手握住手柄﹐另一只手擰松
旋鈕可以通過將底座移到所需的位置來調整鋸割深
度-以這種方式調整鋸割深度后重新擰緊旋鈕-
2. 調整分料刀
擰松夾住分料刀的六角頭螺栓﹐將分料刀調整到
圖 3 所示位置﹐並重新擰緊螺栓-調整之后﹐確
保分料刀按照所調整的鋸割深度移動-
3. 調整傾斜角度
如圖 4(A)﹑圖 4(B)所示擰松斜規上的旋鈕和
底座上的蝶形螺栓﹐根據底座的情況﹐鋸片可能
傾斜至 45 度的最大角度-完成調整之后﹐確認旋
鈕和蝶形螺栓是否擰緊-
4. 調整導向器︰
擰松蝶形螺栓﹐將導向器左右移動﹐即可調整鋸
割位置導向器可以安裝在左邊或右邊-
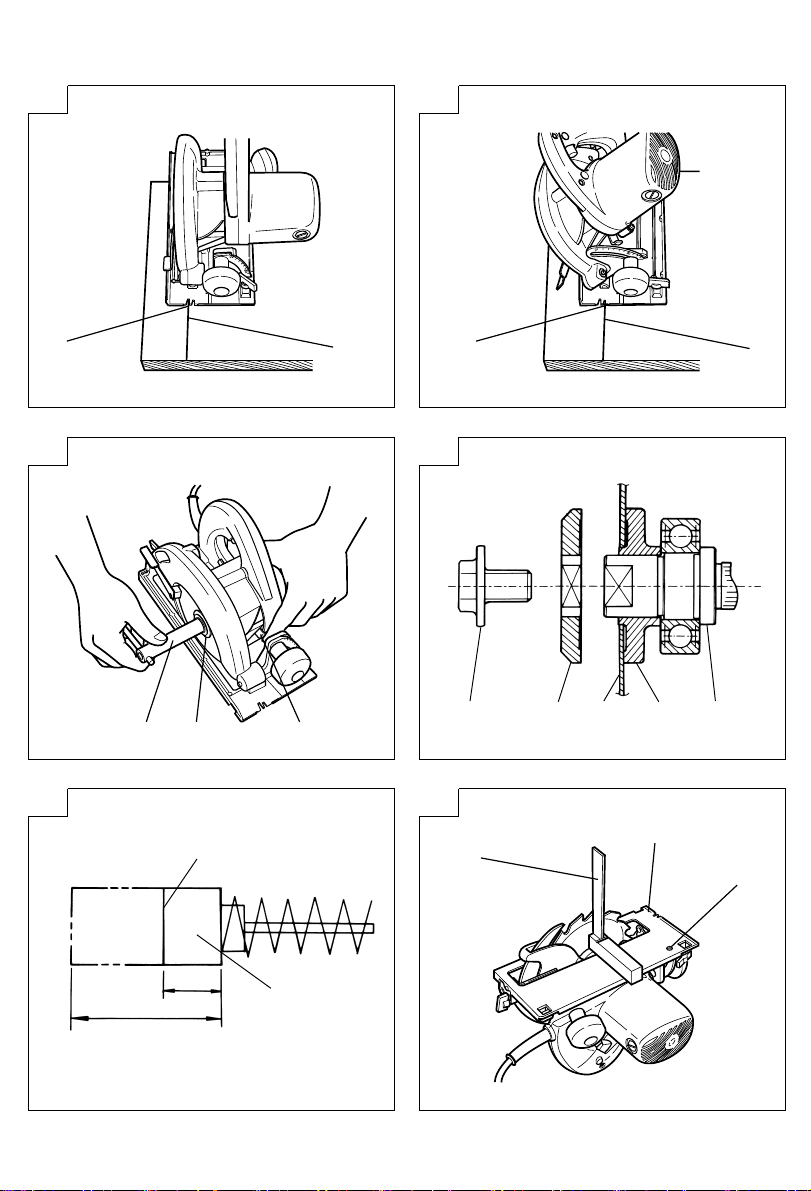
鋸 割 步 驟
1. 將鋸體(底座)放在鋸木上﹐利用前部尺度將鋸
片對準標志線-鋸片未傾斜時﹐參照右側(圖 6
(A));鋸片傾斜(45 度)時﹐參照左側(底座
上標有“45”)(圖 6(B))-
2. 在鋸片碰到鋸木之前打開開關扳動扳機開關就打開;松開扳機開關就關掉-
3. 以定速筆直移動電圓鋸可進行最佳鋸割-
鋸 片 的 裝 卸
注意︰為了避免發生嚴重事故﹐務必將開關置于
OFF(斷開)位置﹐並把電源切斷-
1. 拆卸鋸片︰
(1) 將鋸割深度調到最大﹐把電圓鋸放在堅硬位置
上-(見圖 7)
(2) 壓住鎖緊杆﹐用附屬的套筒扳手小心轉動螺栓(3) 鋸軸固定時﹐反時針方向轉動扳手拆下螺栓和墊
圈(B)(4) 握安全蓋旋鈕時﹐把安全蓋縮入鋸蓋內﹐取出
鋸片-
2. 安裝鋸片︰
(1) 按與拆卸相反順序安裝鋸片(2) 將主軸﹑墊圈等上面的切屑擦拭干淨(3) 如圖 8 所示﹐帶凸起中心的墊圈(A)側﹐其直徑
和鋸片的內徑相同﹐而墊圈(B)的凹入側必須和
鋸片側一致-
*3 種鋸片附帶了墊圈(A)﹐其內徑分別為 16 毫
米﹑20 毫米 和 30 毫米-(購買電圓鋸時﹐隨
機附帶有一種墊圈(A)-)
如果您的鋸片內徑與墊圈(A)的內徑不一致﹐
請與您購買電圓鋸的銷售店聯系-
(4) 鋸片應妥加安裝﹐使鋸片的箭頭同鋸蓋上的箭頭
對準(5) 盡量用手指擰緊固定鋸片的六角頭螺栓-然后壓
下鎖緊杆﹐鎖住主軸﹐並擰緊螺栓-
6
Page 8

注意︰
䡬 若使用附件以外的扳手﹐螺栓不能擰緊﹐故務
必使用附屬的扳手-
䡬 連接電源線之前﹐應先檢查鎖緊杆回到原來位
置﹐鋸片轉動平順-
維 護 和 檢 查
1. 檢查鋸片
使用鈍鋸片將會導致電動機故障﹐降低工作效
率﹐故發現磨損時應盡快加以磨快或更換新的-
2. 檢查安裝螺釘
要經常檢查安裝螺釘是否緊固妥善-若發現螺釘
鬆了﹐應立即重新扭緊﹐否則會導致嚴重的事
故-
3. 電動機的維護
電動機繞線是電動工具的心臟部-應仔細檢查有
無損傷﹐是否被油液或水沾濕-
4. 檢查碳刷(圖 9)
馬達使用碳刷﹐它是消耗部品﹐因為使用過久的
碳刷將會導致馬達故障﹐用具有相同碳刷號的新
碳刷去更換舊的﹐碳刷編號用數字表示碳刷何時
用舊或接近於磨損極限﹐此外﹐要經常保持碳刷
清潔以及保証它在刷握裡能自由滑動-
䡬 更換碳刷
用無頭螺絲刀卸下碳刷蓋﹐然後可以很容易地取
下碳刷-
5. 檢查安全蓋的作用並進行維修︰
小心維護安全蓋﹐使它保持正常作用-將安全蓋
旋轉部分周圍積留的鋸屑去除干淨﹐然后在其滑
動部位涂上主軸油﹐以提高其性能-
6. 調整底座和鋸片以保持垂直︰
底座和鋸片之間的角度已被調整為 90 度﹐但是﹐
這一垂直角度可能會由于某些原因而改變﹐請按
以下方式調整︰
(1) 將底座轉向上方(圖 10)並擰松旋鈕和蝶形螺栓
(圖 4(A)﹑圖 4(B))-
(2) 將一把直角尺放在底座和鋸片上﹐轉動螺絲-移
動底座的位置以形成所需的正確角度-
注意:為求改進﹐本手冊所載規格可能不預先通告
而徑予更改-
7
Page 9

GENERAL OPERATIONAL PRECAUTIONS
WARNING! When using electric tools, basic safety pre-
cautions should always be followed to reduce the risk of
fire, electric shock and personal injury, including the
following.
Read all these instructions before operating this product
and save these instructions.
For safe operations:
1. Keep work area clean. Cluttered areas and benches
invite injuries.
2. Consider work area environment. Do not expose
power tools to rain. Do not use power tools in
damp or wet locations. Keep work area well lit.
Do not use power tools where there is risk to
cause fire or explosion.
3. Guard against electric shock. Avoid body contact
with earthed or grounded surfaces. (e.g. pipes,
radiators, ranges, refrigerators).
4. Keep children away. Do not let visitors touch the
tool or extension cord. All visitors should be kept
away from work area.
5. Store idle tools. When not in use, tools should
be stored in a dry, high or locked up place, out
of reach of children.
6. Do not force the tool. It will do the job better and
safer at the rate for which it was intended.
7. Use the right tool. Do not force small tools or
attachments to do the job of a heavy duty tool.
Do not use tools for purposes not intended; for
example, do not use circular saw to cut tree limbs
or logs.
8. Dress properly. Do not wear loose clothing or
jewelry, they can be caught in moving parts.
Rubber gloves and non-skid footwear are
recommended when working outdoors. Wear
protecting hair covering to contain long hair.
9. Use eye protection. Also use face or dust mask
if the cutting operation is dusty.
10. Connect dust extraction equipment.
If devices are provided for the connection of dust
extraction and collection facilities ensure these are
connected and properly used.
11. Do not abuse the cord. Never carry the tool by
the cord or yank it to disconnect it from the
receptacle. Keep the cord away from heat, oil and
sharp edges.
12. Secure work. Use clamps or a vise to hold the
work. It is safer than using your hand and it frees
both hands to operate tool.
13. Do not overreach. Keep proper footing and balance
at all times.
14. Maintain tools with care. Keep cutting tools sharp
and clean for better and safer performance. Follow
instructions for lubrication and changing
accessories. Inspect tool cords periodically and if
damaged, have it repaired by authorized service
center. Inspect extension cords periodically and
replace, if damaged. Keep handles dry, clean, and
free from oil and grease.
15. Disconnect tools. When not in use, before servicing,
and when changing accessories such as blades,
bits and cutters.
16. Remove adjusting keys and wrenches. Form the
habit of checking to see that keys and adjusting
wrenches are removed from the tool before turning
it on.
17. Avoid unintentional starting. Do not carry a
plugged-in tool with a finger on the switch. Ensure
switch is off when plugging in.
18. Use outdoor extension leads. When tool is used
outdoors, use only extension cords intended for
outdoor use.
19. Stay alert. Watch what you are doing. Use common
sense. Do not operate tool when you are tired.
20. Check damaged parts. Before further use of the
tool, a guard or other part that is damaged should
be carefully checked to determine that it will
operate properly and perform its intended function.
Check for alignment of moving parts, free running
of moving parts, breakage of parts, mounting and
any other conditions that may affect its operation.
A guard or other part that is damaged should be
properly repaired or replaced by an authorized
service center unless otherwise indicated in this
handling instructions. Have defective switches
replaced by an authorized service center. Do not
use the tool if the switch does not turn it on and
off.
21. Warning
The use of any accessory or attachment, other
than those recommended in this handling
instructions, may present a risk of personal injury.
22. Have your tool repaired by a qualified person.
This electric tool is in accordance with the relevant
safety requirements. Repairs should only be carried
out by qualified persons using original spare parts.
Otherwise this may result in considerable danger
to the user.
PRECAUTIONS ON USING CIRCULAR SAW
1. Do not use saw blades which are deformed or
cracked.
2. Do not use saw blades made of high speed steel.
3. Do not use saw blades which do not comply with
the characteristics specified in these instructions.
4. Do not stop the saw blades by lateral pressure
on the disc.
5. Always keep the saw blades sharp.
6. Ensure that the safety cover moves smoothly and
freely.
7. Never use the circular saw with its safety cover
fixed in the open position.
8. Ensure that the retraction mechanism of the guard
system operates correctly.
9. The saw blades body must be thinner than the
riving knife and the width of cut, or kerf (with the
teeth set) must be greater than the thickness of
the riving knife.
10. Never operate the circular saw with the saw blade
turned upward or to the side.
11. Ensure that the material is free of foreign matter
such as pails.
12. The riving knife should always be used except
when plunging in the middle of the work piece.
13. The saw blades range should be from 185 mm to
170 mm. The body of saw blade should be 1.4 mm,
and the kerf of saw blade should be 2.0 mm.
14. Ensure that the riving knife is adjusted so that the
distance between the riving knife and the toothed
rim of the saw blade is not more than 3 mm, and
the toothed rim does not extend more than 3 mm
beyond the lower edge of the riving knife.
15. Do not use any abrasive wheel.
8
Page 10

SPECIFICATIONS
Voltage (by areas)* (110 V, 220 V, 230 V, 240 V)
Cutting Depth 90° 65 mm
45° 47 mm
Input 1150 W*
No-Load Speed 5500/min
Weight (without cord) 4.0 kg
*Be sure to check the nameplate on product as it is subject to change by areas.
STANDARD ACCESSORIES
(1) Box Wrench ................................................................ 1
(2) Guide ........................................................................... 1
(3) Wing-bolt .................................................................... 1
Standard accessories are subject to change without
notice.
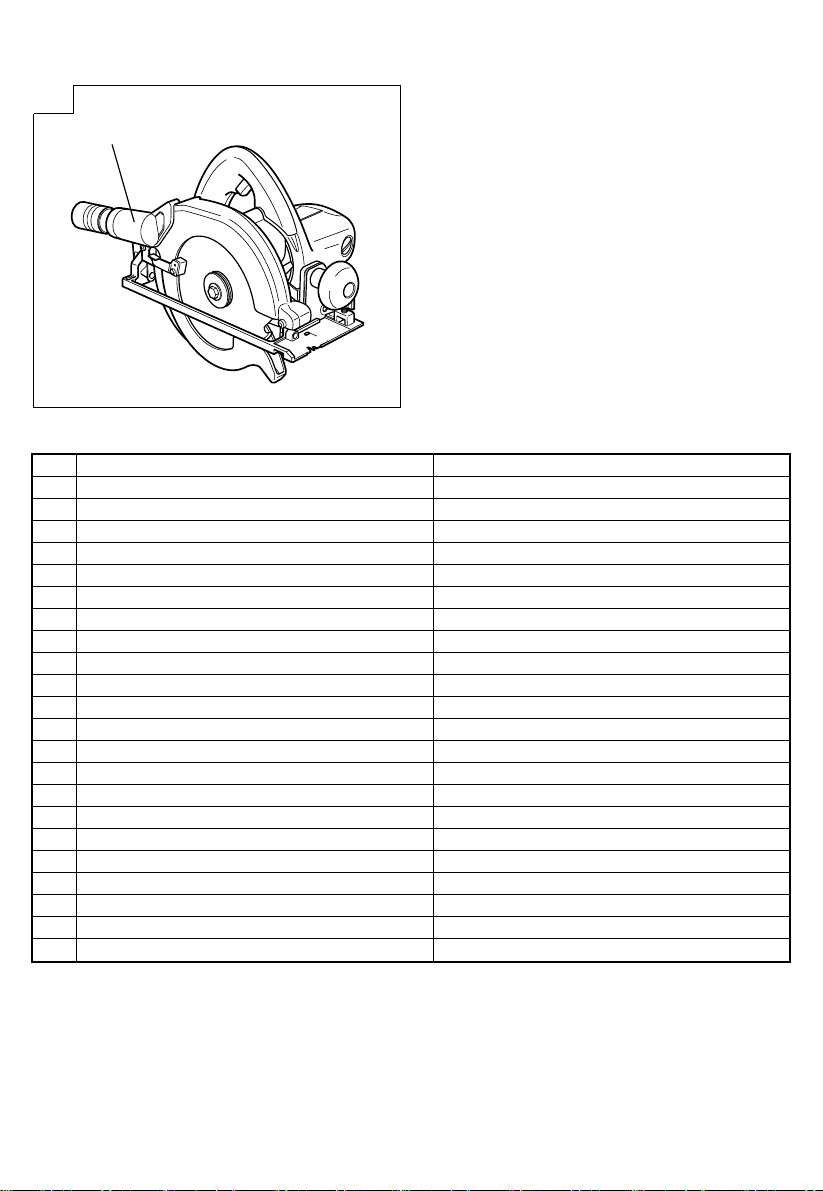
OPTIONAL ACCESSORIES (sold separately)
(1) Dust Collector Set (D)
Connect the suction hose to collect saw dust with the
vacuum cleaner (see Fig. 11).
(2) Washer (A) ........ for 16 mm (Inner dia. of saw blade)
Optional accessories are subject to change without notice.
........ for 20 mm (Inner dia. of saw blade)
........ for 30 mm (Inner dia. of saw blade)
APPLICATION
Cutting various types of wood.
PRIOR TO OPERATION
1. Power source
Ensure that the power source to be utilized conforms
to the power requirements specified on the product
nameplate.
2. Power switch
Ensure that the power switch is in the OFF position.
If the plug is connected to a receptacle while the
power switch is in the ON position, the power tool
will start operating immediately, inviting serious
accident.
3. Extension cord
When the work area is removed from the power
source, use an extension cord of sufficient thickness
and rated capacity. The extension cord should be
kept as short as practicable.
CAUTION:
Damaged cord must be replaced or repaired.
4. Prepare a wooden workbench. (Fig. 1)
Since the saw blade will extend beyond the lower
surface of the lumber, place the lumber on a
workbench when cutting. If a square block is utilized
as a workbench, select level ground to ensure it is
properly stabilized. An unstable workbench will result
in hazardous operation.
CAUTION:
To avoid possible accident, always ensure that the
portion of lumber remaining after cutting is securely
anchored or held in position.
ADJUSTING THE POWER TOOL PRIOR TO USE
1. Adjusting the cutting depth
As shown in Fig. 2, hold the handle with one hand
while loosening the knob with the other.
The cutting depth can be adjusted by moving the
base to the desired position. In such manner adjust
the cutting depth and then securely retighten the
knob.
2. Adjusting the riving knife
Loosen the hexagonal–head bolt used to clamp the
riving knife, adjust the riving knife to the position
shown in Fig. 3 and securely retighten the bolt. After
adjustment, ensure that that riving knife moves in
accordance with the adjusted cutting depth.
3. Adjusting the angle of inclination
As shown in Fig. 4 (A), Fig. 4 (B) by loosening the
knob on the incline gauge and the wing-bolt on the
base, the saw blade may be inclined to a maximum
angle of 45° in relation to the base. After having
completed the adjustment, reconfirm that the knob
and the wing-bolt are firmly tightened.
4. Regulating the guide (Fig. 5)
The cutting position can be regulated by moving the
guide to the left or right after loosening its wing bolt.
The guide can be mounted on either the left or the
right sides.
CUTTING PROCEDURES
1. Place the saw body (base) on the lumber, and align
the marked off line with the saw blade by use of the
front scale. When the saw blade is not inclined, the
right-hand side is the reference (Fig. 6 (A)); when the
saw blade is inclined (45°), the left-hand side (marked
“45” on the base) is the reference (Fig. 6 (B)).
2. Turn ON the switch before the saw blade contacts the
lumber. The switch is turned ON when the trigger is
squeezed, and turned OFF when the trigger is
released.
3. Moving the saw straight at a constant speed will
produce optimum cutting.
CAUTIONS:
䡬 Before starting to saw, confirm that the saw blade
has attained full-speed revolution.
9
Page 11

䡬 Should the saw blade be stopped or made an
abnormal noise while operating, promptly turn OFF
the switch.
䡬 Always take care in preventing the power cord from
coming near to the revolving saw blade.
䡬 Using the Circular Saw with the saw blade facing
upwards or sideways is very hazardous. Such
uncommon applications should be avoided.
䡬 When cutting material, always wear eye protection.
䡬 When finished a job, disconnect the plug from the
receptacle.
MOUNTING AND DISMOUNTING THE SAW
BLADE
CAUTION:
To avoid serious accident, ensure that the switch is in
the OFF position, and the power source is
disconnected.
1. Dismounting the saw blade
(1) Set the cutting depth to maximum and place the
circular saw on a stable place. (Fig. 7)
(2) Keeping the lock lever depressed, carefully turn the
hexagonal-head bolt with the box wrench.
(3) When the saw shaft is fixed, turn the wrench
counterclockwise to remove bolt and washer (B).
(4) While gripping the safety cover knob, retract the
safety cover into the saw cover and take out the saw
blade.
2. Mounting the saw blade
(1) Install the saw blade in the reverse order to removal.
(2) Wipe off the swarf from the spindle, washer, etc.
(3) As shown in Fig. 8, the side of Washer (A) with a
projected center the same diameter as the inner
diameter of the saw blade and the concave side of
Washer (B) must be fitted to the saw blade sides.
* Washer (A) is supplied for 3 types of saw blades
with the inner diameters of 16 mm, 20 mm and 30
mm. (When buying the Circular Saw, one type of
washer (A) is supplied.)
In case the inner diameter of your saw blade does
not correspond to that of washer (A), please contact
the shop where you purchased the Circular Saw.
(4) The saw blade should be installed so that the arrow
in the saw blade is aligned with the arrow on the saw
cover.
(5) Using the fingers, tighten the hexagonal-head bolt
retaining the saw blade as much as possible. Then
depress the lock lever, lock the spindle, and
thoroughly tighten the bolt.
CAUTIONS:
䡬 If a wrench other than the one supplied is used, the
bolt cannot be tightened correctly. Always use the
supplied wrench.
䡬 Before connecting the power plug, check that the
lock lever is returned to its original position and the
saw blade rotates smoothly.
2. Inspecting the mounting screws
Regularly inspect all mounting screws and ensure
that they are properly tightened. Should any of the
screws be loose, retighten them immediately. Failure
to do so could result in serious hazard.
3. Maintenance of the motor
The motor unit winding is the very “heart” of the
power tool. Exercise due care to ensure the winding
does not become damaged and/or wet with oil or
water.
4. Inspecting the carbon brushes (Fig. 9)
The motor employs carbon brushes which are
consumable parts. Since an excessively worn carbon
brush could result in motor trouble, replace the carbon
brushes with new ones which have the same carbon
brush No. shown in the figure when they become
worn to or near the “wear limit”. In addition, always
keep carbon brushes clean and ensure that they slide
freely within the brush holders.
䡬 Replacing carbon brushes
Disassemble the brush caps with a slotted-head
screwdriver. The carbon brushes can then be easily
removed.
5. Inspecting safety cover functioning and its
maintenance
Carefully maintain the safety cover so that it remains
capable of smoothly functioning. Completely remove
sawdust deposited around the rotary portion of the
safety cover, and then apply spindle oil to its sliding
section to attain better functioning.
6. Adjusting the base and saw blade to maintain
perpendicularity:
The angle between the base and the saw blade has
been adjusted to 90°, however should this
perpendicularity be lost for some reason, adjust in
the following manner:
(1) Turn the base face up (Fig. 10) and loosen the knob
and wing-bolt (Fig. 4 (A), Fig. 4 (B)).
(2) Apply a square to the base and the saw blade and
turning the set screw, shift the position of the base to
produce the desired right angle.
Note
Due to HITACHI’s continuing program of research
and development, the specifications herein are subject
to change without prior notice.
MAINTENANCE AND INSPECTION
1. Inspecting the saw blade
Since use of a dull saw blade will cause motor
malfunctioning and degraded efficiently, replace with
a new one without delay if abrasion is noted.
10
Page 12

The exploded assembly drawing should be used only for authorized service center.
11
Page 13

Item
No.
1 Cushion
2 Flat Hd. Screw M6×20
3 Gear Cover Ass'y
4 Spindle Gear
5 Bearing Holder
6 Bushing
7 Ball Bearing (6003 VVCMPS2S)
8 Return Spring
9Safety Cover
10 Bearing Cover
11 Seal Lock Flat Hd. Screw M4×10
12 Washer (A)
14 Washer (B)
15 Flange bolt M8×15.5
16 Knob
17 O-ring (P-7)
18 Bolt Washer M8
19 Diagonal Bolt M8
20 Seal Lock Flat Hd. Screw M5×14
21 Knob
22 Machine Screw (W/Washers) M4×10
23 Machine Screw (W/Washers) M5×35
24 Name Plate
25 Tapping Screw (W/Flange) D4×20
26 Housing Ass'y
27 Switch
28 Noise Suppressor
29 Tube (D)
31 Stator
32 Fan Guide
33 Ball Bearing (608VVMC2EPS2L)
35 Armature
36 Lock Lever
37 Ball Bearing (6001VVCMPS2L)
38 Rubber Ring
39 Hex. Socket Set Screw M5×8
40 Brush Holder
41 Carbon Brush
42 Brush Cap
44 Tube (D)
45 Cord Armor
46 Cord
47 Cord Clip
Part Name
Item
No.
48 Tapping Screw (W/Flange) D4×16
49 Connector (50091)
50 Internal Wire
51 Earth Washer D5
52 Hex. Hd. Tapping Screw D5×60
53 Handle Cover
54 Roll Pin D6×40
55A Riving Knife
56 Flange Bolt M8×10
57 Wing Bolt M6×15
58 Bolt (Square) M8×30
59 Set Screw (Seal Lock) M6×6
60 Base Ass'y
61 Washer M6
62 Wing Bolt M6×17
64 Choke Coil
65 Connector (50091)
67 Bevel Plate
68 Rivet D6×17
501 Guide
502A
Box Wrench 13MM
Parts are subject to possible modification without notice
due to improvements.
Part Name
12
Page 14

Hitachi Koki Co., Ltd.
Code No. C99046523
Printed in China
301
 Loading...