

Page 1

Users
Guide
C28WF535N
C32WF535N
SCREEN
Page 2
Software Notice
It is prohibited for the end user of this product to copy, reverse engineer or reverse
compile the software included therein, save to the extent permitted by law.
Caution
To prevent scratching or damaging the tube face, do not knock or rub the surface
with sharp or hard objects. Clean the screen with a soft cloth moistened with warm water
and dry with a soft cloth. A mild soap may be used if the screen is extremely dirty. Do not
use harsh or abrasive cleaners!
Dolby Digital
Manufactured under license from Dolby Laboratories. “Dolby”, “Pro Logic”
and the double-D symbol are trademarks of Dolby Laboratories. Confidential
Unpublished Works. 1992 - 1997 Dolby laboratories, Inc. All rights reserved.
Digital sound
Your Hitachi television is capable of decoding advanced forms of digital audio
coding (such as Dolby Digital and PCM) that makes it possible to reproduce high
quality digital sound. Being the next step forward from analogue sound, digital
sounds sonic realism and listener involvement will change the way you experience
sound from your Hitachi television. Digital sound works by delivering at maximum 5
separate audio channels - left, right, centre, left surround, right surround and also a
LFE (Low Frequency Effects) channel. These independent channels allow for a more
precise localisation of sounds and a more convincing, realistic ambiance.
Important
Dear HITACHI customer
Congratulations on your purchase of the very latest state of the art
television from HITACHI. At Hitachi we pride ourselves on producing high quality
televisions with outstanding picture and audio capabilities. Together with our
reputation for superior reliability, you should enjoy many years of trouble free
operation from your TV.
Please read this Users Guide thoroughly, especially the Safety
Notes on Page 4. Mis-use may cause damage to your television,
which could shorten its lifespan, or cause injury to yourself. Should
you encounter any difficulty in the set-up or operation of your
television, firstly refer to the Trouble Shooting Guide at the rear of
this manual.
In the unlikely event of a problem occurring with your TV, switch off at the mains
socket, pull out the plug, and contact your dealer immediately.
Under no circumstances remove the rear cover of your TV.
Never guess or take any chances with electrical equipment
of any kind - it is better to be safe than sorry!
Page 3

contents
contents
safety aspects
television safety ................................................................................4
battery safety and installation............................................................5
TV controls overview
front control panel details ..................................................................6
rear socket and scart details. ............................................................7
set-up
aerial, decoder, VCR and DVD installation ........................................8
handset controls
programme tuning ............................................................................9
television/VCR operation....................................................................10
Teletext functions ..............................................................................11
tuning in
TV set up and automatic tuning procedure ......................................12
manual tuning procedure ..................................................................14
programme sort ................................................................................16
programme name change and download ........................................17
viewlink ..............................................................................................18
customer I.D. ....................................................................................20
password change ..............................................................................21
programme, sound and vision adjustment
picture controls ..................................................................................22
NICAM and stereo sound controls ....................................................23
audio and equaliser controls ............................................................24
sound mode ......................................................................................26
digital audio setup ............................................................................28
digital audio status - decode mode ..................................................29
digital audio status - display format ..................................................30
speaker setup ....................................................................................31
surround setup ..................................................................................33
television features
sleep timer and on screen display ....................................................36
wide screen viewing ..........................................................................37
Teletext operation ............................................................................39
other equipment
other equipment connection ............................................................40
signal source entry ............................................................................41
audio visual setup ..............................................................................43
other features
language and installation ..................................................................44
programme download and demo mode ..........................................45
information
trouble shooting guide - digital sound ..............................................46
trouble shooting guide ......................................................................48
guarantee ..........................................................................................49
HITACHI environmental notice ..........................................................50
technical data ....................................................................................51
3
Page 4
4
television safety safety aspects
This television has been designed and manufactured to meet international safety
standards, but like any electrical equipment, care must be taken if you are to obtain
the best results and safety is to be assured.
DO NOT cut off the fitted mains plug as it may contain a special radio interference filter, the
removal of which could lead to impaired performance. If you wish to extend the lead, obtain an
appropriate extension lead or consult your dealer.
DO NOT continue to operate the equipment if you are in any doubt about it working
normally or if it is damaged in any way - switch off, withdraw the mains plug and consult your
dealer.
IF you intend placing this TV into a cabinet or a wall alcove, please ensure there is at least a
100mm (10cm) gap to the sides, rear and top of the TV. This is to allow for adequate ventilation
during your TV's operation.
DO NOT leave equipment switched on when it is unattended unless it is specifically stated that it is
designed for unattended operation or has a stand-by mode. Switch off using the switch on the
equipment and show your family how to do this. Make special arrangements for infirm or
handicapped people.
DO NOT obstruct the ventilation of the equipment, for example with curtains or soft
furnishings. Overheating will cause damage and shorten the lifespan of your equipment.
DO NOT use makeshift stands and NEVER fix legs with wood screws - to ensure complete safety,
always fit the manufacturers approved stand or legs with the fixings provided according to the
instructions.
DO NOT allow electrical equipment to be exposed to rain or moisture.
NEVER let anyone, especially children, push anything into holes, slots, or any
other opening in the case - this could result in a fatal electrical shock. Under NO
circumstances remove the rear cover of your TV!
NEVER guess or take chances with electrical equipment of any kind - it is
better to be safe than sorry!
DO be careful with any glass panels or doors on equipment.
DO consult your dealer if you are in any doubt about installation, operation or safety of your equipment.
DO place your TV on a flat surface, or if supplied, the stand accessory.
DO NOT remove any fixed cover as this may expose dangerous voltages.
DO ensure that all connections, (including the mains plug, extension leads and inter-connections
between the pieces of equipment), are properly made and in accordance with the manufacturers
instructions. Switch off and withdraw the mains plug before making or changing connections.
DO NOT listen to headphones at high volume, as such use can permanently damage your hearing.
DO read the operating instructions before you attempt to use the equipment.
DO NOT use equipment such as personal stereos or radios so that you are distracted from the
requirements of traffic safety. It is illegal to watch television whilst driving.
DO NOT place hot objects such as candles or nightlights on, or close to, equipment. High
temperatures can melt plastic and lead to fires.
DO observe the manufacturers instructions when connecting extension leads to your TV. The fuse should
be a 5 Amp fuse with the safety symbols and displayed. If you are in any doubt about the
extension installation, please consult a competent electrician.
DO NOT place objects filled with liquids, e.g. a vase, on, or close to the equipment, to avoid
spillages into the inside of the apparatus.
SHOULD you require to replace the fuse in the moulded plug with a new fuse, then please replace
with one of the same value, type and approval as the original. Ensure the fuse cover is returned to
its original position.
TO prevent scratching or damaging the tube face, do not knock or rub the surface with sharp or
hard objects. Clean the screen with a soft cloth moistened with warm water and dry with a soft
cloth. A mild soap may be used if the screen is extremely dirty. Do not use harsh or abrasive
cleaners!
Page 5
5
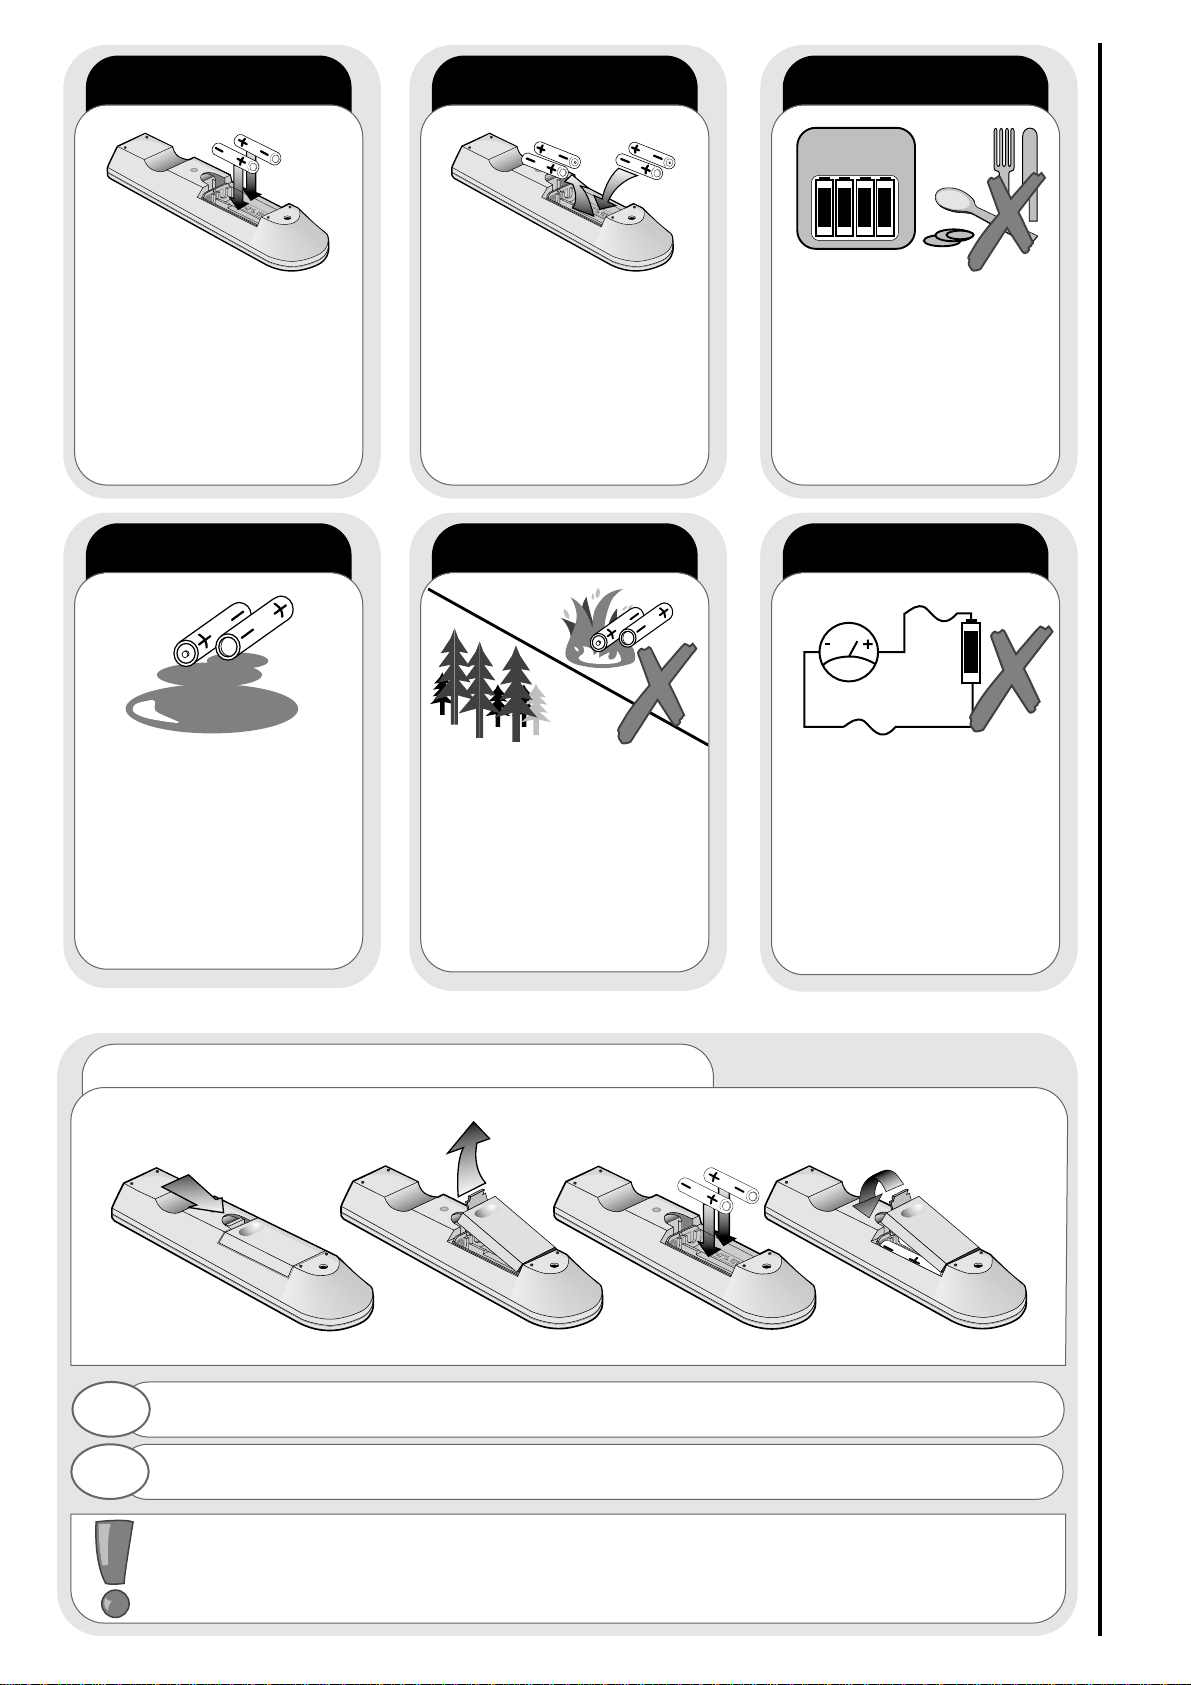
always
battery safety and installation
safety aspects
1. When inserting the batteries make sure the polarities are correct, that is, ‘+’ to ‘+’, ‘-’ to ‘-’.
2. Replace the batteries with the equivalent ‘AA’ type.
3. Discard old batteries safely, following the battery safety guidelines.
battery installation
1
2
Remove cover of handset by lifting up the cover at the recess.
Insert batteries into handset as shown and replace cover.
Take care to fit your batteries
correctly, observing the plus
‘+’ and minus ‘-’ marks on
the battery and appliance.
Incorrect fitting can cause
leakage, or in extreme
cases, fire or explosion.
always
Replace the whole set of
batteries at one time, taking
care not to mix old and new
batteries of different types,
since this can result in
leakage, or in extreme
cases, fire or explosion.
always
Store unused batteries in
their packaging and away
from metal objects which
may cause a short circuit
resulting in leakage, or in
extreme cases, fire or
explosion.
always
Remove dead batteries from
equipment, and all batteries
from equipment that is to be
left for long periods of time
without any use. Otherwise
the batteries may leak and
cause damage.
never!
Never dispose of batteries in
fire as this can cause an
explosion.
Respect the environment -
always dispose of batteries
in an environmentally friendly
manner.
never!
Never attempt to recharge
ordinary batteries, either in a
charger or by applying heat to
them. They may leak, cause
fire or even explode.
Rechargeable NiCAD batteries
and chargers can be
purchased from any good
High Street electrical retailer.
CHARGE
+
-
+-+-+-+
-
Page 6
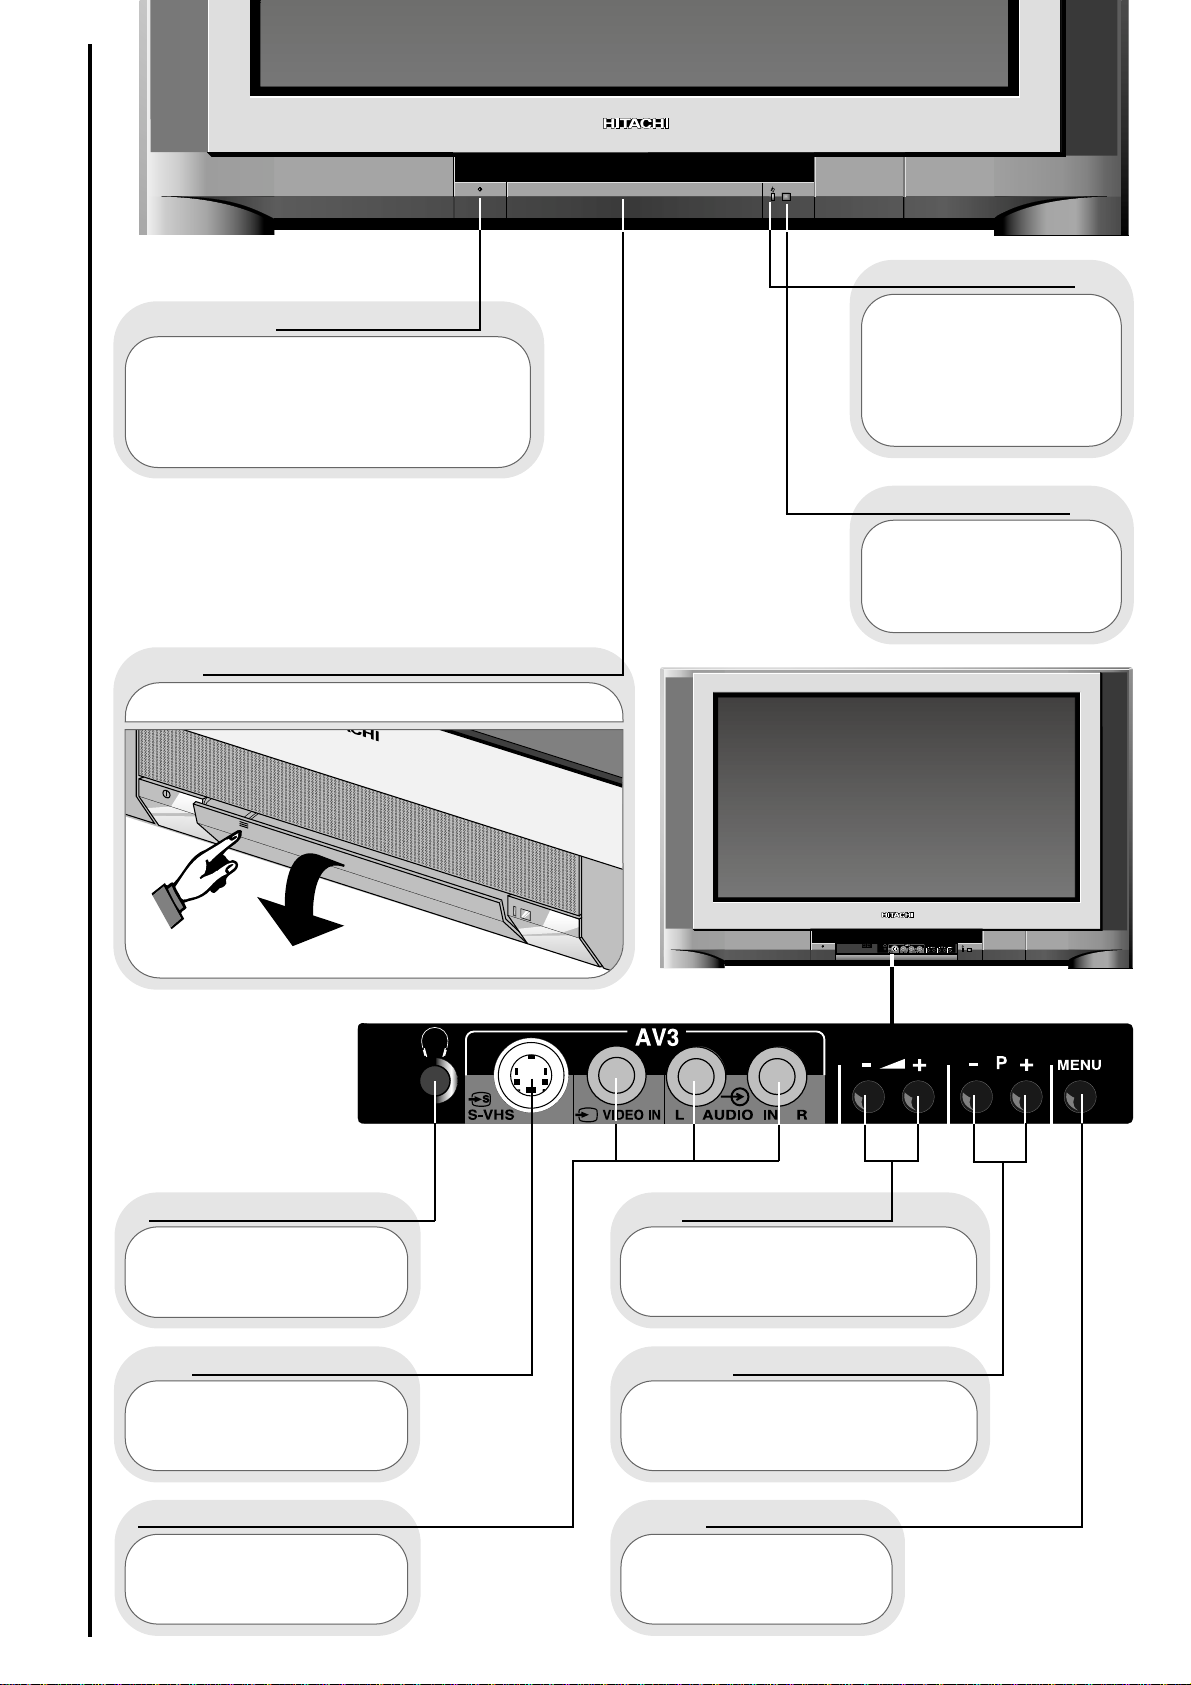
6
This will be lit when
your TV is on and when in
standby mode, and flash
when a function
from your remote control
is being sent to the TV.
This is for reading
commands sent
from your remote control
handset.
Use this to switch your TV on and
off. (When switched off using this button
your TV consumes no power - unlike
when in standby mode).
To use the controls push the door in and release.
These sockets are for
use with external
equipment.
This socket is for use
with external equipment.
Used with
headphones (3.5mm stereo
jack plug required).
Used to access your
on screen MAIN MENU for
TV features adjustment.
Used to change the TV
channel up ‘+’ or down ‘-’ (or
cursor up and down when using the
On Screen Display menus).
Used to increase ‘+’, or
decrease ‘-’ your TV's sound (or
cursor right and left when in On
Screen Display menus).
on/off button
TV mode light
infra-red lens
television controls door panel
headphone socket
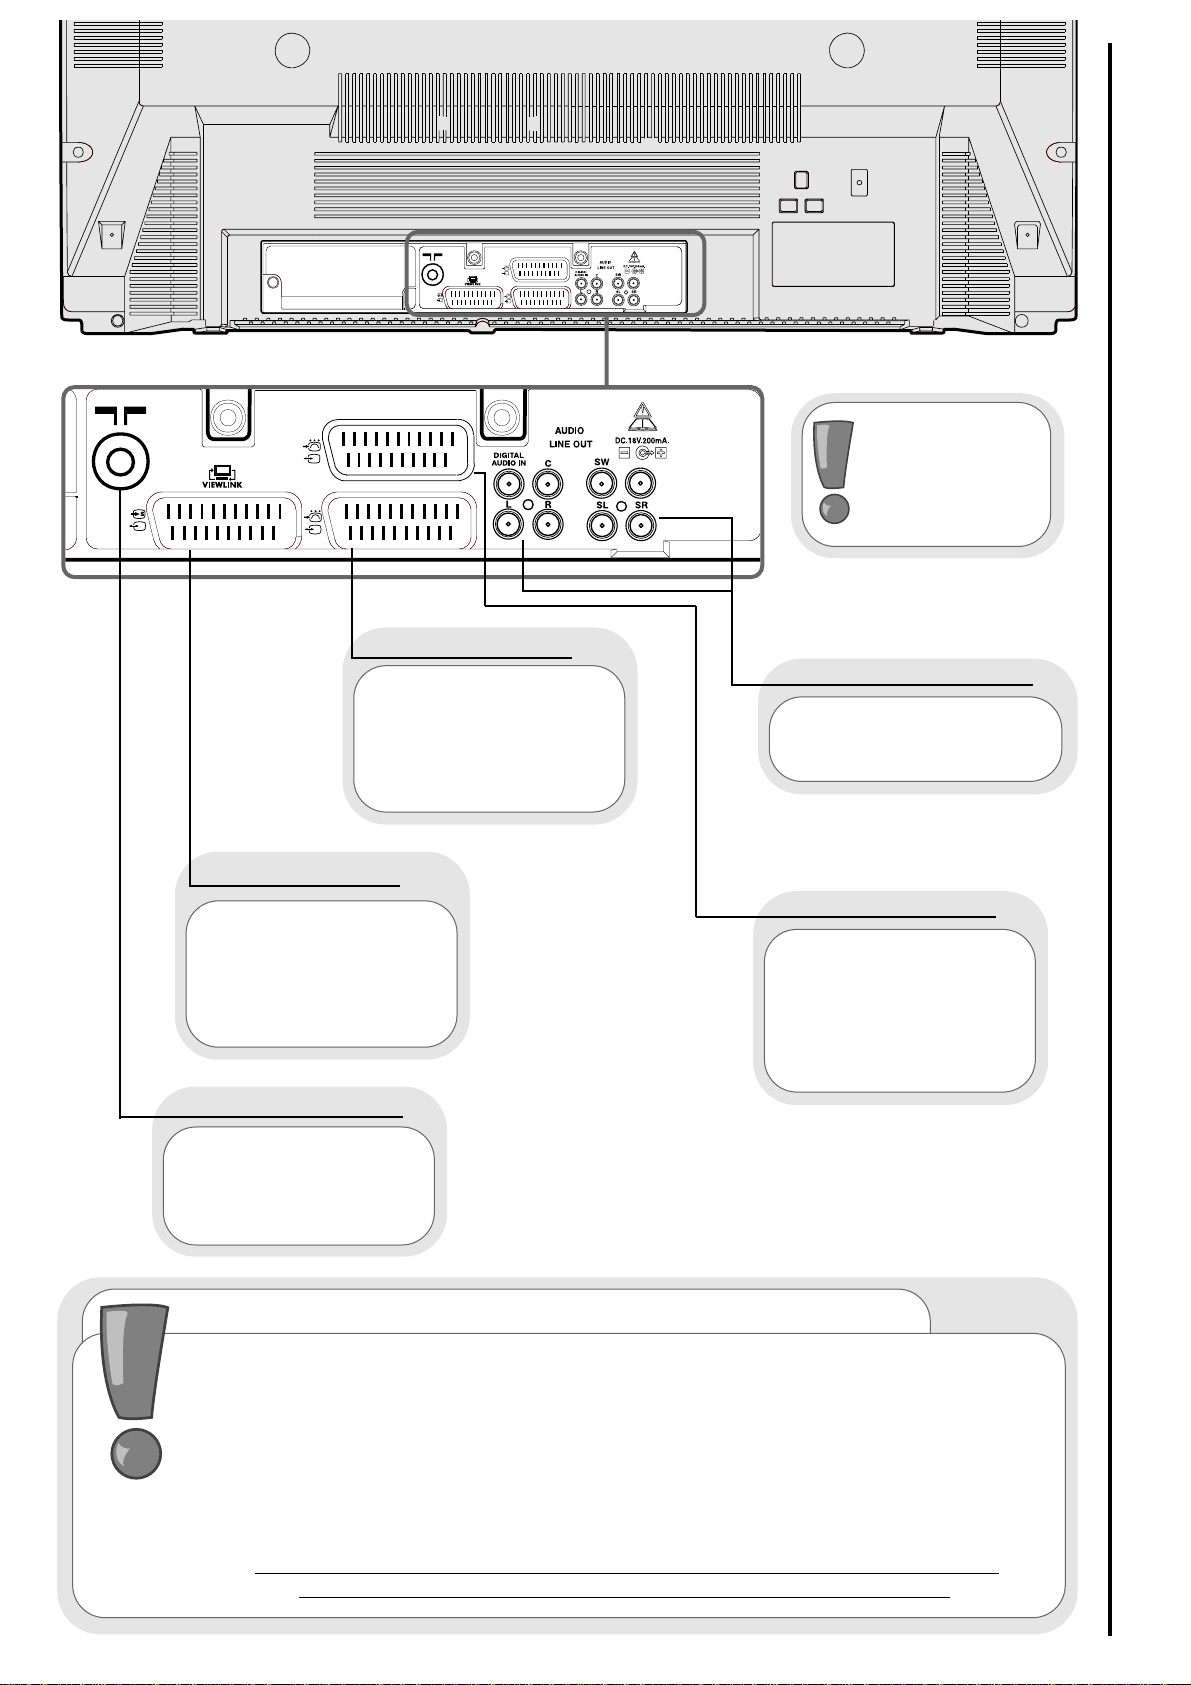
S-VHS sockets
audio/video sockets
volume buttons
program buttons
menu button
front control panel details
TV controls overview
Page 7
7
AV4
Use this socket to connect
ordinary VHS, S-VHS or Hi8
equipment to your TV.
(Connect VCR to AV1 for
Viewlink).
AV4
AV1
AV2
Use this to connect
digital video broadcasting
equipment, home
computers and home
entertainment systems to
your TV.
This should be
permanently connected to
an RF source - i.e your
aerial antenna.
AV2 scart input
AV1 scart input
RF aerial socket
Before
connecting external
equipment, please
consult
audio visual
setup section.
rear socket and scart details
TV controls overview
important note on installation
If you intend placing this TV into a cabinet or wall alcove, please ensure there
is at least a 100mm (10cm) gap to the sides, rear and top of the television. This
is to allow for adequate ventilation.
Do not allow soft furnishings, such as curtains to be draped over the TV whilst
in operation.
Never place the TV onto a carpet during normal operation - this could obstruct
ventilation slots on the base of the TV.
Always place the TV on a flat surface, or if supplied, the stand accessory.
Failure to observe the above guidelines could result in serious
overheating of your TV, or even, in extreme cases, fire.
Use this to connect
digital video broadcasting
equipment, home
computers, home
entertainment systems and
DVD players etc. to your
TV.
AV4 scart input
Use this to connect to
external amplifier or Hi-Fi
system.
audio output (RCA)
AV1
AV2
Page 8
8
TV Setup
AUX
VCR TV
IN
OUT
AV4
AV1
AV2
AV4
AV1
AV2
IN
OUT
IN
OUT
AV1/TV
AV2/
DECODER
IN
OUT
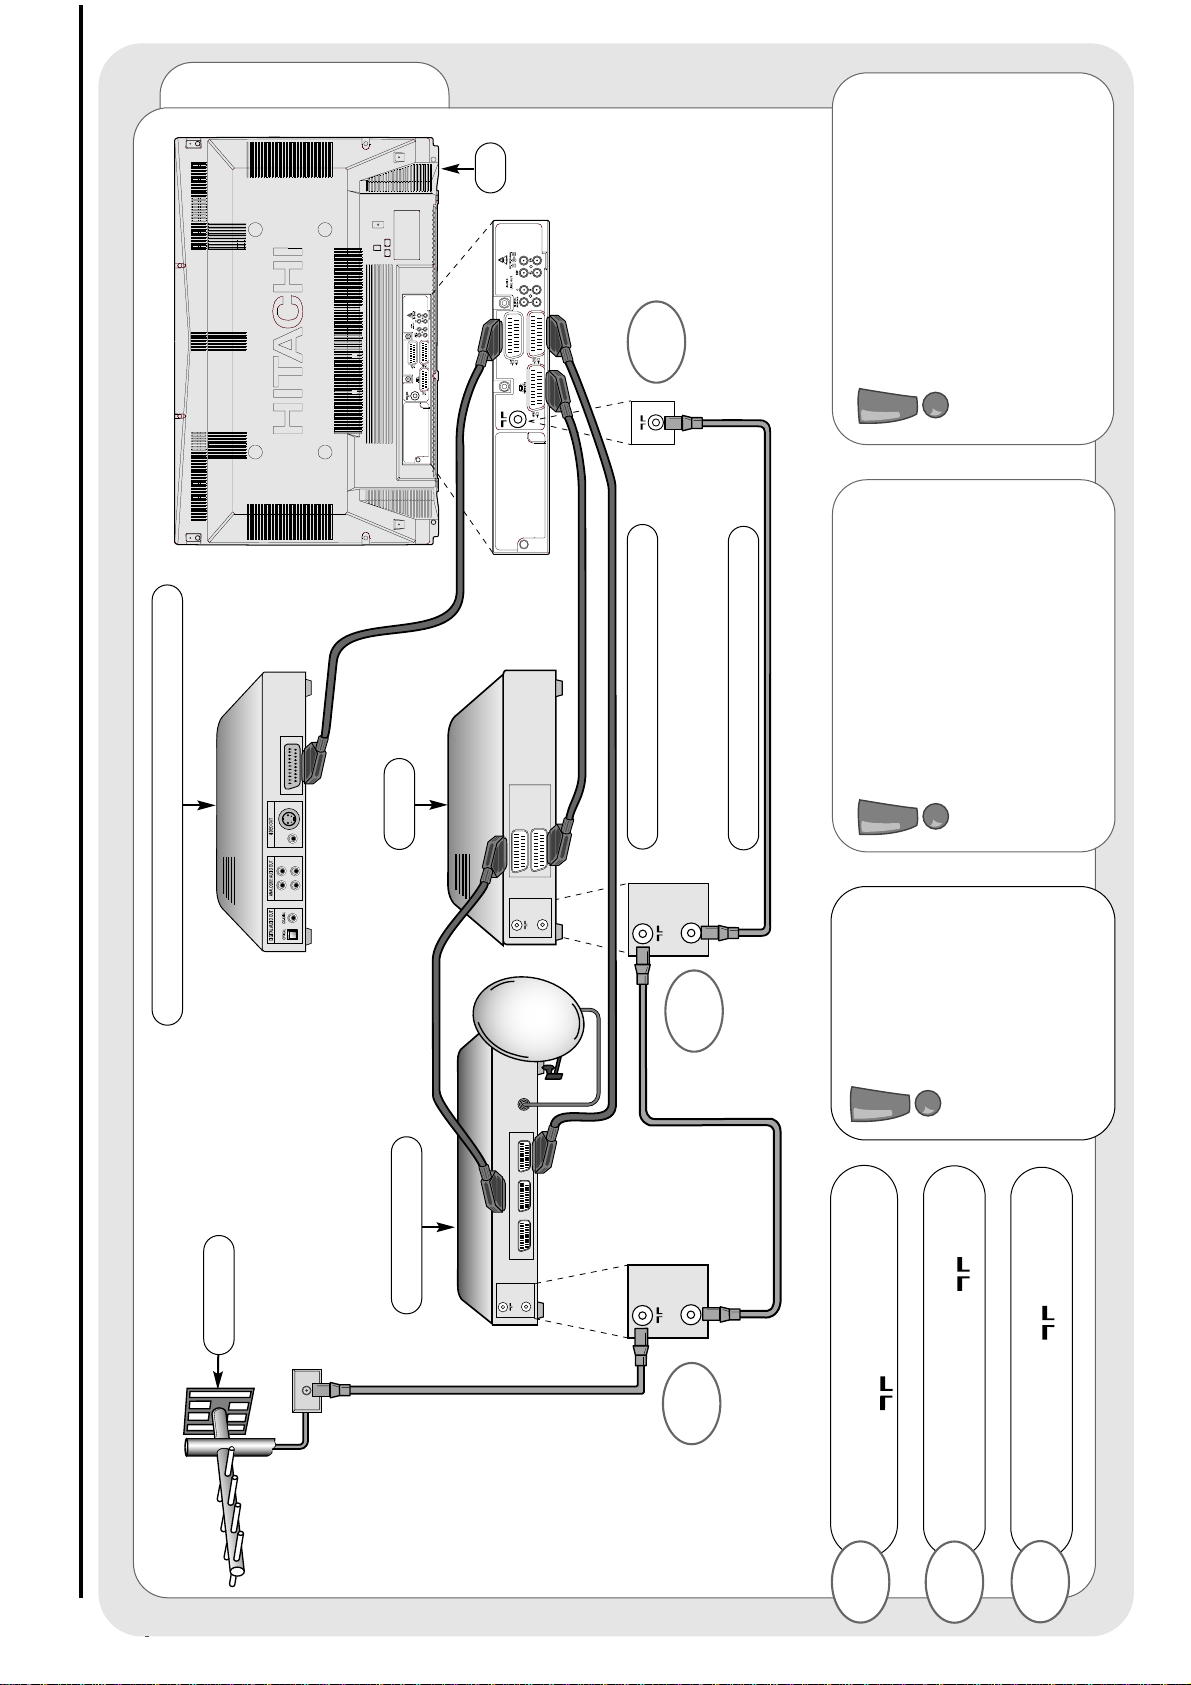
aerial, decoder, VCR and DVD installation
set-up
IMPORTANT
NOTE :
When you
connect your VCR
to your television,
the Audio Visual
option has to be
set correctly to
ensure best picture
quality - see audio
visual setup section.
Connect aerial connection lead to
the STB/Decoder ‘in’ socket marked
.
1
DVD PLAYER/COMPUTER/GAMES
SCART LEADS * (optional)
RF LEADS (1 SUPPLIED)
VHS video equipment
should be connected to the
AV1 scart socket located at the
rear of your TV. A dedicated
programme number may be
assigned to AV1, allowing you
easier access to external
equipment viewing. How to assign an
AV signal to dedicated programme
numbers is explained in signal
source entry section.
* Scart leads should be
fitted between your TV and
other equipment to enhance
your picture and sound quality.
Scart leads are essential if you
have a stereo TV and VCR and
wish to obtain stereo sound from your
equipment. These leads can be
purchased from your Hitachi
dealer or any good High Street
electrical retailer.
3
1
2
Connect STB/Decoder ‘out’ to VCR
‘in’ socket marked .
Connect VCR ‘out’ to TV ‘in’ socket
marked .
2
3
VCR
STB/DECODER
TV
AERIAL
Page 9
9
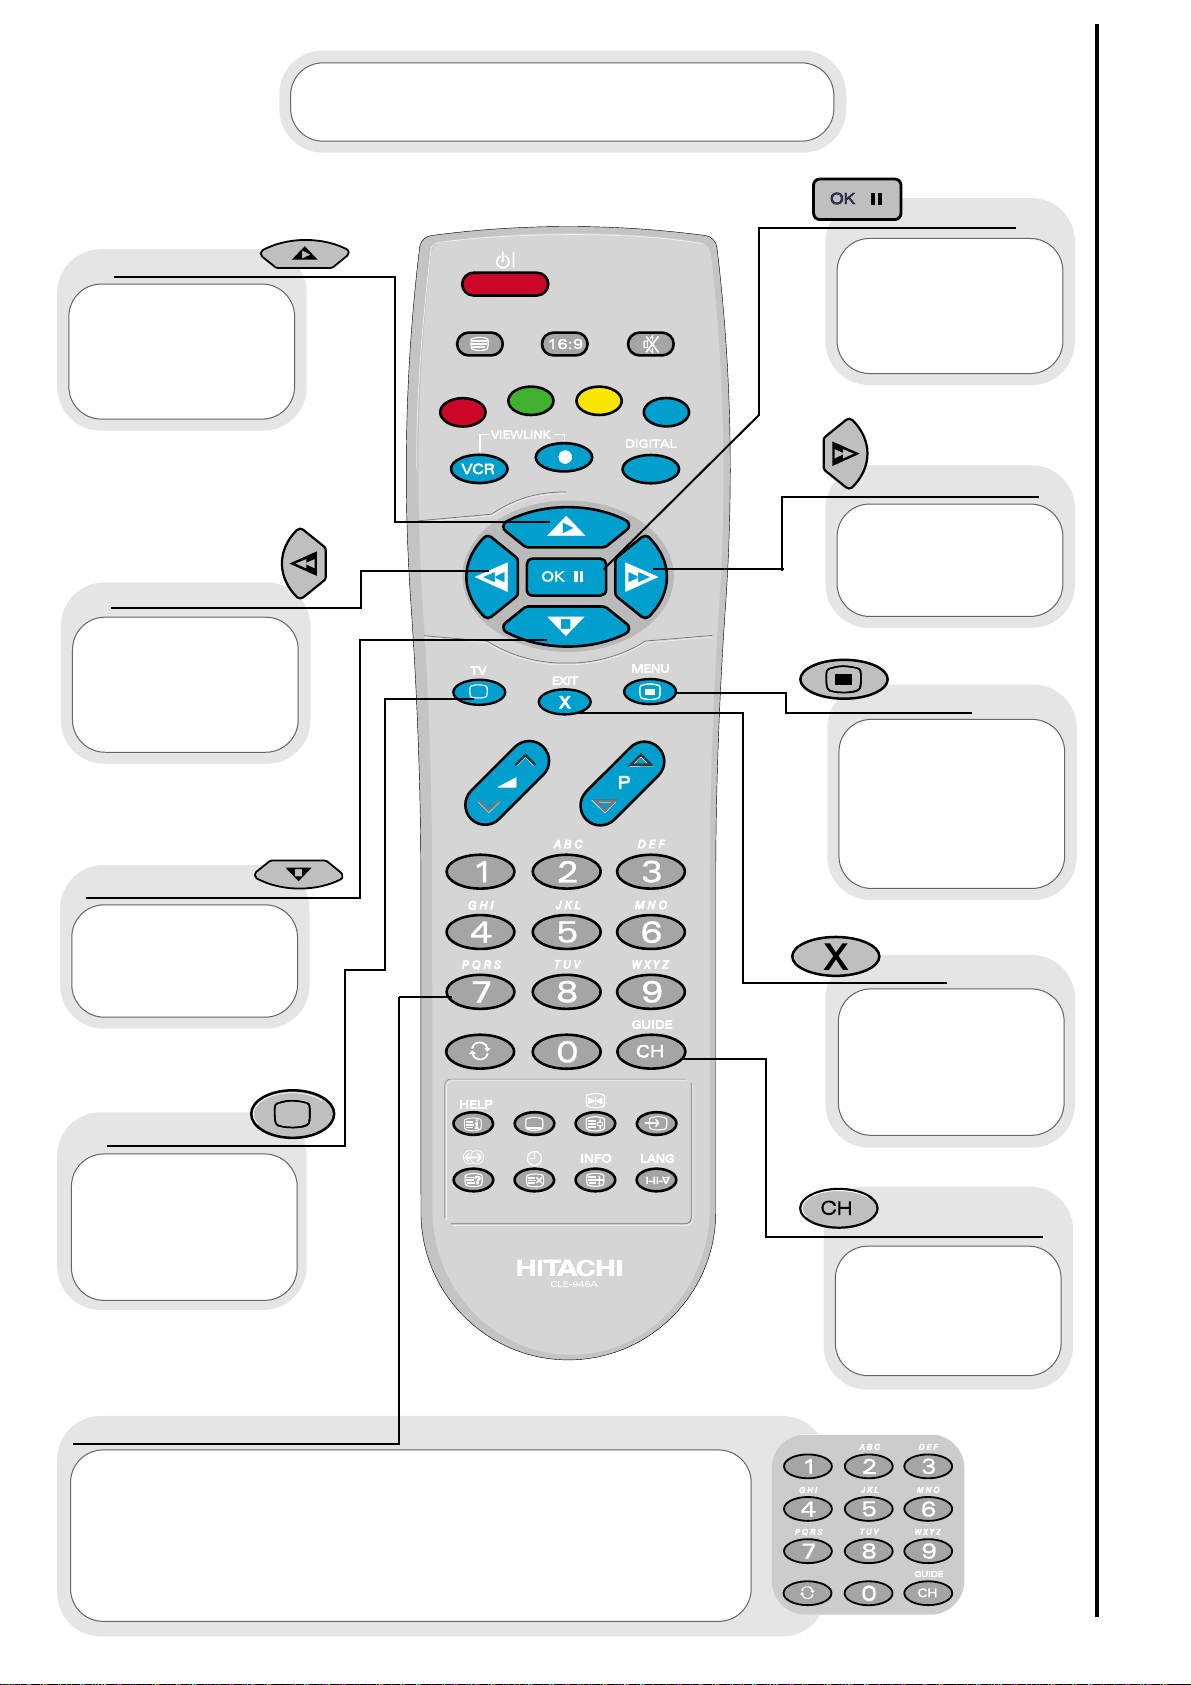
Press this
button to leave the
menu you are on and
return to normal TV
operation.
This button is
used to enter the
main menu. This is
where your TV’s
features options are
displayed.
Use this button
to move the menu
selection box right.
Use this button to
move the menu
selection box left.
Use this button
to move the menu
selection box down.
cursor down
cursor up
television
accept
menu
exit
cursor right
The handset controls shown below are
used when programming your TV and to
adjust the sound and picture features.
cursor left
Use this button to
move the menu
selection box up.
This button is used
to confirm a
highlighted
selection.
programme tuning
handset controls
This button is
used to return to the
previous on screen
menu you were
viewing, or to cancel a
selection.
number/letter buttons
These number buttons can also be used to enter letters, which
are required for some features e.g. programme name change etc.
To enter letters: Press the number key twice for the first
corresponding letter (written above the key), three times for the
second etc.
Example: Press number key 2, twice for ‘A’, three times for ‘B’ and
four times for ‘C’.
This allows you
to directly input
known broadcasting
CH or
frequency numbers.
frequency
Page 10

10
Use this button
to display the current
time on screen.
time
Used to switch
your TV in and out of
standby mode.
standby
Used to
increase ‘+’ or
decrease ‘-’ your
TV’s volume.
volume
controls
Used to select
a signal source for
external equipment.
AV setup
This button
allows you to switch
the TV’s sound on and
off.
sound mute
Press this button
to view the current
TV status.
info
The handset controls
shown here are used when your
TV is in normal operation.
Press both
buttons
simultaneously to
record what is being
viewed (only available
if VCR is Viewlink
compatible -see
viewlink section).
VCR/record
Used to change
channels either up
‘+’ or down ‘-’.
programme
controls
television/VCR operation
handset controls
Press both
buttons
simultaneously to stop
recording (only
available if VCR is
Viewlink compatible -
see viewlink section).
VCR/stop
This button
allows you to switch
between the various
wide screen features
of your TV
(see wide screen
viewing section).
16:9 button
This allows you
to directly input
known broadcasting
CH or
frequency numbers.
frequency
VCR Operation
Your handset incorporates controls for operation of HITACHI Video Cassette Recorders. These
controls are PLAY, STOP, REWIND, FAST FORWARD and PAUSE.
To PLAY : Press the VCR and Play buttons on your handset
simultaneously.
To STOP : Press the VCR and Stop buttons on your handset
simultaneously.
To REWIND : Press the VCR and Rewind buttons on your handset
simultaneously.
To FAST FORWARD : Press the VCR and Fast Forward buttons on your
handset simultaneously.
To PAUSE : Press the VCR and Pause buttons on your handset
simultaneously.
Page 11
11
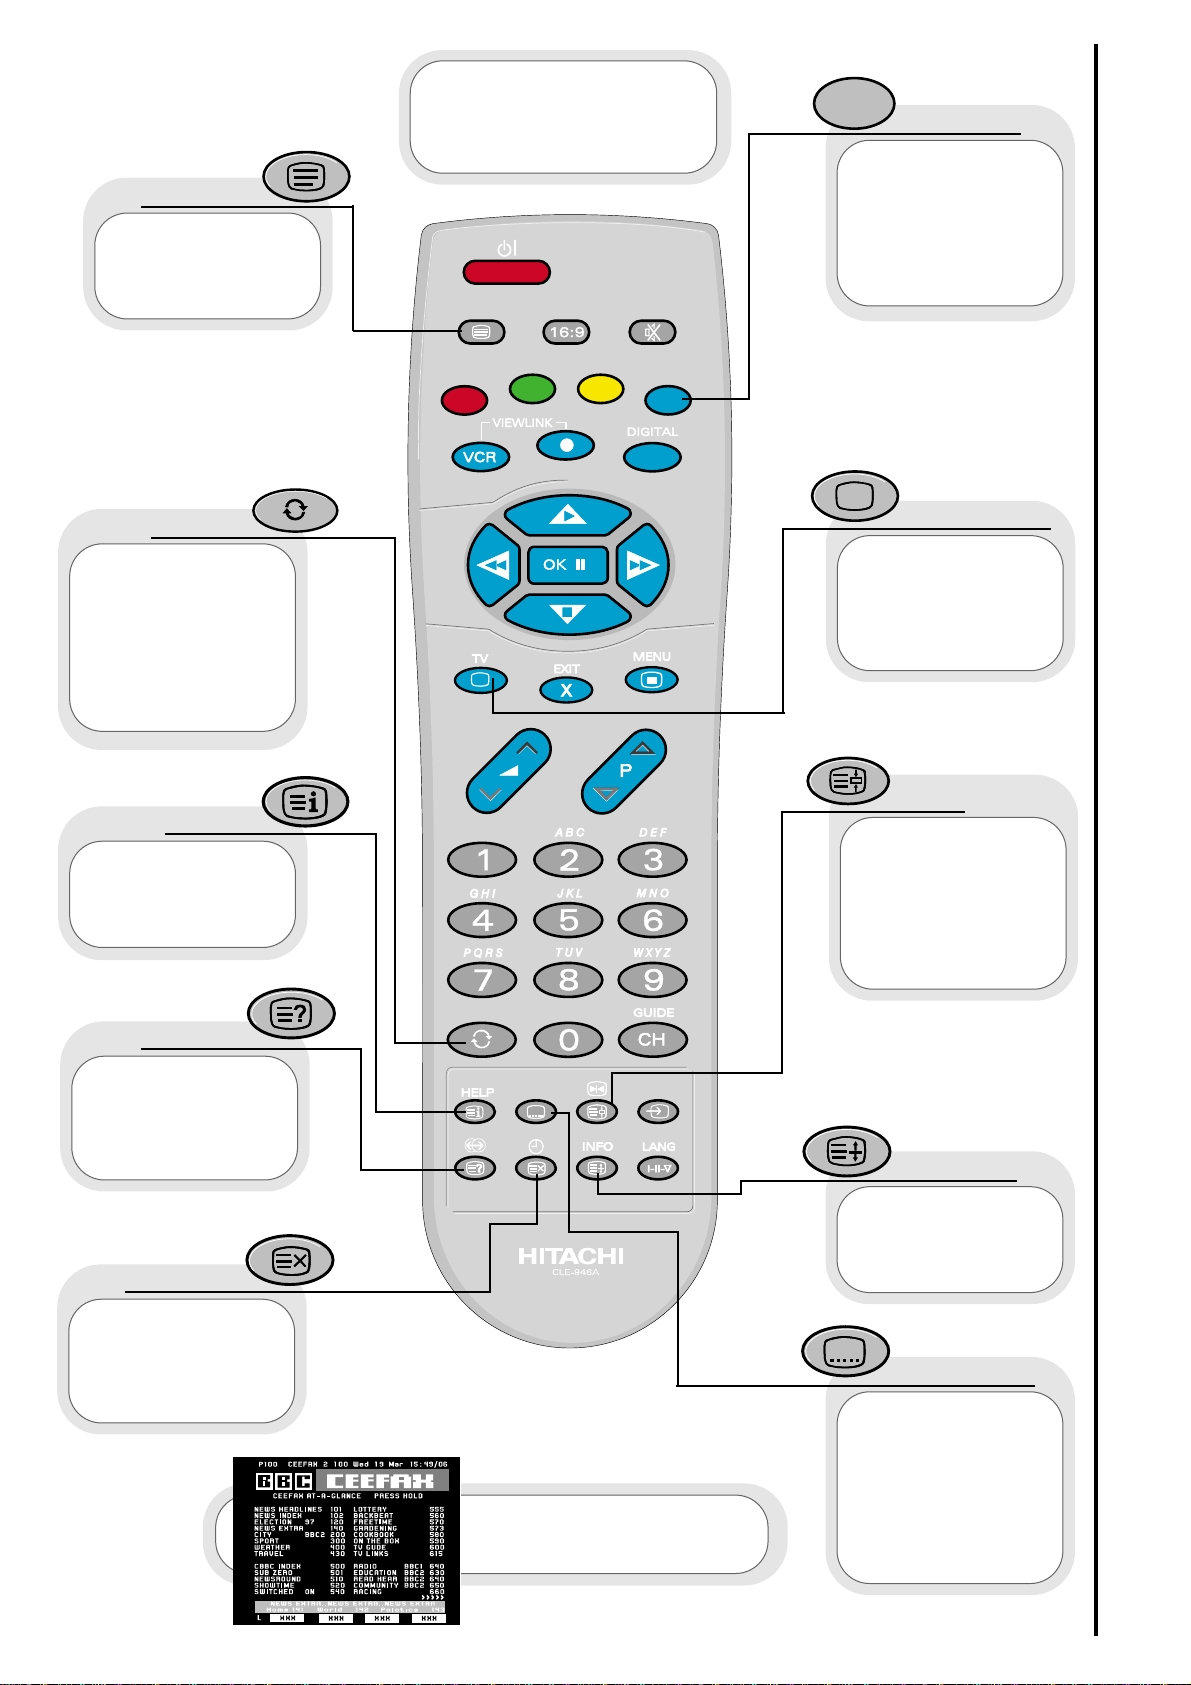
Teletext functions
handset controls
(red, green,
yellow, blue)
On certain pages in
teletext, these will
have coded instructions
i.e. a shortcut to a
Teletext page or title.
colours
Restores TV
picture whilst the TV
is l
ooking for the
entered
Teletext page.
Use this to
access a subtitle
service directly rather
than through a
Teletext service
(subject to subtitle
service broadcasting).
Use this button
to expand the size of
the teletext page on
view.
Press this
button to return to
normal TV operations
when in the Teletext
mode.
Used in Teletext
mode to show hidden
information eg. quiz
pages answers.
reveal
television
expand
subtitles
Pressing this
button will take you to
the index.
index
In Teletext
mode - views the
previous page.
In TV mode - returns
from your current
viewing channel to the
previous one.
swap
Use this to
‘freeze’ the Teletext
page on display to
prevent the page
changing (press again
to continue).
hold
Press this
button to use the
Teletext services.
teletext
update
The handset
controls shown here
are used when you are
operating Teletext.
See ‘Teletext operation’
section for details of
Teletext services
Page 12
12
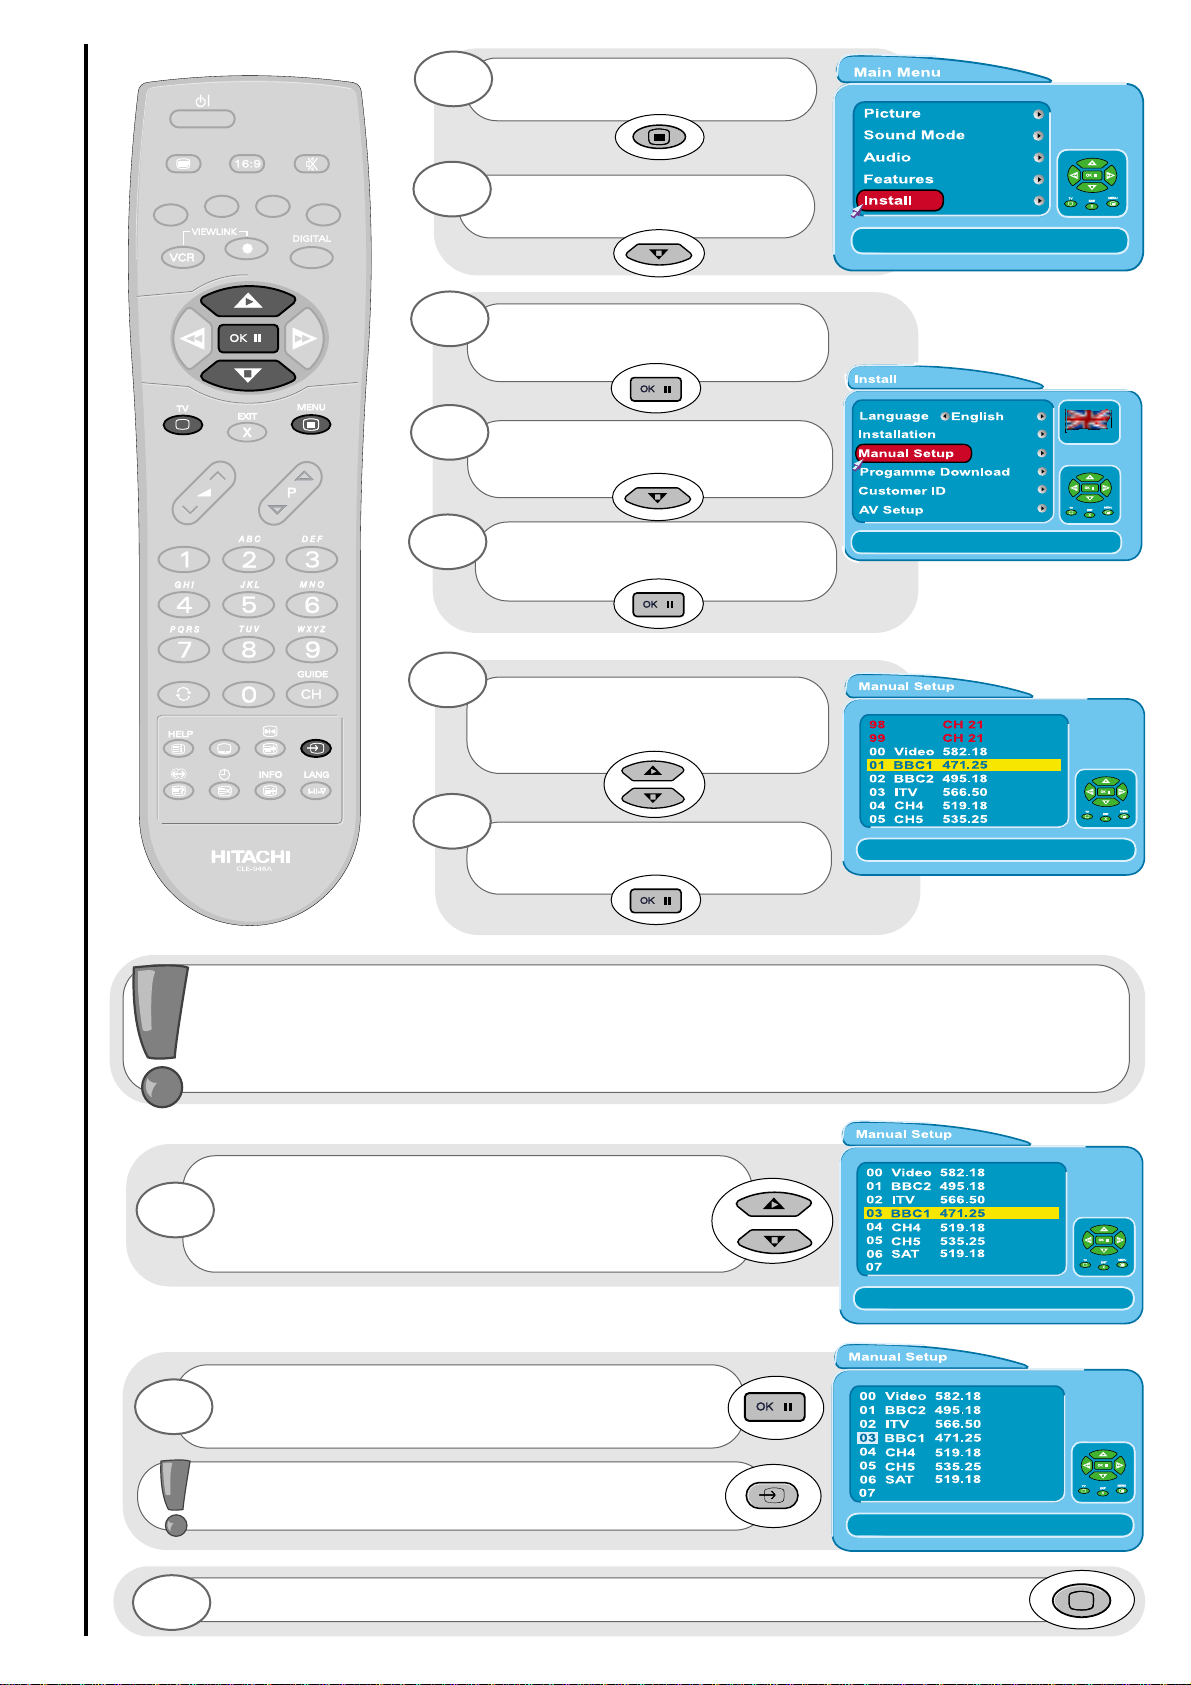
TV set-up and automatic tuning procedure
tuning in
important note on VCR and satellite
Do not switch your TV on until all external equipment is connected. If you have a Video
Cassette Recorder or a Satellite receiver connected to this TV please ensure that they
are switched on before automatic tuning begins. In the case of a VCR, if it is not Viewlink
compatible, insert a pre-recorded tape and begin playback of your equipment. If it is
Viewlink compatible leave VCR in Standby. (See viewlink section of this manual for
details). With a Satellite receiver select Sky News. These measures ensure that all your
external equipment is tuned in during the autotune procedure.
The first screen
viewed will ask you to
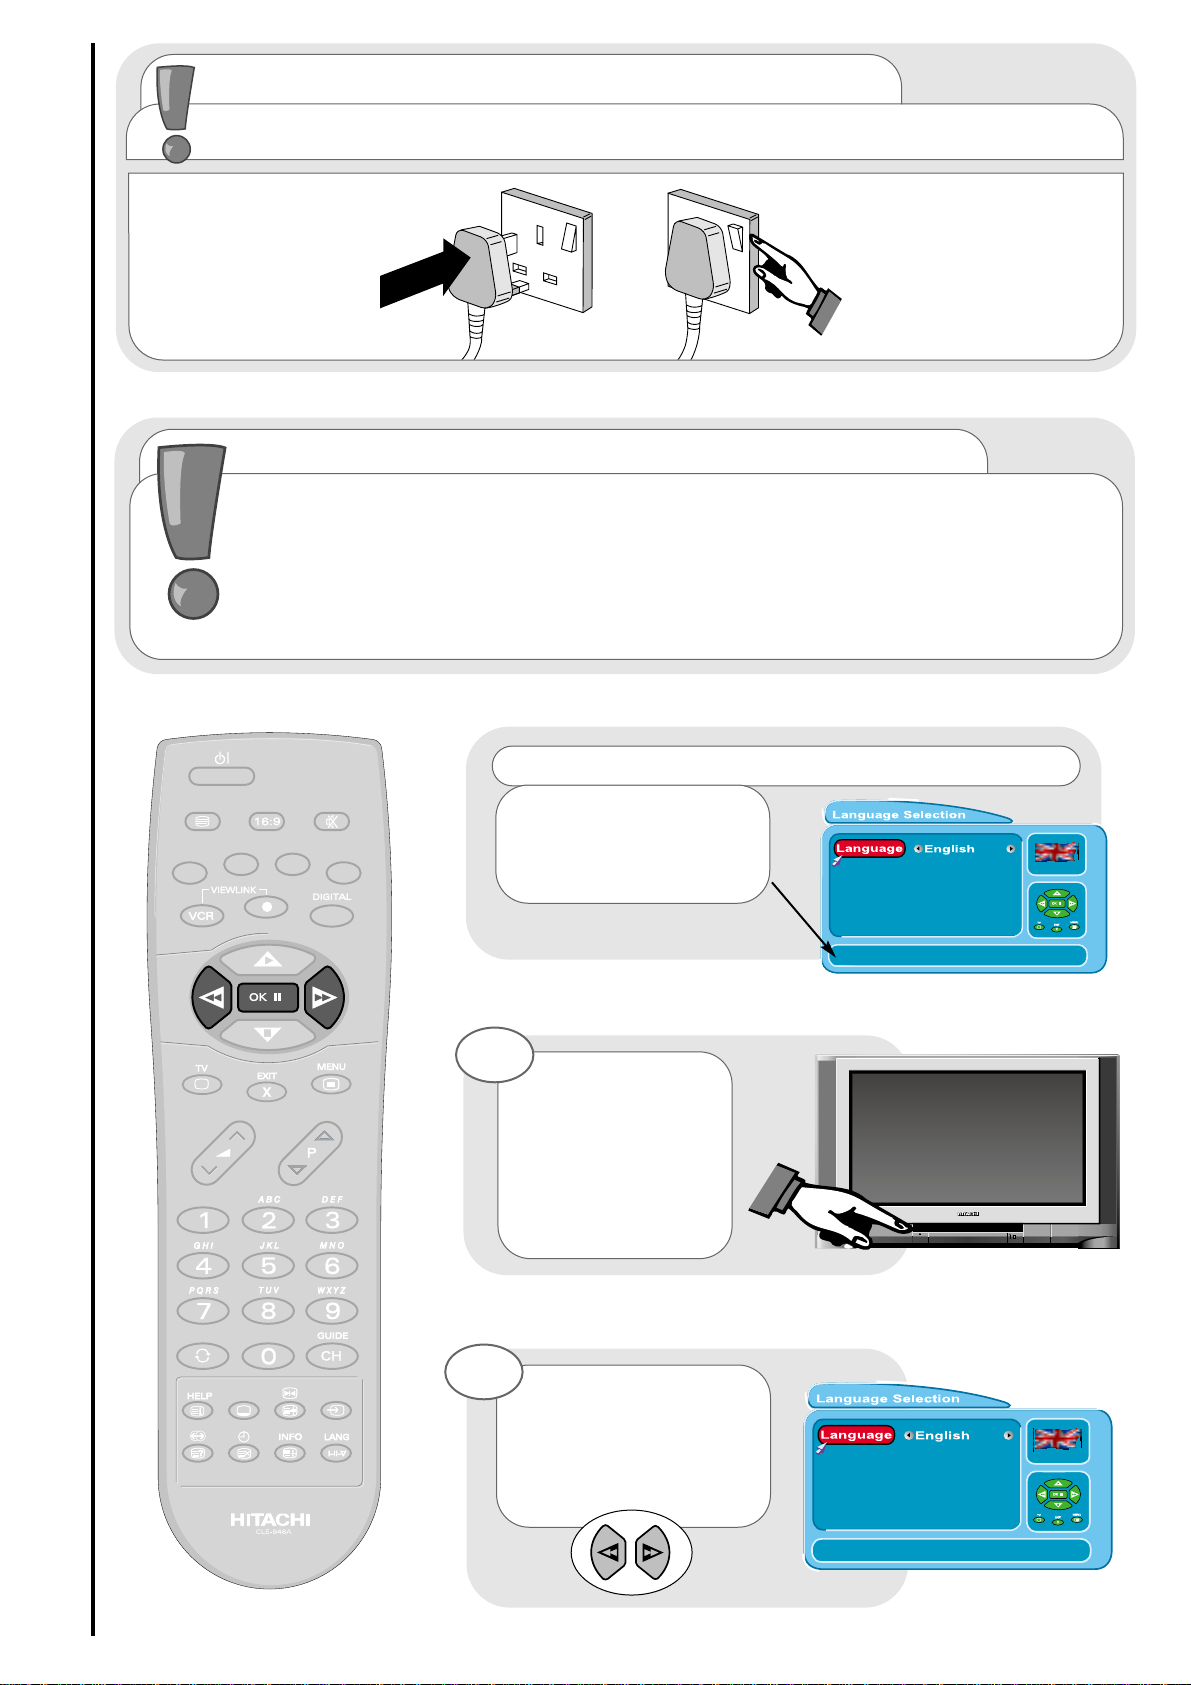
choose the language of
your TV’s display. Use the
LEFT/RIGHT cursor buttons
to choose your language.
To make your
programme tuning
easier, HITACHI have
installed an automatic
tuning procedure to
find the programmes.
Switch your TV on.
1
2
connecting to the mains socket
Important - If you have not already done so, please read the television safety
section before connecting your television and external equipment.
insert plug...
...and switch on
important note - on-screen help
When using the
menus of your Television,
extra on screen help will be
displayed in this window.
Page 13
13
Your TV will now
search through the
frequencies, storing
them in order.
7
The next screen
viewed will ask you to
insert your aerial
connection lead.
If you are satisfied all
external equipment has
been connected, press the
OK button on your handset
and AUTOTUNE will begin.
4
Once highlighted, accept selection.
3
Once the country of choice is viewed,
press the OK button to continue.
6
TV set-up and automatic tuning procedure
tuning in
PLEASE NOTE : If your VCR is Viewlink
compatible, your TV will now download
the programme information - see
viewlink section of this manual.
Next, the country
screen requires you
to select the country in
which you will be
watching your TV. Use the
LEFT/RIGHT buttons to
adjust.
5
Page 14
14
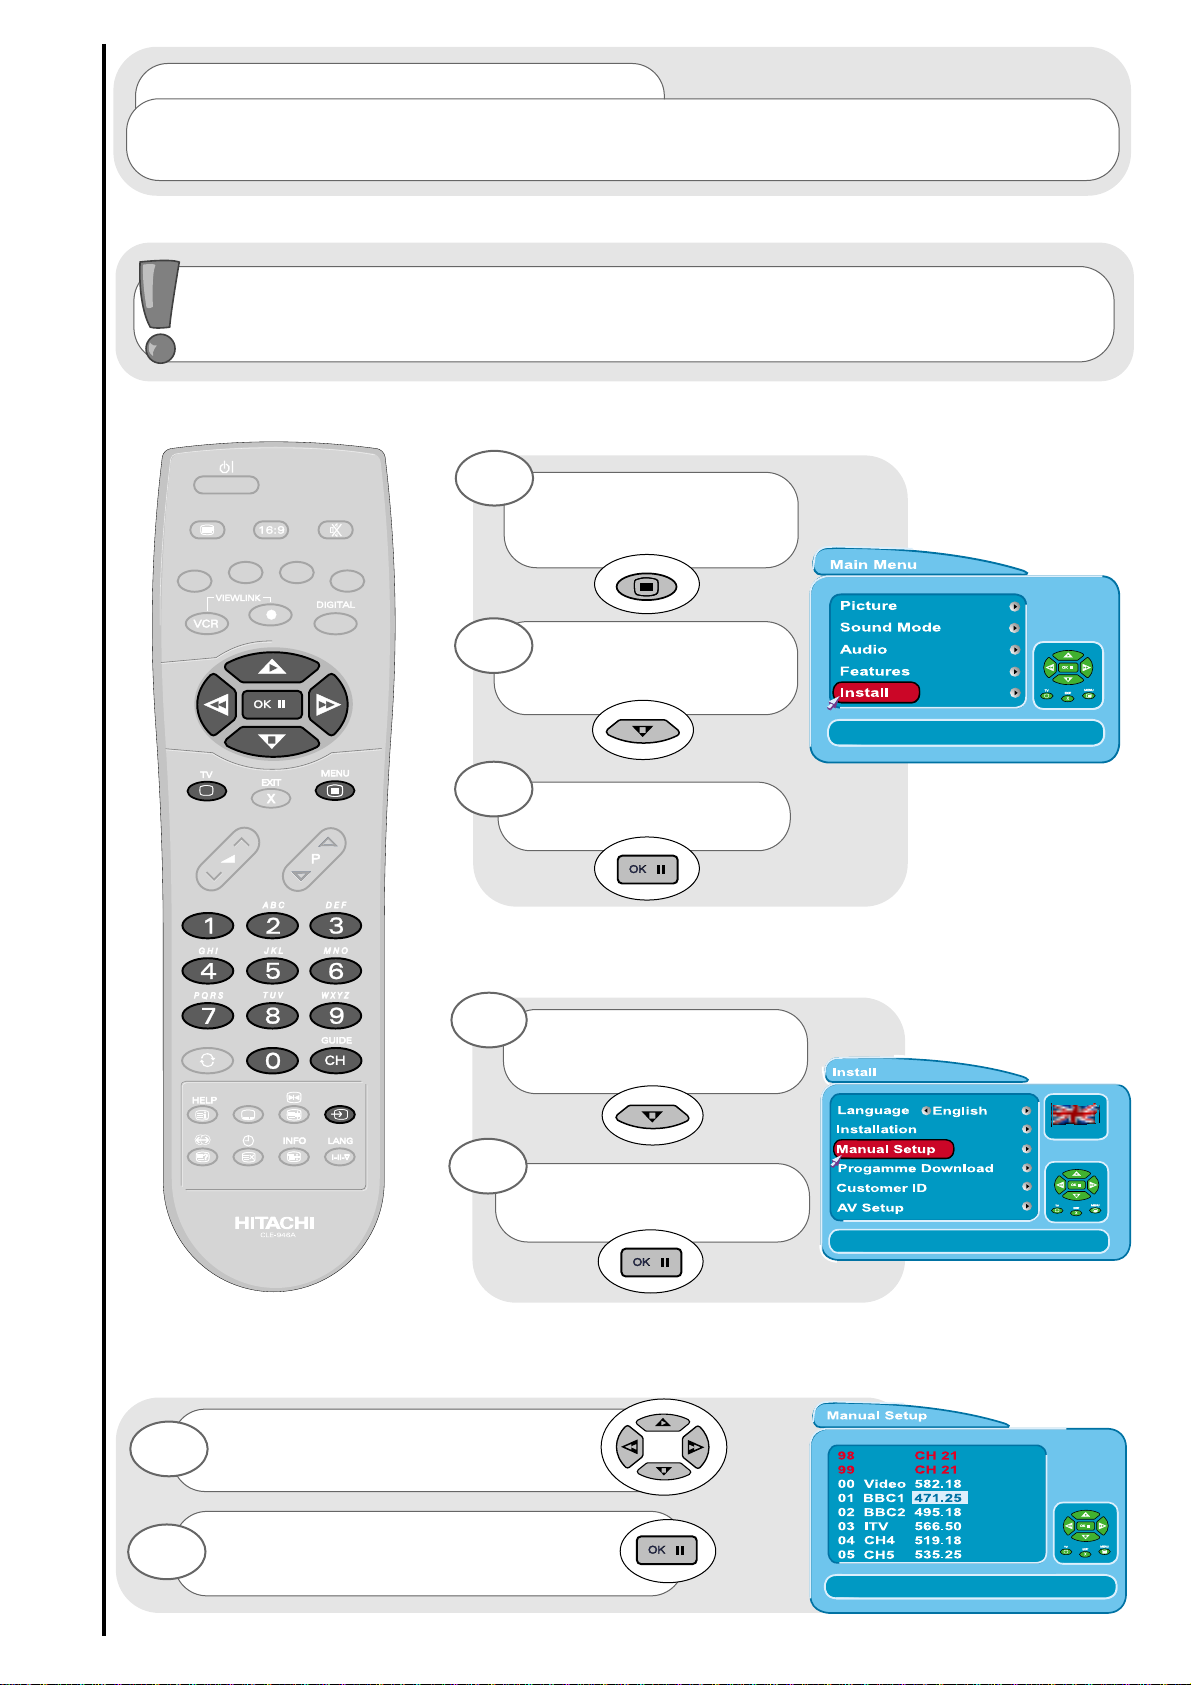
Press the MENU
button. The MAIN MENU
appears.
Press the cursor
DOWN button to select
INSTALL.
Once highlighted,
accept selection.
Press the cursor DOWN
button to select MANUAL
SETUP.
Once highlighted, accept
selection.
1
2
3
4
5
...notes on manual tuning
As well as an automatic tuning procedure your HITACHI television also allows you to input
broadcast frequencies through a number of different entry methods. Follow the steps below and
choose one of the 4 entry methods to input broadcast frequencies.
VCR should be tuned into Programme 0.
Follow the steps below to tune in your VCR if it was not found during Autotune. See
programme sort section to move to channel 0.
manual tuning procedure
tuning in
Use the cursor keys to move the
selection bar over the programme
frequency required to be adjusted.
6
Once highlighted, accept the selection to
change the frequency. The selection bar
will turn blue. It is now ready to change.
7
Page 15
15
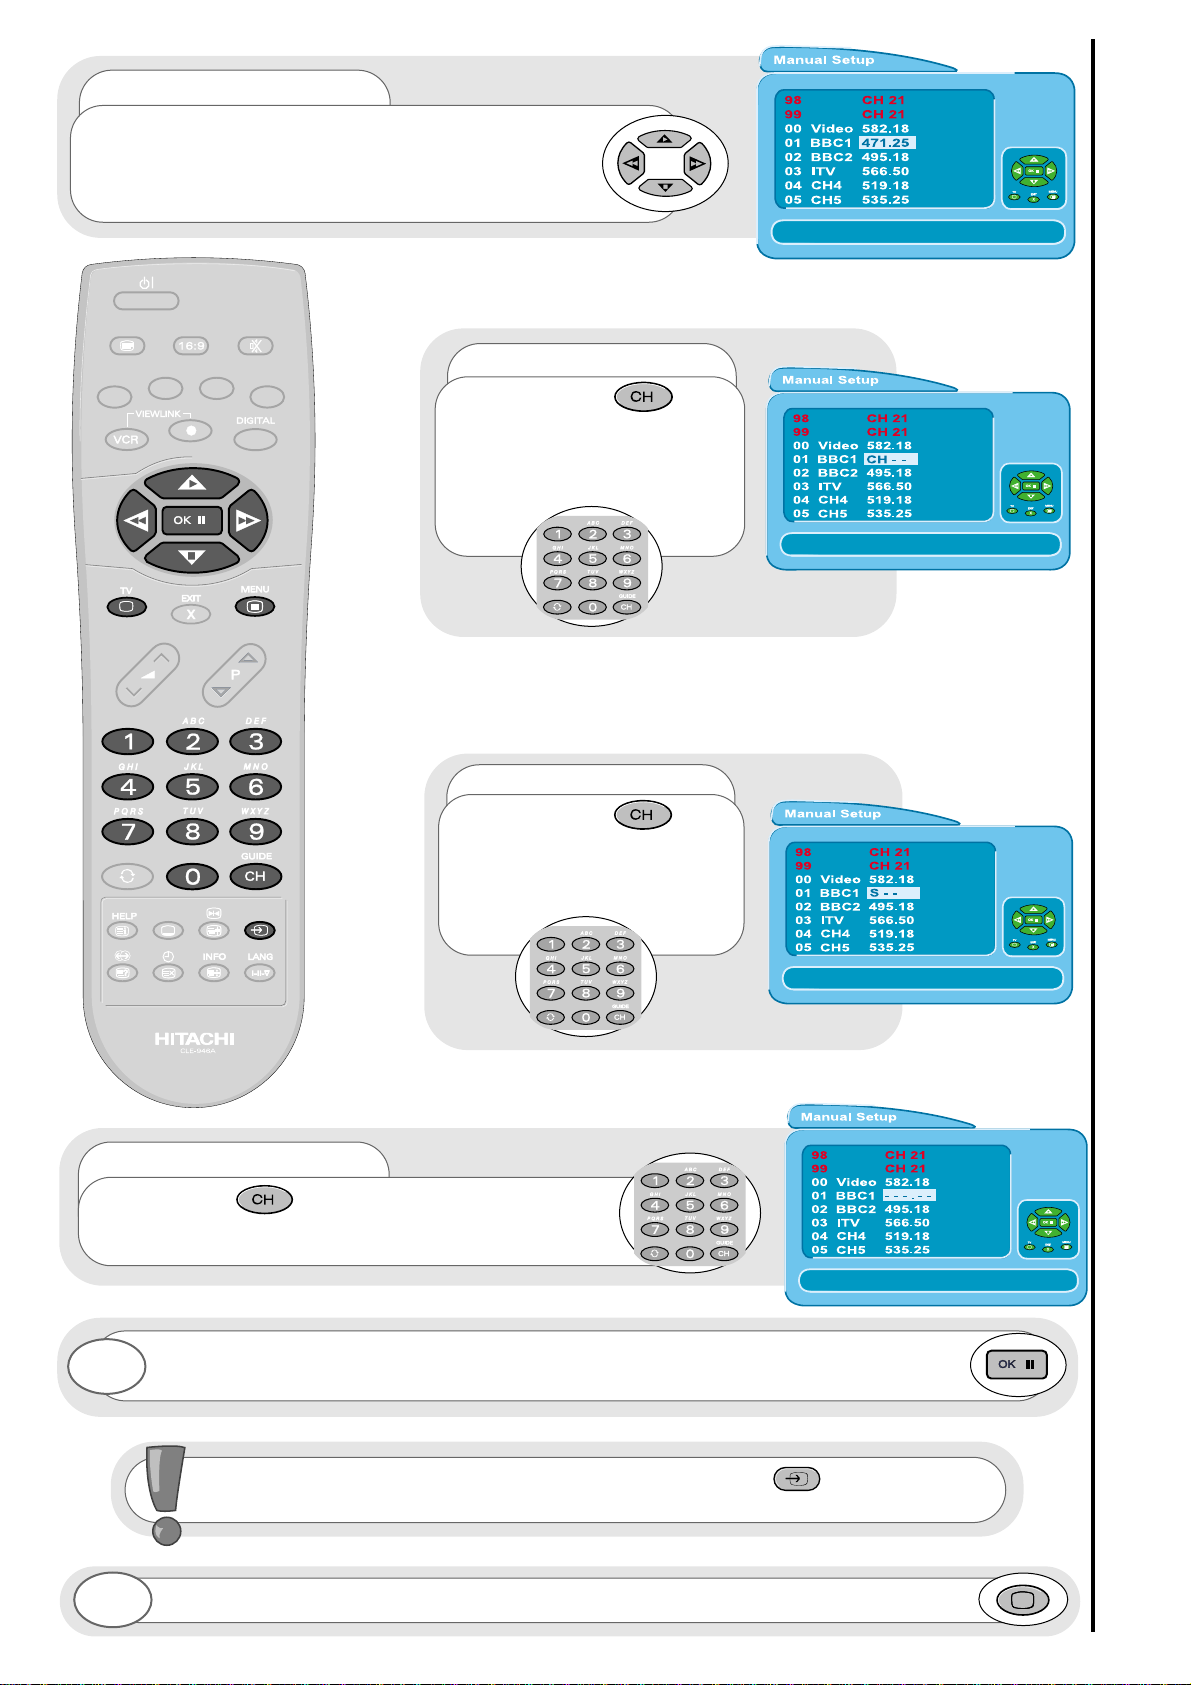
entry method 1
The first option will be to fine tune the chosen
frequency either UP or DOWN using the LEFT/RIGHT
cursor keys or search tune UP or DOWN using the
UP/DOWN cursor keys.
manual tuning procedure
tuning in
entry method 2
If the CH key is
pressed, you can enter a two
digit channel number (CH)
using buttons 0 - 9 on your
handset.
entry method 3
If the CH key is
pressed again, you can enter
a two digit S-band number
using buttons 0 - 9 on your
handset.
entry method 4
If the CH key is pressed again, you can
manually input a five digit frequency (if known) using
buttons 0 - 9 on your handset.
To return to normal TV operation, press the TV button on your handset.
9
Once the method of entry has been decided upon and the new frequency or channel
entered, this can then be stored in the TV’s memory by pressing the OK button.
If you have a Viewlink compatible video, press the AV key to transfer any
information changes to your VCR.
8
Page 16
programme sort
tuning in
Press the MENU button. MAIN
MENU appears.
Press the cursor DOWN button
to select INSTALL.
Once highlighted, accept
selection.
Press the cursor DOWN button
to select MANUAL SETUP.
Once highlighted, accept
selection.
Using the UP/DOWN buttons again you can move
the selection to occupy a new position of your
choice.
Note: Using the P+/P- buttons for movement will
make selections in multiples of 8.
Once this has been done, accept selection
and the chosen programme will now occupy its new
position, Repeat if necessary.
To return to normal TV operation, press the TV button on your handset.
Use the UP/DOWN cursor keys
to select the programme you wish to
move.
1
2
3
4
5
6
8
9
10
When a channel has been selected, you also have the option to ‘hide’ a programme - this makes
your TV skip the hidden channel when the UP/DOWN program controls are used to change channels.
Press the ‘0’ digit on your handset and you will see the text within your chosen selection turn red.
Your selection is hidden. Press the ‘0’ button again to ‘unhide’ the selection. If a hidden channel is to
be viewed, you can achieve this by entering the channel number with the handset digits 0 to 9.
16
Once highlighted, accept
selection.
7
If you have a Viewlink compatible video, press the AV
key to transfer any information changes to your VCR.
Page 17

...notes on programme name change
Programme name change can be very useful if you connect external equipment to your television.
For example, if you have a games machine connected, you can name the allocated channel ‘GAME’,
making it easier to find.
programme name change and download
tuning in
Press the MENU button. The
MAIN MENU appears.
Press the cursor DOWN button
to select INSTALL. Once
highlighted, accept selection.
Press the cursor DOWN button
to select MANUAL SETUP. Once
highlighted, accept selection.
Use the cursor keys to move the
selection bar over the NAME
required to be adjusted.
Once highlighted, accept
selection to start editing name.
Press the LEFT/RIGHT cursor keys to select the
character you wish to change
.
1
2
3
4
5
6
Press the UP/DOWN cursor keys or 0-9 number keys *
to edit the name.
7
*The number buttons on your handset can also be used to enter letters.
To enter letters: Press the number key twice for the first corresponding letter (written
above the key), three times for the second etc.
e.g.: Press number key 2, twice for ‘A’, three times for ‘B’ and four times for ‘C’.
P
ress OK key to confirm change or X key to cancel change and restore previous name.
8
If you have a Viewlink compatible video, press the AV key to transfer any
information changes to your VCR.
...notes on programme download
Programme download can be useful, if, for any reason you have to change your VCR. Providing you
have a viewlink compatible VCR, this feature enables the user to download the preset programmes from
the TV which saves having to tune-in the new VCR.
See viewlink feature for details.
17
To return to normal TV operation, press the TV button on your handset.
9
Page 18

18
viewlink
tuning in
What is
Viewlink
?
The Viewlink function allows the direct communication between your TV and a Viewlink
compatible VCR*, enabling features such as downloading of tuning information from the TV to the
VCR, making TV/Video setup easier.
To use
Viewlink
functions...
*
A
Viewlink
compatible VCR means a Hitachi VCR with the viewlink logo, or a
VCR with one of the following logos:
● “Q-Link” (a trademark of Panasonic Corporation)
● “Data Logic” (a trademark of Metz Corporation)
● “Easy Link” (a trademark of Philips Corporation)
● “Megalogic” (a trademark of Grundig Corporation)
● “Smartlink” (a trademark of Sony Corporation)
● “T-V Link” (a trademark of JVC Corporation)
These VCR’s may support some or all of the features described - refer to the VCR
instruction manual.
Preset Download
This function enables a download of tuning information from the TV to the VCR e.g. programme
order/name etc. This helps to ensure that correct recordings are made.
The Preset Download function automatically begins when initial setup is complete of AUTOTUNE
or the AV key is pressed whilst in MANUAL SETUP.
This function can also be started from the VCR - refer to VCR instruction manual.
1. A
Viewlink
compatible VCR is necessary. *
2. The VCR must be connected to the AV1 socket on the TV by a fully wired scart cable.
Viewlink
features
PLEASE NOTE: If “
No Viewlink compatible VCR found”
is
displayed, the download was not performed correctly.
Before trying to download again, ensure the following:
● The VCR is turned ON;
● The VCR is connected to the AV1 socket;
● The scart cable is fully wired;
● The VCR is
Viewlink
compatible.
Direct TV Recording
What You See Is What You Record -
This will allow the immediate
recording of the programme currently being viewed on the TV.
To Record - Press the VCR and record buttons on your
handset simultaneously. A message will appear on the screen
showing what is being recorded, or if it is not possible to record.
(Examples are shown below and on the opposite page).
Feature Not Supported by VCR
The television is trying to get the VCR to perform a function the VCR
does not support.
The VCR cannot record because there is no tape inserted.
VCR Not Recording - No Tape
The VCR cannot record because it is currently playing a tape.
The television is trying to communicate with a Viewlink compatible
VCR, and cannot find one.
No Viewlink Compatible VCR Found
VCR Is Currently Playing
Page 19

19
viewlink
tuning in
Viewlink
features - continued
PLEASE NOTE: Generally, the VCR cannot record a TV channel that cannot be received
properly by the VCR’s tuner, even though you can view that channel on the TV. However,
some VCR’s can use the TV’s output to record a TV channel. For details, refer to your VCR
instruction manual.
Direct TV Recording - continued
To Stop Recording - Press the VCR and Stop
buttons on your handset
simultaneously. Recording will stop.
To operate via the VCR - refer to VCR
instruction manual.
TV Auto Power On
If you insert a tape and press ‘PLAY’ on the VCR whilst the TV is in ‘Standby’ mode, the TV will
automatically switch ON and select AV1 so that you can view the tape.
VCR Auto Power Standby
If the TV is switched into ‘Standby’ mode, the VCR will also switch into ‘Standby’ mode, providing
the VCR is not in operation. (If rewinding a tape, the VCR will not switch into ‘Standby’ until
rewinding has stopped.)
VCR Image View
If the TV is in ‘Standby’ mode, and a VCR menu is operated, the TV will automatically switch ON
and the images from AV1 terminal will be displayed on screen.
VCR Is Already Recording
The VCR cannot record because it is already
recording.
The VCR is recording from the televisions
tuner. If the channel is changed on the
television, it will affect the recording.
However, menus and OSDs will not affect
the recording.
The VCR is recording from one of its AV
connections. The television can be switched
off and recording will not be affected.
There is no signal on the selected VCR input
(VCR tuner or external AV connection).
The VCR is recording one of its own
channels. The television can be switched off
and recording will not be affected.
The VCR is recording from its own tuner,
using a frequency sent by the television, i.e.
not one of the VCRs own preset channels.
The television can be switched off and
recording will not be affected.
The VCR cannot record because of a
problem other than listed.
The VCR cannot record because the tape
write protect tab is missing.
There is a problem with the tape in the VCR
(tape tangled, faulty, snapped etc.).
Tape Is Write Protected
VCR Has Tape Problems
VCR Has No Signal To Record
VCR Not Recording
VCR Recording from VCR External
VCR Recording Preset
VCR Recording From TV
VCR Recording from VCR Tuner
Page 20

20
customer I.D.
tuning in
...notes on Customer I.D.
The Customer I.D. feature allows the user to enter a personal security code and address information
into the television’s memory, so that in the unfortunate event of theft, it will help the Police trace the owner.
Please follow the steps below.
Press the MENU
button. The MAIN MENU
appears.
Press the cursor DOWN
button to select INSTALL.
Once highlighted, accept
selection.
Press the cursor DOWN
button to select CUSTOMER
I.D. Once highlighted, accept
selection.
1
2
3
‘ENTER PASSWORD’ is
highlighted.
4
PLEASE NOTE: No other selection is
available at this point.
Enter ‘1234’ on handset -
this password is preset at the factory.
6
Press the cursor DOWN button to select NAME.
Once highlighted, accept selection.
8
*The number buttons on your handset can also be used to enter letters.
To enter letters: Press the number key twice for the first corresponding letter (written
above the key), three times for the second etc.
e.g.: Press number key 2, twice for ‘A’, three times for ‘B’ and four times for ‘C’.
Press the LEFT/RIGHT cursor keys to select each
character and UP/DOWN cursor keys, or 0-9 number
keys * to change each character (maximum of 16).
9
Press O.K. to accept selection.
7
Press O.K. to accept
selection.
5
Page 21

21
Repeat steps 8, 9 and 10 to highlight and
change your address and postcode. If you make a
mistake, or wish to cancel the change of address,
press X key on your handset
.
11
Press O.K. to complete.
10
PLEASE NOTE : After
you have changed your
address etc., please see
‘password change’ section
of this manual before returning
to normal TV operation.
password change
tuning in
...notes on Changing your Password
We recommend that the user changes the password
to one of their own choice once all personal details have
been entered. Please see below for instructions.
Whilst still in
CUSTOMER I.D. menu,
press the cursor down button
to select CHANGE PASSWORD.
Once highlighted, accept
selection.
1
‘ENTER PASSWORD’ will
be highlighted.
2
IMPORTANT! For future reference, write
your password in the box provided and
keep in a safe place!
PASSWORD
Press O.K. to accept
selection.
3
*The number buttons on your handset can also be used to enter letters.
To enter letters: Press the number key twice for the first corresponding letter (written
above the key), three times for the second etc.
e.g.: Press number key 2, twice for ‘A’, three times for ‘B’ and four times for ‘C’.
Enter your chosen 4 digit password using the LEFT/RIGHT cursor keys to select each
character and UP/DOWN cursor keys, or 0-9 number keys * to change each character.
4
Press O.K. to complete.
5
To return to normal TV operation, press the TV
button on your handset.
6
Page 22

picture controls
programme, sound and vision adjustment
22
Press the MENU button to obtain
MAIN MENU
.
The MAIN MENU highlights the
PICTURE option automatically -
press OK to select.
1
2
Select the picture control to be
adjusted by using the UP /
DOWN cursor buttons
.
Once highlighted, adjust the
chosen controls by pressing the
LEFT/RIGHT cursor buttons.
3
4
Once highlighted, adjust the
chosen controls by pressing the
LEFT/RIGHT cursor buttons (for
explanation see below).
7
The values changed will remain
until they are next altered. Press
the TV button on your handset
to return to normal TV operation.
8
Noise Reduction
Helps reduce the noise interference visible on your television, especially in weaker signal reception areas.
Select OFF/LOW/MID/HIGH to compensate for noisy pictures.
Colour Temperature (Tint)
Shows a sliding scale so you can adjust the spectrum of colour of your television’s picture - slide to the RIGHT
to exaggerate the RED (WARM) tones of your picture, slide to the LEFT to exaggerate the BLUE (COOL) tones of your
picture. Equal balance is at the centre of the scale.
CTI
Colour Transient Improvement - This control lets you improve the clarity of your television’s colour edges.
VM
Velocity Modulator - this increases or decreases the sharpness of your television’s picture so it appears less
blurred especially in left and right edges of the screen.
Black Stretch
This control turns all dark grey parts of the picture black.
For picture and sound values, moving the cursor
left will decrease
values, whilst moving the cursor
right will increase
values.
To select MORE options, use the
UP/DOWN buttons to highlight selection
and then press OK to confirm.
5
Hue
This control allows you to adjust the colour of your television’s picture when viewing NTSC signals only.
Select the picture control to be
adjusted by using the
UP/DOWN cursor buttons.
6
Dynamic Skintone (DST)
This control dynamically improves the colour of the skin.
Tilt (not available on all models)
Shows a sliding scale which allows you to tilt your TV screen up or down to suit your personal viewing preference.
Page 23

NICAM and stereo sound controls
programme, sound and vision adjustment
23
...notes on NICAM features
NICAM is a method for transmitting and receiving stereo sound. If your TV is unable to receive
NICAM because of the wrong geography, climate etc., or when NICAM in not transmitted in your
location it will produce a monaural sound source.
stereo
This effect produces NICAM digital
stereo sound from your TV. Use this mode for
the majority of TV viewing. When selected the
stereo symbol appears.
Use the button on your handset to switch
to stereo.
monaural
In this mode the TV produces a single
sound source. Some stereo signals can be
poor in adverse weather conditions, and mono
should be selected to avoid poor sound.
Use the button on your handset to switch
to mono.
channel 1
When this symbol is displayed, channel 1
of a dual language broadcast is being received.
Use the button to access the mode while
receiving a dual language broadcast.
channel 2
When this symbol is displayed, channel 2
of a dual language broadcast is being received.
Use the button to access the mode while
receiving a dual language broadcast.
...notes on dual language
transmissions
A dual language transmission is where channel 1 and
channel 2 of the NICAM stereo broadcast carry completely
separate information i.e. soundtracks in two different languages for
a movie. A dual language broadcast is denoted by a symbol
or in the top right hand corner of the screen. This can
be seen on first entry to the channel by pressing the INFO button on
your handset.
The user can select which of the two languages is heard through
both the left and right television speakers by using the button
on your handset. In the case of a NICAM dual language broadcast,
this will also allow the mono FM broadcast to be selected.
The sound source, when chosen, will be stored with the programme number being used.
Page 24

audio and equaliser controls
programme, sound and vision adjustment
24
Select the control to be
adjusted by using the
UP/DOWN cursor buttons.
Once highlighted, adjust the
chosen controls by pressing the
LEFT/RIGHT cursor buttons.
Select EQUALISER option using the UP/DOWN
cursor buttons.
Once highlighted, accept selection.
Press the MENU button to
obtain MAIN MENU.
Press the cursor DOWN
button to select AUDIO.
Once highlighted, accept
selection
.
1
2
3
4
5
6
7
volume control
This control is used to increase, or decrease the sound from your TV's speakers. This also sets the
volume at switch-on.
loudness on/off control
When listening to your TV at a low volume, switch this control ON to compensate for the lack of
low and high frequencies.
mute TV speakers
This option is used to switch your television’s internal speakers ON or OFF. The headphone and
rear RCA outputs are not affected.
Page 25

25
Select the mode or
sound frequency to be
adjusted by using the
UP/DOWN cursor buttons.
Once highlighted,
adjust the chosen
controls by pressing the
LEFT/RIGHT CURSOR
buttons.
120Hz bass range
This range controls the bass sound from your television - if the bass sound from your TV is
too 'boomy', turn this control down.
500Hz mid bass range
This range is the basis of your sound - if your television’s sound is too rich, or not rich
enough, adjust this control to enhance the TV's sound.
1.5kHz mid range
Use this control to adjust the mid-range voice area of your TV's sound.
5kHz mid high range
When this control is increased it emphasizes the flute and string instruments of your TV's
sound - when decreased it has a soothing effect on the sound.
10kHz high range
The sharp sound of triangles and cymbals are emphasised if this control is increased.
To return to normal TV operation press the TV button on your handset.
8
9
10
audio and equaliser controls
programme, sound and vision adjustment
equaliser
The EQUALISER menu is used to adjust the tonal ranges
of your TV’s sound.
LFE Volume
Low Frequency Effects controls.
Only available when your
TV is in Dolby Digital, decode modes (see SOUND MODE) and
receiving a dedicated LFE channel.
This adjusts the contribution
the LFE channel makes to your TV’s bass response.
Please Note: On broadcasts where there is no dedicated LFE
channel, the
LFE VOLUME
option will not be available in the
A
UDIO
on-screen menu.
Page 26

26
sound mode
programme, sound and vision adjustment
Use UP/DOWN cursor
buttons to select your
choice of sound mode.
Once highlighted, accept
selection. When you turn your TV
off, by default this will be the
sound mode when it is switched
back on.
Press the MENU button
to obtain MAIN MENU.
Press the cursor DOWN
button to select SOUND
MODE.
Once highlighted,
accept selection.
1
2
3
4
5
...notes on sound mode
The Sound Mode menu is used to adjust and display the signal sources available from your
TV’s speakers, whether the source be analogue or digital.
analogue options in sound mode
When the Audio signal source is analogue - that is, a television broadcast, a connection
to either the video in or audio in, found on the front control panel, or if you have any equipment
connected to a scart input socket found at the rear of your television the sound mode gives you
two options to choose from - Dolby Pro logic or stereo.
Dolby Pro Logic / Digital 3DS
This mode is particularly suitable for films and programmes that display the Dolby Pro
Logic caption. Dolby Pro Logic/Dolby Digital can only be achieved by the addition of an
external surround sound amplifier and speaker system. Sockets have been provided to
enable you to do so if you wish.
You can, however, enjoy a surround sound experience, without the need to add external
equipment, from your televisions Digital 3DS surround sound system developed by Hitachi.
Digital 3DS uses the surround channel information which has been separated from the
original sound track by the integral Digital decoder, and processes it, before feeding it back
to the internal TV speakers.
stereo
When stereo mode is selected, your TV produces high quality stereo sound. Select
this mode when viewing general TV and music programmes.
when using headphones
When the headphones are in use the only sound mode available will be the
STEREO option.
Page 27

27
sound mode
programme, sound and vision adjustment
digital options in sound mode
When your television is switched to an AV scart input whose decode mode is set to
AUTO/DIGITAL and a digital signal source is connected and playing on the coaxial or optical
connectors, the options found in the SOUND MODE menu become dependent on the type of
digital signal being received.
Please note:
to enjoy the sound benefits of Dolby Digital etc.you will require software (eg. DVD
disc, in which Dolby-D, signals are recorded.) and suitable hardware (some form of disc player,
which can output a digital signal).
To return to normal TV operation press the television button on your handset.
6
Dolby Digital signal
options
Dolby Digital -
In this mode surround sound can be created, with the
digital audio capabilities increasing the precise localisation of
sounds, improving the ambience experienced.
Dolby ProLogic -
In this mode surround sound can be created.
Stereo -
Stereo downmix** mode which inputs the Dolby Digital x/y.z
information through your televisions internal left and right
speakers.
44.1/48kHz PCM signal
options
Dolby Pro Logic -
In this mode surround sound can be created.
Stereo -
Stereo mode which provides signals for your televisions
internal left and right speakers.
Please note:
When the television is set to digital mode and no external equipment is
connected, your television will assume PCM mode and will offer the options listed above in
the PCM signal
options
. It must also be noted that the type of audio signal which will be
outputted can usually be found on your external equipment.
**Downmix -
this is when all the five multi-channels (left, right, surround left,
surround right, centre) are outputted through the televisions left and right speakers
Page 28

...notes on digital audio setup
The Digital Audio Setup menu allows you to control the sound output of any external equipment you
have connected through the Audio Visual sockets. For example, if the connection from your external
equipment to the television is via AV4, the Digital Audio source should be set as AV4.
28
digital audio setup
programme, sound and vision adjustment
see also Sound Mode for effects
Press the cursor DOWN
button to select
DIGITAL AUDIO SETUP.
Once highlighted,
accept selection.
4
5
Press the MENU button
to obtain the MAIN
MENU.
Press the cursor DOWN
button to select
AUDIO.
Once highlighted,
accept selection.
1
2
3
Select the control to be
adjusted by using the
UP/DOWN cursor
buttons.
Once highlighted, adjust
the chosen controls
by pressing the
LEFT/RIGHT cursor
buttons.
6
7
decode mode
There are three possible decode modes...
Digital Your television ignores the analogue input on the selected AV and instead uses the optical or
coaxial input as its source.
Auto Your television will automatically select between digital and analogue sources. If both are
present, the digital source takes priority.
Analogue The television ignores the digital input in either the optical or coaxial connector and instead
uses the analogue information on the selected AV as its source.
digital input source
The digital audio setup menu allows the digital audio decoder in your television to be assigned to
the AV scart input that your DVD, CD player is connected to.
listening mode
When listening to a Dolby Digital source with the television sound mode set to Dolby Digital
this control allows you to take advantage of special codes stored on the disc to reduce, or increase
sound effects.
Maximum makes the best use of the televisions dynamic range. It will enhance sound effects such
as explosions or music.
Standard is the normal listening mode. It does not make full use of your televisions dynamic range,
but is a good compromise for all day viewing/listening.
Night mode allows the audio to be reproduced in such a way that the impact of soundtrack
extremes (such as explosions) are reduced while quiet passages are ‘boosted’, allowing all the audio
information to be heard at a low volume level. As it’s name suggests, this mode is
intended for night-time viewing.
To return to normal TV operation press the television button on your handset.
8
Page 29

digital audio status - decode mode
programme, sound and vision adjustment
29
...notes on digital audio status
When your television is in its appropriate Audio Visual mode and a digital signal is being played
and applied through one of the Audio Digital in connections (either optical or coaxial), the input status
and incoming format will be displayed in the top right hand corner of the screen.
explanation
decode mode
PCM
(Pulse Code Modulation)
Dolby Digital
This is the decode mode for a digital signal encoded by PCM.
This is a two channel audio source which may, or may not be
encoded in Dolby Pro Logic - its encoding depends on the
source material. It can be regarded as a better quality version of
the left and right analogue audio signals heard from your TV
through a scart input connection. This format is generally used
for standard Audio CD’s.
This is the decode mode for a digital signal encoded by Dolby
Digital. This is capable of delivering a maximum of 5 main
channels (left, right, surround left, surround right and centre) and
a Low Frequency Effects (LFE) channel. Your television takes
advantage of data on the disc to tell you the number of different
channels available on the decoded track
...notes on Laserdisc connection
A Laserdisc source with a Dolby Digital RF output cannot be connected to this TV directly.
Please obtain an adaptor from an electrical retailer.
Also note that when using a Laserdisc player in conjunction with an RF demodulator to decode Dolby
digital sound, Hitachi recommend putting the Decode mode to DIGITAL. This will avoid dropping in
and out of analogue sound while searching or pausing the disc that is playing.
Pressing the INFO button on your handset reveals the format of the incoming signal not the
way it is being processed i.e. pressing the INFO key on the handset might reveal Dolby D 3/2.1,
but your TV might be set to stereo mode - see digital audio setup. Also note only analogue
output is available for both AV2 and AV3 as a monitor out signal, even if digital audio has been
selected.
digital input status
describes the type of
incoming digital audio signal
please see table below.
format
for explanation see
digital audio status -
display format
Page 30

digital audio status - display format
programme, sound and vision adjustment
30
Display
Value
Front Left Front Right Centre Left Surround Right Surround
Low Frequency
Effects (LFE)
3/2.1
3/1.1
3/0.1
3/2.0
3/1.0
3/0.0
2/2.1
2/1.1
2/0.1
1/0.1
2/2.0
2/1.0
2/0.0
1/0.0
✓
✓
✓
✓
✓
✓
✓
✓
✓
✓
✓
✓
✓
✓
✓
✓
✓
✓
✓
✓
✓
✓
✓
✓
✓✓✓✓
✓
✓
✓
✓
✓
✓
✓
✓
✓
✓
✓
✓
✓
✓
✓
✓
✓
✓
✓
✓
✓
✓
✓
Channels Present in Digital Input (for Dolby Digital) Comments
Full multi-channel encoding, all active
Surround is mono in this case
No surround channels available
Main channels but no LFE channel
Surround mono in this case, no LFE channel
No surround or LFE channels available
All channels except centre
Left, Right, mono surround and LFE
Left, right and LFE only
Centre and LFE only
All channels except centre and LFE
Left, right and mono surround only
Left and right channels only
(may be encoded in ProLogic)
Centre channel only (mono)
This chart explains what sound channels are present when listening to the connected external
equipment which has a digital output. These values can be viewed by pressing the INFO button on
your handset when a digital signal is being received.
Page 31

...notes on speaker setup
The Speaker Setup menu allows you to customise the televisions audio performance to your
own requirements. These requirements might be the use of external amplifiers on one or more sound
channels, or to use alternative speakers. This menu can help you organise the bass (or ‘boom’) re-
direction by specifying whether large, small or no speaker at all has been connected. Whatever your
choice, this menu allows for greater flexibility and ultimately an improved sound performance.
31
speaker setup
programme, sound and vision adjustment
Press the cursor
DOWN button to
select SPEAKER
SETUP.
Once highlighted,
accept selection.
6
7
Press the cursor
DOWN button to
select DIGITAL AUDIO
SETUP.
Once highlighted,
accept selection.
4
5
Press the MENU button
to obtain the MAIN
MENU.
Press the cursor
DOWN button to
select AUDIO.
Once highlighted,
accept selection.
1
2
3
Page 32

32
speaker & surround setup
programme, sound and vision adjustment
In the DIGITAL AUDIO SETUP menu, press the
cursor DOWN button to select SURROUND SETUP.
Once highlighted, accept selection.
11
12
...notes on surround setup
This menu allows you to change the volume of the available connected speakers and also to
customise the speaker options to optimise the sound output.
...notes on speaker options
The speaker controls can be set to either SMALL, LARGE or OFF,
(except for the SubWoofer speaker which is either ON or OFF. If you have
a SubWoofer speaker attached, choose ON, if not, choose OFF ). This is
to specify the type of speaker connected. If your connected speakers low
frequency response (the bass or ‘boom’ sound) is poor, adjust the chosen
speaker value to SMALL. If the low frequency response is good, set the
speaker value to LARGE. This allows the bass performance to be
optimised. If any of the speaker options are not connected, or you do not
want to hear sound from selected speakers, switch this option to OFF.
The TV will then automatically re-direct the sound to the remaining
speakers.
To complete the setup of your speakers, we recommend that you now select the
SURROUND SETUP menu. Press the X button to return to the DIGITAL AUDIO SETUP
menu.
10
Select the speaker to
be adjusted by
using the UP/DOWN
cursor buttons.
Once highlighted,
adjust the chosen
speaker by pressing
the LEFT/RIGHT
cursor buttons.
8
9
Page 33

surround setup
programme, sound and vision adjustment
33
sound sequencer
The sound sequencer is automatic when entering the
Surround Setup menu. This relays sound in sequence amongst
the available output channels (The selected speaker will flash
and turn RED). From this you can judge what speaker volume has to
be adjusted so you get the impression you are sitting within the
centre of the sound.
speaker environment display
The effect of your adjustments can be heard, and also seen by looking at the display which
accompanies your Surround Setup menu. This diagram is a representation of your living area, and
its contents are explained below.
Press the UP/DOWN buttons to select the speaker
you wish to change.
13
The selected speaker will flash and turn RED on the
display. Press the LEFT/RIGHT buttons to change
the setting.
14
...notes on speaker environment display
your TV and internal speakers
(including centre speaker)
front right external speaker
front left external speaker
seating position see
...notes on seating position
rear right external speaker
rear left external speaker
PLEASE NOTE: Your television allows you to change the test
sound when altering the speaker volumes. Press the swap
button on your handset and your TV will switch between
the Test Tone and normal viewing sound.
Page 34

In the SURROUND SETUP
menu, press the
UP/DOWN buttons to
select SEATING POS.
option.
15
Press the LEFT/RIGHT
buttons to change
the setting.
16
...notes on seating position
• If you are seated near the front speakers, adjust the seating position to FRONT.
• If you are seated between the front and rear speakers, but closer to the front speakers, adjust the
seating position to MID FRONT.
• If you are seated between the front and rear speakers, adjust the seating position to MID.
• If you are seated between the front and rear speakers, but closer to the rear speakers, adjust the
seating position to MID REAR.
• If you are seated at a position close to the rear speakers, adjust the seating position to REAR.
front
mid front
mid rear
rear
mid
surround setup
programme, sound and vision adjustment
34
seating position
The seating position control accommodates the position of the speakers with regard to your
seating position, and so further creates an atmosphere where improved sound qualities are obtained
from your TV. Please see below for details on this control.
Page 35

example 1
(showing top view)
Please Note:
For approximately each 30cm that your
external speakers are placed behind your TV the Centre
Delay value should increase by 1ms - see diagram below.
example 2
(showing top view)
30cm30cm
If speakers are placed 30cm behind TV,
Centre Delay value should be set to 1ms.
If speakers are placed 60cm behind TV,
Centre Delay value should be set to 2ms.
60cm
60cm
The Centre Delay value can be set to a maximum of 5ms. Therefore to enjoy the full sound
capabilities of your television do not place your external speakers more than 150cm behind the
front of your TV.
speakers connected to rear of TV
speakers connected to rear of TV
Once all options have been altered to suit your requirements, press the television
button on your handset to return to normal TV operation.
19
surround setup
programme, sound and vision adjustment
35
In the SURROUND SETUP
menu, press the
UP/DOWN buttons
to select CENTRE
DELAY option.
17
Press the LEFT/RIGHT
buttons to change
the setting.
18
Centre Delay
If your environment is set up in such a way that external speakers (if connected) are behind your
television, increase the Centre Delay so that the sound from external speakers and your TV’s centre
speaker arrive at your seating position at the same time, ensuring no drop in sound quality.
Page 36

36
sleep timer and on screen display
television features
Use UP/DOWN cursor buttons
to select option to adjust.
Press the MENU button to
obtain MAIN MENU.
Press the cursor DOWN button
to select FEATURES.
Once highlighted, accept
selection.
1
2
3
4
Use LEFT/RIGHT buttons to
adjust the number of minutes to be
used in your television’s countdown.
5
...notes on Sleep Timer
This feature is used to automatically place your TV into standby mode after a set number of
minutes - use the LEFT/RIGHT cursor buttons to set the timer between 5 and 120 minutes.
When the timer has only a minute left this will be shown on the screen as a countdown from 59
seconds to zero, after which your TV’s status will be standby.
...notes on O.S.D. (On Screen Display)
This feature is used to choose whether the On Screen Display
(O.S.D.) appears on screen, or to select the amount of time it appears on-
screen, in normal TV viewing. Please see below for details.
REPEAT STEPS 1 TO 4 ABOVE.
1
Use LEFT/RIGHT buttons to adjust the O.S.D. options
i.e. OFF/NORMAL/FAST.
5
OFF
O.S.D. does not appear
on programme change,
volume etc.
NORMAL
O.S.D. appears for a
few seconds on programme
change, volume etc.
FAST
O.S.D. disappears
faster on programme change,
volume etc.
To return to normal TV operation press the TV button
on your handset.
6
To return to normal TV operation press the TV button on your handset.
6
Page 37

37
...notes on wide screen features
Various broadcast stations now transmit movies and programs in true
wide screen format.
Your TV detects these signals and automatically switches your TV to the
correct viewing format. However, some broadcasters do not transmit this
automatic sensing signal, and so your TV will not recognize which format
is being transmitted. Your viewing format can be selected manually by
simply pressing the key on your handset to scroll through the
viewing format options.
See the examples below for the available viewing formats.
wide screen viewing
television features
...notes on auto mode
The Auto format is also one which can be selected manually.
Auto mode automatically detects various screen formats that are
transmitted in either conventional (4:3) or wide screen (16:9 or
14:9) format. After detecting which signal is being transmitted,
the TV will automatically switch to the correct screen ratio.
4:3
4:3
PANORAMIC
14:9L
4:3
14:9L
14:9 ZOOM
4:3
A
U
T
O
The 4:3 broadcast signal
gives black bars to the
sides of the screen which
is consistent with screen
compression.
The 14:9L format is the
medium between the 4:3
and 16:9 ratio signals.
suggested TV
format
result
result
broadcast
format
TV
format
4:3
WIDESCREEN
LETTERBOX
16:9
4:3
C16:9L
(LETTERBOX)
This broadcast is a wide
screen picture format.
This type of picture fills
the entire TV screen.
Page 38

38
wide screen viewing
television features
...notes on Default Zoom
Various broadcast stations now transmit WSS (Wide Screen Signals) which identify the picture
format movies and programmes are broadcast in.
Your TV can detect these Wide Screen Signals and automatically switch to the correct format. However,
some broadcasters do not transmit WSS, and so your TV will not recognize
which format is being transmitted. Therefore, DEFAULT ZOOM is used to
choose your picture requirements when a Wide Screen Signal has not been
sent or has not been detected.
Use UP/DOWN cursor buttons to
select option to adjust.
Press the MENU button to
obtain MAIN MENU.
Press the cursor DOWN button
to select FEATURES.
Once highlighted, accept
selection.
1
2
3
4
Use LEFT/RIGHT buttons to
select DEFAULT ZOOM standard.
5
...notes on Default features
Your TV also has default features which can control the viewing format of your TV’s picture.
See below for entry into and adjustment of these features.
...notes on Smooth Zoom
Smooth Zoom controls the way in which the television changes between 16:9 modes.
Please see below for details.
To return to normal TV operation press the TV button on
your handset.
6
REPEAT STEPS 1 TO 4 ABOVE.
1
Use LEFT/RIGHT buttons to adjust the SMOOTH
ZOOM option i.e. ON/OFF.
5
ON
Television changes
between 16:9 modes
smoothly.
OFF
Television changes
between 16:9 modes
quickly.
To return to normal TV
operation press the TV
button on your handset.
6
Page 39

39
...notes on Teletext
Teletext is an on screen information magazine and it is entered by
pressing the teletext button on your handset - a page similar to the
one below will appear. Select the topic you want to view by entering a
three digit number on your handset corresponding to the page number
eg. press 1, 0, 1 for the News Headlines.
Alternately, press a coloured button which relates to one of the topics at
the bottom of the screen (the Fastext service), e.g. press the green
button on your handset for the sport magazine.
Press a colour coded key you wish to use as a
favourite page
.
Repeat if necessary using a different coloured key, or press the MENU button to return to
normal Teletext viewing.
Enter the 3-digit page number using the
0-9 buttons on your handset.
time
date
magazine name
magazine page
number
page contents
Fastext/favourite
pages
Once this number has been entered, press and hold the same colour coded button
until the favourite page box turns white, then returns to its original colour.
favourite page box
3
4
5
6
teletext operation
television features
magazine title
To return to normal TV operation press the TV button on your handset.
7
Enter Teletext by pressing the Teletext
button.
Enter favourite page mode by pressing the
MENU button (this allows you to swap
between Fastext and favourite page mode).
1
2
...notes on favourite pages
Your TV is capable of storing up to four of your favourite Teletext
pages - maybe the sports page, cookery page or gardening page - the
choice is yours. These are accessed, like Fastext, by pressing the colour
coded buttons on your handset. Follow the steps below to enter your
favourite pages.
Page 40

40
To use headphones with
your TV insert the headphone
jack plug (3.5mm) into the
corresponding socket.
Use this socket, along with
audio in right to obtain sound
from your external equipment
through your TV’s speakers.
Use this socket with an
S-VHS or Hi8 camera to view
your recordings.
Use this in conjunction
with a standard 8mm camera or
digital camera to see the picture
from your equipment.
Use this socket, along with
audio in left to obtain sound
from your external equipment
through your TV’s speakers.
camcorder
Connecting a camcorder to your TV is easy. First, identify the type of camcorder and its
connecting sockets. If it is a standard 8mm type camera then this is likely to have 'RCA' type
sockets. If you have an S-VHS or Hi8 camera you may have an S-VHS socket. Open the front control
panel door and connect your equipment as detailed here. Switch your TV on and press the TV/AV
button on your handset until AV3 is displayed on your TV screen. (If you are using an S-VHS
socket, your TV will automatically switch to AV3). Now begin playback operation of your
equipment. Alternatively, you could allocate an individual channel number for your camcorder
equipment - see signal source entry.
connecting to the mains socket
Important - Please read television safety before connecting your television and
external equipment.
headphone connection
S-VHS socket
audio in right
audio in left
video in
If digital video broadcasting equipment, computer equipment, DVD or video games are to
be connected to this TV, use the AV2 or AV4 socket located on the rear of your TV for RGB
input. (Please see page 8).
PLEASE NOTE: Prolonged use of computer equipment or games on this TV may cause
permanent damage to your picture tube. To avoid such damage, reduce the brightness and
contrast to an acceptable level and limit the duration of use of computer equipment.
Before connecting
external equipment,
please consult
audio visual setup.
other equipment connection
other equipment
PLEASE
NOTE: Do not
connect a
camera to the
S-VHS/Hi8 socket and
the Video in socket at
the same time - fit one
or the other!
Page 41

41
Press the MENU button. The
MAIN MENU appears.
Press the cursor DOWN button
to select INSTALL.
Once highlighted, accept
selection.
Press the cursor DOWN button
to select MANUAL SETUP.
Once highlighted, accept
selection.
Use the UP/DOWN cursor keys
to select the programme you wish
to use and the LEFT/RIGHT cursor
keys to move the selection bar over the
AV required to be adjusted.
Select your method of signal source
entry using the UP/DOWN cursor buttons.
option 1
AV1 is the signal source used when connecting a
VCR through a scart lead to the AV1 socket at the rear of your TV. For
convenience, programme 0 is best used for your VCR.
1
2
3
4
5
6
8
...notes on signal source entry
Each piece of external equipment connected to your TV must have its own input socket. It would
also be easier, and more organized, if the external equipment connected also had its own program
number.
Signal Source entry allows you to tell the allocated program what equipment is connected to which
socket.
This would make the switching between normal operation and the connected equipment much
smoother.
For example, if you want to connect a games machine to your TV -
1. connect to socket AV2 via a scart lead.
2. give your games machine an empty program number of its own.
3. if desired change this program name.
4. give this program the correct AV signal source.
signal source entry
other equipment
Once highlighted, accept selection.
7
Page 42

42
option 2
AV2 is the signal source used when connecting
external equipment such as home entertainment
systems and Set Top Boxes/Decoders through a scart
lead to the AV2 socket at the rear of your TV.
option 3
AV3 is the signal source used when connecting
temporary equipment like a camcorder through the
audio/video sockets at the front of your TV.
option 4
AV4 is the signal source used when connecting
digital video broadcasting equipment or home
entertainment systems through a scart lead to the AV4
socket at the rear of your TV.
Once the signal source for each relevant
program number has been decided, this
can be stored in your TV's memory by
pressing the OK button.
To return to normal TV operation press
the TV button on your handset.
9
10
...notes on RF signal source
RF is the signal source used for standard television
broadcasting and this should be used as the setting for
normal TV programmes. This
source appears blank.
signal source entry
other equipment
option 5
DES is the signal source used when connecting
an external decoder, to descramble signals from the aerial
(i.e. Canal +), through a scart lead to the AV1 socket at the
rear of your TV.
Page 43

43
Press the MENU button.
The MAIN MENU appears.
Press the cursor DOWN
button to select INSTALL.
Once highlighted, accept
selection.
Press the cursor DOWN
button to select AV SETUP.
Once highlighted, accept
selection.
1
2
3
4
5
Use the UP/DOWN
cursor keys to select AV to
adjust.
Adjust chosen AV by
using the LEFT/RIGHT
cursor buttons. (Please see
below).
6
7
important note
It is very important that the AV menu setup is adjusted correctly when connecting external
equipment to your TV - an incorrect setting may lead to poor picture performance
.
audio visual setup
other equipment
To return to normal TV operation
press the television button on
your handset.
8
AV1
NORM
Use this setting
for VHS* video
recorders/decoders etc.
SVHS
Use this setting for
SVHS* equipment e.g.
video recorders/DVD
players.
AV2/4
NORM
Use this setting
for VHS* video
recorders/decoders etc.
RGB
Use this setting for
digital Set Top
Boxes/computer video
games/DVD players etc.
* Please see your other
equipment user manuals to
establish the best setting to use
(VHS/SVHS etc.).
Page 44

Language
This enables you to change the language of the On Screen Displays. Please see below for details.
language and installation
other features
Press the MENU button. The
MAIN MENU appears.
Press the cursor DOWN
button to select INSTALL.
Once highlighted, accept
selection.
1
2
3
44
Press the cursor DOWN
button to select LANGUAGE.
4
Adjust to your chosen
language using the LEFT/RIGHT
cursor buttons.
5
To return to normal TV operation press the television
button on your handset.
6
REPEAT STEPS 1 - 3 ABOVE.
Press the cursor DOWN button to select
INSTALLATION.
Once highlighted, accept selection.
1
4
5
Installation
This enables you to repeat the Autotune installation if required, e.g. if you move house etc.
Please now turn to automatic tuning procedure’, found in the ‘tuning in’ section of
this manual, and follow the instructions, starting from STEP 4 and continuing through
to STEP 7.
important note on Installation
Do not switch your TV on until all external equipment is connected. If you have a Video
Cassette Recorder or a Satellite receiver connected to this TV please ensure that they
are switched on before automatic tuning begins. In the case of a VCR, if it is not Viewlink
compatible, insert a pre-recorded tape and begin playback of your equipment. If it is Viewlink
compatible leave VCR in Standby. (See viewlink section of this manual for details). With a
Satellite receiver select Sky News. These measures ensure that all your external equipment is
tuned in during the autotune procedure.
Page 45

Programme Download
if you have purchased a Viewlink compatible VCR, select this feature
to download the programme listings from your TV to the new VCR.
REPEAT STEPS 1 - 3 AS
PREVIOUS
.
Press the cursor DOWN
button to select
PROGRAMME
DOWNLOAD.
Once highlighted,
accept selection.
1
4
5
Your TV will now download
the programme information.
6
To return to normal TV operation press the TV button
on your handset.
7
Demo Mode
This enables you to have a brief overview of the features available on your television.
To return to normal TV operation, press the TV button on your handset.
8
The TV will now demonstrate the features and On Screen Displays available on your TV.
PLEASE NOTE: This is a demonstration only - no settings are changed during this demonstration!
7
45
Press the MENU button to obtain MAIN MENU.
Press the cursor DOWN button to select FEATURES.
Once highlighted, accept selection.
1
2
3
Press the cursor DOWN button to select DEMO MODE.
4
Use LEFT/RIGHT buttons to adjust the DEMO MODE
options, i.e. ON/OFF.
6
Once highlighted, accept selection.
5
programme download and demo mode
other features
Page 46

46
trouble shooting guide - digital sound
information
remedypossible cause
problem identification
1. No digital audio. Pressing
the info/recall button on your
handset doesn’t show Digital
audio modes or format in top
right hand corner of screen.
No or poor digital connection
between television and external
equipment
See ‘DVD, CD and LaserDisc
player connection’
Incorrect Decode Mode
Set the Decode Mode to
correct AV (see Decode
Mode set up procedure)
Decode Mode is set for wrong
AV (you will have the correct
picture from your external
equipment but no sound)
Set the Decode Mode to
Digital or Auto (see ‘Digital
Audio Status - Decode
Mode’ set up procedure)
Television is set to the wrong AV
(you will have the wrong picture
or no picture at all)
Use the Manual Setup
procedure to set the AV
correctly, or use the AV key
to cycle through the Audio
Visual options.
Player is not playing because it
has been switched off or placed
in ‘Pause’ mode.
Refer to external equipment's
instructions
Invalid or damaged disc has
been placed in player.
Refer to external equipment
instructions. Is the disc
compatible with the external
equipment you are using?
Signal options not supported by
television.
See Digital Audio Status for list
of modes available.
Digital audio out has not been
enabled on player.
Refer to external equipment
instructions on how to enable
the digital audio output.
2. Digital audio works but
only PCM mode is available
even when playing a Dolby
Digital encoded disc.
Your external equipment has not
been configured to output a
digital bitstream, does not
support Dolby Digital output, or
the correct format is not enabled
on the external equipment.
3. No sound even at maximum
volume, although the correct
picture can be seen.
Headphones have been inserted
into front control panel.
Remove headphones.
External/internal speaker switch
is in the incorrect position.
Place in correct position to use
appropriate speakers.
You have not selected a Dolby
Digital track from the DVD title
menu
Refer to title menu on disc to
set audio format
Laserdisc with Dolby Digital RF
signal cannot be detected
Fit adaptor as described in
‘DVD, CD and LaserDisc
player connection’
Refer to external equipment
instructions for compatibility.
Page 47

47
trouble shooting guide - digital sound
information
remedypossible cause
problem identification
6. One or more of the rear
channels is not working.
The disc placed in your external
equipment has no surround
information on it.
This is normal operation
You are in Stereo mode.
Change the mode in the
Sound Mode menu.
You are playing a disc with an
incompatible sample rate.
This is normal operation
7. No digital mode options
available in Sound Mode
Menu.
Are headphones inserted into
front control panel?
Remove headphones to
adjust Surround Mode.
You are playing a disc with a
high sample rate.
This is normal operation.
You have not selected a Dolby
Digital track from the DVD title
menu
Refer to title menu on disc
to set audio format
Your external equipment has not
been configured to output a
digital bitstream, does not
support Dolby Digital output, or
the correct format is not enabled
on the external equipment.
Refer to external equipment
instructions for compatibility.
5. Picture and digital audio are
intermittent.
Has a scart lead connection
been made between TV and
external equipment?
Check quality of connection.
Faulty external equipment.
Try alternative equipment or
contact your equipment's
supplier.
4. Picture is OK, but digital
audio is intermittent.
Poor connections.
Check your coaxial/optical
connections.
Faulty disc. Try an alternative disc.
Faulty external equipment.
Try alternative equipment or
contact your equipment's
supplier.
Page 48

48
remedypossible reason
trouble shooting guide information
questions
answers
problem identification
snowy picture - poor sound
multiple images - sound O.K
intermittent interference
no picture or sound
Connection of aerial lead
to the TV is poor.
Corroded or poor aerial
connections.
Aerial has moved position.
Adverse weather conditions.
Transmitter problems.
Make new connection
and/or change aerial plug.
Make new connections
or renew lead.
Re-align aerial.
None.
Check with local Operator.
Transmitter problems.
Aerial has moved position.
TV not tuned correctly.
Adverse weather conditions.
Re-align aerial.
None.
Re-tune or fine tune TV.
Check with local Operator.
TV may be in AV
mode.
Picture/sound
controls set to
minimum.
TV in standby
mode.
Press the AV button
or to
buttons on your
handset to return to
normal TV mode.
Check
picture/sound
controls (go to
MAIN MENU).
Press one of the
buttons to .
Why doesn't my remote control handset work?
Why won't my TV switch on?
Check that your plug is connected to the
socket and switched on, check fuse and make
sure TV is not in standby mode (see below).
Make sure there are no obstructions between
the handset and the TV's infra-red lens, or the
batteries may be exhausted - replace the whole
set of batteries.
AV Input not set correctly.
If a problem still continues after referring to this guide contact your dealer immediately.
Under NO circumstances remove the rear cover of your TV.
Interference from
electrical or mechanical
motors, fluorescent lights,
portable radios etc.
Check devices for shielding
and renew if necessary or
move further from TV.
Check what external
equipment is connected
and check its scart AV
status.
Page 49

49
guarantee
information
Thank You for purchasing this Hitachi Television.
In the unlikely event that this product should develop a fault, we
undertake to repair or replace any part of the product which fails
due to a manufacturing defect within 12 months of the date of
purchase provided that...
1. the product has been installed and used only in accordance
with the instructions supplied with the product.
2. the product has not been repaired, maintained, or modified by
any person other than a Hitachi authorized dealer.
3. the product serial number has not been removed or altered.
•this guarantee does not apply to a product acquired second hand
or for commercial or communal use.
•this guarantee does not cover the replacement of exhausted
batteries, the adjustment of user controls, or aerial alignment.
•any parts replaced under this guarantee shall become the
property of Hitachi Home Electronics (Europe) Ltd.
•please note that evidence of the date of purchase will be required
before any service under this guarantee is carried out.
Use the boxes provided below to record your TV’s Model and Serial
Number - these are found on the rating plate located on the rear of the TV.
Also, record where and when you purchased this T.V. This information will
help any future queries you may have and should be used in all
correspondence with Hitachi service centres.
SERIAL
NUMBER
MODEL DEALER/STORE DATE
PURCHASED
This guarantee does not affect your statutory rights.
In all cases of difficulty please
consult your Hitachi dealer.
Page 50

50
HITACHI environmental notice
information
Hitachi are signatories to the commitment made by the
consumer electronics industry on reducing energy
consumption by televisions and video recorders on standby.
Even though your TV has a low power consumption, you can
reduce waste to zero if you switch off the set at the mains
after use. Your TV should certainly be switched off overnight
or when you are away from home. Other factors should also
be considered when operating your TV. Reducing volume
settings to sensible levels can reduce power consumption
as well as reducing noise pollution, and
reducing contrast can provide a more pleasing picture as
well as reducing power consumption.
Hitachi Home Electronics (Europe) Ltd. manufacturing site in
Wales is a BSI Registered Company, and has been
assessed to ISO 9001 Quality Management Standard,
certificate FM32366. Your television has been manufactured
under the Environmental Quality Management Standard
ISO14001, certificate EMS 36168.
The paper used for this Users Guide has been produced
from sustainable forests, part of Hitachi’s on going commitment
to the global environment.
Environmental Notice
Page 51

51
scart sockets
21 19 17 15 13 11 9 7 5 3 1
20 18 16 14 12 10 8 6 4 2
technical data
information
S-VHS socket
television specification
TV Standard............................................................................................50Hz
Aerial Impedance ..................................................................................75 unbalanced
Picture Tube............................................................................................66cm type
76cm type
Mains Voltage ........................................................................................220 - 240V AC 50 Hz
Internal Speakers ..................................................................................8 15Watt
Power Consumption ....................................................................................................66cm = 109W (approx)
76cm = 111W (approx)
Standby <6W (all models)
Weight............................................................................................................................66cm = 37.0kg (NET)
76cm = 55.0kg (NET)
Dimensions (Width x Depth x Height) ......................................................................66cm = 790 x 525 x 516 (mm)
76cm = 883 x 572 x 551 (mm)
Remote Control Batteries............................................................................................2 X HITACHI R6P(G)
(equivalent ‘AA’)
FUNCTION
Chrominance input
Luminance input
Chrominance ground
Luminance ground
Frame ground
PIN
1
2
3
4
5
1
2
4
5
3
scart socket AV4
NOT USED
AUDIO INPUT (RIGHT)
NOT USED
GROUND (AUDIO)
GROUND (BLUE)
AUDIO INPUT (LEFT)
BLUE INPUT
SWITCHING INPUT
GROUND (GREEN)
NOT USED
GREEN INPUT
NOT USED
GROUND (RED)
GROUND (BLANKING)
RED INPUT
STATUS (BLANKING) INPUT
GROUND (VIDEO)
GROUND (VIDEO)
NOT USED
COMPOSITE VIDEO INPUT
GROUND
scart socket AV2
AUDIO OUT (RIGHT)
AUDIO INPUT (RIGHT)
AUDIO OUT (LEFT)
GROUND (AUDIO)
GROUND (BLUE)
AUDIO INPUT (LEFT)
BLUE INPUT
SWITCHING INPUT
GROUND (GREEN)
NOT USED
GREEN INPUT
NOT USED
GROUND (RED)
GROUND (BLANKING)
RED INPUT
STATUS (BLANKING) INPUT
GROUND (VIDEO)
GROUND (VIDEO)
COMPOSITE VIDEO OUTPUT
COMPOSITE VIDEO INPUT
GROUND
scart socket AV1
AUDIO OUT (RIGHT)
AUDIO INPUT (RIGHT)
AUDIO OUT (LEFT)
GROUND (AUDIO)
NOT USED
AUDIO INPUT (LEFT)
NOT USED
SWITCHING INPUT
NOT USED
DATALINK TO VCR (VIEWLINK)
NOT USED
NOT USED
CHROMINANCE GROUND
NOT USED
S–VHS CHROMINANCE INPUT
NOT USED
GROUND (VIDEO)
GROUND (VIDEO)
COMPOSITE VIDEO OUTPUT
COMPOSITE VIDEO OR
S–VHS LUMINANCE INPUT
GROUND
1
2
3
4
5
6
7
8
9
10
11
12
13
14
15
16
17
18
19
20
21
1
2
3
4
5
6
7
8
9
10
11
12
13
14
15
16
17
18
19
20
21
1
2
3
4
5
6
7
8
9
10
11
12
13
14
15
16
17
18
19
20
21
Page 52

Hitachi, Ltd. Tokyo, Japan
International Sales Division
THE HITACHI ATAGO BUILDING,
No. 15 –12 Nishi Shinbashi, 2 – Chome,
Minato – Ku, Tokyo 105-8430, Japan.
Tel: 03 35022111
HITACHI EUROPE LTD,
Whitebrook Park
Lower Cookham Road
Maidenhead
Berkshire
SL6 8YA
UNITED KINGDOM
Tel: 01628 643000
Fax: 01628 643400
Email: consumer-service@hitachi-eu.com
HITACHI EUROPE GmbH
Munich Office
Dornacher Strasse 3
D-85622 Feldkirchen bei München
GERMANY
Tel: +49-89-991 80-0
Fax: +49-89-991 80-224
Hotline: +49-180-551 25 51 (12ct/min)
Email: HSE-DUS.service@hitachi-eu.com
HITACHI EUROPE srl
Via Tommaso Gulli N.39, 20147
Milano, Italia
ITALY
Tel: +39 02 487861
Tel: +39 02 38073415 Servizio Clienti
Fax: +39 02 48786381/2
Email: customerservice.italy@hitachi-eu.com
HITACHI EUROPE S.A.S
Lyon Office
B.P. 45, 69671 BRON CEDEX
FRANCE
Tel: 04 72 14 29 70
Fax: 04 72 14 29 99
Email: france.consommateur@hitachi-eu.com
HITACH EUROPE AB
Egebækgård
Egebækvej 98
DK-2850 Nærum
DENMARK
Tel: +45 43 43 6050
Fax: +45 43 60 51
Email: csgnor@hitachi-eu.com
Hitachi Europe Ltd
Bergensesteenweg 421
1600 Sint- Pieters-Leeuw
BELGIUM
Tel: +32 2 363 99 01
Fax: +32 2 363 99 00
Email: sofie.van.bom@hitachi-eu.com
www.hitachidigitalmedia.com
HITACHI EUROPE S.A.
364 Kifissias Ave. & 1, Delfon Str.
152 33 Chalandri
Athens
GREECE
Tel: 1-6837200
Fax: 1-6835964
Email: service.hellas@hitachi-eu.com
HITACHI EUROPE S.A.
Gran Via Carlos III, 101- 1
08028 Barcelona
SPAIN
Tel: 93 409 2550
Fax: 93 491 3513
Email: atencion.cliente@hitachi-eu.com
HITACHI Europe AB
Box 77 S-164 94 Kista
SWEDEN
Tel: +46 (0) 8 562 711 00
Fax: +46 (0) 8 562 711 13
Email: csgswe@hitachi-eu.com
HITACHI EUROPE LTD (Norway) AB
STRANDVEIEN 18
1366 Lysaker
NORWAY
Tel: 67 5190 30
Fax: 67 5190 32
Email: csgnor@hitachi-eu.com
HITACHI EUROPE AB
Neopoli / Niemenkatu 73
FIN-15140 Lahti
FINLAND
Tel : +358 3 8858 271
Fax: +358 3 8858 272
Email: csgnor@hitachi-eu.com
HITACHI EUROPE LTD
Na Sychrove 975/8
101 27 Praha 10 – Bohdalec
CZECH REPUBLIC
Tel: +420 267 212 383
Fax: +420 267 212 385
Email: csgnor@hitachi-eu.com
 Loading...