

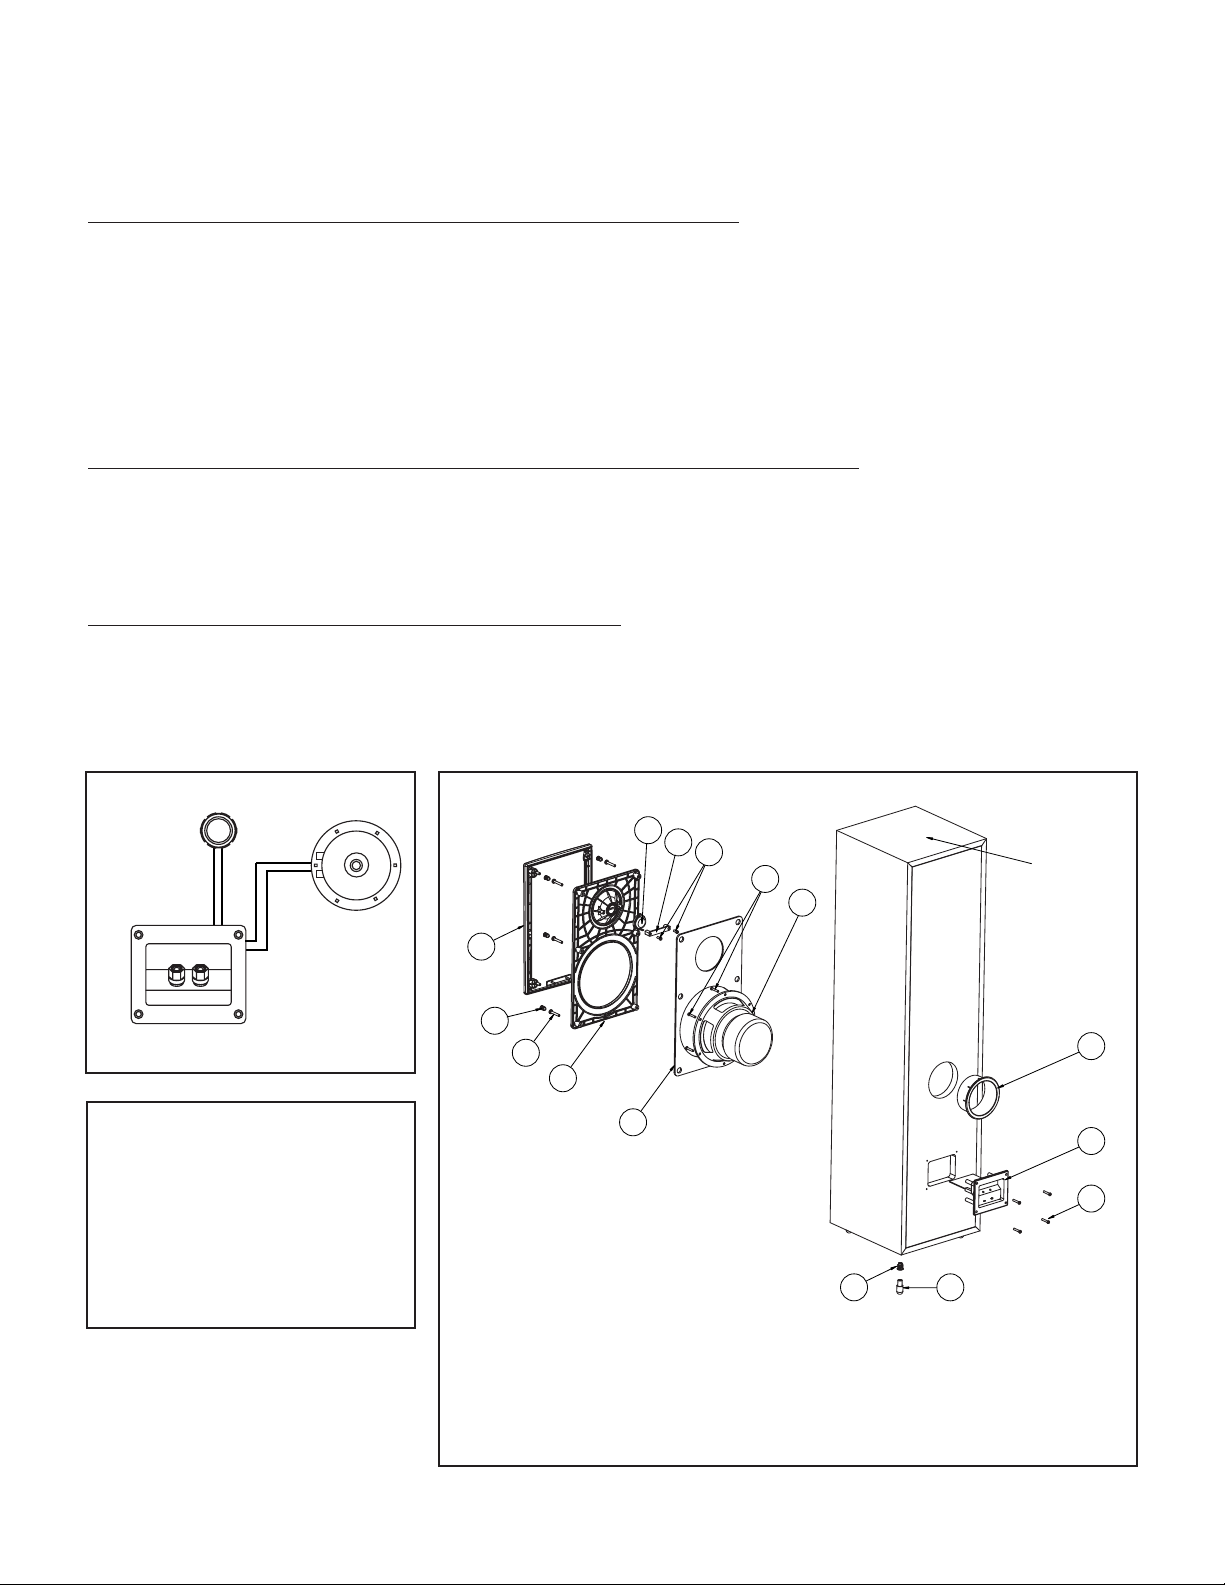
EXPLODED VIEW
WIRING DIAGRAM
HKTW 6
Harman Kardon Loudspeaker Troubleshooting/Repair Tips
Most customers prefer to do simple loudspeaker repairs themselves. By following the steps below, a majority of loudspeakers can be returned to
their original factory performance with minimum effort. Choose the example that best describes the problem you are experiencing.
Problem 1: No sound or distorted sound from one loudspeaker in a pair (or set)
Connect the dead/distorting loudspeaker to a different amplifier channel (one that had a functioning loudspeaker connected to it). If it functions
normally, the problem is not loudspeaker-related. If the loudspeaker still makes no sound or sounds distorted, a wire may have become loose
or disconnected, the network (also known as a crossover) may be defective, the drivers (woofer, tweeter, etc.) may be defective or, in very rare
cases, all may be defective.
Refer to the wiring diagram and exploded view below. The network is a small circuit board found on the inside of the terminal cup, or mounted to
an inside wall of the enclosure. It sends low-frequency sounds to the woofer, high-frequency sounds to the tweeter and, if applicable, mid-frequency
sounds to the midrange driver. Make sure all wires are secure and connected. Look for components on the network that look burnt, “bulged,”
or abnormal. If everything looks normal, connect the network to the drivers from another matching loudspeaker. MAKE SURE you attach the
correct wires to each driver – mid- and low-frequency sounds can damage the tweeter! If there is still no sound or distorted sound, the network
is defective. If there is clean undistorted sound, the drivers are defective.
Problem 2: No sound or distorted sound from one or more (but not all) drivers in an enclosure
Remove the problem driver(s) from the enclosure and make sure all wires are secure and connected. If they are, proceed with the following test:
Woofer or midrange driver – Connect the driver’s + and – input terminals directly to the loudspeaker wires from your receiver/amplifier and play
some music at a reasonable volume. If the driver now sounds normal (produces a clean, undistorted sound), the network is most likely defective.
Tweeter – Replace the tweeter with a functioning tweeter from another loudspeaker. If the tweeter now functions normally (produces clean,
undistorted sound), the original tweeter is defective. If the replacement tweeter also sounds distorted or produces no sound, the network is
most likely defective.
Problem 3: Loudspeakers distort, rattle or pop at higher volumes
This is usually NOT a loudspeaker problem. Common causes are too much power (playing the loudspeakers too loud and causing them to distort),
an amplifier with not enough power (the amplifier can’t produce the required volume without distorting), excessive equalization (turning the tone
controls too far clockwise, and/or engaging the loudness/bass boost button on your receiver) or some combination of the above. If only one
loudspeaker is exhibiting the problem, and you’re confident that it’s not caused by too little power/too much power/excessive equalization, see
solutions for Problems 1 and 2.
ITEM
NO. DESCRIPTION QTY. PART NO.
1. Owner’s Manual 1 339777-001
2. Warranty Card 1 339778-001
3. Top & Bottom Pads 2 350509-001
4. Outer Carton 1 339818-001
5. Spike Foot Set 4 331360-001
6. Tweeter 1 338035-001
7. Tweeter Hold-Down Bar 1 338059-001
8. Front Faceplate 1 350348-001
9. Faceplate Gasket 1 339773-001
10. Woofer 1 339788-001
11.Grille 1 339782-001
12. Grille Retainer 6 338535-002
13. Port Tube 1 339796-001
14. Crossover Network 1 339801-004
ITEM
NO. DESCRIPTION QTY. PART NO.
15. Screw front baffle)
(PB PPH M4 x 20mm 6 910501-020
16. Screw (6 woofers, 4 network) 10 903401-012
PB PPH #6 x .75 BLK
17. Screw (tweeter) MS PHH H/L 2 905402-010
6-19 x 5/8 ZNC
18. Threaded Insert – 4401 4 63154
TO SERVICE THE HKTW 6
1. Remove the grille.
2. Remove all (6) rubber grille retainers;
this can be accomplished by carefully
pulling them out of their cavities with
long-nosed pliers or similar tool.
3. Remove the (6) Phillips screws that are
now exposed.
4. Carefully separate the front baffle, with
tweeter attached, from the cabinet.
HIGH-FREQUENCY
TRANSDUCER
338035-001
CROSSOVER NETWORK
339801-004
+–
YEL
YEL/BLK
GRN/BLK
GRN
–
+
LOW-FREQUENCY
TRANSDUCER
339788-001
6
7
(2)
17
11
(6)
12
(6)
15
8
9
(4)
5
HKTW 6 Cabinet
– Not for Sale
(6)
16
10
(4)
18
13
14
(4)
16
 Loading...