

Page 1
F
D
GB
E
Quick Guide
Kurzanleitung
Notice d’utilisation
Instrucciones breves
Краткое руководство
Istruzioni brevi
Beknopte bedieningsinstructies
Σύντομες οδηγίες
Krótka instrukcja obsługi
Rövid útmutató
Stručný návod
Stručný návod
Instruções resumidas
Kısa kullanımkılavuzu
Instrucțiuni scurte
Snabbguide
Lyhyt ohje
Kort vejledning
Kortveiledning
Digital Hi-Fi Tuner
Digital-HiFi-Tuner
RUS
PL
P
I
H
TR
FIN
NL
CZ
RO
DK
GR
SK
S
N
00054238
(DIT2006BT)
QUICK GUIDE
KURZANLEITUNG
Page 2
Further information and features areavailable on/
WeitereInformationen und Features nden Sie hier
www.hama.com -> 00054238
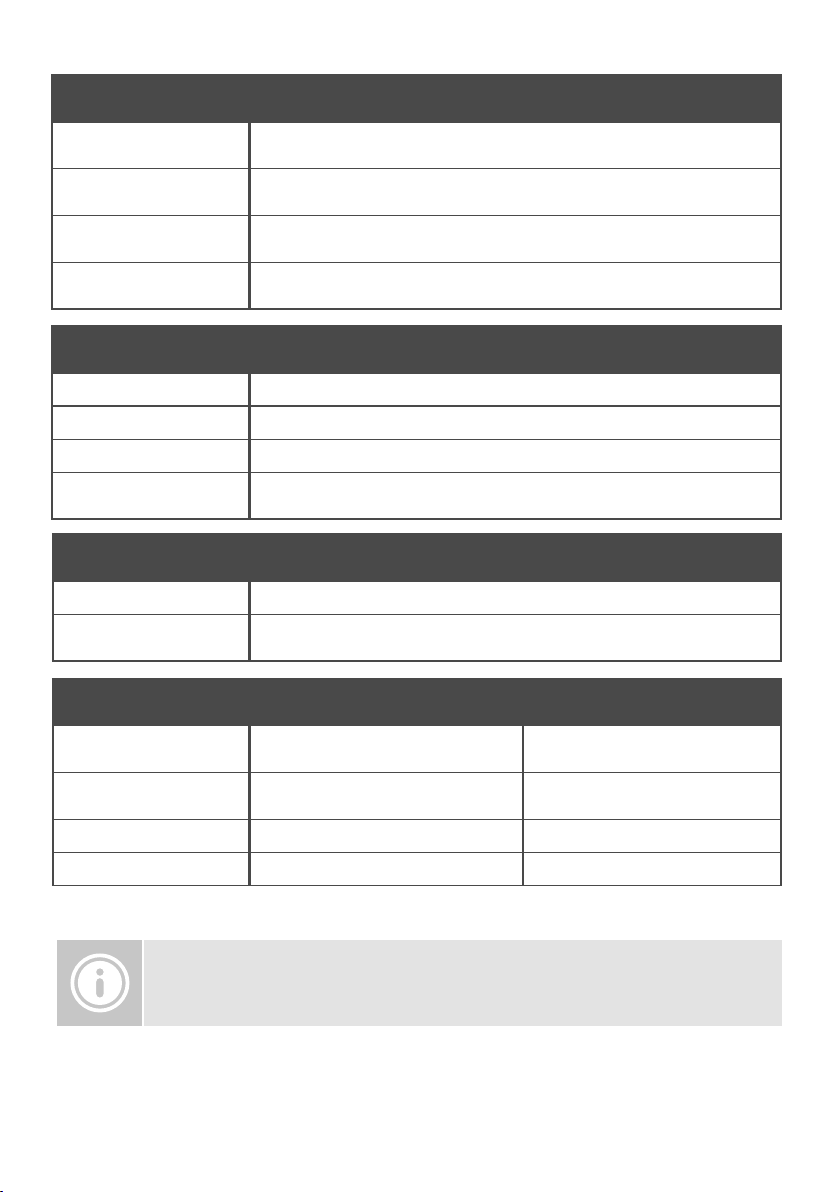
Technical Data
Technische Daten
Display
2.8" (7.11cm) Color TFT
320 x240 px
Power Supply
Stromversorgung
100-240 V~50/60 Hz
Supported Languages
Unterstützte Sprachen
English, German, Danish, Dutch, Finnish, French, Italian, Norwegian, Polish, Portuguese, Spanish,
Swedish, Turkish, Czech, Slovak
Packaging Content
Verpackungsinhalt
Hama DIT2006BT,Power Cord, Remote GB-RC001, 2x AAA Batteries, Quick Start Manual, Te lescope
Antenna Coaxial, WiFi Antenna, RCAAudio Cable
Connectivity
Konnektivität
Ethernet LAN (10/100)
WiFi 2.4GHz (b/g/n) /5GHz (a/n)
Bluetooth Receiver (RX): 4.2, class 1, A2DP,AVRCP
USB
(FAT32 File System)
Charge: 5V /1A
Playback: MP3, WMA, M4A, ADTS, FLAC, WAV
Audio Connectors
Audio Anschlüsse
Inputs AUX In 3.5mm
Outputs
Headphone 3.5mm, Digital Optical, Digital Coaxial, RCAL/R,
Line Out 3.5mm
Sources
Quellen
Presets
Favoriten
DAB/DAB+
(174.928 -239.2 MHz)
ü
30
FM
(87.5 -108 MHz)
ü
30
Internet Radio
ü
30
Spotify Connect
ü
10
Page 3
A
1 3 12
16
2 4 6 9 1115 14
5 7 8 10
13
B
1721 23
2018 24 1922
Page 4
1
2
3
10
12
14
16
18
4
6
5
7
8
9
11
13
15
17
19
Page 5

Page 6

Spotify Connect
G Use your phone, tablet or computer as aremote
control for Spotify.Gotospotify.com/connect to learn how.
D Verwende dein Smartphone, Tablet oder deinen
Computer als Fernbedienung für Spotify.Auf spotify.com/
connect erfährst du mehr.
F Utilisez votretéléphone, votretablette ou votre
ordinateur comme une télécommande pour contrôler
Spotify.Accédez àspotify.com/connect pour en savoir plus.
E Usa tu teléfono, tu tablet otucomputadoracomo
control remoto de Spotify.Paramás información, entraa
spotify.com/connect.
I Usa il tuo cellulare, tablet ocomputer come
telecomando remoto per Spotify.Vai su spotify.com/
connect per scoprirecome.
N Gebruik je telefoon, tablet of computer als een
afstandsbediening voor Spotify.Ganaar spotify.com/
connect om te leren hoe je dat doet
J Χρησιμοποίησε το τηλέφωνο, το τάμπλετ ήτον
υπολογιστή σο
στο spotify.com/connect για να μάθεις πώς.
P Wykorzystuj telefon, tablet lub komputer jako pilota,
aby sterować aplikacją Spotify.Wejdź na spotify.com/
connect, aby dowiedzieć się,jak to zrobić.
υωςτηλεχ
ειριστήριο για το
Spotify
. Πήγαινε
8
Page 7

Spotify Connect
H Használd atelefont, táblagépet vagy számítógépet
aSpotify távirányítójaként. További tudnivalókat aspotify.
com/connect oldalon olvashatsz.
C Hudbu ze Spotify můžeš ovládat na dálku přes
telefon, tablet nebo počítač.Nastránce spotify.com/
connect najdeš, jak na to.
O Usa oteu telemóvel, tablet ou computador como
comando do Spotify.Vai aspotify.com/connect para
saberes como
T Telefon, tablet veya bilgisayarını Spotify için uzaktan
kumanda olarak kullan. Nasılyapacağını öğrenmek için
spotify.com/connect adresine
S Använd din telefon, surfplatta el
fjärrkontroll för Spotify.Gåtill spotify.com/connect för att
ta reda på hur.
L Käytä puhelinta, tablettia tai tietokonetta Spotifyn
kaukosäätimenä. Katso tarkemmat tiedot osoitteesta
spotify.com/connect.
K Brug din telefon, tablet eller computer som
fjernbetjening til Spotify.Gåtil spotify.com/connect for at
nde ud af,hvordan du gør.
V Bruk telefonen, nettbrettet eller datamaskinen som
en fjernkontroll for Spotify.Gåtil spotify.com/connect for å
lærehvordan.
ler dator som
9
Page 8
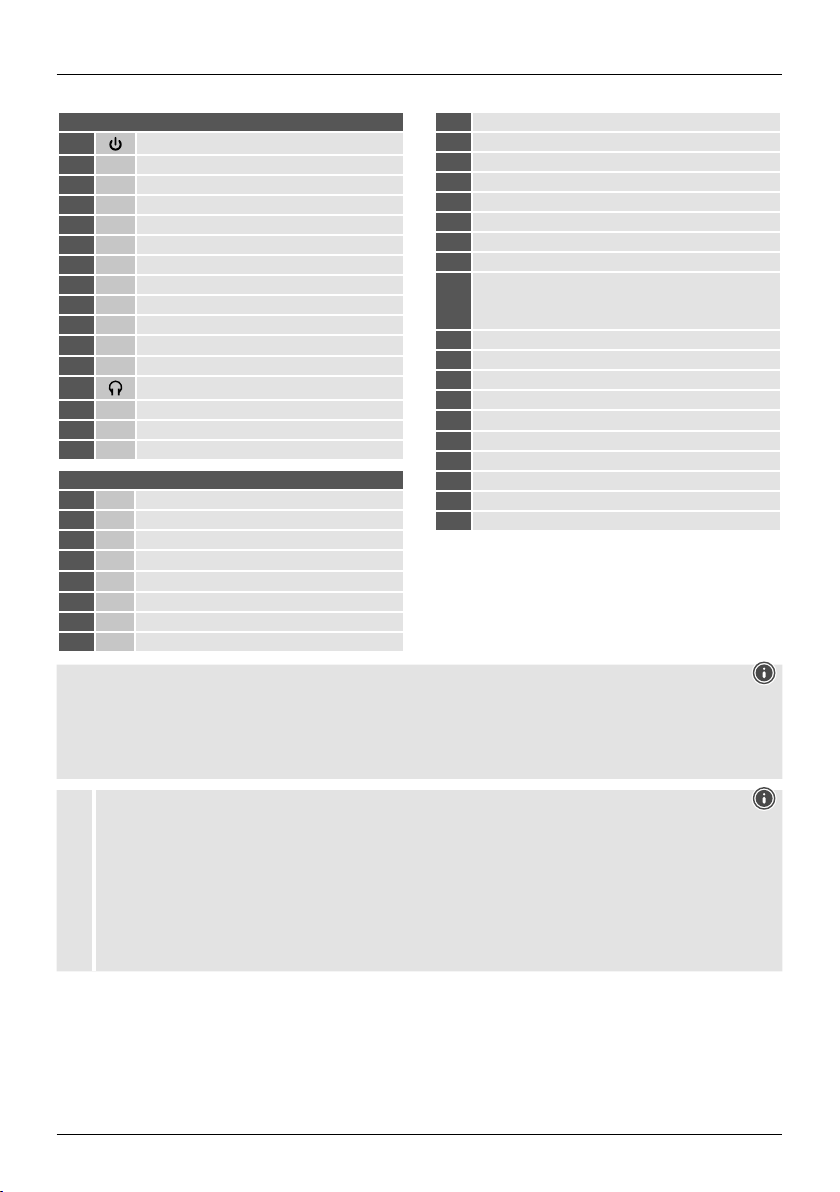
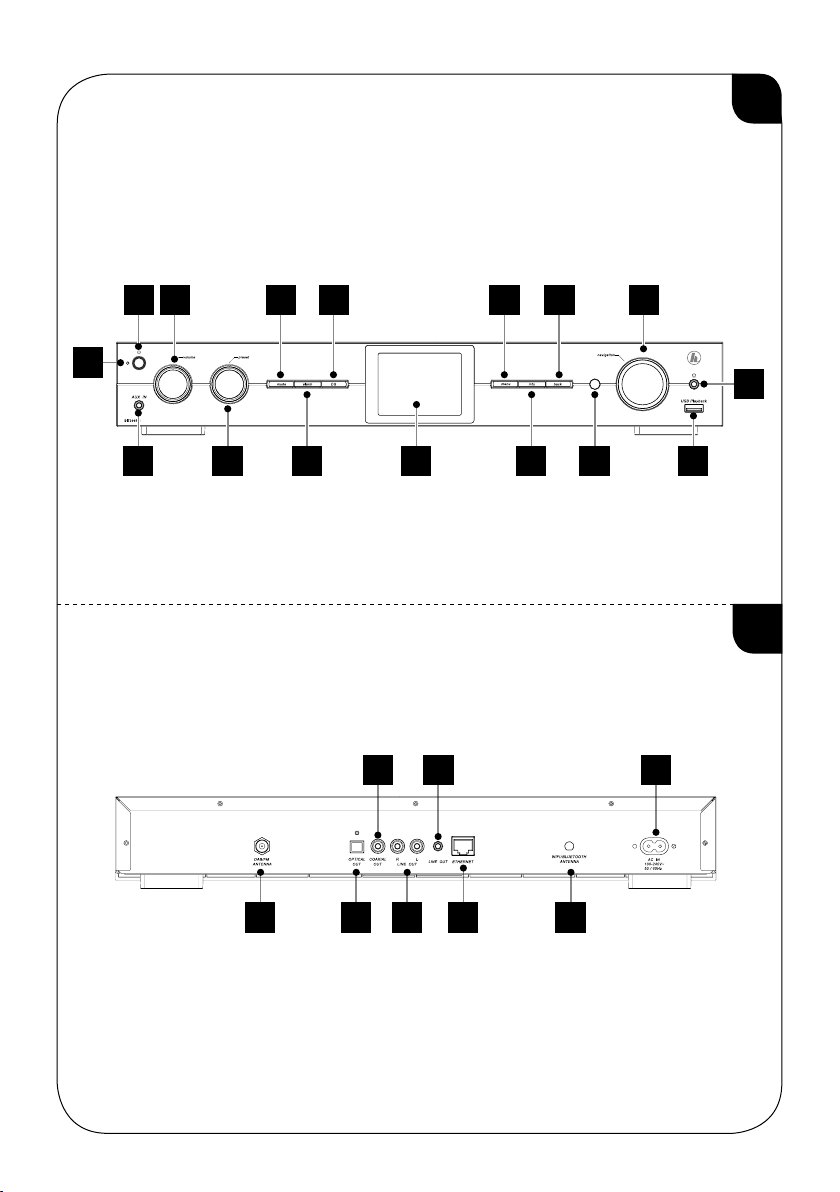
G Quick Reference Guide
Controls and Displays
A: Radio Front
1
2 AUX-In Socket
3 [VOLUME] +/-
4 [PRESET] Wheel
5 [MODE] Button
6 [ALARM] Button
7 [EQUALIZER] Button
8 [MENU] Button
9 [INFO] Button
10 [BACK] Button
11
12 [Navigation]
13 Headphone Socket
14
15 2.8" Colour Display
16 LED
17 Mains Power Supply
18 Antenna*
19 WiFi/Bluetooth Antenna
20
21
22 Stereo Chinch l/R out
23
24
Note
*
"DIT2006BT" has achangeable antenna. Youcan use an active or passive antenna equipped with acoaxial
connection.
** The rotary knob has adual function. Turning the controller allows you to change the volume or navigate through the
menu structure. Pressing this rotary knob puts the device in standby mode or conrms aselection.
[POWER] Button
IR Sensor
USB connection
B: Radio Rear
Optical OUT
Coaxial OUT
Line OUT (3.5mm)
LAN (10 /100 Mbit) Connection
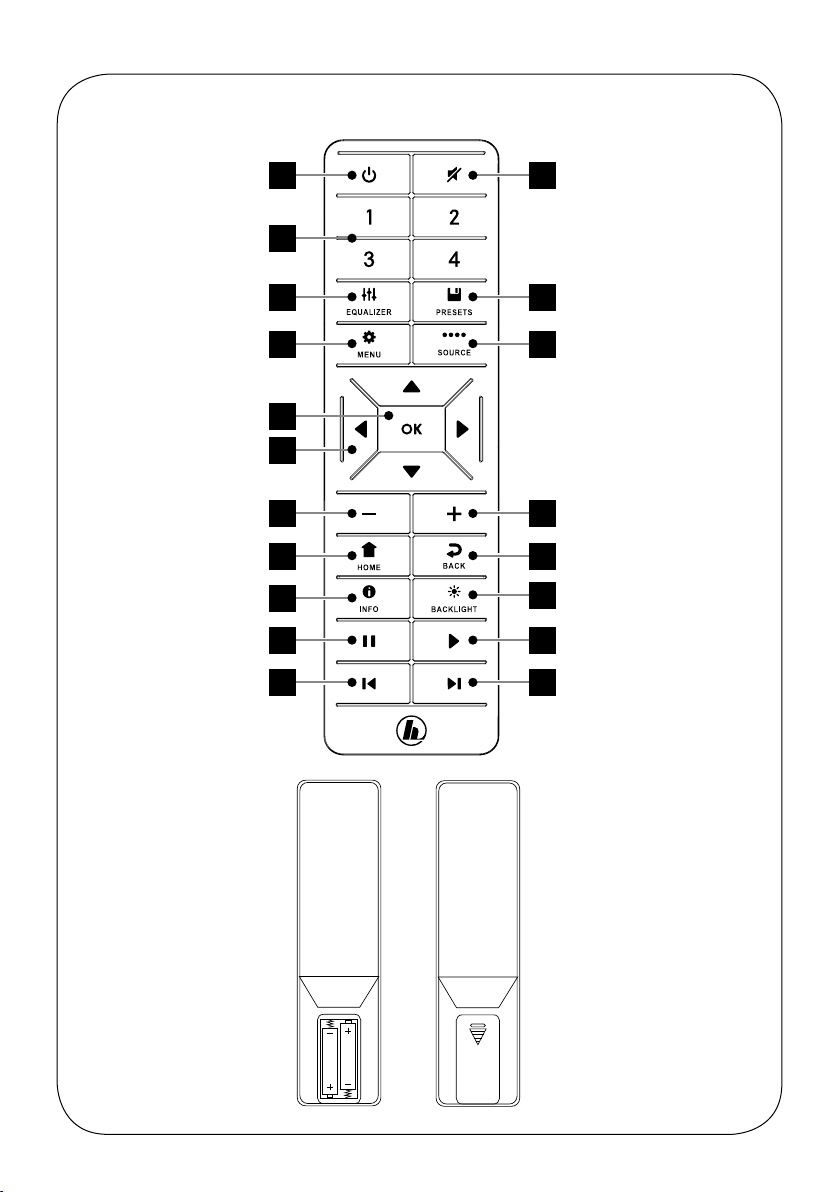
Remote Control
1 [POWER] Button
2 [MUTE] Button
3 [PRESET] Direct Button (1-4)
4 [EQUALIZER] Button
5 [PRESET] List Button
6 [MENU] Button
7 [SOURCE] Button
8 [OK] Button
[NAVIGATION] Button
9
▲ Up ▼ Down
◄ Left ► Right
10 [VOL-] Button
11 [VOL+] Button
12 [HOME] Button
13 [BACK] Button
14 [INFO] Button
15 [BACKLIGHT] Button
16 [PAUSE] Button
17 [PLAY] Button
18 [PREVIOUS] Button
19 [NEXT] Button
Important information -Quick-reference guide
• This quick-reference guide contains the most important basic information, such as safety instructions and the steps
necessary to operate the product.
• To help protect the environmental and conserve valuable rawmaterials, Hama does not issue aprinted manual and
instead makes this available exclusively as aPDF download.
of the
• The full text
!
www.hama.com -> 00054238 -> Downloads
• Save the manual on your computer for reference and print them out if possible.
manual is available at the following internet address:
2
Page 9

1. Explanation of Warning Symbols and Notes
Risk of electric shock
This symbol indicates arisk of electric shock from
touching product parts carrying hazardous voltage.
Warning
This symbol is used to indicate safety instructions or to
draw your attention to specichazards and risks.
Note
This symbol is used to indicate additional information or
important notes.
2. Package Contents
• Digital-HiFi-Tuner DIT2006BT
• RCAcable (for stereo L/R RCAoutput)
• Remote control
• 2x AAA batteries
• Quick guide
3. Safety Instructions
• The product is intended for private, non-commercial use
only.
• Do not use the product in areas in which electronic
products arenot permitted.
• Protect the product from dirt, moistureand overheating
and use it in dry rooms only.
• As with all electrical products, this device should be kept
out of the reach of children.
• Do not drop the product and do not expose it to any
major shocks.
• Do not operate the product outside the power limits
specied in the technical data.
• Keep the packaging material out of the reach of children
due to the risk of suffocation.
• Dispose of packaging material immediately in
accordance with the locally applicable regulations.
• Do not modify the device in any way.Doing so voids the
warranty.
• Use the product only for the intended purpose.
• Do not use the product in the immediate vicinity of
heaters, other heat sources or in direct sunlight.
• Do not use the product in adamp environment and
avoid splashing water.
• Only use the article under moderate climatic conditions.
Risk of electric shock
• Do not open the device or continue to operate it if it
becomes damaged.
• Do not use the product if the
AC adapter,the adapter cable or the mains cable are
damaged.
• Do not attempt to service or repair the product
yourself.Leave any and all service work to qualied
experts.
Warning –Batteries
• When inserting batteries, note the correct polarity (+
and -markings) and insert the batteries accordingly.
Failuretodosocould result in the batteries leaking or
exploding.
• Only use batteries (or rechargeable batteries) that
match the specied type.
• Beforeyou insert the batteries, clean the battery
contacts and the polar contacts.
• Do not allow children to change batteries without
supervision.
• Do not mix old and new batteries, or batteries of
different types or from different manufacturers.
• Remove the batteries from products that arenot being
used for an extended period (unless these arebeing
kept ready for an emergency).
• Do not short-circuit batteries.
• Do not charge batteries.
• Do not burn batteries.
• Keep batteries out of the reach of children.
• Never open, damage or swallow batteries or allow
them to enter the environment. They can contain toxic,
environmentally harmful heavy metals.
• Remove spent batteries from the product and dispose
of them without delay.
• Avoid storing, charging or using the device in extreme
temperatures and extremely low atmospheric pressure
(for example, at high altitudes).
4. Before First Use
Note
Adetailed description of the
UNDOK app and all of its
functions can be found in our
UNDOK guide at:
www.hama.com->00054238 ->Downloads
3
Page 10
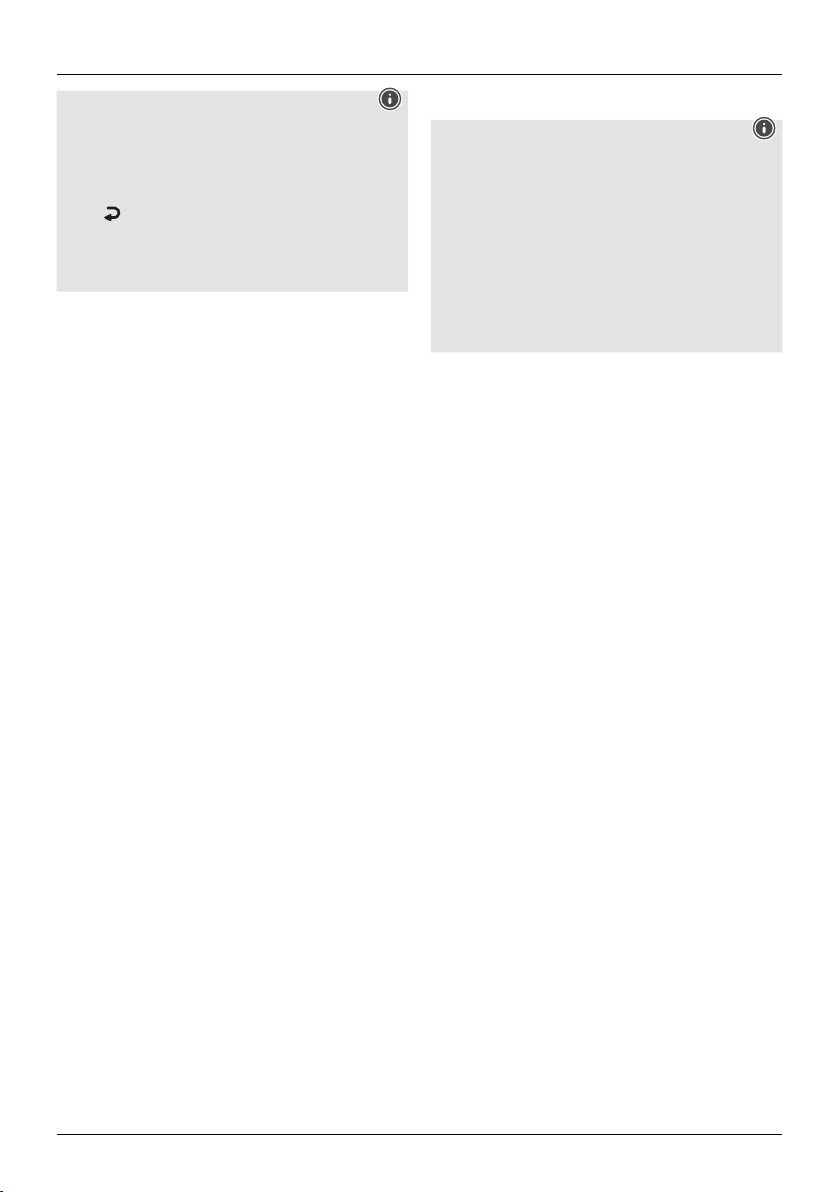
Notes on use
• The [OK] button and ► on the r
correspond to the [POWER/VOLUME/ENTER/
NAVIGATE] button (11) on the front of the radio.
• The ◄ button on the remote control corresponds to
the [ ] button on the front of the radio
• The ▲ ▼ buttons on the remote control correspond
to turning the navigation controller to the left and
right on the front of the radio.
Preparing the remote control for use
Open the cover on the battery compartment. This can
be found on the back of the remote control and can be
opened by sliding in the direction indicated.
The extent of delivery includes two AAA batteries which
must be inserted into the battery compartment for the
remote control to work. When inserting the batteries,
ensurethat they areinserted with the correct polarity.
The relevant polarity (+ /-)ismarked inside the battery
compartment.
Setting up anetwork connection
4.1 LAN (wired network)
• Connect the LAN connection of your router to the LAN
connection on your radio. Youwill requireanEthernet
cable, which is not included in the delivery,todothis.
• Make surethat the router is on and working properly,
and that you have an Internet connection.
• See the operating instructions for your router regarding a
properly functioning LAN connection.
• Then proceed as described in point 5, “Getting Started”.
4.2 WLAN (wireless network)
• Ensurethat the router is switched on, is functioning
correctly and that thereisaconnection to the internet.
• Activate the WLAN function of your router.
• Follow your router‘s operating instructions as regards the
correct functioning of the WLAN connection.
• Then proceed directly as described under section 5
‚Getting started‘.
emote control
5. Getting Started
Note -optimising reception
"DIT2006BT" has an antenna connection for external
antennas with acoaxial connection. Asuitable telescopic
antenna that allows DAB, DAB+ and FM reception is
included in the extent of delivery.Alternatively,you
can use an active or passive antenna to improve the
reception or to adapt it to your requirements.
Please note:
• Always pull the antenna out completely.
• We recommend you adjust the antenna vertically to
ensureoptimal reception.
5.1 General Notes on Use
5.1.1 Switch On /Off /Standby
• Press [POWER/VOLUME/ENTER/NAVIGATE](11) to
switch on the radio.
• Press and hold [POWER/VOLUME/ENTER/NAVIGATE]
(11) for 3seconds to switch the radio off (standby).
• To completely switch off the device, disconnect it from
the power supply.
5.1.2 Navigation and Control
• After pressing ashortcut button, navigate through the
menu items using.
• Select the individual menu items by turning [POWER/
VOLUME/ENTER/NAVIGATE](11).
• Conrm the selection by pressing [POWER/VOLUME/
ENTER/NAVIGATE](11).
5.1.3 Volume Adjustment
• Turn the volume up (right) or down (left) by turning
[POWER/VOLUME/ENTER/NAVIGATE](11)
accordingly.
4
Page 11
5.2 Switching ON
Warning
• Only operate the product from asocket that has been
approved for the device. The socket must be installed
close to the product and must be easily accessible.
• Disconnect the product from the power supply using
the On/Off switch –ifthis is not available, unplug the
power cordfromthe socket.
• If using amulti-socket power strip, make surethat the
total power consumption of all connected devices does
not exceed the power strip's maximum throughput
rating.
• If you will not be using the product for aprolonged
period, disconnect it from mains power.
• Connect the power supply to the mains connection (1)
on the back of the radio.
• Connect the network cable to aproperly installed and
easily accessible network socket.
• Wait until the radio has initialised fully.
• Press [POWER/VOLUME/ENTER/NAVIGATE](11) to
switch on the radio.
Note –switching on for the rst time
• The Setup Wizardstarts up automatically when the
radio is turned on for the rst time.
• The default used language is English.
• Youcan skip the Wizardand start it up again later in
German.
5.3 Language
The rst time it is used, the radio's default language is
English. To change radio's menu language, proceed as
follows:
• Press [
• Use [POWER/VOLUME/ENTER/NAVIGATE](11) to
• Conrm the selection by pressing [POWER/VOLUME/
• Use [POWER/VOLUME/ENTER/NAVIGATE](11) to
• Use [POWER/VOLUME/ENTER/NAVIGATE](11) to
• The language setting currently selected is marked with
](7) to access the Settings menu.
navigate to the "Settings" menu item.
ENTER/NAVIGATE](11).
navigate to the "Language" menu item. Conrm the
selection by pressing [POWER/VOLUME/ENTER/
NAVIGATE](11).
select your preferred system language.
an asterisk (*).
Note
• The following languages areavailable:
English, Danish, French, German, Italian, Norwegian,
Finnish, Swedish, Turkish, Polish, Dutch, Portuguese,
Spanish
6. Care and Maintenance
• Only clean this product with aslightly damp, lint-free
cloth and do not use aggressive cleaning agents.
• If you do not plan to use the product for aprolonged
period, turn off the device and disconnect it from the
power supply.Storeitinaclean, dry place away from
direct sunlight.
7. Warranty Disclaimer
Hama GmbH &CoKGassumes no liability and provides no
warranty for damage resulting from improper installation/
mounting, improper use of the product or from failureto
observe the operating instructions and/or safety notes.
8. Service and Support
Please contact Hama Product Consulting if you have any
questions about this product.
Hotline: +49 9091 502-115 (German/English)
Further support information can be found here:
www.hama.com
The fulltext of the manual is available at the following
internet address:
www.hama.com -> 00054238 -> Downloads
5
Page 12

9. Recycling Information
Note on environmental protection:
After the implementation of the European
Directives 2012/19/EU and 2006/66/EU in the
national legal system, the following applies:
electrical and electronic devices as well as
batteries must not be disposed of with household waste.
Consumers areobliged by law to return electrical and
electronic devices as well as batteries to the designated
public collection points or to the point of sale at the end
of their service lives. Detailed information on this topic is
dened in the national laws of the respective country.This
presence of the above symbol on the product, operating
instructions or package indicates that the product is
subject to these regulations. By recycling, reusing the
materials or other forms of utilising old devices/batteries,
you aremaking an important contribution to protecting
our environment.
10. Declaration of Conformity
Hama GmbH &CoKGhereby declares that the
radio equipment type [00054238] is in compliance
with Directive 2014/53/EU.The full text of the EU
declaration of conformity is available at the following
internet address:
www.hama.com -> 00054238 -> Downloads
Fr
equency band(s)
Bluetooth: 2.402 –2.480GHz 6.5 dBm(EIRP)
WiFi: 2.400 –2.480 GHz 15.5 dBm (EIRP)
WiFi: 5.150 –5.350 GHz 16.5 dBm (EIRP)
WiFi: 5.470 –5.725 GHz 16.5 dBm (EIRP)
WiFi: 5.725 –5.850 GHz 11 dBm (EIRP)
Restrictions or Requirements in
Belgium, Bulgaria, Czech Republic, Denmark, Germany,
Estonia, Ireland, Greece, Spain, France, Croatia, Italy,
Cyprus, Latvia, Lithuania, Luxembourg, Hungary,Malta,
the Netherlands, Austria, Poland, Portugal, Romania,
Slovenia, Slovakia, Finland, Sweden, United Kingdom
Maximum radio-frequency
power transmitted
To limit exposuretoelectromagnetic elds
This device is intended for use at adistance of at least
20 cm from the body of the user or persons nearby.This
device must not be worn or carried on the body.
Note
If channels 36-64 (channels of frequency
5150 MHz -5350 MHz) areused, the device may only be
used in closed rooms.
6
Page 13
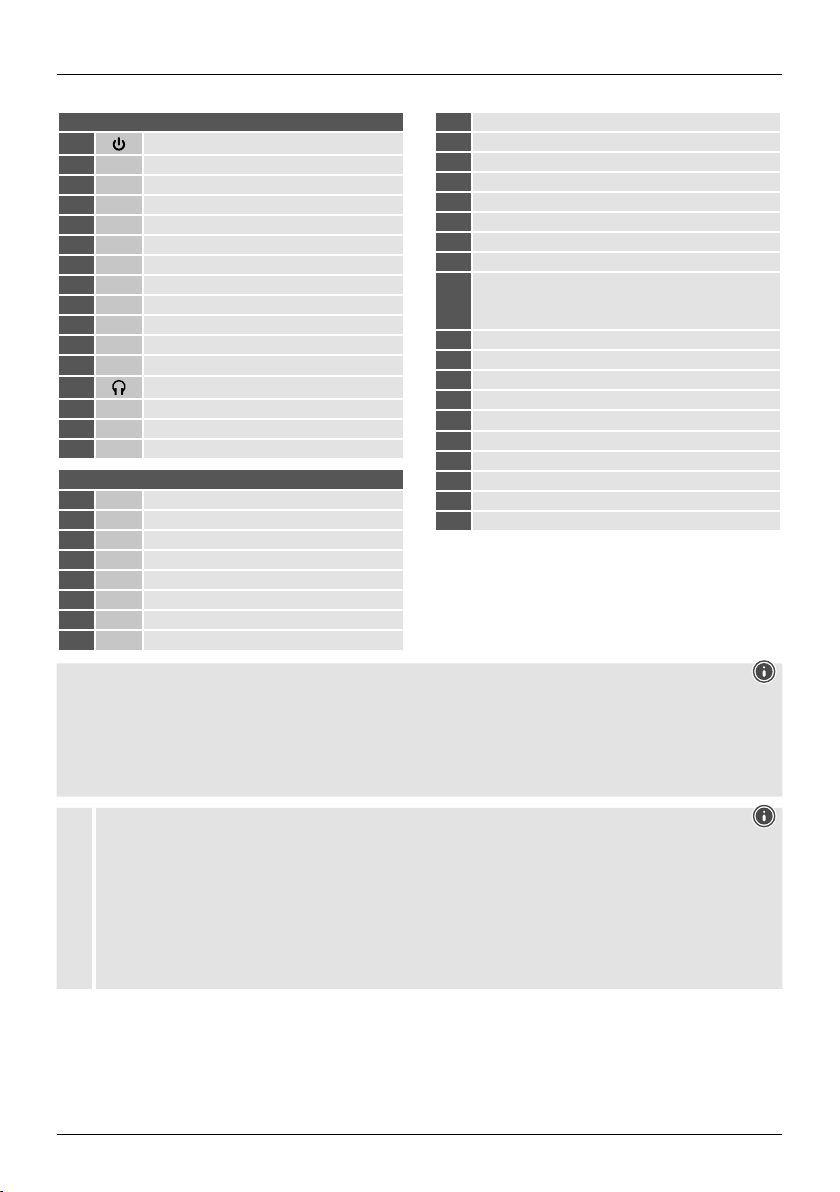
D Schnellstartanleitung
Bedienungselemente und Anzeigen
A: Radio Frontseite
1
2 AUX-In Buchse
3 [VOLUME] +/-
4 [PRESET] Rad
5 [MODE]-Taste
6 [ALARM]-Taste
7 [EQUALIZER] Taste
8 [MENU]-Taste
9 [INFO] Taste
10 [BACK] (Zurück)-Taste
11 Infrarotempfänger
12 [Navigation]
13
14 USB-Anschluss
15 2.8" Farbdisplay
16 LED
17 Netzzuleitung
18 Antenne*
19 WiFi/Bluetooth Antenne
20 Optischer Ausgang
21 Coaxial Ausgang
22 Stereo Cinch L/R Ausgang
23
24
Hinweis
*"DIT2006BT" verfügt über eine wechselbareAntenne. Sie können eine aktive oder passive Antenne verwenden,
welche über einen Koaxial-Anschluss verfügt.
** Der Drehregler verfügt über eine Doppelfunktion. Durch Drehen des Reglers ändern Sie die Lautstärke oder navigieren
durch die Menüstruktur.Durch Drücken dieses Drehreglers wirddas Gerät in den Standby-Modus versetzt bzw.eine
Auswahl bestätigt.
[POWER]-Taste
Kopfhörer Buchse
B: Radio Rückseite
Line-OUT (3.5mm)
LAN (10 /100 Mbit) Anschluss
Fernbedienung
1 [POWER]-Taste
2 [MUTE]-Taste
3 [PRESET]-Direkttasten (1-4)
4 [EQUALIZER]-Taste
5 [PRESET]-Listenansichttaste
6 [MENU]-Taste
7 [SOURCE]-Taste
8 [OK]-Taste
[NAVIGATIONS]-Tasten
9
▲ Hoch▼ Runter
◄ Links ► Rechts
10 [VOL-]-Taste
11 [VOL+]-Taste
12 [HOME]-Taste
13 [BACK]-Taste
14 [INFO]-Taste
15 [BACKLIGHT]-Taste
16 [PAUSE]-Taste
17 [PLAY]-Taste
18 [PREVIOUS]-Taste
19 [NEXT]-Taste
Wichtiger Hinweis -Kurzanleitung
• Dies ist eine Kurzanleitung,die Siemit den wichtigsten Basis-Informationenwie Sicherheitshinweisenund der
Inbetriebnahme IhresProduktesversorgt.
• Aus Gründen desUmweltschutzesund der Einsparung wertvollerRohstoffeverzichtet dieFirma Hamaauf eine
gedruckte Langanleitung und bietet diese ausschließlich alsPDF-Download an.
• Die vollständige Langanleitung istunter der folgendenInternetadresse verfügbar:
!
www.hama.com->00054238 -> Downloads
• SpeichernSie dieLanganleitungzum Nachschlagenauf Ihrem Computer und druckenSie diese nach Möglichkeitaus.
7
Page 14
1. Erklärung von Warnsymbolen und Hinweisen
Gefahr eines elektrischen Schlages
Dieses Symbol weist auf eine Berührungsgefahr mit nicht
isolierten Teilen des Produktes hin, die möglicherweise
eine gefährliche Spannung von solcher Höhe führen,
dass die Gefahr eines elektrischen Schlags besteht.
Warnung
Wirdverwendet, um Sicherheitshinweise zu
kennzeichnen oder um Aufmerksamkeit auf besondere
Gefahren und Risiken zu lenken.
Hinweis
Wirdverwendet, um zusätzlich Informationen oder
wichtige Hinweise zu kennzeichnen.
2. Packungsinhalt
• Digitaltuner DIT2006BT
• Cinchkabel (für Stereo Cinch L/R Ausgang)
• Fernbedienung
• 2x AAA Batterien
• Kurzanleitung
3. Sicherheitshinweise
• Das Produkt ist für den privaten, nicht-gewerblichen
Haushaltsgebrauch vorgesehen.
• Benutzen Sie das Produkt nicht in Bereichen, in denen
elektronische Produkte nicht erlaubt sind.
• Schützen Sie das Produkt vor Schmutz, Feuchtigkeit und
Überhitzung und verwenden Sie es nur in trockenen
Räumen.
• Dieses Produkt gehört, wie alle elektrischen Produkte,
nicht in Kinderhände!
• Lassen Sie das Produkt nicht fallen und setzen Sie es
keinen heftigen Erschütterungen aus.
• Betreiben Sie das Produkt nicht außerhalb seiner in den
technischen Daten angegebenen Leistungsgrenzen.
• Halten Sie Kinder unbedingt von dem
Verpackungsmaterial fern, es besteht Erstickungsgefahr.
• Entsorgen Sie das Verpackungsmaterial sofort gemäß
den örtlich gültigen Entsorgungsvorschriften.
• Nehmen Sie keine Veränderungen am Gerät vor.Dadurch
verlieren sie jegliche Gewährleistungsansprüche.
• Verwenden Sie das Produkt ausschließlich für den dazu
vorgesehenen Zweck.
• Betreiben Sie das Produkt nicht in unmittelbarer Nähe
der Heizung, anderer Hitzequellen oder in direkter
Sonneneinstrahlung.
• Verwenden Sie das Produkt nicht in einer feuchten
Umgebung und vermeiden Sie Spritzwasser.
• Verwenden Sie den Artikel nur unter moderaten
klimatischen Bedingungen.
Gefahr eines elektrischen Schlages
• Öffnen Sie das Produkt nicht und betreiben Sie es bei
Beschädigungen nicht weiter.
• Verwenden Sie das Produkt nicht, wenn der
AC-Adapter,das Adapterkabel oder die Netzleitung
beschädigt sind.
• Versuchen Sie nicht, das Produkt selbst zu warten oder
zu reparieren. Überlassen Sie jegliche Wartungs-arbeit
dem zuständigen Fachpersonal.
Warnung –Batterien
• Beachten Sie unbedingt die korrekte Polarität
(Beschriftung +und -) der Batterien und legen Sie
diese entsprechend ein. Bei Nichtbeachtung besteht
die Gefahr des Auslaufens oder einer Explosion der
Batterien.
• Verwenden Sie ausschließlich Akkus (oder Batterien),
die dem angegebenen Typentsprechen.
• Reinigen Sie vor dem Einlegen der Batterien die
Batteriekontakte und die Gegenkontakte.
• Gestatten Sie Kindern nicht ohne Aufsicht das
Wechseln von Batterien.
• Mischen Sie alte und neue Batterien nicht, sowie
Batterien unterschiedlichen Typs oder Herstellers.
• Entfernen Sie Batterien aus Produkten, die längereZeit
nicht benutzt werden (außer diese werden für einen
Notfallbereit gehalten).
• Schließen Sie die Batterien nicht kurz.
• Laden Sie Batterien nicht.
• Werfen Sie Batterien nicht ins Feuer.
• Bewahren Sie Batterien außerhalb der Reichweite von
Kindern auf.
• Batterien nie öffnen, beschädigen, verschlucken oder
in die Umwelt gelangen lassen. Sie können giftige und
umweltschädliche Schwermetalle enthalten.
• Entfernen und entsorgen Sie verbrauchte Batterien
unverzüglich aus dem Produkt.
• Vermeiden Sie Lagerung, Laden und Benutzung
bei extremen Temperaturen und extrem niedrigem
Luftdruck (wie z.B. in großen Höhen).
8
Page 15
4. Vor der Inbetriebnahme
Hinweis
Eine ausführliche Beschreibung der
UNDOK-App und des vollen
Funktionsumfangs nden Sie in unserem
UNDOK-Guide unter:
www.hama.com->00054238 ->Downloads
Bedienungshinweise
• Die Taste [OK]sowie ► auf der Fernbedienung
entspricht der Taste [POWER/VOLUME/ENTER/
NAVIGATE](11) auf der Frontseite des Radios.
• Die Taste ◄ auf der F
Taste [ ]auf der Frontseite des Radios
• Die Tasten
entsprechen dem Drehen nach links und rechts des
Navigationsreglers auf der Front des Radios.
Fernbedienung in Betrieb nehmen
Öffnen Sie die Abdeckung des Batteriefachs. Diese bendet
sich auf der Rückseite der Fernbedienung und kann
durch Schieben in die gekennzeichnete Richtung geöffnet
werden.
Zum Lieferumfang gehören zwei AAA-Batterien, welche
Sie für die Inbetriebnahme in das Batteriefach einlegen
müssen. Achten Sie beim Einlegen darauf,dass die
Batterien mit der richtigen Polarität eingelegt werden.
Die vorgegebene Polarität (+ /-)ist im Batteriefach
gekennzeichnet.
Netzwerkverbindung einrichten
4.1 LAN (kabelgebundenes Netzwerk)
• Verbinden Sie einen LAN Anschluss Ihres Routers mit
dem Ihres Radios. Sie benötigen dafür ein EthernetKabel, welches nicht zum Lieferumfang gehört.
• Stellen Sie sicher,dass der Router eingeschaltet ist,
korrekt funktioniert und Verbindung zum Internet
besteht.
• Beachten Sie bezüglich einer korrekten Funktion der
LAN-Verbindung die Bedienungsanleitung ihres Routers.
• Gehen Sie dann wie unter Punkt 5. „Inbetriebnahme“
beschrieben direkt weiter vor.
▲ ▼ auf der Fernbedienung
ernbedienung entspricht der
4.2 WLAN (kabelloses Netzwerk)
• Stellen Sie sicher,dass der Router eingeschaltet ist,
korrekt funktioniert und Verbindung zum Internet
besteht.
• Aktivieren Sie die WLAN Funktion ihres Routers.
• Beachten Sie bezüglich einer korrekten Funktion der
WLAN-Verbindung die Bedienungsanleitung ihres
Routers.
• Gehen Sie dann wie unter Pkt. 5„Inbetriebnahme“
beschrieben weiter vor.
5. Inbetriebnahme
Hinweis –optimaler Empfang
"DIT2006BT" verfügt über einen Antennenanschluss
für externe Antennen mit Coaxial-Anschluss. Im
Lieferumfang ist bereits eine passende Teleskopantenne
enthalten, welche Ihnen den Empfang über DAB,
DAB+ und FM ermöglicht. Alternativ können Sie
eine aktive oder passive Antenne verwenden, um
die Empfangsleistung zu verbessern oder Ihren
Anforderungen anzupassen.
Beachten Sie:
• Ziehen Sie die Antenne immer vollständig aus.
• Für einen optimalen Empfang empfehlen wir die
Antenne vertikal auszurichten.
5.1 Allgemeine Hinweise zur Bedienung
5.1.1 Ein- /Ausschalten/ Standby
• Drücken Sie [POWER/VOLUME/ENTER/NAVIGATE]
(11), um das Radio einzuschalten.
• Drücken und halten Sie [POWER/VOLUME/ENTER/
NAVIGATE](11) für ca. 3Sekunden, um das Radio
auszuschalten (Standby).
• Trennen Sie das Gerät von der Stromversorgung, um es
vollständig auszuschalten.
5.1.2 Navigation und Steuerung
• Navigieren Sie nach Druck auf eine Kurzwahltaste durch
die angebotenen Menüpunkte.
• Durch Drehen von [POWER/VOLUME/ENTER/
NAVIGATE](11) wählen Sie einzelne Menüpunkte aus.
• Durch Drücken von [POWER/VOLUME/ENTER/
NAVIGATE](11) bestätigen Sie die Auswahl.
5.1.3 Lautstärke anpassen
• Durch Drehen von [POWER/VOLUME/ENTER/
NAVIGATE](11) wirddie Lautstärke erhöht (rechts) oder
reduziert (links).
9
Page 16

5.2 Einschalten
Warnung
• Betreiben Sie das Produkt nur an einer dafür
zugelassenen Steckdose. Die Steckdose muss in der
Nähe des Produktes angebracht und leicht zugänglich
sein.
• Trennen Sie das Produkt mittels des Ein-/Ausschalters
vom Netz –wenn dieser nicht vorhanden ist, ziehen
Sie die Netzleitung aus der Steckdose.
• Achten Sie bei Mehrfachsteckdosen darauf,dass
die angeschlossenen Verbraucher die zulässige
Gesamtleistungsaufnahme nicht überschreiten.
• Trennen Sie das Produkt vom Netz, wenn Sie es
längereZeit nicht benutzen.
• Schließen Sie das Netzteil an der Netzzuleitung (1) auf
der Rückseite des Radios an.
• Verbinden Sie das Netzkabel mit einer ordnungsgemäß
installierten und leicht zugänglichen Netzsteckdose.
• Warten Sie, bis die Initialisierung des Radios
abgeschlossen ist.
• Drücken Sie die [POWER/VOLUME/ENTER/NAVIGATE]
(11), um das Radio einzuschalten.
Hinweis –beim ersten Einschalten
• Beim ersten Start wirdautomatisch der
Einrichtungsassistent (Setup Wizard) gestartet.
• Der Einrichtungsassistent wirdinenglischer Sprache
ausgeführt.
• Sie können den Assistenten überspringen und später in
deutscher Sprache erneut aufrufen.
5.3 Sprache
Bei Erstinbetriebnahme ist als Standardsprache des Radios
Englisch eingestellt. Um die eingestellte Menüsprache des
Radios zu ändern, gehen Sie wie folgt vor:
• Drücken Sie [
gelangen.
• Navigieren Sie mit Hilfe von [POWER/VOLUME/ENTER/
NAVIGATE](11) zum Menüpunkt „Settings“.
• Bestätigen Sie die Auswahl durch Drücken von [POWER/
VOLUME/ENTER/NAVIGATE](11).
• Navigieren Sie mit Hilfe von [POWER/VOLUME/
ENTER/NAVIGATE](11) zum Menüpunkt „Language“.
Bestätigen Sie die Auswahl durch Drücken von [POWER/
VOLUME/ENTER/NAVIGATE](11).
• Wählen Sie mit Hilfe von [POWER/VOLUME/ENTER/
NAVIGATE](11) Ihregewünschte Systemsprache aus.
• Die aktuell gewählte Spracheinstellung wirdmit *
gekennzeichnet.
](7), um in das Einstellungsmenü zu
Hinweis
• Folgende Sprachen stehen zur Auswahl:
Englisch, Dänisch, Französisch, Deutsch, Italienisch,
Norwegisch, Finnisch, Schwedisch, Türkisch, Polnisch,
Niederländisch, Portugiesisch, Spanisch
6. Wartung und Pflege
• Reinigen Sie dieses Produkt nur mit einem fusselfreien,
leicht feuchten Tuch und verwenden Sie keine
aggressiven Reiniger.
• Sollten Sie das Produkt längereZeit nicht nutzen,
schalten Sie das Gerät aus und trennen es von der
Stromversorgung. Lagern Sie es an einem sauberen,
trockenen Ort ohne direkte Sonneneinstrahlung.
7. Haftungsausschluss
Die Hama GmbH &CoKGübernimmt keinerlei Haftung
oder Gewährleistung für Schäden, die aus unsachgemäßer
Installation, Montage und unsachgemäßem Gebrauch
des Produktes oder einer Nichtbeachtung der
Bedienungsanleitung und/oder der Sicherheitshinweise
resultieren.
8. Service und Support
Bitte wenden Sie sich bei Fragen zum Produkt gerne an die
Hama-Produktberatung.
Hotline: +49 9091 502-115 (Deu/Eng)
WeitereSupportinformationen nden sie hier:
www.hama.com
Die vollständige Langanleitung ist unter der folgenden
Internetadresse verfügbar:
www.hama.com -> 00054238 -> Downloads
10
Page 17

9. Entsorgungshinweise
Hinweis zum Umweltschutz:
Ab dem Zeitpunkt der Umsetzung der
europäischen Richtlinien 2012/19/EU und
2006/66/EG in nationales Recht gilt folgendes:
Elektrische und elektronische Geräte sowie
Batterien dürfen nicht mit dem Hausmüllentsorgt werden.
Der Verbraucher ist gesetzlich verpichtet, elektrische und
elektronische Geräte sowie Batterien am Ende ihrer
Lebensdauer an den dafür eingerichteten, öffentlichen
Sammelstellen oder an die Verkaufsstelle zurückzugeben.
Einzelheiten dazu regelt das jeweilige Landesrecht. Das
Symbol auf dem Produkt, der Gebrauchsanleitung oder der
Verpackung weist auf diese Bestimmungen hin. Mit der
Wiederverwertung, der stoichen Verwertung oder
anderen Formen der Verwertung von Altgeräten/Batterien
leisten Sie einen wichtigen Beitrag zum Schutz unserer
Umwelt.
10. Konformitätserklärung
Hiermit erklärt die Hama GmbH &CoKG, dass der
Funkanlagentyp [00054238] der Richtlinie
2014/53/EU entspricht. Der vollständige Text der
EU-Konformitätserklärung ist unter der folgenden
Internetadresse verfügbar:
www.hama.com -> 00054238 -> Downloads
Fr
equenzband/
Frequenzbänder
Bluetooth: 2.402 –2.480GHz 6.5 dBm(EIRP)
WiFi: 2.400 –2.480 GHz 15.5 dBm (EIRP)
WiFi: 5.150 –5.350 GHz 16.5 dBm (EIRP)
WiFi: 5.470 –5.725 GHz 16.5 dBm (EIRP)
WiFi: 5.725 –5.850 GHz 11 dBm (EIRP)
Abgestr
ahlte maximale
Sendeleistung
Beschränkungen oder Anforderungen in
Belgien, Bulgarien, Tschechische Republik, Dänemark,
Deutschland, Estland, Irland, Griechenland, Spanien,
Frankreich, Kroatien, Italien, Zypern, Lettland, Litauen,
Luxemburg, Ungarn, Malta, Niederlande, Österreich,
Polen, Portugal, Rumänien, Slowenien, Slowakei, Finnland,
Schweden, Vereinigtes Königreich
Hinweis
Wenn Kanal 36-64 (Kanäle der Frequenz
5150 MHz -5350 MHz) verwendet wird, darf das Gerät
nur in geschlossenen Räumen verwendet werden.
Zur Begrenzung der Exposition gegen
elektromagnetische Felder
Dieses Gerät ist vorgesehen für die Verwendung in
einem Abstand von mindestens 20 cm zum Körper des
Benutzers oder Personen in der Nähe. Dieses Gerät darf
nicht am Körper getragen werden.
11
Page 18

F Guide de démarrage rapide
Éléments de commande et d'affichage
A: Radio Face avant
1
2 Prise AUX IN
3 [VOLUME] +/-
4 Molette [PRESET]
5 Touche [MODE]
6 Touche [ALARM]
7 Touche [EQUALIZER]
8 Touche [MENU]
9 Touche [INFO]
10 Touche [BACK] (retour)
11 Récepteur infrarouge
12 [Navigation]
13
14
15 Écran couleur 2.8"
16 LED
17 Alimentation
18 Antenne*
19 Antenne WiFi/Bluetooth
20 Sortie optique
21 Sortie coaxiale
22 Sortie stéréo RCAL/R
23
24
Remarque
*"DIT2006BT" dispose d’une antenne remplaçable. Vous pouvez utiliser une antenne active ou passive dotée d’une
connexion coaxiale.
Le bouton rotatif dispose d’une double fonction. Tournez le bouton pour modier le volume ou naviguer àtravers la
**
structuredes menus. Tournez ce bouton rotatif pour mettrel’appareil en mode de veille ou conrmer un choix.
Touche [POWER]
Prise casque
Connexion USB
B: Face arrière
Prise LINE OUT
Connexion LAN (10/100 Mbit)
Télécommande
1 Touche [POWER]
2 Touche [MUTE]
3 Touches Directes [PRESET] (1-4)
4 Touche [EQUALIZER]
5 Touche [PRESET]
6 Touche [MENU]
7 Touche [SOURCE]
8 Touche [OK]
Touche [NAVIGATIONS]
9
▲ Haut ▼ Bas
◄ Reculer ► Avancer
10 Touche [VOL-]
11 Touche [VOL+]
12 Touche [HOME]
13 Touche [BACK]
14 Touche [INFO]
15 Touche [BACKLIGHT]
16 Touche [PAUSE]
17 Touche [PLAY]
18 Touche [PREVIOUS]
19 Touche [NEXT]
Remarque importante -Guide rapide
• ceci est un guide rapide qui vous fournit les informations de base les plus importantes relatives aux consignes de
sécurité et àlamise en service de votreproduit.
• Pour des raisons de protection de l’environnement et de préservation de précieuses matières premières, la société
Hama renonce àl’impression d’un mode d’emploi complet et met celui-ci àdisposition exclusivement sous forme de
chier PDF.
!
• Le mode d’emploi complet est disponible àl’adresse Internet suivante :
www.hama.com -> 00054238 -> Téléchargements
• Sauvegardez ce mode d’emploi complet pour le consulter sur votreordinateur et imprimez-le si nécessaire.
12
Page 19

1. Explication des symboles d’avertissement et des
remarques
Risque d’électrocution
Ce symbole indique un risque de contact avec des
parties non isolées du produit susceptibles de conduire
un courant électrique capable de provoquer une
électrocution.
Avertissement
Ce symbole est utilisé pour indiquer des consignes de
sécurité ou pour attirer votreattention sur des dangers et
risques particuliers.
Remarque
Ce symbole est utilisé pour indiquer des informations
supplémentaires ou des remarques importantes.
2. Contenu de l’emballage
• Digitaltuner DIT2006BT
• Câble RCA(pour sortie stéréo RCAL/R)
• Télécommande
• 2piles LR03/AAA
• Notice d’utilisation
3. Consignes de sécurité
• Ce produit est destiné àunusage privé et non
commercial.
• N’utilisez pas le produit dans des zones où les produits
électroniques ne sont pas autorisés.
• Protégez le produit de toute saleté, humidité, surchauffe
et utilisez-le uniquement dans des locaux secs.
• Cet appareil, comme tout appareil électrique, doit être
gardé hors de portée des enfants !
• Protégez le produit des secousses violentes et évitez tout
choc ou toute chute.
• N’utilisez pas le produit en dehors des limites
de puissance indiquées dans les caractéristiques
techniques.
• Tenez les emballages d’appareils hors de portée des
enfants, risque d’étouffement.
• Recyclez les matériaux d’embal lage conformément aux
prescriptions locales en vigueur.
• N’apportez aucune modication àl’appareil. Toute
modication vous ferait perdrevos droits de garantie.
• L’emploi du produit est exclusivement réservé àsa
fonction prévue.
• N’utilisez pas l’appareil àproximité immédiate d’un
chauffage, d’autres sources de chaleur ou àlalumière
directe du soleil.
• N’utilisez pas l’appareil dans un environnement humide
et évitez les projections d’eau.
• Utilisez l’article dans des conditions climatiques
modérées uniquement.
Risque d’électrocution
• Ne tentez pas d’ouvrir le produit en cas de
détérioration et cessez de l’utiliser.
• N’utilisez pas l’appareil si
l’adaptateur secteur,lecâble de l’adaptateur ou le
cordon d’alimentation est endommagé.
• Ne tentez pas de réparer l’appareil vous-même ni
d’effectuer des travaux d’entretien. Déléguez les
travaux d’entretien àdes techniciens qualiés.
Avertissement –Piles
• Respectez impérativement la polarité des piles
(indications +et-)lors de leur insertion dans le boîtier.
Risques d’écoulement et d’explosion des piles si tel
n’est pas le cas.
• Utilisez exclusivement des batteries (ou des piles) du
type indiqué.
• Avant d’insérer les piles, nettoyez-en les contacts, ainsi
que les contacts d’accouplement.
• N’autorisez pas des enfants àremplacerles piles d’un
appareil sans surveillance.
• N’utilisez pas simultanément des piles usagées et des
piles neuves ou des piles de différents types.
• Retirez les piles des produits que vous ne comptez pas
utiliser pendant un certain temps (à l’exception de ceux
qui peuvent êtreutilisés en cas d’urgence).
• Ne court-circuitez pas les piles.
• Ne tentez pas de recharger les piles.
• Ne jetez pas de piles au feu.
• Conservez les piles hors de portée des enfants.
• Ne tentez pas d’ouvrir les piles, faites attention àne
pas les endommager,les jeter dans l’environnement
et àceque des jeunes enfants ne les avalent pas. Les
piles sont susceptibles de contenir des métaux lourds
toxiques et nocifs pour l’environnement.
• Retirez les piles usagées immédiatement du produit et
mettez-les au rebut immédiatement.
• Évitez de stocker,charger et utiliser le produit
àdes températures extrêmes et àune pression
atmosphérique extrêmement basse (à haute altitude,
par exemple).
13
Page 20

4. Avant la mise en service
Remarque
Vous trouverez une description détaillée
de notreapplication UNDOK et de toutes
les fonctionnalités dans notre
guide UNDOK àl’adresse :
4.2 WiFi (réseau sans fil)
• Veuillez contrôler que le routeur est bien sous tension,
qu'il fonctionne normalement et que la connexion
internet est bien établie.
• Activez la fonction WiFi de votrerouteur.
• Veuillez consulter le mode d'emploi de votrerouteur pour
toute question concernant la connexion WiFi (réseau
sans l).
• Continuez àl'étape 5«Mise en service ».
5. Mise en service
www.hama.com->00054238 ->Téléchargements
Consignes d’utilisation
• Les touches [OK]et►de la télécommande
correspondent àlatouche [POWER/VOLUME/
ENTER/NAVIGATE](11) sur la face avant de la radio.
• La touche ◄ de la télécommande corr
touche [ ]sur la face avant de la radio
• Les touches ▲ ▼ de la télécommande
correspondent àune rotation vers la gauche et vers
la droite du bouton de navigation de la face avant de
la radio.
Mise en service de la télécommande
Ouvrez le couvercle du compartiment des piles. Celui-ci se
trouve àl’arrièredelatélécommande et peut êtreouvert
en le faisant glisser dans le sens indiqué.
La livraison comprend deux piles AAA que vous devez
insérer dans le compartiment des piles pour la mise en
service. Lors de l’insertion des piles, veillez àcequ’elles
soient insérées avec la polarité correcte. La polarité
préréglée (+ /-)est indiquée dans le compartiment des
piles.
Établissement des la connexion réseau
4.1 Réseau local (LAN)
• Branchez la radio àune connexion réseau local (LAN)
de votrerouteur.Vousaurez besoin d‘un câble Ethernet
pour effectuer cette connexion ;cecâble n‘est pas livré
avec le produit.
• Veuillez contrôler que le routeur est bien sous tension,
qu‘il fonctionne normalement et que la connexion
internet est bien établie.
• Veuillez consulter le mode d‘emploi de votrerouteur pour
toute question concernant la connexion LAN (réseau
local).
• Continuez àl‘étape 5«Mise en service ».
espond àla
Remarque –Réception optimale
"DIT2006BT" dispose d’un connecteur d’antenne pour
des antennes externes avec connecteur coaxial. Une
antenne télescopique adaptée est livrée avec le produit ;
cette antenne permet une réception DAB, DAB+ et FM.
Sinon, vous pouvez utiliser une antenne active ou passive
and’améliorer la réception ou de l’ajuster en fonction
de vos besoins.
Veillez à
• déployer l’antenne entièrement.
• Nous vous recommandons de placer l’antenne àla
verticale andegarantir une réception optimale.
5.1 Remarques générales concernant la commande
5.1.1 Mise sous/hors tension/Veille
• Appuyez sur [POWER/VOLUME/ENTER/NAVIGATE]
(11) pour allumer la radio.
• Maintenez appuyé [POWER/VOLUME/ENTER/
NAVIGATE](11) pendant environ 3secondes pour
éteindrelaradio (Veille).
• Coupez l’alimentation de l’appareil pour l’éteindre
complètement.
5.1.2 Navigation et commande
• Après avoir appuyé sur une touche rapide, naviguez dans
les entrées de menu proposées avec le bouton.
• En tournant [POWER/VOLUME/ENTER/NAVIGATE]
(11), vous sélectionnerez les entrées du menu.
• En appuyant sur [POWER/VOLUME/ENTER/NAVIGATE]
(11), vous conrmerez votresélection.
5.1.3 Réglage du volume
• Tourner le bouton [POWER/VOLUME/ENTER/
NAVIGATE](11) pour augmenter (droite) ou réduire
(gauche) le volume.
14
Page 21

5.2 Mise sous tension
Avertissement
• Branchez l’appareil uniquement àune prise de
courant appropriée. La prise de courant doit être
située àproximité de l’appareil et doit êtrefacilement
accessible.
• Coupez l’appareil du secteur àl’aide de l’interrupteur
-débranchez la prise de courant en cas d’absence
d’interrupteur.
• En cas de prises multiples, veillez àceque les
appareils consommateurs branchés ne dépassent pas
la puissance absorbée totale admissible.
• Débranchez l’appareil si vous ne l’utilisez pas sur une
période prolongée.
• Branchez l’adaptateur secteur au cordon d’alimentation
(1) àl’arrièredelaradio.
• Branchez le cordon d’alimentation àune prise de
courant conformément installée et facile d’accès.
• Attendez que l’initialisation de la radio soit terminée.
• Appuyez sur [POWER/VOLUME/ENTER/NAVIGATE]
(11), pour allumer la radio.
Remarque –àlapremièremise en service
• Un assistant de conguration (Setup Wizard) démarre
automatiquement lors du premier démarrage.
• L’ assistant de conguration est en anglais.
• Vous pouvez ignorer l’assistant, puis le lancer
ultérieurement dans la langue française.
5.3 Langue
L’anglais est la langue par défaut de la radio lors de sa
premièremise en service. Pour modier la langue du menu
de la radio procédez comme suit :
• Appuyez sur [
Paramètres.
• Àl’aide de [POWER/VOLUME/ENTER/NAVIGATE]
(11), naviguez vers l’entrée de menu "Settings".
• Conrmez la sélection appuyant sur [POWER/VOLUME/
ENTER/NAVIGATE](11).
• Naviguez àl’aide de [POWER/VOLUME/ENTER/
NAVIGATE](11) vers le point de menu "Language".
Conrmez la sélection appuyant sur [POWER/VOLUME/
ENTER/NAVIGATE](11).
• Sélectionnez votrelangue préférée àl’aide de [POWER/
VOLUME/ENTER/NAVIGATE](11).
• Le réglage de langue actuellement sélectionné est
indiqué par *.
](7) pour allumer vous rendreaumenu
Remarque
• Vous pouvez choisir entreles langues suivantes :
anglais, danois, français, allemand, italien, norvégien,
nnois, suédois, turc, polonais, dutch, portoguese,
spanish
Pour limiter l’exposition aux champs
électromagnétiques
Cet appareil est prévu pour êtreutilisé àune distance
d’au moins 20 cm du corps de l’utilisateur ou des
personnes se trouvant àproximité. Cet appareil ne doit
pas êtreporté près du corps.
6. Maintenance et entretien
• Nettoyez ce produit uniquement àl’aide d’un chiffon
non breux légèrement humide ;évitez tout détergent
agressif.
• Si vous deviez ne pas utiliser le produit pendant une
période prolongée, éteignez l’appareil et débranchez-le
de l’alimentation électrique. Stockez-le àunendroit
propreetsec et évitez toute exposition directe au soleil.
7. Exclusion de garantie
La société Hama GmbH &CoKGdécline toute
responsabilité en cas de dommages causés par une
installation, un montage ou une utilisation non conforme
du produit ou encorepar un non-respect du mode
d’emploi et/ou des consignes de sécurité.
8. Service clientèle et assistance
En cas de question concernant le produit, veuillez vous
adresser au service de conseil produits de Hama.
Ligne téléphonique directe :+49 9091 502-115
(allemand/anglais)
Vous trouverez des informations d’assistance
complémentaires ici :
www.hama.com
Le mode d’emploi complet est disponible àl’adresse
Internet suivante :
www.hama.com -> 00054238 -> Téléchargements
15
Page 22

9. Consignes de recyclage
Remarques concernant la protection de
l’environnement :
Conformément aux directives européennes
2012/19/UE et 2006/66/CE, les règles suivantes
doivent êtreappliquées dans le droit national :les
appareils électriques et électroniques ainsi que les
piles ne doivent pas êtreéliminés avec les déchets
ménagers. Le consommateur est tenu par la loi de
retourner les produits électriques et électroniques ainsi que
les piles usagés aux points de collecte publics prévus àcet
effet ou il peut les rapporter dans un point de vente. Les
détails àcesujet sont régis par la législation de chaque
pays. Le pictogramme "picto" présent sur le produit, son
manuel d’utilisation ou son emballage indique que le
produit est soumis àcette réglementation. En permettant
le recyclage des matériaux et des piles ou toute autre
forme de valorisation d’anciens appareils, le
consommateur apporte une contribution importante àla
protection de notreenvironnement.
10. Déclaration de conformité
La Hama GmbH &CoKG, déclarepar la présente
que l’équipement radioélectrique du type
[00054238] est conforme àladirective 2014/53/
UE. Le texte complet de la déclaration UE de conformité
est disponible àl’adresse internet suivante :
www.hama.com -> 00054238 -> Téléchargements
Bandes de fréquences
Bluetooth: 2.402 –2.480 GHz6.5 dBm(EIRP)
WiFi: 2.400 –2.480 GHz 15.5 dBm (EIRP)
WiFi: 5.150 –5.350 GHz 16.5 dBm (EIRP)
WiFi: 5.470 –5.725 GHz 16.5 dBm (EIRP)
WiFi: 5.725 –5.850 GHz 11 dBm (EIRP)
Puissance de
radiofréquence maximale
Restrictions ou exigences en
Belgique, Bulgarie, République tchèque, Danemark,
Allemagne, Estonie, Irlande, Grèce, Espagne, France,
Croatie, Italie, Chypre, Lettonie, Lituanie, Luxembourg,
Hongrie, Malte, Pays-Bas, Autriche, Pologne, Portugal,
Roumanie, Slovénie, Slovaquie, Finlande, Suède,
Royaume-Uni
Remarque
Si les canaux 36 -64(fréquence
5150 MHz –5350 MHz) sont employés, ce produit ne
doit êtreutilisé que dans des espaces fermés.
Pour limiter l’exposition aux champs
électromagnétiques
Cet appareil est prévu pour êtreutilisé àune distance
d’au moins 20 cm du corps de l’utilisateur ou des
personnes se trouvant àproximité. Cet appareil ne doit
pas êtreporté près du corps.
16
Page 23

E Guía de inicio rápido
Elementos de manejo eindicadores
A: Radio Lado frontal
1
2 Conector hembraAUX-In
3 [VOLUME] +/-
4 Rueda [PRESET]
5 Tecla [MODE]
6 Tecla [ALARM]
7 Tecla [EQUALIZER]
8 Tecla [MENU]
9 Tecla [INFO]
10 Tecla [BACK] (volver)
11 Receptor de infrarrojos
12 [Navigation]
13
14
15 Pantalla acolor de 2.8"
16 LED
17 Cable de corriente
18 Antena*
19 Antena WiFi/Bluetooth
20 Salida óptica
21 Salida coaxial
22 Salida L/R RCAestéreo
23
24
Tecla [POWER]
Entrada paraauriculares
Puerto USB
B: Radio Parte posterior
Conector hembraLine-Out
Puerto LAN (10/100 Mbit)
Mando adistancia
1 Tecla [POWER]
2 Tecla [MUTE]
3 Teclas Directas [PRESET] (1-4)
4 Tecla [EQUALIZER]
5 Tecla [PRESET]
6 Tecla [MENU]
7 Tecla [SOURCE]
8 Tecla [OK]
Teclas [NAVIGATIONS]
9
▲ ARRIBA ▼ ABAJO
◄ RETROCESO ► AVANCE
10 Tecla [VOL-]
11 Tecla [VOL+]
12 Tecla [HOME]
13 Tecla [BACK]
14 Tecla [INFO]
15 Tecla [BACKLIGHT]
16 Tecla [PAUSE]
17 Tecla [PLAY]
18 Tecla [PREVIOUS]
19 Tecla [NEXT]
Nota
*"DIT2006BT" tiene una antena intercambiable. Puede utilizar una antena activa opasiva que disponga de una
conexión coaxial.
El regulador giratorio tiene una función doble. Girando el regulador podrá modicar el volumen odesplazarse por
**
la estructuradel menú. Pulsando el regulador giratorio, el dispositivo pasa al modo standby oseconrma una
selección.
Nota importante sobrelaguía de inicio rápido
• Este documento es una guía de inicio rápido que recoge la información básica más importante, como indicaciones
de seguridad ocómo poner en funcionamiento el producto.
• Pormotivos de protección medioambiental ycon el ndeahorrar materias primas valiosas, la empresa Hama
prescinde de un manual de instrucciones impreso, ofreciéndolo exclusivamente en formato PDF descargable.
• El manual de instrucciones íntegroestá disponible en la siguiente dirección de Internet:
!
www.hama.com -> 00054238 -> Downloads
• Guarde el manual de instrucciones en su ordenador paraconsultarlo cuando sea necesario eimprímalo si es posible.
17
Page 24

1. Explicación de los símbolos de aviso ydelas
indicaciones
Peligrodesufrir una descarga eléctrica
Este símbolo hace referencia al peligrodecontacto con
partes no aisladas del producto que pueden conducir
una tensión peligrosa de una intensidad tal que puede
provocar una descarga eléctrica.
Aviso
Se utiliza paraindicar indicaciones de seguridad opara
llamar la atención sobrepeligros yriesgos especiales.
Nota
Se utiliza paraindicar información adicional o
indicaciones importantes.
2. Contenido del paquete
• Digital-HiFi-Tuner DIT2006BT
• Cable RCA(parasalida L/R RCAestéreo)
• Mando adistancia
• 2pilas AAA
• Guía de inicio rápido
3. Indicaciones de seguridad
• Este producto está previsto parausarlo en el ámbito
privado ynocomercial del hogar.
• No utilice el producto en áreas donde no se permitan
aparatos electrónicos.
• Proteja el producto de la suciedad, la humedad y
el sobrecalentamiento yutilícelo solo en espacios
secos.
• Este producto, como todos los productos eléctricos, no
debe estar en manos de los niños.
• No deje caer el producto ni lo someta asacudidas
fuertes.
• No utilice el producto fueradelos límites de potencia
indicados en los datos técnicos.
• Mantenga el material de embalaje fueradel alcance de
los niños, ya que existe peligrodeasxia.
• Deseche el material de embalaje de conformidad con las
normativas locales vigentes en materia de eliminación
de desechos.
• No realice cambios en el aparato; ello conllevaría la
pérdida de todos los derechos de garantía.
• Utilice el producto exclusivamente paraelnprevisto.
• No utilice el producto junto asistemas de calefacción,
otras fuentes de calor ni expuesto alaluz solar directa.
• No utilice el producto en entornos húmedos yevite el
contacto con las salpicaduras de agua.
• Use el artículo únicamente cuando las condiciones
climáticas sean moderadas.
Peligrodesufrir una descarga eléctrica
• No abraelproducto ni siga utilizándolo en caso de
presentar daños.
• No use el producto si el
adaptador de CA,elcable del adaptador oelcable de
alimentación están dañados.
• No intente mantener ni reparar el producto por
cuenta propia. Encomiende cualquier trabajo de
mantenimiento al personal especializado competente
en la materia.
Aviso sobrelas pilas
• Asegúrese siempre de que la polaridaddelas pilas
sea correcta (inscripciones +y−)ycolóquelas según
corresponda. La no observación de lo anteriorconlleva el
riesgo de derrame oexplosión de laspilas.
• Utilice exclusivamentebaterías(opilas)del tipo
especicado.
• Antes de colocar las pilas,limpie loscontactos ylos
contracontactos de lasmismas.
• No permitaalos niñoscambiar laspilas sinlasupervisión
de unapersona adulta.
• No mezclepilas viejas ynuevas ni tampoco pilas de tipos
ofabricantes diferentes.
• Retirelas pilas de aquellos productosque no vayan a
usarsedurante un tiempo prolongado(anoser queestos
deban permanecer operativos para casos de emergencia).
• No cortocircuitelas pilas.
• No cargue laspilas.
• No arrojelas pilas al fuego.
• Mantengalas pilasfueradel alcance de los niños.
• Nunca abra, dañe ni ingierapilas ni tampoco las deseche
en el medioambiente. Pueden contener metalespesados
tóxicos ydañinosparaelmedioambiente.
• Retireydeseche deinmediato las pilas gastadas del
producto.
• Evite almacenar,cargar yutilizar el despertador
atemperaturas extremas ycon presiones de aire
exageradamente bajas (p. ej. bajas temperaturas).
18
Page 25

4. Antes de la puesta en funcionamiento
Nota
Encontrará una descripción detallada de la
aplicación UNDOK ydetodas las
guía de UNDOK, alaque podrá acceder en la página
Instrucciones de manejo
• Tanto el botón [OK] como el botón ► del mando
adistancia se corresponden con el botón [POWER/
VOLUME/ENTER/NAVIGATE](11) de la parte frontal
de la radio.
• El botón ◄ del mando adistancia se corr
con el botón [ ]delaparte frontal de la radio.
• Losbotones
corresponden con un girohacia la izquierda yla
derecha del regulador de navegación, ubicado en la
parte frontal de la radio.
Puesta en funcionamiento del mando adistancia
Abralacubierta del compartimento de las pilas. La
cubierta está ubicada en la parte traseradel mando a
distancia ypuede abrirse deslizándola en la dirección
indicada.
En el volumen de suministroseincluyen dos pilas AAA,
que deberá colocar en el compartimento de las pilas
paraponer el mando en funcionamiento. Al colocarlas,
asegúrese de que la polaridad sea correcta (la polaridad
[+/-] está indicada en el interior del compartimento de las
pilas).
Congurar la conexión de red
4.1 LAN (red alámbrica)
• Conecte el puerto LAN de su router con el de su radio.
Para ello necesitará un cable Ethernet, que no se incluye
en el volumen de suministro.
• Asegúrese de que el router está encendido, que funciona
correctamente ydeque hay establecida una conexión a
Internet.
• En lo referente al correcto funcionamiento de la conexión
LAN, observe las instrucciones de manejo de su router.
• Continúe entonces directamente según se indica en el
punto 5.«Puesta en funcionamiento».
funcionalidades en nuestra
web indicada abajo:
www.hama.com->00054238 ->Downloads
esponde
▲ ▼ del mando adistancia se
4.2 WLAN (red inalámbrica)
• Asegúrese de que el router está encendido, que funciona
correctamente ydeque hay establecida una conexión a
Internet.
• Active la función NFC de su router.
• En lo referente al correcto funcionamiento de la conexión
WLAN, observe las instrucciones de manejo de su router.
• Continúe entonces directamente según se indica en el
punto 5.«Puesta en funcionamiento».
5. Puesta en funcionamiento
Nota sobreuna recepción óptima
"DIT2006BT" incorporauna conexión de antena para
antenas externas con conexión coaxial. El volumen de
suministroincluye una antena telescópica adecuada para
recibir radio DAB, DAB+ yFM. También puede usar una
antena activa opasiva paramejorar la capacidad de
recepción oadaptarse asus necesidades especícas.
Tenga en cuenta lo siguiente:
• Siempreextraiga la antena por completo.
• Para que la recepción sea óptima, le recomendamos
orientar la antena verticalmente.
5.1 Notas generales sobre el manejo
5.1.1. Encendido, apagado ystandby
• Pulse [POWER/VOLUME/ENTER/NAVIGATE](11) para
encender la radio.
• Pulse ymantenga presionado [POWER/VOLUME/
ENTER/NAVIGATE](11) durante unos tres segundos
paraapagar la radio (modo standby).
• Desconecte el aparato de la alimentación de corriente
paraapagarlo totalmente.
5.1.2 Navegación ycontrol
• Tras pulsar un botón de marcación abreviada, navegue
por las opciones de menú que se ofrecen.
• Girando [POWER/VOLUME/ENTER/NAVIGATE](11)
podrá seleccionar elementos de menú concretos.
• Pulsando [POWER/VOLUME/ENTER/NAVIGATE] (11)
podrá conrmar la selección.
5.1.3 Ajuste del volumen
• Girando [POWER/VOLUME/ENTER/NAVIGATE] (11) se
sube el volumen (derecha) osebaja (izquierda).
19
Page 26

5.2 Encendido
Aviso
• Utilice el producto solo conectado auna toma de
corriente autorizada. La toma de corriente debe estar
colocada cerca del producto; asimismo, debe ser
fácilmente accesible.
• Desconecte el producto de la redeléctrica mediante
el interruptor de encendido yapagado (de no existir
este, desenchufe el cable de alimentación de la toma
de corriente).
• Si dispone de tomas de corriente múltiples, asegúrese
de que los aparatos eléctricos conectados no
sobrepasen el consumo total de potencia admisible.
• Desconecte el producto de la redsinovaautilizarlo
durante un tiempo prolongado.
• Conecte la fuente de alimentación al cable de
alimentación (1) situado en el lado posterior de la radio.
• Conecte el cable de corriente con una toma de corriente
correctamente instalada yfácilmente accesible.
• Esperehasta que nalice la inicialización de la radio.
• Pulse [POWER/VOLUME/ENTER/NAVIGATE](11) para
encender la radio.
Nota: al encender el aparatopor primeravez
• Cuando se enciende por primeravez, se inicia
automáticamente el asistente de conguración (Setup
Wizard).
• El asistente de conguración se ejecuta en el idioma
inglés.
• Puede saltarse el asistente yabrirlo posteriormente en
español.
5.3 Idioma
Al poner en funcionamiento la radio por primeravez, el
idioma predeterminado es el inglés. Para modicar el
idioma de menú establecido, proceda como se describe a
continuación:
• Pulse [
• Use [POWER/VOLUME/ENTER/NAVIGATE](11) para
• Conrme la selección pulsando [[POWER/VOLUME/
• Use [POWER/VOLUME/ENTER/NAVIGATE](11) para
• Use [POWER/VOLUME/ENTER/NAVIGATE](11)
](7) paraacceder al menú de ajustes.
desplazarse hasta el elemento de menú «Settings».
ENTER/NAVIGATE](11).
desplazarse hasta el elemento de menú «Language».
Conrme la selección pulsando [[POWER/VOLUME/
ENTER/NAVIGATE](11).
paraseleccionar el idioma que quieraestablecer en el
sistema.
• El ajuste de idioma seleccionado actualmente se indicará
con un asterisco (*).
Nota
• Pueden seleccionarse los siguientes idiomas:
inglés, danés, francés, alemán, italiano, noruego, nés,
sueco, turco, polaco, holandés, portugués, español
6. Mantenimiento ycuidado
• Limpie este producto solo con un paño ligeramente
humedecido que no deje pelusas ynoutilice detergentes
agresivos.
• Si no va autilizar el producto durante un periodo
prolongado de tiempo, apague el aparato y
desconéctelo de la alimentación de corriente. Guárdelo
en un lugar limpio yseco que no esté expuesto ala
radiación directa del sol.
7. Exclusión de responsabilidad
La empresa Hama GmbH &CoKGnose responsabiliza
ni concede garantía alguna por los daños que se deriven
de una instalación, montaje omanejo incorrectos del
producto opor la inobservancia de las instrucciones de
uso odelas indicaciones de seguridad.
8. Servicio yasistencia
Si tiene alguna pregunta sobreelproducto, puede ponerse
en contacto con el departamento de asesoramiento de
productos de la empresa Hama.
Línea directa: +49 9091 502-115 (alemán einglés)
Encontrará más información sobreelservicio de asistencia
en el siguiente sitio web:
www.hama.com
El manual de instrucciones íntegroestá disponible en la
siguiente dirección de Internet:
www.hama.com -> 00054238 -> Downloads
20
Page 27

9. Instrucciones para desecho yreciclaje
Nota sobre la protección medioambiental:
Desde la implementación de la Directiva europea
2012/19/UE y2006/66/CE en el sistema legislativo
nacional, se aplica lo siguiente: Losaparatos
eléctricos yelectrónicos, así como las pilas ylos
acumuladores, no se deben eliminar junto con la basura
doméstica. El usuario está legalmente obligado allevar los
aparatos eléctricos yelectrónicos, así como las pilas ylos
acumuladores alos puntos de recogida públicos oa
devolverlos al punto de venta donde los adquirió al nal
de su vida útil. Las particularidades al respecto están
estipuladas en las distintas legislaciones nacionales. El
símbolo ubicado sobreelproducto, en las instrucciones de
uso oenelembalaje hace referencia alas disposiciones
legales mencionadas. Gracias al reciclaje, la recuperación
de materiales uotras formas de recuperación de residuos
de aparatos eléctricos yelectrónicos ypilas y
acumuladores usados, usted contribuye de manera
importante alaprotección de nuestromedio ambiente.
10. Declaración de conformidad
Porlapresente, la empresa Hama GmbH &CoKG
declaraque el tipo de equipo radioeléctrico
[00054238] es conforme con la Directiva 2014/53/
UE. El texto completo de la declaración UE de conformidad
está disponible en la siguiente dirección de Internet:
www.hama.com -> 00054238 -> Downloads
Banda obandas de
frecuencia
WiFi: 2.400 –2.480 GHz 15.5 dBm (EIRP)
WiFi: 5.150 –5.350 GHz 16.5 dBm (EIRP)
WiFi: 5.470 –5.725 GHz 16.5 dBm (EIRP)
WiFi: 5.725 –5.850 GHz 11 dBm (EIRP)
Potencia máxima de
radiofrecuencia
Restricciones oRequisitos en
Bélgica, Bulgaria, República Checa, Dinamarca, Alemania,
Estonia, Irlanda, Grecia, España, Francia, Croacia, Italia,
Chipre, Letonia, Lituania, Luxemburgo, Hungría, Malta,
Países Bajos, Austria, Polonia, Portugal, Rumanía,
Eslovenia, Eslovaquia, Finlandia, Suecia, Reino Unido
Nota
Si se usa cualquier canal entreel36yel64(canales de
frecuencia de
5150 MHz-5350 MHz), solo se permite usar el dispositivo
en espacios cerrados.
Para limitar la exposición alos campos
electromagnéticos
Este aparato está destinado aser utilizado auna
distancia mínima de 20 cm del cuerpo del usuario ode
las personas que se encuentren en las proximidades. Este
aparato no debe llevarse en el cuerpo.
21
Page 28

R Краткое руководство по запуску
Органы управления ииндикации
A: Радиоприемник Передняя панель
1
2 Разъем AUX-In
3 [VOLUME] +/-
4 Переключатель [PRESET]
5 Кнопка [MODE]
6 Кнопка [ALARM]
7 Кнопка [EQUALIZER]
8 Кнопка [MENU]
9 Кнопка [INFO]
10 Кнопка [BACK] (Назад)
11 ИК-приемник
12 [Navigation]
13
14
15 Цветной дисплей 2.8"
16 LED
17 Проводпитания
18 Антенна*
19 антенна WiFi/Bluetooth
20 Оптический выход
21 Коаксиальный выход
22 Стерео, разъем «тюльпан», выход Л/П
23
24
Примечание
*"DIT2006BT" оснащено сменной антенной. Можно использовать активную или пассивную антенну с
коаксиальным разъемом.
Поворотный регулятор выполняет двойную функцию. Поворачивая его, можно изменять громкость или
**
осуществлять навигацию по меню. Нажатием на него устройство можно переводить врежим ожидания или
подтверждать тот или иной выбор.
Кнопка [POWER]
Разъем для наушников
Разъем USB
Задняя панель
Разъем Line-Out
Разъем LAN (10/100 Mbit)
Пульт дистанционного управления
1 Кнопка [ПИТАНИЕ]
2 Кнопка [ВЫКЛЮЧИТЬ МИКРОФОН]
3 Кнопки [ПРЕСЕТ](1-4)
4 Кнопка [ЭКВАЛАЙЗЕР]
5 Кнопка [ПРЕСЕТ]
6 Кнопка [МЕНЮ]
7 Кнопка [ИСТОЧНИК]
8 Кнопка [OK]
Кнопки [НАВИГАЦИЯ]
9
▲ Вверх ▼ Вниз
◄ Назад ► Вперед
10 Кнопка [ГРОМКОСТЬ-]
11 Кнопка [ГРОМКОСТЬ+]
12 Кнопка [ГЛАВНАЯ]
13 Кнопка [НАЗАД]
14 Кнопка [ИНФО]
15 Кнопка [ПОДСВЕТКА]
16 Кнопка [ПАУЗА]
17 Кнопка [ВОСПРОИЗВЕДЕНИЕ]
18 Кнопка [ПРЕДЫДУЩИЙ]
19 Кнопка [СЛЕДУЮЩИЙ]
Важное указание. Краткое руководство
• Это краткое руководство содержит основную информацию: указания по технике безопасности ивводу
изделия вэксплуатацию.
• Сцелью охраны окружающей среды иэкономии ценного сырья Hama отказывается от подробного
руководства по эксплуатации впечатном виде ипредлагает его исключительно для загрузки вформате PDF.
• Сполным текстом подробного руководства по эксплуатации можно ознакомиться здесь:
!
www.hama.com -> 00054238 -> Скачать
• Сохраните данное руководство по эксплуатации для просмотра на вашем компьютере иповозможности
распечатайте его.
22
Page 29

1. Пояснения кпредупреждающим знакам и
указаниям
Опасность поражения электрическим
током
Данный символ указывает на опасность
соприкосновения снеизолированными частями
изделия под напряжением, которое может привести
кпоражению электрическим током.
Предупреждение
Используется для обозначения указаний по технике
безопасности или для акцентирования внимания на
особых опасностях ирисках.
Примечание
Используется для дополнительного обозначения
информации или важных указаний.
• Не используйте изделие во влажной среде, избегайте
брызг.
Используйте изделие только при приемлемых
•
климатических условиях.
Опасность поражения электрическим
током
• Не открывайте изделие инеиспользуйте его при
наличии повреждений.
• Не используйте изделие при
повреждении адаптера переменного тока, кабеля
адаптера или сетевого кабеля.
• Не пытайтесь самостоятельно выполнять
техническое обслуживание или ремонт изделия.
Любые работы по техническому обслуживанию
должны выполнять лица ссоответствующей
подготовкой иразрешением на данный вид
деятельности.
2. Комплект поставки
• Digital-HiFi-Tuner DIT2006BT
• Кабель сразъемом «тюльпан»,
(для стереовыходаЛ/П)
•Пультдистанционногоуправления
• 2 батареи ААА
• Краткое руководство пользователя
3. Указания по технике безопасности
• Изделие предназначено для домашнего,
непромышленного применения.
• Не применяйте взапретных зонах.
• Защищайте изделие от загрязнения, влаги
иперегрева, используйте его только всухих
помещениях.
• Данное изделие, как ивсе электрические приборы,
следует беречь от детей!
• Избегайте падения изделия инеподвергайте его
сильным вибрациям.
• Не используйте изделие при превышении значения
предела мощности, указанного втехнических
характеристиках.
• Не допускайте детей купаковочному материалу,
существует угроза удушения.
• Сразу утилизируйте упаковочный материал
согласно действующим местным предписаниям по
утилизации.
• Не вносите вприбор конструктивные изменения. В
результате этого любые гарантийные обязательства
теряют свою силу.
• Используйте изделие исключительно в
предусмотренных целях.
• Не используйте изделие внепосредственной
близости от систем отопления, других источников
тепла или подпрямыми солнечными лучами.
Предупреждение. Батареи
• Соблюдайте полярность батарей (+ и –).
Несоблюдение полярности может стать причиной
взрыва батарей.
• Разрешается применять аккумуляторы (или
батареи) только указанного типа.
• Перед загрузкой батарей почистите контакты.
• Детям запрещается заменять батареи без
присмотра взрослых.
• Не используйте различные типы или новые и
старые батареи вместе.
• Вслучае большого перерыва вэксплуатации
удалите батареи из устройства (кроме случаев,
когда изделие применяется вкачестве аварийного).
• Не закорачивайте контакты батарей.
• Не заряжайте обычные батареи.
• Не бросайте батареи вогонь.
• Храните батареи вбезопасном месте инедавайте
их детям.
• Не открывайте, не разбирайте, не глотайте ине
утилизируйте батареи сбытовым мусором. В
батареях могут содержаться вредные тяжелые
металлы.
• Использованные батареи немедленно вынимайте
из прибора иутилизируйте.
• Избегайте хранения, зарядки ииспользования
при экстремальных температурах иэкстремально
низком атмосферном давлении (например, на
большой высоте).
23
Page 30

4. Перед вводом вэксплуатацию
Указание
Подробное описание приложения UNDOK ивсех
функций можно найти в UNDOK guide по ссылке:
www.hama.com->00054238 ->Скачать
Указания по эксплуатации
• Кнопки [OK] и ► на пульте дистанционного
управления соответствуют кнопке [POWER/
VOLUME/ENTER/NAVIGATE](11) на фронтальной
стороне радио.
• Кнопка
• Кнопкам ▲ ▼ на пульте дистанционного
Ввод вэксплуатацию пульта дистанционного
управления
Откройте крышку отсека для батареек. Она находится
на обратной стороне пульта дистанционного
управления. Ее можно открыть, сдвинув вуказанном
направлении.
Вкомплект поставки входят две батарейки ААА,
которые необходимо вставить вотсек для батареек для
ввода пульта вэксплуатацию. При вставке следите за
правильной полярностью батареек. Нужная полярность
(+/−) отмечена вотсеке для батареек.
Создание сетевогосоединения
4.1 LAN (проводная сеть)
• Соедините кабелем разъем LAN маршрутизатора с
• Убедитесь, чтомаршрутизаторвключен, правильно
• Для обеспечения правильной работы соединения
• Затем непосредственно переходите квыполнению
◄ на пульте дистанционного управления
соответствует кнопке [ ] на фронтальной стороне
радио.
управления соответствуют повороты влево и
вправо переключателя настроек навигации,
расположенного на фронтальной стороне радио.
аналогичным разъемом радиоприемника. Для этого
необходимо использовать кабель Ethernet, который
не входит вкомплект поставки.
работает иесть подключение кинтернету.
LAN соблюдайте руководство по эксплуатации
маршрутизатора.
действий, описанных вразделе 5. «Вводв
эксплуатацию».
24
4.2 WLAN (беспроводная сеть)
• Убедитесь, чтомаршрутизаторвключен, правильно
работает иесть подключение кинтернету.
• Активируйте функцию WLAN маршрутизатора.
• Для обеспечения правильной работы соединения
WLAN соблюдайте руководство по эксплуатации
маршрутизатора.
• Затем переходите квыполнению действий,
описанных вразделе 5. «Вводвэксплуатацию».
5. Ввод вэксплуатацию
Указание — оптимальный прием
сигналов
"DIT2006BT" имеет гнездо для подключения
внешней антенны скоаксиальным разъемом. В
комплект поставки уже включена соответствующая
телескопическая антенна, позволяющая
осуществлять прием радиосигналов через DAB,
DAB+ и FM. Вкачестве альтернативы можно
использовать активную или пассивную антенну для
большей мощности приема или соответствия Вашим
требованиям.
Внимание:
• Раскладывайте мачту антенны полностью.
• Для оптимального сигнала приема рекомендуется
установить антенну вертикально.
5.1 Общие указания по использованию
5.1.1 Включение/выключение/режим ожидания
• Нажмите кнопку [POWER/VOLUME/ENTER/
NAVIGATE](11), чтобы включить радио.
• Нажмите иудерживайте кнопку [POWER/VOLUME/
ENTER/NAVIGATE](11) ок.3секунд, чтобы
выключить радио (режим ожидания).
• Для полного выключения отключите прибор от
электропитания.
5.1.2 Навигация иуправление
• Для выбора необходимого пункта меню нажимайте
кнопку быстрого выбора.
• Путем вращения кнопки [POWER/VOLUME/ENTER/
NAVIGATE](11) выполняется выбор отдельных
пунктов меню.
• Подтвердите выбор нажатием кнопки [POWER/
VOLUME/ENTER/NAVIGATE](11).
5.1.3 Регулировка громкости
• Вращением кнопки [POWER/VOLUME/ENTER/
NAVIGATE](11) можно повышать (вправо) или
понижать (влево) громкость.
Page 31

5.2. Подключение
Предупреждение
• Для подключения изделия используйте только
розетку, разрешенную для использования. Розетка
должна располагаться вблизи изделия ибыть
легко доступна.
• Отсоедините изделие от сети спомощью
переключателя при отсутствии напряжения всети,
отсоедините сетевой кабель от розетки.
• При наличии блока штепсельных розеток следите
за тем, чтобы общая потребляемая мощность
подключенных электроприборов не превышала
допустимое значение.
• Отсоедините изделие от сети вслучае, если вы
его не используете втечение продолжительного
времени.
• Подсоедините блок питания ссетевым кабелем (1)
на обратной стороне радио.
• Подключите сетевой кабель кнадлежащим образом
подключенной идоступной розетке.
• Дождитесь окончания инициализации радио.
• Нажмите кнопку [POWER/VOLUME/ENTER/
NAVIGATE](11), чтобы включить радио.
Указание — при первом включении
• При первом включении автоматически запускается
ассистент установки (Setup Wizard).
• Ассистент установки начинает работу на
английском языке.
• Можно пропустить ассистента установки изатем
запустить его заново на удобном для вас языке.
5.3. Язык
Стандартной установкой радио при его первом
запуске является английский язык. Для изменения
установленного языка меню радиоустройства
выполните следующие шаги.
• Нажмите [
• Спомощью кнопки [POWER/VOLUME/ENTER/
NAVIGATE] (11) перейдите впункт меню Settings
("Настройки").
• Подтвердите выбор нажатием кнопки [POWER/
VOLUME/ENTER/NAVIGATE] (11).
• Спомощью кнопки [POWER/VOLUME/ENTER/
NAVIGATE] (11) перейдите впункт меню Language
("Язык"). Подтвердите выбор нажатием кнопки
[POWER/VOLUME/ENTER/NAVIGATE] (11).
• Спомощью кнопки [POWER/VOLUME/ENTER/
NAVIGATE] (11) выберите нужный язык меню.
• Выбранный язык обозначен знаком *.
](7) для перехода вменю настроек.
Примечание
• На выбор представлены следующие языки:
английский, датский, французский, немецкий,
итальянский, норвежский, финский, шведский,
турецкий, польский, нидерландский, португальский,
испанский
Для ограничения воздействия
электромагнитных полей
Данный прибор предназначен для использования
на расстоянии минимум 20 см от тела пользователя
или других людей, находящихся рядом сним.
Запрещается носить данный прибор на теле.
6. Техническое обслуживание иуход
• Чистите изделие только спомощью безворсовой,
слегка влажной салфетки, не используйте
агрессивные чистящие средства.
• Если вы не используете изделие втечение
продолжительного времени, выключите его и
отсоедините от электропитания. Храните изделие
вчистом, сухом месте, защищенном от попадания
прямых солнечных лучей.
7. Освобождение от ответственности
Hama GmbH &Co. KG не несет ответственности за
повреждения, возникшие врезультате ненадлежащей
установки, монтажа иненадлежащего использования
изделия или несоблюдения требований руководства
по эксплуатации и/или указаний по технике
безопасности.
8. Сервисное обслуживание иподдержка
При возникновении вопросов по изделию
обращайтесь вслужбу поддержки Hama.
Горячая линия:+49 9091 502-115 (нем./англ.)
Дополнительная информация по технической
поддержке:
www.hama.com
Сполным текстом подробного руководства по
эксплуатации можно ознакомиться здесь:
www.hama.com -> 00054238 -> Downloads
25
Page 32

9. Указания по утилизации
Охрана окружающей среды:
Смомента перехода национального
законодательства на европейские нормативы
согласно директивам 2012/19/ЕС и 2006/66/ЕС
действуют следующие правила: Утилизация
электрических иэлектронных приборов, атакже
батарей вместе сбытовым мусором не разрешается.
Потребитель по закону обязан утилизировать
электрические иэлектронные приборы, атакже
батареи по истечении срока их годности вспециально
предназначенных для этого общественных пунктах
сбора или впункте продаж. Детальная регламентация
этих требований осуществляется соответствующим
местным законодательством. Необходимость
соблюдения данных предписаний обозначается
особым значком на изделии, инструкции по
эксплуатации или упаковке. Сдавая бывшие в
употреблении приборы/батареи на переработку,
вторичную переработку или на утилизацию вдругой
форме, вы вносите важный вклад вохрану
окружающей среды.
10. Сертификат соответствия
Настоящим компания Hama GmbH &CoKG
заявляет, что радиооборудование типа
[00054238] соответствует требованиям
директивы 2014/53/ЕС. Сполным текстом декларации
осоответствии требованиям ЕС можно ознакомиться
здесь:
www.hama.com -> 00054238 -> Downloads
Диапазон/диапазоны частот
Bluetooth: 2.402 –2.480GHz 6.5 dBm(EIRP)
WiFi: 2.400 –2.480 GHz 15.5 dBm (EIRP)
WiFi: 5.150 –5.350 GHz 16.5 dBm (EIRP)
WiFi: 5.470 –5.725 GHz 16.5 dBm (EIRP)
WiFi: 5.725 –5.850 GHz 11 dBm (EIRP)
Максимальная
излучаемая мощность
Ограничения или требования в
Бельгия, Болгария, Чешская Республика, Дания,
Германия, Эстония, Ирландия, Греция, Испания,
Франция, Хорватия, Италия, Кипр, Латвия, Литва,
Люксембург, Венгрия, Мальта, Нидерланды, Австрия,
Польша, Португалия, Румыния, Словения, Словакия,
Финляндия, Швеция, Великобритания
Примечание
При использовании каналов 36–64 (частота
5150–5350 мГц) изделие разрешено применять
только взакрытых помещениях.
Для ограничения воздействия
электромагнитных полей
Данный прибор предназначен для использования
на расстоянии минимум 20 см от тела пользователя
или других людей, находящихся рядом сним.
Запрещается носить данный прибор на теле.
26
Page 33

I Manuale di istruzioni rapido
Elementi di comando eindicazioni
A: Radio Lato anteriore
1
2 Presa AUX-In
3 [VOLUME] +/-
4 Rotella [PRESET]
5 Tasto [MODE]
6 Tasto [ALARM]
7 Tasto [EQUALIZER]
8 Tasto [MENU]
9 Tasto [INFO]
10 Tasto [BACK] (indietro)
11 Ricevitoreainfrarossi
12 [Navigation]
13
14
15 Display acolori 2.8"
16 LED
17 Cavo di rete
18 Antenna*
19 Antenna WiFi/Bluetooth
20 Uscita ottica
21 Uscita coassiale
22 Uscita stereo RCAL/R
23
24
Tasto [POWER]
Presa cue
Attacco USB
B: Radio Lato anteriore
Presa Line-Out
Attacco LAN (10/100 Mbit)
Telecomando
1 Pulsante-[POWER]
2 Pulsante-[MUTE]
3 Pulsanti diretti-[PRESET] (1-4)
4 Pulsante-[EQUALIZER]
5 Pulsante-[PRESET]
6 Pulsante-[MENU]
7 Pulsante-[SOURCE]
8 Pulsante-[OK]
Pulsante-[NAVIGATIONS]
9
▲ Su ▼ Giù
◄ Avanti ► Indietro
10 Pulsante-[VOL-]
11 Pulsante-[VOL+]
12 Pulsante-[HOME]
13 Pulsante-[BACK]
14 Pulsante-[INFO]
15 Pulsante-[BACKLIGHT]
16 Pulsante-[PAUSE]
17 Pulsante-[PLAY]
18 Pulsante-[PREVIOUS]
19 Pulsante-[NEXT]
Nota
*"DIT2006BT" èdotata di antenna intercambiabile. Èpossibile utilizzareun'antenna attiva opassiva provvista di
attacco coassiale.
La manopola svolge una doppia funzione. Ruotando il regolatoreèpossibile modicareilvolume onavigarenella
**
strutturadei menu. Premendo il regolatoreèpossibile passareinmodalità standby oconfermarelascelta effettuata.
Nota importante -Guida rapida
• La presente guida rapida fornisce le informazioni di base più importanti, quali istruzioni di sicurezza emessa in
funzione del prodotto.
• Permotivi di tutela dell’ambiente edirisparmio di preziose materie prime, la ditta Hama non fornisce la versione
estesa del manuale di istruzioni in formato cartaceo, bensì soltanto in PDF.
• La versione estesa del manuale di istruzioni èdisponibile al seguente indirizzo Internet:
!
www.hama.com -> 00054238 -> Downloads
• Salvarelaversione estesa del presente manuale di istruzioni per poterla consultaresul proprio computer estampare,
se necessario.
27
Page 34

1. Spiegazione dei simboli di avvertenza edelle
istruzioni
Pericolo di scarica elettrica
Questo simbolo indica la presenza di pericoli dovuti al
contatto con parti del prodotto sotto tensione, di entità
tale da comportareilrischio di scarica elettrica.
Attenzione
Contraddistingue le istruzioni di sicurezza orichiama
l’attenzione su particolari rischi epericoli.
Nota
Contraddistingue informazioni supplementari o
indicazioni importanti.
2. Contenuto della confezione
• Digital-HiFi-Tuner DIT2006BT
• Cavo RCA(per uscita stereo RCAL/R)
• Telecomando
• 2batterie AAA
• Istruzioni brevi
3. Istruzioni di sicurezza
• Il prodotto èprevisto per uso personale, non
commerciale.
• Non utilizzareilprodotto in ambienti dove non è
consentito l’uso di strumenti elettronici.
• Proteggereilprodotto dallo sporco, dall’umidità e
dal surriscaldamento eutilizzarlo solo in ambienti
asciutti.
• Come tutte le apparecchiatureelettriche, tenereil
prodotto fuori dalla portata dei bambini!
• Non far cadereilprodotto enon esporlo aurti.
• Non utilizzareilprodotto oltreilimiti di potenza indicati
nei dati tecnici.
• Tenerel’imballaggio assolutamente fuori dalla portata
dei bambini: pericolo di soffocamento.
• Smaltireimmediatamente il materiale d’imballaggio in
conformità alle prescrizioni locali vigenti.
• Non apportaremodiche all’apparecchio. In tal caso
decadono idiritti di garanzia.
• Utilizzareilprodotto soltanto per gli scopi previsti.
• Non collocareilprodotto nelle immediate vicinanze del
riscaldamento, di fonti di caloreoalla luce diretta del
sole.
• Non utilizzareilprodotto in ambienti umidi eproteggerlo
dagli spruzzi d’acqua.
• Utilizzareilprodotto soltanto in condizioni climatiche
moderate.
Pericolo di scarica elettrica
• Non aprireilprodotto ecessarne l’utilizzo se presenta
danneggiamenti.
• Non utilizzareilprodotto qualora
l’adattatoreAC, ilcavo adattatoreoquello di
alimentazione siano danneggiati.
• Non effettuareinterventi di manutenzione e
riparazione sul prodotto di propria iniziativa. Fare
eseguirequalsiasi intervento di riparazione al
personale specializzato competente.
Attenzione –batterie
• Inserirelebatterie attenendosi semprealla polarità
indicata (etichetta +e-). La mancata osservanza della
polarità corretta può causareperdite ol’esplosione
delle batterie.
• Utilizzaresoltanto batterie ricaricabili (o normali
batterie) del tipo indicato.
• Prima di inserirelebatterie pulireicontatti delle
medesime eicontrocontatti.
• Ai bambini non èconsentito sostituirelebatterie, se
non sotto la sorveglianza di una persona adulta.
• Non utilizzarecontemporaneamente batterie vecchie e
nuove, nonché di marche etipi diversi.
• Rimuoverelebatterie dai prodotti se non utilizzati per
periodi prolungati (a meno che non debbano essere
disponibili per casi di emergenza).
• Non cortocircuitarelebatterie.
• Non ricaricarebatterie non ricaricabili.
• Non gettarelebatterie nel fuoco.
• Custodirelebatterie fuori dalla portata dei bambini.
• Non aprire, danneggiare, ingerireodisperderele
batterie nell’ambiente per nessuna ragione. Esse
possono conteneremetalli pesanti velenosi enocivi per
l’ambiente.
• Toglieresubito le batterie esaurite dal prodotto e
provvedereallorosmaltimento conforme.
• Evitarediconservare, caricareeutilizzarelabatteria
atemperatureestreme. econ pressione atmosferica
molto bassa (come ad es. ad alta quota).
28
Page 35

4. Prima della messa in funzione
Nota
Una descrizione esauriente
dell’App UNDOK edell’intera
gamma di funzioni èdisponibile nella nostra
guida UNDOK in:
www.hama.com->00054238 ->Downloads
Indicazioni per l'uso
• Il tasto [OK]equello ► del telecomando svolgono la
stessa funzione del tasto [POWER/VOLUME/ENTER/
NAVIGATE](11) posto sul lato frontale della radio.
• Il tasto ◄ del telecomando svolge la stessa funzione
del tasto [ ]posto sul lato frontale della radio
• Itasti ▲ ▼ del telecomando svolgono la stessa
rotazione asinistraeadestradel regolatoredi
navigazione posto sul lato frontale della radio.
Mettereinfunzione il telecomando
Aprireilcoperchio del vano batterie. Esso si trova sul lato
posterioredel telecomando epuò essereaperto facendolo
scorrerenella direzione indicata.
La forniturainclude due batterie AAA da inserire
nell’apposito vano prima di procederecon la messa in
funzione. Inserirelebatterie facendo attenzione alla
polarità corretta. La polarità (+ /-)èindicata nel vano
batterie.
Congurazione della connessione di rete
4.1 LAN (rete con connessione via cavo)
• Collegareunattacco LAN del router aquello della radio
servendosi di un cavo Ethernet non compreso nel volume
di fornitura.
• Accertarsi che il router sia acceso, che funzioni
correttamente eche la connessione Internet sia attiva.
• In merito al corretto funzionamento della connessione
LAN, osservareleistruzioni per l‘uso del router.
• Procederequindi direttamente come indicato al punto 5
„Messa in esercizio”.
4.2 WLAN (rete senza fili)
• Accertarsi che il router sia acceso, che funzioni
correttamente esussista la connessione con Internet.
• Attivarelafunzione WLAN del router.
• In merito al corretto funzionamento della connessione
WLAN osservareleistruzioni per l‘uso del router.
• Procederequindi direttamente come descritto al punto 5
„Messa in funzione”.
5. Messa in funzione
Nota –ricezione ottimale
"DIT2006BT" èdotato di un attacco per antenna esterna
di tipo coassiale. La forniturainclude un'antenna
telescopica che consente la ricezione mediante
DAB, DAB+ eFM. In alternativa èpossibile utilizzare
un’antenna attiva opassiva per migliorareoadeguarela
potenza di ricezione alle proprie speciche esigenze.
Si prega di notare:
• Estrarrel’antenna semprecompletamente.
• Peruna ricezione ottimale, consigliamo di orientare
l'antenna in senso verticale.
5.1 Indicazioni generali di utilizzo
5.1.1 Accendere /Spegnere /Standby
• Premere[POWER/VOLUME/ENTER/NAVIGATE](11)
per accenderelaradio.
• Premere[POWER/VOLUME/ENTER/NAVIGATE](11)
per circa 3secondi per spegnerelaradio (standby).
• Perspegnerecompletamente la radio, disconnetterla
dalla presa elettrica.
5.1.2 Navigazione ecomando
• Dopo averepremuto un tasto di scelta rapida, navigare
attraverso le opzioni di menu proposte.
• Ruotando [POWER/VOLUME/ENTER/NAVIGATE](11)
si selezionano le singole opzioni.
• Premendo [POWER/VOLUME/ENTER/NAVIGATE](11)
viene confermata la scelta.
5.1.3 Regolare il volume
• Ruotando [POWER/VOLUME/ENTER/NAVIGATE](11)
si aumenta (a destra) osiriduce (a sinistra) il volume.
29
Page 36

5.2 Accendere
Attenzione
• Utilizzareilprodotto collegandolo auna presa elettrica
conforme. La presa elettrica deve trovarsi nelle
vicinanze del prodotto ed esserefacilmente accessibile.
• Scollegareilprodotto dalla rete elettrica tramite
il pulsante di accensione/spegnimento. Se non è
disponibile, disconnettereilcavo di alimentazione
dalla presa elettrica.
• Se si utilizzano prese multiple, prestareattenzione che
le utenze collegate non superino l’assorbimento di
potenza totale consentito.
• Scollegareilprodotto dalla rete elettrica in caso di
inutilizzo prolungato.
• Collegarel'alimentatorealla presa (1) posta sul lato
posterioredella radio.
• Collegareilcavo di alimentazione auna presa elettrica
installata anorma edifacile accesso.
• Attendere no all’avvenuta inizializzazione della radio.
• Premere[POWER/VOLUME/ENTER/NAVIGATE](11)
per accenderelaradio.
Nota –alla prima accensione
• Alla prima accensione, si avvia automaticamente la
congurazione guidata (Setup Wizard).
• La congurazione guidata èpreimpostata in lingua
inglese.
• Essa può essereignorata eripresa in un secondo
momento in lingua italiana.
5.3 Lingua
Alla prima messa in funzione èpreimpostata la lingua
inglese. Permodicarla, procederecome segue:
• Premere[
• Scorrereall’opzione “Settings” tramite [POWER/
VOLUME/ENTER/NAVIGATE](11).
• Confermarelascelta premendo [POWER/VOLUME/
ENTER/NAVIGATE](11).
• Scorrereall’opzione “Language” tramite [POWER/
VOLUME/ENTER/NAVIGATE](11). Confermare
la scelta premendo [POWER/VOLUME/ENTER/
NAVIGATE](11).
• Selezionarelalingua desiderata tramite [POWER/
VOLUME/ENTER/NAVIGATE](11).
• La lingua al momento selezionata ècontraddistinta da
un *.
](7) per aprireilmenu delle impostazioni.
Nota
• Sono disponibili le seguenti lingue:
inglese, danese, francese, tedesco, italiano, norvegese,
nlandese, svedese, turco, polacco, olandese,
portoghese, spagnolo
6. Cura emanutenzione
• Pulireilpresente prodotto servendosi di un panno antipelucchi leggermente umido, senza utilizzaredetergenti
aggressivi.
• Qualorailprodotto non venga utilizzato per un periodo
prolungato, spegnerlo edisconnetterlo dalla rete
elettrica. Custodireilprodotto in un ambiente pulito,
asciutto enon esposto alla luce diretta del sole.
7. Esclusione di garanzia
Hama GmbH &CoKGdeclina ogni responsabilità per
danni dovuti al montaggio oall’utilizzo scorretto del
prodotto, nonché alla mancata osservanza delle istruzioni
d’uso e/o di sicurezza.
8. Assistenza esupporto
In caso di domande sul prodotto, rivolgersi alla
Consulenza prodotto Hama.
Hotline: +49 9091 502-115 (tedesco/inglese)
Altreinformazioni sul supporto sono disponibili in:
www.hama.com
La versione estesa del manuale di istruzioni èdisponibile
al seguente indirizzo Internet:
www.hama.com -> 00054238 -> Downloads
30
Page 37

9. Smaltimento
Informazioni sulla tutela dell’ambiente
Aseguito del recepimento delle direttive europee
2012/19/UE e2006/66/UE nella legislazione
nazionale si applica quanto segue: non è
consentito smaltireleapparecchiatureelettriche ed
elettroniche elebatterie insieme ai riuti domestici.
Giunte alla ne del lorociclo di vita, iconsumatori sono
obbligati per legge arestituireleapparecchiature
elettriche ed elettroniche elebatterie presso ipunti di
raccolta pubblici competenti onei punti vendita. Isingoli
aspetti in materia sono regolati dalle leggi nazionali dei
singoli stati. La presenza di questo simbolo sul prodotto,
sul manuale di istruzioni osull’imballaggio indica che esso
èsoggetto atali normative. Riciclando, riutilizzando i
materiali outilizzando sotto altraforma ivecchi prodotti/le
batterie, darete un importante contributo alla protezione
dell’ambiente.
10. Dichiarazione di conformità
Hama GmbH &CoKGdichiarache il tipo di
apparecchiaturaradio [00054238] èconforme alla
direttiva 2014/53/UE. Il testo completo della
dichiarazione di conformità UE èdisponibile al seguente
indirizzo Internet:
www.hama.com -> 00054238 -> Downloads
Bande di fr
Bluetooth: 2.402 –2.480GHz 6.5 dBm(EIRP)
WiFi: 2.400 –2.480 GHz 15.5 dBm (EIRP)
WiFi: 5.150 –5.350 GHz 16.5 dBm (EIRP)
WiFi: 5.470 –5.725 GHz 16.5 dBm (EIRP)
WiFi: 5.725 –5.850 GHz 11 dBm (EIRP)
equenza
Massima potenza a
radiofrequenza trasmessa
Restrizioni orequisiti in
Belgio, Bulgaria, Repubblica Ceca, Danimarca, Germania,
Estonia, Irlanda, Grecia, Spagna, Francia, Croazia, Italia,
Cipro, Lettonia, Lituania, Lussemburgo, Ungheria, Malta,
Paesi Bassi, Austria, Polonia, Portogallo, Romania,
Slovenia, Slovacchia, Finlandia, Svezia, Regno Unito
Nota
Se viene utilizzato il canale 36-64 (canali della frequenza
5150 MHz -5350 MHz) l’apparecchio può essere
impiegato soltanto in ambienti chiusi.
Limitarel’esposizione ai campi
elettromagnetici
Il presente dispositivo èprevisto per l’uso auna distanza
di almeno 20 cm dal corpo dell’utente odapersone
poste nelle sue vicinanze. Non portareildispositivo a
contatto con il corpo.
31
Page 38

N Korte handleiding
Bedieningselementen en indicaties
A: Radio Voorzijde
1
2 AUX-In poort
3 [VOLUME] +/-
4 [PRESET]-wiel
5 [MODE]-toets
6 [ALARM]-toets
7 [EQUALIZER]-toets
8 [MENU]-toets
9 [INFO]-toets
10 [BACK] (terug)-toets
11 Infrarood-ontvanger
12 [Navigation]
13
14
15 2.8" kleurendisplay
16 LED
17 Voedingskabel
18 Antenne*
19 Wi/Bluetooth-antenne
20 Optische uitgang
21 Coaxiale uitgang
22 Stereo Cinch L/R uitgang
23
24
[POWER]-toets
Koptelefoon poort
USB-aansluiting
B: Radio Achterzijde
Line-Out poort
LAN (10 /100 Mbit) -aansluiting
Afstandsbediening
1 [POWER]-Toets
2 [MUTE]-Toets
3 [PRESET]-Directtoetsen (1-4)
4 [EQUALIZER]-Toets
5 [PRESET]-Toets
6 [MENU]-Toets
7 [SOURCE]-Toets
8 [OK]-Toets
[NAVIGATIE]-Toesten
9
▲ Omhoog ▼ Omlaag
◄ Terug ► Vooruit
10 [VOL-]-Toets
11 [VOL+]-Toets
12 [HOME]-Toets
13 [BACK]-Toets
14 [INFO]-Toets
15 [BACKLIGHT]-Toets
16 [PAUSE]-Toets
17 [PLAY]-Toets
18 [PREVIOUS]-Toets
19 [NEXT]-Toets
Aanwzing
*"DIT2006BT" beschikt over een uit te wisselen antenne. Ukunt een actieve of passieve antenne gebruiken welke over
een coax-aansluiting beschikt.
De draaiknop heeft een dubbele functie. Door het draaien van de knop past uhet volume aan of navigeert udoor de
**
menustructuur.Als uopdeze draaiknop drukt, wordt het apparaat in de stand-bymodus gezet of wordt een selectie
bevestigd.
Belangrke aanwzing -beknopte handleiding
• Dit is een beknopte handleiding met belangrke basisinformatie, zoals veiligheidsinstructies en informatie over het in
gebruik nemen van uw product.
• Omwille van milieubescherming en het besparen van waardevolle grondstoffen ziet Hama af van gedrukte lange
gebruikershandleidingen en biedt deze uitsluitend als PDF-download aan.
• De volledige lange gebruikershandleiding is op het volgende internetadres beschikbaar:
!
www.hama.com -> 00054238 -> Downloads
• Bewaar deze lange handleiding ter referentie op uw computer en druk deze zo mogelkaf.
32
Page 39

1. Verklaring van waarschuwingssymbolen en
instructies
Gevaar voor een elektrische schok
Dit symbool duidt op gevaar b aanraking van nietgeïsoleerde onderdelen van het product, welke mogelk
onder een zodanig gevaarlke spanning staan, dat het
gevaar voor een elektrische schok aanwezig is.
Waarschuwing
Wordtgebruikt om veiligheidsinstructies te markeren of
om op bzonderegevaren en risico’s te attenderen.
Aanwzing
Wordtgebruikt om extrainformatie of belangrke
aanwzingen te markeren.
2. Inhoud van de verpakking
• Digital-HiFi-Tuner DIT2006BT
• Cinchkabel (voor stereo cinch L/R-uitgang)
• Afstandsbediening
• 2x AAA-formaat batterijen
• Beknopte bedieningsinstructies
3. Veiligheidsinstructies
• Het product is bedoeld voor huishoudelk, niet-
commercieel gebruik.
• Gebruik het product niet op plaatsen waar elektronische
producten niet zijn toegestaan.
• Bescherm het product tegen vuil, vocht en oververhitting
en gebruik het alleen in droge ruimtes.
• Dit product dient, zoals alle elektrische producten,
buiten het bereik van kinderen te worden gehouden!
• Laat het product niet vallen en stel het niet bloot aan
zwareschokken of stoten.
• Gebruik het product niet buiten de in de technische
gegevens vermelde vermogensgrenzen.
• Het verpakkingsmateriaal mag absoluut niet in handen
van kinderen komen in verband met verstikkingsgevaar.
• Voer het verpakkingsmateriaal direct en overeenkomstig
de lokaal geldende afvoervoorschriften af.
• Verander niets aan het apparaat. Daardoor vervalt elke
aanspraak op garantie.
• Gebruik het product alleen voor het beoogde doel.
• Gebruik het product niet in de onmiddellijke nabijheid
van de verwarming, anderewarmtebronnen of in direct
zonlicht.
• Gebruik het product niet in een vochtige omgeving en
vermijd spatwater.
• Gebruik het artikel alleen in gematigde klimatologische
omstandigheden.
Gevaar voor een elektrische schok
• Open het product niet en gebruik het niet meer b
beschadigingen.
• Gebruik het product niet indien de
adapter,deaansluitkabel of de netkabel is beschadigd.
• Probeer het product niet zelf te onderhouden of te
repareren. Laat onderhoudswerkzaamheden door
vakpersoneel uitvoeren.
Waarschuwing –Batteren
• Let er altdopdat udebatteren met de polen in
de juiste richting plaatst (opschrift +en-). Indien de
batteren verkeerdworden geplaatst kunnen deze
gaan lekken of zelfs exploderen.
• Gebruik uitsluitend accu’s(of batteren), welke met het
vermelde type overeenstemmen.
• Reinig vóór het plaatsen van de batteren de
battercontacten en de contacten in het product.
• Laat kinderen nooit zonder toezicht batteren
vervangen.
• Gebruik geen oude en nieuwe batteren tegelkertd
of batteren van een verschillende soort of fabricaat.
• Verwder batteren uit producten die gedurende
langeretdniet worden gebruikt (behoudens indien
deze voor een noodgeval stand-by moeten blven).
• Sluit de batter niet kort.
• Laad de batteren niet op.
• Werp de batteren niet in vuur.
• Houd de batteren buiten het bereik van kinderen.
• Batteren nooit openen, beschadigen, inslikken of in
het milieu terecht laten komen. Z kunnen giftige en
zwaremetalen bevatten die schadelkznvoor het
milieu.
• Lege batteren direct uit het product verwderen en
afvoeren.
• Vermijd opslag, opladen en gebruik bij extreme
temperaturen en extreem lage luchtdruk (bijv.opgrote
hoogte).
4. Voor het eerste gebruik
Aanwzing
Een uitgebreide beschrving van de
UNDOK-app und en alle functies
ervan vindt uinonze
UNDOK-Guide op:
www.hama.com->00054238 ->Downloads
33
Page 40

Bedieningsinstructies
• De toets [OK]en►op de afstandsbediening komt
overeen met de toets [POWER/VOLUME/ENTER/
NAVIGATE](11) aan de voorkant van de radio.
• De toets ◄ op de afstandsbediening komt overeen
met de toets [ ]aan de voorkant van de radio.
• De toetsen ▲ ▼ op de afstandsbediening komen
overeen met het naar links en rechts draaien van de
navigatieknop aan de voorkant van de radio.
Afstandsbediening in gebruik nemen
Open de afdekking van het battervak Deze bevindt
zich aan de achterkant van de afstandsbediening en
kan worden geopend door in de aangegeven richting te
schuiven.
Er worden bevat twee AAA-batteren meegeleverddie u
voor het gebruik in het battervak moet plaatsen. Zorg
ervoor dat de batteren met de juiste polariteit worden
geplaatst. De aangegeven polariteit (+ /-)is in het
battervak gemarkeerd.
Netwerkverbinding tot stand brengen
4.1 LAN (kabelgebonden netwerk)
• Verbind een LAN-aansluiting van uw router met
een aansluiting van uw radio. Daarvoor heeft ueen
ethernet-kabel nodig. Deze kabel is niet bij de levering
inbegrepen.
• Controleer dat de router is ingeschakeld, correct
functioneert en er een verbinding met het internet is.
• Neem met betrekking tot het correct functioneren van de
LAN-verbinding de bedieningsinstructies van uw router
in acht.
• Ga vervolgens zoals onder punt 5„Inbedrijfstelling“ is
beschreven verder te werk.
4.2 WLAN (draadloos netwerk)
• Controleer dat de router is ingeschakeld, correct
functioneert en er een verbinding met het internet is.
• Activeer de WLAN-functie van uw router.
• Neem met betrekking tot het correct functioneren van de
WLAN-verbinding de bedieningsinstructies van uw router
in acht.
• Ga vervolgens zoals onder punt 5„Inbedrijfstelling“ is
beschreven verder te werk.
5. Ingebruikname
Aanwzing –optimale ontvangst
"DIT2006BT" beschikt over een antenneaansluiting voor
coaxiale externe antennes. Het product wordt geleverd
met een geschikte telescoopantenne, die de ontvangst
via DAB, DAB+ en FM mogelkmaakt. Als alternatief
kunt ueen actieve of passieve antenne gebruiken om de
ontvangstprestaties te verbeteren of aan te passen aan
uw behoeften.
Let op het volgende:
• Trek de antenne altdvolledig uit.
• Voor een optimale ontvangst adviseren w de antenne
verticaal te richten.
5.1 Algemene instructies voor de bediening
5.1.1 In- en uitschakelen /Stand-by
• Druk op [POWER/VOLUME/ENTER/NAVIGATE](11)
om de radio in te schakelen.
• Houd [POWER/VOLUME/ENTER/NAVIGATE](11)
ongeveer 3seconden ingedrukt om de radio uit te
schakelen (stand-by).
• Trek de stekker uit het stopcontact om het apparaat
volledig uit te schakelen.
5.1.2 Navigatie en regeling
• Navigeer na het kiezen van een sneltoets door de
beschikbaremenu-items.
• Door draaien van [POWER/VOLUME/ENTER/NAVIGATE]
(11) selecteert uafzonderlke menu-items.
• Door drukken op [POWER/VOLUME/ENTER/NAVIGATE]
(11) bevestigt udeselectie.
5.1.3 Volume aanpassen
• Door [POWER/VOLUME/ENTER/NAVIGATE] (11) te
draaien wordt het volume verhoogd (rechts) of verlaagd
(links).
5.2 Inschakelen
Waarschuwing
• Sluit het product alleen aan op een daarvoor geschikt
en intact stopcontact. Het stopcontact moet in de
buurt van het product znaangebracht en goed
bereikbaar zn.
• Het product met behulp van de schakelaar in/uit van
het net scheiden -indien er geen schakelaar is, trekt u
de voedingskabel aan de stekker uit het stopcontact.
• Let erop dat b meervoudige stopcontacten de
aangesloten verbruikers niet het toegestane totale
opgenomen vermogen overschrden.
• Als uhet product gedurende langeretdniet gebruikt,
haal dan de stekker uit het stopcontact.
34
Page 41

• Sluit de voedingsadapter op het aansluitpunt (1) op de
achterzde van de radio aan.
• Sluit de voedingskabel aan op een veilig en eenvoudig
bereikbaar stopcontact.
• Wacht tot de initialisatie van de radio voltooid is.
• Druk op [POWER/VOLUME/ENTER/NAVIGATE](11)
om de radio in te schakelen.
Aanwzing –bde eerste keer
inschakelen
• Wanneer de radio voor het eerst wordt aangezet,
wordt automatisch de conguratieassistent (Setup
Wizard) gestart.
• De conguratieassistent wordt in het Engels
uitgevoerd.
• Ukunt deze assistent overslaan en deze op een later
tdstip opnieuw oproepen in uw taal.
5.3 Taal
B de het eerste keer gebruiken is Engels als standaardtaal
van de radio ingesteld. Om de ingestelde menutaal van de
radio te wzigen, gaat uals volgt te werk:
• Druk op [
te gaan.
• Navigeer met behulp van [POWER/VOLUME/ENTER/
NAVIGATE](11) naar het menu-item “Settings“.
• Bevestig de selectie door te drukken op [POWER/
VOLUME/ENTER/NAVIGATE](11).
• Navigeer met behulp van [POWER/VOLUME/ENTER/
NAVIGATE](11) naar het menu-item “Language“.
Bevestig de selectie door te drukken op [POWER/
VOLUME/ENTER/NAVIGATE](11).
• Kies met behulp van [POWER/VOLUME/ENTER/
NAVIGATE](11) de gewenste systeemtaal.
• De momenteel geselecteerde taalinstelling is gemarkeerd
met *.
Aanwzing
• De volgende talen znbeschikbaar:
Engels, Deens, Frans, Duits, Italiaans, Noors, Fins,
Zweeds, Turks, Pools, Nederlands, Portugees, Spaans
](7) om naar het menu met de instellingen
7. Uitsluiting aansprakelijkheid
Hama GmbH &CoKGisniet aansprakelkvoor en
verleent geen garantie op schade die het gevolg is van
ondeskundige installatie, montage en ondeskundig
gebruik van het product of het niet in acht nemen van de
handleiding en/of veiligheidsinstructies.
8. Service en support
B vragen over het product kunt ualtdcontact opnemen
met Hama-productadvies.
Hotline: +49 9091 502-115 (Dui/Eng)
Meer support-informatie vindt uhier:
www.hama.com
De volledige lange gebruikershandleiding is op het
volgende internetadres beschikbaar:
www.hama.com -> 00054238 -> Downloads
9. Aanwijzingen over de afvalverwerking
Opmerking over de omgang met het milieu:
Tengevolge van de invoering van de Europese
Richtln2012/19/EU en 2006/66/EU in het
nationaal juridisch systeem, is het volgende van
toepassing: Elektrische en elektronische
apparatuur,zoals batteren mag niet met het huisvuil
weggegooid worden. Consumenten znwettelkverplicht
om elektrische en elektronische apparaten zoals batteren
op het einde van gebruik in te dienen b openbare
verzamelplaatsen speciaal opgezet voor dit doeleinde of
b een verkooppunt. Verderespecicaties aangaande dit
onderwerp znomschreven door de nationale wet van het
betreffende land. Dit symbool op het product, de
gebruiksaanwzing of de verpakking duidt erop dat het
product onderworpen is aan deze richtlnen. Door te
recycleren, hergebruiken van materialen of anderevormen
van hergebruiken van oude toestellen/batteren, levert u
een grote bdrage aan de bescherming van het milieu.
6. Onderhoud en verzorging
• Reinig dit product uitsluitend met een pluisvre,
licht vochtige doek en gebruik geen agressieve
reinigingsmiddelen.
• Schakel het apparaat dan uit en trek de stekker uit het
stopcontact als uhet product gedurende langeretdniet
gebruikt. Bewaar het apparaat op een schone, droge
plaats en plaats het niet in direct zonlicht.
35
Page 42

10. Conformiteitsverklaring
Hama GmbH &CoKGverklaart hierb dat dit
toestel [00054238] zich in overeenstemming met
de essentiële eisen en aan de overige relevante
bepalingen van de Richtln2014/53/EU bevindt. De
conformiteitsverklaring overeenkomstig de desbetreffende
Richtlnvindt uonder:
www.hama.com -> 00054238 -> Downloads
Frequentieband(en)
Bluetooth: 2.402 –2.480GHz 6.5 dBm(EIRP)
WiFi: 2.400 –2.480 GHz 15.5 dBm (EIRP)
WiFi: 5.150 –5.350 GHz 16.5 dBm (EIRP)
WiFi: 5.470 –5.725 GHz 16.5 dBm (EIRP)
WiFi: 5.725 –5.850 GHz 11 dBm (EIRP)
Beperkingen of voorschriften in
België, Bulgare, Tsjechische Republiek, Denemarken,
Duitsland, Estland, Ierland, Griekenland, Spanje, Frankrk,
Kroatië, Italië, Cyprus, Letland, Litouwen, Luxemburg,
Hongare, Malta, Nederland, Oostenrk, Polen, Portugal,
Roemenië, Slovenië, Slowake, Finland, Zweden, Verenigd
Koninkrk
Aanwzing
Indien de kanalen 36-64 (frequentie
5150GHz –5350GHz) worden gebruikt, dan mag het
product alleen in gesloten ruimtes worden gebruikt.
Maximaal radiofrequent
vermogen
Om de blootstelling aan
elektromagnetische velden te beperken
Dit apparaat is bedoeld voor gebruik op een afstand van
ten minste 20 cm van het lichaam van de gebruiker of
van personen in de omgeving. Dit apparaat mag niet op
het lichaam worden gedragen.
36
Page 43
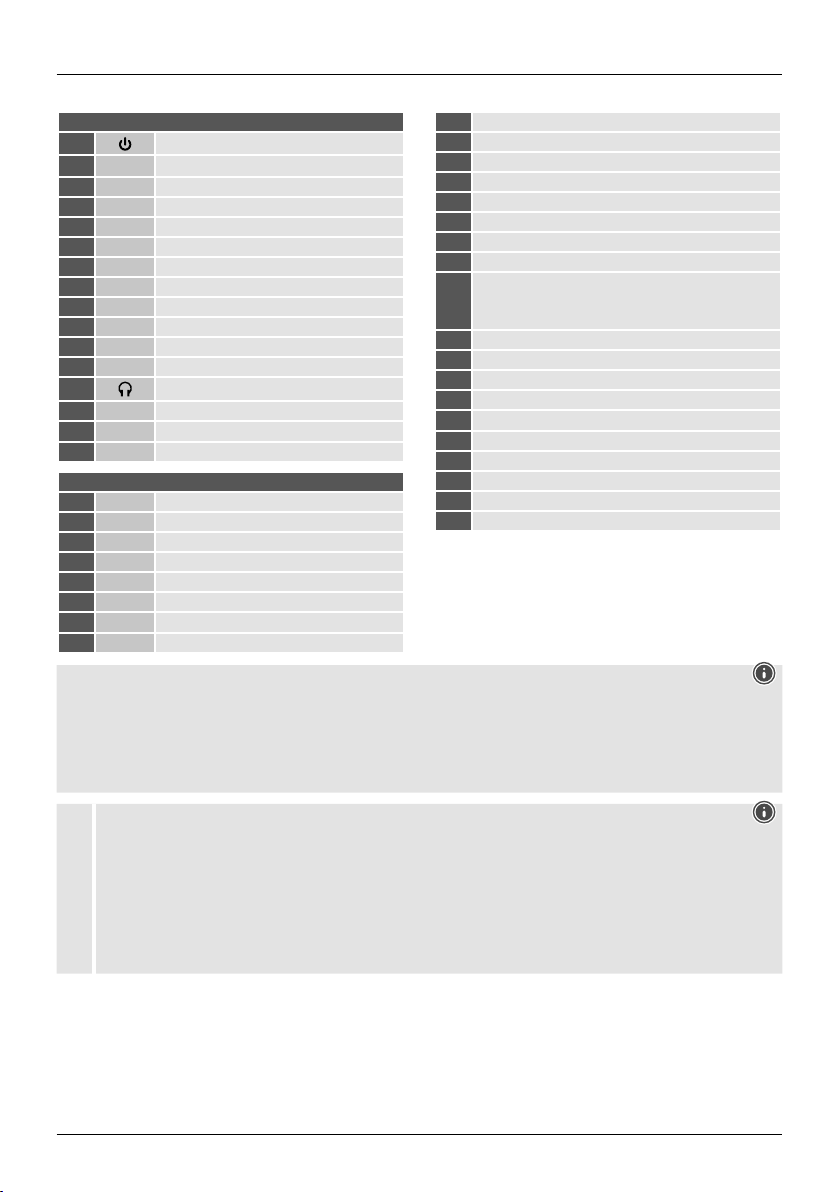
J Οδηγός γρήγορης έναρξης
Στοιχεία χειρισμού καιενδείξεις
A: ΡαδιόφωνοΠρόσοψη
1
2 Υποδοχή AUX-In
3 [VOLUME] +/-
4 Τροχός [PRESET]
5 Πλήκτρο [MODE]
6 Πλήκτρο [ALARM]
7 Πλήκτρο [EQUALIZER]
8 Πλήκτρο [MENU]
9 Πλήκτρο [INFO]
10 Πλήκτρο [BACK] (πίσω)
11 Δέκτης υπέρυθρων
12 [Navigation]
13
14
15 Έγχρωμη οθόνη 2.8"
16 LED
17 Ηλεκτρικόκαλώδιο
18 Κεραία*
19 Κεραία Bluetooth/Wi
20 Οπτική έξοδος
21 Ομοαξονική έξοδος
22 Στερεοφωνική έξοδος RCAL/R
23
24
Πλήκτρο [POWER]
Υποδοχή ακουστικών
Υποδοχή USB
B: Πίσω πλευρά
Υποδοχή Line-Out
Υποδοχή LAN (10/100 Mbit)
Τηλεχειριστήριο
1 Πληκτρο [POWER]
2 Πληκτρο [MUTE]
3 Αμεσα πληκτρα [PRESET] (1-4)
4 Πληκτρο [EQUALIZER]
5 Πληκτρο [PRESET]
6 Πληκτρο [MENU]
7 Πληκτρο [SOURCE]
8 Πληκτρο [OK]
Πληκτρο [NAVIGATION]
9
▲ Επάνω ▼ Κάτω
◄ Πίσω ► Μπροστά
10 Πληκτρο [VOL-]
11 Πληκτρο [VOL+]
12 Πληκτρο [HOME]
13 Πληκτρο [BACK]
14 Πληκτρο [INFO]
15 Πληκτρο [BACKLIGHT]
16 Πληκτρο [PAUSE]
17 Πληκτρο [PLAY]
18 Πληκτρο [PREVIOUS]
19 Πληκτρο [NEXT]
Υπόδειξη
*
"DIT2006BT" ραδιόφωνο διαθέτει κεραία που μπορεί να αλλαχτεί. Μπορείτε να χρησιμοποιήσετε μια ενεργητική ή
παθητική κεραία που να διαθέτει ομοαξονικό καλώδιο.
** Οπεριστρεφόμενος διακόπτης διαθέτει διπλή λειτουργία. Γυρίζοντας τον διακόπτη, μπορείτε να ρυθμίσετε την
ένταση ήχου ήναπλοηγηθείτε στο μενού. Πατώντας τον περιστρεφόμενο διακόπτη θέτετε τη συσκευή σε κατάσταση
αναμονής ήεπιβεβαιώνετε μια επιλογή σας.
Σημαντική υπόδειξη – Συνοπτικό εγχειρίδιο
• Αυτόείναι ένασυνοπτικόεγχειρίδιο το οποίοπεριλαμβάνειτις σημαντικότερεςβασικές πληροφορίες, όπως
προειδοποιήσεις ασφαλείας καιοδηγίες γιατηθέση του προϊόντος σε λειτουργία.
• Για λόγους προστασίας τουπεριβάλλοντος και εξοικονόμησηςσημαντικώνπρώτωνυλών, ηεταιρεία Hama δεν εκδίδει
τυπωμένα λεπτομερή εγχειρίδιαοδηγιών. Τα εγχειρίδιαοδηγιώνδιατίθενται αποκλειστικά ως αρχεία PDF.
• Το πλήρες λεπτομερές εγχειρίδιοοδηγιών διατίθεταιστηνακόλουθη ιστοσελίδα:
!
www.hama.com -> 00054238 -> Downloads
• Αποθηκεύστετολεπτομερές εγχειρίδιο οδηγιώνστον υπολογιστή σας και, αν χρειάζεται, τυπώστε το.
37
Page 44

1. Επεξήγηση προειδοποιητικών συμβόλων και
υποδείξεων
Κίνδυνος ηλεκτροπληξίας
Το συγκεκριμένο σύμβολο υποδεικνύει τον κίνδυνο
επαφής με εξαρτήματα του προϊόντος που δεν έχουν
μόνωση και τα οποία μπορεί να διαπερνά επικίνδυνη
τάση τέτοιου ύψους, ώστε να υπάρχει κίνδυνος
ηλεκτροπληξίας.
Προειδοποίηση
Επισημαίνει προειδοποιήσεις ασφαλείας ήεφιστά την
προσοχή σας σε ιδιαίτερους κινδύνους.
Υπόδειξη
Επισημαίνει πρόσθετες πληροφορίες ήσημαντικές
υποδείξεις.
2. Περιεχόμενα συσκευασίας
• Digital-HiFi-Tuner DIT2006BT
• Καλώδιο RCA(για έξοδο στερεοφωνικού RCAL/R)
• Τηλεχειριστήριο
• 2x μπαταρίες AAA
• QSG
3. Προειδοποιήσεις ασφαλείας
• Το προϊόν προβλέπεται για ιδιωτική, μη επαγγελματική
και οικιακή χρήση.
• Μην χρησιμοποιείτε το προϊόν σε περιοχέςόπου δεν
επιτρέπονται ηλεκτρονικές συσκευές.
• Προστατεύετε το προϊόν από βρομιές, υγρασία και
υπερθέρμανση και χρησιμοποιείτε το προϊόν μόνο σε
στεγνούς χώρους.
• Το συγκεκριμένο προϊόν, όπως και όλα τα ηλεκτρικά
προϊόντα, πρέπει να φυλάσσεται μακριά από τα παιδιά!
• Μην αφήνετε το προϊόν να πέφτει και μην το εκθέτετε σε
ισχυρούς κραδασμούς.
• Μην χρησιμοποιείτε το προϊόν εκτός των ορίων
απόδοσής του που αναφέρονται στα τεχνικά στοιχεία.
• Κρατήστε τα παιδιά μακριά από τα υλικά συσκευασίας,
καθώς υπάρχει κίνδυνος ασφυξίας.
• Απορρίπτετε τα υλικά συσκευασίας αμέσως, σύμφωνα
με τους ισχύοντες τοπικούς κανονισμούς για την
απόρριψη.
• Μην προβαίνετε σε τροποποιήσεις του προϊόντος.
Μπορεί να ακυρωθεί ηεγγύησή σας.
• Χρησιμοποιείτε το προϊόν αποκλειστικάκαι μόνογια τον
προβλεπόμενοσκοπό χρήσης του.
• Μην χρησιμοποιείτε το προϊόν κοντάσεθερμαντικά
σώματα, άλλες πηγές θέρμανσης ήστην άμεση ηλιακή
ακτινοβολία.
• Μην χρησιμοποιείτε το προϊόν σε υγρό περιβάλλον και
αποφεύγετε τις σταγόνες νερού.
• Να χρησιμοποιείτε το προϊόν μόνο σε ήπιες κλιματικές
συνθήκες.
Κίνδυνος ηλεκτροπληξίας
• Μην ανοίγετε το προϊόν και μην συνεχίζετε να το
χρησιμοποιείτε, αν έχουν προκληθεί ζημιές.
• Μην χρησιμοποιείτε το προϊόν, αν ο
αντάπτορας AC, το καλώδιο προσαρμογέα ήτο
τροφοδοτικό έχει βλάβη.
• Μην προσπαθήσετε να συντηρήσετε ήναεπισκευάσετε
μόνοι σας το προϊόν. Οι εργασίες συντήρησης πρέπει
να πραγματοποιούνται από το αρμόδιο εξειδικευμένο
προσωπικό.
Προειδοποίηση – Μπαταρίες
• Πρέπει να προσέχετε οπωσδήποτε τη σωστή
πολικότητα (επιγραφή + και -) των μπαταριών και να τις
τοποθετείτε ανάλογα. Ημητήρηση μπορεί να οδηγήσει
σε διαρροή του υγρού ήσεέκρηξη των μπαταριών.
• Χρησιμοποιείτε αποκλειστικά συσσωρευτές (ή
μπαταρίες) του προβλεπόμενου τύπου.
• Πριν την τοποθέτηση των μπαταριών καθαρίστε τις
επαφές των μπαταριών και τις επαφές του προϊόντος.
• Τα παιδιά δεν επιτρέπεται να αλλάζουν μπαταρίες
χωρίς επίβλεψη.
• Μην μπερδεύετε παλιές και καινούριες μπαταρίες,
καθώς και μπαταρίες διαφορετικού τύπου και
κατασκευαστή.
• Αφαιρέστε τις μπαταρίες από προϊόντα που δεν έχουν
χρησιμοποιηθεί για μεγάλο χρονικό διάστημα (εκτός αν
θέλετε να τα χρησιμοποιήσετε σε περιπτώσεις έκτακτης
ανάγκης).
• Μην βραχυκυκλώνετε τις μπαταρίες.
• Μην φορτίζετε τις απλές μπαταρίες.
• Μην πετάτε τις μπαταρίες στην φωτιά.
• Φυλάξτε τις μπαταρίες μακριά από παιδιά.
• Οι μπαταρίες δεν πρέπει να ανοίγονται, να
καταστρέφονται, να καταπίνονται ήνακαταλήγουν στο
περιβάλλον. Μπορεί να περιέχουν δηλητηριώδη και
βλαβερά για το περιβάλλον βαρέα μέταλλα.
• Αφαιρέστε και απορρίψτε τις χρησιμοποιημένες
μπαταρίες αμέσως από το προϊόν.
• Μην αποθηκεύετε, φορτίζετε καιμην χρησιμοποιείτε
τη μονάδα σε ακραίες θερμοκρασίες καιυπερβολικά
χαμηλή ατμοσφαιρική πίεση (όπως π.χ. σε μεγάλα
ύψη).
38
Page 45

4. Πριν από τη θέση σε λειτουργία
Υπόδειξη
Θα βρείτε τη λεπτομερή περιγραφή της
εφαρμογής UNDOK και όλων των
λειτουργιών στον οδηγό
UNDOK στη διεύθυνση:
4.2 WLAN (ασύρματο δίκτυο)
• Βεβαιωθείτε πως οδρομολογητής είναι ενεργοποιημένος,
λειτουργεί σωστάκαι πως υπάρχεισύνδεση στοίντερνετ.
• Ενεργοποιήστε τη λειτουργία WLAN τουδρομολογητή
σας.
• Αναφορικάμετησωστή λειτουργία της σύνδεσης WLAN
μελετήστε τις οδηγίες λειτουργίας τουδρομολογητή σας.
• Στη συνέχεια συνεχίστε όπως ακριβώς περιγράφεται στο
βήμα 5«Έναρξη χρήσης».
5. Θέση σε λειτουργία
www.hama.com->00054238 ->Downloads
Υποδείξεις για τον χειρισμό
• Το πλήκτρο [[OK]] καθώς και το πλήκτρο ► του
τηλεχειριστηρίου αντιστοιχούν στο πλήκτρο [POWER/
VOLUME/ENTER/NAVIGATE](11) στην μπροστινή
πλευρά του ραδιοφώνου.
• Το πλήκτρο ◄ του τηλεχειριστηρίου αντιστοιχεί στο
πλήκτρο [ ] στην μπροστινή πλευρά του ραδιοφώνου
• Τα πλήκτρα ▲ ▼ του τηλεχειριστηρίου αντιστοιχούν
στην αριστερή και δεξιά περιστροφή του διακόπτη
πλοήγησης που βρίσκεται στην μπροστινή πλευρά του
ραδιοφώνου.
Θέση τηλεχειριστηρίου σε λειτουργία
Ανοίξτε το κάλυμμα της θήκης μπαταριών. Το κάλυμμα
βρίσκεται στην πίσω πλευρά του τηλεχειριστηρίου και
ανοίγει, αν το σπρώξετε προς την κατεύθυνση που
επισημαίνεται.
Στα περιεχόμενα της συσκευασίας περιλαμβάνονται
δύο μπαταρίες ΑΑΑ, τις οποίες πρέπει να τοποθετήσετε
στη θήκη μπαταριών για να θέσετε το τηλεχειριστήριο
σε λειτουργία. Κατά την τοποθέτηση των μπαταριών,
προσέξτε να τοποθετηθούν με τη σωστή πολικότητα. Η
προκαθορισμένη πολικότητα (+/-) επισημαίνεται στη θήκη
μπαταριών.
Προετοιμασία σύνδεσης δικτύου
4.1 LAN (καλωδιακό δίκτυο)
• Συνδέστε μια υποδοχή LAN τουδικούσας δρομολογητή
με εκείνη τουραδιοφώνου σας. Γιατοσκοπό
αυτόχρειάζεστε ένακαλώδιο Ethernet που δεν
συμπεριλαμβάνεται στη συσκευασία παράδοσης.
• Βεβαιωθείτε πως οδρομολογητής είναι ενεργοποιημένος,
λειτουργεί σωστάκαι πως υπάρχεισύνδεση στοίντερνετ.
• Αναφορικάμετησωστή λειτουργία της σύνδεσης LAN
μελετήστε τις οδηγίες λειτουργίας τουδρομολογητή σας.
• Στη συνέχεια συνεχίστε όπως ακριβώς περιγράφεται στο
βήμα 5«Έναρξη χρήσης».
Υπόδειξη – βέλτιστο σήμα
"DIT2006BT" αυτό διαθέτει υποδοχή κεραίας για
εξωτερικές κεραίες με ομοαξονικό καλώδιο. Στον
παρεχόμενο εξοπλισμό περιλαμβάνεται μια κατάλληλη
τηλεσκοπική κεραία που σάς επιτρέπει τη λήψη
σήματος DAB, DAB+ και FM. Εναλλακτικά, μπορείτε
να χρησιμοποιήσετε μια ενεργητική ήπαθητική κεραία,
για να βελτιώσετε την απόδοση του σήματος ήνα
προσαρμόσετε τις απαιτήσεις σας.
Προσοχή:
• Να αποσυνδέετε πάντα εντελώς την κεραία.
• Για βέλτιστο σήμα, συνιστάται να τοποθετείτε την
κεραία κάθετα.
5.1 Γενικές υποδείξεις για τον χειρισμό
5.1.1 Ενεργοποίηση/Απενεργοποίηση/Αναμονή
• Πατήστε [POWER/VOLUME/ENTER/NAVIGATE](11)
για να ενεργοποιήσετε το ραδιόφωνο.
• Πατήστε παρατεταμένα το πλήκτρο [POWER/VOLUME/
ENTER/NAVIGATE](11) για περ.3δευτερόλεπτα, για να
απενεργοποιήσετε το ραδιόφωνο (αναμονή).
• Αποσυνδέστε τη συσκευή από την παροχή ρεύματος, για
να την απενεργοποιήσετε εντελώς.
5.1.2 Πλοήγηση και χειρισμός
• Πλοηγηθείτε στα διαφορετικά σημεία μενού, πατώντας
ένα πλήκτρο σύντομης επιλογής.
• Γυρίζοντας τα [POWER/VOLUME/ENTER/NAVIGATE]
(11), επιλέγετε μεμονωμένα στοιχεία του μενού.
• Πατώντας [POWER/VOLUME/ENTER/NAVIGATE](11),
επιβεβαιώνετε την επιλογή σας.
5.1.3 Ρύθμιση έντασης ήχου
• Γυρίζοντας τα [POWER/VOLUME/ENTER/NAVIGATE]
(11), αυξάνετε (δεξιά) και μειώνετε (αριστερά) την ένταση
του ήχου.
39
Page 46

5.2 Ενεργοποίηση
Προειδοποίηση
• Χρησιμοποιείτε το προϊόν αποκλειστικά και μόνο με μια
κατάλληλη για τον σκοπό αυτό πρίζα. Ηπρίζα πρέπει
να βρίσκεται κοντά στο προϊόν και να είναι εύκολα
προσβάσιμη.
• Αποσυνδέετε το προϊόν από το ρεύμα,
χρησιμοποιώντας τον διακόπτη on/off. Αν δεν υπάρχει,
αποσυνδέετε το τροφοδοτικό από την πρίζα.
• Εάν χρησιμοποιείτε πολύπριζο, προσέξτε, ώστε οι
συνδεδεμένοι καταναλωτές να μην υπερβαίνουν την
επιτρεπόμενη συνολική κατανάλωση ενέργειας.
• Αποσυνδέετε το προϊόν από το ρεύμα, όταν δεν το
χρησιμοποιείτε για μεγάλο χρονικό διάστημα.
• Συνδέστε τον μετασχηματιστή στο καλώδιο τροφοδοσίας
(1) στην πίσω πλευρά του ραδιοφώνου.
• Συνδέστε το καλώδιο τροφοδοσίας σε μια πρίζα που έχει
εγκατασταθεί σωστά και είναι εύκολα προσβάσιμη.
• Περιμένετε έως ότου να έχει ολοκληρωθεί ηεκκίνηση
του ραδιοφώνου.
• Πατήστε το πλήκτρο [POWER/VOLUME/ENTER/
NAVIGATE](11) για να ενεργοποιήσετε το ραδιόφωνο.
Υπόδειξη – πρώτη ενεργοποίηση
• Κατά την πρώτη εκκίνηση, ξεκινά αυτόματα οοδηγός
εγκατάστασης (Setup Wizard).
• Οοδηγός εγκατάστασης εκτελείται στην Αγγλική
γλώσσα.
• Μπορείτε να παρακάμψετε τον οδηγό και να τον
εκτελέσετε αργότερα ξανά σε άλλη γλώσσα.
5.3 Γλώσσα
Κατά την πρώτη θέση σε λειτουργία, ως προεπιλεγμένη
γλώσσα του ραδιοφώνου έχουν οριστεί τα Αγγλικά.
Για να αλλάξετε την προεπιλεγμένη γλώσσα μενού του
ραδιοφώνου, ακολουθήστε τα εξής βήματα:
• Πατήστε [
ρυθμίσεων.
• Πλοηγηθείτε με τα πλήκτρα [POWER/VOLUME/ENTER/
NAVIGATE](11) στο σημείο μενού «Ρυθμίσεις».
• Επιβεβαιώστε την επιλογή σας, πατώντας [POWER/
VOLUME/ENTER/NAVIGATE](11).
• Πλοηγηθείτε με τα πλήκτρα [POWER/VOLUME/
ENTER/NAVIGATE](11) στο σημείο μενού «Γλώσσα».
Επιβεβαιώστε την επιλογή σας, πατώντας [POWER/
VOLUME/ENTER/NAVIGATE](11).
• Επιλέξτε με τα πλήκτρα [POWER/VOLUME/ENTER/
NAVIGATE](11) τη γλώσσα συστήματος που επιθυμείτε.
• Ητρέχουσα επιλεγμένη γλώσσα επισημαίνεται με*.
](7), για να μεταβείτε στο μενού των
Υπόδειξη
• Διατίθενται οι εξής γλώσσες:
αγγλικά, δανικά, γαλλικά, γερμανικά, ιταλικά,
νορβηγικά, φινλανδικά, σουηδικά, τουρκικά, πολωνικά,
нидерлä, Πορτογάλος, ισπανικά
6. Συντήρηση και φροντίδα
• Καθαρίστε το προϊόν με ένα ελαφρώς νωπό πανί
που δεν αφήνει χνούδια. Μην χρησιμοποιείτε ισχυρά
καθαριστικά.
• Εάν δεν χρησιμοποιείτε το προϊόν για μεγάλο χρονικό
διάστημα, απενεργοποιήστε το και αποσυνδέστε το
από την παροχή ρεύματος. Αποθηκεύστε το σε καθαρό
και στεγνό μέρος, μακριά από την άμεση ηλιακή
ακτινοβολία.
7. Αποκλεισμός της ευθύνης
Η Hama GmbH &CoKGδεν αναλαμβάνει καμία ευθύνη
ούτε και εγγύηση για ζημιές οι οποίες προκλήθηκαν
από εσφαλμένη εγκατάσταση και συναρμολόγηση, από
εσφαλμένη χρήση του προϊόντος ήαπό μη τήρηση
του εγχειριδίου οδηγιών ή/και των προειδοποιήσεων
ασφαλείας.
8. Σέρβις και υποστήριξη
Εάν έχετε ερωτήσεις για το προϊόν, μπορείτε να
απευθυνθείτε στην εξυπηρέτηση πελατών της Hama.
Γραμμή εξυπηρέτησης:+49 9091 502-115 (Γερμανικά/
Αγγλικά)
Περισσότερες πληροφορίες για την υποστήριξη θα βρείτε
εδώ:
www.hama.com
Το πλήρες λεπτομερές εγχειρίδιο οδηγιών διατίθεται στην
ακόλουθη ιστοσελίδα:
www.hama.com -> 00054238 -> Downloads
40
Page 47

9. Υποδείξεις για την απόρριψη
Υπόδειξη σχετικά με την προστασία
περιβάλλοντος:
Από τη στιγμή που οι Ευρωπαϊκές Οδηγίες
2012/19/ΕΕ και 2006/66/ΕΚ ενσωματώνονται στην
κρατική νομοθεσία, ισχύουν τα εξής: Οι ηλεκτρικές
και οι ηλεκτρονικές συσκευές καθώς και οι
μπαταρίες δεν επιτρέπεται να απορρίπτονται στα οικιακά
απορρίμματα. Οι καταναλωτές υποχρεούνται από τον νόμο
να επιστρέφουν τις ηλεκτρικές και ηλεκτρονικές συσκευές
καθώς και τις μπαταρίες στο τέλος της ζωής τους στα
δημόσια σημεία περισυλλογής που έχουν δημιουργηθεί γι’
αυτό το σκοπό ήστα σημεία πώλησης. Οι λεπτομέρειες
ρυθμίζονται στην εκάστοτε κρατική νομοθεσία. Το σύμβολο
πάνω στο προϊόν, στο εγχειρίδιο χρήσης ήστη συσκευασία
παραπέμπει σε αυτές τις διατάξεις. Με την ανακύκλωση,
την επαναχρησιμοποίηση των υλικών ήμεάλλες μορφές
αξιοποίησης παλιών συσκευών/μπαταριών συνεισφέρετε
σημαντικά στην προστασία του περιβάλλοντος.
10. Δήλωση συμμόρφωσης
Με την παρούσα η Hama GmbH &CoKGδηλώνει
ότι οραδιοεξοπλισμός [00054238] πληροί τις
απαιτήσεις της οδηγίας 2014/53/ΕΕ. Το πλήρες
κείμενο της δήλωσης συμμόρφωσης ΕΕ διατίθεται στην
ακόλουθη ιστοσελίδα:
www.hama.com -> 00054238 -> Downloads
Ζώνη συχνοτήτων/Ζώνες
συχνοτήτων
Bluetooth: 2.402 –2.480 GHz6.5 dBm(EIRP)
WiFi: 2.400 –2.480 GHz 15.5 dBm (EIRP)
WiFi: 5.150 –5.350 GHz 16.5 dBm (EIRP)
WiFi: 5.470 –5.725 GHz 16.5 dBm (EIRP)
WiFi: 5.725 –5.850 GHz 11 dBm (EIRP)
Μέγιστη εκπεμπόμενη
ισχύς
Περιορισμοί ήαπαιτήσεις
Βέλγιο, Βουλγαρία, Τσεχική Δημοκρατία, Δανία, Γερμανία,
Εσθονία, Ιρλανδία, Ελλάδα, Ισπανία, Γαλλία, Κροατία,
Ιταλία, Κύπρος, Λετονία, Λιθουανία, Λουξεμβούργο,
Ουγγαρία, Μάλτα, Ολλανδία, Αυστρία, Πολωνία,
Πορτογαλία, Ρουμανία, Σλοβενία, Σλοβακία, Φινλανδία,
Σουηδία, Ηνωμένο Βασίλειο
Υπόδειξη
Όταν χρησιμοποιούνται τα κανάλια 36–64 (συχνότητες
5.150 MHz –5.350 MHz) στη ζώνη 5GHz WLAN,
μπορείτε να συνδέσετε το προϊόν μόνο σε κλειστούς
χώρους.
Γιατον περιορισμό της έκθεσης σε
ηλεκτρομαγνητικάπεδία
Ησυσκευή αυτή προβλέπεται για χρήση σε απόσταση
τουλάχιστον 20 cm από το σώμα τουχρήστηήτων
ατόμων που βρίσκονται κοντά. Απαγορεύεται να φοράτε
τη συσκευή πάνω στοσώμα.
41
Page 48
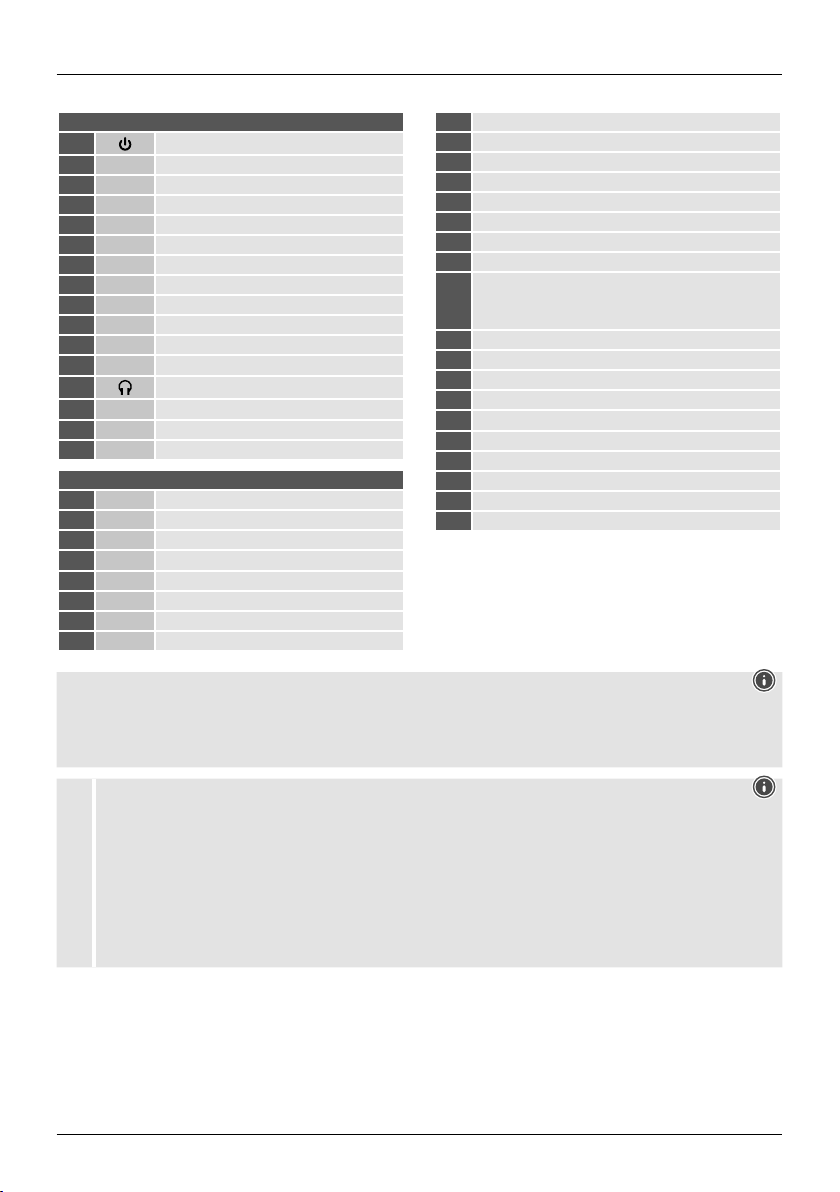
P Skrócona instrukcja obsługi
Elementy obsługi isygnalizacji
A: Radio Przód
1
2 Gniazdo AUX-In
3 [VOLUME] +/-
4 Radio [PRESET]
5 Przycisk [MODE]
6 Przycisk [ALARM]
7 Przycisk [EQUALIZER]
8 Przycisk [MENU]
9 Przycisk [INFO]
10 Przycisk [BACK] (do tyłu)
11 Odbiornik na podczerwień
12 [Navigation]
13
14
15 Kolorowy ekran 2.8"
16 LED
17 Przewód sieciowy
18 Antena*
19 Antena Wi-Fi/Bluetooth
20 Wyjście optyczne
21 Wyjście koncentryczne
22 Wyjście stereo cinch L/R
23
24
Przycisk [POWER]
Gniazdo słuchawkowe
Gniazdo USB
B: Radio Tył
Gniazdo Line-Out
Łącze LAN
Pilot zdalnego sterowania
1 Przycisk [POWER]
2 Przycisk [MUTE]
3 Przycisk (1-4) [PRESET]
4 Przycisk [EQUALIZER]
5 Przycisk [PRESET]
6 Przycisk [MENU]
7 Przycisk [SOURCE]
8 Przycisk [OK]
Przycisk nawigacyjne
9
▲ Wgórę ▼ Wdół
◄Wstecz ► Wprzód
10 Przycisk [VOL-]
11 Przycisk [VOL+]
12 Przycisk [HOME]
13 Przycisk [BACK]
14 Przycisk [INFO]
15 Przycisk [BACKLIGHT]
16 Przycisk [PAUSE]
17 Przycisk [PLAY]
18 Przycisk [PREVIOUS]
19 Przycisk [NEXT]
Wskazówka
*"DIT2006BT" posiada wymienną antenę.Można stosować antenę aktywną lub pasywną z łączem koncentrycznym.
** Pokrętłodoregulacji posiada podwójną funkcjonalność.Obrócić pokrętło, aby zmienić głośność lub poruszać się po
strukturze menu. Naciśnięcie tego pokrętłaprzełącza urządzenie wtryb gotowości lub potwierdza wybór.
Ważna wskazówka —skrócona instrukcja obsługi
• Jest to skrócona instrukcja obsługi, któradostarcza najważniejszych podstawowych informacji, takich jak wskazówki
dotyczące bezpieczeństwa iuruchamiania produktu.
• Ze względu na ochronę środowiska ioszczędność cennych surowców, rma Hama rezygnuje zdrukowanej wersji
instrukcji obsługi iprzedkłada ją wyłącznie wformie pliku PDF do pobrania.
• Pełny tekst instrukcji obsługi jest dostępny pod następującym adresem internetowym:
!
www.hama.com -> 00054238 -> Downloads
• Należyzachować niniejszą instrukcję obsługi wcelach informacyjnych na swoim komputerze iwydrukować ją,jeśli to
możliwe.
42
Page 49

1. Objaśnienie symboli iinstrukcji ostrzegawczych
Ryzyko porażenia prądem
Niniejszy symbol wskazuje na części produktu znajdujące
się pod napięciem na tyle wysokim, żeistnieje zagrożenie
porażenia prądem.
Ostrzeżenie
Niniejszy symbol stosuje się do wskazania zaleceń
dotyczących bezpieczeństwa lub wcelu zwrócenia uwagi
na konkretne zagrożenia iniebezpieczeństwa.
Wskazówka
Niniejszy symbol wskazuje na dodatkowe informacje i
istotne uwagi.
2. Zawartość zestawu
• Digital-HiFi-Tuner DIT2006BT
• Kabel cinch (dla odbioru stereo -wyjście Cinch L/R)
• pilot zdalnego sterowania
• 2baterie typu AAA
• QSG
3. Uwagi dotyczące bezpieczeństwa
• Produkt jest przeznaczony do prywatnego,
niekomercyjnego użytku domowego.
• Nie używać produktu wmiejscach, gdzie niedozwolone
jest stosowanie urządzeń elektronicznych.
• Chronić produkt przed brudem, wilgocią iprzegrzaniem.
Korzystać zproduktu wyłącznie wsuchych
pomieszczeniach.
• Tenprodukt, podobnie jak wszystkie produkty
elektryczne, nie jest przeznaczony do obsługi przez
dzieci!
• Nie upuszczać produktu inie narażać go na silne
wstrząsy.
• Nie używać produktu poza granicami jego wydajności
określonymi wdanych technicznych.
• Opakowanie przechowywać wmiejscu niedostępnym dla
dzieci. Niebezpieczeństwo uduszenia.
• Opakowanie należyniezwłocznie usunąć zgodnie z
lokalnymi przepisami dotyczącymi utylizacji.
• Nie dokonywać żadnych zmian wurządzeniu. W
przeciwnym razie gwarancja utraci ważność.
• Produkt należyużywać wyłącznie zgodnie z
przeznaczeniem.
• Nie używać produktu wbezpośrednim sąsiedztwie
grzejnika, innych źródeł ciepłalub wbezpośrednim
świetle słonecznym.
• Nie używać produktu wwilgotnym otoczeniu ichronić
go przed bryzgami wody.
• Zproduktu należykorzystać wyłącznie wumiarkowanych
warunkach klimatycznych.
Ryzyko porażenia prądem
• Nie otwierać produktu inie kontynuować jego obsługi,
jeżeli jest uszkodzony.
• Nie należykorzystać zproduktu, gdy:
zasilacz sieciowy,kabel zasilający lub przewód
zasilający są uszkodzone.
• Nie próbować samodzielnie dokonywać konserwacji
lub naprawiać urządzenia. Wszelkie prace
konserwacyjne należypowierzyć odpowiedniemu
personelowi specjalistycznemu.
Ostrzeżenie —baterie
• Koniecznie przestrzegać prawidłowej biegunowości
(oznaczenie +i−)baterii oraz odpowiednio je wkładać.
Nieprzestrzeganie grozi wyciekiem lub wybuchem
baterii.
• Używać wyłącznie akumulatorów (lub baterii)
określonego typu.
• Przed włożeniem baterii wyczyścić styki baterii i
przeciwległestyki.
• Nie pozwalać dzieciom na wymienianie baterii bez
nadzoru.
• Nie mieszać starych baterii znowymi, baterii różnego
typu lub różnych producentów.
• Wyjąć baterie zproduktów,którenie będą używane
przez dłuższy czas (chyba żesągotowe do użycia w
sytuacji awaryjnej).
• Nie zwierać baterii.
• Nie ładować baterii.
• Nie wrzucać baterii do ognia.
• Przechowywać baterie wmiejscu niedostępnym dla
dzieci.
• Nigdy nie otwierać,nie uszkadzać ani nie połykać
baterii inie dopuszczać,aby przedostałysiędo
środowiska. Mogą one zawierać toksyczne iszkodliwe
dla środowiska metale ciężkie.
• Zużyte baterie natychmiast wyjąć zproduktu iwyrzucić.
• Unikać przechowywania, ładowania istosowania w
ekstremalnych temperaturach iprzy bardzo niskim
ciśnieniu powietrza (np. na dużych wysokościach).
43
Page 50

4. Przed uruchomieniem
Wskazówka
Szczegółowy opis
aplikacji UNDOK ipełny
zakres funkcji można znaleźć wnaszym
przewodniku UNDOK na stronie internetowej:
www.hama.com->00054238 ->Downloads
Uwagi dotyczące użytkowania
• Przycisk [OK]oraz ► na pilocie odpowiada
przyciskowi [POWER/VOLUME/ENTER/NAVIGATE]
(11) na przednim panelu radia.
• Przycisk ◄ na pilocie odpowiada przyciskowi [
przednim panelu radia
• Przyciski ▲ ▼ na pilocie odpowiadają przekręcaniu
wlewo iwprawo pokrętłaregulacyjnego na przednim
panelu radia.
Rozpoczęcie korzystania zpilota zdalnego
sterowania
Otworzyć pokrywę komory baterii. Znajduje się ona ztyłu
pilota zdalnego sterowania imożna ją otworzyć poprzez
przesunięcie woznaczonym kierunku.
Wzakres dostawy wchodzą dwie baterie typu AAA,
któredorozpoczęcia użytkowania należyzainstalować w
komorze baterii. Podczas wkładania baterii należyuważać,
aby byłyone zainstalowane przy właściwym rozmieszczeniu
biegunów.Właściwe rozmieszczenie biegunów (+/-) jest
zaznaczone wkomorze baterii.
Konfiguracja połączenia sieciowego
4.1 LAN (sieć przewodowa)
• Połączyć gniazdo LAN ruterazgniazdem radia. Potrzebny
jest do tego kabel Ethernet, który nie jest dołączony do
urządzenia.
• Sprawdzić,czy ruter jest włączony,prawidłowo działai
aktywne jest połączenie zInternetem.
• Aby zapewnić prawidłowe działanie łącza LAN,
uwzględnić instrukcję obsługi rutera.
• Następnie postępować zgodnie zopisem wpunkcie 5.
„Uruchamianie“.
]na
4.2 WLAN (sieć bezprzewodowa)
• Sprawdzić,czy ruter jest włączony,prawidłowo działai
aktywne jest połączenie zInternetem.
• Uaktywnić funkcję WLAN rutera.
• Aby zapewnić prawidłowe działanie łącza WLAN,
uwzględnić instrukcję obsługi rutera.
• Następnie postępować zgodnie zopisem wpunkcie 5.
„Uruchamianie“.
5. Pierwsze kroki
Wskazówka —optymalny odbiór
"DIT2006BT" ma złącze antenowe do koncentrycznych
anten zewnętrznych. Dostawa obejmuje odpowiednią
antenę teleskopową,któraumożliwia odbiór przez DAB,
DAB+iFM. Alternatywnie można użyć aktywnej lub
pasywnej anteny,aby poprawić wydajność odbioru lub
dostosować go do swoich potrzeb.
Należypamiętać:
• Zawsze całkowicie wyciągnąć antenę.
• Aby uzyskać optymalny odbiór,zalecamy ustawienie
anteny pionowo.
5.1 Ogólne wskazówki dotyczące obsługi
5.1.1 Włączanie/wyłączanie/tryb gotowości
• Nacisnąć przycisk [POWER/VOLUME/ENTER/
NAVIGATE](11), aby włączyć radio.
• Nacisnąć iprzytrzymać przycisk [POWER/VOLUME/
ENTER/NAVIGATE](11) przez około3sekundy,aby
wyłączyć radio (tryb gotowości).
• Odłączyć urządzenie od zasilania, aby całkowicie je
wyłączyć.
5.1.2 Nawigacja isterowanie
• Po naciśnięciu przycisku skrótu można poruszać się
między pozycjami wmenu.
• Przekręcić element [POWER/VOLUME/ENTER/
NAVIGATE](11), aby wybierać poszczególne elementy
menu.
• Nacisnąć przycisk [POWER/VOLUME/ENTER/NAVIGATE]
(11), aby potwierdzić wybór.
5.1.3 Regulacja głośności
• Przekręcić element [POWER/VOLUME/ENTER/NAVIGATE]
(11), aby zwiększyć (w prawo) lub zmniejszyć (w lewo)
głośność.
44
Page 51

5.2 Włączanie
Ostrzeżenie
• Podłączać produkt tylko do odpowiedniego gniazda
wtykowego. Gniazdo wtykowe musi znajdować się w
pobliżuproduktu ibyćłatwo dostępne.
• Odłączać produkt od sieci za pomocą wyłącznika
zasilania — jeżeli nie jest on na wyposażeniu,
wyciągnąć przewód sieciowy zgniazda wtykowego.
• Wprzypadku wielu gniazd upewnić się, żepodłączone
odbiorniki nie przekraczają dopuszczalnego
całkowitego zużycia energii.
• Odłączyć produkt od zasilania sieciowego, jeżeli nie
jest używany przez dłuższy czas.
• Podłączyć zasilacz sieciowy do gniazda zasilania
sieciowego (1) ztyłuradia.
• Podłączyć przewód sieciowy do prawidłowo
zamontowanego i łatwo dostępnego gniazdka
sieciowego.
• Zaczekać,ażzakończy się uruchamianie radia.
• Nacisnąć przycisk [POWER/VOLUME/ENTER/
NAVIGATE](11), aby włączyć radio.
Wskazówka —podczas pierwszego
włączania
• Podczas pierwszego włączenia uruchamia się
automatycznie asystent konguracji (Setup Wizard).
• Możliwe jest pominięcie asystenta iponowne
uruchomienie wwybranym języku.
• Można pominąć asystenta iwywołać go później w
języku niemieckim.
5.3 Język
Wprzypadku pierwszego uruchomienia domyślnym
językiem radia jest angielski. Aby zmienić język menu
radia, należywykonać następujące czynności:
• Nacisnąć przycisk [
• Za pomocą elementu [POWER/VOLUME/ENTER/
NAVIGATE](11) przejść do punktu menu „Ustawienia)“.
• Potwierdzić wybór,naciskającprzycisk [POWER/
VOLUME/ENTER/NAVIGATE](11).
• Za pomocą elementu [POWER/VOLUME/ENTER/
NAVIGATE](11) przejść do punktu menu „Język“.
Potwierdzić wybór,naciskającprzycisk [POWER/
VOLUME/ENTER/NAVIGATE](11).
• Za pomocą elementu [POWER/VOLUME/ENTER/
NAVIGATE](11) wybrać żądany język systemu.
• Aktualnie wybrane ustawienie języka jest oznaczone
symbolem*.
](7), aby wejść do menu ustawień.
Wskazówka
• Do wyboru są następujące języki:
angielski, duński, francuski, niemiecki, włoski,
norweski, ński, szwedzki, turecki, polski, holenderski,
portugalski, hiszpański
6. Obsługa ikonserwacja
• Czyścić produkt wyłącznie niestrzępiącą się,lekko
wilgotną ściereczką.Nie używać agresywnych środków
czyszczących.
• Jeżeli urządzenie nie jest używane przez dłuższy czas,
należyjewyłączyć iwyjąć przewód zasilający zgniazdka
elektrycznego. Przechowywać wczystym, suchym
miejscu. Chronić przed bezpośrednim działaniem
promieni słonecznych.
7. Wyłączenie odpowiedzialności ztytuługwarancji
Hama GmbH &CoKGnie ponosi odpowiedzialności i
nie udziela żadnej gwarancji ztytułuszkód wynikających
zniewłaściwego montażu, instalacji, niewłaściwego
użytkowania urządzenia ani ztytułuszkód wynikających
zpostępowania niezgodnie zinstrukcją obsługi i
wskazówkami bezpieczeństwa.
8. Serwis ipomoc techniczna
Wprzypadku jakichkolwiek pytań prosimy okontakt z
Działem Obsługi Klienta rmy Hama.
Gorąca linia: +49 9091 502-115 (niem./ang.)
Więcej pomocnych informacji można znaleźć tutaj:
www.hama.com
Pełny tekst instrukcji obsługi jest dostępny pod
następującym adresem internetowym:
www.hama.com -> 00054238 -> Downloads
45
Page 52

9. Informacje dotycząca recyklingu
Wskazówki dotyczące ochrony środowiska:
Od czasu wprowadzenia europejskiej dyrektywy
2012/19/UE i2006/66/WE do prawa narodowego
obowiązują następujące ustalenia: Urządzeń
elektrycznych, elektronicznych oraz baterii
jednorazowych nie należywyrzucać wraz zodpadami
gospodarstwa domowego. Konsumenci są prawnie
zobowiązani do zwrotu sprzętu elektrycznego i
elektronicznego oraz baterii iakumulatorów po
zakończeniu okresu ich eksploatacji do publicznych
punktów zbiórki lub do punktu sprzedaży. Szczegółowe
kwestie regulują przepisy prawne danego kraju. Informuje
otym symbol umieszczony na opakowaniu, na produkcie
lub winstrukcji obsługi. Ponowne wykorzystanie, odzysk
lub inne formy recyklingu starego sprzętu/akumulatorów i
baterii stanowią ważny wkład wochronę naszego
środowiska.
10. Deklaracja zgodności
Hama GmbH &CoKGniniejszym oświadcza, że
typ urządzenia radiowego [00054238] jest zgodny
zdyrektywą 2014/53/UE. Pełny tekst deklaracji
zgodności UE jest dostępny pod następującym adresem
internetowym:
www.hama.com -> 00054238 -> Downloads
Zakres(y) częstotliwości
Bluetooth: 2.402 –2.480GHz 6.5 dBm(EIRP)
WiFi: 2.400 –2.480 GHz 15.5 dBm (EIRP)
WiFi: 5.150 –5.350 GHz 16.5 dBm (EIRP)
WiFi: 5.470 –5.725 GHz 16.5 dBm (EIRP)
WiFi: 5.725 –5.850 GHz 11 dBm (EIRP)
Ograniczenia lub wymagania wnastępujących
krajach:
Belgia, Bułgaria, Czechy,Dania, Niemcy,Estonia, Irlandia,
Grecja, Hiszpania, Francja, Chorwacja, Włochy,Cypr,
Łotwa, Litwa, Luksemburg, Węgry,Malta, Holandia,
Austria, Polska, Portugalia, Rumunia, Słowenia, Słowacja,
Finlandia, Szwecja, Wielka Brytania
Promieniowana
maksymalna moc
transmisji
Wcelu ograniczenia ekspozycji na pola
magnetyczne
Niniejsze urządzenie zostałoprzewidziane do użytku
wodstępie co najmniej 20 cm od ciałaużytkownika
lub innych osób znajdujących się wpobliżu. Niniejsze
urządzenie nie możebyćnoszone na ciele.
Wskazówka
Jeżeli używany jest kanał 36–64 (kanałyoczęstotliwości
5150–5350 MHz), urządzenie możebyćużywane tylko w
pomieszczeniach.
46
Page 53

H Rövid használati útmutató
Kezelőelemek és kijelzők
A: Radio Elülső oldal
1
2 AUX-In hüvely
3 [VOLUME] +/-
4 [PRESET]-kerék
5 [MODE] gomb
6 [ALARM] gomb
7 [EQUALIZER] gomb
8 [MENU] gomb
9 [INFO] gomb
10 [BACK] (vissza) gomb
11 Infravörös vevő
12 [Navigation]
13
14
15 2.8" színes kijelző
16 LED
17 Hálózati tápkábel
18 Antenna*
19 Wi-/Bluetooth-antenna
20 Optikai kimenet
21 Koaxiális kimenet
22 Sztereó B/J RCA-kimenet
23
24
Megjegyzés
*"DIT2006BT" cserélhető antennával rendelkezik. Koaxiális csatlakozóval rendelkező,aktív vagy passzív antenna
használható.
Aforgatható szabályozó két funkcióval rendelkezik. Aszabályozó elforgatásával módosíthatja ahangerőt, illetve
**
navigálhat amenüben. Aforgatható szabályozó lenyomásával az eszköz készenléti üzemmódba kerül, illetve
nyugtázható egy kiválasztás.
[POWER] gomb
Fejhallgató csatlakozás
USB csatlakozás
B: Radio Hátoldal
Line-Out hüvely
LAN (10 /100 Mbit) csatlakozás
Távirányító
1 [POWER] Gomb
2 [MUTE] Gomb
3 [PRESET] Direkt Gomb (1-4)
4 [EQUALIZER] Gomb
5 [PRESET] Gomb
6 [MENU] Gomb
7 [SOURCE] Gomb
8 [OK] Gomb
[NAVIGATIONS] Gomb
9
▲ fel ▼ le
◄ vissza ► előre
10 [VOL-] Gomb
11 [VOL+] Gomb
12 [HOME] Gomb
13 [BACK] Gomb
14 [INFO] Gomb
15 [BACKLIGHT] Gomb
16 [PAUSE] Gomb
17 [PLAY] Gomb
18 [PREVIOUS] Gomb
19 [NEXT] Gomb
Fontos megjegyzés –rövid útmutató:
• Ez arövid útmutató az olyan legfontosabb, alapvető információkat tartalmazza, mint abiztonsági utasítások és a
termék üzembe helyezése.
• AHama cég akörnyezetvédelem és az értékes nyersanyagokkal való takarékoskodás jegyében lemond ahosszú
útmutató nyomtatott, papír alapú változatáról, és azt kizárólag letölthető PDF-fájlként teszi közzé.
• Ateljes, hosszú útmutató az alábbi internetes címen érthető el:
!
www.hama.com -> 00054238 -> Letöltések
• Ahosszú használati útmutatót mentse le aszámítógépére, hogy bármikor beletekinthessen, és lehetőség szerint ki is
nyomtathatja.
47
Page 54

1. Figyelmeztető jelzések és megjegyzések
magyarázata
Áramütés veszélye
Ez ajelzés atermék azon nem szigetelt részeinek
megérintésérevonatkozó veszélyreutal, amelyek olyan
magas, veszélyes feszültség alatt állhatnak, amely miatt
áramütés veszélye áll fenn.
Figyelmeztetés
Abiztonsági utasítások jelölésérehasználjuk, illetve
hogy felhívjuk a gyelmet akülönleges veszélyekreés
kockázatokra.
Megjegyzés
Akkor használjuk, ha kiegészítő információkat közlünk,
vagy fontos tudnivalókrahívjuk fel a gyelmet.
2. Acsomag tartalma
• Digital-HiFi-Tuner DIT2006BT
• RCA-kábel (sztereó B/J RCA-kimenethez)
• Távirányító
• 2x AAA elem
• QSG
3. Biztonsági utasítások
• Atermék magánjellegű,nem üzleti célú alkalmazásra
készült.
• Ne használja aterméket olyan helyen, ahol elektronikus
készülékek használata nem megengedett.
• Óvja aterméket szennyeződéstől, nedvességtől
és túlmelegedéstől, és kizárólag száraz helyen
használja.
• Ez atermék, mint minden elektromos készülék, nem
gyermekek kezébe való!
• Ne ejtse le aterméket és ne tegye ki heves rázkódásnak.
• Ne üzemeltesse aterméket aműszaki adatokban
megadott teljesítményhatárokon túl.
• Feltétlenül tartsa távol agyermekeket a
csomagolóanyagtól, mert fulladásveszély állfenn.
• Azonnal selejtezze ki acsomagolóanyagot ahelyileg
érvényes hulladékkezelési előírások szerint.
• Ne végezzen semmilyen módosítást akészüléken. Ebben
az esetben minden garanciaigény megszűnik.
• Aterméket kizárólag arendeltetési céljárahasználja.
• Ne üzemeltesse aterméket közvetlenül fűtés, más
hőforrás közelében vagy közvetlen napsugárzásnál.
• Ne használja aterméket párás környezetben, és kerülje
az érintkezést fröccsenő vízzel.
• Aterméket csak mérsékelt időjárási körülmények között
használja.
Áramütés veszélye
• Ne nyissa ki aterméket, és sérülés esetén ne
üzemeltesse tovább.
• Ne használja aterméket, ha az
AC-adapter,acsatlakozókábel vagy ahálózati vezeték
megsérült.
• Ne kísérelje meg akészüléket saját kezűleg
karbantartani vagy megjavítani. Minden karbantartási
munkát bízzon illetékes szakemberre.
Figyelmeztetés –Elemek
• Feltétlenül ügyeljen az elemek megfelelő polaritására
(+ és -felirat), és ennek megfelelően tegye be őket.
Ennek gyelmen kívül hagyása esetén az elem
kifolyásának vagy felrobbanásának veszélye állfenn.
• Kizárólag amegadott típusnak megfelelő akkumulátort
(vagy elemet) használjon.
• Az elem behelyezése előtt tisztítsa meg az
elemérintkezőket és az ellenérintkezőket.
• Ne engedje meg agyermekeknek az elemcserét
felügyelet nélkül.
• Ne keverje össze arégi és az új elemeket, valamint
akülönböző típusú vagy más gyártótól származó
elemeket.
• Vegye ki az elemeket abból atermékből, amelyet
hosszú ideig nem használ (kivéve, ha azt vészhelyzet
esetérekészenlétben tartja).
• Ne zárja rövidreazelemeket.
• Ne töltse fel az elemeket.
• Ne dobja tűzbe az elemeket.
• Az elemeket gyermekektőlelzárt helyen tárolja.
• Az elemeket soha ne nyissa fel, rongálja meg, nyelje le
vagy juttassa akörnyezetbe. Mérgező és környezetre
káros nehézfémeket tartalmazhatnak.
• Haladéktalanul távolítsa el alemerült elemeket a
termékből, majd selejtezze le őket.
• Kerülje atárolást, aberakodást és afelhasználást
szélsőséges hőmérsékleteken és rendkívül alacsony
légnyomáson (pl. nagy magasságban).
4. Üzembe helyezés előtt
Megjegyzés
Az UNDOK alkalmazást és annak
összes funkcióját ismertető,
részletes leírást az UNDOK-útmutatónkban,
az alábbi weboldalon találja:
48
www.hama.com->00054238 ->Letöltések
Page 55

Kezelési tudnivalók
• Az [OK]gomb, illetve atávirányító ► gombja arádió
elülső oldalán található [POWER/VOLUME/ENTER/
NAVIGATE](11) gombnak felel meg.
• Atávirányító ◄ gombja arádió elülső oldalán
található [ ]gombnak felel meg.
• Atávirányító ▲ és ▼ gombjai arádió elülső oldalán
található navigációs szabályozó balravagy jobbra
fordításának felel meg.
Atávirányító üzembe helyezése
Nyissa ki az elemtartó fedelét. Ez atávirányító hátoldalán
helyezkedik el, és amegjelölt irányba tolva nyitható.
Amellékelt alkatrészek között megtalálja azt akét
darab AAA elemet, amelyeket az üzembe helyezéshez
az elemtartóba kell helyeznie. Az elemek behelyezésekor
ügyeljen amegfelelő polaritásra. Amegfelelő polaritás
(+/-) az elemtartón látható.
Ahálózati kapcsolat beállítása
4.1 LAN (vezetékes hálózat)
• Kösse össze arouter LAN csatlakozóját arádió
csatlakozójával. Ehhez egy Ethernet kábelrelesz
szükséges, ami nem tartozik aszállított tartozékok közé.
• Bizonyosodjon meg róla, hogy arouterbevan kapcsolva,
megfelelően működik és létezik egy Internet kapcsolat.
• ALAN kapcsolat helyes működéséhez vegye gyelembe a
router kezelési útmutatóját.
• Utána közvetlenül az 5. „Üzembevétel“ pontban leírtak
szerint járjon el.
4.2 WLAN (vezeték nélküli hálózat)
• Bizonyosodjon meg róla, hogy arouterbevan kapcsolva,
megfelelően működikéslétezik egy Internetkapcsolat.
• Aktiválja arouter WLAN funkcióját.
• AWLAN kapcsolat helyes működéséhezvegye gyelembea
routerkezelési útmutatóját.
• Utána az 5. „Üzembevétel“ pontbanleírtak szerint járjon el.
5. Üzembe helyezés
Megjegyzés –optimális vétel
"DIT2006BT" koaxiális csatlakozós, külső antennákhoz
alkalmas antennacsatlakozóval rendelkezik. Acsomag
tartalmaz egy teleszkópos antennát, amely lehetővé
teszi aDAB, DAB+ és FM vételt. Helyette használhat
aktív vagy passzív antennát is, hogy növelje avevő
teljesítményét, vagy az elvárásainak megfelelően alakítsa
azt.
Tartsa be az alábbiakat:
• Mindig teljesen húzza ki az antennát.
• Az optimális vételhez javasoljuk az antenna függőleges
igazítását.
5.1 Akezeléssel kapcsolatos, általános tudnivalók
5.1.1 Be- és kikapcsolás/készenlét
• Arádió bekapcsolásához nyomja meg a[POWER/
VOLUME/ENTER/NAVIGATE](11) gombot.
• Arádió kikapcsolásához (készenlét) nyomja le és tartsa
lenyomva kb. 3másodpercrea[POWER/VOLUME/
ENTER/NAVIGATE](11) gombot.
• Ateljes kikapcsolásához válassza le akészüléket a
tápellátásról.
5.1.2 Navigáció és vezérlés
• Az egyik gyorsgomb megnyomását követően navigáljon a
felkínált menüpontok között.
• A[POWER/VOLUME/ENTER/NAVIGATE](11) gomb
elforgatásával választhatja ki az egyes menüpontokat.
• A[POWER/VOLUME/ENTER/NAVIGATE](11) gomb
megnyomásával megerősíti akiválasztást.
5.1.3 Ahangerő beállítása
• A[POWER/VOLUME/ENTER/NAVIGATE](11)
gomb elforgatásával ahangerő növelhető (jobb) vagy
csökkenthető (bal).
5.2 Bekapcsolás
Figyelmeztetés
• Aterméket csak erreengedélyezett csatlakozóaljzatról
működtesse. Atermék közelében, könnyen
hozzáférhető helyen levő csatlakozóaljzatot kell
használni.
• Afőkapcsolóval válassza le aterméket ahálózatról
–hanincs rajta főkapcsoló, akkor húzza ki ahálózati
kábelt acsatlakozóaljzatból.
• Elosztó használata esetén ügyeljen rá, hogy a
csatlakoztatott fogyasztók ne lépjék túl amegengedett
összesített teljesítményfelvételt.
• Ha hosszabb ideig nem használja aterméket, válassza
le ahálózatról.
49
Page 56

• Csatlakoztassa atápegységet arádió hátoldalán
található hálózati tápkábellel (1).
• Kösse össze ahálózati kábelt egy szabályszerűen szerelt
és könnyen hozzáférhető hálózati csatlakozóaljzattal.
• Várja meg, míg befejeződik arádió első beállítása.
• Arádió bekapcsolásához nyomja meg a[POWER/
VOLUME/ENTER/NAVIGATE](11) gombot.
Megjegyzés –első bekapcsoláskor
• Első indításkor automatikusan elindul aTelepítő
varázsló (Setup Wizard).
• ATelepítő varázsló végrehajtása angol nyelven
történik.
• Átugorhatja avarázslót, és később ismét behívhatja
német nyelven.
5.3 Nyelv
Az első üzembe helyezéskor arádió alapértelmezett
nyelveként az angol van beállítva. Arádió beállított
menünyelvének módosításához az alábbiak szerint járjon
el:
• ABeállítások menübe jutáshoz nyomja meg a(z) [
gombot.
• Navigáljon a[POWER/VOLUME/ENTER/NAVIGATE]
(11) gomb segítségével a„Beállítások” menüpontra.
• Erősítse meg akiválasztást a[POWER/VOLUME/
ENTER/NAVIGATE](11) gomb megnyomásával.
• Navigáljon a [POWER/VOLUME/ENTER/NAVIGATE]
(11) gomb segítségével a„Nyelv” menüpontra. Erősítse
meg akiválasztást a[POWER/VOLUME/ENTER/
NAVIGATE](11) gomb megnyomásával.
• Válassza ki akívánt rendszernyelvet a [POWER/
VOLUME/ENTER/NAVIGATE](11) gomb segítségével.
• Az éppen kiválasztott nyelvi beállítást *jel jelöli.
Megjegyzés
• Akövetkező nyelvek közül választhat:
Angol, dán, francia, német, olasz, norvég, nn, svéd,
török, lengyel, holland, portugál, spanyol
](7)
7. Szavatosság kizárása
AHama GmbH &CoKGsemmilyen felelősséget vagy
szavatosságot nem vállal atermék szakszerűtlen
telepítéséből, szerelésébőlésszakszerűtlen használatából,
vagy akezelési útmutató és/vagy abiztonsági előírások be
nem tartásából eredő károkért.
8. Szerviz és támogatás
Kérjük, hogy atermékkel kapcsolatos kérdéseivel forduljon
aHama terméktanácsadásához.
Segélyvonal: +49 9091 502-115 (német/angol)
További támogatási információt itt talál:
www.hama.com
Ateljes, hosszú útmutató az alábbi internetes címen
érthető el:
www.hama.com -> 00054238 -> Downloads
9. Leselejtezési előírások
Környezetvédelmi tudnivalók:
A2012/19/EU és 2006/66/EK európai irányelvek
ajánlása szerint, amegjelölt időponttól kezdve,
minden EU-s tagállamban érvényesek a
következők: Az elektromos és elektronikai
készülékeket, valamint az elemeket nem szabad a
háztartási hulladékkal együtt leselejtezni. Az elhasznált és
működésképtelen elektromos és elektronikus készülékek
gyűjtéséretörvényi előírás kötelez mindenkit, ezért azokat
el kell szállítani egy kijelölt gyűjtőhelyre, vagy vissza kell
vinni avásárlás helyére. Arészleteket az adott nemzeti jog
szabályozza. Atermék csomagolásán feltüntetett
szimbólum egyértelmű jelzést ad errevonatkozóan a
felhasználónak. Arégi készülékek, elhasználódott elemek
begyűjtése, visszaváltása vagy bármilyen formában történő
újrahasznosítása közös hozzájárulás környezetünk
védelméhez.
6. Karbantartás és ápolás
• Ezt aterméket csak szöszmentes, kissé benedvesített
kendővel tisztítsa, és ne használjon agresszív tisztítószert.
• Amennyiben aterméket hosszabb ideig nem használja,
kapcsolja ki akészüléket és válassza le az elektromos
hálózatról. Tárolja tiszta, száraz, közvetlen napfénytől
védett helyen.
50
Page 57

10. Megfelelőségi nyilatkozat
Hama GmbH &CoKGtanúsítja, hogy a
[00054238] típusú rádióberendezés megfelel a
2014/53/EU irányelv követelményeinek. Az
EU-megfelelőségi nyilatkozat teljes szövege elérhető a
következő internetes címen:
www.hama.com -> 00054238 -> Downloads
www.hama.com -> 00054235 -> Downloads
Frekvenciasáv(ok)
Bluetooth: 2.402 –2.480GHz 6.5 dBm(EIRP)
WiFi: 2.400 –2.480 GHz 15.5 dBm (EIRP)
WiFi: 5.150 –5.350 GHz 16.5 dBm (EIRP)
WiFi: 5.470 –5.725 GHz 16.5 dBm (EIRP)
WiFi: 5.725 –5.850 GHz 11 dBm (EIRP)
Korlátozások vagy követelmények
Ausztria, Belgium, Bulgária, Ciprus, Csehország,
Dánia, Egyesült Királyság, Észtország, Finnország,
Franciaország, Görögország, Hollandia, Horvátország,
Írország, Lengyelország, Lettország, Litvánia, Luxemburg,
Magyarország, Málta, Németország, Olaszország,
Portugália, Románia, Spanyolország, Svédország,
Szlovákia, Szlovénia
Megjegyzés
A36–64 csatornák
(5150 MHz –5350 MHz frekvenciacsatornák) használata
esetén atermék csak zárt helyiségekben használható.
Az elektromágneses mezőnek való
kitettség csökkentése
Akészüléket arraterveztük, hogy azt afelhasználó, ill.
akörnyezetében tartózkodó más személyek testétől
legalább 20 cm-es távolságban használják. Akészüléket
tilos atesten hordani, viselni.
Maximális sugárzott
jelerősség
51
Page 58

C Návod krychlému startu
Ovládací prvky aindikace zobrazit
A: Rádio Přední strana
1
2 Zdířka AUX-In
3 [VOLUME] +/-
4 Kolečko [PRESET]
5 Tlačítko [MODE]
6 Tlačítko [ALARM]
7 Tlačítko [EQUALIZER]
8 Tlačítko [MENU]
9 Tlačítko [INFO]
10 Tlačítko [BACK] (zpět)
11 Infračervený přijímač
12 [Navigation]
13
14
15 Barevný displej 2.8"
16 LED
17 Síťový přívod
18 Anténa*
19 WiFi/Bluetooth anténa
20 Optický výstup
21 Koaxiální výstup
22 Výstup stereo Cinch L/R
23
24
Upozornění
*"DIT2006BT" je vybaveno výměnnou anténou. Můžete používat aktivní nebo pasivní anténu, která má kdispozici
koaxiální konektor.
** Otočný ovladač má dvojí funkci. Otáčením ovladačeměníte hlasitost nebo navigujete ve struktuřemenu. Stisknutím
tohoto otočného ovladačesepřístroj přepne do režimu Standby,popř.sepotvrdí výběr.
Tlačítko [POWER]
Zdířka sluchátka
Přípojka USB
B: Rádio Zadní strana
Zdířka Line-Out
Přípojka LAN (10/100 Mbit)
Dálkové ovládání
1 Tlačítko [POWER]
2 Tlačítko [MUTE]
3 Tlačítka propřímé zadávání [PRESET] (1–4)
4 Tlačítko [EQUALIZER]
5 Tlačítko [PRESET]
6 Tlačítko [MENU]
7 Tlačítko [SOURCE]
8 Tlačítko [OK]
Tlačítka [NAVIGACE]
9
▲ Nahoru ▼ Dolů
◄ Zpět ► Vpřed
10 Tlačítko [VOL-]
11 Tlačítko [VOL+]
12 Tlačítko [HOME]
13 Tlačítko [BACK]
14 Tlačítko [INFO]
15 Tlačítko [BACKLIGHT]
16 Tlačítko [PAUSE]
17 Tlačítko [PLAY]
18 Tlačítko [PREVIOUS]
19 Tlačítko [NEXT]
Důležité upozornění –stručný návod
• Toto je stručný návod, který vám poskytne nejdůležitější základní informace týkající se bezpečnostních pokynů a
uvedení vašeho produktu do provozu.
• Zdůvodů ochrany životního prostředí aúspory cenných surovin společnost Hama upouští od tištěného dlouhého
návodu kobsluze aposkytuje ho výlučně jako soubor ve formátu PDF.
• Úplný dlouhý návod je kdispozici na následující internetové adrese:
!
www.hama.com -> 00054238 -> Downloads
• Tento dlouhý návod si provyhledávání uložte ve svém počítačiapodle možnosti si ho vytiskněte.
52
Page 59

1. Vysvětlení výstražných symbolů apokynů
Nebezpečíporanění elektrickým proudem
Tento symbol upozorňuje na nebezpečípřidotyku
neizolovaných částí produktu, které by mohly vést
nebezpečné napětí otakové síle, že hrozí nebezpečí
poranění elektrickým proudem.
Výstraha
Tento symbol označuje bezpečnostní upozornění, které
poukazuje na určitá rizika anebezpečí.
Upozornění
Tento symbol označuje dodatečné informace nebo
důležité poznámky.
2. Obsah balení
• Digital-HiFi-Tuner DIT2006BT
• Cinch kabel (prostereo cinch L/R výstup)
• Dálkové ovládání
• 2x baterie AAA
• QSG
3. Bezpečnostní pokyny
• Výrobek je určen prosoukromé aneprůmyslové použití.
• Výrobek nepoužívejte na místech, kde je používání
elektronických zařízení zakázáno.
• Chraňte výrobek před znečištěním, vlhkostí apřehřátím a
používejte ho pouze vsuchých prostorách.
• Tento výrobek, stejně jako všechny elektrické produkty,
nepatřídodětských rukou.
• Zabraňte pádu výrobku avýrobek nevystavujte velkým
otřesům.
• Výrobek neprovozujte mimo meze výkonu uvedené v
technických údajích.
• Obalový materiál udržujte bezpodmínečně mimo dosah
dětí, hrozí nebezpečíudušení.
• Obalový materiál likvidujte ihned podle platných
místních předpisů olikvidaci.
• Na přístroji neprovádějte žádné změny.Ztratíte tím
jakékoli nároky na záruční plnění.
• Výrobek používejte pouze kúčelu, ke kterému byl
stanoven.
• Výrobek nepoužívejte vbezprostřední blízkosti topení,
jiných zdrojů horka nebo na přímém slunci.
• Výrobek nepoužívejte ve vlhkém prostředí azabraňte
styku svodou.
• Výrobek používejte pouze vmírných klimatických
podmínkách.
Nebezpečíporanění elektrickým proudem
• Výrobek neotvírejte avpřípadě poškození již dále
nepoužívejte.
• Produkt nepoužívejte, pokud jsou
adaptér AC,kabel adaptéru nebo síťové vedení
poškozené.
• Nepokoušejte se do výrobku sami zasahovat nebo
ho opravovat. Veškeré úkony údržby přenechejte
příslušnému odbornému personálu.
Varování –baterie
• Přivkládání baterií vždy dbejte správné polarity
(označení +a-) baterií avložte je odpovídajícím
způsobem. Přinesprávné polaritě hrozí nebezpečí
vytečení baterií nebo exploze.
• Používejte výhradně akumulátory (nebo baterie)
odpovídající udanému typu.
• Před vložením baterií vyčistěte kontakty baterie a
protilehlé kontakty.
• Nedovolte dětem provádětvýměnu baterií bez dozoru.
• Staré anové baterie nemíchejte, stejně tak
nepoužívejte baterie různých typů avýrobců.
• Odstraňte baterie zproduktů,které nebudou delší dobu
používány (kromě případů,kdy jsou připraveny pro
naléhavé situace).
• Baterie nepřemosťujte.
• Baterie nenabíjejte.
• Baterie nevhazujte do ohně.
• Baterie uchovávejte mimo dosah dětí.
• Baterie nikdy neotvírejte, nepoškozujte, nepolykejte
anevyhazujte do přírody.Mohou obsahovat jedovaté
těžké kovy škodící životnímu prostředí.
• Vybité baterie neprodleně odstraňte zproduktu a
zlikvidujte je.
• Vyhněte se skladování, nabíjení apoužívání při
extrémních teplotách aextrémně nízkém tlaku vzduchu
(např.vevelkých výškách).
4. Před uvedením do provozu
Upozornění
Podrobný popis
aplikace UNDOK acelého
rozsahu funkcí naleznete vnašem
průvodci UNDOK na adrese:
www.hama.com->00054238 ->Downloads
53
Page 60

Pokyny kpoužívání
• Tlačítko [OK], jakož i ► na dálkovém ovládání
odpovídá tlačítku [POWER/VOLUME/ENTER/
NAVIGATE](11) na čelní straně rádia.
• Tlačítko ◄ na dálkovém ovládání odpovídá tlačítku [
]napřední straně rádia
• Tlačítka ▲ ▼ na dálkovém ovládání odpovídají
otáčení ovladačenavigace na přední straně rádia
doleva adoprava.
Uvedení dálkového ovládání do provozu
Otevřete kryt přihrádky na baterie. Ta se nachází na zadní
straně dálkového ovládání ajemožné ji otevřít posunutím
do označeného směru.
Do rozsahu dodávky patřídvěbaterie AAA, které se musí
prouvedení do provozu vložit do přihrádky na baterie. Při
vkládání dávejte pozor na to, aby baterie byly vloženy se
správnou polaritou. Zadaná polarita (+/-) je označena v
přihrádce na baterie.
Zřízení spojení se sítí
4.1 LAN (kabelová síť)
• Spojte přípojku LAN vašeho routeru spřípojkou vašeho
rádia. Potřebujete ktomu ethernetový kabel, který není
součástí dodávky.
• Ujistěte se, že je router zapnutý, správně pracuje aje
aktivní připojení kinternetu.
• Za účelem správné funkce spojení LAN dbejte návodu k
použití vašeho routeru.
• Poté postupujte dále přímo podle pokynů vbodu 5.
„Uvedení do provozu“.
4.2 WLAN (bezdrátová síť)
• Ujistěte se, že je router zapnutý, správně pracuje aje
aktivní připojení kinternetu.
• Aktivujte funkci WLAN vašeho routeru.
• Za účelem správné funkce spojení WLAN dbejte návodu k
použití vašeho routeru.
• Poté postupujte dále přímo podle pokynů vbodu 5.
„Uvedení do provozu“.
5. Uvedení do provozu
Upozornění –optimální příjem
"DIT2006BT" má kdispozici připojení antény proexterní
antény skoaxiálním připojením. Vrozsahu dodávky je
již obsažena odpovídající teleskopická anténa, která
vám umožňuje příjem prostřednictvím DAB, DAB+ a
FM. Alternativně můžete používat aktivní nebo pasivní
anténu, abyste zlepšili výkon příjmu aabyste ho upravili
dle svých požadavků.
Upozorňujeme:
• Anténu vždy zcela vytáhněte.
• Prooptimální příjem doporučujeme vertikální
vyrovnání antény.
5.1 Obecné pokyny kobsluze
5.1.1 Zapnout/vypnout/pohotovostní režim
• Stisknutím tlačítka [POWER/VOLUME/ENTER/
NAVIGATE](11), zapněte rádio.
• Stiskněte apodržte tlačítko [POWER/VOLUME/ENTER/
NAVIGATE](11) po dobu cca 3sekund provypnutí rádia
(Standby).
• Proúplné vypnutí vypojte zařízení zelektrické sítě.
5.1.2 Navigace aovládání
• Po stisknutí tlačítka zkrácené volby navigujte
prostřednictvím nabízených bodů menu.
• Otočením [POWER/VOLUME/ENTER/NAVIGATE](11)
vyberete jednotlivé body menu.
• Otočením [POWER/VOLUME/ENTER/NAVIGATE](11)
potvrdíte výběr.
5.1.3 Nastavení hlasitosti
• Otáčením [POWER/VOLUME/ENTER/NAVIGATE](11)
se hlasitost zvyšuje (vpravo) nebo snižuje (vlevo).
54
Page 61

5.2 Zapnutí
Výstraha
• Výrobek provozujte pouze připojený ke schválené
zásuvce. Zásuvka se musí nacházet vblízkosti výrobku
amusí být snadno přístupná.
• Výrobek odpojte ze sítě pomocí vypínače–pokud není
kdispozici, vytáhněte síťové vedení ze zásuvky.
• Uvícenásobných zásuvek dbejte na to, aby připojené
spotřebičenepřekročily přípustnou celkovou spotřebu
energie.
• Vypojte produkt ze sítě,pokud ho delší dobu
nepoužíváte.
• Připojte napájecí zdroj do síťové přípojky (1) na zadní
straně rádia.
• Síťový kabel připojte ke správně instalované asnadno
přístupné zásuvce.
• Počkejte na dokončení inicializace rádia.
• Stisknutím tlačítka [POWER/VOLUME/ENTER/
NAVIGATE](11), zapněte rádio.
Upozornění –připrvním zapnutí
• Připrvním spuštění se automaticky spustí průvodce
nastavením (Setup Wizard).
• Průvodce nastavením pracuje sanglickým jazykem.
• Průvodce můžete přeskočit apozději znovu vyvolat v
německém jazyce.
5.3 Jazyk
Připrvním uvedení do provozu je jako standardní jazyk
rádia nastavena angličtina. Prozměnu nastaveného jazyka
menu rádia postupujte následujícím způsobem:
• Stiskněte [
• Pomocí [POWER/VOLUME/ENTER/NAVIGATE] (11)
navigujte kmenu „Settings“.
• Výběrpotvrďte stisknutím [POWER/VOLUME/ENTER/
NAVIGATE] (11).
• Pomocí [POWER/VOLUME/ENTER/NAVIGATE] (11)
navigujte kmenu „Language“. Výběrpotvrďte stisknutím
[POWER/VOLUME/ENTER/NAVIGATE] (11).
• Pomocí [POWER/VOLUME/ENTER/NAVIGATE] (11)
vyberte svůjpožadovaný jazyk systému.
• Aktuálně zvolené nastavení jazyka je označeno*.
Upozornění
• Kvýběru jsou následující jazyky:
angličtina, dánština, francouzština, němčina, italština,
norština, nština, švédština, turečtina, polština,
holandský, portugalský, španělský
](7), abyste se dostali do menu nastavení.
6. Údržba a čištění
• Tento výrobek čistěte pouze mírně navlhčeným hadříkem
nepouštějícím vlákna anepoužívejte agresivní čisticí
prostředky.
• Pokud byste výrobek delší dobu nepoužívali, přístroj
vypněte aodpojte od napájení ze sítě.Uložte ho na
čistém suchém místě bez přímého slunečního záření.
7. Vyloučení záruky
Hama GmbH &CoKGnepřebírá žádnou odpovědnost
nebo záruku za škody vzniklé neodbornou instalací,
montáží nebo neodborným použitím výrobku nebo
nedodržováním návodu kpoužití a/nebo bezpečnostních
pokynů.
8. Servis apodpora
Máte otázky kproduktu? Obraťte se na poradenské
oddělení Hama.
Horká linka: +49 9091 502-115 (německy/anglicky)
Další podpůrné informace naleznete zde:
www.hama.com
Úplný dlouhý návod je kdispozici na následující
internetové adrese:
www.hama.com -> 00054238 -> Downloads
9. Pokyny klikvidaci
Ochrana životního prostředí:
Evropská směrnice 2012/19/EU a2006/66/EG
ustanovujete následující: Elektrická aelektronická
zařízení stejně jako baterie nepatřídodomovního
odpadu. Spotřebitel se zavazuje odevzdat všechna
zařízení abaterie po uplynutí jejich životnosti do
příslušných sběren. Podrobnosti stanoví zákon příslušné
země.Symbol na produktu, návod kobsluze nebo balení
na toto poukazuje. Recyklací ajinými způsoby zužitkování
přispíváte kochraně životního prostředí.
55
Page 62

10. Prohlášení oshodě
Společnost Hama GmbH &CoKGtímto
prohlašuje, že typ rádiového zařízení [00054238]
je vsouladu se směrnicí 2014/53/EU. Úplné znění
EU prohlášení oshodě je kdispozici na této internetové
adrese:
www.hama.com -> 00054238 -> Downloads
Kmitočtové pásmo
(kmitočtová pásma)
Bluetooth: 2.402 –2.480GHz 6.5 dBm(EIRP)
WiFi: 2.400 –2.480 GHz 15.5 dBm (EIRP)
WiFi: 5.150 –5.350 GHz 16.5 dBm (EIRP)
WiFi: 5.470 –5.725 GHz 16.5 dBm (EIRP)
WiFi: 5.725 –5.850 GHz 11 dBm (EIRP)
Omezení nebo požadavky v/na
Belgie, Bulharsko, Česká republika, Dánsko, Německo,
Estonsko, Irsko, Řecko, Španělsko, Francie, Chorvatsko,
ypr,Lotyšsko, Litva, L
Itálie, K
Malta, Nizozemí, Rakousko, Polsko, Portugalsko,
Rumunsko, Slovinsko, Slovensko, Finsko, Švédsko, Spojené
Království
Upozornění
Pokud se používá kabel 36–64 (kanály frekvence
5150 MHz–5 350 MHz), smí se přístroj používat pouze v
uzavřených prostorech.
Maximální
radiofrekvenční výkon
vysílaný
ucembursko, Maďarsko,
Komezení expozice vůči
elektromagnetickým polím
Přístroj je určen kpoužití ve vzdálenosti minimálně 20 cm
od těla uživatele nebo osob nacházejících se vblízkosti.
Přístroj se nesmí nosit na těle.
56
Page 63

Q Stručný návod
Ovládacie aindikačné prvky
A: Rádio Čelná strana
1
2 Zdierka AUX-In
3 [VOLUME] +/-
4 [PRESET]-Rad
5 Tlačidlo [MODE]
6 Tlačidlo [ALARM]
7 Tlačidlo [EQUALIZER]
8 Tlačidlo [MENU]
9 Tlačidlo [INFO]
10 Tlačidlo [BACK] (Späť)
11 Prijímač infračervených signálov
12 [Navigation]
13
14 USB prípojka
15 Farebný displej 2.8"
16 LED
17 Prívod do siete
18 Anténa*
19 WiFi/Bluetooth anténa
20 Optický výstup
21 Koaxiálny výstup
22 Výstup Stereo Cinch L/R
23
24
Tlačidlo [POWER]
Zdierka slúchadiel
B: Rádio Zadná strana
Zdierka Line-Out
Prípojka LAN (10/100 Mbit)
Diaľkové ovládanie
1 Tlačidlo [POWER]
2 Tlačidlo [MUTE]
3 Tlačidlá priamej voľby [PRESET] (1-4)
4 Tlačidlo [EQUALIZER]
5 Tlačidlo [PRESET]
6 Tlačidlo [MENU]
7 Tlačidlo [SOURCE]
8 Tlačidlo [OK]
[NAVIGAČNÉ] Tlačidlá
9
▲ hore ▼ dole
◄ späť ► dopredu
10 Tlačidlo [VOL-]
11 Tlačidlo [VOL+]
12 Tlačidlo [HOME]
13 Tlačidlo [BACK]
14 Tlačidlo [INFO]
15 Tlačidlo [BACKLIGHT]
16 Tlačidlo [PAUSE]
17 Tlačidlo [PLAY]
18 Tlačidlo [PREVIOUS]
19 Tlačidlo [NEXT]
Upozornenie
*
"DIT2006BT" je vybavené vymeniteľnou anténou. Môžete použiť aktívnu alebo pasívnu anténu vybavenú koaxiálnou
prípojkou.
** Otočný regulátor má dvojitú funkciu. Otáčaním regulátoramôžete meniť hlasitosť alebo prechádzať štruktúrou menu.
Stlačením tohto otočného regulátorasazariadenie prepne do pohotovostného režimu (standby), resp. potvrdí výber.
Dôležité upozornenie –stručný návod
• Toto je stručný návod, ktorý vám poskytne najdôležitejšie základné informácie, ako sú bezpečnostné pokyny a
uvedenie vášho výrobku do prevádzky.
• Zdôvodov ochrany životného prostredia aúspory cenných surovín upúšťaspoločnosť Hama od tlačenia dlhého
návodu aponúka ho výhradne ako download PDF.
• Úplný dlhý návod je kdispozícii na tejto internetovej adrese:
!
www.hama.com -> 00054238 -> Downloads
• Uložte si vo svojom počítačitento dlhý návod na opakované otváranie apodľamožnosti si ho vytlačte.
57
Page 64

1. Vysvetlenie výstražných symbolov aupozornení
Nebezpečenstvo zásahu elektrickým
prúdom
Tento symbol upozorňuje na nebezpečenstvo dotyku
neizolovaných častí výrobku, ktoré sú eventuálne
pod takým vysokým nebezpečným napätím, že hrozí
nebezpečenstvo elektrického zásahu.
Výstraha
Tento symbol označuje bezpečnostné upozornenia, ktoré
poukazujú na určité riziká anebezpečenstvá.
Upozornenie
Tento symbol označuje dodatočné informácie, alebo
dôležité poznámky.
2. Obsah balenia
• Digital-HiFi-Tuner DIT2006BT
• Kábel cinch (prevýstup Stereo Cinch L/R)
• Diaľkové ovládanie
• 2x AAA batérie
• QSG
3. Bezpečnostné upozornenia
• Výrobok je určený na súkromné, nekomerčné domáce
používanie.
• Výrobok nepoužívajte na miestach, kde je používanie
elektronických zariadení zakázané.
• Výrobok chráňte pred znečistením, vlhkosťou
aprehriatím. Používajte ho iba vsuchých
priestoroch.
• Tento výrobok nepatrí do rúk deťom, rovnako ako všetky
elektrické výrobky!
• Výrobok chráňte pred pádmi anevystavujte ho silným
otrasom.
• Výrobok nepoužívajte mimo výkonnostných limitov
uvedených vtechnických údajoch.
• Obalový materiál odložte mimo dosahu detí, hrozí riziko
zadusenia.
• Obalový materiál zlikvidujte ihneď podľaplatných
miestnych predpisov olikvidácii.
• Na zariadení nevykonávajte žiadne zmeny.Stratíte tým
nároky na záruku.
• Výrobok používajte iba na účel prektorý je určený.
• Výrobok nepoužívajte vbezprostrednej blízkosti
ohrievača, iných tepelných zdrojov alebo na priamom
slnečnom žiarení.
• Výrobok nepoužívajte vo vlhkom prostredí avyvarujte sa
striekajúcej vody.
• Používajte výrobok len vmiernych klimatických
podmienkach.
Nebezpečenstvo zásahu elektrickým
prúdom
• Výrobok neotvárajte avprípade poškodenia ho ďalej
nepoužívajte.
• Výrobok nepoužívajte, keď sú poškodené
AC adaptér,kábel adaptéraalebo sieťové vedenie.
• Nesnažte sa robiť na výrobku údržbu alebo opravy.
Akékoľvek práce na údržbe prenechajte odbornému
personálu.
Výstraha –batérie
• Pri vkladaní batérií vždy dbajte na správnu polaritu
(+ a-). Pri nesprávnej polarite hrozí nebezpečenstvo
vytečenia batérií alebo explózie.
• Používajte výhradne nabíjacie batérie (alebo batérie)
zodpovedajúce uvedenému typu.
• Pred vložením batérií vyčistite kontakty batérie a
protiľahlé kontakty.
• Deti smú vymieňať batérie iba pod dohľadom dospelej
osoby.
• Na napájanie tohto výrobku nekombinujte staré anové
batérie, ani rôzne typy aznačky batérií.
• Vyberte batérie zvýrobkov,ktoré sa dlhší čas nebudú
používať (pokiaľ nemajú byť pripravené prenúdzové
prípady).
• Batérie neskratujte.
• Batérie nenabíjajte.
• Batérie nevhadzujte do ohňa.
• Batérie uchovávajte mimo dosahu detí.
• Batérie nikdy neotvárajte, zabráňte ich poškodeniu,
prehltnutiu alebo uniknutiu do životného prostredia.
Môžu obsahovať jedovaté ťažké kovy,škodlivé pre
životné prostredie.
• Vybité batérie bezodkladne vymeňte azlikvidujte podľa
platných predpisov.
• Vyhýbajte sa skladovaniu, nabíjaniu apoužívaniu pri
extrémnych teplotách aextrémne nízkom tlaku vzduchu
(ako napr.voveľkých výškach).
4. Pred uvedením do prevádzky
Upozornenie
Podrobný opis aplikácie
UNDOK aplného rozsahu
funkcií nájdete vnašom návode
aplikácie UNDOK na adrese:
www.hama.com->00054238 ->Downloads
58
Page 65

Pokyny preobsluhu
• Tlačidlo [OK], ako aj ► na diaľ
zodpovedá tlačidlu [POWER/VOLUME/ENTER/
NAVIGATE](11) na prednej strane rádia.
• Tlačidlo ◄ na diaľkovom ovládaní zodpovedá tlačidlu
[ ]naprednej strane rádia
• Tlačidlá ▲ ▼ na diaľkovom ovládaní zodpovedajú
otáčaniu vľavo alebo vpravo na navigačnom regulátore
na prednej strane rádia.
Uvedenie diaľkového ovládania do prevádzky
Otvorte kryt batériového priestoru. Nachádza sa na zadnej
strane diaľkového ovládania aotvorí sa posunutím do
označeného smeru.
Súčasťou dodávky sú aj dve batérie AAA na uvedenie do
prevádzky,ktoré sa musia vložiť do batériového priestoru.
Pri vkladaní batérií dávajte pozor na správnu polaritu. V
batériovom priestorejepolarita vyznačená (+/-).
Zariadenie sieťového spojenia
4.1 LAN (káblová sieť)
• Spojte LAN prípojku vášho routerasprípojkou vášho
rádia. Potrebujete na to ethernetový kábel, ktorý nie je
súčasťou dodávky.
• Zaistite, aby bol router zapnutý, správne funguje a
existuje internetové pripojenie.
• Vsúvislosti so správnou funkciou spojenia LAN
prihliadajte na návod na používanie routera.
• Postupujte potom priamo ďalej podľapopisu vbode 5.
„Uvedenie do prevádzky“.
4.2 WLAN (bezdrôtová sieť)
• Zaistite, aby bol router zapnutý, správne funguje a
existuje internetové pripojenie.
• Aktivujte funkciu WLAN routera.
• Vsúvislosti so správnou funkciou spojenia WLAN
prihliadajte na návod na používanie routera.
• Postupujte potom ďalej podľapopisu vbode 5„Uvedenie
do prevádzky“.
kovom ovládaní
5. Uvedenie do prevádzky
Upozornenie –optimálny príjem
"DIT2006BT" je vybavený anténovou prípojkou pre
externé antény skoaxiálnou prípojkou. Súčasťou dodávky
je už aj vhodná teleskopická anténa, ktorá umožňuje
príjem cez DAB, DAB+ aFM. Alternatívne môžete na
zlepšenie výkonu prijímačaalebo prispôsobenie svojim
požiadavkám použiť aktívnu alebo pasívnu anténu.
Poznámka:
• Anténu vytiahnite vždy úplne.
• Na dosiahnutie optimálneho príjmu odporúčame
vertikálnu orientáciu antény.
5.1 Všeobecné pokyny pre obsluhu
5.1.1 Zapnutie/vypnutie/standby
• Stlačte [POWER/VOLUME/ENTER/NAVIGATE](11), aby
sa rádio zaplo.
• Stlačte apodržte [POWER/VOLUME/ENTER/
NAVIGATE](11) na cca 3sekundy,aby sa rádio vyplo
(standby).
• Na úplné vypnutie odpojte rádio od elektrickej siete.
5.1.2 Navigácia aovládanie
• Po stlačení niektorého ztlačidiel rýchlej voľby prejdite cez
ponúkané položky menu.
• Otáčaním [POWER/VOLUME/ENTER/NAVIGATE](11)
vyberte jednotlivé položky menu.
• Stlačením [POWER/VOLUME/ENTER/NAVIGATE](11)
potvrďte voľbu.
5.1.3 Nastavenie hlasitosti
• Otáčaním [POWER/VOLUME/ENTER/NAVIGATE](11)
hlasitosť zvýšite (doprava) alebo znížite (doľava).
59
Page 66

5.2 Zapnutie
Výstraha
• Výrobok pripájajte iba do povolených zásuviek.
Zásuvka musí byť vblízkosti výrobku amusí byťľahko
prístupná.
• Výrobok odpojte od siete vypínačom zapnuté/vypnuté
–aktakýto vypínač nie je, vytiahnite sieťové vedenie
zo zásuvky.
• Vprípade viacnásobných zásuviek dávajte pozor na to,
aby pripojené spotrebičeneprekročili celkový dovolený
príkon.
• Ak výrobok dlhšiu dobu nepoužívate, odpojte ho z
elektrickej siete.
• Pripojte sieťový adaptér so sieťovým káblom (1) na
zadnej stane rádia.
• Spojte sieťový kábel so správne nainštalovanou a ľahko
prístupnou sieťovou zásuvkou.
• Počkajte, kým sa neukončíinicializácia rádia.
• Stlačte [POWER/VOLUME/ENTER/NAVIGATE](11),
aby sa rádio zaplo.
Upozornenie –pri prvom zapnutí
• Pri prvom spustení sa automaticky spustí Sprievodca
nastavením (Setup Wizard).
• Sprievodca nastavením je vanglickom jazyku.
• Sprievodcu môžete preskočiť aneskôr ho znova vyvolať
vjazyku, vktorom chcete komunikovať.
5.3 Jazyk
Pri prvom uvedení do prevádzky je ako štandardný jazyk
rádia nastavená angličtina. Ak chcete zmeniť nastavený
jazyk menu na rádiu, postupujte nasledovne:
• Stlačte [
• Pomocou [POWER/VOLUME/ENTER/NAVIGATE](11)
prejdite kpoložke menu „Settings“ (nastavenia).
• Stlačením [POWER/VOLUME/ENTER/NAVIGATE](11)
potvrďte voľbu.
• Pomocou [POWER/VOLUME/ENTER/NAVIGATE] (11)
prejdite kpoložke menu „Language“ (jazyk). Stlačením
[POWER/VOLUME/ENTER/NAVIGATE](11) potvrďte
voľbu.
• Pomocou [POWER/VOLUME/ENTER/NAVIGATE] (11)
vyberte požadovaný jazyk systému.
• Aktuálne zvolené nastavenie jazyka sa označísymbolom
*.
Upozornenie
• Na výber sú nasledujúce jazyky:
](7) aby ste sa dostali do menu nastavení.
angličtina, dánčina, francúzština, nemčina, taliančina,
nórčina, fínčina, švédčina, turečtina, poľština,
holandčina, portugalčina, španielčina
6. Údržba astarostlivosť
• Na čistenie tohto výrobku používajte len navlhčenú
utierku, ktorá nepúšťavlákna anepoužívajte žiadne
agresívne čistiace prostriedky.
• Ak by ste výrobok nemali dlhší čas používať,zariadenie
vypnite aodpojte od elektriky.Uskladňujte ho na čistom
suchom mieste bez priameho slnečného žiarenia.
7. Vylúčenie zodpovednosti
Hama GmbH &CoKGneručí/nezodpovedá za škody
vyplývajúce zneodbornej inštalácie, montáže alebo
neodborného používania výrobku alebo znerešpektovania
návodu na obsluhu a/alebo bezpečnostných upozornení.
8. Servis apodpora
Sotázkami týkajúcimi sa výrobku sa, prosím, obráťte na
poradenské oddelenie Hama.
Horúca linka: +49 9091 502-115 (nem./angl.)
Ďalšie podporné informácie nájdete tu:
www.hama.com
Úplný dlhý návod je kdispozícii na tejto internetovej
adrese:
www.hama.com -> 00054238 -> Downloads
9. Pokyny pre likvidáciu
Upozornenie kochrane životného prostredia:
Európska smernica 2012/19/EU a2006/66/EG
stanovuje: Elektrické aelektronické zariadenia,
rovnako ako batérie, sa nesmú vyhadzovať do
komunálneho odpadu. Spotrebiteľ je zo zákona
povinný zlikvidovať elektrické aelektronické zariadenia a
batérie na konci ich životnosti na miestach, ktoré boli na
to zriadené, na verejných zberných miestach alebo ich
vrátiť na predajné miesto. Podrobnosti ktomu upravuje
zákon príslušnej krajiny.Symbol na výrobku, návode na
použitie alebo obale poukazuje na tieto ustanovenia.
Opätovným zužitkovaním alebo inou formou recyklácie
starých zariadení/batérií prispievate kochrane životného
prostredia.
60
Page 67

10. Vyhlásenie ozhode
Hama GmbH &CoKGtýmto vyhlasuje, že typ
rádiových zariadení [00054238] je vsúlade so
smernicou 2014/53/EÚ. Úplné EÚ vyhlásenie o
zhode je kdispozícii na tejto internetovej adrese:
www.hama.com -> 00054238 -> Downloads
Frekvenčné pásmo/frekvenčné
pásma
Bluetooth: 2.402 –2.480 GHz6.5 dBm(EIRP)
WiFi: 2.400 –2.480 GHz 15.5 dBm (EIRP)
WiFi: 5.150 –5.350 GHz 16.5 dBm (EIRP)
WiFi: 5.470 –5.725 GHz 16.5 dBm (EIRP)
WiFi: 5.725 –5.850 GHz 11 dBm (EIRP)
Obmedzenia alebo požiadavky na
Belgicko, Bulharsko, Česká republika, Dánsko, Nemecko,
Estónsko, Írsko, Grécko, Španielsko, Francúzsko,
Chorvátsko, Taliansko, Cyprus, Lotyšsko, Litva,
Luxembursko, Maďarsko, Malta, Holandsko, Rakúsko,
Poľsko, Portugalsko, Rumunsko, Slovinsko, Slovensko,
Fínsko, Švédsko, Spojené kráľovstvo
Upozornenie
Keď sa používajú kanály 36 –64(frekvencia
5150 MHz –5350 MHz), môže sa zariadenie používať
len vuzavretých priestoroch.
Na obmedzenie expozície
elektromagnetickým poliam
Toto zariadenie je určené na používanie vo vzdialenosti
minimálne 20 cm od tela používateľaalebo osôb vjeho
blízkosti. Toto zariadenie sa nesmie nosiť na tele.
Vyžarovaný maximálny
prenosový výkon
61
Page 68

O Guia rápido
Elementos de comando eindicadores
A: Rádio Parte frontal
1
2 Tomada AUX IN
3 [VOLUME] +/-
4 Roda [PRESET]
5 Botão[MODE]
6 Botão[ALARM]
7 Botão[EQUALIZER]
8 Botão[MENU]
9 Botão[INFO]
10 Botão[BACK] (Retroceder)
11 Recetor de infravermelhos
12 [Navigation]
13
14
15 Visor acores de 2.8"
16 LED
17 Cabo de alimentação
18 Antena*
19 Antena WiFi/Bluetooth
20 Saída ótica
21 Saída coaxial
22 Saída estéreo RCAE/D
23
24
Observação
*"DIT2006BT" tem uma antena substituível. Pode utilizar uma antena ativa ou passiva que disponha de uma ligação
coaxial.
Obotãoderegulaçãotem duas funções diferentes. Pode regular ovolume de som ou navegar pela estruturade
**
menus rodando obotãoderegulação. Pode pressionar este botãoparaativar omodo de standby do aparelho ou
paraconrmar uma seleção.
Botão[POWER]
Tomada paraauscultadores
LigaçãoUSB
B: Rádio Parte traseira
Tomada Line Out
LigaçãoLAN (10/100 Mbit)
Telecomando
Botão[POWER]
1
Botão[MUTE]
2
Botões de atalho [PRESET] (1-4)
3
Botão[EQUALIZER]
4
Botão[PRESET]
5
Botão[MENU]
6
Botão[SOURCE]
7
Botão[OK]
8
Botões [DE NAVEGAÇÃO]
▲ Para cima ▼ Para baixo
9
◄ Retroceder ► Avançar
Botão[VOL-]
10
Botão[VOL+]
11
Botão[HOME]
12
Botão[BACK]
13
Botão[INFO]
14
Botão[BACKLIGHT]
15
Botão[PAUSE]
16
Botão[PLAY]
17
Botão[PREVIOUS]
18
Botão[NEXT]
19
Informação importante -Guia rápido
• Este manual éumguia rápido, que lhedáas informações básicas mais importantes, como, por exemplo, indicações
de segurança einstruções paracolocar oseu produto em funcionamento.
• A mdepreservar oambiente edepoupar matérias primas valiosas, aHama optou por nãoimprimir aversãolonga
do manual de instruções, disponibilizando-a exclusivamente como um PDF paradescarregar.
• Poderá encontrar aversão longa do manual de instruções em:
!
www.hama.com -> 00054238 -> Downloads
• Guarde aversãolonga do manual de instruções no seu computador paraopoder consultar,e,senecessário, parao
imprimir.
62
Page 69

1. Explicação dos símbolos de aviso edas
observações
Perigo de choque elétrico
Este símbolo chama aatençãoparaoperigo de toque
em partes nãoisoladas do produto que podem ser
condutoras de uma tensãoperigosa eapresentar,assim,
perigo de choque elétrico.
Aviso
Este símbolo éutilizado paraidenticar informações de
segurança ou chamar aatençãoparaperigos eriscos
especiais.
Observação
Este símbolo éutilizado paraidenticar informações
de segurança adicionais ou paraassinalar observações
importantes.
2. Conteúdo da embalagem
• Digital-HiFi-Tuner DIT2006BT
• Cabo RCA(parasaída estéreo RCAE/D)
• Telecomando
• 2pilhas AAA
• Guia de início rápido
3. Indicações de segurança
• Oproduto está previsto apenas parautilizaçãoprivada e
nãocomercial.
• Nunca utilize oproduto em áreas em que nãosejam
permitidos aparelhos eletrónicos.
• Proteja oproduto da sujidade, da humidade edo
sobreaquecimento, eutilize-o unicamente em ambientes
secos.
• Talcomo qualquer outroaparelho elétrico, este produto
nãopode ser manuseado por crianças!
• Nunca deixe cair oproduto, nem osubmeta achoques
fortes.
• Nunca utilize oproduto forados limites de desempenho
indicados nas especicações técnicas.
• Mantenha omaterial da embalagem foradoalcance de
crianças. Perigo de asxia.
• Elimine imediatamente omaterial da embalagem em
conformidade com as normas locais aplicáveis.
• Nãointroduza alterações no produto. Se o zer,a
garantia deixará de ser válida.
• Utilize oproduto exclusivamente paraomaque se
destina.
• Nunca utilize oproduto diretamente ao pé de
aquecimentos ou de outras fontes de calor,nem o
exponha àincidência direta dos raios de sol.
• Nunca utilize oproduto em ambientes húmidos eevite
os salpicos de água.
• Utilize oproduto sempresóemcondições climáticas
moderadas.
Perigo de choque elétrico
• Nunca abraoproduto, nem outilize caso esteja
danicado.
• Nãoutilize oproduto se o
adaptador de CA,ocabo de adaptaçãoouocabo de
alimentaçãoestiverem danicados.
• Nunca tente manter ou reparar oaparelho. Qualquer
trabalho de manutençãodeve ser executado por
técnicos especializados.
Aviso –Pilhas
• Ao colocar as pilhas, tenha em atençãoapolaridade
correta (inscrições +e-)das pilhas ecoloque-as
corretamente. Anãoobservaçãodapolaridade correta
poderá provocar oderrame das pilhas ou asua
explosão.
• Utilize exclusivamente baterias (ou pilhas) que
correspondam ao tipo indicado.
• Antes de colocar as pilhas, limpe os contactos das
pilhas eoscontactos do compartimento.
• Nãodeixe crianças substituir as pilhas sem vigilância.
• Nãoutilize pilhas de diferentes tipos ou fabricantes,
nem misturepilhas novas eusadas.
• Retireaspilhas do produto se nãoofor utilizar durante
um período prolongado (a nãoser que este tenha
de ser mantido pronto afuncionar parasituações de
emergência).
• Nãocurto-circuite as pilhas.
• Nãorecarregue as pilhas.
• Nãodeite as pilhas parachamas.
• Mantenha as pilhas foradoalcance das crianças.
• Nunca abra, danique, ingiraouelimine as pilhas
paraoambiente. Estas podem conter metais pesados
tóxicos eprejudiciais paraoambiente.
• Retireimediatamente pilhas gastas do produto e
elimine-as adequadamente.
• Evite oarmazenamento, carregamento eutilização
com temperaturas extremas epressãoatmosférica
extremamente baixa (como, por exemplo, agrande
altitude).
63
Page 70

4. Antes da colocação em funcionamento
Observação
Encontrará uma descriçãodetalhada da
app UNDOK edetodas
as funções no nosso
guia UNDOK em:
www.hama.com->00054238 ->Downloads
Instruções de operação
• Os botões [OK] e ► do comando àdistância
correspondem ao botão[POWER/VOLUME/ENTER/
NAVIGATE](11) na parte da frente do rádio.
• Obotão ◄ do comando àdistância corresponde ao
botão[ ]naparte da frente do rádio.
• Os botões ▲ ▼ do comando àdistância
correspondem àrotaçãoparaaesquerda/a direita do
botãodenavegaçãonaparte da frente do rádio.
Colocar ocomando àdistância em funcionamento
Abradatampa do compartimento das pilhas. Esta tampa
está na parte de trás do comando àdistância, epode ser
aberta deslizando-a na direçãoindicada.
Do âmbito de fornecimento fazem parte duas pilhas AAA
que tem de colocar no compartimento das pilhas para
poder colocar ocomando àdistância em funcionamento.
Ao colocar as pilhas, certique-se de que as coloca com
apolaridade correta. Apolaridade (+ /-)está inscrita no
compartimento das pilhas.
Configurar aligação de rede
4.1 LAN (Rede por cabo)
• Ligue uma entrada LAN do seu router ao rádio. Para tal,
necessita de um cabo Ethernet, oqual nãoéfornecido.
• Certique-se de que orouter está ligado efunciona
corretamente eque existe uma ligaçãoàInternet.
• Consulte omanual de instruções do router relativamente
ao funcionamento correto da ligaçãoLAN.
• Em seguida, proceda diretamente conforme descrito no
ponto 5, «Colocaçãoemfuncionamento».
4.2 WLAN (Rede sem fios)
• Certique-se de que orouter está ligado efunciona
corretamente eque existe uma ligaçãoàInternet.
• Ative afunçãoWLAN do seu router.
• Consulte omanual de instruções do router relativamente
ao funcionamento correto da ligaçãoWLAN.
• Em seguida, proceda conforme descrito no ponto 5,
«Colocaçãoemfuncionamento».
5. Colocação em funcionamento
Observação –Receção ótima
"DIT2006BT" dispõe de uma ligaçãodeantena para
antenas externas com ligaçãocoaxial. Oproduto já
éfornecido com uma antena telescópica adequada,
que possibilita areceçãodeDAB, DAB+ eFM. Em
alternativa, pode utilizar uma antena passiva ou ativa,
seja paramelhorar areceção, seja parasatisfazer os seus
requisitos.
Tenha oseguinte em atenção:
• Estique sempretotalmente aantena.
• Para uma receçãoótima, recomendamos que oriente a
antena verticalmente.
5.1 Indicações gerais sobre aoperação
5.1.1 Ligar/desligar/standby (modo de espera)
• Prima obotão[POWER/VOLUME/ENTER/NAVIGATE]
(11) paraligar orádio.
• Mantenha obotão[POWER/VOLUME/ENTER/
NAVIGATE](11) premido durante cerca de 3segundos
paradesligar orádio (standby).
• Desligue oaparelho da alimentaçãoelétrica parao
desligar completamente.
5.1.2 Navegação ecomando
• Prima um botãodeatalho, paranavegar pelos itens de
menu apresentados.
• Para selecionar itens individuais do menu rode obotão
[POWER/VOLUME/ENTER/NAVIGATE](11).
• Prima obotão[POWER/VOLUME/ENTER/NAVIGATE]
(11) paraconrmar aseleçãofeita.
5.1.3 Regular ovolume de som
• Rode obotão[POWER/VOLUME/ENTER/NAVIGATE]
(11) paraadireita paraaumentar ovolume, eparaa
esquerda paraobaixar.
64
Page 71

5.2 Ligação
Aviso
• Ligue oproduto exclusivamente auma tomada elétrica
adequada. Atomada elétrica deve estar localizada
perto do produto edeve ser facilmente acessível.
• Desligue oproduto da rede elétrica com obotãode
ligar/desligar –seoproduto nãotiver esse botão,
retireacha da tomada elétrica.
• No caso de tomadas múltiplas, certique-se de que os
aparelhos ligados nãoexcedem oconsumo total de
energia permitido.
• Desligue oproduto da rede elétrica quando nãoo
utilizar durante um período prolongado.
• Ligue afonte de alimentaçãoàligaçãoderede (1) na
parte de trás do rádio.
• Ligue ocabo de alimentaçãoauma tomada elétrica
corretamente instalada efacilmente acessível.
• Espereaté ainicializaçãodorádio terminar.
• Prima obotão[POWER/VOLUME/ENTER/NAVIGATE]
(11) paraligar orádio.
Nota –Primeiraligação
• Quando oaparelho éligado pela primeiravez, é
automaticamente iniciado oassistente de conguração
(Setup Wizard).
• Oassistente de conguraçãoéexecutado em inglês.
• Pode ignorar oassistente eaceder posteriormente ao
mesmo em alemão.
5.3 Idioma
Aquando da primeiracolocaçãoemfuncionamento, o
idioma pré-selecionado do rádio éoinglês. Para alterar o
idioma denido paraomenu:
• Prima [
• Navegue com [POWER/VOLUME/ENTER/NAVIGATE]
• Prima [POWER/VOLUME/ENTER/NAVIGATE](11) para
• Navegue com [POWER/VOLUME/ENTER/NAVIGATE]
• Selecione oidioma pretendido com obotão[POWER/
• Oidioma selecionado éassinalado com *.
Observação
• Os idiomas disponíveis sãoosseguintes:
](7) paraaceder ao menu das denições.
(11) até ao item do menu "Settings" (denições).
conrmar aseleçãofeita.
(11) até ao item do menu "Language" (idioma). Prima
[POWER/VOLUME/ENTER/NAVIGATE](11) para
conrmar aseleçãofeita.
VOLUME/ENTER/NAVIGATE](11).
inglês, dinamarquês, francês, alemão, italiano,
norueguês, nlandês, sueco, turco, polaco, neerlandês,
português, espanhol
6. Manutenção econservação
• Limpe oproduto apenas com um pano sem pelos
ligeiramente humedecido enãoutilize produtos de
limpeza agressivos.
• Caso nãopretenda utilizar oproduto durante um
período prolongado, desligue-o eretireacha da
tomada elétrica. Armazene-o num local limpo eseco,
sem exposiçãosolar direta.
7. Exclusão de responsabilidade
AHama GmbH &CoKGdeclina toda equalquer
responsabilidade ou garantia por danos decorrentes da
instalação, da montagem ou do manuseamento incorretos
do produto e/ou do incumprimento das instruções de
utilizaçãoe/ou das informações de segurança.
8. Contactos eapoio técnico
Em caso de dúvidas sobreoproduto, contacte oserviço de
assistência técnica da Hama.
Hotline: +49 9091 502-115 (alemão/inglês)
Para mais informações sobreosserviços de apoio ao
cliente, visite:
www.hama.com
Poderá encontrar aversãolonga do manual de instruções
em:
www.hama.com -> 00054238 -> Downloads
9. Indicações de eliminação
Observação de Proteção ambiental:
Após atransposiçãodas Diretivas Comunitárias
2012/19/UE e2006/66/UE paraalegislação
nacional, aplica-se oseguinte: Os aparelhos
elétricos eeletrónicos, bem como as pilhas e
baterias, nãopodem ser eliminados juntamente com olixo
doméstico. Os consumidores estãoobrigados por lei a
depositar os aparelhos elétricos eeletrónicos, bem como
as pilhas easbaterias, no mdas respetivas vidas úteis,
em locais públicos especícos paraeste efeito ou a
entregá-los no ponto de venda. Os detalhes deste
processo estãoestipulados nas leis dos respetivos países.
Este símbolo no produto, no manual de instruções ou na
embalagem indicam que oproduto está sujeito aestes
regulamentos. Ao possibilitar areciclagem eareutilização
dos materiais dos seus velhos aparelhos/baterias, está a
fazer uma enorme contribuiçãoparaaproteçãodo
ambiente.
65
Page 72

10. Declaração de conformidade
AHama GmbH &CoKGdeclarapor esta via que o
equipamento de rádio do tipo [00054238] está
em conformidade com aDiretiva 2014/53/UE. O
texto integral da declaraçãodeconformidade está
disponível no seguinte endereço de Internet:
www.hama.com -> 00054238 -> Downloads
Banda(s) de frequências
Bluetooth: 2.402 –2.480GHz 6.5 dBm(EIRP)
WiFi: 2.400 –2.480 GHz 15.5 dBm (EIRP)
WiFi: 5.150 –5.350 GHz 16.5 dBm (EIRP)
WiFi: 5.470 –5.725 GHz 16.5 dBm (EIRP)
WiFi: 5.725 –5.850 GHz 11 dBm (EIRP)
Restrições ou requisitos
Bélgica, Bulgária, República Checa, Dinamarca,
Alemanha, Estónia, Irlanda, Grécia, Espanha, França,
Croácia, Itália, Chipre, Letónia, Lituânia, Luxemburgo,
Hungria, Malta, Países Baixos, Áustria, Polónia, Portugal,
Roménia, Eslovénia, Eslováquia, Finlândia, Suécia, Reino
Unido
Observação
Se utilizar os canais 36-64 (frequência
5150 MHz –5350 MHz), oaparelho só pode ser
utilizado em locais fechados.
Potência máxima
transmitida
Limitação da exposição aos campos
eletromagnéticos
Este dispositivo foi previsto parautilizaçãoauma
distância de, pelo menos, 20 cm do corpo do utilizador
ou de pessoas próximas. Este dispositivo nãodeve ser
transportado ou usado no corpo ou junto ao corpo.
66
Page 73

T Hızlı başlangıçkılavuzu
Kumanda ve gösterge elemanları
A: Radyo Ön yüzü
1
2 AUX-In soketi
3 [VOLUME] +/-
4 PRESET] tekeri
5 [MODE] tuşu
6 [ALARM] tuşu
7 [EQUALIZER] tuşu
8 [MENU] tuşu
9 [INFO] tuşu
10 [BACK] (geri) tuşu
11 Kızılötesi alıcı
12 [Navigation]
13
14
15 2.8" renkli ekran
16 LED
17 Elektrik girişi
18 Anten*
19 WiFi/Bluetooth anten
20 Optik çıkış
21 Koaksiyel çıkış
22 Stereo RCAsol/sağ çıkışı
23
24
Uyarı
*"DIT2006BT" değiştirilebilir bir antene sahip. Koaksiyel bağlantıya sahip bir aktif veya pasif anten kullanabilirsiniz.
** Bu döner regülatör,çift fonksiyona sahiptir.Regülatörü çevirerek ses seviyesini değiştirin veya menü yapısında gezinin.
Bu döner regülatörebasarak, cihaz bekleme moduna geçirilir veya bir seçim onaylanır.
[POWER] tuşu
Kulaklıksoketi
USB bağlantısı
B: Radyo Arka yüz
Line-Out soketi
LAN (10 /100 Mbit) bağlantısı
Uzaktan kumanda
1 [POWER] Güç tuşu
2 [MUTE] Sesi kapat tuşu
3 [PRESET] Direkt Önayar Tuşlari(1-4)
4 [EQUALIZER] Ekolayzer Tuşu
5 [PRESET] Önayar Tuş u
6 [MENU] Tuşu
7 [SOURCE] Kaynak Tuşu
8 [OK] Tuşu
[NAVIGATIONS] Gezinme Tuşlar
9
▲ Yukarı ▼ Aşağı
◄ Geri ► İleri
10 [VOL-] Seviye Tuş
11 [VOL+] Seviye Tuş
12 [HOME] Ana Ekran Tu şu
13 [BACK] Geri Dön Tuş
14 [INFO] Bİlgİ Tuşu
15 [BACKLIGHT] Art işik tuşu
16 [PAUSE] Duraklat Tuşu
17 [PLAY] Oynat Tuşu
18 [PREVIOUS] Önceki Tuş
19 [NEXT] Sonraki Tu ş
Önemli uyarı -Kısa kılavuz
• Bu, güvenlik uyarıları ve ürününüzün işletime alınması gibi en önemli temel bilgileri sağlayan bir hızlı kılavuzdur.
• Çevrekoruması ve değerli ham maddelerin tasarrufu nedeniyle, Hama şirketi basılı bir uzun kılavuzdan feragat eder
ve bunu yalnızca indirilmek üzerePDF olarak sunar.
• Uzun kılavuzun tam metni aşağıdaki internet adresinde mevcuttur:
!
www.hama.com -> 00054238 -> İndirmeler
• Uzun kılavuzu bilgisayarınıza referans olarak kaydedin ve mümkünse yazdırın.
67
Page 74

1. Uyarı sembollerinin ve uyarılarınaçıklaması
Elektrik çarpması tehlikesi
Bu sembol, elektrik çarpması riski oluşturacak kadar
yükseklikte tehlikeli bir gerilim taşıyabilecek, ürünün
yalıtılmamış parçalarıyla temas riskini belirtir.
Uyarı
Güvenlik açıklamalarını işaretlemek veya özel tehlikelere
ve risklerekarşı dikkat çekmek için kullanılır.
Uyarı
Ek olarak bilgileri veya önemli açıklamaları işaretlemek
için kullanılır.
2. Paket içeriği
• Digital-HiFi-Tuner DIT2006BT
• RCAkablo (stereo RCAL/R çıkış için)
• Uzaktan kumanda
• 2x AAA pil
• QSG
3. Güvenlik talimatları
• Ürün, ticari olmayan özel ev kullanımı için
öngörülmüştür.
• Ürünü elektronik cihazlarınkullanılmasına izin
verilmeyen alanlarda kullanmayın.
• Ürünü kir,nem ve aşırıısınmaya karşı koruyun ve sadece
kuru ortamlarda kullanın.
• Bu ürün, tüm elektrikli ürünler gibi, çocuklarıneline
geçmemelidir!
• Ürünü düşürmeyin ve sert darbeleremaruz bırakmayın.
• Ürünü, teknik verilerde belirtilen performans sınırlarının
dışında çalıştırmayın.
• Çocukları mutlaka ambalaj malzemesinden uzak tutun,
boğulma tehlikesi mevcuttur.
• Ambalaj malzemesini derhal yerel imha yönetmeliklerine
göreimha edin.
• Cihazda herhangi bir değişiklik yapmayın. Aksi takdirde
garanti hakkınızı kaybedersiniz.
• Ürünü sadece öngörülen amaç için kullanın.
• Ürünü ısıtıcının, diğer ısı kaynaklarınınhemen yakınında
veya doğrudan güneş ışığında çalıştırmayın.
• Ürünü sıcak, ıslak veya çok nemli bir ortamda
kullanmayınveüzerine su püskürtmemeye dikkat edin.
• Ürünü sadece ılıman iklim koşullarında kullanın.
Elektrik çarpması tehlikesi
• Ürünü açmayınvehasar görmesi durumunda
çalıştırmaya devam etmeyin.
• Ürünü, AC adaptörü,
adaptör kablosu veya şebeke bağlantısı hasarlı
olduğunda kullanmayın.
• Ürünün bakımını veya onarımını kendiniz yapmaya
çalışmayın. Her türlü bakımişlerini uygun uzman
personele bırakın.
Uuyarı -Piller
• Pilleri yerleştirirken kutuplarının(+ve-işaretleri) doğru
olmasına mutlaka dikkat edin. Dikkat edilmediğinde pil
akabilir veya patlayabilir.
• Sadece belirtilen tipte aküler (ya da piller) kullanın.
• Pilleri yerleştirmeden önce pil kontaklarını ve karşı
kontakları temizleyin.
• Çocuklarındenetim altında olmadan pil
değiştirmelerine izin vermeyin.
• Eski ve yeni pil lerle farklı tip ve üreticilereait pilleri
birlikte kullanmayın.
• Uzun sürekullanılmayacak ürünlerden pilleri çıkarın
(acil bir durum için bekletildiklerinde bu durum geçerli
değildir).
• Pillerekısa devreyapmayın.
• Pilleri şarj etmeyin.
• Pilleri ateşeatmayın.
• Pilleri çocuklarınerişemeyeceğibir yerde saklayın.
• Pilleri hiçbir zaman açmayın, zarar vermeyin, yutmayın
veya çevreye karışmalarına izin vermeyin. Pillerde zehirli
ve çevresağlığına zararlı ağırmetaller mevcut olabilir.
• Bitmiş pilleri derhal üründen çıkartınveatıktoplamaya
verin.
• Aşırı sıcaklıklarda ve aşırı düşük hava basıncında (örn.
yüksek rakımlarda) depolamaktan, yüklemekten ve
kullanmaktan kaçının.
4. Devreye alımdan önce
Uyarı
UNDOK uygulamasının
ve tam fonksiyon kapsamının
detaylı bir açıklamasını
UNDOK kılavuzumuzda bulabilirsiniz:
68
www.hama.com->00054238 ->İndirmeler
Page 75

Kullanımbilgileri
• Uzaktan kumandadaki [OK]ve►tuşu, r
ön tarafında bulunan [POWER/VOLUME/ENTER/
NAVIGATE](11) tuşuile aynıdır.
• Uzaktan kumandadaki ◄ tuşu, radyonun ön tarafında
bulunan [ ]tuşuile aynıdır
• Uzaktan kumandadaki ▲ ▼ tuşları,radyonun
önündeki navigasyon regülatörünü sağavesola
çevirmek ile aynıdır.
Uzaktan kumandanınişletime alınması
Pil bölmesinin kapağını açın. Bu, uzaktan kumandanınarka
kısmında bulunur ve işaretli yeredoğru iterek açılabilir.
Teslimat kapsamına iki adet AAA pili dahildir. İşletime
almak için bunları pil bölmesine yerleştirmeniz
gerekir.Pilleri yerleştirirken, doğru polariteye göre
yerleştirdiğinizden emin olun. Öngörülen polarite (+/-), pil
bölmesinde belirtilmiştir.
Ağ bağlantısını kurma
4.1 LAN (kablolu ağ)
• Router cihazınızınbir LAN yuvasını radyonuzun bir LAN
yuvasına bağlayın. Bu amaçla, teslimat kapsamında
bulunmayan bir Ethernet kablosu gereklidir.
• Router cihazınınaçıkvedoğru işler durumda olduğundan
ve İnternet bağlantısınınmevcut olduğundan emin olun.
• LAN bağlantısınındoğru işleyip işlemediğini belirlemek
için Router cihazınızınkullanımkılavuzuna başvurun.
• Ardından madde 5“Devreye alma”başlığında tarif
edildiğigibi işlemleredevam edin.
4.2 WLAN (kablosuz ağ)
• Router cihazınınaçıkvedoğru işler durumda olduğundan
ve İnternet bağlantısınınmevcut olduğundan emin olun.
• Router cihazınızınWLAN fonksiyonunu etkinleştirin.
• WLAN bağlantısınındoğru işleyip işlemediğini belirlemek
için Router cihazınızınkullanımkılavuzuna başvurun.
• Ardından madde 5“Devreye alma”başlığında tarif
edildiğigibi işlemleredevam edin.
adyonun
5. İşletime alma
Uyarı -optimum yayın
"DIT2006BT" koaksiyel bağlantılarasahip harici
antenler için bir anten bağlantısına sahiptir.Teslimat
kapsamında, DAB, DAB+ ve FM yayınlarını mümkün
kılan uygun bir teleskopik anten zaten mevcuttur.Yayın
gücünü iyileştirmek veya taleplerinize göreuyarlamak
için alternatif olarak aktif veya pasif bir anten de
kullanabilirsiniz.
Dikkate alın:
• Anteni daima tamamen çekin.
• Optimum bir yayıniçin, anteni dikey olarak
konumlandırmanızı öneriyoruz.
5.1 Kullanımile ilgili genel bilgiler
5.1.1 Açma /Kapama /Uyku modu
• Radyoyu açmak için [POWER/VOLUME/ENTER/
NAVIGATE](11) tuşuna basın.
• Radyoyu kapatmak için (uyku modu) [POWER/VOLUME/
ENTER/NAVIGATE](11) tuşunu yaklaşık3saniye basılı
tutun.
• Cihazı tamamen kapatmak için, fişini çekin.
5.1.2 Navigasyon ve kumanda
• Bir hızlı seçim tuşuna basarak sunulan menü
başlıklarında gezinin.
• [POWER/VOLUME/ENTER/NAVIGATE](11) tuşunu
çevirerek, münferit menü başlıklarını seçebilirsiniz.
• [POWER/VOLUME/ENTER/NAVIGATE](11) tuşuna
basarak seçiminizi onaylayabilirsiniz.
5.1.3 Ses seviyesinin uyarlanması
• [POWER/VOLUME/ENTER/NAVIGATE](11) tuşunu
çevirerek ses seviyesi artırılır(sağ)veya düşürülür (sol).
69
Page 76

5.2 Çalıştırmak
Uyarı
• Ürünü, sadece onun için onaylanmış bir prize takın.
Elektrik prizi ürünün yakınında ve kolay erişilebilir
olmalıdır.
• Ürünü, açma/kapama şalteriyle elektrik şebekesinden
ayırın. Bu mümkün değilse, elektrik kablosunu prizden
çekin.
• Çoklu priz kullanırken, bağlı tüketicilerin izin verilen
toplam güç tüketimini aşmadığından emin olun.
• Ürünü uzun sürekullanmadığınızda elektrik
şebekesinden ayırın.
• Adaptörü, radyoynun arka tarafındaki besleme
şebekesine (1) takın.
• Güç kablosunu düzgün bir şekilde kurulmuş ve erişimi
kolay bir prize takın.
• Radyonun başlatma işleminin tamamlanmasını bekleyin.
• Radyoyu açmak için [POWER/VOLUME/ENTER/
NAVIGATE](11) tuşuna basın.
Bilgi – İlk çalıştırma için
• İlk kez başlatırken otomatik olarak kurulum asistanı
(Setup Wizard) başlatılır.
• Kurulum asistanı İngilizce olarak çalışır.
• Asistanı atlayıpdaha sonraAlmanca olarak tekrar
başlatabilirsiniz.
5.3 Dil
İlk kez işletime alınırken radyonun standart dili, İngilizce
olarak ayarlanmıştır. Radyonun ayarlanmış menü dilini
değiştirmek için, aşağıdaki yolu izleyin:
• Ayar menüsüne ulaşmak için [
• [POWER/VOLUME/ENTER/NAVIGATE](11) yardımı ile
“Ayarlar” menü başlığına ulaşın.
• [POWER/VOLUME/ENTER/NAVIGATE](11) tuşuna
basarak seçimi onaylayın.
• [POWER/VOLUME/ENTER/NAVIGATE](11) yardımı ile
“Dil” menü başlığına ulaşın. [POWER/VOLUME/ENTER/
NAVIGATE](11) tuşuna basarak seçimi onaylayın.
• [POWER/VOLUME/ENTER/NAVIGATE](11) yardımı ile
dilediğiniz sistem dilini seçin.
• Seçilen güncel sistem ayarı *ile işaretlenir.
Uyarı
• Mevcut diller:
İngilizce, Danca, Fransızca, Almanca, İtalyanca,
Norveççe, Fince, İsveççe, Türkçe, Lehçe, Hollandalı,
Portekiz, İspanyolca
](7) tuşuna basın.
6. Bakımvekoruma
• Bu ürünü sadece tüy bırakmayan, hafif nemli bir bezle
temizleyin ve sert temizlik maddeleri kullanmayın.
• Ürünü uzun sürekullanmadığınızda, cihazı kapatınve
elektrik kaynağından ayırın. Doğrudan güneş ışığından
uzak, kuru ve temiz bir yerde saklayın.
7. Sorumluluktan muafiyet
Hama GmbH &CoKG, ürünün yanlış kurulumu, montajı
ve yanlış kullanımı ya da kullanımkılavuzunun ve/
veya güvenlik talimatlarınındikkate alınmaması sonucu
kaynaklanan hasarlar için hiçbir sorumluluk veya garanti
sağlamayı kabul etmez.
8. Servis ve destek
Ürünle ilgili sorularınızda lütfen Hama ürün danışmanlığı
ile iletişime geçmekten çekinmeyin.
Destek hattı:+49 9091 502-115 (Almanca / İngilizce)
Daha fazla destek bilgisini burada bulabilirsiniz:
www.hama.com
Uzun kılavuzun tam metni aşağıdaki internet adresinde
mevcuttur:
www.hama.com -> 00054238 -> İndirmeler
9. Tasfiye uyarıları
Çevre koruma uyarısı:
Avrupa BirliğiYönetmeliği2012/19/AB ve
2006/66/AB ulusal yasal uygulamalar için de
geçerli olduğutarihten itibaren: Elektrikli ve
elektronik cihazlarla piller normal evsel çöpe
atılmamalıdır. Tüketiciler için, artıkçalışmayan elektrikli ve
elektronik cihazları piller,kamuya ait toplama yerlerine
götürme veya satınalındıkları yerleregeri verme yasal bir
zorunluluktur.Bukonu ile ilgili ayrıntılar ulusal yasalarla
düzenlenmektedir.Ürün üzerinde, kullanma kılavuzunda
veya ambalajda bulunan bu sembol tüketiciyi bu konuda
uyarır. Eski cihazlarıngeri kazanımı,yapıldıkları
malzemelerin değerlendirilmesi veya diğer değerlendirme
şekilleri ile, çevrekorumasına önemli bir katkıda
bulunursunuz.
70
Page 77

10. Uygunluk beyanı
İş bu belge ile Hama GmbH &CoKG, [00054238]
numaralı kablosuz sistem tipinin 2014/53/AB sayılı
yönetmeliğeuygun olduğunu beyan eder.AB
Uygunluk Beyanınıntam metni aşağıdaki internet
adresinde incelenebilir:
www.hama.com -> 00054238 -> İndirmeler
Frekans bandı/frekans
bantları
Bluetooth: 2.402 –2.480GHz 6.5 dBm(EIRP)
WiFi: 2.400 –2.480 GHz 15.5 dBm (EIRP)
WiFi: 5.150 –5.350 GHz 16.5 dBm (EIRP)
WiFi: 5.470 –5.725 GHz 16.5 dBm (EIRP)
WiFi: 5.725 –5.850 GHz 11 dBm (EIRP)
Kısıtlama veya gerekliliklerin olduğuülkeler
Belçika, Bulgaristan, Çek Cumhuriyeti, Danimarka,
Almanya, Estonya, İrlanda, Yunanistan, İspanya, Fransa,
Hırvatistan, İtalya, Kıbrıs, Letonya, Litvanya, Lüksemburg,
Macaristan, Malta, Hollanda, Avusturya, Polonya, Portekiz,
Romanya, Slovenya, Slovakya, Finlandiya, İsveç, Birleşik
Krallık
Uyarı
Kanal 36-64 (5150 MHz -5350 MHz
frekansınınkanalları)kullanıldığında, cihaz sadece kapalı
alanlarda kullanılabilir.
İletilen maksimum radyo
frekans gücü
Elektromanyetik alanlarakarşı maruziyeti
sınırlamak için
Bu cihaz, kullanıcınınbedenine veya çevredeki
kişilereenaz20cm'lik bir mesafede kullanılmak için
öngörülmüştür.Bucihaz, vücutta taşınmamalıdır.
71
Page 78

M Instrucțiuni prescurtate
Elemente de comandășiașaje
A: Radio Față
1
2 RacordAUX-IN
3 [VOLUME] +/-
4 Rotiţă [PRESET]
5 Tasta [MODE]
6 Tasta [ALARM]
7 Tasta [EQUALIZER]
8 Tasta [MENU]
9 Tasta [INFO]
10 Tasta [BACK] (Înapoi)
11 Receptor infraroșu
12 [Navigation]
13
14
15 Display color 2.8"
16 LED
17 Branșament la rețea
18 Antenă*
19 Antenă WiFi/Bluetooth
20 Ieşireoptică
21 Ieşirecoaxială
22 IeşireStereo Cinch L/R
23
24
Buton[POWER]
Racordcască
Interfață USB
B: Radio Spate
RacordLINE-OUT
Conector LAN (10/100 Mbit)
Telecomandă
1 Tasta [POWER]
2 Tasta [MUTE]
3 Taste Directe (1-4) [PRESET]
4 Tasta [EQUALIZER]
5 Tasta [PRESET]
6 Tasta [MENU]
7 Tasta [SOURCE]
8 Tasta [OK]
Tasta [NAVIGATIONS]
9
▲ Sus ▼ Jos
◄ Înapoi ► Înainte
10 Tasta [VOL-]
11 Tasta [VOL+]
12 Tasta [HOME]
13 Tasta [BACK]
14 Tasta [INFO]
15 Tasta [BACKLIGHT]
16 Tasta [PAUSE]
17 Tasta [PLAY]
18 Tasta [PREVIOUS]
19 Tasta [NEXT]
Indicație
*"DIT2006BT" dispune de oantenă ce poate înlocuită.Putețiutiliza oantenă activă sau pasivă,caredispune de o
conexiune coaxială.
Regulatorul rotativ dispune de ofuncție dublă.Prin rotirea regulatorului se modică volumul sau navigațiprin
**
structurameniului. Prin apăsarea regulatorului rotativ,aparatul este trecut în modul de standby,respectiv este
conrmată oselecție.
Indicație importantă –Instrucțiuni rezumate
• Acestea sunt niște instrucțiuni rezumate, carevăoferă cele mai importante informații de bază,precum indicațiile de
securitate șipunerea în funcțiune aprodusului dvs.
• Din motive de protecție amediului șideeconomie amateriilor prime valoroase, rma Hama renunță la instrucțiunile
de utilizaretipărite șivileoferă exclusiv sub forma unei descărcări PDF.
• Textul integral al manualului de utilizarecomplet este disponibil la următoarea adresă internet:
!
www.hama.com -> 00054238 -> Downloads
• Salvațimanualul de utilizarecomplet pe calculatorul dvs., pentru oconsultareulterioarășiimprimați-l în funcție de
nevoie.
72
Page 79

1. Explicarea simbolurilor de avertizare șia
indicațiilor
Pericol de electrocutare
Acest simbol atrage atenția asuprapericolului de
atingereacomponentelor neizolate ale produsului,
caresepot aasub otensiune periculoasă,carepoate
reprezenta un pericol de electrocutare.
Avertizare
Este utilizat pentru amarca indicațiile de securitate sau
pentru aatrage atenția asuprapericolelor șiriscurilor
speciale.
Indicație
Este utilizat pentru amarca suplimentar informații sau
indicații importante.
2. Conținutul ambalajului
• Digital-HiFi-Tuner DIT2006BT
• Cablu RCA(pentru ieșirestereo RCAL/R)
• Telecomandă
• 2baterii AAA
• QSG
3. Indicații de securitate
• Produsul este conceput pentru utilizarea casnică,
necomercială.
• Nu folosițiprodusul în zone unde nu sunt admise
aparate electronice.
• Protejațiprodusul de murdărie, umiditate
șisupraîncălzire șiutilizați-l numai în spații
uscate.
• Acest produs, ca toate produsele electrice, nu arece
căuta pe mâinile copiilor!
• Nu lăsațiprodusul să cadășinici nu îl expunețiunor
vibrații puternice.
• Operațiprodusul numai în limita capacităților sale
indicate în cadrul datelor tehnice.
• Ținețicopiii neapăratdeparte de ambalaje, deoarece
există pericol de sufocare.
• Eliminațiambalajele imediat, conform prescripțiilor
locale valabile de eliminareadeșeurilor.
• Nu efectuațimodicări ale aparatului. Aceasta ar duce la
pierderea oricărordrepturi pe baza garanției.
• Utilizațiprodusul numai pentru scopul prevăzut pentru
acesta.
• Nu operațiprodusul în imediata apropiereasistemului
de încălzire, de alte surse de căldură sau în razele directe
ale soarelui.
• Nu folosițiprodusul în mediu umed șievitațistropirea
cu apă.
• Utilizațiarticolul numai în condiții climaterice moderate.
Pericol de electrocutare
• Nu deschidețiprodusul șinucontinuațisăîl operați,
dacă prezintă deteriorări.
• Nu utilizațiprodusul dacă
adaptorul CA,cablul adaptorului sau cablul de
alimentareeste deteriorat.
• Nu încercațisăreparațisau să întreținețiprodusul în
regie proprie. Solicitațipersonalului de specialitate
efectuarea oricărorlucrări de întreținere.
Avertizare–Baterii
• Atenție în mod obligatoriu la polaritatea corectă
(marcajele + și-)șiintroduceți-le corespunzător cu
acestea. Încazul nerespectării vă expunețipericolului
scurgerilor sau exploziei bateriilor.
• Utilizaținumai acumulatoare(sau baterii)
corespunzătoaretipului indicat.
• Înaintea introducerii bateriilor vă rugămsăcurățați
contactele acestoraprecum șicontactele opuse.
• Nu permitețicopiilor să schimbe bateriile
nesupravegheați.
• Nu amestecațibateriile vechi cu cele noi, precum și
baterii de diferite tipuri șiproducători diferiți.
• Îndepărtațibateriile din produsele, carenusunt
utilizate operioadă mai lungă de timp (cu excepția
situației în carelepăstrațidisponibile pentru situații de
urgență).
• Nu scurtcircuitațibateriile.
• Nu încărcațibateriile.
• Nu aruncațibateriile în foc.
• Păstrațibateriile astfel încât să nu elaîndemâna
copiilor.
• Bateriile nu se deschid, nu se deteriorează,nuse înghit
șinuse aruncă în mediul înconjurător.Pot conține
metale grele șitoxice nocive mediului înconjurător.
• Îndepărtați șisalubrizațiimediat bateriile folosite din
produs.
• Evitațidepozitarea, încărcarea șifolosirea la
temperaturi extreme șipresiune foarte scăzută aaerului
(deex. la înălțimi mari).
73
Page 80

4. Înainte de punerea în funcțiune
Indicație
Odescrieredetaliată a
Aplicației UNDOK șia
spectrului întreg de funcții poate găsită în
ghidul nostru UNDOK la:
4.2 WLAN (rețea fără cablu)
• Asigurați-vă că router-ul este pornit, funcționează corect
șieste conectat la internet.
• Activațifuncția WLAN arouter-ului.
• Referitor la funcționarea corectă aconexiunii WLAN
trebuie să avețiînvedereinstrucțiunile de folosireale
router-ului.
• Procedațiconform descrierii de la punctul 5, „Punereîn
funcțiune“.
5. Punerea în funcțiune
www.hama.com->00054238 ->Downloads
Instrucțiunile de utilizare
• Tasta [OK]precum și ► de pe telecomandă
corespunde tastei [POWER/VOLUME/ENTER/
NAVIGATE](11) de pe partea frontală aradioului.
• Tasta ◄ de pe telecomandă cor
pe partea frontală aradioului.
• Tastele ▲ ▼ de pe telecomandă corespunde mișcării
de rotație sprestânga sau dreapta aregulatorului de
navigaredepepartea frontală aradioului.
Punerea în funcțiune atelecomenzii
Deschidețicapacul compartimentului bateriilor.Acesta se
aă pe partea posterioară atelecomenzii șipoate să e
deschis prin împingerea în direcția marcată.
Pachetul de livrareinclude două baterii AAA, caretrebuie
incluse în compartimentul bateriilor pentru punerea în
funcțiune. La introducere, avețiînvederecabateriile să
eintroduse cu polaritatea corectă conform indicațiilor.
Polaritatea prescrisă (+/-) este marcată în compartimentul
bateriilor.
Instalarea conexiunii rețelei
4.1 LAN (rețea legată prin cablu)
• Conectațiunconector LAN al router-ului cu cel a
radioului. Pentru aceasta aveținevoie de un cablu
ethernet carenueste inclus în livrare.
• Asigurați-vă că router-ul este pornit, funcționează corect
șieste conectat la internet.
• Referitor la funcționarea corectă aconexiunii LAN trebuie
să avețiînvedereinstrucțiunile de folosireale router-ului
• Procedațiconform descrierii de la punctul 5, „Punereîn
funcțiune“.
espunde tastei [ ]de
Indicație –recepția optimă
"DIT2006BT" dispune de oconexiune pentru racordarea
antenelor externe prin intermediul unei conexiuni
coaxiale. Pachetul de livrareinclude deja oantenă
telescopică potrivită,carepermite recepționarea DAB,
DAB+ șiFM. Înmod alternativ putețiutiliza oantenă
activă sau pasivă,pentru aameliorarecepția sau pentru
aoadapta la nevoile dvs.
Avețiînvedere:
• Extragețiîntotdeauna antena complet.
• Pentru orecepție optimă vă recomandămalinierea
antenei pe verticală.
5.1 Indicații generale de operare
5.1.1 Pornire/Oprire/Standby
• Apăsați[POWER/VOLUME/ENTER/NAVIGATE](11)
pentru aporni radioul.
• Apăsați șimențineți[POWER/VOLUME/ENTER/
NAVIGATE](11) timp de cca. 3secunde, pentru aopri
radioul (standby).
• Deconectațiaparatul de la alimentarea electrică,pentru
a-l opri complet.
5.1.2 Navigația șicomanda
• Navigațiprin apăsarea unei taste de selecție rapidă prin
punctele de meniu oferite.
• Prin rotirea [POWER/VOLUME/ENTER/NAVIGATE](11)
selectațipunctele individuale ale meniului.
• Prin apăsarea [POWER/VOLUME/ENTER/NAVIGATE]
(11) conrmațiselecția.
5.1.3 Adaptarea volumului
• Prin rotirea [POWER/VOLUME/ENTER/NAVIGATE](11)
este crescut (dreapta) sau redus (stânga) volumul.
74
Page 81

5.2 Pornirea
Avertizare
• Operațiprodusul numai conectat la opriză validată
pentru acesta. Priza trebuie să se aeînapropierea
produsului șisăeușor accesibilă.
• Deconectațiprodusul prin intermediul butonului de
conectare/deconectaredelarețea –dacă acesta
lipsește, deconectațicablul de alimentaredelapriză.
• Încazul prizelor multiple, trebuie să avețiînvedere
ca puterea totală aprizei să nu edepășită de
consumatorii conectați.
• Deconectațiprodusul de la rețea, dacă nu îl utilizațio
perioadă mai lungă de timp.
• Conectațialimentatorul la cablul de alimentare(1) pe
partea posterioară aradioului.
• Conectațicablul de alimentarelaopriză instalată într-un
mod adecvat șiușor accesibilă.
• Așteptațipână ce inițializarea radioului s-a încheiat.
• Apăsați[POWER/VOLUME/ENTER/NAVIGATE](11)
pentru aporni radioul.
6. Întreținerea șiîngrijirea
• Curățațiprodusul numai cu olavetă ce nu lasă scame,
ușor umezitășinuutilizațidetergențiagresivi.
• Încazul în carenuutilizațiprodusul pe operioadă mai
îndelungată,opriți-l șideconectați-l de la alimentarea
electrică.Depozitați-l într-un loc curat, uscat, fără raze
directe ale soarelui.
7. Excluderea răspunderii
Hama GmbH &CoKGnuîșiasumă nicio răspundere
sau garanție pentru daunele, ce rezultă din instalarea,
montajul, utilizarea inadecvată aprodusului sau
nerespectarea instrucțiunilor de utilizare și/sau a
indicațiilor de securitate.
8. Service șisuport
Încazul în careavețiîntrebări referitoarelaprodus vă
putețiadresa serviciului de consultanță pentru produse
Hama.
Linia de asistență:+49 9091 502-115 (Ger/Eng)
Informații suplimentaredesuport putețigăsi aici:
www.hama.com
Indicație –Laprima utilizare
• La prima pornireeste inițiat în mod automat asistentul
de setare(Setup Wizard).
• Asistentul de setaresederulează în limba engleză.
• Putețisări peste asistent șiputețisăîl accesațimai
apoi în limba germană.
5.3 Limba
La prima punereînfuncțiune aradioului, limba setată a
acestuia este engleză.Pentru amodica limba de meniu
setată aradioului, procedațidupă cum urmează:
• Apăsați[
• Navigai cu ajutorul [POWER/VOLUME/ENTER/
NAVIGATE](11) la submeniul „Setări”.
• Conrmațiselecția prin apăsarea [POWER/VOLUME/
ENTER/NAVIGATE](11).
• Navigațicuajutorul [POWER/VOLUME/ENTER/
NAVIGATE](11) la submeniul „Limba”. Conrmați
selecția prin apăsarea [POWER/VOLUME/ENTER/
NAVIGATE](11).
• Selectațicuajutorul [POWER/VOLUME/ENTER/
NAVIGATE](11) limba de sistem dorită de dvs.
• Setarea actuală alimbii de sistem este marcată cu*.
Indicație
• Putețiselecta din următoarele limbi:
Engleză,Daneză,Franceză,Germană,Italiană,
Norvegiană,Finlandeză,Suedeză,Turcă,Poloneză,
olandeză,portugheză,spaniolă
](7), pentru aajunge în meniul de setări.
Textul integral al manualului de utilizarecomplet este
disponibil la următoarea adresă internet:
www.hama.com-> 00054238 ->Downloads
75
Page 82

9. Indicații de eliminare ca deșeu
Instrucţiuni pentru protecţia mediului înconjurător:
Din momentul aplicării directivelor europene
2012/19/UE și2006/66/EG în dreptul național sunt
valabile următoarele: Aparatele electrice și
electronice nu pot salubrizate cu gunoiul
menajer.Consumatorul este obligat conform legii să
predea aparatele electrice șielectronice la sfârșitul duratei
de utilizarelalocurile de colectarepublice sau înapoi de
unde au fost cumpărate. Detaliile sunt reglementate de
cătrelegislația țării respective. Simbolul de pe produs, în
instrucțiunile de utilizaresau pe ambalaj indică aceste
reglementări. Prin reciclarea, revaloricarea materialelor
sau alte forme de valoricareaaparatelor scoase din uz
aducețiocontribuție importantă la protecția mediului
nostru înconjurător.
10. Declarație de conformitate
Prin prezenta declară Hama GmbH &CoKG, că
tipul de instalație cu emisii radio [00054238]
corespunde Directivei 2014/53/UE. Textul integral
al declarației UE de conformitate este disponibil la
următoarea adresă internet:
www.hama.com-> 00054238 ->Downloads
Pentru limitarea expunerii la câmpurile
electromagnetice
Acest aparat este prevăzut pentru utilizarea la odistanță
de cel puțin 20 cm față de corpul utilizatorului sau de
persoanele din apropiere. Acest aparat nu poate să e
purtat pe corp.
Banda (benzile) de fr
Bluetooth: 2.402 –2.480 GHz6.5 dBm(EIRP)
WiFi: 2.400 –2.480 GHz 15.5 dBm (EIRP)
WiFi: 5.150 –5.350 GHz 16.5 dBm (EIRP)
WiFi: 5.470 –5.725 GHz 16.5 dBm (EIRP)
WiFi: 5.725 –5.850 GHz 11 dBm (EIRP)
Restricții sau Cerințeîn
Belgia, Bulgaria, Republica Cehă,Danemarca, Germania,
Estonia, Irlanda, Grecia, Spania, Franța, Croația, Italia,
Cipru, Letonia, Lituania, Luxemburg, Ungaria, Malta,
Olanda, Austria, Polonia, Portugalia, România, Slovenia,
Slovacia, Finlanda, Suedia, Marea Britanie
Indicație
Dacă este utilizat un canal între36–64 (canalele
frecvenței
5150 MHz –5350 MHz), aparatul trebuie utilizat numai
în spații închise.
ecvențeP
uter
ea maximă
76
Page 83

S Snabbstartinstruktion
Manöverelement och indikeringar
A: Radio Framsidan
1
2 AUX-In-uttag
3 [VOLUME] +/-
4 [PRESET]-ratt
5 [MODE]-knapp
6 [ALARM]-knapp
7 [EQUALIZER]-knapp
8 [MENU]-knapp
9 [INFO]-knapp
10 [BACK] (tillbaka)-knapp
11 Infrarödmottagare
12 [Navigation]
13
14
15 2.8"-färgdisplay
16 LED
17 Elsladd
18 Antenn*
19 WiFi-/Bluetoothantenn
20 Optisk utgång
21 Koaxial utgång
22 Stereo RCAL/R-utgång
23
24
Information
*"DIT2006BT" har en antenn som kan bytas ut. Du kan använda en aktiv eller passiv antenn som har en
koaxialanslutning.
** Ratten har en dubbenfunktion. **Vrid på ratten för att ändravolymen eller navigeraimenyn. Tryck på ratten för att
sätta radion iviloläge eller bekräfta ett val.
[POWER]-knapp
Uttag för hörlurar
USB-anslutning
B: Radio Baksidan
Line-Out-uttag
LAN (10 /100 Mbit) -anslutning
Fjärrkontroll
1 [POWER]-Knapp
2 [MUTE]-Knapp
3 [PRESET]-Direktknappar (1-4)
4 [EQUALIZER]-Knapp
5 [PRESET]-Knapp
6 [MENU]-Knapp
7 [SOURCE]-Knapp
8 [OK]-Knapp
[NAVIGATIONS]-Knappar
9
▲ Upp ▼ Ner
◄ Bakåt ► Framåt
10 [VOL-]-Knapp
11 [VOL+]-Knapp
12 [HOME]-Knapp
13 [BACK]-Knapp
14 [INFO]-Knapp
15 [BACKLIGHT]-Knapp
16 [PAUSE]-Knapp
17 [PLAY]-Knapp
18 [PREVIOUS]-Knapp
19 [NEXT]-Knapp
Viktig information –snabbinstruktion
• Detta är en snabbinstruktion som innehåller den viktigaste informationen som säkerhetsanvisningar och hur du
kommer igång med din produkt.
• Av miljöskäl och för att sparapåvärdefull råvaraavstår Hama från en tryckt, komplett bruksanvisning. Den nns
endast att ladda ned som PDF.
• Den fullständigabruksanvisningen nns på följande webbadress:
!
www.hama.com -> 00054238 -> Downloads
• Sparadenna fullständiga bruksanvisningen idin dator så att du kan titta iden, och skriv ut den om du behöver det.
77
Page 84

1. Förklaring av varningssymboler och hänvisningar
Fara för elektrisk stöt
Denna symbol hänvisar till faravid beröring av oisolerade
produktdelar som kan ha en så pass hög spänning att
det nns risk för elektrisk stöt.
Varning
Används för att markerasäkerhetsanvisningar eller för att
rikta uppmärksamheten mot speciella faror och risker.
Information
Används för att markeraytterligareinformation eller
viktig information.
2. Förpackningens innehåll
• Digital-HiFi-Tuner DIT2006BT
• RCA-kabel (för stereo RCAL/R-utgång)
• Fjärrkontroll
• 2x AAA batterier
• Snabbguide
3. Säkerhetsanvisningar
• Produkten är avsedd för privat hemanvändning, inte
yrkesmässig användning.
• Använd inte produkten inom områden där elektroniska
apparater inte är tillåtna.
• Skydda produkten mot smuts, fukt och överhettning och
använd den baraiinomhusmiljöer.
• Precis som alla elektriska apparater ska även denna
förvaras utom räckhåll för barn!
• Tappa inte produkten och utsätt den inte för kraftiga
vibrationer.
• Använd inte produkten utöver de kapacitetsgränser som
anges itekniska data.
• Det är viktigt att barn hålls borta från
förpackningsmaterialet. Det nns risk för kvävning.
• Återvinn förpackningsmaterialet direkt enligt de lokala
återvinningsbestämmelserna.
• Förändraingenting på produkten. Då förlorar du alla
garantianspråk.
• Använd endast produkten för det avsedda ändamålet.
• Använd inte produkten iomedelbar närhet av
värmeelement, andravärmekällor eller idirekt solsken.
• Använd inte produkten ifuktig miljö och undvik
vattenstänk.
• Använd endast produkten under normala
väderförhållanden.
Fara för elektrisk stöt
• Öppna inte produkten och fortsätt inte att använda
den om den är skadad.
• Använd inte produkten när
AC-adaptern, adapterkabeln eller nätkabeln är
skadade.
• Försök inte serva eller repareraprodukten själv.Överlåt
allt servicearbete tillansvarig fackpersonal.
Varning –batterier
• Varmycket noga med batteripolerna (märkta +och -)
och lägg ibatterierna vända åt rätt håll. Annars nns
det risk för att batterierna läcker eller exploderar.
• Använd enbart uppladdningsbarabatterier (eller
batterier) som motsvarar den angivna typen.
• Rengör batterikontakterna och motkontakterna innan
batterierna läggs i.
• Låt inte barn byta batterier utan uppsikt.
• Blanda inte gamla och nya batterier,inte heller olika
sorters batterier eller batterier från olika tillverkare.
• Ta ut batterierna om produkten inte ska användas
under en längretid (såvida den inte ska stå redo för ett
nödläge).
• Kortslut inte batterierna.
• Ladda inte batterierna.
• Kasta inte batterier iöppen eld.
• Förvarabatterier utom räckhållför barn.
• Öppna, skada eller förtär aldrig batterier och
släng dem inte inaturen. De kan innehålla giftiga
tungmetaller som är skadliga för miljön.
• Förbrukade batterier ska tas ut ur produkten direkt och
kasseras.
• Förvara, ladda eller använd inte vid extrema
temperaturer och extremt lågt lufttryck (t.ex. på hög
höjd).
4. Före första start
Information
En utförlig beskrivning av
UNDOK-appen och alla
funktioner hittar du ivår
UNDOK-guide på:
www.hama.com->00054238 ->Downloads
78
Page 85

Bruksanvisning
• Knapparna [OK]och ► på f
knappen[POWER/VOLUME/ENTER/NAVIGATE](11)
på radions framsida.
• Knappen ◄ på fjärrkontrollen motsvarar knappen [
]påradions framsida
• Knapparna ▲ ▼ på fjärrkontrollen motsvarar att
vrida åt vänster eller höger på navigationsratten på
radions framsida.
Använda fjärrkontrollen
Öppna batterifackets lock. Det sitter på fjärrkontrollens
baksida och går att öppna om du skjuter det ipilens
riktning.
Ileveransen ingår två AAA-batterier som du ska sätta i
innan du kan använda fjärrkontrollen. Se till att du vänder
batterierna rätt så att inte polariteten blir fel. Polariteten är
märkt med (+/-) ibatterifacket.
Ställ in nätverksanslutningen
4.1 LAN (kabelanslutet nätverk)
• Anslut radions LAN-anslutning till en LAN-anslutning på
routern. Du behöver en ethernetkabel som måste köpas
separat.
• Kontrolleraatt routern är på, fungerar korrekt och är
ansluten till internet.
• Kontrolleraatt LAN-anslutningen fungerar korrekt enligt
bruksanvisningen till routern.
• Fortsätt med punkt 5. “Börja använda radion”.
4.2 WLAN (trådlöst nätverk)
• Kontrolleraatt routern är på, fungerar korrekt och är
ansluten till internet.
• AktiveraWLAN-funktionen på routern.
• Kontrolleraatt WLAN-anslutningen fungerar korrekt
enligt bruksanvisningen till routern.
• Fortsätt med punkt 5“Börja använda radion”.
5. Komma igång
Information –optimal mottagning
"DIT2006BT" har en antennanslutning för externa
antenner med koaxialkabelanslutning. En passande
teleskopantenn medföljer produkten, som möjliggör
mottagning via DAB, DAB+ och FM. Alternativt kan du
använda en aktiv eller passiv antenn för att förbättra
mottagningsprestanda eller anpassa dem tilldina
önskemål.
Tänk på att
• alltid drautantennen helt.
• rikta antennen vertikalt för bättremottagning.
järrkontrollen motsvarar
5.1 Allmänna anvisningar för användning
5.1.1 Till/Från/ Viloläge
• Tryck på [POWER/VOLUME/ENTER/NAVIGATE](11),
för att slå på radion.
• Tryck och håll[POWER/VOLUME/ENTER/NAVIGATE]
(11) intryckt ica3sekunder för att stänga av radion
(viloläge).
• Koppla bort apparaten från strömförsörjningen för att
stänga av den helt.
5.1.2 Navigation och styrning
• Tryck på en snabbvalsknapp och bläddrasedan genom
de menyalternativ som nns.
• Vrid på [POWER/VOLUME/ENTER/NAVIGATE](11) för
att välja ett menyalternativ.
• Tryck på [POWER/VOLUME/ENTER/NAVIGATE](11)
och bekräfta ditt val.
5.1.3 Justera volymen
• Vrid på [POWER/VOLUME/ENTER/NAVIGATE](11) för
att öka volymen (åt höger) eller minska den (åt vänster).
5.2 Inkoppling
Varning
• Anslut baraprodukten till ett godkänt eluttag.
Eluttaget ska sitta inärheten av produkten och vara
lätt att nå.
• Koppla bort produkten från elnätet med hjälp av
strömbrytaren –omden saknas drar du ut nätkabeln
ur eluttaget.
• Om grenuttag används får de anslutna förbrukarna
inte överskrida tillåten total effektförbrukning.
• Koppla bort produkten från elnätet om den inte ska
användas under en längretid.
• Anslut nätdelen till nätkabeln (1) på radions baksida.
• Anslut nätkabeln till ett korrekt installerat och lätt
åtkomligt eluttag.
• Vänta tills initialiseringen av radion är avslutad.
• Tryck på [POWER/VOLUME/ENTER/NAVIGATE](11),
för att slå på radion.
79
Page 86

Information –vid första inkoppling
• När radion startas för första gången startas
inställningsassistenten (Setup Wizard) automatiskt.
• Inställningsassistenten körs på engelska.
• Du kan hoppa över assistenten och starta den senare
på svenska.
5.3 Språk
Standardspråket när radion startas första gången är
engelska. Gör så här för att ändraradions inställda
menyspråk:
• Tryck på [
• Gå till menyalternativet Instäl lningar.med [POWER/
VOLUME/ENTER/NAVIGATE](11).
• Bekräfta ditt val genom att trycka på [POWER/
VOLUME/ENTER/NAVIGATE](11).
• Gå till menyalternativet Språk med [POWER/VOLUME/
ENTER/NAVIGATE](11). Bekräfta ditt val genom att
trycka på [POWER/VOLUME/ENTER/NAVIGATE](11).
• Välj önskat systemspråk med [POWER/VOLUME/
ENTER/NAVIGATE](11).
• Den valda språkinställningen markeras med *.
Information
• Följande språk kan väljas:
Engelska, danska, franska, tyska, italienska, norska,
nska, svenska, turkiska, polska, nederländska,
portugisiska, spanska
6. Service och skötsel
• Använd baraenluddfri, lätt fuktad trasa för att rengöra
produkten och använd inga aggressiva rengöringsmedel.
• Stäng av enheten och draursladden om den inte ska
användas på ett tag. Förvaraden på en renoch torr
plats utan direkt solljus.
](7) för att komma till inställningsmenyn.
7. Garantifriskrivning
Hama GmbH &CoKGövertar ingen form av ansvar eller
garanti för skador som beror på olämplig installation,
montering och olämplig produktanvändning eller på att
bruksanvisningen och/eller säkerhetsinformationen inte
följs.
8. Service och support
Kontakta Hama produktrådgivning om du har frågor om
produkten.
Hotline: +49 9091 502-115 (tyska/engelska)
Du hittar mer supportinformation här:
www.hama.com
Den fullständiga bruksanvisningen nns på följande
webbadress:
www.hama.com -> 00054238 -> Downloads
9. Information om avfallshantering
Information om miljöskydd:
Efter implementeringen av EU-direktiv 2012/19/EU
och 2006/66/EG iden nationella lagstiftningen
gäller följande: Elektriska och elektroniska
apparater samt batterier får inte kastas i
hushållssoporna. Konsumenter är skyldiga att återlämna
elektriska och elektroniska apparater samt batterier vid
slutet av dess livslängd till, för detta ändamål, offentliga
uppsamlingsplatser.Detaljer för detta regleras iden
nationella lagstiftningen irespektive land. Denna symbol
på produkten, bruksanvisningen eller på förpackningen
visar att produkten omfattas av denna bestämmelse.
Genom återvinning och återanvändning av material/
batterier bidrar du till att skydda miljön och din
omgivning.
80
Page 87

10. Försäkran om överensstämmelse
Härmed försäkrar Hama GmbH &CoKGatt denna
typ av radioutrustning [00054238]
överensstämmer med direktiv 2014/53/EU.Den
fullständiga texten till EU-försäkran om överensstämmelse
nns på följande webbadress:
www.hama.com -> 00054238 -> Downloads
Frekvensband Max. sändareffekt
Bluetooth: 2.402 –2.480GHz 6.5 dBm(EIRP)
WiFi: 2.400 –2.480 GHz 15.5 dBm (EIRP)
WiFi: 5.150 –5.350 GHz 16.5 dBm (EIRP)
WiFi: 5.470 –5.725 GHz 16.5 dBm (EIRP)
WiFi: 5.725 –5.850 GHz 11 dBm (EIRP)
Restriktioner eller krav i
Belgien, Bulgarien, Tjeckien, Danmark, Tyskland, Estland,
Irland, Grekland, Spanien, Frankrike, Kroatien, Italien,
Cypern, Lettland, Litauen, Luxemburg, Ungern, Malta,
Nederländerna, Österrike, Polen, Portugal, Rumänien,
Slovenien, Slovakien, Finland, Sverige, Storbritannien
Information
Om kanalerna 36–64 (frekvens
5150 MHz –5350 MHz) används får produkten endast
användas inomhus.
För begränsning av exponeringen mot
elektromagnetiska fält
Denna apparat är avsedd att användas på minst 20
cm avstånd från användarens kropp eller personer i
närheten. Denna apparat får inte bäras på kroppen.
81
Page 88

L Pikaohje
Käyttöelementit ja näytöt
A: Radio Etupuoli
1
2 AUX-In-pistorasia
3 [VOLUME] +/-
4 [ESIASETUS]-pyörä
5 [MODE]-näppäin
6 [ALARM]-näppäin
7 [EQUALIZER]-näppäin
8 [MENU]-näppäin
9 [INFO]-näppäin
10 [BACK] (takaisin)-näppäin
11 Infrapunavastaanotin
12 [Navigation]
13
14
15 2.8" värinäyttö
16 LED
17 Verkkojohto
18 Antenni*
19 Wi-/Bluetooth-antenni
20 Optinen lähtö
21 Koaksiaalinen lähtö
22 Stereo Cinch L/R -lähtö
23
24
Ohje
*"DIT2006BT" on varustettu vaihdettavalla antennilla. Voit käyttää aktiivista tai passiivista antennia, joka on varustettu
koaksiaaliliitännällä.
** Säädin sisältää kaksoistoiminnon. Säädintä kääntämällä saat muutettua äänenvoimakkuutta tai navigoitua
valikkorakenteen läpi. Tätä säädintä painamalla laite asetetaan valmiustilaan tai valinta vahvistetaan.
[POWER]-näppäin
Kuulokepistorasia
USB-liitäntä
B: Radio Takapuoli
Line-Out-pistorasia
LAN (10 /100 Mbit) -liitäntä
Kaukosäädin
1 [POWER]-Painike
2 [MUTE]-Painike
3 [PRESET]-Suorapainikkeet (1-4)
4 [EQUALIZER]-Painike
5 [PRESET]-Painike
6 [MENU]-Painike
7 [SOURCE]-Painike
8 [OK]-Painike
[NAVIGATIONS]-Painikkeet
9
▲ Ylös ▼ Alas
◄ Takaisin ► Eteenpäin
10 [VOL-]-Painike
11 [VOL+]-Painike
12 [HOME]-Painike
13 [BACK]-Painike
14 [INFO]-Painike
15 [BACKLIGHT]-Painike
16 [PAUSE]-Painike
17 [PLAY]-Painike
18 [PREVIOUS]-Painike
19 [NEXT]-Painike
Tärkeä ohje –pikaohje
• Tämä on pikaohje, joka sisältää tärkeimmät perustiedot tuotteesta, kuten turvallisuusohjeet ja tuotteen käyttöönoton.
• Koska Hama on luopunut painetusta käyttöohjeesta ympäristönsuojelullisista ja arvokkaiden raaka-aineiden
säästämistä koskevista syistä johtuen, pitkä ohje on saatavissa ainoastaan ladattavana PDF-tiedostona.
• Täysimittainen pitkä ohje on saatavilla seuraavasta internetosoitteesta:
!
www.hama.com -> 00054238 -> Downloads
• Tallenna pitkä ohje tietokoneellesi myöhempää tarvetta varten ja tulosta se tarvittaessa.
82
Page 89

1. Varoitusmerkkien ja ohjeiden selitykset
Sähköiskun vaara
Tämä merkki viittaa tuotteen eristämättömien osien
kosketuksesta aiheutuvaan vaaraan, joka saattaa
aiheuttaa niin suuren jännitteen, että on olemassa
sähköiskun vaara.
Varoitus
Käytetään turvallisuusohjeiden merkitsemiseen ja
huomion kiinnittämiseen erityisiin vaaroihin ja riskeihin.
Ohje
Käytetään lisätietojen tai tärkeiden ohjeiden
merkitsemiseen.
2. Pakkauksen sisältö
• Digital-HiFi-Tuner DIT2006BTSBT
• Jakkijohto (stereo Cinch L/R -lähdölle)
• Kaukosäädin
• 2x AAA-paristoa
• Lyhyt ohje
3. Turvallisuusohjeet
• Tuote on tarkoitettu yksityiseen, ei-kaupalliseen
kotikäyttöön.
• Älä käytä tuotetta alueilla, joilla elektroniikkalaitteet
eivät ole sallittuja.
• Suojaa tuotetta lialta, kosteudelta ja ylikuumenemiselta
ja käytä sitä vain kuivissa tiloissa.
• Tämä tuote, kuten kaikki muut sähkölaitteet, ei kuulu
lasten käsiin!
• Älä päästä laitetta putoamaan, äläkä altista sitä
voimakkaalle tärinälle.
• Älä käytä tuotetta sen teknisissä tiedoissa ilmoitettujen
suorituskykyrajojen ulkopuolella.
• Pidä pakkausmateriaalit poissa lasten ulottuvilta, niistä
aiheutuu tukehtumisvaara.
• Hävitä pakkausmateriaalit heti paikallisten
jätehuoltomääräysten mukaisesti.
• Älä tee mitään muutoksia laitteeseen. Muutosten
tekeminen johtaa takuun raukeamiseen.
• Käytä tuotetta vain sen käyttötarkoitukseen.
• Älä käytä tuotetta lämmityslaitteiden ja muiden
lämmönlähteiden välittömässä läheisyydessä tai
suorassa auringonsäteilyssä.
• Älä käytä tuotetta kosteassa ympäristössä, ja vältä
roiskevesiä.
• Käytä tuotetta vain kohtuullisissa ilmasto-olosuhteissa.
Sähköiskun vaara
• Älä avaa tuotetta, äläkä jatka sen käyttöä, jos se on
vaurioitunut.
• Älä käytä tuotetta, jos
vaihtovirtasovitin, sovitinkaapeli tai verkkojohto on
vaurioitunut.
• Älä yritä huoltaa tai korjata tuotetta itse. Jätä kaikki
huoltotyöt valtuutetulle ammattihenkilölle.
Varoitus –paristot
• Varmista ehdottomasti, että paristojen navat (+ ja -)
ovat oikein päin, ja aseta ne paikoilleen sen mukaisesti.
Jos tätä ohjetta ei noudateta, paristot voivat vuotaa tai
räjähtää.
• Käytä ainoastaan akkuja (tai paristoja), jotka vastaavat
ilmoitettua tyyppiä.
• Puhdista ennen paristojen asettamista paikalleen
paristo- ja vastakontaktit.
• Älä anna lasten vaihtaa paristoja ilman valvontaa.
• Älä sekoita keskenään vanhoja ja uusia paristoja tai
erityyppisiä tai eri valmistajan paristoja.
• Ota paristot pois laitteista, jotka ovat pitkään
käyttämättä (paitsi jos laitteita pidetään valmiina
hätätilanteita varten).
• Älä oikosulje paristoja.
• Älä lataa paristoja.
• Älä heitä paristoja tuleen.
• Säilytä paristot poissa lasten ulottuvilta.
• Älä koskaan avaa, vaurioita tai niele paristoja äläkä
anna niiden päätyä luontoon. Ne voivat sisältää
myrkyllisiä ja ympäristölle haitallisia raskasmetalleja.
• Poista tyhjentyneet paristot tuotteesta ja hävitä ne
viipymättä.
• Vältä säilytystä, lataamista ja käyttöä äärimmäisissä
lämpötiloissa ja erittäin alhaisessa ilmanpaineessa
(esim. suurissa korkeuksissa).
4. Ennen käyttöönottoa
Ohje
Perusteellisen kuvauksen
UNDOK-sovelluksesta ja täydellisestä
toimintalaajuudesta löydät
UNDOK-oppaastamme:
www.hama.com->00054238-->Downloads
83
Page 90

Käyttöohjeet
• Painike [OK]sekä kaukosäätimen ► vastaavat r
etusivulla olevaa painiketta [POWER/VOLUME/
ENTER/NAVIGATE](11).
• Kaukosäätimen ◄-painike vastaa radion etusivulla
olevaa painiketta [ ].
• Kaukosäätimen painikkeet ▲ ▼ vastaavat radion
etupuolella olevan navigointisäätimen kääntämistä
vasemmalle ja oikealle.
Kaukosäätimen käyttöönottaminen
Avaa paristolokeron kansi. Kaukosäätimen takaosassa
sijaitseva paristolokerovoidaan avata työntämällä kantta
merkittyyn suuntaan.
Toimitus sisältää kaksi AAA-paristoa, jotka täytyy asettaa
paristolokeroon käyttöä varten. Huomioi, että paristot
asetetaan sisään oikein päin. Napaisuus (+/-) on merkitty
paristolokeroon.
Verkkoyhteyden asettaminen
4.1 LAN (johdollinen verkko)
• Yhdistä reitittimesi LAN-liitäntä radioosi. Tätä varten
tarvitset Ethernet-johdon, joka ei kuulu toimituksen
sisältöön.
• Varmistu, että reititin on kytkettynä päälle, toimii oikein
ja yhteys internettiin on muodostettu.
• Huomioi reitittimesi käyttöohje LAN-yhteyden oikean
toiminnan varmistamiseksi.
• Jatka sitten suoraan kohdassa 5. “Käyttöönotto”
kuvatuilla ohjeilla.
4.2 WLAN (langaton verkko)
• Varmistu, että reititin on kytkettynä päälle, toimii oikein
ja yhteys internettiin on muodostettu.
• Aktivoi reitittimesi WLAN-toiminto.
• Huomioi reitittimesi käyttöohje WLAN-yhteyden oikean
toiminnan varmistamiseksi.
• Jatka sitten suoraan kohdassa 5“Käyttöönotto”
kuvatuilla ohjeilla.
adion
5. Käyttöönotto
Ohje –optimaalinen vastaanotto
"DIT2006BT" on antenniliitäntä koaksiaaliliitännällä
varustettuja ulkoisia antenneja varten. Tuotteen
mukana tulee sopiva teleskooppiantenni, joka
mahdollistaa vastaanoton DAB:n, DAB+:n ja FM:n
kautta. Vaihtoehtoisesti voit käyttää aktiivista tai
passiivista antennia vastaanottotehon parantamiseksi tai
vaatimustesi täyttämiseksi.
Huomaa:
• Antenni tulee aina vetää kokonaan ulos.
• Suosittelemme, että antenni suunnataan
pystysuoraan parhaan mahdollisen vastaanottolaadun
saavuttamiseksi.
5.1 Yleiset käyttöohjeet
5.1.1 Kytkeminen päälle /pois päältä /valmiustila
• Käynnistä radio painamalla [POWER/VOLUME/ENTER/
NAVIGATE](11).
• Sammuta radio (valmiustila) painamalla [POWER/
VOLUME/ENTER/NAVIGATE](11) noin 3sekunnin
ajan.
• Kytke laite täysin pois päältä irrottamalla se
sähköverkosta.
5.1.2 Navigointi ja ohjaus
• Navigoi pikavalintapainikkeen painamisen jälkeen
tarjottujen valikkokohtien läpi.
• Valitse yksittäisiä valikkokohtia kiertämällä painiketta
[POWER/VOLUME/ENTER/NAVIGATE](11).
• Vahvista valinta painamalla [POWER/VOLUME/ENTER/
NAVIGATE]-säädintä (11).
5.1.3 Äänenvoimakkuuden sopeuttaminen
• [POWER/VOLUME/ENTER/NAVIGATE]-säädintä (11)
kierrettäessä äänenvoimakkuus nousee (oikealle) tai
laskee (vasemmalle).
84
Page 91

5.2 Päällekytkeminen
Varoitus
• Kytke tuote vain hyväksyttyyn pistorasiaan. Pistorasian
täytyy sijaita tuotteen lähellä ja olla helposti
saavutettavissa.
• Irrota tuote sähköverkosta virtakatkaisimen avulla. Jos
katkaisinta ei ole, irrota verkkojohto pistorasiasta.
• Huomioi monipistorasioiden yhteydessä, että liitetyt
laitteet eivät ylitä sallittua kokonaisottotehoa.
• Irrota tuote sähköverkosta, jos et käytä sitä pidempään
aikaan.
• Yhdistä verkkolaite radion taustapuolella olevaan
verkkojohtoon (1).
• Yhdistä verkkojohto asianmukaisesti asennettuun ja
helposti käsiksi päästävään verkkopistorasiaan.
• Odota, kunnes radion alustus on päättynyt.
• Käynnistä radio painamalla [POWER/VOLUME/ENTER/
NAVIGATE](11).
Ohje ensimmäisestä päällekytkennästä
• Asennustoiminto (Setup Wizard) käynnistetään
automaattisesti ensimmäisen käynnistyksen
yhteydessä.
• Asennustoiminto suoritetaan englannin kielellä.
• Voit ohittaa asennustoiminnon ja kutsua sen
myöhemmin omankielisenä uudelleen esiin.
5.3 Kieli
Radion vakiokieleksi on asetettu ensimmäisessä
käyttöönotossa englanti. Muuta radion asetettu
valikkokieli seuraavalla tavalla:
• Paina [
• Navigoi [POWER/VOLUME/ENTER/NAVIGATE]-
• Vahvista valinta painamalla [POWER/VOLUME/ENTER/
• Navigoi [POWER/VOLUME/ENTER/NAVIGATE]-
• Valitse [POWER/VOLUME/ENTER/NAVIGATE]-
• Kulloinkin valittuna oleva kieliasetus on merkitty tähdellä *.
Ohje
• Voit valita seuraavista kielistä:
]-painiketta (7), niin pääset asetusvalikkoon.
säätimellä (11) valikkokohtaan ”Settings”.
NAVIGATE]-säädintä (11).
säätimellä (11) valikkokohtaan ”Language”. Vahvista
valinta painamalla [POWER/VOLUME/ENTER/
NAVIGATE]-säädintä (11).
säätimellä (11) haluamasi järjestelmäkieli.
Englanti, tanska, ranska, saksa, italia, norja, suomi,
ruotsi, turkki, puola, hollanti, portugali, espanja
6. Hoito ja huolto
• Puhdista tuote ainoastaan nukattomalla, kevyesti
kostutetulla liinalla, älä käytä syövyttäviä
puhdistusaineita.
• Mikäli et käytä tuotetta pidempään aikaan, kytke se pois
päältä ja irrota virtalähteestä. Säilytä sitä puhtaassa,
kuivassa tilassa ilman suoraa auringonsäteilyä.
7. Vastuuvapauslauseke
Hama GmbH &CoKGeivastaa millään tavalla
vahingoista, jotka johtuvat epäasianmukaisesta
asennuksesta ja tuotteen käytöstä tai käyttöohjeen ja/tai
turvallisuusohjeiden vastaisesta toiminnasta.
8. Huolto ja tuki
Tuotetta koskevissa kysymyksissä pyydämme kääntymään
Haman tuoteneuvonnan puoleen.
Asiakaspalvelunumero: +49 9091 502 115 (saksa/
englanti)
Lisätietoja tuesta löytyy osoitteesta:
www.hama.com
Täysimittainen pitkä ohje on saatavilla seuraavasta
internetosoitteesta:
www.hama.com -> 00054238 -> Downloads
9. Hävittämisohjeet
Ympäristönsuojelua koskeva ohje:
Siitä lähtien, kun Euroopan unionin direktiivi
2012/19/EU ja 2006/66/EU otetaan käyttöön
kansallisessa lainsäädännössä, pätevät seuraavat
määräykset: Sähkö- ja elektroniikkalaitteita sekä
paristoja ei saa hävittää talousjätteen mukana. Kuluttajalla
on lain mukaan velvollisuus toimittaa sähkö- ja
elektroniikkalaitteet niiden käyttöiän päätyttyä niille
varattuihin julkisiin keräyspisteisiin tai palauttaa ne
myyntipaikkaan. Tähän liittyvistä yksityiskohdista
säädetään kussakin kansallisessa lainsäädännössä. Näistä
määräyksistä mainitaan myös tuotteen merkissä,
käyttöohjeessa tai pakkauksessa. Uudelleenkäytöllä,
materiaalien/paristoja uudelleenkäytöllä tai muilla
vanhojen laitteiden uudelleenkäyttötavoilla on tärkeä
vaikutus yhteisen ympäristömme suojelussa.
85
Page 92

10. Vaatimustenmukaisuusvakuutus
Hama GmbH &CoKGvakuuttaa, että
radiolaitetyyppi [00054238] on direktiivin
2014/53/EU mukainen. EUvaatimustenmukaisuusvakuutuksen täysimittainen teksti
on saatavilla seuraavassa internetosoitteessa:
www.hama.com -> 00054238 -> Downloads
Taajuusalue/taajuusalueet
Bluetooth: 2.402 –2.480GHz 6.5 dBm(EIRP)
WiFi: 2.400 –2.480 GHz 15.5 dBm (EIRP)
WiFi: 5.150 –5.350 GHz 16.5 dBm (EIRP)
WiFi: 5.470 –5.725 GHz 16.5 dBm (EIRP)
WiFi: 5.725 –5.850 GHz 11 dBm (EIRP)
Käyttöä koskee rajoituksia tai vaatimuksia:ssa/ssä
Belgia, Bulgaria, Tšekin tasavalta, Tanska, Saksa, Viro,
Irlanti, Kreikka, Espanja, Ranska, Kroatia, Italia, Kypros,
Latvia, Liettua, Luxemburg, Unkari, Malta, Alankomaat,
Itävalta, Puola, Portugali, Romania, Slovenia, Slovakia,
Suomi, Ruotsi, Yhdistynyt kuningaskunta
Ohje
Käytettäessä kanavia 36–64 (kanavia, joiden taajuus on
5150 MHz –5350 MHz) tuotetta saa käyttää vain
suljetuissa tiloissa.
Sähkömagneettikentille altistuksen
rajoittamiseksi
Tämä laite on tarkoitettu käytettäväksi vähintään 20
cm:n etäisyydeltä käyttäjän tai lähellä olevien henkilöiden
kehoista. Tätä laitetta ei saa pitää kehon lähellä.
Suurin mahdollinen
lähetysteho
86
Page 93

K Lynvejledning
Betjeningselementer og visninger
A: Radio Forside
1
2 AUX-In-stik
3 [VOLUME] +/-
4 [PRESET]-hjul
5 [MODE]-tast
6 [ALARM]-tast
7 [EQUALIZER]-tast
8 [MENU]-tast
9 [INFO]-tast
10 [BACK] (tilbage)-tast
11 Infrarød modtager
12 [Navigation]
13
14 USB-port
15 2.8" farvedisplay
16 LED
17 Netforsyningsledning
18 Antenne*
19 WiFi-/Bluetooth-antenne
20 Optisk udgang
21 Coaxial udgang
22 Stereo cinch L/R udgang
23
24
Henvisning
*
"DIT2006BT" har en udskiftelig antenne. Du kan anvende en aktiv eller passiv antenne, som har en
koaksialtilslutning.
** Drejeregulatoren har en dobbeltfunktion. Vedatdreje regulatoren ændrer du lydstyrken eller navigerer gennem
menustrukturen. Vedattrykke på denne sættes apparatet istandby-modus, eller et valg bekræftes.
[POWER]-tast
Hovedtelefonstik
B: Radio Bagside
Line-Out-stik
LAN-tilslutning
Fjernbetjening
1 [POWER]-Tast
2 [MUTE]-Tast
3 DIREKTE [PRESET]-TASTER (1-4)
4 [EQUALIZER]-Tast
5 [PRESET]-Tast
6 [MENU]-Tast
7 [SOURCE]-Tast
8 [OK]-Tast
[NAVIGATIONS]-Taster
9
▲ Op ▼ Ned
◄ Tilbage ► Frem
10 [VOL-]-Tast
11 [VOL+]-Tast
12 [HOME]-Tast
13 [BACK]-Tast
14 [INFO]-Tast
15 [BACKLIGHT]-Tast
16 [PAUSE]-Tast
17 [PLAY]-Tast
18 [PREVIOUS]-Tast
19 [NEXT]-Tast
Vigtig henvisning –lynvejledning
• Dette er en lynvejledning, som giver dig vigtige basisinformationer såsom sikkerhedshenvisninger og oplysninger om
ibrugtagningen af dit produkt.
• Foratskåne miljøet og spareværdifulde råstoffer trykker rmaet Hama ikke den lange vejledning, men tilbyder den
udelukkende som PDF-download.
• Den komplette lange vejledning ndes på følgende internetadresse:
!
www.hama.com -> 00054238 -> Downloads
• Gem den lange vejledning på din computer til senereopslag, og udskriv den eventuelt.
87
Page 94

1. Forklaring af advarselssymboler og henvisninger
Fare for elektrisk stød
Dette symbol henviser til farefor berøring med
produktets uisolerede dele, som muligvis leder en farlig
spænding, der er så kraftig, at der er farefor elektrisk
stød.
Advarsel
Anvendes til at markeresikkerhedshenvisninger eller til at
gøreopmærksom på særlige farer og risici.
Henvisning
Anvendes til at markereyderligereinformationer eller
vigtige henvisninger.
2. Pakningsindhold
• Digital-HiFi-Tuner DIT2006BT
• Cinchkabel (til L/R-cinch-stereoudgang)
• Fjernbetjening
• 2x AAA-batterier
• Kort vejledning
3. Sikkerhedshenvisninger
• Produktet er beregnet til privat, ikke-erhvervsmæssig
husholdningsbrug.
• Anvend ikke produktet iområder,hvor elektroniske
produkter ikke er tilladt.
• Beskyt produktet mod smuds, fugtighed og
overophedning, og anvend det kun itørre
rum.
• Dette produkt skal, som alle elektriske produkter,
opbevares utilgængeligt for børn!
• Tabikke produktet, og udsæt det ikke for kraftige
rystelser.
• Anvend ikke produktet uden for dets ydelsesgrænser,der
er angivet idetekniske data.
• Hold ubetinget børn borte fraemballeringsmaterialet,
der er farefor kvælning.
• Bortskaf straks emballeringsmaterialet ihenhold til de
lokalt gældende forskrifter for bortskaffelse.
• Undlad at foretage ændringer på apparatet. Derved
bortfalder alle garantikrav.
• Produktet må udelukkende bruges til det tiltænkte
formål.
• Benyt ikke produktet iumiddelbar nærhed af
varmeapparater,andrevarmekilder eller idirekte sollys.
• Anvend ikke produktet ifugtige omgivelser,ogundgå
stænkvand.
• Anvend kun produktet under moderate klimatiske
forhold.
Fare for elektrisk stød
• Åbn ikke produktet, og anvend det ikke længereved
beskadigelser.
• Anvend ikke produktet, hvis
AC-adapteren, adapterkablet eller netledningen er
beskadiget.
• Forsøg aldrig selv at vedligeholde eller reparere
produktet. Overlad alle vedligeholdelsesarbejder til det
ansvarlige fagpersonale.
Avarsel –batterier
• Sørgubetinget for,atbatteriernes poler vender
rigtigt (påskrift +og-), og læg dem tilsvarende i. Ved
manglende overholdelse er der farefor,atbatterierne
løber ud eller eksploderer.
• Anvend udelukkende genopladelige batterier (eller
batterier), der svarer til den anførte type.
• Rengør batterikontakterne og modkontakterne, når
batterierne sættes i.
• Tilladikke, at børn udskifter batterier uden opsyn.
• Bland ikke gamle og nye batterier og batterier af
forskellig type eller fraforskellige producenter.
• Fjern batterierne fraprodukter,der ikke anvendes
ilængeretid (medmindredeholdes klar til et
nødstilfælde).
• Kortslut ikke batterierne.
• Oplad ikke batterier.
• Kast ikke batterier iild.
• Opbevar batterier uden for børns rækkevidde.
• Batterier må aldrig åbnes, beskadiges, indtages eller
komme ud imiljøet. De kan indeholde giftige og
miljøfarlige tungmetaller.
• Fjern og bortskaf brugte batterier fraproduktet med
det samme.
• Undgå opbevaring, læsning og anvendelse ved
ekstreme temperaturer og ekstremt lavt lufttryk (som
f.eks. istorehøjder).
4. Før ibrugtagning
Henvisning
En udførlig beskrivelse af
UNDOK-appen og det fulde
funktionsomfang nder du ivores
UNDOK-guide på:
www.hama.com->00054238 ->Downloads
88
Page 95

Betjeningshenvisninger
• Tasten [OK]og►på f
tasten [POWER/VOLUME/ENTER/NAVIGATE](11)
på radioens forside.
• Tasten ◄ på fjernbetjeningen svarer til tasten [ ]på
radioens forside.
• Tasterne ▲ ▼ på fjernbetjeningen svarer til at
dreje navigationsregulatoren på radioens forside mod
venstreoghøjre.
Ibrugtagning af fjernbetjeningen
Åbn afdækningen på batterirummet. Den sidder på
bagsiden af fjernbetjeningen og kan åbnes ved at skubbes
iden markerede retning.
Der medfølger to AAA-batterier,som skal sættes i
batterirummet iforbindelse med ibrugtagningen. Vær
opmærksom på polariteten, når du sætter batterierne i.
Den korrekte polaritet (+ /-)er vist ibatterirummet.
Indstilling af netværksforbindelsen
4.1 LAN (kabelforbundet netværk)
• Forbind en LAN-tilslutning på din router med din radios
tilslutning. Du har brug for et ethernet-kabel, som ikke
hører til leveringsomfanget.
• Kontrollér,atrouteren er tændt, fungerer korrekt, og at
der er forbindelse til internettet.
• Læs betjeningsvejledningen til din router med hensyn til
LAN-forbindelsens korrekte funktion.
• Gå derefter direkte frem som beskrevet under punkt 5.
„Ibrugtagning“.
4.2 WLAN (kabelløst netværk)
• Kontrollér,atrouteren er tændt, fungerer korrekt, og at
der er forbindelse til internettet.
• Aktivér din routers WLAN-funktion.
• Læs betjeningsvejledningen til din router med hensyn til
WLAN-forbindelsens korrekte funktion.
• Gå derefter frem som beskrevet under pkt. 5
„Ibrugtagning“.
jernbetjeningen svarer til
5. Ibrugtagning
Henvisning –optimal modtagelse
"DIT2006BT" har en antennetilslutning til eksterne
antenner med koaksialtilslutning. Der er allerede vedlagt
en passende teleskopantenne, som gør det muligt at
modtage via DAB, DAB+ og FM. Alternativt kan du
anvende en aktiv eller passiv antenne for at forbedre
modtageeffekten eller tilpasse til dine krav.
Vær opmærksom på følgende:
• Træk altid antennen helt ud.
• Forenoptimal modtagelse anbefaler vi at justere
antennen vertikalt.
5.1 Generelle henvisninger vedrørende betjeningen
5.1.1 Tænd /sluk /standby
• Tryk på [POWER/VOLUME/ENTER/NAVIGATE](11) for
at tænde radioen.
• Tryk på [POWER/VOLUME/ENTER/NAVIGATE](11), og
hold tasten inde ica. 3sekunder for at slukke radioen
(standby).
• Afbryd apparatet frastrømforsyningen for at slukke det
fuldstændigt.
5.1.2 Navigation og styring
• Naviger gennem de viste menupunkter,når der er trykket
på en genvejstast.
• Vedatdreje på [POWER/VOLUME/ENTER/NAVIGATE]
(11) vælger du enkelte menupunkter.
• Vedattrykke på [POWER/VOLUME/ENTER/NAVIGATE]
(11) bekræfter du valget.
5.1.3 Tilpasning af lydstyrke
• Vedatdreje [POWER/VOLUME/ENTER/NAVIGATE] (11)
forøges (til højre) eller reduceres (til venstre) lydstyrken.
89
Page 96

5.2 Tænde
Advarsel
• Tilslut kun produktet til en stikdåse, der er tilladt
til det. Stikdåsen skal væreplaceret inærheden af
produktet, og der skal værenem adgang til den.
• Afbryd produktet franettet ved hjælp af tænd/slukkontakten. Træk netledningen ud af stikdåsen, hvis
kontakten ikke ndes.
• Vær ved multistikdåser opmærksom på, at de
tilsluttede forbrugereikke overskrider det tilladte
samlede effektforbrug.
• Afbryd produktet franettet, hvis du ikke bruger det i
længeretid.
• Tilslut strømforsyningen til nettilslutningen (1) på
bagsiden af radioen.
• Forbind netkablet med en stikdåse, der er korrekt
installeret og let tilgængelig.
• Vent, indtil initialiseringen af radioen er afsluttet.
• Tryk på [POWER/VOLUME/ENTER/NAVIGATE](11) for
at tænde radioen.
Henvisning –når tuneren tændes første
gang
• Når der startes første gang, startes
indstillingsassistenten (setup wizard).
• Indstillingsassistenten udføres på engelsk.
• Du kan springe assistenten over og hente den igen
senerepåtysk.
5.3 Sprog
Vedden første ibrugtagning er engelsk indstillet som
radioens standardsprog. Gå frem på følgende måde for at
ændreradioens menusprog:
• Tryk på [
• Naviger ved hjælp af [POWER/VOLUME/ENTER/
NAVIGATE](11) til menupunktet "Settings".
• Bekræft valget ved at trykke på [POWER/VOLUME/
ENTER/NAVIGATE](11).
• Naviger ved hjælp af [POWER/VOLUME/ENTER/
NAVIGATE](11) til menupunktet "Language". Bekræft
valget ved at trykke på [POWER/VOLUME/ENTER/
NAVIGATE](11).
• Vælg ved hjælp af [POWER/VOLUME/ENTER/
NAVIGATE](11) det ønskede menusprog.
• Den aktuelt valgte sprogindstilling markeres med *.
Henvisning
• Der kan vælges mellem følgende sprog:
Engelsk, dansk, fransk, tysk, italiensk, norsk, nsk,
svensk, tyrkisk, polsk, hollandsk, portugisisk, spansk
](7) for at gå til indstillingsmenuen.
6. Vedligeholdelse og pleje
• Rengør kun dette produkt med en fnugfri, let fugtet
klud, og anvend ikke aggressive rengøringsmidler.
• Hvis du ikke anvender produktet ilængeretid, skal du
slukke apparatet og afbryde det frastrømforsyningen.
Opbevar det på et rent, tørt sted uden direkte sollys.
7. Udelukkelse af garantikrav
Hama GmbH &Co. KG påtager sig ikke ansvar eller garanti
for skader,der skyldes ukorrekt installation, montering og
ukorrekt brug af produktet eller manglende overholdelse af
betjeningsvejledningen og/eller sikkerhedshenvisningerne.
8. Service og support
Kontakt venligst Hama-produktrådgivningen, hvis du har
spørgsmål vedrørende produktet.
Hotline: +49 9091 502-115 (tysk/engelsk)
Du nder eresupportinformationer på:
www.hama.com
Den komplette lange vejledning ndes på følgende
internetadresse:
www.hama.com -> 00054238 -> Downloads
9. Instruktioner bortskaffelse
Anvisninger til beskyttelse af miljøet:
Fraogmed indførelsen af EU-direktiverne
2012/19/EU og 2006/66/EF inational retgælder
følgende: Elektrisk og elektronisk udstyr samt
batterier må ikke bortskaffes sammen med
almindeligt husholdningsaffald. Forbrugeren er lovmæssigt
forpligtet til at aevereudtjent elektrisk og elektronisk
udstyr samt batterier til dertil indrettede, offentlige
indsamlingssteder eller til forhandleren. De nærmere
bestemmelser vedr.dette fastlægges af lovgivningen idet
pågældende land. Symbolet på produktet,
brugsvejledningen eller emballagen henviser til disse
bestemmelser.Ved genbrug, genvinding eller andreformer
for nyttiggørelse af udtjent udstyr/batterier giver du et
vigtigt bidrag til beskyttelse af miljøet.
90
Page 97

10. Overensstemmelseserklæring
Hermed erklærer Hama GmbH &CoKG, at
radioudstyrstypen [00054238] opfylder direktivet
2014/53/EU.EU-overensstemmelseserklæringens
komplette tekst ndes på følgende internetadresse:
www.hama.com -> 00054238 -> Downloads
Frekvensbånd Maksimal sendeeffekt
Bluetooth: 2.402 –2.480GHz 6.5 dBm(EIRP)
WiFi: 2.400 –2.480 GHz 15.5 dBm (EIRP)
WiFi: 5.150 –5.350 GHz 16.5 dBm (EIRP)
WiFi: 5.470 –5.725 GHz 16.5 dBm (EIRP)
WiFi: 5.725 –5.850 GHz 11 dBm (EIRP)
Begrænsninger eller krav i
Belgien, Bulgarien, Tjekkiet, Danmark, Tyskland, Estland,
Irland, Grækenland, Spanien, Frankrig, Kroatien, Italien,
Cypern, Letland, Litauen, Luxembourg, Ungarn, Malta,
Nederlandene, Østrig, Polen, Portugal, Rumænien,
Slovenien, Slovakiet, Finland, Sverige, Storbritannien
Henvisning
Hvis kanalerne 36-64 (frekvens
5,150 GHz -5,350 GHz) anvendes, må produktet kun
anvendes ilukkede rum.
Vedr.begrænsning af eksponering for
elektromagnetiske felter
Dette apparat er beregnet til at anvendes ienafstand
af mindst 20 cm frabrugerens krop eller personer i
nærheden. Dette apparat må ikke bæres på kroppen.
91
Page 98

V Hurtigstartsveiledning
Betjeningselementer og indikatorer
A: Radio Forside
1
2 AUX-In-kontakt
3 [VOLUME] +/-
4 [PRESET]-hjul
5 [MODE]-knapp
6 [ALARM]-knapp
7 [EQUALIZER]-knapp
8 [MENU]-knapp
9 [INFO]-knapp
10 [BACK] (tilbake)-knapp
11 Infrarødmottager
12 [Navigation]
13
14
15 2.8" fargedisplay
16 LED
17 Nettilførselsledning
18 Antenne*
19 WiFi/Bluetooth antenne
20 Optisk utgang
21 Koaksial utgang
22 Stereo cinch L/R utgang
23
24
Anvisning
*"DIT2006BT" har en utskiftbar antenne. En aktiv eller passiv antenne med koaksialtilkobling kan benyttes.
** Skruknappen har en dobbeltfunksjon. Vedåvri på skruknappen, kan du endrevolum eller navigeregjennom
menystrykturen. Vedåtrykke på skruknappen setter du apparatet istandby-modus eller bekrefter et valg.
[POWER]-knapp
Hodetelefonkontakt
USB-tilkobling
B: Radio Bakside
Line-Out-kontakt
LAN (10 /100 Mbit) -tilkobling
Fjernkontroll
1 [POWER]-Tast
2 [MUTE]-Tast
3 [PRESET]-Direktetaster (1-4)
4 [EQUALIZER]-Tast
5 [PRESET]-Tast
6 [MENU]-Tast
7 [SOURCE]-Tast
8 [OK]-Tast
[NAVIGATIONS]-Taster
9
▲ Opp ▼ Ned
◄ Tilbake ► Fremover
10 [VOL-]-Tast
11 [VOL+]-Tast
12 [HOME]-Tast
13 [BACK]-Tast
14 [INFO]-Tast
15 [BACKLIGHT]-Tast
16 [PAUSE]-Tast
17 [PLAY]-Tast
18 [PREVIOUS]-Tast
19 [NEXT]-Tast
Viktig anvisning -hurtigveiledning
• Dette er en hurtigveiledning som gir deg den viktigste grunnleggende informasjonen, som for eksempel
sikkerhetsinstruksjoner og åtaproduktet ibruk.
• Av hensyn til miljøvern og for åsparebruk verdifulle råvarer avstår selskapet Hama fraåtrykke en lang
bruksanvisning og tilby heller dette utelukkende som en PDF-nedlasting.
• Den komplette lange bruksanvisningen nnes på følgende Internettadresse:
!
www.hama.com -> 00054238 -> Downloads
• Lagrebruksanvisningen på datamaskinen for senerebruk og skriv den ut hvis nødvendig.
92
Page 99

1. Forklaring av varselsymboler og anvisninger
Fare for elektriske støt
Dette symbolet viser til farefor berøring av produktdeler
som ikke er isolert og som potensielt leder farlig
spenning med en styrke som kan forårsake elektriske
støt.
Advarsel
Benyttes for åmerke sikkerhetsinformasjon eller for å
rette oppmerksomheten mot spesielle farer og risikoer.
Anvisning
Benyttes for åmerke informasjon eller viktige merknader
ytterligere.
2. Pakkeinnhold
• Digital-HiFi-Tuner DIT2006BT
• RCA-kabel (for stereo RCAV/H utgang)
• Fjernkontroll
• 2x AAA batterier
• Kortveiledning
3. Sikkerhetsanvisninger
• Produktet er beregnet på privat, ikke-kommersiell bruk i
husholdninger.
• Produktet må ikke brukes iområder der elektroniske
produkter ikke er tillatt.
• Ikke utsett apparatet for smuss, fuktighet og
overoppheting, og bruk det kun itørrerom.
• Detteproduktet skal, som alle elektriske apparater,
oppbevares utilgjengelig for barn!
• Produktet må ikke falle ned frahøyder,ogmåikke
utsettes for kraftig risting.
• Produktet skal ikke benyttes utenfor de ytelsesgrensene
som er angitt under tekniske spesikasjoner.
• På grunn av farefor kvelning må emballasjen holdes
unna små barn.
• Fjern emballasjen umiddelbart ihenhold til lokale
forskrifter for avfallshåndtering.
• Foreta aldri endringer på apparatet. Da vil garantikrav
kunne bortfalle.
• Produktet må utelukkende brukes til det formålet det er
beregnet på.
• Ikke bruk produktet inærheten av varmeovner,andre
varmekilder eller idirekte sollys.
• Produktet på ikke brukes ifuktige omgivelser og unngå
vannsprut.
• Bruk produktet kun under moderate klimatiske forhold.
Fare for elektriske støt
• Produktet skal ikke åpnes og ikke benyttes dersom det
er skadet.
• Produktet må ikke brukes hvis
AC-adapteren, adapterledningen eller strømledningen
er skadet.
• Prøv aldri åvedlikeholde eller reparereproduktet på
egenhånd. Vedlikeholdsarbeid skal kun utføres av
ansvarlig fagpersonell.
Advarsel –Batterier
• Vær alltid oppmerksom på batterienes polaritet (+ og -)
og sørgfor at batteriene legges inn korrekt. Hvis dette
ikke overholdes, er det farefor at batteriet utlades eller
at de eksploderer.
• Bruk kun oppladbarebatterier (eller batterier) som
tilfredsstiller typen som er angitt.
• Rengjør batterikontaktene og motkontaktene før du
legger inn batteriene.
• Små barn skal ikke skifte batterier uten tilsyn av en
voksen.
• Bland aldri gamle og nye batterier,ogbruk aldri
batterier av forskjellige typer eller fraforskjellige
produsenter.
• Fjern batteriene fraprodukter som ikke skal brukes ien
lengretidsperiode (unntatt hvis de må holdes klarefor
et nødstilfelle).
• Batteriene skal aldri kortsluttes.
• Ikke lad opp batteriene.
• Kast aldri batterier iåpne ammer.
• Batterier skal oppbevares utilgjengelig for barn.
• Batterier må aldri åpnes, skades, svelges eller havne
imiljøet. De kan inneholde giftige og miljøskadelige
tungmetaller.
• Ta ut og kasser brukte batterier fraproduktet med en
gang.
• Unngå lagring, lading og bruk iekstreme temperaturer
og ved ekstremt lavt lufttrykk (som f.eks. istore
høyder).
4. Før oppstart
Henvisning
Du nner en utførlig beskrivelse av
UNDOK-appen og det fulle
funksjonsomfanget ivår
UNDOK-guide på:
www.hama.com->00054238 ->Downloads
93
Page 100

Informasjon om bruk
• Tasten [OK]samt ► på f
[POWER/VOLUME/ENTER/NAVIGATE](11) på
radioens forside.
• Tasten ◄ på fjernkontrollen tilsvarer tasten [ ] på
radioens forside
• Tastene ▲ ▼ på fjernkontrollen tilsvarer vridning til
venstreoghøyrepåskruknappen på radioens forside.
Hold fjernkontrollen idrift
Åpne dekselet på batterirommet. Dette er plassert på
baksiden av fjernkontrollen og kan åpnes ved åskyve iden
angitte retningen.
Det medfølger to AAA-batterier som skal settes inn i
batterirommet. Vær alltid oppmerksom på batterienes
polaritet og sørgfor at de legges inn korrekt. Anvist
polaritet (+/-) er merket ibatterirommet.
Etablerenettverksforbindelse
4.1 LAN (kabelført nettverk)
• Koble en LAN kontakt på ruteren til radioens kontakt. I
den forbindelse trenger du en Ethernet-kabel. Kabelen
inngår ikke ileveransen.
• Kontroller at ruteren er innkoblet og fungerer som den
skal og at forbindelsen til Internett er etablert.
• Med hensyn til korrekt funksjon ved LAN-forbindelsen må
du lese ruterens bruksveiledning.
• Gå viderefremsom beskrevet under punkt 5,
Idriftsettelse.
4.2 WLAN (kabelløst nettverk)
• Kontroller at ruteren er innkoblet og fungerer som den
skal, og at forbindelsen til Internett er etablert.
• Aktiver ruterens WLAN-funksjon.
• Med hensyn til korrekt funksjon ved WLAN-forbindelsen
må du lese ruterens bruksveiledning.
• Gå viderefremsom beskrevet under punkt 5,
Idriftsettelse.
5. Igangsetting
Henvisning –optimalt mottak
"DIT2006BT" har en antennetilkobling for ekstern
antenne med koaksialtilkobling. Leveransen omfatter
en passende teleskopantenne som åpner for mottak via
DAB, DAB+ og FM. Alternativt kan du bruke en aktiv
eller passiv antenne for åforbedremottaket eller tilpasse
kravene dine.
Vær oppmerksom på følgende:
• Trekk antennen alltid komplett ut.
• Foroptimal mottakskvalitet anbefaler vi åposisjonere
antennen vertikalt.
jernkontrollen tilsvarer tasten
5.1 Generelle henvisninger angående betjening
5.1.1 Slå på /Slå av /Standby
• Trykk på [POWER/VOLUME/ENTER/NAVIGATE](11)
for åslå på radioen.
• Hold og hold inne [POWER/VOLUME/ENTER/
NAVIGATE](11) ica. 3sekunder for åslå av radioen
(standby).
• Koble enheten frastrømforsyningen for åslå det helt av.
5.1.2 Navigasjon og styring
• Naviger gjennom de tilbudte menypunktene etter et trykk
på kortvalgtasten.
• Vedåskru på [POWER/VOLUME/ENTER/NAVIGATE]
(11) velger du de enkelte menypunktene.
• Bekreft valget ved åtrykke på [POWER/VOLUME/
ENTER/NAVIGATE](11).
5.1.3 Tilpasse lydstyrken
• Vedåvri på [POWER/VOLUME/ENTER/NAVIGATE]
(11) økes (høyre) eller reduseres (venstre) lydstyrken.
5.2 Slå på
Advarsel
• Enheten skal kun brukes med en stikkontakt som er
godkjent for formålet. Stikkontakten må plasseres i
nærheten av produktet og værelett tilgjengelig.
• Koble produktet franettet ved hjelp av AV-/PÅbryteren –hvis den ikke er tilgjengelig, trekker du
strømledningen ut av stikkontakten.
• Ved erestikkontakter må du se til at tilkoblet forbruk
ikke overskrider tillatt totalt strømforbruk.
• Produktet må kobles frastrømnettet når det ikke skal
væreibruk over lengretid.
• Koble nettdelen til nettkontakten (1) på baksiden av
radioen.
• Koble nettkabelen til en forskriftsmessig installert og lett
tilgjengelig stikkontakt.
• Vent til initialiseringen av radioen er fullført.
• Trykk på [POWER/VOLUME/ENTER/NAVIGATE](11)
for åslå på radioen.
94
 Loading...