

Page 1
Preheater
Instruction Manual
Thank you for purchasing the HAKKO FR-872 Preheater.
Please read this manual before operating the HAKKO FR-872.
Keep this manual readily accessible for reference.
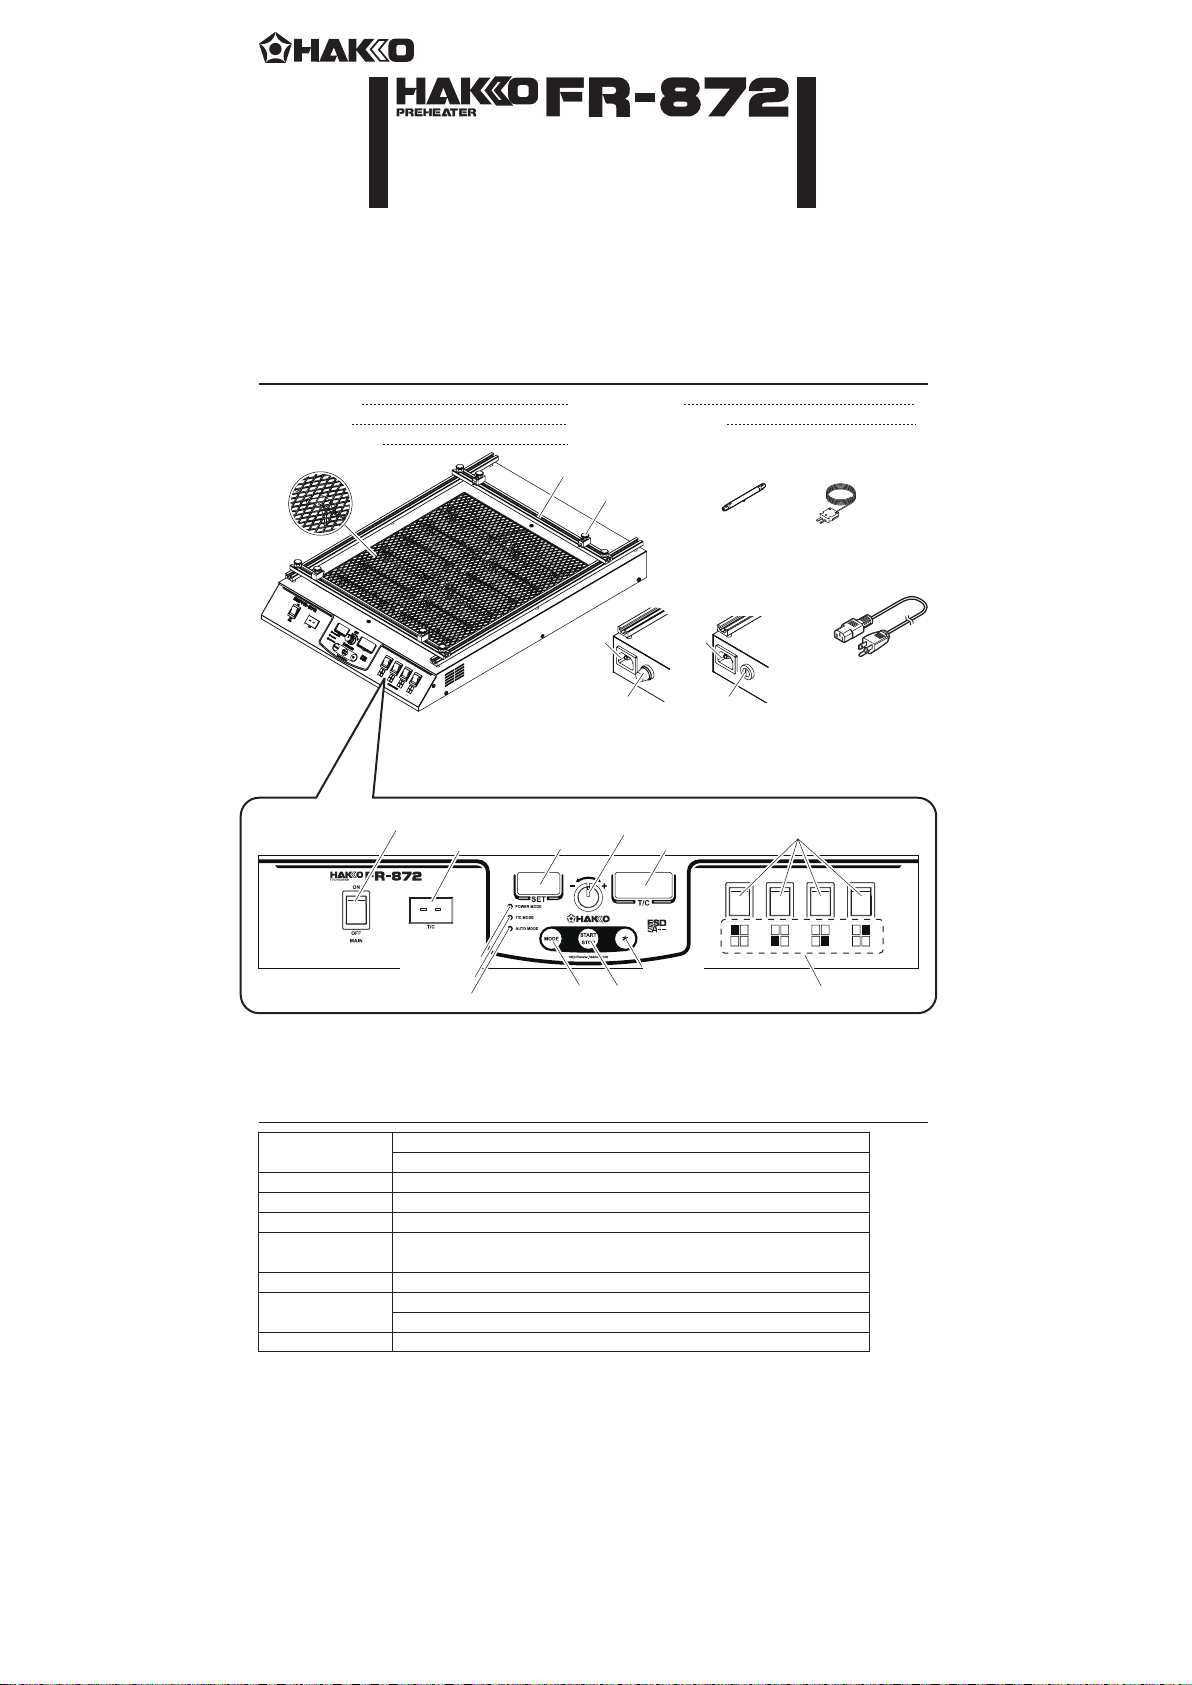
1. PACKING LIST AND PART NAMES
HAKKO FR-872
Thermocouple
Heater (For spare)
Lamp cover
HAKKO FR-872
Power switch
T/C connector
100 - 120V
SET
indicator
1
1
1
Cross bar (×2)
Power
receptacle
Fuse holder
ADJ knob
Power cord
Instruction Manual
P.W.B. holder (×4)
HAKKO FR-872 rear
receptacle
T/C indicator
Please check to make sure that all items listed
below are included in the package.
Heater
(For spare)
Power
Thermocouple
220, 230V
Fuse holder
Zone selector switch
1
1
Power cord
Power mode
T/C mode
Auto mode MODE button START / STOP button
2. SPECIFICATIONS
Power consumption
Effective heated area
Heater area dimensions
Maximum board depth
Dimensions
Weight (w/o cord)
Mode
Temperature stability
* This product is protected against electrostatic discharge.
* Specifications and design are subject to change without notice.
100V-1050W 110V-1250W 120V-1440W
220V-1150W 230V-1250W
224(W) × 266(D) mm (8.8 × 10.5 in.)
286(W) × 350(D) mm (11.3 × 13.8 in.)
430 mm (16.9 in.)
360(W) × 97(H) × 535(D) mm (14.2 × 3.8 × 21.1 in.) (AC100 - 120V) /
360(W) × 97(H) × 524(D) mm (14.2 × 3.8 × 20.6 in.) (AC220, 230V)
5.6 kg (12.4 lb.)
Power mode0 - 100%
T/C mode 50 - 200℃ (122〜392°F)
T/C mode ±5℃ (±9°F)
* button
Heating area
Page 2

3. WARNINGS, CAUTIONS AND NOTES
Warnings, cautions and notes are placed at critical points in this manual to direct the operator's
attention to significant items. They are defined as follows:
WARNING: Failure to comply with a WARNING may result in serious injury or death.
CAUTION : Failure to comply with a CAUTION may result in injury to the operator,
or damage to the items involved. Two examples are given below.
NOTE : A NOTE indicates a procedure or point that is important to the process being described.
WARNING
When powered, the preheater unit will become extremely hot, reaching possibly reaching temperatures above
200℃ (392℉).Be sure of the following to avoid possible burns/fires resulting from the failure to observe them.
● Do not touch the lamp cover. Also, do not place a metal object around the lamp cover.
● Do not use the product near an object that may readily catch fire.
● Inform all individuals nearby that the "product can be extremely hot and can pose a hazard."
● Turn off the product when suspending/terminating its operation or before leaving it unattended.
● Turn off the product and check to be sure it has sufficiently cooled before replacing a part or storing the product.
● The unit is for a counter or workbench use only.
● This appliance can be used by children aged from 8 years and above and persons with reduced physical,
sensory or mental capabilities or lack of experience and knowledge if they have been given supervision or
instruction concerning use of the appliance in safe way and understand the hazards involved.
● Children shall not play with the appliance.
● Cleaning and user maintenance shall not be made by children without supervision.
● To prevent accidents or damage to the HAKKO FR-872, be sure to observe the following:
● Do not use the product for purposes other than preheating.
● Do not subject the product to excessive impact.
● Do not expose the heater unit to Hot Air directly from above.
● Be sure that the product is properly grounded before use.
● Do not modify the product.
● Be sure to use genuine HAKKO parts for replacement.
● Be sure the product does not wet. Do not handle it with wet hands.
● Be sure to hold the plug whenever connecting/disconnecting the cord.
● Avoid any use or actions acts that could pose a hazard.
4. INITIAL SETUP
A. Making connections and turning on
the power
1. Connect the power cord to the power receptacle
found on the rear of the preheater body.
2. Connect the power plug to the power outlet.
3. Turn ON the applicable zone selector switch.
The heating area is printed under the select
switch.(Refer to 1.PACKING LIST AND NAMES.)
Turn ON the select switch where you want to
heat.
CAUTION
If pressing the START/STOP button with the zone
selector switch both turned off, the display might
indicate a heater error. When this occurs, turn on
the zone selector switch, then turn the power
switch on again.
4. Turn on the power switch.
Power switch
Zone selector
switch
B. Mounting the P.W.B.
Fit the P.W.B. to the FR-872. (Figure 1)
Tighten a screw after
determining the place.
Figure1
P.W.B.
P.W.B.
holder
P.W.B
Ensure the front cross bar is secure. Place one edge of
the P.W.B. against the holder clips. Bring the rear cross bar
into contact with the opposite edge of the P.W.B. so that
the holder clips secure the P.W.B..
Page 3

4. INITIAL SETUP
C.
Attaching the thermocouple
insert the thermocouple in the thermocouple connector;
then, bring the tip of the thermocouple into contact with
any location where you want to take measurements or a
part you want to heat. (Figure 2)
CAUTION
S-E is indicated when the thermocouple is not
properly connected to the preheater body or has an
open circuit. If you receive an error, insert the
thermocouple properly in the thermocouple connector,
then, turn on the power switch again.
■ Connection with the HAKKO
FR-803B/FM-206 (Optional)
The HAKKO FR-803B and HAKKO FM-206 can be
connected to the HAKKO FR-872 with a connecting
cable, which permits the HAKKO FR-803B /
FM-206 to start/stop the HAKKO FR-872.
CAUTION
Connect the HAKKO FR-872 and FR-803B /
FM-206 by the connecting cable before turning
on the power switch.
1. HAKKO FR-803B
● START
When pressing the Hot Air button of the HAKKO
FR-803B handpiece, the HAKKO FR-872 will work
in conjunction with the HAKKO FR-803B. the
HAKKO FR-872 and FR-803B will be operated by
the setting and mode of each unit.
NOTE:
When pressing the START/STOP button of the
HAKKO FR-872, Only the HAKKO FR-872 will be
activated.
in (auto) T/C mode
Figure 2
Thermocouple
FR-872 side
Figure
3
T/C Connector
T/C
Connecting
cable
(not included)
P.W.B.
side
HAKKO FR-803B
● STOP
Press the Hot Air button of the HAKKO FR-803B
handpiece or turn off the power when the profile is
finished in auto mode.
CAUTION
Be sure that both the HAKKO FR-872 and HAKKO
FR-803B are starting from the STOP state. If the
FR-872 is running and the FR-803B is not, starting
the FR-803B will effectively stop the FR-872.
Please refer to the HAKKO FR-803B instruction
manual for its use.
2. HAKKO FM-206
● START
When pressing the Hot Air button of the HAKKO
FM-2029 handpiece with the HAKKO FM-2029
connected to the HAKKO FM-206, or pressing the
START/ STOP button of the HAKKO FR-872, the
HAKKO FR-872 will work in conjunction with the
HAKKO FM-206. The HAKKO FR-872 and FM-206
will be operated by the profile of each unit.
● STOP
Press the Hot Air button of the HAKKO FM-2029
handpiece while the HAKKO FM-2029 is connected
to the HAKKO FM-206, or press the START/ STOP
button of the FR-872. If the HAKKO FM-206 is in
AUTO mode, the FR-872 will stop automatically
when the FM-206 reaches the end of the
programmed profile.
CAUTION
When using the HAKKO FR-872 in Auto Mode, it is
necessary to ensure that each stage of the profile
has the same time setting as the profile on the FR-803B
or FM-206. It is also necessary to set the FR-803B or
FM-206 to use CLOSED timing.
DC5V~24V
OUTPUT
DC5V~24V
INPUT
POWER
START / STOP
CONTROL
ALARM
Output in
normal mode
Output when
error occurs
External input
OUT1
COM
OUT2
COM
IN
ON
OFF
ON
OFF
ON
OFF
ON
OFF
ON
OFF
ON
OFF
ON
OFF
Normal
Operation
Connecting
cable
(not included)
Connector
Operating chart
When error
occurs
1
4
7
Output in
normal mode
1
2
3
4
5
6
7
8
9
HAKKO FM-206
3
6
9
Output when
error occurs
1
2
3
4
5
6
7
8
9
External input
OutsideInside
External
input
DC5V
-24V
Please refer to the HAKKO FM-206 / FM-2029
instruction manual for its use.
Page 4

5. OPERATION
A. Selecting the desired mode
Use the MODE button to select the desired mode. (Normal or Auto mode)
Each mode (Normal or Auto) is divided into the following control modes:
Power mode: The preheater is controlled by setting the output.
T/C mode : The preheater is controlled by setting the temperature.
CAUTION
If the preheater is used in combination with a hot air rework station, be sure the heater is not exposed directly to the hot air.
Normal modes
● Power mode
The unit is controlled according to the setting output during operation.
LED lamp :
POWER MODE
● T/C mode
The unit is controlled so that measurement temperature by the thermocouple becomes the setting
temperature during operation.
LED lamp :
T/C MODE
Auto modes
In auto modes, the preheater automatically returns to its previous state when all associated operations are
completed. The unit will return to standby even when pressing the START/STOP button during operation.
● Auto power mode
The output (%) and time (sec) are controlled
according to the profile set in 3 steps.
It’s possible to store ten profiles.
Standby In operation
Output setting
SET
POWER MODE
T/C MODE
AUTO MODE
MODE
POWER MODE
T/C MODE
AUTO MODE
Press the “start / stop”
T/C
button once.
Press the “start / stop”
button once.
ADJ
SET
START
MODE
STOP
http://www.hakko.com
*
Standby In operation
STEP2
Time(s)
Target
temperature
setting
SET
POWER MODE
T/C MODE
AUTO MODE
MODE
STEP3
POWER MODE
T/C MODE
AUTO MODE
Measured
temperature
ADJ
SET
START
MODE
STOP
http://www.hakko.com
*
T/C
Press the “start / stop”
button once.
Press the “start / stop”
button once.
Auto power mode
STEP1
Power (%)
ADJ
START
STOP
http://www.hakko.com
ADJ
START
STOP
http://www.hakko.com
*
Measured
temperature
*
×10
T/C
T/C
LED lamp :
POWER MODE
AUTO MODE
● Auto T/C Mode
The thermocouple is used to control the temperature of a
specific location of measurement for a specific length of
time according to the profile set in 3 steps.
It’s possible to store ten profiles.
Standby In operation
STEP2
Time
STEP No.
SET
POWER MODE
T/C MODE
AUTO MODE
MODE
Temp
STEP3
File No.
SET
POWER MODE
T/C MODE
AUTO MODE
MODE
ADJ
START
STOP
http://www.hakko.com
Press the “start / stop”
button once.
T/C
*
Auto T/C mode
Temp
Time
Temp
Temp (℃ or ℉)
STEP1
Time
ADJ
START
STOP
http://www.hakko.com
Step Time
Countdown
*
×10
T/C
Time(s)
LED lamp :
T/C MODE
AUTO MODE
Standby In operation
STEP No.File No.
POWER MODE
T/C MODE
AUTO MODE
SET
MODE
POWER MODE
T/C MODE
AUTO MODE
T/C
Press the “start / stop”
button once.
ADJ
SET
START
MODE
STOP
http://www.hakko.com
*
ADJ
START
STOP
http://www.hakko.com
Step Time
Countdown
T/C
*
If the thermocouple is attached to the T/C connector while the preheater is in power mode/auto power mode, temperature
readings are indicated on the T/C indicator for monitoring; otherwise, the display will read " ".
B. Changing the settings used in normal mode
Example: Changing the settings used in power mode
Be sure that the setting in power mode is
between 0% and 100%.
● Initially, the setting is 50%.
EX: To change from 25% to 50%,
1. Hold down the button found on the front panel for
at least one second.
The SET indicator flashes to indicate the current setting.
CAUTION
Although it’s possible to change the setting value during
operation, note that the output can fluctuate.
Hold down the button
at least one second.
SET SET
Turn the ADJ knob.
2. Changing the Setting
Turn the ADJ knob until the desired setting is indicated.
When the desired setting is indicated, press the button
to complete the task.
Press the button.
SET SET
Page 5

5. OPERATION
Changing the setting used in t/c mode
Be sure that the setting used in T/C mode is
between 50℃ and 200℃ (122℉ to 392℉)
● Initially, the setting is 100℃ (212℉).
EX: To change from 50℃ (122℉) to 125℃ (257℉),
1. Hold down the button found on the front panel for
at least one second.
The SET indicator flashes to indicate the current setting.
NOTE:
You can change the setting while the preheater is in operation.
Hold down the button
at least one second.
SET SET
Turn the ADJ knob.
2. Changing the Setting
Turn the ADJ knob until the desired setting is indicated.
When the desired setting is indicated, press the button
to complete the task.
C. Changing the file used in auto modes
Each file (indicated as F-0 through F-9) used in auto modes
permits the specification of 10 profile settings. Before
selecting a different file, be sure that the preheater is in auto
mode (i.e., the AUTO MODE lamp is on).
1. Hold down the button found on the front panel for
at least one second.
The SET indicator flashes to indicate the current setting.
2. Changing the Setting
Turn the ADJ knob until the desired setting is indicated.
When the desired setting is indicated, press the button
to complete the task.
D. Changing the settings used in auto modes
Changing the Settings Used in Power Auto Mode
Table 1 Indications of Profile Nos.
Setting
STEP1 Power (%)
STEP1 Time (s)
1. Hold down the (MODE) and buttons found on
the front panel simultaneously for 1 sec or more.
The SET indicator flashes to indicate the profile number
while the T/C indicator indicates the current setting.
Setting
STEP2 Power (%)
STEP2 Time (s)
2. Select the profile No. you want to edit.
Turn the ADJ knob until the desired profile No. is
indicated. (For the profile setting corresponding to each
profile No., see Table 1.) When the button is pressed,
the T/C indicator flashes to permit changing the set value.
3. Edit the profile settings as necessary.
Turn the ADJ knob to edit the setting used in each STEP
indicated on the flashing T/C indicator.
4. When the setting change is completed, hold down
the button until the display reads “ ”.
When " " is indicated on the SET indicator and the
button is pressed, the preheater returns to its standby
state (i.e., to end the task).
Setting
STEP3 Power (%)
STEP3 Time (s)
Press the button.
SET SET
EX: To switch from file No. 0 to file No. 3,
Hold down the button
at least one second.
SET SET
Turn the ADJ knob.
Press the button.
SETSET
EX: To change the control time in STEP 2 from 5 sec to 7 sec,
Hold down the and button
SET
at least one second.
T/C
MODE
Turn the ADJ knob.
SET
T/C
Press the button.
SET
T/C
Turn the ADJ knob.
SET
T/C
Hold down the button until
SET
SET
Press the
button.
Continue the settings.
You can edit the settings as many times as you need until
all settings are as you desire. If the power is removed while
settings are being edited, the previous settings will remain
valid.
the display reads “ ”.
T/C
T/C
SET
Press the
button.
End (return to the
standby screen)
T/C
Changing the settings used in t/c auto mode
Table 2 Indications of Profile Nos.
Setting
STEP1 Temp (℃/°F)
STEP1 Time (s)
1. Hold down the (MODE) and buttons found on
the front panel simultaneously for 1 sec or more.
The SET indicator flashes to indicate the profile number
while the T/C indicator indicates the current setting.
Setting
STEP2 Temp (℃/°F)
STEP2 Time (s)
Setting
STEP3 Temp (℃/°F)
STEP3 Time (s)
2. Select the profile No. you want to edit.
Turn the ADJ knob until the desired profile No. is
indicated. (For the profile setting corresponding to each
profile No., see Table 2.) When the button is pressed,
the T/C indicator flashes to permit changing the set value.
3. Edit the profile settings as necessary.
Turn the ADJ knob to edit the setting used in each STEP
indicated on the flashing T/C indicator.
4. When the setting change is completed, hold down
the button until the display reads “ ”.
When " " is indicated on the SET indicator and the
button is pressed, the preheater returns to its standby
state (i.e., to end the task).
EX: To change the control time in STEP3 from 5 sec to 3 sec
Hold down the and button
SET
at least one second.
T/C
MODE
Turn the ADJ knob.
SET
T/C
Press the button.
SET
T/C
Turn the ADJ knob.
SET
T/C
Hold down the button until
SET
Turn the ADJ knob.
SET
Press the
button.
Continue the settings.
You can edit the settings as many times as you need until
all settings are as you desire. If the power is removed while
settings are being edited, the previous settings will remain
valid.
the display reads “ ”.
T/C
T/C
SET
Press the
button.
End (return to the
standby screen)
T/C
Page 6

6. PARAMETER SETTINGS
Table 3 Parameters and Their Settings
Parameter
℃ / ℉ display
Temperature upper limit
Temperature lower limit
Auto shutoff
Heater power alert time
Protection level
Ramp rate control
* For the particulars of protection levels, see Table 5.
** For U.S.A.
Particulars of Parameters
SET indicator
01
02
03
04
05
06
16
T/C indicator
C or F
3-digit value (0~537℃ / 32~999℉)
3-digit value (0~537℃ / 32~999℉)
2-digit value (0~30min)
2-digit value (0~30min)
C-1 / C-2 / C-3
1: OFF 2: 1℃/s 3: 2℃/s 4: 3℃/s
Setting
C : ℃ F : ℉
Temperature upper limit alert
Temperature lower limit alert
Shutoff time
Heater power alert time
Protection level
Ramp rate control
Initial setting
F** (C)
999** (537)
32** (0)
0
0
C-1
1
℃ / ℉ display
Temperature upper limit alert function
Temperature lower limit alert function
Auto shutoff function
Heater power alert function
Ramp rate control
Table 4 Protection Levels and Particulars of Protection
Protection level
C-3
C-2
C-1
Permits only the START/STOP operation.
In addition to C-3 operation, permits setting the output (temperature) and changing auto mode settings.
In addition to C-2 operation, permits switching modes.
Permits selection of either Celsius or Fahrenheit temperature indication.
Turns on the upper limit temperature alert to stop heater control if the temperature
rises above the upper limit after reaching its predetermined level.
Turns on the lower limit temperature alert to stop heater control if the temperature
drops below the lower limit after reaching its predetermined level.
Stops heater control after a specific period of time following the start of control.
The auto shutoff function will not operate if the timer is set to 0.
Turns on the heater power alert to stop heater control if the temperature fails to
reach the predetermined level after a specific period of time following the start of
control. The heater power alert function will not operate if the timer is set to 0.
Permits control of temperature increase ramp rate in the T/C mode. You can select
the rate from 1℃/s, 2℃/s and 3℃/s. If the “1:OFF” is selected, the unit will perform
normal operation.
Setting
● Editing the Parameters
1. Turn on the power while holding down the MODE button.
SET indicator: Indicates parameter Nos.
T/C indicator : Indicates parameter settings.
You can change the item on the flashing indicator.
2. Select the desired parameter No.
See that the parameter No. on the SET indicator is
flashing while the parameter setting on the T/C indicator
remains on. Turn the ADJ knob to select the desired
parameter No., and press the button to confirm the
change.
3. Edit the parameter setting.
When you have selected the desired parameter No., the
flashing moves from the SET indicator to the T/C
indicator. Turn the ADJ knob to edit the parameter setting,
and press the button to accept.
4. Save the change.
When you have finished changing all parameters you
want to change, hold down the button for a while
(possibly at the end of 2. or 3.). When " " is indicated
on the SET indicator, press the button once again to
end the task and return the preheater to a standby state.
EX: To set the auto shutoff time to 15 min
Turn on the power while holding
MODE
SET
Turn the ADJ knob.
down the button.
T/C
SET
T/C
Press the button.
SET
T/C
Turn the ADJ knob.
SET
T/C
Hold down the button until
SET
Turn the ADJ knob.
SET
Press the
button.
Continue the settings.
You can edit the settings as many times as you need until
all settings are as you desire. If the power is removed while
settings are being edited, the previous settings will remain
valid.
the display reads “ ”.
T/C
T/C
SET
Press the
button.
End (return to the
standby screen)
T/C
Page 7

7. MAINTENANCE
In order for you to use the preheater in optimum condition for a long time, it is important that you perform maintenance work
on a regular basis. The degree of wear and tear the preheater may incur varies depending on the temperatures it is used at
and the environment it is used in. Provide appropriate care according to the conditions of its use.
WARNING
When replacing the heater:
・Make sure the heater and lamp cover have sufficiently cooled.
・Be careful for any injures which may be caused by sharp edges on the lamp cover.
■ Burned-out heater
Measure the resistance value between
the terminals.
■ Replacing the heater
②
CAUTION
・ Mount the heater so that the sealing at the center faces downward (on the reflector side).
・ Be sure that the grounding wire of the lamp cover is properly connected.
Measure the resistance of the heater. If the heater has an
open circuit, replace the heater.
1. Remove the screws from the both sides of the unit and
detach the cover.
①
2. Lift and move the lamp cover out of the way of the lamps.
CAUTION
Do not remove the nuts securing the grounding strap to the
lamp cover.
3. Replace the heater.
CAUTION
・ Do not subject the heater to excessive impact.
・ Do not hold the heater by its glass portion at the center with
bare hands.
・ For replacement, hold the end of the heater, and detach it
from the socket at an angle.
Replace the lamp cover and re-install the cover of the unit.
4.
###W
++V
■ Replacing the Fuse
100 - 120V 220, 230V
Rotate it counterclockwise and remove.
Mount the heater so that the
protrusion faces downward.
Specifications:40V120WTerminal:Brown(100-120V)
Specifications:80V250WTerminal:White(220-240V)
1. Disconnect the power cord from the power receptacle.
2. Pull the fuse out of the fuse holder.
3. Replace the fuse with a new one.
4. Put the fuse holder back in place.
Page 8

8. TROUBLESHOOTING
WARNING
Be sure to disconnect the power plug before inspecting the inside of the preheater or replacing its part to avoid electric shocks.
● The unit does not operate when
the power switch is turned on.
● The heater is not powered.
CAUTION
A single block has a set of 3 heaters.
Keep in mind that an open circuit in
one heater deprives the other
heaters in the same block of power.
● S-E is indicated.
(in T/C mode, auto T/C mode)
● H-E is indicated.
(in T/C mode, auto T/C mode)
● O-E is indicated
(in T/C mode, auto T/C mode)
● U-E is indicated.
(in T/C mode, auto T/C mode)
●
The heater fails to exert control, the control
mechanism is not normal, or the temperature
indication remains unchanged.
● Settings cannot be edited. The
mode cannot be changed.
● The unit turns off suddenly
while running.
CHECK
:
Is the power cord or the power plug disconnected?
ACTION
:
Connect the cord or the plug.
CHECK
:
Has the fuse blown?
ACTION
:
Find out why the fuse has blown; then, replace the fuse. If the fuse blows
once again, ship the preheater body together with the fuse for necessary
repairs.
CHECK
:
Has the START/STOP button been pressed?
ACTION
:
Press the START/STOP button.
CHECK
:
Is the selector switch off?
ACTION
:
Turn on the selector switch.
CHECK
:
Is the heater out of the socket?
ACTION
:
Fit the heater properly in the socket.
CHECK
:
Is the heater burned out?
ACTION
:
if the result indicates that the heater has burned out, replace it.
CHECK
:
Is the thermocouple connected to the preheater body?
ACTION
:
Connect the thermocouple to the preheater body.
CHECK
:
Does the thermocouple have an open circuit?
ACTION
:
If feasible, correct the open circuit; otherwise, replace the thermocouple.
CHECK
:
Is the selector switch off?
ACTION
:
Turn on the selector switch.
CHECK
:
Is the heater burned out or out of place?
ACTION
:
See "● The heater is not powered.".
CHECK
:
Is the setting for the heater power alert too low (set to too short a time)?
ACTION
:
Change the heater power alert to an appropriate setting.
CHECK
:
Is the location of measurement for the thermocouple inappropriate or is
the thermocouple mounted improperly?
ACTION
:
Mount the thermocouple to an appropriate location of measurement.
CHECK
:
Is the setting for the temperature upper limit too low?
ACTION
:
Change the temperature upper limit to an appropriate setting.
CHECK
:
Is the setting for the temperature lower limit too high?
ACTION
:
Change the temperature lower limit to an appropriate setting.
CHECK
:
Is the thermocouple displaced from the location of measurement or is it
mounted improperly?
ACTION
:
Mount the thermocouple in an appropriate location of measurement.
CHECK
:
Is the protection level C-2 or higher?
ACTION
:
By referring to "● Editing the Parameters", change the protect level to
one that permits changing of the settings.
CHECK
:
Is the Auto power shutoff set?
ACTION
:
Turn OFF the power switch and then back ON. By referring to "● Editing
the Parameters", change the Auto shutoff time.
9. ERROR MESSAGES
All error indications occur only in T/C mode or T/C auto mode.
● Sensor error
● Heater error
● Temperature upper limit
setting error
● Temperature lower limit
setting error
CAUTION
All error indications will remain until the preheater is turned off and then back on.
S-E is indicated when the thermocouple is not properly connected to the
preheater body or has an open circuit.
H-E is indicated when the selector switch is off or the heater lamp has
burned out or is detached from the preheater body.H-E is also indicated
when the heater power alert goes on.
O-E is indicated when the temperature rises above the predetermined
upper limit for some reason after it has stabilized during preheating.
U-E is indicated when the temperature drops below the predetermined
lower limit for some reason after it has stabilized during preheating.
Page 9

11. PARTS LIST
④
②
①
③
● HAKKO FR-872
Item No.
Part No.
A5003
①
A5004
②
B5039
B3674
③
B3516
④
B3658
⑤
B3704
⑥
B3656
① ②
⑦
Part Name
Heater
Heater
Fuse / 250V-15A
Fuse / 250V-7A
Thermo couple
P.W.B. holder
Switch
Switch
Specifications
100-120V
220-240V
100-120V
220-240V
100-110V
For power Supply
For zone selector
Part No.
Item No.
B5042
⑦
B2422
B2424
B2436
B3508
● Optional parts
Part No.
Item No.
B3657
①
B3686
②
⑤
Part Name
Power cord, 3-wire
cord & American plug
Power cord, 3-wire
cord & BS plug
Power cord, 3-wire
cord & European plug
Power cord, 3-wire
cord & Chinese plug
Power cord, 3-wire cord
& American plug (B)
Part Name
Connecting cable
Connecting cable
⑥
Specifications
120V USA
India
230V CE
China
Specifications
For FR-803B
For FM-206
Page 10

CAUTION
This product includes such features as electrically conductive plastic parts and grounding of
the handpiece and station as measures to protect the device to be soldered from the effects
of static electricity. Be sure to observe the following instructions:
1.
The handle and other plastic parts are not insulators, they are conductors. When
making repairs or replacing parts, take sufficient care not to expose live electrical parts
or damage insulation materials.
2. Be sure to ground the unit during use.
HEAD OFFICE
4-5, Shiokusa 2-chome, Naniwa-ku, Osaka 556-0024 JAPAN
TEL:+81-6-6561-3225 FAX:+81-6-6561-8466
http://www.hakko.com E-mail:sales@hakko.com
OVERSEAS AFFILIATES
U.S.A.: AMERICAN HAKKO PRODUCTS, INC.
TEL: (661) 294-0090 FAX: (661) 294-0096
Toll Free (800)88-HAKKO
4 2 5 5 6
http://www.hakkousa.com
HONG KONG: HAKKO DEVELOPMENT CO., LTD.
TEL: 2811-5588 FAX: 2590-0217
http://www.hakko.com.hk
E-mail:info@hakko.com.hk
SINGAPORE: HAKKO PRODUCTS PTE LTD.
TEL: 6748-2277 FAX: 6744-0033
http://www.hakko.com.sg
E-mail:sales@hakko.com.sg
Please access to the following address for the other Sales affiliates.
http://www.hakko.com
Copyright © 2014 HAKKO Corporation. All Rights Reserved.
MA02636XZ140805
2014.8
 Loading...