

Page 1
Multi Rework Station
Instruction Manual
Thank you for purchasing HAKKO FM-206 Rework System.
Please read this manual before operating the HAKKO FM-206.
Keep this manual readily accessible for reference.
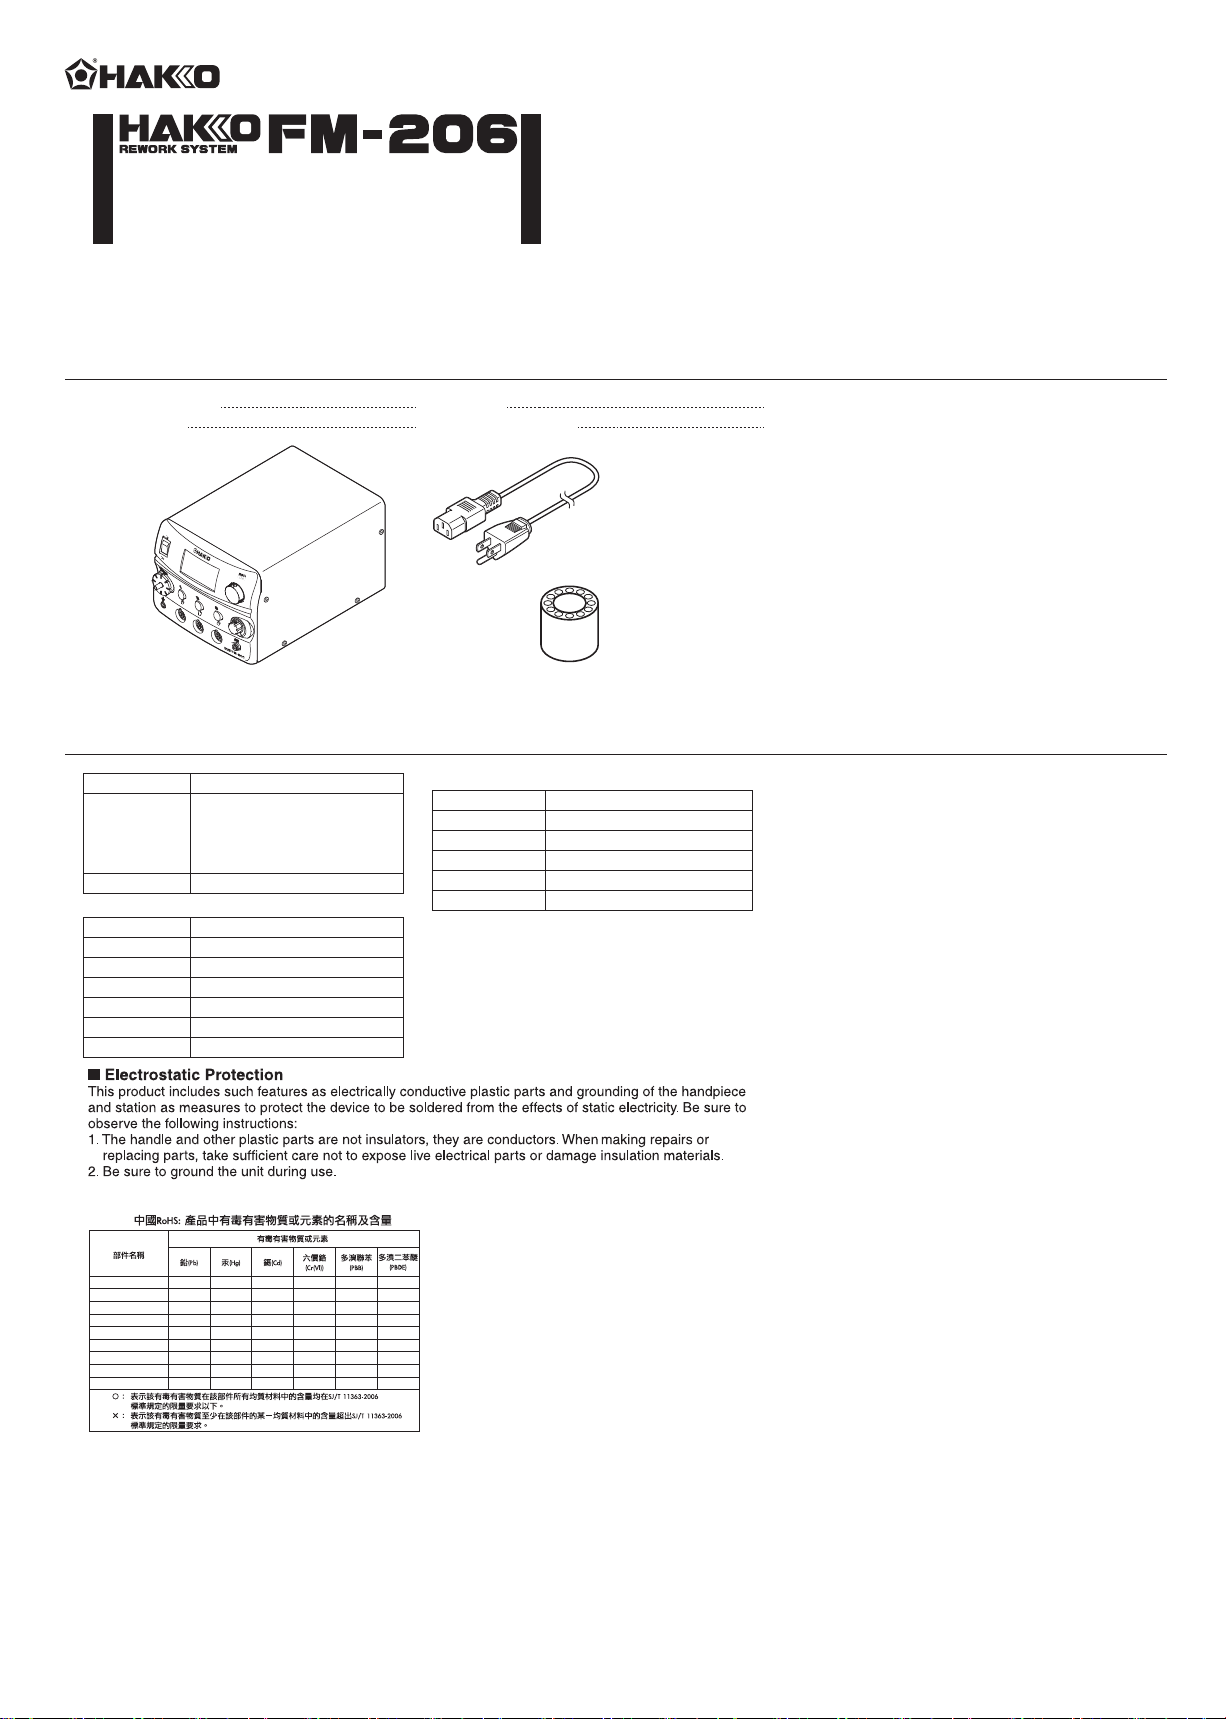
1. PACKING LIST
HAKKO FM-206
Power cord
HAKKO FM-206
2. SPECIFICATIONS
Power Consumption
Temperature Range
Temperature Stability
● Station
Output
Dimensions (W x H x D)
Weight
Capacity (Max)
Vacuum Generator
Vacuum Pressure (Max.)
Suction Flow
MAX 410W
HAKKO FM-2026/2027 200 - 450℃ (400 - 840℉)
MODEL FM-2022/2023 200 - 400℃ (400 - 750℉)
MODEL FM-2024 350 - 450℃ (660 - 840℉)
HAKKO FM-2029 100 - 550℃ (200 - 1030℉)
HAKKO FM-2030 200 - 500℃ (400 - 930℉)
±5°C (±9°F) at idle temperature
24V
162 × 136 × 245 mm (6.4 × 5.4 × 9.7 in)
6.2 kg (13.7 lb.)
6L/min.
Vacuum pump, cylinder type
80kpa (600 mm Hg) (24 in. Hg)
14L/min.
Please check to make sure that all items listed below are included in the package.
11Tip tray
Instruction manual
*Each Hakko handpiece with the exception of the HAKKO
FM-2027 has their own instruction manual. Please refer to
this manual for specifications and replacement parts.
1
1
■Use this product with the following models.
HAKKO FM-2027 (Soldering Iron)
Power cord
MODEL FM-2022 (Parallel Remover)
MODEL FM-2023 (Mini Parallel Remover)
MODEL FM-2024 (Desoldering Tool)
HAKKO FM-2026 (Soldering Iron N2 Type)
HAKKO FM-2029 (Hot Air Handpiece)
Tip tray
HAKKO FM-2030 (Heavy Duty Soldering Iron)
● HAKKO FM-2027
Power Consumption
Tip to Ground Resistance
Tip to Ground Potential
Cord
Total Length (w/o cord)
Weight (w/o cord)
* The temperature was measured using the HAKKO FG-101
thermometer.
* This product is protected against electrostatic discharge.
* Specifications and design are subject to change without
notice.
70 W (24 V)
< 2 Ω
< 2 mV
1.2 m (4 ft)
188 mm (7.4 in.) with 2.4D tip
30 g (0.067 lb./1.07 oz.)with 2.4D tip
連接部
隔離器
電路板
插座
電磁蓋
真空泵組件
螺釘
坦克組件
排出閥門
×
○
○
○
○
×
○
○
×
○
×
○
×
○
×
○
×
○
×
○
×
○
○
○
○
○
○
○
○
○
○
○
○
○
○
○
○
○
○
○
○
○
○
○
○
○
○
○
○
○
○
○
○
○
1
Page 2
3. WARNINGS, CAUTIONS, NOTES AND EXAMPLES
Warnings, cautions and notes are placed at critical points in this manual to direct the operator’s attention to
significant items. They are defined as follows:
WARNING: Failure to comply with a WARNING may result in serious injury or death.
CAUTION : Failure to comply with a CAUTION may result in injury to the operator, or damage to the
NOTE: A NOTE indicates a procedure or point that is important to the process being described.
items involved.
CAUTION
When power is ON, the tip will be hot. To avoid injury or damage to personnel and items in the work
area, observe the following:
● Do not touch the tip or the metal parts near the tip.
● Do not allow the tip to come close to, or touch, flammable materials.
● Inform others in the area that the unit is hot and should not be touched.
● Turn the power off when not in use, or left unattended.
●
Turn the power off when connecting the handpieces or storing the HAKKO FM-206.
●
This appliance is not intended for use by persons (including children) with reduced physical, sensory
or mental capabilities, or lack of experience and knowledge, unless they have been given supervision
or instruction concerning use of the appliance by a person responsible for their safety.
●
Children should be supervised to ensure that they do not play with the appliance.
To prevent accidents or damage to the HAKKO FM-206, be sure to observe the following:
●
●
Do not use the HAKKO FM-206 for applications other than soldering.
●
Do not strike the iron against hard objects to remove excess solder. This will damage the iron.
●
Do not modify the HAKKO FM-206.
●
Use only genuine Hakko replacement parts.
●
Do not allow the HAKKO FM-206 to become wet, or use it with wet hands.
●
Remove power and iron cords by holding the plug − not the wires.
●
Be sure the work area is well ventilated. Soldering produces smoke.
●
While using HAKKO FM-206, don’t do anything which may cause bodily harm or physical damage.
4. INITIAL SETUP
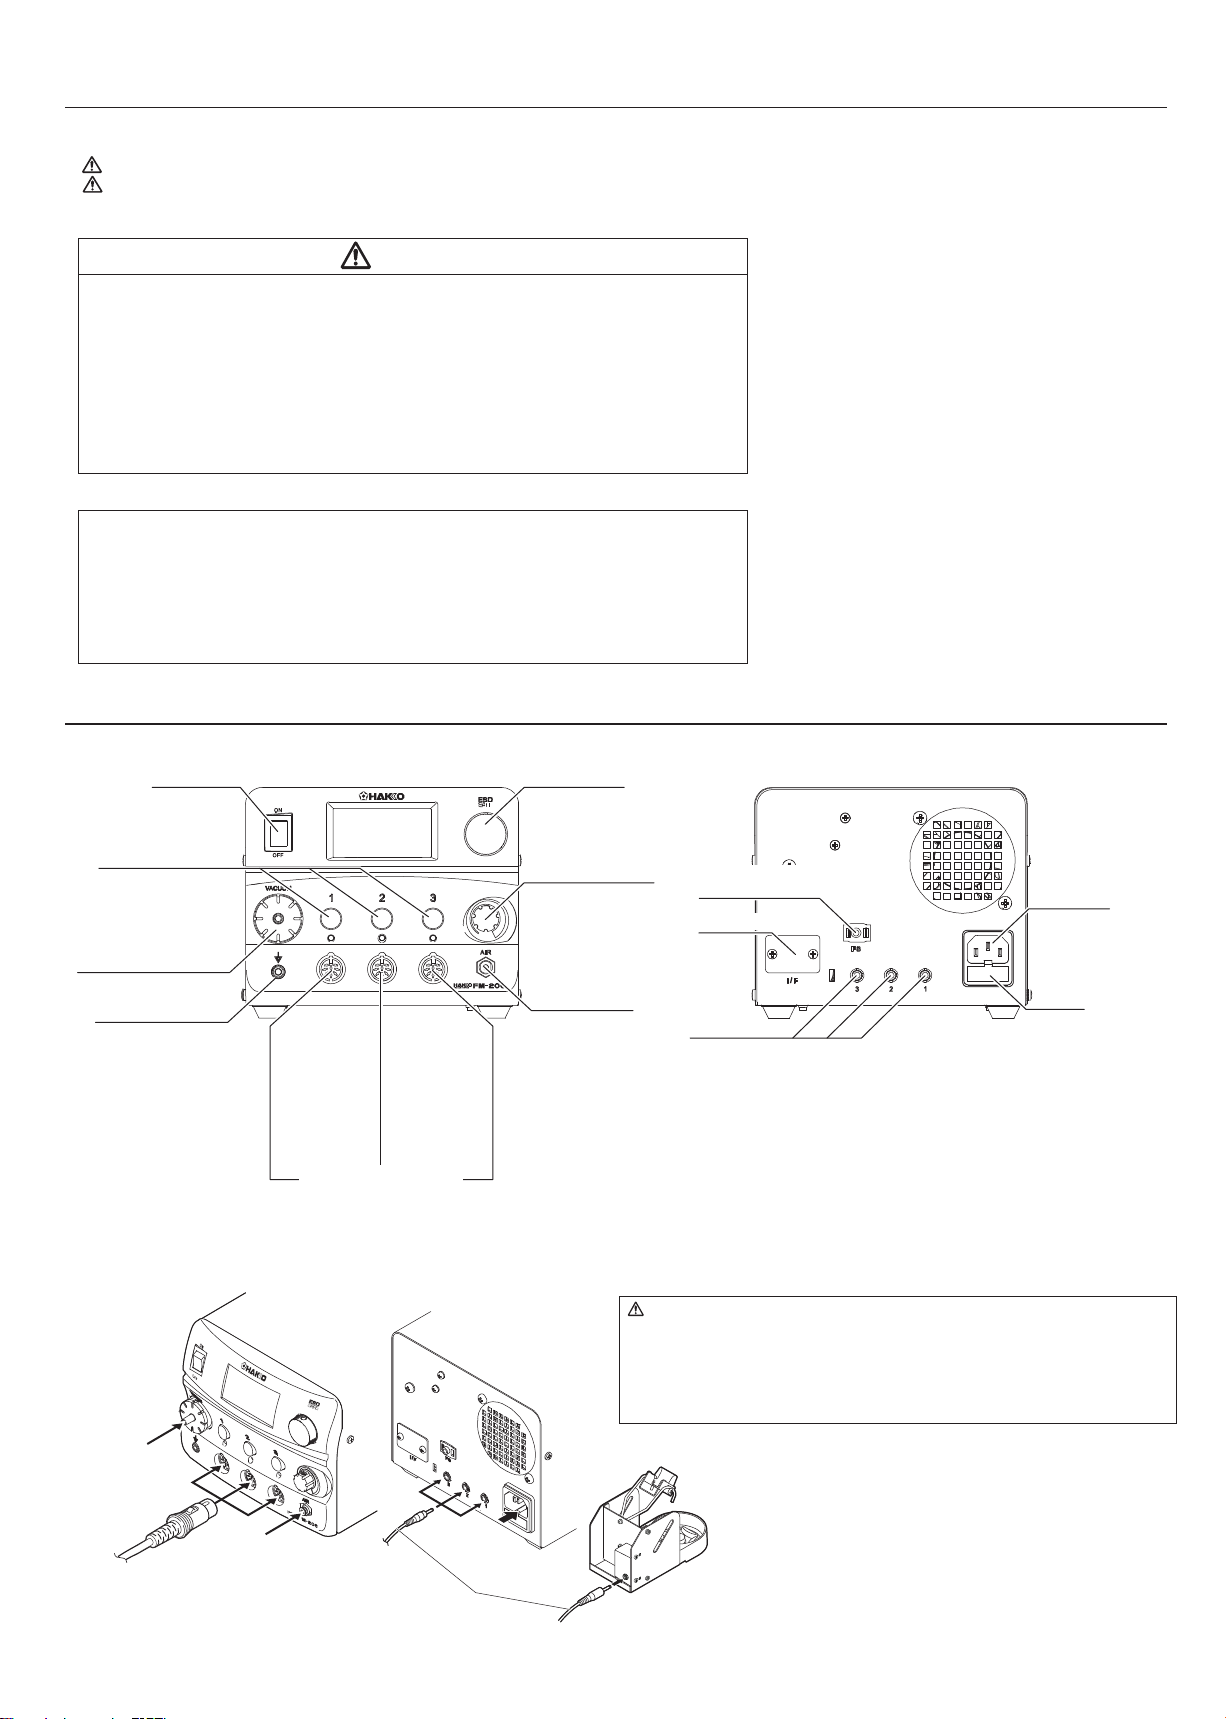
■Part Names
Power Switch
Control Button(1, 2, 3)
Filter Case Cover
Jack
(equipotential)
Compatible with
FM-2024
FM-2026
FM-2027
Receptacle* (1, 2, 3)
■Setup
●Hooking up the iron and connecting cable.
Compatible with
FM-2022
FM-2023
FM-2024
FM-2026
FM-2027
FM-2030
Control Knob
Flow Control Knob
Air Output
Compatible with
FM-2024
FM-2026
FM-2027
FM-2029
FM-2030
Jack
(for foot switch)
I/OCoverPlate
Jack**(1, 2, 3)
* Each receptacle connector differs, please be careful not to connect an
incompatible device.
**F
or connecting iron holders. Make sure to connect the correct holder.
While both vacuum and hot air can be used, only one can be operated at once. One
cannot use a combination of hot air and vacuum or two vacuums simultaneously.
Errors will result.
Power
Receptacle
Fuse
Connection for
FM-2024 Suction
Hose
Plug the iron's connector
cord into the receptacle.
Connection for
FM-2029 Air Hose
Power
Cable
Connecting
Cable
Plug in power and connecting cables.
CAUTION
• Please make sure the power is off when you plug in cables.
• Please make sure to hook up the connector cable and the iron holder on the same
channel and not to place the iron in a holder connected to a differing channel.
• Please take care not to mix up the hose connections, the MODEL FM-2024 connects
to the filter case cover and the HAKKO FM-2029 to the air output.
• Securely insert the connecting cable all the way in to the jack.
2
Page 3
4. INITIAL SETUP
●Replacing the tip (HAKKO FM-2027)
CAUTION
The tip may be hot. Avoid holding the hot tip for a long time even if
using the heat-resistant pad. Otherwise burns may result.
Removing the tip:
● Hold down the lock release buttons in the sleeve assembly, pull out
the tip together with the sleeve assembly from the connector.
CAUTION
• Be sure to keep the lock release buttons held down while pulling
out the sleeve assembly. Failure to do so will damage the locking
mechanism.
• Be sure to pull out the tip only after separating the sleeve assembly
from the connector. Otherwise, the sleeve assembly may fall down
and break.
● While holding the front end of the sleeve assembly, pull out the tip.
Insert the tip:
●
Reassemble in the reverse order of disassembly.
CAUTION
• Insert the tip into the sleeve assembly until it clicks into place. When
you hear it click, avoid forcing the tip into the sleeve assembly.
• When holding the head of the tip, there is a danger of burn. Be sure
to use the heat-resistant pad.
*Each Hakko handpiece with the exception of the HAKKO
FM-2027 has their own instruction manual. Please refer to
this manual for specifications and replacement parts.
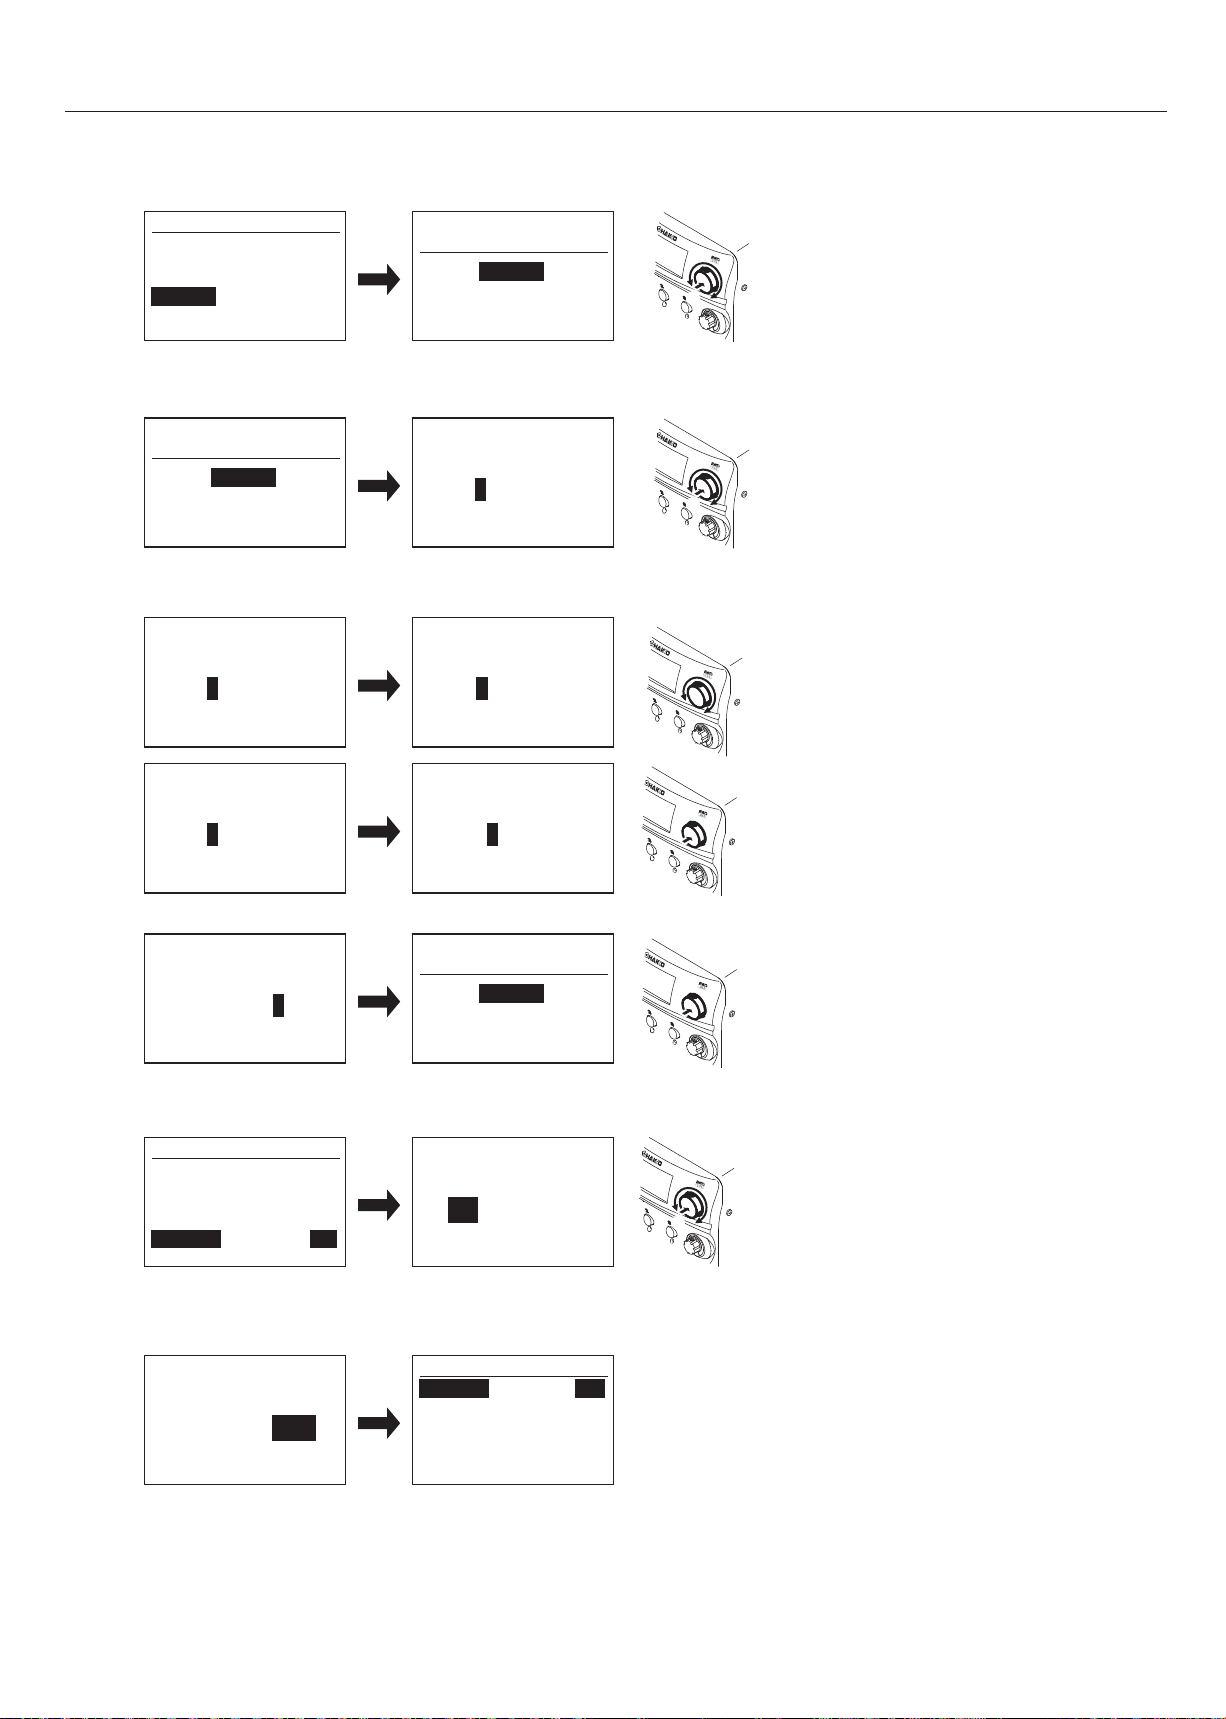
■Switch, Control
Power switch
Use the power switch to turn
the power on and off.
Control Buttons
Use to change settings such as
temperature.
When pressed briefly:
Displays the preset screen.
When pressed and held:
Displays the change settings
screen.
Change Settings Screen Details
1. Temperature Settings
2. Offset Settings
3. Preset Temperature Settings
4. Preset Names
5. Channel Power (On/Off)
6 Exit
Button
and
Knob
Usage
Control Knob Usage
Use to change settings
Turning the control knob:
Changes setting values
or moves the cursor
Pushing the control knob:
Makes selection
Flow Control Knob
When HAKKO FM-2029 is connected to
HAKKO FM-206, air flow will be displayed.
By turning the flow control knob, air flow
can be changed.
CH1 CH2 CH3
℃
350
SOL
* If you press a control button while on the Preset or Change
Settings screen, the corresponding channel screen will be
displayed.
Plugged in irons will be heated according to the settings
when the power is turned on.
Off
Ready
100%M
3
Page 4

5. OPERATION
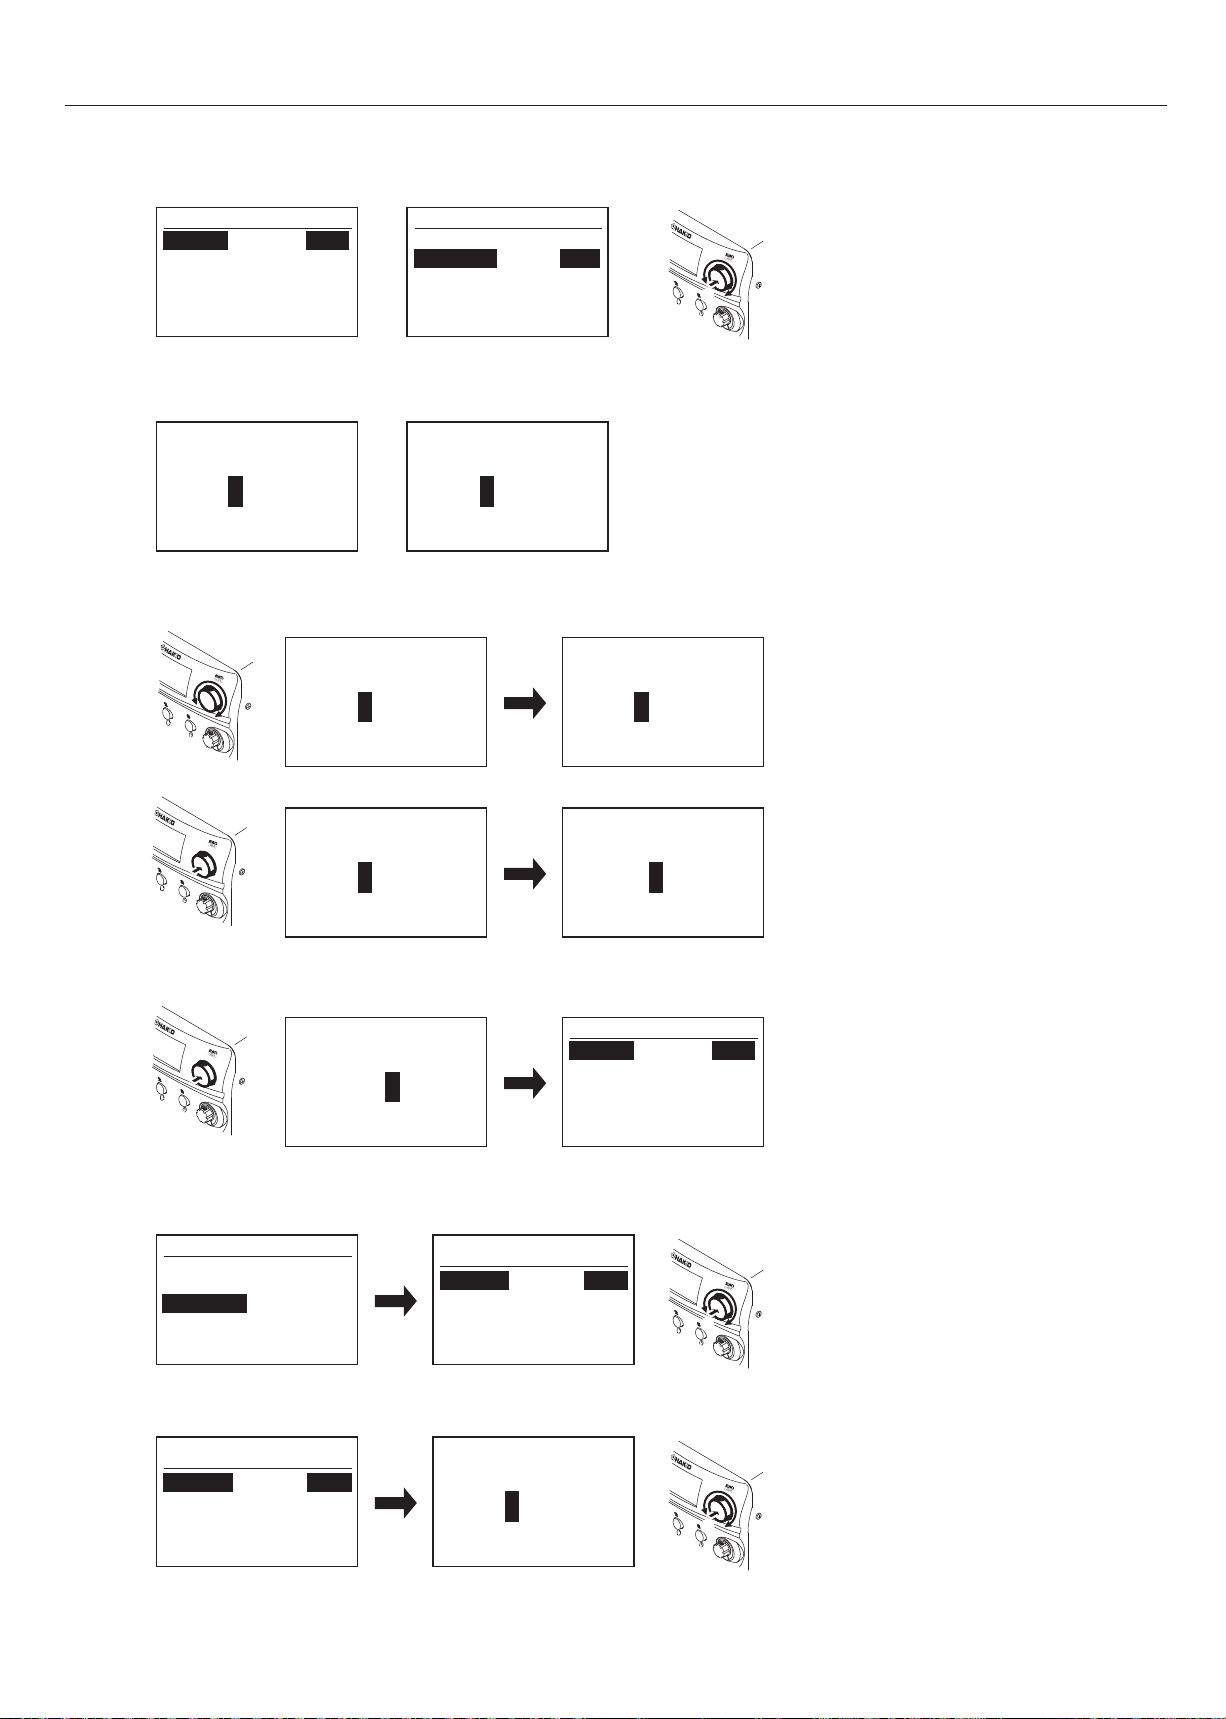
■ Various setting changes (Preset select)
● Range of preset temperatures
Grip
HAKKO FM-2027
MODEL FM-2022 / FM-2023
MODEL FM-2024
HAKKO FM-2030
HAKKO FM-2029
● Selecting the Preset Temperature
1. Press the control button for the channel you want to change.
2. By turning the control knob, the preset temperature to be selected will change.
CH1 PresetSelect
PRESET1
PRESET2
PRESET3
Initial preset temperatures for each grip
The display screen will switch to the preset selection screen shown below.
CH1 CH2 CH3
℃
350
SOL
OffOff
Set Temp 350℃
Initial Value
300/350/400℃ (570/660/750℉)
300/350/400℃ (570/660/750℉)
350/375/400℃ (660/700/750℉)
300/350/400℃ (570/660/750℉)
300/350/400℃ (570/660/750℉)
300℃
350℃
400℃
Exit
CH1 PresetSelect
PRESET1
PRESET2
PRESET3
CH1 PresetSelect
PRESET1
PRESET2
PRESET3
* When the acceptable setting range is exceeded it will
return to the initial setting.
For the setting range, refer to "Initial preset temperatures
(
for each grip."
**The setting temperature, offset temperature, preset
temperature, and preset name are remembered by
each grip.
Set Temp 350℃
Set Temp 350℃
)
300℃
350℃
400℃
Exit
300℃
350℃
400℃
Exit
3. Press the control knob when the desired preset temperature is highlighted.
The iron tip will now be set to the selected preset temperature.
CH1 PresetSelect
PRESET1
PRESET2
PRESET3
Set Temp 350℃
* Should you press another control button while in the preset selection screen, it will shift to that channel's
preset selection screen if the channel is in operation, and it will return to the screen before the preset
selection screen if the channel is not in operation.
■ Changing various settings (other than preset selections)
● Setting items, possible change range and initial value
Items that can be changed during normal operation and initial setting
Set Temp
Offset Temp
Preset Temp
Preset ID
CH Power
*For setting items pertaining to the HAKKO FM-2029 Hot Air Pencil, please refer to "Settings for the
HAKKO FM-2029 Hot Air Pencil" later in this manual.
Grip
HAKKO FM-2027
MODEL FM-2022 / FM-2023
HAKKO FM-2024
HAKKO FM-2030
HAKKO FM-2029
● Change procedures (initial and when finished)
1. Press and hold the control button for the channel you want to change for approximately 1 second.
The display screen will switch to the setting selection screen shown below.
350
SOL
2. Select the item you want to change in the screen above by turning the control knob to highlight the item,
and press the control knob to change the setting. When you are finished, turn the control knob to select
EXIT and press the control knob.
Set Temp
Offset Temp
Preset Temp
Preset ID
Ch Power
Exit
Possible Change Range
Refer to "Temperature ranges for each grip."
+/- 50℃(+/- 90℉)
Refer to "Temperature ranges for each grip."
Input up to 7 characters (English numerals + '_').
ON / OFF
Temperature range for each grip
CH1 CH2 CH3
℃
Off
CH1
300℃
350℃
400℃
Exit
Setting Temperature Range
200〜450℃ (400〜840℉)
200〜400℃ (400〜750℉)
350〜450℃ (660〜840℉)
200〜500℃ (400〜930℉)
100〜550℃ (200〜1030℉)
Off
350℃
00℃
ON
CH1 CH2 CH3
℃
400
SOL
Initial Value
350℃ (750℉)
0℃ (0℉)
(Varies by grip)
PRESET1 / PRESET2 / PRESET3
ON
Set Temp
Offset Temp
Preset Temp
Preset ID
Ch Power
Exit
CH1 CH2 CH3
℃
350
SOL
Off
CH1
Off
Off
350℃
00℃
ON
Off
4
Page 5
5. OPERATION
● Change setting temperature and offset temperature
1. Turn the control knob and highlight SET TEMP for the setting temperature or OFFSET TEMP for the
offset temperature, and press the control knob to change the setting.
Setting temperature
CH1
Set Temp
Offset Temp
Preset Temp
Preset ID
Ch Power
Exit
2. SET TEMP will begin adjusting from the highest possible setting digit; OFFSET TEMP will start with either
a blank space, representing a positive (+) value, or a '-' for a negative value.
Setting temperature
Setting
Temperature
350℃
00℃
ON
℃
350
3. Turn the control knob to change the value of the selected digit, and press the control knob to accept the
value and move to the next digit. (The figure below is an example using the SETTING TEMPERATURE
display.)
Setting
Temperature
Offset temperature
Set Temp
Offset Temp
Preset Temp
Preset ID
Ch Power
Exit
Offset temperature
Temperature
CH1
Setting
℃
00
350℃
00℃
ON
For the third digit of the
offset temperature, select
either + (blank) or -.
Setting
Temperature
①
②
℃
350
Setting
Temperature
℃
450
4. After the last digit has been accepted by pressing the control knob, the screen will return to the previous
menu.
Setting
Temperature
℃
400
● Setting the preset temperature
1. Turn the control knob, select "Preset Temp," and press the control knob when you have made your
choice.
Set Temp
Offset Temp
Preset Temp
Preset ID
Ch Power
Exit
CH1
350℃
00℃
ON
CH1 Preset Set
PRESET1
PRESET2
PRESET3
Set Temp
Offset Temp
Preset Temp
Preset ID
Ch Power
Exit
300℃
350℃
400℃
Exit
℃
450
Setting
Temperature
℃
450
CH1
350℃
00℃
ON
①
②
2. Turn the control knob, and make your choice by selecting the desired preset from the three options
shown and pressing the control knob.
CH1 Preset Set
PRESET1
PRESET2
PRESET3
Changing the value for each selected preset follows the same steps as when changing the SET TEMP.
300℃
350℃
400℃
Exit
PRESET1
Temperature
℃
300
①
②
5
Page 6
5. OPERATION
● Changing the preset ID
1. When you select the preset ID and press the operating knob, it will move to a screen where you can
change the names of each preset.
CH1
Set Temp
Offset Temp
Preset Temp
Preset ID
Ch Power
Exit
2. When you highlight the PRESET NAME you want to change, press the control knob.
350℃
00℃
ON
Rename PresetID
CH1
PRESET1
PRESET2
PRESET3
Exit
①
②
Rename PresetID
3. Turn the control knob to change the highlighted character in the PRESET NAME, and press the control
knob to accept the value and move to the next character.
CH1
PRESET1
PRESET2
PRESET3
Exit
Preset1 ID
PRESET1
Preset1 ID
PRESET1
4. Once you accept the value for the last character, the menu returns to the PRESENT ID list.
Preset1 ID
PRESET4
Preset1 ID
PRESET1
Preset1 ID
QRESET1
Preset1 ID
PRESET1
Rename PresetID
CH1
PRESET4
PRESET2
PRESET3
Exit
①
②
● Switching the ON/OFF output for each channel
1. Turn the control knob so that the cursor is on "Ch Power" and press the control knob.
CH1
Set Temp
Offset Temp
Preset Temp
Preset ID
Ch Power
Exit
2. When you select either ON or OFF for the CHANNEL POWER and press the control knob, it will return
to the setting screen. At this time, if you set the power to OFF, the setting screen will be as shown below.
This is because settings other than the channel power are no longer necessary.
Channel Power
350℃
00℃
ON
Channel Power
ON OFF
CH1
Ch Power
Exit
①
②
OFF
ON OFF
6
Page 7

5. OPERATION
● Settings for the HAKKO FM-2029 Hot Air Pencil
The Hot Air Pencil can only be used on CH3. When you connect it, the screen will be as shown below.
When on standby
CH1 CH2 CH3
℃
350
SOL
The Hot Air Pencil has a manual mode and an auto mode, and the settings that can be changed are different.
Manual mode
HotAir Mode
Set Temp
Offset Temp
Preset Temp
Preset ID
Ch Power
Exit
In either case, the screen is set to scroll since all of the items cannot fit on the screen. In manual mode, other
than selecting Hot Air Mode, both the changing method and initial settings are the same as the other grips.
● Initial settings when in auto mode
Offset Temp
Timer Mode
Time Unit
Profile(Temp)
(Time)
Ch Power
The steps for changing settings with the same name are the same as the setting method for the other grips.
The steps for changing settings not previously covered are illustrated below.
Ready
Off
Initial Value
0℃(0℉)
Opened
min-sec
300/350/400℃(570/660/750℉)
30/30/30sec
ON
100%M
CH3
Man
350℃
00℃
ON
When in use
CH1 CH2 CH3
℃
350
SOL
HotAir Mode
Offset Temp
Timer Mode
Time Unit
Profile
Ch Power
Exit
Off
Auto mode
CH3
℃
120
100%M
Auto
00℃
Opn
m-s
ON
● Changing Timer Mode
1. Turn the control knob, select "Timer Mode," and press the control knob when you have made your
choice.
CH3
HotAir Mode
Offset Temp
Timer Mode
Time Unit
Profile
Ch Power
Exit
2.When you have selected the desired setting, press the control knob.
Timer Mode
for Auto-Mode
Opened
■On the difference between Opened and Closed in "Timer Mode"
In Auto mode, the temperature profile shown below is followed by the system. In OPENED timer mode, the
time for each step starts the countdown once the output air temperature reaches the set value. In CLOSED
timer mode, the timer starts immediately regardless if the output air temperature has reached the set value
or not.
Air temperature
Auto
00℃
Opn
m-s
ON
Closed
Step 1 Step 2 Step 3
Closed
Opened
Timer Mode
for Auto-Mode
Opened
HotAir Mode
Offset Temp
Timer Mode
Time Unit
Profile
Ch Power
Exit
Temperature
stable
CH3
Temperature
Closed
Auto
00℃
Opn
m-s
ON
Temperature
rising
stable
Temperature falling*
Temperature
stable
rising
Temperature
*In Auto mode, a 15 second cool-down will be performed after all steps are completed and the air will stop.
rising
Temperature
Time
7
Page 8

5. OPERATION
● Changing Time Unit
1. Turn the control knob and select "Time Unit." Press the control knob.
CH3
HotAir Mode
Offset Temp
Timer Mode
Time Unit
Profile
Ch Power
Exit
2. When you press the control knob after making your selection, it will return to the setting selection
screen.
Time Unit for
Timer Value Set
Auto
00℃
Opn
m-s
ON
sec min-sec
For the Time Unit, when you set the temperature profile, the set time for each step will be displayed as
"sec" for seconds and "min-sec" for minutes and seconds.
● Changing the Profile
1. Turn the control knob and select "Profile." When you press the control knob, it will switch to the
profile setting screen.
CH3
HotAir Mode
Offset Temp
Timer Mode
Time Unit
Profile
Ch Power
Exit
2. When you press the control knob once in the profile setting screen, you can change the value of the
profile parameter highlighted.
350℃
0m30s
300℃
0m30s
00℃
400℃
0m30s
Auto
Opn
m-s
ON
Time Unit for
Timer Value Set
sec min-sec
CH3
HotAir Mode
Offset Temp
Timer Mode
Time Unit
Profile
Ch Power
Exit
350℃
0m30s
300℃
0m30s
350℃
0m30s
300℃
0m30s
Auto
00℃
400℃
0m30s
400℃
0m30s
①
②
Opn
sec
ON
①
②
Exit
400℃
0m30s
400℃
0m30s
400℃
0m30s
400℃
0m30s
Exit
Exit
Exit
Exit
Exit
Exit
3. To change the parameter value, turn the control knob to highlight the value you want to change, and
press the control knob start the change.
400℃
350℃
0m30s
300℃
0m30s
350℃
0m30s
400℃
0m30s
4. When you press the control knob after changing the last digit highlighted in the parameter, the screen
will return to the original profile setting screen.
350℃
0m30s
400℃
0m30s
* To move to another profile parameter make another change, turn the control knob to highlight the
parameter.
350℃
0m30s
400℃
0m30s
0m30s
400℃
0m30s
400℃
0m30s
400℃
0m30s
Exit
Exit
Exit
Exit
400℃
0m30s
400℃
0m30s
400℃
0m30s
400℃
0m30s
350℃
0m30s
350℃
0m30s
350℃
0m30s
350℃
0m30s
8
Page 9

6. PARAMETER SETTINGS
■ Parameter settings
For parameters, there are two types: system parameters and channel parameters. System parameters are used
for the settings for the entire system, and channel parameters are used for the settings for each channel.
change parameters screen can be displayed by turning on the power while the control knob is pressed.
Parameter
System
Channel
Exit
The
System parameters
Parameter name
Temp Mode
Auto-Shut Off
Vaccum Mode
Vacuum Time*
Password Lock
Password**
Initial Reset
* "Vacuum Time" is displayed when "Timer" is selected in Vacuum Mode.
** "Password" is displayed when "ON" or "Partial" is selected for the Password Lock.
Parameter name
AutoSleep
Sleep Temp
Low Temp
Error Alarm
Ready Alarm
Pump Select*
Exit
Value
℃ / ℉
Off / 30min / 60min
Normal / Timer
1〜5sec
ON / Partial / OFF
3 upper case alphabetic characters
OK / Cancel
Channel parameters
Value
OFF / 0 ~ 29min
200 ~ 300℃ increments of 20℃
(390 ~ 570℉ increments of 36℉)
30 ~ 150℃ (54 ~ 270°F)
On / Off
On / Off
Internal / External
Initial value
℃
Off
Normal
1sec
OFF
none
Initial value
6min
200℃ (390℉)
150℃ (270℉)
On
On
Internal
*
"
System setting screen
System
Temp Mode
ShutOff Set
Vacuum Mode
Vacuum Time*
PasswordLock
Password**
℃
Off
Time
1s
On
InitialReset
Exit
Pump Select" is displayed when a hot air
handpiece is connected to channel 3.
Explanation of each parameter and how to change the settings
● Temperature Mode
The displayed temperature can be switched between Centigrade and Fahrenheit. Turn the control knob
to switch it and press the control knob when you have made your choice.
Temperature Mode
℃ °F
Select
Execute
● Auto-Shut Off Setting
Select whether you will activate the auto shut off function. You can select from three options: OFF, 30
minutes or 60 minutes. Turn the control knob when making your selection and press the control knob
when you have made your choice.
Auto-ShutOff
Setting
Off
Select
Execute
30min 60min
● Vacuum Mode Setting
Suction with the desoldering iron is performed either manually or in timer form. For mode selection, turn the
control knob and press the control knob when you have made your choice.
Vacuum Mode
Setting
Normal Timer
Select
Execute
● Vacuum Time
This item is displayed when selecting "Timer" in Vacuum Mode. After suction, you can set the amount of
time it will operate after you remove your hand from the trigger. When changing the numerical value, turn
the control knob; Press the control knob to accept your selected value.
Vacuum Time
Setting
Normal
: suction only when the trigger is pulled
Timer
: suction performed for a designated time*
even after you remove your hand from
the trigger
* Time setting is set as "Vacuum Time".
Change numerical
value
1sec
Accept
9
Page 10

6. PARAMETER SETTINGS
● Password Lock Setting
When this function is activated, settings cannot be changed if the correct password is not entered.
Selection choices are as follows.
:Password entry required when changing all settings
ON
:Password entry not required only when setting the offset, but required for everything else
Partial
:Password entry not required when changing all settings
OFF
Turn the control knob and highlight the desired item, then press the control knob when you have
made your choice. When the password lock is set to "ON" or "Partial," the item "Password" will
be added to the parameter settings. Here, password changes can be performed.
Password Lock
Setting
ON PartialOFF
A password is not included when it is shipped from the factory.
Immediately after the password lock is activated, it will move to
the password input screen.
Set New Password
Select
Accept
Please refer to the "Password" section for how to enter your password.
A **
After activating the password lock, you will be asked for your password before changing your settings in
the manner shown below, so please change your settings after entering your password.
Example: When setting the Vacuum Mode
Input Password
A **
Vacuum Mode
Setting
Normal Timer
Normal Timer
● Password
This is displayed when the password lock is activated, and you can enter and change your password. However,
as stated above, entering your password is necessary before almost all setting changes. This is also true when
you change your password, and when the first password input screen will be displayed.
Input Password
A **
When you enter the correct password, the monitor title will change from "Input Password" to "Set New
Password". If it is still on "Input Password," the correct password was not entered. Check your password
once more and then enter it.
Enter the last character
Input Password
AA*
In the event you completely forgot your
password and cannot change your
settings, please contact your HAKKO
representative
Alphabetic character
change
Accept
(move the cursor)
Input
failure
Successfully
entered
When changing the alphabetic characters, turn
the control knob, and when moving the cursor to
the next character, press the control knob.
Return to the screen where you
enter the current password
Input Password
A **
New password setting screen
Set New Password
Here is how you
know you are on
A **
the right page.
10
Page 11

6. PARAMETER SETTINGS
● Initial Reset
With initial reset, you can return the settings (except for the password) to what they were when it was
shipped from the factory. The selection and execution methods are the same as the methods for the other
settings.
Initial Reset
OK
■ Explanations of each channel parameter and setting method
Select
Execute
For the channel parameters, the displayed screen will differ depending on which handpiece is attached the applicable channel.
All handpieces EXCEPT FM-2029
CH1
Auto Sleep
Sleep Temp
Low Temp
Error Alarm
Ready Alarm
Exit
The reason the display screen is different is because the necessary setting items differ according to the
connected handpiece. Below, the setting method for each item is illustrated.
● Auto Sleep
Select whether you want to activate the soldering iron's sleep function. When activated, the sleep
function will turn on when then handpiece has been placed in the sleep holder for a set period of time
and the temperature of the iron tip will drop* to a set temperature.
Auto Sleep
Setting
Cancel
Parameter
CH1
CH2
CH3
Exit
06m
200℃
150℃
ON
ON
Select
Accept
FM-2029 Handpiece ONLY
Error Alarm
Ready Alarm
Pump Select
Exit
Select
"Off"
ON Off
06min
NOTE:
The password lock function and the password
will be maintained even after an initial reset.
When the channel parameter is selected, the screen
shown to the right will be displayed. When you select
the channel you want to set here, it will switch to that
channel's setting screen.
Turn the control knob when you want to change the
selection, and press the control knob when you have
made your choice.
No Handpiece Connected
CH3
Auto Sleep
Sleep Temp
Low Temp
Error Alarm
Ready Alarm
Exit
ON
ON
Error Alarm
Ready Alarm
Int
Exit
CH1
200℃
150℃
CH1
Off
ON
ON
ON
ON
Select "On"
Auto Sleep
Setting
ON Off
06min
* The temperature when it is lowered is set as "Sleep Temp".
● Sleep Temperature
This sets the temperature when it is sleeping. The setting for the sleep temperature is not entered one digit
at a time, the displayed temperature changes in 20 ℃ (36℉) increments by turning the operating knob.
When the desired temperature is displayed, you can set it by pressing the operating knob.
Sleep
Temperature
200℃
● Low Temp Alert Setting
Set the lower-limit error temperature. When this function is activated, if the sensor temperature goes below
the lower-limit temperature, an error will be displayed and the warning buzzer will sound. Change the value
by turning the control knob, and pressing the control knob to accept the value.
Low Temp Alert
Setting
When changing your selection or changing
the numerical value, turn the control knob
and press the control knob when you have
made your choice.
After the last digit has been accepted for
the time setting, the screen will return to the
previous screen as if the setting were OFF.
Change
value
Accept
Change numerical
value
Select
Accept
150℃
Execute
11
Page 12

6. PARAMETER SETTINGS
● Error Alarm Setting
You can set whether the buzzer will sound or not when an error occurs. Turn the control knob and select
ON or OFF, and press the control knob to accept.
Error Alarm
Setting
ON Off
● Ready Alarm Setting
You can set whether the buzzer will sound or not when the iron tip, etc. has reached the set temperature
and is ready for use. Turn the control knob and select ON or OFF, and press the control knob to accept.
Ready Alarm
Setting
ON Off
● Pump Select for Hot-Air (HAKKO FM-2029 only)
For the air for the HAKKO FM-2029, select whether you will use the station's internal pump or external air.
Pump Select for
Hot-Air
Internal
Select
Accept
Select
Accept
Select
Accept
External
12
Page 13

7. MAINTENANCE
Performing proper and periodical maintenance extends the product life. Efficient soldering depends upon
the temperature, the quality and quantity of the solder and flux. Apply the following service procedure as
dictated by the conditions of the usage.
WARNING
Since the handpiece tip/nozzle can reach a very high temperature, please work carefully. Except the case especially indicated,
always turn the power switch OFF and disconnect the power plug before performing any maintenance procedure.
1 Temperature
2. Cleaning
3. After use
When the unit is not
4.
being used and the
auto power shutoff
is not active.
High temperatures shorten tip life and may cause thermal shock to components.
Always use the lowest possible temperature. The excellent thermal recovery
characteristics of the HAKKO FM-206 ensure effective soldering at low
temperatures.
Always clean the tip/nozzle before use to remove any residual solder or flux
adhering to it. Use the tip cleaner or cleaning sponge. Contaminants on the tip
have many deleterious effects, including reduced heat conductivity, which
contribute to poor performance.
Always clean the tip/nozzle and coat it with fresh solder after use. This guards
against oxidation.
This procedure, if followed daily, will materially add to tip life.
a. Set the temperature to 250℃ (482℉).
b. When the temperature stabilizes, clean the tip and check the condition of the
tip. If the tip is badly worn or deformed, replace it.
c. If the solder plated part of the tip is covered with black oxide, apply fresh
solder, containing flux, and clean the tip again. Repeat until all the oxide is
removed, then coat the tip with fresh solder.
d. Turn the power OFF and remove the tip, using the heat resistant pad. Set the
tip aside to cool.
e. Remaining oxides, such as the yellow discoloration on the tip shaft, are not
harmful but can be removed with isopropyl alcohol.
Never allow the unit to idle at a high temperature for extended periods. This will
allow the tip to become oxidized. Turn the power switch OFF. If it is to be out of
service for several hours, it is advisable to pull the power plug as well.
■Maintenance of the electromagnetic valve and pump head
● Remove the cover
When performing maintenance on either the electromagnetic valve or the pump head, remove the
screws holding the cover and take the cover off.
● Electromagnetic valve maintenance
1. Remove the screws holding the electromagnetic valve in place.
13
Page 14

7. MAINTENANCE
2. Remove the bottom of the electromagnetic valve.
3. Clean the parts that have flux attached to them, such as the inside of the electromagnetic valve, with
alcohol.
Caution
Do not use thinner when cleaning.
Clean with alcohol.
4. Assembly is done in the opposite order of disassembly.
*There is one more electromagnetic valve. Remove the screws on the back of the chassis, and from that
point on remove and clean following the same steps.
Remove
the screws.
● Cleaning the pump head
1. Remove the valve and valve guard and remove any attached flux.
Caution
・When the valve guard is difficult to remove,
please warm it with hot air. Please do not try
to forcibly remove it with a screwdriver, etc.
If the valve guard becomes deformed, it will
no longer be airtight.
・Please clean with either alcohol or thinner.
Pump head disassembly
*It is resting on its side.
Clean the pump head, valve
and valve guard.
Pump head
Valve guard
Valve
*Please replace the valve if it is
deformed or hardened.
2. Install the valve and valve guard.
Caution
When assembling the pump, please make sure to keep it airtight so that there are no air leaks.
14
Page 15

8. CHECKING PROCEDURE
WARNING
Unless otherwise directed, carry out these procedures with the power switch OFF and the power UNPLUGGED.
■Check for a broken heater or
sensor
■Check the grounding line
2
5
4
3
7
1
8
6
■Checking the connection cord
for breakage (HAKKO FM-2027)
Black
White
Green
Red
■Replacing the fuse
1. Check for a broken heater or sensor
Measure the resistance across this position.
Verify the electrical integrity of the heater and sensor.
Measure the resistance of the heater and sensor while at room
temperature(15〜25℃;59〜77℉). It should be 8 Ω ±10%. If
the resistance exceeds these limits, replace the tip.
1. Unplug the connection cord from the station.
2. Measure the resistance value between Pin 2 and the tip.
3. If the value exceeds 2 Ω (at room temperature), perform the
tip maintenance described on section 2, maintenance for the
tip. If the value still does not decrease, check the connection
cord for breakage.
1. Remove the soldering tip and the sleeve assembly.
2. Turn the front piece of the HAKKO FM-2027 counterclockwise
and remove the cover.
3. Measure the resistance values between the connector and the
lead wires at the socket as follows:
Pin 1 – Red Pin 2 – Green
Pin 3 – Black Pin 5 – White
If any value exceeds 0 Ω or is ∞, replace the HAKKO FM-2027.
1. Unplug the power cord from the power receptacle.
2. Remove the fuse holder.
3. Replace the fuse.
4. Put the fuse holder back in place.
9. TROUBLE SHOOTING GUIDE
WARNING
BeforecheckingtheinsideoftheHAKKOFM-206orreplacingparts,besuretodisconnectthepower
plug.Failuretodosomayresultinelectricshock.
● The unit does not operate
when the power switch is
turned on.
● The tip does not heat up.
“Sens Error” is displayed.
● Solder does not wet the tip.
● The tip temperature is too
high.
● The tip temperature is too
low.
● “Grip Error” is displayed.
● The low-temperature alarm
tolerance error “Low Temp”
is displayed.
●
Heater terminal short circuit
error “Heater Short Error” is
displayed.
● “Heat up Error” is displayed.
(for MODEL FM-2023)
● “Drive Error” is displayed.
(for MODEL FM-2023)
● “Zero-Cross Error” or
“System Error” is displayed.
CHECK : Is the power cord and/or the connection plug disconnected?
ACTION : Connect it.
CHECK : Is the fuse blown?
ACTION : Replace the fuse. If the fuse blows again, send the unit in for repair.
CHECK : Is the tip inserted properly?
ACTION : Insert the tip completely.
CHECK : Is the connection cord and/or the heater/sensor broken?
ACTION : If the cord assembly is broken, replace the soldering iron, desoldering tool or
handpiece.
CHECK : Is the tip temperature too high?
ACTION : Set the appropriate temperature.
CHECK : Is the tip contaminated with oxide?
ACTION : Remove the oxide
CHECK : Is the connection cord broken?
ACTION : If the cord assembly is broken, replace the soldering iron, desoldering tool or
handpiece.
CHECK : Is the tip contaminated with oxide?
ACTION : Remove the oxide
CHECK : Is the handpiece connected?
ACTION : Remove and reinsert the handpiece.
CHECK : Is the tip too small for the items to be soldered?
ACTION : Use a tip with a larger thermal capacity.
CHECK : Is the setting value for the low-temperature alarm tolerance too low?
ACTION : Increase the setting value.
CHECK : Is the appropriate HAKKO tip/nozzle being used?
ACTION : Turn the power switch OFF and insert the genuine HAKKO tip/nozzle. Turn the
power switch ON.
ACTION : Turn the power switch OFF and insert the genuine HAKKO tip. Turn the power
switch ON.
CHECK : Is the tip left on the wet cleaning sponge?
ACTION : Turn the power switch off. Turn the power switch on again after removing the
tip from the wet cleaning sponge.
ACTION : Turn off the power switch. Turn on the power switch again.
If the “Zero-Cross Error” / “System Error” continues to be displayed after
turning on the power switch, contact your HAKKO representative.
15
Page 16

10. ERROR MESSAGE
● Sens Error
● Grip Error
● Low Temp
EXAMPLE:
350℃ (400℃ - 50℃)
Set temperature
Set temperature
● Heater Short Error
● Heat up Error
● Drive Error
● TRig Error
● Zero-Cross Error
● System Error
● Det Error
Low-temperature alarm tolerance
OR
650℉ (750℉ -100℉)
Low-temperature alarm tolerance
(For MODEL FM-2023)
(For MODEL FM-2023)
When there is the possibility that a failure has occurred in the
sensor or heater (including the sensor circuit), "Sens Error" is
displayed and the power is shut down.
"Grip Error" will be displayed if the connector cord is not attached
to the station OR the wrong soldering iron is connected.
If the sensor temperature falls below the difference between the
current temperature setting and the low-temperature alarm
tolerance, "Low Temp" is displayed and the warning buzzer sounds.
When the tip temperature rises to a value within the set tolerance,
the buzzer will stop sounding.
EXAMPLE:
Assume that the temperature setting is 400℃/750℉ and the
tolerance 50℃/100℉. If the temperature continues to decrease
and finally falls below the value indicated below while the heating
element is on, the displayed value starts blinking to indicate that
the tip temperature has dropped.
"Heater Short Error" will flash, and the buzzer will sound
continuously, when the tip is inserted incorrectly, an incompatible tip
is inserted, or a foreign object has found its way into the connector.
This is displayed in cases such as when the iron tip abnormally
heats up relative to the set temperature when the micro-tweezers
(MODEL FM-2023) are connected.
This is displayed in cases such as when judged that an excessive
pulse has been generated when the micro-tweezers (MODEL
FM-2023) are connected.
A "trig error" will occur if the trigger is pulled before the nozzle
temperature has reached the set temperature. Please wait until the
temperature reaches the set temperature and stabilizes.
This is displayed when a zero-cross cannot be measured in the
designated cycle. Should this error be displayed, please contact
your HAKKO representative.
This is displayed when the system is unable to operate normally.
Should this error be displayed, please contact your HAKKO
representative.
"Det Error" appears on the display when turning the power on after
connecting the MODEL FM-2022/2023 with a hot tip.
This is not an error.
Wait for approximately 10 seconds until the model functions
properly.
11. OPTION
●External seitch (MODEL FM-2024)
An optional Foot Switch is available which can be connected to the unit to START/STOP the pump.
Foot switch
(B1649)
●Security lock
The HAKKO FM-206 comes with an anti-theft security slot.
Compatible Slot Sizes
3 x 7 mm
(0.12 x 0.28 in.)
16
Page 17

11. OPTION
Connection with HAKKO FR-830
■
HAKKO FM-206 can be connected to HAKKO FR-830 with connecting cable,
which permits HAKKO FM-206 to be used along with HAKKO FR-830.
CAUTION
Connect the HAKKO FM-206 and FR-830 by the connecting cable before turning on the power switch.
START
●
When pressing the HOT AIR button of HAKKO FM-2029 handpiece with HAKKO FM-2029 connected to HAKKO FM-206,
HAKKO FR-830 will work in conjunction with HAKKO FM-206. HAKKO FR-830 and FM-206 will be operated by the setting and mode of each unit.
NOTE :
When pressing the START/STOP button of the HAKKO FR-830, only HAKKO FR-830 will be activated.
STOP
●
Press the Hot Air button of the HAKKO FM-2029 handpiece while HAKKO FM-2029 is connected to HAKKO FM-206.
CAUTION
When the Hakko FM-206 and Hakko FR-830 are connected, be sure they are both in the
same operating state (idle or active) otherwise they units will activate/deactivate opposite of
each other. For example, if the FM-206 is idle, but the FR-830 is actively running, pressing
the Hot Air button on the Hakko FM-2029 will activate the FM-206 and will turn off the FR-830.
Connection with HAKKO FR-870
■
HAKKO FM-206 can be connected to HAKKO FR-870 with connecting cable,
which permits HAKKO FM-206 to be used along with HAKKO FR-870.
START
●
When pressing the HOT AIR button of HAKKO FM-2029 handpiece with HAKKO FM-2029 connected to HAKKO FM-206,
or pressing the START/ STOP button of the FR-870, HAKKO FR-870 will work in conjunction with HAKKO FM-206.
HAKKO FR-870 and FM-206 will be operated by the profile of each unit.
STOP
●
Press the Hot Air button of the HAKKO FM-2029 handpiece while HAKKO FM-2029 is connected to HAKKO FM-206,
or press the START/ STOP button of the FR-870.
Also, whsn the HAKKO FM-206 deactivates in Auto mode, HAKKO FR-870 will deactivate.
CAUTION
When setting the time and temperature in Auto mode with HAKKO FM-206 and HAKKO FR-870 connected,
set the same time and temperature of the HAKKO FM-206 and FR-870.
17
Page 18

12. PARTS LIST
Pump assembly
9
● HAKKO FM-206
Part No.
Item No.
A1514
1
B1075
2
B2756
3
B2384
15
11
17
16
12
②
14
13
19
18
26
26
22
21
②
4
20
2
4
5
6
7
8
9
10
Item No.
11
12
13
14
15
16
17
18
19
20
21
22
23
24
25
26
27
B2852
B2880
B2954
B3439
B3428
B2419
Part No.
A1583
A1584
B3667
B3668
B3669
B3670
B3671
B3672
B3673
B3674
B3676
B3678
B3679
B3681
B3682
B3683
B3684
Part Name
Ceramic paper filter
Specifications
10 pcs.
Elbow Union
Tip tray
Inlet
Switch
With O-ring
Vacuum outlet cap
O-ring
Vacuum outlet retainer
Motor
Power cord, 3 wired cord & american plug
Part Name
Specifications
Valve plate
Diaphragm
Solenoid valve
Pump frame
Pump head
Diaphragm setting plate
Fixing plate
Crank shaft
Crank
Fuse/250V-7A
Transformer/100-120V
P.W.B./Transformer
P.W.B./Temp. Control & display
Inner hose
Inner hose
Inner hose
Inner hose
6MM×100L
6MM×115L
6MM×220L
3MM×170L
13
23
10
5
3
6
8
1
7
27
25
24
2
18
Page 19

12. PARTS LIST
5
6
7
● HAKKO FM-2027
Item No.
Part No.
1
3
4
2
1
2
3
4
5
6
FM2027-02
B3215
B3216
B3217
B3218
B3219
B2300
B3253
Part Name
Connector Assembly
Connector Cover
Sleeve Assembly
Sleeve Assembly
Sleeve Assembly
Sleeve Assembly
Tip
Heat Resistant Pad
Connecting Cable
Specifications
24V-70W
Yellow
Orange
Blue
Green
● Iron Holder
Item No.
Part No.
-
1 9
6
FH200-01
Part Name
Iron holder
Specifications
● Iron Holder Parts
Item No.
Part No.
1
2
3
1
8
9
B3001
2
B2791
3
B3248
4
B3251
5
B3249
6
B3250
7
B3252
8
599B-02
599-029
9
Part Name
Iron receptacle
Tip fixing spring
Holder for iron receptacle
Iron holder base
Cleaner base
Stay
Switch case assembly
Tip cleaner
Cleaning wire
Specifications
With screws
With rubber feet
With rubber feet
4
5
Instruction manual in the language of Japanese, English, Chinse, French, German and Korean
can be downloaded from the HAKKO Document Portal.
(Please note that some languages may not be available depending on the product.)
Copyright © 2011 HAKKO Corporation. All Rights Reserved.
MA02391XZ110708
2011.6
 Loading...