

Page 1
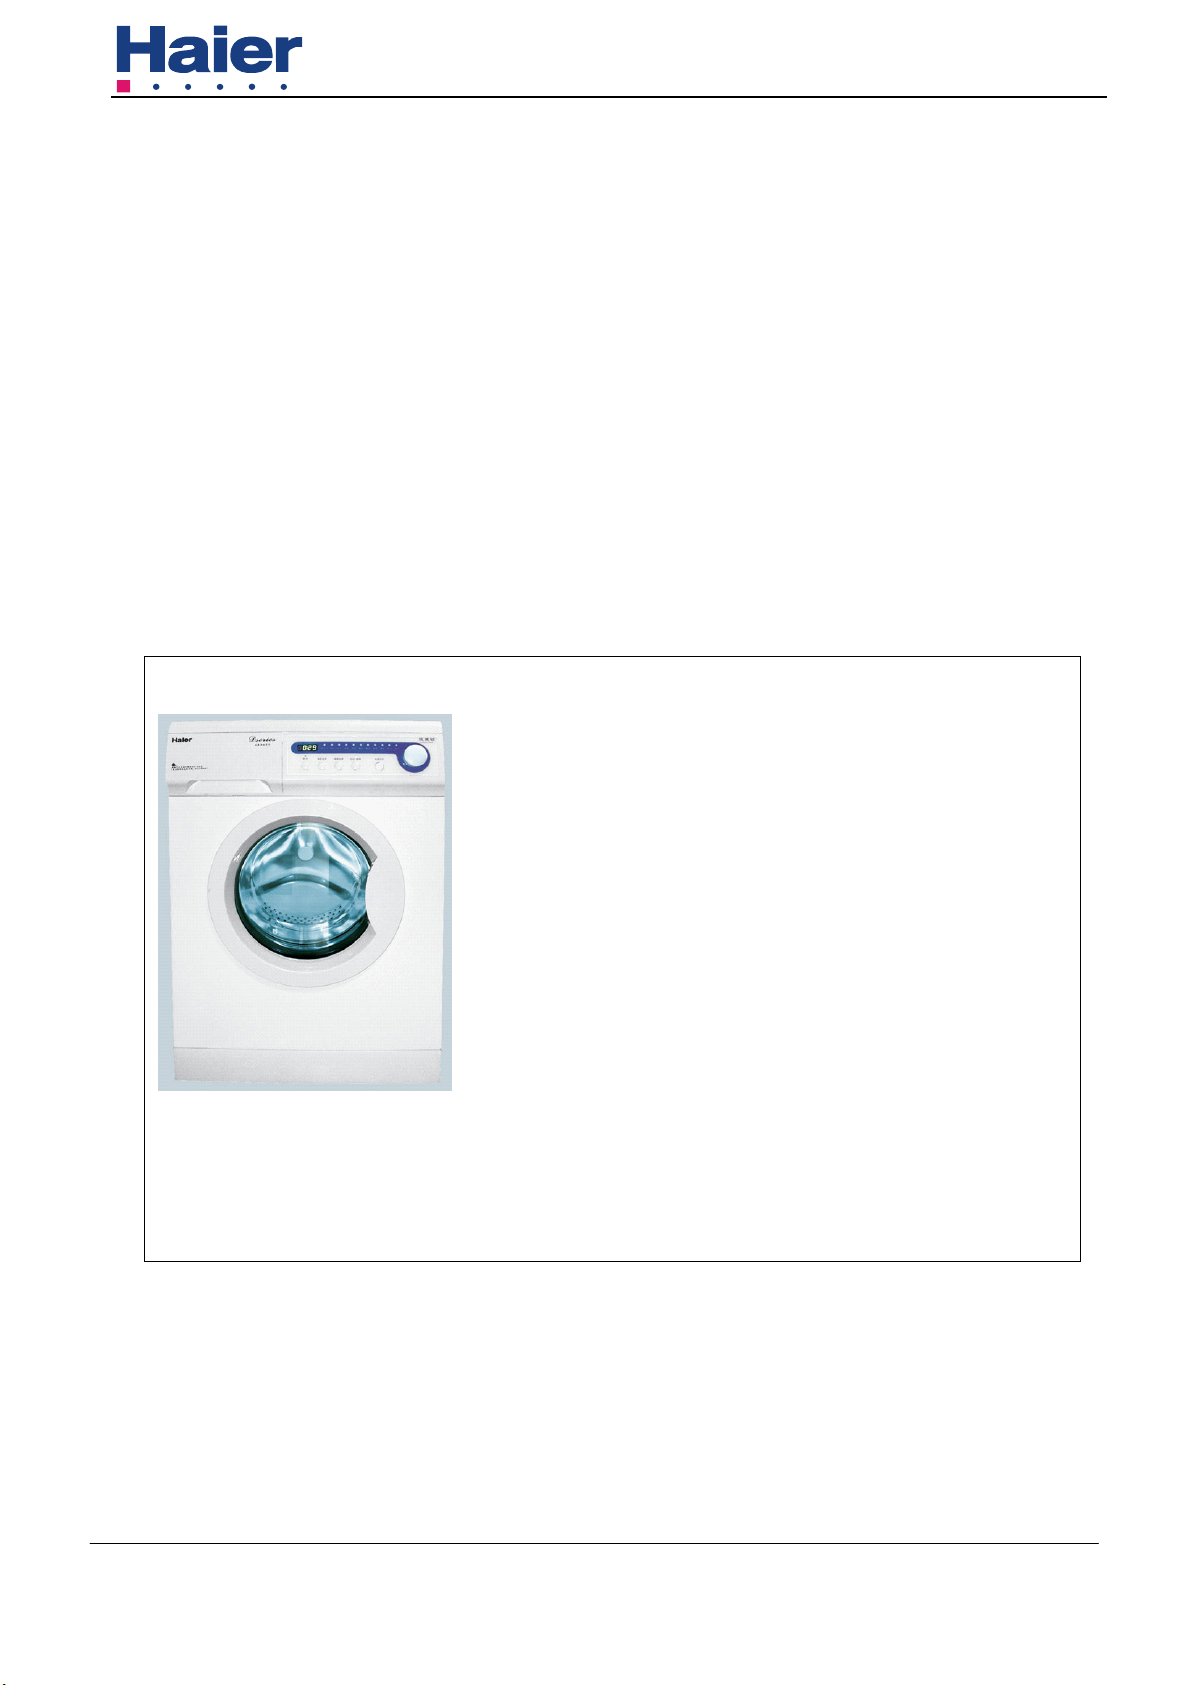
Front Load Washer HMS1000TVE
MODEL: HMS1000TVE
FRONT LOADING WASHING MACHINE
Service Manual
Features:
● 300mm diameter porthole, door may be
open at a 180 degrees.
●Multi-gear speed controller
●Unique gasket design featuring no residual
water hidden inside
●Selecting washing temperature according to
the type of fabrics
●Delay time adjustive
●Washing Programs-11
Haier Group
MANUAL CODE: No.1
Page 2

Front Load Washer HMS1000TVE
1、Contents----------------------------------------------------------------------------------------1
2、Product code illumination and series introduction-----------------------------------2
3、Features ---------------------------------------------------------------------------------------3
4、Specification ----------------------------------------------------------------------------------4
5、Safety caution --------------------------------------------------------------------------------6
6、Installation ------------------------------------------------------------------------------------9
7、Net dimention -------------------------------------------------------------------------------11
8、Names of the parts-------------------------------------------------------------------------12
9、Function --------------------------------------------------------------------------------------13
10、Functions schedule----------------------------------------------------------------------15
11、Trouble shooting--------------------------------------------------------------------------16
12、Wiring circuit ------------------------------------------------------------------------------22
13、Exploded view and list of parts-------------------------------------------------------23
1
Page 3

Front Load Washer HMS1000TVE
Model code rule description
Model identification:
HMS 1000 T V E
A B C D E
A:Serial code
B:Max spin speed
C:Temprature adjustive
D:
Spin speed adjustive
E:
Computer control
Examples:
HMS1000TVE
It represents HK series appearance,with big window、180°opening window、800rpm spin
speed.Spin speed is adjustive from 0 to 1000rpm,temprature is also adjustive.
by computer.
it’s controlled .
2
Page 4

Front Load Washer HMS1000TVE
●300mm diameter porthole, door may be open at a 180 degrees.
Facilitate view of wash process, facilitate unloading and easy to use with large port.
●Multi-gear speed controller
According to different costuming,you can slect corresponding spin speed,from 0 to 1000 rpm.
●Unique gasket design featuring no residual water hidden inside.
By the unique gasket,washing machine can left no residual water hidden between outer drum and
board.
●Delay time adjustive.
According to different costuming,you can slect delay time,from 0.5h to 24h.
3
Page 5

Front Load Washer HMS1000TVE
Front loaders washing machines
On white: silver / On silver : black or dark grey
1. Product identification
Description of appliance Washing machine
Type of appliance (FS = standing, BI = built-in)
Supplier own brand Haier
Supplier bar code EAN TBC
Mares computer code
Commercial Brand / Model
Commercial bar code EAN
2. Key-Features
Energy efficiency class
Washing performance class
Spin efficiency class
Programs
Capacity
Spin speed (max. / optional)
3. Basics data
Door:
Proposal 2004
Brand position center upper frame of door / chromed sticker
Model number serigraphy right top corner control panel
n°
Kg
rpm 1000-0
Noise level dB(A) 72
Energy consumption per wash circle * kWh 0.95
Water consumption* l
Residual dampness (spin result) % 56%
Spin speed selector switch (steps) rpm
Spin speed variator (stepless) rpm
Adjustable thermostat (water temp. adjust from -
to)
Drum capacity dry laundry / water kg / l 6 / 49
Auto water level adjust (depending on volume of filled in laundry)
Washing time (max.) min 124(TBC)
Washing temperatures (program-controlled) °C 40 / 60 / 90
Certification's (CE / ISO 9001 / ISO 9002) CE / ISO 9001
Approvals (VDE/GS / TÜV/GS / IMQ) TÜV/GS (Rhl.)
* EN 60456 (60°C cycle, full load without pre-wash) =
COLD
Unit dimensions (H x W x D) cm 86 x 48.5 x 59.5
Net weight kg 63
Voltage/frequency V/Hz 220-230V~50Hz
Input power / main fuse (intensity) W / A 1800/10
Work top / removable /
Control M = electromechanical, E = electronic,
F = fuzzy
Drum S = stainless steel / Z = zinc coated S
Tub P = Polyprop./ S = stainless steel P
aesthetic (R = round, Y = big eye, Q =
square)
Diameter cm 30
Outer door frame S= stainless steel / M
= metal / P = plastic
Inner door G= glass / P=
plastic
Detergent compartments n° 4
Removable compartment for liquid detergent -
°C 80 - 0
AWL
R
G
New Sensor
HMS1000TVE
FS
A
C
C
11
Max. 5
<65
1000/800/600/400/0
F
P
4
Page 6

●
●
● ● ●/●
●
● ●●
Front Load Washer HMS1000TVE
4. Safety systems
5. Programs
1) Strong action /cotton cycles
2) Normal action / synthetics
3) Delicate action / wooll cycles
Easy ironing
Delay timer (from - to) h 0.5-24
Self cleaning suds pump
Water inlet hose cold water / hot water
Water drain hose / -support /
Adjustable feet n° 4
Auto door lock
Motor overheating protection
No heating without water
Auto water cool-down (before drain 90°C boiled water)
Water return protection
ADL
MOP
NHW
AWC
WRP
Acqua Stop kit
Child protection
n°
n°
n°
Pre-wash / wash
Quick wash / super quick wash
Rinse / soften
Delicate / hand wash
Wool / cashmere
Soak / spin
Drain
Optional function keys (additional program settings)
ON/OFF button
Half load
Fussy
Spin exclusion
Spin reduction rpm
High water level
No Soak
Rinse stop
Delicate
Cold wash
Delay Timer
Extre Rinse
Load Select
Easy Ironning
Temperature reduction
6kg wash
Prewash
-
●/-
●/●
●/-
● /●
●
●
●
-
-
-
-
-
-
-
-
-
-
-
-
5
Page 7
Front Load Washer HMS1000TVE
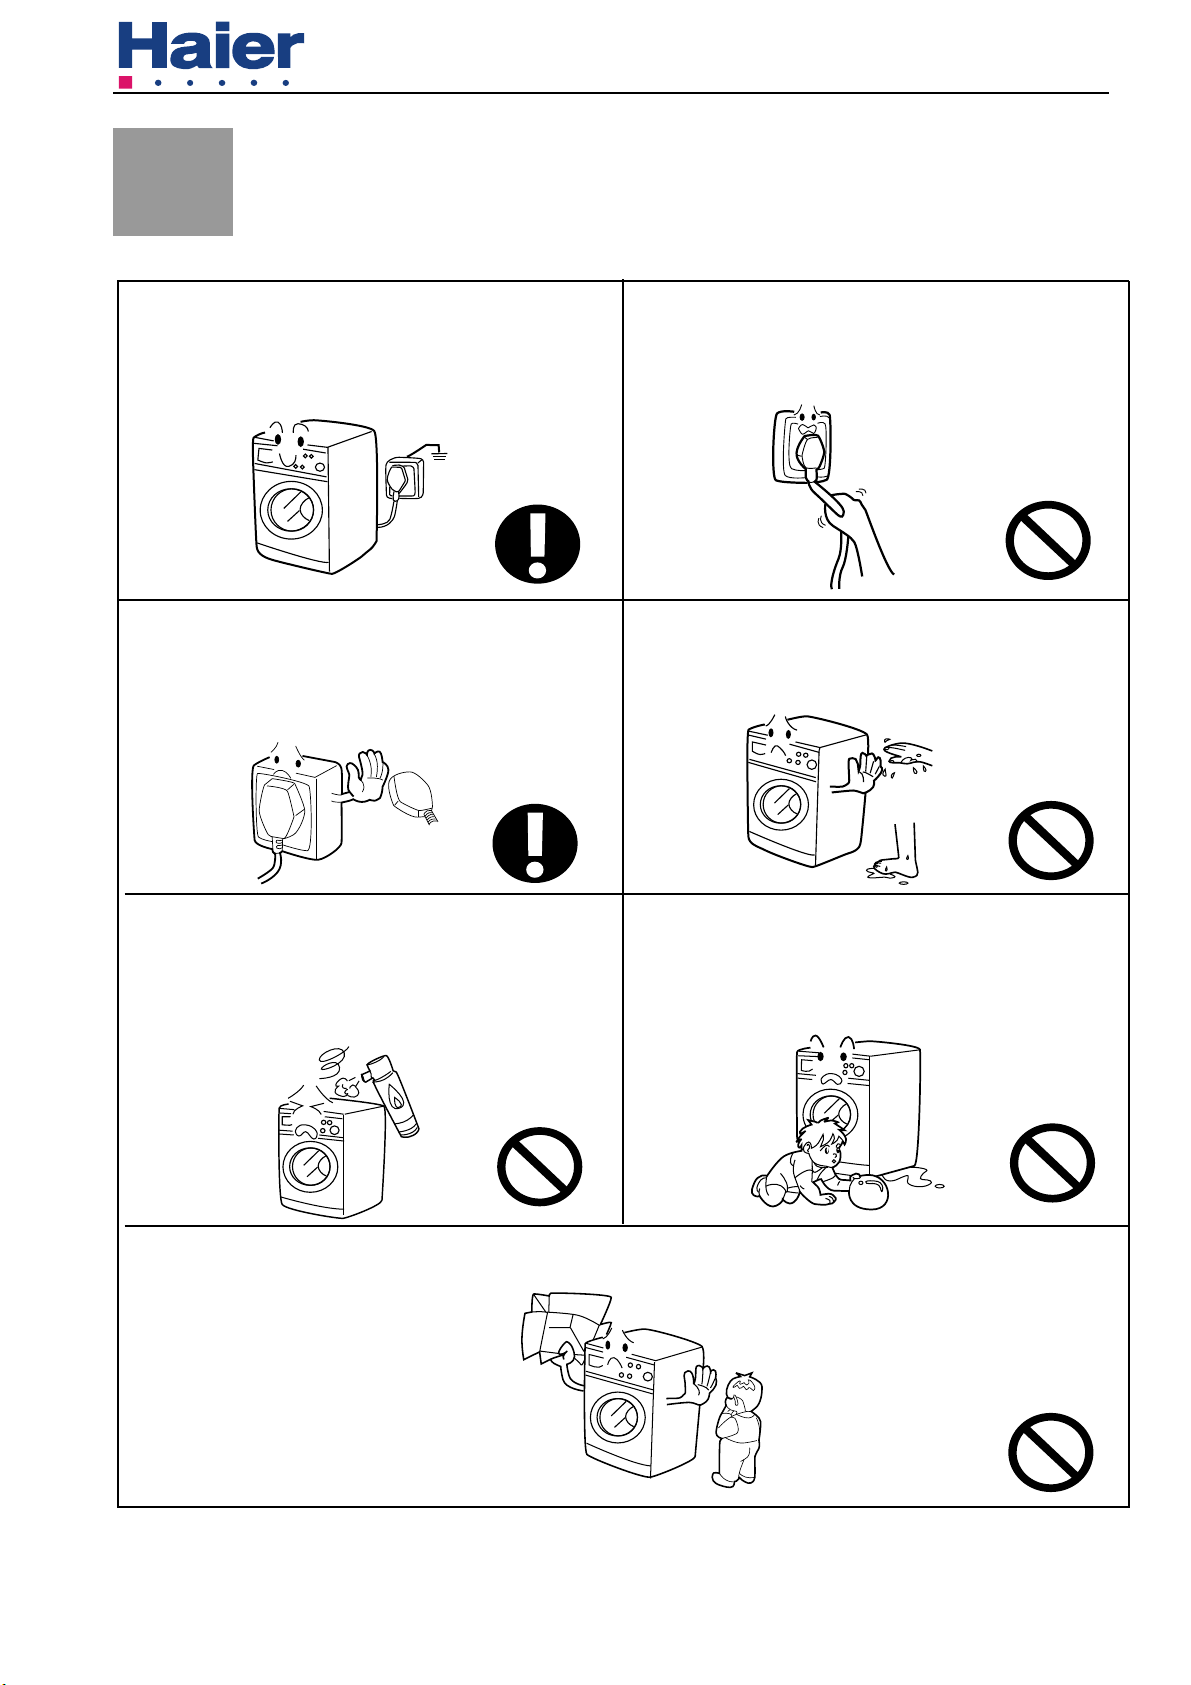
Matters Needing Attention
● Safety
.A separate earthed socket is required for the
1.
power supply. The washing machine must be
positioned so that the plug is accessible.
2. Hold the plug and not the electric cable
when unplugging the washing machine.
3.Fuses in the power circuit should be rated for 15A.
If the supply cord is damaged, it must be replaced
by the manufacturer, its service agent or similarly
qualified persons in order to avoid a hazard.
5.Do not use flammable detergent or dry clean
ing agent; do not use flammable spray in
close vicinity to the washing machine; do not
remove or insert the plug in the presence of
flammable gas.
4. Do not touch or use the washing machine bare footed or when the hands or feet are wet.
6. The door of the washing machine will become hot
during the heating process. Avoid contact with the
door during the heating process. For safety, keep
children away from the washing machine.
7.
Keep children away from the packing materials after unpacked.
6
Page 8
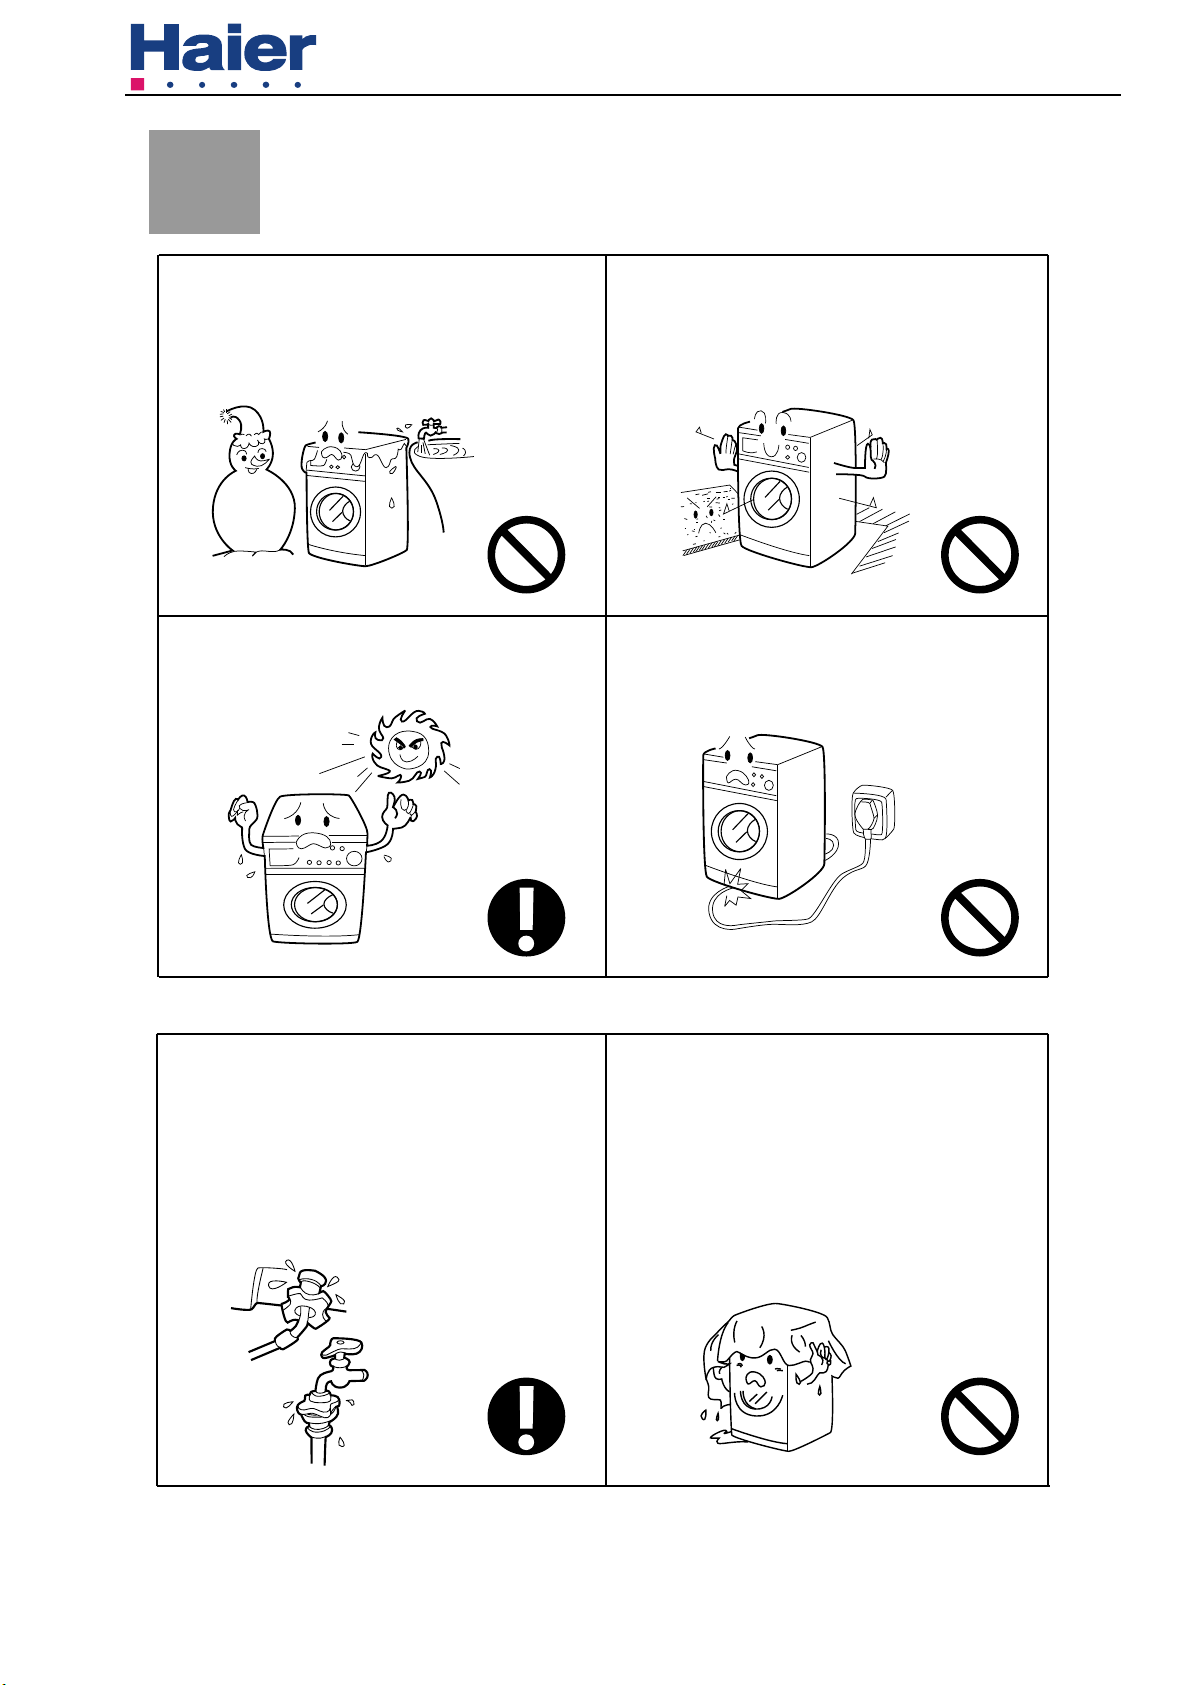
Front Load Washer HMS1000TVE
Matters Needing Attention
8.The washing machine should not be install ed outdoors or in a damp place. In the
event of water leakage or splashes allow
the machine to dry naturally.
10.Keep away from heat sources and direct sun light to prevent plastic and rubber components
from aging.
9.The carpet must not obstruct the ventilation
openings in the base of the washing machine.
11.During installation, ensure that the electric
cable is not trapped by the washing machine
and avoid damage to the electric cable.
●During Use
1. Before use, check the joints of the filling hose, the
tap and the drainage hose for possible problems
from water pressure fluctuations. If joints are loose
or there is leakage, turn off the tap and repair. Do
not use the washing machine until the hoses are
properly fixed.
Keep the door slightly open when the washing
2.
machine is not in use to prevent formation of
odors; do not cover the washing machine with
plastic cover so that inside dampness cannot
be kept in.
7
Page 9
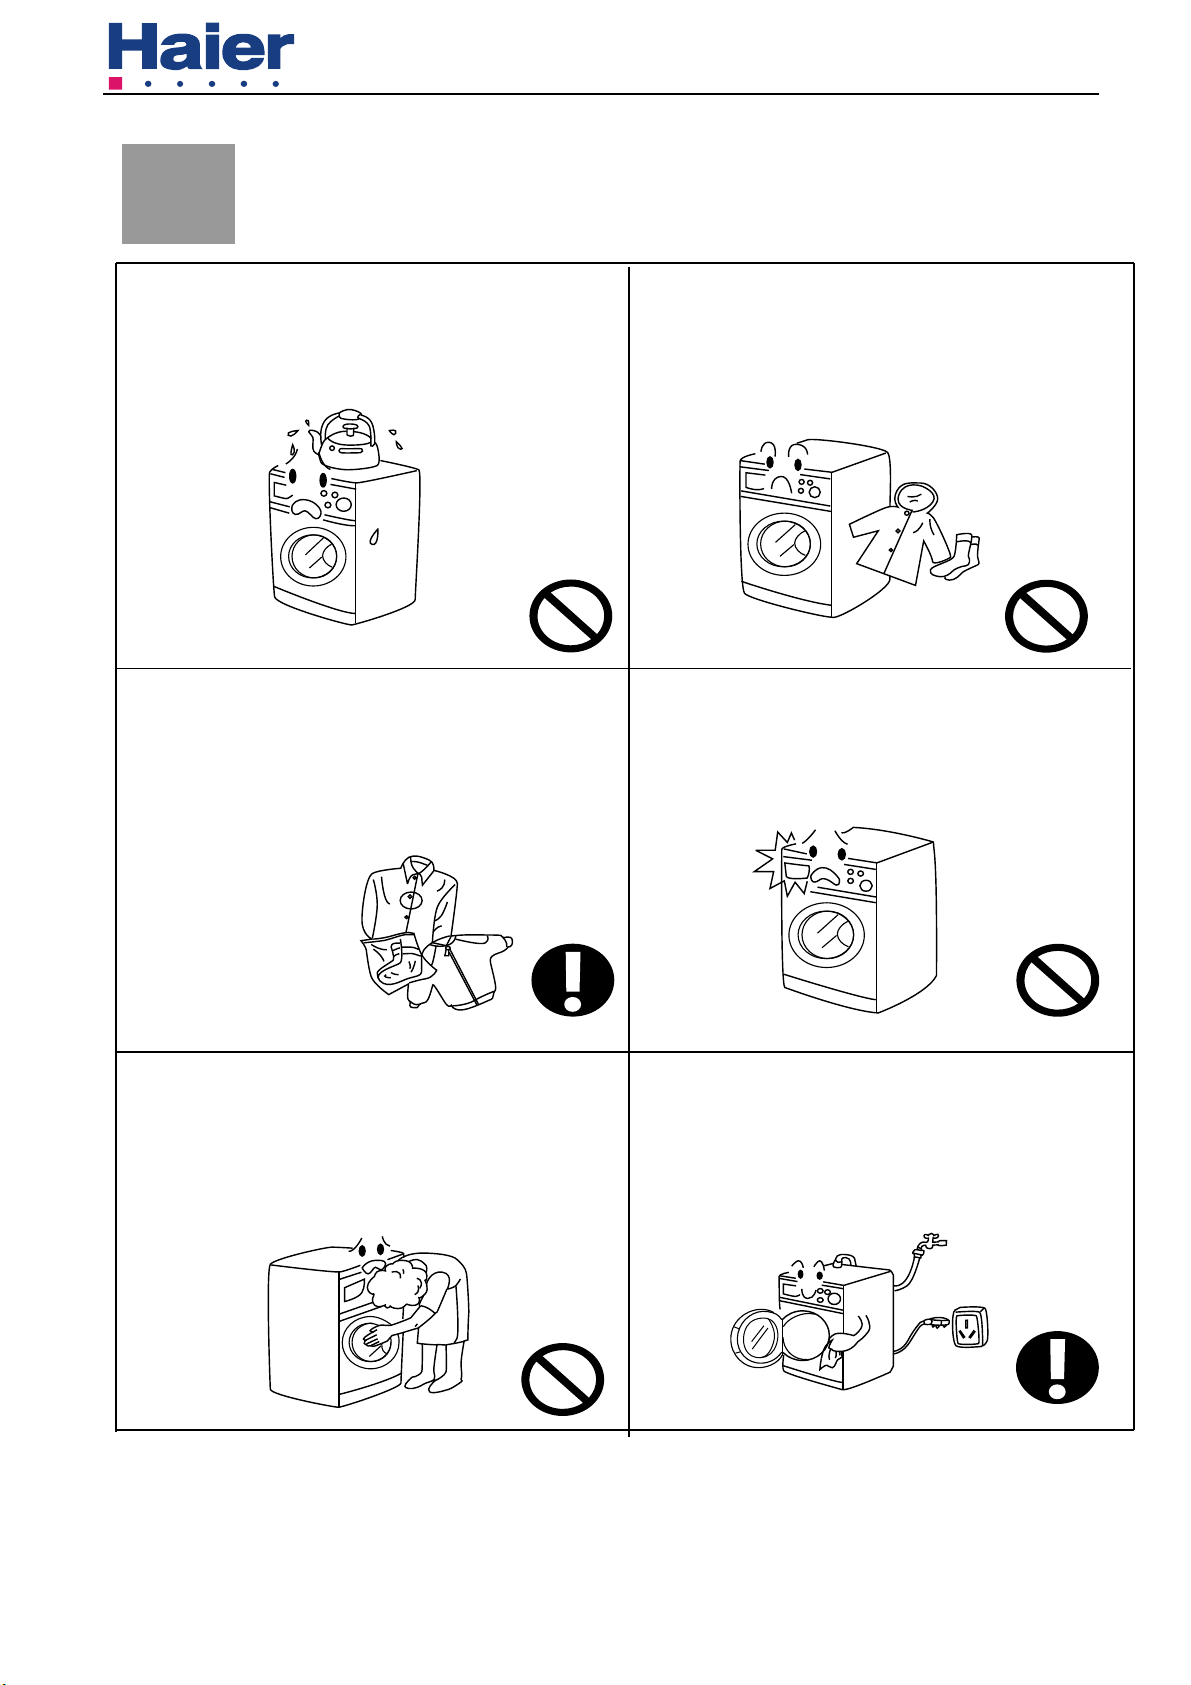
Front Load Washer HMS1000TVE
Matters Needing Attention
3. Do not place heavy, heating source or wet
articles on the top of the washing machine.
5. Before washing, do up zippers, buttons and
clothes straps and put small articles, such as
socks, laces or bras, into a washing bag or a
pillow.
4. Do not hot wash foam rubber or sponge-like
materials.
6. Do not open the detergent distribution drawer
during the wash cycle..
Steel wires in bras will pop
out during washing; never
wash bras containing steel
wires.
7. The door is fitted with a self-lock device and will not open until
2~3 minutes after the washing machine stops. Do not force
the door open. Do not open the door if water level can reach
the porthole.
8.After each wash program, turn off the tap to
prevent leakage; and unplug the washing
machine and wipe clean the lower part of
the porthole.
8
Page 10

Front Load Washer HMS1000TVE
Installation
Remove all the packing materials (including the foam base)
●
to prevent vibration during use, as shown in Fig. 1.
Upon opening of the package, water drops may be seen on the
plastic bag and the porthole. This is normal phenomenon
resulting from water test in the factory.
Check attachments and materials with reference to the following
●
Fig
. 1
Quty
Model
●
Dismantle the packing bolts as shown in Fig. 2.
The packing bolts are designed for clamping anti-vibration components
inside of the washing machine during the transportation process.
Beforeuse:
1. Remove the back plate;
2. Remove the three packing bolts on the back plate and take out the
rubber hose;
3. Replace the back plate;
4. Fill the holes left by the packing bolts with plastic plugs.
(Attention: The packing bolts and rubber hose should be kept in a safe
Name
HMS1000TVE
Operation
manual
1
Quality
certificate
1
Water
hose
1
Drainage
holder
1
Plastic
plugs
3
place for later use)
Fig.
2
Adjusting the washing machine
●
There are adjustable feet under the bottom of the washing machine.
Before use, the washing machine should be adjusted, as shown in
Fig. 3, so that it is level.
Fig. 3
9
Page 11

Front Load Washer HMS700TVE
Installation
Joining the Inlet Hose to the Washing Machine
1. Connect the nut on the inlet hose to the connector on the water valve.
2. Tighten the nut to secure the hose
Connect of water inlet valve
Drainage Hose
The height of the drainage outlet must be 80-100cm. To prevent the drainage hose from dropping off,
fix it to the drainage hose clip at the back of the washing machine.
Use the drainage holder to keep the end of the drainage hose retained and to prevent the outflow
of water. It is recommended that drainage hose extensions not be used; if an extension is needed,
please consult a serviceman. The additional hose should be no more than 250cm (overextended
hoses could lead to siphonage). Note: The drainage hose should not be submerged in water and
should be securely fixed and leak-free.The appliance is to be connected to the waster mains using
new hose-sets and that old hose-sets should not be reused.
Water inlet hose out
100cm
80cm
Connecting to the Power Supply
Before connecting to the power supply, check:
The socket is adequate for the maximum power of the washing machine (For safety, fuses in the power circuit should be rated
for no less than 15A).
The voltage should meet the requirement.
The power outlet should be capable of accepting the washing machine plug. The washing machine must be earthed before
use.
Supplementary earth cable should not be necessary if the socket is connected to the earth
Supplementary earth cable shoulde be installed on the upper back of the washing machine andconnected to an earth if the
power supply socket has no earth connection
10
Page 12

Front Load Washer HMS700TVE
595
485
860
height: 860mm / width: 595mm / depth: 485mm
11
Page 13

Front Load Washer HMS1000TVE
Detergent dispenser
Button
Door
Porthole
Power supply cable
Top
Progtam selector
handle
Bottom plaque
Earth terminal
Back plate screw(3)
Drain hose clip
Packing blot(4)
Drain hose
Back plate
12
Page 14

Front Load Washer HMS1000TVE
Control Panel
HMS1000TVE
W
ash programming knob
Delay
Pre-wash
Temperature
Cotton
Synthetic
Spin
Wool
Cashmere Silk
Start/Pause
Rinse Spin
Power
Drain
On
Off
Quick
Wash
By turning the knob clockwise/counterclockwise, the required program can be
selected. There are 1
1 programs available.
After a program is selected, the cor-
responding light will go on. (Refer to Guide to Operational Program Selection).
Power Switch
Press this button to switch on the washing machine. Press it again to switch it off.
Start / Pause Button
When the washing machine is connected to the power socket and a program is
selected, washing operation will start. Lightly touch this button during a wash
cycle, operation will stop and the digits on the screen start blinking. Touch it
again to resume operation. To cancel a wash program during a wash cycle,
touch this button, when the digits on the screen start blinking, press the Power
switch, the program will be cancelled.
D: Spinning Speed Setting Button
Touch this button lightly to select the desired speed. When a speed is set, it will
be displayed on the screen.
Note: Different water temperatures and spinning speeds can be set for different
laundries. Refer to the operation instructions on pages 11 and 14. Wash using the
default settings if there is no special requirement.
E: Washing temperature button
Touch this button lightly, the washing temperature will be displayed on the
screen. Select a temperature according to the type of laundry.
13
Page 15

Front Load Washer HMS1000TVE
F: Delay Button
Touch this button lightly, the washing machine will start operation after a period of time
and the corresponding indicator will go on. The range is 0.5-24 hours; each touch of this
button increases a half hour. After the button is set, press the Start/Pause button to start
countdown of the set time (the time is displayed on the screen until the program ends).
E+F Key Combination
Press these two keys simultaneously, the sign "LOCK" and the remaining washing time
are displayed on the LED alternately. Now all the function keys except the Power switch
can be locked. Press the key combination again to cancel this function.
G: Detergent distribution drawer
Open the drawer, three compartments can be seen:
Compartment 1: Pre-wash detergent
Compartment 2: Normal - Quick wash detergent
Compartment 3: Softener, conditioning agent,
perfume, etc.
H: DisplayPress
Such information as remaining wash time, temperature and speed setting and error
messages will be shown.
Note: After power is switched on, the display will go on and the remaining wash time
decreases. As the water pressure and temperature may differ, the remaining time may
be adjusted accordingly. When the laundry is not balanced during spinning, the time
may be automatically prolonged. These are normal phenomena.
14
Page 16

Front Load Washer HMS1000TVE
Guide to Operational Program Selection
Program
Pre-wash
Cotton
Synthetic
Wool
Cashmere
Silk
Quick
Recommended
Laundry
Heavy-soil laundry
Cotton fabrics
Fast-color synth-
etic
Woolen fabrics
Cashmere fabrics
Silk fabrics
Medium-soil
laundry
Default Setting
Temperature
Speed
800
800
600
600
400
400
800
Total Time
2:46
2:28
1:30
0:58
0:58
0:55
0:29
Temperature
Cold
8
Cold
8
Cold
Cold
Cold
ColdCold
Cold
Ironing-free
(Working in
Washing Cycle)
Yes
Yes
Yes
No
No
Yes
No
Detergent Compartment
Delay
3
Yes
Yes
Yes
Yes
Yes
Yes
Yes
Wash
Rinse
Spin
Drain
Medium-soil
laundry
Medium-soil
laundry
0
800
800
0:53
0:27
0:13
0:03
Cold
No
Yes
Yes
No
Yes
Yes
Yes
Yes
Note: ○ indicates that softener can be added if needed; ★ indicates that detergent
must be added; X indicates that detergent must not be added. LED display "--"
indicates cold water; "0" indicates no spinning.
The wash temperature refers to the max temperature. The required time differs
according to different laundries, temperatures and functions. The total time is for
reference only (it may vary slightly for different water temperatures).
15
Page 17

Front Load Washer HMS1000TVE
1. Control panel lock function: To prevent children from accidentally
starting the machine, the control panel can be locked by pressing the
"Temp" and "Delay" buttons at the same time. After the panel is locked,
the sign "LOCK" and the wash time are displayed alternately and all the
keys are inactivated. Press the two buttons again to cancel.
2. Power-off memory function: This machine has a power-off memory
function. In case of abrupt power failure or the power must be cut off
during a program cycle, the present settings will be saved, and operation
will resume when the power is switched on again.
3. Display messages:
Cause: Door not properly shut.
Correction: Shut the door properly.
Cause: Drainage error, water not emptied within 4 minutes.
Correction: Clean the filter and check the drain hose for blockage.
If error still exists, please contact the maintenance personnel.
Cause: Temperature sensor not properly connected or damaged
Correction: Contact the maintenance personnel.
Cause: Heating coil damage or overload of laundry that leads to
a failure to reach the set temperature within the specified time.
(this message is displayed at the end of a program).
Correction: Reduce load and then start washing again or contact
the maintenance personnel.
Cause: Water level not met in 8 minutes.
Correction: Make sure that tap is turned on, and water pressure is normal.
If problem still exists, please contact the maintenance personnel.
Cause: Motor overheat protection or damage.
Correction: Contact the maintenance personnel.
Cause: Higher water level protection.
Correction: Contact the maintenance personnel.
A program ends.
The remaining time is 1hour 25 minutes.
The machine will start in 19 hours 25 minutes. The time is renewed
every minute. After the program starts, the remaining time will be
displayed.
16
Page 18

Front Load Washer HMS1000TVE
I .The appliance does not work.
Possible causes
1.The socket is not the required one or the connection is loose.
2.The door is not properly closed or the switch of micro delay is in poor contact.
3.The plug wire of motor is in poor contact or the motor is broken.
4.Malfunction of PCB
Troubleshooting
1.Check the socket and plug to make sure that they are properly connected.
2.Check whether the micro delay switch is in good contact in on-position. If yes, insert the
terminal firmly to provide a good connection.
3.The PCB controls the washing machine operation.In case of the failure, check the wiring
or replace the PCB.
II .Filling failur
Possible causes
1.The switch of water supply is not opened or the water pressure is too low.
2.The door is not properly closed or the micro delay switch is in poor contact
3.The water electromagnetic valve is broken.
4.The plug wire of drainage pump is in poor contact.
5.The pressure switch is broken.
Troubleshooting
1.Repeat the following steps.
1).Open the switch of water supply
2).Check whether the filling hose is twisted or blocked.
3).Check whether the water eletromagnetic valve is blocked.
4).Check whether program is properly selected.
5).Check whether the water supply pressure is too low.
2.Check the door catch and the door lock are in good contact. If not, make necessary
adjustment. Check whether the micro delay switch is in good contact in on-position.
3.Check whether the electromagnetic is good in on-position. Fasten it if necessary.
4.Blow on the pressure switch and "click, click" can be heard. Otherwise, replace the
pressure switch with a new one.
III .No drainage
Possible causes
1.Improper installation
2.The drainage pump is broken.
Troubleshooting
1.Repeat the following steps.
1).Check whether the drainage pipe is twisted or blocked. The appropriate height of the
17
Page 19

Front Load Washer HMS1000TVE
water drainage outlet should be from 80 to100cm.
2).Check whether the program is properly selected.
3).Connect the power cable to the drainage pump to check whether the operation is normal.
If not, make necessary replacement.
IV .Unusual noise
Possible causes
1.The packing screws should be disassembled.
2.The washer is placed too near a wall.
3.The washer is loaded over the standard capacity (5Kg).
4.There is foreign object other than fabrics in the washer.
5.The washer does not stand level.
6.Bolts or screws are loose.
7.The belt is loose.
Troubleshooting
1.Disassemble the packing screws.
2.Move the washer away from the wall.
3.Do not load the appliance more than the standard capacity.
4.Remove the foreign object.
5.Adjust the washer until it is level.
6.Tighten the bolts and screws.
1) .Fastening bolts of vibration damper
2) .Fastening bolts of balances
3) .Screws of water heating pipe
7.Increase the tension of belt.
V.The drum doesn't rotate; the spin speed is too high or too low.
Possible causes
1.The belt tension is too low or the fastening bolts are loose.
2.The plug wire of motor is loose or the motor is broken.
3.The capacitor is broken.
4.The PCB is broken or is not properly plugged.
Troubleshooting
1.Adjust the tension of belt and tighten the screws.
2.Check whether the plug wire of motor is loose or whether the motor works normally. If not,
make necessary replacement.
3.Check whether the capacitor is good with a universal meter. If not, make necessary
replacement.
4.Replace the PCB with a new one.
VI .The water level is too high.
18
Page 20

Front Load Washer HMS1000TVE
Possible causes
1.Gas leakage at pressure system of water supply.
2.The pressure switch is broken.
Troubleshooting
1.Check whether the pipeline of pressure system is blocked or there is gas leakage. The
pressure system includes:
(1) Gas-collecting valve
(2) Rubber pipe
(3) Pipe clip2.Blow on the pressure switch and "click, click" can be heard. Otherwise, replace
the pressure switch with a new one.
VII .No heating or automatic heating
Possible causes
1.NTC is breaken.
2.Effect of ambient temperature
3.The water-heating pipe is broken.
Troubleshooting
1.Check whether the setting of temperature at no heating(Diplay "--").If not, make
necessary replacement.
2.Check the water-heating pipe to see whether the resistance wire is normal. If not,
make necessary replacement.
VIII .Water leakage
Possible causes
1.Leakage at joints
2.The front flange of outer cylinder is poorly close.
3.There is foreign object on the cushion of sight window.
Troubleshooting
1.Check whether the joints are damaged or loose.
1).Filling pipe
2).Hose connecting electromagnetic valve to dispenser
3).Hose connecting dispenser to outer cylinder
4).Cushion of sight window
5).Hose connecting outer cylinder to pump
6).Drainage pump
7).Gas-collecting valve
19
Page 21

Front Load Washer HMS1000TVE
8).Dispenser
9)Condenser
10) Hose connecting condenser to hose of outer cylinder
2.Fasting the U-bolt.
3.Wipe off the foreign object from the cushion of sight window.
IX .Improper distribution of dispenser
Possible causes
1.The plug wire of the water eletromagnetic valve is mistaked.
2.The PCB is broken.
3.Fault of assemblage of dispenser.
Troubleshooting
1.Reassemble the plug wire.
2.Replace the PCB with a new one.
3.Reassemble the assemblage of dispenser.
X.The door lock indicator does not light
Possible causes
1.The door lock indicator is broken.
2.The wiring of micro delay switch is loose.
3.The indicator loses.
Troubleshooting
1.Replace the broken indicator.
2.Tighten the stub of micro delay switch.
3.Refasten the indicator.
XI.No function or malfunction of program controller
Possible causes
1.The motor of program controller loses or the stub is sealing-off.
2.The knob of program controller is stuck.
3.Poor contact of wiring of program controller.
4.Poor contact at inner contacts of program controller (even after the all the plug wires are
tightened.)
Troubleshooting
1.Reassemble the motor of program controller and make spot welding of the stubs (the
operation of program controller and motor can be heard after the appliance is turned on.)
2.Adjust the position of knob of program controller.
3.Tighten the stubs of program controller one by one.
4.Replace the program controller with a new one.
20
Page 22

Front Load Washer HMS1000TVE
XII.Control panel display Err message
Troubleshooting
1.Reference user manual,finding the cause of Err message.
2.Following the instructions of the user manual,chenk the washing machine .if not ,
replace relating element.
21
Page 23

Wiring Circuit
Front Load Washer HMS1000TVE
P
Heat
N
G
FA
L
Switch
MR
N
C
L
EVF
EVP
PS
NTC
PCB
Motor
PCB-Printed Circuit Board
FA-Interference Suppresser
Switch-Power Swittch
P-Pressure Switch
Heat-Heating element
NTC-Temperature Sensor
MR-Door Lock
EVP,EVF-Water Inlet Magnetic Valve
PS-Drainage Pump
Motor-Motor
22
Page 24

Front Load Washer HMS1000TVE
Exploded view
1
2
4
3
9
5
6
10
7
8
13
37
36
38
12
31
11
30
28
22
33
14
15
16
19
17
26
29
18
21
27
25
20
24
23
35
34
32
23
Page 25

Filling pipe(Main- wash
)
1 EA
●
5 0020300415
Filling pipe(Pre-wash
)
1 EA
●
6 0020802101
Water storage sink
1 EA
7 00216000049404
Water level pressure switch
1 EA
●
8 00211320011300
Pipe clip of gas-collecting valve
1 EA
9 0020400549
Cable assembly
1 EA
10 00214400028702
Hose of gas-collecting valve
1 EA
11 0020400505
Doorlock
1 EA
●
12 0020400162
Power cable
1 EA
13 0020202063
Box of PCB
1 EA
14 0020400542
PCB
1 EA
●
15 00216001231806
Key switch
1 EA
16 0020202056
Control panel
1 EA
●
17 0020202059
Buttons
1 EA
●
18 0020202060
Ornamental bar
1 EA
●
19 0020202152
Knob of program controller
1 EA
●
20 0020202065
Button
1 EA
●
21 0020202057
Handle of disp enser
1 EA
●
22 0020801303
Dispenser
1 EA
23 0020200717
Door glass cover
1 EA
24 0020202222
Outer frame of sight window
1 EA
●
25 0021400009
Glass of sight window
1 EA
26 0020202020
Inner frame of sight window
1 EA
27 0020102723
Torsion of door catch
1 EA
28 0020102508
Door catch
1 EA
29 00215200024102
Axle of door catch
1 EA
30 0020600029
Bolt of flap
2 EA
31 0020102735
Flap of sight window
1 EA
32 00214800777304
Lower plaque
1 EA
●
33 00215200021504
clamp
5 EA
34 00221120300212
Foot
4 EA
35 00215000519000
Foot nut
4 EA
36 0020102491
Back cover
1 EA
●
37 00216910320111
Self-tapping screw
3 EA
38 0020802174
Case
1 EA
Front Load Washer HMS1000TVE
Number Special code Name of part
1 0020202058
2 00218230700611
3 00216000486102
4 0020300414
Top cover
Able clamp
Water electromagnetic
QTY Unit
1 EA
4 EA
1 EA
Remark
●
●
24
Page 26

Front Load Washer HMS Series
39
40
41
42
78
43
44
45
46
76
77
75
74
4748
49
73
72
71
70
50
51
68 69
67
66
52
53
54
55
56
64
65
57
58
59
60
61
63
62
25
Page 27

Front tightening ring of cushion of
sight window
1 EA
40 0020300393
Cushion of sight window
1 EA
●
41 0020600063
Back tightening ring of cushion of
sight window
1 EA
42 0020300422
Front balance
1 EA
43 0020100071
Bracket of front balance
3 EA
44 0020202025
Front flange of outer cylinder
1 EA
●
45 0020100245
U-lock
1 EA
46 0020300071
Seal ring of front flange
1 EA
●
47 0020802173
Inner cylinder
1 EA
48 0020102727
Triangle of inner cylinder
1 EA
49 0020102351
Spring
2 EA
50 00215100001300
Screw
3 EA
51 0020300147
Upper balance
1 EA
52 0020201753
Outer cylinder
1 EA
●
53 00214500000600
Filling pipe
1 EA
54 0020400524
Heater
1 EA
●
55 00214500001000
Oil seal
1 EA
56 00218910510119
Bearing(6204
)
1 EA
57 00218910610119
Bearing(6205
)
1 EA
Hose connecting outer cylinder to
pump
1 EA
●
72 00211320015200
Clip
1 EA
73 00217400046900
gas-collecting valve
1 EA
74 00215200294400
Clip
1 EA
75 0022150033660401
Pump
1 EA
76 0020600050
Clip
1 EA
77 00221120363014
Bracket of drain pipe
1 EA
78 0020300148
Drain pipe
1 EA
●
Front Load Washer HMS1000TVE
No.
Special code Name of part
39
0020600062
58 0020600106
59 0020100326
60 00214400002200
61 00215000008800
64 0020700365
65 0020600036
66 0020600048
67 00211500013800
68 0020400514
69 00214400042900
70 00215200004402
Liner of belt pulley
Belt pulley
Belt
Screw
Vibration damper
Fastening bolt of motor
Fastening long-bolt of motor
Fastening bushing of motor
motor
Fastening liner of motor
Clip
QTY Unit
1 EA
1 EA
1 EA
1 EA
2 EA
1 EA
1 EA
1 EA
1 EA
4 EA
1 EA
Remark
●
71 0020300070
26
Page 28

Front Load Washer HMS1000TVE
Sincere Forever
Haier Group
Tel:86-532-8939999
Web site:http://www.haier.com
27
Page 29

HAIER Front Load Washer HMS1000TVE
Page 30

HAIER Front Load Washer
HMS1000TVE
 Loading...