

Page 1

Dishwasher
DW15-PFE1**/PFE2**
Instructions for Use
0120504497A
en
Page 2

Page 3
Index
Safety information
Installation
How to remove the top of your dishwasher
Getting to know your dishwasher
How to fill the salt
How to fill rinse aid
Not suitable for the dishwasher
Arranging crockery, glasses, etc. in the dishwasher
How to fill the detergent dispenser
Programme overview
Washing dishes
How to keep your dishwasher in shape
Care and maintenance
Fault finding
Technical data
Important information
2
4
6
7
9
11
12
13
15
16
18
22
23
25
29
30
1
Page 4

Safety information
At time of delivery
Check packaging and dishwasher immediately for signs of transport damage. If the appliance is
damaged, do not put it into use but contact your supplier or customer service without delay.
Please dispose of packaging materials properly.
During installation
Site the dishwasher and connect it up in accordance with the installation instructions.
The dishwasher must not be connected to the electricity supply while installation is being carried out.
Ensure that the domestic wiring is properly earthed.
The mains electricity supply must conform to the details shown on the dishwasher nameplate.
Do not connect the dishwasher to the electricity supply via an extension cable.
Built-under and built-in appliances should always be installed under a continuous work surface which
is attached to the adjacent cupboards, in order to ensure that the appliance is entirely stable.
After the appliance has been installed,the mains plug should still be easily accessible.
Not on all models:
The plastic housing on the water inlet contains an electrically operated valve.The connecting wires
are inside the inlet hose.Do not cut through this hose and do not immerse the plastic housing in water.
During installation, the power supply cord must not be excessively or dangerously bent or flattened.
During normal use
The dishwasher must only be used by adults for the washing of household dishes and cooking utensils.
This appliance cannot be installed outdoor, not even if the area in which it is installed is covered by a
roof; it is also very dangerous to leave it exposed to the rain and elements.
Do not place any heavy objects or stand on the door when it is open. The appliance could tip forward.
The water inside the dishwasher is not suitable for drinking.
Do not use solvents of any kind inside your dishwasher. They could cause an explosion danger.
Open the door very carefully if the dishwasher is operating. There is a risk of water squirting out.
Do not touch the heating element during or after a wash cycle.
Fundamental rules to follow when using the appliance:
- Never touch the dishwasher when barefoot or with wet hands or feet;
- We discourage the use of extension cords and multiple sockets;
- If the appliance is not operating properly or maintenance must be performed, disconnect the
appliance from the power supply.
2
Page 5
If your family includes children
The appliance is not intended for use by young children or infirm persons without supervision.
Young children should be supervised to ensure that they do not play with the appliance.
Keep detergents out of the reach of children, who must also be kept away from the dishwasher when
it is open.
If a fault occurs
If the appliance malfunctions, turn off water supply to the appliance and disconnect the plug from the
wall socket. Then, consult the section entitled, "Fault finding" .If you cannot solve the problem, contact a service center.
Only specialised personnel are authorised to make repairs.
If the supply cord is damaged, it must be replaced by a special cord or assembly available from the
manufacturer or its service agent.
To maintain the EFFICIENCY and SAFETY of this appliance,we recommend:
- call only the Service Centers authorized by the manufacturer.
- always use original Spare Parts.
When disposing of old appliances
Appliances which are no longer being used must be made inoperable by cutting the power supply
cord and removing the door lock.
Take the appliance to a designated waste disposal center.
Dangerous voltage
Warning
Children could get locked in the appliance (risk of suffocation)
or get stuck in other positions. Therefore: Remove the mains
plug, cut the mains wire and set aside. Damage the door lock so
that the door can no longer be closed.
3
Page 6
Installation
Positioning the appliance
Positioning the appliance in the desired location. The back should rest against the wall behind it, and the
sides, along the adjacent cabinets or wall. The dishwasher is equipped with water supply and drain
hoses that can be positioned to the right or the left to facilitate proper installation.
Levelling the appliance
Once the appliance is positioned, adjust the feet (screwing them
in or out) to adjust the dishwasher, making it level. In any case,
the appliance should not be inclined more than 2˚. If the appliance is level, it will help ensure proper performance.
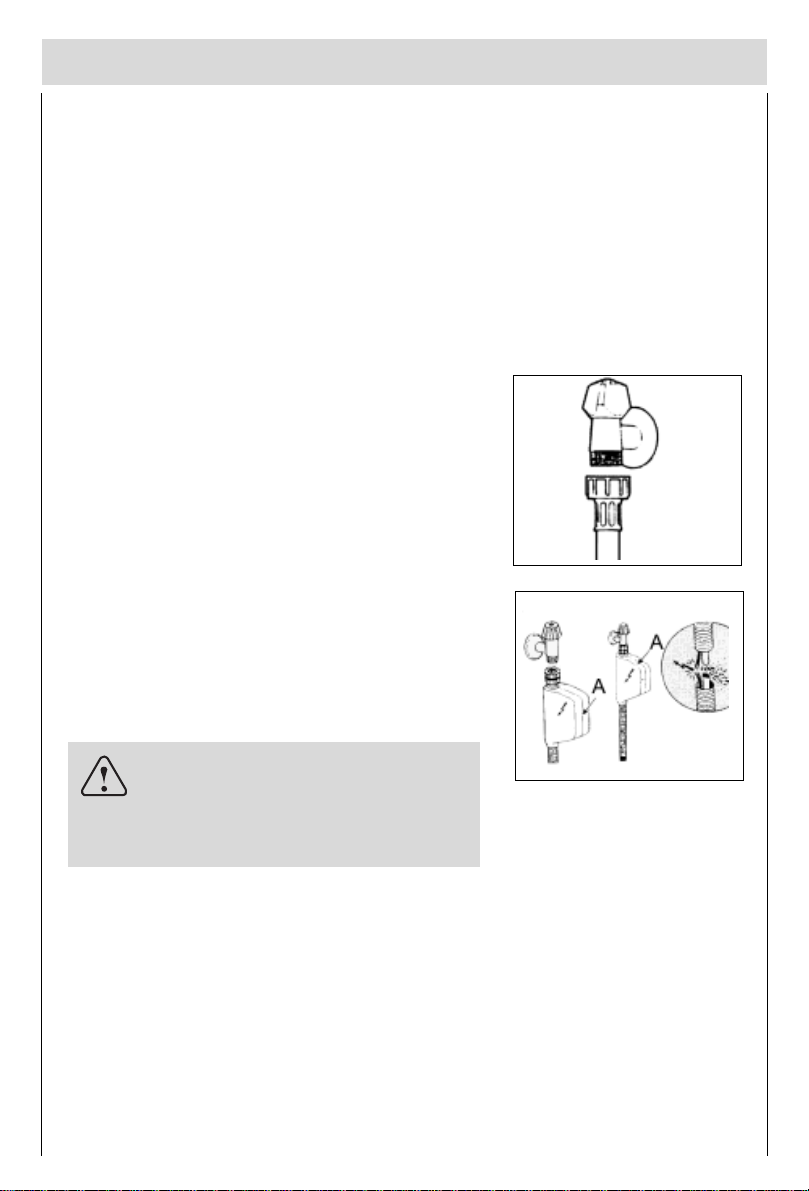
Cold water connection
Connect the water supply hose to a threaded 3/4 (gas)
connector, making sure that it is fastened tightly in place (see
fig.A).
Some models are fitted with an "Aquastop" water supply hose
(see fig.B) in which the small filter is already housed in the
threaded end.
If the water pipes are new or have not been used for an extended period of time, let the water run to make sure that the
water is clear and free of impurities. If this precaution is not
taken, there is a risk that the water inlet can get blocked and
damage the appliance.
fig.A
Warning
The appliance is to be connected to the
water mains using new hose-sets and
that old hose-sets should not be reused.
fig.B
Anti-Flooding protection (for some models)
The dishwasher is equipped with a system that stops the supply of water in the event of a problem with the water
supply hose, or leaks within the unit, in order to prevent damage to your home. If for any reason the box
containing the electrical components happens to get damaged, remove the plug for the appliance from the
socket immediately. In order to guarantee that the anti-flooding feature operates properly, the "A" box with water
supply hose must be attached to the water supply tap as shown in fig.B. No other type of connection is acceptable.
The water supply hose must not, under any circumstances, be cut, as it contains electrical parts which are live.
If the length of the hose is not adequate to make a proper connection, the hose must be replaced with one which
is long enough. This hose is available upon request from specialised retailers and service center.
4
Page 7
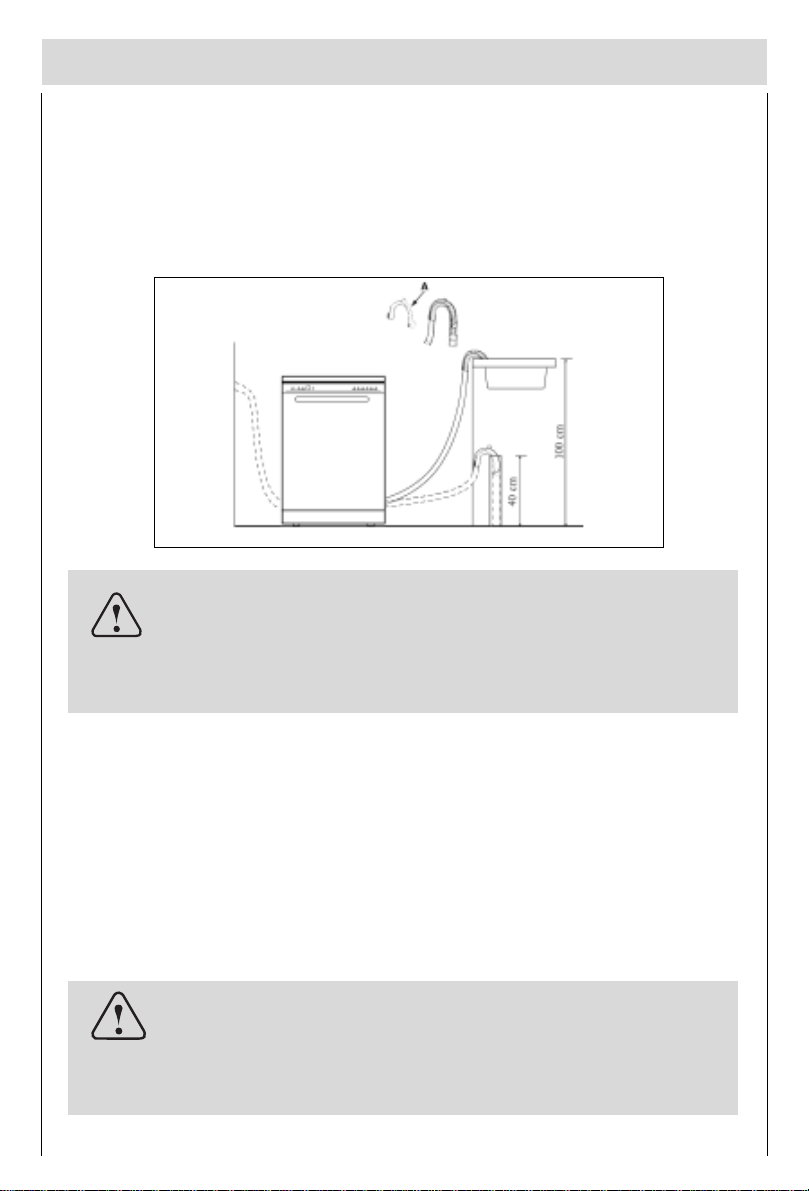
Drain hose connection
Insert the drain hose into a drain pipe with a minimum diameter of 4cm, or let it run into the sink, making
sure to avoid bending or crimping it. If necessary, fit a syphon trap (U-bend) with a connecting piece for
the drain hose (fig.C). The free end of the hose must be at a height between 40 and 100 cm and must not
be immersed in water.
fig.C
Attention:
The connecting piece for syphon trap (U-bend) must be solidly
fastened to the wall to prevent the drain hose from moving and
allowing water to spill outside the drain.
Electrical Connection
After making sure that the voltage and frequency values for the current in the home correspond to those
on the rating plate (located on the stainless steel inner door of the appliance) and that the electrical
system is correct for the maximum voltage on the rating plate, insert the plug into an electrical socket
which is earthed properly (the earthing of the appliance is a safety requirement mandated by law).
If the electrical socket to which the appliance must be connected is not appropriate for the plug, replace
the whole cable, rather than using adaptors or the like as they could cause overheating and burns.
Caution:
The dishwasher plug must be accessible even when the appliance is installed as a built-in unit so that maintenance can be
done safely.
5
Page 8

How to remove the top of your dishwasher
Please follow below pictures step by step.
100-150mm
6
Page 9
Getting to know your dishwasher
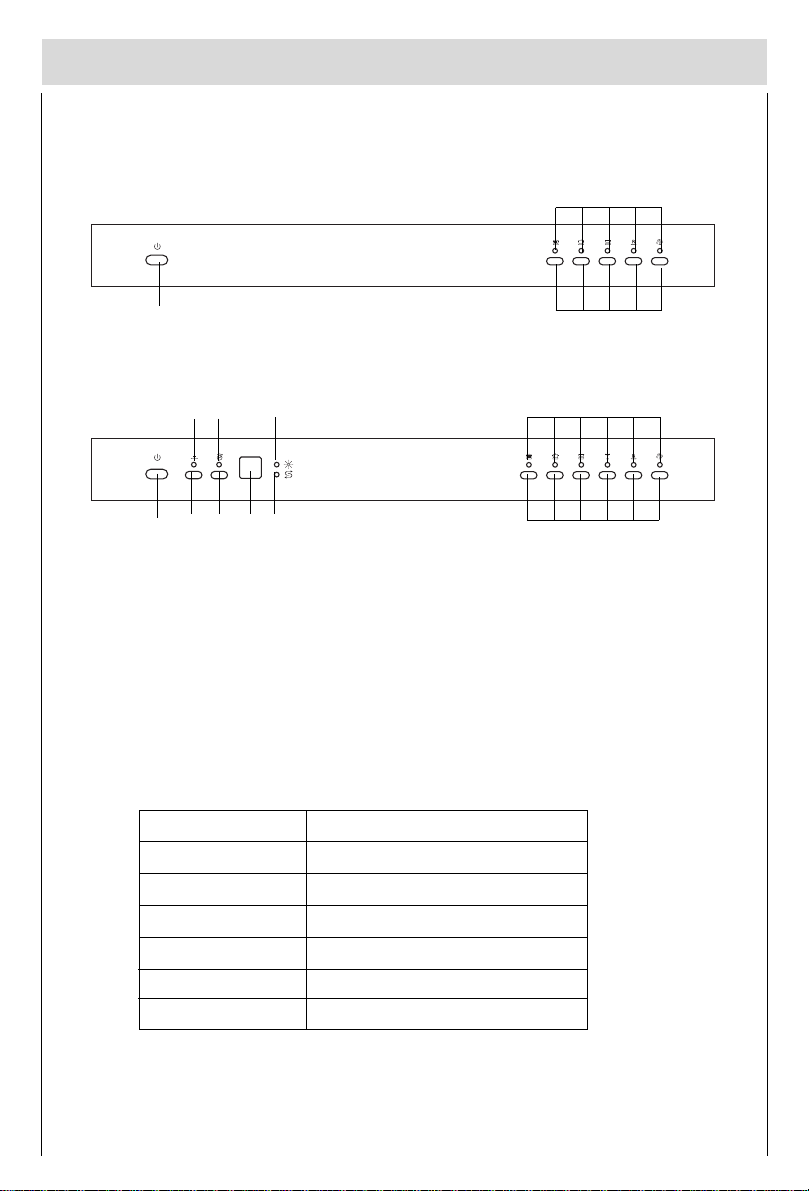
Close-up view (control panel)
DW15-PFE1**
A
DW15-PFE2**
ACBDEFHG
ON-OFF Button
A
B
" 1/2 " Button
C
" 1/2 " Indicator
D
Delayed Start Button
Delayed Start Indicator
E
K
J
Time-remaining Indicator
F
Low Salt Indicator
G
Low Rinse Aid Indicator
H
Programme Button
J
Programme Indicator
K
K
J
Models explanation
Model
DW15-PFE1
DW15-PFE1ME
DW15-PFE1SS
DW15-PFE2
DW15-PFE2ME
DW15-PFE2SS
You can select dishwasher with big handle or without big handle according to requirement.
Colour
White
Silver
Stainless Steel
White
Silver
Stainless Steel
7
Page 10
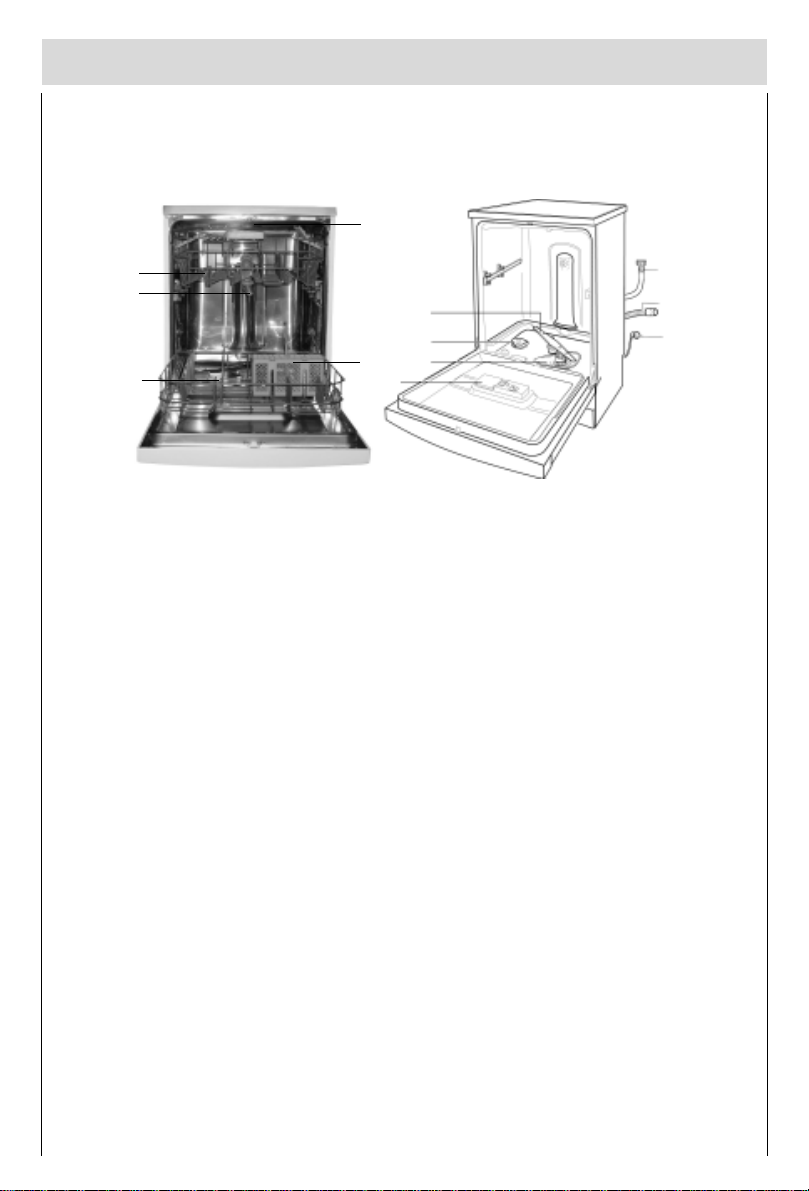
Dishwasher interior
e
a
c
b
Upper Rack
a
Lower Rack
b
Top Spray Arm
c
d
Silverware Basket
e
Third Sprayer
f
Bottom Spray Arm
f
g
h
d
i
Salt Container Cap
g
h
Washing Filter
Detergent and Rinse Aid Dispenser
i
Water Inlet Hose
j
Drain Hose
k
Power Supply Cord
l
j
k
l
8
Page 11
How to fill the salt
Salt
The hardness of the water varies from place to place. If hard water is used in the dishwasher, deposits
will form on the dishes and utensils.
The appliance is equipped with a special softener that uses a salt specifically designed to eliminate lime
and minerals from the water.
Loading the salt into the container
Always use salt intended for use with dishwashers.
The salt container is located beneath the lower rack and should be filled as follows:
For DW15-PFE1**
According to the “Water Hardness Tabel”, you can calculate the time of use , then load the salt .
Remove the lower rack and then unscrew and remove
the cap from the salt container.
If you are filling the container for the first time, fill it with
water.
Place the end of the funnel (supplied) into the hole and
introduce about 2 kg of salt. It is normal for a small amount
of water to come out of the salt container.
Carefully screw the cap back on.
For DW15-PFE2**
When the low salt indicator “1” lights, you must fill the salt.
Remove the lower rack and then unscrew and remove
the cap from the salt container;
If you are filling the container for the first time, fill it with
water;
Place the end of the funnel (supplied) into the hole and
introduce about 2 kg of salt. It is normal for a small amount
of water to come out of the salt container.
Carefully screw the cap back on.
Important
To prevent the formation of rust, load the salt just before beginning a
wash cycle.
1
9
Page 12

Adjusting salt consumption
The dishwasher is designed to allow for adjusting the amount
of salt consumed based on the hardness of the water used.
This is intended to optimize and customize the level of salt
consumption so that it remains at a minimum.
To adjust salt consumption, proceed as follows:
Unscrew the cap from the salt container;
There is a ring on the container with an arrow on it (see
figure to the side),
If necessary, rotate the ring in an anticlockwise direction
from the "-" setting towards the "+" sign, based on the
hardness of the water being used.
It is recommended that adjustments be made in accordance with the following table:
Water Hardness
Clarke
Level
degrees
014 MNT MNIT
1
2
PSTN QRUV QIRUIV
3
4
ºdH
mmol/l
NIUQIQNUQQNQPS
[UV[TN [UIV
Selector
position
L
=?J?
jba
Salt
consumption
(Grams/cycle)
OM
QM
SM?H?
Autonomy
(cycles/2kg)
LM
SM
QM
OR
10
Page 13

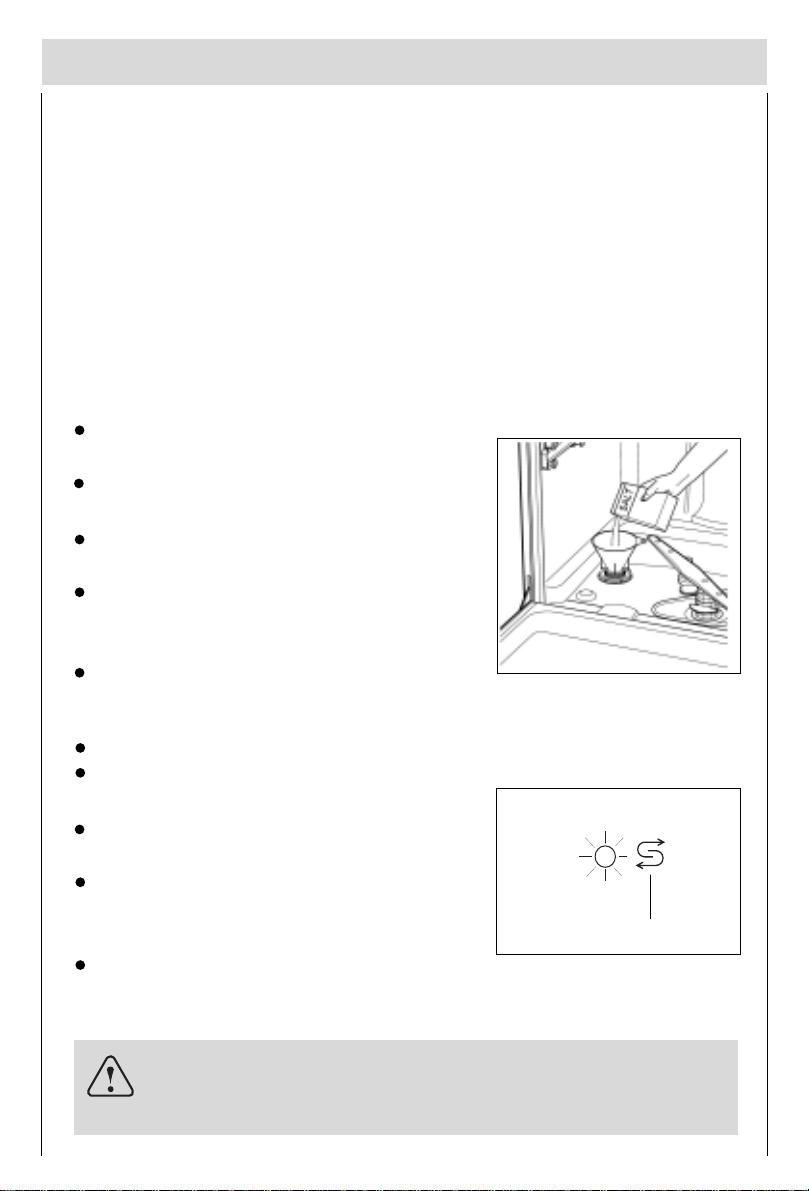
How to fill rinse aid
Rinse aid
This product makes dishes sparkle and helps them to dry
without spotting. The dispenser is located on the inside panel
of the door .
2
For DW15-PFE1**
When the low rinse aid indicator “ 2 ” is bright ,it means the
rinse aid is low,you must load rinse aid .
Low
Full
For DW15-PFE2**
When the low rinse aid indicator “ H ” lights , you must load
rinse aid .
Loading the rinse aid
Regardless of the type of detergent dispenser installed on
your appliance, you must proceed as indicated below when
loading the rinse aid.
To open the dispenser, turn the "3" cap in an anti-clockwise
direction and then pour in the rinse aid, making sure not to
overfill. The amount of rinse aid used for each cycle can be
regulated by turning the " 4" dose adjustor, located beneath
the "3" cap, with a screwdriver. There are 6 different settings;
the normal dosage setting is 3.
H
3
4
Important
Proper dosage of the rinse aid improves drying.
If drops of water remain on the dishes or spotting occurs, the dosage adjustor should be turned to a higher setting.
If the dishes have white streaks, turn the dosage adjustor to a lower setting.
11
Page 14

Not suitable for the dishwasher
What you should not put into the dishwasher
Cutlery and tableware manufactured in whole or part from wood.They become faded and unsightly in
appearance.Furthermore,the adhesives that are used are not suitable for the temperature that occur
inside the dishwasher.Delicate decorative glassware and vases,special antique or irreplaceable china.
The decorative patterns on such items will not be dishwasher-proof.
Plastic objects that are not resistant to hot water, copper and pewter utensils are also not suitable.
Decorative patterns printed or painted onto the surface of crockery, glasses, etc.,aluminium and silver
items tend to become discoloured or faded if washed in the diswasher. Some types of glass can become
opaque in appearance after they have been washed many times in a dishwasher. Highly absorbent
materials, such as sponges and towels,should never be placed in the dishwasher.
Our recommendation
In future, only purchase table or kitchenware that has been confirmed as being dishwasher-proof.
Important
Dishes or cutlery that have been soiled by tobacco ash, wax,
Iubricating grease or paint, should not be put in the dishwasher.
Damage to glassware and other dishes
Possible causes
type of glass or manufacturing process
chemical composition of detergent
water temperature and duration of dishwasher programme.
Suggested remedy
Use glassware or porcelain dishes that have been marked ‘dishwasher-proof’ by the manufacture.
Use a mild detergent that is described as ‘kind to dishes’. If necessary, seek further information from
detergent manufacturers.
Select a programme with a low temperature and a short duration as possible.
To prevent damage, take glass and cutlery out of the dishwasher as soon as possible after the
programme has ended.
12
Page 15

Arranging crockery, glasses, etc. in the dishwasher
Before placing the dishes in the dishwasher, remove larger food particles to prevent the filter from becoming clogged, which results in reduced performance.
If the pots and pans have baked-on food that is extremely hard to remove, we recommend that they are
soaked before washed. This will eliminate the need for extra wash cycles.
Pull out the rack to load the dishwasher.
How to use the lower rack
We recommend that you place the most difficult to clean items
on the bottom rack: pots, pans, lids, serving dishes and bowls,
as shown in the figure to the right.
It is preferable to place serving dishes and lids on the sides of
the racks in order to avoid blocking the rotation of the top spray
arm.
Pots, serving bowls, etc. must always be placed face down
(see fig.D) .
Deep pots should be slanted to allow the water to flow out.
Normal daily load
Warning
knives and other utensils with sharp points must be loaded in the
basket with their points down or placed in a horizontal position.
How to use the upper rack
The upper rack is designed to hold more delicate and lighter
dishware, such as glasses, cups and saucers, plates, small
bowls and shallow pans (as long as they are not too dirty).
Position the dishes and cookware so that they do not get
moved by the spray of water.
The upper rack can be adjusted for height by using the knobs
located on both sides of the rack itself (see fig.E).
Adjust the upper basket to the higher level and you have
more space to accommodate those taller pans and trays in
the bottom basket.
fig.D
fig.E
13
Page 16

Shelf
Lean tall glasses and those with long stems against the shelfnot against other items to be washed.
Place glasses, cups and small bowls on the additional cup rack.
The additional cup rack can be swivelled in or out as required
(see fig.F).
Knife rack
The knife rack clips onto the side of the top basket, giving you
the freedom to wash your large sharp knives separately and
out of harm’s way (see fig.G).
fig.F
14
fig.G
Page 17

How to fill the detergent dispenser
Detergent
Detergent specifically intended for use with dishwashers
must be used. The dispenser must be refilled before the start
of each wash cycle following the instructions provided in the
"Programme overview". The detergent dispenser is located
on the inside panel of the door.
Loading the detergent
To open the " 5 " cover on the dispenser, press the " 6 "
button.
The detergent for the wash cycle should be poured into
the " 7 " compartment.
The detergent for the pre-wash cycle should be poured
into the “ 8 ” compartment.
After the detergent has been placed in the dispenser,
close the cover and press down until it clicks in place.
5
7
6
8
Notice:
To facilitate closing the cover, remove any excess detergent on
the edges of the dispenser.
15
Page 18

Programme overview
Wash
programme
Intensive
crokery e.g.
china, pots/
glasses, etc
Nondelicate
Wash
Normal
Wash
Light Wash
(IEC-
EN50242)
Mixed
Glass ware
( for DW15-PFE2 )
Type of
pan s,
cutiery,
Type of
food
remains
Soups,
casseroles,
sauces,
potatoes,
pasts, rice,
eggs, roast or
fried food.
Soups,
potatoes,
pasta, rice,
eggs, roast or
fried food.
Coffee,cakes,
milk, sausage,
cold drinks,
salads
Amount of
food
remains
a lot
a little
Very little
Condi-
tion of
food
remains
stuck
on hard
loosely
attached
loosely
attached
Description of cycle
Pre-wash with hot water.
Extended wash at 70°C.
Rinses with cold water.
Rinse with hot water.
Drying.
Prewash use cold water.
Extended wash at 55°C.
Rinse with cold water.
Rinse with hot water.
Drying.
Prewash use cold water.
Extended wash at 50°C.
Rinse with cold water.
Rinse with hot water.
Drying.
Wash at 45°C.
Rinse with cold water.
Hot rinse.
Drying.
1/2 Load
( for DW15-PFE2** )
Rapid wash
16
Soak
Rinse off if the dishes have been
stacked for several days in the dishwasher prior to washing.
Short wash at 40°C.
Cold rinse.
Short cold wash to prevent food residue from
drying on the dishes .
Page 19

Delayed
Start
( for DW15-PFE2** )
Extended
Detergent
Wash
Prewash
Rinse Aid
Duration in
minutes
Energy
consump-
tion in kWh
Water
consump-
tion in litres
30g
20g
30g
20g
30g
20g
15g
10g
15g
10g
7.5g
5g
7.5g
5g
7.5g
5g
(G)
112
94
102
90
170
142
92
82
31
29
1.62
1.48
1.24
1.15
1.10
1.00
1.12
1.10
0.40
0.30
18
16
15
14
16
13
12
10
9
8
* EN50242 test with rinse aid setting 5
12
12
0.02
0.02
3
3
Laboratory measured valve in accordance with European Standard EN50242
17
Page 20

Washing dishes
Programme selection
The most appropriate programme can be identified by comparing the type of crockery, cutlery, etc., as
well as the amount and condition of food remains, with the details contained in the wash cycle table.The
corresponding programme sequence, duration and consumption details are shown in the right half of the
overview. For example:
Use the« normal» programme for dishes and utensils which have plenty of food remains stuck on
hard.
Earn savings
If only a small number of dishes have been loaded into the dishwasher,selecting a programme that
operates at the next lowest temperature will usually be sufficient.
Programme data
The stated programme data are based on standard operating conditions. The values can vary considerably according to:
different amounts of dishes
temperature of mains water supply
pressure of mains water supply
ambient temperature
fluctuations in mains voltage
machine-related factors (e.g. temperature, water volume,...)
Energy and water consumption is reduced by up to 1/4 when dishes are washed in the upper basket
only.The water consumption values are related to water hardness level 1.
Turbisensor*
*on applicable models
The Aquasensor ia an optical measuring device with which the cloudiness of the water in the dishwasher
is measured. A photoelectric sensor is used to detect the degree of soiling in the water, caused by
dissolved food particals such as egg, fat and rolled oats, etc.
18
Page 21

Switching the dishwasher ON
For DW15-PFE1**
Turn on the tap.
Set ON-OFF button “ A ” to ON. All the programme
indicators “K1,K2,K3,K5,K6 ” light .
Press programme button “J1” , programme indicator
“ K1” blinks.
If the door is closed, after 5 seconds, the programme
indicator “ K1” bcomes to light and the dishwasher
beeps one time , then the programme starts
automatically.
For DW15-PFE2**
Turn on the tap.
Set ON-OFF button “ A ” to ON. All the programme
indicators “K1,K2,K3,K4,K5,K6 ” light .
Press programme button “J1” , programme indicator
“ K1” blinks and the time-remaining indicator “ F ”
displays the time of the programme..
If the door is closed, after 5 seconds, the programme
indicator “ K1” bcomes to light and the dishwasher
beeps one time , then the programme starts
automatically.
A
K1
K2 K3 K5 K6
J1
A
K1 K2 K3 K4 K5
J1
K6
F
End of programme
Six beeps will indicate that the wash cycle has finished and all the programme indicators light.
Switching the dishwasher OFF
Several minutes after the programme has ended:
Set main switch “A” to OFF.
Open the door .
Turn the water tap off. (Does not apply when Aquastop unit has been fitted)
Remove dishes, etc. when they have cooled down.
19
Page 22

Interrupping the programme
Open the door. Caution! There is a risk of water squirting out from inside the appliance. Do not open
the door fully until spray arm has stopped rotating.
When you open the door, the dishwasher will beep ten times every thirty seconds.
If the appliance has already heated up or the hot water was switched ON and then the appliance door
opened, leave the door ajar for several minutes and then close. Otherwise, the appliance door may
open due to expansion.
Delayed start programming (for DW15-PFE2**)
You can delay the start of a programme in increments of one hour up to 12 hours.
Switch dishwasher ON.
Immediately press the Delayed Start button “ D ”, the delayed start indicator “ E ” blinks, the delayed
start time indicator “ F ” changes to “ ”.
Press the Delayed Start button “ D ” as many times as necessary until the numerical display shows
the required delay.
To cancel the time delay setting, pressing the Delayed Start button until the delayed start indicator “
E” goes out.
20
DEF
Press programme button “ J ” to choose the desired programme.
J
If the the door is closed, after 5 seconds the delayed start indicator “ E ” lights , the time-remaining
indicator “ F ” will blink and decrease , the programme will start until the delayed start indicator “ F ”
goes out .
Page 23

Cancelling or modifying a cycle
A cycle that is underway can be modified if it has only been running for a short time. Otherwise, the
detergent may have already been used, and the appliance may have already drained the wash water.
If this is the case, the detergent dispenser must be refilled ( see the paragraph entitled, “ Loading the
detergent ”).
To modify a cycle that is already underway, press the button“ A ” , all of the settings will be cancelled.
To set a new cycle, follow the instructions contained in the paragraph entitled “Switching the dishwasher ON”.
A
1/2 Load Button (for DW15-PFE2**)
This button E (see" Close-up View (Control Panel), letter " B ") makes it possible to wash dishes using
only the upper rack if there are not enough dishes for a full load. This will allow you to save on water and
energy consumption.
To select 1/2 load:
Select the programme ( see the paragraph entitled“ Switching the dishwaher ON”)
Press the 1/2 load button “ B ” , 1/2 load indicator “ C ” blinks.
If the door is closed, after 5 seconds, the programme starts automatically.
- Please keep in mind that the amount of detergent should also be adapted to the 1/2 load.
- To cancel the 1/2 load, you can press the 1/2 load button “ B ” again ,until the 1/2 load indicators
“ C” goes out.
C
B
21
Page 24

How to keep your dishwasher in shape
After Every Wash
After every wash, turn off the water supply (not necessary for models with “Aquastop” ) the appliance
and leave the door slightly ajar so that moisture and odors are not trapped inside.
Remove the plug
Before cleaning or performing maintenance, always remove the plug from the socket. Do not run risks.
No solvents or Abrasive Cleaning Products
To clean the exterior and rubber parts of the dishwasher, do not use solvents or abrasive cleaning
products. Rather, use only a cloth and warm soapy water.
To remove spots or stains from the surface of the interior, use a cloth dampened with water and a little
while vinegar, or cleaning product made specifically for dishwashers.
Moving the Appliance
If the appliance must be moved, try to keep it in a vertical position. If absolutely necessary, it can be
positioned on its back.
Seals
One of the factors that cause odors to form in the dishwasher is food that remains trapped in the seals.
Periodic cleaning with a damp sponge will prevent this from occurring.
The door should not be left in the open position since this could present a tripping hazard.
When You Go on Holiday
When you go on holiday, it is recommended that you run a wash cycle with the dishwasher empty and
then remove the plug from the socket, turn off the water supply and leave the door of the appliance
slightly ajar. This will help the seals last longer and prevent odors from forming within the appliance.
22
Page 25

Care and maintenance
Regular inspection and maintenance of your appliance helps to prevent problems from occurring.This
saves time and aggravation.You should therefore carefully inspect the inside of your dishwasher from
time to time.
Overall condition of appliance
Check that no grease or scale has accumulated on the inside of the dishwasher.
If you discover any deposits:
Clean the interior of the dishwasher thorughly with a detergent solution.
Dishwasher salt ( for DW15-PFE2**)
Check the LOW SALT indicator “ G” .Top up with salt, if
required.
Rinse-aid ( for DW15-PFE2**)
Check the LOW RINSE AID indicator “ H ”, on the front
panel. Top up with rinse-aid,if required.
Filters
The filters “ 9”,“ 10” prevent larger particles of food in the
water from reaching the pump.These particles may occasionally block the filters.
When the appliance has finished washing, check the filters for particles of food and, if required, clean.
After undoing the coarse micro-filter “ 9 ” , the filter unit
“ 10” can be removed. Remove any particles of food and
rinse the filters under running water.
Insert the filter unit “ 10 ” and tighten the coarse microfilter.
H
G
9
10
23
Page 26

Spray arms
Lime and remnants of food in the washing water can block the
nozzles in the spray arms “ 11 ” and “ 12 ” and the arm
mountings.
Inspect the nozzles in the spray arms for blocked holes
due to remnants of food.
If necessary, pull the lower arm “ 12 ” upwards and lift it off.
Unscrew the upper spray arm “ 11 ”.
Clean both spray arms under running water.
Refit the spray arms. Ensure that the lower arm has locked
into place and the upper one is screwed tight.
11
12
24
Page 27

Fault finding
Resolving minor problems yourself
Experience has shown that you can resolve most problems that rise during normal daily usage yourself,
without having to call out a service engineer.Not only does this save costs,but it also means that the
appliance is available for use again that much sooner. The following list of common occurrences and
their remedies should help you identify the causes of most problems.
Problems...
...when the appliance is switched on
Appliance does not start up
Fault with fuse in mains electricity supply.
Plug not inserted in wall socket.
Appliance door not closed properly.
Programme button has not been pressed.
Water tap not turned on.
Blocked strainer in water intake hose.
- The strainer is situated in the Aquastop or supply-hose connection.
Caution
Do not forget that repairs should only be carried out by a qualified
specialist. Improper repairs can lead to considerable equipment damage as well as danger to the user.
...with the appliance itself
Error display on the time-remaining indicator
When all the programme indicators “ K” blink.
Have you checked whether:
the door is closed properly.
When the programme indicators “ K1,K2,K3” blink.
Have you checked whether:
the water is turned on and the hose is connected properly;
the water supply to the house is on and has sufficient pressure;
the water supply hose is crimped or bent;
the filter for the water supply hose is clogged.
the drain hose is too low.
K
K
K1 K2 K3
K1 K2 K3
25
Page 28

When the programme indicators “ K1,K3,K5” (DW15PFE1**) or “ K1,K3,K4” (DW15-PFE2**) blink.
Have you checked whether:
the drain hose is crimped or bent.
the drain hose is too high.
K1
K1 K3
K5K3
K4
When the programme indicators “ K1,K2,K5” (DW15-
K1
K5
K2
PFE1**) or “ K1,K2,K6” (DW15-PFE2**) blink.
Have you checked whether:
the drain hose is too low.
K1
K2
K6
If you take all these checks and the dishwasher still does not function or your dishwasher have any other error display, you can power the dishwasher OFF, and wait a few
minutes. You can power the dishwasher on, try it again , if the dishwasher still does not
function and/or the problem persists, contact the nearest authorised service center and
provide them with the following information:
the nature of the problem.
the model type number (Mod...) And the serial number (S/N...), which are indicated on the plate
located on the side of the inner part of the door.
Lower spray arm rotates with difficulty
Spray arm is blocked by small items or food remains.
Lid in detergent compartment cannot be closed
Detergent compartment has been overfilled.
Mechanism is clogged with remnants of detergent.
Indicator lamps do not extinguish after washing has finished
Main switch is still set to ON.
Remnants of detergent stuck inside dispenser
Compartment was damp when it was filled up with detergent. Compartment must be dry before
detergent is added.
26
Page 29

Water remains inside appliance after programme has ended
Blockage or kind in drainage hose.
Pump is jammed.
Filters are blocked.
The programme is still running. Wait for the programme to end .
...during washing
Unusual amount of foam is creased
Normal washing up liquid has been poured into the rinse-aid container.
Remove any spilled rinse aid with a cloth as it could otherwise lead to excessive foaming during the
next washing cycle.
Appliance stops suddenly while washing is taking place
Cut off electricity supply to appliance.
Water supply has been interrupted.
Knocking sound can be heared while washing is taking place
A spray arm is knocking against the dishes inside the appliance.
Rattling sound can be heared while washing is taking place
Crockery has not been stacked properly inside the appliance.
Knocking sound coming from inlet valves
This is caused by the way the water pipes have been laid and it has no effect upon the way the
appliance functions. There is no remedy for this.
...with the dishes,cutlery, etc.
Remnants of food are stuck to the dishes, cutlery,etc.
Dishwasher was not loaded properly. Jets of water could not reach all parts of the dishes, ect.
Too many items in the rack.
Items in the rack were touching each other.
Not enough detergent was added to dispenser.
Selected wash programme was not intensive enough.
Rotation of spray arm was obstructed by dishes, etc.
N ozzles in spray arm are blokcked by remnants of food.
Filters are blocked.
Filters have been incorrectly fitted.
Waste-water pump is jammed.
27
Page 30

Plastic items are discoloured
Not enough detergent was added to dispenser.
Detergent has insuffcient bleaching properties. Use a detergent containing a chemical bleaching agent.
White stains are left on crockery, glasses have a milky appearance
Not enough detergent was added to dispenser compartment.
Amount of rinse-aid was set too low.
Although water is quite hard, no salt has been put in appliance.
Water softener was set too low.
Lid on salt container is not screwed tight.
If you used a phosphate-free detergent , try a detergent containing phosphates and compare results.
Dishes,cultlery,etc.have not been dried
Selected programme did not include drying function.
Amount of rinse-aid was set too low.
Items were removed from dishwasher too soon.
Glasses have a dull appearance
Amount of rinse-aid was set too low.
Tea stains or traces of lipstick have not been completely removed
Detergent does not have a sufficient bleaching effect.
Washing temperature was set too low.
Traces of rust on cutlery
Cutlery is not sufficiently rustproof.
Salt content in washing water is too high.
- Lid on salt container is not screwed tight.
- Too much salt was spilt while filling container.
Glasses become clouded and discoloured; coating cannot be wiped off
Unsuitable detergent was used.
Glasses are not dishwasher-proof.
Smears left behind on glasses and cutlery; glasses have acquired a metallic appearance
Amount of rinse-aid set too high.
28
Page 31

Technical data
Width
Depth
Height
Capacity
Mains water pressure
Power voltage
Maximum current intensity
Total absorbed power
60 cm
60 cm
85 cm
15 standard place settings
0.03-0.6MPa
220-240V~ 50Hz
10A
1950W
29
Page 32

Important information
Notes on waste disposal
Old appliances still have some residual value. An environment-friendly method of disposal will ensure
that valuable raw materials can be recovered and used again.
When an appliance has reached the end of its working life,unplug it from the mains.Cut through the
mains cable and dispose of it together with the plug.
Destroy the door locking mechanism. This will ensure that children at play cannot become locked inside
and are not exposed to the risk of suffocation.
Your new appliance was protected by suitable packaging while it was on its way to you. All materials
used for this purpose are environment-friendly and can be recycled. Please make a contribution to
protecting the environment by disposing of the packaging appropriately.
Do not allow children to play with any parts of the packaging. There is a risk of suffocation by the
cardboard boxes and the plastic wrapping.
Up-to -date information concerning options for disposal can obtained from your retailer or local municipal administration.
General information
Measures must be taken to ensure that built-under and built-in units that are subsequently re-sited as
free-standing appliances cannot topple over. This can be achieved by bolting the dishwasher to the
wall or fitting it under a continuous work surface which is screwed to the adjacent cupboards.
30
For Switzerland only:
There are no restrictions on installing the appliance between wooden or plastic walls as part of a fitted
kitchen. If the appliance is not plugged into a wall socket, it must be connected to the mains via a
separator for all poles within the domestic wiring system. This device must have a gap of at least 3mm
between open contacts, in order to conform with relevant safety regulations.
Page 33

Information on comparability tests implemented in compliance with
1
1
1
1
1
1
1
1
1
1
1
1
1
1
1
22
22
22
22
22
22
22
2
3
3
3
3
3
3
3
3
3
3
3
3
3
3
3
44444
4
12
3
4
EN 50242
Appliance loaded in accordance with standard specifications.
Example of loaded dishwasher: See Fig 1 , 2 and 3.
Capacity: 15 place settings
Comparability programme: Light wash
Rinse-aid setting: 5
Detergent: 30+7.5g
Fig.1 Fig.3Fig.2
Height-adjustable top-basket must be inserted in the uppermost position.
If the comparability tests do not comply fully with EN 50242, e.g., degree of soiling, type of dishes and
cutlery, etc., contact the appliance manufacturer before starting the test.
31
Page 34

For DW15-PFE1**
A: Wiring box
B: Door switch
C: Water level switch
D: Drain pump motor
For DW15-PFE2**
A: Wiring box
B: Door switch
C: Water level switch
D: Drain pump motor
E: Dispenser
E: Dispenser
F: Softener valve
G: Overflow switch
H: Inlet valve
F: 2-way valve
G: Softener valve
H: Overflow switch
I1: Inlet valve
I2: Inlet valve (Aquastop)
I: Washing pump motor
J: Temperature limiter
K: Heater
L: Relay
J: Washing pump motor
K: Temperature limiter
L: Heater
M: Relay
N: Low salt switch
M: Flowmeter
N: Temperature sensor
O: Low rinse aid switch
P: Temperature sensor
Q: Flowmeter
R: Turbidity sensor
32
Page 35

The symbol on the product or on its packaging indicates that this product may not
be treated as household waste. Instead it shall be handed over to the applicable collection point for the recycling of electrical and electronic equipment. By ensuring this product is disposed of correctly, you will help prevent potential negative consequences for
the environment and human health, which could otherwise be caused by inappropriate
waste handling of this product.
For more detailed information about recycling of this product, please contact your local
city office, your household waste disposal service or the shop where you purchased the
product.
Page 36

 Loading...