

Page 1

CI-1255e
12 Channel Multi Zone
Power Ampli er
User Guide
Hafl er is a division of Radial Engineering Ltd.
1588 Kebet Way, Port Coquitlam
BC, Canada V3C 5M5
(604) 942-1001 info@hafl er.com
www.hafl er.com
Page 2

Page 3

CI-1255e
12 Channel Multi Zone
Power Amplier
Table of Contents Page
Overview.............................................................................................. 1
Features ........................................................................................... 2-3
Mounting Options ................................................................................ 4
Making Connections ......................................................................... 5-6
Using the Bus Inputs ........................................................................... 7
Using Individual Channel Inputs .......................................................... 8
Adjusting Levels .................................................................................. 9
Troubleshooting ............................................................................ 10-12
FAQ ................................................................................................... 13
Specications .................................................................................... 14
Block Diagram ................................................................................... 15
Warranty ..............................................................................Back Cover
Thank you for selecting the Haer CI-1255e™ amplier. We are condent that you will nd
the performance to be extraordinary and the feature set to be truly comprehensive.
Although the CI-1255e is designed for use by experienced professionals, it is in fact easy
to use. It is important to note that the design features a number of functions that are worthy
of your full understanding. So before you start connecting wires, please take some time to
read through this short manual. After you have done your homework, if you nd yourself
asking questions, please visit the Haer FAQ page. This is where we post questions from
users and updates that may occasionally come about. If afterwards, you still do not nd the
answer to your question, feel free to send us an email at info@haer.com and we will do
our very best to respond in short order.
Page 4

IMPORTANT SAFETY INSTRUCTIONS:
This amplier is designed to be installed by an experienced audio or AV technician. If you are not experienced, please contact your
vendor to arrange installation by a properly accredited individual. The user is entirely responsible for misuse or improper installation.
1. Read these instructions and keep them handy for future reference.
2. Read all warnings and the manual to ensure proper functionality.
3. Do not use this apparatus near water or in constant humidity that exceeds 90%.
4. Clean only with a dry cloth.
5. Do not block any ventilation openings and install in accordance with the manufacturer’s instructions.
6. Do not install near any heat sources such as radiators, heat registers, stoves, or other apparatus that produce heat.
7. If installing in a 19” rack, ensure at least a single rack space is provided above and below the amplier to assure proper
ventilation.
8. Do not ever cut or ‘cheat’ the 3rd safety prong – it is there for your safety.
9. Protect the power cord from being walked on or pinched particularly at plugs, convenience receptacles, and the point where
they exit from the apparatus.
10. Only use attachments and/or accessories specied and/or approved by the manufacturer.
11. Unplug this apparatus during lightning storms or when not used for long periods of time.
12. Under no circumstances should the output terminals of the amplier be short-circuited.
13. Do not connect loudspeakers that are below the rated output.
14. Ensure the loudspeakers being connected are capable of handing the amplier’s peak output.
15. Do not change the voltage selector as this has been factory-set to work in your geographic region.
16. There are no serviceable parts inside.
17. You are responsible to abide by all local electrical regulations – if you are unsure, contact your local building authority to ensure
the proper and safe utilization of this product.
Servicing is required when your CI-1255e has been damaged in any way. Examples include power-supply cord or plug is damaged;
liquid has been spilled or objects have fallen into the amp; the amplier has been exposed to rain or moisture; does not seem to
operate normally; or has been dropped. Refer all servicing to qualied service personnel.
WARNING
This Haer amplier is to be installed and/or used in accordance with the appropriate electrical codes and regulations as described
by the local building authority in your state or province. Please consult with these authorities before using or specifying a Haer
amplier to ensure it meets local regulations. As the installation is completely out of our control, Haer and its employees,
directors, parent company, distributors and resellers are not responsible for misuse or inappropriate application of this amplier. It
is solely the responsibility of the customer or specifying engineer to ensure its proper and safe use.
WARNING
This product may contain chemicals, including lead, known to the State of California to cause birth defects or other reproductive
harm. Wash hands after handling.
Page 5
Passion for Perfection
OVERVIEW
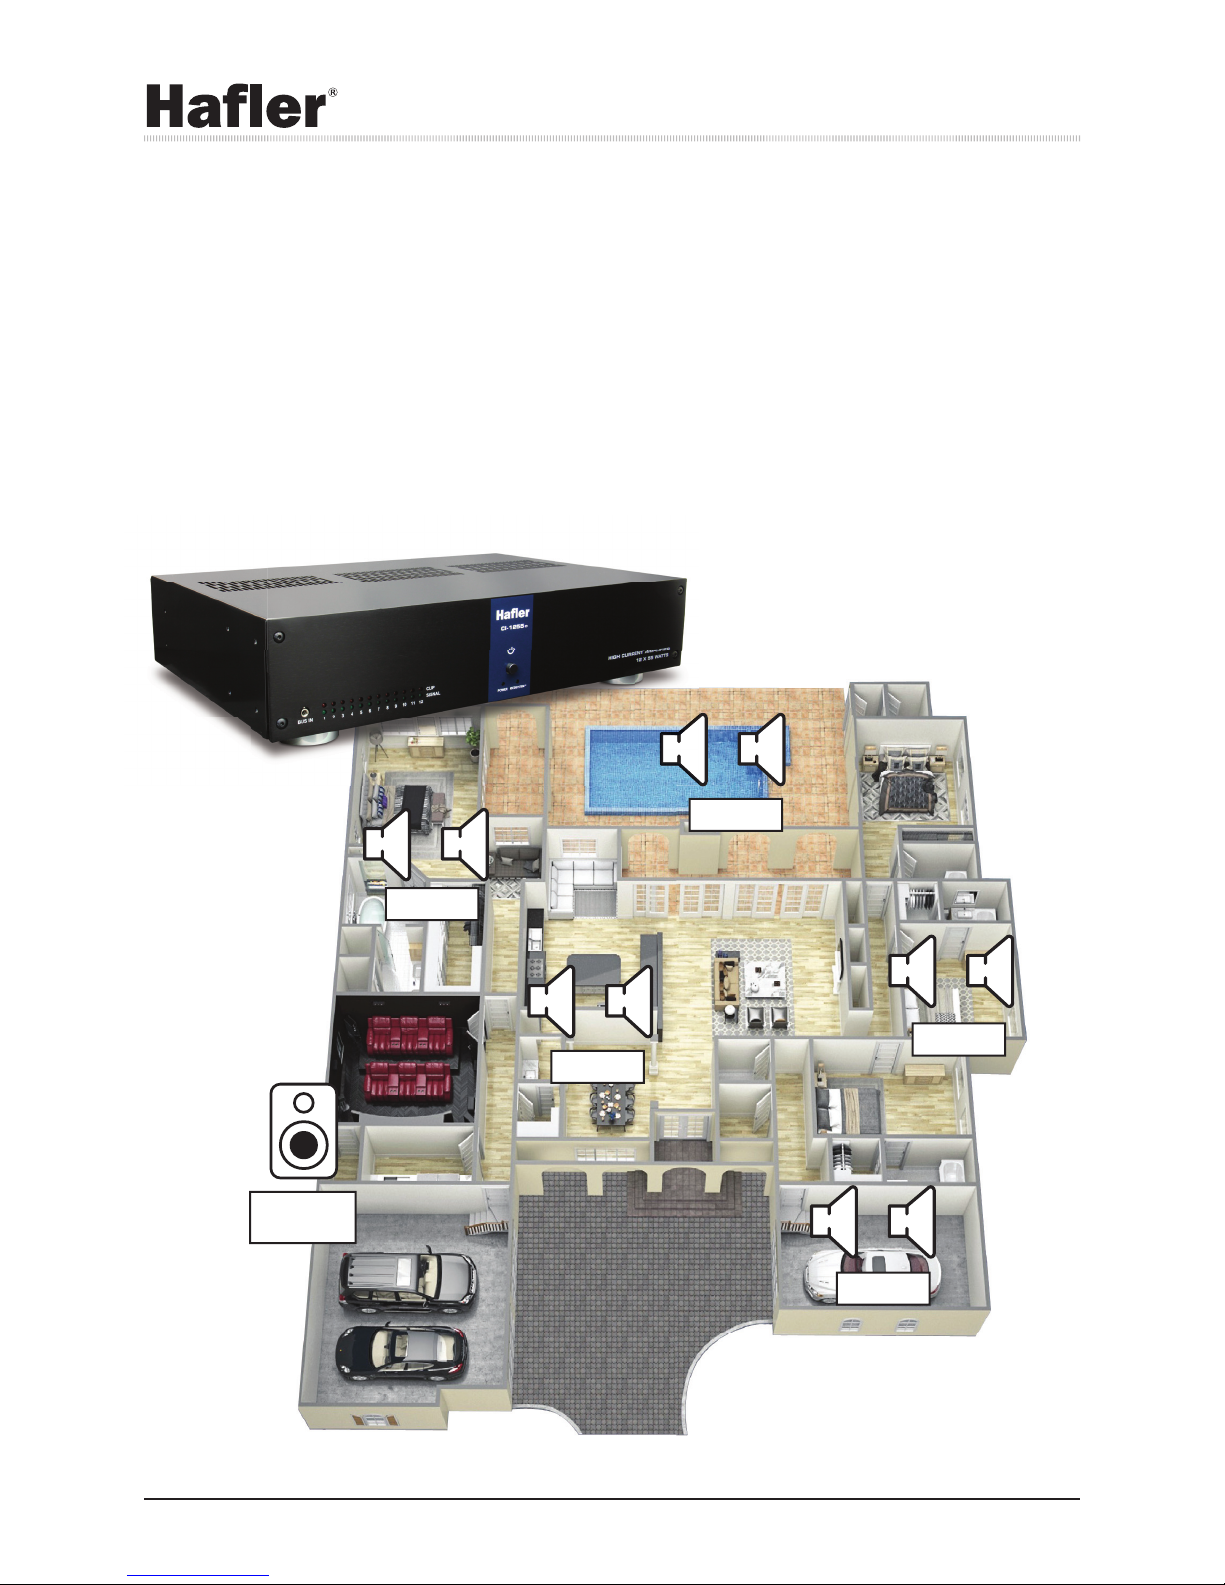
The Ha er CI-1255e is designed primarily for the custom installation and commercial markets. It is used to power speakers in multiple
rooms, using a single audio source or many individual sources. With 12 channels rated for 55 watts per channels at 8 Ω, the CI-1255e
packs some serious punch. Each channel has a recessed gain control, rear and front mounted LED signal presence indicators,
individual channel clip indicators, individual RCA inputs for each channel, and a global bus that allows you to connect one stereo
source and have it feed as many of the stereo pairs as you like. The CI-1255e is turned on and off via the front panel power switch
and with ECOSYSTEM™, it automatically turns itself off when no signal is present for energy savings. The CI-1255e will automatically
spring back to life in 10 milliseconds as soon as signal is detected. The front panel also has a power present indicator and an
ECOSYSTEM indicator that illuminates when all channels are shut down saving energy. Unlike other multi-channel amps that employ
switch-mode class D or H type amps, the Ha er CI-1255e employs an extremely accurate class AB topology for the most demanding
audio critic. This means that it is perfectly suited for home theater applications and listening rooms where sound quality is of utmost
concern.
Zone 6
Bridge Mono
Zone 1
Zone 2
Zone 4
Zone 3
Zone 5
Ha er
1
1
CI-1255e™ Power Ampli er
Page 6
FEATURES
Passion for Perfection
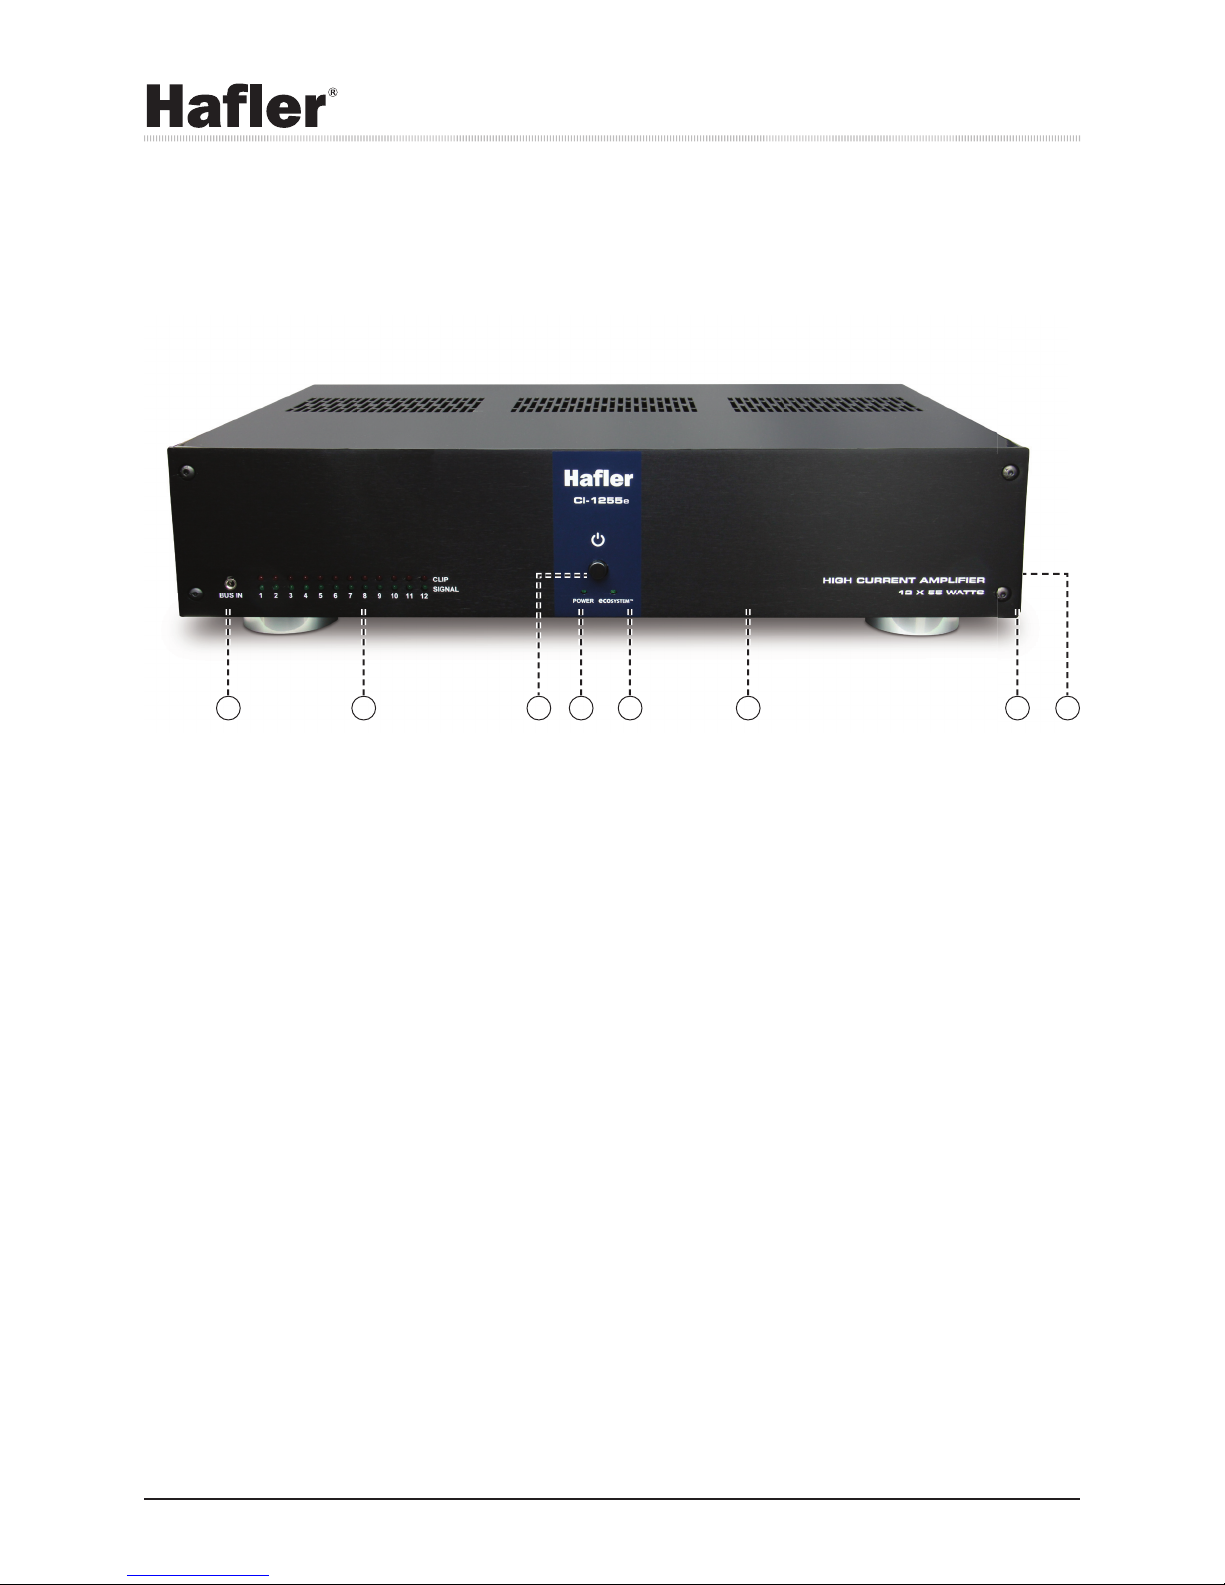
1 2 3 4 5 6 7 8
1. BUS INPUT: conveniently located to connect a cell phone, tablet, or Bluetooth® interface to the CI-1255e.
2. LEDS: Individual LEDs on each channel to monitor signal presence and clip for each connected zone.
3. POWER: High tensile power switch is rated at over 10,000 actuations for extra durability.
4. POWER LED: Lets you know the CI-1255e is powered up and working.
5. ECOSYSTEM™: Power saving feature, automatically sets the ampli er on standby when audio signal is inactive for over a
minute. Automatically comes to life in 10 milliseconds as soon as signal is detected on any channel.
6. ENCLOSURE: Compact 17” x 3.5” x 11.5” (432 x 89 x 292mm) solid steel enclosure.
7. RACK EARS: Optional rack mounting brackets to t the amp into a standard 19” 2 RU rack enclosure.
8. HUSHTONE™: Side-mounted fan delivers quiet cooling without the need for a dust lter.
2
CI-1255e™ Power Ampli erHa er
Page 7

15 16
Passion for Perfection
9 11 1210 13 14 17
9. BUS INPUT: Input used when you want to feed multiple channels from the same source.
10. BUS SELECT: Routes input of each channel to the stereo input BUS.
11. RCA INPUTS: Used to connect unbalanced source audio signal to the CI-1255e input channels.
12. GAIN: Individual level control for each channel, set using a small screwdriver.
13. LED: Detects signal presence – rear mounted to simplify setup when con guring and testing system.
14. SPEAKER: Euroblock (Phoenix® style) detachable screw-down connectors for quick, easy and reliable connectivity to the
loudspeaker wires. Handles 18 to 10-gauge wire.
15. OMNIPORT™: module input slot, expands connectivity with optional Dante digital network card, unbalanced Euroblock input
connectors, transformer isolation and more.
16. POWER: Standard IEC 3-pole connector allows various cables to be used for international markets.
17. BRIDGE MODE: Available on channels 11 and 12 for a 120 Watt mono output to feed a subwoofer. Push in to activate.
3
CI-1255e™ Power Ampli erHa er
Page 8

Passion for Perfection
MOUNTING OPTIONS
Before making connections, take a few minutes to ensure you are familiar with where the amplier will be residing. Whether you plan
to install it on a shelf, in a rack or in a cupboard, you must ensure that it has proper ventilation to ensure proper performance. If you do
not allow for proper ventilation, the amp may shut down due to thermal overload. The Haer CI-1255e is equipped with a side access
HushTone™ fan that ventilates hot air out of the amplier as it draws fresh air in from the other side. Inside, a series of heat sink blades
transfer the heat from the power transistors to the air as it runs across and around them.
It is also important that you allow enough extra wiring to move the amp around during the installation. This will make it much easier
especially when troubleshooting. As a rule, try to allow roughly 16”-24” (40-60cm) of extra wire for this purpose.
Mounting the CI-1255e on a shelf
When used on an open shelf, ensure the sides are free from debris to allow the
amp’s ventilation system to perform properly.
Mounting the CI-1255e inside a cupboard
It is important that you vent the cupboard as heat build-up is common which
can cause the CI-1255e to over heat and shut down. Installing an exhaust fan
at the rear of the cupboard is usually an adequate x to this problem.
Mounting the CI-1255e inside a rack
The Haer CI-1255e may be ordered with rack-mount ears to t inside a
standard 19” equipment rack. It is important that you allow an extra rack space
in between the CI-1255e and other rack gear for optimal air ow and ventilation.
This is particularly important if rack mounting more than one amplier in your
BUS IN
5
234
1
<OPEN RACK SPACE>
CLIP
SIGNAL
7
8 9
6
10
11 12
Hafler
CI-1255e
POWER
HIGH CURRENT AMPLIFIER
TM
12 X 55 WATTS
rack. If being used this way, you can remove the large feet using a Philips
# 2 screwdriver. Be sure to use the rack ear hardware supplied with the kit.
Longer mount screws may contact internal parts that may cause critical safety
violations.
IMPORTANT INSTALLATION NOTES
Important installation notes: Installing the CI-1255e should be relatively easy. With a bit of planning, it will provide trouble-free
service for years. The most important consideration when installing the CI-1255e is cooling. The CI-1255e has a lot of power
packed into a small chassis size. When installing it in an equipment stack, it should be the top component. It needs at least
3”-5” of space above the amplier to allow for adequate convection cooling. If CI-1255e channels frequently shutdown due to
overheating, install a fan pointing directed up from the CI-1255e bottom center. Never operate the CI-1255e on its side, as the
cooling potential drops signicantly when operated this way. Connect the CI-1255e inputs to the source component outputs with
good quality cables. Keeping the cables short will reduce opportunity for induced noise. Connect the CI-1255e speaker outputs to
speakers using good quality speaker wire. Minimum 16 gauge copper wire is recommended with 14 gauge minimum for runs over
30’ (10m) — see chart below. The CI-1255e works optimally with 6-8 Ω loads. Connecting to 4 Ω loads won’t hurt the CI-1255e but
those channels connected to 4 Ω loads may occasionally shutdown due to thermal overloading. Never connect to speaker loads
less than 4 Ω. Channels 11/12 bridged mode require a minimum 8 Ω speaker. For best performance, adjust the channel trims as
required. Ideally, all trims are 100% on (fully clockwise).
4
CI-1255e™ Power AmplierHaer
Page 9

Passion for Perfection
CONNECTING THE POWER
Your Ha er ampli er has been factory set for use in your country. If you are in the United States or Canada or other countries that
employ 110-120 volts, the rear panel voltage switch will be factory set to 115 volts. If you are in Europe, the United Kingdom, Australia
or other countries that employ 220-240 volts, the rear panel voltage switch will be factory set to 230 volts. The CI-1255e is designed to
safely handle a fairly wide voltage range at the input to address most needs. It is a good idea to check the voltage just in case it has not
be set properly. The voltage should clearly appear in the window. If not correct, you can change it by removing the protective window
using a hex screwdriver and set it as needed. It is a good idea that you have a quali ed service technician verify this on your behalf.
Your Ha er CI-1255e comes with a standard IEC 3-prong plug with an integral safety ground. This is there to protect you should the
electrical system develop a fault. It is both illegal and extremely dangerous to remove the third safety ground. This is sometimes done
in order to try to reduce system noise. If you encounter noise, the most effective method of reducing it is to insert the Ha er CI9012,
CI9022 or CI9024 balancing/isolating modules into the Omniport, or by inserting a Jensen Iso-Max CI-2RR onto any of the offending
channels. These are easily installed in series at the input of the ampli er and provide an effective and safe means of eliminating
system noise.
CONNECTING THE SPEAKERS
Before making connections, ensure the ampli er is turned off along with all of the source
equipment. This will avoid loud plug in and connection transients that can damage more
sensitive components such as tweeters.
It is also very important that you do not connect loudspeakers that are below the designated
impedance. Your Ha er CI-1255e is capable of driving loads down to 4 ohms, but not less.
Driving loads below the rated impedance can lead to overheating and premature part failure.
For greater ef ciency, you should also use suf ciently large speaker cable gauge that correlates
to the length of cable in use. Proper speaker wire selection will also improve the performance
of the ampli er and resulting sound. The following table has been prepared as a reference:
Recommended speaker wire (core size)
DISTANCE IMPERIAL (gauge) DISTANCE METRIC (Conductor OD)
25 feet 18 AWG 8 meters 1.02 mm
50 feet 16 AWG 15 meters 1.29 mm
100 feet 14 AWG 30 meters 1.63 mm
150 feet 12 AWG 45 meters 2.05 mm
200 feet 10 AWG 60 meters 2.59 mm
Connecting the speaker cable from the CI-1255e is done using
a series of detachable euro-block (Phoenix style) connectors.
These snap in and out of place for a secure lock and the
wire is inserted and the screwed down into place using a
at-blade screwdriver or tweaker. Disconnect the euro-block
connectors from the amp to connect the speaker wires and
then reconnect once all the zones have been determined.
SPEAKERS
1L
2R
+ +
Your loudspeakers should be able to handle a minimum of 100 Watts peak (60 watts RMS) to ensure that the CI-1255e does not
damage them if driven hard.
IMPORTANT NOTE
5
CI-1255e™ Power Ampli erHa er
Page 10

Passion for Perfection
CONNECTING A SUBWOOFER
All of the ampli er pairs (1/2, 3/4 etc..) are identical except for channels 11 and 12. These work double duty as either a stereo pair
or a mono amp to drive a passive subwoofer. When used this way, you have to push the recessed BRIDGE MONO switch inward
and connect your source to the top channel 11 INPUT. This will now step up the output to 120 Watts RMS (200 W peak) for plenty of
bass power! As your subwoofer will likely be a loudspeaker that will solely produce low frequencies, a crossover circuit is not required
in between the source and the bridged ampli er. When connecting the cable, make sure you connect the speaker using the two
OUTSIDE terminals. You should also increase the wire gauge size to compensate for the extra power as this will reduce the loss due
to heat dissipation in the cable. The minimum subwoofer impedance is 8 ohms.
CONNECTING THE INPUTS
There are several ways to connect to the CI-1255e from your source system. This can be done with all channels playing the same
music or program material, or be setup with individual programs for each zone. You can also order special modules and mount them
into the OmniPort to add screw-down terminal inputs, Jensen transformer isolation, balanced inputs and even a Dante digital interface
to connect your CI-1255e to an Ethernet network hub.
IPod® Laptop Audio Streamer
6
CI-1255e™ Power Ampli erHa er
Page 11

Passion for Perfection
USING THE BUS INPUT
The BUS input is a simple way to send the same stereo signal to as many of the ampli ers as you like. This is done by connecting the
source program to the left and right bus inputs. Note that these are standard unbalanced -10dB inputs — the same type of connection
that would be used to connect a CD player or of other typical consumer electronic device.
Each of the channel-pairs (stereo zones) are out tted with a BUS SELECT switch. Simply pushing in the switch will defeat the
individual channel-pair inputs so that the bus input feeds those channels. You can have as many or as little channels connected to the
bus and these do not have to be in any particular order. Simply activate to suit your setup requirements.
A handy 3.5mm TRS input on the front panel allows you to connect audio from a laptop, tablet, phone or even a Bluetooth adaptor. The
front panel 3.5mm input is in parallel with the rear panel BUS (RCA) inputs. Do not attempt to use both at the same time.
Playback around the house
A common application would be setting up a music playback
system in a backyard, decks and around a pool. Your source
would connect to the RCA bus inputs and the same program
material would be heard throughout the area. If a guest has
music on their phone that they want to play, simply connect
via the 3.5mm input. The BUS RCA input on the rear should
be disconnected.
Zone 5
Zone 2
Zone 3
Zone 6
Zone 4
Zone 1
7
CI-1255e™ Power Ampli erHa er
Page 12

Passion for Perfection
USING THE INDIVIDUAL CHANNEL INPUTS
In situations where you would like to send a different program to the various zones, you simply connect the source program to the
individual RCA inputs. Make sure the bus switch is in the out position. You can also mix and match by having some of the channels
fed by the bus and others fed by individual source programs.
A common application could be a hotel lobby and bar whereby you may want to have the lobby supplied with gentle background
classical music while the bar would be fed some rock and roll!
Zone 5
Zone 1 Zone 2
Zone 3
Zone 4
Zone 6
Bridge Mono
Rock Playlist
Zone 1 Zone 2 Zone 3 Zone 4 Zone 5 Zone 6
Bus In Bus In Bus In Bus In
Classical Music
8
CI-1255e™ Power Ampli erHa er
Page 13

Passion for Perfection
ADJUSTING THE LEVELS IN THE VARIOUS ZONES
Each of the 12 channels is equipped with individual level controls to set the music loudness for each of the zones. There is also a full
array of rear mounted LEDs that let you visually check to make sure you are getting a source signal when setting up the system. Using
a cell phone or tablet as a source during setup is made easy with the 3.5mm front panel input.
Start with the trim controls fully open (fully clockwise), and your preamp turned down. Turn on the source material and the amplier,
check the LEDs to make sure signal is being received, and turn up the preamp until the desired level is achieved. If any of the zones
are too loud, you can use a tweaker or a small slot screwdriver to turn down on the associated trim controls for those channels.
The front panel is also equipped with the same array of signal presence LEDs along with a second series that shows clip levels. When
driven into the red, it is a good idea to back down the levels in order to prevent distortion and thermal overload.
ECOSYSTEM™ ENERGY SAVINGS
One of the best features with the Haer CI-1255e is the energy-saving ECOSYSTEM
circuit. ECOSYSTEM automatically shuts of the amplier when no signal is detected
after a minute. This of course saves on your electrical bill and because the amp is off,
it also reduces the heat being generated which means a reduction in air conditioning
costs!
As soon as a signal is detected on any of the inputs (the global bus or individual
channels) the CI-1255e will spring back to life in about 10 milliseconds – faster than
you can pronounce a consonant. Best of all, ECOSYSTEM is super quiet and pop-free.
When the ECOSYSTEM is activated, ECOSYSTEM LED will illuminate.
AUTOMATIC FAULT-SAFE™ PROTECTION CIRCUITRY
Another great feature that is built into the CI-1255e is the Fault-Safe™ automatic protection mode. Each CI-1255e channel is
individually and fully protected against low impedance, overheating, overloading, over voltage and under voltage — should any of the
following faults occur, the CI-1255e will automatically shut down any affected channels. The protection circuitry automatically restores
the amplier channel as soon as its fault returns to the safe operating range.
Haer
9
CI-1255e™ Power Amplier
Page 14

Passion for Perfection
TROUBLESHOOTING FOR SYSTEM NOISE
NOTICE
The following instructions are intended for qualied service personnel only. To reduce the risk of electric shock do not attempt to
perform these tasks unless you are qualied to do so.
In most cases, one of the following suggestions should help you solve a hum, buzz or sporadic noise in your system. Try these steps
in the order shown, proceeding from one step to the next if the prior suggestion does not eliminate the problem.
Eliminating noise by avoiding induction
Hum and buzz problems are most often attributed to ground loops. These can occur when the electrical ground and the audio ground
are conicting. Another common problem is induced noise on the system from generators, motors, power transformers, dimmers and
even high voltage power cable that may be introducing hash on the line. When using multiple sources, it can sometimes be daunting
to identify and locate the problem. However, following these simple instructions can help you isolate the problem and introduce a
solution.
Turn off all components in your system and then disconnect the input cables at the amplier. Turn the amplier back on to see if the
hum is still present. If the hum disappears, the fault may be in the input cables you are using. Try replacing them with cables that
have better shielding and make certain that the input cables are not running on top of any AC power cords or external power supplies.
Change the cables one at a time to determine if one or all cables are responsible. If the hum disappears when the input cables are
disconnected but returns after the cables are changed and the system reconnected, your source device may be causing the problem.
Try the same process by replacing the cables one at a time to see if you can locate a problem.
Starting Backwards
If after testing your cables you still encounter noise, the rst thing you want to do is disconnect all of the source program connections
(RCA inputs) from the CI-1255e. At this point, your system should be dead quiet. Then, connect your cell phone or tablet to the 3.5mm
bus input and listen. If all is well, you are set to start testing the source.
Addressing the electrical outlets
Most often, the CI-1255e will be connected to a preamp of sorts that will have various sources connected to it such as a TV, cable,
video player and so on. Disconnect all of these and connect the preamp to the CI-1255e and listen. If at this point you are hearing
some noise, check the electrical system using a polarity checker. These simple devices are typically equipped with 3 LEDs to let you
know if the electrical outlets have been wired correctly. If they have not, have your electrician rewire the plugs to the proper polarity.
Another option is to plug all of your audio-visual equipment together using a single power bar. Be careful to check the current
consumption as most circuits are only capable of 115 volts and 15 amps in the USA and Canada and 230 volts and 7.5 amps in
Europe. Exceeding the load will trip the breaker. Most AV systems require more than one circuit, so this may only provide you with an
indicator that you have a problem.
Haer
10
CI-1255e™ Power Amplier
Page 15

Passion for Perfection
ELIMINATING GROUND LOOPS USING AUDIO GROUND ISOLATOR
If all is well with the electrical outlets, but you are encountering noise, adding an isolation transformer module in between your preamp
and amplier can help eliminate the noise. If you are only using the bus input on the CI-1255e, the easiest solution is to add a CI-9022
or CI-9024 into the Omniport. This is easily done by following the instructions that come with the module. Once installed, connect the
source to the isolation module input and enjoy the noise-free solution!
If you plan to use multiple sources, the same ‘start backwards’ rule applies. Add one source at a time and listen. If you encounter noise,
try introducing an isolation transformer in series between the source and the amp input. The Jensen CI-2RR is a wonderfully effective
device that will not deteriorate the audio quality.
Introducing a video isolator into your system
One of the most common noise makers is the cable TV connection. Your cable TV is not powered by your home electrical system, but
it is instead powered by a distant cable TV sub station. With two power sources, it is easy to understand how this can pose a problem.
To determine if a cable TV connection is responsible for the hum, rst turn off all the components. Disconnect the cable TV feed to
your system. Turn your system back on, and listen if the hum has disappeared. If removing the cable TV feed has eliminated the hum,
you will need to insert a Ground Loop Isolator like the Jensen VRD-1FF before reconnecting the cable TV feed. These are effective at
stopping hum and will pass analog and digital signals without hampering the performance.
WARNING
If you suspect that the grounding system in the home’s electrical wiring is causing the hum problem, it is important that you do not
make any changes to the wiring yourself. Only a licensed electrician should make any changes to household wiring and they must
be made in full compliance with all local building, safety and electrical codes.
WARNING
If you are hearing distorted sound, turn the volume down immediately. Check to make sure the speakers are in proper working
order and no faults are found with the cables. Failure to head this warning could result in speaker and/or amplier damage that
is not covered by the warranty. If this problem persists, contact your dealer.
Haer
11
CI-1255e™ Power Amplier
Page 16

Passion for Perfection
TROUBLESHOOTING FOR OTHER CONCERNS
If a problem is encountered with the CI-1255e, the most expedient procedure is to locate the problem and if possible solve it
before requesting service. Be sure to carefully check other system components such as controllers, CD players, volume controls,
wiring, speakers, etc. that may be at fault. More often than not, problems are due to poor connections or problems due to not fully
understanding the system. The following are common problems and solutions:
Power LED does not go on
1. Check that the CI-1255e is plugged in… no light - no sound.
2. Test the AC outlet with a lamp to make sure a fuse or breaker has not blown.
3. If no sound, check signal LEDs to make sure program material is reaching the amp.
4. Check CI-1255e power button is pushed on and in the inward position.
Sound cuts out and then comes back on
1. Verify speaker impedance is 4-16 Ω, if below 4 ohms, the amp may be overheating.
2. Check if the CI-1255e feels hot, if it does, make sure sufcient ventilation has been provided and check to make sure the CI-
1255e fan is working or not obstructed in any way.
Sound is distorted
1. Check the front panel LED peak indicators, if in the red, turn down the source volume.
2. Try adjusting the CI-1255e level controls if set too low, as it could be starving the speakers.
3. Check speakers for damage.
4. Check to ensure speakers are not less than 4 Ω.
CI-1255e does not turn on
1. Check to make sure the power cable is connected.
2. Make sure the power switch is pushed in (in the ON position).
3. Check the signal present LEDs to make sure source signal is being received.
Speakers pops when amp turns on or off
1. The speakers may need a resistor placed across the amp terminal.
2. We suggest 2k0 ¼ W resister.
3. This will discharge the speaker output’s internal capacitor.
Speakers sound as if lacking bass
1. Out of phase speakers give unstable imaging and poor bass response.
2. Make sure the speakers in each room are connected in phase with the amplier.
3. Check that the positive (+) terminal from the amp is going to the positive terminal on the speaker.
Circuit breaker (fuse) trips all the time
1. Make sure you connect the amplier’s AC power into an outlet that supplies at least 15 amps 110~120 VAC or 7.5 amps 220
~240 VAC (1000 watts).
2. One circuit as described here needs to be dedicated to each CI-1255e and not shared with any other appliance or amplier.
ECOSYSTEM turns amp off prematurely or Sound Present indicators are not showing any signal present and sound is
playing on speakers.
1. Turn down GAIN pots on affected (or all) channels on rear of CI amp (suggest starting with ¼ to 1/3 gain) and turn up source
volume accordingly. Signal presence and ECOSYSTEM are sampled before the individual channel gain pots.
ECOSYSTEM will not allow amplier to turn off. This may be due to noisy input lines.
1. Disconnect all RCA inputs to the CI amp. Individually connect the RCA inputs one at a time to discover which (or all) inputs
are causing the problem.
2. On the affected (or all) channels turn the GAIN (on the CI amp rear) up (suggest starting with fully on clockwise) and adjust
down the source volume accordingly.
Haer
12
CI-1255e™ Power Amplier
Page 17

Passion for Perfection
FAQ
How long does it take for the ECOSYSTEM to turn off?
If the CI-1255e does not ‘see’ any signal for over one minute, the ECOSYSTEM circuit will power down the amp to save energy.
Will I lose some music or communication during power up?
No, this would be very unlikely as the ECOSYSTEM will re-activate the amp within 10 milliseconds which is less time than it takes to
verbalize a consonant.
Can I have all 12 channels play the same program material in mono?
Yes. The easiest way to do this would be to use the CI-9020 stereo to mono converter.
Can the CI-1255e be used in countries that operate at 240 volts?
Yes. The CI-1255e is designed with sufcient headroom to handle 240 volts.
Can I bridge other channels mono like channels 11 and 12?
No, only the last two channels can be bridged.
What happens if I use a loudspeaker with a lower impedance than rated?
Do not do so. The Haer CI-1255e is designed to work within certain limits and applying the proper load is critical to long term reliability.
What happens if I use a loudspeaker that is rated higher than the recommended impedance?
The efciency of the system will be reduced and the system will not play as loud.
Can I stack more than one amplier on top of each other?
Yes, but this must be done in such a way to ensure proper ventilation. If stacked on a shelf, ensure the large feet are employed and
that the sides and back are free from obstructions. If you are rack mounting the CI-1255e using the optional 19” rack ears, leave a rack
space in between each amp to ensure air ow is not restricted.
Will the fan be noisy?
The CI-1255e employs a very special ultra-quiet HushTone™ fan that produces less than 22dB of sound. This is quieter than most
household appliances. When the amplier is in the low power ECOSYSTEM mode, the fan is shut off.
What happens if I notice a dead short - like a nail or screw through a speaker cable?
Switch off the amp power switch immediately and remove the nail or screw. Using an ohm meter check to see if the wires are still not
short circuited and they are working properly. Replace the wire if there are any problems.
Do all channels need to be connected for safe use?
No. You can use as many or as little channels as you like. Simply leave the amp channel that are not in use unterminated and make
sure the bus switch is in the out position.
Haer
13
CI-1255e™ Power Amplier
Page 18

SPECIFICATIONS
# of Channels 12
Passion for Perfection
Inputs
Optional Analog Inputs Euroblock (Phoenix® style) connectors
Optional Digital Inputs Dante® network connection over Ethernet
Input Impedance 22k Ohms
Outputs Euroblock (Phoenix® style) connectors
Output Power 55 watts RMS per channel (8 Ohms)
Peak Output Power 100 watts per channel (8 Ohms)
Bridged Output Power 120 watts per channel (8 Ohms only)
Ideal Impedance 6 - 8 Ohms
Frequency Response +/-0.5dB from 15Hz - 50kHz
S/N Ratio > 102dB (A weighted)
THD Distortion < 0.1% 20Hz to 20kHz
IMD Distortion < 0.01%@ 60Hz
Common Mode Rejection
Dimensions 17" x 3.5" x 11.5" (432 x 89 x 292mm)
HushTone™ Fan Noise 22dB maximum
Gold RCA jacks with adjustable gain,
3.5mm global bus input
-70dB direct coupled
-90dB with Jensen transformer option
Power (Maximum) 750 watts at 117VAC or 230VAC
Gain control -40dB to +20dB for each channel
Weight 24lbs (11kg)
Storage Temperature -40° to +120° C
Working Temperature -5° to +40° C
Voltage Requirements 115V 60 Hz, 230V 50Hz
Damping Factor 400
Maximum wire gauge 10-gauge (2.59mm)
Recommended Minimum 25ft (8m) - min 18-gauge copper
Wire Gauge
ECOSYSTEM™ shut-off time Automatically variable 40-200s
ECOSYSTEM™ turn-on time 10ms typical
Specications subject to change without notice
50ft (16m) - min 16-gauge copper
100ft (32m) - min 14-gauge copper
200ft (64m) - min 12-gauge copper
500ft (160m) - min 10-gauge copper
Haer
14
CI-1255e™ Power Amplier
Page 19

BLOCK DIAGRAM
Ci1255e BLOCK DIAGRAM
Passion for Perfection
1 LEFT
2 RIGHT
3 LEFT
4 RIGHT
5 LEFT
6 RIGHT
7 LEFT
8 RIGHT
9 LEFT
10 RIGHT
11 LEFT
12 RIGHT
L
SELECT
BUS OR
R
LOCAL
GAIN
SIGNAL
PRESENT
LED
L
R
PROCESS
L
R
PROCESS
L
R
PROCESS
L
R
PROCESS
L
R
PROCESS
L
R
PROCESS
ECO
DETECT
ECO
DETECT
ECO
DETECT
ECO
DETECT
ECO
DETECT
ECO
DETECT
INVERT
BUS INPUT
3.5mm or
REAR RCA’s
OMNIPORT
STEREO
POWER
AMP
CLIP
LED
L
R
L
R
L
R
L
R
L
R
L
R
OUTPUTS TO
SPEAKERS
LEFT +
LEFT -
RIGHT -
RIGHT +
LEFT +
LEFT -
RIGHT -
RIGHT +
LEFT +
LEFT -
RIGHT -
RIGHT +
LEFT +
LEFT -
RIGHT -
RIGHT +
LEFT +
LEFT -
RIGHT -
RIGHT +
BRIDGE +
LEFT +
LEFT -
RIGHT -
RIGHT +
BRIDGE -
Specications subject to change without notice
Haer
15
BRIDGE
CI-1255e™ Power Amplier
Page 20

THREE YEAR TRANSFERABLE LIMITED WARRANTY
HAFLER (A division of Radial Engineering Ltd.) (“Hafl er”) warrants this product to be free from defects
in material and workmanship and will remedy any such defects free of charge according to the terms
of this warranty. Hafl er will repair or replace (at its option) any defective component(s) of this product
(excluding fi nish and wear and tear on components under normal use) for a period of three (3) years
from the original date of purchase. In the event that a particular product is no longer available, Hafl er
reserves the right to replace the product with a similar product of equal or greater value. In the unlikely
event that a defect is uncovered, please call 604-942-1001 or email service@hafl er.com to obtain a RA
number (Return Authorization number) before the 3 year warranty period expires. The product must be
returned prepaid in the original shipping container (or equivalent) to Hafl er or to an authorized Hafl er
repair centre and you must assume the risk of loss or damage. A copy of the original invoice showing
date of purchase and the dealer name must accompany any request for work to be performed under this
limited and transferable warranty. This warranty shall not apply if the product has been damaged due
to abuse, misuse, misapplication, accident or as a result of service or modifi cation by any other than an
authorized Hafl er repair center.
THERE ARE NO EXPRESSED WARRANTIES OTHER THAN THOSE ON THE FACE HEREOF AND
DESCRIBED ABOVE. NO WARRANTIES WHETHER EXPRESSED OR IMPLIED, INCLUDING BUT NOT
LIMITED TO, ANY IMPLIED WARRANTIES OF MERCHANTABILITY OR FITNESS FOR A PARTICULAR
PURPOSE SHALL EXTEND BEYOND THE RESPECTIVE WARRANTY PERIOD DESCRIBED ABOVE OF
THREE YEARS. HAFLER SHALL NOT BE RESPONSIBLE OR LIABLE FOR ANY SPECIAL, INCIDENTAL
OR CONSEQUENTIAL DAMAGES OR LOSS ARISING FROM THE USE OF THIS PRODUCT. THIS WARRANTY GIVES YOU SPECIFIC LEGAL RIGHTS, AND YOU MAY ALSO HAVE OTHER RIGHTS, WHICH
MAY VARY DEPENDING ON WHERE YOU LIVE AND WHERE THE PRODUCT WAS PURCHASED.
Hafl er CI-1255e™ User Guide - Part #: R870 1350 00 / 08-2017
Copyright 2017 Hafl er All rights reserved.
Specifi cations and appearance subject to change without notice.
www.hafl er.com
 Loading...