


Tower Dryer
12', 18', 24' and 30' Diameter Dryer Models
Operation and Service Manual - 2011
PNEG-526
Date: 02-28-11
PNEG-526

THIS PRODUCT IS PROTECTED UNDER ONE OR MORE OF THE FOLLOWING U.S. PATENTS:
6233843, 6189235, 6141886, 6101742, 6098305, 6088929, 6076276, 6073367, 6073364, 5570521, 6457256, 6035544, 5860221, 5653043,
5651193, 5604996,5566470, 5400525

Tower Dryer Operations & Service |
TABLE OF CONTENTS |
DRYER OPERATION |
|
SafetyFirst .......................................................................................................... |
7 |
SafetyPrecautions ............................................................................................. |
9 |
Installation Requirements ............................................................................... |
10 |
Dryer Control Panel........................................................................................... |
11 |
Dryer Start Up.................................................................................................. |
13 |
Dryer Shutdown................................................................................................ |
17 |
Viewing Temperature/Moisture History........................................................... |
. 17 |
Viewing Burner/Fuel Train Status.................................................................... |
17 |
Viewing Grain Flow Status............................................................................... |
17 |
Setting the BPH Correction Factor................................................................... |
17 |
TRI-POINT MOISTURE CONTROLLER |
|
Main Screen...................................................................................................... |
19 |
Set-Up of the Controller.................................................................................... |
20 |
Operation Procedure......................................................................................... |
21 |
How the Controller Works................................................................................ |
22 |
Alarms............................................................................................................... |
23 |
Access Drying History...................................................................................... |
24 |
WARRANTY......................................................................................................... |
19 |
MAINTENANCE |
|
Pre-Seasonal Inspection And Service............................................................... |
31 |
Seasonal Inspection And Service...................................................................... |
32 |
End Of Season Service..................................................................................... |
32 |
Lubrication Table.............................................................................................. |
33 |
Pre-Season/End of Season Checklist................................................................ |
35 |
TROUBLE SHOOTING |
|
Drying Issues..................................................................................................... |
3 |
Burner................................................................................................................ |
3 |
General.............................................................................................................. |
|
OIU (Screen) Messages..................................................................................... |
4 |
PARTS LIST |
|
Commercial Tower Dryer Common Service Parts............................................ |
4 |
Commercial Tower Dryer Sidewall Sheets....................................................... |
5 |
ELECTRICAL DIAGRAMS |
|
Tower Dryer Control Panel Wiring Diagrams................................................... |
53 |
COMPONENT MANUALS |
|
Allen-Bradley Variable Frequency Drive |
|
Maxon "NP-LE" Burner |
|
Maxon "CV" Gas Control Valve |
|
Maxon "808" Gas Shut-Off Valve |
|
Nord Gear Reduction Gear Unit |
|
Sumitomo Cyclo-Drive Gear Unit |
|
Honeywell Modutrol IV Motor Actuator |
|
Invensys 121 Gas Regulator |
|
ASCO Solenoid Valves |
|
Protection Controls Protectofier Service Manual |
|
3
4
DRYER
OPERATIONS
5
6
Tower Dryer Operations & Service |
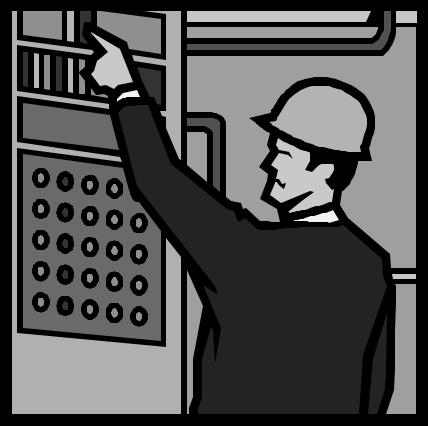
SAFETY FIRST |
SAFETY GUIDELINES
This manual contains information that is important for you, the owner/operator, to know and understand. This information relates to protecting personal safety and preventing equipment problems. It is the responsibility of the owner/operator to inform anyone operating or working in the area of this equipment of these safety guidlines.To help you recognize this information, we use the symbols that are defined below.
Please read the manual and pay attention to these sections. Failure to read this manual and it’s safety instructions is a misuse of the equipment and may lead to serious injury or death.
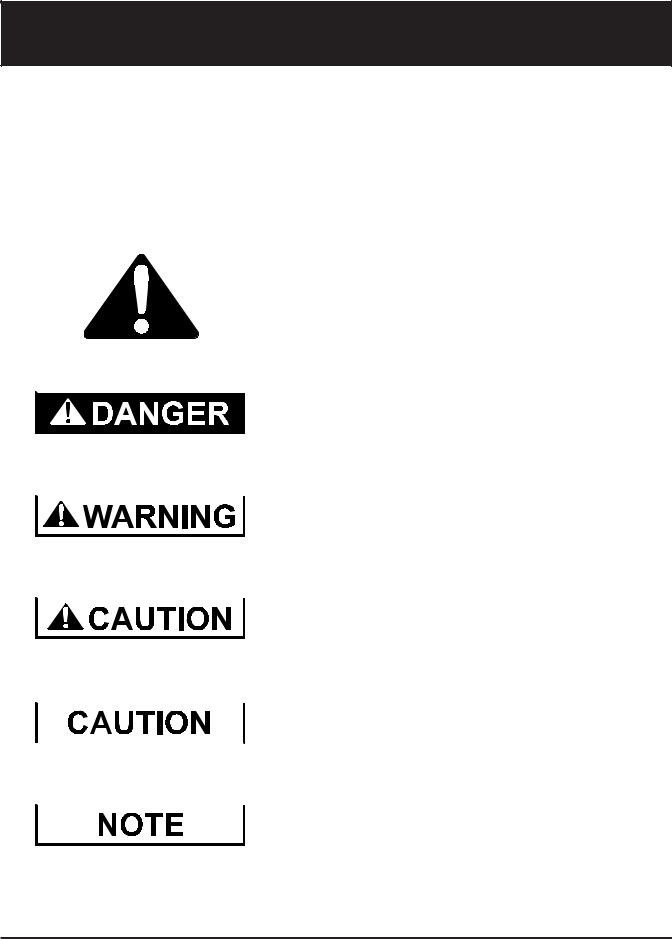
This is the safety alert symbol. It is used to alert you to potential personal injury hazards. Obey all safety messages that follow this symbol to avoid possible injury or death.
 DANGER indicates an imminently hazardous situation which, if not avoided, will result in death or serious injury.
 WARNING indicates a potentially hazardous situation which, if not avoided, could result in death or serious injury.
 CAUTION indicates a potentially hazardous situation which, if not avoided, may result in minor or moderate injury.
 CAUTION used without the safety alert symbol indicates a potentially hazardous situation which, if not avoided, may
  result in property damage.
 NOTE indicates information about the equipment that you should pay special attention to.
7 |
1 |
SAFETY FIRST |
Tower Dryer Operations & Service |
The GSI Group Inc.'s principle concern is your safety and the safety of others associated with grain handling equipment. This manual was written with that thought in mind. We want to keep you as a customer by helping you understand
safe operating procedures, and some of the problems that may be encountered by the dryer operator or other personnel.
As owner and/or operator, it is your responsibility to know what requirements, hazards and precautions exist, and to inform
all personnel associated with the equipment or who are in the dryer area. Avoid any alterations to the equipment. Such alterations may produce a very dangerous situation, where serious injury or death may occur.
The GSI Group, Inc. recommends you contact your local power company and have a representative survey your dryer installation, so your wiring will be compatible with their system and you will have adequate power supplied to your unit.
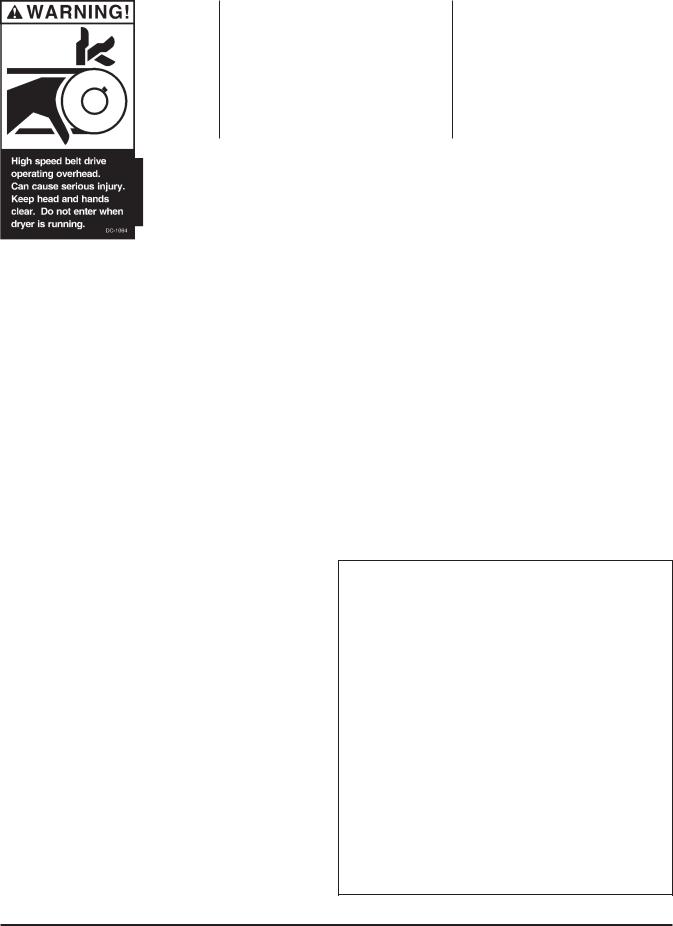
Safety decals should be read and understood by all people in and around the dryer area. If the following safety decals are not displayed on your dryer, or if they are damaged, contact The GSI Group, Inc. for replacement:
The GSI Group, Inc.
1004 E. Illinois St. Assumption, Illinois 62510
phone: 217-226-4421 • fax: 800-800-5329
2 |
8 |
|

Tower Dryer Operations & Service |
SAFETY PRECAUTIONS |
|
|
READ THESE INSTRUCTIONS BEFORE OPERATION AND SERVICE
SAVE FOR FUTURE REFERENCE
1.Read and understand the operating manual before trying to operate the dryer.
2.Never operate the dryer while any guards are removed.
3.Power supply should be OFF for service of electrical components. Use CAUTION in checking voltage or other procedures requiring power to be ON.
4.Check for gas leaks at all gas pipe connections. If any leaks are detected, do not operate dryer. Shut down and repair before further operation.
5.Never attempt to operate the dryer by jumping or otherwise bypassing any safety devices on the unit.
6.Do not exceed maximum recommended drying temperatures.
7.Keep the dryer clean. Do not allow fine material to accumulate in the plenum chamber.
8.Keep blower drive belts tight enough to prevent slippage.
9.Use CAUTION in working around high speed fans, gas burners, augers and auxiliary conveyors which START AUTOMATICALLY.
10.Do not operate in any area where combustible material will be drawn into the fan.
11.Be certain that capacities of auxiliary conveyors are matched to dryer metering capacities.
12.Clean grain is easier to dry. Fine material increases resistance to airflow and requires removal of extra moisture.
13.Do not adjust any moving part on the dryer while it is running.
Use Caution In The
Operation Of This Equipment
The design and manufacture of this dryer is directed toward operator safety. However, the very nature of a grain dryer having a gas burner, high voltage electrical equipment and high speed rotating parts, does present a hazard to personnel, which can not be completely safeguarded against, without interfering with efficient operation and reasonable access to components.
Use extreme caution in working around high speed fans, gas-fired heaters, augers and auxiliary conveyors.
KEEPTHE DRYER CLEAN DO NOT ALLOW FINE MATERIALTO ACCUMULATE INTHE PLENUMCHAMBER OR SURROUNDING THE OUTSIDE OFTHE DRYER
Continued safe, dependable operation of automatic equipment depends, to a great degree, upon the owner. For a safe and dependable drying system, follow the recommendations within this manual, and make it a practice to regularly inspect the operation of the unit for any developing problems or unsafe conditions.
Take special note of the safety precautions listed above before attempting to operate the dryer.
9 |
3 |
INSTALLATION REQUIREMENTS |
Tower Dryer Operations & Service |
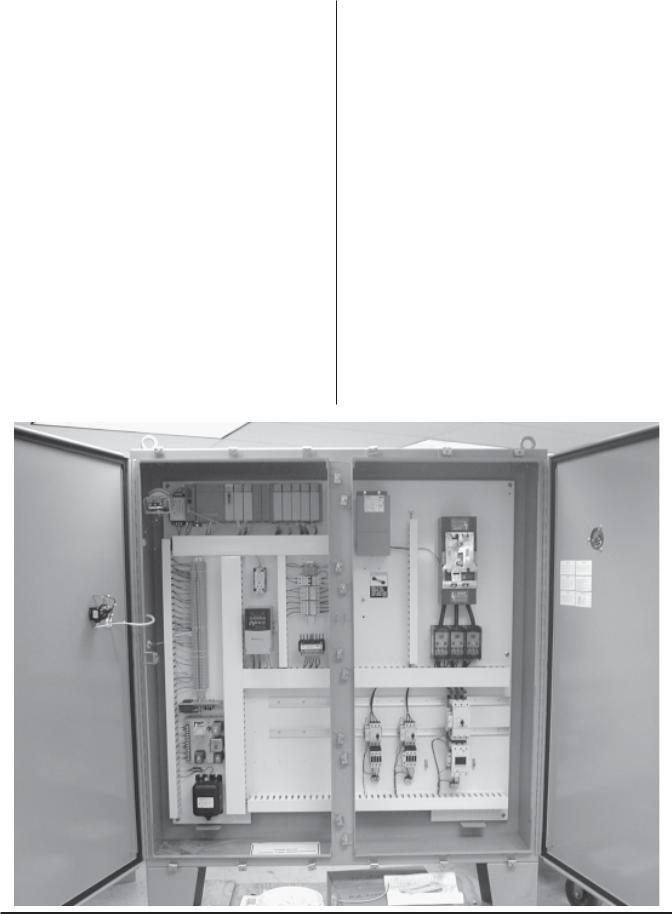
Electrical
The dryer can be furnished to operate off of 240, 480, or 575 volt, 60 Hz power or 380 volt, 50 cycle power. The dryer is furnished with a power panel equipped with a main circuit breaker disconnect and motor starters and branch breakers for the individual blower motors. Standard blower motor starting is across-the-line starting. When necessary, the dryer can be equipped with optional soft-start motor starting equipment.
No dry grain conveyor is furnished with the dryer, however, a 10 hp motor starter for a dry grain conveyor is furnished in the control panel. If the dryer is ordered with a demand fill, a 10 hp motor starter is also provided in the control panel to operate a wet conveyor.
GSI personnel will perform all necessary dryer wiring from the power panel to the dryer. The customer is responsible for bringing electrical power into the main circuit breaker and also for wiring the unload (and load) conveyor.
A wiring diagram is furnished with each dryer. Extensive safety controls are used on the dryer for equipment and personnel protection and should not be bypassed.
Fuel
The burner is designed to burn either natural gas or propane vapor fuel. The volume of fuel supplied must be sufficient to maintain a minimum of 7 to 10 psi pressure when the burner is operating at rated capacity.
When propane is used as the fuel source, external propane vaporizers must be used in order to supply vapor gas to the dryer. Vaporizers must be sized to the burner capacity of the dryer. Fuel pressure to the dryer must be regulated to approximately 10 psi.
GSI personnel will plumb all necessary gas piping from the dryer's gas shutoff valve to the burner. The customer must provide fuel to the gas shutoff valve.
4 |
10 |
|
Tower Dryer Operations & Service |
DRYER CONTROL PANEL |
1
2
3
4
7
11
5
13
14
6
8
9 |
10 |
12 |
Figure 1: The grain dryer control panel with full color touch screen control.
11 |
5 |

DRYER CONTROL PANEL |
Tower Dryer Operations & Service |
Dryer Control Panel Featuring The
Allen-Bradley PLC Control System
1.Full Color Graphical Display provides continuous visual feedback on the current dryer status as well as a convenient means of setting operating parameters and options. Most set points and status screens are accessed by simply touching an on-screen object.
2.Message Center displays current dryer conditions and alarm messages with toubleshooting tips in easy to read language.
3.Dryer View provides a quick visual indication of primary dryer functions as well as easy access to current burner and grain flow status screens.
4.Temperature/Moisture History Chart records up to 32 hours of dryer temperature and/or moisture data (with optional moisture control). The chart can be easily "rewound" to view earlier drying conditions.
5.Control Power Switch energizes the control panel and the PLC Control System. (NOTE: It takes approximately 60 seconds to power up the Full Color Graphical Display once the Control Power Switch is turned on).
6.Outside Light Switch turns the dryer service light on or off. On "AUTO", the light turns on when the dryer is running and off when a shutdown occurs.
7.Load Switch controls the filling of the dryer. The "ON" position initially fills the dryer. The "OFF" position turns the conveyor off/shuts the slide gate. The "AUTO" position enables automatic fill control and the OUT OF GRAIN TIMER.
On dryers filled on demand with a conveyor or slide gate:
In the "ON" or "AUTO" position the fill conveyor turns on / slide gate opens when the dryer is low on grain and off / closes when the dryer is full.
In the "AUTO" position only, the dryer will automatically shut down when the dryer is low on grain and the OUT OF GRAIN TIMER expires.
On choke filled dryers:
In the "AUTO" position only, the dryer will automatically shut down when the dryer is low on grain and the OUT OF GRAIN TIMER expires.
In the "ON" or "OFF" position the OUT OF GRAIN TIMER IS DISABLED.
The LOAD switch is illuminated whenever the load conveyor is running.
8.Low Grain Light flashes when the grain level is low and the OUT OF GRAIN TIMER is running. The LOW GRAIN light is on steady when the timer expires.
9.Blowers Switch turns the blower(s) on or off. On multifan dryers, the blowers start sequentially. The lighted switch flashes during blower start-up. The switch is illuminated when all of the blower airflow switches close indicating that the blowers are operating correctly. After the closure of all of the airflow, the dryer automatically goes through a 30 second purge cycle.
10.Burner Switch turns the burner on or off. When the switch is turned on, the burner pilot will automatically light, after the purging cycle is completed. The lighted burner switch will flash during the 15 second pilot ignition time. The switch illuminates when the pilot flame is sensed at the pilot. After the pilot flame is established the Maxon shut-off valves in the fuel train are energized. Motorized valves will automatically open to provide gas to the main burner. Manual valves must be opened manually to supply gas to the main burner.
11.Unload Conveyor Switch turns the dry grain unload conveyor on or off. The switch illuminates when the conveyor is operating.
12.Metering Device Switch turns the metering device on or off in forward or reverse. The device will not run unless the unload conveyor is on. The switch illuminates when the metering device is discharging grain.
13.Dryer Power Start Button initiates automatic operation of the dryer. When depressed, the dryer begins the startup cycle and operates based on the positions of the selector switches on the control panel. To control the operation of individual components, first depress the DRYER POWER START button, then turn on the individual dryer components as desired.
14.Dryer Power Stop Button manually stops all dryer functions and automatic equipment in a controlled
shutdown sequence.
Important: In case of an automatic dryer shutdown, the DRYER POWER STOP button must be depressed before the dryer can be restarted.
6 |
12 |
|

Tower Dryer Operations & Service |
DRYER START UP |
1. Prepare dryer for start up
Perform preseason inspection and service as outlined in the Maintenance Section before attempting to operate the dryer.
 The dryer must have all Pre-Season and Post-Season maintenance to ensure reliable operation
Make sure all discharge doors, grain exchanger cleanout doors, heat section door, louvered cooling section doors, etc. are closed. Make sure that all personnel are clear of the dryer and any grainhandlingmachinery.
2.Open main gas valve to dryer.
3.Switch on main breaker to provide electrical power to the dryer by placing the main circuit breaker handle located on the dryer power panel to the "ON" position.
4.Pull out both Emergency Stop Buttons located on the side of the control and power box to enable the main PLC circuit.
5.1Switch on the control panel by turning the CONTROL POWER selector switch to the "ON" position. The switch will illuminate indicating that the control panel has power and is operating correctly. After a short series of selfdiagnostic tests, the LCD display screen will display a copyright message and a start button.
5.2Press the on-screen Start button to enter the dryer status screen.
6.Press the DRYER POWER "START" button to activate the LOAD, BLOWERS, BURNER, UNLOAD and METERING DEVICE selector switches on the control panel.
7.Start auxiliary equipment needed for filling
dryer. (ie. wet legs, conveyors, etc.)
8. Fill the dryer by turning the LOAD selector switch to the "ON" position. On a demand fill dryer, the wet conveyor will turn on / slide gate will open and the dryer will start filling with grain. Once the dryer is full, a horn will sound and the wet conveyor will stop / slide gate will shut. Turn the LOAD selector switch to the "AUTO" position to silence the alarm and begin normal
 The burner should be covered before filling the dryer to prevent accumulation of foreign material on the Ignitor, Flame Sensor, and Burner Ports. Foreign material may interfere with burner operation.
dryer operation. In the "AUTO" position, the dryer automatically controls the conveyor / slide gate and the OUT OF GRAIN TIMER is enabled, allowing automatic shutdown if the dryer remains low on grain after a preset period of time.
9.Set drying / plenum temperature by touching the P.L. Temp box on the LCD display. On the pop-up keypad that is displayed, enter the new drying temperature.
Recommended Drying Temperatures
Corn.............................. |
180o to 210oF |
Soybeans...................... |
140o to 160oF |
Wheat........................... |
140o to 160oF |
Milo.............................. |
160o to 180oF |
Barley........................... |
140o to 160oF |
Oats.............................. |
140o to 160oF |
10.Start the blower(s) by turning the BLOWERS selector switch to the "ON" position. The blower(s) will automatically start. On multiblower units the PLC will automatically, start the blowers sequentially. Once the blower(s) are up to speed the airswitches will close and the blower switch lightwillilluminate.
13 |
7 |

DRYER START UP |
|
Tower Dryer Operations & Service |
|||
5.1 |
8 |
10 |
11 |
14 |
6 |
14
5.2
9 |
15 |
|
NOTE: PRESS TO ENTER NEW TEMP.
OR UNLOAD RATE
8 |
14 |
|

Tower Dryer Operations & Service |
DRYER START UP |
11.Start the burner by turning the BURNER selector switch to the "ON" position. The dryer automatically goes through a 30 second purge period once the blowers are started. The amount of time remaining on the purge cycle will be displayed on the LCD display screen. After the purge period the burner pilot will automatically light. Once the flame control circuit on the dryer senses flame, the light in the BURNER selector switch will illuminate. If the pilot fails to light in 15 seconds the burner will lock out and must be restarted by turning the BURNER switch "OFF" then back "ON".
12.Cock and open the Maxon valves. After the pilot is ignited, the main burner can be lit by cocking and opening the two Maxon gas shutoff valves. These valves will automatically open on dryers equipped with motorized Maxon Valves. The main burner will light and the dryer's plenum temperature will be automatically controlled by the modulating motor and maintained at the selected temperature.
12.1 Open firing valve (Canadian dryers only)
13.Let plenum come up to temperature and begin drying. Depending upon ambient conditions, the dryer may take 10 minutes or more to reach the drying temperature.
14.Startunloadsystem.Before discharging grain from the dryer, first make sure all dry legs and conveyors are operating ahead of the dryer. Turn the UNLOAD CONVEYOR selector switch to the
The metering device will not run unless the unloadconveyorisalsorunning.
"ON" position to operate the dry grain conveyor leadingfromthedryer.TurntheMETERINGDE-
VICEselectorswitch tothe"FORWARD"position tostartdischarginggrainfromthedryer.
15.Set Unload Rate/Moisture Control Temperature manually. While operating the dryer in manual mode, set the unload rate by touching the U.L. Rate box on the LCD display. On the popup keypad, enter the new unload rate and press return.
16.Check discharge moisture content after 10 minutes. Take five small samples from the discharge and mix before taking a moisture reading.
17.Switch over to Automatic Moisture Control.
When the discharge moisture content has stabilized at the desired amount for 20 to 30 minutes, the dryer may be switched over toAutomatic Moisture Control.
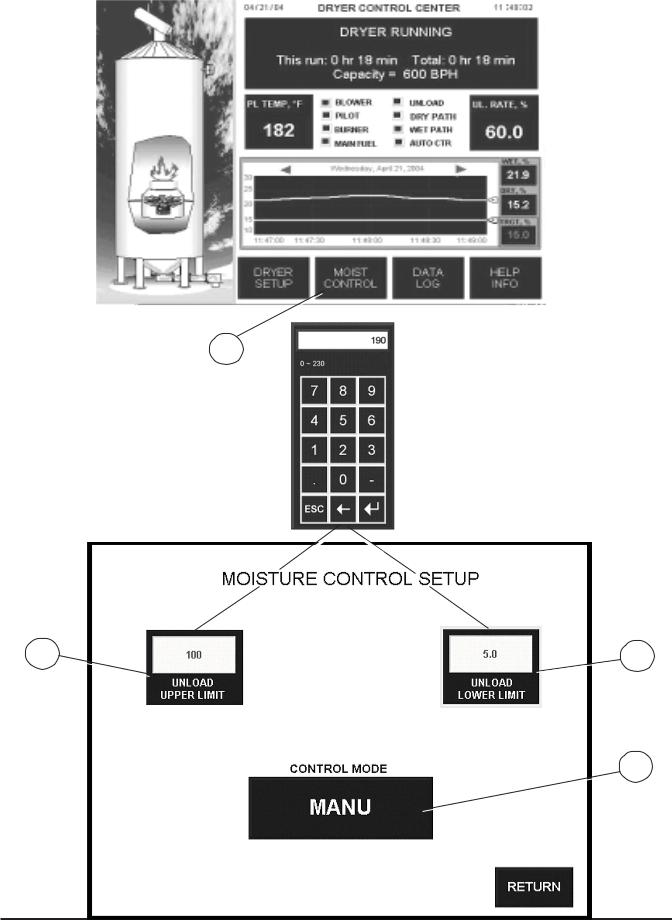
17.1Press the MOISTURE CONTROL button at the bottom of the LCD screen.
17.2On the Moisture Control Setup screen, set the upper and lower limits by touching the corresponding box and using the pop-up keypad. These values prevent the unload from moving too fast or too slow should the incoming moisture be significantly greater or less than anticipated.
17.3Press the CONTROL MODE box to toggle
between Manual andAutomatic moisture control. Note that the current and target grain tempertures
are displayed next to the Temperature History Chart.
 If the discharge moisture content is consistently too high or too low, adjust the target grain temperature as follows:
5oF increase = 1 moisture point decrease
5oF decrease = 1 moisture point increase Allow 30 minutes between adjustments.
15 |
9 |
DRYER START UP |
Tower Dryer Operations & Service |
17.1
17.2 |
17.2 |
17.3
10 |
16 |
|

Tower Dryer Operations & Service |
DRYER SHUTDOWN |
18.Shutdown dryer. The dryer will likely have to be shutdown from time to time. The steps used to shut it down will depend upon the duration of the shutdown. If the dryer will be shutdown for 4 hours or less, follow the Short Shutdown procedure. For longer shutdowns, such as overnight, follow the Extended Shutdown procedure
Short Shutdowns - Less than 4 hours
For short shutdown periods, the dryer can be shutdown by pushing the DRYER POWER STOP button. To restart the dryer, push the DRYER POWER START button. The PLC will restart the dryer automatically based on selector switch settings.
Extended Shutdowns - 4 hours or more
1.Shut off the burner. Turn the BURNER selector switch to the "OFF" position.All gas valves will immediately close and the burner willextinguish.
2.Cool down grain. PLC will continue to operate blowers to cool grain. To avoid overdried grain upon restarting the dryer, continue to move grain through the dryer during the cooling off period.
3.Shut off unload equipment. Turn METERING DEVICE and UNLOAD CONVEYOR selector switches to "OFF" position.
4.Shut off blowers. Turn BLOWER selector switch to "OFF" position.
5.Shut off control panel. Turn the CONTROL POWER selector switch to the "OFF" position.
6.Turn off main circuit breaker located on the power panel.
7.Close main gas valve to the dryer.
8.Inspect the inside of the dryer after operation to insure against the possibility of hot spots or fires.
Viewing Temperature/Moisture
History
Press the left and right arrows above the Temperature/Moisture History Chart to move backward and forward through the graph.
Viewing Burner/Fuel Train Status
Press the Burner region in the Dryer View portion of the LCD display to switch to the Fuel Train Status screen. This screen displays the open/closed state of all valves as well as the modulating valve control value.
Viewing Grain Flow Status
Press the Unload region in the Dryer View portion of the LCD display to switch to the Grain Flow Status screen. This screen displays therunning status of all controlled/interlocked equipment in the grain flow path.
Modifying the Bushel Per Hour Factor
The bushel per hour reading given by the PLC is a calculated value based on metering device speed. Due to variations in grain test weight and unload system settings, the correction factor may need to be calibrated so that the calculated and actual grain flow rates agree. The bushel per hour factor is normally set at 1.0. If, for example, the actual grain flow rate is 5 percent higher than displayed, change the bushel per hour factor to 1.05. To adjust the correction factor, press the DRYER SETUPbutton, then the BUSHEL COUNTER button. Press the CORRECTION FACTOR box to adjust the value.
17 |
11 |

TRI-POINT MOISTURE CONTROLLER Tower Dryer Operations & Service
Optional Tri-Point
Moisture
Controller
Operation Manual
12 |
18 |
|
Tower Dryer Operations & ServiceTRI-POINT MOISTURE CONTROLLER
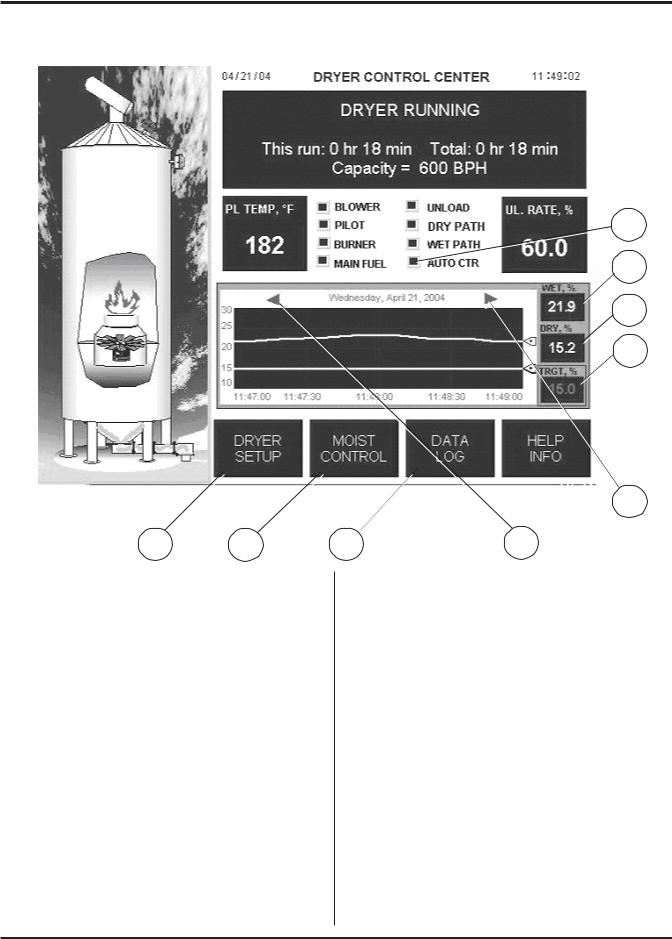
I. Main Screen
9
8
7
6
5
1 |
2 |
3 |
4 |
1.Two-hour moisture history chart - green line for incoming moisture; yellow line for outgoing moisture; and the red line is the target moisture.
2.Moisture Control button - to access the Moisture Control Set-up screen.
3.Data Log button - to access the moisture history data (up to last 30 hours).
4.Back browse button - to scroll the chart back in time.
5.Forward browse button - to scroll the chart in forward time
6.Moisture target - To change the moisture target, press within the rectangular area and key in the new target from the pop-up keypad.
7.Current moisture coming out of the dryer.
8.Current moisture coming into the dryer.
9.Moisture control status - the LED turns on if the moisture controller is in auto
mode
19 |
13 |
TRI-POINT MOISTURE CONTROLLER Tower Dryer Operations & Service
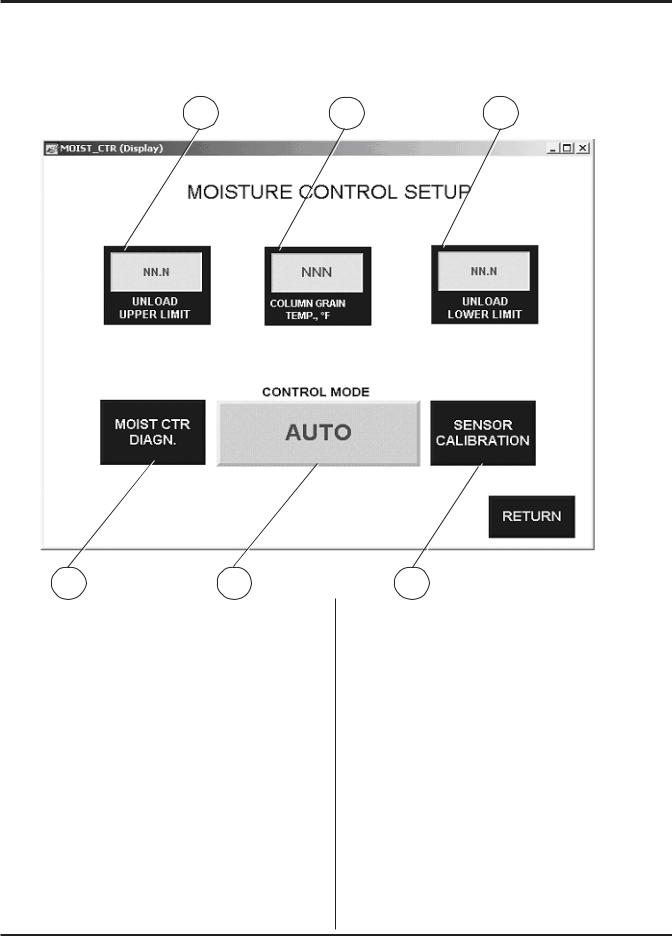
II. Set-Up of the Controller
*Press the “MOIST CONTROL” button from the main screen to access the moisture set-up
screen: |
1 |
2 |
3 |
6 |
5 |
4 |
1.Unload upper limit - the maximum unloading rate (%) in which dryer can be run without plugging any unloading conveyors.
2.Current column grain temperature - measured from the RTD sensor at the end of the drying section (it is not the temperatureof the grain coming out of the dryer).
3.Unload lower limit - the minimum unloading speed that can maintain the sampling box of the dry sensor full of grain. It is essential to have the sensor fully covered
by grain to get an accurate reading of the grain moisture.
4.Calibration button - to access sensor calibration screen (see Section III, Step 3).
5.Control Mode button - toggle the control mode between MANUAL and AUTO by pressing the button.
6.Moisture Control Diagnosis button - to access the diagnostic screen for factory trouble shooting.
14 |
20 |
|
Tower Dryer Operations & Service TRI-POINT MOISTURE CONTROLLER
III. Operation Procedure
1.Start the dryer; set the dryer unload at a desired speed from the dryer control panel.
2.Let the dryer run under manual mode for warming up until the column grain temperature has stabilized and the moisture coming out of the dryer is within ± 2% of the target moisture.
3.During the start-up period, calibrate both the wet and dry sensors against a bench meter as follows:
a)Press “SENSOR CALIBRATION” button from the moisture control set-up screen to open the sensor calibration screen.
b) Take grain samples from the dryer, measure the moisture with a bench meter and then compare to the sensor reading during the sampling period.
Change the sensor offset if the sensor reading does not match the bench measurement. For example, if the offset was 1.0%, and the sensor reading is 0.5% lower than the bench meter, then change the offset to 1.5% to match the sensor to the bench meter. Likewise, if the sensor reading is higher than the bench meter, the offset should be decreased accordingly.
21 |
15 |

TRI-POINT MOISTURE CONTROLLER Tower Dryer Operations & Service
 The sensor should be calibrated 2-3 times a day. At the same time check and clean the sensor and sensor sampling box to make sure that there is no debris blocking the grain flow around the sensor.
4. Check or change the target moisture from the main screen.
5. Press “MOIST CONTROL” to access the moisture control set-up screen.
Check upper/lower unloading limits and change them if needed.
6. Press the “CONTROL MODE” button from the moisture control set-up screen and set the mode to AUTO. The moisture controller will start adjusting the unload rate between the upper and lower limits of the unload speed to maintain the moisture coming out of the dryer.
IV. How the Controller Works
The controller continuously monitors the moisture coming in and out of the dryer, and the column grain temperature at the end of the drying section. The control action is mainly based on the dry sensor at the outlet of the dryer. If the moisture coming out of the dryer is not right at the target, the controller will speed up or slow down the unload device accordingly. The wet sensor and the column grain temperature sensor are intended to detect moisture spikes coming into the dryer so that the moisture controller can react ahead of time. For example, if the wet sensor detects a jump of moisture coming into the dryer, the controller will start slowing down the unload speed right away. However, the controller does not act to the full scale immediately. Instead, it
slows down the dryer gradually so that the grain currently in the dryer will not be overdried too much.
In the first pass after the dryer started, the controller does not have enough information of the grain in the dryer. It controls the dryer by using the manual speed setting as a starting point. In other words, the manual speed setting is most responsible for the first pass of drying. Therefore, set the manual unloading speed as close as it should be for the grain currently in the dryer before switching to AUTO control mode. The manual speed setting does not have to be adjusted after the controller is switched into AUTO mode.
16 |
22 |
|

Tower Dryer Operations & ServiceTRI-POINT MOISTURE CONTROLLER
V. Alarms
The controller checks the sensors and control status regularly. If abnormal conditions are detected, a corresponding alarm will go off, an alarm message will come up on the main screen and the dryer will be shut down.
ALARM |
CAUSES |
SOLUTION |
||
Moisture out of range - |
• Sensor box plugged and |
• Clear the sampler and |
||
the moisture coming out |
|
sensor was not covered |
|
sensor box |
of the dryer was 2.5% |
|
by grain |
|
|
above or below the set- |
• Dry sensor out of |
• |
Calibrate the sensor |
|
point for more than one |
|
calibration |
|
|
hour under AUTO control |
• Too big swing of |
• Run the dryer manually |
||
mode |
|
moisture coming into the |
|
for one pass |
|
|
dryer |
|
|
Dry sensor error - |
• |
Bad wiring |
• |
Check connection |
sensor reading is less than |
• |
Bad sensor |
• |
Change the sensor |
6% or higher than 40% |
• |
Bad circuit board |
• Change the circuit board |
|
|
|
|
|
|
Dry grain temperature out |
• |
Bad wiring |
• |
Check connection |
of range (0-300F) |
• |
Bad sensor |
• |
Change the sensor |
|
• |
Bad circuit board |
• Change the circuit board |
|
|
|
|
|
|
Wet sensor error - |
• |
Bad wiring |
• |
Check connection |
sensor readng is less than |
• |
Bad sensor |
• |
Change the sensor |
6% or higher than 40% |
• |
Bad circuit board |
• Change the circuit board |
|
|
|
|
|
|
Wet grain temp. out of |
• |
Bad wiring |
• |
Check connection |
range |
• |
Bad sensor |
• |
Change the sensor |
(0-300F) |
• |
Bad circuit board |
• Change the circuit board |
|
|
|
|
|
|
Column grain temperature |
• |
Bad wiring |
• |
Check connection |
RTD out of range |
• |
Bad sensor |
• |
Change the sensor |
(0-300F) |
• |
Bad circuit board |
• Change the circuit board |
|
|
|
|
|
|
23 |
17 |
TRI-POINT MOISTURE CONTROLLER Tower Dryer Operations & Service
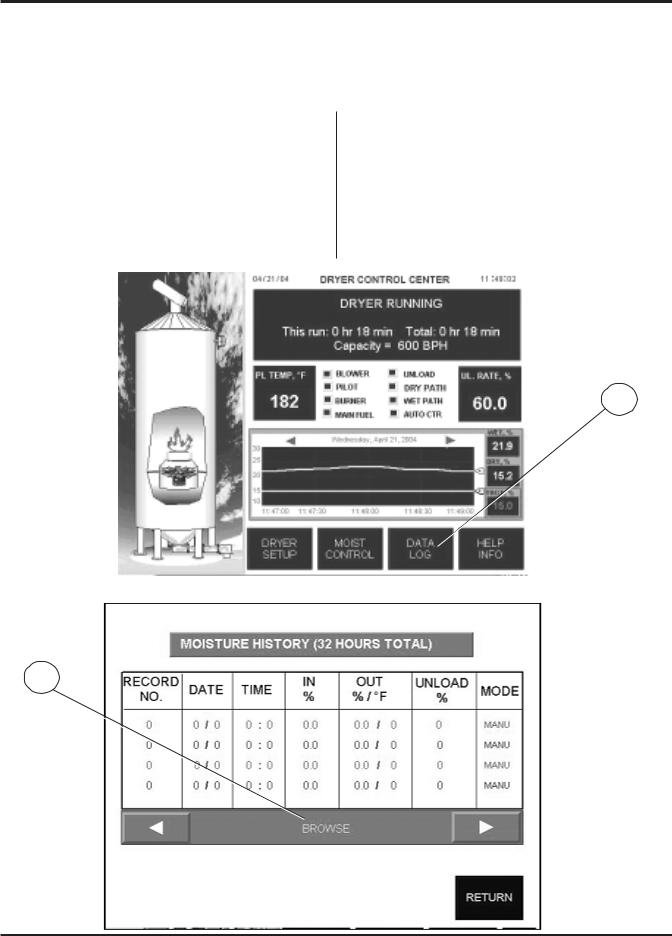
VI. Access Drying History
1. Press the “DATA LOG” button from the main screen to open the moisture history screen. The controller logs quarterly data up to 120 records (i.e. 30 hours) into the archive.
2.Press the browse buttons to browse the record.
1
2
18 |
24 |
|

Tower Dryer Operations & Service |
NOTES |
______________________________________________________________________________________________________
_______________________________________________________________________________________________________
______________________________________________________________________________________________________
__________________________________________________________________________________________________________
___________________________________________________________________________________________________________
__________________________________________________________________________________________________________
________________________________________________________________________________________________________
__________________________________________________________________________________________________________
_________________________________________________________________________________________________________
_______________________________________________________________________________________________________
_________________________________________________________________________________________________________
_______________________________________________________________________________________________________
__________________________________________________________________________________________________
___________________________________________________________________________________________________
_____________________________________________________________________________________________________
____________________________________________________________________________________________________
________________________________________________________________________________________________________
_______________________________________________________________________________________________________
________________________________________________________________________________________________________
_________________________________________________________________________________________________________
________________________________________________________________________________________________________
______________________________________________________________________________________________________
________________________________________________________________________________________________________
____________________________________________________________________________________________________
_______________________________________________________________________________________________________
______________________________________________________________________________________________________
___________________________________________________________________________________________________________
25 |
19 |

NOTES |
Tower Dryer Operations & Service |
______________________________________________________________________________________________________
_______________________________________________________________________________________________________
______________________________________________________________________________________________________
__________________________________________________________________________________________________________
___________________________________________________________________________________________________________
__________________________________________________________________________________________________________
________________________________________________________________________________________________________
__________________________________________________________________________________________________________
_________________________________________________________________________________________________________
_______________________________________________________________________________________________________
_________________________________________________________________________________________________________
_______________________________________________________________________________________________________
__________________________________________________________________________________________________
___________________________________________________________________________________________________
_____________________________________________________________________________________________________
____________________________________________________________________________________________________
________________________________________________________________________________________________________
_______________________________________________________________________________________________________
________________________________________________________________________________________________________
_________________________________________________________________________________________________________
________________________________________________________________________________________________________
______________________________________________________________________________________________________
________________________________________________________________________________________________________
____________________________________________________________________________________________________
_______________________________________________________________________________________________________
______________________________________________________________________________________________________
20 |
26 |
|

Tower Dryer Operations & Service |
NOTES |
______________________________________________________________________________________________________
_______________________________________________________________________________________________________
______________________________________________________________________________________________________
__________________________________________________________________________________________________________
___________________________________________________________________________________________________________
__________________________________________________________________________________________________________
________________________________________________________________________________________________________
__________________________________________________________________________________________________________
_________________________________________________________________________________________________________
_______________________________________________________________________________________________________
_________________________________________________________________________________________________________
_______________________________________________________________________________________________________
__________________________________________________________________________________________________
___________________________________________________________________________________________________
_____________________________________________________________________________________________________
____________________________________________________________________________________________________
________________________________________________________________________________________________________
_______________________________________________________________________________________________________
________________________________________________________________________________________________________
_________________________________________________________________________________________________________
________________________________________________________________________________________________________
______________________________________________________________________________________________________
________________________________________________________________________________________________________
____________________________________________________________________________________________________
_______________________________________________________________________________________________________
______________________________________________________________________________________________________
___________________________________________________________________________________________________________
27 |
21 |

NOTES |
Tower Dryer Operations & Service |
______________________________________________________________________________________________________
_______________________________________________________________________________________________________
______________________________________________________________________________________________________
__________________________________________________________________________________________________________
___________________________________________________________________________________________________________
__________________________________________________________________________________________________________
________________________________________________________________________________________________________
__________________________________________________________________________________________________________
_________________________________________________________________________________________________________
_______________________________________________________________________________________________________
_________________________________________________________________________________________________________
_______________________________________________________________________________________________________
__________________________________________________________________________________________________
___________________________________________________________________________________________________
_____________________________________________________________________________________________________
____________________________________________________________________________________________________
________________________________________________________________________________________________________
_______________________________________________________________________________________________________
________________________________________________________________________________________________________
_________________________________________________________________________________________________________
________________________________________________________________________________________________________
______________________________________________________________________________________________________
________________________________________________________________________________________________________
____________________________________________________________________________________________________
_______________________________________________________________________________________________________
______________________________________________________________________________________________________
2 |
28 |
|
MAINTENANCE
29
30
 Loading...