

Page 1
ULTRASONIC CLEANER
UC 5020
de en es tr
Page 2
_________________________________________________________
A
B
E
C
D
H
G
2
I
F
J
Page 3

_________________________________________________________
DEUTSCH 04-17
ENGLISH 18-30
ESPAÑOL 31-44
TÜRKÇE 45-57
3
Page 4

SAFETY AND SET-UP _____________________
Please note the following instructions
when using the appliance:
7
The appliance is designed for
domestic use only.
7
Do not immerse the appliance,
power cord or power plug in
water or in other liquid.
7
Pull out the power plug after
using the appliance and before
cleaning the appliance. Do not
disconnect the plug by pulling on
the cord.
7
Never use the appliance if it
or the power cord is visibly
damaged.
7
If the power cord is damaged,
it must be replaced by the
manufacturer, a service centre
or a similarly qualified person to
avoid any danger of electrical
shock.
7
Keep the appliance out of the
reach of children.
7
The appliance should not be
used by the following people,
including children: those with
limited physical, sensory or
mental capabilities and also
those with a lack of experience
and knowledge. This does not
apply to the latter if they were
instructed in the use of the
appliance or if they use it under
the supervision of a person
responsible for their safety.
Children should always be
supervised to ensure that they do
not play with the appliance.
7
Store the packaging material
and the accessories away
from children; they may cause
danger of life by suffocating and
swallowing.
7
Never open the appliance under
any circumstance. No warranty
claims are accepted for damage
caused by improper handling.
7
Check if the mains voltage on the
type label corresponds to your
local mains supply. The only way
to disconnect the appliance from
the mains is to pull out the plug.
7
Keep the surface of the
appliance, control panel and
switch always clean and dry.
7
To clean the appliance, see the
“Cleaning and care” section.
18
ENGLISH
Page 5

SAFETY AND SET-UP
_____________________
7
Do not operate the appliance
without filling with water,
otherwise it will get damaged.
7
Do not let power cord hang over
sharp edges or hot surfaces.
7
Do not operate or place any
part of this appliance on or near
any hot surface, such as gas or
electric burners.
7
Do not use the appliance for any
purpose other than its intended
use. The appliance is designed
for cleaning jewelry, waterproof
watches, glasses, CDs and DVDs
etc.; see the " Which objects
should be cleaned " section.
7
Do not use the appliance with
wet hands.
7
Use the appliance on a stable
work surface.
7
Unplug the appliance before
filling it. Do not exceed the
“MAX” marking when filling with
water.
7
Do not place sensitive, small
objects directly in stainless
steel tank, otherwise they will
get scratched; use the plastic
cleaning basket for them.
7
Do not use strong cleansing
agents or chemicals, such as
caustic, ammonia, bleach,
detergents with strong perfumes,
in the appliance.
7
Do not touch the inside of the
appliance and the cleaning liquid
while it operates.
ENGLISH
19
Page 6

AT A GLANCE
___________________________
Dear Customer,
Congratulations on the purchase of
your UC 5020 Ultrasonic Cleaner.
Please read the following user notes
carefully to ensure full enjoyment
of your quality Grundig product for
many years to come.
A responsible approach!
GRUNDIG focuses
on contractually
agreed social
working conditions
with fair wages for
both internal
employees and suppliers, as well as
on the efficient use of raw materials
with continual waste reduction of
several tons of plastic each year –
and availability of at least 5 years
for all accessories.
For a future worth living.
For a good reason. Grundig.
Special Features
Your Ultrasonic Cleaner is suitable
for a gentle, intensive cleaning for
shaving heads, hair clipper cutting
heads, tooth brushes, dentures,
braces, jewelry, waterproof
watches, glasses, CDs/DVDs,
combs and many more objects.
It gives shine and cleanliness with
highly-efficient, gentle cleaning
with ultrasound technology, without
damaging the surfaces. It loosens
even stubborn dirt, in the most
inaccessible places.
Dirt elimination principle
7
Ultrasonic wave diffuses into
the water so that it generates
exquisite cavitation and
emulsification.
7
Millions of tiny cavitation bubbles
are generated each second. The
bubbles are generated largely
and imploded constantly under
the wave of mechanical libration
with high frequency.
7
The powerful impact and the
negative press suction split up
the dirt into many granules and
separates them from the surface
of the object, the granules then
come into water.
20
ENGLISH
Page 7

AT A GLANCE
___________________________
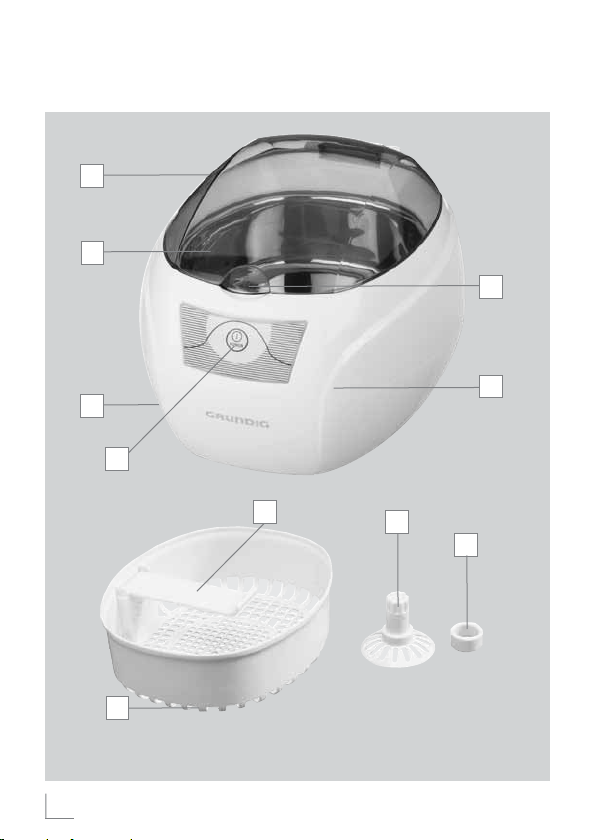
Controls and parts
See the figure on page 2.
A
Translucent lid
B
Stainless steel tank (550 ml)
C
Power cord
D
On/Off switch
E
Power on indicator light
F
Body
Accessories
G
Plastic cleaning basket
H
Plastic watch stand
I
CD rack
J
CD rack spacer
Which objects should be
cleaned?
Glasses
Place your glasses always with the
glasses in upward position into the
Plastic cleaning basket
Glasses or glass frames which have
scratches should not be cleaned
in the appliance. Ultrasound
technology can deeper the
stratches.
G
.
Gold, silver and metal
jewelry
The appliance is suitable for
cleaning gold, silver and metal
jewelry. The jewelry should not
contain fragile or porous stones.
See also 'Which objects should not
be cleaned? ". To be on the safe
side, you should consult the store,
where you purchased the jewelry,
whether it is suitable for cleaning
with the ultrasonic cleaner.
Metal bracelets of
waterproof watches
Do not clean clockworks with
the appliance since they may be
damaged.
Do not clean watches which are
not waterproof.
Do not clean mechanical watches
with the appliance. The spiral
spring in the watch may be
magnetic and the watch would not
show the exact time.
CDs and DVDs
CDs and DVDs, which have
discernible cracks, may get
damaged.
ENGLISH
21
Page 8

AT A GLANCE
___________________________
Other objects
7
Combs, dentures, braces, or
heads of electric shavers;
7
Nibs, ink jet printer cartridges,
seals;
7
Metal cutlery, coins, metal
nozzles or valves of metal.
Which objects should not
be cleaned?
Jewelry with fragile or
porous stones
Do not use the appliance for
cleaning fragile or porous stones,
such as pearls and mother of pearl,
emerald, opal, coral, turquoise,
lapis lazuli, malachite, black onyx
and tiger eye.
Glasses with frames made of
natural materials
Do not use the device for cleaning
glasses with frames made of fragile
or porous natural materials such as
tortoiseshell and horn.
Other objects
7
Objects consist of or containing
wood, textile or leather
7
Contact lenses
7
Costume jewelry, especially
silver-plated costume jewelry
7
Older CDs and DVDs
ENGLISH
22
Hints and Tips
7
Most of the dirt will already be
loosened at the first cleaning
operation. If there are still some
dirt particles at the objects, you
can try to remove with a damp,
soft cloth before repeating the
cleaning operation for a second
time.
7
Clean one side of large objects
first. After finishing please turn
the large objects for cleaning the
other side and start operation
again.
7
If you want to have a better
cleaning for very dirty objects,
you can repeat the cleaning
operation for several times. Wait
at least 2 minutes before you start
the next cleaning operation.
7
You can increase the effect of
cleaning by adding a few drops
of a very soft liquid soap in the
water. For your watches and
jewelry; ask the specialists where
you buy them, whether they are
suitable for cleaning with liquid
soap. Never use liquid soap for
cleaning CDs and DVDs.
Page 9

OPERATION
_____________________________
Before first use
7
Remove the transparent
protection sleeve on the On/Off
D
switch
appliance for the first time.
Cleaning sensitive and
small objects
1
Open translucent lid A and fill
the stainless steel tank
water.
Caution
7
marking.
7
without filling with water,
otherwise it will get damaged.
7
2 Put the object in the plastic
cleaning basket
3 Place the plastic cleaning basket
panel before using the
B
with
Do not exceed the “MAX”
Do not operate the appliance
Use only clear, cold water.
G
.
G
into the stainless steel tank B.
C
into a
A
.
4 Close the translucent lid
5 Plug the power cord
suitable power outlet.
– Power on indicator light
illuminates for a few seconds
and disappears.
6 Press the On/Off switch
D
.
– The power on indicator
E
illuminates and the
light
cleaning operation starts.
It takes 5 minutes for the
appliance to finish cleaning
operation.
7 When the cleaning operation
finishes, the appliance
automatically stops and the
E
power on indicator light
disappears.
8 After using the appliance,
disconnect the power cord
from the power outlet.
9 Open the translucent lid
A
and
take out the plastic cleaning
basket
with the object. Pour
G
out the water and clean the
appliance. See the “Cleaning
and care” section.
Notes
7
You can put multiple of jewelries
at the same time.
7
Put the glasses in the plastic
cleaning basket
G
always with
the glasses in upward position.
ENGLISH
E
C
23
Page 10

OPERATION
7
Plastic cleaning basket
_____________________________
G
absorbs one third of the
ultrasonic energy and decreases
the cleaning power. So it might
be necessary to repeat the
cleaning operation more than
once.
7
Be sure that the water level does
not exceed the “MAX” marking
after placing the objects into
the Stainless steel tank
. If the
B
“MAX” marking is exceeded,
take an object out until the water
level again matches with the
“MAX” marking.
7
The object should be immersed
well into the water.
7
Do not press On/Off switch
while power on indicator light
E illuminates for a few seconds.
Press it after the light disappears.
7
The appliance has an integrated
timer for 5 minutes of operation.
7
If you want to stop the cleaning
operation earlier than 5 minutes,
press the On/Off switch
D
Cleaning metal bracelets
of waterproof watches
A
1 Open translucent lid
the stainless steel tank
water.
Caution
7
Make sure that the watch is
waterproof and suitable for
cleaning in the Ultrasonic
Cleaner.
7
Do not exceed the “MAX”
marking.
7
Do not operate the appliance
without filling with water,
otherwise it will get damaged.
7
D
Use only clear, cold water.
2 Place the watch onto the plastic
watch stand
H
cleaning basket
3 Place the plastic cleaning basket
into the stainless steel tank B .
G
.
and fill
with
B
in the plastic
.
G
24
ENGLISH
Page 11

OPERATION
4 Close the translucent lid
5 Plug the power cord
_____________________________
A
into a
C
suitable power outlet.
– Power on indicator light
illuminates for a few seconds
and disappears.
6 Press the On/Off switch
D
– The power on indicator
illuminates and the
light
E
cleaning operation starts.
It takes 5 minutes for the
appliance to finish cleaning
operation.
7 When the cleaning operation
finishes, the appliance
automatically stops and the
power on indicator light
E
disappears.
8 After using the appliance
disconnect the power cord
from the power outlet.
9 Open the translucent lid
A
take out the plastic cleaning
basket
with the watch. Pour
G
out the water and clean the
appliance. See the “Cleaning
and care” section.
Notes
7
Do not press On/Off switch
while power on indicator light
illuminates for a few seconds.
E
Press it after the light disappears.
.
E
.
C
and
D
7
The appliance has an integrated
timer for 5 minutes of operation.
7
If you want to stop the cleaning
operation earlier than 5 minutes,
D
press the On/Off switch
.
ENGLISH
25
Page 12

OPERATION
_____________________________
Cleaning CDs/DVDs
1 Open translucent lid
the stainless steel tank
water.
Caution
7
Do not exceed the “MAX”
marking.
7
Do not operate the appliance
without filling with water,
otherwise it will get damaged.
7
Use only clear, cold water.
2 Put the CD or DVD onto the CD
I
.
rack
3 Place the CD rack
stainless steel tank
4 Close the translucent lid
5 Plug the power cord
suitable power outlet.
– Power on indicator light
illuminates for a few seconds
and disappears.
A
B
into the
I
.
B
C into a
and fill
with
A
.
E
D
6 Press the On/Off switch
.
– The power on indicator light
illuminates and the cleaning
E
operation starts.
D
7 Press On/Off switch
after
2 minutes of operation. The
appliance stops and the power on
indicator light
disappears.
E
8 After using the appliance
disconnect the Power cord
C
from
the power outlet.
9 Open the translucent lid
take out the CD rack
. Pour
I
A
and
out the water and clean the
appliance. See the “Cleaning and
care” section.
Warning
7
Never repeat the cleaning
operation for CDs and DVDs.
Never use liquid soap or other
cleaning agents for CDs and
DVDs. Otherwise, the printings
on the CDs and DVDs will get
damaged.
7
Do not clean your CDs or DVDs
more than 2 minutes, otherwise
they will get damaged.
Notes
7
Back-up the data on CDs or DVDs
before cleaning.
26
ENGLISH
Page 13

OPERATION
7
You can put 2 CDs or DVDs at
_____________________________
the same time. Put the first CD or
DVD onto the CD rack
place CD rack spacer
I
and put
J
the second CD or DVD onto the
CD rack spacer.
7
Do not press On/Off switch
while power on indicator light
illuminates for a few seconds.
E
Press it after the light disappears.
7
Dry the CDs or DVDs with a soft
cloth, which does not leave any
floss or scratch the CDs or DVDs.
, then
D
Cleaning large objects
1 Open translucent lid
stainless steel tank
Caution
7
Do not exceed the “MAX”
marking.
7
Do not operate the appliance
without filling with water,
otherwise it will get damaged.
7
Use only clear, cold water.
2 Put the object in the stainless steel
B
tank
.
A
fill the
with water.
B
3 Plug the power cord
suitable power outlet.
– Power on indicator light
illuminates for a few seconds
and disappears.
into a
C
ENGLISH
E
27
Page 14

OPERATION
4 Press the On/Off switch
_____________________________
.
D
– The Power on indicator light
illuminates and the cleaning
E
operation starts. It takes 5
minutes for the appliance to
finish cleaning operation.
5 When the cleaning operation
finishes, the appliance
automatically stops and the power
on indicator light
disappears.
E
6 After using the appliance
disconnect the power cord
C
from the power outlet.
7 Take out the object from the
stainless steel tank
.
B
8 Pour out the water and clean the
appliance. See the “Cleaning and
care” section.
Notes
7
You can use the appliance with
the translucent lid
A
open for
large objects.
7
Clean one part of the large
objects first. After cleaning, insert
the uncleaned part of the object
into the appliance and repeat the
cleaning process.
7
Do not press On/Off switch
D
while power on indicator light
illuminates for a few seconds.
E
Press it after the light disappears.
7
The appliance has an integrated
timer for 5 minutes of operation.
7
If you want to stop the cleaning
operation earlier than 5 minutes,
D
press the On/Off switch
.
28
ENGLISH
Page 15

INFORMATION
__________________________
Cleaning and care
1 Turn the appliance off and
unplug it.
2 Pour out the water in the stainless
steel tank
3 Clean and dry stainless steel
tank
appliance. Use only damp, soft
cloth to clean.
.
B
and the exterior of the
B
Caution
7
Never put the appliance or
power cord in water or any other
liquid.
Storage
If you do not plan to use the
appliance for a long period of time,
please store it carefully.
Make sure that it is unplugged and
is completely dry.
Do not wrap the power cord
around the appliance.
Store it in a cool and dry place.
Make sure the appliance is kept out
of the reach of children.
ENGLISH
29
Page 16

INFORMATION
________________________
Environmental note
This product has been
manufactured with high-quality
parts and materials which can
be reused and are suitable for
recycling.
Therefore, do not
dispose the product
with normal domestic
waste at the end of its
service life. Take it to
a collection point for
the recycling of electrical and
electronic equipment. This is
indicated by this symbol on the
product, in the operating manual
and on the packaging.
Please consult your local authorities
to learn the nearest collection point.
Help protect the environment by
recycling used products.
Technical data
This product conforms to the
European directives 2004/108/EC,
2006/95/EC and 2009/125/EC.
Power supply: 220-240V~,
50/60 Hz
Power: 50 W
Technical and design modifications
reserved.
30
ENGLISH
Page 17

www.grundig.com
72011 906 1500
 Loading...