

Grundig RR 440 CD User Manual

RADIO RECORDER WITH CD
RR 440 CD
1

2
________________________________________________________________
3 Sicherheit und Pflege 9 CD-Betrieb
4 Auf einen Blick 13 Cassetten-Betrieb
6 Stromversorgung 15 Informationen
7 Lautstärke/Klang 16 Fehlersuche
8 Radio-Betrieb 144 Service
17 Care and safety 24 CD mode
18 Overview 28 Tape mode
20 Power supply 30 Information
22 Volume/tone 31 Troubleshooting
23 Radio mode 144 Service
32 Sécurité et entretien 38 Fonction CD
33 Vue d’ensemble 42 Fonction cassette
35 Alimentation en courant 44 Informations
36 Volume/son 45 Recherche d’erreurs
37 Fonction radio 144 Service
46 Sicurezza e cura 52 Funzionamento CD
47 In breve 56
Funzionamento Cassetta
49 Alimentazione elettrica 58 Informazioni
50 Volume/suono 59 Ricerca degli errori
51 Funzionamento Radio 144 Service
60 Segurança e conservação 66 Função CD
61 Vista geral 70 Função cassetes
63 Alimentação de corrente 72 Informações
64 Volume/som 73 Identificação de erros
65 Função rádio 144 Assistência a clientes
74 Seguridad y cuidado 80 Modo CD
75 Vista general 84 Modo casete
77 Alimentación de corriente 86 Información
78 Volumen/sonido 87 Búsqueda de fallos
79 Modo radio 144 Servicio
88 Veiligheid en onderhoud 94 CD-mode
89 In een oogopslag 98 Cassette-mode
91 Stroomtoevoer 100 Informatie
92 Volume/geluid 101 Foutopsporing
93 Radiofunctie 144 Service
102 Sikkerhed og vedligeholdelse 108 CD-funktion
103 Kort oversigt 112 Kassettefunktion
105 Strømforsyning 114 Informationer
106 Lydstyrke/toneindstilling 115 Fejlfinding
107 Radiofunktion 144 Service
116 Säkerhet och skötsel 122 CD-spelaren
117 En överblick 126 Kassettbandspelaren
119 Strömförsörjning 128 Information
120 Volym/ljud 129 Felsökning
121 Radio 144 Service
130 Turvallisuus ja hoito 136 CD-käyttö
131 Yleiskatsaus 140 Kasettikäyttö
133 Virransyöttö 142 Tietoja
134 Äänenvoimakkuus/-sävy 143 Vianetsintä
135 Radiokäyttö 144 Huolto (Service)
DEUTSCH
ENGLISH
FRANÇAIS
ITALIANO
PORTUGUÊS
ESPAÑOL
NEDERLANDS
DANSK
SVENSKA
SUOMI
ENGLISH
17
CARE AND SAFETY
______________________________
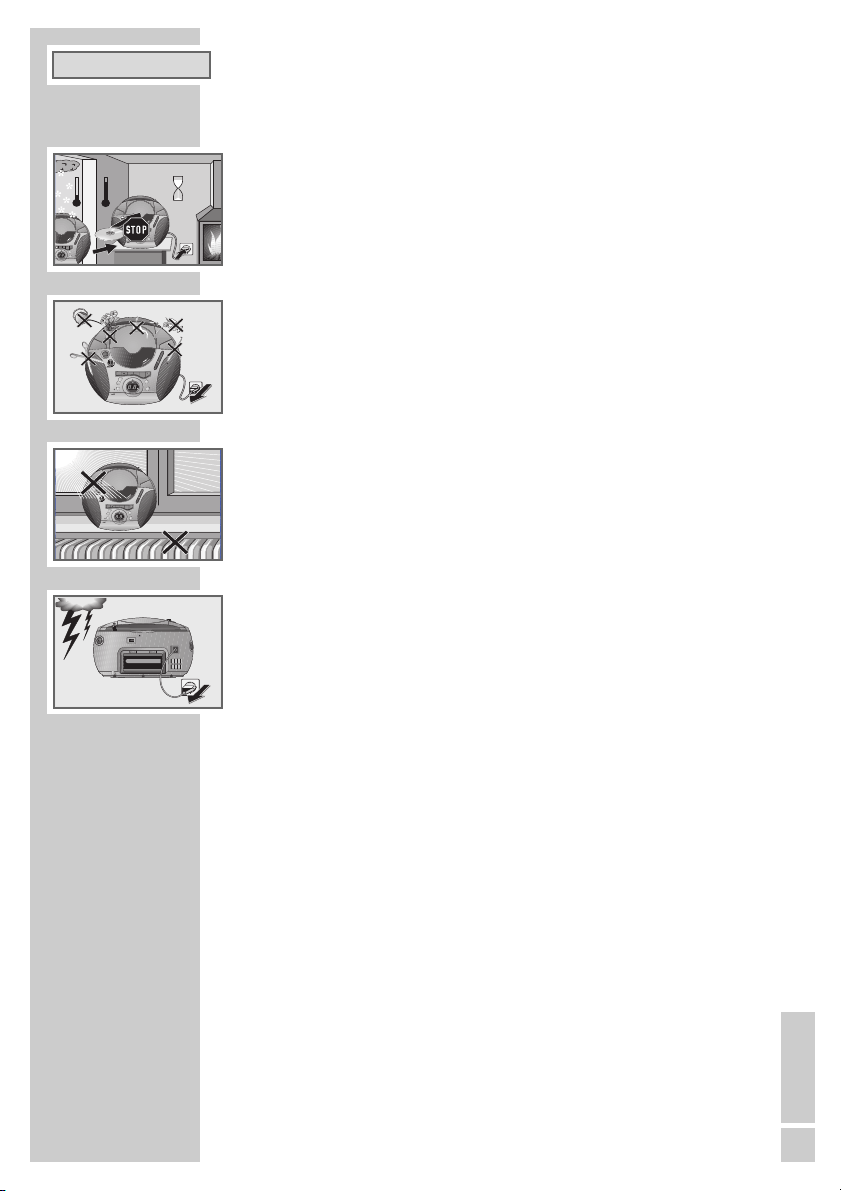
To ensure that this device provides you with long-term satisfaction and enjoyment, please observe the following instructions:
This device is designed for the recording and playback of audio signals.
Any other use is expressly prohibited.
Protect the device, the CDs and cassettes from rain, moisture, sand and heat.
Do not leave it next to heaters or inside parked cars in the sun.
Do not insert any foreign bodies in the CD or tape compartments.
Bringing the device in from the cold can cause condensation on the CD lens,
which prevents it from playing. Allow the device to adapt to room
conditions.
The CD and tape units contain self-lubricating bearings, which must not be
oiled or greased.
Never open the device casing under any circumstances. The manufacturer
accepts no liability for damage resulting from improper handling.
Thunderstorms present a danger to all electrical devices. Even if the device is
switched off, it can be damaged by a lightning strike to the mains. Always
remove the mains plug during an electrical storm.
Do not use any cleaning agent, as this may damage the casing. Clean the
device with a clean, moist leather cloth.
Please note when deciding where to put the device that furniture surfaces are
covered by various types of lacquer and plastic, most of which contain
chemical additives. These may cause corrosion to the feet of the device, thus
resulting in stains on the surface of the furniture which can be difficult or
impossible to remove.
°C
2h
°C
CLOSE
1
7
8
!
S
T
O
P
S
K
I
P
P
L
A
Y
/
P
A
U
S
E
ON
R
E
P
E
A
T
O
k
H
z
1
60
1
3
0
1
0
0
80
6
5
53
M
W
STEREO
MHz
108
104
100
96
92
88
FM
k
H
z
2
8
0
2
6
0
2
3
0
2
0
0
1
7
0
15
0
L
W
10X
10
+
1
R
R
4
4
0
C
D
R
A
D
I
O
C
A
S
S
E
T
T
E
R
E
C
O
R
D
E
R
W
I
T
H
C
D
8
8
4
4
.
.
3
3
A
N
T
E
N
N
A
CLOSE
TAPE DIRECTION
1
U
L
T
R
A
B
AS
S
S
Y
S
T
E
M
PROG
M
O
D
E
3
3
7
8
!
S
T
O
P
R
-
S
K
I
P
F
-
S
K
I
P
P
L
A
Y
/
P
A
U
S
E
ON
R
E
P
E
A
T
O
k
H
z
16
0
1
3
0
1
00
8
0
6
5
5
3
M
W
STEREO
MHz
108
104
100
96
92
88
FM
k
H
z
2
8
0
26
0
2
3
0
2
0
0
1
70
1
5
0
L
W
10X
10
+
1
R
R
4
4
0
C
D
R
A
D
I
O
C
A
S
S
E
T
T
E
R
E
C
O
R
D
E
R
W
I
T
H
C
D
8
8
4
4
.
.
!
!
3
3
U
.
B
.
S
.
U
.
B
.
S
.
U
L
T
R
A
B
A
S
S
S
Y
S
T
E
M
V
O
L
.
A
N
T
E
N
N
A
ENGLISH
A
N
T
E
N
N
A
1
R
D
A
C
D
I
H
O
S
S
S
STEREO
T
A
Y
I
C
S
B
A
W
T
S
A
O
R
S
E
E
E
D
T
R
T
R
MHz
E
M
O
R
C
E
T
L
kHz
R
D
10X
R
U
kHz
108
C
4
0
4
10
160
280
.
.
S
S
.
.
104
B
B
.
.
U
U
130
L
.
O
260
V
100
100
230
96
80
200
92
65
170
88
53
+
150
FM
MW
LW
!
!
3
4
4
3
.
.
8
8
P
E
P
A
E
T
I
R
3
K
P
S
L
-
A
F
Y
/
P
8
P
I
A
3
ON
!
U
K
S
S
-
E
R
P
O
M
ODE
T
7
S
PROG
CLOSE
TAPE DIRECTION
! SERVICE !! SERVICE !! SERVICE !
1
U
M
E
L
T
T
R
S
A
Y
S
B
S
AS
A
N
T
E
N
N
A
1
R
D
A
C
D
I
H
O
S
S
S
S
T
T
A
Y
I
E
C
R
S
B
E
O
A
W
T
S
A
O
R
S
E
E
E
D
T
R
T
R
M
E
M
O
R
C
E
H
z
T
L
kHz
R
D
10X
R
U
kHz
1
C
4
0
0
4
8
10
160
280
.
.
S
S
.
.
1
B
B
.
0
.
4
U
U
130
L
.
O
260
V
1
0
0
100
230
9
6
80
200
9
2
65
170
8
8
53
+
150
F
M
MW
LW
!
!
3
4
4
3
.
.
8
8
P
E
P
A
E
T
I
R
3
K
P
S
L
-
A
F
Y
/
P
8
P
I
A
3
ON
!
U
K
S
S
-
E
R
P
O
M
O
T
D
7
E
S
PROG
CLOSE
TAPE DIRECTION
1
U
M
E
L
T
T
R
S
A
Y
S
B
AS
S
ANTENNA
TUNING
LIFT
FM
MONO
STEREO
1
AC
~
18
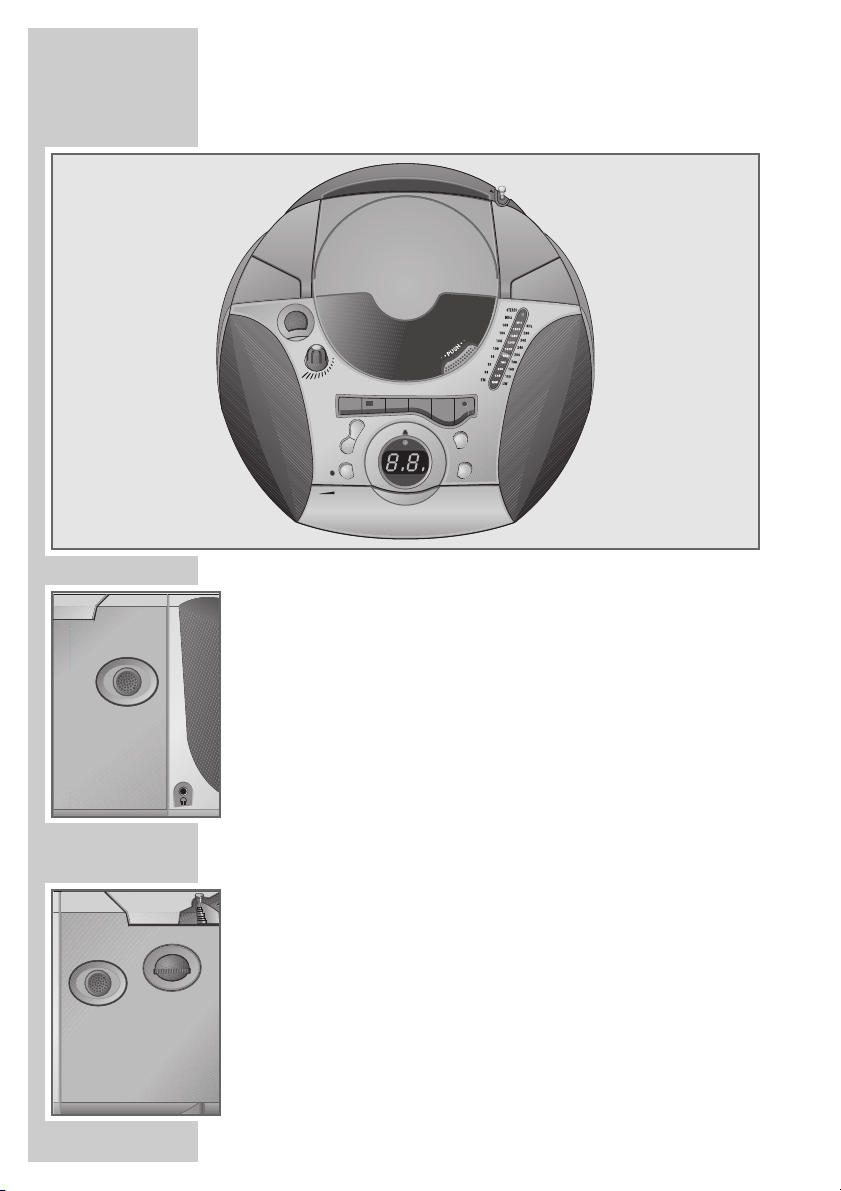
Controls
General
FUNCTION Function switch for selecting »TAPE«, »RADIO«
RADIO or »CD« mode.
TAPE/OFF CD
U.B.S Boosts the bass tones (Ultra Bass System).
VOL. Adjusts the volume.
UU
Headphone jack for connecting a headphone set with
a jack plug (ø 3.5 mm) on the left side of the device.
This automatically switches off the loudspeakers.
LED ON Lights up when the Radio Recorder is switched on.
Radio unit
ANTENNA Telescopic antenna for FM reception.
SCALE Tuning scale for the »FM«, »MW«, »LW« frequency
bands.
BAND Band selector » FM«, » MW«, » LW«.
FM MW LW
TUNING For tuning to radio stations.
STEREO Stereo indicator which lights up for FM stereo
programmes.
FM For switching to MONO in case of poor reception
MONO/STEREO (on the back of the device).
OVERVIEW
____________________________________________
FUNCTION
TAPE /
OFF
RADIO • • • CD
A
N
T
E
N
N
A
1
R
D
A
C
D
I
H
S
S
S
A
Y
S
B
T
A
E
R
M
T
L
U
.
.
S
S
.
.
B
B
.
.
U
U
L
.
O
V
O
T
I
C
A
W
S
R
S
E
E
D
T
T
R
E
O
R
C
E
R
D
R
C
4
0
4
+
!
!
3
4
4
3
.
.
3
P
I
K
S
-
F
3
P
I
K
S
-
R
MODE
PROG
TAPE DIRECTION
1
U
L
T
R
A
8
8
E
A
P
E
T
R
P
L
A
8
Y
/
P
ON
B
AS
!
A
U
S
E
P
O
T
S
7
CLOSE
M
E
T
S
Y
S
S
BAND
FM MW LW
TUNING
• • •
ENGLISH
19
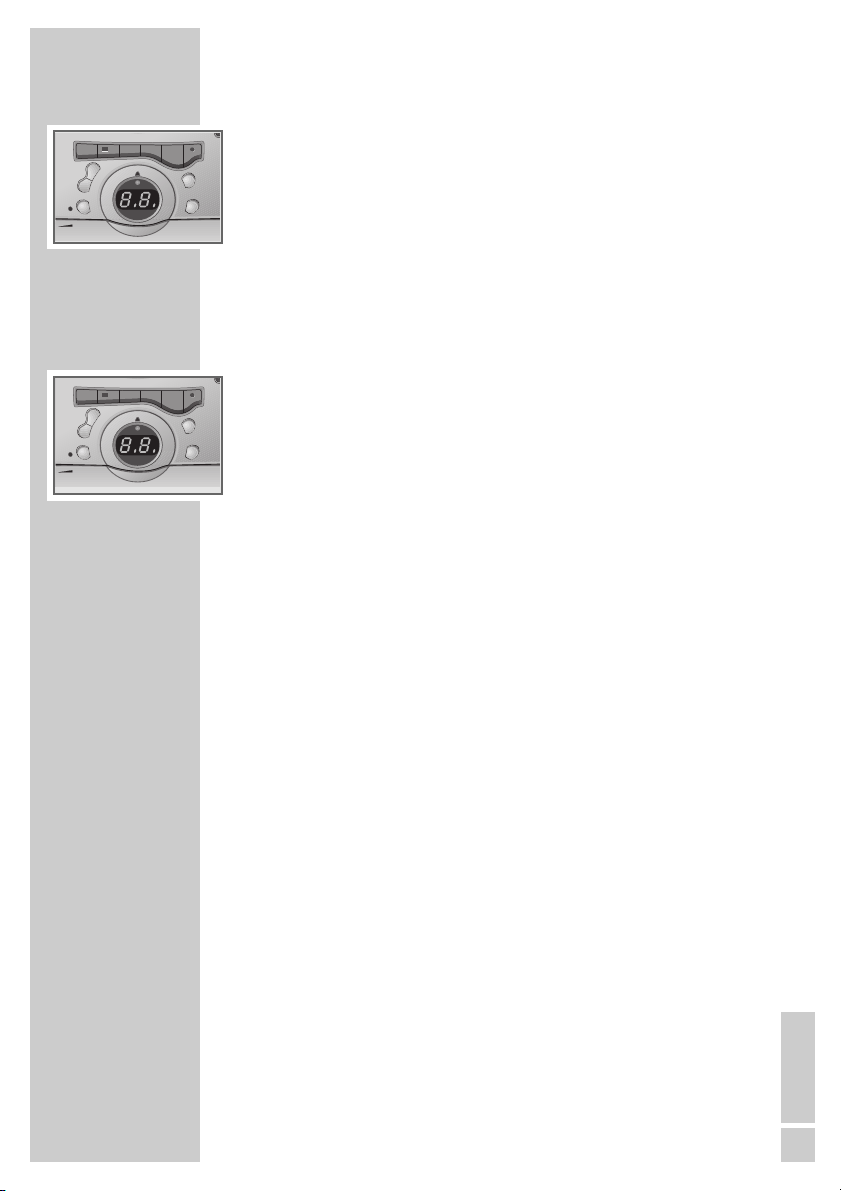
Tape unit
CLOSE Press here to close the cassette compartment.
● Starts recording.
r Starts playback.
ee Rewinds the tape to the beginning.
rr Fast forwards the tape to the end.
■/
.
Ends playback/recording of the cassette
and opens the tape compartment.
II Pauses recording and playback.
CD unit
PUSH Opens and closes the CD compartment.
F-SKIP
ss
Press briefly to select a track;
R-SKIP
§
Hold down to search for a particular passage.
MODE From STOP: for creating a track memory;
From PLAY/PAUSE: repeats one or all tracks or starts
random playback.
STOP ■ Ends playback of the CD.
PLAY/PAUSE
e
II Starts CD playback.
Pauses CD playback.
LED PROG. Lights up during playback of a track memory.
LED REPEAT Lights up when a single track is repeated; flashes
when the whole CD is repeated.
LED ON Lights up when the device is switched on.
OVERVIEW
____________________________________________
E
E
!
!
3
4
4
3
.
.
3
P
I
K
S
-
F
3
P
I
K
S
-
R
MODE
PROG
APE DIRECTION
8
8
E
A
P
E
T
R
P
L
A
8
Y
/
P
ON
A
U
S
E
P
O
T
S
7
!
CLOS
!
!
3
4
4
3
.
.
3
P
I
K
S
-
F
3
P
I
K
S
-
R
MODE
PROG
APE DIRECTION
8
8
E
A
P
E
T
R
P
L
A
8
Y
/
P
ON
A
U
S
E
P
O
T
S
7
!
CLOS
20
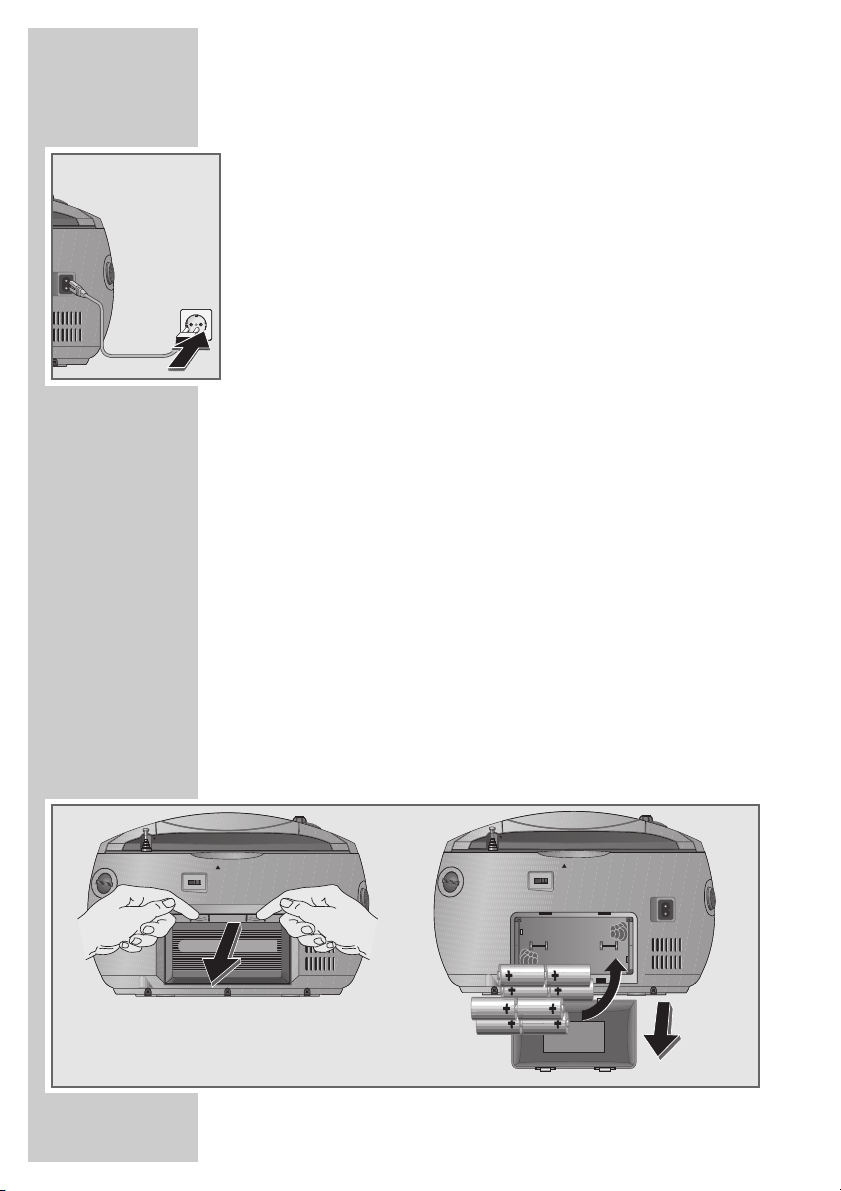
Mains operation
Note:
Check if the mains voltage on the type plate (on the bottom of the
device) corresponds to your local mains supply.
If this is not the case, contact your dealer.
1 Plug the mains cable supplied (in the battery compartment) into the
socket »AC
~« on the Radio Recorder.
2 Insert the mains cable plug in the socket.
Caution:
The only way to disconnect the device from the mains supply is to pull
out the plug.
Battery operation
1 Open the battery compartment by pressing the snap-catch, and remove
the lid.
2 Insert eight batteries (round cell type, R 14, UM 2 or C), observing the
polarity indicated on the bottom of the battery compartment.
Note:
Remove the batteries when they are flat or when you know that the
device will not be used for a long period of time.
No liability is accepted for damage resulting from leaking batteries.
The batteries are switched off during mains operation.
Environmental note:
Batteries, including those which are heavy metal-free, may not be
disposed of with household waste. Please dispose of used batteries in
and environmentally sound way, for example at public collection points.
Find out about the legal regulations which apply in your area.
POWER SUPPLY
___________________________________
AC
~
ANTENNA
TUNING
LIFT
FM
MONO
STEREO
AC
~
TUNING
ANTENNA
LIFT
FM
MONO
STEREO
AC
~
1
 Loading...