

Page 1
MULTI HAIR TRIMMER
SET
MT 5810
DE EN TR ES
FR HR PL
Page 2

Page 3
______________________________________
A
B
C
F E DG
3
Page 4

------------------------------------------------------------------------------------------------------------------------------------------------------------------
DEUTSCH 05-26
ENGLISH 27-44
TÜRKÇE 45-61
ESPAÑOL 62-79
FRANÇAIS 80-98
HRVATSKI 99-116
POLSKI 117-134
4
Page 5

SICHERHEIT
----------------------------------------------------------------------------------------------------
Lesen Sie diese Bedienungsanleitung sorgfältig, bevor Sie
das Gerät benutzen! Befolgen
Sie alle Sicherheitshinweise, um
Schäden wegen falscher Benutzung zu vermeiden!
7
Bewahren Sie die Bedienungsanleitung zum späteren
Nachschlagen auf. Sollte das
Gerät an Dritte weitergegeben
werden, muss diese Bedienungsanleitung ebenfalls mit
ausgehändigt werden.
7
Das Gerät nicht für Zwecke benutzen, für die es nicht bestimmt
ist. Batterie nicht kurzschließen.
DEUTSCH
5
Page 6

SICHERHEIT
7
Dieses Gerät ist nur für den
----------------------------------------------------------------------------------------------------
privaten Gebrauch bestimmt.
7
Das Gerät nie in der Badewanne, Dusche, über einem
mit Wasser gefüllten Waschbecken oder in der Nähe
anderer Wasserquellen verwenden; nicht mit feuchten
oder nassen Händen betreiben.
DEUTSCH
6
Page 7

SICHERHEIT
7
Warnung: Verwenden Sie die-
----------------------------------------------------------------------------------------------------
ses Gerät nicht in der Nähe
von Badewannen, Duschen,
Waschbecken oder anderen
mit Wasser gefüllten Behältern.
7
Gerät immer von Kindern fernhalten.
7
Dieses Gerät kann von Kindern ab 8 Jahren sowie von
Personen mit reduzierten physischen, sensorischen oder
mentalen Fähigkeiten oder
Mangel an Erfahrung und/
oder Wissen benutzt werden,
DEUTSCH
7
Page 8

SICHERHEIT
----------------------------------------------------------------------------------------------------
wenn sie beaufsichtigt oder
bezüglich des sicheren Gebrauchs des Gerätes unterwiesen wurden und die daraus
resultierenden Gefahren verstanden haben. Kinder dürfen
nicht mit dem Gerät spielen.
Reinigung und Benutzer-Wartung dürfen nicht durch Kinder
durchgeführt werden, es sei
denn, sie sind beaufsichtigt.
7
Gerät unter keinen Umständen öffnen.
7
Für Schäden aufgrund von
falscher Benutzung wird keine
Haftung übernommen.
DEUTSCH
8
Page 9

SICHERHEIT
7
Gerät niemals im Freien ver-
----------------------------------------------------------------------------------------------------
wenden.
7
Das Gerät darf nicht in Betrieb
genommen werden, wenn es
sichtbare Schäden aufweist.
7
Das Gerät während des Gebrauchs nicht zu tief in Nase
oder Ohren einführen.
7
Während der Benutzung keinen
Druck ausüben, da dies den
Aufsatz beschädigen und zu
Hautverletzungen führen kann.
7
Soll das Gerät für längere Zeit
nicht verwendet werden, Batterie entfernen.
DEUTSCH
9
Page 10

SICHERHEIT
7
Gerät immer einschalten
----------------------------------------------------------------------------------------------------
bevor es in Nase oder Ohr
eingeführt wird, um Verletzungen zu vermeiden.
7
Batterie keiner extremen Hitze
aussetzen, da diese sonst explodieren kann oder giftige
Stoffe auslaufen können.
7
Gerät nicht verwenden, wenn
Schmerzen, Ekzeme oder andere Hautirritationen vorhanden sind.
7
Gerät nicht auf verbrannter
Haut verwenden.
DEUTSCH
10
Page 11

SICHERHEIT
7
Innere Klinge des Gerätes
----------------------------------------------------------------------------------------------------
nicht mit den bloßen Fingern
berühren. Dies kann zu Verletzungen an Ihren Fingern führen.
7
Keine aufladbaren Batterien
verwenden.
7
Vor der Benutzung Klingen
auf Deformationen oder Schäden untersuchen. Hautverletzungen können die Folge der
Benutzung von deformierten
oder beschädigten Klingen
sein.
DEUTSCH
11
Page 12

SICHERHEIT
7
Gerät nicht in Einzelteile zer-
----------------------------------------------------------------------------------------------------
legen und keine Reparaturen
am Gerät durchführen. Dies
kann zu Verletzungen führen.
7
Setzen Sie die Batterien keiner
extremen Hitze wie z.B. durch
Sonneneinstrahlung, Heizungen, Feuer, etc. aus.
7
Entfernen Sie die Batterien,
wenn Sie verbraucht sind oder
wenn Sie das Gerät längere
Zeit nicht benutzen. Für Schäden, die durch ausgelaufene
Batterien entstehen, kann nicht
gehaftet werden.
DEUTSCH
12
Page 13

SICHERHEIT
7
Kühl und trocken lagern.
7
Batterien nicht falsch herum ein-
----------------------------------------------------------------------------------------------------
legen und nicht kurzschließen.
DEUTSCH
13
Page 14

AUF EINEN BLICK
Sehr geehrte Kundin, sehr geehrter Kunde,
herzlichen Glückwunsch zum Kauf Ihres neuen
GRUNDIG Multihaartrimmer- Sets MT 5810.
Bitte lesen Sie die folgenden Anweisungen auf-
merksam, um sicherzustellen, dass Sie Ihr Qualitätsprodukt von GRUNDIG viele Jahre benutzen
können.
----------------------------------------------------------------------
Verantwortungsbewusstes Handeln!
GRUNDIG setzt intern wie auch
bei unseren Lieferanten auf vertraglich zugesicherte soziale Arbeitsbedingungen mit fairem Lohn, auf
effizienten Rohstoffeinsatz bei steti-
ger Abfallreduzierung von mehreren Tonnen Plastik pro Jahr – und auf mindestens
5 Jahre Verfügbarkeit sämtlichen Zubehörs.
Für eine lebenswerte Zukunft.
Grundig.
DEUTSCH
14
Page 15
AUF EINEN BLICK
----------------------------------------------------------------------
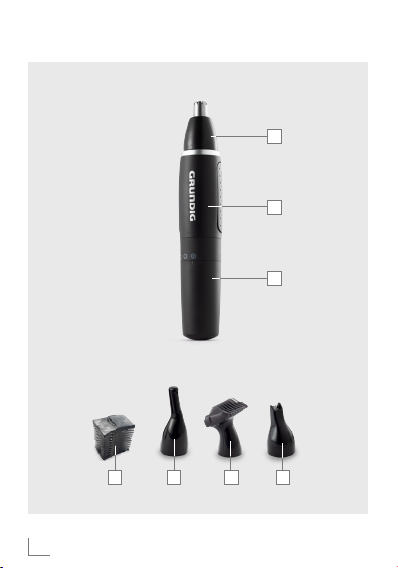
Bedienelemente
Siehe Abbildung auf Seite 3.
A
Trimmaufsatz mit Rotationsschneider
B
Gehäuse
C
Batteriefachdeckel -
Ein-/Ausschalter
Zubehör
D
Detail-Trimmer
E
Bart-Trimmer
F
Augenbrauen-Trimmer
_
Reinigungspinsel
_
Einschalten
_
Ausschalten
_
Batteriefachabdeckung öffnen
G
3-stufiger Kammaufsatz für den Bart-Trimmer
DEUTSCH
15
Page 16

BETRIEB
------------------------------------------------------------------------------------------------------------------------
Vorbereitung
Ihr Multihaartrimmer benötigt eine 1*AA - 1.5V
DC Alkaline Batterie.
1 Um das Batteriefach zu öffnen, Batteriefachde-
ckel C linksherum drehen und abziehen.
2 AA Alkaline Batterie in das Batteriefach ein-
setzen, so dass die + und - Markierungen der
Batterie mit den Markierungen im Batteriefach
übereinstimmen.
Hinweise
7
Das Gerät kann nicht betrieben werden, falls
die Batterie nicht richtig eingesetzt wird.
7
Soll das Gerät für längere Zeit nicht verwendet
werden, Batterie entfernen.
Umwelthinweis
7
Die Batterien – auch schwermetallfreie –
dürfen nicht im Hausmüll entsorgt werden.
Verbrauchte Batterien müssen in die Altbatteriensammelgefäße bei Handel und öffentlichrechtlichen Entsorgungsträgern gegeben
werden.
DEUTSCH
16
Page 17

BETRIEB
------------------------------------------------------------------------------------------------------------------------
3 Um das Batteriefach zu schließen, Batteriefach-
deckel C wieder aufsetzen und rechtsherum
drehen bis er einrastet.
Anbringen und Wechseln der Aufsätze
1 Sicherstellen, dass das Gerät ausgeschaltet ist.
2 Wenn ein Aufsatz am Gerät
angebracht ist, Aufsatz rechtsherum drehen
und abziehen.
3 Gewünschten Aufsatz am Gerät anbringen und
linksherum drehen bis er einrastet.
Nasen- oder Ohrenhaare trimmen
A
1 Sicherstellen, dass das Gerät ausgeschaltet ist.
2 Um das Gerät einzuschalten, Ein-/Ausschalter
C
rechtsherum drehen.
3 Gerät mit dem Trimmaufsatz vorsichtig in Nase
oder Ohr einführen.
DEUTSCH
17
Page 18

BETRIEB
------------------------------------------------------------------------------------------------------------------------
Achtung
7
Das Gerät während des Gebrauchs nicht zu
tief in Nase oder Ohren einführen.
Hinweise
7
Vorsichtig den Schneidsatz in die Nase oder
Ohren hinein- und wieder heraus-führen während das Gerät rotiert wird.
4 Um das Gerät auszuschalten, Ein-/Ausschalter
C
linksherum drehen.
Haare und Augenbrauen trimmen
F
1 Sicherstellen, dass das Gerät ausgeschaltet ist.
2 Vertikalen Trimmer-Aufsatz F am Gerät anbrin-
gen.
Hinweise
7
Bei Bedarf Kammaufsatz (3 mm oder 6 mm)
am Augenbrauen-Trimmer anbringen.
7
Um Haare sehr kurz zu trimmen, vertikalen
Trimmer-Aufsatz F benutzen.
DEUTSCH
18
Page 19
BETRIEB
------------------------------------------------------------------------------------------------------------------------
3 Um das Gerät einzuschalten, Ein-/Ausschalter
C
rechtsherum drehen.
4 Vorsichtig den Schneidsatz über den Bereich
der zu entfernenden Haare oder über die Augenbrauen führen.
Achtung
7
Während der Benutzung keinen Druck ausüben, da dies den Aufsatz beschädigen und zu
Hautverletzungen führen kann.
5 Um das Gerät auszuschalten, Ein-/Ausschalter
C
linksherum drehen.
Mit Bartschneider trimmen
E
1 Sicherstellen, dass das Gerät ausgeschaltet ist.
2 Bart-Trimmer E anbringen.
Hinweise
7
Bei Bedarf Kammaufsatz (2 mm, 4 mm oder 6
mm) am Bart-Trimmer E anbringen.
3 Zum Einschalten den Ein-/Ausschalter C nach
rechts drehen.
DEUTSCH
19
Page 20

BETRIEB
------------------------------------------------------------------------------------------------------------------------
Achtung
7
Diesen Aufsatz nur für kleinere Bereiche wie
Haaransatz, Bart, Koteletten, verwenden.
7
Trimmer so halten, dass der Rasierer sanft Ihre
Haut berührt.
7
Trimmer nicht angewinkelt halten, da sich andernfalls der Rasierer verziehen und Hautreizungen verursachen könnte.
4 Zum Ausschalten den Ein-/Ausschalter C nach
links drehen.
Mit Detail-Trimmer trimmen
D
1 Sicherstellen, dass das Gerät ausgeschaltet ist.
2 Den Detail-Trimmer D anbringen.
3 Zum Einschalten den Ein-/Ausschalter C nach
rechts drehen.
7
Das schmale Design dieses Aufsatzes ermöglicht präzises Trimmen und Formen von Koteletten und Bärten.
4 Zum Ausschalten den Ein-/Ausschalter C nach
links drehen.
DEUTSCH
20
Page 21

INFORMATIONEN
------------------------------------------------------------------
Reinigung und Pflege
1 Gerät ausschalten und Batterie entfernen.
2 Angesammelte Haare vom Schneidsatz spülen
und an-schließend ausschütteln.
3 Gehäuse des Gerätes nur mit einem weichen,
angefeuchteten Tuch reinigen.
Achtung
7
Gerät nicht in Wasser tauchen.
7
Keine Reinigungsmittel verwenden.
Hinweis
7
Alle Teile sorgfältig mit einem weichen Tuch
trocknen, bevor das Gerät nach der Reinigung
benutzt wird.
7
Es wird empfohlen den Multihaartrimmer nach
jeder Benutzung zu reinigen.
7
Die einfachste und hygienischste Art den Multihaartrimmer zu reinigen ist, den Gerätekopf
nach der Benutzung mit warmem Wasser zu
spülen.
DEUTSCH
21
Page 22

INFORMATIONEN
------------------------------------------------------------------
Lagerung
7
Wenn das Gerät längere Zeit nicht benutzt
wird, sollte es sorgfältig aufbewahrt werden.
7
Sicherstellen, dass das Gerät vollständig trocken ist.
7
Gerät an einem kühlen, trockenen Ort lagern.
7
Darauf achten, dass sich das Gerät immer außerhalb der Reichweite von Kindern befindet.
Aufbewahrung
7
Falls Sie das Gerät längere Zeit nicht benutzen
möchten, bewahren Sie es bitte sorgfältig auf.
7
Achten Sie darauf, dass das Gerät ausgeschaltet und vollständig trocken ist.
7
Bewahren Sie es an einem kühlen, trockenen
Ort auf.
7
Achten Sie darauf, dass sich das Gerät stets außerhalb der Reichweite von Kindern befindet.
DEUTSCH
22
Page 23
INFORMATIONEN
------------------------------------------------------------------
Entsorgung von Altgeräten:
Dieses Produkt erfüllt die Vorgaben der EU-WEEEDirektive (2012/19/EU). Das Produkt wurde mit
einem Klassifizierungssymbol für elektrische und
elektronische Altgeräte (WEEE) gekennzeichnet.
Dieses Gerät wurde aus hochwertigen
Materialien hergestellt, die
wiederverwendet und recycelt werden
können. Entsorgen Sie das Gerät am
Ende seiner Einsatzzeit nicht mit dem
regulären Hausmüll; geben Sie es stattdessen bei
einer Sammelstelle zur Wiederverwertung von
elektrischen und elektronischen Altgeräten ab.
Ihre Stadtverwaltung informiert Sie gerne über
geeignete Sammelstellen in Ihrer Nähe.
Einhaltung von RoHS-Vorgaben:
Das von Ihnen erworbene Produkt erfüllt die Vorgaben der EU-RoHS Direktive (2011/65/EU). Es
enthält keine in der Direktive angegebenen gefährlichen und unzulässigen Materialien.
DEUTSCH
23
Page 24
INFORMATIONEN
------------------------------------------------------------------
Informationen zur Verpackung
Die Verpackung des Produkts wurde
gemäß unserer nationalen Gesetzge-
bung aus recyclingfähigen Materialien
hergestellt. Entsorgen Sie die Verpa-
ckungsmaterialien nicht mit dem Hausmüll oder
anderem Müll. Bringen Sie sie zu einer von der
Stadtverwaltung bereitgestellten Sammelstelle für
Verpackungsmaterial.
Technische Daten
Batterien : 1*AA - 1.5V DC
Technische und optische Änderungen vorbehalten.
DEUTSCH
24
Page 25

INFORMATIONEN
------------------------------------------------------------------
Service und Ersatzteile
Unsere Geräte werden nach den neuesten technischen Erkenntnissen entwickelt, produziert und
geprüft. Sollte trotzdem eine Störung auftreten, so
bitten wir Sie, sich mit Ihrem Fachhändler bzw. mit
der Verkaufsstelle in Verbindung zu setzen. Sollte
dies nicht möglich sein, wenden Sie sich bitte an
das GRUNDIG Service-Center unter folgenden
Kontaktdaten:
Telefon: 0911 / 590 597 29
(Montag bis Freitag von 08.00 bis 18.00 Uhr)
Telefax: 0911 / 590 597 31
E-Mail: service@grundig.com
http://www.grundig.com/de-de/support
Unter den obengenannten Kontaktdaten erhalten
Sie ebenfalls Auskunft über den Bezug möglicher
Ersatz- und Zubehörteile.
DEUTSCH
25
Page 26

INFORMATIONEN
------------------------------------------------------------------
GRUNDIG Kundenberatungszentrum
Montag bis Freitag von 8.00 bis 18.00 Uhr
Deutschland: 0911 / 590 597 30
Österreich: 0820 / 220 33 22 *
*gebührenpflichtig (0,145 €/Min. aus dem
Festnetz,
Mobilfunk: max. 0,20 €/Min.)
Haben Sie Fragen?
Unser Kundenberatungszentrum steht Ihnen werk-
tags stets von 8.00 – 18.00 Uhr zur Verfügung.
DEUTSCH
26
Page 27

SAFETY
---------------------------------------------------------------------------------------------------------------------------
Please read this instruction manual thoroughly prior to using this
appliance! Follow all safety instructions in order to avoid damage due to improper use!
7
Keep the instruction manual for future use. Should a third party be
given the unit, please ensure the
instruction manual is included.
7
Never use the appliance for any
other purpose than those described in these instructions. Do
not short-circuit the battery.
7
This appliance is designed for domestic use only.
ENGLISH
27
Page 28
SAFETY
7
Never use the appliance in the
---------------------------------------------------------------------------------------------------------------------------
bath, shower, over a wash basin
filled with water or near any
source of water; nor should it be
operated with wet hands.
7
Warning: Do not use this appliance near bathtubs, showers,
basins or other vessels containing
water.
7
Always keep the appliance out of
the reach of children.
28
ENGLISH
Page 29

SAFETY
7
This appliance can be used by
---------------------------------------------------------------------------------------------------------------------------
children aged from 8 years and
above and persons with reduced
physical, sensory or mental capabilities or lack of experience
and knowledge if they have been
given supervision or instruction
concerning use of the appliance
in a safe way and understand
the hazards involved. Children
shall not play with the appliance.
Cleaning and user maintenance
shall not be made by children
without supervision.
ENGLISH
29
Page 30

SAFETY
7
Do not dismantle the appliance
---------------------------------------------------------------------------------------------------------------------------
under any circumstances. No
warranty claims are accepted for
damage caused by improper handling.
7
Never use the appliance outdoors.
7
Never use the appliance if it is visibly damaged.
7
Do not insert the appliance too far
into the nose or the ears during
use.
7
Do not apply excessive pressure
as this damages the attachment
and may cause skin injury.
7
If you do not wish to use the appliance for a long period of time,
remove the battery.
30
ENGLISH
Page 31

SAFETY
7
Always remember to turn on the
---------------------------------------------------------------------------------------------------------------------------
appliance before you insert it into
your nose or ear to avoid injury.
7
Do not put in fire or break apart
your batteries as they may burst or
release toxic materials.
7
Do not use the appliance if you
suffer from ache, eczema or any
other skin irritations.
7
Do not use the appliance on inflamed skin.
7
Do not touch the blade of the inner
blade (metallic part) with your finger. Doing so may result in injury
to your finger.
7
Do not use a rechargeable battery.
ENGLISH
31
Page 32

SAFETY
7
Check the blade for deforma-
---------------------------------------------------------------------------------------------------------------------------
tion or damage before use. Your
skin may be injured if damage or
deformation is present.
7
Never alter the appliance. Also,
do not disassemble or repair it.
Doing so could result in injury.
7
Do not expose the batteries to extreme heat, caused for example
by direct sunlight, heaters or fire.
7
Remove the batteries if it is flat or
when you know that the device
will not be used for a long period
of time. The manufacturer accepts
no liability for damage caused by
leaking batteries.
32
ENGLISH
Page 33

SAFETY
7
Store in a cool and dry place.
7
Do not insert the batteries in the
---------------------------------------------------------------------------------------------------------------------------
wrong way around and do not
short-circuit them.
ENGLISH
33
Page 34

OVERVIEW
-------------------------------------------------------------------------------------------------------
Dear Customer,
Congratulations on the purchase of your new
GRUNDIG Multi Hair Trimmer Kit MT 5810.
Read the following user notes carefully to ensure
full enjoyment of your quality Grundig product for
many years to come.
A responsible approach!
GRUNDIG focusses on contractually
agreed social working conditions with
fair wages for both internal employees
and suppliers. We also attach great
importance to the efficient use of raw
materials with continuous waste reduction of several tonnes of plastic every year. Furthermore, all
our accessories are available for at least 5 years.
For a future worth living.
Grundig.
34
ENGLISH
Page 35

OVERVIEW
-------------------------------------------------------------------------------------------------------
Controls
See the figures on page 3.
Trimming attachment with
A
rotating blade
B
Body
Battery cap - On/Off switch
C
Accessories
Detail trimmer
D
E
Beard trimmer
F
Eyebrow trimmer
_
Cleaning brush
_
Switch on
_
Switch off
_
Opening of the battery cover
G
3--stage comb for beard trimmer
ENGLISH
35
Page 36

OPERATION
-------------------------------------------------------------------------------------------------
Preparation
Your multi hair trimmer requires one 1*AA - 1.5V
DC alkaline battery.
1 To open the battery compartment, rotate the
battery cap C to the left and pull it off.
2 Insert the AA alkaline battery, so that the + and
- marks on the battery match with the polarity
marks in the battery compartment.
Notes
7
The appliance will not work if the battery is inserted incorrectly.
7
Remove the battery if the appliance will not be
used for a long period of time.
Environmental note
7
Batteries, including those which do not contain
heavy metal, should not be disposed of with
household waste. Always dispose of used batteries in accordance with local environmental
regulations.
36
ENGLISH
Page 37

OPERATION
-------------------------------------------------------------------------------------------------
3 To close the battery compartment, put the bat-
tery cap C back on and rotate it to the right
until the cap snaps into place.
Attaching and exchanging attachments
1 Ensure that the appliance is switched off.
2 If there is an attached attachment, remove it by
turning it to the right to the unlocked position
and pull it off.
3 Attach the desired attachment by placing it on
the top of the appliance and turning it to the left
until it locks into position.
Trimming nose or ear hair
A
1 Ensure that the appliance is switched off.
2 To turn the appliance on, turn the On/Off
switch C to the right.
3 Carefully insert the device with the trimmer at-
tachment into the nose or ear.
ENGLISH
37
Page 38

OPERATION
-------------------------------------------------------------------------------------------------
Caution
7
Do not insert the device too far into the nose or
the ears during use.
Notes
7
Carefully insert the cutting set into the nose or
ears and remove again while rotating the device.
4 To turn the appliance off, turn the On/Off
switch C to the left.
Removing hair from eyebrows
F
1 Ensure that the appliance is switched off.
2 Attach the vertical trimming head F.
Notes
7
If necessary, attach the comb attachment (3
mm or 6 mm) to the eyebrow trimmer.
7
To remove hairs completely use only the vertical trimming head F.
3 To turn the appliance on, turn the On/Off
switch C to the right.
38
ENGLISH
Page 39

OPERATION
-------------------------------------------------------------------------------------------------
4 Gently guide the cutting unit over the area of
unwanted hair along the eyebrow line or the
eyebrow itself.
Caution
7
Do not apply excessive pressure as this damages the attachment and may cause skin injury.
5 To turn the appliance off, turn the On/Off
switch C to the left.
Trimming of beard trimmer
E
1 Ensure that the appliance is switched off.
2 Attach the beard trimmer E.
Notes
7
If necessary, attach the comb attachment (2
mm, 4 mm or 6 mm) to the beard trimmer E.
3 To turn the appliance on, turn the On/Off
switch C to the right.
Caution
7
Use this attachment for smaller areas such as
hairlines, beard, sideburns.
ENGLISH
39
Page 40

OPERATION
7
Hold the trimmer so the shaver screen gently
-------------------------------------------------------------------------------------------------
touches your skin.
7
Avoid holding the trimmer at an angle as this
may distort the screen and cause some skin
irritation.
4 To turn the appliance off, turn the On/Off
switch C to the left.
Trimming of detail trimmer
D
1 Ensure that the appliance is switched off.
2 Attach the Detail trimmer D.
3 To turn the appliance on, turn the On/Off
switch C to the right.
7
The narrow design of this attachment allows for
precise trimming and shaping of sideburns and
beards.
4 To turn the appliance off, turn the On/Off
switch C to the left.
40
ENGLISH
Page 41

INFORMATION
---------------------------------------------------------------------------------
Cleaning and care
1 Turn the appliance off and remove the battery.
2 Rinse the accumulated hair from the cutters and
shake off excess water.
3 Clean the housing of the appliance only with a
soft damp cloth.
Caution
7
Do not immerse the device in water.
7
Do not use any cleaning agents or other fluids.
Note
7
Before using the appliance after cleaning, dry
all parts carefully with a soft cloth or paper
towel.
7
We recommend you clean your multi hair trimmer after each use.
7
The easiest and most hygienic way to clean the
multi hair trimmer is rinsing the product head
after use with warm water.
ENGLISH
41
Page 42

INFORMATION
---------------------------------------------------------------------------------
Storage
7
If you do not plan to use the appliance for a
long period of time, please store it carefully.
7
Make sure it is completely dry.
7
Keep the appliance in a cool and dry place.
7
Make sure the appliance is kept out of the
reach of children.
Compliance with the WEEE Directive
and Disposing of the Waste Product:
This product complies with EU WEEE Directive
(2012/19/EU). This product bears a classification symbol for waste electrical and electronic
equipment (WEEE).
42
ENGLISH
Page 43

INFORMATION
---------------------------------------------------------------------------------
This product has been manufactured
with high quality parts and materials
which can be reused and are suitable
for recycling. Do not dispose of the
waste product with normal domestic
and other wastes at the end of its service life. Take
it to the collection center for the recycling of electrical and electronic equipment. Please consult
your local authorities to learn about these collection centers.
Compliance with RoHS Directive
The product you have purchased complies with
EU RoHS Directive (2011/65/EU). It does not
contain harmful and prohibited materials specified in the Directive.
ENGLISH
43
Page 44

INFORMATION
---------------------------------------------------------------------------------
Package information
Packaging materials of the product are
manufactured from recyclable materials in accordance with our National
Environment Regulations. Do not dispose of the packaging materials together with the
domestic or other wastes. Take them to the packaging material collection points designated by the
local authorities.
Technical data
Battery: 1*AA - 1.5V DC
Technical and design modifications
reserved.
44
ENGLISH
Page 45

GÜVENLİK
---------------------------------------------------------------------------------------------------------
Lütfen cihazı kullanmadan önce
bu kullanma kılavuzunu tam olarak okuyun! Hatalı kullanımdan
kaynaklanan hasarları önlemek
için tüm güvenlik talimatlarına
uyun!
7
Kullanma kılavuzunu daha sonra
başvurmak üzere saklayın. Cihaz
başka birine verildiğinde, lütfen
kullanım kılavuzunun da verildiğinden emin olun.
7
Cihazı, bu kullanım talimatlarında
tarif edilen amacının dışındaki
herhangi bir amaçla kullanmayın.
Asla pili kısa devre yaptırmayın.
TÜRKÇE
45
Page 46

GÜVENLİK
7
Bu cihaz sadece evde kullanılmak
---------------------------------------------------------------------------------------------------------
üzere tasarlanmıştır.
7
Cihazı banyoda, duşta ya da
suyla dolu küvet üzerinde asla kullanmayın; ayrıca cihaz, ıslak ellerle
de kullanılmamalıdır.
7
Uyarı: Bu cihaz küvet, duş teknesi
ve su içeren diğer kaplara yakın
yerlerde kullanmayın.
7
Cihazı her zaman çocukların ulaşamayacağı bir yerde muhafaza
edin.
46
TÜRKÇE
Page 47

GÜVENLİK
7
Bu cihaz, cihazın güvenli bir şe-
---------------------------------------------------------------------------------------------------------
kilde kullanımıyla ilgili olarak
gözetim altında tutulmaları veya
kendilerine talimat verilmesi ve
cihazın kullanımıyla ilgili tehlikeleri anlamaları koşuluyla 8 yaş
ve üzeri çocuklar ile kısıtlı fiziksel,
duyusal veya zihinsel kapasiteye
sahip olan ya da bilgi ve deneyimi
olmayan kişilerce kullanılabilir. Çocuklar cihazla oynamamalıdır. Temizlik ve kullanıcı bakım işlemleri,
başlarında bir büyük olmadığı
sürece çocuklar tarafından yapılmamalıdır.
TÜRKÇE
47
Page 48

GÜVENLİK
7
Kesinlikle cihazı parçalarına ayır-
---------------------------------------------------------------------------------------------------------
mayın. Hatalı kullanımın neden
olduğu hasar için hiçbir garanti
talebi kabul edilmez.
7
Cihazı kesinlikle kapalı alanlar dışında kullanmayın.
7
Cihazda gözle görülür bir hasar
mevcutsa, cihazı asla kullanmayın.
7
Kullanım esnasında cihazı burnunuza veya kulağınıza çok fazla
sokmayın.
7
Aksesuar ve cihazı, cildinizin zarar
görmesine neden olabileceğiniz
için cihazı aşırı derecede bastırmayın.
48
TÜRKÇE
Page 49

GÜVENLİK
7
Cihazı uzun süre kullanmayacaksı-
---------------------------------------------------------------------------------------------------------
nız pilini çıkarın.
7
Yaralanmaları önlemek için cihazı
her zaman, burnunuza veya kulağınıza sokmadan önce çalıştırın.
7
Patlayabileceği veya zehirli maddeler sızdırabileceği için pillerinizi
ateşe atmayın veya parçalamayın.
7
Ağrınız, egzamanız veya başka
cilt rahatsızlığınız varsa cihazı kullanmayın.
7
Cihazı iltihaplı cilt üzerinde kullanmayın.
TÜRKÇE
49
Page 50

GÜVENLİK
7
İç bıçağın (metal parçanın) bıça-
---------------------------------------------------------------------------------------------------------
ğına parmaklarınızla dokunmayın.
Bunu yapmak parmaklarınızın yaralanmasına neden olabilir.
7
Şarj edilebilir bir pil kullanmayın.
7
Kullanmadan önce deformasyona
veya hasara karşı bıçağı kontrol
edin. Hasar veya deformasyon
mevcutsa cildiniz yaralanabilir.
7
Ürün üzerinde kesinlikle değişiklik yapmayın. Cihazı parçalarına
ayırmaya veya onarmaya çalışmayın. Bunları yapmak yaralanmalara neden olabilir.
50
TÜRKÇE
Page 51

GÜVENLİK
7
Pilleri güneş ışınları, kalorifer, ateş
---------------------------------------------------------------------------------------------------------
vb. tarafından yayılan sıcaklıklara
maruz bırakmayın.
7
Tükendiğinde veya cihaz uzun bir
süre kullanılmayacak ise, pili çıkartınız. Akmış pillerin oluşturduğu zararlardan dolayı sorumluluk kabul
edilemez.
7
Kuru serin bir yerde muhafaza ediniz.
7
Pillerin ters takmayın ve kısa devre
ettirmeyin.
TÜRKÇE
51
Page 52

GENEL BAKIŞ
-------------------------------------------------------------------------------------------
Değerli Müşterimiz,
GRUNDIG Fonksiyonlu Tıraş Seti MT 5810’u
aldığınız için sizi kutlarız.
Grundig kalitesindeki ürününüzü yıllarca keyifle
kullanabilmeniz için aşağıdaki kullanıcı notlarını
dikkatle okuyun.
Sorumlu yaklaşım!
GRUNDIG hem çalışanlar hem de tedarikçiler için adil ücretlendirme sunan
sözleşmeyle kabul edilmiş sosyal çalışma koşulları sağlamayı hedef alır.
Hammaddelerin etkin kullanımı ve her
yıl birkaç ton plastik atık miktarını düzenli olarak
azaltmak da öncelikli hedeflerimiz arasında yer
alıyor. Ayrıca, tüm aksesuarlarımız en az 5 yıl boyunca kullanılabilir.
Yaşamaya değer bir gelecek için.
Grundig.
52
TÜRKÇE
Page 53

GENEL BAKIŞ
-------------------------------------------------------------------------------------------
Kumandalar
Sayfa 3’deki şekillere bakın.
A
Döner bıçaklı kesme aksesuarı
B
Gövde
C
Pil kapağı - Açma/Kapama düğmesi
Aksesuarlar
D
Detaylı şekillendirici
E
Sakal şekillendirici
Kaş şekillendirici
F
_
Temizlik fırçası
_
Açma
_
Kapama
_
Pil kapağının açılması
G
Sakal şekillendirici için 3 kademeli tarak
TÜRKÇE
53
Page 54

ÇALIŞTIRMA
------------------------------------------------------------------------------------------------
Hazırlık
Çok amaçlı kıl düzeltme makineniz bir adet 1*AA
- 1.5V DC alkalin pil ile çalışır.
1 Pil yuvasını açmak için pil kapağını C sola
doğru çevirin ve ardından çekin.
2 AA tip alkalin pili, pilin üzerinde bulunan +
ve - işaretler pil yuvasındaki kutup işaretleriyle
eşleşecek şekilde yerleştirin.
Notlar
7
Pil doğru takılmazsa cihaz çalışmayacaktır.
7
Cihaz uzun süre kullanılmayacaksa pilini
çıkarın.
Çevresel bilgiler
7
Piller, ağır metal içermeseler dahi evsel atıklarla
birlikte atılmamalıdır. Eski pilleri daima yerel
çevre kurallarına uygun olarak atın.
3 Pil yuvasını kapatmak için pil kapağını C ye-
rine yerleştirerek kapak yerine oturana kadar
sağa doğru çevirin.
54
TÜRKÇE
Page 55

ÇALIŞTIRMA
------------------------------------------------------------------------------------------------
Aksesuarların takılması ve değiştirilmesi
1 Cihazın kapalı olduğundan emin olun.
2 Cihaza takılı bir aksesuar varsa sağa, kilit açık
konuma doğru çevirin ve ardından çekerek
çıkartın.
3 İstediğiniz aksesuarı, cihazın üst kısmına
yerleştirip yerine oturana kadar sola doğru çevirmek suretiyle takın.
Burun ve kulak kıllarının düzeltil-
A
mesi
1 Cihazın kapalı olduğundan emin olun.
2 Cihazı açmak için Açma/Kapama düğmesini
C
sağa doğru çevirin.
3 Cihazı düzeltme başlığı ile itinalı bir şekilde
burun veya kulak içine götürün.
Dikkat
7
Cihazı kullanırken burun veya kulak içinde çok
derinlere götürmeyin.
TÜRKÇE
55
Page 56

ÇALIŞTIRMA
------------------------------------------------------------------------------------------------
Not
7
Kesici seti, cihaz dönerken burnunuza veya
kulaklarınıza sokarken ve çıkarırken dikkatli
olun.
4 Cihazı kapatmak için Açma/
Kapama düğmesini C sola doğru çevirin.
Saç ve kaş şekillendirme
F
1 Cihazın kapalı olduğundan emin olun.
2 Dikey kesme kafasını F takın.
Notlar
7
Gerekirse tarak aksesuarını (3 veya 6 mm) kaş
şekillendiriciye takın.
7
Kılları tamamen kesmek için sadece dikey
kesme kafasını F kullanın.
3 Cihazı açmak için Açma/
Kapama düğmesini C sağa doğru çevirin.
4 Kesme elemanını yavaşça istenmeyen kılların
bulunduğu alanda kaş çizgisi veya kaşın kendisi boyunca hareket ettirin.
56
TÜRKÇE
Page 57

ÇALIŞTIRMA
------------------------------------------------------------------------------------------------
Uyarı
7
Aksesuar ve cihazı, cildinizin zarar görmesine
neden olabileceğiniz için cihazı aşırı derecede
bastırmayın.
5 Cihazı kapatmak için Açma/
Kapama düğmesini C sola doğru çevirin.
Sakal şekillendiricinin kullanımı
E
1 Cihazın kapalı olduğundan emin olun.
2 Sakal şekillendiriciyi takın E.
Notlar
7
Gerekirse tarak aksesuarını (2, 4 veya 6 mm)
sakal şekillendiriciye takın E.
3 Cihazı açmak için Açma/Kapama düğmesini
C
sağa çevirin.
Dikkat
7
Bu aksesuarı saç çizgileri, sakal, favori gibi
küçük alanlar için kullanın.
7
Şekillendiriciyi, tıraş bıçağının teninize hafifçe
değeceği şekilde tutun.
TÜRKÇE
57
Page 58

ÇALIŞTIRMA
7
Şekillendiriciyi açılı şekilde tutmaktan kaçının.
------------------------------------------------------------------------------------------------
Aksi takdirde cildiniz bozulabilir ve tahriş olabilir.
7
Cihazı kapatmak için Açma/Kapama
düğmesini C sola çevirin.
4 Cihazın kapalı olduğundan emin olun.
Detaylı şekillendiricinin kullanılması
D
1 Cihazın kapalı olduğundan emin olun.
2 Detaylı şekillendiriciyi takın D.
3 Cihazı açmak için Açma/Kapama düğmesini
C
sağa çevirin.
7
Bu aksesuarın dar tasarımı, favorilerinizi ve
sakallarınızı hassas bir biçimde tıraş edip
şekillendirmenize olanak sağlar.
4 Cihazı kapatmak için Açma/Kapama
düğmesini C sola çevirin.
58
TÜRKÇE
Page 59

BİLGİLER
-------------------------------------------------------------------------------------------------------------------
Temizleme ve bakım
1 Cihazı kapatın ve pilini çıkarın.
2 Kesicilerde biriken kılları durulayın ve fazla
suyu silkeleyin.
3 Cihazın gövdesini yalnızca yumuşak ve nemli
bir bezle temizleyin.
Uyarı
7
Cihazı suya batırmayın.
7
Herhangi bir temizleme maddesi veya sıvısı
kullanmayın.
Not
7
Temizlik sonrasında cihazı kullanmadan önce
yumuşak bir bezle veya kağıt havluyla tüm
parçalarını kurulayın.
7
Çok amaçlı kıl kesme makinenizi her
kullanımdan sonra temizlemenizi tavsiye
ederiz.
7
Çok amaçlı kıl kesme makinenizi temizlemenin
en kolay ve en hijyenik yolu, kullandıktan sonra
ürünün kafasını sıcak suyla durulamaktır.
TÜRKÇE
59
Page 60

BİLGİLER
-------------------------------------------------------------------------------------------------------------------
Saklama
7
Cihazı uzun süre kullanmayı düşünmüyorsanız, lütfen dikkatli bir şekilde saklayın.
7
Cihazın tamamen kuru olduğundan emin olun.
7
Cihazı serin ve kuru bir yerde muhafaza edin.
7
Cihazın, çocukların ulaşamayacağı bir yerde muhafaza edildiğinden emin olun.
AEEE Yönetmeliğine Uyum ve Atık Ürünün Elden Çıkarılması
Bu ürün T.C. Çevre ve Şehircilik Bakanlığı tarafından yayımlanan “Atık elektrikli ve Elektronik eşyaların Kontrolü
Yönetmeliği’nde belirtilen zararlı ve yasaklı maddeleri
içermez.
AEEE Yönetmeliğine uygundur. Bu ürün,
geri dönüşümlü ve tekrar kullanılabilir nite-
likteki yüksek kaliteli parça ve malzemeler-
den üretilmiştir. Bu nedenle, ürünü, hizmet
larla birlikte atmayın. Elektrikli ve elektronik cihazların
geri dönüşümü için bir toplama noktasına götürün. Bu
toplama noktalarını bölgenizdeki yerel yönetime sorun.
60
ömrünün sonunda evsel veya diğer atık-
TÜRKÇE
Page 61

BİLGİLER
-------------------------------------------------------------------------------------------------------------------
Kullanılmış ürünleri geri kazanıma vererek Çevrenin ve doğal kaynakların korunmasına yardımcı
olun.
Ambalaj bilgisi
Ürünün ambalajı, Ulusal Mevzuatımız
gereği geri dönüştürülebilir malzemelerden üretilmiştir. Ambalaj atığını evsel
veya diğer atıklarla birlikte atmayın,
yerel otoritenin belirttiği ambalaj toplama noktalarına atın.
Technische Daten
Güç kaynağı
Pil : 1*AA - 1.5V DC
Teknik ve tasarım değişiklikleri yapma
hakkı saklıdır.
TÜRKÇE
61
Page 62

SEGURIDAD
---------------------------------------------------------------------------------------------------
Lea este manual de instrucciones detenidamente antes de
utilizar el aparato. Siga todas
las instrucciones de seguridad
para evitar daños debidos a un
uso indebido.
7
Guarde el manual de instrucciones para su uso futuro. En caso de
entregar el aparato a un tercero,
asegúrese de incluir también el
manual de instrucciones.
7
Nunca use el dispositivo para ningún otro propósito que el descrito
en estas instrucciones. No cortocircuite la pila.
ESPAÑOL
62
Page 63

SEGURIDAD
7
Este aparato está diseñado única-
---------------------------------------------------------------------------------------------------
mente para uso doméstico.
7
Jamás utilice el aparato en la
bañera, en la ducha o sobre un
lavabo lleno de agua. Tampoco
lo utilice con las manos mojadas.
7
Advertencia: No utilice este
aparato cerca de duchas, lavabos
u otros recipientes que contengan
agua.
7
Mantenga siempre el aparato
fuera del alcance de los niños.
ESPAÑOL
63
Page 64

SEGURIDAD
7
Pueden usar el aparato los niños
---------------------------------------------------------------------------------------------------
a partir de 8 años y las personas
con las capacidades físicas, sensoriales lo hagan bajo supervisión o
hayan recibido instrucciones para
un uso seguro y comprendan los
riesgos implicados. No deje que
los niños jueguen con el aparato,
ni que lleven a cabo su limpieza o
mantenimiento sin vigilancia.
7
No desmonte el aparato bajo
ninguna circunstancia. No se admitirá reclamación de garantía alguna por daños causados por un
manejo inadecuado.
7
No utilice el aparato al aire libre.
ESPAÑOL
64
Page 65

SEGURIDAD
7
No utilice el aparato si está visi-
---------------------------------------------------------------------------------------------------
blemente dañado.
7
No introduzca el aparato con demasiada profundidad en la nariz
u orejas durante su uso.
7
No aplique una presión excesiva,
porque podría dañar el aparato y
causar lesiones cutáneas.
7
Si no va a utilizar el aparato durante un periodo prolongado de
tiempo, retire la pila.
7
Para evitar lesiones, recuerde encender el aparato antes de introducirlo en su nariz u orejas.
ESPAÑOL
65
Page 66

SEGURIDAD
7
No arroje al fuego ni rompa las
---------------------------------------------------------------------------------------------------
pilas, ya que podrían explotar o
liberar materiales tóxicos.
7
No utilice el aparato si sufre dolores, eczema o cualquier otra irritación cutánea.
7
No utilice el aparato sobre la piel
inflamada.
7
No toque la cuchilla de la cuchilla interior (parte metálica) con los
dedos. Podría sufrir lesiones.
7
No utilice una pila recargable.
7
Antes del uso, compruebe que
la cuchilla no esté deformada o
dañada. Si está deformada o dañada, podría dañar la piel.
ESPAÑOL
66
Page 67

SEGURIDAD
7
No modifique el aparato. Asi-
---------------------------------------------------------------------------------------------------
mismo, no lo desmonte o lo repare. Podría sufrir lesiones.
7
No exponga las pilas a un calor
extremo que provenga, por ejemplo, de la radiación directa del
sol, calefacción, fuego, etc.
7
Extraiga las pilas cuando esté
gastada o cuando no vaya a utilizar el aparato durante un tiempo
prolongado. El fabricante no se
responsabiliza de los daños provocados por derrames de pilas.
7
Guardar en un lugar fresco y
seco.
ESPAÑOL
67
Page 68

SEGURIDAD
7
No introduzca las baterías de
---------------------------------------------------------------------------------------------------
forma incorrecta y no las cortocircuite.
ESPAÑOL
68
Page 69

INFORMACIÓN GENERAL
-----------------------------
Estimado cliente:
Le felicitamos por la compra de su nuevo kit de
cortapelos GRUNDIG MT 5810.
Lea con atención las siguientes notas de uso
para disfrutar al máximo de la calidad de este
producto Grundig durante muchos años.
Una estrategia responsable
GRUNDIG aplica condiciones de trabajo sociales acordadas por contrato
y con salarios justos tanto a sus propios empleados como a los proveedo-
res, y damos una gran importancia al
uso eficiente de las materias primas con una reducción continua de residuos de varias toneladas
de plástico al año. Además, todos nuestros accesorios están disponibles por lo menos durante
cinco años.
Para un futuro mejor.
Grundig.
ESPAÑOL
69
Page 70

INFORMACIÓN GENERAL
Controles
Vea las figuras de la pág. 3.
A
Accesorio de corte con
cuchilla giratoria
B
Cuerpo
C
Tapa de la pila - Interruptor de encendido/
apagado.
Accesorios
D
Retocador de precisión
E
Recorte de barbas
Recortador de cejas
F
_
Cepillo de limpieza
_
Encender
_
Apagar
_
Apertura de la tapa de la batería
G
Peine de 3 etapas para recortador de barba
ESPAÑOL
70
-----------------------------
Page 71

FUNCIONAMIENTO
-----------------------------------------------------------
Preparación
Su cortapelos multi utiliza una pila de 1*AA -
1.5V DC alcalina.
1 Para abrir el compartimento de la pila, gire
la tapa de la pila C hacia la izquierda para
retirarla.
2 Introduzca la pila AA alcalina, de modo que
las marcas + y - de la pila coincidan con las
marcas de polaridad del compartimento de la
pila.
Notas
7
El aparato no funcionará si la pila no se ha
introducido correctamente.
7
Retire la pila si no va a usar el aparato durante
un periodo de tiempo prolongado.
Nota sobre el medio ambiente
7
Las pilas, incluidas aquellas que no contienen
metales pesados, no se deben eliminar junto
con los residuos domésticos. Elimine las pilas
cumpliendo con los reglamentos medioambientales locales.
ESPAÑOL
71
Page 72

FUNCIONAMIENTO
-----------------------------------------------------------
3 Para cerrar el compartimento de la pila, colo-
que la tapa C y gírela hacia la derecha hasta
que quede fija en su posición.
Colocación y cambio de accesorios
1 Asegúrese de que el aparato esté apagado.
2 Si hay un accesorio colocado, retírelo girando
hacia la derecha a la posición desbloqueada
y tirando.
3 Coloque el accesorio deseado poniéndolo
en la parte superior del aparato y girándolo
hacia la izquierda hasta que quede fijo en su
posición.
Recortar el vello de la nariz y oídos
A
1 Asegúrese de que el aparato esté apagado.
2 Para encender el aparato, gire el interruptor
de encendido/apagado C hacia la derecha.
3 Introduzca cuidadosamente en la nariz o en el
oído el aparato con el accesorio de recorte.
ESPAÑOL
72
Page 73

FUNCIONAMIENTO
-----------------------------------------------------------
Atención
7
Al utilizar el aparato no lo introduzca a demasiada profundidad en la nariz ni oídos.
Notas
7
Inserte cuidadosamente el set de corte en la
nariz o en las orejas y retírelo mientras gira el
dispositivo.
4 Para apagar el aparato, gire el interruptor de
encendido/apagado C hacia la izquierda.
Recorte de pelo y cejas
F
1 Asegúrese de que el aparato esté apagado.
2 Coloque el cabezal de corte vertical F.
Notas
7
Si es necesario, acople el peine accesorio (3
mm o 6 mm) en el recortador de cejas.
7
Para eliminar el pelo completamente, utilice
sólo el cabezal de corte vertical F.
3 Para encender el aparato, gire el interruptor
de encendido/apagado C hacia la derecha.
ESPAÑOL
73
Page 74

FUNCIONAMIENTO
-----------------------------------------------------------
4 Guíe suavemente la unidad de corte por en-
cima del área del pelo no deseado a lo largo
de la línea de la ceja o sobre la propia ceja.
Atención
7
No aplique una presión excesiva, porque podría dañar el aparato y causar lesiones cutáneas.
5 Para apagar el aparato, gire el interruptor de
encendido/apagado C hacia la izquierda.
Recorte de barbas E
1 Asegúrese de que el aparato esté apagado.
2 Coloque el cortabarbas E .
Notas
7
Si es necesario, acople el peine accesorio (2
mm o 4 mm) en el cortabarbas E.
3 Para encender el aparato, gire el interruptor
de encendido/apagado C hacia la derecha.
Precaución
7
Use este accesorio para áreas más pequeñas
como las líneas del cabello, barba, patillas.
ESPAÑOL
74
Page 75

FUNCIONAMIENTO
7
Sujeta el recortador de modo que la pantalla
-----------------------------------------------------------
de la maquinilla toque suavemente su piel.
7
Evite sujetar el recortador en ángulo, ya que
esto puede distorsionar la pantalla y causar
irritación en la piel.
7
Para apagar el aparato, gire el interruptor de
encendido/apagado C hacia la izquierda.
4 Asegúrese de que el aparato esté apagado.
Recorte del retocador de precisión D
1 Asegúrese de que el aparato esté apagado.
2 Coloque el retocador de precisión D .
3 Para encender el aparato, gire el interruptor
de encendido/apagado C hacia la derecha.
7
El diseño estrecho de este accesorio permite
un recorte y modelado preciso de las patillas
y barbas.
4 Para apagar el aparato, gire el interruptor de
encendido/apagado C hacia la izquierda.
ESPAÑOL
75
Page 76

INFORMACIÓN
---------------------------------------------------------------------------------
Limpieza y cuidados
1 Apague el aparato y retire la pila.
2 Lave el pelo acumulado de los accesorios de
corte y seque el exceso de agua.
3 Limpie la carcasa del aparato únicamente con
un paño suave y húmedo.
Atención
7
No sumerja el aparato en agua.
7
No utilice productos de limpieza u otros líquidos.
Nota
7
Antes de utilizar de nuevo el aparato tras una
limpieza, seque con cuidado todas las piezas
con un paño o una servilleta de papel suave.
7
Recomendamos la limpieza del cortapelos después de cada uso.
7
La forma más fácil e higiénica para limpiar el
cortapelos es lavar el cabezal del producto
con agua templada tras su uso.
ESPAÑOL
76
Page 77

INFORMACIÓN
---------------------------------------------------------------------------------
Almacenaje
7
Si no va a utilizar el aparato durante un periodo prolongado de tiempo, guárdelo cuidadosamente.
7
Asegúrese de que esté completamente seco.
7
Guarde el aparato en un lugar fresco y seco.
7
Mantenga el aparato fuera del alcance de los
niños.
ESPAÑOL
77
Page 78

INFORMACIÓN
---------------------------------------------------------------------------------
Conformidad con la normativa WEEE
y eliminación del aparato al final de
su vida útil:
Este producto es conforme con la directiva de la
UE sobre residuos de aparatos eléctricos y electrónicos (WEEE) (2012/19/UE). Este producto
incorpora el símbolo de la clasificación selectiva
para los residuos de aparatos eléctricos y electrónicos (WEEE).
Este aparato se ha fabricado con pie-
zas y materiales de primera calidad,
que pueden ser reutilizados y son
aptos para el reciclado. No se des-
haga del producto junto con sus los
residuos domésticos normales y de otros tipos al
final de su vida útil. Llévelo a un centro de reciclaje de dispositivos eléctricos y electrónicos. Solicite a las autoridades locales información
acerca de dichos centros de recogida.
ESPAÑOL
78
Page 79

INFORMACIÓN
---------------------------------------------------------------------------------
Cumplimiento de la directiva RoHS:
El producto que ha adquirido es conforme con
la directiva de la UE sobre la restricción de sustancias peligrosas (RoHS) (2011/65/UE). No
contiene ninguno de los materiales nocivos o prohibidos especificados en la directiva.
Información de embalaje
El embalaje del producto está fabri-
cado con material reciclable de
acuerdo con las normativas naciona-
les sobre medio ambiente. No se deshaga del material de embalaje ni de los desechos
domésticos o de otro tipo. Llévelos a los puntos de
recogida de material de embalaje designados
por las autoridades locales.
Datos técnicos
Alimentación Pila: 1*AA - 1.5V DC
Queda reservado el derecho a realizar
modificaciones técnicas y de diseño.
ESPAÑOL
79
Page 80

SÉCURITÉ
------------------------------------------------------------------------------------------------------------------
Veuillez lire attentivement le présent manuel d’utilisation avant
d’utiliser cet appareil ! Respectez toutes les consignes de sécurité pour éviter des dommages
dus à une mauvaise utilisation !
7
Conservez le manuel d’utilisation
car vous pourriez en avoir besoin
ultérieurement. Si l’élément est
donné à un tiers, veillez à joindre
le manuel d’utilisation.
7
Ne jamais utiliser l’appareil pour
un autre usage que celui décrit dans ce manuel. Évitez de
court-circuiter les piles.
FRANÇAIS
80
Page 81

SÉCURITÉ
7
Le présent appareil a été conçu à
------------------------------------------------------------------------------------------------------------------
des fins domestiques uniquement.
7
Ne jamais utiliser l’appareil dans
une salle de bains, sous une douche,
ni au-dessus d’une bassine remplie
d’eau; évitez également de le manipuler avec des mains mouillées.
7
Avertissement : Évitez d’utiliser cet
appareil près des baignoires, des
douches, des lavabos ou tout autre
récipient contenant de l’eau.
FRANÇAIS
81
Page 82

SÉCURITÉ
7
Maintenez toujours l’appareil hors
------------------------------------------------------------------------------------------------------------------
de portée des enfants.
7
Cet appareil peut être utilisé par des
enfants de 8 ans et plus et des personnes dont les capacités physiques,
sensorielles ou mentales sont réduites ou n’ayant pas suffisamment
d’expérience ou de connaissances
si une personne chargée de la sécurité les surveille ou leur apprend
à utiliser le produit en toute sécurité
et en étant conscients des dangers
y afférents. Les enfants ne doivent
pas jouer avec cet appareil. Le nettoyage et l’entretien d’utilisation ne
doivent pas être effectués par des
enfants sans surveillance.
FRANÇAIS
82
Page 83

SÉCURITÉ
7
N’ouvrez en aucun cas l’appareil.
------------------------------------------------------------------------------------------------------------------
Aucune réclamation au titre de la
garantie ne sera acceptée pour
les dégâts résultats d’une manipulation incorrecte.
7
Ne jamais utiliser l’appareil en
plein air.
7
Ne jamais utiliser l’appareil s’il est
visiblement endommagé.
7
Pendant l’utilisation, évitez d’enfoncer l’appareil profondément
dans le nez ou les oreilles.
7
De même, évitez de faire une
pression excessive, qui pourrait
endommager l’accessoire et causer des lésions de la peau.
FRANÇAIS
83
Page 84

SÉCURITÉ
7
Si vous ne comptez pas utiliser
------------------------------------------------------------------------------------------------------------------
l’appareil pendant un certain
temps, veuillez le débarrasser de
ses piles.
7
Pour éviter de vous blesser, pensez toujours à mettre l’appareil
en marche avant de l’insérer dans
votre nez ou oreille.
7
Évitez de jeter vos piles au feu ou
de les casser, car elles pourraient
exploser ou dégager des substances toxiques.
7
Évitez d’utiliser cet appareil si
vous souffrez d’acné, d’eczéma
ou d’autres irritations de la peau.
FRANÇAIS
84
Page 85

SÉCURITÉ
7
N’utilisez pas l’appareil sur une
------------------------------------------------------------------------------------------------------------------
peau enflammée.
7
Évitez tout contact entre vos doigts
et la lame interne (pièce métallique). Vous pourriez ainsi vous
blesser.
7
N’utilisez pas de batteries rechargeables.
7
Avant toute utilisation, vérifiez que
la lame n’est ni déformée, ni endommagée. Votre peau pourrait
être blessée si la lame est endommagée ou déformée.
FRANÇAIS
85
Page 86

SÉCURITÉ
7
N’altérez jamais l’appareil. De
------------------------------------------------------------------------------------------------------------------
même, évitez de le démonter ou
de le réparer. De telles opérations présentent des risques de
blessure.
7
N’exposez pas les piles à des
sources de chaleur extrêmes,
comme les rayons du soleil, le
chauffage, le feu, etc.
7
Veillez à retirer les piles lorsqu’elle est usée ou si vous n’utilisez pas l’appareil pendant une
durée prolongée. La garantie
du fabricant ne couvre aucun
dégât occasionné par des piles
usagées.
FRANÇAIS
86
Page 87

SÉCURITÉ
7
Conservez dans un endroit frais
------------------------------------------------------------------------------------------------------------------
et sec.
7
N’insérez pas les piles dans le
mauvais sens et évitez de les
court-circuiter.
FRANÇAIS
87
Page 88

APERÇU
------------------------------------------------------------------------------------------------------------------------
Cher client,
Merci d’avoir acheté de votre nouveau GRUN-
DIG Multi Hair Trimmer Kit MT 5810.
Veuillez lire attentivement les recommandations
ci-après pour pouvoir profiter au maximum de
la qualité de votre produit Grundig pendant de
nombreuses années à venir.
Une approche responsable !
GRUNDIG est attaché à des condi-
tions de travail négociées sur contrat
avec des salaires équitables pour les
employés internes et les fournisseurs.
Nous attachons également une grande
importance à l’utilisation efficace des matières
brutes avec une constante réduction des déchets
de plusieurs tonnes de plastique chaque année.
En outre, tous nos accessoires sont disponibles au
moins 5 ans.
Pour un avenir valant la peine d’être vécu.
Grundig.
FRANÇAIS
88
Page 89

APERÇU
------------------------------------------------------------------------------------------------------------------------
Commandes
Voir les images en page 3.
A
Accessoire de tondeuse avec lame rotative
B
Corps
C
Couvre-batteries-Bouton
Marche/Arrêt
Accessoires
D
Tondeuse de précision
E
Rasage de la barbe
Tondeuse pour sourcils
F
_
Brosse de nettoyage
_
Mise en marche
_
Mise à l’arrêt
_
Ouverture du couvercle de batterie
G
Peigne à 3 niveaux pour tondeuse à barbe
FRANÇAIS
89
Page 90

FUNCTIONNAMENT
----------------------------------------------------------
Préparation
Votre tondeuse multi-usages nécessite une pile alcaline 1*AA - 1.5V DC.
1 Pour ouvrir le compartiment de la batterie, tour-
nez le couvre-batterie C vers la gauche, puis
enlevez.
2 Insérez la pile alcaline AA, de sorte que les
marques + et - correspondent aux signes de
polarité inscrits dans le compartiment de la
batterie.
Remarques
7
L’appareil ne peut fonctionner si la pile n’est
pas insérée correctement.
7
Si l’appareil ne doit pas être utilisé pendant
une longue période, retirez la batterie.
Remarque à caractère environnemental
7
Les piles, y compris celles ne contenant pas de
métal lourd, ne doivent pas être éliminées avec
les ordures ménagères. Éliminez toujours les
piles usées conformément aux dispositions environnementales en vigueur dans votre région.
FRANÇAIS
90
Page 91

FUNCTIONNAMENT
----------------------------------------------------------
3 Pour fermer le compartiment de la batterie,
replacez le couvre-batterie C et tournez-le à
droite jusqu’à ce qu’il soit bien en place.
Fixation et remplacement des accessoires
1 Assurez-vous que l’appareil est arrêté.
2 Si un accessoire y est relié, déconnectez-le en
le tournant à droite pour le débloquer, puis
l’enlever.
3 Relier l’accessoire de votre choix en le pla-
çant par-dessus l’appareil et en le tournant à
gauche pour le fixer en place.
Coupe des poils du nez ou des
oreilles
1 Assurez-vous que l’appareil est arrêté.
2 Mettez l’appareil en marche en tournant l’inter-
3 Introduisez avec précaution l’appareil avec
A
rupteur Marche/Arrêt C vers la droite.
son embout dans le nez ou l’oreille.
FRANÇAIS
91
Page 92

FUNCTIONNAMENT
----------------------------------------------------------
Attention
7
Insérez attentivement l’ensemble de coupe
dans le nez ou les oreilles et retirez-le à nouveau tout en faisant pivoter l’appareil.
Remarques
7
Faites entrer et sortir l’extrémité de coupe lentement dans la narine, en tournant l’appareil.
4 Arrêtez l’appareil en tournant l’interrupteur
Marche/Arrêt C vers la gauche.
Coupez les cheveux et les sourcils
1 Assurez-vous que l’appareil est arrêté.
2 Fixer la tête de rasage verticale F.
Remarques
7
Si nécessaire, fixez le peigne (3 mm ou 6 mm)
à la tondeuse à sourcils
7
Pour un rasage complet des sourcils, utilisez
uniquement la tête de rasage verticale F.
3 Mettez l’appareil en marche en tournant l’inter-
rupteur Marche/Arrêt C vers la droite.
FRANÇAIS
92
F
Page 93

FUNCTIONNAMENT
----------------------------------------------------------
4 Orienter lentement le dispositif de rasage sur la
zone à raser, le long du sourcil ou sur le sourcil
lui-même.
Attention
7
De même, évitez de faire une pression excessive, qui pourrait endommager l’accessoire et
causer des lésions de la peau.
5 Arrêtez l’appareil en tournant l’interrupteur
Marche/Arrêt C vers la gauche.
Utilisation de la tondeuse à barbe
1 Assurez-vous que l’appareil est à l’arrêt.
2 Fixez la tondeuse à barbe E.
Remarques
7
Si nécessaire, fixez le peigne
(2 mm, 4 mm ou 6 mm) au rasage de la-barbe
E
.
3 Pour mettre l’appareil en marche, tournez l’in-
terrupteur Marche/Arrêt C vers la droite.
FRANÇAIS
93
E
Page 94

FUNCTIONNAMENT
----------------------------------------------------------
Mise en garde
7
Utilisez cet accessoire pour les petites zones
telles que les contours, la barbe, les favoris.
7
Tenez la tondeuse de façon à ce que l’écran du
rasoir touche doucement votre peau.
7
Évitez de tenir la tondeuse par un angle car
vous pouvez déformer l’écran et causer une
irritation de la peau.
7
Pour mettre l’appareil à l’arrêt, tournez l’interrupteur Marche/Arrêt C vers la gauche.
4 Assurez-vous que l’appareil est à l’arrêt.
Utilisation de la tondeuse de précision D
1 Assurez-vous que l’appareil est à l’arrêt.
2 Fixez la tondeuse de précision D.
3 Pour mettre l’appareil en marche, tournez l’in-
terrupteur Marche/Arrêt C vers la droite.
7
La conception étroite de cet accessoire permet
une coupe et une mise en forme précises des
favoris et de la barbe.
FRANÇAIS
94
Page 95

FUNCTIONNAMENT
----------------------------------------------------------
4 Pour mettre l’appareil à l’arrêt, tournez l’inter-
rupteur Marche/Arrêt C vers la gauche.
INFORMATIONS
----------------------------------------------------------------------------
Nettoyage et entretien
1 Éteignez l’appareil et enlever la batterie.
2 Rincer les lames pour les débarrasser de l’amas
de poils, puis secouez-les pour en retirer l’excès
d’eau.
3 Nettoyez l’appareil uniquement à l’aide d’un
chiffon humide et doux.
Attention
7
Évitez d’introduire complètement l’appareil
dans de l’eau.
7
Évitez d’utiliser des agents nettoyants ou
d’autres liquides.
FRANÇAIS
95
Page 96

INFORMATIONS
----------------------------------------------------------------------------
Remarque
7
Avant d’utiliser l’appareil après le nettoyage,
séchez soigneusement tous les éléments l’aide
d’un chiffon doux ou d’une serviette en papier.
7
Nous vous recommandons de nettoyer votre
tondeuse multi-usages après chaque utilisation.
7
Le moyen le plus facile et le plus hygiénique de
la faire est de rincer la tête de l’article à l’eau
tiède après chaque usage.
Rangement
7
Veuillez conserver soigneusement votre appareil si vous ne comptez pas l’utiliser pendant
une période prolongée.
7
Assurez-vous que l’appareil est complètement
sec.
7
Conservez l’appareil dans un endroit frais et
sec.
7
Assurez-vous de tenir l’appareil hors de portée
des enfants.
FRANÇAIS
96
Page 97

INFORMATIONS
----------------------------------------------------------------------------
Conformité avec la directive DEEE et
mise au rebut des déchets :
Ce produit est conforme à la directive DEEE
(2012/19/UE) de l’Union européenne). Ce
produit porte un symbole de classification pour
la mise au rebut des équipements électriques et
électroniques (DEEE).
Le présent produit a été fabriqué avec
des pièces et du matériel de qualité
supérieure susceptibles d’être réutilisés
et adaptés au recyclage.
Par conséquent, nous vous conseillons
de ne pas le mettre au rebut avec les ordures ménagères et d’autres déchets à la fin de sa durée
de vie. Au contraire, rendez-vous dans un point
de collecte pour le recyclage de tout matériel
électrique et électronique. Veuillez vous rapprocher des autorités de votre localité pour plus d’informations concernant le point de collecte le plus
proche.
FRANÇAIS
97
Page 98

INFORMATIONS
----------------------------------------------------------------------------
Conformité avec la directive LdSD :
L’appareil que vous avez acheté est conforme à
la directive LdSD (2011/65/UE) de l’Union européenne. Il ne comporte pas les matériels dangereux et interdits mentionnés dans la directive.
Information sur l’emballage
L’emballage du produit est composé
de matériaux recyclables, conformé-
ment à notre réglementation nationale.
Ne jetez pas les éléments d’emballage
avec les déchets domestiques et autres déchets.
Déposez-les dans un des points de collecte d’éléments d’emballage que vous indiquera l’autorité
locale dont vous dépendez.
Données techniques
Alimentation
Piles : 1*AA - 1.5V DC
Modifications relatives à la technique
et à la conception réservées.
FRANÇAIS
98
Page 99

SIGURNOST
--------------------------------------------------------------------------------------------------
Molimo, pažljivo pročitajte ovaj
korisnički priručnik prije uporabe
vašeg uređaja! Slijedite sve
sigurnosne upute da biste izbjegli
oštećenje zbog nepravilne
uporabe!
7
Sačuvajte korisnički priručnik za
kasniju uporabu. Ukoliko vam
treća strana da uređaj, pazite da
je dostavljen i korisnički priručnik.
7
Nikada nemojte koristiti uređaj
za bilo koju svrhu osim one koja
je opisana u ovim uputama. Ne
spajajte bateriju u kratki spoj.
7
Uređaj je napravljen samo za
uporabu u kućanstvu.
HRVATSKI
99
Page 100

SIGURNOST
7
Nikada ne koristite uređaj u
--------------------------------------------------------------------------------------------------
kadi, tušu ili iznad umivaonika
punog vode; niti radite s njim
mokrim rukama.
7
Upozorenje: ne upotrebljavajte
uređaj blizu kada, tuševa,
umivaonika ni drugih posuda
koji sadrže vodu.
7
Uvijek držite uređaj podalje od
dosega djece.
HRVATSKI
100
 Loading...