

Groen Braising Pan, ECLIPSE Brochure & Specs
UNIFIED BRANDS
ECLIPSE™ BRAISING PANS

ECLIPSE™ BRAISING PANS
Welcome to the Unied Brands Culinary Collection!
We are pleased to present the Unied Brands Culinary Collection. This collection of application
information, cook times, and recipes for Groen Eclipse Ergonomic Tilting Braising Pans will
benet all foodservice operations or service providers.
The rst section of the Culinary Collection includes topics that directly affect every foodservice
operation; food safety, event planning, calculation formulas, and charts to aid in determining
the cost of shrinkage, cost of labor and volume sizing. The second section addresses how the
Braising Pan works along with offering great application ideas.
Since these collections are working documents, periodic
updates will include timely application suggestions for
current menu trends or food safety challenges along
with recipes from Unied Brands Culinary Center or from
users like you. A compilation of the Culinary Collection
recipes for all Groen products; braising pans, steamers,
combination steamer-ovens, and kettles is available in
PDF format in the “Chef’s Corner” section of the Unied
Brands website at uniedbrands.net. The collection is
also available on CD when requested through our literature
department. Either format allows for simple printing of the
new pages of interest which can be added to your Unied
Brands Culinary Collection materials.
We know you’ll nd the Unied Brands Culinary
Collection to be valuable when used in your
foodservice operation!

groen.com, 888-994-7636
Kettle
groen.com, 888-994-7636
Braising Pan
INDEX
Are You in Compliance................................................... 5-7
Planning A Successful Event........................................ 8-13
Eclipse Ergonomic Tilting Braising Pans
Features.......................................................................... 14
From A Chef’s Perspective......................................... 14-16
Recipes
Breakfast Foods & Crepes......................................... 17-21
Entrée – Beef............................................................. 22-35
Entrée – Non Meat..................................................... 36-38
Entrée – Pork............................................................. 39-43
Entrée – Chicken........................................................ 44-53
Entrée – Turkey............................................................... 54
Entrée – Sandwich..................................................... 55-57
Entrée – Seafood....................................................... 58-63
Vegetable................................................................... 64-67
Soup........................................................................... 78-69
Sauce......................................................................... 70-71
Dessert....................................................................... 72-74
General Information
Proportion Chart...................................... inside back cover
Groen® is a registered trademark of Unied Brands
Eclipse™ is a trademark of Groen
4

groen.com, 888-994-7636
Kettle
groen.com, 888-994-7636
Braising Pan
Are You In Compliance?
The 2001 Food Code will remain thru 2005, when it will be revised by the FDA. In 2003 an update
was issued which brought several changes, including lowering the minimum hot holding from 140°
to 135°F. Other changes include greater emphasis on the when, where and how of hand-washing.
Hand-Washing: Code revisions set the minimum temperature on hand-washing stations at 100°F.
The code also claries and strictly enforces that hands must be washed for 20 seconds and only in
an easily accessible hand-washing sink in the kitchen. No hand-washing should occur in food prep
or three compartment sinks. Also, the code claries that hands must be washed before donning
gloves, and alcohol gels are not suitable for proper hand-washing.
Bare Hand Contact: There is some confusion about gloves and bare hand contact. The regulation
prohibits bare hand contact, but does not dictate gloves in all instances. The regulation reads:
“Except when washing fruits and vegetables, food employees may not contact exposed ready-toeat foods with their bare hands and shall use suitable utensils such as deli tissue, spatulas, tongs,
single use gloves or dispensing equipment.” For example, a fry cook would not be required to wear
gloves as gloves can become contaminated and lead to cross-contamination just as hands. Check
with your local health department for regulations regarding bare hand contact.
Date Marking and Storage Time Limits: All potentially hazardous food prepared and held for
more than 24 hours should be clearly marked to indicate the date or day by which the food shall be
consumed or discarded. If the food is in a manufacturer’s sealed package, the manufacturer’s useby date is sufcient. Once opened, that date must be replaced by a label with a date assigned by the
kitchen. The maximum time shall be seven days if the food is kept at a temperature of 41°F or below
the entire time. If food is taken in and out of the refrigerator, that time span must be shortened. You
must not, however, exceed the manufacturer’s use by date. It is the manufacturer’s use-by date or
up to seven days, whichever comes rst. Day one of the seven-day period starts with the prep date
of the oldest ingredient. For example, if you prepare potatoes for a salad on Sunday, but actually
make the salad on Monday, day one would be Sunday.
Thermometers: The new regulations require you to have proper equipment to measure
temperatures accurately. Calibrated bimetallic stem thermometers are good for certain applications
but do not register temperatures instantly. Therefore, the use of thermocouples may be required in
certain situations. Buffets, for example, must be checked at least every two hours and an instant
reading thermocouple would be needed to accurately check each station. The code also requires
a thin probe to measure items such as meat patties. Thin probes are available for use with certain
thermocouples.
5

groen.com, 888-994-7636
Kettle
groen.com, 888-994-7636
Braising Pan
Time and Temperature Logs: Environmentalists can require time and temperature logs to be
maintained. The logs simply require temperatures to be recorded at least every two hours and
this record maintained on le. Buffets, barbecue operations, and other places where potentially
hazardous foods are held are most likely to have this mandate. This would include foods held in the
kitchen and front of the house service. Hot foods must be maintained at 135°F or above and cold
foods at 41°F or lower. Even if the health department does not require that you maintain these logs,
it is good practice to make sure that food temperatures are being checked and documented, and the
food is being kept above 135°F or below 41°F.
NOTES:
______________________________________________________________________________
______________________________________________________________________________
______________________________________________________________________________
______________________________________________________________________________
______________________________________________________________________________
______________________________________________________________________________
______________________________________________________________________________
______________________________________________________________________________
______________________________________________________________________________
______________________________________________________________________________
______________________________________________________________________________
______________________________________________________________________________
______________________________________________________________________________
______________________________________________________________________________
______________________________________________________________________________
______________________________________________________________________________
6
groen.com, 888-994-7636
Kettle
groen.com, 888-994-7636
Braising Pan
Time/Temperature Log Example:
Time/Temperature Log
Must be recorded at least every two hours
Date:
Cold Foods: 41°F or lower
Hot Foods: Reheat to 165°F /Hold 135°F or higher
Time Temp Product Comment/Action Taken Initials
7

groen.com, 888-994-7636
Kettle
groen.com, 888-994-7636
Braising Pan
Planning A Successful Event
1. List All Items Needed For A Job: Recheck that list for items you may have overlooked.
2. Use A Contract
3. Get A Deposit
4. Keep Your Eye On Inventory:
your business.
5. Prep Certain Foods Ahead Of Time: i.e. make toast rounds, blanch vegetables, pack dry
goods and supplies.
6. Use Labor Wisely: Schedule labor for the appropriate times, stagger talent to hold
down overtime.
7. Schedule Deliveries: Make sure supplies are ordered well in advance to avoid surprises,
especially special items that are hard to nd.
8. Keep The Onsite Event Prep Simple: Eliminate as much onsite cooking as possible.
9. Do A Site Inspection In Advance: Determine what facilities will be used and what is
available to you. Be sure to check for Ice Machines and Garbage Disposal facilities.
10. Use Alternating Colors And Shapes: Use contrasting colors and shapes on trays; ex. cut
and roll meats, layer cheeses and arrange in alternate colors. For the nishing touch, use
fresh Green Leaf Lettuce Leaves to separate layers and add height to the tray.
Don’t use a lot of special items that you do not use in
11. Keep Cold Foods Cold: Save setting cold trays and garnishes until as close to serving
time as needed. Most garnishes can be prepped ahead of time and kept in resealable bags.
12. Keep Food Trays Fresh And Supplies Well Stocked: Prepare spare or backup trays and
hold them in the cooler. Never prepare trays at the table. Have staff prepared to quickly
replace as needed. Be sure to have spare meats and garnishes ready for replenishment in
prep area.
13. Rent Early: Reserve any equipment or linens in plenty of time before the event and conrm
the week before the event.
14. Be Creative But Know Your Limits: Do not experiment on the actual event. Practice a
recipe rst and make sure you and others like it before you sell it. Sometimes recipes sound
better than they taste.
8

groen.com, 888-994-7636
Kettle
groen.com, 888-994-7636
Braising Pan
15. Taste Before You Serve: To make sure the food meets your standards by personally
tasting all items before you serve them. Have disposable spoons available for tasting.
16. Calculate Your Costs: When calculating event prices, make sure you categorize your
costs. i.e. a) food b) labor c) equipment and linen rental d) facility rental.
17. Food: Markup can be calculated several ways, 3 x food cost will give you a 33%, 4 x food
cost will give you 25%. Many restaurants nd a happy medium between the two
(usually 28%).
Food Calculation Cart:
Menu Item: ___________________ # Servings: ______ Estimated Prep Time: _______
Ingredient: Recipe Amount: Price:
________________________ ________________________ ____________________
________________________ ________________________ ____________________
________________________ ________________________ ____________________
________________________ ________________________ ____________________
Total food cost for this recipe $ _________________
Divided by the number of servings / _________________
Subtotal of food cost per serving = _________________
Cost of seasonings per serving $ _________________
How to determine food cost/food cost percentage
Food cost per serving = _________________
Divided by menu price / _________________
Food cost percentage = _________________
18. Labor: Your best estimate of how many hours it will take you and your staff to do all of the
activities necessary to service your customers completely will do. This includes preparing
the food, setting up the facility, working the actual party and time spent cleaning the facility
after the event.
9

groen.com, 888-994-7636
Kettle
groen.com, 888-994-7636
Braising Pan
Labor Calculation Chart: The following table calculates the actual hourly cost of time
for people at various income levels. The value of each of your hours, even each of your
minutes, is something to bear in mind when you review your dietary record. Look at your
time as money to invest. (all below values in dollars)
Salary Salary- Benets-40% Total Value Value
-Year Week Total Salary Week Per Hour Per Minute
$5,000 96 38 135 3 .06
$6,000 115 46 162 4 .07
$7,000 135 54 188 5 .08
$8,000 154 62 215 5 .09
$9,000 173 69 242 6 .10
$10,000 192 77 269 7 .11
$15,000 288 115 404 10 .17
$20,000 385 154 538 13 .22
$25,000 481 192 673 17 .28
$30,000 577 231 808 20 .34
$35,000 673 269 942 24 .39
$40,000 769 308 1,077 27 .45
$45,000 865 346 1,212 30 .50
$50,000 962 385 1,346 34 .56
$55,000 1,058 423 1,481 37 .62
$60,000 1,154 462 1,615 40 .67
19. Equipment And Linen Rental: If you need any equipment, silverware, glassware, plates,
bowls, etc., get rm prices on cost of rental ahead of time so it can be included in the
contract.
20. Facility Rental: (if needed) Reserve the site well in advance and make sure it is included
in the deposit section of the contract. This covers you in case of customer cancellation.
21. Your Food Is Your Best Advertisement: It is important, especially in the case of catering
parties, that each item placed on a tray or in a display is given careful attention. All
members of the party are prospective clients, they eat rst with their eyes. Keep your
business cards handy.
22. Use Your Party Staff Wisely: Assign select members of your staff to pick up plates,
glasses, napkins, etc., keeping the serving area neat and tidy.
10

groen.com, 888-994-7636
Kettle
groen.com, 888-994-7636
Braising Pan
23. When Is Case Cost Not Usable Case Cost: When working on your food cost, keep into
account what your nished cost is going to be. As an example - shrimp (31-35 count) may
cost $6 per pound. After it is thawed, cooked, and peeled, the nished weight will decrease
as much as 25% or up to 1/4 lb of shrimp which makes the cost increase to $7.50 per lb.
This is a strong consideration when preparing large amounts of shrimp. Considering waste,
labor savings and ease of preparation, you might consider using pre-cooked shrimp.
Conversion Exercise (Scratch vs. Cooked, Pulled and Diced Chicken Meat):
10 Lbs of cooked boneless pulled chicken meat wanted. No skin, natural proportion of light
and dark meat.
25% Cook Shrink – The fat cooks away when raw chicken is cooked; therefore, allowing
meat shrinkage. The water that is added to fresh chicken during processing also cooks
away. A minimum of 25% is lost.
+ 30% Bone Weight – 30% of the chicken’s weight is bone.
+ 15% Skin Weight – 15% of the chicken’s weight is skin.
+ 5% Unusable Carcass Meat – This accounts for any meat left on the carcass that is
unusable for pulled or diced chicken meat.
= 75% Total Loss – There is only 25% usable meat on a raw bird.
1. Cost per pound __________ x 40 pounds __________
(to yield 10 lbs, 40 is needed)
2. Labor rate per hour __________ x 1.3 hours __________
(based on 30 lbs/hour, an industry average)
3. Credit for fat and broth @ $.30 per pound x 10 pounds __________
(current value approx. $.30 per pound)
(when cooking chicken, 25% broth and fat are created)
For 10 lbs of pulled chicken, __________
meat prepared from scratch
For 10 lbs of pulled chicken, __________
meat prepared from frozen
11

groen.com, 888-994-7636
Kettle
groen.com, 888-994-7636
Braising Pan
Cooking Yield Of Raw Whole Turkey: Are you buying turkey the most economical
way? Here are some facts that may surprise you (gures based on averages taken from
independent tests on 20 lb turkeys).
Cost/Lb Raw Turkey Cost of Servable Cooked Meat/Lb From Raw Turkey
.70 2.07
.72 2.13
.74 2.19
.76 2.25
.78 2.31
.80 2.37
.82 2.43
.84 2.49
In the left column nd the price you most recently paid for your raw turkey. Compare that
price with the price in the column at the right and you will see how much you actually paid
per lb for the servable meat. Surprised? The difference between the price paid and the
cost of the usable meat is made up from a combination of water loss, cooking loss, carcass,
bones and unservable scrap. Only 33.8% of a frozen raw bird is available for serving.
Usable cooked meat – 20.6% white, 13.2% dark, 33.8% total. Unusable part of bird – 5.2%
giblets, 3.4% water on thawing, 27.1% cooking loss, 30.5% carcass and bones.
24. Avoid Confusion: To eliminate as much miscommunication as possible between you and
the customer, design a function sheet and contract. Have the customer sign the contract
and share a copy with them. Changes can be made, just note them on the form and initial
it. Don’t leave anything to question.
This form should include:
• Customer name
• Name of function
• Person responsible for payment
• Number of guests expected
• Date and time (beginning and ending)
• Location
• Items and amounts to be served
• Equipment, smallwares and linens needed
• Labor needed (servers, carvers, bussers, bartenders, etc)
• Labor hours contracted (ending time for party is important for this)
• Party decor and person(s) responsible
• Cost of party
• Deposit required
12

groen.com, 888-994-7636
Kettle
groen.com, 888-994-7636
Braising Pan
25. Plan Your Work: Assemble your staff in advance and discuss an unpriced copy of the
function sheet. This is your opportunity to assign duties, describe the party theme, and
create an expectation of performance. Distribute a checklist to each department.
26. Use An Inventory List: Before the party have an inventory list of all items to be used
(equipment, smallwares and linens). After the party, use this list to clean and repack to
avoid loss. Catering equipment and linens can be expensive, loss could cost you the prots
from your event.
27. Conrm A Job Well Done: Follow up with your customer a couple of days after the party
to make sure they are satised and get their permission to use them as a reference for
future business.
28. Employee Feedback: Encourage employees to give feedback on both good and not so
good aspects of the process. Always work to improve yourself and your business, it pays
big dividends.
13

groen.com, 888-994-7636
Kettle
groen.com, 888-994-7636
Braising Pan
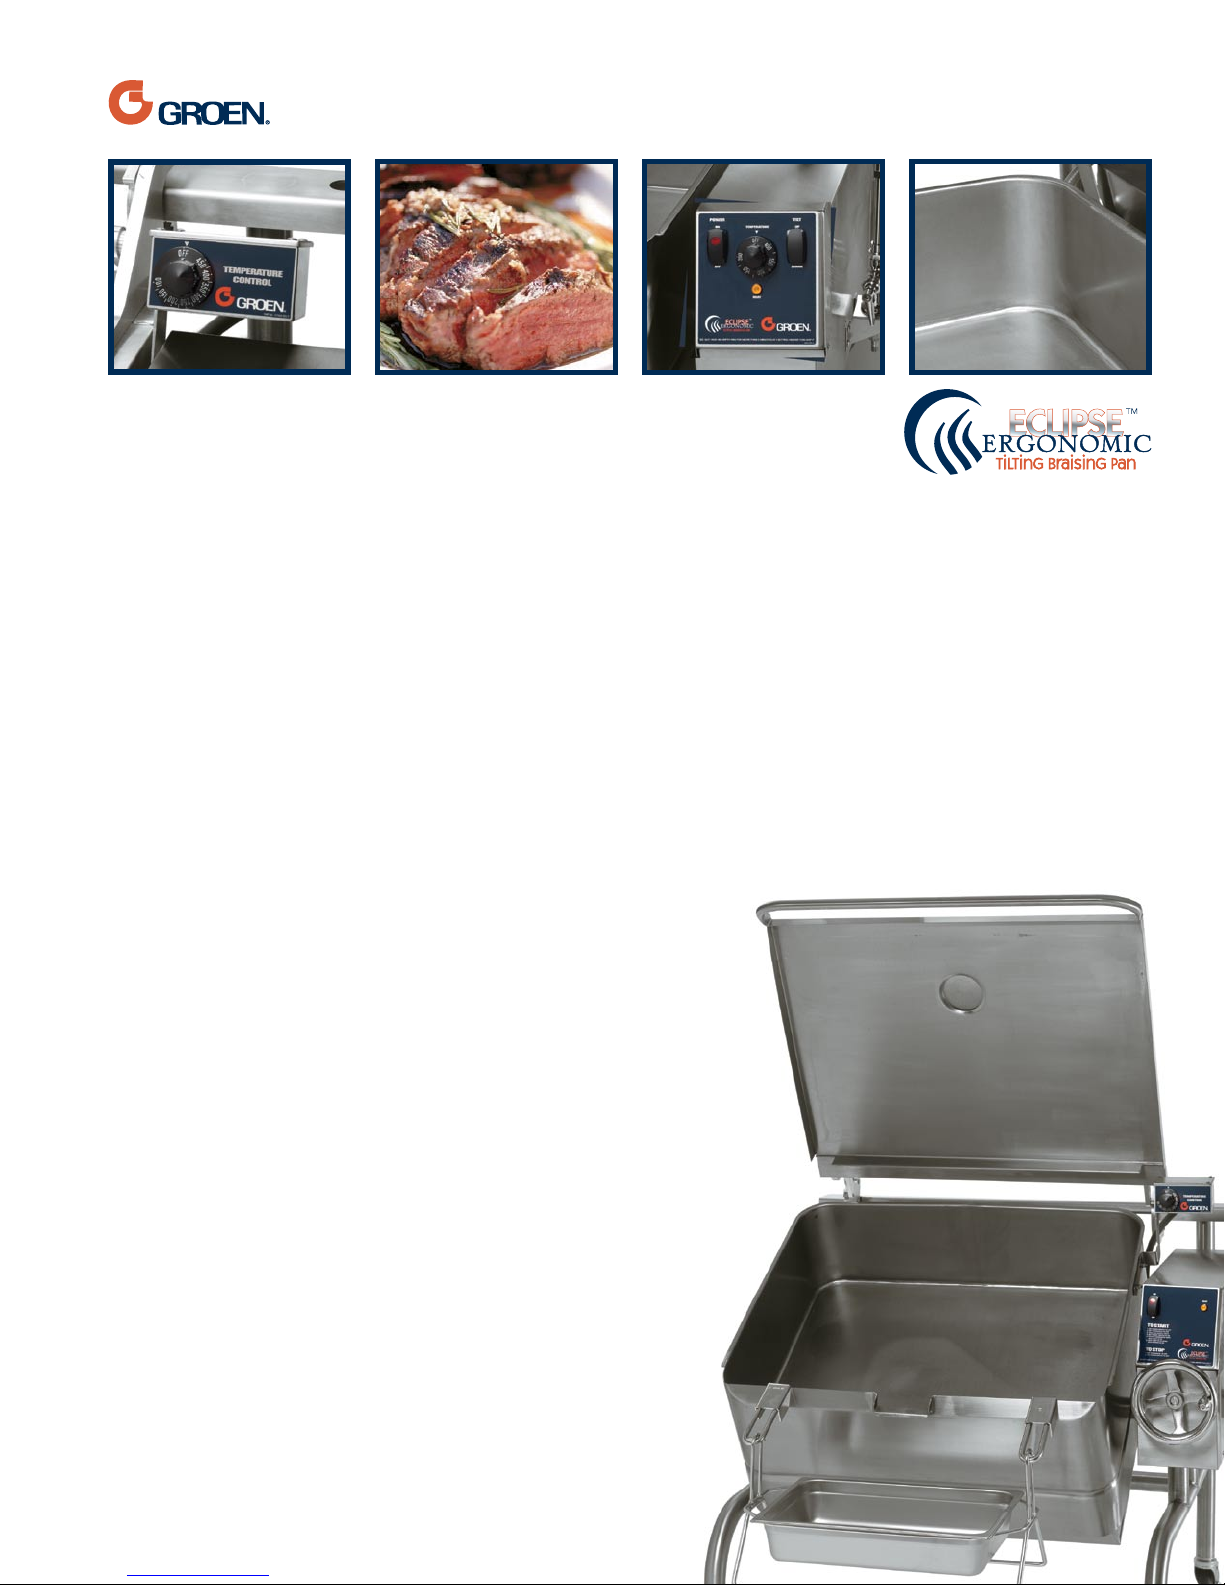
Eclipse™ Ergonomic Tilting Braising Pans
The best is now even better. The Eclipse takes a great braising pan concept to a new level.
Features:
• Performance, water resistance and improved ergonomics in a streamlined design.
• Narrow-width and single point utility connections.
• Rounded-leg stands and one-piece covers are easier to clean.
• High performance—fast, high-capacity pan heats to 350ºF in just 4 minutes.
• Faster cook times with more even cooking.
• Precision thermostat regulates temperature for accurate cooking.
• Water-resistant pan shell and control housing—less problems with splash back and spray.
• Center tilt design optimizes pour path and oor/aisle space.
• Smooth-action, quick-tilting body on manual and power tilt models.
• Counterbalanced cover design improves operation and cleaning.
• Easy to reach right-hand, left-hand, or rear faucet mounts.
• Easy-to-clean, 3-inch radius, rounded interiors—no tight corners to clean.
• Table top electric model braising pan features the same proven design as the larger oor
models.
Eclipse Ergonomic Tilting Braising Pans From A Chef’s Perspective
by Chef Michael Williams
The greatest chefs of the world have known for years that the most versatile piece of equipment
in the kitchen is the braising pan, or some call it the “tilt skillet”. Regrettably, most foodservice
operators do not realize their versatility. The best part of having a braising pan is the versatility. You
can utilize the pan to make a few hundred ap jacks in the morning, cook salisbury steaks with gravy
for lunch, and nally, make a great stir fry for dinner. Now that’s versatility!
I am often asked “just what is a braising pan used for, is it like a skillet?”. I relate it more to one of
those electric skillets many of us had in our rst apartment. It works in just about the same way. The
pan has a heater coil attached to the outside of the bottom. When it is heated you can cook almost
anything in a snap, and clean-up is a breeze.
When you rst got the electric skillet and burned a few batches of chicken, you realized that this
method of cooking was pretty efcient. It did not require everything to be cooked on “HIGH” because
the heat source was part of the equipment and truly provided highly efcient conductive heat. During
the life of this trusty friend you began to notice that some things, like cream or high sugar items,
stuck or burned in the area around where the element was located, but the products in the middle
of the pan were just right. This is because the element typically ran about 2 inches from the outside
14

groen.com, 888-994-7636
Kettle
groen.com, 888-994-7636
Braising Pan
edge of the pan and the element had to work hard to get energy to product in the middle of that thin
pan. This uneven heating has been addressed in the design of the Eclipse Braising pan.
Commercial braising pans share many of the same principles as that handy home appliance. They both
are heated from below, heat very quickly, and are easy to clean. But that’s where the similarity ends.
The commercial cousin has a 10, 30 or 40-gal stainless steel pan and is heated from below by either
electric elements or gas burners. This pan is hinged on each side and tilts to dispense the cooked food.
A hinged vented cover is attached to the back frame and covers the entire pan when closed.
The Eclipse Braising pan from Groen is considered by many to be the most durable and easy to
use braising pan available on the market today. Even heat, excellent bi-metal cooking surface, 3”
radius corners, and a highly water resistant tilted front control box make the Eclipse braising pan
easy to use and a snap to clean. This workhorse can be used to produce mass quantities of food
products, create meticulously prepared sauces, sear meats, pan fry chicken or sh, sauté, steam
or be used as a Bain Marie. In almost any application the Eclipse Braising Pan provides excellent
performance. Heater strips are bonded in pairs across the bottom of the electric Eclipse Braising
pan. This provides very even and efcient conductive heating. Since the heater strip pairs are
mounted across the entire surface, there is no need to burn in one area to heat up another. The
gas models utilize a series of gas jets working in conjunction with ns welded directly to a portion of
the back base of the pan. It combines radiant heat of the gas jets with conductive energy of the ns
to carry the heat more efciently into the entire cooking surface. Both electric and gas models will
provide exceptional performance for years.
Most operators will go through a period of adjustment when rst using this equipment. Like anything
else, there is a measure of nesse involved in cooking delicate items. Some people experience
some over caramelization with products high in sugar like carrots or onions. You guessed it, “over
caramelization” means burnt and carbon bonded to the surface. This happens because the surface
of the pan gets hot and stays hot. Moisture is cooked away quickly and the sugars melt to the
surface and cause scorching. The best rule of thumb is to cook these items at or slightly below
300°F. You will have plenty of heat to caramelize any vegetable to perfection. When cooking items
such as meats or sauces you should increase the temperature to between 350°F and 375°F. At this
temperature, meats caramelize very evenly and give a wonderful color to any sauce.
Two options make a braising pan even more functional. The rst option is a device called a TDO
(Tangent Draw-Off), which really helps in the total operation of the equipment. The TDO is a wide
mouth drain available with a 2” or 3” opening. The TDO is afxed to the front of the pan at a tangent
to the bottom of the pan. This conguration allows the user to draw-off liquids and most solids from
the bottom of the pan. The TDO option allows you to dispense soups or gravies directly into the
serving container, when used with the strainer; liquids can be drained from ground beef or sausage
as you cook it, water after cooking pasta. After all of that it can also be used to drain the wash water
when you clean the equipment after use. As you can tell, this is a “must have” not really an option.
Another handy option is the steamer insert. Two sizes are available, one to t the 30-gal pan and one
15

groen.com, 888-994-7636
Kettle
groen.com, 888-994-7636
Braising Pan
for the 40-gal. You can t two inserts per pan. These inserts allow the operator to use the braising
pan as a steamer or Bain Marie (water bath). These inserts are constructed of stainless steel and
hold a #200 pan for steaming and up to a #400 pan for water bath applications. Here is how it works
for steaming. The operator lls the pan with about 3 inches of water, the insert is placed in the water,
and the braising pan is heated to 300°F. When the water comes to a boil, a #200 perforated pan
lled with the item to be steamed is placed in the insert. The operator closes the lid and allows the
product to steam for the desired time. To use it as a Bain Marie, you follow the same steps but set
the temperature to 250°F. When the water gets hot, place up to a #400 solid pan in the insert and
place a at pan lid on the individual pan. Reduce the temperature to the desired level and add water
as needed.
After the cooking process and product is removed from the pan, spray out remaining debris. Clean
with soap and water, then sanitize. I normally tilt the pan to the 90°F and let it air dry.
Use the recipes contained in this section with what you have learned, then experiment with
variations of others and enjoy.
NOTES:
______________________________________________________________________________
______________________________________________________________________________
______________________________________________________________________________
______________________________________________________________________________
______________________________________________________________________________
______________________________________________________________________________
______________________________________________________________________________
______________________________________________________________________________
______________________________________________________________________________
______________________________________________________________________________
______________________________________________________________________________
______________________________________________________________________________
16

groen.com, 888-994-7636
Kettle
groen.com, 888-994-7636
Braising Pan
Category: Breakfast Foods and Crepes
Recipe: Crepes
For Product: Eclipse Braising Pan
Publish Date: 5/05
______________________________________________________________________________
Yield: 25 Servings
Flour 1 lb
Salt 1/4 tsp
Confectioner’s sugar 6 oz
Milk 1 qt
Eggs, slightly beaten 10
Vanilla 1/2 oz
Oil 1/2 cup
BREAKFAST FOODS & CREPES
1. Mix ingredients with a whip, heat pan, lubricate with oil and pour or ladle batter into
6 inch circles.
2. Cook over moderate heat 1 to 2 minutes or until underside is brown and bubbles have
formed on top. Turn and cook half to one minute or until the other side is browned.
3. When each crepe is cooked, roll them up and place in shallow counter pan. Sprinkle with
confectioner’s sugar.
4. Keep them warm until sauce is completed.
Cooking Tip -
No flipping, crepes cook on
one side only.
17

groen.com, 888-994-7636
Kettle
groen.com, 888-994-7636
Braising Pan
Category: Breakfast Foods and Crepes
Recipe: French Toast
For Product: Eclipse Braising Pan
Publish Date: 5/05
______________________________________________________________________________
BREAKFAST FOODS & CREPES
Yield: 48 Servings (1 slice/serving)
Slices of Bread 48 each
Butter or Margarine 1 cup
Eggs 24 each
Milk 2 cups
Maple Syrup 1/2 cups
1. Combine milk, eggs and Maple syrup. Mix until well blended.
2. Heat butter in braising pan at 325°F.
3. Dip bread in egg/milk mixture on both sides.
4. Lay in pan, when last slice is down, turn rst. Remove rst slice when last is turned.
Food Safety Tip -
To avoid the “Temperature
Danger Zone” place egg and
milk pre-mixtures in the top rail
of a Randell Raised Rail
Prep Table.
18

groen.com, 888-994-7636
Kettle
groen.com, 888-994-7636
Braising Pan
Category: Breakfast Foods and Crepes
Recipe: Kaiser Schmarren Emperor’s Pancakes Austrian - Style
For Product: Eclipse Braising Pan
Publish Date: 5/05
______________________________________________________________________________
Yield: 10 Servings 30 Servings
Eggs 1 large 3 large
All Purpose Flour 1 cup 3 cups
Sugar 1 serving spoon (2 oz) 3 serving spoons (6 oz)
Raisins 2/3 cups 2 cups
Milk 1 cup 3 cups
Salt pinch 3/4 tsp
Salad Oil 1 tsp 1 tbsp
Butter 1/4 cup (2 oz) 3/4 cups
Sugar 1 serving spoon (2 oz) 3 serving spoons (6 oz)
Butter 1/4 cup 3/4 cup (6 oz)
Cinnamon pinch 3/4 tsp
BREAKFAST FOODS & CREPES
1. Pre—heat braising pan at 250°F for four (4) minutes.
2. With a wire whip, combine eggs, our, rst amount of sugar, milk, salt and salad oil. Beat
until smooth.
3. Add raisins.
4. Turn thermostat up to 400°F and add rst amount of butter.
5. Pour approximately 3/4 quarts of batter into braising pan to make each pancake. Reduce
heat to 350°F.
6. Brown and ip.
7. Tear each pancake apart with 2 large forks. Add 2 oz butter to each pancake.
9. Add 2 oz sugar and a pinch of cinnamon to each pancake.
10. Continue to tear.
11. Remove from braising pan (1 batch equals 30 pancakes).
19

groen.com, 888-994-7636
Kettle
groen.com, 888-994-7636
Braising Pan
Category: Breakfast Foods and Crepes
Recipe: Mushroom, Onion Omelets
For Product: Eclipse Braising Pan
Publish Date: 5/05
______________________________________________________________________________
BREAKFAST FOODS & CREPES
Yield: 12 Omelets
Fresh Eggs 2 doz, large
Milk 1 1/2 cups
Salt 1/4 tsp
Margarine 1 lb
1. Beat eggs, salt and milk together.
2. Melt margarine in the braising pan set at 375°F.
3. Pour 12 oz of mixture into the braising pan.
4. As the edges start to set, fold into center and continue this until egg is almost cooked
thoroughly.
5. Add cooked or sautéed mushrooms and onions to the center of the omelet.
6. Fold in both edges of the omelet to the center.
7. Remove from heat.
Cooking Tip -
Pan & grill oils or shortenings
work better than margarine
when coating a pan.
20

groen.com, 888-994-7636
Kettle
groen.com, 888-994-7636
Braising Pan
Category: Breakfast Foods and Crepes
Recipe: Pancakes
For Product: Eclipse Braising Pan
Publish Date: 5/05
______________________________________________________________________________
Complete Pancake Mix 5 lbs
Appropriate water for mixing per package directions
Oil 3 cups
1. Heat oil in braising pan to 325°F.
2. Drop cup of batter into the braising pan for each pancake.
3. When the surface of the pancake is completely covered with bubbles, turn them over and
cook three minutes longer.
BREAKFAST FOODS & CREPES
Cooking Tip -
If using a spray pan coating
make sure to use one that is
made with oil, not water. Read
the ingredient statement.
21

groen.com, 888-994-7636
Kettle
groen.com, 888-994-7636
Braising Pan
Category: Entree - Beef
Recipe: Beef and Macaroni
For Product: Eclipse Braising Pan
Publish Date: 5/05
______________________________________________________________________________
Yield: 100 Servings
Butter 1/2 lb
Onions, sliced 1 1/2 lb
Green Peppers, chopped 1/2 lb
Ground Beef 17 1/2 lb
Salt 2 tbsp
Pepper 1 tsp
ENTREE - BEEF
Elbow Macaroni 2 lbs
Water 3 gal
Salt 1/2 cup
Tomatoes 3 qts
Tomato Soup (3) #5 cans
1. Bring water to a boil in braising pan. Add salt and macaroni and cook until almost tender.
2. Drain, reserve macaroni.
3. Melt butter; add onions, peppers, meat and pepper.
4. Sauté at 325°F until brown. Simmer mixture for 1/2 hour, stirring occasionally.
5. Add salt, tomatoes and tomato soup to meat mixture.
6. Add macaroni. Heat to simmering, serve with 6 oz ladle.
Food Safety Tip -
Safely chill unused portions in
a Randell Blast Chiller.
22

groen.com, 888-994-7636
Kettle
groen.com, 888-994-7636
Braising Pan
Category: Entree - Beef
Recipe: Beef Stroganoff
For Product: Eclipse Braising Pan
Publish Date: 5/05
______________________________________________________________________________
Yield: 100 Servings
Beef Sirloin, cut in 1’ cubes 20 lbs
Onions, sliced 2 lbs
Water, hot 1 gal
Mushrooms, fresh sliced 2 lbs
Salt 2 tbsp
Pepper 1 tbsp
Flour 1 lb
Water, cold as needed to make a roux
Sherry 1 cup
Sour Cream 2 qts
1. Brown beef and onions at 325°F. Add water to cover and cook until meat is almost done
(approx. 1 hour).
2. Add mushrooms, salt and pepper.
3. Stir in our which has been dissolved in cold water.
4. When mixture thickens, add sherry and sour cream, turn off pan.
5. Serve over rice or noodles.
ENTREE - BEEF
Prep Tip -
Use the SmartSteam to
prepare fluffy rice or perfect
pasta everytime!
23

groen.com, 888-994-7636
Kettle
groen.com, 888-994-7636
Braising Pan
Category: Entree - Beef
Recipe: Chalaupe Topping
For Product: Eclipse Braising Pan
Publish Date: 5/05
______________________________________________________________________________
Yield: (100) 4 oz Servings
Pinto Beans, washed 1 gal
Salt 1/4 cup
1. Fill heated braising pan with 3” of water. Turn thermostat to 300°F, add beans and salt.
2. Cover pan & allow beans to boil.
3. Reduce heat to 250°F and simmer beans until tender (2 hrs).
ENTREE - BEEF
4. Drain beans, saving liquid.
5. Put beans in a mixing bowl and mash, using a paddle. Add enough liquid to make beans
the consistency of mashed potatoes.
6. Refrigerate until needed.
Ground Beef 10 lbs
Onions, chopped 2 cups
Chili Powder 1/2 cup
Cumin 1/4 cup
Garlic Powder 2 tbsp
Salt 2 tbsp
Cooked Beans 3 gals
1. Turn thermostat to 325°F & brown off ground beef & onions. Do not drain off fat.
2. Add chili powder, cumin, garlic powder, salt & mashed beans. Heat for 30 minutes.
3. Remove from pan.
Serve with nacho chips and top with mozzarella & american cheese.
Food Safety Tip -
After quick chilling the beans
in a Randell Blast Chiller, store
them in a Randell Reach-In
Refrigerator.
24
 Loading...