

GreenWorks Tools 25297, 25357 User Manual

MANUEL 1 NOITASILITU’D
USER’S 11 LAUNAM
BEDIENUNGSANLEITUNG 21
MANUAL DE UTILIZACIÓN 31
MANUALE 14 OSU’D
MANUAL DE UTILIZAÇÃO 51
GEBRUIKERSHANDLEIDING 61
17 KOBSNOITKURTSNI
18 GNINDELJEVREGURB
19 GNINSIVNASKURB
KÄYTTÄJÄN KÄSIKIRJA 100
HASZNÁLATI ÚTMUTATÓ 109
NÁVOD K OBSLUZE 119
РУКОВОДСТВО ПО ЭКСПЛУАТАЦИИ
128
931 ERAZILITU ED LAUNAM
SBO AJCKURTSNI ŁUGI 149
ORIRP IKŠINBAROPU ČNIK 159
KORISNIČKI PRIRUČNIK
168
771 DNEHUJAJATUSAK
781 SAVODAV OMIJODUAN
TOTEIL ĀJA ROKASGRĀMATA 197
NÁVOD NA POUŽITIE 206
РЪКОВОДСТВО ЗА УПОТРЕБА 216
TONDEUSE À GAZON
LAWN MOWER
RASENMÄHER
CORTACÉSPED
TOSAERBA
CORTADOR DE RELVA
GRASMAAIER
GRÄSKLIPPARE
PLÆNEKLIPPER
GRESSKLIPPER
RUOHONLEIKKURIT
FŰNYÍRÓ
SEKAČKA TRÁVY
ГАЗОНОКОСИЛКА
MAŞINĂ DE TUNS GAZON
KOSIARKA DO TRAWY
KOSILNICA
KOSILICA
MURUNIIDUK
ŽOLIAPJOVĖ
ZĀLES PĻAUJMAŠĪNA
KOSAČKA TRÁVY
КО
САЧКА ЗА ТРЕВА
FR
EN
DE
ES
IT
PT
NL
SV
DA
NO
FI
HU
CS
RU
RO
PL
SL
HR
ET
LT
LV
SK
BG
25297 / 25357

Attention!
Il est indispensable que vous lisiez les instructions contenues dans ce manuel avant la mise en service
de l’appareil.
Important!
It is essential that you read the instructions in this manual before operating this machine.
Achtung!
Bitte lesen Sie unbedingt vor Inbetriebnahme die Hinweise dieser Bedienungsanleitung.
¡Atención!
Es imprescindible que lea las instrucciones de este manual antes de la puesta en servicio.
Attenzione!
Prima di procedere alla messa in funzione, è indispensabile leggere attentamente le istruzioni contenute
nel manuale.
Atenção!
É indispensável que leia as instruções deste manual antes de utilizar a máquina.
Let op!
Het is van essentieel belang dat u de instructies in deze gebruiksaanwijzing leest vooraleer u dit toestel
in gebruik neemt.
Observera!
Det är nödvändigt att läsa instruktionerna i denna bruksanvisning innan användning.
OBS!
Denne brugervejledning skal gennemlæses inden maskinen tage i brug.
Advarsel!
Det er meget viktig at du leser denne brukerveiledningen før du tar maskinen i bruk.
Huomio!
On ehdottoman välttämätöntä lukea tässä käyttöohjeessa annetut ohjeet ennen käyttöönottoa.
Figyelem!
Feltétlenül fontos, hogy a jelen használati útmutatóban foglalt előírásokat az üzembe helyezés előtt
elolvassa!
Důležité upozornění!
Nepoužívejte tento přístroj dříve, než si přečtete pokyny uvedené v tomto návodu.
Внимание!
Перед сборкой и запуском инструмента необходимо ознакомиться с инструкцией по эксплуатации.
Atenţie!
Este esenţial să citiţi instrucţiunile din acest manual înainte de operarea acestui aparat.
Uwaga!
Przed przystąpieniem do użytkowania tego urządzenia, należy koniecznie zapoznać się z zaleceniami
zawartymi w niniejszym podręczniku.
Pomembno!
Pred uporabo tega stroja, obvezno preberite navodila iz tega priročnika.
Upozorenje! Neophodno je da pročitate ove upute prije uporabe ovog uređaja.
Tähtis!
Enne trelli kasutama hakkamist tuleb käesolevas juhendis esitatud juhised kindlasti läbi lugeda.
D
ėmesio! Prieš pradėdami eksploatuoti šį prietaisą, svarbu, kad perskaitytumėte šiose instrukcijose pateiktus
nurodymus.
Uzmanību! Svarīgi, lai jūs pirms mašīnas darbināšanas izlasītu instrukcijas šajā rokasgrāmatā.
Dôležité! Pre prácou s týmto zariadením je dôležité, by ste si prečítali pokyny v tomto návode.
Важно!
От изключителна важност е да прочетете инструкциите в това ръководство, преди да стартирате и
използвате тази машина.
Sous réserve de modifications techniques / Subject to technical modifications / Technische Änderungen vorbehalten /
Sujeto a modificaciones técnicas / Con riserva di eventuali modifiche tecniche / Com reserva de modificações técnicas /
Technische wijzigingen voorbehouden / Med förbehåll för tekniska ändringar / Med forbehold for tekniske ændringer /
Med forbehold om tekniske endringer / Tekniset muutokset varataan / A műszaki módosítás jogát fenntartjuk /
Změny technických údajů vyhrazeny / Могут быть внесены технические изменения
/ Sub rezerva modificaţiilor tehnice /
Z zastrzeżeniem modyfikacji technicznych / Tehnične spremembe dopuščene/ Podložno tehničkim promjenama /
Tehnilised muudatused võimalikud / Pasiliekant teisę daryti techninius pakeitimus /
Paturam tiesības mainīt tehniskos raksturlielumus /
T
echnické zmeny vyhradené /
Подлежи на т
е
хнически модификации
11
Deutsch (Übersetzung der originalen Anleitungen)
DE
FR EN ES IT PT NL SV DA NO FI HU CS RU RO PL SL HR ET LT LV SK BG
11
English (Original instructions)
EN
FR DE ES IT PT NL SV DA NO FI HU CS RU RO PL SL HR ET LT LV SK BG
Your product has been engineered and manufactured to
Greenworks tools’ high standard for dependability, ease of
operation, and operator safety. When properly cared for, it
will give you years of rugged, trouble-free performance.
Thank you for buying a Greenworks tools product.
Save this manual for future reference
INTENDED USE
This product is intended for domestic lawn mowing. The
cutting blade should rotate approximately parallel to the
ground over which it is being wheeled. All four wheels
should touch the ground while mowing. It is a pedestrian
controlled walk behind mower.
NOTE: The mower should never be operated with the
wheels off the ground, it should not be pulled or ridden on.
It should not be used to cut anything other than domestic
grass lawns.
GENERAL SAFETY RULES
WARNING
To reduce the risk of injury, the user must read and
understand the operator's manual.
WARNING
Do not attempt to operate this mower until you have read
thoroughly and understood completely all instructions,
safety rules, etc. contained in this manual. Failure to
comply may result in accidents involving electric shock,
fire, and/or serious personal injury.
WARNING
The machine should be operated with the battery pack.
When using battery operated machine basic safety
precaution should always be followed to reduce the risk
of
re, leaking batteries and personal injury.
PERSONAL SAFETY
■ The lawn mower is capable of amputating hands and
feet, and throwing objects. Failure to observe all safety
instructions could result in serious injury or death.
■ Never allow children or people unfamiliar with the
instructions to use the machine. Local regulations may
restrict the age of the operator.
■ Stay alert, watch what you are doing, and use common
sense when operating the lawn mower. Do not operate
the mower while tired or under the influence of drugs,
alcohol, or medication. A lapse in concentration while
operating the machine may result in serious personal
injury.
■ Wear heavy, long trousers, long sleeves, boots,
and gloves. Do not wear loose fitting clothing, short
trousers, sandals, or go barefoot.
■ Always wear safety glasses with side shields. Use
face mask if operation is dusty.
■ Always be sure of your footing. Keep firm footing and
balance. Do not overreach. Overreaching can result in
loss of balance.
■ Walk, never run.
■ Mow across the face of slopes, never up and down.
Exercise extreme caution when changing direction on
slopes.
■ Do not mow near drop-offs, ditches, excessively steep
slopes, or embankments. Poor footing could cause a
slip and fall accident.
■ Plan your mowing pattern to avoid discharge of
material toward roads, public
pavements, bystanders
and the like. Also, avoid discharging material against
a wall or obstruction, which may cause the material to
ricochet back toward the operator.
WORK AREA SAFETY
■ Never mow while people, especially children, or pets
are nearby.
■ Always mow in the daylight or in good artificial light.
■ Do not operate the machine in explosive atmospheres,
such as in the presence of flammable liquids, gases or
dust. The tool may create sparks which may ignite the
dust or fumes.
■ Objects struck by the lawn mower blade can cause
severe injuries to persons. Thoroughly inspect the
area where the machine is to be used and remove all
rocks, sticks, metal, wire, bones, toys, or other foreign
objects.
■ Do not operate the machine in wet grass or in the rain.
■ Keep in mind that the operator or user is responsible
for accidents or hazards occurring to other people or
their property.
GARDEN TOOLS USE AND CARE
■ Before using, always visually inspect to ensure blades,
blade bolts, and cutter assembly are not worn or
damaged.
■ Replace worn or damaged blades and bolts in sets to
preserve balance.
■ Check all nuts, bolts, and screws at frequent intervals
for proper tightness to be sure the equipment is in safe
working condition.
■ Check the grass catcher frequently for wear or

12
Deutsch (Übersetzung der originalen Anleitungen)
DE
FR EN ES IT PT NL SV DA NO FI HU CS RU RO PL SL HR ET LT LV SK BG
12
English (Original instructions)
EN
FR DE ES IT PT NL SV DA NO FI HU CS RU RO PL SL HR ET LT LV SK BG
deterioration.
■ Replace worn or damaged parts.
■ Do not leave the battery in the mower in direct sunlight.
■ Do not force the machine. It will do the job better and
safer at the speed for which it was designed.
■ Do not overload your mower. Mowing long thick grass
may cause the motor speed to drop, or the power to
cut out. When mowing in long thick grass a first cut
with the cutting height set higher will help reduce the
load.
■ Stop the blade when crossing gravel surfaces.
■ Do not pull the mower backward unless absolutely
necessary. If you must back the machine away from a
wall or obstruction, first look down and behind to avoid
tripping or pulling the machine over your feet.
■ Stop the blade(s) if the machine has to be tilted for
transportation when crossing surfaces other than
grass, and when transporting the machine to and from
the area to be mowed.
■ Never operate the machine with defective guards
or shields, or without safety devices, for example,
deflectors and/or grassboxes, in place.
■ Switch on the motor according to instructions and
keep hands and feet away from cutting area.
■ Never pick up or carry a lawnmower while the engine
is running.
■ Remove isolator key for the below cases:
● whenever you leave the machine
● before cleaning a blockage
● before checking, cleaning or working on the
machine
● after striking a foreign object; inspect the appliance
for damage and make repairs as necessary
● before clearing the grassbox
● if the machine starts to vibrate abnormally (check
immediately)
● when not in use and storing the machine
● when recharging and removing/inserting battery
pack
■ Avoid holes, ruts, bumps, rocks, property stakes, or
other hidden objects. Uneven terrain could cause a
slip and fall accident.
■ If the machine should start to vibrate abnormally,
stop the motor and check immediately for the cause.
Replace the blade if it is unevenly worn or damaged in
any way. Vibration is generally a warning of trouble.
■ If the machine strikes a foreign object, follow these
steps:
● Stop the machine by releasing the power lever,
wait until the blade comes to a complete stop, and
then remove isolator key.
● Thoroughly inspect the machine for any damage.
● Replace the blade if it is damaged in any way.
Repair any damage before restarting and
continuing to operate the mower.
● Use the right appliance. Do not use the machine
for any job except that for which it is intended.
■ When not in use, mower should be stored in a well-
ventilated, dry, locked up place-out of the reach of
children. The isolator key should also be removed.
■ Do not expose machine to rain or wet conditions.
Water entering a garden tool will increase the risk of
electric shock.
■ Follow manufacturer's instructions for proper operation
and installation of accessories. Only use accessories
approved by the manufacturer.
BA
TTERY TOOL USE AND CARE
■ Recharge only with the charger specified by the
manufacturer. Using a charger with an incompatible
battery pack may create a risk of fire.
■ Use power tools only with specifically designated
battery packs. Use of any other battery packs may
create a risk of injury and fire.
■ When battery pack is not in use, keep it away from
other metal objects like, paper clips, coins, keys, nails,
screws, or other small metal objects, that can make a
connection from one terminal to another. Shorting the
battery terminals together may cause burns or a fire.
■ Under abusive conditions, liquid may be ejected from
the battery; avoid contact. If contact accidentally
occurs, flush with water. If liquid contacts eyes,
additionally seek medical help. Liquid ejected from the
battery may cause irritation or burns.
SERVICE
■ Service on the product must be performed by qualified
repair personnel only. Service or maintenance
performed by unqualified personnel could result in a
risk of injury to the user, or damage to the machine.
■ Use only identical replacement parts when servicing
the product. Use of unauthorised parts may create
a risk of serious injury to the user, or damage to the
product.
MAINTENANCE
■ After use and before storage, disconnect the machine
from the battery and check for damage.
■ When not in use store the machine out of the reach
of children.
■ The machine should only be repaired by an authorised
repairer.
13
Deutsch (Übersetzung der originalen Anleitungen)
DE
FR EN ES IT PT NL SV DA NO FI HU CS RU RO PL SL HR ET LT LV SK BG
13
English (Original instructions)
EN
FR DE ES IT PT NL SV DA NO FI HU CS RU RO PL SL HR ET LT LV SK BG
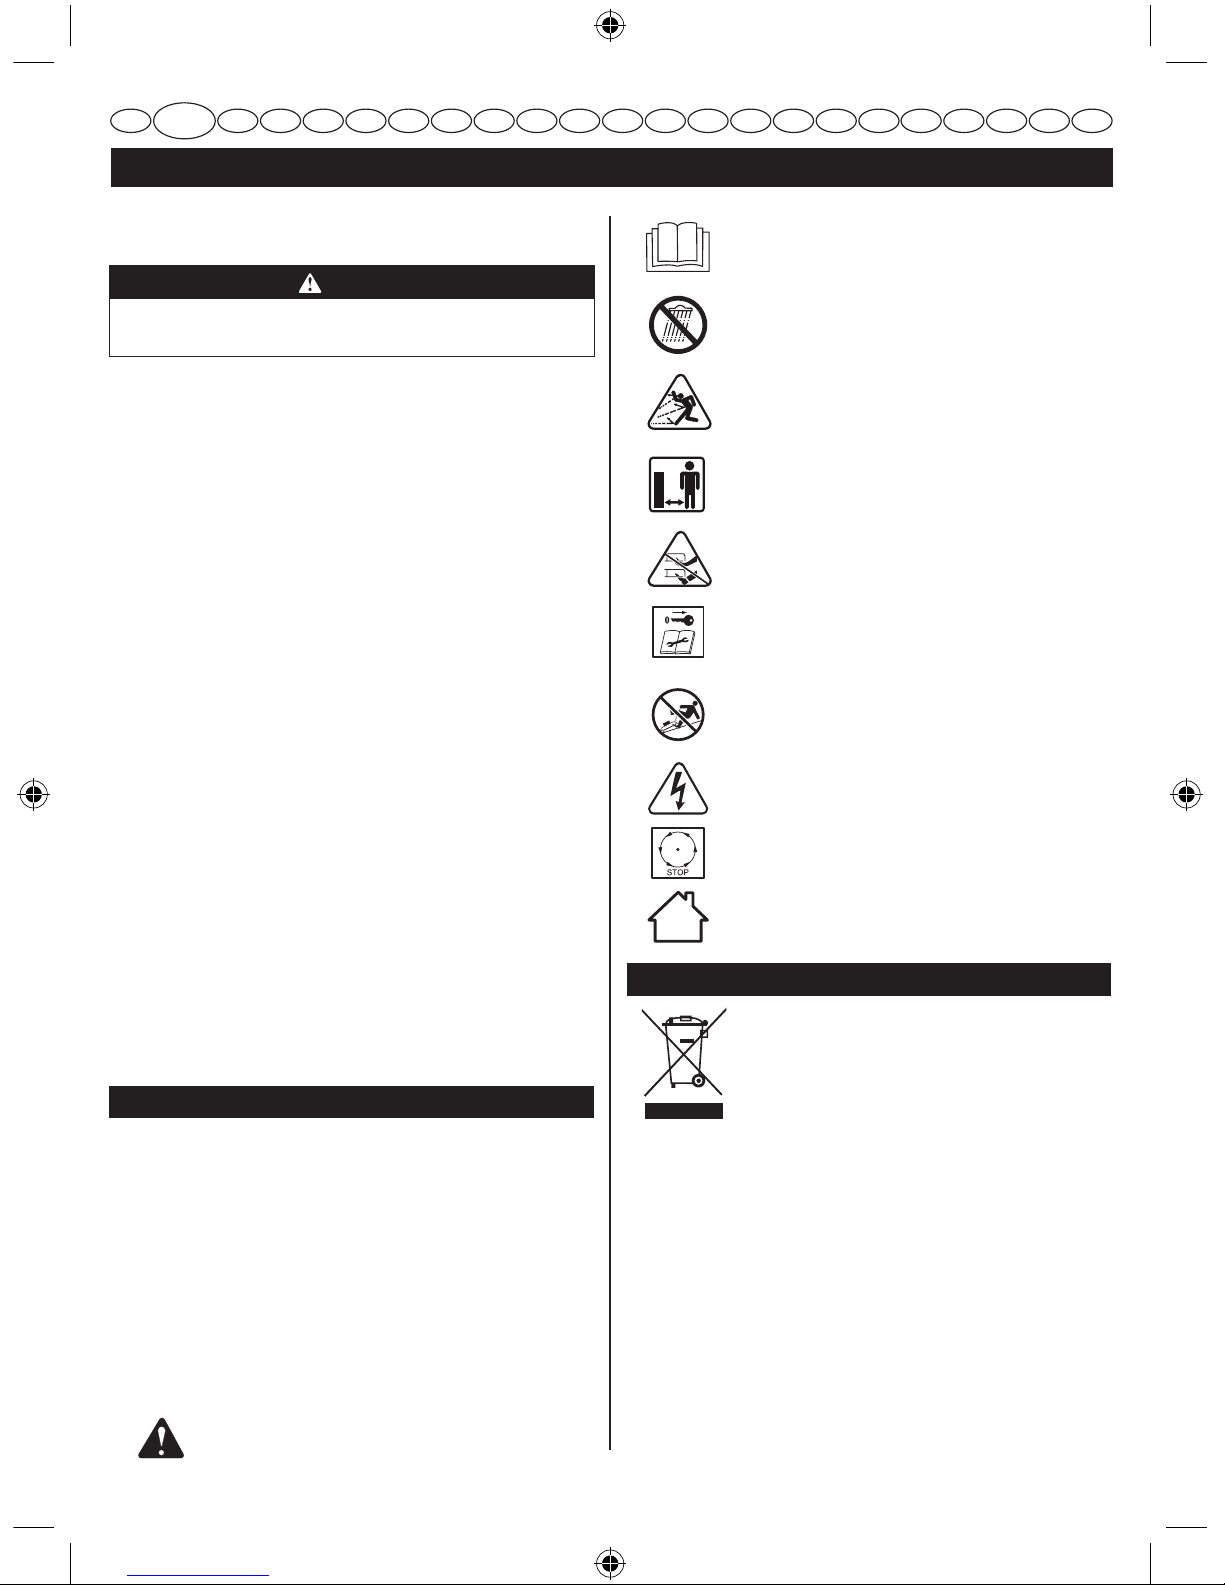
Precautions that involve your safety.
To reduce the risk of injury, user must read
and understand user’s manual before
using this product.
Do not expose machine to rain or wet
conditions.
Pay attention that bystanders are not
injured through foreign objects thrown from
the mower.
Keep all bystanders (especially children
and pets) at least 15 m away from the work
area.
Keep hands and feet away from blade and
cutting area.
Switch off and remove isolator key before
adjusting, cleaning and before leaving the
product unattended for any period.
Do not operate on inclines greater than
15
o
. Mow across the face of slopes, never
up and down.
Beware of electric shock hazard.
Wait for all components of machine to have
completely stopped before touching them.
The charger is intended for indoor use
only.
ENVIRONMENTAL PROTECTION
Waste electrical products should not be
disposed of with household waste. Please
recycle where facilities exist. Check with
your local authority or retailer for recycling
advice.
The battery contains material which is
hazardous to you and the environment. It
must be removed and disposed of separately at a facility
that accepts lithium-ion batteries.
SERVICE
Servicing requires extreme care and knowledge
and should be performed only by a qualifi ed service
technician. For service we suggest you return the product
to your nearest authorised service centre for repair. When
servicing, use only identical replacement parts.
■ Use only manufacturers recommended replacement
parts and accessories.
CAUTION
The cutter head will continue to rotate for a few seconds
after switching off.
■ The vibration level during actual use of the power tool
can differ from the declared total value depending on
the ways in which the tool is used.
■ It has been reported that vibrations from the tools may
contribute to a condition called Raynaud’s Syndrome
in certain individuals. Symptoms may include tingling,
numbness and blanching of the fingers, usually
apparent upon exposure to cold. Hereditary factors,
exposure to cold and dampness, diet, smoking and
work practices are all thought to contribute to the
development of these symptoms. It is presently
unknown what, if any, vibrations or extent of exposure
may contribute to the condition. There are measures
that can be taken by the operator to possibly reduce
the effects of vibration:
● Keep your body warm in cold weather. When
operating the unit wear gloves to keep the hands
and wrists warm. It is reported that cold weather
is a major factor contributing to Raynaud’s
Syndrome.
● After each period of operation, exercise to increase
blood circulation.
● Take frequent work breaks. Limit the amount of
exposure per day.
If you experience any of the symptoms of this
condition, immediately discontinue use and see your
physician about these symptoms.
Save these instructions. Refer to them frequently and use
them to instruct others who may use this product. If you
lend someone this unit, lend them these instructions also.
SYMBOL
Some of the following symbols may be used on this
product. Please study them and learn their meaning.
Proper interpretation of these symbols will allow you to
operate the product better and safer.
V Volts
A Amperes
Hz Hertz
W Watts
Hrs Hours
This product has many features for making its use more
pleasant and enjoyable.
14
Deutsch (Übersetzung der originalen Anleitungen)
DE
FR EN ES IT PT NL SV DA NO FI HU CS RU RO PL SL HR ET LT LV SK BG
14
English (Original instructions)
EN
FR DE ES IT PT NL SV DA NO FI HU CS RU RO PL SL HR ET LT LV SK BG
35. Side discharge door
36. Block of wood (not included)
37. Wrench (not included)
SPECIFICATIONS
Lawn mower 25297 / 25357
Width of cut 45 cm
Height of cut 19 mm - 70 mm
No-load speed 2900 rpm
Battery number 1 pc
Grassbox capacity 50 L
Net weight 22.2 kg
Serial number See product rating label
Battery Lithium-ion
Model number 29727
Rated voltage 40 V
Capacity hw641
Number of battery
cells
20 pcs
Battery charger
Model number 29417/29447
Input 100-240V AC 50/60Hz Max 1.9A
Output 40V DC, 2.2 A
Allowable charging
temperature range
7-40 °C
WARNING
Use of any other battery packs may result in a risk of
fire, electric shock, or injury to persons.
KNOW YOUR LAWN MOWER
.1 erug if eeS
The safe use of the product requires an understanding of
the information on the tool and in this operator’s manual
as well as a knowledge of the project you are attempting.
Before use of this product, familiarize yourself with all
operating features and safety rules.
Safety, performance, and dependability have been given
top priority in the design of this product making it easy to
maintain and operate.
WARNING
The operation of any power tool can result in foreign
objects being thrown into your eyes, which can result
in severe eye damage. Before beginning power tool
operation, always wear safety goggles or safety glasses
with side shields and, when needed, a full face shield.
We recommend Wide Vision Safety Mask for use
over eyeglasses or standard safety glasses with side
shields. Always use eye protection which is marked to
comply with EN 166.
DESCRIPTION
1. Power lever
2. Start button
3. Motor control cable
4. Upper handle
5. Lower handle
6. Height adjustment lever
7. Battery door
8. Front wheel
9. Rear wheel
10. Grassbox
11. Battery
12. Charger
13. Quick release fasteners
14. Wing nuts
15. Grassbox handle
16. Slots
17. Rear door
18. Rear discharge opening
19. Door rod
20. Hooks
21. Isolator key
22. Blade
23. Blade holder
24. Motor shaft
25. Blade insulator
26. Spacer
27. Blade nut
28. Blade posts
29. Wheel cover
30. Split pin
31. Washer
32. Axle
33. Mulching plug
34. Side discharge deflector
BATTERY METER
The battery meter measures the amount of charge
remaining in the battery.
GRASSBOX
The grassbox collects grass clippings and prevents them
from being discharged across your lawn as you mow.

15
Deutsch (Übersetzung der originalen Anleitungen)
DE
FR EN ES IT PT NL SV DA NO FI HU CS RU RO PL SL HR ET LT LV SK BG
15
English (Original instructions)
EN
FR DE ES IT PT NL SV DA NO FI HU CS RU RO PL SL HR ET LT LV SK BG
WARNING
If any parts are damaged or missing do not operate this
product until the parts are replaced. Using a product
with damaged or missing parts could result in serious
personal injury.
WARNING
Do not attempt to modify this product or create
accessories not recommended for use with this product.
Any such alteration or modification is misuse and could
result in a hazardous condition leading to possible
serious personal injury.
WARNING
Do not insert isolator key until assembly is complete and
you are ready to mow. Failure to comply could result in
accidental starting and possible serious personal injury.
WARNING
To prevent accidental starting that could cause serious
personal injury, always remove the battery pack from
the product when assembling parts.
WARNING
Never operate the mower without the proper safety
devices in place and working. Never operate the mower
with damaged safety devices. Operation of this product
with damaged or missing parts could result in serious
personal injury.
UNFOLDING AND ADJUSTING HANDLE
.2 erug if eeS
1. Pull up and back on the upper handle to raise the
handle into operating position. Make certain the
handles snap into place securely.
2. Tighten the lower handle with the wing nuts on
HEIGHT ADJUSTMENT LEVER
The height adjustment lever provides cutting height
adjustments.
MOTOR CONTROL CABLE
The motor control cable, located on the upper handle of
the mower, engages and disengages the motor and blade.
ISOLATOR KEY
The isolator key must be inserted before the mower can
be started.
MULCHING PLUG
Your mower is equipped with a mulching plug that covers
the rear discharge opening, which allows the mower blade
.sgnippilc ren if rof tucer dna tuc ot
ASSEMBLY
UNPACKING
This product requires assembly.
■ Carefully remove the product and any accessories
from the box. Make sure that all items listed in the
packing list are included.
WARNING
Do not use this product if any parts on the packing list are
already assembled to your product when you unpack it.
Parts on this list are not assembled to the product by
the manufacturer and require customer installation. Use
of a product that may have been improperly assembled
could result in serious personal injury.
■ Inspect the product carefully to make sure no breakage
or damage occurred during shipping.
■ Do not discard the packing material until you have
carefully inspected and satisfactorily operated the
product.
■ If any parts are damaged or missing, please call your
Greenworks tools service centre for assistance.
SIDE DISCHARGE DEFLECTOR
Use the side discharge defl ector on your mower when the
grass is too high to mulch or when side discharging is
preferred. The grass clippings produced when using the
side discharge defl ector are noticeably larger than those
produced when using the mulching plug and side mulching
plate.
SIDE DISCHARGE DOOR
Your mower is equipped with a door that covers the side
discharge opening, which allows the mower blade to cut
and recut the grass for fi ner clippings if the mulching plug
is engaged, or otherwise sends the grass clippings to the
collection bag.
INSTALLING SIDE DISCHARGE DEFLECTOR
See figure 6.
NOTE: When using the side discharge deflector, do not
install the grassbox. The mulching plug should remain
installed.
1. Lift the side discharge door.
2. Align the hooks on the defl ector with the hinge rod on
the underside of the door.
3. Lower the defl ector until the hooks are secured on the
mulch door hinge rod.
4. Release the defl ector and side discharge door.
16
Deutsch (Übersetzung der originalen Anleitungen)
DE
FR EN ES IT PT NL SV DA NO FI HU CS RU RO PL SL HR ET LT LV SK BG
16
English (Original instructions)
EN
FR DE ES IT PT NL SV DA NO FI HU CS RU RO PL SL HR ET LT LV SK BG
WARNING
Do not use any attachments or accessories not
recommended by the manufacturer of this product. The
use of attachments or accessories not recommended
can result in serious personal injury.
WARNING
Always inspect mower for missing or damaged parts
and blade for damage, uneven, or excessive wear prior
to use. Using a product with damaged or missing parts
could result in serious personal injury.
■ Do not tilt the lawn mower when starting the engine
or switching on the motor, unless the lawn mower has
to be tilted for starting. In this case, do not tilt it more
than absolutely necessary and lift only the part which
is away from the operator.
■ Do not start the engine when standing in front of the
discharge chute.
■ Do not put hands or feet near or under rotating parts.
Always keep clear of the discharge opening.
For complete charging instructions, refer to the operator’s
manual for the battery packs and chargers listed in the
specifi cations section.
TO INSTALL BATTERY PACK
See figure 8.
1. Lift and hold up the battery door.
2. Place the battery pack on the tool. Align raised ribs on
battery pack with grooves in the product's battery port.
3. Make sure the latch on bottom of the battery pack
snaps in place and that battery pack is fully seated
and secure in the product before beginning operation.
4. Insert the isolator key.
5. If the machine is not going to be used immediately, do
not insert the isolator key.
6. Close the door.
both sides.
3. Tighten the upper handle with the quick release
fasteners on both sides.
INSTALLING THE GRASSBOX
See figure 3.
1. Lift the rear discharge door.
2. Lift the grassbox by its handle and place under the
rear door, so that the hooks on the grassbox frame are
seated into the slots in the handle bracket.
3. Release the rear door. When installed correctly, the
hooks on the grassbox will rest securely in the slots on
the handle brackets.
INSTALLING THE MULCHING PLUG
See figure 5.
1. Lift and hold up the rear discharge door.
2. Grasp the mulching plug by its handle and insert it at a
slight angle, as shown.
3. Push the mulching plug securely into place.
4. Lower the rear discharge door.
SETTING BLADE HEIGHT
See figure 7.
When shipped, the wheels on the mower are set to a lowcutting position. Before using the mower for the first time,
adjust the cutting position to the height best suited for your
lawn. The average lawn should be between 38 mm and 51
mm during cool months and between 51 mm and 70 mm
during hot months.
To adjust the blade height
■ To raise the blade height, grasp the height adjustment
lever and move it toward the back of the mower.
■ To lower the blade height, grasp the height adjustment
lever and move it toward the front of the mower.
OPERATION
WARNING
Do not allow familiarity with products to make you
careless. Remember that a careless fraction of a
second is suffi cient to infl ict serious injury.
WARNING
Always wear eye protection. Failure to do so could
result in objects being thrown into your eyes resulting
in possible serious injury.
 Loading...