

GRASS VALLEY THE KAYENNE CLIPSTORE - APPLICATION NOTE 11-2010, Kayenne ClipStore Application Note
Page 1

APPLICATION
NOTE
The Kayenne ClipStore
David Casper
November 2010
The Grass Valley™ Kayenne™ Video Production
Center ClipStore provides the means to
rapidly load and play clips that are integral to
live production, whether they’re packages for
replay, or animations used in transitions.
www.grassvalley.com
Page 2

Introduction
THE KAYENNE CLIPSTORE
The Grass Valley Kayenne ClipStore
incorporates K2 media server
technology by embedding either a
4-channel K2 Summit
nel K2 Solo
channels records and plays a video
and key pair. The ClipStore video and
key are kept in one single file (not
two files) so that video, key, and
audio are always synchronized without the need to gang channels.
The ClipStore records and plays
back using AVC-Intra 100 compression format. Clips imported
in DVCPRO HD, DVCPRO 25/50,
DV, and MPEG-2 will play natively.
The ClipStore supports record and
playback of embedded audio. The
server’s AES I/O is not used in this
application.
™
. Each of these server
™
or a 2-chan-
Control and use of the ClipStore
is completely integrated into the
Kayenne’s control panel and menu.
There is no need to ever use the
server’s native AppCenter Elite user
interface. Indeed, using this interface could cause conflicts with the
switcher if used at the same time.
Of course the ClipStore provides
the means to ingest material.
Additionally, it provides the means
to edit and trim clips, and to
assemble a video/key/audio clip
from separate files. This is described
later in this document. However,
what is most important is the way
the ClipStore is integrated into the
switcher’s control system, so that
in addition to the manual loading
of clips using the switcher’s menu,
clips can be loaded, cued, and
played using E-MEM, macros, and
Q-MEM. It is this integration, which
makes the ClipStore so valuable and
versatile.
Unlike other K2 media servers and
media players in a facility’s network,
the ClipStore is intentionally isolated
from that network, and embedded
in the switcher’s control system.
The ClipStore is provided for direct
control by the technical director/
vision mixer, and is considered to be
local storage completely under the
user’s control. Let’s first look at how
clips can be manually loaded and
played. Then we shall see how this
is done under E-MEM control and
Macro control.
Fusion adds value to Grass Valley solutions by providing tighter
integration, unique functionality, and increased flexibility when our
products are connected together—leading to more efficient and faster
production. With Fusion, a ClipStore is part of the Grass Valley Kayenne
Video Production Center.
1
www.grassvalley.com
Page 3
Loading and Playing
THE KAYENNE CLIPSTORE
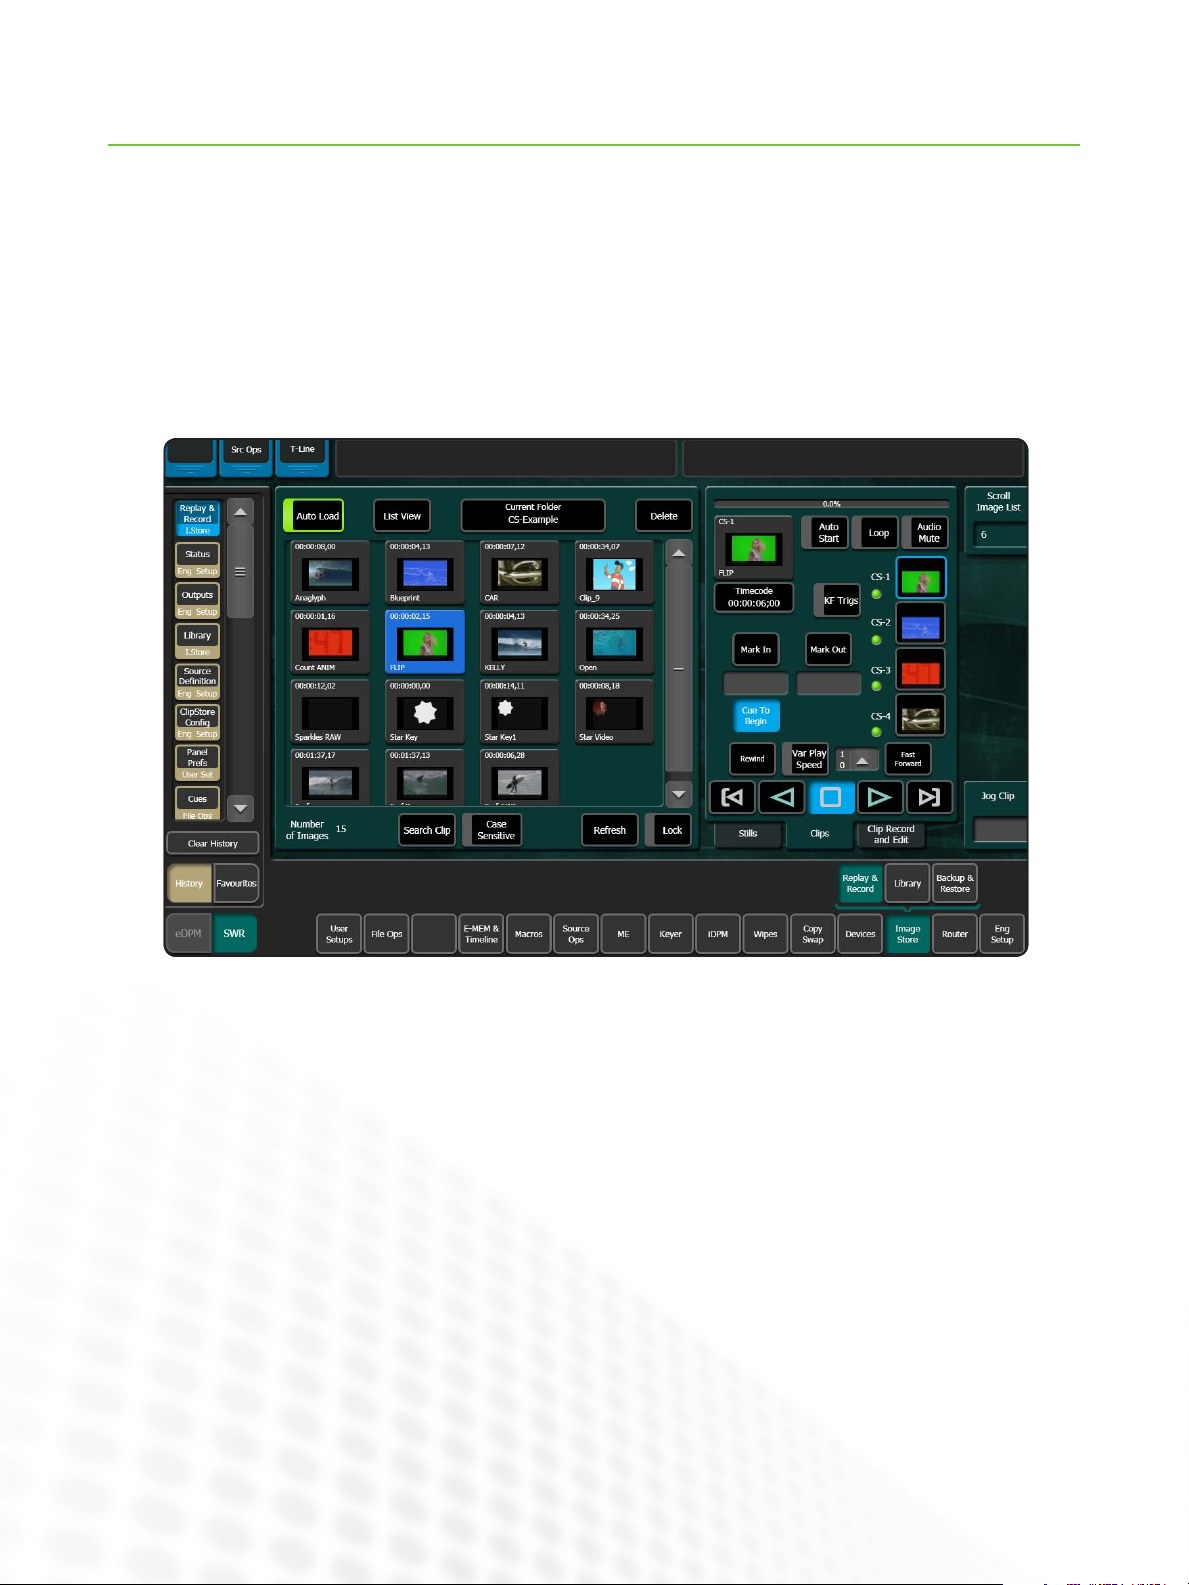
ClipStore playout is found in the Kayenne menu system
under Image Store/Record and Replay. This selection
has three tabs: Stills, Clips, and Clip Record and Edit.
When selecting the ‘Clips’ tab, the clips in the currently
selected folder are displayed as thumbnails or in a list
view. To load a clip, select a channel by touching its
output icon, and then touch the clip. As soon as the clip
is loaded and ready to play, the thumbnail is displayed in
the channel’s icon. There is a full range of motion control
for the clip, playing at unity or variable speed, for ward
or reverse, and of course fast forward and rewind. The
menu also has a jog knob to precisely move the clip
as well as setting precise mark-in and mark-out points.
Also, most useful for animated backgrounds, is the ability to loop a clip continuously.
2
www.grassvalley.com
Page 4
THE KAYENNE CLIPSTORE
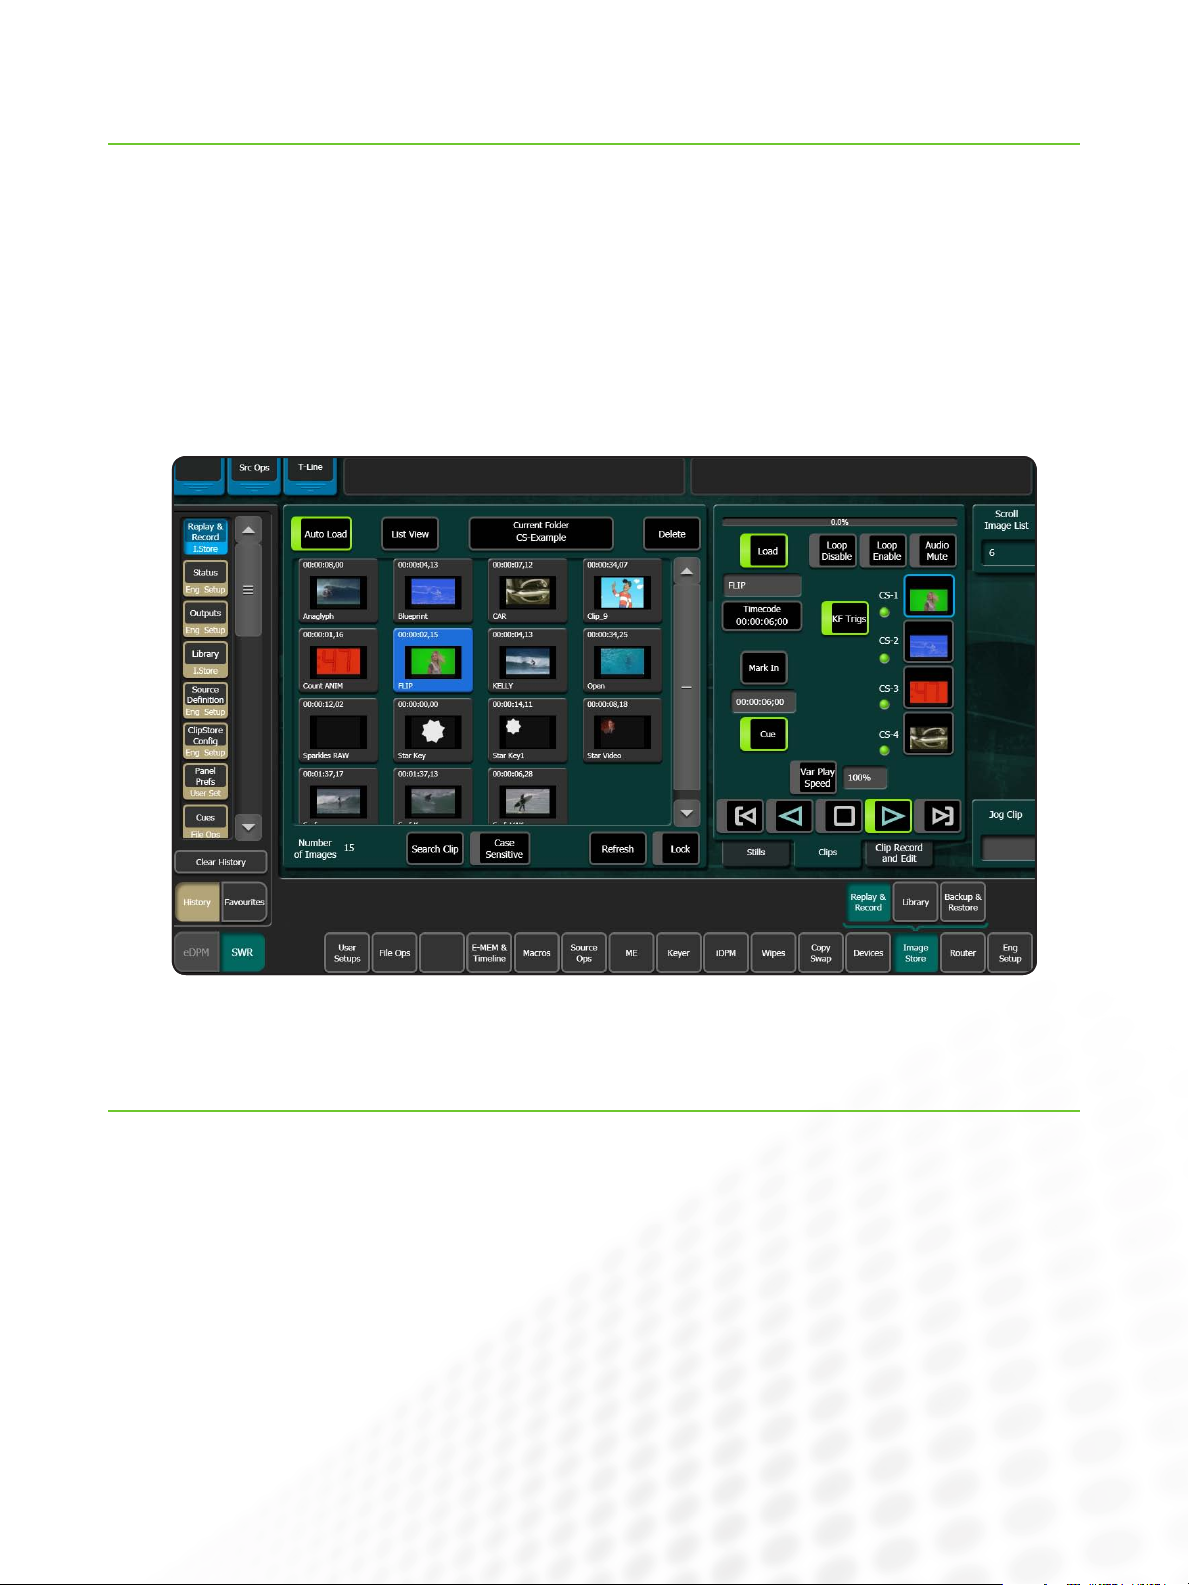
Cueing and Playing using E-MEM Keyframe Triggers
To build a show, it is important to include the load and
play of clips into E-MEM effects. This is done easily in
the same menu by using keyframe triggers. When the
‘KF Triggers’ button is pressed, the keyframable options
become jeweled in the menu, so they can be turned
on or off. A keyframe can optionally load a clip (making it current), cue the current clip to mark-in, play the
current clip, and loop it. It is generally best to go to the
Master E-MEM section of the control panel and learn
the ‘Load Trigger’ into a new register. This keyframe
remembers the output, the clip name, and the directory
location. Then, insert after the current keyframe, a new
keyframe containing a ‘Play Trigger’. So the first keyframe loads the clip and the second plays the clip. The
ClipStore channels CS-1 to CS-4 default to MISC levels
1 to 4 of Master E-MEM. However these channels can
be assigned to any level. Most usefully, the channels
can be made definable and placed as sub-levels within
an M/E. In this case the M/E and the clip can be driven
from a local E-MEM panel rather than the master.
Cueing and Playing Using Macros
To create a macro for the ClipStore, first ensure that
‘KF Triggers’ are turned off. Now ClipStore functions
accessed through the menu can be recorded into a
macro, including Load, Cue, Play, Stop, Rewind, and
Audio Mute. Initiation of the macro record can be performed on the control panel or the macro menu. In both
cases it is the same, select a macro and press ‘Record.’
Then go to the ClipStore Menu, select the output channel, and then select the clip. Before recording the playing of the clip it is necessar y to insert a delay of at least
three frames before the play command is recorded; use
the ‘Insert Delay’ button to insert this delay. Not only
does the macro record the name of the clip, but also
the directory in which it is located—which is necessar y
where different shows have the same clip name such as
‘Opening.’
3www.grassvalley.com
Page 5

THE KAYENNE CLIPSTORE
Loading and Playing using Q-MEM and the
Device Control Module
Alternatively, channels can be controlled using
Kayenne’s Device Control Module (DCM) and learned
into Q-MEM (cue memor y). To start, channels can be
loaded onto one of the letter buttons A through F by
rotating the top knob until a channel is displayed and
then holding down learn and pressing the letter button.
This assignment of the channel to a letter button (or say
all four channels to A through D) can be learned into
a Q-MEM on its own, so that the DCM can be rapidly
delegated to controlling the ClipStore. Once a channel is
selected, rotating the second knob scrolls through available clips, and pressing the load button loads the clip
onto the channel. The power of Q-MEM is fully utilized
when named clips, in and out points, and auto-play are
learned into one of the 100 Q-MEM registers together
with learning the delegation(s) to letter buttons.
Ingesting Material
Let’s now look at the process of ingesting material into
the ClipStore. This can be done in two ways: either by
recording video, key, and embedded audio directly, or by
importing files.
For recording there are two elements: video and key.
Either of these may contain embedded audio, although
it is usually associated with the video. A clip can contain
Q-MEM registers can be recalled directly from the
panel. If auto-play was not learned into the cue, then
the TD can watch the clip being loaded on the monitor wall, and then press the ‘Play’ button as needed.
Alternatively, the Q-MEM register number can be
learned into an E-MEM and recalled when the E-MEM
is recalled. By default Q-MEMs are stored in MISC
level 16. The Q-MEM sub-level can be made definable
and assigned to an M/E level. The advantage of using
Q-MEM registers in E-MEM effects is that the same
Q-MEM register can be used in multiple effects without
having to re-learn the cue. So, for example, the cue for
the animation “breaking news” could be recalled from
any M/E, or used in different effects such as full-screen
or in an over-the-shoulder shot. Of course, macros can
be used to recall Q-MEM registers too.
one to three tracks; the tracks being video, key, and
audio. These tracks can all be recorded at the same
time to form a clip, or recorded separately into clips
with only one (or two) tracks, and then assembled into a
single clip using the editing tools in the ClipStore editing
menu. Recording a clip can be open-ended or for a fixed
duration.
4
www.grassvalley.com
Page 6

Ingesting Material (cont.)
THE KAYENNE CLIPSTORE
The ClipStore menu editing tools allow you to trim clips,
create sub-clips from a longer clip, join clips together
(concatenate), and most importantly, combine tracks
from separate clips into a single clip. In the illustration
below, we see three different clips, one with video, the
second with audio, and the third with key. For precise
and accurate alignment, the individual tracks can be
offset (jogged) relative to the video. When the ‘Make
Clip’ button is pressed, a new clip is created containing
all three tracks.
This process of assembly is very important where video
and key material is provided sequentially on a single
tape. This can be recorded as a whole, and then subclips created, which are assembled so that video and
key are synchronous.
More and more, the industry is finding it easier to transfer material as files. The ClipStore provides tools for both
import and export of files. The ClipStore supports import
of files in GXF, MXF, AVI, and MOV formats, however
it is only the GXF format that can have video and key
combined in the same file, so it is only GXF format that
is supported on export.
www.grassvalley.com
5
Page 7

Ingesting Material (cont.)
THE KAYENNE CLIPSTORE
Files can be imported directly by plugging a USB
memory stick into the Kayenne Menu Panel, or over
the network from any NAS. All directories mounted as
D:, E:, F:, etc. by the underlying Windows operating
system are shown in the Kayenne Library menu for the
ClipStore. Using this menu, files can be copied into and
out of the ClipStore. The left hand side of the menu is
always the source and the right hand side the target.
Files can be copied and deleted using this menu. Once a
file is imported into the ClipStore, it can immediately be
loaded and played. In a workflow that is centered around
the ClipStore, clips will be in the high-quality AVC-Intra
100 compression standard. In workflows that integrate
with other third-party equipment, files in native DV50,
DV100, or similar, can be imported and played.
6
www.grassvalley.com
Page 8
Setup and Configuration
THE KAYENNE CLIPSTORE
The ClipStore itself is entirely configured using the
Kayenne menu. Additionally, to set up the ClipStore you
need to cable and configure its inputs used for recording
(sends from the Kayenne switcher) and its outputs used
for playout (returns to the switcher). Once this is done,
the ClipStore is ready for use.
Configuring the ClipStore Using the Kayenne
Menu
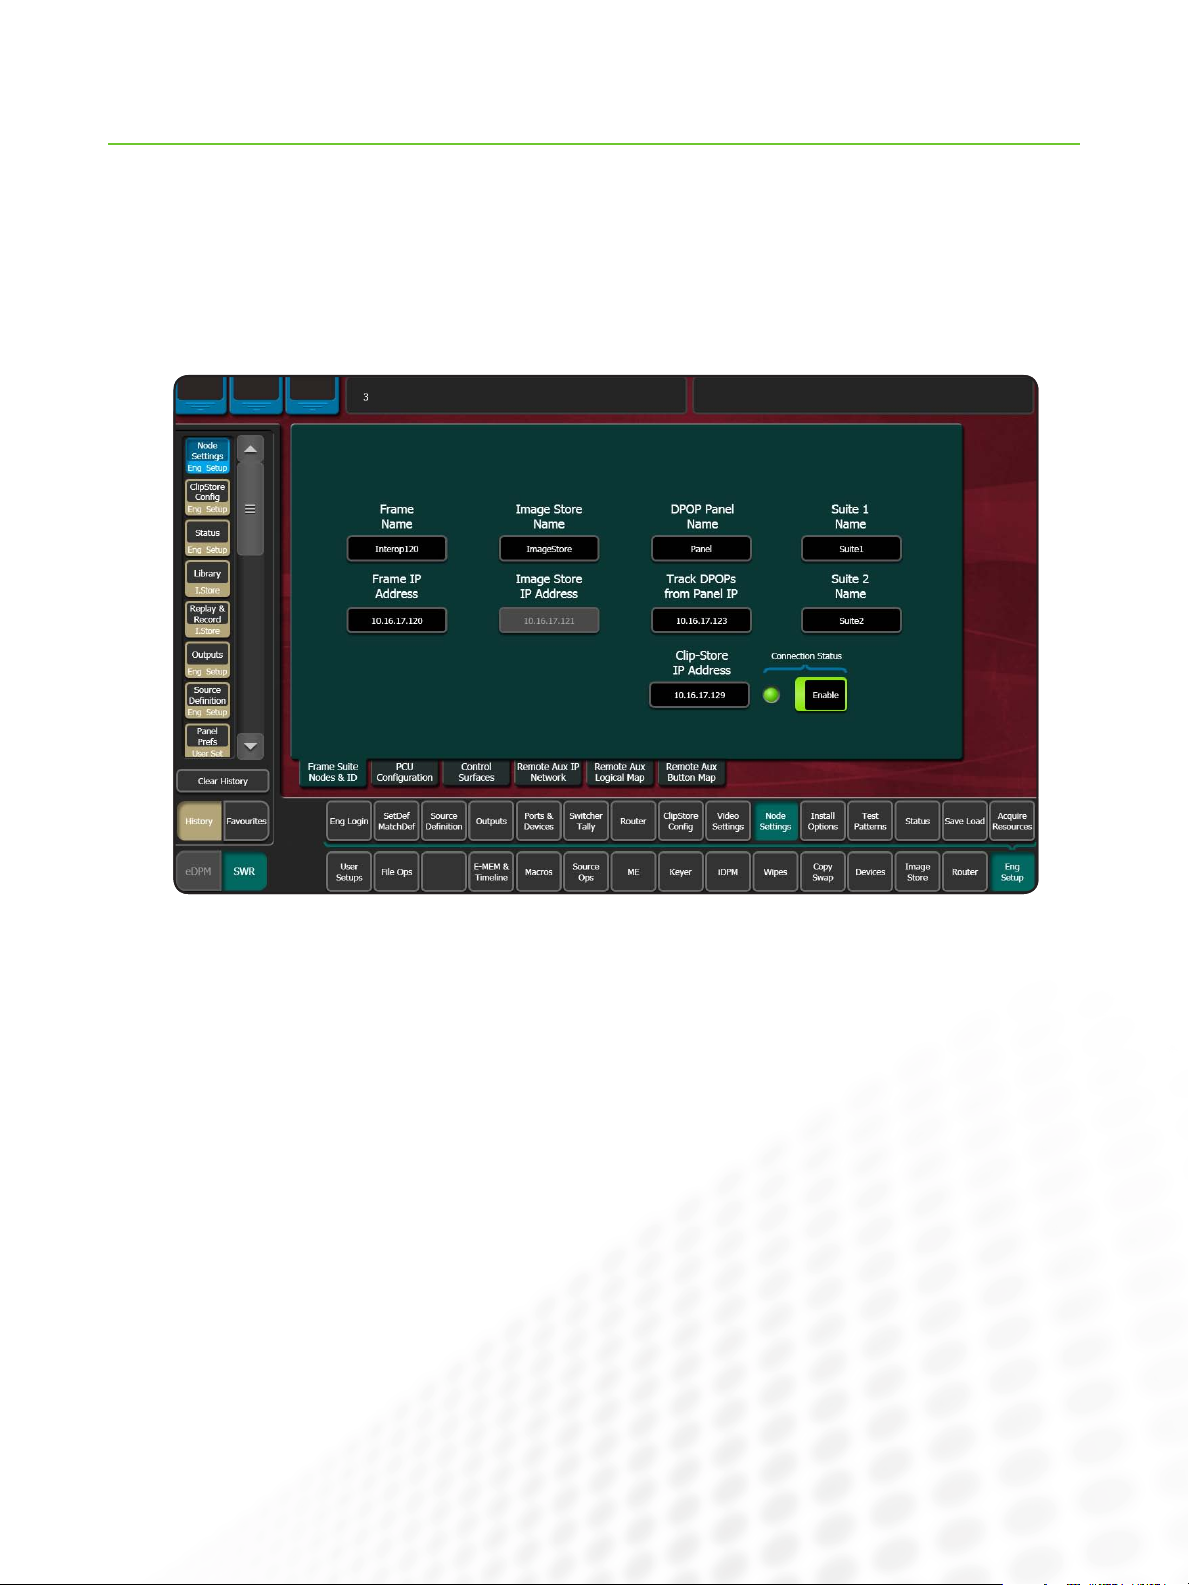
Connection to the ClipStore is made by configuring its IP
address in the Eng Setup / Node Settings / Frame Suites
Nodes & ID menu and pressing the ‘Enable’ button.
www.grassvalley.com
7
Page 9

Setup and Configuration (cont.)
THE KAYENNE CLIPSTORE
The green LED indicator shows that the ClipStore
is operating and connected. Once the ClipStore’s IP
address is configured, each ClipStore channel automatically appears in the Enables/Devices menu. The following illustration show how a four-channel ClipStore
appears in that menu. The ClipStore is not treated as
an external device and should not be configured in that
menu—doing so would cause conflicts due to a duplicate configuration.
8
www.grassvalley.com
Page 10
Setup and Configuration (cont.)
THE KAYENNE CLIPSTORE
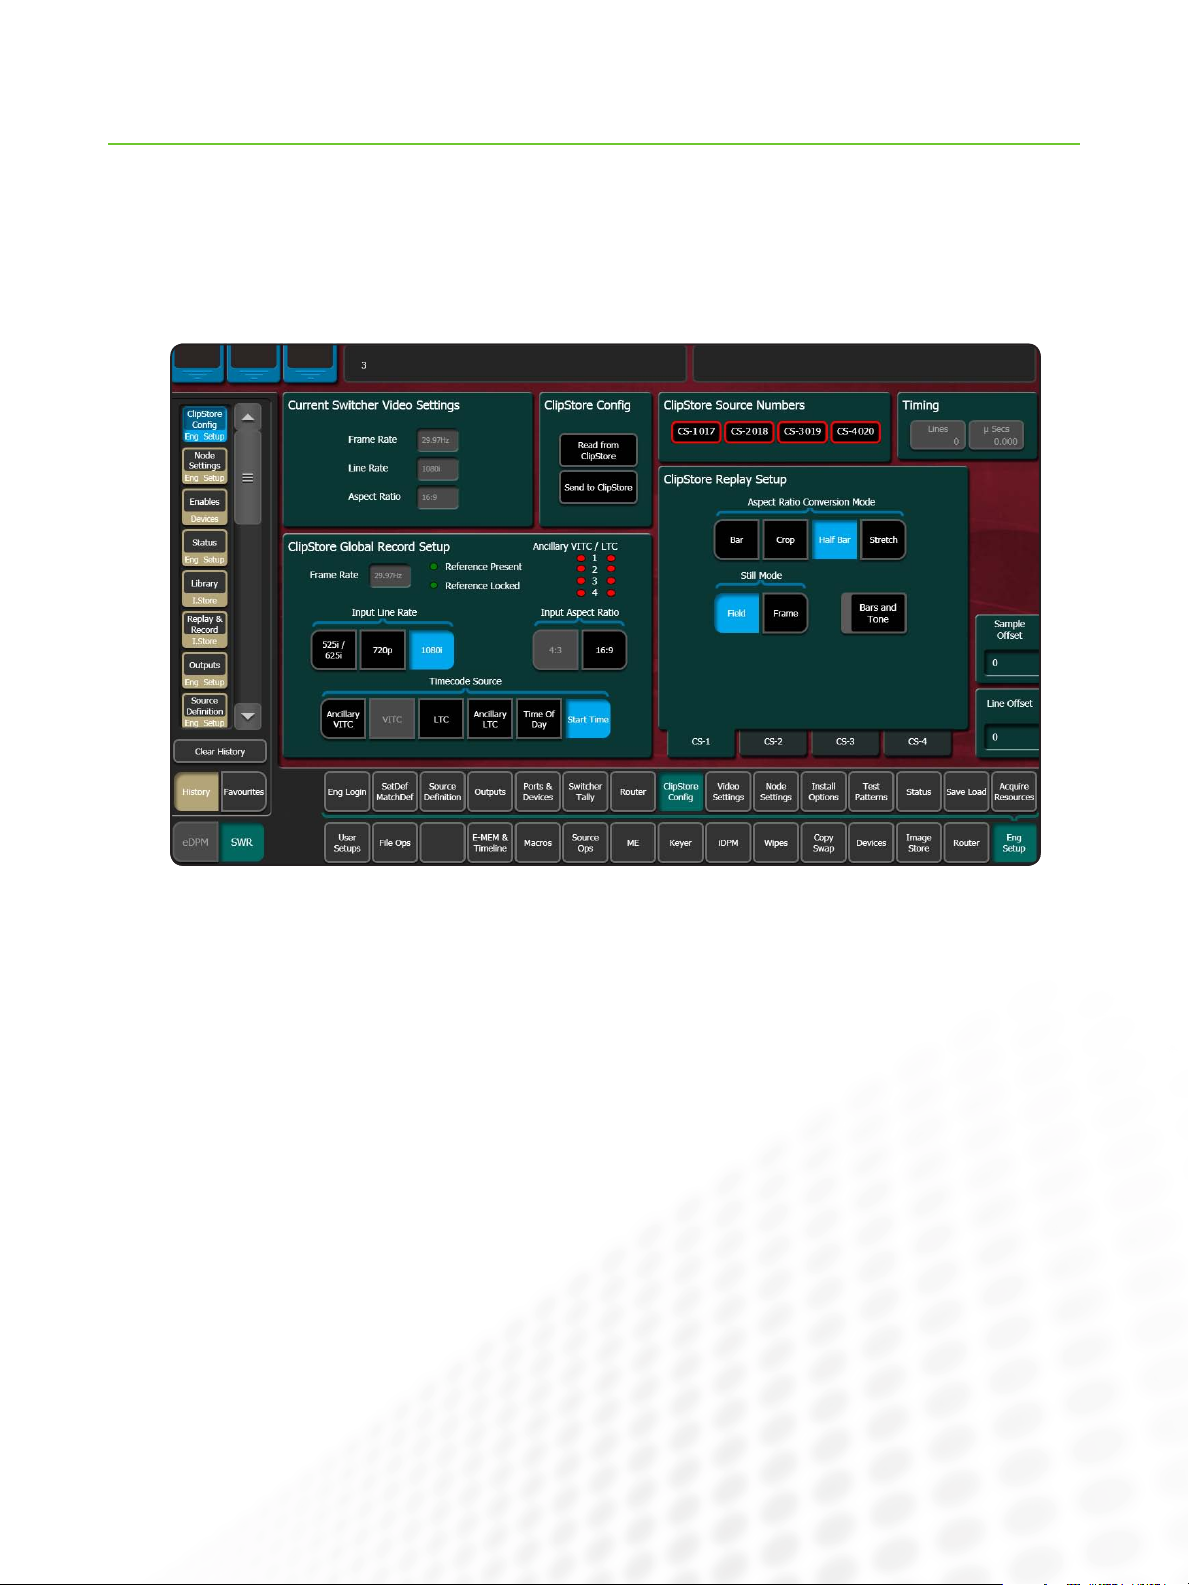
The ClipStore itself is configured using the ClipStore
Config/Eng Setup menu. It is recommended that the
configuration is first retrieved from the ClipStore, using
the ‘Read from ClipStore’ button, the desired changes
are made to the configuration, and then the ClipStore is
configured by pressing the ‘Send to ClipStore’ button.
Using this menu, various settings can be made, such
as configuring the aspect ratio conversion or the freeze
mode.
www.grassvalley.com
9
Page 11

THE KAYENNE CLIPSTORE
Cabling and Configuring ClipStore Inputs
The ClipStore’s inputs are used for recording material.
Each channel has two BNCs for recording (one each for
video and key). How these are connected is very much
up the system designer. The standard way (described
below), is to use a Kayenne video key Aux Bus pair to
feed each channel. However, in many cases, there is
no need to simultaneously record on more than one
channel. So, a single Aux Bus pair can be used from the
switcher, and this output is sent to all ClipStore channels
by using an external distribution amplifier (DA). Where
there are two suites, one Aux Bus per suite could be
used. In some sites, the ClipStore inputs are directly
connected to a router and switcher Aux Buses not used
at all.
For a standard configuration (using one VK Aux Bus pair
per channel), start by cabling the switcher output BNCs
to the ClipStore. Each channel should have four cables:
two cables for record, one for video, the other for key.
On the switcher side, they should be connected to
adjacent BNCs, with video on the odd numbered output,
and key on the even numbered output. Then proceed to
configure the Aux Buses as shown below.
In this example outputs 25 and 26 form a pair that is
connected to ClipStore channel 1 (CS-1).
10
www.grassvalley.com
Page 12

THE KAYENNE CLIPSTORE
Cabling and Configuring ClipStore Outputs
Similarly, each ClipStore channel has a pair of outputs (video and key) that are cabled to switcher inputs for playout.
In the menu illustration above, the user selected source
25, selected device, and then selected CS-1 (Clip Store
Channel 1) from a pop-up list of devices. Similar configurations were made for logical sources 27, 29, and
31. Any input BNCs can be used for the returns from
the ClipStore. In the example of source 25, the video is
on input 31 and the key on 12. All that is necessary for
operation of the ClipStore is to configure the sources as
in 25, 27, 29, and 31. However, the creator of this configuration chose to additionally configure logical sources
26, 28, 30, and 32, which are the key-only side of the
ClipStore output for each channel.
Conclusion
The Grass Valley Kayenne Video Production Center ClipStore is highly integrated into the Kayenne control panel.
Sends to the ClipStore from the Kayenne (for recording) are there on the panel when a row is delegated to Aux Bus
Control. In this mode, sources can be selected for recording. The returns from the ClipStore are logical sources
that can be mapped to any source select button for any shift level. These are inputs which can be taken on any bus.
Given the overall storage capacity of the ClipStore (30 hours for the 4-channel unit, and five hours for the 2-channel
unit), and its tight integration into the switcher, the ClipStore is the gold standard for live production.
SALES
Local and regional sales contacts can be found by visiting
www.grassvalley.com/sales
Local and regional support contacts can be found by visiting
SUPPORT
www.grassvalley.com/support
© Copyright 2010 Technicolor USA, Inc. dba Grass Valley. All rights reserved. Grass Valley, Kayenne, K2 Summit, and K2 Solo are trademarks of Technicolor
USA, Inc. All other tradenames referenced are service marks, trademarks, or registered trademarks of their respective companies. Specifications subject
to change without notice. LPS-4014M
 Loading...