

Page 1
KayakDD- 1
™
Quick Start Guide
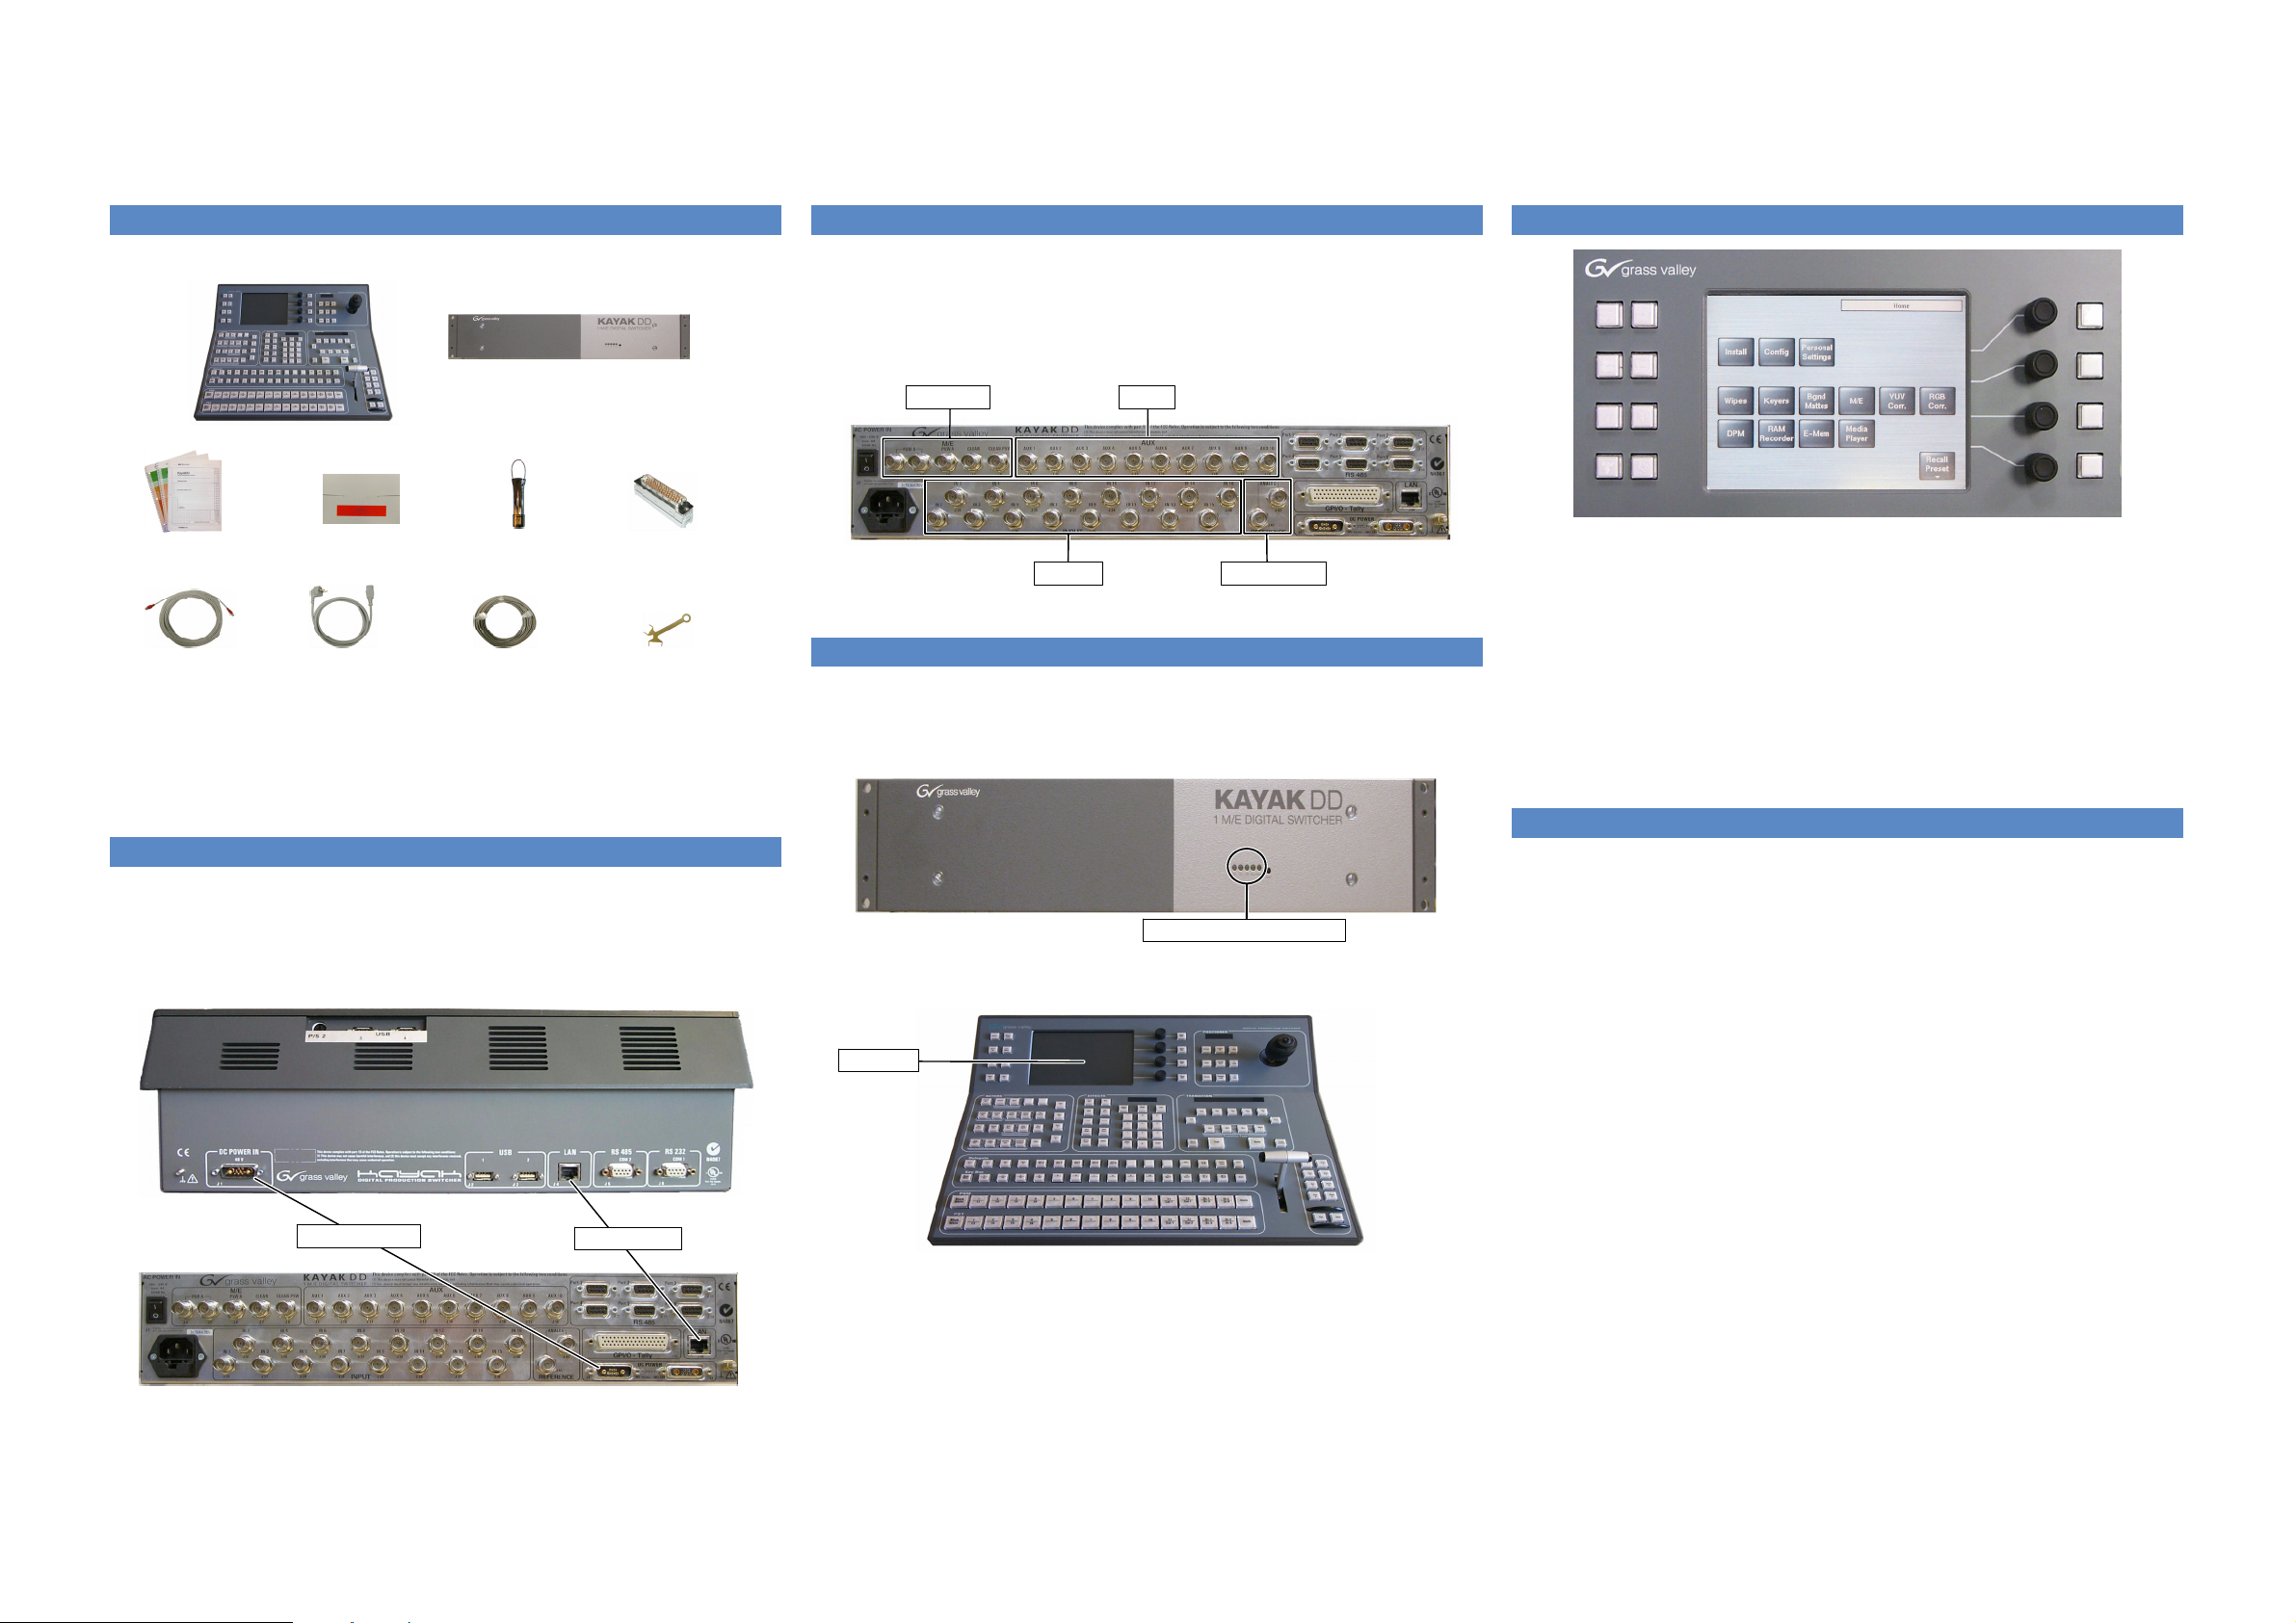
UNPACKING
Before you begin, unpack and identify the following items:
Mainframe
Control Panel
Manuals and
Release Notes
Crossover
LAN Cable
Fig. 1: Delivered parts
Note that most options are software license keys that are already loaded in the
system. Refer to the Release Notes for the latest information about your system’s
capabilities.
Software CD and
License Keys
AC Power
Cable
USB
Flash Memory
48V DC
Power Cable
50pin
Tally Connector
Key Caps
Remover Tool
CONNECT FRAME AND CONTROL PANEL
D Crossover LAN cable.
D 48 Volt DC Power cable.
Refer to the Planning and Installation manual how to connect a KayakDD
switcher with a networked PC.
Power Cable
Fig. 2: Cabling between Frame and Control Panel
LAN Cable
CONNECT INPUTS AND OUTPUTS
All Serial Digital (SDI) 4:3 or 16:9 inputs and outputs.
D Connect inputs in any order (they can be mapped later, see User Manual).
D Connect preview and program outputs to monitors.
D Connect AUX outputs as needed.
D Connect analog genlock reference (optional) Terminate as needed.
Outputs
Inputs
Fig. 3: Rear of the frame
CONNECT AC POWER CORD AND SWITCH ON
D Power Supply is wide--range and frequency auto--sensing.
D Wait approx. 60 seconds until all blue lights on the frame front side of the
frame are on and the control panel display is on.
Fig. 4: Front of the frame
Display
Fig. 5: KayakDD--1 Control Panel
AUX
Reference
Blue Lights must be on
CONTROL PANEL
Menu
Home
Lock
Last
Live
Menu
Mode
User
User
1
2
User
User
4
3
Fig. 6: Panel Display with Home Menu
HOME Jumps to the HOME MENU.
MENU LOCK Activate to disable auto menu follow.
LIVE MODE Makes the WIPE MENU and KEYER MENU buttons quicker
to use for On--Air applications by displaying fewer selections.
LAST MENU Jumps back to the last selected menu.
USER 1...4 User definable preferred menus. Select a menu, hold down the
USER X button for two seconds. A short flash of the button
confirms that the menu is learned. To recall the menu, just press
the USER X button again.
SOURCES, DESTINATION AND SHIFT
SOURCE SELECTION. On any Source Selection Row, pressing a Source
Selector button will change that row output to the newly selected source. Any
Source Selection row that contributes to the On--Air picture will change button
color to RED (or increase brightness -- depending on Personality setting).
D By pressing and holding the SHIFT BUTTON you get access to the shifted
(2nd) sources on the source selector row.
D When a shifted source is selected the SHIFT BUTTON on that row stays
illuminated.
D If the source is a PGM or PST source and is transitioned the SHIFT
BUTTON follows the flip--flop.
D To select a non--shifted source press only the source selector button
required. This cancels the shift function for that row.
SHIFT BUTTON on DESTINATION SELECTORS. In the Delegate Row of the
switcher, the top row is a destination row.
D To access AUX Busses higher than AUX 5 you must press the SHIFT
BUTTON at the end of the Delegate Row.
D Selecting a Shifted Destination will keep the SHIFT BUTTON illuminated
until a non--shifted destination is selected.
Customized source legends can be created using the template on the software
CD Rom ( Path: \Kayak\KayakManuals ).
The template can be printed on transparent foil in A4 or letter size.
Please refer to the Planning & Installation Manual how to remove button caps with
the supplied tool, insert the legend and re--seat the cap.
Page 2

GENLOCK SETUP (Menu Install -- E--Box -- Genlock)
By default your KayakDD is set for analog (Blackburst) Reference -- on the
REFERENCE loop--through connectors and ’AutoDetect’ for 625Lines/50Hz and
525Lines/60Hz.
D First make sure that an analog reference is connected to the reference
input of the frame or select the input for Digital reference.
D To adjust genlock settings, bring up the install menu by pressing the ”Install”
button in the main menu.
D Make sure that the right video standard and genlock input type (analog or
digital) is selected.
D If not, change them by pressing the ”Video Std.” / ”GL Inp. Type” buttons.
D If the input type is digital, choose the desired input source using the ”GL Dig.
Inp. Src.” button.
D Check that the displayed ”Ext. Ref.” standard matches the ”Video Std.”
setting.
D The Genlock Phase shifts the switcher timing with respect to the reference
signal.
D Whether the source signals are within the auto--timing window can be
checked by selecting them on AUX bus 1.
D To adjust the genlock phase, turn the digipot to the left or to the right.
D The source is within the auto--timing window when the marker is displayed
in the middle of the timing bar on a green background.
KEYING TIPS
KEYING a Character Generator.
D Use ADD KEY if you use a character generator that produces
ANTI--ALIASED lettering or an external Digital Effectsdevice that produces
soft borders on its video output.
D In the Keyer Mode Menu check that the key signal is being used correctly
by going to the setup menu.
D Switch to Clip High/Low and set Clip High to 100% and Clip Low to 0%. If
you prefer Clip and Gain control set the value of Clip to 50% and Gain to
100%.
D If you have problems with a keyer setup, press the KEY PVW button in the
Keyer Area. It will automatically switch your Preview Monitor to show only
the currently delegated keyer over the background.
D Pressing it again will display the monochrome key signal (Show Key).
D For a CG this should match exactly the key signal from the unit.
D Pressing KEY PVW a third time will restore the Preview Monitor to
Look--ahead Preview mode.
D Use LUM key for a caption camera.
D Use SELF KEY for a caption camera and other selfkey sources, like
Chromakey cameras.
CHROMAKEY AUTOSETUP
D To perform a chroma key using auto setup, first select one of the four keyers
by using the key delegation buttons or the keyer menu.
D Push the chroma key button at the keyer subpanel.
D Make sure “FGD Fade” is switched off.
D Chose a chroma key source on the key bus corresponding to the
selected keyer.
D Use the PGM bus to select the desired background signal.
D Press the cursor button at the keyer subpanel to enter the automatic cursor
assisted key adjustment.
D After pressing the cursor button the preview output will display the chroma
key source with a superimposed crosshair cursor.
D with the Positioner move the cursor to the colour to key on.
D Press “Auto” or the button on the Positioner to start the auto--adjustment.
MASKING TIPS
D Press INHIB(inhibit) or FORCE MASK in the Keyer Area to go to the mask
menu.
D The switcher will highlight FORCE or INHIBIT Mask control databox for
you.
D Choose the MASK SOURCE.
D For WIPES choose the pattern. (Don’t forget each k eyer has a wipe
generator and a box mask).
D Set the SIZE of a Wipe, and SOFTNESS. The Positioner will only work if
you switch it on in the wipe selection menu.
D For a BOX MASK set each edge position and softness.
D If you need to see through the mask use OPACITY (100% = full masking).
TRANSITION MODES
You can select any combination of BGND, KEY1, KEY2, KEY 3, KEY 4 and PRIOR
TRANS for any transition. Just press the buttons simultaneously.
D To change only Background from PGM to PST use BGND transition.
D To change whether a keyer is ON or OFF select the desired KEY n.
D Any combination you can press is good -- just check on Preview to see your
result.
D Move the Lever arm in the direction of the blue arrow, or press CUT or
AUTO to make your transition.
D Keyers also have CUT and MIX buttons that can be used even if the lever
arm is doing a different transition. This operates the keyers like being DSKs.
To change AUTO transition duration.
D Press and Hold the TRANS DUR Button in the EFFECTS subpanel.
D The AUTO, KEY1 MIX, KEY2 MIX, KEY3 MIX, KEY4 MIX and the FTB
AUTO buttons will blink.
D Press the AUTO button for which you want to alter the transition duration.
Use the Effects Keypad to type the number of frames you want it to be and then
ENTER.
E--MEMt TIPS
D E--Mem operates in ”Normal Mode” and ”Bank” Mode. Bank Mode is more
similar to traditional E--Mem operation than Normal Mode.
Modes are switched with the BANK button. If it is lit Bank Mode is active.
The display also shows a ”B” in front of the register number.
D Store a snapshot in Normal Mode: Press STORE, type in register number
(two digits), press ENTER. Switcher confirms with ”Stored”.
D Recall a snapshot in Normal Mode: Type in register number (two digits),
press CUT for recall, or press AUTO for Effects Dissolve.
D Store a snapshot in Bank Mode: Press STORE, press register number
(0--9), press ENTER. Switcher confirms with ”Stored”.
D Recall a snapshot in Bank Mode: Press register number (0--9).
D Changing Bank in Bank Mode: hold down BANK and press Bank number
(0--9) KayakDD E--Mem can also do timelines.
Please see the User Manual how to work with timelines.
EXPLORE
If you wish to explore Look in the Menu
D Genlock or uncal indications Install -- E--Box -- Genlock
D Reset to factory settings Home -- Recall Preset --
Factory Preset
D Video Input mapping Config -- Panel Assign
D Tally Assignment Install -- E--Box -- GPO
D DVE capability DPM
D RAMRecorder capability RAMRecorder
D Installed options Install -- E--Box -- Licenses
TECHNICAL SUPPORT NUMBERS
For other issues, please refer to the KayakDD Installation or User Manuals.
Otherwise contact your Thomson Customer Support.
Thomson Worldwide
Headquarters
17 rue du Petit Albi -- BP 8244
95801 Cergy Pontoise Cedex
FRANCE
North America Pacific
Sales/Support +1 800 547 8949 Sales +852 2531 3000
+1 530 478 4148 Support +852 2531 3056
Fax +1 530 478 3347 Fax +852 2802 2996
Latin America Rest of the World
Sales +1 305 477 5488 Sales +33 (0) 1 34 20 70 00
Support +1 530 478 4148 Support +800 80 80 20 20
Fax +1 305 477 5385 (West/North Europe only)
Fax +33 (0) 1 48 25 20 20
(East Europe, Middle East, Africa)
Fax +33 (0) 1 34 20 70 47
Website
www.thomsongrassvalley.com
For general KayakDD information navigate to Products area.
For support and software download navigate to Support/Training area.
Copyright E 2005, Thomson Broadcast and Media Solutions, Inc.
Order number: 071837401 March, 2005
 Loading...