

Page 1

Step-by-Step Configuration
M926-3904-101
22 August 2013
Page 2

Notices
Copyright & Trademark Notice
Copyright © 2012–2013, Miranda Technologies Partnership.. All rights reserved.
Belden, Belden Sending All The Right Signals, and the Belden logo are trademarks or
registered trademarks of Belden Inc. or its affiliated companies in the United States and
other jurisdictions. Miranda, Kaleido-IP, Kaleido-X16, and Kaleido-X are trademarks or
registered trademarks of Miranda Technologies Partnership. Belden Inc., Miranda
Technologies Partnership, and other parties may also have trademark rights in other terms
used herein.
Terms and Conditions
Please read the following terms and conditions carefully. By using Kaleido multiviewer
documentation, you agree to the following terms and conditions.
Miranda Technologies Partnership. (“Miranda”) hereby grants permission and license to
owners of Kaleido multiviewers to use their product manuals for their own internal
business use. Manuals for Miranda products may not be reproduced or transmitted in any
form or by any means, electronic or mechanical, including photocopying and recording, for
any purpose unless specifically authorized in writing by Miranda.
A Miranda manual may have been revised to reflect changes made to the product during its
manufacturing life. Thus, different versions of a manual may exist for any given product.
Care should be taken to ensure that one obtains the proper manual version for a specific
product serial number.
Information in this document is subject to change without notice and does not represent a
commitment on the part of Miranda.
Warranty information is available in the Support section of the Miranda Web site
(www.miranda.com).
Title Kaleido-IP/Kaleido-X16 Cascade Step-by-Step Configuration
Part Number M926-3904-101
Revision 22 August 2013, 9:00 am
ii
Page 3

This document explains how to connect two multiviewers — a Kaleido-IP and a Kaleido-X16
— in cascade mode, and how to configure and operate them as a single system. Both
multiviewers must have the same Kaleido-X software version (6.40 or later).
Summary
Introduction . . . . . . . . . . . . . . . . . . . . . . . . . . . . . . . . . . . . . . . . . . . . . . . . . . . . . . . . . . . . . . . . . . . . . . . . . . 1
Physical Installation . . . . . . . . . . . . . . . . . . . . . . . . . . . . . . . . . . . . . . . . . . . . . . . . . . . . . . . . . . . . . . . . . . . 1
Cascade Configuration in XEdit . . . . . . . . . . . . . . . . . . . . . . . . . . . . . . . . . . . . . . . . . . . . . . . . . . . . . . . . 3
Cascade Upgrade . . . . . . . . . . . . . . . . . . . . . . . . . . . . . . . . . . . . . . . . . . . . . . . . . . . . . . . . . . . . . . . . . . . . . 6
Limitations . . . . . . . . . . . . . . . . . . . . . . . . . . . . . . . . . . . . . . . . . . . . . . . . . . . . . . . . . . . . . . . . . . . . . . . . . . . 10
Introduction
The number of sources that can be monitored concurrently on a single monitor wall display
is limited by the number of inputs supported by your specific multiviewer model. One
Kaleido-X16 multiviewer supports 16 inputs. One way to increase the number of inputs is to
use more than one multiviewer to build the output to a single head, by configuring a
multiviewer cascade. It is possible to configure up to three Kaleido-X16 or KMV-3901/3911
multiviewers as a cascade system. Depending on your purposes, you may wish to monitor
both baseband and IP sources at once, on the same monitor wall display. This can be
achieved by configuring a hybrid cascade system, involving one Kaleido-IP multiviewer and
one Kaleido-X or Kaleido-X16 multiviewer.
Kaleido-IP/Kaleido-X16 Cascade
Step-by-Step Configuration
With a Kaleido-IP/Kaleido-X16 Cascade system, the Kaleido-IP provides some parts of the
monitor wall image, sends it to the Kaleido-X16, which adds some more elements to the
output and then sends the resulting output to the monitor wall. Unlike the cluster, whose
purpose is to increase the number of output heads in a room, the hybrid cascade not only
increases the maximum number of inputs that can be displayed to a single head but also
allows you to display both IP sources and baseband sources to the same head.
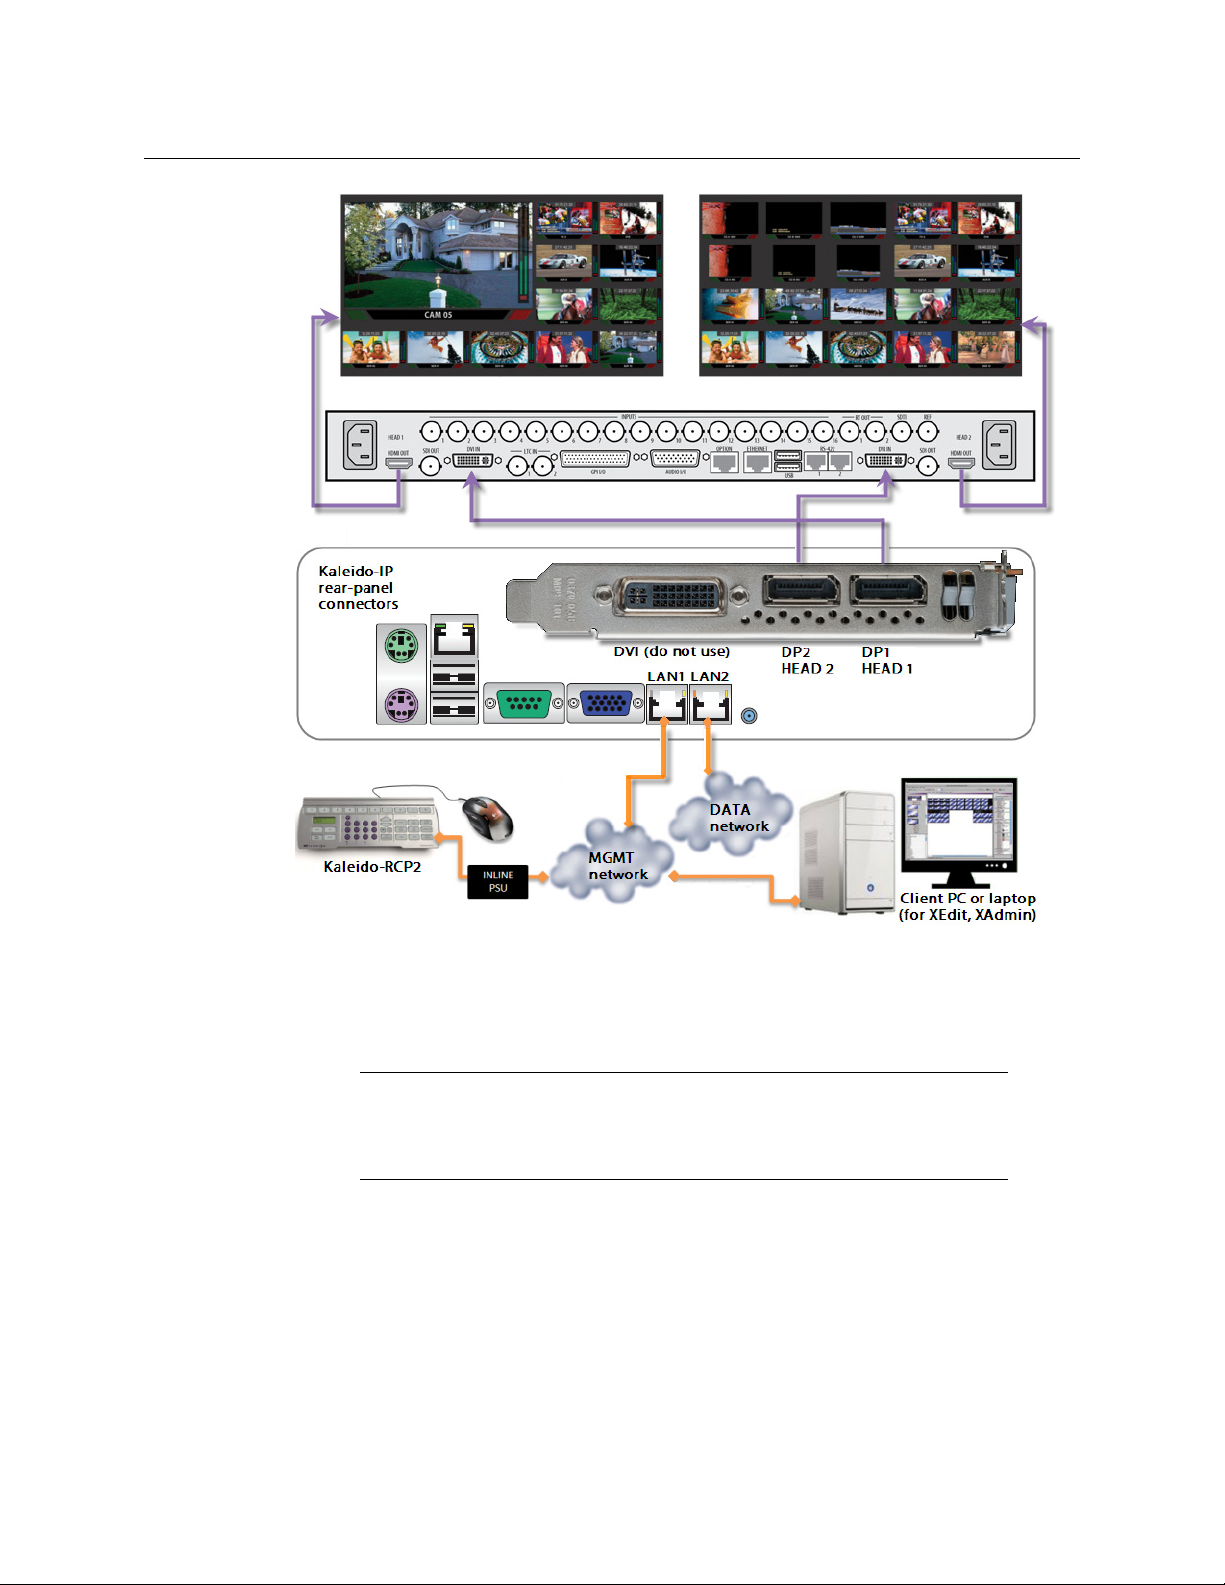
To configure your Kaleido-IP and Kaleido-X16 multiviewers as a cascade system, you need
to physically connect one Kaleido-IP output to a DVI input on the Kaleido-X16 multiviewer.
Then connect a display to the appropriate output on the Kaleido-X16. Once you have
defined your cascade system and room in XEdit, you will be able to operate the cascade as a
single multiviewer.
Physical Installation
To interconnect the Kaleido-IP and the Kaleido-X16 multiviewers in a cascade room with a
single output head, you will need a good-quality DisplayPort-to-DVI cable, as short as
possible. For a cascade room with two output heads, then you will need two such cables.
1
Page 4
Physical Installation
To interconnect a Kaleido-IP and a Kaleido-X16 into a cascade
1 Connect one of the Kaleido-IP’s DisplayPort outputs to a DVI input on the Kaleido-X16.
2 In the case of a cascade room with two output heads, connect the second DisplayPort
output on the Kaleido-IP to the second DVI input on the Kaleido-X16.
Note: Although nothing prevents you from connecting any DisplayPort
output to any DVI input, the recommended practice is to choose the most
logical signal path, by connecting DP1 to DVI IN
Configuring your cascade system in XEdit will then be straightforward.
1, and DP2 to DVI IN 2.
3 Connect the appropriate HDMI outputs on the Kaleido-X16 to one or two monitor wall
displays, depending on the multiviewer model (dual or single) and on your specific
purposes.
2
Page 5
Cascade Configuration in XEdit
Adding Multiviewers to a Cascade
The Kaleido-X software’s support for cascade systems is based on the cluster feature.
Therefore, like a cluster, a cascade system must meet the following requirements:
• The multiviewers you wish to add to a Kaleido-IP/Kaleido-X16 cascade must have
Kaleido-X software version 6.40 or later, and both cascade members must have the
same version of the software.
• Each multiviewer you wish to add to a cascade must have a unique name.
• Do not change the system name of a multiviewer or its IP address, once it has been
added to a cascade, if the other multiviewer is offline or otherwise unavailable. This
would cause all head assignments to become unknown. If you must rename a
multiviewer, or change its IP address, while the other member of the cascade is
unavailable, remove it from the cascade configuration first, and then add it again after
you made the required change. You will then need to reconfigure the head
assignments for any room that includes display screens associated with the renamed
multiviewer (see
• A multiviewer can only be part of one cascade or cluster system at any time. XEdit will
not let you add a multiviewer that is already included in a different cascade or cluster
system.
Repairing a Cascade Configuration on page 5).
Kaleido-IP/Kaleido-X16 cascade
Step-by-Step Configuration
To add multiviewers to a cascade
1 Open XEdit, and then click Connect on the Configure menu, to access the Kaleido-X16
(i.e. the multiviewer that will output directly to the monitor wall).
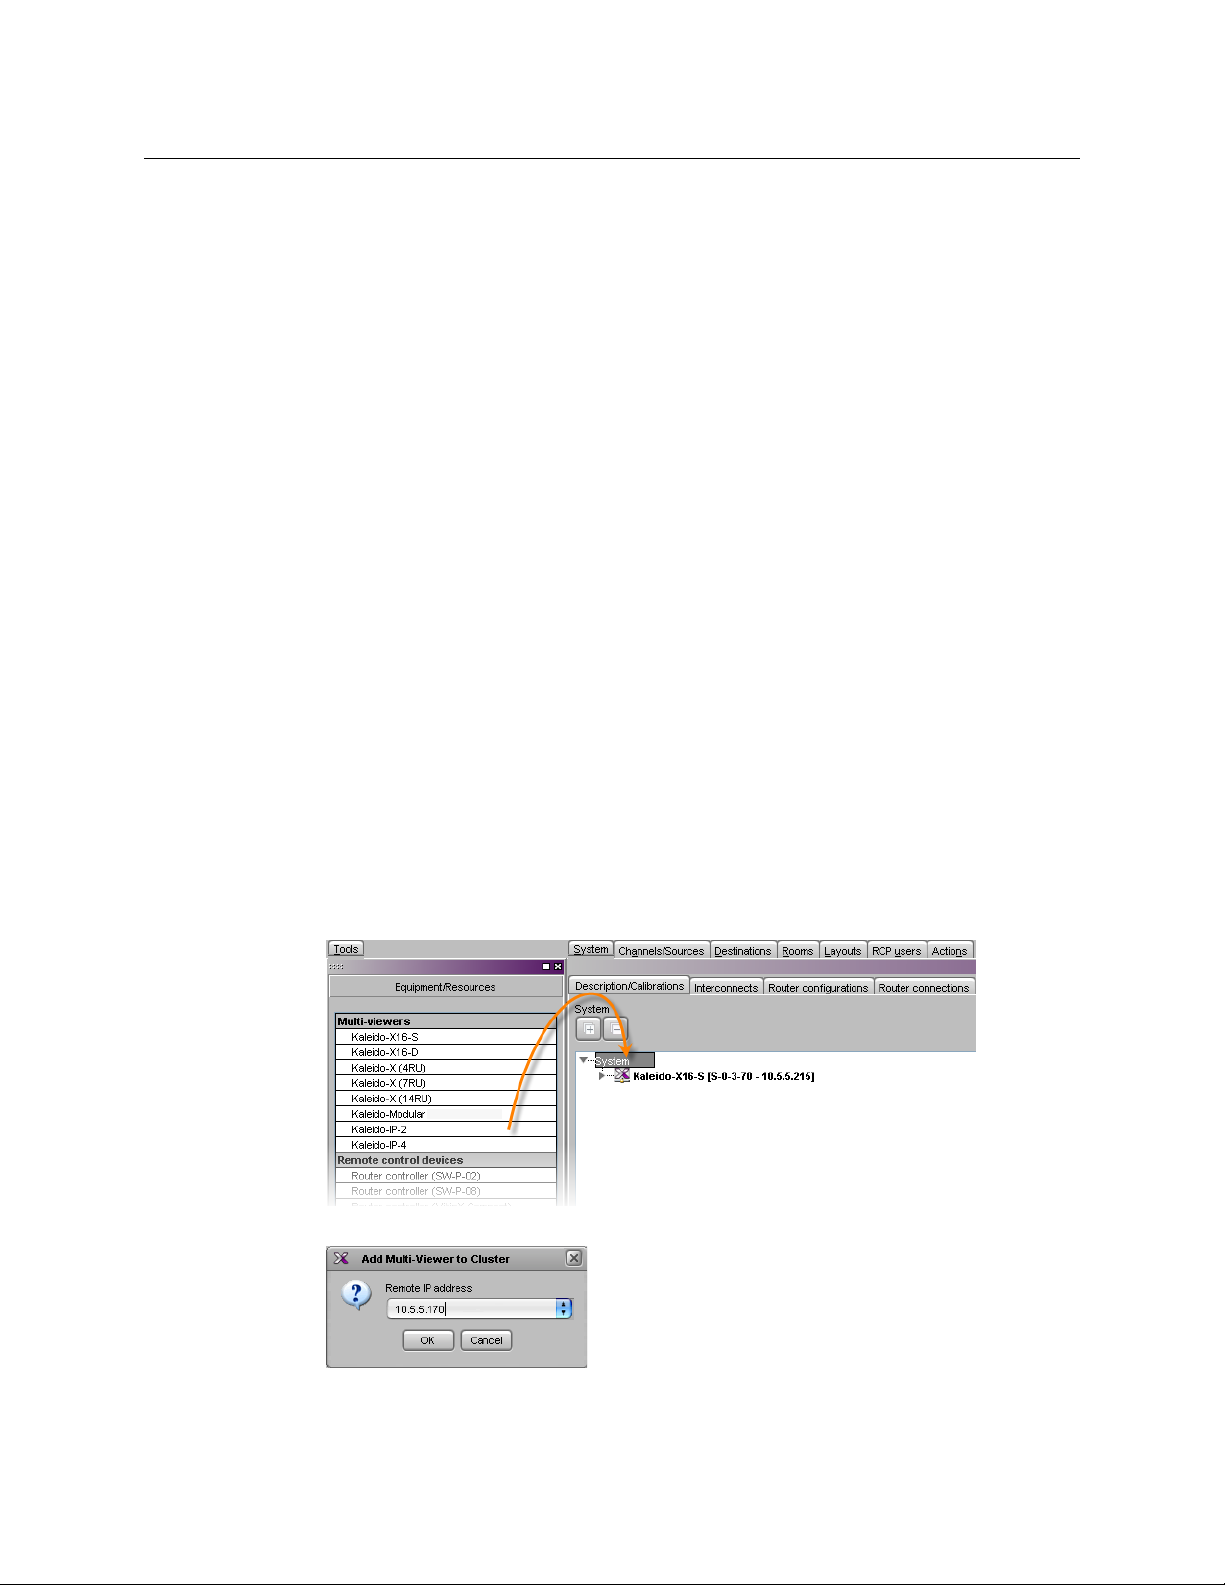
You can now create a cluster by adding the Kaleido-IP to your system configuration.
2 In the equipment library, select any multiviewer type, and then drag it onto the root of
the System hierarchical list.
The Add Multiviewer to Cluster window appears.
3
Page 6

Configuring Cascade Rooms
3 If your PC and the multiviewer you wish to add are on the same subnet, then you can
select the multiviewer’s IP address from the list. Otherwise type the appropriate IP
address in the box.
4Click OK.
The multiviewer is added to the System list.
Notes
• The system type is automatically adjusted based on the actual target
system.
• Each member of a cluster has its own database where both common
information about the cluster and information local to the individual
cluster member are stored. Room and layout definitions are automatically
replicated to all cluster members, whereas the configuration for devices
connected to a specific system is only stored in this system’s database.
Configuring Cascade Rooms
In a Kaleido-IP/Kaleido-X16 cascade room, each cascaded display is assigned heads from
both multiviewers, configured as layers, by setting the display’s Output head and Layer 2
head property to match the actual head order in your physical configuration.
To configure a cascade room
1 In XEdit, while connected to the Kaleido-X16, open the room you wish to configure.
Note: If the room does not exist yet, create it by adding the appropriate
number of displays, and then assign heads from the current multiviewer to
the displays in the usual fashion.
2 Click a first head. In the Properties pane, its name appears in the Output head box.
4
Page 7

3 Select the appropriate Kaleido-IP head from the Layer 2 head (for cascade
configuration) list.
Since the Kaleido-IP/Kaleido-X16 cascade does not support a third layer, leave Layer 3
head (for cascade configuration) unassigned.
4 In the case of a dual-head cascade room, repeat the procedure to configure the head
layer assignments for the other Kaleido-X16 head.
5On the File menu, click Save.
The updated room configuration is automatically propagated to the Kaleido-IP.
Configuring Layouts for a Cascade Room
Creating cascade layouts is no different than creating any regular layout. The only limitation
is that all layout creation and configuration must be performed in online mode, while
connected to one of the cascade members.
• When you configure layouts for a cascade room, all logical sources from all the
multiviewers associated with this cascade room are available.
• When you save a Kaleido-IP/Kaleido-X16 cascade layout, any changes are automatically
propagated to the other multiviewer in the cascade.
Kaleido-IP/Kaleido-X16 cascade
Step-by-Step Configuration
Repairing a Cascade Configuration
While connected in XEdit to a multiviewer that is part of a cascade, if you change the
system name or IP address of this multiviewer while another cascade member is offline or
otherwise unavailable, the underlying cluster’s integrity will be broken. If you attempt to
make such a change, XEdit will alert you of the situation, prompting you to cancel the
operation and try again later, when all cascade members are available. However, in the
advent that such a change was made by mistake, or that is had to be forced for some
reason, you will have to repair the broken cascade.
Note: In the procedure below, System A refers to the system whose name or
IP
address was changed while another multiviewer, referred to as System B,
was unavailable.
To repair the cascade configuration
1 In XEdit, connect to System B, the multiviewer that was unavailable when the change
was made, once it is available again.
2In the Description/Calibrations tab, remove System A from the cluster, and then add it
back to the cluster.
If only the IP address was changed then no further action is required. Otherwise, if the
system name was changed, then proceed as follows.
3Connect to System A.
5
Page 8

Cascade Upgrade
4 Change something in every room (e.g. move a display and then bring it back to its
initial position) to enable the Save button, and then save the room.
This will replicate the proper room configuration to the other member of the cascade.
(At the same time, the layouts will also be updated on all multiviewers in the cascade.)
Cascade Upgrade
Update the multiviewers that are part of a Kaleido-IP/Kaleido-X16 cascade in sequence,
starting with the multiviewer farthest from the monitor wall (i.e. the Kaleido-IP), and
finishing with the one connected to the monitor wall displays (i.e. the Kaleido-X16). When
you restart one multiviewer at the end of its update process, you can start updating the
other without waiting for the restart to be completed.
To upgrade a Kaleido-IP/Kaleido-X16 cascade system
1 Load an empty layout on the monitor wall, or make sure that the bottom area of the
current layout is empty.
2 From a workstation on the same subnet, open a Web browser window and type the
Kaleido-IP’s management IP address in the address bar.
The Kaleido-IP home page appears.
Firefox users:
If you see a security warning instead of the home page, then refer to
Registering your Multiviewer's Security Credentials with your Browser, in the
Kaleido-X User’s Manual.
3 Click the XAdmin button.
The XAdmin Status and Options page appears.
6
Page 9

Kaleido-IP/Kaleido-X16 cascade
Internet Explorer users:
• If the page remains blank, then refer to Enabling the Compatibility View in
Internet Explorer 10, in the Kaleido-X User’s Manual.
• If you see a certificate error message instead of the Status and Options
page, then refer to Registering your Multiviewer's Security Credentials with
your Browser, in the Kaleido-X User’s Manual.
4Click Upgrade, in the navigation area on the left of the page.
The Upgrade page appears.
Step-by-Step Configuration
5Click Choose a package to upload.
A file chooser window appears.
6 Navigate to the RUN package you wish to install, select it, and then click Open.
The selected file is uploaded to the Kaleido-IP. This may take a few seconds.
7
Page 10

Cascade Upgrade
7 Once the upload has completed, click Apply update.
While the upgrade is taking place you can monitor its progress if you wish, or wait until
the system prompts you to restart the Kaleido-IP unit.
8 Once the upgrade has completed, if you wish to keep a copy of the log messages, scroll
down to the bottom of the page, right-click Download the Upgrade log, and save the
log to your hard drive as a text file.ƒ
9Click Restart unit.
The system prompts you to confirm.
8
Page 11

Kaleido-IP/Kaleido-X16 cascade
Step-by-Step Configuration
10 Click Ye s to proceed.
Your multiviewer will shut down, and then start again. This may take a while.
Once the multiviewer has restarted, the system notifies you.
11 Click OK.
The XAdmin Status and Options page appears.
12 Verify that the expected version number appears in the page title (check the tab label,
or the browser’s title bar).
At this point the Kaleido-IP upgrade is complete, and you can now proceed with
upgrading the Kaleido-X16.
13 Copy the Kaleido-X16 upgrade package files to a USB key (see “Preparing a USB Key” in
the Release Notes).
14 Insert the USB key into any of the USB ports on the Kaleido-X16.
After a while, a message appears at the bottom left corner of the monitor wall, reporting that the Upgrade Manager is verifying software, firmware, and safe mode versions.
Once the verification process is complete, you will be advised what upgrade action, if
any, needs to be performed. Then, after 30 seconds, the upgrade process begins auto
-
matically, starting with the software upgrade.
When the entire upgrade process has successfully completed, a red button appears at
the bottom of the upgrade dashboard, prompting you to restart the multiviewer.
15 Click the Upgrade complete button to restart the system.
The multiviewer now restarts. This may take up to 30 seconds.
9
Page 12

Limitations
Limitations
In the current version of the Kaleido-X software, cascade systems are subject to the
following limitations:
16 Remove the USB key from the USB port.
You have now completed the upgrade, for both multiviewers in this cascade.
• Full screen layouts are not supported.
• Changing a display resolution from the monitor wall menu is not supported and will
break the underlying cluster’s integrity. You must use XEdit to configure the display
resolution (see “Changing Room Display Resolutions” in the Kaleido-X User’s Manual).
In the advent that such a change was made by mistake, you will have to repair the
broken cascade as follows:
1 Connect to the multiviewer associated with the display whose resolution was
changed by mistake, and open the corresponding room.
•If you wish to restore the previous resolution, then set this display to its previous
resolution.
•If you wish to apply the new resolution, then change something in the room to
enable the Save button (e.g. move a display and then bring it back to its initial
position).
2On the File menu, click Save.
• Some changes are not automatically propagated to all members of a cascade. If you
wish to have the same configuration for every multiviewer in a cascade, then the
following elements must be manually replicated: system calibrations, audio monitoring
output assignment for each RCP user, sources/channels and router configurations,
pointer size configuration.
10
Note: After changing the pointer size for a room, on all multiviewers in a
cascade, you must restart every multiviewer, for the change to become
effective across the cascade system.
• If two multiviewers in a cascade are connected to the same router, then the router
name should be the same in both configurations. Conversely, two different routers in
the same cascade must not have the same name.
• Serial ports are not shared between cascade members. A serial device connected to
one multiviewer in a cascade is not known to the other cascade members.
• Audio monitoring is not supported.
• RCP operation: In the case of a cascade system, monitor wall functions performed via
the associated buttons on a Kaleido-RCP2 or RCP-200 (ASPECT RATIO, UNDERSCAN,
FULL SCREEN, etc.) only work in parts of the layout associated with the multiviewer that
is directly connected to the displays.
Workaround: Use the monitor wall menu.
• Router outputs are not cascaded.
• Working against the same cascade system in concurrent XEdit sessions is not
supported.
Page 13

Kaleido-IP/Kaleido-X16 cascade
Step-by-Step Configuration
• EDID auto-detection is not supported. When configuring a cascade room, make sure
the Use detected monitor resolution check box is not selected for any of its displays.
Refer to “Enabling EDID Auto-Detection from the Monitor Wall“, or “Enabling EDID
Auto-Detection in XEdit“, in the Kaleido-X User’s Manual, for details.
11
Page 14

Page 15

Miranda Technical Support
For technical assistance, please contact the Miranda Technical Support center nearest you:
Contact Us
Americas
Office hours: 9:00 a.m. – 9:00 p.m. (EST)
Telephone: 1-800-224-7882
Fax: +1 514 335 1614
E-mail: support@miranda.com
Europe, Middle East, Africa, UK
Office hours: 9:00 a.m. – 6:00 p.m. (GMT)
Telephone: +44 118 952 3444
Fax: +44 118 952 3401
E-mail: eurotech@miranda.com
France
Office hours: 9:00 a.m. – 5:00 p.m. (GMT+1)
Telephone: +33 1 55 86 87 88
Fax: +33 1 55 86 00 29
E-mail: eurotech@miranda.com
Corporate Head Office
Miranda Technologies
3499 Douglas-B.-Floreani, St-Laurent, Quebec, Canada H4S 2C6
Telephone: +1 514 333 1772
Fax: +1 514 333 9828
Web: www.miranda.com
Asia
Office hours: 9:00 a.m. – 5:00 p.m. (GMT+8)
Telephone: +852 2539 6987
Fax: +852 2539 0804
E-mail: asiatech@miranda.com
China
Telephone: +86 10 5873 1814
E-mail: asiatech@miranda.com
EMERGENCY After Hours (Global)
Toll Free: 1-800-224-7882 (US and Canada)
Telephone: +1 514 333 1772
 Loading...