

Page 1
K2 TimeDelay
APPLICATION SOFTWARE
User Manual
Software Version 9.0
071-8727-03
November 2013
Page 2

CERTIFICATE
Certificate Number: 510040.001
The Quality System of:
Grass Valley USA, LLC and its Grass Valley Affiliates
Headquarters:
400 Providence Mine Road
Nevada City, CA 95945
United States
15655 SW Greystone Ct.
Beaverton, OR 97006
United States
Kapittelweg 10
4827 HG Breda
The Nederlands
Including its implementation, meets the requirements of the standard:
2300 So. Decker Lake Blvd.
Salt Lake City, UT 84119
United States
ISO 9001:2008
Scope:
The design, manufacture and support of video and audio hardware and software
products and related systems.
This Certificate is valid until: June 14, 2015
This Certificate is valid as of: June 14, 2012
Certified for the first time: June 14, 2000
H. Pierre Sallé
President
DEKRA Certification, Inc
The method of operation for quality certification is defined in the DEKRA General Terms
And Conditions For Quality And Environmental Management Systems Certifications.
Integral publication of this certificate is allowed.
DEKRA Certification, Inc.
4377 County Line Road
Chalfont, PA 18914
Ph: (215)997-4519
Fax: (215)997-3809
CRT 001 042108
Accredited By:
ANAB
Page 3

K2 TimeDelay
Application Software
User Manual
Software Version 9.0
071-8727-03
November 2013
Page 4
Contacting Grass Valley
Copyright © Grass Valley USA, LLC. All rights reserved.
This product may be covered by one or more U.S. and foreign patents.
Grass Valley Web Site
The www.grassvalley.com web site offers the following:
Online User Documentation
data sheets, ordering guides, planning guides, manuals, and release notes
in .pdf format can be downloaded.
FAQ Database
found by searching our Frequently Asked Questions (FAQ) database.
Software Downloads
— Solutions to problems and troubleshooting efforts can be
— Current versions of product catalogs, brochures,
— Download software updates, drivers, and patches.
4 K2 TimeDelay — User Manual
Page 5

Contents
About K2 TimeDelay..........................................................................................................7
K2 TimeDelay overview...............................................................................................7
K2 TimeDelay channel panes ......................................................................................9
K2 TimeDelay menu .....................................................................................................9
K2 TimeDelay settings..................................................................................................11
Lock/Unlock AppCenter .............................................................................................12
K2 TimeDelay messages...............................................................................................12
Status Bar messages .................................................................................................12
Channel status ..........................................................................................................12
Error messages..........................................................................................................12
Using K2 TimeDelay ..........................................................................................................13
Before using K2 TimeDelay .........................................................................................13
Starting a new session manually.................................................................................14
Starting a new session automatically..........................................................................14
Stopping a K2 TimeDelay session...............................................................................14
Modifying the time of day timecode source..............................................................14
Adjusting K2 TimeDelay playback.............................................................................15
Changing K2 TimeDelay audio levels........................................................................15
Recovering from K2 TimeDelay disruptions.............................................................16
Purging media with K2 TimeDelay ............................................................................16
Using K2 TimeDelay clip in another application......................................................17
Appendix A Trademarks and Agreements
Trademarks..........................................................................................................................18
JPEG acknowledgement.....................................................................................................18
Index
....................................................................................................................................19
7 November 2013 K2 TimeDelay User Manual
5
Page 6

Contents
6
K2 TimeDelay User Manual 7 November 2013
Page 7
About K2 TimeDelay
K2 TimeDelay is an optional control application that runs in the AppCenter
application on your local K2 Summit Production Client. TimeDelay records
incoming source material and delays the playback of the media. You can
determine the length of the delay. The system notifies you if you have
exceeded the limit of the available disk space. TimeDelay allows you to start
recording on the assumption that you will make sufficient room manually.
TimeDelay requires K2 Summit software version 7.1 or higher.
The record and play channels need to be on the same K2 system. Multiple
sessions of TimeDelay can run simultaneously if there are enough record and
playback channels on the K2. For example, in a K2 Summit Production Client
with two record and two play channels, you could have two sessions of
TimeDelay running, each with one recorder and one playback channel.
This section is divided into the following topics:
“K2 TimeDelay overview” on page 7
“K2 TimeDelay channel panes” on page 9
“K2 TimeDelay menu” on page 10
About K2 TimeDelay
“K2 TimeDelay settings” on page 11
“K2 TimeDelay messages” on page 12
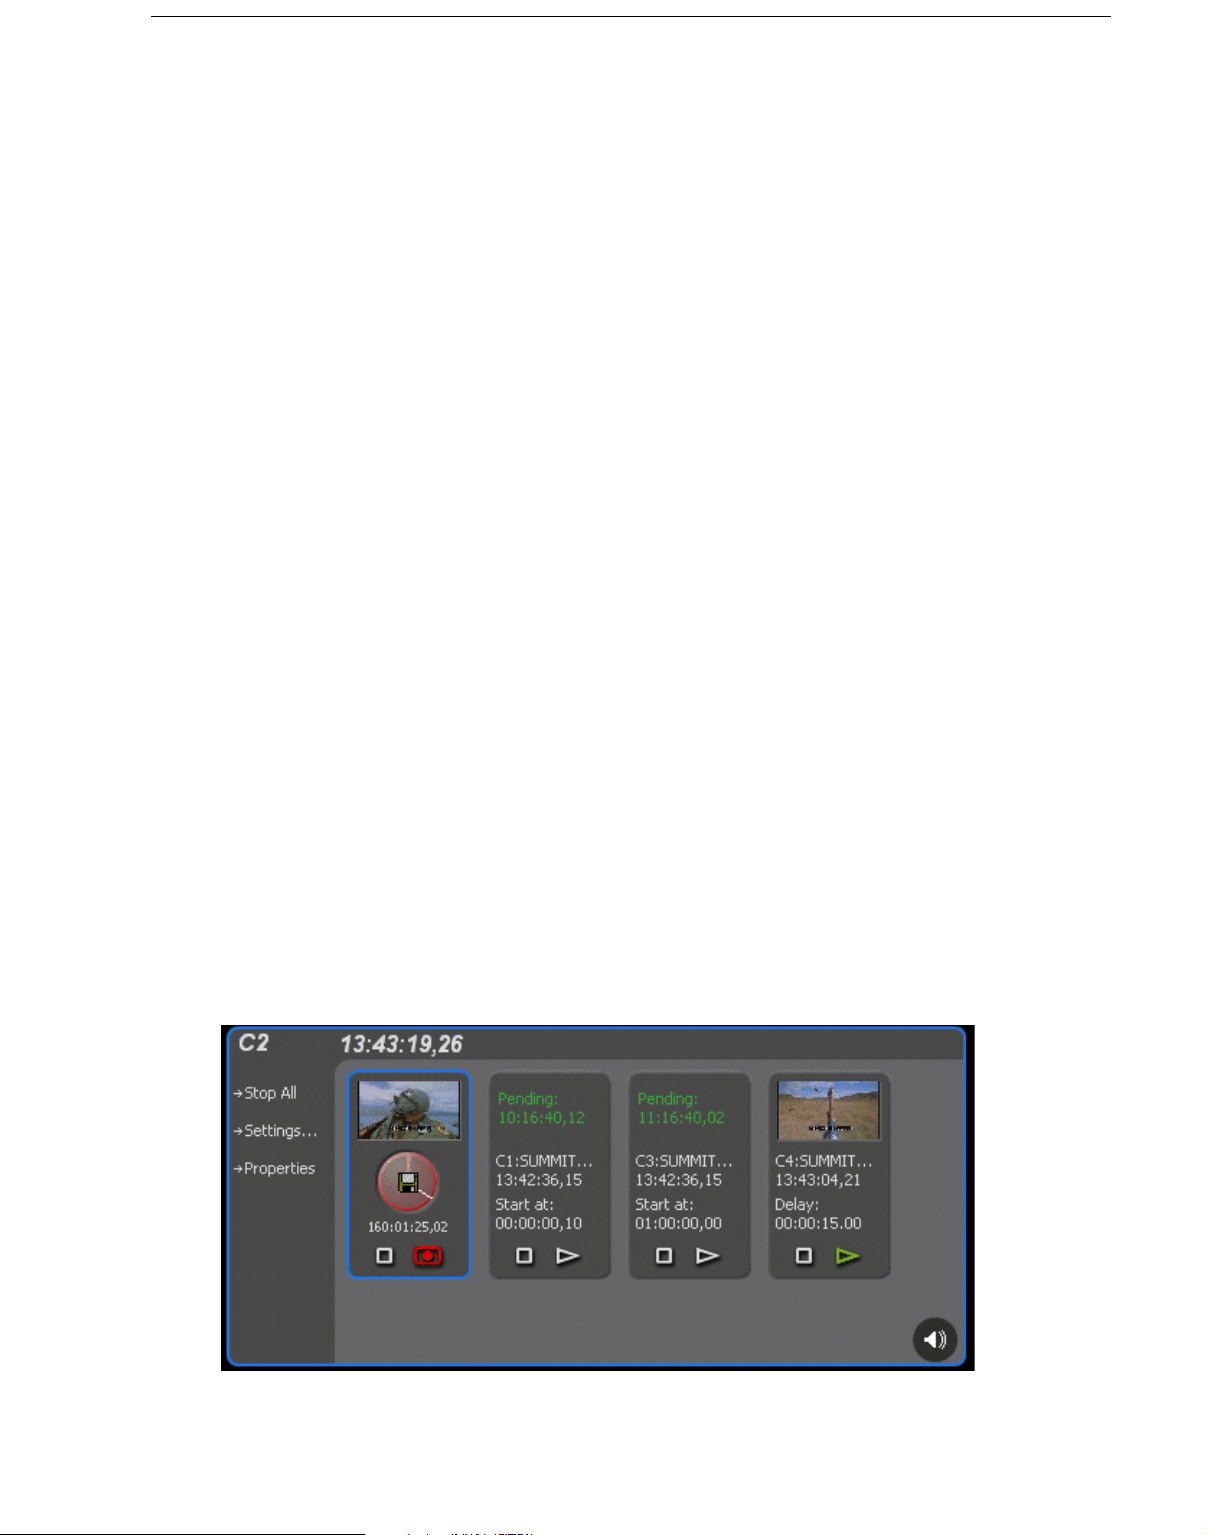
K2 TimeDelay overview
K2 TimeDelay allows you to view a summary of all the channels controlled
by this TimeDelay session. When you select a channel, it is highlighted with
a blue background; all other channels have a grey background. Only the
selected channel responds to keyboard input such as using keyboard
shortcuts to Play, Record, or Stop.
This section describes the graphical interface. The picture below shows the
TimeDelay pane with 3 playback channels: C2 and C3 are pending; C4 has
started playing. C1 is the selected channel.
7 November 2013 K2 TimeDelay User Manual
7
Page 8

Channel pane
Clips pane
Monitor pane
Note that the play channels used by this session of K2 TimeDelay do not show
the TimeDelay application to their right. Instead, they show that the channel
is in use by the TimeDelay application running on the corresponding record
channel. Use the recording channel to interact with the TimeDelay
application. In the monitor pane, a red outline indicates a recording channel
and a green outline indicates a channel that is currently playing media.
The following illustration shows a K2 Summit Production Client. C2 is
recording (note the red outline around the monitor pane), C1 and C3 are
pending, and C4 is playing out the media (note the green outline around
monitor pane).
8
K2 TimeDelay is an optional application designed to interface with
AppCenter. Since K2 TimeDelay is not a standalone application, the K2
TimeDelay documentation is provided to supplement the existing server
documentation. This manual does not cover basic AppCenter tasks except
where they overlap with TimeDelay functions.
Once K2 TimeDelay is installed, AppCenter includes a TimeDelay item in the
application droplist on all channels capable of recording.
For more information on installing K2 TimeDelay, see the K2 TimeDelay
Release Notes.
K2 TimeDelay User Manual 7 November 2013
Page 9

K2 TimeDelay channel panes
When the channel associated with a pane is selected, the pane is highlighted
with a blue outline. This indicates that both the keyboard controls and the
status bar now belong to this channel.
Channel Description
Record channel
(selected channel)
Play channels (p ending
and playing)
The record channel pane contains a thumbnail, time dome, and stop
and record controls. The thumbnail for the currently recording asset is
displayed above the time dome. If no thumbnail can be found or
created, an icon is displayed indicating that there is no thumbnail
available. Unlike the thumbnail in the Recorder application, this
thumbnail is updated every 10–20 seconds to reflect the current record
position.
The Time Dome control graphically displays the remaining storage
and shows estimated remaining time available on the drive. A filled
Time Dome represents no storage remaining. A “sweep second hand”
shows that recording is in progress. This is represented as a white line
on the Time Dome that sweeps through a complete revolution every
ten seconds.
The Record and Stop controls manually start and stop the TimeDelay
session. This starts and stops all channels currently controlled by that
TimeDelay session, including the playback channels.
A selected channel is indicated by a blue outline.
Each play channel contains a thumbnail, the channel and machine
name, timecode, preset delay value, and stop and play controls.
Before playback starts, the play channel displays a countdown in place
of the thumbnail. After playback starts, the thumbnail appears, and is
updated every 10–20 seconds to represent a roughly current playback
position.
The Play and Stop controls can be used to manually start and stop
playback. When you press Play, the delay changes to indicate the
appropriate time differential. When you press Stop and then press
Play, playback does not resume where it was paused. Instead,
playback jumps to the correct delay position.
If you pause a play channel that was started with Start At, it
automatically switches to Delay to maintain the initial offset.
If you pause a play channel pause or stop a playing channel, then go to
the Settings dialog box to change that channel from Delay to Start At,
you must hit Play for the change to take effect.
K2 TimeDelay channel panes
7 November 2013 K2 TimeDelay User Manual
9
Page 10

K2 TimeDelay menu
When the K2 TimeDelay application is active, a TimeDelay menu appears in
AppCenter’s main window. The following table describes the menu items.
Menu item Description
Stop All/Start This menu item and the corresponding tool bar control
toggle between Start and Stop All, depending on whether
or not a TimeDelay session is in progress. It has the same
effect as the Record and Stop controls on the record
channel pane.
Properties Displays the properties for the program that is being
recorded in a dialog box.
Settings Opens the TimeDelay Settings dialog box.
10
K2 TimeDelay User Manual 7 November 2013
Page 11

K2 TimeDelay settings
Setting Description
Channel Allows you to select the playback channel(s).
Auto Start Enables Auto Start to begin recording
K2 TimeDelay settings
Up to three checkboxes might be available,
depending on the number of channels
available.
Provides a default clip seed name of
TimeDelay. You can enter a clip seed name of
up to 28 characters.
automatically when the current timecode
source reaches the designated start time.
Buffer K2 TimeDelay automatically determines the
buffer size. By default, the record buffer size is
based on the largest playback delay. You can
customize the buffer size, but it must always be
larger than the minimum buffer size.
7 November 2013 K2 TimeDelay User Manual
11
Page 12

Lock/Unlock AppCenter
The Lock/Unlock feature in AppCenter Workstation allows you to lock the
entire AppCenter application.
It could be useful after the TimeDelay starts running in order to prevent any
accidental interference with its operation.
To lock the AppCenter, select Lock from the AppCenter System menu.
When AppCenter is unlocked it does not respond to keyboard or mouse input
(except to unlock AppCenter). However, the status of any application in
AppCenter, including TimeDelay, is still updated as normal.
To unlock AppCenter, do the following:
1. Press any key on the keyboard, or click the left mouse button anywhere in
the AppCenter window.
2. A dialog appears to confirm that you want to unlock AppCenter. Click
K2 TimeDelay messages
This section is divided into the following topics:
“Status Bar messages” on page 12
“Channel status” on page 12
“Error messages” on page 12
Status Bar messages
The K2 TimeDelay application displays status information and error
messages on the AppCenter status bar.
Channel status
The K2 TimeDelay application displays status messages on the AppCenter
status bar for the active channel. The message describes whether the channel
is recording, playing, pending, or stopped.
The messages have this format:
<channel>: <machine> - ‘<timedelay session name>’ message.
Error messages
Yes
.
12
The K2 TimeDelay application displays error messages in the AppCenter
status bar. For example, if recording fails for some reason after a record
session has begun.
K2 TimeDelay User Manual 7 November 2013
Page 13

Using K2 TimeDelay
This section is divided into the following topics:
“Before using K2 TimeDelay” on page 13
“Starting a new session manually” on page 14
“Starting a new session automatically” on page 14
“Stopping a K2 TimeDelay session” on page 14
“Modifying the time of day timecode source” on page 14
“Adjusting K2 TimeDelay playback” on page 15
“Changing K2 TimeDelay audio levels” on page 15
“Recovering from K2 TimeDelay disruptions” on page 16
“Purging media with K2 TimeDelay” on page 16
“Using K2 TimeDelay clip in another application” on page 17
Before using K2 TimeDelay
Using K2 TimeDelay
Before you can access K2 TimeDelay, you need to log on to a K2 Summit
Production Client or K2 Media Solo Server and launch AppCenter. (You can
set up AppCenter to log you in automatically. For more information, see the
K2 AppCenter User Manual.) When AppCenter is started, an application is
launched for each channel. To change the application running on a channel,
select a new application from the channel’s application drop-down
list.TimeDelay only appears in a channel’s drop-down list if that channel is
capable of recording.
A TimeDelay session uses one record channel and one or more play channels.
To interact with the TimeDelay application, you must activate the record
channel that it is using. To activate the channel, you can select the channel
from inside the channel status pane or click on the TimeDelay application in
the applications pane.
To start TimeDelay on a channel, follow these steps:
1. Select the channel you want to record on.
2. Select TimeDelay from the channel’s application drop-down list. (If the
channel is not capable of recording, TimeDelay does not display as an
option.)
3. The K2 TimeDelay application starts. In the Settings dialog box, select the
play channel or channels for this TimeDelay session.
4. Specify the playback start time either in terms of delay or give an exact start
time.
5. (Optional) Set up the AutoStart or Buffer. For more information, see “K2
TimeDelay settings” on page
6. Click OK. The settings do not take affect until you click OK.
7 November 2013 K2 TimeDelay User Manual
11.
13
Page 14

NOTE: If any of the selected channels are actively playing or recording, a
confirmation message box appears before TimeDelay commandeers the channel.
Starting a new session manually
If you are already in the K2 TimeDelay application, you can start a new
session manually. To start a new session, do the following:
1. If any channel controlled by TimeDelay is still running, click the Stop
control on the record channel.
2. You can click the Settings button to open the TimeDelay Settings dialog to
setup the new session. Otherwise, the last settings are used.
3. Click the Record control on the record channel, click the Start tool bar
control, or select the Start menu item. The play channel(s) will start their
delay session.
Starting a new session automatically
The TimeDelay process can be started automatically at a specific timecode
value, regardless of the timecode source.
To automatically start TimeDelay, do the following:
1. To open the TimeDelay Settings dialog box, click on Settings button or
select
TimeDelay | Settings.
2. Select the Auto Start tab.
3. Check the Auto Start checkbox.
4. In the Start Time field, enter the appropriate start time. The start time must
be at least 10 seconds ahead of the current time.
5. Click OK to close the TimeDelay Settings dialog box. The record is not
scheduled until you press
When auto start is activated, a countdown is shown in place of the thumbnail
for the record channel.
OK
.
Stopping a K2 TimeDelay session
To stop the TimeDelay session, do one of the following:
• Click the Stop All tool bar button.
— or —
• Select the Stop All menu item.
— or —
• Click the Stop control on the record channel.
14
Modifying the time of day timecode source
The time of day timecode is displayed in the upper-left of the TimeDelay title
bar. It is used to schedule playback (and record when using the auto start
feature) and is the timecode recorded to the TimeDelay clip.
K2 TimeDelay User Manual 7 November 2013
Page 15

Adjusting K2 TimeDelay playback
NOTE: To ensure frame accuracy, Grass Valley recommends using an external
timecode source such as LITC.
To modify the time of day source, do the following:
1. Select
System | Configuration
.
2. Select the System tab.
3. In the Time Of Day section, select the source.
4. Click OK to close the Configuration dialog box.
Adjusting K2 TimeDelay playback
Use the TimeDelay Settings dialog box to modify the start time either in terms
of delay or give a specific start time. Once you have clicked the
TimeDelay adjusts the playback in one of two ways:
• If playback has not started, TimeDelay schedules the playback as usual.
— or —
• If playback has already started, clicking the OK button causes TimeDelay to
stop the playback on that channel, cue to the new delay offset, and begin
playback at the new position.
The maximum delay allowed is 23:59:59;29. If a delay larger than the
maximum is entered, TimeDelay converts the entered value to less than the
maximum. For example, if you enter a value of 24:10:59;29 TimeDelay
converts it to 00:10:59;29. If you enter a value of 25:10:59;29 TimeDelay
converts it to 01:10:59;29.
OK
button,
Playback delays that are too small are automatically adjusted to the closest
valid value. The minimum playback delay is based on the video server that
the TimeDelay channels reside on; it is summarized in the following table.
Video server Minimum playback delay (seconds)
K2 Summit Production Client with internal
storage or K2 Solo Media Server
K2 Summit Production with external storage 25
You can modify the length of the K2 TimeDelay playback delay. The system
notifies you if you have exceeded the limit of the available disk space.
TimeDelay allows you to start recording on the assumption that you will
make sufficient room manually.
Changing K2 TimeDelay audio levels
You can modify the audio levels for the record channel or any one of the
playback channels independently. To open the Meters window, select the
TimeDelay channel and click on the Meters button in the lower right-hand
corner.
15
7 November 2013 K2 TimeDelay User Manual
15
Page 16

This window contains a meter for each audio input or output (depending on
the current channel selection) that displays the audio level.
Each audio meter indicates the final (adjusted) audio level on the audio input
or output for that track. A decibel scale is displayed alongside the sliders.
To adjust the input gain for the record channel or the output gain for a play
channel, move the slider on the meter. To snap all the gain levels back to Unity
default, click the Unity button. To change all gain levels proportionately
when any one of them is moved, click the Gang checkbox.
Recovering from K2 TimeDelay disruptions
If K2 TimeDelay is disrupted, due to a power outage, like when both power
cords are pulled, it restarts automatically at the correct position. (To restart
TimeDelay without logging in, you need to configure auto login in
Appcenter. For more information, see the K2 AppCenter User Manual.)
To initiate auto recovery, AppCenter must be restarted, either manually or
automatically on reboot. TimeDelay reloads the clip, jumps to the correct
position, and begins recording or playback depending on which operations
were in progress during the failure. It fills in black video where the system
was not recording, so that the clip length and delays are exactly maintained.
Purging media with K2 TimeDelay
By default, K2 TimeDelay automatically starts purging media after the
longest playback delay, but you can specify a longer time interval after which
purging will begin. This could be useful if you want to use the underlying clip
in another application, potentially on another server that shares the same
storage. The purge interval is the period between the start of recording and
the start of the media purge.
You are notified if there is not enough disk space to support recording for this
time interval. If so, the application allows the record to start on the
assumption that you will make sufficient room manually. If the server runs
out of storage, recording stops.
16
To set the time interval for purging, do the following:
K2 TimeDelay User Manual 7 November 2013
Page 17

Using K2 TimeDelay clip in another application
1. Click the Settings button or select Settings menu item from the Menu to
open the TimeDelay Settings dialog box.
2. Select the Buffer page.
3. Check the Start purging after check box and enter a time interval. If the
specified time interval is shorter than the longest playback delay, then
purging does not begin until after the longest playback delay.
4. Click OK to close the TimeDelay Settings dialog box.
Using K2 TimeDelay clip in another application
The clip recorded by K2 TimeDelay can be used in other applications, in a
similar manner to any other clip on the system. For example, you can load it
into the Player application and play it or create subclips from it.
NOTE: When the purge interval is reached, the oldest media is purged. The first
frames will be deleted as the session continues along. For more information on
purging media, see
“Purging media with K2 TimeDelay,” on page 16.
7 November 2013 K2 TimeDelay User Manual
17
Page 18

18
K2 TimeDelay User Manual 7 November 2013
Page 19

Appendix
A
Trademarks and Agreements
This section contains the following topics:
• “Trademarks”
• “JPEG acknowledgement”
7 November 2013 K2 TimeDelay User Manual
17
Page 20

Appendix A Trademarks and Agreements
Trademarks
Grass Valley, STRATUS, K2, Aurora, Summit, ChannelFlex, Dyno, Solo,
ClipStore, Infinity, Turbo, Profile, Profile XP, NetCentral, NewsBrowse,
NewsEdit, NewsQ, NewsShare, NewsQ Pro, and Media Manager are either
registered trademarks or trademarks of Grass Valley USA, LLC. in the United
States and/or other countries. Grass Valley USA, LLC. products are covered
by U.S. and foreign patents, issued and pending. Additional information
regarding Grass Valley USA, LLC. trademarks and other proprietary rights
may be found at www.grassvalley.com. Other trademarks and logos used in
this document are either registered trademarks or trademarks of the
manufacturers or vendors of the associated products, such as Microsoft®
Windows® operating system, Windows Media® player, Internet Explorer®
internet browser, and SQL Server™. QuickTime and the QuickTime logo are
trademarks or registered trademarks of Apple Computer, Inc., used under
license therefrom.
JPEG acknowledgement
This software is based in part on the work of the Independent JPEG Group.
18
K2 TimeDelay User Manual 7 November 2013
Page 21

Index
A
AppCenter
keyboard shortcuts
appcenter, lock/unlock
audio levels, changing
auto start
autorecovery
11
16
18
15
12
B
buffer 11
C
channel 11
channel buttons
channel status
clip, using in other applications
12
9
D
delay
maximum allowed
minimum playback
disruption of TimeDelay session
documentation online
15
15
4
E
error messages 12
F
FAQ dat abase 4
frequently asked questions
4
G
Grass Valley web site 4
17
16
P
playback
adjusting
maximum allowed delay
minimum delay
properties
purging media
15
15
9
16
R
restarting automatically 16
S
settings 10, 11
shortcuts, keyboard
software download from web
starting TimeDelay
automatically
manually
status bar messages
Stop All/Start
stopping TimeDelay
14
18
14
12
9
14
T
timecode source, modifying 14
TimeDelay overview
7
U
Using K2 TimeDelay 13
W
web site documentation 4
web site FAQ database
web site Grass Valley
web site software download
4
4
4
15
4
K
keyboard shortcuts 17, 18
M
menu 9
O
online documentation 4
7 November 2013 K2 TimeDelay User Manual
19
Page 22

Index
20
K2 TimeDelay User Manual 7 November 2013
 Loading...