

GRASS VALLEY K2 7.3.8 - RELEASE NOTES AND, K2 Summit Production Client, K2 Solo Media Server, K2 Summit SAN Quick Start Manual
Page 1

Documentation path to install
071-8781-00
K2 Summit Production Client,
K2 Solo Media Server, and
K2 Summit SAN
Version 7.3.8
Release Notes & Upgrade Instructions
These release notes contain the most recent information and supersede previous
publications, as of 23 November 2010. Check the Grass Valley website at
www.grassvalley.com/docs for an updated version that contains additional important
information.
These release notes contain information for the following:
• K2 Summit models with internal storage
•
K2 Summit models with direct-connect storage
• K2 Solo Media Server
• The K2 Storage Area Network (SAN) with connected shared storage K2 Summit
Production Clients
K2 system with internal storage
Release
Notes
Documentation path to install
Copyright © Grass Valley, Inc. All rights reserved. Printed in the United States of America. Portions of software © 2000 – 2010, Microsoft Corporation. All rights reserved. This
document may not be copied in whole or in part, or otherwise reproduced except as specifically permitted under U.S. copyright law, without the prior written consent of Grass
Valley, Inc., P.O. Box 59900, Nevada City, California 95959-7900. This product may be covered by one or more U.S. and foreign patents.
Product options and specifications subject to change without notice. The information in this manual is furnished for informational use only, is subject to change without notice,
and should not be construed as a commitment by Grass Valley, Inc. Grass Valley, Inc. assumes no responsibility or liability for any errors or inaccuracies that may appear in
this publication.
Grass Valley, K2, Aurora, Summit, Dyno, Solo, Infinity, Turbo, Profile, Profile XP, NetCentral, NewsBrowse, NewsEdit, NewsQ, NewsShare, NewsQ Pro, and Media Manager
are either registered trademarks or trademarks of Grass Valley, Inc. in the United States and/or other countries. Grass Valley, Inc. products are covered by U.S. and foreign
patents, issued and pending. Additional information regarding Grass Valley, Inc. trademarks and other proprietary rights may be found at www.grassvalley.com. Other
trademarks and logos used in this document are either registered trademarks or trademarks of the manufacturers or vendors of the associated products, such as Microsoft®
Windows® operating system, Windows Media® player, Internet Explorer® internet browser, and SQL Server™. QuickTime and the QuickTime logo are trademarks or
registered trademarks of Apple Computer, Inc., used under license therefrom.
K2 client with shared or direct-connect storage
Release
Notes
*Cabling Guide packed with RAID primary chassis
Quick Start
Guide
Grass Valley
K2
flxxxxx
xxxxxxxxxxxxxx
flxxxxx
*Cabling
Guide
flxxxxx
SAN Manual
(shared storage)
System
Guide
System
Guide
Quick Start
Guide
Page 2

Contents
Grass Valley Product Support......................................................................................................................5
Release Summary........................................................................................................................................7
What's new in version 7.3.8......................................................................................................................7
Not supported in this release....................................................................................................................9
Changes and features in previous releases..............................................................................................9
Additional notes..........................................................................................................................................13
Using reference files...............................................................................................................................13
About QuickTime reference files.........................................................................................................13
About MXF reference files...................................................................................................................13
Configuring reference file type on a stand-alone K2 system...............................................................13
Configuring reference file type on a K2 SAN system..........................................................................14
Using the Export capture service............................................................................................................14
About the Export capture service........................................................................................................14
Prerequisites for using the Export capture service.............................................................................15
Considerations for using the Export capture service...........................................................................15
Configuring the Export Capture Service.............................................................................................15
Testing the Export Capture Service....................................................................................................18
Export capture service components....................................................................................................18
MXF interchange specification................................................................................................................18
MXF export behavior on K2 systems..................................................................................................19
QuickTime interchange specification......................................................................................................19
QuickTime video and key import specification....................................................................................20
P2 interchange specification...................................................................................................................21
About introducing ChannelFlex Suite on existing K2 systems................................................................22
Codec option matrix................................................................................................................................23
Managing the write filter..........................................................................................................................23
Passwords and security on K2 systems.................................................................................................25
About application security on the K2 SAN..........................................................................................26
Upgrading firmware on HP switch...........................................................................................................27
Configuring QOS on the GigE switch.....................................................................................................28
Operation considerations...........................................................................................................................30
Version compatibility...................................................................................................................................31
Compatible K2 Summit/Solo components..............................................................................................31
Compatible K2 Media Server components.............................................................................................33
Compatible K2 Control Point PC components........................................................................................33
Compatible HP ProCurve GigE switch components...............................................................................34
Compatible K2 RAID components..........................................................................................................35
Compatible K2 RAID disk drive firmware................................................................................................36
Compatible Grass Valley products..........................................................................................................39
Compatible third party products..............................................................................................................41
Compatible recovery applications...........................................................................................................41
Upgrading K2 systems...............................................................................................................................42
Upgrading a K2 SAN..............................................................................................................................42
About upgrading the K2 SAN with SiteConfig.....................................................................................42
Make recovery images........................................................................................................................43
Prepare SiteConfig for software deployment to K2 SAN devices........................................................43
Deploy control point PC software........................................................................................................44
Take SAN clients offline......................................................................................................................45
Manage multiple K2 Media Servers....................................................................................................45
23 November 2010 K2 Version 7.3.8 Release Notes & Upgrade Instructions 2
Page 3

Upgrade K2 Media Server...................................................................................................................46
Verify/upgrade switch firmware...........................................................................................................54
Upgrade RAID controller microcode...................................................................................................55
Upgrade RAID disk drive firmware......................................................................................................55
Reset Capture Services......................................................................................................................56
Manage redundancy on K2 Media Servers.........................................................................................57
Upgrade remaining K2 Media Servers................................................................................................58
Upgrade K2 client................................................................................................................................58
Upgrade Aurora Edit, Ingest, and Playout systems.............................................................................63
Upgrade NAS systems........................................................................................................................63
Upgrade Browse and MediaFrame systems.......................................................................................64
Upgrade other SAN clients..................................................................................................................64
Make recovery images........................................................................................................................64
Upgrading stand-alone K2 systems with SiteConfig...............................................................................64
About upgrading stand-alone K2 systems with SiteConfig.................................................................65
Make recovery images........................................................................................................................65
Prepare for K2 system upgrade..........................................................................................................66
Upgrade QuickTime............................................................................................................................66
Configure SNFS default.cfg file on stand-alone K2 system................................................................66
Prepare SiteConfig for software deployment to stand-alone K2 systems...........................................67
Check all currently installed software on stand-alone K2 systems......................................................68
Add software package to deployment group for stand-alone K2 systems...........................................68
Unlock K2 Summit Production Clients or K2 Solo Media Servers......................................................69
Upgrade software on stand-alone K2 systems....................................................................................69
Power cycle K2 system.......................................................................................................................71
Install required Windows update.........................................................................................................72
Upgrade LSI RAID controller driver.....................................................................................................73
Upgrade MegaRAID Storage Manager...............................................................................................73
Upgrade RAID Controller microcode on stand-alone K2 system........................................................74
Upgrade disk drive firmware on stand-alone K2 system.....................................................................76
Configure RTIO...................................................................................................................................77
Reset Capture Services......................................................................................................................78
Upgrade K2 Dyno Server software......................................................................................................79
Lock K2 Summit Production Clients....................................................................................................80
Upgrade K2 Dyno Controller...............................................................................................................81
Install MPEG-2/AVC-Intra field kit.......................................................................................................82
Make recovery images........................................................................................................................82
Deploy control point PC software........................................................................................................82
Upgrading stand-alone K2 systems without SiteConfig..........................................................................83
Make recovery images........................................................................................................................83
Prepare for K2 system upgrade..........................................................................................................83
Disable write filter................................................................................................................................84
Upgrade QuickTime............................................................................................................................84
Configure SNFS default.cfg file on stand-alone K2 system................................................................84
Uninstall K2 software from stand-alone K2 system.............................................................................85
Uninstall SNFS from K2 client.............................................................................................................86
Install K2 software...............................................................................................................................86
Install SNFS on stand-alone K2 system..............................................................................................89
Verify upgraded software.....................................................................................................................89
Install required Windows update.........................................................................................................90
Upgrade LSI RAID controller driver.....................................................................................................90
Upgrade MegaRAID Storage Manager...............................................................................................91
Upgrade RAID Controller microcode on stand-alone K2 system........................................................92
Upgrade disk drive firmware on stand-alone K2 system.....................................................................93
23 November 2010 K2 Version 7.3.8 Release Notes & Upgrade Instructions 3
Page 4

Configure RTIO...................................................................................................................................95
Reset Capture Services......................................................................................................................96
Upgrade K2 Dyno Server software......................................................................................................97
Upgrade remaining stand-alone K2 systems......................................................................................98
Enable write filter.................................................................................................................................99
Upgrade K2 Dyno Controller...............................................................................................................99
Install MPEG-2/AVC-Intra field kit.....................................................................................................100
Make recovery images......................................................................................................................101
Licensing K2 products..........................................................................................................................101
K2 licenses........................................................................................................................................101
About K2 system software licensing.................................................................................................102
Requesting a license.........................................................................................................................102
Adding a license................................................................................................................................104
Deleting licenses...............................................................................................................................104
Archiving licenses.............................................................................................................................105
Known Problems......................................................................................................................................106
4 K2 Version 7.3.8 Release Notes & Upgrade Instructions 23 November 2010
Page 5

Grass Valley Product Support
To get technical assistance, check on the status of a question, or to report a new issue, contact Grass
Valley Product Support via e-mail, the Web, or by phone or fax.
Web Technical Support
To access support information on the Web, visit the product support Web page on the Grass Valley
Web site. You can download software or find solutions to problems.
World Wide Web: http://www.grassvalley.com/support/
Technical Support E-mail Address: gvgtechsupport@grassvalley.com
Grass Valley Knowledge Base: http://grassvalley.novosolutions.net/
In the Knowledge Base you can search by topic, search by product, or browse the Table of Contents
to find Frequently Asked Questions (FAQ).
Telephone Support
Use the following information to contact Product Support by phone.
International Support Centers
Our international support centers are available 24 hours a day, 7 days a week.
Authorized Local Support Representative
A local support representative may be available in your country. To locate a support center during
normal local business hours, refer to the following list. This list is regularly updated on the website
for Grass Valley Product Support
(http://www.grassvalley.com/support/contact/phone/)
After–hours local phone support is also available for warranty and contract customers.
In countryToll freeSupport Center
+33 1 48 25 20 20+800 80 80 20 20France
+1 530 478 4148+1 800 547 8949United States
TelephoneCountryRegion
+86 10 5883 7575ChinaAsia
23 November 2010 K2 Version 7.3.8 Release Notes & Upgrade Instructions 5
+852 2531 3058Hong Kong, Taiwan, Korea,
Macau
+81 3 6848 5561Japan
+603 7492 3303Southeast Asia - Malaysia
+65 6379 1313Southeast Asia - Singapore
Page 6

Grass Valley Product Support
TelephoneCountryRegion
+91 22 676 10324India
1 300 721 495AustraliaPacific
0800 846 676New Zealand
+61 3 8540 3650For callers outside Australia or
New Zealand
+55 11 5509 3440AllCentral America, South America
North America
North America, Mexico,
Caribbean
France
Eastern Europe
Ukraine, Uzbekistan
Near East and Africa
+1 800 547 8949;
+1 530 478 4148
+44 1189 230 499UK, Ireland, IsraelEurope
+31 (0) 35 62 38 421Benelux – Netherlands
+32 (0) 2 334 90 30Benelux – Belgium
+800 80 80 20 20;
+33 1 48 25 20 20
+49 6150 104 444Germany, Austria,
+7 495 258 09 20Belarus, Russia, Tadzhikistan,
+45 404 72 237Northern Europe
+39 06 87 20 35 28Southern Europe – Italy
+34 91 512 03 50Southern Europe – Spain
+971 4 299 64 40Middle EastMiddle East, Near East, Africa
+800 80 80 20 20;
+33 1 48 25 20 20
6 K2 Version 7.3.8 Release Notes & Upgrade Instructions 23 November 2010
Page 7

Release Summary
What's new in version 7.3.8
The following features are available with the initial software release:
• Licensing for K2 system software — When upgrading, version 7.3.8 K2 system software installs
with a 30 day trial license. You must obtain a permanent license from Grass Valley. Version
7.3.8 is a free upgrade for anyone under a service contract or SLA. Customers with previous
versions who are outside the 1 year warranty can purchase an upgrade. When upgrading to version
7.3.8, make sure that you carefully follow the upgrade and licensing procedures later in these
release notes, so that licensing features are correctly installed.
• HotBin Export – Automatically export K2 clips in any format that the K2 system supports. The
feature requires the K2-HotBinExportService license. Refer to About the Export capture service
on page 14.
• P2 Export – AppCenter export supports P2 format.
• QuickTime Video+Key Import – Import QuickTime files with an alpha video channel encoded
using the Apple Animation codec for Video+Key (key-fill) clips. This feature requires the
AppCenterElite license. Refer to QuickTime video and key import specification on page 20.
• MXF reference files — When you create a simple K2 clip on a K2 system, K2 software can
create a corresponding reference file. The reference file is stored in a directory in the clip's folder
on the V: drive. You can configure the software to create QuickTime reference files, MXF
reference files, or no reference files. Refer to About MXF reference files on page 13.
• MXF and QuickTime export of complex movies – Complex movies are flattened during MXF
and QuickTime streaming export, as these formats do not directly support complex movies. MXF
interchange specification on page 18.
• Storage Utility features — Clean Unreferenced Files and Clean Unreferenced Movies are now
supported.
• Continuous record export — You can export a completed continuous (loop) record clip as
MXF or QuickTime, with the result being a flattened stream file. Recording must be complete
before you export the clip, however you can make sub-clips while record is underway and export
the sub-clips. For this feature, MPEG-2 long GoP is not supported.
• More robust performance — Improved recovery from interrupted video inputs.
• Turbo iDDR — Compatibility with Turbo iDDR no longer supported.
• K2 SAN Quality of Service (QOS) — A third level of QOS is available for better management
of generic iSCSI clients, such as editing workstations. Refer to the K2 SAN Installation and
Service Manual.
• SNFS file system — Upgrade to version 3.5.2.1b15620 is required. This version supports 64-bit
systems.
• K2 Dyno PA DLC tool — A DLC (Distributed LAN Client) tool streamlines the configuration
of a stand-alone K2 Summit system with the K2 Dyno PA application. For more information,
see the K2 Dyno PA documentation.
23 November 2010 K2 Version 7.3.8 Release Notes & Upgrade Instructions 7
Page 8

Release Summary
The following hardware components and systems are available at some time after the initial software
release:
• K2 10G SAN systems with K2 10G RAID storage — A new storage infrastructure for SAN
systems provides increased bandwidth. Devices include the following:
• K2 10G RAID storage (NEC Condor) with 8 Gig (D4) controllers
• K2 Media Server (Dell 610) with 10 Gig iSCSI interface adapter (TOE) and SFP+ connection
• 2910 HP Switch with 10 Gig SFP+ connections
Features include the following:
• 10 Gig iSCSI connection between K2 Media Server and Ethernet switch.
• 8 Gig Fibre Channel connection for SAN between K2 Media Server and K2 10G RAID
storage.
• K2 Media Servers are 64-bit Windows Server 2008 operating system.
• Licensing of a single K2 Media Server provides multiple bandwidth levels without requiring
additional iSCSI interface adapters and K2 Media Servers. This leads to an overall system
simplification.
• K2 10G RAID for K2 client direct-connect — Provides 8 Gig Fibre Channel connection for
direct-connect between K2 client and K2 10G RAID storage.
• K2 Summit Transmission models — New SD and HD/SD models provide high value for
transmission and play-to-air solutions. All models support agile playback of DV/DCVPRO,
MPEG-2, SD and HD at bit rates up to 50Mbps. Channels for MPEG-2 record at up to 50Mbps
vary by model. Both SAN and stand-alone models are available. Stand-alone models offer 4 TB
and 16 TB storage.
In addition to these release notes, the following documentation is available for existing and new
systems with this version 7.3.8 release of software:
• K2 Documentation CD 063-8289-05 has been revised for use with this release of software.
• K2 Lx0 RAID Instruction Manual 071-8614-01. This manual has not been revised. Use this
manual for K2 Level 10-40 RAID storage (NEC Condor with 4 Gig D1 and D3 controllers).
• K2 10G RAID Instruction Manual 071-8778-00. This manual has been revised. Use this manual
for the new K2 10G RAID storage (NEC Condor with 8 Gig D4 controllers).
• K2 Storage Area Network Installation and Service Manual 071-8724-01. This manual has not
been revised. Use this manual for K2 Level 10-40 SAN systems (1 Gig TOEs and 4 Gig
controllers).
• K2 Storage Area Network Installation and Service Manual 071-8779-00. This manual has been
revised. Use this manual for K2 10G SAN systems (10 Gig TOEs and 8 gig controllers).
• K2 Storage Cabling Guide 071-8713-01. This manual has not been revised. Use this manual for
K2 Level 10-40 SAN systems (1 Gig TOEs and 4 Gig controllers) and K2 client direct-connect
storage with K2 Level 10-30 RAID storage (4 Gig controllers).
• K2 Storage Cabling Guide 071-8780-00. This manual has been revised. Use this manual for K2
10G SAN systems (10 Gig TOEs and 8 gig controllers) and K2 client direct-connect storage
with K2 10G RAID storage (8 gig controllers).
• Fibre Channel Switch Installation Manual 071-8713-02. This manual has been revised.
• K2 Summit/Solo Field Kit Upgrade Instructions 071-8721-01. This document has been revised.
Use it for all field kit upgrades.
• K2 AppCenter User Manual 071-8723-01, K2 System Guide 071-8726-01, Quickstart Guides,
and Service Manuals have not been revised. Use these manuals with this release of software,
with new features/changes as documented in these release notes.
8 K2 Version 7.3.8 Release Notes & Upgrade Instructions 23 November 2010
Page 9

Not supported in this release
The following devices and functionality are not supported with 7.x versions of K2 software. Check
with your Grass Valley representative regarding availability.
• K2 Media Client — Compatible with 3.x versions of K2 software only.
Changes and features in previous releases
The following sections describe changes and features in past releases.
Version 7.2.7
• ChannelFlex Suite — Multiple inputs and outputs per channel are enabled by the AppCenter
Elite license. This license must be ordered from Grass Valley. The license is not included with
this version of software as a 30 day trial license. Refer to About introducing ChannelFlex Suite
on existing K2 systems on page 22 for more information. ChannelFlex Suite features are
summarized as follows:
Release Summary
• Super Slo-Mo — 2x and 3x frame rate record. Also requires HD license.
• Multi-Cam — Two SDI video inputs on a single channel.
• Video + Key — Record and playback.
• 3D — Left + Right eye. Record and playback.
• Super Out — This feature is enhanced with the display of additional information. Requires
AppCenter Pro license.
• K2 Summit Transmission Package — This model has 1 TB drives and is limited to DV and
MPEG formats at maximum 50 Mbps. Also limited to 1-IN/3-OUT or 4-OUT channel
configurations. Refer to the K2 System Guide for more information.
• K2 Dyno Replay Controller — The 1.6 Dyno software version is compatible with this release
of K2 software. Refer to compatibility information later in these release notes.
• AVC-Intra on K2 Solo Media Server — AVC-Intra 50/100 record/play is available on a K2
Solo Media Server as the K2-SOLO-ELITE model or as a field-kit upgrade.
• QuickTime AVC-Intra import — K2 storage supports import of QuickTime AVC-Intra. This
completes the AVC-Intra workflow, as export of QuickTime AVC-Intra is already supported.
• Nearline K2 SAN — The Nearline 120 redundant (NL120R) K2 SAN replaces the Nearline 10
and Nearline 10R K2 SAN. If using the K2 Storage Cabling Guide to cable the NL120R SAN,
the instructions for Nearline 10R apply.
• SNFS file system — Upgrade to version 3.5.2 is required.
• Compact Flash — The internal storage K2 system now supports multiple varieties of Compact
Flash for the system drive. To accommodate these varieties, when you re-image you must resize
partitions. Refer to your K2 product's Service Manual for instructions.
• K2 Dyno Production Assistant support — K2 Dyno PA can transfer a file from a stand-alone
K2 system to an Apple Xsan. The file can be edited while streaming. Also, on new systems and
if you make a new file system on existing systems, unique disk labels are created, which is
required for control by K2 Dyno PA. The disk labels and the file system name must be unique.
23 November 2010 K2 Version 7.3.8 Release Notes & Upgrade Instructions 9
Page 10

Release Summary
Version 7.1.14
• Documentation – In addition to these release notes, use K2 Documentation CD 063-8289-04
April 2010 with this release of K2 software. The following manuals are revised:
• K2 Solo Media Server Service Manual 071-8709-01
• K2 Solo Media Server Quick Start Guide 071-8710-01
• K2 Storage Cabling Guide 071-8713-01
• K2 AppCenter User Manual 071-8723-01
• K2 Storage Area Network Installation and Service Manual 071-8724-01
• K2 Summit Client Service Manual 071-8725-01
• K2 System Guide 071-8726-01
• K2 Summit Client Quick Start Guide 071-8722-01
• AVC-Intra — AVC-Intra 50/100 record/play is available as an option or as a field-kit upgrade.
Requires HD license.
• P2 Import Capture Service — P2 material can be imported to K2 storage.
• QuickTime MPEG export/stream — The K2 system can export MPEG formats and stream
MPEG Long GoP.
• GPI — The commands Take Next Event, and Take Next Scheduled Event are supported.
• 4 GB USB Recovery Drive — A larger capacity recovery drive is available to ship on new
systems sometime after this release.
• K2 Summit drives — A new family of drives for K2 Summit Production Client internal storage
is available, with 600 GB and 450 GB capacities. 300 GB drives are no longer available.
• K2 Summit/Solo drive firmware — New systems have new drive firmware versions. If you
are upgrading an existing system, you must upgrade to the new version. Refer to compatibility
information later in these release notes.
• External storage drives — The Cheetah 7 family of drives for direct-connect and SAN storage
is available, with 600 GB, 450 GB, and 300 GB capacities. Larger drive capacities require
multiple LUNs per rank. For systems with multiple LUNs per RANK, expansion by bandwidth
is supported. Expansion by capacity is not supported.
• K2 Dyno Replay Controller — The 1.5 Dyno software version is compatible with this release
of K2 software. Refer to compatibility information later in these release notes.
• Event Scheduler — When licensed for Event Scheduler, the Event Monitor application is
available. This application is a monitor-only application that displays the list of events scheduled
in Event Server for a channel. The events must be scheduled by an application developed by a
third party application developer. There is Start menu item and desktop icon for licensing Event
Scheduler. Do not attempt to license Event Scheduler unless instructed to do so by Grass Valley
or your application developer.
• Documentation – In addition to these release notes, use either of following with this release of
K2 software:
• K2 Documentation CD – 063-8289-02 – November 2009
• K2 Documentation CD – 063-8289-03 – February 2010
Both CDs contain the same set of K2 Summit/SAN manuals that document this release of K2
software. K2 Documentation CD 063-8289-03 additionally provides a manual set for the 1.5
release of K2 Dyno software.
10 K2 Version 7.3.8 Release Notes & Upgrade Instructions 23 November 2010
Page 11

Version 7.1.9
• MPEG-2 play — MPEG-2 Playback is a standard feature on all models, relative to current
licensing. MPEG-2 SD Playback is standard with or without the HD license. MPEG-2 HD
Playback is available only on systems that are licensed for HD.
• MPEG-2 record — MPEG-2 recording is a standard feature on MPEG models or as a field-kit
upgrade, relative to current licensing. MPEG-2 SD recording is standard with or without the HD
license. MPEG-2 HD recording is available only on systems that are licensed for HD.
• Solid State Disks — Solid State Disks (SSD) available.
• Super out — Timecode burn-in on monitor output. This is an AppCenter Pro feature.
• AFD support — Active Format Description (AFD) is supported for control of aspect ratio.
• Ancillary data — Support for SD ancillary data, including SD/HD data bridging.
• Capture services — The K2 Pathfire capture service and the K2 DG capture service are supported.
• Security — Based on Windows user accounts and groups, you can set permissions on bins and
on channels.
• SNFS — Upgrade to SNFS version 3.5.1 is required. With this version there is a change to SNFS
services, as displayed in the Service control panel. Also, on new systems and if you make a new
file system on existing systems, the name that Storage Utility creates for the SNFS volume (the
V: drive) is gvfs_hostname, where hostname is the name of the primary SNFS file system server.
• QuickTime update — Upgrade to QuickTime version 7.6 or higher is required.
• Licensing for K2 system software — When upgrading, version 7.1.9 K2 system software installs
with a 30 day trial license. You must obtain a permanent license from Grass Valley. When
upgrading to version 7.1.9, make sure that you carefully follow the upgrade and licensing
procedures later in these release notes, so that licensing features are correctly installed.
• 2910al series switch — A new Gigabit Ethernet switch, the “ProCurve Networking Switch
2910al Series” is qualified for use with K2 Storage Systems. Its use and configuration are the
same as the existing 2900 series switch, as documented in the K2 Storage Area Network
Installation and Service Manual.
• K2 Coder — The K2 Coder is supported on the K2 SAN. The K2 Coder compatible with this
version of K2 software does not have watch folders pre-configured, so you must create them
yourself, as documented in the K2 Storage Area Network Installation and Service Manual.
• Preroll setting — For mixed compression format playout (DV/MPEG/AVC-Intra), the preroll
is increased to 1 second. For same compression format playout, preroll remains at 10 frames.
This applies to AMP protocol, VDCP protocol, and Harris settings Disk Prerolls, Frames to send
Play early, and Frames to send Record early. These specifications supersede those in the K2
System Guide part number 071-8726-00.
Release Summary
Version 7.0.13
• K2 Media Servers — Dell PowerEdge R710 and R610 are supported as K2 Media Server
platforms.
• Live Production option — In K2Config, you can now create a Live Production K2 SAN. This
type of SAN has a shorter minimum delay between start record and start playout when the record
and play are on different SAN K2 Summit Production Clients. To support this feature, the K2
SAN must be sized for increased bandwidth. Contact your Grass Valley representative for
specifications relative to your needs.
23 November 2010 K2 Version 7.3.8 Release Notes & Upgrade Instructions 11
Page 12

Release Summary
Version 7.0.12
Version 7.0.11
• K2 Dyno Reply Controller — For live event replay, the K2 Dyno Replay System includes a
K2 Dyno Controller and a K2 Summit Product Client.
• Final Cut Pro support — K2 FCP Connect is a licensable feature that allows your Macintosh
Final Cut Pro system to become a K2 SAN iSCSI client. This enables edit in place functionality
for K2 media via QuickTime reference files. Supports DV, IMX, HD, and XDCAM formats.
• K2 Summit Production Client — This new product is a SD/HD K2 client for replay in sports,
news, live, and live-to-tape applications. Its features are similar to the current K2 Media Client.
• Live Play — Extremely fast record-to-playout performance. Also known as Chase Play.
Playout to within ½ second of record point.
• DV formats — Supports the DV25, DV50, and DV100 (DVCPROHD) P2 acquisition formats
natively. Does not support MPEG.
• Transition effects — Dissolves and audio fades can be assigned to clip playout transitions.
This is an AppCenter Pro feature.
• Graphical User Interface design — AppCenter has a gray/brown color scheme with improved
buttons and fonts.
• Media file system — The file system with this release allows nested bins for better media
management and is supported on the K2 Summit Production Client only. It is not supported
on the K2 Media Client.
• Write filter — A file-based write filter prevents accidental or unintended changes. It must
be disabled before changes are made and enabled after changes are made.
• Metadata server role — The role of metadata server replaces the role of media database
server for a K2 Media Server. The metadata server role is required to support the media file
system with this release.
• AppCenter Video Monitor — Active video is provided on a locally connected VGA monitor
for AppCenter channels. You can also select the AppCenter view to display a four pane active
video monitor of all four channels. This is an AppCenter Pro feature.
• Modular channels — Codec and real-time functionality is combined on a two channel
module, allowing for two and four channel options.
• CompactFlash — The system drive is CompactFlash.
12 K2 Version 7.3.8 Release Notes & Upgrade Instructions 23 November 2010
Page 13

Additional notes
The following sections contain additional information about this release.
Using reference files
When you create a simple K2 clip on a K2 system, K2 software can create a corresponding reference
file. The reference file is stored in a directory in the clip's folder on the V: drive. You can configure
the software to create QuickTime reference files, MXF reference files, or no reference files. The
following topics provide information about reference files on K2 systems.
About QuickTime reference files
For QuickTime reference files, the K2 clip must be a DV, AVC-Intra, XDCAM-EX, XDCAM-HD,
XDCAM-HD 422, or IMX format simple clip in order to create the reference file. With the QuickTime
reference file you can open the K2 clip with QuickTime tools, such as Final Cut Pro, for playback
and editing. The QuickTime tool must be run on another system. Running the QuickTime player or
other QuickTime tools on the K2 system is not supported. You have options for connections, access,
and software to support your workflow requirements.
About MXF reference files
For MXF reference files, the K2 clip can be any supported format simple clip. K2 software creates
the MXF reference file when you create a new simple clip by recording, importing, or copying. K2
software does not create the MXF reference file when you create a playlist, a program with
continuous-recorded material, or a clip with tracks having a duration less than the clip duration. The
reference file is a MXF OP1b file with external essence. The reference file gives you options for
connections, access, and software to support your workflow requirements.
Configuring reference file type on a stand-alone K2 system
1. In AppCenter, click File | System | Configuration.
Configuration Manager opens.
2. In Configuration Manager, click the System tab.
3. In Reference Files settings, for the Reference file type setting, select one of the following:
• None — K2 software does not create reference files.
• QuickTime — K2 software creates QuickTime reference files.
• MXF — K2 software creates MXF reference files.
4. Click OK to apply the setting.
5. Restart the stand-alone K2 system to put the change into effect.
23 November 2010 K2 Version 7.3.8 Release Notes & Upgrade Instructions 13
Page 14

Additional notes
Configuring reference file type on a K2 SAN system
1. In the K2Config application, for the K2 Media Server with role of file system server, access the
File System Server Configuration page as follows:
• On a SAN that is already configured, in the tree view click File System Server.
• On a SAN that is not yet fully configured, work through the Configure K2 Server wizard until
you reach the File System Server Configuration page.
2. On the File System Server Configuration page select one of the following:
• No reference file — K2 software does not create reference files.
• QuickTime reference file — K2 software creates QuickTime reference files.
• MXF reference file — K2 software creates MXF reference files.
3. Click Check to apply the setting.
4. Manage the required K2 Media Server restart as follows:
• On a SAN that is already configured, you must restart the K2 Media Server to put the change
into effect. Follow the restart procedure appropriate for the basic or redundant K2 SAN.
• On a SAN that is not yet fully configured, continue to work through the Configure K2 Server
wizard. The restart at the end of the configuration process is sufficient.
If a redundant K2 SAN, you must configure similarly and restart both K2 Media Servers with role
of file system server.
Using the Export capture service
The following topics provide information for the Export capture service.
About the Export capture service
The Export capture service provides a way to have media automatically exported from a K2 system.
The capture service has a watched bin. The watched bin is a K2 storage system bin. You place the
media in the bin and it is exported from the K2 system.
You configure the watched bin to export the K2 media as your desired clip format. After you place
the K2 clip in the watched bin, the capture service goes into action and validates the media to make
sure it has the proper structure for the desired file format. If it is valid, the capture service then does
the necessary processing to export the clip to the destination folder.
The Export capture service and its watched bin must be on a K2 system that hosts the K2 FTP
interface, as follows:
• Stand-alone K2 system — When you place a K2 clip in the watched bin, the capture service
exports the clip from the internal storage or direct-connect media storage of the K2 system. The
watched bin must be on the K2 system’s V: drive.
14 K2 Version 7.3.8 Release Notes & Upgrade Instructions 23 November 2010
Page 15

• K2 Media Server with role of FTP server — When you place a K2 clip in the watched bin, the
capture service exports the clip from the shared media storage of the K2 SAN. The watched bin
must be on the K2 Media Server’s V: drive.
Prerequisites for using the Export capture service
Before you can configure and use the Export capture service, the following requirements must be
satisfied:
• The K2 system must support the clip format you plan to export. This could require specific
hardware and/or licenses.
• K2 system software must be at a version that supports the Export capture service. Refer to K2
Release Notes for information on Export capture service version compatibility.
• The capture service must be licensed on the stand-alone K2 system or K2 Media Server. This is
a Grass Valley software license.
Use topics in this section as appropriate to satisfy prerequisites.
Considerations for using the Export capture service
Additional notes
When you are configuring and using the Export capture service, bear in mind the following
considerations:
• You must be logged in with administrator privileges on the stand-alone K2 system or the K2
Media Server as well as having the appropriate security permissions to access the watched folder
or bin.
• If you have multiple source folders (for import) or destination folders (for export) on external
systems, use the same user account for all capture service access to all systems.
• If using the export capture service on a K2 SAN, the K2 Capture Services utility must be on a
K2 Media Server that is also an FTP server. If your K2 SAN has multiple FTP servers, the utility
must be on the primary FTP server.
Configuring the Export Capture Service
1. From the Start menu, access the Programs menu and select Grass Valley | K2 Capture Services.
If the write filter is enabled, a message appears that informs you about the write filter and prompts
you to restart.
2. If the write filter is enabled, restart as prompted, then repeat previous steps.
The K2 Capture Services utility dialog box is displayed.
23 November 2010 K2 Version 7.3.8 Release Notes & Upgrade Instructions 15
Page 16
Additional notes
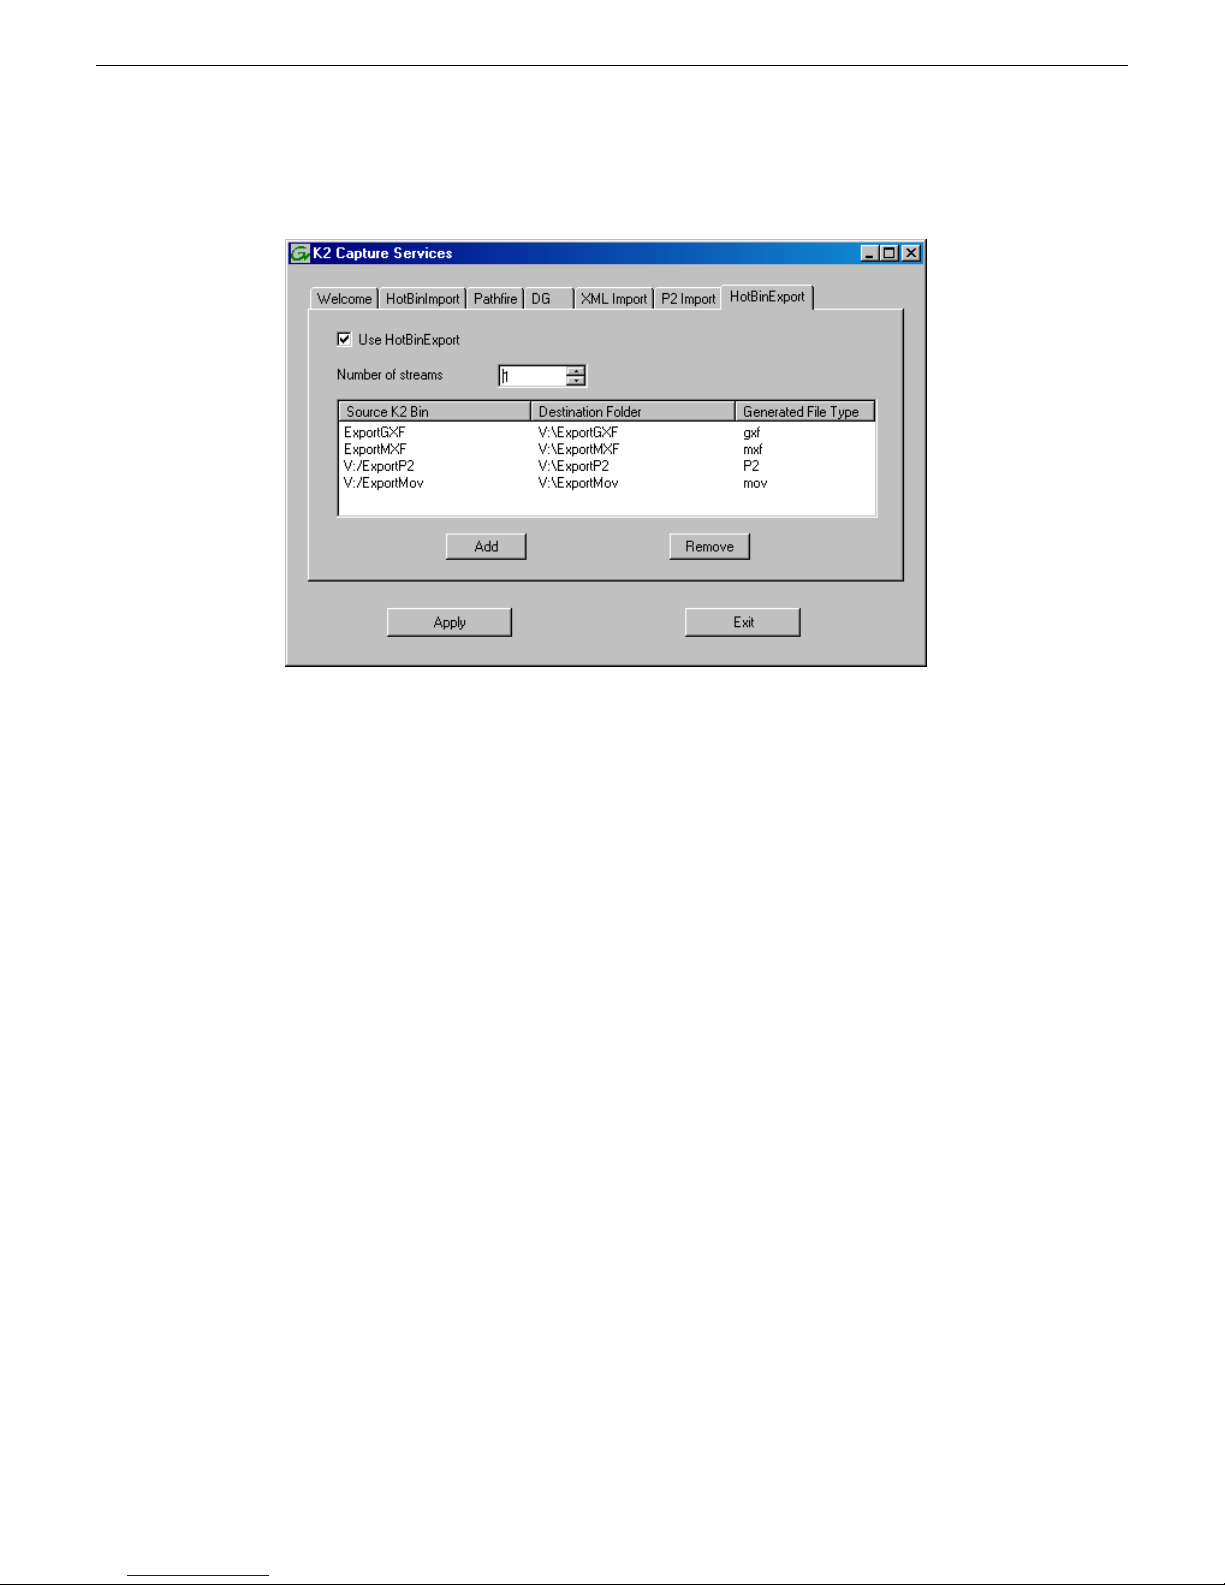
3. Click the HotBin Export tab.
4. Select Use HotBin Export.
If you have not yet licensed the HotBin Export capture service, a “…start the process of getting
a license now?” message appears. Follow on-screen instructions to obtain a license. After licensing,
restart the K2 Capture Services utility and continue with this procedure. Make sure the write
filter is disabled.
5. Select the number of streams.
Exports run serially. If you select one stream, only one export can occur at a time. If you select
multiple streams, multiple exports can occur at one time.
16 K2 Version 7.3.8 Release Notes & Upgrade Instructions 23 November 2010
Page 17
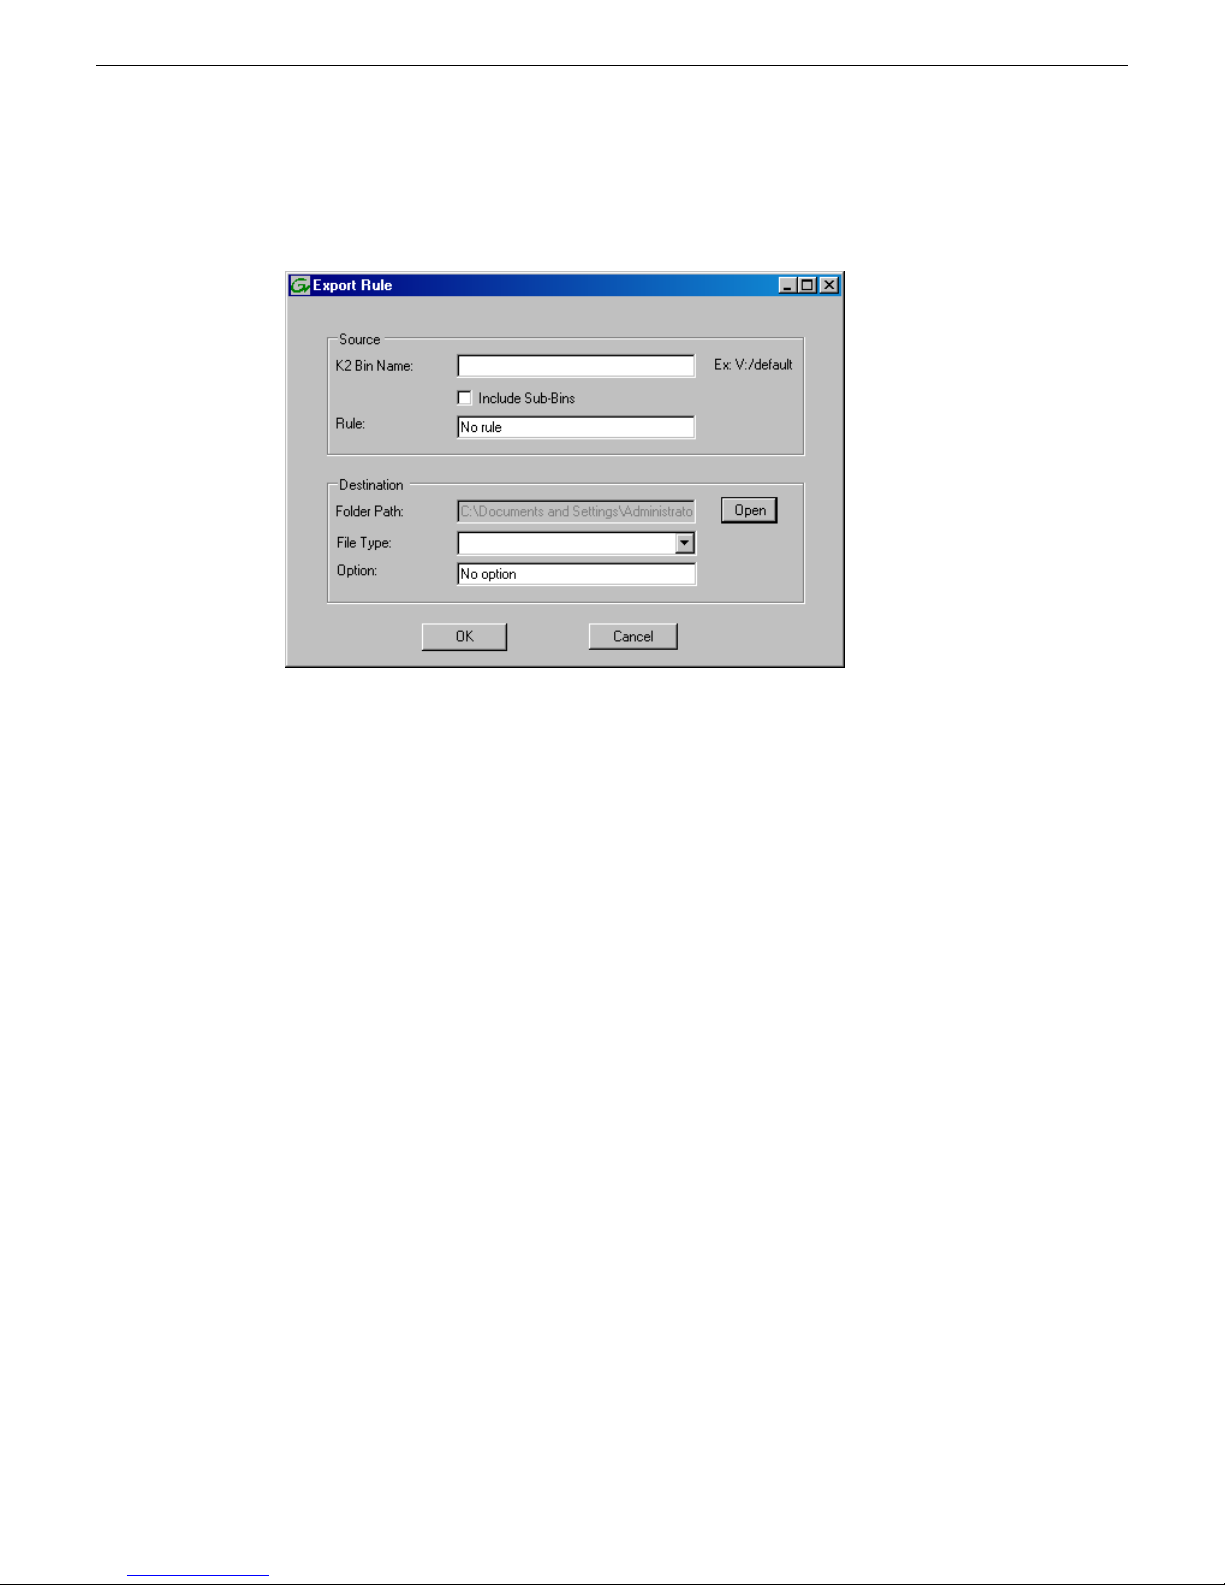
6. Click Add.
The Export Rule dialog box opens.
Additional notes
7. Configure as follows:
• Source K2 Bin Name — Required. This is the watched bin. The bin must be on the K2 system’s
V: drive. It must be in the K2 media database and appears in AppCenter as a media bin. When
valid clips are placed in this bin, the HotBin Export capture service automatically exports the
clips.
• Include Sub-Bins — Optional. When selected, clips are exported if they are in a bin nested
inside the Source K2 Bin.
• Rule — Do not configure this field. Leave the default value as it is.
• Destination Folder Path — Required. This is a standard file system directory. It receives the
files/directories exported by the Export capture service. If you specify a destination folder
that does not yet exist, the K2 system creates it when exporting. If the destination folder is
not on the local K2 system, you are prompted to enter user account credentials to access the
source directory. If part of a domain, enter the domain name.
NOTE: You must use the same user account for all capture service access to all systems.
• File Type — Required. Select the file format in which K2 clips are exported.
• Option — Do not configure this field. Leave the default value as it is.
8. Click OK to save settings and close the Export Rule dialog box.
9. Repeat previous steps to add additional Export HotBins.
10. When your capture service settings are complete, click Apply.
A message appears that informs you about the write filter and prompts you to restart.
11. Click OK.
The K2 system restarts.
23 November 2010 K2 Version 7.3.8 Release Notes & Upgrade Instructions 17
Page 18

Additional notes
Testing the Export Capture Service
Export capture service components
1. Place the clips to export into the watched bin.
2. Verify that the media appears in the destination.
3. Play to verify success.
The following table describes the components that support Export capture service functionality.
DescriptionName
Grass Valley Import Service
Source K2 bin
Destination folder
MXF interchange specification
This specification applies to MXF file transfer, import, and export on K2 Summit, Solo, and SAN
systems.
MXF does not support multiple video tracks, such as 3D/Video + Key.
Formats are supported are as follows:
This is the service that provides the functionality for the capture
service. It is the service that automatically exports K2 clips from
the K2 media storage.
Configures K2 capture services.K2 Capture Services utility
This is the watched bin. It is a bin in K2 media storage. When
files are placed in this directory, the capture service automatically
exports them from K2 media storage.
The folder that receives the files exported from the K2 media
storage.
NotesSupported formats
—DVCPRO25Video
DVCPRO HD
D10
MPEG-2
18 K2 Version 7.3.8 Release Notes & Upgrade Instructions 23 November 2010
—DVCPRO50
Super Slo-Mo requires software version 7.1.
x or higher
—DVCAM
See MXF export behavior for eVTR style
D10AES3.
Includes all MPEG-2 formats (IMX,
XDCAM, etc.) that can be stored on a K2
system
—AVC-Intra
—48 kHzAudio
Page 19

Additional notes
NotesSupported formats
—16 bit, 24 bit
—PCM, Dolby-E, AC-3
VBIData
MXF supports either ancillary data packets
or VBI lines in the data track but not both,
so if ancillary data packets and VBI lines
have been recorded into the K2 clip’s data
track, then the VBI lines will be dropped
from the MXF data track on an MXF export.
—Ancillary
Interchange mechanisms are supported as follows:
SupportMechanism
YesImportFile based
YesExport
YesImportFTP stream
YesExport
You can export a completed continuous (loop) record clip as MXF or QuickTime, with the result
being a flattened stream file. Recording must be complete before you export the clip, however you
can make sub-clips while record is underway and export the sub-clips. For this feature, MPEG-2
long GoP is not supported.
MXF export behavior on K2 systems
Upon MXF export the K2 system checks media for specifications as they apply to industry standard
formats such as XDCAM and eVTR style D10AES3. If specifications match, the media is exported
as the appropriate format.
The K2 system allows you to alter clips so that they no longer match the specifications for the
industry-standard format. For example, you can add audio tracks to exceed the “# of Audio Tracks”
specification. If you alter a clip in this way, on MXF export the K2 system exports the clip but it is
not compatible with the industry-standard format.
QuickTime interchange specification
This specification applies to QuickTime file transfer, import, and export on K2 Summit, Solo, and
SAN systems.
Formats are supported are as follows:
NotesSupported formats
—DVCPRO25Video
—DVCPRO50
23 November 2010 K2 Version 7.3.8 Release Notes & Upgrade Instructions 19
Page 20

Additional notes
NotesSupported formats
DVCPRO HD
Super Slo-Mo requires software version 7.1.
x or higher
—DVCAM
—AVC-Intra
—D10/IMX
—XDCAM-HD
—XDCAM-EX
—XDCAM-HD422
48 kHzAudio
16 bit, 24 bit PCM
Audio tracks handled as stereo pairs on
export
—NoneData
Interchange mechanisms are supported as follows:
SupportMechanism
YesImportFile based
YesExport
NoImportFTP stream
NoExport
You can export a completed continuous (loop) record clip as MXF or QuickTime, with the result
being a flattened stream file. Recording must be complete before you export the clip, however you
can make sub-clips while record is underway and export the sub-clips. For this feature, MPEG-2
long GoP is not supported.
QuickTime video and key import specification
This specification applies to importing a QuickTime file with two video tracks for video and key
playout. This is a licensed feature.
The imported file must be QuickTime 32 with alpha RLE 32-bit raster encoding, as produced by
the Apple Animation Codec.
Supported video formats for import are as follows:
Frame RateScanFormat
29.97Interlaced720 x 480SD video
29.97Interlaced720 x 512
25Interlaced720 x 576
25Progressive720 x 608
20 K2 Version 7.3.8 Release Notes & Upgrade Instructions 23 November 2010
29.97, 25Interlaced1920 x 1080HD video
Page 21

Supported audio formats for import are as follows:
Format
Mono or stereo48 kHzAudio tracks
(if present)
16 bit, 24 bit
PCM
Interchange mechanisms are supported as follows:
SupportMechanism
YesImportFile based
NoExport
NoImportFTP stream
Additional notes
Frame RateScanFormat
59.94, 50Progressive1280 x 720
When K2 software imports a file that meets the above requirements, it creates a K2 clip with two
video tracks, in formats as follows:
HD video
100
100
Audio tracks, if present are imported.
Timecode data is imported as K2 striped timecode. The first timecode value is the starting value
and subsequent timecode is continuous.
The import process consumes system resource. Be aware of this if running other resource intensive
processes during import.
P2 interchange specification
NoExport
Data RateFrame RateFormat
50 CBR29.97720 x 512D10/IMXSD video
50 CBR25720 x 608D10/IMX
100 Mbps29.97, 251920 x 1080AVC-Intra
100 Mbps29.97, 251280 x 720AVC-Intra
This specification applies to P2 file transfer, import, and export on K2 Summit, Solo, and SAN
systems.
Formats are supported are as follows:
23 November 2010 K2 Version 7.3.8 Release Notes & Upgrade Instructions 21
Page 22

Additional notes
NotesSupported formats
Directory structure as specified by P2AVC-IntraVideo
DVCPRO25
DVCPRO50
DVCPRO HD
DVCAM
48 kHzAudio
16 bit, 24 bit PCM
Interchange mechanisms are supported as follows:
SupportMechanism
YesImportFile based
YesExport
NoImportFTP stream
NoExport
About introducing ChannelFlex Suite on existing K2 systems
When you upgrade to a K2 system software version that supports ChannelFlex Suite and then begin
to use ChannelFlex Suite features, you increase the number of inputs and outputs on the K2 system.
To support this increased load on system resources, you must adjust your system, as follows:
• Stand-alone K2 systems – This includes internal storage K2 Summit Production Clients,
direct-connect storage K2 Summit Production Clients, and K2 Solo Media Servers. These system
require an updated RTIO setting. You must update this setting when you upgrade.
• K2 SANs – These system might require additional disks for bandwidth and additional K2 Media
Servers to act as iSCSI bridges (TOEs), depending on the number and type of inputs and outputs
you are adding by your use of ChannelFlex Suite features. Contact your Grass Valley
representative to evaluate your system and its suitability for supporting your use of ChannelFlex
Suite.
22 K2 Version 7.3.8 Release Notes & Upgrade Instructions 23 November 2010
Page 23

Codec option matrix
Standard and optional codec functionality is specified in the following table. You can order codec
functionality on a new system as an option or add it to an existing system as a field kit upgrade.
Codec options
Additional notes
DV
HDSDOption
encode
MPEG card
AVC-Intra card
Product nomenclature for options
Option
With MPEG card
With HD license and MPEG card
K2 Summit Production Client
nomenclature
K2-XPD-4SD-MPG
K2-XPD-4HD-MPG
DV
decode
MPEG
encode
MPEG
decode
XXXXStandard
XXXXXWith HD license
XXXXXWith MPEG card
XXXXXXWith HD license and
K2 Solo Media Server
nomenclature
NAK2-XDP-2SD, K2-XPD -4SDStandard
K2-SOLOK2-XDP-2HD, K2 -XPD-4HDWith HD license
NAK2-XDP-2SD-MPG,
K2- SOLO-MPEGK2-XDP-2HD-MPG,
AVC-I
encode
AVC-I
decode
XXXXXXXWith HD license and
With HD license and AVC-Intra card
Managing the write filter
The following topics describe the K2 Summit Production Client and K2 Solo Media Client write
filter.
About the write filter
The K2 Summit Production Client and K2 Solo Media Server have a file-based write filter, which
is a feature of the Windows embedded operating system. With the write filter enabled, files can be
created, modified, and deleted, but these changes are held in a memory cache. When the K2 system
restarts, these changes are lost and the K2 system returns to its original state. This protects the K2
system from changes and increases on-air reliability. For any system configuration change the write
filter must be disabled otherwise changes are lost at the next restart.
23 November 2010 K2 Version 7.3.8 Release Notes & Upgrade Instructions 23
K2- SOLO-ELITEK2-XDP-2HD-AVCI,
K2-XPD-4HD-AVCI
Page 24

Additional notes
Local software installation and the write filter
Some directories, such as C:\logs, C:\Profile\config, and C:\Profile\ChannelSuites, are
excluded from write filter protection, so that channel configuration and logs are saved. Do not
attempt to alter this list of excluded directories. If you suspect that write filter configuration has
been altered, use the recovery image process to restore to the default configuration.
To enable the write filter, the K2 Summit Production Client or K2 Solo Media Server must be
restarted. Likewise, to disable the write filter, the K2 system must be restarted. You can enable/disable
the write filter remotely using the SiteConfig lock/unlock feature on one K2 system at a time or on
a group of K2 systems all at once. You can also enable/disable the write filter from a local K2
system, but if you use the local method, do not also use the SiteConfig method. If you enable/disable
the write filter locally, the change is not automatically sent to SiteConfig, so SiteConfig can not
reliably indicate the current lock/unlock state.
When you manually install K2 client software at the local K2 Summit Production Client or K2 Solo
Media Server, the installation program helps you manage the write filter. Both the uninstall program
and the install program have the same behavior. When you run either the uninstall or the install
program, the program behaves as follows:
• If the write filter is enabled, the program notifies you and sets the writer filter to disabled, then
prompts you to restart. To continue the uninstall or install process, you must restart and then run
the program again, this time with the write filter disabled.
• If the write filter is disabled, the program sets it to be enabled so that after next restart the K2
system starts up with the write filter enabled.
In this way the write filter is disabled while software is installed. Changes made to system settings
or to the system drive before the restart following an install are preserved.
Once you have uninstalled or installed K2 Client software, at the next restart the write filter is
enabled. If you want to keep the write filter disabled after an install, run the Write Filter Utility and
disable the write filter before restarting.
SiteConfig software installation and the write filter
When you use SiteConfig to install K2 client software on a K2 Summit Production Client or K2
Solo Media Server, SiteConfig helps you manage the write filter. The SiteConfig "Lock" feature
enables the write filter and the "Unlock" feature disables the write filter. In addition, both uninstall
deployment tasks and install deployment tasks behave the same way in how they manage the write
filter, as follows:
• If the write filter is enabled (the K2 system is locked), SiteConfig does not allow the task to be
deployed. To deploy software, you must first disable (unlock) the write filter on the K2 system.
• If the write filter is disabled (the K2 system is unlocked), when the deployment task completes
SiteConfig keeps the write filter disabled. If you then restart the K2 system, the write filter is
still disabled after the restart. This allows you to deploy additional software.
When you are finished deploying software, use SiteConfig to enable (lock) the write filter on the
K2 system.
24 K2 Version 7.3.8 Release Notes & Upgrade Instructions 23 November 2010
Page 25

Disable write filter
1. If you have not already done so, log on to the K2 system with Windows administrator privileges.
2. From the Windows desktop, click Start | All Programs | Grass Valley | Write Filter Utility.
FBWF Manager opens.
3. Under Filter Settings, set Filter to Disable.
Do not modify other settings.
4. Click OK.
5. When prompted, restart the K2 system.
Enable write filter
1. If you have not already done so, log on to the K2 Summit Production Client or K2 Solo Media
Server with Windows administrator privileges.
2. From the Windows desktop, click Start | All Programs | Grass Valley | Write Filter Utility.
FBWF Manager opens.
Additional notes
3. Under Filter Settings, set Filter to Enable.
4. Under Protected Volumes, set C: to Protected.
Do not modify other settings.
5. Click OK.
6. When prompted, restart the K2 Summit Production Client or K2 Solo Media Server.
Passwords and security on K2 systems
To provide a basic level of security, K2 systems recognize four different security levels based on
Windows users and groups, and the systems ship from the factory with accounts pre-configured
accordingly. To access the system you must login with the username and password for one of the
pre-configured accounts.
The following table shows the different types of K2 users and their privileges. Passwords are case
sensitive. The term “unknown user” applies to any user who logs in to the K2 System without using
the Windows administrator, K2 administrator, or K2 user login and password
administrator
Unknown userK2 userK2 administratorWindows
1
K2UserK2AdminAdministratorLogin
N/A
1
The unknown user, like all others who access the K2 system, must have a valid Windows login for the K2 client or the
control point PC through which the K2 system is being accessed.
23 November 2010 K2 Version 7.3.8 Release Notes & Upgrade Instructions 25
N/AK2userK2adminadminK2Password
Page 26

Additional notes
Unknown userK2 userK2 administratorWindows
administrator
Can’t accessCan viewFull accessFull accessAppCenter
Configuration
Manager
Full accessFull accessAppCenter
Full accessWindows
Operating System
Limited access
(based on
Windows login
privileges)
To support FTP and security features, K2 systems also have movie, mxfmovie, and mpgmovie
accounts. Do not use these accounts to log in to the Windows operating system on K2 systems.
About application security on the K2 SAN
The K2Config application and the Storage Utility application both require that you be logged in to
the application with administrator privileges in order to modify any settings. These privileges are
based on the Windows account that you use when you log in to the K2Config application. When
you open Storage Utility from within the K2Config application, the account information is passed
to Storage Utility, so you do not need to log in separately to Storage Utility.
Full access;
requires an
account on the K2
Media Client(s)
Limited access
(based on
Windows login
privileges)
Can view channel
suites, channel
status, on-line help
and System Status
pane. Can export
logs.
Can’t accessCan’t accessFull accessFull accessStorage Utility
Can’t accessCan’t accessFull accessFull accessK2Config
Limited access
(based on
Windows login
privileges)
In SiteConfig you configure global and/or device-type credentials for device access. These credentials
are likewise based on Windows accounts.
You must use a Windows account that has local administrator privileges on the machine to be
configured. For example, when you are on a control point PC and you run the K2Config application
for the purpose of configuring a K2 Media Server, the account with which you log in to the K2Config
application must be present on the K2 Media Server and must have administrator privileges on the
K2 Media Server.
By default, all K2 SAN machines are set up with the following accounts:
Administrator
26 K2 Version 7.3.8 Release Notes & Upgrade Instructions 23 November 2010
PasswordUsernameAccount
K2 Configuration
permissions
Storage Utility
permissions
Run/changeRun/changeadminK2AdministratorWindows
Run/changeRun/changeK2adminK2AdminK2 Administrator
No accessNo accessK2userK2UserK2 User
Page 27

Additional notes
For initial setup and configuration, you can use the default Windows Administrator username and
password to log in to applications and machines as you work on your K2 SAN. However, for ongoing
security you should change the username/password and/or create unique accounts with similar
privileges. When you do this, you must ensure that the accounts are present locally on all K2 SAN
machines, including control point PCs, K2 Media Servers, K2 Media Clients, K2 Summit Production
Clients, and other iSCSI clients.
NetCentral also has accounts for security levels, as follows:
• NetCentral Administrator
• NetCentral Technician
• NetCentral User
Grass Valley recommends mapping the NetCentral administrator with the K2 administrator level.
If you are using the Grass Valley Control Point PC, this mapping is already done for you at the
factory, so you can log on to NetCentral as administrator using the K2 administrator
(K2Admin/K2admin) logon. You can also assign other NetCentral groups to users, as necessary for
your site’s security policies. You need Windows administrator privileges to add or modify a user’s
privileges. For more information on NetCentral security, see the NetCentral User Guide.
About credentials in SiteConfig
SiteConfig requires administrative privileges on devices in order to perform most of the network
configuration and deployment tasks. If you add a device based on a known device type, SiteConfig
knows the default administrator login and password to use. Then, when you use remote desktop or
perform software deployment to the device, SiteConfig automatically uses these credentials. These
credentials are called "global" credentials for the device since the same credentials are used on all
devices of that type in the system.
You can choose to override the default credentials for a given device type. For example, if you have
specified a different administrator account or a different password on the devices when commissioning
the system, then you want SiteConfig to use these modified credentials.
It is possible to also override the default credentials for a single device.
Upgrading firmware on HP switch
1. If you have not already done so, install a TFTP Server.
For example, to install tftpd32.exe, go to http://tftpd32.jounin.net/.
2. Open the TFTP Server.
3. Make sure your current working directory includes the *.swi file that you are using for the
upgrade.
23 November 2010 K2 Version 7.3.8 Release Notes & Upgrade Instructions 27
Page 28

Additional notes
4. Execute the copy command with the following syntax:
copy tftp flash <ip-address> <remote-os-file> [ < primary | secondary
> ]
Note that if you do not specify the flash destination, the TFTP download defaults to the primary
flash.
For example, to download a software file named T_13_23.swi from a TFTP server with the IP
address of 10.16.34.3 1, use the following:
ProCurve # copy tftp flash 10.16.34.3 T_13_23.swi
5. When prompted The primary OS image will be deleted. continue [y/n]?, press
Y.
When the switch finishes downloading the software file from the server, it displays the progress
message Validating and Writing System Software to FLASH...
6. Wait until the CLI prompt re-appears, then continue with the next step in this procedure.
7. Check the version of firmware on the switch. To do this, type the following, then press Enter:
show flash
Information is displayed similar to the following example:
HP_iSCSI_switch1# show flash
Image Size(Bytes) Date Version
----- ---------- -------- ------Primary Image : 6737518 07/25/08 T.13.23
Secondary Image : 5886358 10/26/06 T.11.12
Boot Rom Version: K.12.12
Current Boot : Primary
8. Verify that the new software version is in the expected flash area (primary or secondary).
9. Restart the switch from the flash area that holds the new software (primary or secondary).
Configuring QOS on the GigE switch
Prerequisites for this procedure are as follows:
• The switch is HP ProCurve switch 29xx series.
• Trunks, VLANs and all other configuration is complete.
• The switch has an IP address
• You have network access to the switch
Use this procedure to make the Quality of Service (QOS) setting on the HP ProCurve switch 29xx
series.
1. If you have not already done so, from a network connected PC open the MS-DOS command
prompt and login to the switch as administrator, as follows:
a) Telnet to the switch. For example, if the switch’s IP address is 192.168.40.12, you type the
following, then press Enter.
telnet 192.168.40.12
b) Press Enter one or more times until the switch’s username prompt appears.
c) Type the switch’ s administrator username and press Enter, then type the switch’ s administrator
password and press Enter. The switch console command (CLI) prompt appears.
28 K2 Version 7.3.8 Release Notes & Upgrade Instructions 23 November 2010
Page 29

Additional notes
2. Type the following, then press Enter:
config
You are now in configuration mode.
3. Type the following, then press Enter:
qos queue-config 2-queues
This limits the number of active queues within the switch giving the most buffering to VLANs
1 and 60
4. Type the following, then press Enter:
show qos vlan
The screen displays VLAN information. Note the ID number of the Media (iSCSI) VLAN. It
should be 60, as follows:
VLAN priorities
VLAN ID Apply rule | DSCP Priority
------- ----------- + ------ ---------- 1 No-override | No-override
60 No-override | No-override
5. a) Assign the Media VLAN the QOS priority of 3. For example, if the VLAN ID is 60, you type
the following, then press Enter.
vlan 60 qos priority 3
b) Type the following, then press Enter:
show qos vlan
The screen displays VLAN information. Make sure that the Priority column reports that the
Media VLAN has a value of 3.
Next, verify flow control settings.
23 November 2010 K2 Version 7.3.8 Release Notes & Upgrade Instructions 29
Page 30

Operation considerations
• Do not neglect to make a “first birthday” image of each K2 product shortly after installation and
configuration is complete.
• Changing system video standards (NTSC/PAL) requires a restart as part of the channel changes
as soon as the new standard is selected. Configuration Manager causes an immediate restart of
the K2 client if the system reference standard is changed and AppCenter is being used.
• Refer to the “Remote control protocols” appendix in the K2 System Guide for operation
considerations related to AMP, VDCP, BVW, Harris, RS-422, etc.
• To import/export between systems using AppCenter, in Configuration Manager on the Remote
tab, add each system that you want to have available as a source or a destination. Do this for K2
systems as well as non-K2 systems, such as Profile XP.
• When transferring between K2 systems and other types of systems, such as Profile XP, you must
specify the IP address, path, and file name to initiate a transfer.
• Constrain media names and filepaths for support across systems. For example, on a K2 Summit
Production Client, AppCenter allows you to create bin names and clip names longer than 32
characters. However, names of this length are not supported on Aurora products.
• Tri-level sync is not supported on K2 systems.
• Before configuring audio tracks on a channel, eject all clips. This is required to put changes into
effect.
• The K2 client and K2 Media Server can operate continuously for a long period of time, but the
recommended operational practice is to restart at least once every three to six months.
• When restoring from a system-specific recovery image (an image you have created from your
K2 system or the image on your K2 system's USB recovery flash drive), follow the procedure
in the K2 product's service manual. When restoring from a generic recovery image (a baseline
image for the K2 product), you must also restore network configuration, install K2 software,
install SNFS software, and make a new file system.
• Mix effects (an AppCenter Pro feature) are supported as follows:
• Supported between like compression formats: DV-to-DV, MPEG-to-MPEG, etc.
• Not supported between between different compression formats.
• Not supported for MPEG long GoP.
• A 3D/Video+Key player channel does not support agile play, mix effects, or a two-head player
model.
• On a K2 Solo Media Server, before making a new file system, first upgrade drive firmware to
the latest version, as specified in Compatible K2 Summit/Solo components on page 31. Failure
to do so generates a Storage Utility error.
• Grass Valley recommends that you use a frame synchronizer on incoming video sources that are
recorded in AVC-Intra format.
• If Dyno PA connects to an internal storage K2 system, there are special requirements for media
disk labels. Refer to the Dyno Production Assistant Configuration Manual.
• When configuring editors on a K2 SAN with 1 Gig TOEs, do not assign editors and K2 clients
(K2 Summit or K2 Media Client) to the same TOE. Instead, assign editors to their own TOE.
• To export AVI format files to a shared CIFS drive, first export to the local disk, then copy the
file to the share.
23 November 2010 K2 Version 7.3.8 Release Notes & Upgrade Instructions 30
Page 31

Version compatibility
Versions qualified for compatibility with this version 7.3.8 release of K2 software are summarized
in the following sections.
Compatible K2 Summit/Solo components
The following components are part of K2 Summit Production Client, K2 Solo Media Server, or K2
Summit Transmission Client/Server products. Components are compatible with this release of K2
software as listed in the following table. Compatible versions are pre-installed on the K2 system
when you receive it new from Grass Valley.
Component versions
CommentsVersionComponent
Includes AppCenter7.3.8GrassValley K2 Client software
—3.5.2.1b15620Media File System (SNFS)
SiteConfig Discovery Agent,
also known as SiteConfig
Network Configuration Connect
Kit
Windows Operating System
Microsoft .NET Framework
(internal storage only)
(internal storage only)
1.0.8 and
higher
embedded 2002
SP3
SP2, 3.5 SP1
A minimum version of 1.0.8 is required to
support device discovery. Then when you deploy
software to the device, the SiteConfig application
prompts you to upgrade to the correct version of
the Discovery Agent on the device.
—Windows XP
—2.0.50727.4022Windows update
—2.0 SP2, 3.0
—7.6 and higherQuickTime
—13.3Intel Network Connections
—2.08Microsoft iSCSI Initiator
—4.0 SP2, 6.0MS XML
—v2.91-05MegaRAID Storage Manager
See table below for locations and filenames.1.40.52-0629RAID controller microcode
(Summit internal storage only)
Hitachi ViperB drives
(Summit internal storage only)
Hitachi ViperC drives
23 November 2010 K2 Version 7.3.8 Release Notes & Upgrade Instructions 31
See table below for locations and filenames.570RAID disk drive firmware
See table below for locations and filenames.510RAID disk drive firmware
Page 32

Version compatibility
internal storage only)
(Solid State drives)
(internal storage only)
K2 Summit Production Client internal storage RAID controller microcode file names
Find files at C:\profile\microcode\Internal Storage\LSI Controller.
K2 Summit Production Client internal storage drive firmware file names
Find files at C:\profile\microcode\Internal Storage\Hitachi.
CommentsVersionComponent
See table below for locations and filenames.4101RAID disk drive firmware (Solo
—2269RAID disk drive firmware
—3.10.0.32LSI RAID controller driver
Microcode fileVersion
SAS1078_FW_Image_1.40.52.0629.rom1.40.52-0629
Drive
type
size
Firmware fileVersionStorage Utility IdentifierDrive
HITACHI_ViperB_15K_A570.bin570HUS154530VLS300300GBViperB
HITACHI_ViperB_15K_A570.bin570HUS154545VLS300450GB
HITACHI_ViperC_15K_A510.bin510HUS156030VLS600300GBViperC
HITACHI_ViperC_15K_A510.bin510HUS156045VLS600450GB
HITACHI_ViperC_15K_A510.bin510HUS156060VLS600600GB
K2 Solo Media Server drive firmware file names
Find files at C:\profile\microcode\Internal Storage\Fujitsu.
Firmware fileVersionStorage Utility IdentifierDrive size
FUJITSU_15K_25_4101.frm4101MBE2147RC136GB
K2 Summit Transmission internal storage 7.2K SAS drives
Find files at C:\profile\microcode\External Storage\K2_L10-L40 Condor\Drive\7.2K.
Storage Utility IdentifierDisk Drive
Version
Firmware fileFirmware
32 K2 Version 7.3.8 Release Notes & Upgrade Instructions 23 November 2010
MU_7K_SAS_1T_500G_N004.binN004ST3500414SS500G
MU_7K_SAS_1T_500G_N004.binN004ST31000424SS1TB
MU_7K_SAS_2T_N004.binN004ST32000444SS2TB
Page 33

Compatible K2 Media Server components
The following components reside on the K2 Media Server and are compatible with this release of
K2 software as listed in the following table. Compatible versions are pre-installed on the K2 Media
Server when you receive it new from Grass Valley.
software
Version compatibility
CommentsVersionComponent
—7.3.8Grass Valley K2 Server
—3.5.2.1b15620Media File System (SNFS)
also known as SiteConfig
Network Configuration Connect
Kit
1.0.8 and higherSiteConfig Discovery Agent,
A minimum version of 1.0.8 is
required to support device
discovery. Then when you
deploy software to the device,
the SiteConfig application
prompts you to upgrade to the
correct version of the Discovery
Agent on the device.
With the latest updateWindows 2003 ServerWindows Operating System
With the latest updateWindows 2008 Server
—2.0.50727.4022Windows update
—2.0 SP2, 3.0 SP2, 3.5 SP1Microsoft .NET Framework
—7.6 and higherQuickTime
—7.0 and higherAdobe Acrobat Reader
—8.24.3.0ATI Display Driver
—5.3.0Dell OpenManage
—6, Update 3J2SE Runtime Environment
—4.0 and higherMSXML
Compatible K2 Control Point PC components
The following components reside on the K2 Control Point PC and are compatible with this release
of K2 software as listed in the following table. Compatible versions are pre-installed on the K2
Control Point PC when you receive it new from Grass Valley.
23 November 2010 K2 Version 7.3.8 Release Notes & Upgrade Instructions 33
R710, R610, 2950, 1950Dell Server Models
As provided by Grass Valley for
specific K2 storage levels and
applications.
CommentsVersionSoftware
—7.3.8K2 control point
—Server 2003 SP 1Windows operating system
Page 34

Version compatibility
CommentsVersionSoftware
—2.0.50727.4022Windows update
.NET Framework
Agent, also known as
SiteConfig Network
Configuration Connect Kit
5.2.xNetCentral
3.0 SP2, 3.5 SP1
1.4.0.463 and higherSiteConfig application
1.0.8 and higherSiteConfig Discovery
Check with your Grass Valley
representative for the specific version.
—2005SQL Server Express
—1.1, 1.1 Hotfix, 2.0 SP2,
—7.6 and higherQuickTime
—4.0MS XML
—3.1Windows Installer
Upgrade to this version before deploying
software to any devices.
A minimum version of 1.0.8 is required
to support device discovery. Then when
you deploy software to the device, the
SiteConfig application prompts you to
upgrade to the correct version of the
Discovery Agent on the device.
——7-ZIP
—9.0Adobe Reader
Compatible HP ProCurve GigE switch components
Components that reside on the HP ProCurve 3400cl series GigE switch and the HP ProCurve 29xx
series GigE switch are compatible with this release of K2 software as follows:
W_14_30HP ProCurve 2910al series
firmware
T.11.12HP ProCurve 2900 series
firmware
T.13.23
M.08.66HP ProCurve 3400cl series
firmware
M.08.86
CommentsVersionProduct
This is the only version
available on this model of
switch.
This older version is no longer
recommended.
Upgrade to this version is
required. After upgrade,
configure QOS settings.
This older version is still
compatible
Upgrade to this version is
recommended
34 K2 Version 7.3.8 Release Notes & Upgrade Instructions 23 November 2010
Page 35

Related Links
Upgrading firmware on HP switch on page 27
Configuring QOS on the GigE switch on page 28
Verify/upgrade switch firmware on page 54
Compatible K2 RAID components
This compatibility specification applies to K2 Lx0 RAID (Condor with 4 Gig controllers) and K2
10G RAID (Condor with 8 Gig controllers) on a K2 SAN, both basic and redundant. RAID firmware
is compatible with this release of K2 software as follows:
Find firmware on the K2 client (for direct-connect storage) or the K2 Media Server (for shared
storage) at C:\profile\microcode\External Storage\K2_L10-L40 Condor\Controller.
Version compatibility
CommentsFile NameVersionComponent
primary chassis with 15K SAS drives
or SATA drives
expansion chassis with 15K SAS drives
or SATA drives
primary chassis with 7.2K SAS drives
expansion chassis with 7.2K SAS
drives
D1_07VS.BIN07VSLevel 10/20 controller firmware for
D1_07VV.BIN07VV
D1_07VW.BIN07VW
ENCL_030F.BIN030FLevel 10/20 controller firmware for
ENCL_050B.BIN050B
D1_07VV.BIN07VVLevel 10/20 controller firmware for
ENCL_050B.BIN050BLevel 10/20 controller firmware for
This version is still compatible for 300
and 450 GB drives
This version is still compatible for 300
and 450 GB drives
This version required for 600 GB
drives, recommended for 300 and 450
GB drives. Requires version 050B for
expansion chassis.
This version is still compatible for 300
and 450 GB drives with 07VS or 07VV
controller firmware.
This version is compatible for 300 and
450 GB with 07VS, 07VV, or 07VW
controller firmware. Required for 600
GB drives with 07VW controller
firmware.
7.2K SAS drives are used in K2
Production Storage and K2 Nearline
Storage.
primary chassis with 15K SAS drives
or SATA drives
23 November 2010 K2 Version 7.3.8 Release Notes & Upgrade Instructions 35
D3_07VS.BIN07VSLevel 30/35 controller firmware for
D3_07VV.BIN07VV
D3_07VW.BIN07VW
This version is still compatible for 300
and 450 GB drives
This version is still compatible for 300
and 450 GB drives
This version required for 600 GB
drives, recommended for 300 and 450
GB drives. Requires 050B for
expansion chassis.
Page 36

Version compatibility
CommentsFile NameVersionComponent
ENCL_030F.BIN030FLevel 30/35 controller firmware for
expansion chassis with 15K SAS drives
or SATA drives
ENCL_050B.BIN050B
D3_07VV.BIN07VVLevel 30/35 controller firmware for
primary chassis with 7.2K SAS drives
ENCL_050B.BIN050BLevel 30/35 controller firmware for
expansion chassis with 7.2K SAS
drives
chassis with either 7.2K or 15K drives
chassis with either 7.2K or 15K drives
Compatible K2 RAID disk drive firmware
This version is still compatible for 300
and 450 GB drives with 07VS or 07VV
controller firmware.
This version is compatible for 300 and
450 GB with 07VS, 07VV, or 07VW
controller firmware. Required for 600
GB drives with 07VW controller
firmware.
7.2K SAS drives are used in K2
Production Storage and K2 Nearline
Storage.
—D4_ 01VP.BIN01VP10G controller firmware for primary
—ENCL_020F.BIN020F10G controller firmware for expansion
This compatibility specification applies to K2 Lx0 RAID (Condor with 4 Gig controllers) and K2
10G RAID (Condor with 8 Gig controllers) on a K2 SAN, both basic and redundant.
Be aware that Storage Utility can report inconsistent disk drive firmware versions. This can be a
normal condition, since the RAID system supports multiple drive capacities and firmware versions.
Be sure to compare the version numbers with this table, and update only as required.
Disk drive firmware is compatible with this release of K2 software as summarized in the following
tables:
15K SAS Cheetah 5 drives with 4G controllers compatible versions
Find files for these versions at C:\profile\microcode\External Storage\K2_L10-L40
Condor\Drive\15K\Cheetah 5. Refer to "Firmware file names" below to identify files.
Storage Utility IdentifierDisk Drive
Version
CommentsFirmware
—0002ST373685SS73G
—0002ST3146685SS146G
—0002ST3300655SS300G
15K SAS Cheetah 6 drives with 4G controllers compatible versions
Find files for these versions at C:\profile\microcode\External Storage\K2_L10-L40
Condor\Drive\15K\Cheetah 6. Refer to "Firmware file names" below to identify files.
36 K2 Version 7.3.8 Release Notes & Upgrade Instructions 23 November 2010
Page 37

Version compatibility
Storage Utility IdentifierDisk Drive
Version
CommentsFirmware
This version is still compatible0004ST3146356SS146G
N005
This is the currently shipping version.
Upgrade is recommended but not
required.
This version is still compatible0004ST3300656SS300G
N005
This is the currently shipping version.
Upgrade is recommended but not
required.
This version is still compatible0004ST3450856SS450G
N005
This is the currently shipping version.
Upgrade is recommended but not
required.
15K SAS Cheetah 7 drives with 4G controllers compatible versions
Find files for these versions at C:\profile\microcode\External Storage\K2_L10-L40
Condor\Drive\15K\Cheetah 7, except for N005
2
versions. The files for these N005 versions are
removed from C:\profile\microcode\... directories when you upgrade your K2 software. Refer
to "Firmware file names" below to identify files.
Storage Utility IdentifierDisk Drive
Version
N005ST3300657SS300G
CommentsFirmware
N005 is compatible with 4G controllers
only. Not compatible with 8G controllers.
N006
This is the currently shipping version and
is compatible with 4G controllers.
Upgrade is recommended. If you must
load disk firmware, load version N006.
N005ST3450857SS450G
N005 is compatible with 4G controllers
only. Not compatible with 8G controllers.
N006
This is the currently shipping version and
is compatible with both 4G and 8G
controllers. Upgrade is recommended. If
you must load disk firmware, load version
N006.
N005ST3600057SS600G
N005 is compatible with 4G controllers
only. Not compatible with 8G controllers.
2
Do not use file CH_15K7_SAS.N005 for any drive
23 November 2010 K2 Version 7.3.8 Release Notes & Upgrade Instructions 37
Page 38

Version compatibility
Storage Utility IdentifierDisk Drive
Version
N006
CommentsFirmware
This is the currently shipping version and
is compatible with both 4G and 8G
controllers. Upgrade is recommended. If
you must load disk firmware, load version
N006.
15K SAS Cheetah 7 drives with 8G controllers compatible versions
Find files for these versions at C:\profile\microcode\External Storage\K2_L10-L40
Condor\Drive\15K\Cheetah 7. Refer to "Firmware file names" below to identify files.
Storage Utility IdentifierDisk Drive
Version
N006ST3450857SS450G
CommentsFirmware
This is the currently shipping version and
is compatible with both 4G and 8G
controllers.
N006ST3600057SS600G
This is the currently shipping version and
is compatible with both 4G and 8G
controllers.
7.2K SAS drives with 4G controllers compatible versions
Find files for these versions at C:\profile\microcode\External Storage\K2_L10-L40
Condor\Drive\7.2K. Refer to "Firmware file names" below to identify files.
Storage Utility IdentifierDisk Drive
Version
CommentsFirmware
—N001ST3500620SS500G
—N001ST31000640SS1TB
7.2K SAS drives with 8G controllers compatible versions
Find files for these versions at C:\profile\microcode\External Storage\K2_L10-L40
Condor\Drive\7.2K. Refer to "Firmware file names" below to identify files.
Storage Utility IdentifierDisk Drive
Version
CommentsFirmware
—N004ST3500414SS500G
—N004ST32000444SS2TB
Firmware file names
Disk Drive
Version
Firmware File NameFirmware TypeFirmware
38 K2 Version 7.3.8 Release Notes & Upgrade Instructions 23 November 2010
CT15K5SAS.01_Interface0002Cheetah 5 15K SAS 73G
Page 39

Version compatibility
Disk Drive
Firmware File NameFirmware TypeFirmware
Version
CT15K5SAS_73.__1Servo
CT15K5SAS.01_Interface0002Cheetah 5 15K SAS 146G
CT15K5SAS_146.__1Servo
CT15K5SAS.01_Interface0002Cheetah 5 15K SAS 300G
CT15K5SAS_300.__1Servo
CH_15K6_SAS.N004Interface/Servo0004Cheetah 6 15K SAS 146G
CH_15K6_SAS.N005Interface/ServoN005
CH_15K6_SAS.N004Interface/Servo0004Cheetah 6 15K SAS 300G
CH_15K6_SAS.N005Interface/ServoN005
CH_15K6_SAS.N004Interface/Servo0004Cheetah 6 15K SAS 450G
CH_15K6_SAS.N005Interface/ServoN005
CH_15K7_SAS_300G_N006.binInterface/ServoN006Cheetah 7 15K SAS 300G
CH_15K7_SAS_450G_N006.binInterface/ServoN006Cheetah 7 15K SAS 450G
CH_15K7_SAS_600G_N006.binInterface/ServoN006Cheetah 7 15K SAS 600G
Compatible Grass Valley products
Grass Valley products are compatible with this version 7.3.8 release of K2 software as follows:
1.6.5.128K2 Dyno Replay Controller
1.5.0.1595K2 Dyno PA
7.1.0.18Aurora Browse
7.1.0.273Aurora Suite
7.1.0.68Aurora Ingest
BA_7K_ Interface.N001InterfaceN0017.2K SAS 500G
BA_7K_ ST3500620SS_ Servo.C30DServo
BA_7K_ Interface.N001InterfaceN0017.2K SAS 1TB
BA_7K_ ST31000640SS_ Servo.B30DServo
MU_7K_SAS_1T_500G_N004.binInterface/ServoN0047.2K SAS 500G
MU_7K_SAS_1T_500G_N004.binInterface/ServoN0047.2K SAS 1TB
MU_7K_SAS_2T_N004.binInterface/ServoN0047.2K SAS 2TB
CommentsVersionProduct
Check with your Grass Valley
representative for version
availability.
23 November 2010 K2 Version 7.3.8 Release Notes & Upgrade Instructions 39
7.1.0.39Aurora Playout
Page 40

Version compatibility
CommentsVersionProduct
5.4.8 or higherProfile XP Media Platform
Media assets can be transferred
to/from a Profile XP system but
cannot be browsed.
5.2.xNetCentral
Check with your Grass Valley
representative for the specific
version.
—1.4.0.460 and higherSiteConfig application
—2.1.1UIM
—7.1.1 and higherK2 TimeDelay
4.0.3K2 InSync
Check with your Grass Valley
representative for version
availability
7.0.0K2 Avid plug-in
On the Avid Editor install the
K2AvidIngest module and on the
device that runs the Avid
Transfer Manager/Interplay
Engine install the K2AvidDhm
module.
—2.0K2 FCP Connect
—7.1.0.273K2-Aurora FTP
SloMo Camera
SportElite HD Super SloMo
Camera
Camera
—Grass Valley LDK8300 Super
3x and 2x frame rates supported.
Requires AppCenter Elite
license.
—Grass Valley LDK8000
2x frame rate. Requires
AppCenter Elite license.
—Sony 3300 Super SloMo
3x frame rate only; 2x is not
supported. Requires AppCenter
Elite license.
—6.0.2Edius
—ClipStore
Check with your Grass Valley
representative for version
availability.
40 K2 Version 7.3.8 Release Notes & Upgrade Instructions 23 November 2010
Page 41

Compatible third party products
Products by manufacturers other than Grass Valley are compatible with this release of software as
follows:
Version compatibility
CommentsVersionProduct
5.4.3.0Pathfire Transfer Service
1.4.7.0 or higherDG
Compatible recovery applications
To create a recovery image of a K2 device, use compatible versions of the recovery application, as
follows:
K2 Summit Production Client
K2 Media Server
Recovery Flash Drive part
number 86205900
063-8246-04
This version required for
operation with the licensable K2
Pathfire capture service option.
This version required for
operation with the licensable K2
DG capture service option.
CommentsRecovery application and versionProduct
Use the Recovery Flash Drive
that you received with the
product. It is identified with the
product's serial number and is
to be used on that specific K2
Summit Production Client only.
—Recovery CD part number
Grass Valley Control Point PC
—Recovery CD part number
063-8246-04
23 November 2010 K2 Version 7.3.8 Release Notes & Upgrade Instructions 41
Page 42

Upgrading K2 systems
This section contains the tasks necessary for the upgrade to this release of software.
NOTE: If installing an MPEG encode card or an AVC-Intra codec card field kit upgrade, do so
after the K2 software upgrade, not before.
K2 software downgrade is supported only via the recovery image process. If you must downgrade
and you do not have a recovery image at the desired software version, obtain a recovery image from
Grass Valley Support.
Upgrading a K2 SAN
This section contains the tasks necessary to upgrade a K2 SAN to this release of K2 software. Work
through the tasks sequentially to complete the upgrade.
NOTE: These upgrade instructions assume that the current K2 software is at version 7.0.11 or
higher. If the current K2 software is a 7.x version lower than 7.0.11, contact Grass Valley Support
before upgrading. If a K2 Media Client or any K2 device with current K2 software at a 3.x version,
do not upgrade, as version 7.x is not supported on these devices.
NOTE: When upgrading from a version lower than 7.1, K2 system software installs with a 30
day trial license. You need a permanent license to operate beyond the trial period.
About upgrading the K2 SAN with SiteConfig
This section provides instructions to upgrade the following K2 SAN devices:
• K2 Media Servers
• K2 Summit Production Clients
With these upgrade instructions, you use SiteConfig from a network connected control point PC
and remotely upgrade software simultaneously on multiple K2 devices. This is the required process
for software upgrades. Do not upgrade software on a K2 SAN locally at each device or via any other
process.
If this is the first time using SiteConfig for software upgrade, follow instructions in K2 SAN
Installation and Service Manual rather than instruction in these release notes. You must first have
SiteConfig set up for system management and software deployment of the K2 SAN. Also refer to
the SiteConfig User Manual or SiteConfig Help Topics. Then, after you have completed this initial
SiteConfig set up, you can follow the instructions in this section to upgrade software.
NOTE: If this is the first time using SiteConfig for software upgrade do not follow instructions
in these release notes alone.
NOTE: Do not attempt to upgrade software incrementally across the devices of a K2 SAN while
media access is underway. Online software upgrading is not supported.
The following installation tasks provide information specifically for the upgrade to this 7.3.8 version
of software. Read the information in these sections carefully before attempting any upgrade to
software on any of the devices of a K2 SAN, including K2 systems, Aurora Edit systems, or other
clients.
23 November 2010 K2 Version 7.3.8 Release Notes & Upgrade Instructions 42
Page 43

Make recovery images
Do not do this task if:
• You previously made a recovery image at the current software version for each computer you
are upgrading.
Do this task if:
• You do not have a recovery image at the current software version for one or more of the computers
you are upgrading.
The recommended procedure is to make a recovery image immediately after a software upgrade. If
you neglected to do this when you last upgraded software you should make the recovery image now,
before upgrading to the new version.
Refer to the Grass Valley product's Service Manual for recovery image procedures.
CAUTION: If you upgrade and then decide you do not want to stay with this version of K2
system software, you must use the recovery disk image process to downgrade to your previous
version.
Prepare SiteConfig for software deployment to K2 SAN devices
Upgrading K2 systems
Do the following to prepare SiteConfig for the software upgrade.
1. Make the following files accessible to the SiteConfig control point PC:
• K2 Summit Client SAN software installation (*.cab) file.
• K2 Media Server software installation (*.cab) file. Use file with x86 in filename for 32-bit
systems and file with x64 in filename for 64-bit systems.
• SNFS software installation (*.cab) file. Use file with x86 in filename for 32-bit systems and
file with x64 in filename for 64-bit systems.
• Summit SNFS software installation (*.cab) file.
• Control Point software installation (*.cab) file.
2. On the K2 Media Server, check for the C:\SNFS directory and then proceed as follows:
• If C:\SNFS exists on the K2 Media Server, then SNFS 3.5.1 is on the C: drive. In this case
you must move SNFS to the D: drive. To do this you must procure the 35c235d.reg file and
use it as instructed with special tasks in the upgrade process below. The 35c235d.reg file is
on the version 7.3.8.xxxx K2 software CD in the SNFS directory. It can also be obtained at
http://www.grassvalley.com/downloads.
• If C:\SNFS does not exist on the K2 Media Server, continue with this procedure. No special
tasks are required.
3. If a newer version of SiteConfig is available for upgrade and you have not yet upgraded
SiteConfig, do the following:
a) From Windows Add/Remove programs, uninstall the current version of SiteConfig from the
control point PC.
b) Install the new version of SiteConfig on the control point PC.
23 November 2010 K2 Version 7.3.8 Release Notes & Upgrade Instructions 43
Page 44

Upgrading K2 systems
4. If not already present in the SiteConfig system description, configure deployment groups as
follows:
• A deployment group that contains your SAN K2 clients
• A deployment group that contains your K2 Media Servers
• A deployment group that contains your control point PC
Deploy control point PC software
Use SiteConfig to upgrade control point software on the K2 control point PC. In most cases, the K2
control point PC is also the SiteConfig control point PC, so you are in effect using SiteConfig to
upgrade software on its own local system.
For this release of K2 software, the install task identifies the control point software in the Managed
Package column as follows:
• GrassValleyControlPoint 7.3.8.xxxx
The software deployment process for the control point PC is similar to that used to upgrade software
on other K2 devices. Use similar procedures and adjust accordingly to do the following:
1. Add the K2 control point software package to the deployment group that contains the control
point PC.
2. Check software on the control point PC.
3. Configure and run deployment tasks to upgrade software.
Unlock K2 Summit Production Clients
This task disables the write filter on one or more K2 Summit Production Clients.
Prerequisites for this task are as follows:
• The device or all the devices in the group are communicating correctly in SiteConfig. This is
indicated by the green star icon overlay.
• The device or all the devices in the group are currently locked. This is indicated by the gray lock
icon overlay.
1. If you have not already done so, stop all media access on the K2 systems. This includes record,
play, and transfer operations.
2. In either the Network Configuration | Devices tree view or the Software Deployment | Deployment
Groups tree view, identify the device or the group of devices that you intend to unlock.
3. Right-click the device or the group and select Unlock.
A “…may require restart…” message appears.
4. Click Yes to allow SiteConfig to restart the device or devices.
The Set Administrative Credentials dialog box opens.
5. Enter a username and password with administrator level privileges on the device or devices and
click OK.
The Unlocking Devices window opens and displays progress.
44 K2 Version 7.3.8 Release Notes & Upgrade Instructions 23 November 2010
Page 45

6. When the Unlocking Devices window reports that the unlock process completed successfully,
click Close.
The device or devices are now unlocked. For K2 Summit Production Clients, this also disables the
write filter, which enforces a restart.
Take SAN clients offline
When upgrading software on a K2 SAN, you upgrade software on K2 Media Servers before you
upgrade software on the connected SAN clients. This includes K2 clients, K2 appliances, Aurora
clients, and generic clients. While you are upgrading software on K2 Media Servers you must keep
all connected client devices offline (all media access stopped) or shut down. Do not power up or
start media access on connected devices until the upgrade on K2 Media Servers is complete and the
media file system/database server is fully operational.
1. If you have not already done so, stop all media access on SAN clients. This includes all record,
play, and transfer operations
2. For K2 Summit Production Clients, if you have not already done so, disable (unlock) the write
filter.
3. Shutdown all the SAN K2 clients on the SAN. To do this in SiteConfig, right-click a client device
in the tree view and select Shutdown.
Upgrading K2 systems
Next upgrade K2 Media Servers. If you have multiple K2 Media Servers you must manage them
properly for the upgrade process.
Manage multiple K2 Media Servers
Do not do this task if:
• You are upgrading a K2 SAN with only one K2 Media Server. Skip ahead and begin upgrading
your K2 Media Server.
Do this task if:
• You are upgrading a basic (non-redundant) K2 SAN with multiple servers. This means you have
just one K2 Media Server that takes the role of media file system/database server and one or
more other K2 Media Servers dedicated to other roles, such as FTP server.
• You are upgrading a redundant K2 SAN. This means you have two K2 Media Servers (primary
and backup) that take the role of media file system/database server.
NOTE: If the K2 SAN has multiple K2 Media Servers, you must upgrade all to the same version.
If you are upgrading a basic K2 SAN with multiple servers:
1. Upgrade the server that takes the role of media file system/database server first.
2. After the media file system/database server is upgraded and when instructed to do so in a later
task, upgrade your other servers.
If you are upgrading a redundant K2 SAN:
Use the following steps to manage primary/backup roles and upgrade your two media file
system/database servers in the proper sequence. This avoids triggering a failover event.
23 November 2010 K2 Version 7.3.8 Release Notes & Upgrade Instructions 45
Page 46

Upgrading K2 systems
1. Determine the current primary/backup roles of the servers. You can use Server Control Panel
(via the K2 System Configuration application or on the local K2 Media Server) or NetCentral
to make this determination.
2. Shut down the backup server.
3. Upgrade the primary server.
4. Continue with upgrade tasks on your two K2 Media Servers that take the role of media file
system/database server. If you have additional servers, upgrade them later, when instructed to
do so in a later task.
Upgrade K2 Media Server
Prerequisites for the upgrade are as follows:
• From the SiteConfig control point PC, you must have access to the software installation files for
this release.
Install required Windows update
Do this task if:
• A K2 Media Server, Control Point PC, or K2 Coder with Windows update at a version lower
than 2.0.50727.4022.
NOTE: In addition to this required update, Grass Valley recommends that you also install "High
Priority" updates.
1. If you are not sure of the Windows update version currently installed, do the following:
a) Navigate to C:\Windows\Microsoft.NET\Framework\v2.0.50727.
b) Check file properties. The following properties indicate that version 2.0.50727.4022 is already
installed:
PlatformTimeDateFile sizeFile versionFile name
x8604:5611-Mar-2009989,0002.0.50727.4022mscordacwks.dll
x8604:5611-Mar-20094,550,6562.0.50727.4022mscorlib.dll
x8604:5611-Mar-20095,812,5442.0.50727.4022mscorwks.dll
x8604:5611-Mar-2009388,9362.0.50727.4022sos.dll
c) If your properties are different than those specified above, the update is necessary. This is
true even if your version numbers are higher or your dates are later. Continue with this
procedure.
NOTE: You must update even if your version numbers are higher or your dates are later.
2. Access the upgrade files and double-click NDP20SP2-KB968760-x86.exe.
The installation wizard opens.
3. Work through the wizard, accepting all default settings, and finish.
4. Restart as prompted.
46 K2 Version 7.3.8 Release Notes & Upgrade Instructions 23 November 2010
Page 47

Install High Priority Windows updates (recommended)
• Windows “High Priority” updates are recommended, but not required. While you have devices
in an offline state to upgrade software, you should check to see if there are any new updates that
you need to install. Use standard Windows procedures.
CAUTION: Only “High Priority Updates” should be installed. Do not install other Windows
or driver updates unless specifically directed by product documentation or by Grass Valley
Support.
Upgrade QuickTime
Do not do this task if:
• QuickTime is currently at version 7.6 or higher.
Do this task if:
• QuickTime is at a version lower than 7.6.
1. Access the QuickTime installation files.
2. Locate and open the following QuickTime install file:
QuickTimeInstaller-7.6.exe
Upgrading K2 systems
3. Work through the install wizard.
Configure settings so that the software does not automatically update Quicktime and other Apple
software.
NOTE: Unless instructed to do so by Grass Valley, do not update or install Apple software.
Accept the default destination folder and other default settings.
Configure GlobalSuperUser in SNFS default.cfg file on K2 Media Servers
In this task you open the media file system (SNFS) configuration file and verify/modify settings.
Do not do this task if:
• You have already modified the configuration file with the required settings.
Do this task if:
• The configuration file does not have the required settings.
Prerequisites for this task are as follows:
• K2 systems must be offline
You can verify and, if necessary, modify the media file system (SNFS) configuration file and still
keep your media file system intact if you carefully follow the steps in this procedure.
As an alternative to manually modifying the configuration file, if you need to make a new file system
after upgrading K2 software, the required values are set automatically by the upgraded version of
Storage Utility.
This task applies to the following devices:
• K2 Media Servers with role of file system server. If a redundant SAN, you must do this task on
both primary and backup K2 Media Server.
23 November 2010 K2 Version 7.3.8 Release Notes & Upgrade Instructions 47
Page 48

Upgrading K2 systems
1. On a K2 Media Server, using Notepad, open the media file system (SNFS) configuration file:
The configuration file can be either D:\SNFS\config\default.cfg. or
D:\SNFS\config\gvfs_hostname.cfg, where hostname is the name of the primary file system
server (FSM).
2. On a K2 Media Server, verify, and if necessary modify, settings for required values as follows:
# *********************************************************
# A global section for defining file system-wide parameters
# *********************************************************
GlobalSuperUser Yes
.
.
.
.
.
.
InodeDeleteMax 1000
.
BufferCacheSize 64M
.
.
.
.
InodeCacheSize 32K
.
ReservedSpace No
3. Close, and if necessary save, the SNFS configuration file.
If you made changes, the K2 system must be restarted for the changes to take effect.
The restart later in this upgrade procedure is sufficient to put the changes into effect.
Configure Macintosh access in SNFS configuration file on K2 Media Servers
In this task you open the media file system (SNFS) configuration file and verify/modify settings.
Do not do this task if:
• The K2 SAN has no iSCSI or Fibre Channel connected Macintosh clients
• The K2 SAN has iSCSI connected or Fibre Channel connected Macintosh clients and Windows
Security is configured to Yes on the SNFS file system.
Do this task if:
• The K2 SAN has iSCSI connected or Fibre Channel connected Macintosh clients and Windows
Security is configured to No on the SNFS file system.
Prerequisites for this task are as follows:
• The Macintosh client connection requires K2 FCP Connect.
• The K2 SAN must be offline
48 K2 Version 7.3.8 Release Notes & Upgrade Instructions 23 November 2010
Page 49

Upgrading K2 systems
You can verify and, if necessary, modify the media file system (SNFS) configuration file and still
keep your media file system intact if you carefully follow the steps in this procedure.
This task applies to the following devices:
• K2 Media Servers with role of file system server. If a redundant SAN, you must do this task on
both primary and backup K2 Media Server.
1. On a K2 Media Server, using Notepad, open the media file system (SNFS) configuration file:
The configuration file can be either D:\SNFS\config\default.cfg. or
D:\SNFS\config\gvfs_hostname.cfg, where hostname is the name of the primary file system
server (FSM).
2. On a K2 Media Server, verify, and if necessary modify, settings for required values as follows:
# *********************************************************
# A global section for defining file system-wide parameters
# *********************************************************
.
.
WindowsSecurity No
UnixDirectoryCreationModeOnWindows 0777
UnixFileCreationModeOnWindows 0666
3. Close, and if necessary save, the SNFS configuration file.
If you made changes, the K2 system must be restarted for the changes to take effect.
The restart later in this upgrade procedure is sufficient to put the changes into effect.
If you made changes to UnixDirectoryCreationModeOnWindows and
UnixFileCreationModeOnWindows parameters, to apply changes to existing assets you must delete
and then re-create files and/or bins, such as HotBins.
If SNFS is on C: uninstall SNFS manually
Do not do this task if:
• SNFS is on the D: drive of the K2 Media Server.
Do this task if:
• SNFS 3.5.1 is on the C: drive of the K2 Media Server. If C:\SNFS exists on the K2 Media Server,
then SNFS 3.5.1 is on the C: drive.
If SNFS 3.5.1 is on the C: drive of the K2 Media Server, you must move it to the D: drive. This is
best accomplished as part of the upgrade process. After you uninstall SNFS, you must reset registry
settings, install SNFS, then copy files from C: to D:. To do this, use the following procedure and
other steps as instructed later in the upgrade process.
1. If you have not already done so, procure the 35c235d.reg file.
The 35c235d.reg file is on the version 7.3.8.xxxx K2 software CD in the SNFS directory. It can
also be obtained at http://www.grassvalley.com/downloads.
2. Copy 35c235d.reg to the local K2 Media Server.
3. On the local K2 Media Server open Windows Add/Remove Programs and uninstall SNFS.
23 November 2010 K2 Version 7.3.8 Release Notes & Upgrade Instructions 49
Page 50

Upgrading K2 systems
4. Double-click 35c235d.reg to run the file.
The file resets registry entries in preparation for moving SNFS from C: to D:.
5. When prompted "Are you sure...", answer Yes.
6. When a message confirms the registry change, dismiss the message.
7. Restart the K2 Media Server.
Check all currently installed software on K2 Media Servers
Prerequisites for this task are as follows:
• The device is assigned in the SiteConfig system description and network connectivity is present.
• SiteConfig is able to log in to the device using the username/password credentials assigned to
the device.
• The SiteConfig control point PC does not have a network drive mapped to an administrative
share (such as C$) on a device on which you are checking software.
Do the following steps on the K2 Media Servers that you are upgrading.
1. In the Software Deployment | Deployment Groups tree view, right-click the top-most node for the
group or any individual device and select Check Software.
NOTE: If you have access problems, verify that the adminstrator account on the device has
credentials as currently configured in SiteConfig. By default credentials on the device should
be administrator/adminGV! for Aurora devices and Administrator/adminK2 for K2 devices.
The Check Software dialog box appears. SiteConfig searches for software on the selected device
or devices and gathers information. Progress is reported.
2. When the check is complete for the selected device or devices, close the Check Software dialog
box.
An updated list of all currently installed software is displayed in the Software Deployment | Devices
| Installed Software list view. If software is a SiteConfig managed software package, information is
displayed in the Managed Package and Deployment Group columns.
Add software package to deployment group for K2 Media Servers
Prerequisites for this task are as follows:
• You can access the software package file from the SiteConfig control point PC.
• The K2 Media Servers to which you are deploying software are in a deployment group.
Use the following procedure to add one or more software packages to the deployment group that
contains your K2 Media Servers. For this release of K2 software, identify and add software installation
files as follows:
File nameSoftware
GrassValleyK2Server_x86_7.3.8.xxxx.cabK2 Server software
for 32-bit systems
GrassValleyK2Server_x64_7.3.8.xxxx.cabK2 Server software
for 64-bit systems
SNFS_x86_3.5.2.1b15620.cabSNFS software for
32-bit systems
50 K2 Version 7.3.8 Release Notes & Upgrade Instructions 23 November 2010
Page 51

Upgrading K2 systems
File nameSoftware
SNFS_x64_3.5.2.1b15620.cabSNFS software for
64-bit systems
You can add files for both 32 bit and 64 bit systems because when SiteConfig deploys software it
automatically deploys the 32 bit or 64 bit software appropriate for the target device. You must install
SNFS as a separate cab file.
1. In the Software Deployment | Deployment Groups tree view, select a deployment group.
2. Click the Add button.
The Add Package(s) dialog box opens.
3. Do one of the following to select the software package:
• Select from the list of packages then click OK.
• Click Browse, browse to and select the package, then click Open.
4. If one or more EULAs are displayed, accept them to proceed. If you do not accept a EULA, the
associated software is not assigned to the deployment group.
SiteConfig adds the package to the deployment group.
The package appears in the Managed Packages list for the selected deployment group. SiteConfig
creates new software deployment tasks for the package and displays them in the Tasks list view.
Upgrade software on K2 Media Servers
Prerequisites for this task are as follows:
• The devices that you are upgrading are in a deployment group.
• For the software you are upgrading, you have added a newer version of that managed software
package to the deployment group.
• If SNFS was on C:, you have uninstalled SNFS manually as instructed earlier in this upgrade
procedure.
• You have recently done the SiteConfig "Check Software" operation on the devices you are
upgrading.
• NOTE: On a K2 system, if a SNFS version lower than 3.0 is installed, do not uninstall using
SiteConfig. You must manually uninstall using a special batch file. Follow instructions in the
release notes for your current version of K2 software.
If you are upgrading multiple software components for which there is a required sequence, you must
check and uncheck tasks and run multiple deployment sessions to control the sequence. For some
software components, SiteConfig aids you by enforcing dependencies. For each individual software
component, SiteConfig enforces an uninstall of the current version of software before installing the
upgrade version. SiteConfig provides uninstall deployment tasks and install deployment tasks to
indicate the taskflow. SiteConfig can do the uninstall/install in a single deployment session.
1. In the Software Deployment | Deployment Groups tree view, select the device or the group of
devices to which you are deploying software.
The corresponding software deployment tasks are displayed in the Tasks list view.
2. For the software you are deploying, select the Deploy check box in the row for the uninstall task.
23 November 2010 K2 Version 7.3.8 Release Notes & Upgrade Instructions 51
Page 52

Upgrading K2 systems
3. For the software you are installing, select the Deploy check box in the row for the install task.
For upgrading a K2 Media Server to this release, deploy the following tasks:
You can deploy packages for both 32 bit and 64 bit systems because when SiteConfig deploys
software it automatically deploys the 32 bit or 64 bit software appropriate for the target device.
You must install SNFS as a separate cab file.
Also, when upgrading SNFS, configure deployment tasks to upgrade (uninstall/install) SNFS.
Deploy the following tasks to K2 Media Servers with role of file system server:
ActionManaged PackageDeploy
UninstallGrassValleyK2Server xxxxx.xxxx or
GrassValleyK2Server_x86 xxxxx.xxxx or
GrassValleyK2Server_x64 xxxxx.xxxx
InstallGrassValleyK2Server_x86 7.3.8.xxxx
InstallGrassValleyK2Server_x64 7.3.8.xxxx
ActionManaged PackageDeploy
UninstallSNFS xxxxxx or SNFS x86 xxxxxx or
SNFS x64 xxxxxx
InstallSNFS x86 3.5.2.1b15620
InstallSNFS x64 3.5.2.1b15620
If you previously uninstalled SNFS manually and then did a Check Software operation, only the
install task is present.
You can deploy packages for both 32 bit and 64 bit systems because when SiteConfig deploys
software it automatically deploys the 32 bit or 64 bit software appropriate for the target device.
You must install SNFS as a separate cab file.
If using K2-Aurora FTP and an upgrade to a compatible version is required, deploy the K2-Aurora
FTP software while you are upgrading K2 software. Refer to Compatible Grass Valley products
on page 39 to determine if an upgrade is required.
NOTE: If there are dependencies, SiteConfig can enforce that some tasks be deployed together.
52 K2 Version 7.3.8 Release Notes & Upgrade Instructions 23 November 2010
Page 53

Upgrading K2 systems
4. Check the area next to the Start Deployment button for a message.
If a message instructs you to upgrade the Discovery Agent, on the control point PC go to the
directory to which SiteConfig is installed, find the DiscoveryAgent_x.x.x.x.cab file, add it
to the deployment group, and deploy the Discovery Agent software as well.
5. Click the Start Deployment button.
Deployment tasks run and software is uninstalled. Progress is reported and next steps are indicated
in both the Status and Details columns. If an error appears regarding prerequisite software, install
the prerequisite files on the control point PC and then repeat this step.
When upgrading both K2 and SNFS software, SiteConfig uninstalls both in the proper sequence.
6. When the Status or Details columns indicate next steps, identify the software in the row, then
do one of the following:
• For K2 software, when Details displays a Restart required link, click the link and when
prompted "...are you sure...", click Yes.
The K2 Media Server restarts. This restart is required by the K2 software uninstall.
When upgrading SNFS software, this is also the restart required by the SNFS uninstall.
Deployment tasks run and software is installed. Progress is reported and next steps are indicated
in both the Status and Details columns.
If upgrading both K2 and SNFS software, SiteConfig uninstalls both in the proper sequence.
7. When the Status or Details columns indicate next steps, identify the software in the row, then
do one of the following:
• For K2 software, when Details displays a Restart required link, click the link and when
prompted "...are you sure...", click Yes.
The K2 Media Server restarts. This restart is required by the K2 software install.
If upgrading both K2 and SNFS software, SiteConfig uninstalls both in the proper sequence.
8. Monitor progress as indicated by both the Status and Details column. When finished, the Status
column indicates complete.
23 November 2010 K2 Version 7.3.8 Release Notes & Upgrade Instructions 53
Page 54

Upgrading K2 systems
9. If you previously uninstalled SNFS manually because SNFS was on C:, copy directories/files
from C: to D:, overwriting files on D:, as follows.
a) Copy the C:\SNFS\config directory to D:\SNFS\config.
b) Copy the C:\SNFS\data directory to D:\SNFS\data. This directory can be large, so allow
c) A restart is required to put the change into effect. If you do a subsequent upgrade task that
d) After the entire K2 SAN upgrade process is complete, test media access. If successful, delete
Verify/upgrade switch firmware
Do not do this task if:
• Your HP ProCurve 29xx series switch already has the current required firmware version.
Do this task if:
• Your HP ProCurve 29xx series switch does not have the current required firmware version.
adequate time to complete the copy operation.
also requires a restart, that restart is sufficient. Otherwise restart now.
the C:\SNFS directory and its files on the K2 Media Server.
Refer to compatibility information earlier in these release notes for firmware version requirements.
1. Telnet to the switch and login with the administrator username and password.
2. At the switch console command (CLI) prompt, type the following, then press Enter:
menu
If prompted to save the current configuration, answer no (press the n key) to proceed.
The main menu opens.
3. From the main menu, tab to Command Line (CLI) and press Enter. The command prompt appears.
4. Check the version of firmware on the switch. To do this, type the following, then press Enter:
show flash
Information is displayed similar to the following example:
HP_iSCSI_switch1# show flash
Image Size(Bytes) Date Version
----- ---------- -------- ------Primary Image : 6737518 07/25/08 T.13.23
Secondary Image : 5886358 10/26/06 T.11.12
Boot Rom Version: K.12.12
Current Boot : Primary
5. Check the Primary Image Version and refer to compatibility information earlier in these release
notes. If instructed to change the firmware on the switch, do so before continuing.
Related Links
Upgrading firmware on HP switch on page 27
Configuring QOS on the GigE switch on page 28
54 K2 Version 7.3.8 Release Notes & Upgrade Instructions 23 November 2010
Page 55

Compatible HP ProCurve GigE switch components on page 34
Upgrade RAID controller microcode
Do not do this task if:
• The K2 RAID controller and expansion chassis microcode is already at compatible versions, as
listed in Compatible K2 RAID components on page 35.
• The K2 RAID is a Level 2 or Level 3.
Do this task if:
• The K2 RAID controller and/or expansion chassis microcode is at a version that is not compatible.
The microcode files are copied on to the K2 Media Server when the K2 system software is installed.
1. Refer to the K2 RAID compatibility specifications earlier in these release notes for the version
to which you must upgrade and for the file names for the microcode files.
2. Use Storage Utility to upgrade microcode.
Refer to the K2 SAN Installation and Service Manual for procedures.
3. On 100% completion, proceed as follows:
Upgrading K2 systems
• If the RAID controller chassis has redundant controllers, no power cycle is required. The
microcode download is complete.
• If the RAID controller chassis does not have redundant controllers, power cycle the RAID
controller chassis, then restart the K2 Media Server.
Upgrade RAID disk drive firmware
Do not do this task if:
• The K2 RAID disk drive firmware is already at compatible versions, as listed in Compatible K2
RAID disk drive firmware on page 36.
• The K2 RAID is Level 2 or Level 3 SAN.
Do this task if:
• The K2 RAID disk drive firmware is at a version that is not compatible.
Prerequisites:
• The RAID system is offline.
• Only the primary K2 Media Server is powered up.
• K2 software has been upgraded on the K2 Media Server. This is required because the firmware
files are copied onto the K2 Media Server when the K2 software is installed.
1. Determine if disk drive firmware upgrades are required as follows:
a) Select a disk drive icon in the Storage Utility tree view, then note the drive properties reported
in the right-hand pane.
b) Refer to the K2 RAID compatibility specifications earlier in these release notes for drive-type
identifiers and firmware versions.
23 November 2010 K2 Version 7.3.8 Release Notes & Upgrade Instructions 55
Page 56

Upgrading K2 systems
2. If an upgrade is required, continue with this procedure to upgrade disk drive firmware.
Refer to the K2 SAN Installation and Service Manual for complete procedures.
3. In Storage Utility, right-click a controller in the tree view, then select Advanced | Download Disk
Firmware in the context menu.
NOTE: You can download firmware to a single disk by right-clicking a disk icon in the tree
view.
The Open File dialog box opens.
4. In the Open File dialog box, browse to the desired firmware file for your disks, select the file,
and click OK.
As instructed by a message that appears, watch the lights on the drives. For each drive, one at a
time, the lights flash as firmware loads. Wait until the lights on all the drives on which you are
downloading firmware have completed their flashing pattern. This can take several minutes.
The Progress Report window appears showing the disk firmware download task and the percentage
complete.
5. When finished, restart the K2 Media Server.
Reset Capture Services
Do not do this task if:
• You do not use any of the K2 Capture Services.
Do this task if:
• You are using one or more K2 Capture Services, such HotBin, Pathfire, DG, XML Import,
Export, P2, etc
Do this task on the K2 system running your K2 Capture Service, which is the K2 system that receives
the media to be imported into K2 storage. This can be a K2 Solo Media Server, a stand-alone K2
Summit Production Client, or the K2 Media Server with the role of primary FTP server on a K2
SAN.
When you configure a K2 Capture Service for the first time, the service is set to startup type
Automatic. However, if you upgrade or otherwise re-install your K2 System Software, the service
is re-set to startup type Manual. Therefore, you must re-configure the service after K2 System
Software upgrade/ reinstall in order to set the startup type back to Automatic.
1. From the Start menu, access the Programs menu and select Grass Valley | K2 Capture Services.
On a K2 Summit/Solo system, if the write filter is enabled, a message appears that informs you
about the write filter and prompts you to restart. Restart as prompted, then repeat this step.
The K2 Capture Services utility dialog box is displayed.
2. Click Apply.
On a K2 Summit/Solo system, a message appears that informs you about the write filter and
prompts you to restart. Click OK and the K2 Summit/Solo system restarts.
For import capture services, the service checks the source directory for files. If files are present,
the service moves them to the Archive sub-directory. It does not import the files into the
destination bin on the K2 system.
56 K2 Version 7.3.8 Release Notes & Upgrade Instructions 23 November 2010
Page 57

Manage redundancy on K2 Media Servers
Do not do this task if:
• You are upgrading a basic (non-redundant) K2 SAN. This means you have just one K2 Media
Server that takes the role of media file system/database server. Skip ahead and begin upgrading
your other K2 Media Servers or SAN K2 clients.
Do this task if:
• You are upgrading a redundant K2 SAN. To prevent triggering failover mechanisms, you must
manage primary/backup roles as instructed.
If primary upgrade only is complete
If you have completed the upgrade to the primary server but you have not yet upgraded the backup
server, do the following:
1. Make sure the backup server is still shut down.
2. Put the primary server in service as follows:
a) On the primary server, run Server Control Panel. You can do this at the local server or through
the K2 System Configuration application.
b) Use the Start button on Server Control Panel. This makes the primary server qualified to take
the role of media file system/database server.
c) Make sure that Server Control Panel shows green LEDs and that the server on which you
have upgraded software is indeed the current primary server.
Upgrading K2 systems
3. Power up the backup server. Wait until startup processes complete before continuing.
The Failover Monitor should currently be off, as this is the normal state of the service at system
startup.
Next upgrade the backup server. Perform all K2 Media Server upgrade tasks on the backup server.
If primary and backup upgrades are complete
If you have completed the upgrade to both the primary and backup servers, do the following:
1. Make sure the primary server is powered up.
2. Run Server Control Panel. You can do this at the local server or through the K2 System
Configuration application. Make sure Server Control Panel shows green LEDs and that the first
server on which you upgraded software is still the current primary server.
3. Put the backup server in service as follows:
a) Run Server Control Panel. You can do this at the local server or through the K2 System
Configuration application.
The Failover Monitor should currently be off on the backup server, as this is the normal state
of the service at system startup.
b) Use the Start button on Server Control Panel. This makes the backup server qualified to take
the role of media file system/database server.
c) Make sure that Server Control Panel shows green LEDs and that servers are correctly taking
primary/backup roles.
23 November 2010 K2 Version 7.3.8 Release Notes & Upgrade Instructions 57
Page 58

Upgrading K2 systems
Next upgrade any remaining K2 Media Servers.
Upgrade remaining K2 Media Servers
Do not do this task if:
• All the K2 Media Servers on the K2 SAN have been upgraded.
Do this task if:
• There are K2 Media Servers that do not take the role of media file system/database server on the
K2 SAN that have not yet been upgraded.
Perform all upgrade tasks on the remaining K2 Media Servers.
Upgrade K2 client
Work through the following topics sequentially to upgrade K2 clients.
Prepare for K2 system upgrade
Before upgrading K2 systems, do the following:
• Procure the software installation files for this release via the appropriate distribution method,
such as download, CD-ROM, network drive, or external drive.
• Start up the K2 systems you are upgrading, if they are not already started.
• For K2 Summit Production Client or K2 Solo Media Server, if you have not already done so,
disable (unlock) the write filter.
• Stop all media access on K2 systems.
• Shut down all applications on K2 systems.
Upgrade QuickTime
Do not do this task if:
• QuickTime is currently at version 7.6 or higher.
Do this task if:
• QuickTime is at a version lower than 7.6.
1. Access the QuickTime installation files.
2. Locate and open the following QuickTime install file:
QuickTimeInstaller-7.6.exe
3. Work through the install wizard.
Configure settings so that the software does not automatically update Quicktime and other Apple
software.
NOTE: Unless instructed to do so by Grass Valley, do not update or install Apple software.
Accept the default destination folder and other default settings.
Check all currently installed software on SAN K2 clients
Prerequisites for this task are as follows:
• The device is assigned in the SiteConfig system description and network connectivity is present.
58 K2 Version 7.3.8 Release Notes & Upgrade Instructions 23 November 2010
Page 59

Upgrading K2 systems
• SiteConfig is able to log in to the device using the username/password credentials assigned to
the device.
• The SiteConfig control point PC does not have a network drive mapped to an administrative
share (such as C$) on a device on which you are checking software.
Do the following steps on the SAN K2 clients that you are upgrading.
1. In the Software Deployment | Deployment Groups tree view, right-click the top-most node for the
group or any individual device and select Check Software.
NOTE: If you have access problems, verify that the adminstrator account on the device has
credentials as currently configured in SiteConfig. By default credentials on the device should
be administrator/adminGV! for Aurora devices and Administrator/adminK2 for K2 devices.
The Check Software dialog box appears. SiteConfig searches for software on the selected device
or devices and gathers information. Progress is reported.
2. When the check is complete for the selected device or devices, close the Check Software dialog
box.
An updated list of all currently installed software is displayed in the Software Deployment | Devices
| Installed Software list view. If software is a SiteConfig managed software package, information is
displayed in the Managed Package and Deployment Group columns.
Add software package to deployment group for SAN K2 clients
Prerequisites for this task are as follows:
• You can access the software package file from the SiteConfig control point PC.
• The SAN K2 clients to which you are deploying software are in a deployment group.
Use the following procedure to add one or more software packages to the deployment group that
contains your SAN K2 clients. For this release of K2 software, identify and add software installation
files as follows:
File nameSoftware
GrassValleyK2SummitSANClient_7.3.8.xxxx.cabK2 client software
SNFS_Summit_3.5.2.1b15620.cabSNFS software
1. In the Software Deployment | Deployment Groups tree view, select a deployment group.
2. Click the Add button.
The Add Package(s) dialog box opens.
3. Do one of the following to select the software package:
• Select from the list of packages then click OK.
• Click Browse, browse to and select the package, then click Open.
4. If one or more EULAs are displayed, accept them to proceed. If you do not accept a EULA, the
associated software is not assigned to the deployment group.
SiteConfig adds the package to the deployment group.
The package appears in the Managed Packages list for the selected deployment group. SiteConfig
creates new software deployment tasks for the package and displays them in the Tasks list view.
23 November 2010 K2 Version 7.3.8 Release Notes & Upgrade Instructions 59
Page 60

Upgrading K2 systems
Upgrade software on SAN K2 clients
Prerequisites for this task are as follows:
• The devices that you are upgrading are in a deployment group.
• For the software you are upgrading, you have added a newer version of that managed software
package to the deployment group.
• You have recently done the SiteConfig "Check Software" operation on the devices you are
upgrading.
• For the K2 Summit Production Client, the write filter is disabled (unlocked).
• NOTE: On a K2 system, if a SNFS version lower than 3.0 is installed, do not uninstall using
SiteConfig. You must manually uninstall using a special batch file. Follow instructions in the
release notes for your current version of K2 software.
If you are upgrading multiple software components for which there is a required sequence, you must
check and uncheck tasks and run multiple deployment sessions to control the sequence. For some
software components, SiteConfig aids you by enforcing dependencies. For each individual software
component, SiteConfig enforces an uninstall of the current version of software before installing the
upgrade version. SiteConfig provides uninstall deployment tasks and install deployment tasks to
indicate the taskflow. SiteConfig can do the uninstall/install in a single deployment session.
1. In the Software Deployment | Deployment Groups tree view, select the device or the group of
devices to which you are deploying software.
The corresponding software deployment tasks are displayed in the Tasks list view.
2. For the software you are deploying, select the Deploy check box in the row for the uninstall task.
3. For the software you are installing, select the Deploy check box in the row for the install task.
For upgrading SAN K2 clients to this release, configure Deploy check boxes as follows:
ActionManaged PackageDeploy
UninstallGrassValleyK2SummitSANClient
xxxx.xxxx
InstallGrassValleyK2SummitSANClient
7.3.8.xxxx
WFRegMon_SummitSANClient x.x.x
Install (there is no uninstall task for this
software)
Also, when upgrading SNFS, configure deployment tasks to upgrade (uninstall/install) SNFS.
Deploy the following tasks at the same time:
ActionManaged PackageDeploy
UninstallSNFS Summit xxxxxx
NOTE: If there are dependencies, SiteConfig can enforce that some tasks be deployed together.
60 K2 Version 7.3.8 Release Notes & Upgrade Instructions 23 November 2010
InstallSNFS Summit 3.5.2.1b15620
Page 61

Upgrading K2 systems
4. Check the area next to the Start Deployment button for a message.
If a message instructs you to upgrade the Discovery Agent, on the control point PC go to the
directory to which SiteConfig is installed, find the DiscoveryAgent_x.x.x.x.cab file, add it
to the deployment group, and deploy the Discovery Agent software as well.
5. Click the Start Deployment button.
Deployment tasks run and software is uninstalled. Progress is reported and next steps are indicated
in both the Status and Details columns. If an error appears regarding prerequisite software, install
the prerequisite files on the control point PC and then repeat this step.
When upgrading both K2 and SNFS software, SiteConfig uninstalls both in the proper sequence.
6. When the Status or Details columns indicate next steps, identify the software in the row, then
do one of the following:
• For SNFS software, when Details displays a Restart required link, click the link and when
prompted "...are you sure...", click Yes. After this restart, continue with other restarts as
indicated.
• For K2 software, if the version from which you are upgrading is lower than 7.1.0.1153, do
not restart. Do not click the Restart required link displayed in Details. Instead, you must power
cycle the K2 system, as instructed in the next task.
• For K2 software, if the version from which you are upgrading is 7.1.0.1153 or higher, when
Details displays a Restart required link, click the link and when prompted "...are you sure...",
click Yes.
7. Monitor progress as indicated by both the Status and Details column. When finished, the Status
column indicates complete.
Power cycle K2 system
Do not do this task if:
• The standard, SiteConfig-supported Restart operation is sufficient for the required restart after
installing software.
23 November 2010 K2 Version 7.3.8 Release Notes & Upgrade Instructions 61
Page 62

Upgrading K2 systems
Do this task if:
• You must power cycle, rather than restart, the K2 system after installing software.
When you must shutdown and then power up (power cycle) a device, rather than restart the device,
you must use a combination of SiteConfig and manual operations.
1. In the SiteConfig tree-view, right-click the device and select Shutdown.
SiteConfig initiates the Windows shutdown operation on the device and the device powers off.
2. At the local device, verify that shutdown operations are complete, then press the standby button
or otherwise manually power up the device.
The device starts up.
3. Verify that startup operations are complete on the device.
4. In SiteConfig, in the tree-view, right-click the device and select Set Restart Complete.
This re-synchronizes SiteConfig regarding the current state of the device. If software deployment
tasks were waiting for the restart to occur, SiteConfig now allows them to proceed.
Install required Windows update
Do not do this task if one of the following is true:
• A K2 Summit Production Client or K2 Solo Media Server received new from Grass Valley with
K2 software version 7.3.x or higher pre-installed, in which case the required Windows update
is pre-installed.
Do this task if:
• A K2 Summit Production Client or K2 Solo Media Server being upgraded from a version of K2
software version lower than 7.3.x.
NOTE: Do not install general Windows updates as available from Microsoft. Update only as
directed by Grass Valley.
1. Extract the contents of the RunUpdates.zip file into the C:\Temp directory.
This creates a folder named RunUpdates that includes all of the Windows update files.
2. Within the RunUpdates folder run RunUpdates.exe.
A command shell starts.
3. When prompted enter Y to start the update process
For each of the updates, the shell displays a line showing the update installing. A window showing
the progress of an update opens and then closes when complete. The shell then updates with the
completion status of the update.
4. If you interrupt the Windows update process, run RunUpdates.exe to start it again. Updates
continue from the point of interruption.
5. When updates complete and the shell displays the prompt “Do you want to reboot now?”, enter
Y to restart.
6. Log on to the K2 system with Windows administrator privileges.
7. Delete the RunUpdates folder and files.
8. Empty the Recycle Bin.
62 K2 Version 7.3.8 Release Notes & Upgrade Instructions 23 November 2010
Page 63

Lock K2 Summit Production Clients
This task enables the write filter on a K2 Summit Production Client or on a group of K2 Summit
Production Clients.
Prerequisites for this task are as follows:
• The device or all the devices in the group are communicating correctly in SiteConfig. This is
indicated by the green star icon overlay.
• The device or all the devices in the group are currently unlocked. This is indicated by the red
lock icon overlay.
1. In the Network Configuration | Devices tree view or the Software Deployment | Deployment Groups
tree view, identify the device or the group of devices that you intend to lock.
2. Right-click the device or the group and select Lock.
A “…may require restart…” message appears.
3. Click Yes to allow SiteConfig to restart the device or devices.
The Locking Devices window opens and displays progress.
4. When the Locking Devices window reports that the lock process completed successfully, click
Close.
Upgrading K2 systems
The device or devices are now locked. For K2 Summit/Solo, this also enables the write filter, which
enforces the restart.
Install MPEG-2/AVC-Intra field kit
If you are installing an MPEG-2 or AVC-Intra field kit upgrade on one or more or your K2
Summit Production Clients or K2 Solo Media Servers, do so now. Follow the procedure in the
Field Kit Upgrade Instructions document that you received with the field kit.
Upgrade Aurora Edit, Ingest, and Playout systems
Prerequisites for this task are as follows:
• K2 systems are upgraded to the compatible version of K2 system software.
• All Aurora Browse and MediaFrame devices are offline (all media access stopped) or shut down.
Upgrade your Aurora Edit, Ingest, and Playout systems to the compatible versions of software.
Refer to each Aurora product's release notes for procedures.
Upgrade NAS systems
Prerequisites for this task are as follows:
• K2 systems are upgraded to the compatible version of K2 system software.
• Aurora Edit, Ingest, and Playout systems are upgraded to the compatible versions of software.
23 November 2010 K2 Version 7.3.8 Release Notes & Upgrade Instructions 63
Page 64

Upgrading K2 systems
Upgrade the MediaFrame Proxy NAS (K2 Nearline SAN) to the compatible version of K2
software. Use SiteConfig and deploy software, using steps similar to those for other systems.
a) Check software on the Nearline SAN's K2 Media Servers.
b) Add software *.cab file to the deployment group that contains the K2 Media Servers.
c) Upgrade software on K2 Media Servers via a SiteConfig deployment session.
Upgrade Browse and MediaFrame systems
Prerequisites for this task are as follows:
• K2 systems are upgraded to the compatible version of K2 system software.
• Aurora Edit, Ingest, and Playout systems are upgraded to the compatible versions of software.
• K2 Nearline SAN (NAS) systems are upgraded to the compatible version of K2 system software.
Upgrade your Browse and MediaFrame systems to the compatible versions of software. Refer
to Aurora Browse Release Notes for procedures.
Upgrade other SAN clients
Do this task if:
• You have clients on the K2 SAN that have not yet been upgraded. This is the case if you have
K2 appliances or other products that use the shared storage of the K2 SAN.
Prerequisites for this task are as follows:
• You have access to the software installation files for this release. Procure the files via the
appropriate distibution method, such as download, CD-ROM, network drive, or external drive.
Refer to upgrade procedures for K2 clients and similarly upgrade all remaining client devices
on the K2 SAN.
NOTE: You must restart after installing K2 software.
Make recovery images
After you have upgraded software as instructed in these procedures and verified that your system
is working properly, you should always make a recovery image of each of your upgraded
computers. Use a sequence of tasks similar to those you followed for upgrading software so that
as you take systems offline you manage redundancy, servers, and clients, as appropriate for your
system.
Refer to the Grass Valley product's Service Manual for recovery image procedures.
Upgrading stand-alone K2 systems with SiteConfig
This section contains the tasks for using SiteConfig to upgrade stand-alone K2 systems to this release
of K2 software.
Work through the tasks sequentially to complete the upgrade.
64 K2 Version 7.3.8 Release Notes & Upgrade Instructions 23 November 2010
Page 65

NOTE: These upgrade instructions assume that the current K2 software is at version 7.0.11 or
higher. If the current K2 software is a 7.x version lower than 7.0.11, contact Grass Valley Support
before upgrading. If a K2 Media Client or any K2 device with current K2 software at a 3.x version,
do not upgrade, as version 7.x is not supported on these devices.
NOTE: When upgrading from a version lower than 7.1, K2 system software installs with a 30
day trial license. You need a permanent license to operate beyond the trial period.
About upgrading stand-alone K2 systems with SiteConfig
These upgrade instructions apply to stand-alone K2 systems as follows:
• K2 Summit Production Client internal storage
• K2 Summit Production Client direct-connect storage
• K2 Solo Media Server
With these upgrade instructions, you use SiteConfig from a network connected control point PC
and remotely upgrade software simultaneously on multiple K2 systems.
NOTE: A control point PC is required.
Upgrading K2 systems
This is the recommended process for software upgrades. If you choose to upgrade manually instead,
you can go to each local K2 system and use keyboard, monitor, and mouse to upgrade software.
You can find instructions for a manual upgrade without SiteConfig at Upgrading stand-alone K2
systems with SiteConfig on page 64 in these release notes.
If this is the first time using SiteConfig for software upgrade, follow instructions in K2 System Guide
rather than instruction in these release notes. You must first have SiteConfig set up for system
management and software deployment of the stand-alone K2. Also refer to the SiteConfig User
Manual or SiteConfig Help Topics. Then, after you have completed this initial SiteConfig set up,
you can follow the instructions in this section to upgrade software.
NOTE: If this is the first time using SiteConfig for software upgrade do not follow instructions
in these release notes alone.
The following installation tasks provide information specifically for the upgrade to this version of
7.3.8 software. Read the information in these sections carefully before attempting any upgrade to
software on a stand-alone K2 system.
Make recovery images
Do not do this task if:
• You previously made a recovery image at the current software version for each computer you
are upgrading.
Do this task if:
• You do not have a recovery image at the current software version for one or more of the computers
you are upgrading.
The recommended procedure is to make a recovery image immediately after a software upgrade. If
you neglected to do this when you last upgraded software you should make the recovery image now,
before upgrading to the new version.
Refer to the Grass Valley product's Service Manual for recovery image procedures.
23 November 2010 K2 Version 7.3.8 Release Notes & Upgrade Instructions 65
Page 66

Upgrading K2 systems
CAUTION: If you upgrade and then decide you do not want to stay with this version of K2
system software, you must use the recovery disk image process to downgrade to your previous
version.
Prepare for K2 system upgrade
Before upgrading K2 systems, do the following:
• Procure the software installation files for this release via the appropriate distribution method,
such as download, CD-ROM, network drive, or external drive.
• Start up the K2 systems you are upgrading, if they are not already started.
• For K2 Summit Production Client or K2 Solo Media Server, if you have not already done so,
disable (unlock) the write filter.
• Stop all media access on K2 systems.
• Shut down all applications on K2 systems.
Upgrade QuickTime
Do not do this task if:
• QuickTime is currently at version 7.6 or higher.
Do this task if:
• QuickTime is at a version lower than 7.6.
1. Access the QuickTime installation files.
2. Locate and open the following QuickTime install file:
QuickTimeInstaller-7.6.exe
3. Work through the install wizard.
Configure settings so that the software does not automatically update Quicktime and other Apple
software.
NOTE: Unless instructed to do so by Grass Valley, do not update or install Apple software.
Accept the default destination folder and other default settings.
Configure SNFS default.cfg file on stand-alone K2 system
In this task you open the media file system (SNFS) configuration file and verify/modify settings.
Do not do this task if:
• You have already modified the configuration file with the required settings.
Do this task if:
• The configuration file does not have the required settings.
Prerequisites for this task are as follows:
• K2 systems must be offline
You can verify and, if necessary, modify the media file system (SNFS) configuration file and still
keep your media file system intact if you carefully follow the steps in this procedure.
66 K2 Version 7.3.8 Release Notes & Upgrade Instructions 23 November 2010
Page 67

Upgrading K2 systems
As an alternative to manually modifying the configuration file, if you need to make a new file system
after upgrading K2 software, the required values are set automatically by the upgraded version of
Storage Utility.
This task applies to the following devices:
• K2 Solo Media Servers and stand-alone K2 Summit Production Clients. This includes internal
storage and direct-connect storage K2 Summit Production Clients.
NOTE: Make sure the write filter is disabled.
1. On a stand-alone K2 system, using Notepad, open the media file system (SNFS) configuration
file:
On a stand-alone K2 system, the configuration file can be either C:\SNFS\config\default.cfg.
or C:\SNFS\config\gvfs_hostname.cfg, where hostname is the name of the K2 system.
2. On a stand-alone K2 system, verify, and if necessary modify, settings for required values as
follows:
# *********************************************************
# A global section for defining file system-wide parameters
# *********************************************************
GlobalSuperUser Yes
.
.
.
.
.
.
InodeDeleteMax 1000
.
ReservedSpace No
3. Close, and if necessary save, the SNFS configuration file.
If you made changes, the K2 system must be restarted for the changes to take effect.
The restart later in this upgrade procedure is sufficient to put the changes into effect.
Prepare SiteConfig for software deployment to stand-alone K2 systems
Do the following to prepare SiteConfig for the software upgrade.
1. Make the following files accessible to the SiteConfig control point PC:
• K2 Summit Client Standalone software installation (*.cab) file.
• Summit SNFS software installation (*.cab) file.
2. If a newer version of SiteConfig is available for upgrade and you have not yet upgraded
SiteConfig, do the following:
a) From Windows Add/Remove programs, uninstall the current version of SiteConfig from the
control point PC.
b) Install the new version of SiteConfig on the control point PC.
23 November 2010 K2 Version 7.3.8 Release Notes & Upgrade Instructions 67
Page 68

Upgrading K2 systems
3. If not already present in the SiteConfig system description, configure deployment groups as
follows:
• A deployment group that contains your stand-alone K2 systems
• A deployment group that contains your control point PC
Check all currently installed software on stand-alone K2 systems
Prerequisites for this task are as follows:
• The device is assigned in the SiteConfig system description and network connectivity is present.
• SiteConfig is able to log in to the device using the username/password credentials assigned to
the device.
• The SiteConfig control point PC does not have a network drive mapped to an administrative
share (such as C$) on a device on which you are checking software.
Do the following steps on the stand-alone K2 systems that you are upgrading.
1. In the Software Deployment | Deployment Groups tree view, right-click the top-most node for the
group or any individual device and select Check Software.
NOTE: If you have access problems, verify that the adminstrator account on the device has
credentials as currently configured in SiteConfig. By default credentials on the device should
be administrator/adminGV! for Aurora devices and Administrator/adminK2 for K2 devices.
The Check Software dialog box appears. SiteConfig searches for software on the selected device
or devices and gathers information. Progress is reported.
2. When the check is complete for the selected device or devices, close the Check Software dialog
box.
An updated list of all currently installed software is displayed in the Software Deployment | Devices
| Installed Software list view. If software is a SiteConfig managed software package, information is
displayed in the Managed Package and Deployment Group columns.
Add software package to deployment group for stand-alone K2 systems
Prerequisites for this task are as follows:
• You can access the software package file or files from the SiteConfig control point PC.
• The stand-alone K2 systems to which you are deploying software are in a deployment group.
Use the following procedure to add one or more software packages to the deployment group that
contains your stand-alone K2 systems. For this release of K2 software, identify and add software
installation files as follows:
File nameSoftware
GrassValleyK2SummitStandalone_7.3.8.xxxx .cabK2 Client
software
SNFS_Summit_3.5.2.1b15620.cabSNFS software
1. In the Software Deployment | Deployment Groups tree view, select a deployment group.
68 K2 Version 7.3.8 Release Notes & Upgrade Instructions 23 November 2010
Page 69

2. Click the Add button.
The Add Package(s) dialog box opens.
3. Do one of the following to select the software package:
• Select from the list of packages then click OK.
• Click Browse, browse to and select the package, then click Open.
4. If one or more EULAs are displayed, accept them to proceed. If you do not accept a EULA, the
associated software is not assigned to the deployment group.
SiteConfig adds the package to the deployment group.
The package appears in the Managed Packages list for the selected deployment group. SiteConfig
creates new software deployment tasks for the package and displays them in the Tasks list view.
Unlock K2 Summit Production Clients or K2 Solo Media Servers
This task disables the write filter on one or more K2 Summit Production Clients or K2 Solo Media
Servers.
Upgrading K2 systems
Prerequisites for this task are as follows:
• The device or all the devices in the group are communicating correctly in SiteConfig. This is
indicated by the green star icon overlay.
• The device or all the devices in the group are currently locked. This is indicated by the gray lock
icon overlay.
1. If you have not already done so, stop all media access on the K2 systems. This includes record,
play, and transfer operations.
2. In either the Network Configuration | Devices tree view or the Software Deployment | Deployment
Groups tree view, identify the device or the group of devices that you intend to unlock.
3. Right-click the device or the group and select Unlock.
A “…may require restart…” message appears.
4. Click Yes to allow SiteConfig to restart the device or devices.
The Set Administrative Credentials dialog box opens.
5. Enter a username and password with administrator level privileges on the device or devices and
click OK.
The Unlocking Devices window opens and displays progress.
6. When the Unlocking Devices window reports that the unlock process completed successfully,
click Close.
The device or devices are now unlocked. For K2 Summit Production Clients, this also disables the
write filter, which enforces a restart.
Upgrade software on stand-alone K2 systems
Prerequisites for this task are as follows:
• The devices that you are upgrading are in a deployment group.
23 November 2010 K2 Version 7.3.8 Release Notes & Upgrade Instructions 69
Page 70

Upgrading K2 systems
• For the software you are upgrading, you have added a newer version of that managed software
package to the deployment group.
• You have recently done the SiteConfig "Check Software" operation on the devices you are
upgrading.
• For the K2 Summit Production Client or K2 Solo Media Server, the write filter is disabled
(unlocked).
• NOTE: On a K2 system, if a SNFS version lower than 3.0 is installed, do not uninstall using
SiteConfig. You must manually uninstall using a special batch file. Follow instructions in the
release notes for your current version of K2 software.
If you are upgrading multiple software components for which there is a required sequence, you must
check and uncheck tasks and run multiple deployment sessions to control the sequence. For some
software components, SiteConfig aids you by enforcing dependencies. For each individual software
component, SiteConfig enforces an uninstall of the current version of software before installing the
upgrade version. SiteConfig provides uninstall deployment tasks and install deployment tasks to
indicate the taskflow. SiteConfig can do the uninstall/install in a single deployment session.
1. In the Software Deployment | Deployment Groups tree view, select the device or the group of
devices to which you are deploying software.
The corresponding software deployment tasks are displayed in the Tasks list view.
2. For the software you are deploying, select the Deploy check box in the row for the uninstall task.
3. For the software you are installing, select the Deploy check box in the row for the install task.
For upgrading stand-alone K2 systems to this release, configure Deploy check boxes as follows:
ActionManaged PackageDeploy
UninstallGrassValleyK2SummitStandalone
xxxx.xxxx
InstallGrassValleyK2SummitStandalone
7.3.8.xxxx
WFRegMon_SummitStandalone x.x.x
Install (there is no uninstall task for this
software)
Also, when upgrading SNFS, configure deployment tasks to upgrade (uninstall/install) SNFS.
Deploy the following tasks at the same time:
ActionManaged PackageDeploy
UninstallSNFS Summit xxxxxx
InstallSNFS Summit 3.5.2.1b15620
NOTE: If there are dependencies, SiteConfig can enforce that some tasks be deployed together.
70 K2 Version 7.3.8 Release Notes & Upgrade Instructions 23 November 2010
Page 71
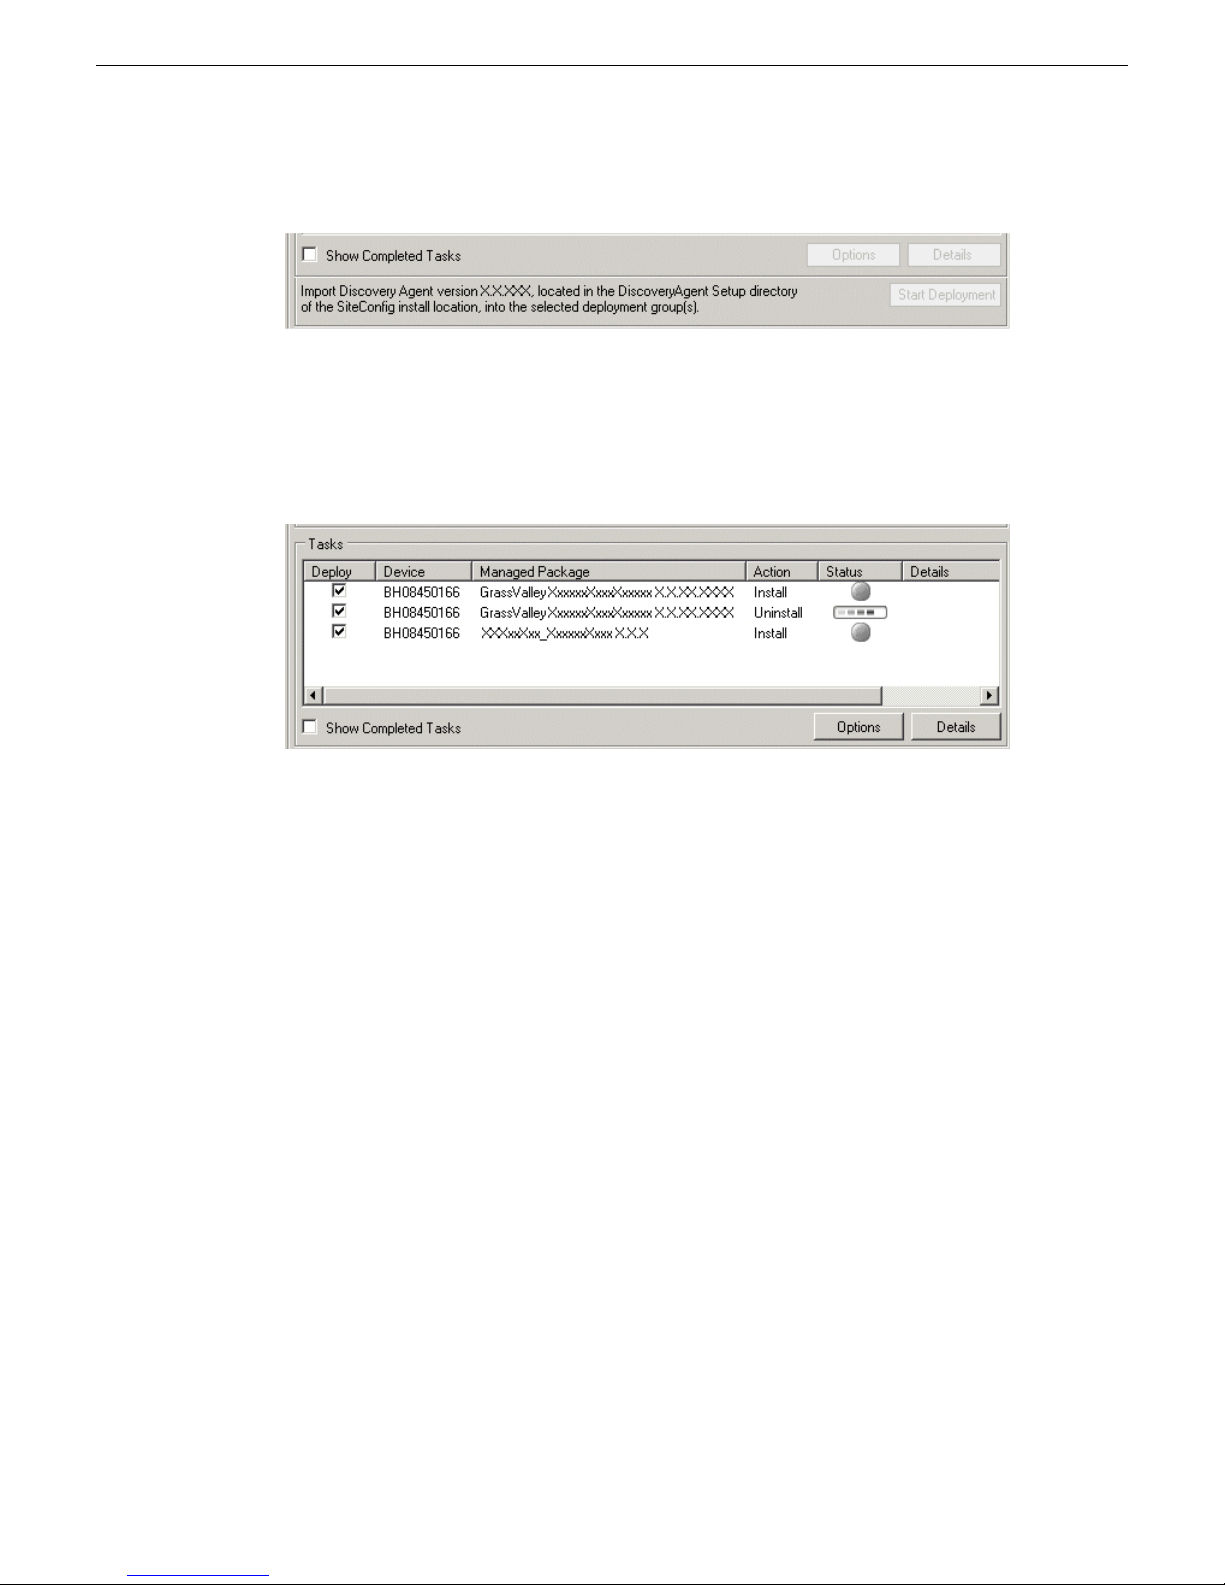
Upgrading K2 systems
4. Check the area next to the Start Deployment button for a message.
If a message instructs you to upgrade the Discovery Agent, on the control point PC go to the
directory to which SiteConfig is installed, find the DiscoveryAgent_x.x.x.x.cab file, add it
to the deployment group, and deploy the Discovery Agent software as well.
5. Click the Start Deployment button.
Deployment tasks run and software is uninstalled. Progress is reported and next steps are indicated
in both the Status and Details columns. If an error appears regarding prerequisite software, install
the prerequisite files on the control point PC and then repeat this step.
When upgrading both K2 and SNFS software, SiteConfig uninstalls both in the proper sequence.
6. When the Status or Details columns indicate next steps, identify the software in the row, then
do one of the following:
• For SNFS software, when Details displays a Restart required link, click the link and when
prompted "...are you sure...", click Yes. After this restart, continue with other restarts as
indicated.
• For K2 software, if the version from which you are upgrading is lower than 7.1.0.1153, do
not restart. Do not click the Restart required link displayed in Details. Instead, you must power
cycle the K2 system, as instructed in the next task.
• For K2 software, if the version from which you are upgrading is 7.1.0.1153 or higher, when
Details displays a Restart required link, click the link and when prompted "...are you sure...",
click Yes.
7. Monitor progress as indicated by both the Status and Details column. When finished, the Status
column indicates complete.
Power cycle K2 system
Do not do this task if:
• The standard, SiteConfig-supported Restart operation is sufficient for the required restart after
installing software.
23 November 2010 K2 Version 7.3.8 Release Notes & Upgrade Instructions 71
Page 72

Upgrading K2 systems
Do this task if:
• You must power cycle, rather than restart, the K2 system after installing software.
When you must shutdown and then power up (power cycle) a device, rather than restart the device,
you must use a combination of SiteConfig and manual operations.
1. In the SiteConfig tree-view, right-click the device and select Shutdown.
SiteConfig initiates the Windows shutdown operation on the device and the device powers off.
2. At the local device, verify that shutdown operations are complete, then press the standby button
or otherwise manually power up the device.
The device starts up.
3. Verify that startup operations are complete on the device.
4. In SiteConfig, in the tree-view, right-click the device and select Set Restart Complete.
This re-synchronizes SiteConfig regarding the current state of the device. If software deployment
tasks were waiting for the restart to occur, SiteConfig now allows them to proceed.
Install required Windows update
Do not do this task if one of the following is true:
• A K2 Summit Production Client or K2 Solo Media Server received new from Grass Valley with
K2 software version 7.3.x or higher pre-installed, in which case the required Windows update
is pre-installed.
Do this task if:
• A K2 Summit Production Client or K2 Solo Media Server being upgraded from a version of K2
software version lower than 7.3.x.
NOTE: Do not install general Windows updates as available from Microsoft. Update only as
directed by Grass Valley.
1. Extract the contents of the RunUpdates.zip file into the C:\Temp directory.
This creates a folder named RunUpdates that includes all of the Windows update files.
2. Within the RunUpdates folder run RunUpdates.exe.
A command shell starts.
3. When prompted enter Y to start the update process
For each of the updates, the shell displays a line showing the update installing. A window showing
the progress of an update opens and then closes when complete. The shell then updates with the
completion status of the update.
4. If you interrupt the Windows update process, run RunUpdates.exe to start it again. Updates
continue from the point of interruption.
5. When updates complete and the shell displays the prompt “Do you want to reboot now?”, enter
Y to restart.
6. Log on to the K2 system with Windows administrator privileges.
7. Delete the RunUpdates folder and files.
8. Empty the Recycle Bin.
72 K2 Version 7.3.8 Release Notes & Upgrade Instructions 23 November 2010
Page 73

Upgrade LSI RAID controller driver
Do not do this task if:
• A K2 Solo Media Server
• A K2 Summit Production Client with direct-connect storage
• A K2 Summit Production Client installed new with K2 software version 7.1.x or higher, in which
case the driver is pre-installed at version 3.10.0.32.
• A K2 Summit Production Client with the driver already upgraded to version 3.10.0.32.
Do this task if:
• A K2 Summit Production Client with internal storage and a driver at a version lower than
3.10.0.32.
1. If you are not sure of the driver version currently installed, do the following:
a) open Windows Device Manager | SCSI and RAID controllers | LSI MegaRAID SAS PCI Express
ROMB | Properties | Driver.
b) Check file properties. The following properties indicate that version 3.10.0.32 is already
installed:
Upgrading K2 systems
c) If the upgrade is necessary, continue with this procedure.
2. Open Windows Device Manager | SCSI and RAID controllers.
3. Right-click LSI MegaRAID SAS PCI Express ROMB and select Update driver.
An install wizard opens.
4. Select No, not this time and click Next.
5. Select Install from a list or specific location [Advanced] and click Next.
6. Select Don't search. I will choose the driver to install and click Next.
7. Click Have disk.
8. Click Browse, navigate to the LSI_1078_winxp directory, select oemsetup.inf, and click OK.
9. Click Next.
10. When prompted regarding Windows Logo Compatibility, select Continue Anyway and click
Finish.
11. Restart as prompted.
Upgrade MegaRAID Storage Manager
DateVersion
7/22/20093.10.0.32
Do not do this task if:
• A K2 Solo Media Server
• A K2 Summit Production Client with direct-connect storage
• A K2 Summit Production Client installed new with K2 software version 7.1.x or higher, in which
case MegaRAID Storage Manager is pre-installed at version 2.91-05.
23 November 2010 K2 Version 7.3.8 Release Notes & Upgrade Instructions 73
Page 74

Upgrading K2 systems
• A K2 Summit Production Client with MegaRAID Storage Manager already upgraded to version
2.91-05.
Do this task if:
• A K2 Summit Production Client with internal storage and with the MegaRAID Storage Manager
at a version lower than 2.91-05.
1. If you are not sure of the MegaRAID Storage Manager version currently installed, open Windows
Add/Remove Programs Control Panel and identify the version. Continue if the upgrade is necessary.
2. Access the installation file at ..\Drivers\MegaRAID29105\DISK1\ and double-click setup.exe.
An install wizard opens.
3. Work through wizard pages, accepting defaults.
4. When prompted, select Custom Installation and click Next.
5. Select the StandAlone option and click Next.
6. Click Install.
7. When prompted "...continue?" click Yes.
The software installs.
Upgrade RAID Controller microcode on stand-alone K2 system
Do not do this task if one of the following is true:
• A K2 Solo Media Server
• A K2 Summit Production Client installed new with K2 software version 7.1.x or higher, in which
case a compatible version of RAID controller microcode is pre-installed.
• A K2 Summit Production Client with internal storage and with RAID controller microcode
already upgraded to a compatible version, as listed in compatibility specifications.
• A K2 Summit Production Client with direct-connect storage and with RAID controller and/or
expansion chassis microcode already at compatible versions, as listed in compatibility
specifications.
Do this task if:
• A K2 Summit Production Client with internal storage and with RAID controller microcode that
you need to upgrade, as listed in compatibility specifications.
• A K2 Summit Production Client with direct-connect storage and with RAID controller and/or
expansion chassis microcode that you need to upgrade, as listed in compatibility specifications.
For internal storage K2 Summit/Solo systems, find compatibility specifications at Compatible K2
Summit/Solo components on page 31. For a K2 Summit Production Client with direct-connect
storage, find compatibility specifications at Compatible K2 RAID components on page 35.
1. Open AppCenter Workstation, either on the local K2 system or on the control point PC and
logon.
Make sure you logon to AppCenter with appropriate privileges, as this logon is passed to Storage
Utility. Administrator-level permission is necessary for most Storage Utility operations. If you
log in with user-level permissions, the Storage Utility menu item is disabled.
74 K2 Version 7.3.8 Release Notes & Upgrade Instructions 23 November 2010
Page 75

Upgrading K2 systems
2. If you are running AppCenter from a control point PC and you have channels from multiple K2
systems in your channel suite, select a channel from the stand-alone K2 system whose storage
you intend to configure with Storage Utility. This is important as Storage Utility automatically
connects to the K2 system that hosts the currently selected channel.
NOTE: Make sure you are connecting to a stand-alone K2 system. You should never connect
Storage Utility directly to a K2 system that uses shared (SAN) storage.
3. From the AppCenter System menu, select Storage Utility.
Storage Utility opens.
4. If you are connecting from a control point PC, you should verify that you are connected to the
correct K2 system. To verify this, use the Identify feature to flash the disks on the K2 system.
5. Select the controller in the Storage Utility tree view, then in the properties reported in the
right-hand pane, note the controller microcode version. Proceed if you need to upgrade the
controller microcode.
6. Right-click the controller in the tree view and do one of the following:
• For internal storage, select Load Controller Microcode in the context menu.
• For direct-connect storage, select Advanced | Load Controller Microcode in the context menu.
7. If online, messages appear “…offline mode now?” and “…continue?”. Click Yes to put the K2
system in offline mode.
AppCenter channels go offline. The Open File dialog box opens.
8. In the Open File dialog box, browse to and select the microcode file for the required version.
Refer to the following for locations and filenames:
• For internal-storage, refer to Compatible K2 Summit/Solo components on page 31.
• For direct-connect storage, refer to Compatible K2 RAID components on page 35.
9. Click OK.
The Progress Report window appears showing the microcode download task and the percentage
completion.
10. If direct-connect storage and upgrading expansion chassis microcode, do the following:
a) Right-click the controller in the tree view, then select Advanced | Load Disk Enclosure
Microcode in the context menu.
b) In the Open File dialog box, browse to the directory and file as listed in K2 RAID compatibility
specifications earlier in these release notes.
c) Click OK.
The Progress Report window appears showing the microcode download task and the percentage
completion.
11. When finished, exit Storage Utility.
12. If direct-connect storage, on 100% completion, proceed as follows:
• If the RAID controller chassis has redundant controllers, no power cycle is required. The
microcode download is complete.
• If the RAID controller chassis does not have redundant controllers, power cycle the RAID
controller chassis.
23 November 2010 K2 Version 7.3.8 Release Notes & Upgrade Instructions 75
Page 76

Upgrading K2 systems
13. Put AppCenter channels back online.
14. Restart.
Upgrade disk drive firmware on stand-alone K2 system
Do not do this task if:
• A K2 system with disk drive firmware already at a compatible version, as listed in compatibility
specifications.
Do this task if:
• A K2 system with disk drive firmware that you need to upgrade, as listed in compatibility
specifications.
For internal storage K2 Summit/Solo systems, find compatibility specifications at Compatible K2
Summit/Solo components on page 31. For a K2 Summit Production Client with direct-connect
storage, find compatibility specifications at Compatible K2 RAID components on page 35.
NOTE: The disk drives are upgraded one at a time which can take as long as 2 minutes per drive.
Take this into consideration when scheduling the upgrade.
1. Open AppCenter Workstation, either on the local K2 system or on the control point PC and
logon.
Make sure you logon to AppCenter with appropriate privileges, as this logon is passed to Storage
Utility. Administrator-level permission is necessary for most Storage Utility operations. If you
log in with user-level permissions, the Storage Utility menu item is disabled.
2. If you are running AppCenter from a control point PC and you have channels from multiple K2
systems in your channel suite, select a channel from the stand-alone K2 system whose storage
you intend to configure with Storage Utility. This is important as Storage Utility automatically
connects to the K2 system that hosts the currently selected channel.
NOTE: Make sure you are connecting to a stand-alone K2 system. You should never connect
Storage Utility directly to a K2 system that uses shared (SAN) storage.
3. From the AppCenter System menu, select Storage Utility.
Storage Utility opens.
4. If you are connecting from a control point PC, you should verify that you are connected to the
correct K2 system. To verify this, use the Identify feature to flash the disks on the K2 system.
5. Select a disk drive icon in the Storage Utility tree view, then note the firmware version in drive
properties reported in the right-hand pane. Proceed if you need to download disk drive firmware.
6. Right-click a disk in the tree view, then select Advanced | Download Disk Firmware in the context
menu.
7. If online, messages appear “…offline mode now?” and “…continue?”. Click Yes to put the K2
system in offline mode.
AppCenter channels go offline. The Open File dialog box opens.
8. In the Open File dialog box browse to the directory and file as listed in compatibility tables
earlier in these release notes. You must select the correct file for the device, storage type, and
drive size/type.
76 K2 Version 7.3.8 Release Notes & Upgrade Instructions 23 November 2010
Page 77

9. Click OK.
For internal drives, watch the lights on the drive to which you are downloading firmware. The
lights flash as firmware loads. Wait until the lights have completed their flashing pattern. This
can take several minutes.
The Progress Report window appears showing the disk firmware download task and the percentage
completion.
10. Repeat this procedure on each drive.
11. When finished, exit Storage Utility.
12. Put AppCenter channels back online.
13. Restart.
Configure RTIO
In this task you set the Real Time Input/Output (RTIO) value for the SNFS file system to support
K2 software features. This setting is required for all stand-alone K2 systems.
Do not do this task if:
Upgrading K2 systems
• A shared storage (SAN client) K2 system.
• A stand-alone K2 system that was installed new with K2 software version 7.2 or higher. On these
systems the RTIO setting is already at the required value.
• A stand-alone K2 system on which you have already set RTIO to the required value.
Do this task if:
• The K2 software from which you are upgrading is version 7.1.x or lower.
• — OR —
• You are not sure if the RTIO setting is already at the required value.
Prerequisites for this task are as follows:
• K2 systems must be offline
In this task you manually modify the SNFS configuration file. You can do this and still keep your
media file system intact if you carefully follow the steps in this procedure.
If you need to make a new file system after upgrading K2 software, the values are set automatically
by the upgraded version of Storage Utility.
This task applies to the following devices:
• Stand-alone K2 Summit Production Clients. This includes internal storage and direct-connect
storage K2 Summit Production Clients.
• K2 Solo Media Server
1. Open Storage Utility on the K2 Solo Media Server or stand-alone K2 Summit Production Client.
2. In Storage Utility click Tools | Modify File System.
3. When prompted "...offline mode now?" click Yes.
4. When prompted "...continue?" click Yes.
The Modify File System window opens and displays the text of the configuration file.
23 November 2010 K2 Version 7.3.8 Release Notes & Upgrade Instructions 77
Page 78

Upgrading K2 systems
5. In the text of the configuration file, identify the RTIO setting and if necessary modify the value
as follows:
• On a K2 Summit Production Client the required RTIO value is 370 and is configured as
• On a K2 Solo Media Server with standard Hard Disk Drives (HDD) the required RTIO value
• On a K2 Solo Media Server with optional Solid State Drives (SSD) or on a K2 Summit
follows:
# *********************************************************
# A stripe section for defining stripe groups.
# *********************************************************
[StripeGroup VStripe]
.
.
.
Rtios 370
.
is 170 and is configured as follows:
# *********************************************************
# A stripe section for defining stripe groups.
# *********************************************************
[StripeGroup VStripe]
.
.
.
Rtios 170
.
Production Client the required RTIO value is 250 and is configured as follows:
# *********************************************************
# A stripe section for defining stripe groups.
# *********************************************************
[StripeGroup VStripe]
.
.
.
Rtios 250
.
6. Do one of the following:
• If you modified the configuration file, click Modify and when prompted "...restarted now"
click OK. The K2 system restarts.
• If you did not modify the configuration file, click Cancel and then exit Storage Utility. When
prompted "...back to online mode?" click Yes.
Reset Capture Services
Do not do this task if:
• You do not use any of the K2 Capture Services.
78 K2 Version 7.3.8 Release Notes & Upgrade Instructions 23 November 2010
Page 79

Upgrading K2 systems
Do this task if:
• You are using one or more K2 Capture Services, such HotBin, Pathfire, DG, XML Import,
Export, P2, etc
Do this task on the K2 system running your K2 Capture Service, which is the K2 system that receives
the media to be imported into K2 storage. This can be a K2 Solo Media Server, a stand-alone K2
Summit Production Client, or the K2 Media Server with the role of primary FTP server on a K2
SAN.
When you configure a K2 Capture Service for the first time, the service is set to startup type
Automatic. However, if you upgrade or otherwise re-install your K2 System Software, the service
is re-set to startup type Manual. Therefore, you must re-configure the service after K2 System
Software upgrade/ reinstall in order to set the startup type back to Automatic.
1. From the Start menu, access the Programs menu and select Grass Valley | K2 Capture Services.
On a K2 Summit/Solo system, if the write filter is enabled, a message appears that informs you
about the write filter and prompts you to restart. Restart as prompted, then repeat this step.
The K2 Capture Services utility dialog box is displayed.
2. Click Apply.
On a K2 Summit/Solo system, a message appears that informs you about the write filter and
prompts you to restart. Click OK and the K2 Summit/Solo system restarts.
For import capture services, the service checks the source directory for files. If files are present,
the service moves them to the Archive sub-directory. It does not import the files into the
destination bin on the K2 system.
Upgrade K2 Dyno Server software
Do not do the tasks in this section if:
• The K2 Summit Production Client or K2 Solo Media Server is not controlled by a K2 Dyno
Controller and therefore K2 Dyno Server software is not installed.
Do the tasks in this section if:
• The K2 Summit Production Client or K2 Solo Media Server is controlled by a K2 Dyno Controller
and you need to upgrade the K2 Dyno Server software. Refer to compatibility specifications to
determine if you need to upgrade.
Check the K2 Dyno Controller release notes for any updated information regarding the upgrade
process, then proceed with the tasks in this section.
About K2 Dyno software
There are two software components in the K2 Dyno Replay system, as follows:
• K2 Dyno Server software – This software runs on the K2 Summit/Solo that is controlled by the
K2 Dyno Controller.
• K2 Dyno Client software – This software runs on the K2 Dyno Controller.
When installing/upgrading K2 Dyno software you must consider versions and compatibility for
both components: one on the K2 Summit/Solo and one on the K2 Dyno Controller.
23 November 2010 K2 Version 7.3.8 Release Notes & Upgrade Instructions 79
Page 80

Upgrading K2 systems
Uninstall K2 Dyno Server software
If you have not already done so, disable the write filter on the K2 Summit Production Client or K2
Solo Media Server.
On the K2 Summit Production Client or K2 Solo Media Server, use the Windows Add/Remove
Programs control panel and uninstall K2 Dyno Server software.
The display name of the software is K2 Dyno.
Do not restart the K2 Summit Production Client or K2 Solo Media Server.
Install K2 Dyno Server software
If the K2 Dyno Server software was previously installed, you must uninstall the software before
you use these steps to install.
If you have not already done so, disable the write filter on the K2 Summit Production Client or K2
Solo Media Server.
1. From the K2 Summit Production Client or K2 Solo Media Server, access the K2 Dyno Server
software installation files.
2. In the Server directory, locate and open the following file:
setup.exe
3. Follow the onscreen instructions, and work through each page.
4. Click Next and Finish to complete the installation.
5. Restart the K2 Summit Production Client or K2 Solo Media Server.
6. On the K2 Summit Production Client or K2 Solo Media Server, in Configuration Manager on
the Ganging tab, make sure that Use a single channel to control the gang or Record/play same clip
on all channels of Gang is not selected.
NOTE: The K2 Dyno Controller can exhibit behavior that is difficult to troubleshoot if this
checkbox is selected.
Lock K2 Summit Production Clients
This task enables the write filter on a K2 Summit Production Client or on a group of K2 Summit
Production Clients.
Prerequisites for this task are as follows:
• The device or all the devices in the group are communicating correctly in SiteConfig. This is
indicated by the green star icon overlay.
• The device or all the devices in the group are currently unlocked. This is indicated by the red
lock icon overlay.
1. In the Network Configuration | Devices tree view or the Software Deployment | Deployment Groups
tree view, identify the device or the group of devices that you intend to lock.
2. Right-click the device or the group and select Lock.
A “…may require restart…” message appears.
80 K2 Version 7.3.8 Release Notes & Upgrade Instructions 23 November 2010
Page 81

3. Click Yes to allow SiteConfig to restart the device or devices.
The Locking Devices window opens and displays progress.
4. When the Locking Devices window reports that the lock process completed successfully, click
Close.
The device or devices are now locked. For K2 Summit/Solo, this also enables the write filter, which
enforces the restart.
Upgrade K2 Dyno Controller
Do not do the tasks in this section if:
• The K2 Summit Production Client or K2 Solo Media Server is not controlled by a K2 Dyno
Controller.
Do the tasks in this section if:
• The K2 Summit Production Client or K2 Solo Media Server is controlled by a K2 Dyno Controller
and you need to upgrade software on the K2 Dyno Controller. Refer to compatibility specifications
to determine if you need to upgrade.
Before upgrading a K2 Dyno Controller, verify the following:
Upgrading K2 systems
• You have access to the software installation files for this release. Procure the files via the
appropriate distibution method, such as download, CD-ROM, network drive, or external drive.
• You have a recovery image for the K2 Dyno Contoller at the current software version.
• Media access is stopped.
About K2 Dyno Replay Controller modes
The K2 Dyno Reply Controller operates in the following modes:
• Dyno mode – The Dyno application is open for normal operations such as capturing and replaying
highlight clips.
• Maintenance mode – The Dyno application is closed and the Windows operating system desktop
is available for system tasks such as network configuration and software update.
By default, the K2 Dyno Replay Controller is in the Dyno mode. You must manually put the unit
in the maintenance mode, which requires a restart. Once you are in the maintenance mode, if you
shutdown or restart, you are prompted to confirm the switch back to the Dyno mode at next startup.
You can also choose to stay in the maintenance mode at next startup.
Uninstall K2 Dyno Controller Client software
1. On the K2 Dyno Controller, switch to the maintenance mode as follows:
a) At the startup screen, press the Shift button and then touch SHUTDOWN.
b) Touch MAINTENANCE MODE.
The K2 Dyno Client software closes and the Windows OS desktop is displayed after a restart.
2. Use the Windows Add/Remove Programs control panel and remove K2 Dyno Client software.
23 November 2010 K2 Version 7.3.8 Release Notes & Upgrade Instructions 81
Page 82

Upgrading K2 systems
Install software on K2 Dyno Controller
Before you install K2 Dyno Client software you must first uninstall the current version.
1. Copy the directory that contains the K2 Dyno Client software onto a portable USB drive, such
as a Flash drive.
2. Connect the USB drive to the K2 Dyno Controller and copy the Client directory to the K2 Dyno
Controller desktop.
3. In the Client directory, locate and open the following file:
setup.exe
4. Follow the onscreen instructions, and work through each page.
• If this is the first install after a re-image, enter the K2 Dyno Replay Controller serial number
• If the K2 Dyno System Configuration Tool opens, do not enter any information. Remove any
• If prompted "...update to new firmware?" click Yes, observe progress on the K2 Dyno
when prompted.
text from the serial number field, as it must be blank. Then click OK and when prompted
"...number is empty. Continue?", click OK.
Controller Firmware Updater, and when a Success message displays, click OK.
5. Click Next and Close to complete the installation.
6. Remove the portable USB drive, if it is still connected.
7. Restart using standard Windows procedures.
8. When prompted "...back to K2 Dyno mode...?", click Yes.
The K2 Dyno Controller restarts.
Install MPEG-2/AVC-Intra field kit
If you are installing an MPEG-2 or AVC-Intra field kit upgrade on one or more or your K2
Summit Production Clients or K2 Solo Media Servers, do so now. Follow the procedure in the
Field Kit Upgrade Instructions document that you received with the field kit.
Make recovery images
After you have upgraded software as instructed in these procedures and verified that your system
is working properly, you should always make a recovery image of each of your upgraded
computers. Use a sequence of tasks similar to those you followed for upgrading software so that
as you take systems offline you manage redundancy, servers, and clients, as appropriate for your
system.
Refer to the Grass Valley product's Service Manual for recovery image procedures.
Deploy control point PC software
Use SiteConfig to upgrade control point software on the K2 control point PC. In most cases, the K2
control point PC is also the SiteConfig control point PC, so you are in effect using SiteConfig to
upgrade software on its own local system.
82 K2 Version 7.3.8 Release Notes & Upgrade Instructions 23 November 2010
Page 83

For this release of K2 software, the install task identifies the control point software in the Managed
Package column as follows:
• GrassValleyControlPoint 7.3.8.xxxx
The software deployment process for the control point PC is similar to that used to upgrade software
on other K2 devices. Use similar procedures and adjust accordingly to do the following:
1. Add the K2 control point software package to the deployment group that contains the control
point PC.
2. Check software on the control point PC.
3. Configure and run deployment tasks to upgrade software.
Upgrading stand-alone K2 systems without SiteConfig
This section contains the tasks for upgrading stand-alone K2 systems to this release of K2 software.
With these instructions you go to each local K2 system and upgrade software using locally connected
keyboard, monitor, and mouse. Work through the tasks sequentially to complete the upgrade.
NOTE: These upgrade instructions assume that the current K2 software is at version 7.0.11 or
higher. If the current K2 software is a 7.x version lower than 7.0.11, contact Grass Valley Support
before upgrading. If a K2 Media Client or any K2 device with current K2 software at a 3.x version,
do not upgrade, as version 7.x is not supported on these devices.
Upgrading K2 systems
NOTE: When upgrading from a version lower than 7.1, K2 system software installs with a 30
day trial license. You need a permanent license to operate beyond the trial period.
Make recovery images
Do not do this task if:
• You previously made a recovery image at the current software version for each computer you
are upgrading.
Do this task if:
• You do not have a recovery image at the current software version for one or more of the computers
you are upgrading.
The recommended procedure is to make a recovery image immediately after a software upgrade. If
you neglected to do this when you last upgraded software you should make the recovery image now,
before upgrading to the new version.
Refer to the Grass Valley product's Service Manual for recovery image procedures.
CAUTION: If you upgrade and then decide you do not want to stay with this version of K2
system software, you must use the recovery disk image process to downgrade to your previous
version.
Prepare for K2 system upgrade
Before upgrading K2 systems, do the following:
• Procure the software installation files for this release via the appropriate distribution method,
such as download, CD-ROM, network drive, or external drive.
• Start up the K2 systems you are upgrading, if they are not already started.
23 November 2010 K2 Version 7.3.8 Release Notes & Upgrade Instructions 83
Page 84

Upgrading K2 systems
• For K2 Summit Production Client or K2 Solo Media Server, if you have not already done so,
disable (unlock) the write filter.
• Stop all media access on K2 systems.
• Shut down all applications on K2 systems.
Disable write filter
1. If you have not already done so, log on to the K2 system with Windows administrator privileges.
2. From the Windows desktop, click Start | All Programs | Grass Valley | Write Filter Utility.
FBWF Manager opens.
3. Under Filter Settings, set Filter to Disable.
Do not modify other settings.
4. Click OK.
5. When prompted, restart the K2 system.
Upgrade QuickTime
Do not do this task if:
• QuickTime is currently at version 7.6 or higher.
Do this task if:
• QuickTime is at a version lower than 7.6.
1. Access the QuickTime installation files.
2. Locate and open the following QuickTime install file:
QuickTimeInstaller-7.6.exe
3. Work through the install wizard.
Configure settings so that the software does not automatically update Quicktime and other Apple
software.
NOTE: Unless instructed to do so by Grass Valley, do not update or install Apple software.
Accept the default destination folder and other default settings.
Configure SNFS default.cfg file on stand-alone K2 system
In this task you open the media file system (SNFS) configuration file and verify/modify settings.
Do not do this task if:
• You have already modified the configuration file with the required settings.
Do this task if:
• The configuration file does not have the required settings.
Prerequisites for this task are as follows:
• K2 systems must be offline
84 K2 Version 7.3.8 Release Notes & Upgrade Instructions 23 November 2010
Page 85

Upgrading K2 systems
You can verify and, if necessary, modify the media file system (SNFS) configuration file and still
keep your media file system intact if you carefully follow the steps in this procedure.
As an alternative to manually modifying the configuration file, if you need to make a new file system
after upgrading K2 software, the required values are set automatically by the upgraded version of
Storage Utility.
This task applies to the following devices:
• K2 Solo Media Servers and stand-alone K2 Summit Production Clients. This includes internal
storage and direct-connect storage K2 Summit Production Clients.
NOTE: Make sure the write filter is disabled.
1. On a stand-alone K2 system, using Notepad, open the media file system (SNFS) configuration
file:
On a stand-alone K2 system, the configuration file can be either C:\SNFS\config\default.cfg.
or C:\SNFS\config\gvfs_hostname.cfg, where hostname is the name of the K2 system.
2. On a stand-alone K2 system, verify, and if necessary modify, settings for required values as
follows:
# *********************************************************
# A global section for defining file system-wide parameters
# *********************************************************
GlobalSuperUser Yes
.
.
.
.
.
.
InodeDeleteMax 1000
.
ReservedSpace No
3. Close, and if necessary save, the SNFS configuration file.
If you made changes, the K2 system must be restarted for the changes to take effect.
The restart later in this upgrade procedure is sufficient to put the changes into effect.
Uninstall K2 software from stand-alone K2 system
1. Disable the write filter, if not already disabled.
2. Open the Windows Add/Remove Programs control panel.
3. Select GrassValleyK2Client. and click Remove.
4. When prompted "Are you sure...?", click Yes.
5. When prompted to restart, do not restart.
While a restart is required after installing K2 Client software, you can delay the restart until after
other tasks are complete.
23 November 2010 K2 Version 7.3.8 Release Notes & Upgrade Instructions 85
Page 86

Upgrading K2 systems
6. On a K2 Summit Production Client or K2 Solo Media Server, disable the write filter.
Disabling the write filter at this point keeps it disabled after the required restart. This is helpful
because it must be disabled in order to uninstall or install software, which you will be doing after
the restart.
7. Manage the required restart as follows:
• Restart now.
Uninstall SNFS from K2 client
Do not do this task if:
• The desired version of SNFS is already installed and the installation (including required restarts)
is complete.
Do this task if:
• A SNFS version lower than 3.5.2.1b15620 is currently installed
If you have not already done so, disable the write filter on the K2 Summit Production Client or K2
Solo Media Server.
1. Make sure you are logged in with an administrator account.
2. Use the Windows Add/Remove Programs control panel and uninstall SNFS.
3. Disable the write filter.
Disabling the write filter at this point keeps it disabled after the required restart. This is helpful
because it must be disabled in order to install software, which you will be doing after the restart.
4. Restart using the Windows operating system restart procedure.
Install K2 software
Prerequisites for this task are as follows:
• If you uninstalled the previous version of K2 software, you must restart the K2 client at least
once before installing the new version of K2 software.
1. Log in with a local administrator account. This is required to support K2 System Software
licensing.
NOTE: When installing K2 system software, you must be logged in with a local administrator
account. Do not install software using a domain account.
2. Disable the write filter, if not already disabled.
3. If installation files are on a connected external USB drive, copy the installation files to the local
drive before proceeding.
4. Access the installation files.
86 K2 Version 7.3.8 Release Notes & Upgrade Instructions 23 November 2010
Page 87
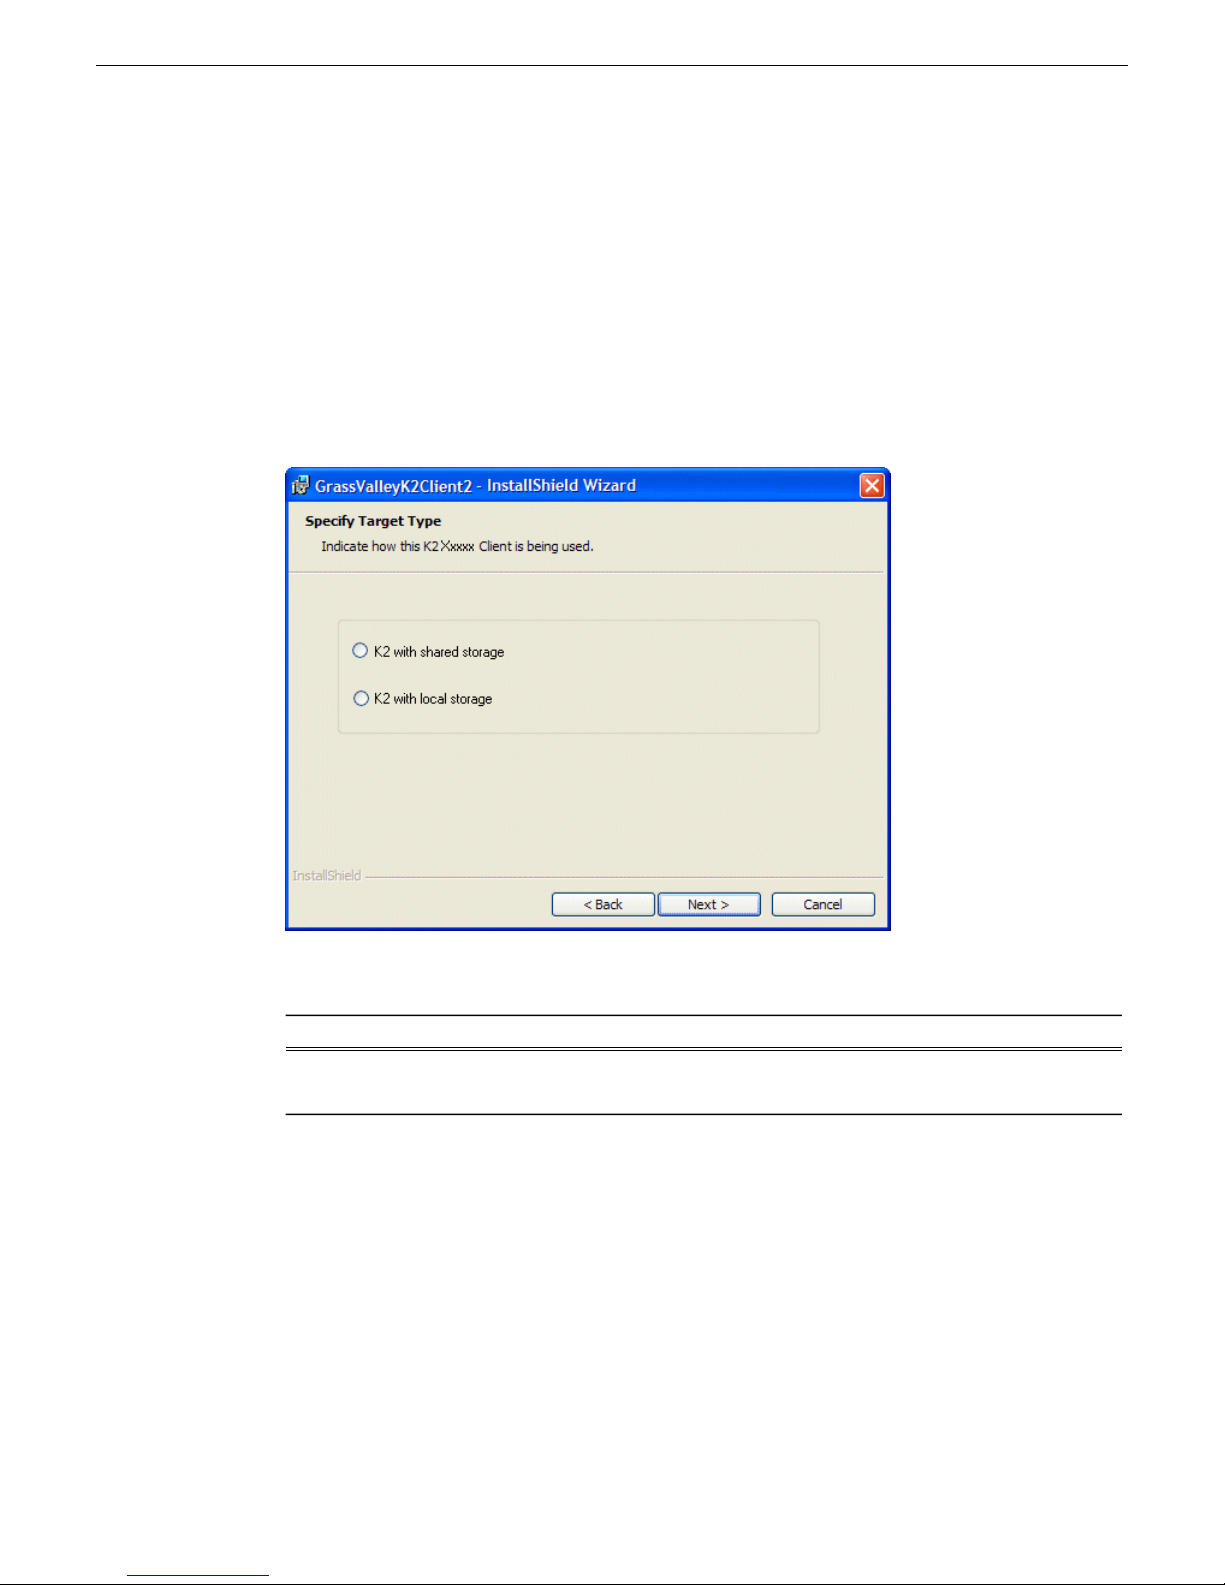
Upgrading K2 systems
5. Locate and open the following file:
For K2 Summit Production Client or K2 Solo Media Server —
• If a message appears informing you that you must restart, click OK to restart. If an external
USB drive is currently connected, disconnect it before startup processes begin. Then repeat
previous steps as necessary to run the install program again before continuing with the next
step in this procedure.
• If no message appears, the install wizard opens. Continue with the next step in this procedure.
6. Follow the install wizard onscreen instructions, and work through each page.
7. When you arrive at the Specify Target Type page, select the option as follows:
K2 with local storage
23 November 2010 K2 Version 7.3.8 Release Notes & Upgrade Instructions 87
DescriptionOption
For installing on an internal storage K2 system or on a
direct-connect storage K2 system.
Page 88
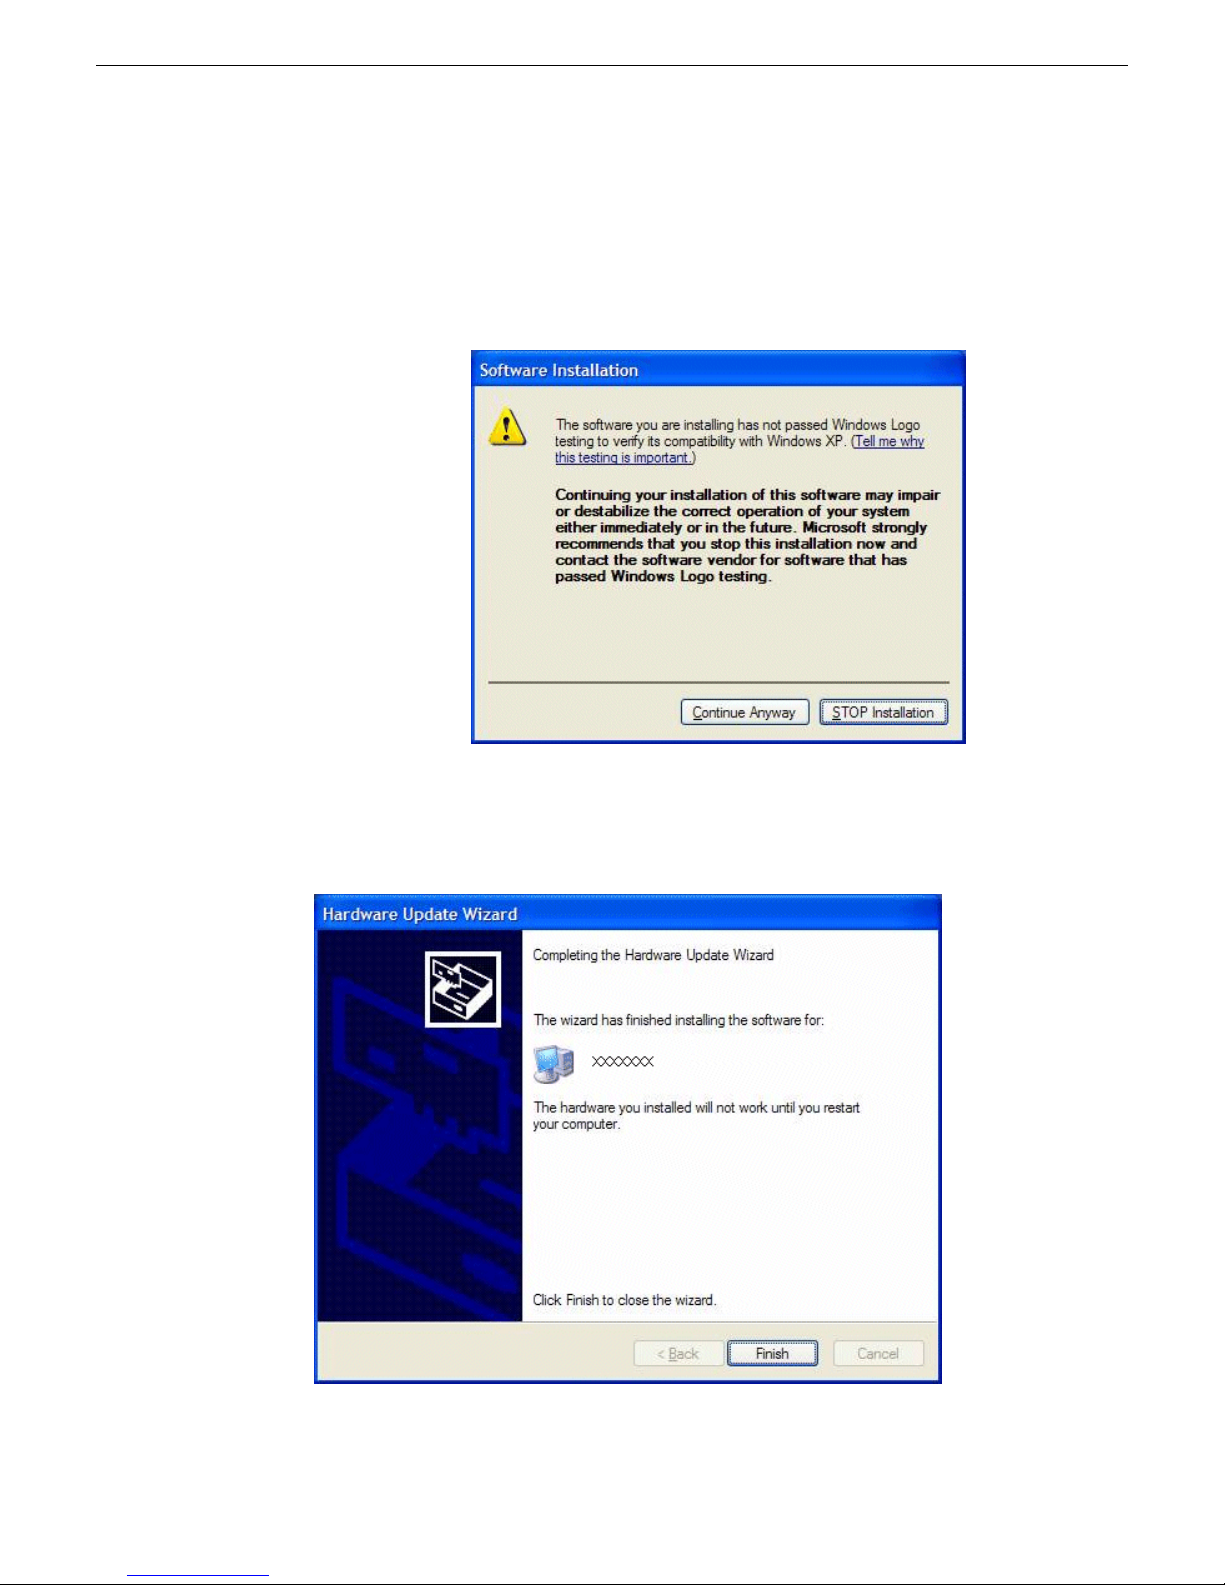
Upgrading K2 systems
8. Depending on the state of the system when upgrading, you might see one or more of the following
screens or messages as you work through the installation wizard. Proceed as instructed, and then
continue with this procedure:
a) If one or more messages appear referring to “…has not passed Windows logo testing…”, you
can safely continue. This is a normal part of the upgrade.
Click Yes or Continue… to allow the installation to progress.
b) If installation progress stops after about a minute and does not proceed, look in the Windows
taskbar for a Hardware Update Wizard window that has opened.
Click Finish on the Hardware Update Wizard to continue installation. If multiple Hardware
Update Wizards open, finish them similarly.
88 K2 Version 7.3.8 Release Notes & Upgrade Instructions 23 November 2010
Page 89

9. Click Next and Finish to complete the installation.
10. When prompted to restart, proceed as follows:
• Disable the write filter.
Disabling the write filter before the restart keeps it disabled after restart. This is helpful
because it must be disabled in order to install software, which you will be doing after the
restart.
• Do one of the following:
• If the version from which you are upgrading is lower than 7.1.0.1153, shut down the
system. After the system is shut down, press the standby button to power up the system.
You must shutdown/powerup (power cycle), rather than restart.
• If the version from which you are upgrading is 7.1.0.1153 or higher, restart.
Install SNFS on stand-alone K2 system
Prerequisites for this task are as follows:
Upgrading K2 systems
• Before installing a new version of SNFS software, make sure that the computer has been restarted
at least once since the previous version of SNFS software was uninstalled.
1. Access the installation files.
2. Press any key to proceed.
3. Restart media file system services as follows:
a) Click Start | Programs | SNFS File System | Services Stop.
b) Click Start | Programs | SNFS File System | Services Start.
4. Restart the computer using the Windows operating system restart procedure.
Verify upgraded software
When the K2 client starts up, you can verify that the correct versions of software are installed as
follows:
1. Log on to AppCenter.
2. In AppCenter click Help | About.
The About dialog box opens.
3. Identify versions as follows
7.3.8.xxxSystem Version
7.3.8.xxxRTS Version
These should both report the
same version number. This is
the K2 System Software
version number.
23 November 2010 K2 Version 7.3.8 Release Notes & Upgrade Instructions 89
This is the SNFS version.3.5.2.1b15620Media File System
Page 90

Upgrading K2 systems
Install required Windows update
Do not do this task if one of the following is true:
• A K2 Summit Production Client or K2 Solo Media Server received new from Grass Valley with
K2 software version 7.3.x or higher pre-installed, in which case the required Windows update
is pre-installed.
Do this task if:
• A K2 Summit Production Client or K2 Solo Media Server being upgraded from a version of K2
software version lower than 7.3.x.
NOTE: Do not install general Windows updates as available from Microsoft. Update only as
directed by Grass Valley.
1. Extract the contents of the RunUpdates.zip file into the C:\Temp directory.
This creates a folder named RunUpdates that includes all of the Windows update files.
2. Within the RunUpdates folder run RunUpdates.exe.
A command shell starts.
3. When prompted enter Y to start the update process
For each of the updates, the shell displays a line showing the update installing. A window showing
the progress of an update opens and then closes when complete. The shell then updates with the
completion status of the update.
4. If you interrupt the Windows update process, run RunUpdates.exe to start it again. Updates
continue from the point of interruption.
5. When updates complete and the shell displays the prompt “Do you want to reboot now?”, enter
Y to restart.
6. Log on to the K2 system with Windows administrator privileges.
7. Delete the RunUpdates folder and files.
8. Empty the Recycle Bin.
Upgrade LSI RAID controller driver
Do not do this task if:
• A K2 Solo Media Server
• A K2 Summit Production Client with direct-connect storage
• A K2 Summit Production Client installed new with K2 software version 7.1.x or higher, in which
case the driver is pre-installed at version 3.10.0.32.
• A K2 Summit Production Client with the driver already upgraded to version 3.10.0.32.
Do this task if:
• A K2 Summit Production Client with internal storage and a driver at a version lower than
3.10.0.32.
90 K2 Version 7.3.8 Release Notes & Upgrade Instructions 23 November 2010
Page 91

Upgrading K2 systems
1. If you are not sure of the driver version currently installed, do the following:
a) open Windows Device Manager | SCSI and RAID controllers | LSI MegaRAID SAS PCI Express
ROMB | Properties | Driver.
b) Check file properties. The following properties indicate that version 3.10.0.32 is already
installed:
DateVersion
7/22/20093.10.0.32
c) If the upgrade is necessary, continue with this procedure.
2. Open Windows Device Manager | SCSI and RAID controllers.
3. Right-click LSI MegaRAID SAS PCI Express ROMB and select Update driver.
An install wizard opens.
4. Select No, not this time and click Next.
5. Select Install from a list or specific location [Advanced] and click Next.
6. Select Don't search. I will choose the driver to install and click Next.
7. Click Have disk.
8. Click Browse, navigate to the LSI_1078_winxp directory, select oemsetup.inf, and click OK.
9. Click Next.
10. When prompted regarding Windows Logo Compatibility, select Continue Anyway and click
Finish.
11. Restart as prompted.
Upgrade MegaRAID Storage Manager
Do not do this task if:
• A K2 Solo Media Server
• A K2 Summit Production Client with direct-connect storage
• A K2 Summit Production Client installed new with K2 software version 7.1.x or higher, in which
case MegaRAID Storage Manager is pre-installed at version 2.91-05.
• A K2 Summit Production Client with MegaRAID Storage Manager already upgraded to version
2.91-05.
Do this task if:
• A K2 Summit Production Client with internal storage and with the MegaRAID Storage Manager
at a version lower than 2.91-05.
1. If you are not sure of the MegaRAID Storage Manager version currently installed, open Windows
Add/Remove Programs Control Panel and identify the version. Continue if the upgrade is necessary.
2. Access the installation file at ..\Drivers\MegaRAID29105\DISK1\ and double-click setup.exe.
An install wizard opens.
3. Work through wizard pages, accepting defaults.
4. When prompted, select Custom Installation and click Next.
5. Select the StandAlone option and click Next.
23 November 2010 K2 Version 7.3.8 Release Notes & Upgrade Instructions 91
Page 92

Upgrading K2 systems
6. Click Install.
7. When prompted "...continue?" click Yes.
The software installs.
Upgrade RAID Controller microcode on stand-alone K2 system
Do not do this task if one of the following is true:
• A K2 Solo Media Server
• A K2 Summit Production Client installed new with K2 software version 7.1.x or higher, in which
case a compatible version of RAID controller microcode is pre-installed.
• A K2 Summit Production Client with internal storage and with RAID controller microcode
already upgraded to a compatible version, as listed in compatibility specifications.
• A K2 Summit Production Client with direct-connect storage and with RAID controller and/or
expansion chassis microcode already at compatible versions, as listed in compatibility
specifications.
Do this task if:
• A K2 Summit Production Client with internal storage and with RAID controller microcode that
you need to upgrade, as listed in compatibility specifications.
• A K2 Summit Production Client with direct-connect storage and with RAID controller and/or
expansion chassis microcode that you need to upgrade, as listed in compatibility specifications.
For internal storage K2 Summit/Solo systems, find compatibility specifications at Compatible K2
Summit/Solo components on page 31. For a K2 Summit Production Client with direct-connect
storage, find compatibility specifications at Compatible K2 RAID components on page 35.
1. Open AppCenter Workstation, either on the local K2 system or on the control point PC and
logon.
Make sure you logon to AppCenter with appropriate privileges, as this logon is passed to Storage
Utility. Administrator-level permission is necessary for most Storage Utility operations. If you
log in with user-level permissions, the Storage Utility menu item is disabled.
2. If you are running AppCenter from a control point PC and you have channels from multiple K2
systems in your channel suite, select a channel from the stand-alone K2 system whose storage
you intend to configure with Storage Utility. This is important as Storage Utility automatically
connects to the K2 system that hosts the currently selected channel.
NOTE: Make sure you are connecting to a stand-alone K2 system. You should never connect
Storage Utility directly to a K2 system that uses shared (SAN) storage.
3. From the AppCenter System menu, select Storage Utility.
Storage Utility opens.
4. If you are connecting from a control point PC, you should verify that you are connected to the
correct K2 system. To verify this, use the Identify feature to flash the disks on the K2 system.
5. Select the controller in the Storage Utility tree view, then in the properties reported in the
right-hand pane, note the controller microcode version. Proceed if you need to upgrade the
controller microcode.
92 K2 Version 7.3.8 Release Notes & Upgrade Instructions 23 November 2010
Page 93

Upgrading K2 systems
6. Right-click the controller in the tree view and do one of the following:
• For internal storage, select Load Controller Microcode in the context menu.
• For direct-connect storage, select Advanced | Load Controller Microcode in the context menu.
7. If online, messages appear “…offline mode now?” and “…continue?”. Click Yes to put the K2
system in offline mode.
AppCenter channels go offline. The Open File dialog box opens.
8. In the Open File dialog box, browse to and select the microcode file for the required version.
Refer to the following for locations and filenames:
• For internal-storage, refer to Compatible K2 Summit/Solo components on page 31.
• For direct-connect storage, refer to Compatible K2 RAID components on page 35.
9. Click OK.
The Progress Report window appears showing the microcode download task and the percentage
completion.
10. If direct-connect storage and upgrading expansion chassis microcode, do the following:
a) Right-click the controller in the tree view, then select Advanced | Load Disk Enclosure
Microcode in the context menu.
b) In the Open File dialog box, browse to the directory and file as listed in K2 RAID compatibility
specifications earlier in these release notes.
c) Click OK.
The Progress Report window appears showing the microcode download task and the percentage
completion.
11. When finished, exit Storage Utility.
12. If direct-connect storage, on 100% completion, proceed as follows:
• If the RAID controller chassis has redundant controllers, no power cycle is required. The
microcode download is complete.
• If the RAID controller chassis does not have redundant controllers, power cycle the RAID
controller chassis.
13. Put AppCenter channels back online.
14. Restart.
Upgrade disk drive firmware on stand-alone K2 system
Do not do this task if:
• A K2 system with disk drive firmware already at a compatible version, as listed in compatibility
specifications.
Do this task if:
• A K2 system with disk drive firmware that you need to upgrade, as listed in compatibility
specifications.
23 November 2010 K2 Version 7.3.8 Release Notes & Upgrade Instructions 93
Page 94

Upgrading K2 systems
For internal storage K2 Summit/Solo systems, find compatibility specifications at Compatible K2
Summit/Solo components on page 31. For a K2 Summit Production Client with direct-connect
storage, find compatibility specifications at Compatible K2 RAID components on page 35.
NOTE: The disk drives are upgraded one at a time which can take as long as 2 minutes per drive.
Take this into consideration when scheduling the upgrade.
1. Open AppCenter Workstation, either on the local K2 system or on the control point PC and
logon.
Make sure you logon to AppCenter with appropriate privileges, as this logon is passed to Storage
Utility. Administrator-level permission is necessary for most Storage Utility operations. If you
log in with user-level permissions, the Storage Utility menu item is disabled.
2. If you are running AppCenter from a control point PC and you have channels from multiple K2
systems in your channel suite, select a channel from the stand-alone K2 system whose storage
you intend to configure with Storage Utility. This is important as Storage Utility automatically
connects to the K2 system that hosts the currently selected channel.
NOTE: Make sure you are connecting to a stand-alone K2 system. You should never connect
Storage Utility directly to a K2 system that uses shared (SAN) storage.
3. From the AppCenter System menu, select Storage Utility.
Storage Utility opens.
4. If you are connecting from a control point PC, you should verify that you are connected to the
correct K2 system. To verify this, use the Identify feature to flash the disks on the K2 system.
5. Select a disk drive icon in the Storage Utility tree view, then note the firmware version in drive
properties reported in the right-hand pane. Proceed if you need to download disk drive firmware.
6. Right-click a disk in the tree view, then select Advanced | Download Disk Firmware in the context
menu.
7. If online, messages appear “…offline mode now?” and “…continue?”. Click Yes to put the K2
system in offline mode.
AppCenter channels go offline. The Open File dialog box opens.
8. In the Open File dialog box browse to the directory and file as listed in compatibility tables
earlier in these release notes. You must select the correct file for the device, storage type, and
drive size/type.
9. Click OK.
For internal drives, watch the lights on the drive to which you are downloading firmware. The
lights flash as firmware loads. Wait until the lights have completed their flashing pattern. This
can take several minutes.
The Progress Report window appears showing the disk firmware download task and the percentage
completion.
10. Repeat this procedure on each drive.
11. When finished, exit Storage Utility.
12. Put AppCenter channels back online.
13. Restart.
94 K2 Version 7.3.8 Release Notes & Upgrade Instructions 23 November 2010
Page 95

Configure RTIO
In this task you set the Real Time Input/Output (RTIO) value for the SNFS file system to support
K2 software features. This setting is required for all stand-alone K2 systems.
Do not do this task if:
• A shared storage (SAN client) K2 system.
• A stand-alone K2 system that was installed new with K2 software version 7.2 or higher. On these
systems the RTIO setting is already at the required value.
• A stand-alone K2 system on which you have already set RTIO to the required value.
Do this task if:
• The K2 software from which you are upgrading is version 7.1.x or lower.
• — OR —
• You are not sure if the RTIO setting is already at the required value.
Prerequisites for this task are as follows:
• K2 systems must be offline
In this task you manually modify the SNFS configuration file. You can do this and still keep your
media file system intact if you carefully follow the steps in this procedure.
Upgrading K2 systems
If you need to make a new file system after upgrading K2 software, the values are set automatically
by the upgraded version of Storage Utility.
This task applies to the following devices:
• Stand-alone K2 Summit Production Clients. This includes internal storage and direct-connect
storage K2 Summit Production Clients.
• K2 Solo Media Server
1. Open Storage Utility on the K2 Solo Media Server or stand-alone K2 Summit Production Client.
2. In Storage Utility click Tools | Modify File System.
3. When prompted "...offline mode now?" click Yes.
4. When prompted "...continue?" click Yes.
The Modify File System window opens and displays the text of the configuration file.
23 November 2010 K2 Version 7.3.8 Release Notes & Upgrade Instructions 95
Page 96

Upgrading K2 systems
5. In the text of the configuration file, identify the RTIO setting and if necessary modify the value
as follows:
• On a K2 Summit Production Client the required RTIO value is 370 and is configured as
• On a K2 Solo Media Server with standard Hard Disk Drives (HDD) the required RTIO value
• On a K2 Solo Media Server with optional Solid State Drives (SSD) or on a K2 Summit
follows:
# *********************************************************
# A stripe section for defining stripe groups.
# *********************************************************
[StripeGroup VStripe]
.
.
.
Rtios 370
.
is 170 and is configured as follows:
# *********************************************************
# A stripe section for defining stripe groups.
# *********************************************************
[StripeGroup VStripe]
.
.
.
Rtios 170
.
Production Client the required RTIO value is 250 and is configured as follows:
# *********************************************************
# A stripe section for defining stripe groups.
# *********************************************************
[StripeGroup VStripe]
.
.
.
Rtios 250
.
6. Do one of the following:
• If you modified the configuration file, click Modify and when prompted "...restarted now"
click OK. The K2 system restarts.
• If you did not modify the configuration file, click Cancel and then exit Storage Utility. When
prompted "...back to online mode?" click Yes.
Reset Capture Services
Do not do this task if:
• You do not use any of the K2 Capture Services.
96 K2 Version 7.3.8 Release Notes & Upgrade Instructions 23 November 2010
Page 97

Upgrading K2 systems
Do this task if:
• You are using one or more K2 Capture Services, such HotBin, Pathfire, DG, XML Import,
Export, P2, etc
Do this task on the K2 system running your K2 Capture Service, which is the K2 system that receives
the media to be imported into K2 storage. This can be a K2 Solo Media Server, a stand-alone K2
Summit Production Client, or the K2 Media Server with the role of primary FTP server on a K2
SAN.
When you configure a K2 Capture Service for the first time, the service is set to startup type
Automatic. However, if you upgrade or otherwise re-install your K2 System Software, the service
is re-set to startup type Manual. Therefore, you must re-configure the service after K2 System
Software upgrade/ reinstall in order to set the startup type back to Automatic.
1. From the Start menu, access the Programs menu and select Grass Valley | K2 Capture Services.
On a K2 Summit/Solo system, if the write filter is enabled, a message appears that informs you
about the write filter and prompts you to restart. Restart as prompted, then repeat this step.
The K2 Capture Services utility dialog box is displayed.
2. Click Apply.
On a K2 Summit/Solo system, a message appears that informs you about the write filter and
prompts you to restart. Click OK and the K2 Summit/Solo system restarts.
For import capture services, the service checks the source directory for files. If files are present,
the service moves them to the Archive sub-directory. It does not import the files into the
destination bin on the K2 system.
Upgrade K2 Dyno Server software
Do not do the tasks in this section if:
• The K2 Summit Production Client or K2 Solo Media Server is not controlled by a K2 Dyno
Controller and therefore K2 Dyno Server software is not installed.
Do the tasks in this section if:
• The K2 Summit Production Client or K2 Solo Media Server is controlled by a K2 Dyno Controller
and you need to upgrade the K2 Dyno Server software. Refer to compatibility specifications to
determine if you need to upgrade.
Check the K2 Dyno Controller release notes for any updated information regarding the upgrade
process, then proceed with the tasks in this section.
About K2 Dyno software
There are two software components in the K2 Dyno Replay system, as follows:
• K2 Dyno Server software – This software runs on the K2 Summit/Solo that is controlled by the
K2 Dyno Controller.
• K2 Dyno Client software – This software runs on the K2 Dyno Controller.
When installing/upgrading K2 Dyno software you must consider versions and compatibility for
both components: one on the K2 Summit/Solo and one on the K2 Dyno Controller.
23 November 2010 K2 Version 7.3.8 Release Notes & Upgrade Instructions 97
Page 98

Upgrading K2 systems
Disable write filter
1. If you have not already done so, log on to the K2 system with Windows administrator privileges.
2. From the Windows desktop, click Start | All Programs | Grass Valley | Write Filter Utility.
FBWF Manager opens.
3. Under Filter Settings, set Filter to Disable.
Do not modify other settings.
4. Click OK.
5. When prompted, restart the K2 system.
Uninstall K2 Dyno Server software
If you have not already done so, disable the write filter on the K2 Summit Production Client or K2
Solo Media Server.
On the K2 Summit Production Client or K2 Solo Media Server, use the Windows Add/Remove
Programs control panel and uninstall K2 Dyno Server software.
The display name of the software is K2 Dyno.
Do not restart the K2 Summit Production Client or K2 Solo Media Server.
Install K2 Dyno Server software
If the K2 Dyno Server software was previously installed, you must uninstall the software before
you use these steps to install.
If you have not already done so, disable the write filter on the K2 Summit Production Client or K2
Solo Media Server.
1. From the K2 Summit Production Client or K2 Solo Media Server, access the K2 Dyno Server
software installation files.
2. In the Server directory, locate and open the following file:
setup.exe
3. Follow the onscreen instructions, and work through each page.
4. Click Next and Finish to complete the installation.
5. Restart the K2 Summit Production Client or K2 Solo Media Server.
6. On the K2 Summit Production Client or K2 Solo Media Server, in Configuration Manager on
the Ganging tab, make sure that Use a single channel to control the gang or Record/play same clip
on all channels of Gang is not selected.
NOTE: The K2 Dyno Controller can exhibit behavior that is difficult to troubleshoot if this
checkbox is selected.
Upgrade remaining stand-alone K2 systems
For stand-alone storage K2 systems, repeat the previous steps to upgrade your remaining
stand-alone storage K2 systems.
98 K2 Version 7.3.8 Release Notes & Upgrade Instructions 23 November 2010
Page 99

For the K2 Summit Production Client or K2 Solo Media Server, after you are done with the upgrade
process, enable the write filter.
Enable write filter
1. If you have not already done so, log on to the K2 Summit Production Client or K2 Solo Media
Server with Windows administrator privileges.
2. From the Windows desktop, click Start | All Programs | Grass Valley | Write Filter Utility.
FBWF Manager opens.
3. Under Filter Settings, set Filter to Enable.
4. Under Protected Volumes, set C: to Protected.
Do not modify other settings.
5. Click OK.
6. When prompted, restart the K2 Summit Production Client or K2 Solo Media Server.
Upgrade K2 Dyno Controller
Upgrading K2 systems
Do not do the tasks in this section if:
• The K2 Summit Production Client or K2 Solo Media Server is not controlled by a K2 Dyno
Controller.
Do the tasks in this section if:
• The K2 Summit Production Client or K2 Solo Media Server is controlled by a K2 Dyno Controller
and you need to upgrade software on the K2 Dyno Controller. Refer to compatibility specifications
to determine if you need to upgrade.
Before upgrading a K2 Dyno Controller, verify the following:
• You have access to the software installation files for this release. Procure the files via the
appropriate distibution method, such as download, CD-ROM, network drive, or external drive.
• You have a recovery image for the K2 Dyno Contoller at the current software version.
• Media access is stopped.
About K2 Dyno Replay Controller modes
The K2 Dyno Reply Controller operates in the following modes:
• Dyno mode – The Dyno application is open for normal operations such as capturing and replaying
highlight clips.
• Maintenance mode – The Dyno application is closed and the Windows operating system desktop
is available for system tasks such as network configuration and software update.
By default, the K2 Dyno Replay Controller is in the Dyno mode. You must manually put the unit
in the maintenance mode, which requires a restart. Once you are in the maintenance mode, if you
shutdown or restart, you are prompted to confirm the switch back to the Dyno mode at next startup.
You can also choose to stay in the maintenance mode at next startup.
23 November 2010 K2 Version 7.3.8 Release Notes & Upgrade Instructions 99
Page 100

Upgrading K2 systems
Uninstall K2 Dyno Controller Client software
1. On the K2 Dyno Controller, switch to the maintenance mode as follows:
a) At the startup screen, press the Shift button and then touch SHUTDOWN.
b) Touch MAINTENANCE MODE.
2. Use the Windows Add/Remove Programs control panel and remove K2 Dyno Client software.
Install software on K2 Dyno Controller
Before you install K2 Dyno Client software you must first uninstall the current version.
1. Copy the directory that contains the K2 Dyno Client software onto a portable USB drive, such
as a Flash drive.
2. Connect the USB drive to the K2 Dyno Controller and copy the Client directory to the K2 Dyno
Controller desktop.
3. In the Client directory, locate and open the following file:
setup.exe
The K2 Dyno Client software closes and the Windows OS desktop is displayed after a restart.
4. Follow the onscreen instructions, and work through each page.
• If this is the first install after a re-image, enter the K2 Dyno Replay Controller serial number
when prompted.
• If the K2 Dyno System Configuration Tool opens, do not enter any information. Remove any
text from the serial number field, as it must be blank. Then click OK and when prompted
"...number is empty. Continue?", click OK.
• If prompted "...update to new firmware?" click Yes, observe progress on the K2 Dyno
Controller Firmware Updater, and when a Success message displays, click OK.
5. Click Next and Close to complete the installation.
6. Remove the portable USB drive, if it is still connected.
7. Restart using standard Windows procedures.
8. When prompted "...back to K2 Dyno mode...?", click Yes.
The K2 Dyno Controller restarts.
Install MPEG-2/AVC-Intra field kit
If you are installing an MPEG-2 or AVC-Intra field kit upgrade on one or more or your K2
Summit Production Clients or K2 Solo Media Servers, do so now. Follow the procedure in the
Field Kit Upgrade Instructions document that you received with the field kit.
100 K2 Version 7.3.8 Release Notes & Upgrade Instructions 23 November 2010
 Loading...