

Page 1

K2 Summit/Solo/Media Server
Field Kit Upgrade Instructions
This document applies to rst generation K2 Summit Production Client, K2 Summit 3G
Production Client, K2 Solo 3G Media Server, K2 Media Server, and Grass Valley Control Point
PC.
071-8721- 07
Page 2
Page 3

Contents
Upgrade instructions....................................................................................................................................5
Safety Summaries....................................................................................................................................5
Installing software and CPU carrier module upgrades.................................................................................6
Saving settings.........................................................................................................................................6
Replace CPU carrier module....................................................................................................................7
Replace CompactFlash boot media..........................................................................................................7
Reimage K2 Summit/Solo system............................................................................................................8
Restore settings after generic reimage...................................................................................................10
Restore network configuration................................................................................................................10
Create the Control Team.....................................................................................................................10
Name team and loopback...................................................................................................................14
Reorder adapters................................................................................................................................15
Enhance network bandwidth...................................................................................................................16
Disable Large Send Offloads..............................................................................................................16
Disable CPU Power Technology..........................................................................................................17
Install the Discovery Agent on a K2 Summit/Solo system......................................................................18
If you install software with SiteConfig.....................................................................................................18
Leave the embedded security solution Update mode.........................................................................19
Install software using SiteConfig.........................................................................................................19
Restore licensing.................................................................................................................................20
If you install software manually...............................................................................................................20
Install software manually.....................................................................................................................20
Leave the embedded security solution Update mode.........................................................................21
Restore licensing.................................................................................................................................21
Install Multi-Path I/O software.................................................................................................................22
Install the Fibre Channel card driver.......................................................................................................23
Install the LSI Fibre Channel card driver.............................................................................................24
Install the ATTO Fibre Channel card driver.........................................................................................25
Final steps for software and CPU carrier module upgrades...................................................................26
Install codec module upgrade....................................................................................................................27
Replace codec module and power supplies...........................................................................................27
Upgrading a K2 Media Server to version 9.x..............................................................................................29
Upgrading a Control Point PC....................................................................................................................32
Re-image Control Point PC.....................................................................................................................32
Set BIOS prerequisites...........................................................................................................................32
Configure Virtual Machine......................................................................................................................32
Setting up Windows on the Virtual Machine...........................................................................................34
Logging on to the Virtual Machine..........................................................................................................34
License NetCentral on the Virtual Machine............................................................................................35
Adding a license to the Virtual Machine..............................................................................................36
Installing a two channel upgrade................................................................................................................37
Installing the two channel codec license....................................................................................................39
Requesting a license..............................................................................................................................39
Adding a license.....................................................................................................................................40
Installing a MPEG/Multi-Cam codec option upgrade..................................................................................41
K2 Summit System Procedures.................................................................................................................44
K2 Summit system procedures...............................................................................................................44
Carrier module removal.......................................................................................................................44
Power supply module removal............................................................................................................45
20140204 K2 Summit/Solo/Media Server Field Kit Upgrade Instructions 3
Page 4

Front bezel assembly removal K2 Summit..........................................................................................45
CompactFlash boot media removal K2 Summit..................................................................................46
Manage Embedded Security Update mode........................................................................................47
K2 Solo Media Server procedures.............................................................................................................48
Front bezel removal K2 Solo...................................................................................................................48
CompactFlash boot media removal K2 Solo...........................................................................................48
Trademarks and Agreements.....................................................................................................................49
Trademarks.............................................................................................................................................49
JPEG acknowledgment...........................................................................................................................49
4 K2 Summit/Solo/Media Server Field Kit Upgrade Instructions 20140204
Page 5

Upgrade instructions
Use these installation instructions to upgrade your K2 system. Refer to the section in this document
that applies to the upgrade kit that you received.
SectionUpgrade kit
K2-XDP2-CPU-FK
K2-XDP2-V9-FK
K2-XDP2-3G-FK
K2-XDPSVR-V9-FK
CP-XDPCP-V9-FK
K2-XDP2-2IO-FK
K2-XDP2-AVC-2CH-FK
K2-XDP2-MPG2-MC-FK
Safety Summaries
WARNING: In order to avoid personal injury and prevent damage to this product and its peripheral
products, be sure to review all safety and ESD precautions listed in the K2 product Service Manual.
Installing software and CPU carrier module upgrades on page 6.
Installing software and CPU carrier module upgrades on page 6.
Install codec module upgrade on page 27.
Upgrading a K2 Media Server to version 9.x on page 29.
Upgrading a Control Point PC on page 32.
Installing a two channel upgrade on page 37.
Installing the two channel codec license on page 39.
Installing a MPEG/Multi-Cam codec option upgrade on page 41.
20140204 K2 Summit/Solo/Media Server Field Kit Upgrade Instructions 5
Page 6

Installing software and CPU carrier module upgrades
Tools and materials needed:
• Hardware as provided by upgrade kit. See descriptions below.
• Torx tool with T15 magnetic tip
This section provides instructions for the following eld kits:
DescriptionUpgrade Nomenclature
K2-XDP2-CPU-FK
K2-XDP2-V9-FK
For any upgrade from a software version lower than 9.0 to a 9.x version, you must reimage the
system and do all the steps as directed in the procedure to ensure the system is properly initialized.
CAUTION: This system contains board-level components that must be protected from static
discharge and physical shock. Wear a wrist strap grounded to the system chassis when handling
system components.
Work through the tasks in this section sequentially.
Saving settings
Do this task for both software and CPU carrier module upgrade kits.
Before doing this task, on the 16GB USB Recovery Flash Drive that you received with the kit, write
the serial number of the K2 Summit/Solo system to identify it as belonging to that individual system.
NOTE: Do not attempt to use a single Recovery Flash Drive on multiple systems. This can
overwrite saved settings and lose the ability to restore settings on one or more systems. Also,
software licensing requires one Recovery Flash Drive for each system.
Processor upgrade Field Kit. Includes updated Type III CPU carrier
module required for advanced features such as ShareFlex. NOT
AVAILABLE for K2-SOLO models.
K2 Summit / K2 Solo 9.x Upgrade Field Kit. Includes 9.x system
software license, 16GB CompactFlash system drive with image, and
16GB USB recovery ash drive with Acronis backup software and
new Windows Embedded System 7 license with Embedded Security
Solution. Requires Type II or Type III CPU carrier module.
1. If you are working on a K2 client SAN-attached system, record iSCSI bandwidth settings, so
you can recongure after removing and readding to SAN.
2. Make sure you are logged in to the K2 Summit/Solo system with administrator privileges.
3. Connect the USB Recovery Flash Drive to a USB port on the K2 Summit/Solo system.
4. On the USB Recovery Flash Drive, navigate to the following location:
\tools\SaveRestoreScripts.
NOTE: Do not attempt to use the same Recovery Flash Drive on multiple systems.
20140204 K2 Summit/Solo/Media Server Field Kit Upgrade Instructions 6
Page 7

5. Run the following and wait for the process to complete:
ssave.bat
This saves current settings onto the USB Recovery Flash Drive in the \settings directory.
6. Disconnect the USB Recovery Flash Drive.
Next, do one of the following:
• If you are installing K2-XDP2-V9-FK on a K2 Summit 3G system with mSATA system drive,
skip ahead and reimage.
• If you are installing K2-XDP2-V9-FK on a K2 Summit/Solo system with CompactFlash system
drive, skip ahead and replace the CompactFlash boot media with the new larger 16GB CF.
• If you are installing K2-XDP2-CPU-FK on a K2 Summit system, replace the CPU carrier module.
Replace CPU carrier module
Do this task if installing K2-XDP2-CPU-FK on a K2 Summit system.
NOTE: Do not attempt to replace the CPU carrier module on a K2 Solo Media Server.
K2-XDP2-CPU-FK does not apply to K2 Solo Media Server.
Installing software and CPU carrier module upgrades
1. Shutdown the K2 Summit system.
2. Disconnect all power cables from the K2 Summit system.
3. Press the power button on the K2 Summit system to drain off power from boards.
4. Remove any cables connected to the CPU carrier module.
5. Replace the current CPU carrier module with the new CPU carrier module.
6. Reconnect cables to the CPU carrier module.
7. Reconnect power cables.
Next, do one of the following:
• If you are installing K2-XDP2-V9-FK on a K2 Summit 3G system with mSATA system drive,
skip ahead and reimage.
• If you are installing K2-XDP2-V9-FK on a K2 Summit/Solo system with CompactFlash system
drive, replace the CompactFlash boot media with the new larger 16GB CF.
Related Topics
Carrier module removal on page 44
Replace CompactFlash boot media
Do not do this task if:
• A K2 Summit 3G system with mSATA system drive.
Do this task if:
• A K2 Summit/Solo system with CompactFlash system drive.
20140204 K2 Summit/Solo/Media Server Field Kit Upgrade Instructions 7
Page 8

Installing software and CPU carrier module upgrades
Before doing this task, make sure the K2 Summit/Solo system is powered off.
1. Remove the front bezel assembly.
2. Replace the current CompactFlash boot media with the new CompactFlash boot media.
3. Replace the front bezel assembly.
Next, reimage the K2 Summit/Solo system.
Related Topics
Front bezel assembly removal K2 Summit on page 45
CompactFlash boot media removal K2 Summit on page 46
Front bezel removal K2 Solo on page 48
CompactFlash boot media removal K2 Solo on page 48
Reimage K2 Summit/Solo system
Do this task for both software and CPU carrier module upgrade kits.
Before doing this task, make sure that you have done the following:
• Saved settings using the ssave.bat script.
• Replaced hardware, as supplied by your upgrade kit.
• Reconnected cables.
• Back up the iSCSI-SVR (FSM TOE) licenses prior to reimage the le system server (FSM).
1. If you have not already done so, connect keyboard, monitor, and mouse.
2. Do the following:
a) Insert the Recovery Flash Drive into a USB port.
b) Restart the machine, or power on if currently shut down.
The machine boots from the Recovery Flash Drive, into a version of Windows stored on the
drive.
A MS-DOS command window opens.
c) When prompted with a list of options, type 2 to select the Acronis option and then press Enter.
The Acronis program loads.
3. In the Acronis main window, click Recovery.
The Restore Data Wizard opens.
4. On the Welcome page, click Next.
5. On the Backup Archive Selection page, do the following:
a) In the tree view expand the node for Computer/SummitBoot9_0_2_1803(D:). This is the
Recovery Flash Drive.
b) In the Images folder, select the correct version of the image le such as
Summit_WES7_7.0.13.tib.
c) Click Next.
6. On the Restoration Type Selection page, select Restore disks or partitions and then click Next.
7. On the Partition or Disk to Restore page, select MBR and Track 0 and then click Next.
8 K2 Summit/Solo/Media Server Field Kit Upgrade Instructions 20140204
Page 9

Installing software and CPU carrier module upgrades
8. On the Disk Selection page, select Disk 1 and then click Next.
NOTE: Verify capacity to make sure you select the boot media card (CompactFlash or mSATA)
and not a media drive. The boot media has a much smaller capacity and has an interface
identied as "IDE (0) Primary Master".
9. On the Next Selection page, select Yes, I want to restore another partition or hard disk drive and
then click Next.
10. On the Partition or Disk to Restore page, select (C:) and then click Next.
11. On the Restored Partitions Resizing page, select Yes, I want to resize partitions and then click
Next.
12. On the Restored Location page, select (C:) and then click Next.
NOTE: Verify capacity to make sure you select the boot media card (CompactFlash or mSATA)
and not a media drive. The boot media has a much smaller capacity and has an interface
identied as "IDE (0) Primary Master".
13. On the Restored Partition Type page, select Active and then click Next.
14. Do one of the following:
• If the Restored Partition Size page does not appear. Skip ahead to the Next Selection page.
• If the Restored Partition Size page appears. Continue with the next step.
15. On the Restored Partition Size page, do one of the following:
• If Free space after reports 0 bytes, leave settings as they are. Click Next.
• If Free space after does not report 0 bytes, increase Partition size until Free space after reports
0 bytes. Click Next.
16. On the Next Selection page, select No, I do not and then click Next.
17. On the Restoration Options page, do not make any selections. Click Next.
18. On the “…ready to proceed…” page, verify that you are restoring the correct image to the correct
location. Click Proceed.
19. On the Operation Progress page, observe the progress report.
20. When a message appears indicating a successful recovery, click OK.
21. Click Operations | Exit to exit the Acronis True Image program.
The machine restarts automatically.
22. Remove the recovery media while the machine is shutting down.
23. Upon startup, wait for initialization processes to complete. This can take several minutes, during
which time USB keyboard/mouse input is not operational. The system might automatically restart.
Do not attempt to shutdown or otherwise interfere with initialization processes.
24. When prompted, enter the K2 Summit system machine name.
Make sure the name is identical to the name it previously had.
After start up, one or more device discovery windows can open. Allow processes to complete
without interference. Refer to Release Notes for informaion on compatible driver versions. If a
Fibre Channel card driver, ignore until instructed later in this process.
At rst start up after reimage, the system is in Embedded Security Update mode by default.
Next, restore settings.
20140204 K2 Summit/Solo/Media Server Field Kit Upgrade Instructions 9
Page 10

Installing software and CPU carrier module upgrades
Restore settings after generic reimage
Do this task for both software and CPU carrier module upgrade kits.
This task assumes that you have saved settings using ssave.bat before reimaging the K2
Summit/Solo system, and that the reimage (Acronis) process is complete.
NOTE: Do not attempt to use a single Recovery Flash Drive on multiple systems. This can
overwrite saved settings and lose the ability to restore settings on one or more systems. Also,
software licensing requires one Recovery Flash Drive for each system.
1. If you have not already done so, start up the K2 Summit/Solo system and log on with administrator
privileges.
The administrator password is adminGV!.
2. Connect the USB Recovery Flash Drive to a USB port on the K2 Summit/Solo system.
3. From the USB Recovery Flash Drive, run the following and wait for the process to complete:
Tools\SaveRestoreScripts\srestore.bat
Next, restore network conguration.
Restore network configuration
Do this task for both software and CPU carrier module upgrade kits.
Work through the tasks in this section sequentially to restore the default network conguration. As
you do so, refer to C:\ipconfig.txt for the complete listing of the network settings that the K2
Summit/Solo system had before reimaging.
Create the Control Team
NOTE: Team control ports only. Do not team media ports.
1. Open Network Connections, if it is not already open.
a) From the Windows Start menu, in the Run or the Search programs and files box, type ncpa.cpl
and press Enter.
10 K2 Summit/Solo/Media Server Field Kit Upgrade Instructions 20140204
Page 11

Installing software and CPU carrier module upgrades
2. In Network Connections, view Details and identify the adapter name that maps to Control
Connection #1 and the adapter name that maps to Control Connection #2.
3. Right-click the adapter name that maps to Control Connection #1.
4. Select Properties, then click Configure.
The Properties dialog box opens.
20140204 K2 Summit/Solo/Media Server Field Kit Upgrade Instructions 11
Page 12
Installing software and CPU carrier module upgrades
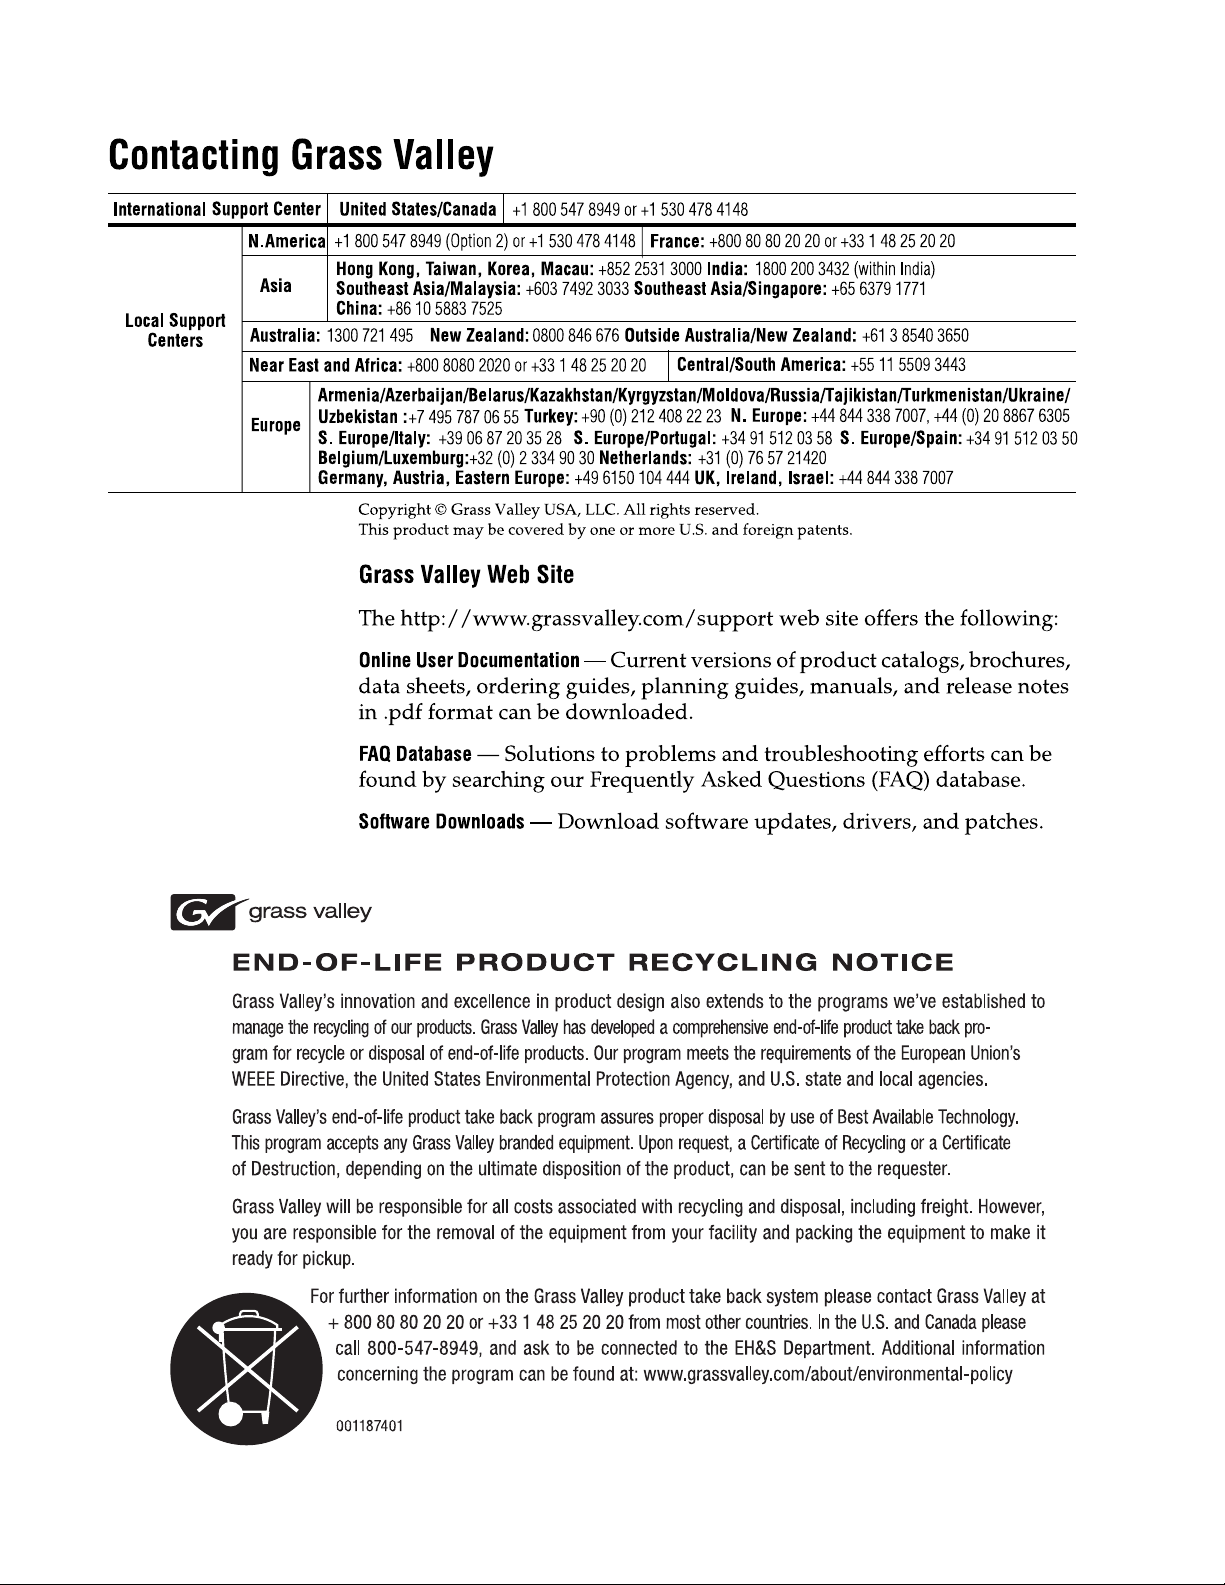
5. Select the Teaming tab.
6. Select Team this adapter with other adapters, then click New Team. The New Team Wizard opens.
12 K2 Summit/Solo/Media Server Field Kit Upgrade Instructions 20140204
Page 13
7. Enter Control Team.
Click Next.
Installing software and CPU carrier module upgrades
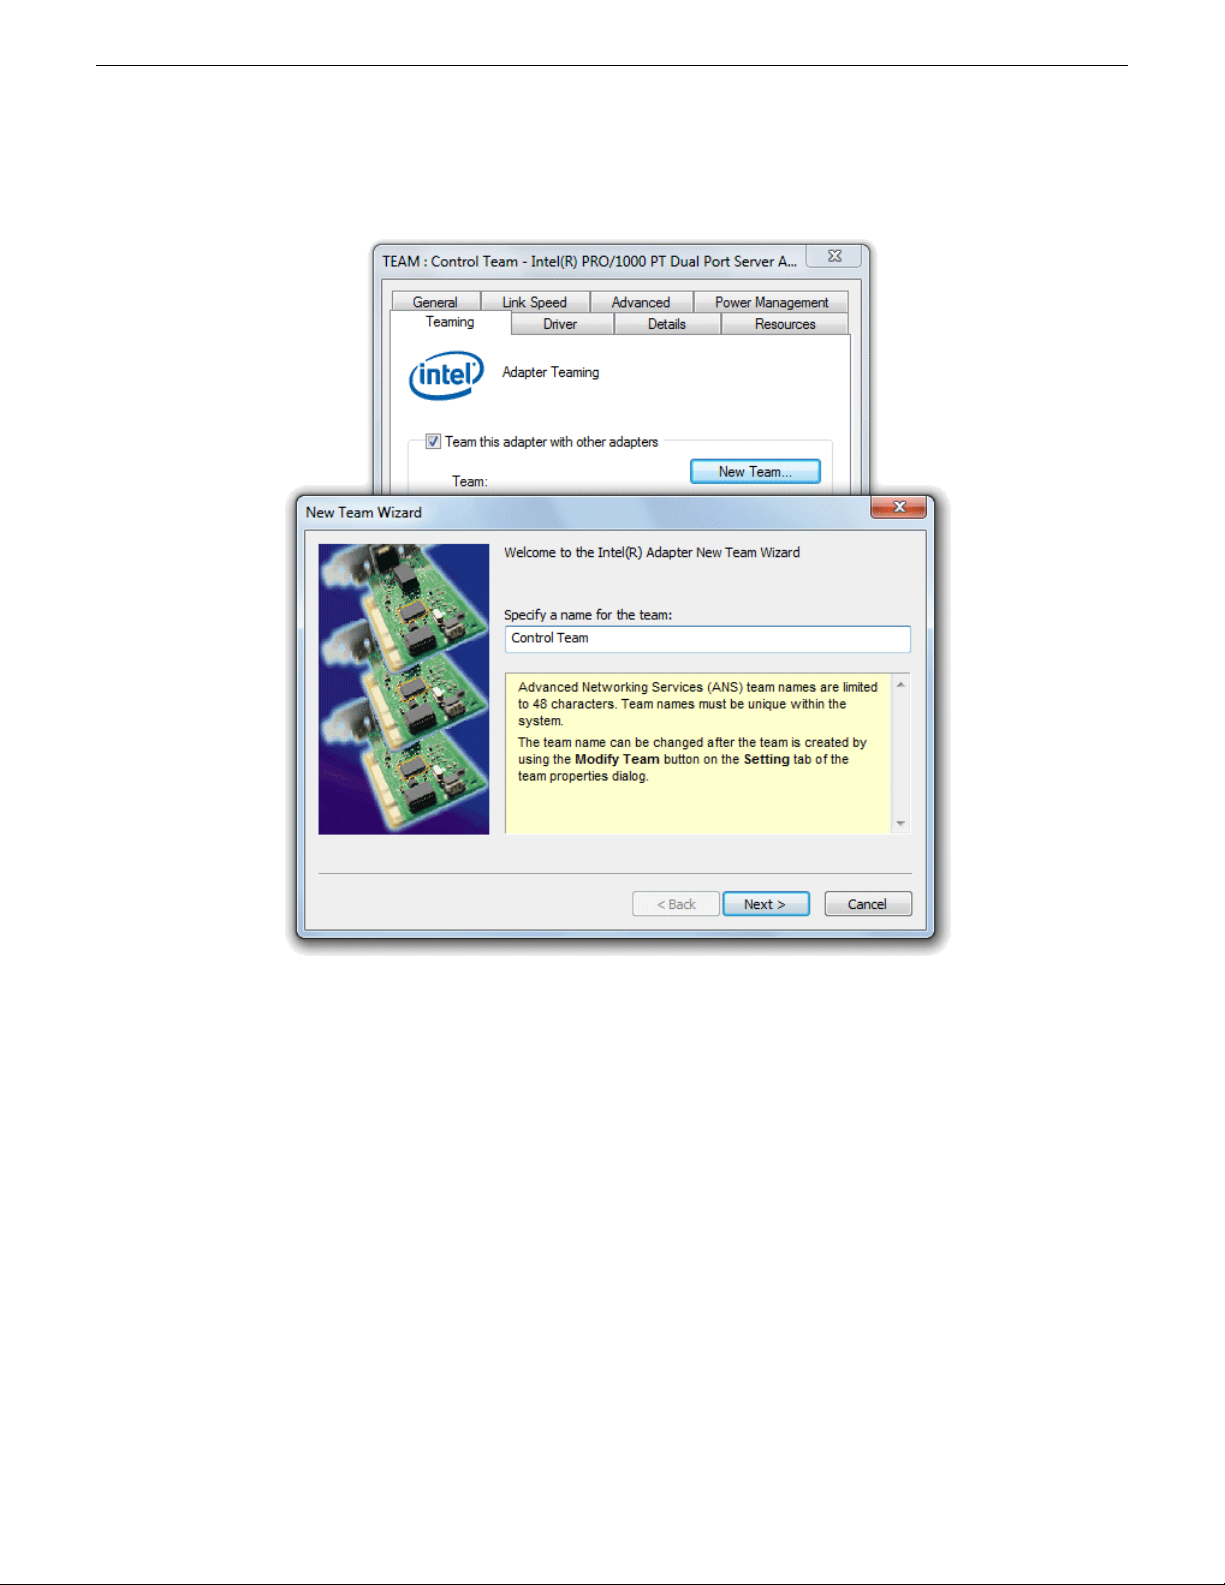
8. Select the check box for the adapter name that maps to Control Connection #1 and for the adapter
name that maps to Control Connection #2. Click Next.
9. Select Switch Fault Tolerance. Click Next.
10. Click Finish and wait a few seconds for the adapters to be teamed.
20140204 K2 Summit/Solo/Media Server Field Kit Upgrade Instructions 13
Page 14
Installing software and CPU carrier module upgrades
11. Open the Modify Team dialog box as follows:
a) In Device Manager | Network Adapters, right-click Control Team and select Properties. The
Properties dialog box opens.
b) Select the Settings tab.
c) Click Modify Team. A dialog box opens.
12. On the Adapters tab, do the following:
a) Select the top entry, which is the adapter name that maps to Control Connection #1 and click
Set Primary.
b) Select the adapter name that maps to Control Connection #2 and click Set Secondary.
13. Click OK and OK and to close dialog boxes.
14. Restart the K2 Summit/Solo system.
If continuing with network conguration, your next task is to name team and loopback.
Name team and loopback
Before beginning this task, make sure of the following:
• Adapters are named
• The control team is created
1. On the Windows desktop right-click Start | Control Panel | Network and Sharing Center | Change
adapter settings. The Network Connections window opens.
14 K2 Summit/Solo/Media Server Field Kit Upgrade Instructions 20140204
Page 15

Installing software and CPU carrier module upgrades
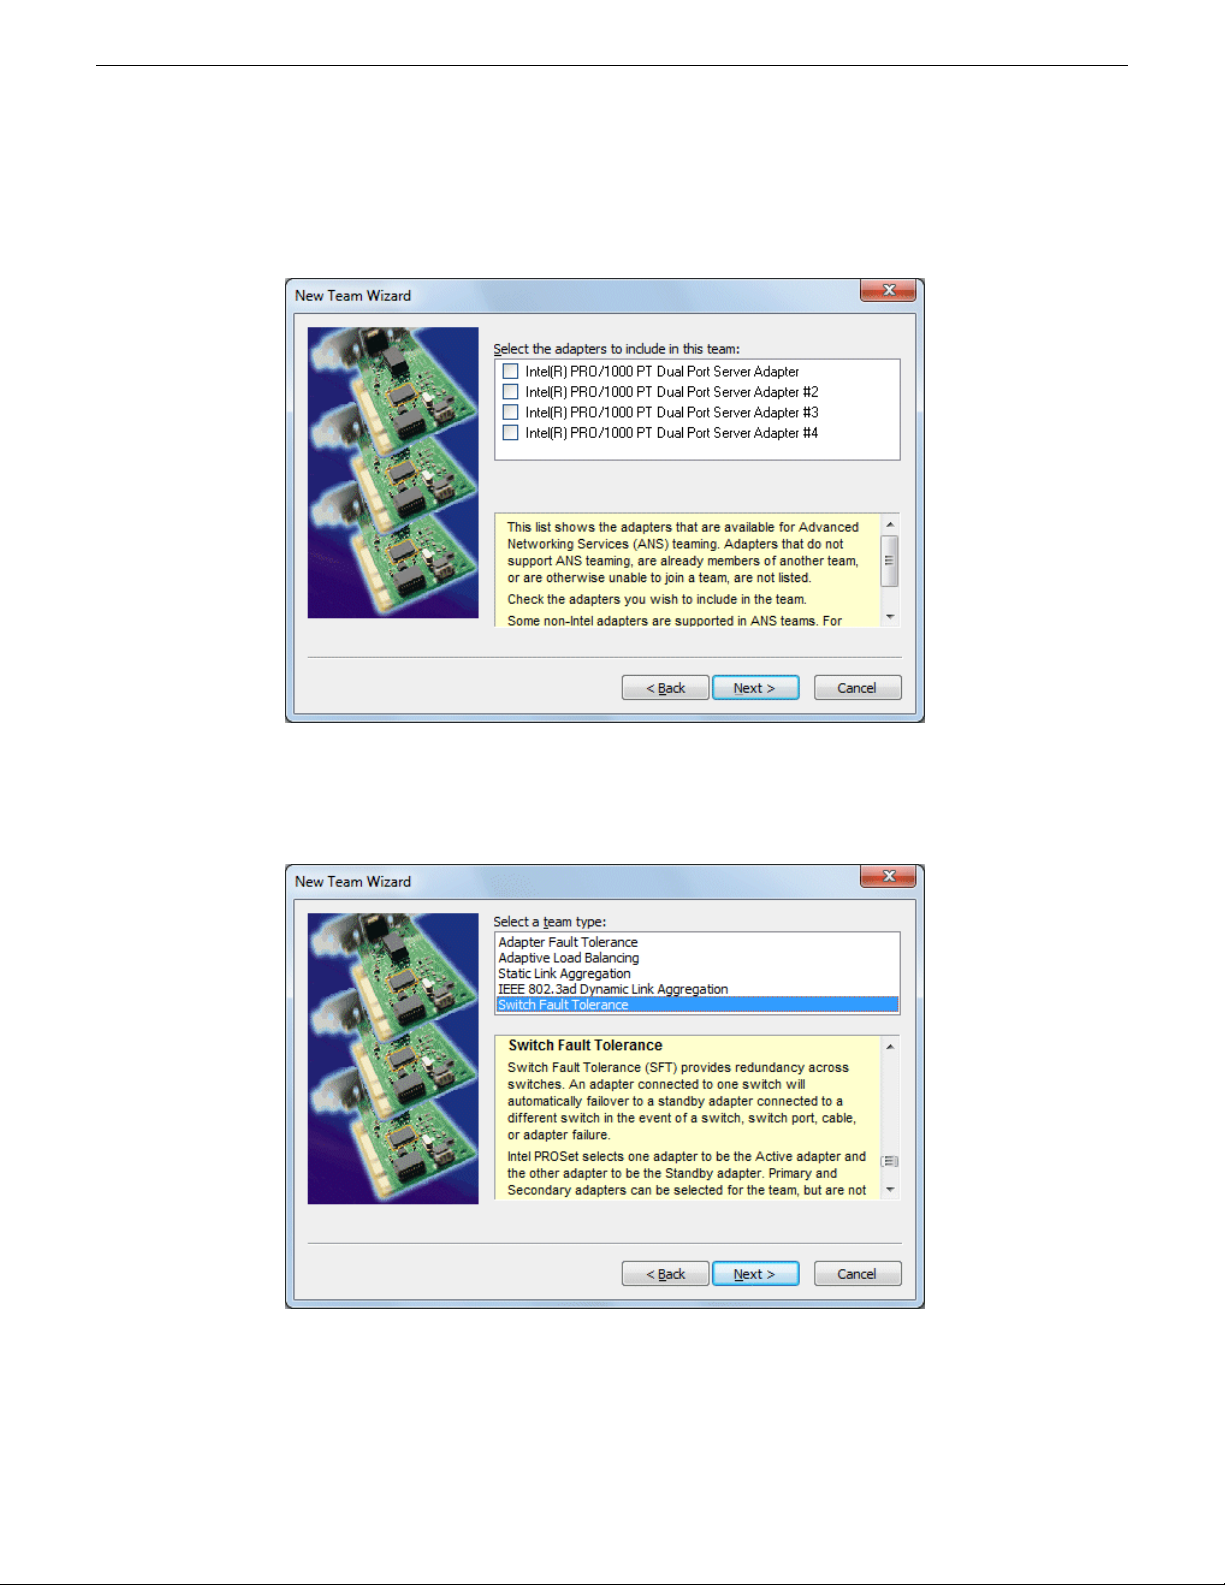
2. For the Control Team and the loopback, select adapter names in the “Device Name” column and
rename them as follows:
a) Select the adapter name.
b) Select File | Rename to enter rename mode.
c) Type the name, as specied in the following table:
And rename it as follows:In the Device Name column, select this adapter name…
Control TeamTEAM : Control Team
3. Do one of the following:
• If you intend to use SiteCong for device discovery and IP address conguration, you do not
need to set an IP address for the Control Team at this time. You are done with this procedure.
• If you are not using SiteCong, set an IP address for the Control Team at this time. Use
standard Windows procedures.
NOTE: Do not set IP addresses for the two Media Connections.
If continuing with network conguration, your next task is to reorder adapters.
Reorder adapters
Before beginning this task, make sure of the following:
• Adapters are named correctly
• The control team is created
• The team and loopback are named
1. Open Network Connections, if it is not already open.
a) From the Windows Start menu, in the Run or the Search programs and files box, type ncpa.cpl
and press Enter.
The Network Connections window opens.
2. Select Advanced, then Advanced Settings…
20140204 K2 Summit/Solo/Media Server Field Kit Upgrade Instructions 15
Page 16

Installing software and CPU carrier module upgrades
3. On the Adapters and Bindings tab, depending on the K2 system storage, order adapters as follows:
Shared (SAN) storageInternal or direct-connect
storage
Control TeamLoopback
Control Connection #1Control Team
Control Connection #2Control Connection #1
Media Connection #1Control Connection #2
Media Connection #2Media Connection #1
LoopbackMedia Connection #2
1394 Connection1394 Connection
If controlled by Dyno Production Assistant, refer to Dyno PA documentation for adapter order.
4. Click OK to close and accept the changes.
5. Close Network Connections.
Network conguration is complete.
Next, enhance network bandwidth.
Enhance network bandwidth
On K2 Summit/Solo systems with K2 system software 9.x, the on-board network adapters have a
performance limitation that causes them to function at half the expected bandwidth. On most systems,
there are no symptoms related to this limitation, as network trafc is below the limitation. Systems
using ShareFlex or having other requirements for high network bandwidth might be impacted to
some degree. Symptoms include general network bandwidth restrictions, slow iSCSI I/O performance,
slower than expected FTP trafc, and other slowness not caused by other factors.
Grass Valley requires that you remove the limitation and enhance the network performance. Once
the limitation is removed, the change persists throughout normal software upgrades. However, if
you reimage the K2 Summit/Solo system you must check and reapply the change if necessary.
To remove the limitation, disable "Large Send Ofoads" on the network adapters and disable "CPU
Power Technology" in the BIOS.
Refer to Grass Valley Knowledge Base Article #000011688 for more information.
Disable Large Send Offloads
1. From the Windows operating Start menu, open Control Panel.
2. In Control Panel, open Network and Sharing Center.
16 K2 Summit/Solo/Media Server Field Kit Upgrade Instructions 20140204
Page 17

Installing software and CPU carrier module upgrades
3. In Network and Sharing Center, select Change adapter settings.
Network Connections opens and displays network adapters, including the following:
• Control Connection #1
• Control Connection #2
• Media Connection #1
• Media Connection #2
4. For each Control Connection and each Media Connection, do the following:
a) Right-click the connection and select Properties.
The Connection Properties dialog box opens.
b) In the Connection Properties dialog box, click Configure.
The Adapter Properties dialog box opens.
c) In the Adapter Properties dialog box, click the Advanced tab.
d) On the Advanced tab, in the Settings list select Large Send Offload v2 (IPv4) and then in the
Value drop-down list select Disabled.
e) Click OK to save settings and close.
f) Repeat these steps for each Control Connection and each Media Connection.
Next, disable CPU power technology.
Disable CPU Power Technology
1. Restart the K2 Summit/Solo system.
2. During the BIOS startup screen, press F2 repeatedly until Entering Setup... appears.
The BIOS screen opens.
3. On the BIOS screen, use arrow keys and select the Advanced tab.
4. On the Advanced tab select CPU Core Configuration and then press Enter.
The CPU Core Conguration screen opens.
5. On the CPU Core Conguration screen, select Power Technology and then press Enter.
A Power Technology dialog box opens.
6. In the Power Technology dialog box select Disable and then press Enter.
7. Press F4 to save and exit.
A Save & Exit Setup dialog box opens.
8. In the Save & Exit Setup dialog box, select Yes and then press Enter.
9. The K2 Summit/Solo system restarts.
Next, install the SiteCong Discovery Agent.
20140204 K2 Summit/Solo/Media Server Field Kit Upgrade Instructions 17
Page 18

Installing software and CPU carrier module upgrades
Install the Discovery Agent on a K2 Summit/Solo system
Do this task for both software and CPU carrier module upgrade kits.
Find the Discovery Agent installation les on the USB Recovery Flash Drive you received with the
upgrade kit. The les are in the \release\DiscoveryAgent folder.
1. Navigate to your SiteCong les.
2. To launch the program that installs the ProductFrame Discovery Agent Service do the following:
a) Copy the Discovery Agent directory to the device.
b) In the directory, double-click the DiscoveryAgentServiceSetup.msi le.
The setup program launches to install the SiteCong Discovery Agent.
c) Follow the setup wizard.
3. When presented with a list of device types, select one of the following as appropriate:
• K2SummitSanClient
• K2SummitStandaloneClient
• K2SoloStandaloneClient
4. Complete the setup wizard and restart the device.
The restart is required after the installation.
Next, do one of the following:
• Install software using SiteCong.
• Install software manually.
If you install software with SiteConfig
Do not do the tasks in this section if:
• You install/upgrade software on the K2 Summit/Solo system manually, rather than using
SiteCong.
Do the tasks in this section if:
• You use SiteCong to install/upgrade software on the K2 Summit/Solo system.
NOTE: You must use the same install/upgrade method now, either SiteCong or manual, as you
will use for installations and upgrades in the future. Do not switch between methods, using one
method now and a different method for future installations and upgrades.
Follow the task in this section sequentially.
18 K2 Summit/Solo/Media Server Field Kit Upgrade Instructions 20140204
Page 19

Installing software and CPU carrier module upgrades
Leave the embedded security solution Update mode
1. From the Windows desktop, click Start | All Programs | Grass Valley | Embedded Security Manager.
Embedded Security Manager opens.
Interpret Current Status as follows:
• Enabled: Embedded Security is enabled but is not in Update mode.
• Update: Embedded Security is enabled and is in Update mode, ready for software installation.
2. Under Update, manage the Update mode as follows:
• Click Leave to take Embedded Security out of Update mode.
A restart is not required after you leave the Update mode.
Install software using SiteConfig
1. Find SNFS software, K2 software, and "K2 Release Notes" on the USB Recovery Flash Drive
that you received with the upgrade kit.
2. If you have reimaged 32-bit Windows XP K2 Summit system so that it is now a 64-bit Windows
7 system, do the following:
a) Remove the K2 Summit system from the SiteCong system descriptions.
b) Add the K2 Summit system as a 64-bit system to the SiteCong system description.
SiteCong generates an "RPES Service Error 2" if you do not do this step.
20140204 K2 Summit/Solo/Media Server Field Kit Upgrade Instructions 19
Page 20

Installing software and CPU carrier module upgrades
3. Use your normal methodology with SiteCong to install the following software:
• SNFS software
• K2 system software
NOTE: When checking software, if an "Unable to copy ... to target" error appears for a device
that has Grass Valley Embedded Security, put Embedded Security in Update mode.
Next, restore licensing.
Restore licensing
1. On the Windows desktop, click License Manager.
SabreTooth License Manger opens.
2. If the License Manager says the licenses are not for this machine then the hardware for the
network interfaces has changed. Contact Grass Valley Customer Service to order new replacement
licenses.
Next, from the following list, do those tasks that apply to the K2 Summit/Solo system. Follow
instructions in related topics later in this document as necessary.
• If a K2 Summit system with direct-connect storage or shared storage on a redundant K2 SAN,
install MPIO software.
• If a K2 Summit system with a Fibre Channel card, install the Fibre Channel card driver.
If none of the tasks above apply to the K2 Summit/Solo system, skip ahead and do nal steps.
If you install software manually
Do not do the tasks in this section if:
• You use SiteCong to install/upgrade software on the K2 Summit/Solo system.
Do the tasks in this section if:
• You install/upgrade software on the K2 Summit/Solo system manually, rather than using
SiteCong.
NOTE: You must use the same install/upgrade method now, either SiteCong or manual, as you
will use for installations and upgrades in the future. Do not switch between methods, using one
method now and a different method for future installations and upgrades.
Follow the task in this section sequentially.
Install software manually
Do not do this task if:
• You use SiteCong to install/upgrade software on the K2 Summit/Solo system.
Do this task if:
• You install/upgrade software on the K2 Summit/Solo system manually, rather than using
SiteCong.
20 K2 Summit/Solo/Media Server Field Kit Upgrade Instructions 20140204
Page 21

Installing software and CPU carrier module upgrades
NOTE: You must use the same install/upgrade method now, either SiteCong or manual, as you
will use for installations and upgrades in the future. Do not switch between methods, using one
method now and a different method for future installations and upgrades.
Find K2 software, SNFS software, and "K2 Release Notes" on the USB Recovery Flash Drive that
you received with the upgrade kit.
1. Install SNFS software. Refer to "K2 Release Notes" for procedures.
SNFS uses the settings restored from srestore.bat.
2. Install K2 software. Refer to "K2 Release Notes" for procedures.
Leave the embedded security solution Update mode
1. From the Windows desktop, click Start | All Programs | Grass Valley | Embedded Security Manager.
Embedded Security Manager opens.
Interpret Current Status as follows:
• Enabled: Embedded Security is enabled but is not in Update mode.
• Update: Embedded Security is enabled and is in Update mode, ready for software installation.
2. Under Update, manage the Update mode as follows:
• Click Leave to take Embedded Security out of Update mode.
A restart is not required after you leave the Update mode.
Restore licensing
1. On the Windows desktop, click License Manager.
SabreTooth License Manger opens.
20140204 K2 Summit/Solo/Media Server Field Kit Upgrade Instructions 21
Page 22

Installing software and CPU carrier module upgrades
2. If the License Manager says the licenses are not for this machine then the hardware for the
network interfaces has changed. Contact Grass Valley Customer Service to order new replacement
licenses.
Next, from the following list, do those tasks that apply to the K2 Summit/Solo system. Follow
instructions in related topics later in this document as necessary.
• If a K2 Summit system with direct-connect storage or shared storage on a redundant K2 SAN,
install MPIO software.
• If a K2 Summit system with a Fibre Channel card, install the Fibre Channel card driver.
If none of the tasks above apply to the K2 Summit/Solo system, skip ahead and do nal steps.
Install Multi-Path I/O software
Do this task on a 64-bit K2 Summit system with direct-connect storage or shared storage on a
redundant K2 SAN.
1. Access the Windows desktop on the computer on which you are installing MPIO.
You can do this locally with a connected keyboard, mouse, and monitor or remotely via the
Windows Remote Desktop Connection.
2. Access the Windows desktop on the computer on which you are installing MPIO.
You can do this locally with a connected keyboard, mouse, and monitor or remotely via the
Windows Remote Desktop Connection.
3. Stop all media access. If AppCenter is open, close it.
4. Click Start | Run, type cmd and press Enter.
The MS-DOS command prompt window opens.
5. From the command prompt, navigate to the C:\profile\mpio directory.
6. Type the following at the command prompt:
gdsminstall64.exe -i
7. Restart the computer on which you installed MPIO.
22 K2 Summit/Solo/Media Server Field Kit Upgrade Instructions 20140204
Page 23

Installing software and CPU carrier module upgrades
8. After restart, to verify that the software is installed, on the Windows desktop right-click My
Computer and select Manage.
The Computer Management window opens.
9. In the left pane select Device Manager.
10. In the right pane open the System devices node and verify that GVG ISCSI Multi-Path Device
Specific Module is listed.
Next, do one of the following:
• If the K2 Summit system does not have a Fibre Channel card, skip ahead and do nal steps.
• If the K2 Summit system has a Fibre Channel card, install the Fibre Channel card driver.
Install the Fibre Channel card driver
If the K2 Summit system is on a redundant K2 SAN or is connected to direct-connect storage, make
sure that MPIO software is installed.
If your K2 Summit system has the optional Fibre Channel card, the driver for the Fibre Channel
card is not installed on the recovery image provided by Grass Valley for that K2 Summit system.
Therefore, after restoring the image, you must install the Fibre Channel card driver.
A K2 Summit system can have one of the following types of Fibre Channel cards:
• LSI
• ATTO
Depending on the type of Fibre Channel card in the K2 Summit system, do the appropriate task
from this section to install the Fibre Channel card driver.
20140204 K2 Summit/Solo/Media Server Field Kit Upgrade Instructions 23
Page 24

Installing software and CPU carrier module upgrades
Install the LSI Fibre Channel card driver
1. Make sure that you have access to the Fibre Channel card driver le. K2 software installation
copies the driver to the local K2 Summit system, in C:\Windows. In that location, look for
LSI_SCSIPORT_1.21.25.00, then do one of the following:
• If the le is present, continue with the next step in this procedure.
• If the le is not present, procure the le from
ftp://ftp.grassvalley.com/pub/K2/Microcode_and _Drivers/LSI_SCSIPORT. The
lename is LSI_SCSIPORT_1.21.25.00.zip. Then continue with this procedure.
2. Upon restart a Found New Hardware wizard opens for the Fibre Channel controller. Install the
driver on the rst FC port as follows:
a) Select Install from a list or specific location. Click Next.
b) Select Don’t search. I will choose the driver to install and then click Next.
c) Select SCSI and Raid Controllers and Have Disk.
d) Browse to C:\Windows and nd LSI_SCSIPORT_1.21.25.00. Click Open and OK.
e) Start the driver install by selecting Next.
f) On the Hardware Installation page, click Continue Anyway.
g) Click Finish.
3. If the K2 Summit system has a dual port Fibre Channel card, on the Found New Hardware wizard,
install the driver on the second FC port as follows:
a) Select Install from a list or specific location and then click Next.
b) Select Don’t search. I will choose the driver to install. Click Next.
c) Select Have Disk.
d) Browse to C:\Windows and nd LSI_SCSIPORT_1.21.25.00. Click Open and OK.
e) Start the driver install by selecting Next.
f) On the Hardware Installation page, click Continue Anyway.
g) Click Finish.
4. On the Found New Hardware wizard, install the rst LSI Pseudo Device as follows:
a) Select Install from a list or specific location. Click Next.
b) Select Don’t search. I will choose the driver to install and then click Next.
c) Select Have Disk.
d) Browse to C:\Windows and nd LSI_SCSIPORT_1.21.25.00. Click Open and OK.
e) Start the driver install by selecting Next.
f) On the Hardware Installation page, click Continue Anyway.
g) Click Finish.
24 K2 Summit/Solo/Media Server Field Kit Upgrade Instructions 20140204
Page 25

Installing software and CPU carrier module upgrades
5. If the K2 Summit system has a dual port Fibre Channel card, on the Found New Hardware wizard,
install the driver on the second LSI Pseudo Device port as follows:
a) Select Install from a list or specific location and then click Next.
b) Select Don’t search. I will choose the driver to install and then click Next.
c) Select Have Disk.
d) Browse to C:\Windows and nd LSI_SCSIPORT_1.21.25.00. Click Open and OK.
e) Start the driver install by selecting Next.
f) On the Hardware Installation page, click Continue Anyway.
g) Click Finish.
6. If the K2 Summit system is on a redundant K2 SAN or is connected to direct-connect storage,
make the following registry settings:
[HKEY_LOCAL_MACHINE\SYSTEM\CurrentControlSet\Services\Symmpi\Parameters\Device]
"DriverParameter"="MPIOMode=2"
"MaximumSGList"=dword:000000ff
"NumberOfRequests"=dword:00000020
Next, do nal steps.
Install the ATTO Fibre Channel card driver
1. Open Device Manager.
2. Right-click on K2 Summit Client and select Manage.
3. Click Device Manager
4. Install the rst Fibre Channel driver as follows:
a) Right click on the upper Fibre Channel Controller and select Update Driver…
b) On the Welcome page, select No, not this time and then click Next.
c) Select Install from a list or specific location and then click Next.
d) Browse to C:\Profile\Drivers\ Atto 8Gb HBA Drivers\x86.
e) Click OK.
f) Click Next.
g) Click Finish when prompted.
h) In the Found new hardware wizard that will open for the ATTO Phantom device, select No,
not this time.
i) Select Install from a list or specific location and then click Next.
j) Browse to C:\Profile\Drivers\ Atto 8Gb HBA Drivers and select the x86 directory if
installing on a 32-bit computer or the x64 directory if installing on a 64-bit computer.
k) Click OK .
l) Click Next..
m) Click Finish when prompted.
20140204 K2 Summit/Solo/Media Server Field Kit Upgrade Instructions 25
Page 26

Installing software and CPU carrier module upgrades
5. Repeat the process for the second Fibre Channel Controller as follows:
a) Right-click on the remaining Fibre Channel Controller and select Update Driver…
b) On the Welcome page, select No, not this time and then click Next.
c) Select Install from a list or specific location and then click Next.
d) Browse to C:\Profile\Drivers\ Atto 8Gb HBA Drivers and select the x86 directory if
installing on a 32-bit computer or the x64 directory if installing on a 64-bit computer..
e) Click OK.
f) Click Next.
g) Click Finish when prompted.
6. Verify that the two "ATTO" devices are now listed under the SCSI and RAID Controllers
7. Close the Device Manager and System windows
Next, do nal steps.
Final steps for software and CPU carrier module upgrades
Do this task for both software and CPU carrier module upgrade kits.
1. If you have not already done so, manage the Embedded Security. Make sure Update mode is
ended.
2. Check the Windows operating system clock and, if necessary, set it to the correct time.
3. If you installed K2-XDP2-V9-FK, apply the Windows operating system sticker that you received
with the upgrade kit. Attach it to the K2 Summit/Solo system, in the same location as the previous
Windows operating system sticker.
4. If you are upgrading a K2 Summit SAN-attached system, on the K2 SAN’s control point PC,
use the K2Cong application to add the K2 Summit system back to the SAN.
5. When the K2 Summit/Solo system is fully congured, licensed, and operational, create a
rst-birthday disk image and store it on the USB Recovery Flash Drive. Refer to the K2 product's
Service Manual for procedures.
6. Disconnect the USB Recovery Flash Drive and store it in the front bezel assembly.
If present, discard the previous USB Recovery Flash Drive.
The upgrade process is complete for the following upgrade kits:
• K2-XDP2-CPU-FK
• K2-XDP2-V9-FK
For a K2 Summit system upgraded with the K2-XDP2-CPU-FK kit, if you do any service work or
replace any Field Replaceable Units (FRUs), rst consult "K2 Summit 3G Production Client Service
Manual". This is true even if replacing an original FRU that has not been upgraded. System
dependencies involving FRUs require procedures found only in "K2 Summit 3G Production Client
Service Manual".
Related Topics
Manage Embedded Security Update mode on page 47
26 K2 Summit/Solo/Media Server Field Kit Upgrade Instructions 20140204
Page 27

Install codec module upgrade
Before installing a codec module upgrade, the K2 Summit system must have Type II or Type III
CPU carrier module, 16 GB system drive, 16 GB or 32 GB USB Recovery Flash Drive, and K2
software version 9.x or higher.
Tools and materials needed:
• Hardware as provided by upgrade kit. See description below.
• Torx tool with T15 magnetic tip
This section provides instructions for the following eld kit:
DescriptionUpgrade Nomenclature
K2-XDP2-3G-FK
CAUTION: This system contains board-level components that must be protected from static
discharge and physical shock. Wear a wrist strap grounded to the system chassis when handling
system components.
Work through the task in this section.
K2 Summit Production Client XDP Series 3G SDI Interface eld kit
for K2-XDP series platforms. Includes 2ea - 3G codec modules, 2 ea. 550W power supplies, and installation instructions. NOTE: This
kit cannot be used with K2-XDT Series Summit Transmission Clients
and Servers or K2-SOLO models.
Replace codec module and power supplies
Do this task if installing K2-XDP2-3G-FK on a K2 Summit system.
NOTE: Do not attempt to replace the CPU carrier module on a K2 Solo Media Server.
K2-XDP2-3G-FK does not apply to K2 Solo Media Server.
Before doing this task, do the following, if not already done:
• Shutdown the K2 Summit system.
• Disconnect all power cables from the K2 Summit system.
• Press the power button on the K2 Summit system to drain off power from boards.
1. Remove any cables connected to the codec modules.
20140204 K2 Summit/Solo/Media Server Field Kit Upgrade Instructions 27
Page 28

Slide out
2
Loosen
thumbscrews
1
Install codec module upgrade
2. Access the rear panel and remove as illustrated.
NOTE: With a rm grip on the metal (EMI) bracket, ensure the board is level and parallel
to the card guides to avoid damage to the components on the edge opposite the rear panel.
CAUTION: Improper handling can damage components on the board. Do not allow the
board to come in contact with the chassis sheet metal during removal or installation. The
components on the edge opposite the rear panel are the most susceptible to damage.
3. Install the new codec modules.
4. Replace the current power supply modules with the new power supply modules.
5. Reconnect cables to the codec modules and power supplies.
6. After installing the card, start up and log on to the K2 Summit system with administrator privileges,
then load software onto the codec board as follows:
a) Stop all Grass Valley services except for Grass Valley Host File Service.
b) From the Windows command prompt, navigate to the following directory:
C:\profile
c) Type the following and press Enter.
srtploader -U
This ensures that the board is ashed with the proper version to be compatible with K2 software.
The upgrade process is complete for the following upgrade kit:
• K2-XDP2-3G-FK
For a K2 Summit system upgraded with the K2-XDP2-3G-FK kit, if you do any service work or
replace any Field Replaceable Units (FRUs), rst consult "K2 Summit 3G Production Client Service
Manual". This is true even if replacing an original FRU that has not been upgraded. System
dependencies involving FRUs require procedures found only in "K2 Summit 3G Production Client
Service Manual".
Related Topics
Power supply module removal on page 45
28 K2 Summit/Solo/Media Server Field Kit Upgrade Instructions 20140204
Page 29

Upgrading a K2 Media Server to version 9.x
Software needed:
• K2 software version 9.x. Refer to "K2 Release Notes" to determine your compatible version.
• SNFS software version 4.1
• SNFS software version 4.2
This section provides instructions for the following eld kit:
DescriptionUpgrade Nomenclature
K2-XDPSVR-V9-FK
Do not do this task if one of the following is true:
• The server has a version 8.1.x or higher disk image and you do not require the Embedded Security
solution on the server. If this is the case, you can do a software-only upgrade on the server, as
instructed by "K2 Release Notes" upgrade instructions.
• The server is a Dell 1910 or 2850. Version 9.x supports Dell 2950, Dell R610, and newer Dell
platforms only.
Do this task if either of the following is true:
• The server has a disk image version lower than 8.1.x.
• You require the Embedded Security solution on the server.
This section provides instructions for servers that have the role of K2 le system server, such as the
following:
• K2 SAN system:
• The FSM on a basic (non-redundant) K2 SAN
• The two FSMs on a redundant K2 SAN
• K2 Nearline system:
K2 Server 9.x Upgrade Field Kit. Includes 9.x system software
license, 32GB USB Thumb drive with Windows Server 2008 64bit,
McAfee Embedded Server; CD with Acronis True Image Server.
• The NH server on a basic (non-redundant) system
• The two NH servers on a redundant system
In addition to the instructions in this section, review "K2 Release Notes" upgrade instructions. When
you upgrade the server, do so in the proper sequence with the other devices of the system. Also refer
to "K2 SAN Installation and Service Manual" as necessary to accomplish the tasks in this section.
These instructions are for upgrading from a K2 system software 7.4.x or 8.x version to a 9.x version.
Part of the upgrade is re-imaging the K2 Media Server. You must do all the steps as directed in the
20140204 K2 Summit/Solo/Media Server Field Kit Upgrade Instructions 29
Page 30

Upgrading a K2 Media Server to version 9.x
procedure to ensure the system is properly upgraded. When you upgrade to version 9.x, all connected
devices that run K2 system software must also upgrade to version 9.x.
1. Check the current base image version on the K2 Media Server to verify prerequisites stated earlier
in this topic.
• On a 32-bit K2 Media Server, use registry key
Computer\HKEY_LOCAL_MACHINE\SOFTWARE\Grass Valley Group\Base
• On a 64-bit K2 Media Server, use registry key
Computer\HKEY_LOCAL_MACHINE\SOFTWARE\Wow6432Node\Grass Valley Group\Base
2. If you have not already done so, download the required software from the Grass Valley website.
Use the following URL and then browse to the required version.
http://www.grassvalley.com/dl/k2_summit
3. On the K2 Media Server, open SabreTooth License Manager. If a K2-ISCSI-SVR license is
installed, archive the license to a different location so that you can reinstall the license at the end
of this process.
4. From the Control Point PC, remove the server from K2Cong.
5. Remove SAN-attached K2 Summit systems and other K2 SAN clients from K2Cong.
6. On the K2 Media Server, create a backup recovery disk image of the server's C and D partitions.
7. Restore the server's C partition from the disk image provided on the USB thumb drive you
received with the upgrade kit.
NOTE: To preserve existing media, only restore the C partition from the generic disk image.
At rst start up after reimage, the system is in Embedded Security Update mode by default.
8. Set up Windows.
9. Restore network conguration.
10. Install SiteCong Discovery Agent.
11. At the server, manually install SNFS 4.1.
12. Restart the server and wait for all start up processes to complete.
13. Manually uninstall SNFS 4.1.
14. Restart the server and wait for all start up processes to complete.
15. Manually install SNFS 4.2.
16. Restart the server and wait for all start up processes to complete.
17. Manually install K2 9.x software.
While manually installing software, accept any hardware installation or driver/security prompts
that appear. Also refer to related topics in "K2 Release Notes".
18. Restart the server and wait for all start up processes to complete.
19. Install Fibre Channel Card driver.
20. If you archived the K2-ISCSI-SVR Sabretooth license earlier in this process, reinstall it on the
K2 Media Server.
21. Launch the Embedded Security Manager and select Leave to exit out of Update mode.
22. From the Control Point PC, use K2Cong and add the server to the K2 SAN.
30 K2 Summit/Solo/Media Server Field Kit Upgrade Instructions 20140204
Page 31

Upgrading a K2 Media Server to version 9.x
23. In K2Cong, congure the server's File System Server page as follows:
• If a redundant K2 SAN, copy le system cong settings from the redundant K2 Media Server,
as prompted by K2Cong.
• If a basic (non-redundant) K2 SAN, launch Storage Utility, identify a disk, then exit Storage
Utility.
NOTE: Do not make a new le system.
K2Cong does not allow you to proceed until you do these steps.
24. In K2Cong, add SAN-attached K2 Summit systems and other K2 SAN clients.
25. Verify the server operates as expected.
26. Activate Windows within 30 days.
20140204 K2 Summit/Solo/Media Server Field Kit Upgrade Instructions 31
Page 32

Upgrading a Control Point PC
Software needed:
• K2 software version 9.x.
• SiteCong software
Refer to "K2 Release Notes" to determine your compatible versions.
This section provides instructions for the following eld kit:
DescriptionUpgrade Nomenclature
CP-XDPCP-V9-FK
These instructions apply to the upgrade of a Grass Valley supplied, Dell platform, Control Point
PC. As part of the upgrade you re-image the Control Point PC. On the Windows Server 2008 R2
64-bit image there is a Virtual Machine that has a Windows Server 2003 32-bit operating system.
This is required to support NetCentral.
Re-image Control Point PC
1. Make a record of your current NetCentral licenses, as you must request new licenses later in this
process.
2. Backup the current Grass Valley Control Point image to an external USB drive.
3. Reimage the Grass Valley Control Point Dell R610 to the image on the USB thumb drive you
received with the upgrade kit. At the time of this writing, it is a version C9.0.3 base image.
4. Install K2 Control Point, SiteCong, and other software as required for your use of the Control
Point PC.
Set BIOS prerequisites
K2 Server 9.x Upgrade Field Kit. Includes 9.x system software
license, 32GB USB Thumb drive with Windows Server 2008 64bit,
Windows Server 2003 HyperV, McAfee Embedded Server,
NetCentral 5.2.2; CD with Acronis True Image Server.
1. In the BIOS set EXECUTE DISABLE to ENABLED.
2. In the BIOS set VIRTUALIZATION TECHNOLOGY to ENABLED.
Configure Virtual Machine
Before doing this task, verify that the base image is version C9.0.3.
1. Check the current base image version to verify prerequisites stated earlier in this topic.
• On a 64-bit machine, use registry key
Computer\HKEY_LOCAL_MACHINE\SOFTWARE\Wow6432Node\Grass Valley Group\Base
20140204 K2 Summit/Solo/Media Server Field Kit Upgrade Instructions 32
Page 33

Upgrading a Control Point PC
2. From the Windows desktop, right-click Computer and select Manage.
Server Manager opens.
3. In the tree-view, expand nodes Roles | Hyper-V | Hyper-V Manager.
4. Select BASEPC.
5. Under Actions, select Virtual Network Manager.
Virtual Network Manager opens.
6. Identify the physical network adapter to use for the Virtual Network. You do this using Windows
Network Connections.
a) To open Network Connections, from the Windows Start menu, in the Run or the Search
programs and files box, type ncpa.cpl and press Enter.
The Network Connections window opens.
b) Find the connection that is the physical network adapter (not a virtual adapter) that you use
for connection to your network.
For example, if the connection named "Control Connection" is currently connected to your
network, then that is the connection to use for the Virtual Network.
c) Take note of the adapter and its number, as specied in the Device Name column.
In next steps, you must select this adapter to use it for the Virtual Network.
7. In Virtual Network Manager, click Add.
8. Under New Virtual Network, Connection Type, in the External drop-down list, select the network
adapter that you identied to use for the Virtual Network.
9. Verify that Allow management operating system to share this network adapter. is selected.
10. Click Apply and when prompted to apply network changes, click Yes.
Progress is reported for applying changes. Wait until changes are complete.
11. Click OK to close the connection set-up.
12. Under BASEPC, select NetCentral.
13. Under Actions, NetCentral, select Settings.
Setting for NetCentral opens.
14. Under Hardware, click Memory.
15. Under Memory management settings, click Static.
16. Verify that Static RAM is specied as 2048 MB.
17. Under Hardware, click Network Adapter.
18. In the Network drop-down list, select the network you created, which is New Virtual Network.
19. Under Management, click Automatic Start Action.
20. Select the Always start this virtual machine automatically option.
21. Under Management, click Automatic Stop Action.
22. Select the Save the virtual machine state option.
23. Click Apply and OK.
24. Verify that the physical network adapter that you used for the Virtual Network is connected to
your network.
25. Restart the Control Point PC.
20140204 K2 Summit/Solo/Media Server Field Kit Upgrade Instructions 33
Page 34

Upgrading a Control Point PC
26. From the Windows desktop, right-click Computer and select Manage.
Server Manager opens.
27. In the tree-view, expand nodes Roles | Hyper-V | Hyper-V Manager.
28. Select BASEPC.
29. Under BASEPC, verify that the NetCentral Virtual Machine is running.
Next, do Windows setup on the NetCentral Virtual Machine.
Setting up Windows on the Virtual Machine
Before doing this task, you must congure the NetCentral Virtual Machine on the Control Point
PC.
1. From the Windows desktop, right-click Computer and select Manage.
Server Manager opens.
2. In the tree-view, expand nodes Roles | Hyper-V | Hyper-V Manager.
3. Select BASEPC.
4. Under BASEPC, verify that the NetCentral Virtual Machine is running.
5. To connect to the NetCentral Virtual Machine, under NetCentral click Connect.
A Virtual Machine Connection window opens.
If you have not yet done Windows setup, a Windows Setup Wizard is displayed.
6. Work through the Windows Setup Wizard, clicking Next and I accept and entering other
information as desired.
7. On the Product Key page, key in your 25-character Product Key to authenticate your Microsoft
Windows Server 2003.
8. On the Workgroup or Computer Domain page, choose one of the following:
• Workgroup: GRASSVALLEY
• Computer Domain: Enter your own domain.
9. Click Finish to complete the Windows Setup Wizard.
The Virtual Machine restarts.
Next, log on to the Virtual Machine and license NetCentral.
Logging on to the Virtual Machine
Before doing this task, congure the Virtual Machine and set up Windows.
1. From the Control Point PC Windows desktop, right-click Computer and select Manage.
Server Manager opens.
2. In the tree-view, expand nodes Roles | Hyper-V | Hyper-V Manager.
3. Select the Virtual Machine name, as named in Windows setup.
4. Under the Virtual Machine name, verify that the NetCentral Virtual Machine is running.
34 K2 Summit/Solo/Media Server Field Kit Upgrade Instructions 20140204
Page 35

5. To connect to the NetCentral Virtual Machine, under NetCentral click Connect.
A Virtual Machine Connection window opens.
6. If a Welcome to Windows log on message is displayed, do the following to log on to the Virtual
Machine.
a) On the Virtual Machine Connection window tool bar, click the Ctrl + Alt + Delete button.
Ctrl + Alt + Delete is sent to the Virtual Machine.
b) Enter your user name and password and click OK.
The Virtual Machine Windows desktop opens.
Next, license NetCentral.
License NetCentral on the Virtual Machine
You must request new NetCentral licenses and add them to the Virtual Machine. You do this on the
Virtual Machine (not on the Control Point PC), using the SabreTooth License Manager. Because
the NetCentral Virtual Machine desktop does not have a License Request Wizard, start by following
the instructions in the next topic If you encounter difculties when requesting a license on page 35.
Upgrading a Control Point PC
Licenses are requested through email and managed through the SabreTooth License Manager, which
is installed on the Grass Valley product with the Grass Valley software. The SabreTooth License
Manager must be located on the Grass Valley product.
If you encounter difficulties when requesting a license
If you encounter difculties running the License wizard, or the License wizard is not available, try
this alternate method:
1. Generate a unique ID of the device where you will install software, as follows:
a) Double click on the License Manager icon on the Windows Desktop.
The SabreTooth License Manager opens.
b) Choose File | Generate Unique Id the License Manager.
c) Click Copy to clipboard to copy the generated ID, and OK to exit.
2. Prepare an email that includes the following information:
• Customer Name
• Customer Email
• Sales Order Number
• Unique ID of the device where you will install software.
• The license types you are requesting.
3. Send the email to NC-Licenses@grassvalley.com.
The SabreTooth license number will be emailed to the email address you specied.
20140204 K2 Summit/Solo/Media Server Field Kit Upgrade Instructions 35
Page 36

Upgrading a Control Point PC
Adding a license to the Virtual Machine
Your software license, Licenses_<SalesNumber>.txt, is provided as a text le. Use the License
Manager to add this le to your system and enable the desired feature.
1. Double click on the License Manager icon on the Windows Desktop.
The SabreTooth License Manager opens.
2. Do one of the following:
• Choose File | Import License and navigate to the le location to open the text le.
• Drag and drop the text le onto the License Manager.
You will now see the permanent license in SabreTooth, as well as any other licenses, permanent
or temporary, that have been installed on this machine.
3. Restart the Virtual Machine.
You should archive the permanent license to a backup system.
36 K2 Summit/Solo/Media Server Field Kit Upgrade Instructions 20140204
Page 37

Installing a two channel upgrade
Loosen thumbscrews
1
Tools and materials needed:
• Upgrade codec module.
This section provides instructions for the following eld kits.
DescriptionUpgrade Nomenclature
K2-XDP2-2IO-FK
CAUTION: This system contains board-level components that must be protected from static
discharge and physical shock. Wear a wrist strap grounded to the system chassis when handling
system components.
1. If you intend to upgrade K2 software along with this Field Kit upgrade, upgrade K2 software
rst, completing all upgrade processes as documented in "K2 Release Notes", then proceed with
this procedure.
2. Restart the K2 system.
3. Log in to Windows.
4. When the AppCenter logon box appears, click Cancel and Abort.
5. Delete the channel suites le in the C:\profile\ChannelSuites directory. The le name begins
with the K2 system’s name. For example, if the name is k2client1, then the le name is
K2CLIENT1_localConnection.xml.
6. Shutdown the K2 system.
7. From the rear panel, remove the blank plate that covers the empty codec module slot, as illustrated.
K2 Summit 3G 2 HD/SD channel I/O eld kit. Adds 2 HD/SD
bi-directional channels to the K2-XDP2-02 or any of the K2- XDP
Series clients. When used with the K2-XDP Series clients all codec
modules must be replaced with the Summit 3G module.
20140204 K2 Summit/Solo/Media Server Field Kit Upgrade Instructions 37
Page 38

Slide in
1
Tighten thumbscrews
2
Installing a two channel upgrade
8. Install the upgrade codec module as illustrated.
NOTE: With a rm grip on the metal (EMI) bracket, ensure the board is level and parallel
to the card guides to avoid damage to the components on the edge opposite the rear panel.
CAUTION: Improper handling can damage components on the board. Do not allow the
board to come in contact with the chassis sheet metal during removal or installation. The
components on the edge opposite the rear panel are the most susceptible to damage.
9. Start up the K2 system.
On restart, the K2 sysem rescans hardware and automatically discovers the new codec module.
10. If a message appears, follow the instructions in the message to either restart or shutdown/startup.
This second startup process is necessary so that the K2 system can recongure appropriately.
11. After installing the replacement codec module, install the current version of K2 software and
restart.
This is a re-install of current software, not an upgrade. You must install the same version of
software that is currently on the K2 system now, regardless of whether you did or did not upgrade
software earlier in this procedure. You install software now to ensure that the board is ashed
with the proper version to be compatible with software currently on the K2 system. An over-install
is all that is required. You do not need to rst un-install the software.
12. Log in to Windows and AppCenter, and open Conguration Manager. The new channels are
available for conguration.
Congure channels as follows:
• If you are installing a codec license eld kit, do not congure your new channels yet. First install
the codec license eld kit, then congure your new channels.
38 K2 Summit/Solo/Media Server Field Kit Upgrade Instructions 20140204
Page 39

Installing the two channel codec license
Tools and materials needed:
• The license sheet you received with the upgrade kit.
This section provides instructions for the following eld kits:
DescriptionUpgrade Nomenclature
K2-XDP2-AVC-2CH-FK
Work through the tasks in this section sequentially.
Requesting a license
1. If you have not already done so, log on to the K2 Summit/Solo system.
NOTE: You must log in as an Administrator with a local account, not a domain account.
2. On the Windows desktop in the Grass Valley License Requests folder, open the appropriate
license request shortcut.
The License Request Wizard displays.
3. Read the on-screen instructions, then click Next.
The Customer dialog box displays.
4. Enter the information requested on this page then click Next.
You must provide a valid email address to receive your license le.
The Sales Number dialog box displays.
K2 Summit 3G AVC-Intra 2 channel codec license. Includes
AVC-Intra level 50 and 100 and decoding of H.264 L4.2. Two
required for 4 channel model (K2-XDP2-04) Field kit.
5. Enter the Sales Order Number in the eld then click Next.
Typically the Sales Order Number is found on the Software License sheet that you received from
Grass Valley.
The Summary dialog box displays.
6. Review the License Request information and click Finish.
A License Request text le, License_Request_<SalesNumber>.txt, is generated and saved to
the Windows Desktop.
NOTE: If you are requesting licenses for more than one application, be sure to modify the
name of the rst License Request text le before saving it to your desktop. (In Notepad, use
the Save As command.) Otherwise, the second License Request text le will overwrite it.
20140204 K2 Summit/Solo/Media Server Field Kit Upgrade Instructions 39
Page 40

Installing the two channel codec license
7. If a K2 Summit/Solo system at a K2 software version lower than 9.0 and the write lter is currently
enabled, be aware that les on the desktop are lost on restart. Therefore do one of the following:
• Save the License Request text le(s) to a different location.
• Keep the K2 system running (do not restart) until after you have requested the license(s).
8. Do one of the following:
• Attach the License Request text le to an email.
• Paste the text directly into an email message.
You might want to keep a copy of the message for your records.
9. Send the email as instructed by the License Request Wizard.
An email will be sent from Grass Valley to the return email address you specied; your SabreTooth
software license will be provided as a text le.
10. Save this email in case you ever need to re-image this machine.
Next, when you receive the email from Grass Valley with your license, add the license to the K2
Summit/Solo system.
Adding a license
Your software license, Licenses_<SalesNumber>.txt, is provided as a text le. Use the License
Manager to add this le to your system and enable the desired feature.
1. Double click on the License Manager icon on the Windows Desktop.
The SabreTooth License Manager opens.
2. Do one of the following:
• Choose File | Import License and navigate to the le location to open the text le.
• Drag and drop the text le onto the License Manager.
You will now see the permanent license in SabreTooth, as well as any other licenses, permanent
or temporary, that have been installed on this machine.
You should archive the permanent license to a backup system.
40 K2 Summit/Solo/Media Server Field Kit Upgrade Instructions 20140204
Page 41

Installing a MPEG/Multi-Cam codec option upgrade
Prerequisites:
• K2 software version 8.1 or higher is required
Tools and materials needed:
• Codec option card
• #1 Phillips screwdriver
This section provides instructions for the following eld kits:
DescriptionUpgrade Nomenclature
K2-XDP2-MPG2-MC-FK
CAUTION: This system contains board-level components that must be protected from static
discharge and physical shock. Wear a wrist strap grounded to the system chassis when handling
system components.
1. If you intend to upgrade K2 software along with this Field Kit upgrade, upgrade K2 software
rst, then continue with this procedure.
2. Shutdown the K2 Summit system.
K2 Summit 3G MPEG2 Multicam encoding eld. Adds the ability
to record up to 4 video streams per codec module using MPEG2
compression when used in ChannelFlex mode. Includes hardware
and additional MPEG encoding license and
K2_APPCENTER_ELITE. Two K2-XDP2-MPG-FK kits are required
for the K2-XDP2-04 and enables up to 8 video streams to be recorded.
20140204 K2 Summit/Solo/Media Server Field Kit Upgrade Instructions 41
Page 42

Slide out
2
Loosen
thumbscrews
1
Install phillips head screws
3
Orient the codec module
with the card connectors
facing up
1
Position card
and engage card
connectors
2
Installing a MPEG/Multi-Cam codec option upgrade
3. Access the rear panel and remove as illustrated.
NOTE: With a rm grip on the metal (EMI) bracket, ensure the board is level and parallel
to the card guides to avoid damage to the components on the edge opposite the rear panel.
CAUTION: Improper handling can damage components on the board. Do not allow the
board to come in contact with the chassis sheet metal during removal or installation. The
components on the edge opposite the rear panel are the most susceptible to damage.
4. Install codec option card as shown.
42 K2 Summit/Solo/Media Server Field Kit Upgrade Instructions 20140204
Page 43

Installing a MPEG/Multi-Cam codec option upgrade
5. Install the codec module into the K2 Summit system.
6. Start up the K2 Summit system.
On restart, the K2 Summit system rescans hardware and automatically discovers the codec option
card.
7. If a message appears, follow the instructions in the message to either restart or shutdown/startup.
This second startup process is necessary so that the K2 Summit system can recongure
appropriately.
8. After installing the card, start up and log on to the K2 Summit system with administrator privileges,
then load software onto the codec board as follows:
a) Stop all Grass Valley services except for Grass Valley Host File Service.
b) From the Windows command prompt, navigate to the following directory:
C:\profile
c) Type the following and press Enter.
srtploader -U
This ensures that the board is ashed with the proper version to be compatible with K2 software.
Next, license the K2 Summit system for K2 AppCenter Elite, if it is not already licensed. The license
enables the ChannelFlex functionality supported by the codec option card.
NOTE: Once a channel is operational, if you then remove the codec option card from the codec
module you must also delete C:/profile/config/config.xml. Failure to do so causes errors in
Conguration Manager.
20140204 K2 Summit/Solo/Media Server Field Kit Upgrade Instructions 43
Page 44

K2 Summit System Procedures
K2 Summit system procedures
Refer to the following procedures as directed by the instructions for the Field Kit you are installing.
Carrier module removal
1. When removing the carrier module, access it from the rear panel. Remove as illustrated.
2. When replacing the carrier module, the screw attachment sequence is critical, as illustrated.
20140204 K2 Summit/Solo/Media Server Field Kit Upgrade Instructions 44
Page 45

Power supply module removal
Slide outt
2
Loosen thumbscrews
1
Access the power supply module from the rear panel. Remove as illustrated.
K2 Summit System Procedures
Front bezel assembly removal K2 Summit
You can remove the bezel assembly while the K2 Summit system is operating. If you do so, make
sure you replace it within three minutes to ensure that the correct operating temperature is maintained.
To remove the front bezel assembly, proceed as illustrated.
20140204 K2 Summit/Solo/Media Server Field Kit Upgrade Instructions 45
Page 46

Slide out
Push button
1
2
K2 Summit System Procedures
CompactFlash boot media removal K2 Summit
Before doing this task, remove the front bezel assembly.
To remove the boot media, proceed as illustrated.
You must use the CompactFlash boot media provided by Grass Valley. Do not use CompactFlash
media procured elsewhere.
46 K2 Summit/Solo/Media Server Field Kit Upgrade Instructions 20140204
Page 47

Manage Embedded Security Update mode
1. From the Windows desktop, click Start | All Programs | Grass Valley | Embedded Security Manager.
Embedded Security Manager opens.
K2 Summit System Procedures
Interpret Current Status as follows:
• Enabled: Embedded Security is enabled but is not in Update mode.
• Update: Embedded Security is enabled and is in Update mode, ready for software installation.
2. Manage the Update mode as follows:
• If Embedded Security is not in Update mode, click Enter to put it in Update mode.
• If Embedded Security is already in Update mode, click Leave to take it out of Update mode.
A restart is not required after you change the Update mode.
20140204 K2 Summit/Solo/Media Server Field Kit Upgrade Instructions 47
Page 48

K2 Solo Media Server procedures
Remove bezel
Remove
4 screws
1
2
Slide out
2
Push button.
Use pencil or
similar implement.
1
Refer to the following procedures as directed by the instructions for the Field Kit you are installing.
Front bezel removal K2 Solo
To remove the front bezel, proceed as illustrated.
CAUTION: Do not remove bezel while power is on. If powered, the fan can turn on with
moving blades exposed.
CompactFlash boot media removal K2 Solo
To remove the boot media, rst remove the front bezel, then proceed as illustrated.
You must use the CompactFlash boot media provided by Grass Valley. Do not use CompactFlash
media procured elsewhere.
20140204 K2 Summit/Solo/Media Server Field Kit Upgrade Instructions 48
Page 49

Trademarks and Agreements
Trademarks
Grass Valley, GV STRATUS, GV Director, K2, Aurora, Summit, ChannelFlex, Dyno, Solo,
ClipStore, Innity, Turbo, Prole, Prole XP, NetCentral, NewsBrowse, NewsEdit, NewsQ,
NewsShare, NewsQ Pro, and Media Manager are either registered trademarks or trademarks of
Grass Valley USA, LLC. in the United States and/or other countries. GRASS VALLEY®is a
registered trademark. Grass Valley USA, LLC. products are covered by U.S. and foreign patents,
issued and pending. Additional information regarding Grass Valley USA, LLC. trademarks and
other proprietary rights may be found at www.grassvalley.com. Other trademarks and logos used
in this document are either registered trademarks or trademarks of the manufacturers or vendors of
the associated products, such as Microsoft®Windows®operating system, Windows Media®player,
Internet Explorer®internet browser, and SQL Server™. QuickTime and the QuickTime logo are
trademarks or registered trademarks of Apple Computer, Inc., used under license therefrom. AVCHD
and the AVCHD logo are trademarks of Panasonic Corporation and Sony Corporation. Avid DNxHD
is a registered trademark of Avid Technology, Inc., a Delaware corporation.
JPEG acknowledgment
This software is based in part on the work of the Independent JPEG Group.
20140204 K2 Summit/Solo/Media Server Field Kit Upgrade Instructions 49
 Loading...