

Page 1

071-8826-00
K2 Summit 3G
Field Kit Upgrade Instructions
Copyright © Grass Valley USA, LLC. All rights reserved. Printed in the United States of America. Portions of software © 2000 – 2010, Microsoft Corporation. All rights rese rved.
This document may not be copied in whole or in part, or otherwise reproduced except as specifically permitted under U.S. copyright law, without the prior written consent of
Grass Valley USA, LLC., P.O. Box 59900, Nevada City, California 95959-7900. This product may be covered by one or more U.S. and foreign patents.
Product options and specifications subject to change without notice. The information in this manual is furnished for informational use only, is subject to change without notice,
and should not be construed as a commitment by Grass Valley USA, LLC. Grass Valley USA, LLC. assumes no responsibility or liability for any errors or inaccuracies that
may appear in this publication.
Grass Valley, STRATUS, K2, Aurora, Summit, ChannelFlex, Dyno, Solo, ClipStore, Infinity, Turbo, Profile, Profile XP, NetCentral, NewsBrowse, NewsEdit, NewsQ,
NewsShare, NewsQ Pro, and Media Manager are either registered trademarks or trademarks of Grass Valley USA, LLC. in the United States and/or other countries. Grass
Valley USA, LLC. products are co vered by U.S. and foreign patents, issued and pending. Additional information regarding Grass Valley USA, LLC. trademarks and other
proprietary rights may be found at www.grassvalley.com. Other trademarks and logos used in this document are either registered trademarks or trademarks of the
manufacturers or vendors of the associated products, such as Microsoft® Windows® operating system, Windows Media® player, Internet Explorer® internet browser, and
SQL Server™. QuickTime and the QuickTime logo are trademarks or registered trademarks of Apple Computer, Inc., used under license therefrom.
Page 2

Contents
Grass Valley Product Support......................................................................................................................3
Upgrade instructions....................................................................................................................................5
Safety Summaries....................................................................................................................................5
Installing a MPEG/Multi-Cam codec option upgrade................................................................................5
Installing upgrade licenses.......................................................................................................................7
Requesting a license.............................................................................................................................7
Adding a license....................................................................................................................................9
K2 Summit system procedures.................................................................................................................9
Disable write filter..................................................................................................................................9
Enable write filter.................................................................................................................................10
31 January 2012 K2 Summit 3G Field Kit Upgrade Instructions 2
Page 3

Grass Valley Product Support
To get technical assistance, check on the status of a question, or to report a new issue, contact Grass
Valley Product Support via e-mail, the Web, or by phone or fax.
Web Technical Support
To access support information on the Web, visit the product support Web page on the Grass Valley
Web site. You can download software or find solutions to problems.
World Wide Web: http://www.grassvalley.com/support/
Technical Support E-mail Address: gvgtechsupport@grassvalley.com
Grass Valley Knowledge Base: http://grassvalley.novosolutions.net/
In the Knowledge Base you can search by topic, search by product, or browse the Table of Contents
to find Frequently Asked Questions (FAQ).
Telephone Support
Use the following information to contact Product Support by phone.
International Support Centers
Our international support centers are available 24 hours a day, 7 days a week.
Authorized Local Support Representative
A local support representative may be available in your country. To locate a support center during
normal local business hours, refer to the following list. This list is regularly updated on the website
for Grass Valley Product Support
(http://www.grassvalley.com/support/contact/phone/)
After–hours local phone support is also available for warranty and contract customers.
In countryToll freeSupport Center
+33 1 48 25 20 20+800 80 80 20 20France
+1 530 478 4148+1 800 547 8949United States
TelephoneCountryRegion
+86 10 5883 7575ChinaAsia
+852 2531 3058Hong Kong, Taiwan, Korea,
Macau
+81 3 6848 5561Japan
+603 7492 3303Southeast Asia - Malaysia
+65 6379 1313Southeast Asia - Singapore
31 January 2012 K2 Summit 3G Field Kit Upgrade Instructions 3
Page 4

Grass Valley Product Support
TelephoneCountryRegion
+91 22 676 10324India
1 300 721 495AustraliaPacific
0800 846 676New Zealand
+61 3 8540 3650For callers outside Australia or
New Zealand
+55 11 5509 3440AllCentral America, South America
North America
North America, Mexico,
Caribbean
France
Eastern Europe
Ukraine, Uzbekistan
Near East and Africa
+1 800 547 8949;
+1 530 478 4148
+44 1189 230 499UK, Ireland, IsraelEurope
+31 (0) 35 62 38 421Benelux – Netherlands
+32 (0) 2 334 90 30Benelux – Belgium
+800 80 80 20 20;
+33 1 48 25 20 20
+49 6150 104 444Germany, Austria,
+7 495 258 09 20Belarus, Russia, Tadzhikistan,
+45 404 72 237Northern Europe
+39 06 87 20 35 28Southern Europe – Italy
+34 91 512 03 50Southern Europe – Spain
+971 4 299 64 40Middle EastMiddle East, Near East, Africa
+800 80 80 20 20;
+33 1 48 25 20 20
4 K2 Summit 3G Field Kit Upgrade Instructions 31 January 2012
Page 5

Upgrade instructions
Use these installation instructions to upgrade your K2 Summit 3G system. Refer to the section in
this document that applies to the upgrade kit that you received.
Safety Summaries
WARNING: In order to avoid personal injury and prevent damage to this product and its peripheral
products, be sure to review all safety and ESD precautions listed in the K2 product Service Manual.
Installing a MPEG/Multi-Cam codec option upgrade
Prerequisites:
• K2 software version 8.1 or higher is required
Tools and materials needed:
• Codec option card
• #1 Phillips screwdriver
This section provides instructions for the following field kits:
DescriptionUpgrade Nomenclature
K2-XDP2-MPG-MC-FK
CAUTION: This system contains board-level components that must be protected from static
discharge and physical shock. Wear a wrist strap grounded to the system chassis when handling
system components.
1. If you intend to upgrade K2 software along with this Field Kit upgrade, upgrade K2 software
first, then continue with this procedure.
2. Shutdown the K2 Summit system.
Adds the ability to record up to 4 video streams per codec
module using MPEG-2 compression when used in ChannelFlex
mode. Includes hardware and K2 AppCenter Elite license.
31 January 2012 K2 Summit 3G Field Kit Upgrade Instructions 5
Page 6
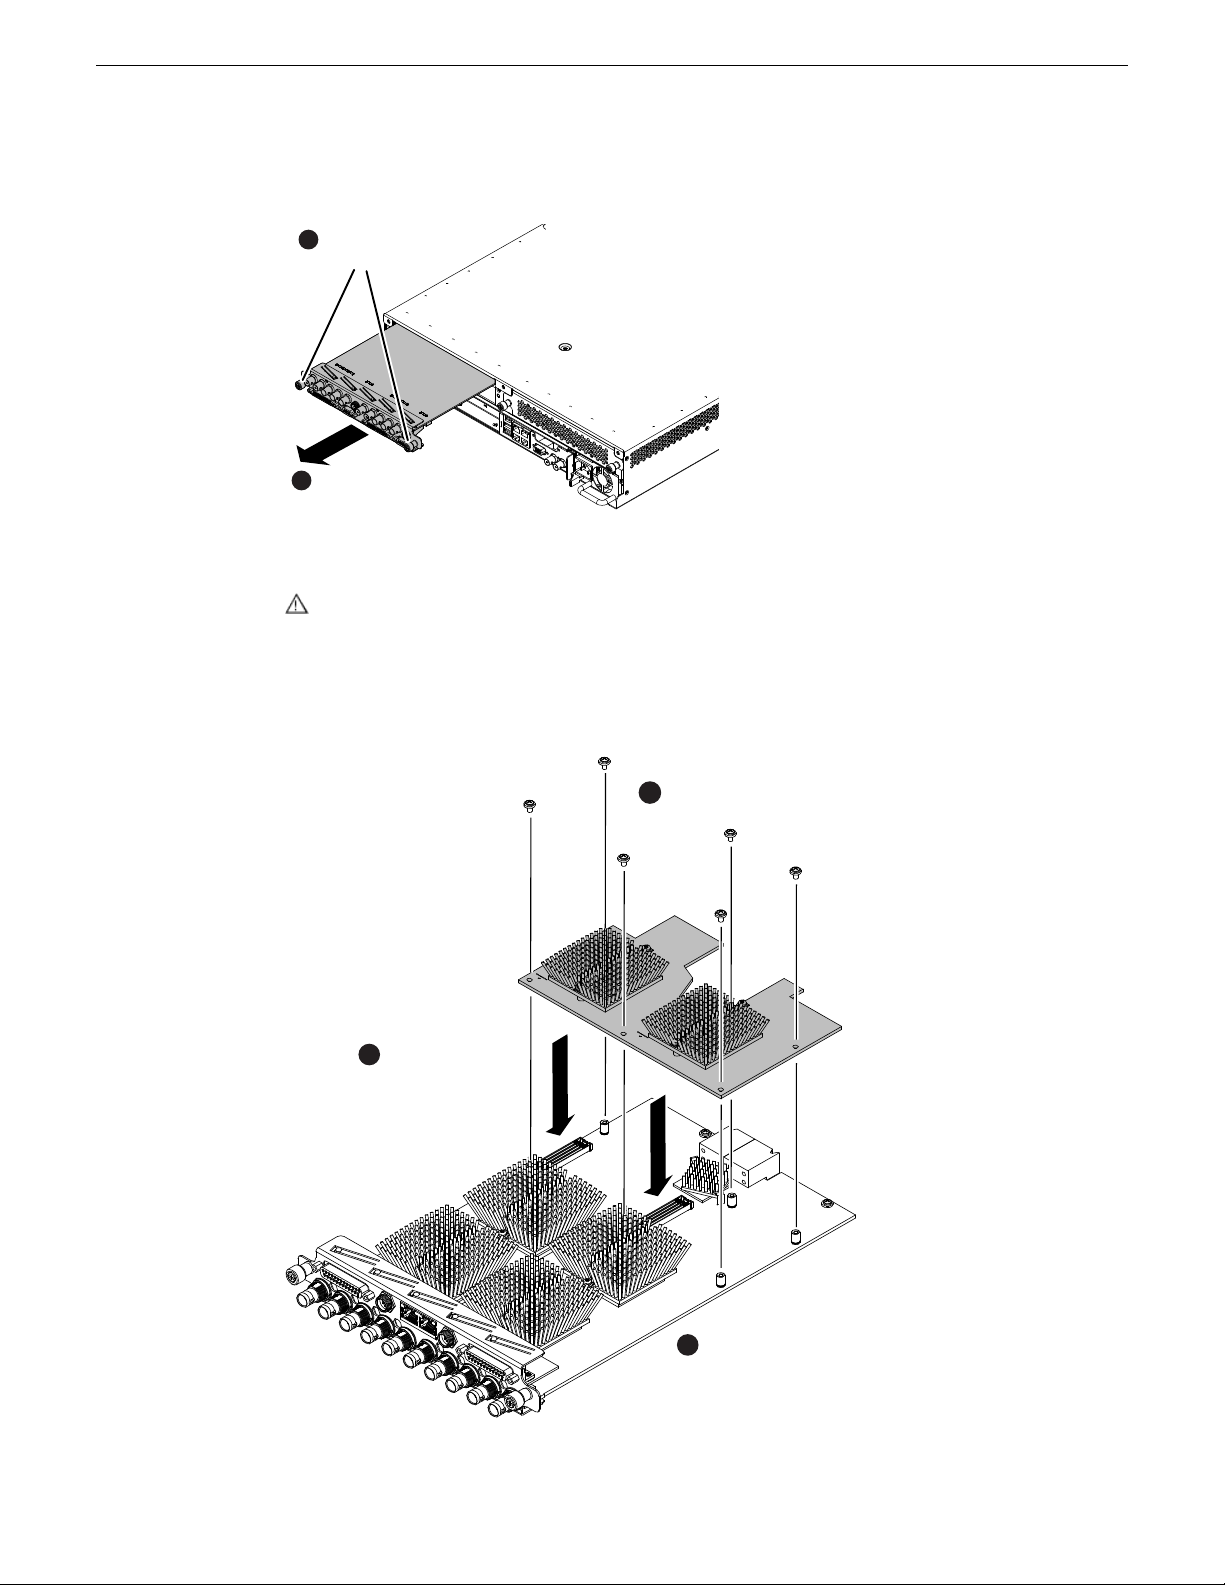
Slide out
2
Loosen
thumbscrews
1
Install phillips head screws
3
Orient the codec module
with the card connectors
facing up
1
Position card
and engage card
connectors
2
Upgrade instructions
3. Access the rear panel and remove as illustrated.
NOTE: With a firm grip on the metal (EMI) bracket, ensure the board is level and parallel
to the card guides to avoid damage to the components on the edge opposite the rear panel.
CAUTION: Improper handling can damage components on the board. Do not allow the
board to come in contact with the chassis sheet metal during removal or installation. The
components on the edge opposite the rear panel are the most susceptible to damage.
4. Install codec option card as shown.
6 K2 Summit 3G Field Kit Upgrade Instructions 31 January 2012
Page 7

Upgrade instructions
5. Install the codec module into the K2 Summit system.
6. Start up the K2 Summit system.
On restart, the K2 Summit system rescans hardware and automatically discovers the codec option
card.
7. If a message appears, follow the instructions in the message to either restart or shutdown/startup.
This second startup process is necessary so that the K2 Summit system can reconfigure
appropriately.
8. After installing the card, install the current version of K2 software and restart.
An over-install is all that is required. You do not need to first un-install the software. This ensures
that the board is flashed with the proper version to be compatible with K2 software.
Next, license the K2 Summit system for K2 AppCenter Elite, if it is not already licensed. The license
enables the ChannelFlex functionality supported by the codec option card.
NOTE: Once a channel is operational, if you then remove the codec option card from the codec
module you must also delete C:/profile/config/config.xml. Failure to do so causes errors in
Configuration Manager.
Installing upgrade licenses
Tools and materials needed:
• The license sheet you received with the upgrade kit.
This section provides instructions for the following field kits:
K2-APPCNTR-ELTE-FK
K2-APPCNTR-PRO-FK
K2-XDP2-AVC-2CH-FK
Work through the tasks in this section sequentially.
Requesting a license
DescriptionUpgrade Nomenclature
Extends the feature set of standard App Center and includes all
AppCenter Pro features plus ChannelFlex and proxy encoding
licenses for 8 channels of low resolution proxy generation.
ChannelFlex includes 2x and 3x Super Slo-Mo record, 3D/Video
+ Key record and play, and Multi-Cam recording.
Extends the feature set of standard AppCenter and includes such
features as audio track tagging, super out and proxy encoding
licenses for 4 channels of low resolution proxy generation.
Includes AVC-Intra level 50 and 100 and decoding of AVCHD
for one codec module.
1. If you have not already done so, log on to the K2 Summit system.
NOTE: You must log in as an Administrator with a local account, not a domain account.
31 January 2012 K2 Summit 3G Field Kit Upgrade Instructions 7
Page 8

Upgrade instructions
2. On the Windows desktop in the Grass Valley License Requests folder, open the appropriate
3. Read the on-screen instructions, then click Next.
4. Enter the information requested on this page then click Next.
5. Enter the Sales Order Number in the field then click Next.
6. Review the License Request information and click Finish.
license request shortcut.
The License Request Wizard displays.
The Customer dialog box displays.
You must provide a valid email address to receive your license file.
The Sales Number dialog box displays.
Typically the Sales Order Number is found on the Software License sheet that you received from
Grass Valley.
The Summary dialog box displays.
A License Request text file, License_Request_<SalesNumber>.txt, is generated and saved to
the Windows Desktop.
NOTE: If you are requesting licenses for more than one application, be sure to modify the
name of the first License Request text file before saving it to your desktop. (In Notepad, use
the Save As command.) Otherwise, the second License Request text file will overwrite it.
7. If a K2 Summit/Solo system and the write filter is currently enabled, be aware that files on the
desktop are lost on restart. Therefore do one of the following:
• Save the License Request text file(s) to a different location.
• Keep the K2 system running (do not restart) until after you have requested the license(s).
8. Do one of the following:
• Attach the License Request text file to an email.
• Paste the text directly into an email message.
You might want to keep a copy of the message for your records.
9. Send the email as instructed by the License Request Wizard.
An email will be sent from Grass Valley to the return email address you specified; your
SabreTooth software license will be provided as a text file.
10. Save this email in case you ever need to re-image this machine.
Next, when you receive the email from Grass Valley with your license, add the license to the K2
Summit/Solo system.
8 K2 Summit 3G Field Kit Upgrade Instructions 31 January 2012
Page 9

Adding a license
Your software license, Licenses_<SalesNumber>.txt, is provided as a text file. Use the License
Manager to add this file to your system and enable the desired feature.
1. If adding a license on a K2 Summit/Solo system, if you have not already done so, disable the
write filter.
2. Double click on the License Manager icon on the Windows Desktop.
The SabreTooth License Manager opens.
3. Do one of the following:
• Choose File | Import License and navigate to the file location to open the text file.
• Drag and drop the text file onto the License Manager.
You will now see the permanent license in SabreTooth, as well as any other licenses, permanent
or temporary, that have been installed on this machine.
4. On a K2 Summit/Solo system, if you have completed your changes, enable the write filter.
You should archive the permanent license to a backup system.
Upgrade instructions
Related Links
Disable write filter on page 9
Enable write filter on page 10
K2 Summit system procedures
Refer to the following procedures as directed by the instructions for the Field Kit you are installing.
Disable write filter
Prerequisite:
• K2 software must be installed on the K2 Summit/Solo system.
1. If you have not already done so, log on to the K2 Summit/Solo system with Windows administrator
privileges.
2. From the Windows desktop, click Start | All Programs | Grass Valley | Write Filter Utility.
FBWF Manager opens.
3. Under Filter Settings, set Filter to Disable.
Do not modify other settings.
4. Click OK.
5. When prompted, restart the K2 system.
31 January 2012 K2 Summit 3G Field Kit Upgrade Instructions 9
Page 10

Upgrade instructions
Enable write filter
Prerequisite:
• K2 software must be installed on the K2 Summit/Solo system.
1. If you have not already done so, log on to the K2 Summit/Solo system with Windows administrator
2. From the Windows desktop, click Start | All Programs | Grass Valley | Write Filter Utility.
3. Under Filter Settings, set Filter to Enable.
4. Under Protected Volumes, set C: to Protected.
5. Click OK.
6. When prompted, restart the K2 system.
privileges.
FBWF Manager opens.
Do not modify other settings.
10 K2 Summit 3G Field Kit Upgrade Instructions 31 January 2012
 Loading...