

Page 1

K2 Media Client
Field Kit Upgrade Instructions
Table of Contents
Grass Valley Product Support................................................................................2
About this document ...............................................................................................3
Safety Summaries.......................................... ....................................... ...................3
Installing a mezzanine board upgrade....................................................................3
Converting SD to HD..............................................................................................9
*071-8450-01*
Copyright © 2007 Grass Valley, Inc. All rights reserved. Printed in the United States of America. Portions of softwar e © 2000 – 2007, Microsoft Corpora tion. All rights reser ved.
This document may not be copied in whole or in part, or otherwise reproduced except as specifically permitted under U.S. copyright law, without the prior written consent of
Grass Valley, Inc., P.O. Box 59900, Nevada City, California 95959-7900.
Grass Valley, K2, Aurora, Turbo, M-Series, Profile, Profile XP, NewsBrowse, NewsEdit, NewsQ, NewsShare, NewsQ Pro, and Media Manager are either registered tradema rks
or trademarks of Grass Valle y, Inc. i n t he Un ited S tat es an d/or othe r co untr ies. Other trademarks used in this document are either register ed tr adem arks or tra dema rks o f the
manufacturers or vendors of the associated products. Grass Valley, Inc. prod ucts are covered by U.S. and foreign pate nts, issued and pend ing. Additional i nformation regarding Grass Valley, Inc.’s trademarks and other proprietary rights may be found at www.thomsongrassvalley.com.
Product options and specifications subject to change without no tice. The infor matio n in this manual is furni shed for in form atio nal use only, is subject to change without noti ce,
and should not be construed as a commitment by Grass Valley, Inc. Grass Valley, Inc. assumes no responsibility or liability for any errors or inaccuracies that may appear in
this publication.
Page 2

K2 Media Client Field Kit Upgrade Instructions
Grass Valley Product Support
To get technical assistance, check on the status of a question, or to report new issue,
contact Grass Valley Product Support via e-mail, the Web, or by phone or fax.
Contact Grass Valley first regarding problems with third party software on Grass
Valley products, such as the Microsoft
®
Media
player, Internet Explorer® internet browser, and SQL Server™.
Web Technical Support
To access support in formation on t he Web, visit the pro duct support Web p age on the
Grass Valley Web site. You can download software or fi nd sol ut ion s to problems by
searching our Frequently Asked Questions (FAQ) database.
World Wide Web: http://www.thomsongrassvalley.com/support/
Technical Support E-mail Address: gvgtechsupport@thomson.net.
Phone Support
Use the following information to contact product support by phone during business
hours. Afterhours phone support is available for warranty and contract customers.
®
Windows® operating system, Windows
International
(France)
International
(United States,
Canada)
Hong Kong,
Taiwan, Korea,
Macau
Australia, New
Zealand
Central, South
America
China +861 066 0159 450 Netherlands +31 (0) 35 62 38 421
Belgium +32 (0) 2 334 90 30 Northern Europe +45 45 96 88 70
Japan +81 3 5484 6868 Singapore +65 6379 1313
Malaysia +603 7805 3884 Spain +41 487 80 02
Middle East +971 4 299 64 40 UK, Ireland, Israel +44 118 923 0499
+800 80 80 20 20
+33 1 48 25 20 20
+1 800 547 8949
+1 530 478 4148
+852 2531 3058 Indian
+61 1300 721 495 Germany, Austria,
+55 11 5509 3440 Near East, Africa +33 1 48 25 20 20
Authorized Support Representative
Italy +39 02 24 13 16 01
+39 06 87 20 35 42
Belarus, Russia,
Tadzikistan,
Ukraine,
Uzbekistan
Subcontinent
Eastern Europe
+7 095 258 09 20
+33 (0) 2 334 90 30
+91 11 515 282 502
+91 11 515 282 504
+49 6150 104 444
A local authorized s upport repre sentative may be availabl e in your coun try. To locat e
the support repr esentative for your country, vi sit the product support Web page on the
Grass Valley Web site.
2 K2 Media Client Field Kit Upgrade Instructions August 3, 2007
Page 3
About this document
Use these installation instructions to upgrade your K2 Media Client. Refer to the
section in this document that applies to the upgrade kit that you received.
Safety Summaries
Safety Summaries
!
WARNING: In order to avoid personal injury and prevent damage to
this product and i ts peripheral produc ts, be sure to re view all safety a nd
ESD precautions listed in the K2 Media Client System Guide.
Installing a mezzanine board upgrade
This section provides instructions for the following field kits.
Upgrade Nomenclature Description
K2-HD-01-FK Adds one decoder mezzanine board to a HD-00 K2 Media
Client. For a K2 Media Client model with two or three
channels, this adds one playout channel.
K2-HD-10-FK Adds one encoder mezzanine board to a HD-00 K2 Media
Client. For a K2 Media Client model with two or three
channels, this adds one record channel.
Tools and materials needed:
• Torx tool with T15 magnetic tip.
• Upgrade mezzanine board and four attachment screws.
!
CAUTION: This system contains boa rd-level components that must be
protected from stati c di scharge and physical shock. Wear a wrist strap
grounded th rough one o f the system's ESD Grou nd jacks wh en
handling system components.
To install the Codec upgrade:
1. Make a record of the settings in Configur ation Manager for your cur rent channel s.
Because the mezzanine board upgrade process rewrites configuration files, all
channel settings are reset to their default values. Therefore, at the end of the
upgrade process you must reconfigure your channels.
2. Shutdown the K2 Media Client
3. Remove both power cords from power supplies.
!
4. Remove the top cover as illustrated:
August 3, 20 07 K2 Media Client Field Kit Upgrade Instructions 3
CAUTION: To avoid possible damage to circuit boards and other
sensitive parts, turn off the K2 Media Client and d is conne ct AC power
before opening the top cover or removing any internal parts.
Page 4

K2 Media Client Field Kit Upgrade Instructions
Remove screw
1
2
Pull cover toward
rear 2 cm to release,
then lift off
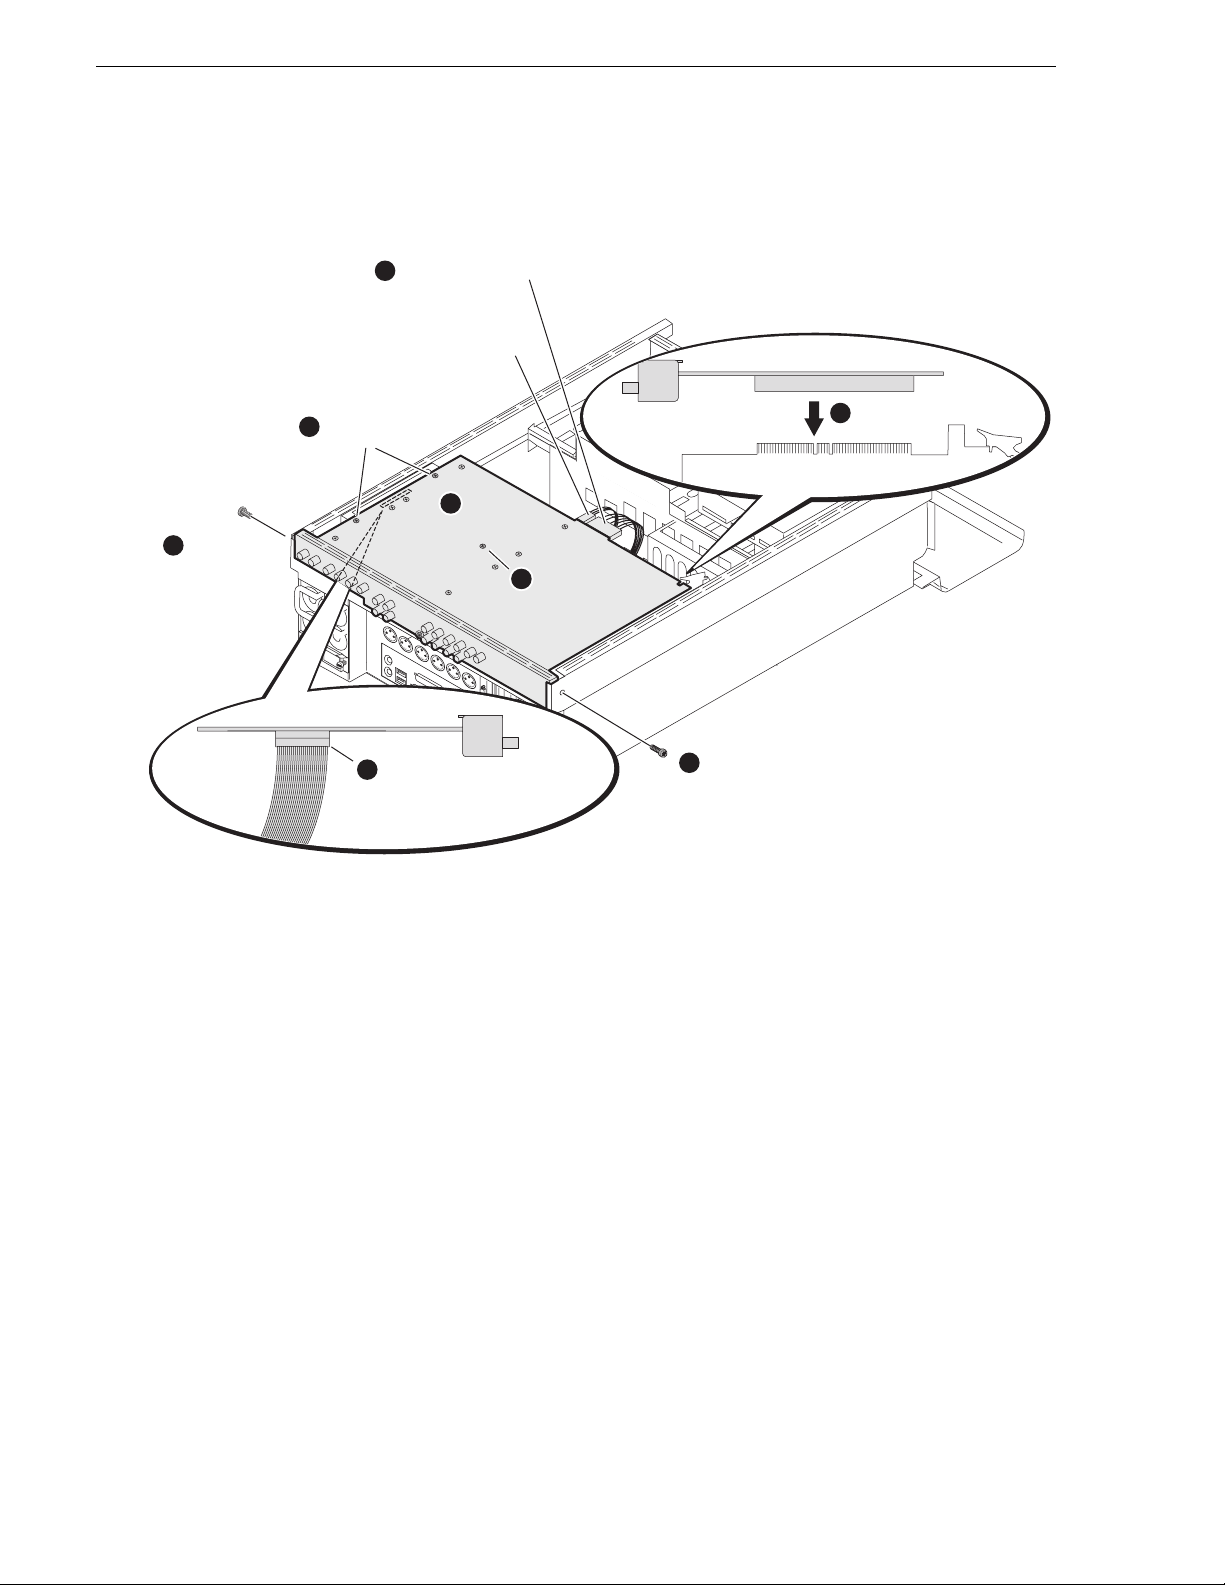
5. Remove the codec board as illustrated.
1
Disconnect
power cables
Remove six screws*
2
4
Lift board gently from
chassis, then reach
under and disconnect
XLR board cable
*Do not remove any
of the mezzanine
board screws.
3
Disengage from RTP
board
A mezzanine board is at tached by four screws, which a re accessed from the top si de
of the codec board. Do not remove these screws while removing the codec board.
4 K2 Media Client Field Kit Upgrade Instructions August 3, 2007
Page 5

Installing a mezzanine board upgrade
6. Identify the position of a mezzanine board cu rrently installed, as illustrated.
1
Flip the codec board
over so the mezzanine
board is on top.
2
Identify mezzanine
board positions
P3/R2 position
BNC connectors
P4/R1 position
Each position could have either a decoder mezzanine board or an encoder
mezzanine board, according to the current channel configuration, as follows:
If the system has the following channels… Mezzanine boards are positioned as follows:
Record Channels Play Channels Position P3/R2 Position P4/R1
02EmptyEmpty
0 3 Decoder Empty
0 4 Decoder Decoder
12EmptyEncoder
1 3 Decoder Encoder
2 2 Encoder Encoder
August 3, 20 07 K2 Media Client Field Kit Upgrade Instructions 5
Page 6

K2 Media Client Field Kit Upgrade Instructions
7. Verify if a currently installed mezzanine board is a decoder or an encoder.
Likewise verify if the upg rade mezzanine board you are abou t to install is a decoder
or an encode r. Refer to the following il lustration:
XXXXX XXXXXX
XX XXXXXXX
GRASS VALLEY
HD/SD ENCODER
GRASS VALLEY
XXXXX XXXXXX
XXXXXXXXX
XX XXXXXXX
HD DECODER
MEZZANINE
8. Make sure that you have the correct mezzanine board ( decoder or encoder) for your
intended upgrade. Also make sure you are installing it in the cor rect position. Refer
to the previous steps for information on the mezzanine boa rd positions for the
current and target channel configuration. In some cases you need to remove a
currently installed board to create the correct target channel configuration.
NOTE: Installing the upgrade mezzanine board in the wrong position will render
the K2 Media Client inoperable.
6 K2 Media Client Field Kit Upgrade Instructions August 3, 2007
Page 7

Installing a mezzanine board upgrade
9. Install the upgrade mezzanine board. Refer to the following illustration:
1
Engage connectors at
both ends of mezzanine
If installing in
P4/R1 position
Provide support
under the codec
board when seating
connectors.
board.
If installing in
P3/R2 position
Make sure both
connectors are fully
seated.
3
Install the four
screws attaching the
upgrade mezzanine board
Screws for P4/R1
mezzanine board
2
Flip the codec
board over
Screws for P3/R2
mezzanine board
August 3, 20 07 K2 Media Client Field Kit Upgrade Instructions 7
Page 8
K2 Media Client Field Kit Upgrade Instructions
10.Replace the codec board. Make sure screws are installed in the proper sequence,
as illustrat ed:
7
Connect large
power cable
On HD/SD models,
also connect
small power cable
Install side
4
screws tightly
Tighten
5
center
Install side
6
screws
screw
Loosely install
3
center screw
2
Carefully engage the
RTP board
Install side
1
Move board into position,
then reach under and
connect XLR board cable
6
screws
11.Replace the top cover.
12.Connect power cables.
13. Start up the K2 Media Client.
14.Log in to Windows.
15.When the AppCenter logon box appears, click
Cancel and Abort.
16. Delete all co nfiguratio n XML files in the C:\profile\config direct or y. These
configuration files cannot be saved and reused.
On restart, the K2 Media C lient rescans hardware, discovers th e new mezzanine
board, reconfigures appropriately, and writes a new configuration file.
17.Restart the K2 Media Client, log in to Windows and AppCenter, and open
Configuration Manager. The new channel should be available for configuration,
according to the decoder (play channel) or encoder (record channel) installed.
In addition, all settings on all chan nels are at the default va lues.
18.Configure all channels, making new settings on the new channel and returning
existing channels to their previous settings.
8 K2 Media Client Field Kit Upgrade Instructions August 3, 2007
Page 9

Converting SD to HD
This section provides instructions for the following field kit:
Upgrade Nomenclature Description
K2-SD-HD-UPGD-KIT Converts a SD K2 Media Client to a HD K2 Media Client.
Tools and materials needed:
• Torx tool with T15 magnetic tip.
• HD codec board.
•The K2 Media Client Service Manual
Converting SD to HD
!
CAUTION: This system contains boa rd-level components that must be
protected from stati c di scharge and physical shock. Wear a wrist strap
grounded th rough one o f the system's ESD Grou nd jacks wh en
handling system components.
Refer to instructions and illustrations earlier in this document and in the K2 Media
Client Service Manual as needed.
To do the conversion:
1. Make a record of the settings in Configur ation Manager for your cur rent channel s.
Because the conversion process rewrites configuration files, all channel settings
are reset to their default values. Therefore, at the end of the process you must
reconfigure your channels.
2. On the K2 Media Client go to Windows
Valley K2 Client
software.
Add/Remove Programs and remove Grass
3. Open Windows Explorer and delete the following file:
C:/profile/config/config.xml
4. Shutdown the K2 Media Client
5. Remove both power cords from power supplies.
!
CAUTION: To avoid possible damage to circuit boards and other
sensitive parts, turn off the K2 Media Client and d is conne ct AC power
before opening the top cover or removing any internal parts.
6. Remove the top cover from the K2 Media Client
7. Remove the existing SD Codec board.
8. Switch the positions of the RTP card and Dual port network card.
9. Install the HD codec board. If you are also adding mezzanine boards, refer to
instructions earlier in this document as appropriate.
10.Replace the top cover.
11.Connect power cables.
August 3, 20 07 K2 Media Client Field Kit Upgrade Instructions 9
Page 10

K2 Media Client Field Kit Upgrade Instructions
12. Start up the K2 Media Client.
13. Follow the procedure in the K2 Media Client Service Manual to make motherboard
CMOS settings, which involves the following steps:
• During startup processes, access BIOS settings.
• Make BIOS settings.
• Save settings and restart the K2 Media Client.
14.At startup, ignore “Found New Hardware” messages.
15.Install K2 client software and configure based on customer requirements.
10 K2 Media Client Field Kit Upgrade Instructions August 3, 2007
 Loading...