

Page 1
K2 InSync
K2 MIRRORING SOFTWARE
User Guide
SOFTWARE VERSION 4.0
071-8529-01
AUGUST 2008
Page 2

Copyright Copyright © 2008 Grass Valley, Inc. All rights reserved. Printed in the United States of America.
Portions of software © 2000 – 2008, Microsoft Corporation. All rights reserved. This document
may not be copied in whole or in part, or otherwise reproduced except as specifically permitted
under U.S. copyright law, without the prior written consent of Grass Valley, Inc., P.O. Box
59900, Nevada City, California 95959-7900. This product may be covered by one or more U.S.
and foreign patents.
Disclaimer Product options and specifications subject to change without notice. The information in this
manual is furnished for informational use only, is subject to change without notice, and should
not be construed as a commitment by Grass Valley, Inc. Grass Valley, Inc. assumes no
responsibility or liability for any errors or inacc uracies that may appear in this publication.
U.S. Government
Restricted Rights
Legend
Trademarks and
Logos
Revision Status
Use, duplication, or disclosure by the United States Government is subject to restrictions as set
forth in subparagraph (c)(1)(ii) of the Rights in Technical Data and Computer Software clause
at DFARS 252.277-7013 or in subparagraph c(1) and (2) of the Commercial Computer
Software Restricted Rights clause at FAR 52.227-19, as applicable. Manufacturer is Grass
Valley, Inc., P.O. Box 59900, Nevada City, California 95959-7900 U.S.A.
Grass Valley, K2, Aurora, Infinity, Turbo, M-Series, Profile, Profile XP, NetCentral,
NewsBrowse, NewsEdit, NewsQ, NewsShare, Ne wsQ Pro, and Media Manager are either
registered trademarks or trademarks of Grass Valley, Inc. in the United States and/or other
countries. Grass Valley, Inc. products are covered by U.S. and foreign patents, issued and
pending. Additional information regarding Grass Valley, Inc. trademarks and other proprietary
rights may be found at www.thomsongrassvalley.com.
Other trademarks and logos used in this document are either registered trademarks or
trademarks of the manufacturers or vendors of the associated products, such as Microsoft®
Windows® operating system, Windows Media® play er, Internet Explorer® internet browser,
and SQL Server™. QuickTime and the QuickTime logo are trademarks or registered
trademarks of Apple Computer, Inc., used under license therefrom.
Rev Date Description
November 2006 Initial release of the K2 InSync User Guide, 071-8529-00.
April 2008 Updates for automatic bin creation, Master/Slave path
requirements. Sofware version 4.0. 071-8529-01.
2 K2 InSync User Guide August 4, 2008
Page 3

Contents
Grass Valley Product Support.................................................................................4
Introducing K2 InSync.............................................................................................6
K2 System requirements.........................................................................................6
Operational considerations when using K2 InSync.................................................6
Installing K2 InSync.................................................................................................7
Upgrading K2 InSync..........................................................................................7
Starting and stopping K2 InSync......................................... ..... ...............................7
Setting master and slave K2s..................................................................................8
About synchronization.............................................................................................9
Configuring synchronization rules...........................................................................10
Defining filters.................................... ...... ..... ...... ..... ........................................ ..... ...13
Saving a configuration file.......................................................................................14
Loading a configuration file .....................................................................................15
Running synchronizations .......................................................................................15
Managing individual synchronization tasks.............................................................16
About task blocks ............................... ..... ...... ..... ........................................ ..... ...16
Re-arranging the order of synchronization tasks................................................16
Excluding synchronization tasks.........................................................................16
Including synchronizati on tas ks........................................... ...... .........................17
Manually controlling deletions.................................................................................17
Viewing synchronization history..............................................................................18
Viewing the history log ............................................................................................18
Changing the slave K2 to be master.......................................................................18
August 4, 2008 K2 InSync User Guide 3
Page 4

Grass Valley Product Support
T o get technica l assistance, che ck on the status of a ques tion, or to report new i ssue, contact
Grass Valley Product Support via e-mail, the Web, or by phone or fax.
Web Technical Support
To access support infor mation on the Web, v isit the pr oduct support Web page on the
Grass Valley Web site. Yo u ca n do wn loa d s oft war e or f ind sol utions to problems by
searching our Frequently Asked Questions (FAQ) database.
World Wide Web: http://www.thomsongrassvalley.com/support/
Technical Support E-mail Address: gvgtechsupport@thomson.net.
Phone Support
Use the following information to contact product support by phone during business
hours. Afterhours phone support is available for warranty and contract customers.
International
(France)
International
(United States,
Canada)
Hong Kong,
Taiwan, Korea,
Macau
Australia, New
Zealand
Central, South
America
China +861 066 0159 450 Netherlands +31 (0) 35 62 38 421
Belgium +32 (0) 2 334 90 30 Northern Europe +45 45 96 88 70
Japan +81 3 5484 6868 Singapore +65 6379 1313
Malaysia +603 7805 3884 Spain +41 487 80 02
Middle East +971 4 299 64 40 UK, Ireland, Israel +44 118 923 0499
+800 80 80 20 20
+33 1 48 25 20 20
+1 800 547 8949
+1 530 478 4148
+852 2531 3058 Indian
+61 1300 721 495 Germany, Austria,
+55 11 5509 3440 Near East, Africa +33 1 48 25 20 20
Authorized Support Representative
Italy +39 02 24 13 16 01
+39 06 87 20 35 42
Belarus, Russia,
Tadzikistan,
Ukraine,
Uzbekistan
Subcontinent
Eastern Europe
+7 095 258 09 20
+33 (0) 2 334 90 30
+91 11 515 282 502
+91 11 515 282 504
+49 6150 104 444
A local authoriz ed support repres entative may be av ailable in you r country. To locat e the
support represent ative for your c ountry, visit the product support Web p age on the Grass
Valley Web site.
4 K2 InSync User Guide August 4, 2008
Page 5
Grass Valley Product Support
August 4, 2008 K2 InSync User Guide 5
Page 6

Using K2 InSync
Introducing K2 InSync
Regardless of how reliable any broadcast device is, for mission-critical applications
like broadcast, many facilities require full redundancy in their play-to-air servers.
Disk mirroring, normally the responsibility of the controlling application, can add
significantly to the complexity of the application. With K2 InSync, mirroring is
accomplished within the K2 system. K2 InSync ensures that the contents of two
systems are maintained as a mirrored pair. In the event of a failure the user routes
control of replay funct ion to the sla ve sy st em, which K2 InSync keeps synchronized
with the master.
K2 InSync can also provide bi-dire ctional mirrorin g between two K2 systems. In this
mode K2 InSync allows each system to operate as a master system while serving as
slave to the other.
K2 System requirements
• K2 InSync and K2 system software versions must be compatible. Refer to K2
Media Client Release Notes and K2 InSync Release Notes for software
compatibility information.
• Fibre Channel or Ethernet video network must be installed and configured, such
that the K2 AppCenter application can make transfers between the K2s. For
information about configuring a network, see the K2 Media Client System Guide.
• K2 InSync must be installed on the master K2. It can also be installed on the slave
K2, but it should not be run simultaneously on both.
NOTE: Grass Valley recommends that the s torage ca pacity of the maste r and slave
K2 systems be the same . If the capacity of the slave unit is smaller, you must
carefully manage the backup of mater ial to avoid e xceeding the storage capacit y of
the slave K2. You can use fi lters or specif y a bin to avoid f illing up a smaller sy stem.
Exceeding the capacity of the slave K2 can result in the excess material not being
backed up.
Operational considerations when using K2 InSync
When using K2 InSync, keep in mind the following considerations:
• When using the bi- directional mirro ring mode with initia l duplicate, th e clips in the
master K2’s Recycle bin are mirrored on the slave K2. If you do not want the
Recycle Bin clips mirrored, select
check the option to delete clips immediately.
• When you are using the bi-directional mirroring mode, do not create (or allow an
automation progra m to create ), a clip wit h the same name in th e same direc tory at
the same time on both units. Doing so can result in the loss of one of the clips
created.
• When you are using th e bi-d irectio nal mirrori ng mode, do not edit th e same c lip in
the same di rectory at th e same time on both units. Doing s o results in the loss of
edits to the clip closed first.
Organize Bins | Recycle Bin in K2 AppCenter and
• Continuous recording cannot be used with K2 InSync.
August 4, 2008 K2 InSync User Guide 6
Page 7
• When a bin is created on the master and clip is put in that bin, In Sync automatically
creates the bin on the slave.
• When InSync automatically creates a bin, permissions on the bin are set to
“Everyone”.
• If you restrict permission on a bin on the master, InSync does not automatically
implement those same permissio ns on the slave.
Installing K2 InSync
The first step to installing K2 InSync is to run the Setup program on the K2 InSync
CD-ROM. You must install K2 InSync on one of the K2s (the master) that you will
use. You might want to install K2 InSync on the slave K2 as well as the master.
Having K2 InSync insta lled and re ady to run c an be conveni ent if you need to opera te
the slave K2 as master and assign a new slave to maintain redundancy.
To install K2 InSync you must be logge d on as Administr ator. For infor mation about
logging on as Administrator, see the K2 Media Client System Guide.
1. Insert the CD-ROM into the drive on the K2 you’ve chosen to be master. Choose
Start | Run and browse for K2 InSync Setup.exe on the CD-ROM.
Installing K2 InSync
2. Follow on-screen instructions, clicking
installation program.
Next and Finish, to work through the
Upgrading K2 InSync
Before you upgrade K2 InSync, uninstall the current version. Do not install an
upgrade over an ex isting v ersio n of K2 InSy nc. Refer to K2 InSync Re lease Not es for
upgrade information.
Starting and stopping K2 InSync
As K2 InSync runs, it provi des continuous, automatic mirr or ing of the master K2 on
the slave K2 (unless you configure it to only run manually).
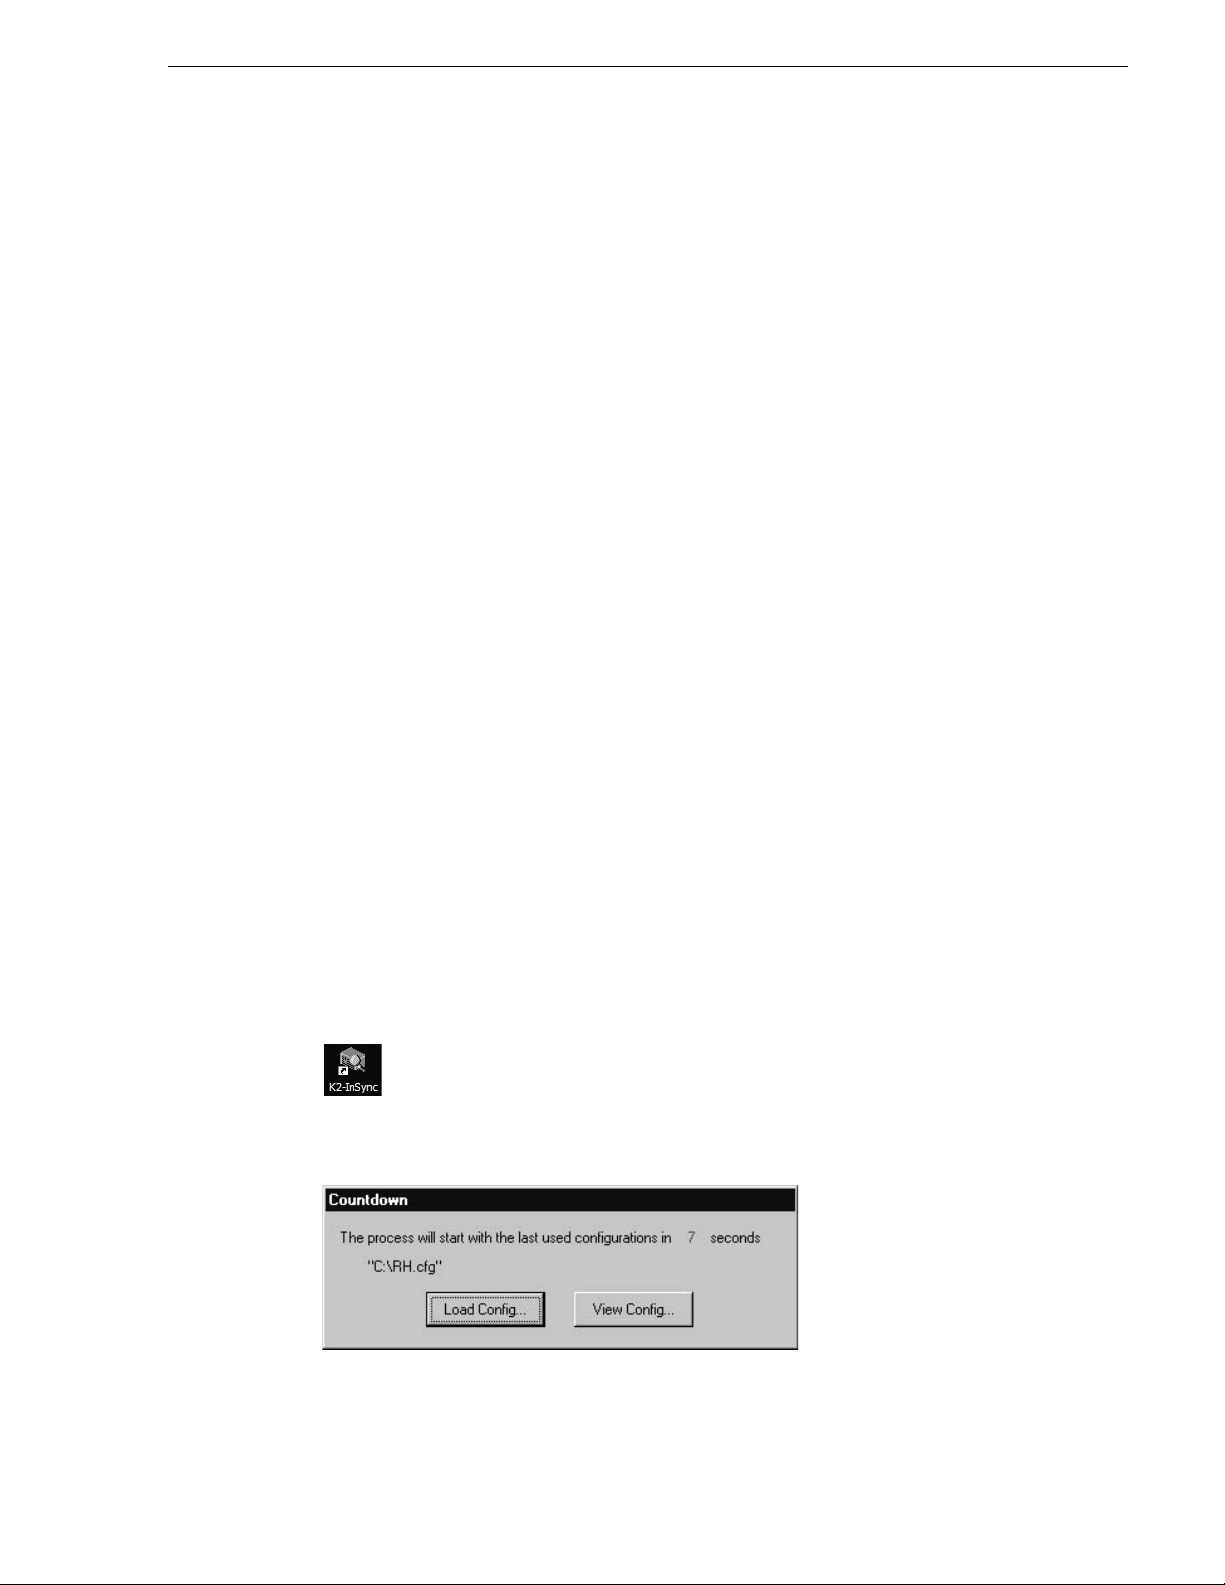
Start K2 InSync by clicking on the K2 InSync icon on the desktop:
The Countdown dialog box appears.
August 4, 2008 K2 InSync User Guide 7
Page 8

Using K2 InSync
This dialog box allows you to manu ally view or load a previousl y saved configuration
file. If you do not manually view or load a configuration file before the countdown
time period expires, K2 InSync automatically loads the configuration file that you
used last. The first time you start K2 InSync, it loads a default configuration file,
which is stored at C:/InSync.cfg.
There is a pause as the confi guration fi le loads and K2 InSync get s a list of clip s from
the K2 system. This pause can last for several seconds, depending on the number of
clips on the K2 system. After the pause, the K2 InSync main interface opens.
K2 InSync opens with the Synchr onization Li st area displaye d. The status area, at the
bottom of the K2 InSync application window, displays a summary of the
configuration currently loaded. Synchronization begins, depending on the current
configuration, and a queue of synchronization tasks is displayed in the
Synchronization List area. The progress of the task currently being processed is
reported in the “%” colum n. When a task completes, it is purged from the queue.
To stop the current synchronization processes but leave the K2 InSync application
open, click the Pause button.
To close the K2 InSync application altogether, click
Continue with the following procedures to create, save, and use configurations to
control K2 InSync operation
.
Setting master and slave K2s
You must define a maste r K2 and a s lave K2 befor e any synchro niz ation takes plac e.
The K2s must meet requirements as in “K2 System requirement s” on page 6. To test
the connectivity requ ir ed f or K2 I nSync , use the K2 AppCenter application and do a
transfer between the K2s.
To set master and slave K2s, do the following:
1. Click
Config | View. The Configuration dialog box opens.
File | Exit.
8 K2 InSync User Guide August 4, 2008
Page 9

About synchronization
2. In the Master text fie ld, ent er the mac hine name an d path to the volume or bin tha t
contains the clips to be backed up or mirrored. Use forw ard slashe s.
3. In the
Slave text field, enter the machine name a nd path to the volume or bin to
which clips are duplicated or mirrored. Use forward slashes.
4. When you are satisfie d with your settings, c lick
leave the dialog box open, or click
box. When you click OK, the following occurs:
• If the manual synchronization mode is currently selected, no synchronization
processes begin.
• If event, periodic, or timed synchronization mode is currently selected, a
synchronization process might begin, depending on other settings. Refer to
“Running synchronizations” on page 15.
About synchronization
There are two phases of synchronization, as follows:
Initial synchronization — This runs only when a configuration is first loaded. This
occurs when the InSync application is first started. It also occurs when a configuration
is modified and you click the
In preparation for initial synchronization, K2 InSync compares the clips on both the
master and slave. The following conditions are detected:
OK button.
Apply to put settings int o effect and
OK to put settings i nto effect and close the dialog
• Clips present on one K2 system but not on the other
August 4, 2008 K2 InSync User Guide 9
Page 10

Using K2 InSync
• Clips present on both K2 systems
Based on these conditions, K2 InSync runs the initial synchronization. The
synchronization behavior is determined by the currently loaded configuration.
Ongoing synchronization — Th is is the primary synchronization pr oce ss that runs on
a regular basis for as long as the InSync application remains open. It runs only after
the initial synchronization is complete and is triggered according to the
synchronization rules in the currently loaded configuration. In preparation for an
ongoing synchronization process, K2 InSync compares the clips on both the master
and slave. The following conditions are detected:
• Clips present on one K2 system but not on the other
• Clips present on both K2 systems that are identical
• Clips present on both K2 systems that are not identical. This includes clips that
have been created (recorded or copied), modified (trimmed or renamed), or
otherwise modified on one or both K2 systems since the last ongoing
synchronization occurred.
Based on these conditions, K2 InSync runs synchronization processes according to
the currently loaded configuration.
Configuring synchronization rules
Configure the rules for K2 InSync’s synchronization processes as follows:
1. Click
2. To control the behavior of initial synchronization, select one of the
3. Select one of the following Synchroniz ati on Mod es:
Config | View. The Configuration dialog box opens.
Synchronization Directions, as explained in the following table:
If you select this
synchronization direction…
One Way Copy to slave Nothing
BiDirectional With Initial Delete Delete from master Delete from slave
BiDirectional With Initial
Duplicate
BiDirectional Without Initial
Action
•
Event — Synchronizes each time K2 InSync detects a change in the master or
K2 InSync initially doe s t his to
clips on the master but not on
the slave…
Copy to slave Copy to master
Nothing Nothing
slave file system, such as when a file is created (recorded or copied), modified
(trimmed or renamed), or deleted.
And this to clips on the slave
but not on the master…
•
Manual — Synchronizes only when you click the Start button.
•
Periodic — When a sync hronizat ion co mpletes, K2 InSy nc waits for a specifi ed
time period, then automatically triggers another synchronization. Enter the time
period that you want K2 InSync to wait between synchronizations.
10 K2 InSync User Guide August 4, 2008
Page 11

Configuring synchronization rules
• Timed — Synchronizes at specified times. To specify times, cl ick the Set Times
button. The Select Time di alog box opens.
Enter a synchronization start time and click
Add. Repeat until all your desired
start times are added, then close the dialog box.
4. To control the behavior of ongoing synchronization, select one of the
Synchronization Directions, as explained in the following tables:
• If Event synchronization mode is selected, settings behave as follows:
If you select this
synchronization
direction…
One Way Nothing Delete from slave Copy to slave Nothing
BiDirectional
With Initial Delete
BiDirectional
With Initial
Duplicate
BiDirectional
Without Initial
Action
K2 InSync does
this to clips
deleted from the
slave only…
Delete from
master
Delete from
master
Delete from
master
And this to cl ip s
deleted from the
master only…
And does this to
clips modified on
the master only…
And this to clips
modified on the
slave only…
Delete from slave Copy to slave Copy to master
Delete from slave Copy to slave Copy to master
Delete from slave Copy to slave Copy to master
• If Manual, Period, or Time sync hronizat ion mode is s elected, se ttings beh ave as
follows:
If you select this
synchronization
direction…
K2 InSync does
this to clips
deleted from the
slave only…
And this to clips
deleted from the
master only…
And does this to
clips modified on
the master only…
And this to cl ip s
modified on the
slave only…
One Way Copy to slave Nothing Copy to slave Nothing
BiDirectional
With Initial Delete
Delete from
master
Delete from slave Delete from
master
Delete from slave
August 4, 2008 K2 InSync User Guide 11
Page 12

Using K2 InSync
If you select this
synchronization
direction…
BiDirectional
With Initial
Duplicate
K2 InSync does
this to clips
deleted from the
slave only…
Copy to slave Copy to master Copy to slave Copy to master
And this to cl ip s
deleted from the
master only…
And does this to
clips modified on
the master only…
And this to cl ip s
modified on the
slave only…
5. To further control the behavior of ongoing synchronization, configure the Do not
overwrite if clip is newer
If you select this
synchronization
direction…
One Way If clip newer on master, it ov erwrites clip
BiDirectional With
Initial Delete
BiDirectional With
Initial Duplicate
BiDirectional
Without Initial
Action
And the checkbox is unchecked, K2
Insync does this to clips modified on
both the master and the slave.
on slave. If clip newer on slave, nothing
occurs.
Newer clip overwrites older clip Nothing
Newer clip overwrites older clip Nothing
Newer clip overwrites older clip Nothing
checkbox, as explained in the following table:
And the checkbox is checked, K2
Insync does this to clips modified on
both the master and the slave.
Nothing
6. Configure values for Queue Retry as follows:
•
Retry Attempt — When K2 InSync cannot copy or delete a file, it can try the
process again. Enter the number of times that you want K2 InSync to try again.
•
Retry Interval — Enter the number of minutes that you want K2 InSync to wait
between retries.
•
Transfer when clip has finished recording — Check this box if you do not want
K2 InSync to begin transferring while the clip is still recording.
7. Select one of the following Delete Processing Modes. These modes apply only
when the Synchronizatio n Direction is set to BiDirectional With Initial Delete:
•
Normal — When a clip has a delete task l isted in th e synchro nization queue, K2
InSync processes the delete task and deletes the clip during the normal
synchronization process. Each clip deletion is recorded in the History List.
•
No-Delete — When a clip has a delete task listed in the synchronization queue,
K2 InSync does not process the delete task and the clip remains untouched.
These unprocessed delete tasks remain in the synchronization list until a new
synchronization runs. K2 InSync does not retain any history or log entries of
these unprocessed delete tasks.
Delete Confirm — When a clip has a delete task listed in the synchronization
•
queue, K2 InSync does not process the delete task during the synchronization
process. Instead, K2 InSync places the clip’s delete task in the Confirm Delete
List, so that you can later view the list and manually accept or reject each clip
deletion. Refer to “Managing individual synchronization tasks” on page 16.
12 K2 InSync User Guide August 4, 2008
Page 13

8. When you are satisfie d with your settings, c lick Apply to put settings into effect and
leave the dialog box open, or click
box. When you click OK, the following occurs:
• If the manual synchronization mode is currently selected, no synchronization
processes begin.
• If event, periodic, or timed synchronization mode is currently selected, a
synchronization process might begin, depending on other settings. Refer to
“Running synchronizations” on page 15.
Defining filters
You can define a filter by which K2 InSync only processes certain files during
synchronization, as follows :
Defining filters
OK to put settings i nto effect and close the dialog
1. Click
Config | View. The Configuration dialog box opens.
2. Click the
Filter tab.
3. Click
Add. A filter name appears in the Filters list. Change the filter name to a name
of your choosing.
4. With your new filter st ill selected in the
Filters list, select the filter settings to
include in that f ilte r. As y ou sel ect t he che ck box for a fi lter set ting, its p aramete rs
become enabled for modification.
5. For your selected filter settings, modify parameters as follows:
•
Path — Clips in the path are synchronized. Clips outside the path are not
synchronized. Make su re that the path define d here is in “Master”, as defined on
the General tab. Define the path by entering, in order, one of more of the
August 4, 2008 K2 InSync User Guide 13
Page 14

Using K2 InSync
following:
- Volume (such as EXT:
- Bin (su ch as default)
-Clip Name
•
Type — Select Include or Exclude to specif y how K2 InSync should treat the
Filter criteria.
•
Duration — Select Is Less Than, Is More Than, or Is B etween two given times.
Enter Hours:Minutes:Seconds.Frames to define the length of the clips to
synchronize.
•
Creation Date Time — Select Is Earlier Than, Is Later Than, or In Between two
given times. Enter dates and times to define the age of the clips to synchronize
or select from the drop-down list.
•
Last Modified Date Time — Se lect Is Earlier Th an, Is Later Than, or In Between two
given times. Enter dates and times to define the time last modified of the clips
to synchronize or select from the drop-down list.
•
Encoding Format — Select the format-type of the clips to sy nchronize: MPEG or
DV. If you want to synchroniz e both format-type s, do not select th is filter set ting.
•
Resolution Format — Selec t the resol ution type t o synchroniz e: SD or HD. If y ou
want to synchronize both types, do not select this filter setting.
6. Select filters in the
Filters list and use the Add, Duplicate, Delete, and Rename
buttons as necessary t o cr eat e your required list of filt ers . For example, you could
duplicate and rename a fi lter severa l times and for e ach duplicati on de-select some
of the filter settin gs or otherwise modify cert ain paramete rs so as to create a ser ies
of “windows” for tight control of the clips to be synchronized. You can have a
maximum of ten filters in the list. All filters in the list are processed when
synchronization occurs.
7. When you are satisfie d with your settings, c lick
leave the dialog box open, or click
OK to put settings into effect and close the dialog
box. When you click OK, the following occurs:
• If the manual synchronization mode is currently selected, no synchronization
processes begin.
• If event, periodic, or timed synchronization mode is currently selected, a
synchronization process might begin, depending on other settings. Refer to
“Running synchronizations” on page 15.
Saving a configuration file
The default configuration file is stored at C:\InSync.cfg. This default configuration
file is updated whenever you modify K2 InSync configuration, unless you
intentionally save a configuration file with a specific name or location, as explained
in this procedure.
Apply to put settings int o effect and
You can create and save multiple configuration files, as follows:
1. Configure settings as in “Setting master and slave K2s” on page 8, “Configuring
14 K2 InSync User Guide August 4, 2008
Page 15

Loading a configuration file
synchronization rules” on page 10, and “Defining filters” on page 13 to create a
configuration that you want to save.
2. Click
3. Click
4. Name the configuration file, navigate to a location, and save the file as type *.cfg.
5. Repeat this procedure to save other configuration files.
OK to retain current settings.
Config | Save. The Save Configuration File As dialog box opens.
Loading a configuration file
You can load one of your previously saved configuration files as means of
re-configuring all settings in a batch, as follows:
1. If K2 InSync is n ot already runn ing, start it a s in “Starting a nd stopping K2 InS ync”
on page 7. When the Countdown dialog box appear s, cli ck
Configuration File dialog box appears. Continue with step 3 of this procedure.
2. If K2 InSync is already r unni ng, c li ck
dialog box appears.
3. Navigate to the location of your saved configuration file, select it, and load it. K2
InSync settings are re-configured accordingly.
4. Click
Config | View to confirm that you have the correct settings.
Running synchronizations
Load Config. The Load
Config | Load. The Load Configurat ion File
K2 InSync is intended to be used prima rily as an automat ic sync hroniz ation tool tha t
runs continuously in the background and trigge rs synchronization processes as
defined by the rules that you conf igure. The mech anisms that run t he synchroni zation
processes are designed for this use, as follows:
• In the manual synchronization mode, click the Start button to start a
synchronization. Only in the manual synchronization mode can you directly
control the start o f a synchronization in this wa y. Thi s i s t he only synchronization
mode in which the Start button is enabled.
• In any synchronizat ion mode you can pause a currently running synchroniz ation by
clicking the Pause but ton. When you do so, the currently dupl icating task, if
any, is cancelled. Clicking the button again resumes processing at the same task.
• K2 InSync refreshes its synchronization rules at the following times: when K2
InSync starts up; when a config urati on is c hanged a nd you cl ick OK; or when y ou
manually load a conf iguration file. I f a synchroniz ation is underway at any of these
times, the synchroni zati on is cance lled a nd a new sy nchroni zati on runs a s foll ows:
• If the configuration is set to manual synchronization mode, no synchr oni zation
starts.
• If the configuration is set to periodic synchronization mode, synchronization
starts immediately.
• If the configuration i s set to event sync hronizatio n mode, synchronizat ion starts
immediately.
August 4, 2008 K2 InSync User Guide 15
Page 16

Using K2 InSync
Managing individual synchronization tasks
About task blocks
Re-arranging the order of synchronization tasks
• If the configuration is set to timed synchronization mode, K2 InSync reads the
start time in the configuration, and automatically starts synchronization when
the time arrives.
Individual sync hroniz ation t asks are list ed as a queue in the sync hroniz at ion l ist. The
following procedures explain how you can manage the tasks a s they a ppear in the lis t.
Individual tasks in the list can be r elated such that the y form task blocks. For example,
when a task uses a clip which is a result of an earlier copy or rename task, these two
tasks are re lated. Multiple tasks can be inter-related in this way to form a task block.
As you manage individual t asks, you can do so only t o the extent that you do not break
task block relationships. For example, if you are moving a task up or down the list,
you might find that it will not move past a related task if it creates an illogical
sequence, such as renaming a clip after it has been deleted. In this case you need to
move the related tasks as well and keep the task block intact.
You can move tasks up or down the queue as follows:
1. Right-click a task in the synchronization list.
2. On the pop-up menu, select Up or Down. This moves the task one row in the
direction selected. Repeat this step until the task is in the required position.
Excluding synchronization tasks
You can individuall y exclude a task so t hat it is not process ed. This ca uses K2 InSync
to skip the excluded task as it works down through the synchronization queue.
To exclude a task, do the following:
1. Right-click a task in the synchronization list for which the value in the Exclude
16 K2 InSync User Guide August 4, 2008
Page 17

column is N. N is the value for a normally included task.
Including synchronization tasks
2. On the pop-up menu, s elect
from N to Y. K2 InSync will now skip the task (an d other task- block r elate d ta sks)
when the task reaches the currently processing position at the head of the queue.
Excluded tasks move past t he currently processing position and accumulat e at t he
top of the synchronization list area while other tasks continue their processing
beneath.
Exclude. This changes the value in the Exclude column
Including synchronization tasks
You can individually include an excluded task, as follows:
1. Right-click a task in the synchronization list for which the value in the Exclude
column is Y. Y is the value for an excluded task.
2. On the pop-up menu, select
from Y to N. K2 InSync will now process the task. Excluded tasks that K2 InSync
previously skipped and that remain at the top of the synch ron ization list area dro p
to the bottom of the list upon their inclusion.
Include. This changes the value in the Exclude column
Manually controlli ng deletion s
These features appl y only wh en the Sync hronizat ion Direc tion is set to BiDir ectional
With Initial Delete.
K2 InSync provides a process whereby no clip is deleted unless you individually
confirm its deletion. To set up and use this process, do the following:
1. As explained in “Configuring synchronization rules” on page 10, set your current
configuration to
2. Set Synchronization Direction to BiDirectional With Initial Delete.
3. Allow one or more synchron izati ons to run in whi ch the co nfigur atio n rul es dir ect
one or more clips to be deleted.
4. Click
View | Confirm Delete List. The Confirm Delete List opens.
Delete Confirm.
August 4, 2008 K2 InSync User Guide 17
Page 18

Using K2 InSync
Viewing synchronization history
Delete tasks, i ncluding task- block related tasks, are listed for clips that s hould have
been deleted, but were no t. This is the result of setti ng the configuration to Conf irm
Delete.
5. For each clip that you want to confirm for deletion, select the row and cl ick the
Delete button. You can use Ctrl + Click or Shift + Click to select mult iple
rows. K2 InSync immediately moves t hese delete tasks, with th eir task-block
related tasks, to the bottom of the synchronization queue and then cl oses the
Confirm Delete List window. K2 InSyn c processe s the delet e tasks when the tasks
reach the currently processing position at the head of the queue.
To view a list of th e synchronization task s processed since K2 I nSync was last started,
View | History List. The History List opens.
click
Viewing the history log
K2 InSync saves history logs for the last 30 days of activity, which includes startup,
shutdown, and the tasks completed by K2 InSync. Log files are stored in C:\GVG\
InSync History. A history log file is named InSynclog.xxyyy, where xx is the day of
the month and yy is the running number of tot al log fil es pres ent. You ca n view a log
file with WinTail or a t ext editor su ch as Notepad.
Changing the slave K2 to be master
If you must remove t he master K2 (call it Unit A) fr om service a nd place th e slave K2
(call it Unit B) on line, and you want to maintain redundancy, you must reassign K2
B to be master and assign a different K2 (call it Unit C) as slave. You can do this by
preparing a configuration file in advance, so that you can quickly load it should the
need arise, or yo u can simpl y chan ge the cur rent con figurat ion. In either case, use the
following procedure to create the required configuration.
To change the designation of K2 B from slave to master, do the following:
18 K2 InSync User Guide August 4, 2008
Page 19

Changing the slave K2 to be master
1. Install K2 InSync on K2 B (if it is not already installed). Follow the insta llation
instructions given earlier.
2. On K2 B, set K2 B as master and K2 C as slave.
3. Select
Manual synchronization mode so that you can control the start of the
synchronization.
4. Make other configurations, according to your synchronization requirements.
5. Click
OK.
6. If you do not want to use the configuration file immediately, save it with an
appropriate name, then re-load your previous configuration.
7. If you do want to use the conf iguration immediately, fir st make sure that PortServer
is running on K2 C, then click the Start button.
8. After the initial synchronization completes, you can change the synchronization
mode according to your ongoing synchronization requirements.
August 4, 2008 K2 InSync User Guide 19
Page 20

Using K2 InSync
20 K2 InSync User Guide August 4, 2008
Page 21

Index
C
configuration file
default 8
loading 15
rules 10
saving 14
D
delete confirm mode 12
delete modes 12
deleting a clip manually 17
E
event synchronization mode 10
F
filters, de fining 13
H
history 18
I
individual tasks 16
installing 7
K
K2 InSync
about 6
system requirements 6
O
operational considerations 6
P
periodic synchronization mode 10
Q
queue retry 12
S
slave
changing to master 18
defining 8
starting and stopping 7
synchronization 15
excluding 16
history 18
manual 15
rules 10
, 16
T
task blocks 16
timed mode 11
U
upgrading 7
L
logs, viewing 18
M
manual deletion mode 17
manual synchronization mode 10
master, defining 8
, 15
N
no-delete mode 12
normal delete mode 12
August 4, 2008 K2 InSync User Guide 21
Page 22

Index
22 K2 InSync User Guide August 4, 2008
 Loading...