

Page 1
K2 FCP Connect
Toolset
Apple Final Cut Pro Integration with K2 systems
Installation Manual
Software Version 2.0
071-8738-02
October 2010
Page 2

Affiliate with the N.V. KEMA in The Netherlands
CERTIFICATE
Certificate Number: 510040.001
The Quality System of:
Thomson Inc, and its worLdwide Grass Valley division affiliates DBA
GRASS VALLEY
Headquarters
400 Providence Mine Rd
Nevada City, CA 95959
United States
15655 SW Greystone Ct.
Beaverton, OR 97006
United States
10 Presidential Way
Suite 300
Woburn, MA 01801
United States
Kapittelweg 10
4827 HG Breda
The Nederlands
7140 Baymeadows Way
Ste 101
Jacksonville, FL 32256
United States
2300 So. Decker Lake Blvd.
Salt Lake City, UT 84119
United States
Rue du Clos Courtel
CS 31719
35517 Cesson-Sevigné Cedex
France
1 rue de l’Hautil
Z.I. des Boutries BP 150
78702 Conflans-Sainte
Honorine Cedex
France
Technopole Brest-Iroise
Site de la Pointe du Diable
CS 73808
29238 Brest Cedex 3
France
40 Rue de Bray
2 Rue des Landelles
35510 Cesson Sevigné
France
Spinnereistrasse 5
CH-5300 Turgi
Switzerland
Brunnenweg 9
D-64331 Weiterstadt
Germany
Carl-Benz-Strasse 6-8
67105 Schifferstadt
Germany
Including its implementation, meets the requirements of the standard:
ISO 9001:2008
Scope:
The design, manufacture and support of video and audio hardware and software products and
related systems
.
This Certificate is valid until: June 14, 2012
This Certificate is valid as of: June 14, 2009
Certified for the first time: June 14, 2000
H. Pierre Sallé
President
KEMA-Registered Quality
The method of operation for quality certification is defined in the KEMA General Terms
And Conditions For Quality And Environmental Management Systems Certifications.
Integral publication of this certificate is allowed.
KEMA-Registered Quality, Inc.
4377 County Line Road
Chalfont, PA 18914
Ph: (215)997-4519
Fax: (215)997-3809
CRT 001 073004
Accredited By:
ANAB
Page 3

K2 FCP Connect
Toolset
Apple Final Cut Pro Integration with K2 systems
Installation Manual
Software Version 2.0
071-8738-02
October 2010
Page 4

Copyright Copyright © Grass Valley, Inc. All rights reserved. Printed in the United States of America.
Portions of software © 2000 – 2010, Microsoft Corporation. All rights reserved. This document
may not be copied in whole or in part, or otherwise reproduced except as specifically permitted
under U.S. copyright law, without the prior written consent of Grass Valley, Inc., P.O. Box
59900, Nevada City, California 95959-7900. This product may be covered by one or more U.S.
and foreign patents.
Disclaimer Product options and specifications subject to change without notice. The information in this
manual is furnished for informational use only, is subject to change without notice, and should
not be construed as a commitment by Grass Valley, Inc. Grass Valley, Inc. assumes no
responsibility or liability for any errors or inacc uracies that may appear in this publication.
U.S. Government
Restricted Rights
Legend
Trademarks and
Logos
Revision Status
Use, duplication, or disclosure by the United States Government is subject to restrictions as set
forth in subparagraph (c)(1)(ii) of the Rights in Technical Data and Computer Software clause
at DFARS 252.277-7013 or in subparagraph c(1) and (2) of the Commercial Computer
Software Restricted Rights clause at FAR 52.227-19, as applicable. Manufacturer is Grass
Valley, Inc., P.O. Box 59900, Nevada City, California 95959-7900 U.S.A.
Grass Valley, K2, Aurora, Summit, Dyno, Solo, Infinity, Turbo, Profile, Profile XP, NetCentral,
NewsBrowse, NewsEdit, NewsQ, NewsShare, Ne wsQ Pro, and Media Manager are either
registered trademarks or trademarks of Grass Valley, Inc. in the United States and/or other
countries. Grass Valley, Inc. products are covered by U.S. and foreign patents, issued and
pending. Additional information regarding Grass Valley, Inc. trademarks and other proprietary
rights may be found at www.grassvalley.com. Other trademarks and logos used in this
document are either registered trademarks or trademarks of the manufactu rers or vendors of
the associated products, such as Microsoft® Windows® operating system, Windows Media®
player, Internet Explorer® internet browser, and SQL Server™. QuickTime and the QuickTime
logo are trademarks or registered trademarks of Apple Computer, Inc., used under license
therefrom.
Rev Date Description
December 18,
2009
Initial release of the K2 FCP Connect Installation Manual –
071-8702-00
Xxxx xx, 2010 Revisions for version 1.1 – 071-8702-01
October 22, 2010 Revisions for version 2.0 – 071-8702-02
4 K2 FCP Connect Installation Manua l 22 October 2010
Page 5

Contents
Chapter 1: Overview of K2 connections....................................................................7
About connecting to K2 storage with Final Cut Pro.................................................................8
About K2 FCP Connect...........................................................................................................9
About Aurora Edit and Final Cut Pro.....................................................................................10
About GV Browse, Aurora Browse and Final Cut Pro...........................................................11
Chapter 2: Installing and configuring K2 FCP Connect.........................................13
Final Cut Pro on K2 SAN quick start installation checklist....................................................14
Prerequisites......................................................................................................................14
On all Macintosh client computers.....................................................................................14
On the K2 Media Server (FSM).........................................................................................15
On the Control Point PC....................................................................................................15
On selected Macintosh computer(s)..................................................................................15
Final tasks..........................................................................................................................15
Final Cut Pro on stand-alone K2 system quick start installation checklist.............................16
Prerequisites......................................................................................................................16
On the stand-alone K2 system..........................................................................................16
On all Macintosh client computers.....................................................................................17
Final tasks..........................................................................................................................17
K2 SAN System Requirements ............................................................................................18
Macintosh System Requirements .........................................................................................18
Aurora Playout System Requirements ..................................................................................19
Install Xsan software.............................................................................................................19
Install K2 FCP Connect software on Macintosh systems......................................................19
Uninstall K2 FCP Connect software on Macintosh systems.................................................21
Cable Macintosh systems.....................................................................................................23
Configure Macintosh systems for control network.................................................................24
Configure Macintosh systems for Active Directory Domain...................................................24
Licensing K2 FCP Connect on K2 systems...........................................................................27
About K2 FCP Connect software licensing........................................................................27
Requesting a license ........................................................................................................28
Adding a license ...............................................................................................................30
Enable SabretoothWS service...........................................................................................30
Add Macintosh systems to K2 system hosts file...................................................................30
Enable Access Control Lists on the K2 system.....................................................................31
Add Mac Client to K2 SAN....................................................................................................32
Configure Mac Client on K2 SAN..........................................................................................32
Test K2 system file access....................................................................................................36
Verify Access Control Lists....................................................................................................36
Verify bandwidth of connection to K2 storage.......................................................................38
Verify/configure SNFS configuration file on K2 Media Servers.............................................39
Configure HotBin...................................................................................................................40
About QuickTime import delay..............................................................................................41
Configure Aurora Playout workflow.......................................................................................41
Contents
22 October 2010 K2 FCP Connect Installation Manual 5
Page 6

Contents
Connecting via SAMBA/CIFS................................................................................................42
Chapter 3: Using and maintaining K2 FCP Connect..............................................45
About GV Connect................................................................................................................46
About GV Browse..................................................................................................................46
Operation guidelines.............................................................................................................47
About administrative and maintenance tools.........................................................................47
Managing K2 FCP Connect licenses for CIFS mount...........................................................47
Stopping and starting the K2Config for Mac service.............................................................48
Accessing logs .....................................................................................................................48
Running diagnostics..............................................................................................................50
Configuring non-K2 storage..................................................................................................51
Modifying the export format list.............................................................................................51
6 K2 FCP Connect Installation Manual 22 October 2010
Page 7

Chapter 1
Overview of K2 connections
This section contains the following topics:
• About connecting to K2 storage with Final Cut Pro
• About K2 FCP Connect
• About Aurora Edit and Final Cut Pro
• About GV Browse, Aurora Browse and Final Cut Pro
22 October 2010 K2 FCP Connect Installation Manual 7
Page 8

Overview of K2 connections
About connecting to K2 storage with Final Cut Pro
Whenever a D V, AVC-Intra, XDCAM-EX, XDCAM-HD, XDCAM-HD 422, or IMX
format simple clip is created on a K2 system, K2 software creates a corresponding
QuickTime reference file. With the QuickTime reference file you can open the K2
clip with QuickTime tools, such as Final Cut Pro, for playback and editing. The
QuickTime tool must be run on another system. Running the QuickTime player or
other QuickTime tools on the K2 system is not supported. You have options for
connections, access, and software to support your workflow requirements.
Connection types are as follows:
• Fibre Channel – This is a connection as a client to a Fibre Channel K2 SAN. The
connection requires a K2 FCP Connect license and supporting software on the
Macintosh system. The connection uses the K2 SAN's Fibre Channel network.
• iSCSI – This is a connection as a client to an iSCSI K2 SAN. The connection
requires a K2 FCP Connect license and supporting software on the Macintosh
system. The connection uses the K2 SAN's iSCSI Gigabit Ethernet network.
• CIFS – This is a basic CIFS connection. You can access files on K2 SAN storage
or K2 stand-alone storage with this type of connection. The connection uses a basic
Ethernet network.
Access methods are as follows:
• Edit-in-place – With this method you edit the K2 media in Final Cut Pro across
the network while the media is still in place in K2 storage. You can do this over
any connection type.
• File transfer – With this method you transfer (copy) the K2 media to the Macintosh
system and then edit it in Final Cut Pro across the network while the media is still
in place in K2 storage. You can do this over any connection type. You can initiate
the transfer as file copy over Fibre Channel, file copy over iSCSI, file copy over
CIFS, or via FTP.
With all access methods, after you are done editing the K2 media you export it back
to K2 storage via a K2 HotBin.
Software components that support various workflows are as follows:
• K2 FCP Connect – This is a Grass Valley product that supports all connection
types for optimal performance. It is a toolset that must be purchased, installed,
licensed, and configured. It includes GV Connect, which is a Final Cut Pro plug-in.
GV Connect supports edit-in-place and file transfer over Fibre Channel, iSCSI, or
CIFS connections. It also includes GV Browse, which supports searching for
QuickTime reference files on a MediaFrame server and transferring them to Final
Cut Pro for editing.
• Flip4Mac – This is a Telestream product that supports FTP file transfer of K2
media to the Macintosh system. It is a Final Cut Pro plug-in.
Connections, access, and software apply to K2 storage and versions as follows:
8 K2 FCP Connect Installation Manual 22 October 2010
Page 9

Overview of K2 connections
K2 storage/version
Client software version 3.3.2.1374
and higher
software version 3.3.2.1374 and
higher, and stand-alone K2 Summit
Production Client software version
7.2.7.1397 and higher
software version 3.3 and higher,
7.2.7.1397 and higher required for
Connection
type
method
File transferCIFSK2 SAN and stand-alone K2 Media
AllCIFSStand-alone K2 Media Client
AllAllK2 SAN (K2 Media Client)
SoftwareAccess
Flip4Mac
recommended
K2 FCP
Connect
recommended
K2 FCP
Connect
recommendedand K2 SAN (K2 Summit
for CIFS,Production Client) software version
iSCSI and Fibre
Channel SAN.
For detailed instructions refer to documentation as follows:
• Basic CIFS connection without K2 FCP Connect – Refer to the K2 System Guide.
• Fibre Channel, iSCSI, or CIFS connection with K2 FCP Connect – Refer to topics
in this manual, as well as in the following documents:
• K2 FCP Connect Release Notes
• GV Connect User Manual
About K2 FCP Connect
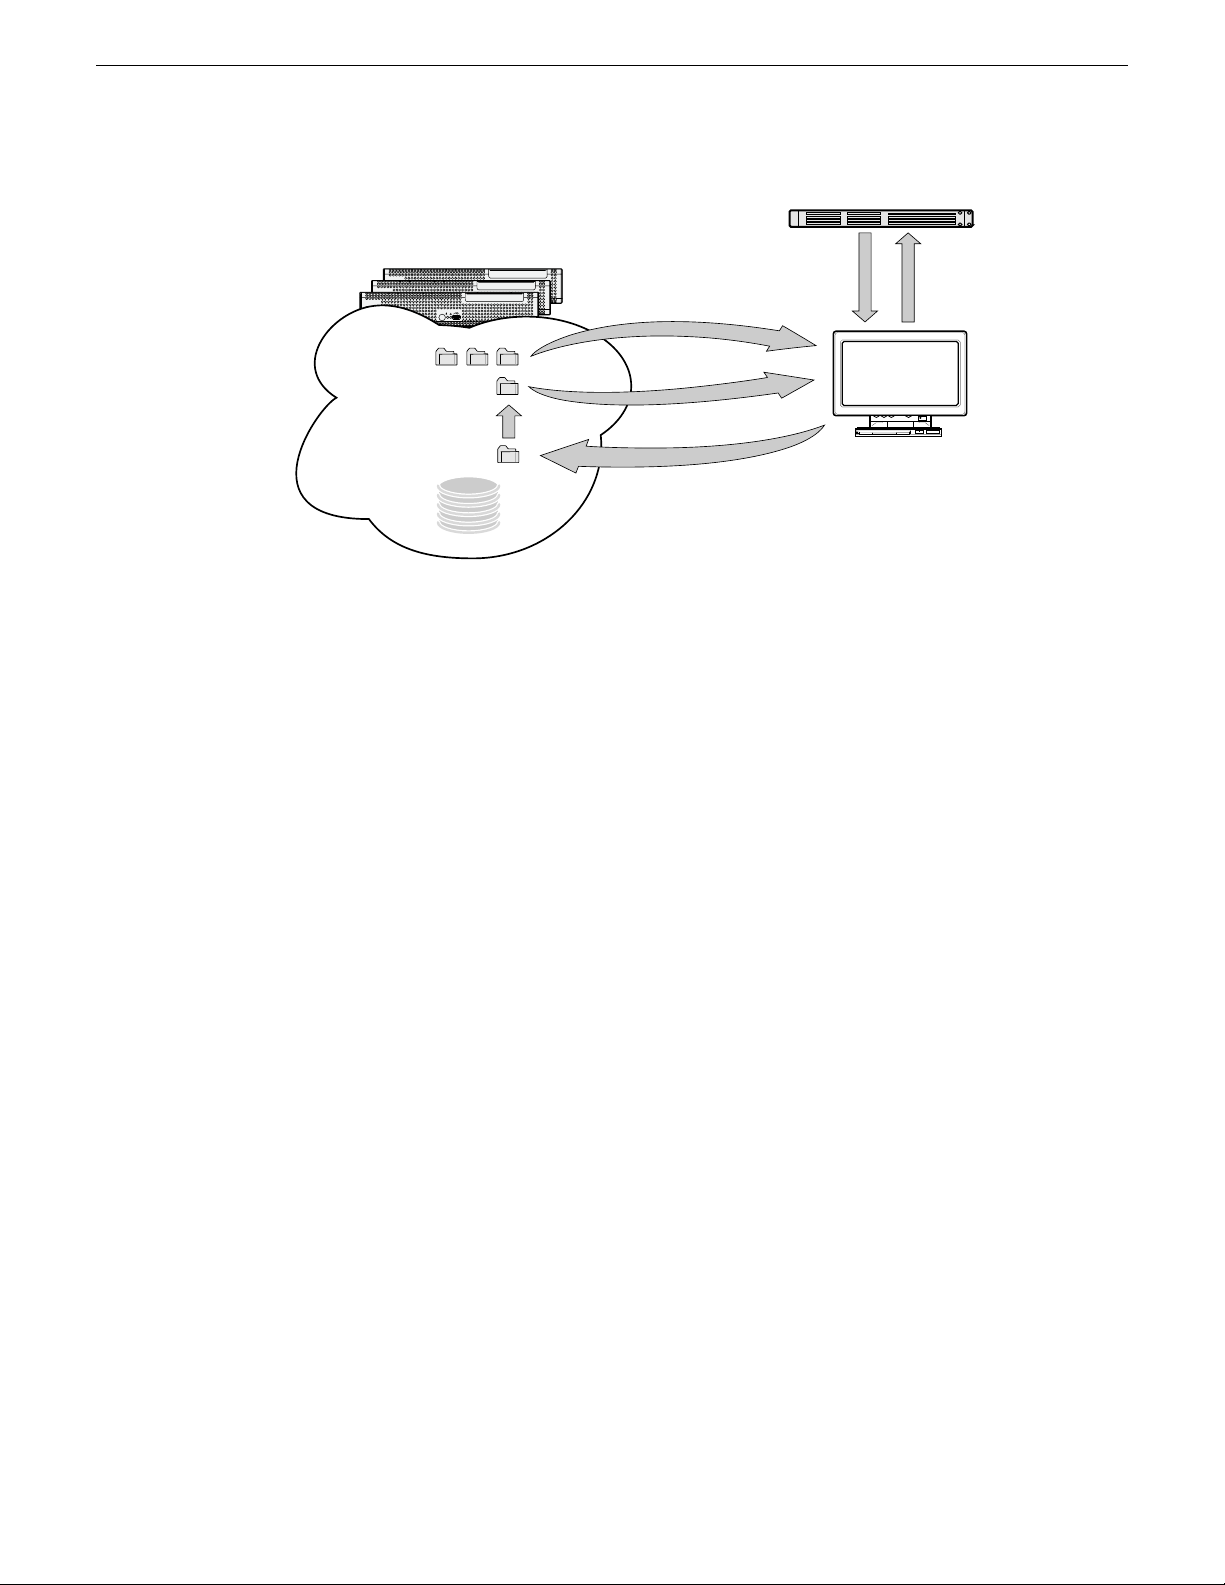
K2 FCP Connect enables an efficient workflow. You can quickly and easily locate
and edit QuickTime files on K2 storage without a file transfer . This capability is called
Edit in Place.
The workflow on a K2 SAN with Aurora Playout is illustrated as follows:
22 October 2010 K2 FCP Connect Installation Manual 9
Page 10
K2 SUMMIT
PRODUCTION
CLIENT
K2 SUMMIT
PRODUCTION
CLIENT
K2 SUMMIT
PRODUCTION
CLIENT
Mac FinalCut Pro
Aurora Playout
K2 SANStorage
Hot Bin
QuickTime reference files
3. Editin place from K2 bins
1. Placeholders
retrieved
5. Aurora
Playout
placeholder
updated
4. Export rendered sequence
to K2Hot Bin as a
QuickTime clip
5. Sequenceis moved
to apreset K2 bin
as aK2 clip
QuickTime stream file
2. Create
sequence
from
placeholder
Overview of K2 connections
The K2 FCP Connect product has the following features:
• Seamless browsing of K2 content
• Support growing files editing
• Export/render/flattening of Final Cut Pro finished sequences on the K2 SAN for
sharing or playout
• Final Cut Pro and Aurora sequence sharing
• Aurora Playout workflow
You have several options for connecting your Macintosh systems to K2 storage with
K2 FCP Connect, all of which support the full range of K2 FCP Connect features, as
follows:
• Fibre Channel SCSI to K2 SAN — Excellent performance
• Gigabit Ethernet iSCSI to K2 SAN — Excellent performance
• CIFS mount to K2 SAN or K2 stand-alone — Good performance, relative to your
network's bandwidth
Related Links
About GV Connect on page 46
About Aurora Edit and Final Cut Pro
This topic describes the different ways you can integrate Aurora Edit and Aurora Edit
LD with Final Cut Pro.
Aurora Edit allows you to work with Apple’s Final Cut Pro video editing application.
Files created in Aurora Edit and in a shared en vironment on K2 storage include a .mov
10 K2 FCP Connect Installation Manual 22 October 2010
file as one of its components, which makes it compatible with the Final Cut Pro format.
You can use Final Cut Pro and Aurora Edit in two different ways in your newsroom
workflow:
Page 11

Overview of K2 connections
• Create a sequence in Aurora Edit and export the sequence as an XML EDL that
can be imported into Final Cut Pro, then finish editing using Final Cut Pro.
• Create a sequence from scratch in Final Cut Pro and choose clips directly off K2
storage.
The devices and software components that support Aurora Edit and Aurora Edit LD
workflows are as follows:
• Final Cut Pro installed on a Macintosh system
• K2 FCP Connect – This is a Grass Valley product that provides optimal
performance. It is a toolset that must be purchased, installed, licensed, and
configured. It includes GV Connect, which is a Final Cut Pro plug-in.
• Aurora NewsShare on K2 SAN storage
• A K2 system with stand-alone storage
Refer to your Aurora product release notes as well as the K2 FCP Connect Release
Notes for version compatibility information.
For detailed instructions refer to documentation as follows:
• Workflows for Aurora Edit and Final Cut Pro – Refer to the Aurora Edit User
Manual.
• Connecting and using Final Cut Pro on K2 storage – Refer to the complete K2 FCP
Connect documentation set, which includes the following documents:
• K2 FCP Connect Installation Manual
• K2 FCP Connect Release Notes
• GV Connect User Manual
• GV Browse User Manual
About GV Browse, Aurora Browse and Final Cut Pro
This topic describes how you can use GV Browse to integrate the Aurora Browse
system with Final Cut Pro.
GV Browse allows you to browse files on an Aurora Browse MediaFrame database
and transfer them to Apple's Final Cut Pro application.
The devices and software components that support GV Browse and the Aurora Bro wse
workflow are as follows:
• Final Cut Pro installed on a Macintosh system
• K2 FCP Connect – This is a Grass Valley product that provides optimal
performance. It is a toolset that must be purchased, installed, licensed, and
configured. It includes GV Connect, which is a Final Cut Pro plug-in, and GV
Browse.
• Aurora Browse system
• K2 SAN storage
22 October 2010 K2 FCP Connect Installation Manual 11
Page 12

Overview of K2 connections
• A K2 system with stand-alone storage
Refer to your Aurora product release notes as well as the K2 FCP Connect Release
Notes for version compatibility information.
For detailed instructions refer to documentation as follows:
• Connecting and using Final Cut Pro on K2 storage – Refer to the complete K2 FCP
Connect documentation set, which includes the following documents:
• K2 FCP Connect Installation Manual
• K2 FCP Connect Release Notes
• GV Connect User Manual
• GV Browse User Manual
12 K2 FCP Connect Installation Manual 22 October 2010
Page 13

Chapter 2
Installing and configuring K2 FCP Connect
This section contains the following topics:
• Final Cut Pro on K2 SAN quick start installation checklist
• Final Cut Pro on stand-alone K2 system quick start installation checklist
• K2 SAN System Requirements
• Macintosh System Requirements
• Aurora Playout System Requirements
• Install Xsan software
• Install K2 FCP Connect software on Macintosh systems
• Uninstall K2 FCP Connect software on Macintosh systems
• Cable Macintosh systems
• Configure Macintosh systems for control network
• Configure Macintosh systems for Active Directory Domain
• Licensing K2 FCP Connect on K2 systems
• Add Macintosh systems to K2 system hosts file
• Enable Access Control Lists on the K2 system
• Add Mac Client to K2 SAN
• Configure Mac Client on K2 SAN
• Test K2 system file access
• Verify Access Control Lists
• Verify bandwidth of connection to K2 storage
• Verify/configure SNFS configuration file on K2 Media Servers
• Configure HotBin
• About QuickTime import delay
• Configure Aurora Playout workflow
• Connecting via SAMBA/CIFS
22 October 2010 K2 FCP Connect Installation Manual 13
Page 14

Installing and configuring K2 FCP Connect
Final Cut Pro on K2 SAN quick start installation checklist
Use the following sequence of tasks to set up Final Cut Pro on a K2 SAN with Fibre
Channel SCSI access or Gigabit iSCSI access. This checklist assumes that the K2
SAN has been installed/commissioned and is fully operational.
Prerequisites
Aurora system requirements as
applicable.
On all Macintosh client computers
CommentTask
—Verify K2 SAN, Macintosh, and
CommentTask
installed.
Install Xsan software, if not already
installed.
Install K2 FCP Connect software.
Fibre Channel, if used.
already done.
Configure the hosts file for
networking.
Optional: Configure Acti ve Directory
Domain
—Install Final Cut Pro, if not already
Xsan must be installed before K2 FCP
Connect.
The software install file is
K2FCPConnect.pkg.
NOTE: Before installing the
software, you must be logged in as a
user with administrative privileges
on the domain.
—Cable network connections, including
—Configure for control network, if not
Copy in host table information from
the K2 SAN's hosts file.
This is optional. If you do this task,
you must also enable Access Control
Lists on the K2 Media Server (FSM).
14 K2 FCP Connect Installation Manual 22 October 2010
Page 15

On the K2 Media Server (FSM)
Installing and configuring K2 FCP Connect
CommentTask
Request a K2 FCP Connect license
from Grass Valley for each K2 Media
Server with role of media file system
server (FSM) on the SAN.
install it on the K2 Media Server
(FSM).
Optional: Enable Access Control Lists
On the Control Point PC
In K2Config, add and configure Mac
Client(s) onto K2 SAN.
Make the license request early to
ensure that the license file is received
and installed before configuring the
Mac Client in K2Config.
—When the license XML is received,
Enter Macintosh devices in hosts files.Configure hosts files on SAN devices.
This is optional. If you do this task,
you must also configure Active
Directory Domain on the Macintosh
systems.
CommentTask
Enter Macintosh devices in hosts file.Configure hosts file.
The K2 FCP Connect license must be
installed on K2 Media Server(s).
K2Config can not proceed if the
license is not installed.
On selected Macintosh computer(s)
CommentTask
Test access to K2 SAN storage.
From the Macintosh system, create,
modify, delete a text file.
Final tasks
CommentTask
Optional: Verify Access Control Lists.
Test connection
22 October 2010 K2 FCP Connect Installation Manual 15
Do this if you are using Access
Control Lists.
Use Xbench.Optional: Verify bandwidth.
Launch Final Cut Pro and open GV
Connect. GV Connect automatically
Page 16

Installing and configuring K2 FCP Connect
configure if necessary.
finished Final Cut Pro files.
CommentTask
detects and displays K2 storage that
is mounted as a volume on the
Macintosh system.
Check GlobalSuperUser setting.Verify SNFS configuration file and
Refer to the K2 System Guide.Configure K2 SAN HotBin to receive
If using an Aurora workflow,
configure your Aurora system.
The Aurora system must be
operational and available to the
Macintosh system.
Final Cut Pro on stand-alone K2 system quick start installation checklist
Use the following sequence of tasks to set up Final Cut Pro to access a stand-alone
K2 Media Client, stand-alone K2 Summit Production Client, or K2 Solo Media Server .
This checklist assumes that the K2 system has been installed/commissioned and is
fully operational.
Prerequisites
CommentTask
—V erify K2 SAN, Macintosh, and Aurora
system requirements as applicable.
On the stand-alone K2 system
CommentTask
Request a K2 FCP Connect license
from Grass Valley for the stand-alone
K2 system. installed before attempting to complete
install it on the stand-alone K2 system.
SabreToothWS service.
16 K2 FCP Connect Installation Manual 22 October 2010
Make the license request early to ensure
that the license file is received and
the installation process. If there is no
shortcut on the desktop use the
procedure "If you encounter difficulties
when requesting a license" from release
notes.
—When the license XML is received,
—Enable the Grass Valley
Page 17

K2 system
Installing and configuring K2 FCP Connect
CommentTask
Enter Macintosh devices in hosts files.Configure hosts files on the stand-alone
Create a Macintosh user account. This
is the account that the Macintosh
system uses to log on to the K2 system. administrator account
On all Macintosh client computers
installed.
Install K2 FCP Connect software.
Cable network connections.
already done.
This is not necessary if the Macintosh
system logs on with the default K2
(administrator/adminK2)
—Share V: drive as default.
CommentTask
—Install Final Cut Pro, if not already
The software install file is
K2FCPConnect.pkg.
NOTE: Before installing the software,
you must be logged in as a user with
administrative privileges on the domain.
Only the control network connection is
necessary.
—Configure for control network, if not
Final tasks
Configure the hosts file for
networking.
Mount the K2 system's volume
default.
Set the license server to the
stand-alone K2 system and verify
license status.
Test connection
Copy in host table information from the
stand-alone K2 system's hosts file.
In the Name field, enter
<K2_name>/<username>.
Ignore "...could not start the file system
service..." error message.
CommentTask
Launch Final Cut Pro and open GV
Connect. GV Connect automatically
detects and displays K2 storage that is
mounted as a volume on the Macintosh
system.
22 October 2010 K2 FCP Connect Installation Manual 17
Page 18

Installing and configuring K2 FCP Connect
K2 system to receive finished Final Cut
Pro files.
CommentTask
Use Xbench.Optional: Verify bandwidth.
—Configure HotBin on the stand-alone
If using an Aurora workflo w , configure
your Aurora system.
K2 SAN System Requirements
T o support K2 FCP Connect your K2 SAN must meet requirements as follows. Products
and versions listed are the minimum required at the time of this writing. Some
product/component versions have dependencies on others. Refer to compatibility
matrix information in release notes for complete and updated requirements.
• K2 SAN devices with K2 software at a 3.x version of 3.3.1 or higher, or a 7.x
version of 7.1.9 or higher.
• On K2 SAN K2 Media Servers (FSMs), the SNFS configuration file must be
configured to GlobalSuperUser Yes.
• The K2 SAN must have unused bandwidth sufficient to support the Mac clients.
• Storage must be K2 Lx0 RAID. K2 Level 2, 3, and 4 RAID not supported.
• For Aurora Playout, requires Aurora Playout system with XMOS interface.
Macintosh System Requirements
To support K2 FCP Connect for connection to a K2 storage, your Final Cut Pro
Macintosh systems have requirements as follows. Products and v ersions listed are the
minimum required at the time of this writing. Some product/component versions have
dependencies on others. Refer to compatibility matrix information in release notes for
complete and updated requirements.
The Aurora system must be operational
and available to the Macintosh system.
• MacPro
• Intel processor
• Two GigE ports
• Mac OS X 10.6. Dependency on other versions. Refer to release notes.
• Final Cut Pro version 6.0.5 or higher. Dependency on other versions. Refer to
release notes.
• Apple Xsan 2.2. Dependency on other versions. Refer to release notes.
If using CIFS mount only for access to K2 storage, Mac Book Pro with one GigE port
is supported.
18 K2 FCP Connect Installation Manual 22 October 2010
Page 19

Installing and configuring K2 FCP Connect
Aurora Playout System Requirements
If using the Aurora Playout workflow the Aurora Playout system must meet
requirements as follows. Products and versions listed are the minimum required at the
time of this writing. Some product/component versions have dependencies on others.
Refer to compatibility matrix information in release notes for complete and updated
requirements.
• Aurora Playout system with XMOS interface.
Install Xsan software
If you have not already done so, install Xsan software on each Macintosh system
that connects to a K2 SAN via iSCSI or Fibre Channel.
Install K2 FCP Connect software on Macintosh systems
Before doing this task, procure the K2 FCP Connect installation files via download
or as appropriate for your Grass Valley product.
1. Prepare the Macintosh system for the restart that is required at the end of the
installation process. Close any open applications as necessary.
2. Close the System Preferences window, if it is currently open.
3. From the Macintosh system, access the K2 FCP Connect installation files.
4. Double-click K2FCPConnect.pkg.
The Installer opens.
5. Click Continue, agree to software license terms as appropriate.
22 October 2010 K2 FCP Connect Installation Manual 19
Page 20

Installing and configuring K2 FCP Connect
6. On the Custom Install screen, do one of the following:
• If accessing media on a K2 SAN via iSCSI or Fibre Channel connection, accept
all default packages.
• If accessing media on K2 storage via CIFs connection only, uncheck XtendSAN
iSCSI Initiator, but accept all other packages.
7. Click Install and when prompted enter the Macintosh system's administrator
username and password.
Software installs.
20 K2 FCP Connect Installation Manual 22 October 2010
Page 21

Installing and configuring K2 FCP Connect
8. On the Xtend SAN install screen, make sure you click Done. If you do not do so,
the K2 FCP Connect installation stalls.
NOTE: The Xtend SAN install screen can be partially obscured behind the
K2 FCP Connect install screen.
9. Click Restart when the installation completes successfully.
The Macintosh system restarts.
Uninstall K2 FCP Connect software on Macintosh systems
If you ever need to uninstall K2 FCP Connect from your Macintosh system, use the
following procedure. This remov es all files associated with K2 FCP Connect from the
Macintosh system, including Mono software.
1. Procure the K2 FCP Connect uninstall program file.
Refer to K2 FCP Connect Release Notes for information on obtaining the
uninstall program file.
2. On the Macintosh system, double-click UninstallK2FCPConnect.pkg.
22 October 2010 K2 FCP Connect Installation Manual 21
Page 22

Installing and configuring K2 FCP Connect
The uninstall program opens.
3. Click Continue.
The Installation Type screen opens.
4. Click Install and when prompted enter the Macintosh system's administrator
username and password.
Software uninstalls.
22 K2 FCP Connect Installation Manual 22 October 2010
Page 23

Installing and configuring K2 FCP Connect
5. On the Xtend SAN uninstall screen, make sure you click Done. If you do not do
so, the K2 FCP Connect uninstallation stalls.
NOTE: The Xtend SAN screen can be partially obscured behind the K2 FCP
Connect install screen.
6. Click Close when the uninstallation completes successfully.
All files associated with K2 FCP Connect are removed from the Macintosh system.
If an application that is currently installed on the Macintosh system requires Mono
software, you must re-install the Mono software.
Cable Macintosh systems
Connect each Macintosh system as follows. If you have multiple Macintosh systems
and a redundant K2 SAN, balance Macintosh systems between A and B switches.
Refer to the K2 SAN Installation and Service Manual for more information about SAN
connections.
1. Connect GigE port 1 to a control port on the Ethernet switch.
2. Do one of the following:
• If CIFS access, no further connections are required.
• If iSCSI access, connect GigE port 2 to a media port on the K2 SAN Ethernet
switch. This connection is for the media (iSCSI) network.
22 October 2010 K2 FCP Connect Installation Manual 23
Page 24

Installing and configuring K2 FCP Connect
• If Fibre Channel access, connect the Fibre Channel port to the K2 SAN Fibre
Channel switch or to a Fibre Channel port on the K2 RAID controller.
Configure Macintosh systems for control network
Configure each Macintosh system as follows:
1. Open System Preferences, Network settings.
2. Set Ethernet 1 to configure manually (static IP).
3. Configure IP address, subnet mask, and other settings as required for the control
network.
Configure Macintosh systems for Active Directory Domain
If desired, MAC OS X can be configured to use Acti ve Directory (AD) resources such
as users and groups. Once a computer is bound to an AD domain, users belonging to
that domain may login to the Macintosh system at the main login prompt. If you do
this task, you must also enable Access Control Lists on the K2 storage you access,
either the K2 Media Server (FSM) for SAN access or the stand-alone K2 system.
1. Open System Preferences and click Accounts.
2. If the Lock icon is locked, unlock it by clicking it and entering the administrator
name and password.
3. Click Login Options, then click Join or Edit. If you see an Edit button, your computer
has at least one connection to a directory server.
24 K2 FCP Connect Installation Manual 22 October 2010
Page 25

Installing and configuring K2 FCP Connect
4. Click the Add (+) button.
5. From the "Add a new directory of type" pop-up menu, choose Active Directory.
6. Fill in the Active Directory information for the domain administrator account.
The administrator account is only needed at the time of binding. Once the
computer is bound to a domain, all users of the domain can be used to log in to
the Macintosh system.
7. Click OK.
The Macintosh computer goes through the binding process. If successful, the
domain name is listed with the status message, "This server is responding
normally".
8. Click Open Directory Utility or, if desired, click Done and open the Directory Utility
from the System/Library/Core Services folder.
9. Click Services.
22 October 2010 K2 FCP Connect Installation Manual 25
Page 26

Installing and configuring K2 FCP Connect
10. Verify that the Active Directory option is checked.
If you need to change options, first double-click the Lock icon on the lower left
hand corner and authenticate as administrator.
11. If desired, add AD accounts or groups as administrators of the Macintosh computer
as follows:
a) In the Services tab, double-click on the Active Directory name.
b) Open the advanced options and click on the Administrative tab.
26 K2 FCP Connect Installation Manual 22 October 2010
Page 27

Installing and configuring K2 FCP Connect
c) Verify that the Pref er this domain server and Allow administration by check boxes
are checked.
d) Add any AD user or group of the domain to the list.
You must type the user or group name, then a backslash, before the domain
name.
Licensing K2 FCP Connect on K2 systems
The following sections contain instructions for managing the K2 FCP Connect license.
About K2 FCP Connect software licensing
K2 FCP Connect requires a license from Grass Valley . The license allows a set number
of connections for Macintosh systems to access K2 storage. The license is made
available via a Grass Valley SabreTooth licensing web service. When a Macintosh
system attempts to connect to a K2 system, the connection is verified with the service
and either allowed or disallowed.
K2 FCP Connect licenses are installed as follows:
22 October 2010 K2 FCP Connect Installation Manual 27
Page 28

Installing and configuring K2 FCP Connect
• For K2 SAN access, the license is installed on the K2 SAN's K2 Media Server that
takes the role of file system server. If a redundant K2 SAN, the license is installed
on primary and backup K2 Media Servers.
• For stand-alone K2 system access via CIFS mount, the license is installed on a
stand-alone K2 system. If you need Macintosh access to multiple stand-alone K2
systems, you should designate one of your stand-alone K2 systems as your K2 FCP
Connect licensing server and install the licenses on that system. You must manually
enable the SabreT oothWS webservice on a K2 system that acts as a K2 FCP Connect
licensing server. Then as long as the K2 FCP Connect licensing server is on the
network it provides the license verification for multiple Macintosh systems accessing
multiple stand-alone K2 systems, up to the maximum number of connections the
license allows.
• No Grass Valley license is required to be installed on the Macintosh system or on
the control point PC.
Licenses are requested through the License Wizard and managed through the
SabreTooth License Manager, which is installed on the Grass Valley product with the
Grass Valley software. The License Wizard and SabreTooth License Manager must
be located on the Grass Valley product.
License information is stored in text files that you can manage just like any other file
on your system. Licenses are unique to the system for which they are requested and
cannot be used on any other machine. You should back up the license text files to a
separate drive or as part of a recovery image.
Licenses are based on your system’s unique identifier, which is partially deriv ed from
your system’s Media Access Control (MAC) address. If you change your system’s
MAC address by performing operations such as changing the System Processor card,
you must obtain a new license based on the new MAC address.
Apply licensing instructions according to your requirements for Macintosh access to
K2 SAN or stand-alone K2 systems.
Requesting a license
This topic applies to Grass Valley Sabretooth licenses. Software licenses are unique
to the system for which they are purchased. They cannot be used on an y other system.
This requires that you provide a generated unique ID for the desired system to Grass
Valley, which is then used to create your unique license.
1. Log on to the device that you want to license.
You must log in as a Windows administrator with a local account, not a domain
account.
2. Open the License Request Wizard.
Find the License Request Wizard shortcut on the Windows desktop.
28 K2 FCP Connect Installation Manual 22 October 2010
Page 29

Installing and configuring K2 FCP Connect
The License Request Wizard displays.
3. Read the on-screen instructions, then click Next.
The Customer dialog box displays.
4. Enter the information requested on this page then click Next.
You must provide a valid email address to receive your license file.
The Sales Number dialog box displays.
5. Enter the Sales Order Number in the field then click Next.
Typically the Sales Order Number is found on the Software License sheet that
you received with your Grass Valley product.
The Summary dialog box displays.
6. Review the License Request information and click Finish.
A License Request text file, License_Request_<SalesNumber>.txt, is generated
and saved to the Windows Desktop.
NOTE: If you are requesting licenses for more than one application, be sure
to modify the name of the first License Request text file before saving it to
your desktop. (In Notepad, use the Save As command.) Otherwise, the second
License Request text file will overwrite it.
7. If you have K2 Summit Production Client or K2 Solo Media Server and if the write
filter is currently enabled, be aware that files on the desktop are lost on restart.
Therefore do one of the following:
• Save the License Request text file(s) to a different location.
• Keep the K2 system running (do not restart) until after you have requested the
license(s).
8. Do one of the following:
• Attach the License Request text file to an email.
• Paste the text directly into an email message.
You might want to keep a copy of the message for your records.
9. Send the email as instructed by the License Request Wizard.
An email will be sent from Grass Valley to the return email address you specified;
your SabreTooth software license will be provided as a text file.
22 October 2010 K2 FCP Connect Installation Manual 29
Page 30

Installing and configuring K2 FCP Connect
10. Save this email in case you ever need to re-image this machine.
Next add the license to the SabreTooth License Manager.
Adding a license
Your software license, Licenses_<SalesNumber>.txt, is pro vided as a te xt file. Use
the License Manager to add this file to your system and enable the desired feature.
1. Click on the License Manager icon on the Windows Desktop.
The SabreTooth License Manager opens.
2. Do one of the following:
• Choose File | Import License and navigate to the file location to open the text
file.
• Drag and drop the text file onto the License Manager.
You will now see the permanent license in SabreTooth, as well as any other
licenses, permanent or temporary, that have been installed on this machine.
You should save the permanent license to a backup system.
Enable SabretoothWS service
Do this task on the K2 system that is your Sabretooth licensing server for access to
stand-alone K2 systems.
1. Open the Windows Services control panel.
2. Right-click Grass Valley SabretoothWS, open Properties and click the General tab.
3. Set Startup Type to Automatic.
4. Click OK to save settings and close.
Add Macintosh systems to K2 system hosts file
1. On a K2 system, open the hosts file in a text editor.
2. Following the convention in the hosts file, enter text in one line for each Final Cut
Pro Macintosh system as follows:
a) On a text line, type a Macintosh system's control network IP address.
b) Use the TAB key or Space bar to insert a few spaces.
c) On that same text line after the space, type the machine name, such as
MacClient01.
The machine name cannot have any spaces in it.
This sets up the host file for resolving the machine name on the control network.
30 K2 FCP Connect Installation Manual 22 October 2010
Page 31

Installing and configuring K2 FCP Connect
3. Save the hosts file.
4. Similarly configure the hosts file on the other K2 systems.
5. Copy the hosts file or otherwise make the hosts file accessible to each Final Cut
Pro Macintosh system.
Enable Access Control Lists on the K2 system
Prerequisites for the K2 system are as follows:
• Current compatible versions of the Windo ws operating system and SNFS software.
• Standard C:, D:, E: and V: disk volumes.
• SNFS has been configured with Grass Valley's Storage Utility.
• The SNFS configuration file is located in the D:\SNFS\config\ directory.
If desired, you can enable Access Control Lists (A CLs). F or SAN access enable A CLs
on the K2 Media Server(s). For stand-alone K2 storage access enable ACLs on the
stand-alone K2 system. If you do this task, you must also configure Active Directory
Domain on the Macintosh systems.
1. If a redundant K2 SAN, take FSM K2 Media Servers out of service and manage
redundancy as directed in documented procedures.
2. Navigate to D:\SNFS\config\ and open the SNFS configuration file in a text editor .
The file is named either default.cfg or gvfs_hostname.cfg where hostname is
the name of the K2 system—if a redundant SAN, the name of the primary FSM.
3. Confirm/enter/modify text lines as necessary to configure as follows:
WindowsSecurity Yes
EnforceACLs Yes
UnixIdFabricationOnWindows Yes
UnixDirectoryCreationModeOnWindows 0700
UnixFileCreationModeOnWindows 0600
UnixNobodyGidOnWindows 60001
UnixNobodyUidOnWindows 60001
Avoid duplicate settings.
NOTE: Once ACLs are enabled on the K2 system (WindowsSecurity set to
Yes), they cannot be disabled.
4. Save the SNFS configuration file.
5. Restart the K2 system.
6. If a redundant K2 SAN, repeat these steps on the redundant FSM K2 Media Server .
7. After restart of K2 Media Server(s) is complete, restart all clients of the K2 SAN.
22 October 2010 K2 FCP Connect Installation Manual 31
Page 32

Installing and configuring K2 FCP Connect
Add Mac Client to K2 SAN
Prerequisites for this task are as follows:
• Y ou must be logged in to the K2 System Configuration application with permissions
equivalent to K2 administrator or higher.
• The devices of the K2 SAN do not need to be offline, and there is no restart of
devices required.
1. In the K2 System Configuration application tree view, select the name of the K2
SAN, which is the top node of the storage system tree.
2. Click Add Device
The Add Device dialog box opens.
3. Select Mac Client.
4. Click OK.
The new client appears in the tree view.
Next, configure the new client on the K2 SAN.
Configure Mac Client on K2 SAN
Use this procedure to configure each of your Macintosh Final Cut Pro systems on the
K2 SAN as a SAN client device.
Prerequisites for this task are as follows:
• The K2 SAN's K2 Media Server(s) with role of file system server (FSMs) have
the K2 FCP Connect license installed.
• You are logged in to the K2 System Configuration (K2Config) application with
permissions equivalent to K2 administrator or higher.
• The client device is added to the K2 SAN and appears in the K2 System
Configuration application tree view.
• The K2 SAN has adequate bandwidth available to meet the bandwidth needs of
the client device you are adding.
• The client device is connected to appropriate networks and is powered up.
• The client device's IP address and other network properties are configured for the
control network.
• Host table information for K2 SAN devices, the control point PC, and the client
device is in the hosts file on the client device.
• The devices of the K2 SAN do not need to be offline, and there is no restart of
devices required.
1. In the K2Config tree view, select the client device.
2. Click the Configure button.
The Client Configuration wizard opens.
32 K2 FCP Connect Installation Manual 22 October 2010
Page 33

Installing and configuring K2 FCP Connect
NOTE: If your system has a large number of iSCSI clients, you are prompted
to restart the K2 Media Server when you configure clients and cross the
following thresholds: 64 clients; 80 clients; 96 clients.
3. Enter the network name for the client device, as currently configured on the device.
If you have multiple client devices to configure, you should configure your
highest bandwidth devices first, as this ensures load balancing is correct.
4. For Storage Access, leave iSCSI selected.
5. Click Next.
The Xsan Licensing Information page opens.
6. Enter information exactly as received from Apple with your Xsan license. If you
did not receive information for a field on this page, leave the field blank.
For example, if a one-seat license, enter only the Serial number and leave the
Registered To and Organization fields blank.
7. Click Next.
The Software Configuration page opens.
This page checks the client device for required software.
22 October 2010 K2 FCP Connect Installation Manual 33
Page 34

Installing and configuring K2 FCP Connect
8. Identify software installed on the client device and proceed as follows:
• If any software with Yes in the Required column reports as Not Installed, you
must install it on the client device. After installing the software, click Check
Software.
• If all software with Y es in the Required column reports as Installed, click Check
Software.
When all required software reports as Installed, continue with the next step in
this procedure.
9. Click Next.
The SabreTooth Server Configuration page opens.
10. Enter the K2 Media Server (FSM) as follows:
• If a basic (non-redundant) K2 SAN, enter the media file system K2 Media
Server as primary.
• If a redundant K2 SAN, enter primary and backup media file system K2 Media
Servers.
11. Click Next.
The Network Configuration page opens.
This page configures both control and media (iSCSI) network connections. The
top port is the port over which the K2 System Configuration application is
34 K2 FCP Connect Installation Manual 22 October 2010
Page 35

Installing and configuring K2 FCP Connect
communicating with the client device. If correctly configured, it is already
assigned the control network IP address, which is displayed in the window.
12. Proceed as follows:
• If a Fibre Channel connected client, skip ahead to step 21 and configure the
File System Client Configuration page.
• If an iSCSI connected client, proceed with the next step.
13. Select the media (iSCSI) port and click Modify.
A network configuration dialog box opens.
14. Enter the media network IP address and subnet mask and then click OK.
15. Click Check.
The iSCSI Initiator Configuration page opens.
This page load balances the client device’s iSCSI connection to the K2 SAN.
The iSCSI adapters on your K2 Media Server or servers are listed here as iSCSI
targets.
On redundant systems, if you have multiple client devices, they should be
balanced between A and B.
For pre-defined K2 SAN levels, K2Config determines the iSCSI tar get to which
each client device subscribes, based on the bandwidth values that you enter.
This enforces policies by which each client device has sufficient bandwidth for
its intended use and no individual iSCSI target is oversubscribed.
For custom K2 SANs (Level 4 or 40), qualified system designers can view
subnets to help assign iSCSI targets.
16. Click Modify.
The Bandwidth Input dialog box opens.
17. Enter the bandwidth of the Mac Client. This is calculated according to your system
design, and provided to you by your Grass Valley representative.
18. Click Assign TOE.
K2Config automatically chooses an iSCSI target to assign to the client device.
A message appears that specifies the chosen iSCSI target, but allows you to
choose a different iSCSI target.
19. Respond to the message as follows:
• In most cases you should accept the iSCSI target chosen by K2Config. Click
Yes, then OK to continue.
• If your system design specifies a different iSCSI target, click No, then select
the iSCSI target on the iSCSI Initiator Configuration page.
22 October 2010 K2 FCP Connect Installation Manual 35
Page 36

Installing and configuring K2 FCP Connect
20. When the wizard reports that the configuration check is successful, click Next.
The File System Client Configuration page opens.
This page connects the client device as a media file system client to the K2
Media Server taking the role of media file system server. If there are redundant
K2 Media Servers, both are listed on this page as file system servers.
21. V erify that the client de vice is connecting to the correct K2 Media Server or Servers,
as follows:
• For non-redundant K2 Storage Systems, the client connects to the only server.
• For iSCSI redundant K2 Storage Systems, the client connects to server A as
file system server 1 and server B as file system server 2, so that if there is a
problem with one server, the other server is available.
22. Click Next.
The Completing the Configuration Wizard page opens.
23. Click Finish.
When prompted, restart the client device.
Test K2 system file access
K2 storage is automatically mounted as a volume (the V: drive) on the Macintosh
system. From a Macintosh system, perform create, read, write, and delete operations
on a file on the V: drive. This verifies the media file system.
1. On the Macintosh desktop, verify that the K2 storage volume is present. This is
also known as the V: drive.
2. From the Macintosh system, open a text editor, create a text file, enter text, and
save it on the V: drive.
3. Close the text editor.
4. In Finder, browse to the V: drive and open the text file.
5. Make a change to the text in the text file and then save and close the text file.
6. Delete the text file.
Verify Access Control Lists
Prerequisites:
• Two domain users
• A correctly configured K2 system
• At least one Macintosh system attached
36 K2 FCP Connect Installation Manual 22 October 2010
Page 37

Installing and configuring K2 FCP Connect
If you are using Access Control Lists on Macintosh OS X and the Windows operating
system, use this task to verify.
1. T est permissions on the K2 system as follows. For K2 SAN access, test permissions
on the primary K2 Media Server FSM. For stand-alone K2 storage access, test
permissions on the stand-alone K2 system.
a) Create a new text file on the V: drive.
b) Right-click on the text file and select Properties.
c) Click the Permissions tab.
d) Select Everyone and then for the Write permission select the Deny check box.
e) Create a folder on the V: drive.
f) Give full permissions to the first user (designated in this procedure as userA)
on the domain.
g) Give read only permissions to the second user (designated in this procedure as
userB) on the domain.
2. On the Macintosh system, do the following:
a) Login as userA.
b) Right-click on the text file and select Properties.
c) Open up Terminal and change directory to the volume.
If the SNFS file system is named "default" type the following and press Enter:
cd /Volumes/default
If the SNFS file system is named "gvfs_hostname" (where hostname is the
name of the K2 system) type the following and press Enter:
cd /Volumes/gvfs_hostname
d) Type the following command:
ls –le
22 October 2010 K2 FCP Connect Installation Manual 37
Page 38

Installing and configuring K2 FCP Connect
e) Verify that there is a "+" next the text file, plus a list of permissions below. If
this is true then cross-platform ACLs are enabled.
f) Open the Finder, go to the default volume and try to edit the text file. This
should fail as the file should not be writeable.
g) In the Finder, go to the folder you created earlier in this procedure and create
a text file in the folder. This operation should be successful.
h) Log out and then log back in as userB.
i) In the Finder, go to the folder you created earlier in this procedure and try to
create a text file in the folder. This operation should fail.
Verify bandwidth of connection to K2 storage
Before starting this task, procure the Xbench software. You can download it from
http://www.xbench.com.
1. Install Xbench on the Macintosh system.
2. Open Xbench.
38 K2 FCP Connect Installation Manual 22 October 2010
Page 39

Installing and configuring K2 FCP Connect
3. Select the K2 system volume.
4. Click Start.
It might take several minutes to create the test results.
5. Verify bandwidth and other performance parameters.
Verify/configure SNFS configuration file on K2 Media Servers
In this task you open the media file system (SNFS) configuration file and verify/modify
settings.
Do this task if you access media on a K2 SAN and in the SNFS configuration file,
Windo wsSecurity is set to No. If you are not sure about the W indo wsSecurity setting,
proceed with this task to check the setting.
You can v erify and, if necessary, modify the media file system (SNFS) configuration
file and still keep your media file system intact if you carefully follow the steps in this
procedure.
This task applies to the following devices:
22 October 2010 K2 FCP Connect Installation Manual 39
Page 40

Installing and configuring K2 FCP Connect
• K2 Media Servers with role of file system server. If a redundant SAN, you must
do this task on both primary and backup K2 Media Server.
1. On a K2 Media Server, using Notepad, open the media file system (SNFS)
configuration file:
The configuration file can be either D:\SNFS\config\default.cfg. or
D:\SNFS\config\gvfs_hostname.cfg, where hostname is the name of the
primary file system server (FSM).
2. Locate the WindowsSecurity setting and proceed as follows:
• If WindowsSecurity is set to Yes, skip the remainder of this procedure. Do not
modify or save the SNFS configuration file.
• If WindowsSecurity is set to No, continue with this procedure.
3. On a K2 Media Server, v erify , and if necessary modify , settings for required v alues
as follows:
# *********************************************************
# A global section for defining file system-wide parameters
# *********************************************************
.
WindowsSecurity No
GlobalSuperUser Yes
UnixDirectoryCreationModeOnWindows 0777
UnixFileCreationModeOnWindows 0666
.
4. Close, and if necessary save, the SNFS configuration file.
If you made changes, the K2 system must be restarted for the changes to take effect.
If you made changes to UnixDirectoryCreationModeOnWindows and
UnixFileCreationModeOnWindows parameters, to apply changes to existing assets
you must delete and then re-create files and/or bins, such as HotBins.
Configure HotBin
If a K2 SAN, the SNFS configuration file must have settings as follows:
• If Windows Security is No, GlobalSuperUser must be set to Yes.
• If Windows Security is Yes, no GlobalSuperUser setting is required.
Configure a HotBin on the K2 system to receive the finished media from Final Cut
Pro.
1. In K2 AppCenter, create a bin with an appropriate name, such as "dstBin".
2. Configure dstBin as a HotBin.
40 K2 FCP Connect Installation Manual 22 October 2010
Page 41

Refer to the K2 System Guide for instructions.
3. When you configure a HotBin, in the Capture Services Utility you can adjust
QuickTime Import Delay. The recommended setting is 15 seconds. Refer to the
next topic for more information.
About QuickTime import delay
When you copy a file into a K2 HotBin, the HotBin watches for the file to close and
the copy operation to stop, which should indicate the file is complete, before it begins
to import the file into K2 storage. Howev er, Final Cut Pro repeatedly opens and closes
any QuickTime file as it e xports the file, so it is possible that the K2 HotBin can detect
a file closed event and begin to import the file before Final Cut Pro is done. If this
occurs, the K2 HotBin import for that file fails.
To avoid this problem, when you configure a K2 HotBin you can configure the
QuickTime import delay setting. This setting allows you to adjust how long a
QuickTime file must be idle (no data being written to the file) before the HotBin begins
to import the file into K2 storage. The recommended default value is 15 seconds. If
you have problems with failed imports and you suspect that Final Cut Pro is holding
on to the file with pauses longer than 15 seconds, you should increase the QuickTime
import delay time and re-try the import. The HotBin process constrains the QuickTime
import delay range to between 10 and 60 seconds.
Installing and configuring K2 FCP Connect
Configure Aurora Playout workflow
Prerequisites are as follows:
• A Aurora Playout server must be a mounted volume available to the Macintosh
system.
• A playout destination must be a location on configured and licensed K2 storage.
• A HotBin must be configured so that when it receives media, it imports that media
into K2 storage, to the bin that Aurora Playout monitors.
In this procedure you specify the Aurora Playout server on which GV Connect accesses
placeholders/rundowns and one or more K2 storage locations to which GV Connect
exports sequences.
1. Close GV Connect, if it is currently open.
2. In System Preferences open K2 FCP GV Connect.
3. Click the Playout tab.
4. For Display Name, enter the name that you want displayed on the GV Connect
drop-down list.
This is name of the location on K2 storage to which GV Connect exports the
Aurora Playout associated sequences.
22 October 2010 K2 FCP Connect Installation Manual 41
Page 42

Installing and configuring K2 FCP Connect
5. For Location, click the browse arrow to navigate to and select the HotBin that is
configured to import the sequence to the bin that Aurora Playout monitors.
6. For Format, select the format in which the sequences are exported to K2 storage.
7. Click Add to add the location as a playout destination.
8. Repeat these steps to add multiple locations.
9. Select an item in the list and use the Modify or Delete buttons to manage the list.
10. For GV SimpleDB Server IP Address, enter the IP address of the Aurora Playout
server on which GV connect accesses placeholders/rundowns.
11. If you are using XMOS, do the following:
a) Next to GV XMOS Rundowns/Script Path:, select Active.
b) Browse to and select the directory where scripts are stored.
c) For GV Mos Id, enter the MOS protocol ID that GV Connect uses to access
placeholders/rundowns.
Connecting via SAMBA/CIFS
Use this method to connect to the SNFS volume via CIFS. Once the Macintosh
computer has been bound to a domain it can then connect to any domain controlled,
shared volume via SAMBA. If connecting via SAMB A, XSan softw are does not need
to be installed or configured.
1. On the Macintosh computer open the Finder program and at the top menu click Go
| Connect to Server.
The Connect to Server dialog box opens.
2. In the Server Address field, type smb://, then type the IP or DNS name of the
server to which you are connecting, slash, then type the volume name.
42 K2 FCP Connect Installation Manual 22 October 2010
Page 43

3. Click Connect.
You are prompted to authenticate.
Installing and configuring K2 FCP Connect
In the Name field, make sure you enter the name of the K2 system (shown here
as "yourdomain"), then a backslash, then the username.
The volume should be mounted in the /Volumes directory and viewable in the Finder
program. Rights to files and folders are enforced based on the security profile of the
user you authenticated with when connecting with SAMBA, not the user you are
logged in as on the Macintosh computer.
22 October 2010 K2 FCP Connect Installation Manual 43
Page 44

Page 45

Chapter 3
Using and maintaining K2 FCP Connect
This section contains the following topics:
• About GV Connect
• About GV Browse
• Operation guidelines
• About administrative and maintenance tools
• Managing K2 FCP Connect licenses for CIFS mount
• Stopping and starting the K2Config for Mac service
• Accessing logs
• Running diagnostics
• Configuring non-K2 storage
• Modifying the export format list
22 October 2010 K2 FCP Connect Installation Manual 45
Page 46

Using and maintaining K2 FCP Connect
About GV Connect
GV Connect is a Grass Valley plug-in for Final Cut Pro. With the plug-in you can
quickly and easily locate QuickTime files on a K2 System (SAN or stand-alone). Then
you can add the files to the current Final Cut Pro project to allow editing of the files
directly over the network or after transfer locally. The capability to add files without
file transfer is called Edit in Place. The plug-in also includes Final Cut Pro support
for Aurora sequences, growing file support, and export/render/flattening of Final Cut
Pro finished sequences on a K2 system for sharing or playout.
With GV Connect you can do the following:
Import
• Browse K2 (SAN or standalone) file structure to find, preview and add or transfer
clips to bin
• Browse K2/Aurora file structure to find, preview and add or transfer clips to bin
• Browse K2/Aurora file structure to find, preview and add Sequences to bin
• Browse local or network path for QuickTime files to preview and add or transfer
to bin as well as adding sequences to bin.
Export
• Export one or multiple clips or sequence to a K2 system (SAN or standalone)
• Two presets available: Export and Quick Export
Send to Playout
• Interface with Aurora Playout placeholders.
• Create a sequence from a placeholder. GV Connect locks the placeholder on the
Aurora Playout system.
• Export a finished sequence to K2 storage and simultaneously update and unlock
the placeholder on the Aurora Playout rundown.
The GV Connect Final Cut Pro plug-in is installed in the Final Cut Pro plug-in folder
and is available on the Final Cut Pro Tools menu.
About GV Browse
GV Browse is a Grass Valley plug-in for Final Cut Pro. With the plug-in you can
quickly and easily locate QuickTime files on a MediaFrame server in an Aurora Bro wse
system. Then you can preview and add or transfer the files to the current Final Cut
Pro project to allow editing of the files directly over the network
The GV Browse plug-in is installed in the Final Cut Pro plug-in folder and is av ailable
on the Final Cut Pro Tools menu.
46 K2 FCP Connect Installation Manual 22 October 2010
Page 47

Using and maintaining K2 FCP Connect
Operation guidelines
Take the following into consideration as you use Final Cut Pro on K2 storage.
• Do not use the K2 AppCenter "Erase Unused Media" operation on clips that you
are accessing on K2 storage.
About administrative and maintenance tools
When you install K2 FCP Connect on your Macintosh system, the K2 FCP GV Connect
Preferences is also installed, which provides features for maintaining K2 FCP Connect
operations on the Macintosh system, as follows:
• Check license in/out to manage licensing on multiple Final Cut Pro Macintosh
systems.
• Stop/start the K2Config for Mac service
• Access logs
• Edit hosts file
• Run diagnostics
• Configure export locations, formats, and server for Aurora Playout workflow
• Add non-K2 media storage
K2 FCP GV Connect Preferences incorporates the features of the former GV Helper
Tool.
Managing K2 FCP Connect licenses for CIFS mount
You can drop the K2 FCP Connect license that your Macintosh system is using for
CIFS mount connection to a stand-alone K2 system. This makes the license av ailable
for use by a different Macintosh system. You can also assign a license for use by your
Macintosh system, as long as there is an unused license available.
1. Close GV Connect, if it is currently open.
2. In System Preferences open K2 FCP GV Connect.
3. Click the Licensing tab.
4. To drop the license currently used by the local Macintosh system, click Checkin
License.
5. T o assign an unused license to the local Macintosh system, click Checkout License.
6. You can also change the licensing server, which is the machine to which the
Macintosh system looks to get its license, with the following considerations:
• For access to stand-alone K2 systems make the change here in the K2 FCP GV
Connect Preferences.
22 October 2010 K2 FCP Connect Installation Manual 47
Page 48

Using and maintaining K2 FCP Connect
• For access to a K2 SAN, you should use K2Config, rather than the K2 FCP GV
Connect Preferences, to change the licensing server.
Stopping and starting the K2Config for Mac service
1. Close GV Connect, if it is currently open.
2. In System Preferences open K2 FCP GV Connect.
3. Click the Tools tab.
4. To start the K2Config for Mac service, click Start and then enter username and
password with administrator privileges.
5. To stop the K2Config for Mac service, click Stop, when prompted "...Are you
sure..." click Yes, and then enter username and password with administrator
privileges.
6. To view any recent status change, click Refresh Status.
When you stop the K2Config for Mac, the service is stopped permanently , ev en
after the Macintosh system is restarted. Once you have stopped the service, you
must re-start it manually.
Accessing logs
1. Close GV Connect, if it is currently open.
2. In System Preferences open K2 FCP GV Connect.
3. Click the Tools tab.
48 K2 FCP Connect Installation Manual 22 October 2010
Page 49

Using and maintaining K2 FCP Connect
4. Click Launch System Log (Console).
A Console window opens and displays logs.
22 October 2010 K2 FCP Connect Installation Manual 49
Page 50

Using and maintaining K2 FCP Connect
5. Select system.log.
The system log displays. This is the log that contains entries relevant to the
connection to K2 storage.
6. To send log information to Grass Valley for analysis, copy text from the Console
window, paste it into a text file and send the text file.
Running diagnostics
1. Close GV Connect, if it is currently open.
2. In System Preferences open K2 FCP GV Connect.
3. Click the Diagnostics tab.
4. Click Print System Diagnostics To Log.
5. A message prompts you to authenticate. Do one of the following:
• Click Yes and then enter administrator username and password. All diagnostics
run.
• Click No. A subset of the diagnostics run.
.
50 K2 FCP Connect Installation Manual 22 October 2010
Page 51

6. When a message appears to confirm diagnostic results are written to the system
log, click OK.
7. Access the system log to view diagnostic results.
Related Links
Accessing logs on page 48
Configuring non-K2 storage
If you must access media that is not stored on a K2 system, the non-K2 storage must
be a mounted volume available to the Macintosh system.
You can add non-K2 storage so it is available from the GV Connect Import tab.
1. Close GV Connect, if it is currently open.
2. In System Preferences open K2 FCP GV Connect.
3. Click the Special SAN Mounts tab.
4. For Display Name, enter the name of the non-K2 storage that GV Connect displays.
5. For Location, click the browse arrow to locate and select the non-K2 storage.
6. Click Add to add the non-K2 storage.
7. Repeat these steps to add multiple non-K2 storage locations.
Using and maintaining K2 FCP Connect
Modifying the export format list
Y ou can remo ve items from the GV Connect export format list so that the only formats
available are those that match your workflow policies.
1. On the Macintosh system, close GV Connect.
2. On the Macintosh system's main hard drive, navig ate to ..\Applications\Grass
Valley.
3. Open allowedpresets.xml with TextEdit or some other text editor.
<?xml version="1.0" encoding="UTF-8"?>
<GVPresets>
<FCPPreset>DV NTSC 48 kHz</FCPPreset>
<FCPPreset>DV PAL 48 kHz</FCPPreset>
<FCPPreset>DVCPRO - PAL 48 kHz</FCPPreset>
<FCPPreset>DV50 NTSC 48 kHz</FCPPreset>
<FCPPreset>DV50 PAL 48 kHz</FCPPreset>
<FCPPreset>DVCPRO HD - 1080i50</FCPPreset>
<FCPPreset>DVCPRO HD - 1080i60</FCPPreset>
<FCPPreset>DVCPRO HD - 720p60</FCPPreset>
<FCPPreset>IMX NTSC (30 Mb/s)</FCPPreset>
<FCPPreset>IMX NTSC (40 Mb/s)</FCPPreset>
<FCPPreset>IMX NTSC (50 Mb/s)</FCPPreset>
<FCPPreset>IMX PAL (30 Mb/s)</FCPPreset>
22 October 2010 K2 FCP Connect Installation Manual 51
Page 52

Using and maintaining K2 FCP Connect
<FCPPreset>IMX PAL (40 Mb/s)</FCPPreset>
<FCPPreset>IMX PAL (50 Mb/s)</FCPPreset>
<FCPPreset>HDV - 1080i50</FCPPreset>
<FCPPreset>HDV - 1080i60</FCPPreset>
<FCPPreset>HDV - 720p50</FCPPreset>
<FCPPreset>HDV - 720p60</FCPPreset>
<FCPPreset>XDCAM HD 1080i50 CBR</FCPPreset>
<FCPPreset>XDCAM HD 1080i50 VBR</FCPPreset>
<FCPPreset>XDCAM HD 1080i60 CBR</FCPPreset>
<FCPPreset>XDCAM HD 1080i60 VBR</FCPPreset>
</GVPresets>
4. Identify the presets that you do not want to be displayed in the export format list.
5. For each format that you do not want to be displayed, delete the entire row.
For example, if you want to remov e IMX NTSC (30 Mb/s), delete the following
row:
<FCPPreset>IMX NTSC (30 Mb/s)</FCPPreset>
NOTE: Only delete one or more preset ro ws. Do not add rows, add text, modify
XML tags, or otherwise modify the file.
6. Save and close allowedpresets.xml.
7. Open GV Connect.
The presets you deleted are no longer displayed in the export format list.
52 K2 FCP Connect Installation Manual 22 October 2010
 Loading...