

Page 1
K2 Dyno S
Replay System
Quick Start Guide
Software Version 3.0
071888600
DECEMBER 2012
Page 2

CERTIFICATE
Certificate Number: 510040.001
The Quality System of:
Grass Valley USA, LLC and its Grass Valley Affiliates
400 Providence Mine Road
Nevada City, CA 95945
United States
15655 SW Greystone Ct.
Beaverton, OR 97006
United States
4827 HG Breda
Salt Lake City, UT 84119
Including its implementation, meets the requirements of the standard:
ISO 9001:2008
Scope:
The design, manufacture and support of video and audio hardware and software
products and related systems.
This Certificate is valid until: June 14, 2015
This Certificate is valid as of: June 14, 2012
Certified for the first time: June 14, 2000
H. Pierre Sallé
President
DEKRA Certification, Inc
The method of operation for quality certification is defined in the DEKRA General Terms
And Conditions For Quality And Environmental Management Systems Certifications.
Integral publication of this certificate is allowed.
4377 County Line Road
Chalfont, PA 18914
Ph: (215)997-4519
Fax: (215)997-3809
ANAB
Headquarters:
Kapittelweg 10
The Nederlands
2300 So. Decker Lake Blvd.
United States
DEKRA Certification, Inc.
CRT 001 042108
Accredited By:
Page 3
K2 Dyno S
Replay System
Quick Start Guide
Software Version 3.0
071888600
DECEMBER 2012
Page 4
Contacting Grass Valley
International
Support Centers
Local Support
Centers
(available
during normal
business hours)
France
24 x 7
Australia and New Zealand: +61 1300 721 495 Central/South America: +55 11 5509 3443
Middle East: +971 4 299 64 40 Near East and Africa: +800 8080 2020 or +33 1 48 25 20 20
Europe
+800 8080 2020 or +33 1 48 25 20 20
Hong Kong, Taiwan, Korea, Macau: +852 2531 3058 Indian Subcontinent: +91 22 24933476
Asia
Southeast Asia/Malaysia: +603 7492 3303 Southeast Asia/Singapore: +65 6379 1313
China: +861 0660 159 450 Japan: +81 3 5484 6868
Belarus, Russia, Tadzikistan, Ukraine, Uzbekistan: +7 095 2580924 225 Switzerland: +41 1 487 80 02
S. Europe/Italy-Roma: +39 06 87 20 35 28 -Milan: +39 02 48 41 46 58 S. Europe/Spain: +34 91 512 03 50
Benelux/Belgium: +32 (0) 2 334 90 30 Benelux/Netherlands: +31 (0) 35 62 38 42 1 N. Europe: +45 45 96 88 70
Germany, Austria, Eastern Europe: +49 6150 104 444 UK, Ireland, Israel: +44 118 923 0499
Copyright © Grass Valley USA, LLC. All rights reserved.
This product may be covered by one or more U.S. and foreign patents.
United States/Canada
24 x 7
+1 800 547 8949 or +1 530 478 4148
Grass Valley Web Site
The http://www.grassvalley.com/support web site offers the following:
Online User Documentation — Current versions of product catalogs, brochures,
data sheets, ordering guides, planning guides, manuals, and release notes
in .pdf format can be downloaded.
FAQ Database — Solutions to problems and troubleshooting efforts can be
found by searching our Frequently Asked Questions (FAQ) database.
Software Downloads — Download software updates, drivers, and patches.
K2 Dyno S Replay System 4 Quick Start Guide
4 December 2012
Page 5

Contents
Chapter 1 Installation
Chapter 2 Dyno S Controller operation
Unpack and check contents.....................................................................................7
K2 Summit 3G Production Client........................................................................7
K2 Dyno S Replay Controller..............................................................................8
Gather additional items........................................................................................ ....8
System overview......................................................................................................9
System cabling ........................................................................................................10
Cable K2 Summit 3G Client................................................................................10
Cable Dyno S Controller .....................................................................................10
System startup.........................................................................................................11
Start up K2 Summit 3G Client.............................................................................11
Start up Dyno S Controller..................................................................................11
Configure network....................................................................................................12
Dyno-Pack Default IP Addresses........................................................................ 12
Configure to facility network................................................................................12
Configure K2 Summit system channels...................................................................12
Monitor K2 Summit system video channels.............................................................14
K2 Summit system computer display monitoring................................................14
External video monitors ...................................................................................... 14
Connect to server and create new session..............................................................15
View Home page status...........................................................................................16
Select input and playout channels...........................................................................17
Live replay ............................... ... ..................................................... ........................18
Capture clip.......................................... .. ... ................................................... ............19
Navigate through and manage bins.........................................................................20
Play highlight clip.....................................................................................................21
Create a playlist: Touchscreen................................................................................22
Touchscreen playlist editing................................................ ... ... ..........................23
Create a playlist: External display............................................................................24
External display playlist editing...........................................................................24
Play a playlist...........................................................................................................25
Add metadata ..........................................................................................................26
Search metadata, existing criteria ...........................................................................27
Configuration settings.............................................................. ................................28
Shutdown Dyno S Controller ...................................................................................29
Controller buttons: reference...................................................................................31
Index ......................................................................................................................33
K2 Dyno S Replay System 5 Quick Start Guide
4 December 2012
Page 6

Contents
K2 Dyno S Replay System 6 Quick Start Guide
4 December 2012
Page 7
Chapter 1
Installation
This section explains installation of the bundled K2 Summit 3G Production Client and K2
S Replay Controller that you buy as a Dyno-Pack. If you are connecting a K2 Solo
Dyno
Media Server or a K2 Summit Production Client that is not part of a Dyno-Pack and has not
been previously controlled by a Dyno
Controller Installation Manual.
Unpack and check contents
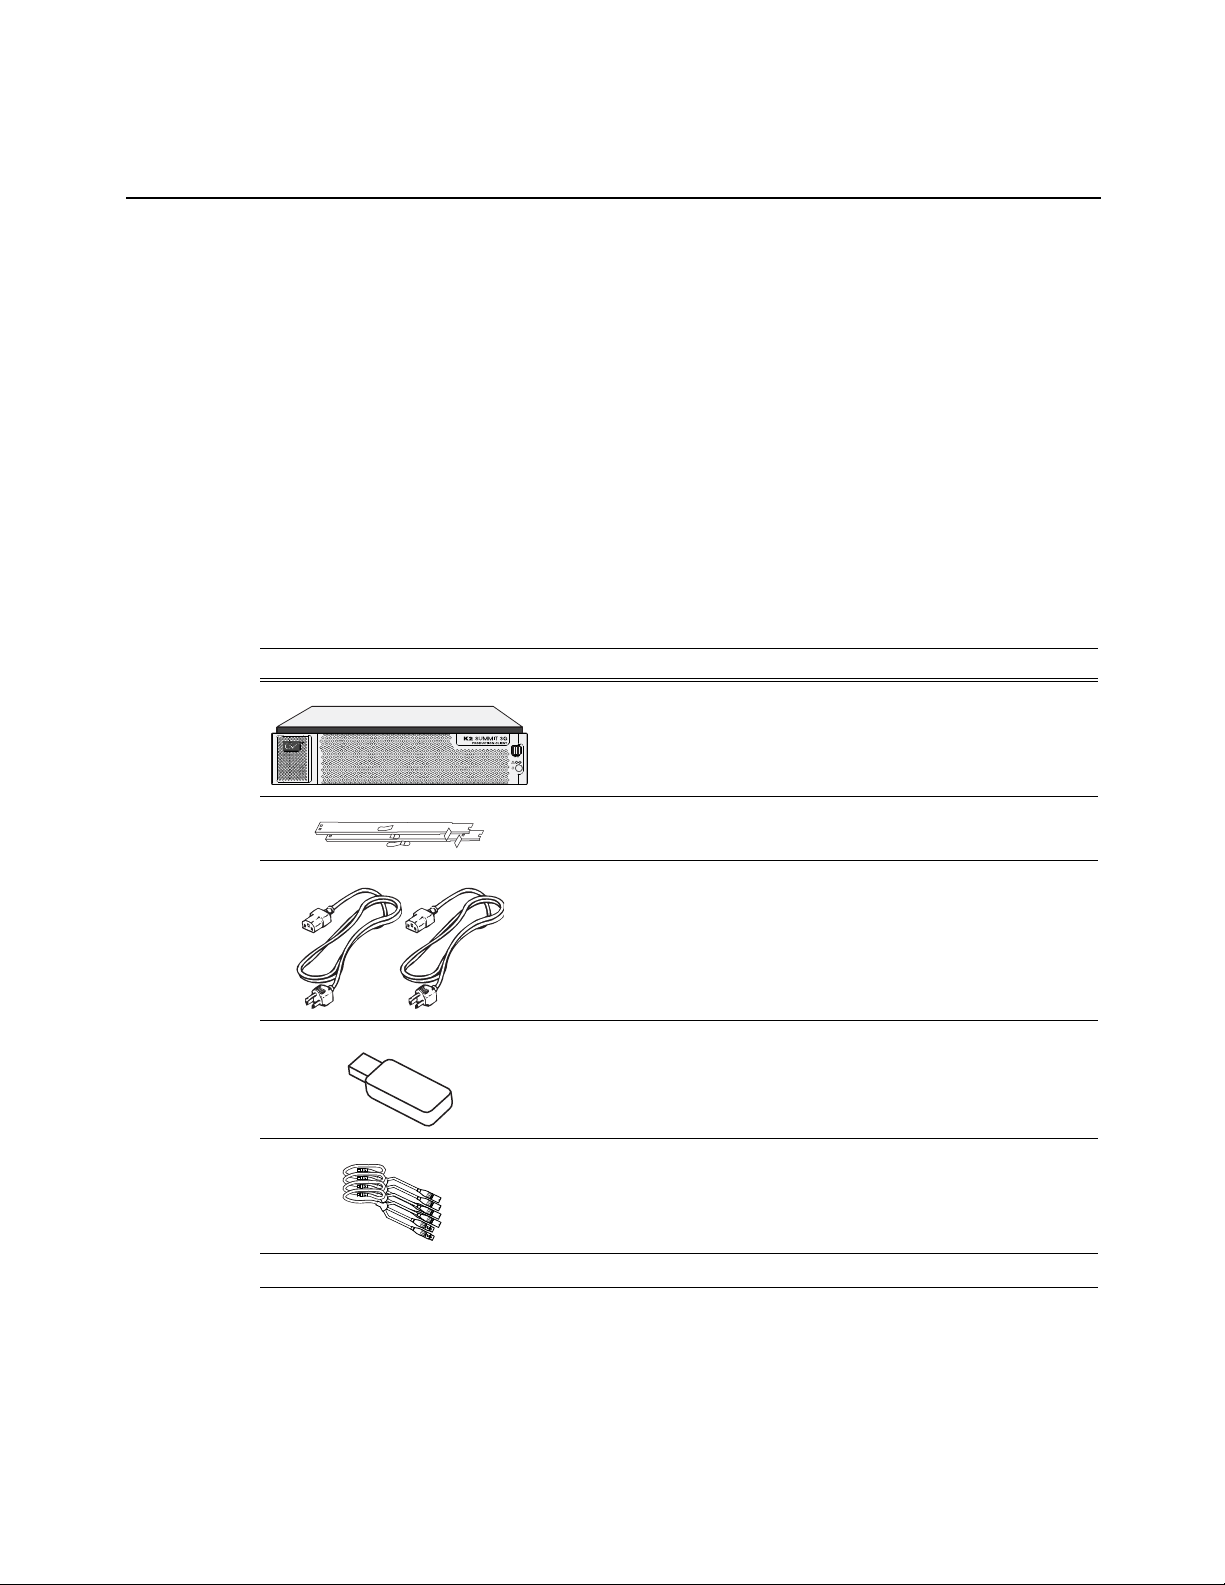
K2 Summit 3G Production Client
Find the following items in the packaging for the K2 Summit 3G Production Client.
Optional accessory: AES breakout cables (K2-AES-Breakout)
Item Description
S Controller, refer to the K2 Dyno S Replay
K2 Summit 3G Production Client
Rack Slides
Power Cords (2)
Recovery Flash Drive (stored in Summit front fan panel) which contains:
-Software and disk images
-K2 Documentation
LTC Cables
Licenses and Warranties
NOTE: Do not lose the Recovery Flash Drive. It contains the recovery disk image for
this specific K2 Summit system.
K2 Dyno S Replay System 7 Quick Start Guide
4 December 2012
Page 8
Chapter 1 Installation K2 Dyno S Replay Controller
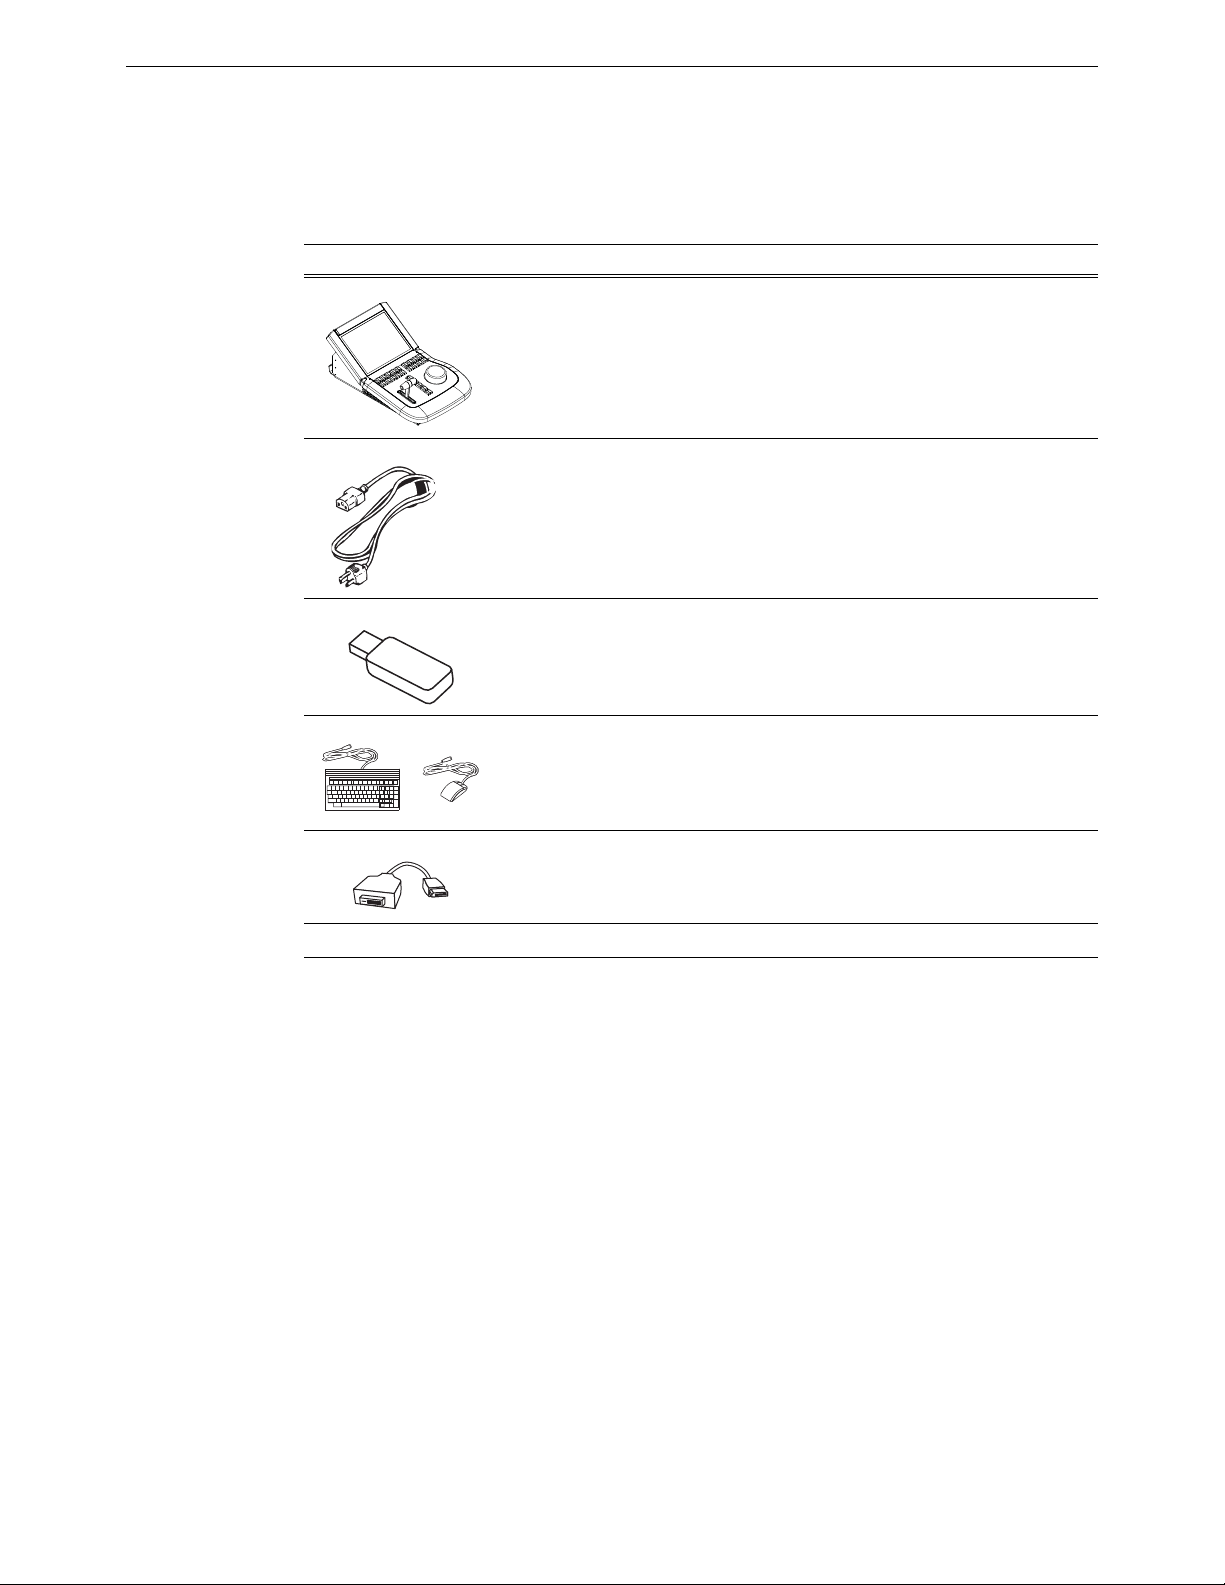
K2 Dyno S Replay Controller
Find the following items in the packaging for the Dyno S Controller.
Item Description
K2 Dyno S Replay Controller
Power Cord
Recovery Flash Drive (stored on rear panel) which contains:
-Software and disk images
-Dyno S Documentation
Keyboard and Mouse
DisplayPort to DVI Adapter (passive)
Licenses and Warranties
NOTE: Do not lose the Recovery Flash Drive. It contains the recovery disk image for
this specific K2 Dyno
Gather additional items
To complete a typical K2 Dyno S Replay System, as referenced in this Quick Start Guide,
you must provide the following items:
• Two computer monitors (1280 x 1024 x 32 or greater) and cables. The K2 Summit 3G
Client has a VGA connector, and the Dyno
• Ethernet cables, either crossover or straight-through.
• USB keyboard and mouse, for use with Summit.
S system.
S has DisplayPort connectors.
• Video monitors and cables, or if equipped with the App Center Pro license the K2
Summit 3G Client computer monitor can be used to monitor video in and out.
• Audio monitoring (headphones or speakers).
K2 Dyno S Replay System 8 Quick Start Guide
4 December 2012
Page 9
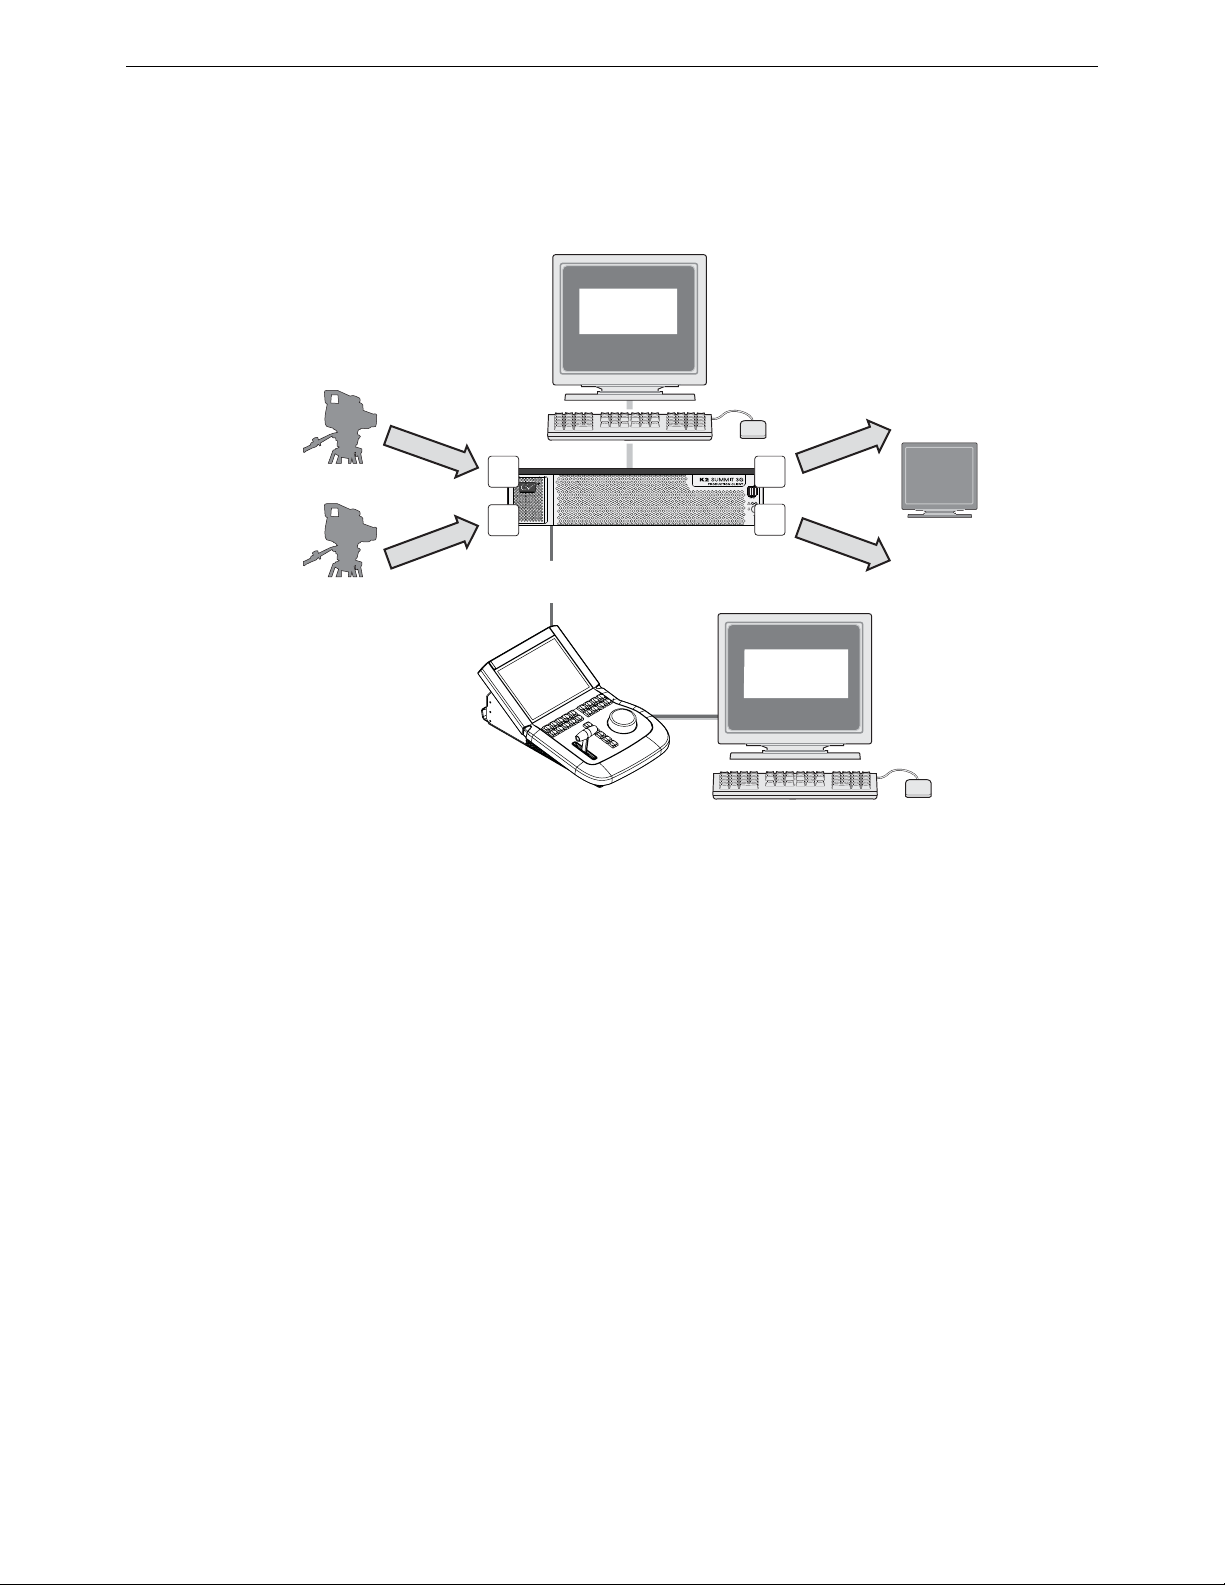
Chapter 1 Installation System overview
K2 Summit 3G Client
K2 Dyno S Replay Controller
Ethernet
connection
Video/audio
monitoring
SDI in (A)
C1
SDI out (C)
SDI out (D)
C3
Record
Play
C4
SDI in (B)
C2
AppCenter Pro
on K2 Summit
Production Client
K2 Dyno S Replay
application
computer output
P1
PGM
P2
PVW
System overview
A Dyno-Pack system consists of a K2 Summit 3G Client, a Dyno S Controller, video and
audio cabling and monitoring, and system communications interconnections
.
System communications is accomplished using Ethernet between the K2 Summit 3G Client
and the Dyno
Summit and Dyno
computer display information. The Dyno
S Controller. The K2 Summit receives and outputs video. Both the K2
S Controller have keyboard and mouse connections, and each generates
S Controller also has a built-in touch screen
computer display
K2 Dyno S Replay System 9 Quick Start Guide
4 December 2012
Page 10
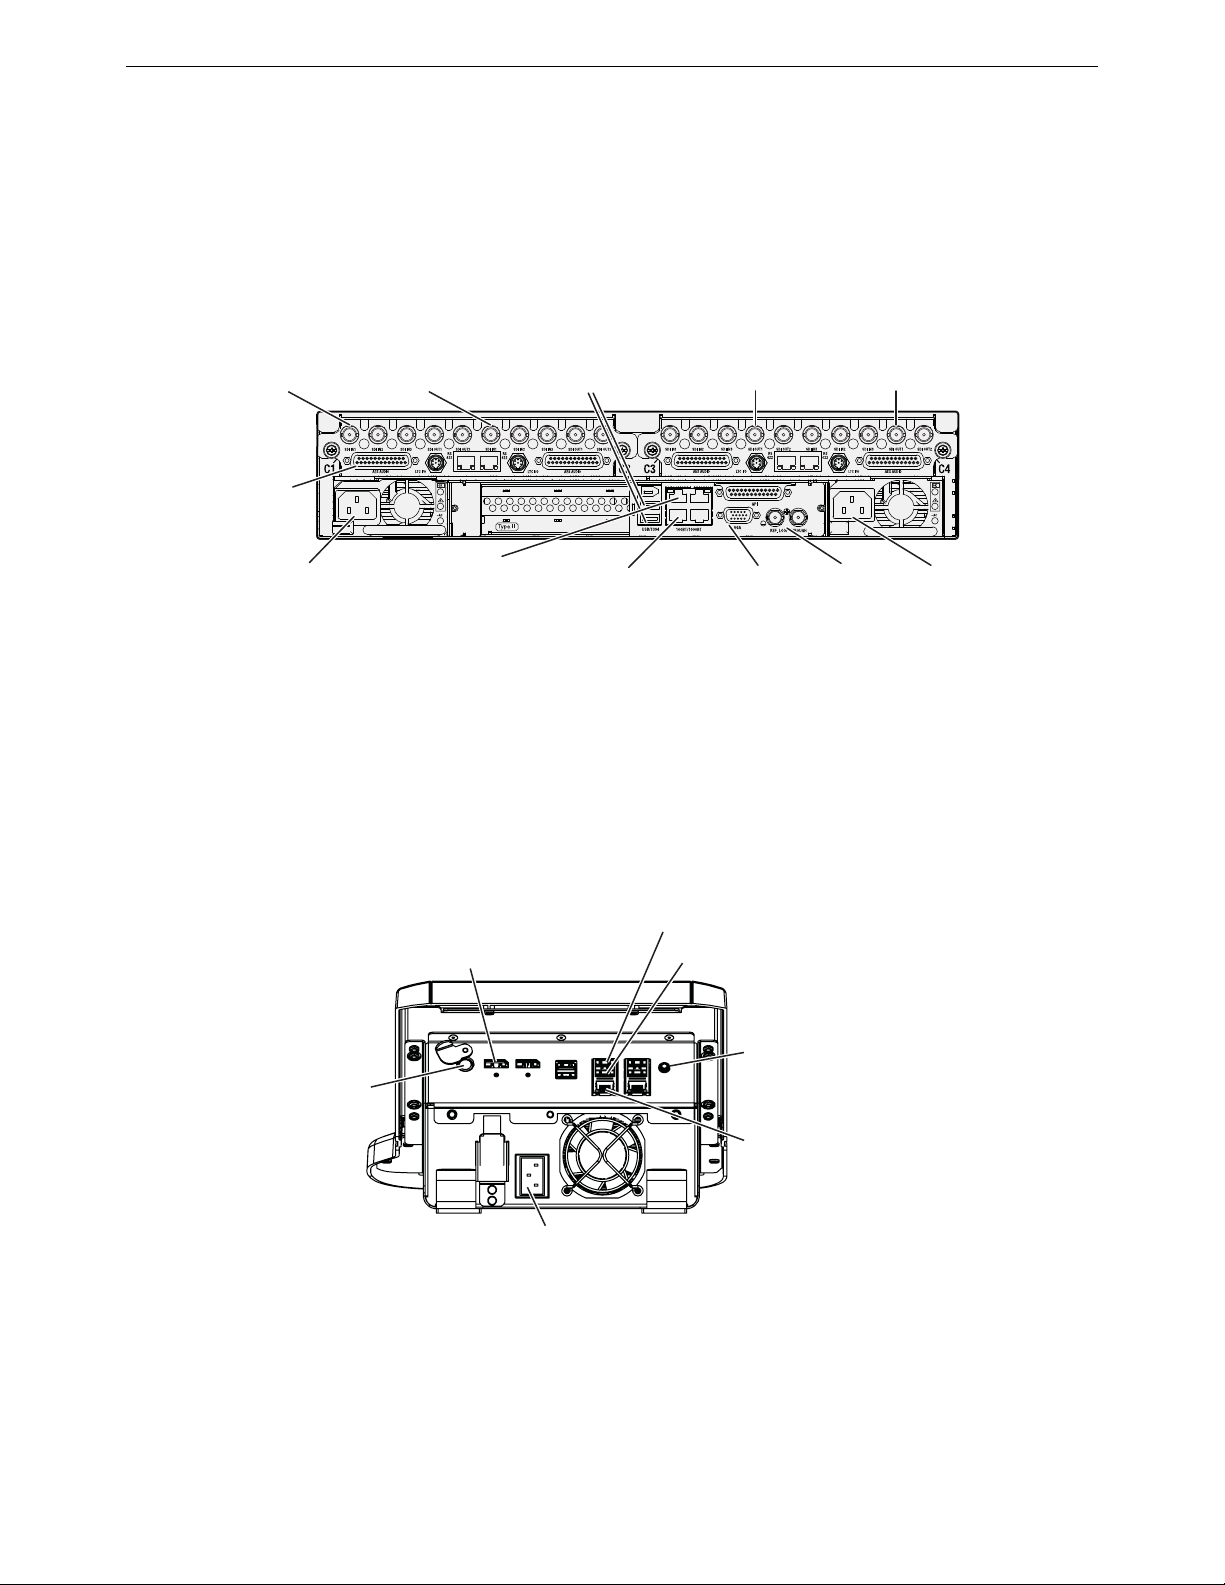
Chapter 1 Installation System cabling
Channels (C1, C2, C3, C4) are bi-directional
Use C1 as record
channel. Connect
C1 SDI in 1
Use C2 as record
channel. Connect
C2 SDI in 1
Use C3 as play
channel. Connect
C3 SDI out 1
Use C4 as play
channel. Connect
C4 SDI out 1
Power
cord
Power
cord
Reference
Loop
AES audio
(1 for each
channel)
Keyboard
and mouse
(2 USB)
VGA
monitor
Ethernet control
connection
Optional:
Ethernet media
(FTP) connection
Power Cord
Power
Standby
Ethernet
(control)
Keyboard
Mouse
Stereo
Audio Out
(1/8 in.)
DisplayPort
(use adapter if connecting
to a DVI or VGA monitor)
System cabling
Cable K2 Summit 3G Client
Make K2 Summit 3G Client cable connections as illustrated.
NOTE: For Ethernet control, use the lower left port (as viewed from the rear).
K2 Dyno S Replay System 10 Quick Start Guide
4 December 2012
Each channel can be both an input (record channel) and an output (play channel). For the
K2 Dyno
S Replay System documented in this Quick Start Guide, C1 and C2 are record
channels and C3 and C4 are play channels.
For complete cabling instructions, refer to the K2 System Guide.
Cable Dyno S Controller
Make Dyno S Controller cable connections as illustrated.
The Ethernet connection between the K2 Summit 3G Client and the Dyno S Controller can
be via direct connect cable or via an Ethernet switch.
Page 11
Chapter 1 Installation System startup
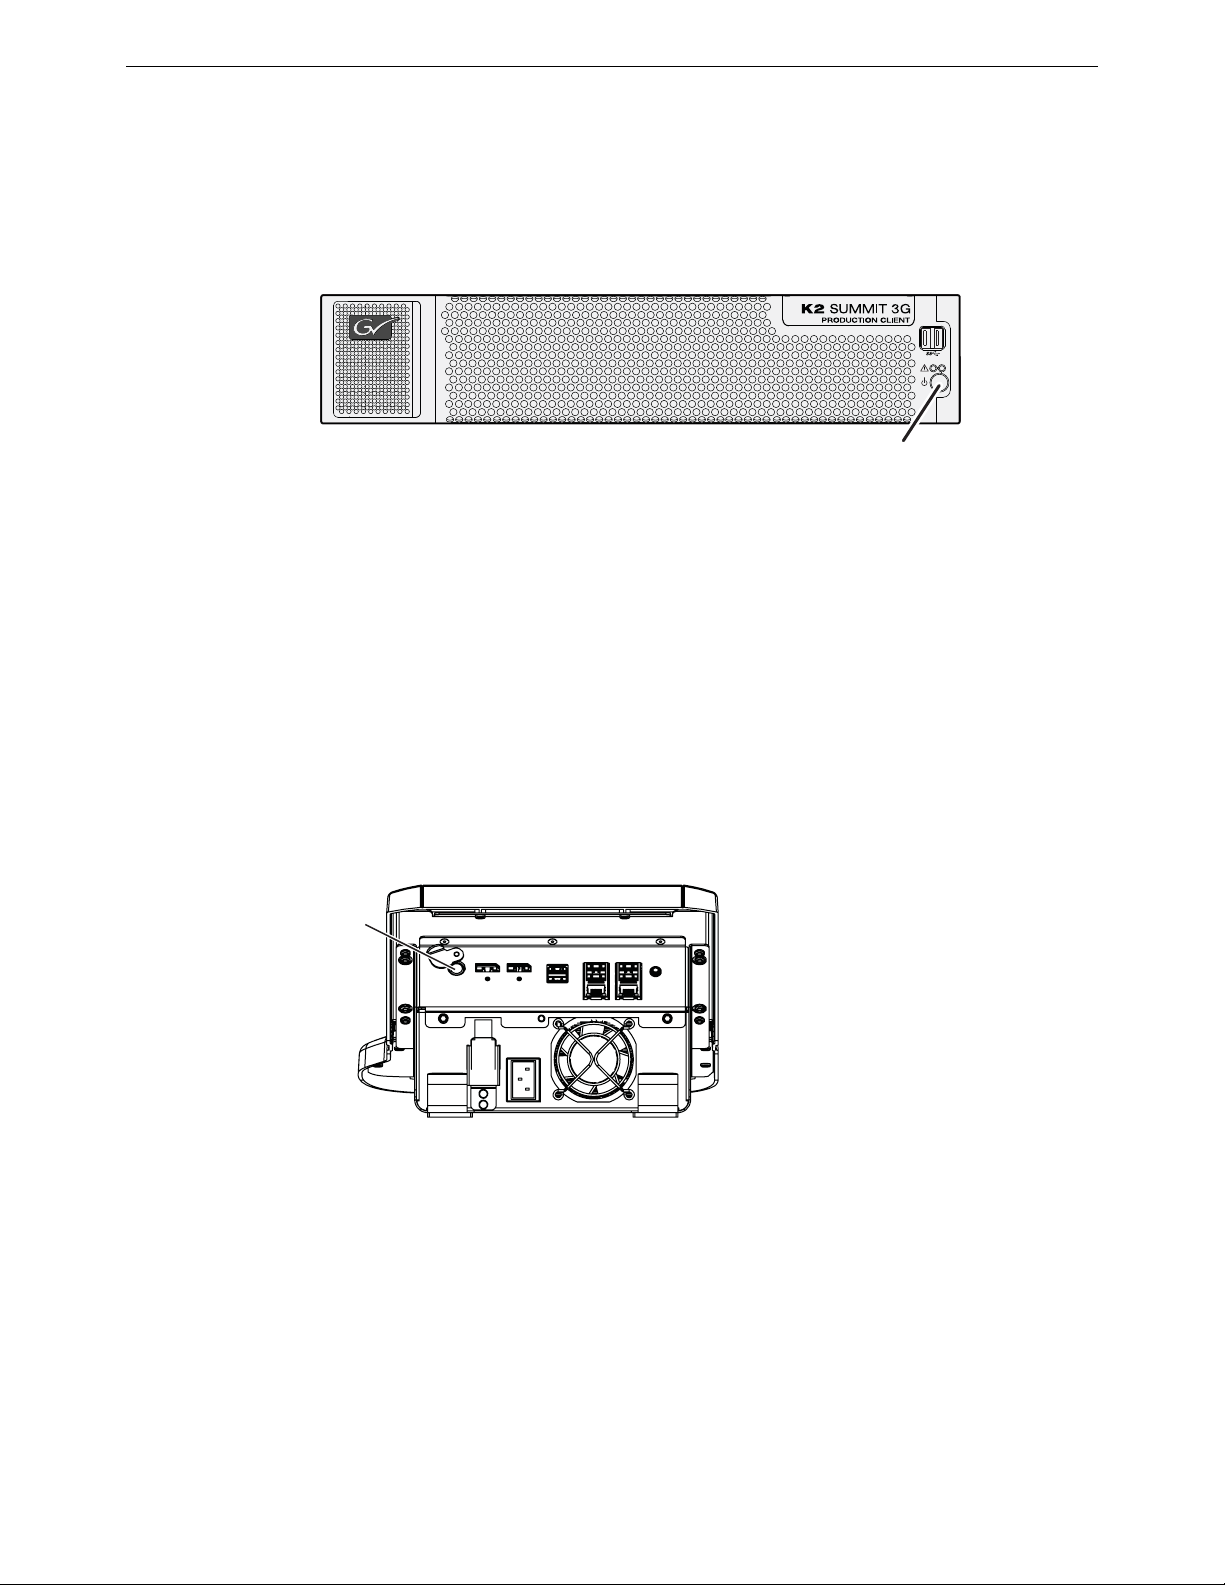
System startup
Start up K2 Summit 3G Client
1. Press the Standby button on the front of the K2 Summit to activate the unit.
8681_03
Press Standby
2. Power up the computer monitor connected to the K2 Summit.
3. Log on to the K2 Summit with the default Windows administrator account:
• Username: Administrator
• Password: adminGV! (The password is case sensitive)
4. At first startup, End User License Agreements appear on the K2 Summit computer
screen. Accept the agreements to continue.
The Power LED goes on and stays on. The Service LED stays off. Startup processes
complete in approximately two minutes and the K2 Summit is ready for connection and
operation.
Start up Dyno S Controller
1. Press the Standby button on the rear of the Dyno S Controller to activate the unit.
Press
Standby
8681_04
2. Power up the computer monitor connected to the Dyno S Controller.
The Dyno S Controller does not require a login, and will boot to the Dyno UI screen.
K2 Dyno S Replay System 11 Quick Start Guide
4 December 2012
Page 12

Chapter 1 Installation Configure network
Configure network
Dyno-Pack Default IP Addresses
A Dyno-Pack, consisting of a Dyno S Controller paired with a K2 Summit(3G)/Solo(3G),
ships with static IP network addressing
Device Default Static IP Address Subnet
Dyno S Controller
K2 Summit system
Configure to facility network
The Dyno-Pack default IP addresses will work if the K2 Summit system and Dyno S
Controller operate on an isolated network. These values will probably need to be changed
to be compatible with your facility’s existing network.
Use standard Windows operating system procedures on both the K2 Summit system and
the Dyno
can also configure a host name if desired.
S Controller to configure each with a static IP address on the same subnet. You
192.168.40.155 255.255.255.0
192.168.40.156 255.255.255.0
Configure K2 Summit system channels
The K2 Summit system channels may need to be configured for your required formats and
resolutions.
1. If necessary, open AppCenter, either by clicking on its icon on the desktop or selecting
the application in the Windows Start menu.
2. Logon to the AppCenter application with the administrator account. If a licensing
message appears, refer to K2 Release Notes.
The default K2 administrator account is the same as the Windows logon:
• Username: Administrator
• Password: adminGV! (The password is case sensitive)
3. Click System / Configuration.The Configuration System pane appears.
K2 Dyno S Replay System 12 Quick Start Guide
4 December 2012
Page 13

Chapter 1 Installation Configure K2 Summit system channels
The Configuration menus have tabs, scroll bars, drop down lists, and buttons that are
used to navigate to and choose various settings (video input format, video output
format, audio, etc.). For this initial setting four Player Recorder channels will be
configured.
4. Click Channel, select the C1 tab, ensure the Player/Recorder type is selected, and then
scroll down and make video and audio settings as appropriate for your input and
output.
K2 Dyno S Replay System 13 Quick Start Guide
4 December 2012
Page 14

Chapter 1 Installation Monitor K2 Summit system video channels
5. Repeat the above step for tabs C2, C3, and C4 so that all four channels are set to
Player/Recorder with appropriate settings.
6. Click OK to exit the Configuration menu.
Selecting which channels will be used for recording and playback is accomplished when a
Dyno session is created.
If using ChannelFlex™ features, refer to the K2 AppCenter User Manual.
Monitor K2 Summit system video channels
Record and playback video can be viewed on the K2 Summit system computer monitor, or
can be viewed using external video monitors.
K2 Summit system computer display monitoring
On the VGA monitor connected to the K2 Summit system, you can mon itor four video
channels. This requires an AppCenter Pro or Elite license. Switching between views can be
accomplished in two ways.
• In AppCenter, click View/Video Monitor to display multi-view video.
• Alternatively, at any time you can double-click on a monitor area in the multi-view or
control screen to switch between views.
External video monitors
Using a facility routing system or video DAs, route duplicates of the K2 Summit system
video inputs and outputs to external monitors.
K2 Dyno S Replay System 14 Quick Start Guide
4 December 2012
Page 15

Chapter 2
Dyno S Controller operation
NOTE: Tutorials on basic operation are available on the Grass Valley video website:
http://video.grassvalley.com/video/k2_dyno_tutorial/
Connect to server and create new session
1
2
3
4
5
1. When you start the Dyno S Controller it does not require a login and will boot to the
Dyno UI screen. The Server List screen will be displayed on the Dyno
touch screen.
2. Select a Server on the list, or touch Add Server and type the name of the Server.
3. Select Connect or Reconnect.
4. Select New Session.
5. Name the session and set Loop Record.
8681_04
6
7
8681_05
S Controller
• Touch the Name button and enter a name for this session.
•Set Loop Record On. This ensures the Server will not become completely filled.
Older unmarked video and audio material will be overwritten with new material.
6. Setup the channels for the session.
K2 Dyno S Replay System 15 Quick Start Guide
4 December 2012
Page 16

Chapter 2 Dyno S Controller operation View Home page status
• Set C1 and C2 to Recorder and C3 and C4 to Player.
•Touch On to activate each channel.
7. Touch Start. The session begins and the Home tab screen appears on the touch screen
and external computer display,
Typically C1 and C2 are recorders and C3 and C4 are players, but these and the Loop
Record settings will vary depending on your specific operational requirements. These
settings, once chosen, are fixed for that session and cannot be changed. Create a new
session if you want to operate the system with different settings.
View Home page status
Touching the Home tab displays the Home page.
At the top of the screen the remaining storage time for this session is displayed. The
remaining storage time is available in terms of an Event Day, taking into account the
available time for all Record channels.
• When Loop Record is On, when the Server becomes filled older unmarked video and
audio material will be overwritten with new material.
• When Loop Record is Off, when the Server fills completely it will stop and all the
material will be retained. If you want a record session that will not overwrite older
material, create a session with Loop Record Off.
K2 Dyno S Replay System 16 Quick Start Guide
4 December 2012
Page 17

Chapter 2 Dyno S Controller operation Select input and playout channels
1
2
8681_06
Select input and playout channels
1. Select A or B to choose which input (camera angle) to assign to the currently selected
playout channel.
2. Select P1 or P2 to choose which playout channel will be controlled by the Dyno S
panel. To gang channels, press both
The Input buttons go Red when assigned to the currently selected playout channel(s), and
go Green when not being controlled by the Dyno panel.
The Playout buttons go Red when selected for control by the panel, and Green when not
selected for control.
P1 and P2 at the same time.
K2 Dyno S Replay System 17 Quick Start Guide
4 December 2012
Page 18

Chapter 2 Dyno S Controller operation Live replay
Live replay
8681_07
1
3 4
2
You can use the Dyno S panel to directly control playback of recently recorded material.
1. Press Live/Local to start Live mode (button lights red).
2. Pressing the Stop (square) and Play (triangle) buttons stops and starts playback. The
Live/Local button lights white. When Play is pressed it lights green. Material
continues to be recorded as the live playback is started and stopped.
3. Moving the T-Bar permits playback speed control. When the T-Bar is moved the
Live/Local button goes white.
• Holding down Fn before moving the T-Bar permits lever adjustment without
changing playback speed, to allow moving the bar to a limit to realign speed
control.
4. Turning the Jog Knob permits scrubbing (forward and backwards playback). The
Live/Local button lights white, and the Play button turns off.
K2 Dyno S Replay System 18 Quick Start Guide
4 December 2012
Page 19

Chapter 2 Dyno S Controller operation Capture clip
45
2
3
1
8681_08
Capture clip
A clip can be captured and saved as a highlight using the Jog Knob.
1. Move the Jog Knob to the first frame of the clip.
2. Press In to mark that timecode in location.
3. Move the Jog Knob to the last frame of the clip.
4. Press Out to mark that timecode out location.
• In and out points can also be marked on-the-fly (without using the Jog Knob)
during live recording with the
5. Press Add HL to save the clip to the Highlight bin of that session. Deleting that session
will also delete highlight clips saved during this session.
• Clips can also be saved to a Library bin (Shift, Add Lib). Clips saved in this manner
go to the Library default bin. Clips saved to the Library are retained if that session
is deleted.
In and Out buttons.
K2 Dyno S Replay System 19 Quick Start Guide
4 December 2012
Page 20

Chapter 2 Dyno S Controller operation Navigate through and manage bins
2
8681_10
1
Navigate through and manage bins
2
1
3
8681_09
1. Touch the HIGHLIGHT tab on the Dyno S touch screen to display the Highlight screen.
2. Touch < or > at the top of the screen to navigate between bins.
3. Touch the center top button go move up one directory (see below).
From this higher directory location you can select a bin and rename it.
1. Touch a bin icon to select it.
2. Touch the lower bin button and enter the new name for that bin directory.
• Identical navigation and bin rename procedures are used on the Library screen.
K2 Dyno S Replay System 20 Quick Start Guide
4 December 2012
Page 21

Chapter 2 Dyno S Controller operation Play highlight clip
• Bin navigation and selection shortcuts:
• To select a bin, enter its number. Example: typing 1 and Enter selects bin 1.
• To select a particular slot inside a bin, type the bin number and the slot number.
Example: typing 1.2 and Enter cues up the second slot in bin 1.
• To select a particular angle, type the bin, slot, and angle number. Example, typing
1.2.3 and Enter selects the third angle of the second slot in bin 1
Play highlight clip
1
8681_11
1. In the Highlight bin, double touch the desired clip to select and load it. When selected
the clip has a blue outline, and when loaded the outline turns orange.
• On the Home tab selecting Auto Play makes clips play automatically when loaded.
K2 Dyno S Replay System 21 Quick Start Guide
4 December 2012
Page 22

Chapter 2 Dyno S Controller operation Create a playlist: Touchscreen
8681_12
2
4
3
1
8681_138681_13
8681_14
2. Touch Cue Up to cue the clip (if necessary).
3. Touch Play to play the clip. The playing clip has a green outline.
4. Use the T-Bar to control the speed of playback.
Create a playlist: Touchscreen
1. Select a clip in a Highlight or Library bin.
K2 Dyno S Replay System 22 Quick Start Guide
4 December 2012
Page 23

Chapter 2 Dyno S Controller operation Touchscreen playlist editing
3
8681_15
2
8681_13
2. Touch Add PL. The clip is added to the current Playlist. Repeat for multiple clips.
3. Touch the PLAYLIST tab to see the added clips.
Touchscreen playlist editing
• To move a clip to a different location, touch that clip on the playlist until the event
turns blue, and then drag it to the new location.
• A brief touch-and-drag will only scroll up or down the playlist.
• To remove a clip from the playlist, touch the clip on the playlist to select it, press the
Shift button on the panel; then touch the REMOVE button on the lower touchscreen.
• To add a pause between all clips in the playlist, touch All Pause. P will be displayed
next to all the clips in the playlist.
• To add the same transition mix effect between all clips in the playlist, touch the All M/E
button twice, and repeat to cycle through all the available effects. M/E
5 will be displayed on the button when selected, and also next to all the clips in
M/E
the playlist.
• To add or change a mix effect between individual clips, touch the button on the right
of the clip in the playlist you wish to transition from, and repeat to cycle through all
the available effects.
1 through
K2 Dyno S Replay System 23 Quick Start Guide
4 December 2012
Page 24

Chapter 2 Dyno S Controller operation Create a playlist: External display
1
Create a playlist: External display
1. Click and drag clips to the playlist in the desired order, from either the Highlights or
Library tab screens.
External display playlist editing
• To move a clip to a different location, drag the clip with the mouse or use the cut/move
or copy/paste soft keys.
• To remove a clip from the playlist, right click on a clip and select Delete.
• To add a pause between all clips in the playlist, click All Pause. P will be displayed
next to all the clips in the playlist.
• To add the same transition mix effect between all clips in the playlist, double click the
All M/E button, and repeat click to cycle through all the available effects. M/E 1
through M/E
• To add or change a mix effect between individual clips, click the button on the right
of the clip in the playlist you wish to transition from, and repeat to cycle through all
the available effects.
• To add a pause to a single event in a playlist, press Fn and touch the corresponding
button to the right of the event.
5 will be displayed next to all the clips in the playlist.
K2 Dyno S Replay System 24 Quick Start Guide
4 December 2012
Page 25

Chapter 2 Dyno S Controller operation Play a playlist
Play a playlist
1
3
8681_17
1. Press PL M/E twice to display the Playlist screen and cue up the first clip in the playlist.
2. Press Play to play the playlist.
2
3. Use the T-Bar at any time to control the speed of playback.
• Press Take/Trim at any time to cue to and play the next clip in the playlist.
• Touch or click Loop at any time on the touch screen or external display to make the
playlist continuously repeat from the first clip in the playlist.
• Pauses and effects can be changed in a running playlist by touching or clicking the
button to the right of the desired clip.
• When any touchscreen tab other than PLAYLIST is selected (HOME, MARK,
HIGHLIGHT, etc), pressing
cued event (whichever was most recent), and pressing
the top of the playlist.
PL M/E twice will cue to the last inserted event or the last
PL M/E three times will cue to
K2 Dyno S Replay System 25 Quick Start Guide
4 December 2012
Page 26

Chapter 2 Dyno S Controller operation Add metadata
3
4
5
6
Add metadata
1
2
8681_18
1. Touch a highlight to select it.
• At any time you can rename a selected clip with the Dyno S keyboard by pressing
Enter <type name> and press Enter again.
2. Click to open the Metadata screen.
3. Touch the star icons to assign a one, two, or three star rating.
• When Auto is selected below, the next metadata category advances automatically.
4. If the highlight has not already been named with the keyboard, touch Name and type
a name for the highlight.
K2 Dyno S Replay System 26 Quick Start Guide
4 December 2012
Page 27

Chapter 2 Dyno S Controller operation Search metadata, existing criteria
2
1
8681_20
5. Select preset keyword names (up to three).
• You can pre-make metadata keywords with the Dyno Keyword Editor application,
which you install on a separate PC. You then import K2 Dyno Editor files (XML)
into the Dyno Controller.
6. Touch Back to return to the Highlight screen. The metadata is displayed for the clip.
Search metadata, existing criteria
1. Touch the SEARCH tab to open the Search screen.
K2 Dyno S Replay System 27 Quick Start Guide
4 December 2012
Page 28

Chapter 2 Dyno S Controller operation Configuration settings
2. Double touch the folder named for your desired search. The results of the search are
shown.
• A selected highlight in the search folder can be cued for playback by touching the
highlight twice, or can be loaded to a playlist by pressing the
panel.
• Different searches can be created by pressing Shift on the panel, touching New on
the touchscreen, and entering and running the new search criteria.
Configuration settings
Add PL button on the
K2 Dyno S Replay System 28 Quick Start Guide
4 December 2012
Page 29

Chapter 2 Dyno S Controller operation Shutdown Dyno S Controller
1
2
3
8681_22
1
2
Touching the Config tab, then Panel opens a screen to adjust Jog knob and
button/touchscreen brightness settings. The
CALIBRATE T-BAR button at the bottom of the
screen opens a screen allowing you to adjust these settings. Tabs for other settings are
available at the top.
Shutdown Dyno S Controller
1. Touch HOME to go to the Home screen.
2. Press SHIFT to enable shifted functions.
3. Touch EXIT. The Exit screen is displayed.
K2 Dyno S Replay System 29 Quick Start Guide
4 December 2012
Page 30

Chapter 2 Dyno S Controller operation Shutdown Dyno S Controller
4. Touch buttons to cycle through the available options.
5. Touch the button to perform the selected exit option.
K2 Dyno S Replay System 30 Quick Start Guide
4 December 2012
Page 31

Chapter 2 Dyno S Controller operation Shutdown Dyno S Controller
Controller buttons: reference
After pressing Shift (button illuminated) After pressing Fn (button illuminated)
Add PL
Add HL
Add item to Playlist
Add item to Highlight
New PL
Add Lib
Create new Playlist
Add item to Library
Add
angle
Add all angles of a clip to a
playlist
Cue Up
A
B
C
D
Play
M1
Stop
Prev.
Next
Live
Mark
Cue & continue
Switch A & continue
Switch B & continue
Switch C & continue
Switch D & continue
Playback 100% speed
(future use)
Stop the playback
Cue previous & continue
Cue next & continue
Go LIVE mode
Add mark
Match
E
F
G
H
Fast
M2
Open
Prev.
Next
Local
Brws
Match frame to record train
Switch E & continue
Switch F & continue
Switch G & continue
Switch H & continue
Fast Jog mode On/Off
(future use)
Open the bin or Playlist
Cue an asset
Rewind cue previous & stop
Cue next & stop
(If using Browse on a SAN)
Display Home screen
Open Browse menu
Cue Up
A/E
B/F
C/G
H/D
Play
Prev.
Next
Cue & stop
Cue In point & continue
Cue In point & continue
Cue In point & continue
Cue In point & continue
Play in preset speed
C
ue previous & stop
C
ue next & stop
P1
Select P1-ch (Gang Off)
PGM
On-air preview mode/
P1
Channel offer up/toggle.
Multi-channel mode toggle
P2
Select P2-ch (Gang Off)
PVW
On-air preview mode/
P2
Channel offer up/toggle.
Multi-channel mode toggle
PL
Display Playlist
M/E
Flying M/E On/Off
(Press 3 times to cue to
beginning of a playlist.)
Goto
In
Out
Take
Open goto window
Mark In
Mark Out
Close, skip. In Pgm/Pvw
Send
Top
Btm
Trim
Transfer
Go to the beginning of the item
Go to the end of the item
Enter trim mode, Cancel
In
Out
Take
Clear Mark In
Clear Mark Out
Swap channel contents
mode push to air.
K2 Dyno S Replay System 31 Quick Start Guide
4 December 2012
Page 32

Chapter 2 Dyno S Controller operation Shutdown Dyno S Controller
Pressing P1, P2 at the same time (both buttons illuminate Red)
P1, P2
Hold down Fn button while selecting clips
P1/P2 Gang on
+ select clip
Multiselect
Pressing PL with PLAYLIST tab selected.
Press
twice
Press 3
times
Pressing PL with any tab other than PLAYLIST selected (HOME, MARK,
HIGHLIGHT, etc,)
Press
twice
Press 3
times
Select multiple clips. Order of selection is used to establish order.
Cue to beginning of a playlist.
Same as above, cue to beginning of a playlist.
Cue to the last inserted event or the last cued event (whichever
was most recent), and touchscreen goes to PLAYLIST screen.
Cue to beginning of a playlist, and touchscreen goes to
PLAYLIST screen.
K2 Dyno S Replay System 32 Quick Start Guide
4 December 2012
Page 33

Index
A
Add HL button
save clip 19
Add Lib button
save clip 19
All M/E button
use to select effects 24
B
basic operation tutorials 15
bin management 20
bins
navigation 20
button color
Input button 17
Playout button 17
C
cabling
Dyno S 10
K2 Summit 3G Client 10
capture clip 19
channel configuration
K2 Summit system 12
clip
play 21
computer display monitoring
K2 Summit system 14
connect to server 15
create playlist
using external display 24
using touchscreen 22
Cue Up button 22
D
documentation online 4
Dyno Keyword Editor application 27
Dyno S
cabling 10
contents 8
shutdown 29
Dyno-Pack system overview 9
end user supplied items 8
external monitors on K2 Summit system 14
F
facility network
configuration 12
FAQ database 4
Fn button
T-Bar realignment 18
frequently asked questions 4
G
Grass Valley web site 4
H
highlight
play 21
Home page status 16
I
input channel
select 17
IP addresses
default 12
J
Jog Knob
mark in out points 19
use during clip capture 19
use during live playback 18
K
K2 Summit 3G Client
cabling 10
contents 7
K2 Summit system
channel configuration 12
computer display monitoring 14
external video monitors 14
user name and password 11
video monitoring 14
keywords 27
E
effects
selecting with M/E button 24
K2 Dyno S Replay System 33 Quick Start Guide
4 December 2012
L
live replay 18
Page 34

Index
logon
K2 Summit system 11
Loop Record 15
Off 16
On 16
M
metadata
Dyno Keyword Editor application 27
keywords 27
search 27
star rating 26
monitoring 14
N
navigating through bins 20
network
configuration 12
O
online documentation 4
P
password
K2 Summit system 11
play a playlist 25
Play button
use during clip playback 22
use during live playback 18
use during playlist playback 25
play highlight clip 21
playlist
create with external display 24
create with touchscreen 22
play 25
playlist editing
using external display 24
using touchscreen 23
playout channel
select 17
R
remaining storage time 16
to HIghlight bin 19
to Library bin 19
search metadata 27
select input channel 17
select playout channel 17
server
connect to 15
session
create new 15
shutdown Dyno S 29
software download from web 4
star rating 26
Stop button
use during live playback 18
system overview
Dyno-Pack 9
system startup 11
T
Take/Trim button
use during playlist playback 25
T-Bar
use during clip playback 22
use during live playback 18
use during playlist playback 25
T-Bar realignment
Fn button 18
tutorials
Grass Valley website 15
video 15
U
user name
K2 Summit system 11
V
video monitoring
K2 Summit system 14
W
web site documentation 4
web site FAQ database 4
web site Grass Valley 4
web site software download 4
S
save clip
K2 Dyno S Replay System 34 Quick Start Guide
4 December 2012
 Loading...