

Grandstream Networks GXE5024 User Manual

GXE502x User Manual 2/26/2008
GXE5024 Users Manual
Version .02
1

GXE502x User Manual 2/26/2008
Table of Contents
1. INTRODUCTION.................................................................................................................................................................4
Equipment Packaging...........................................................................................................................................................4
2. ADMINISTERING EXTENSIONS ON THE GXE................................................................................................................4
Using the Express Setup wizard to create extensions and auto-provision phones......................................................4
Using the Phone Extensions menu to create, modify, view, and delete extensions.....................................................5
Busy Lamp Field and Message Waiting Indication............................................................................................................6
3. CONFIGURING TRUNKS ON THE GXE...........................................................................................................................7
Configuring internal PSTN trunks via FXO ports...............................................................................................................7
Configuring internal phone/fax devices via FXS ports .....................................................................................................8
Configuring SIP trunks.........................................................................................................................................................9
Configuring external PSTN trunk gateways via SIP........................................................................................................11
4. CONFIGURING CONFERENCE BRIDGES.....................................................................................................................12
View conference bridge statuses......................................................................................................................................12
Assign extension numbers and passwords to conference bridges..............................................................................13
5. CONFIGURING RING GROUPS......................................................................................................................................13
Viewing ring groups............................................................................................................................................................13
Adding and modifying ring groups...................................................................................................................................13
6. CONFIGURING AUTO-ATTENDANTS............................................................................................................................15
Configuring auto-attendant menus...................................................................................................................................15
Configuring time-based playing rules for auto-attendants ............................................................................................17
7. CALL QUEUES ................................................................................................................................................................18
Setting up In-Queue Announcements...............................................................................................................................18
Setting up Agents ..............................................................................................................
Add an Agent.......................................................................................................................................................................18
Call Queues..........................................................................................................................................................................19
Add a Call Queue ................................................................................................................................................................19
Version .02
.................................................18
2

GXE502x User Manual 2/26/2008
8. SYSTEM CONFIGURATION............................................................................................................................................21
Configuring network settings............................................................................................................................................21
Setting the LAN-port IP address:......................................................................................................................................21
Configuring DHCP:...........................................................................................................................................................21
Setting the WAN-port IP address:.....................................................................................................................................22
Enabling/disabling WAN-side HTTP access:....................................................................................................................22
Placing a LAN-side device in the DMZ:............................................................................................................................22
Using Dynamic DNS:........................................................................................................................................................22
Configuring port forwarding: .............................................................................................................................................23
Configuring system settings..............................................................................................................................................23
Setting the web UI login password:..................................................................................................................................23
Storing administrator contact and information:.................................................................................................................23
Setting SIP IP and port:....................................................................................................................................................24
Using STUN for NAT traversal:.........................................................................................................................................24
Enabling voicemail-to-email:.............................................................................................................................................24
Configuring a Call Detail Record server: ..........................................................................................................................24
Setting the system time: ...................................................................................................................................................24
Selecting Music on Hold source:......................................................................................................................................25
Setting mailbox storage quota:.........................................................................................................................................25
Setting feature codes..........................................................................................................................................................25
Uploading voice prompts and configuration templates .................................................................................................27
Upgrading firmware............................................................................................................................................................27
Backing up and restoring configuration files ..................................................................................................................27
Rebooting and resetting to default ...................................................................................................................................28
Configuring Syslog logging...............................................................................................................................................28
9. CONFIGURING PEER PBX SYSTEMS...........................................................................................................................29
Viewing peer systems.........................................................................................................................................................29
Adding and modifying peer systems................................................................................................................................29
10. VIEWING GXE STATUS AND REPORTING INFORMATION.......................................................................................30
GXE current status information.........................................................................................................................................30
System and call reports......................................................................................................................................................31
11. CONFIGURING VOICEMAIL..........................................................................................................................................33
Version .02
3

GXE502x User Manual 2/26/2008
1. Introduction
Thank you for purchasing the Grandstream GXE502x IP-PBX, a SIP-based, affordable, high-quality
converged communications platform designed to enhance small to medium business enterprises.
The GXE502x is capable of providing the cutting-edge IP-based communications to businesses
demanding the latest of technologies, while leveraging existing infrastructure and providing a most
friendly transition into IP telephony for others. Supporting open-standard SIP, the GXE502x can
easily integrate into and interoperate with other components of your IP-based communications
network while providing a rich set of features to reduce costs and increase productivity. Built-in FXO
and FXS ports enable the GXE502x to interface with analog lines and devices while concurrently
registering to SIP trunks and SIP-based trunk gateways to maximize available communications
resources.
An auto-provisioning Express Setup wizard and an intuitive user interface allow the GXE502x to be
set up and installed quickly and confidently. Voicemail, voicemail-to-email, conference bridges, and
other enhanced features can be enabled and functioning with just minimal effort via user-friendly web
configuration pages. Its broad feature set, ease of operation, and quality and value makes it ideal for
any business communication environment.
- Equipment Packaging
The GXE502x IP-PBX package contains:
1) One GXE502x IP-PBX unit
2) One 12 Volt power adapter
3) One Ethernet cable
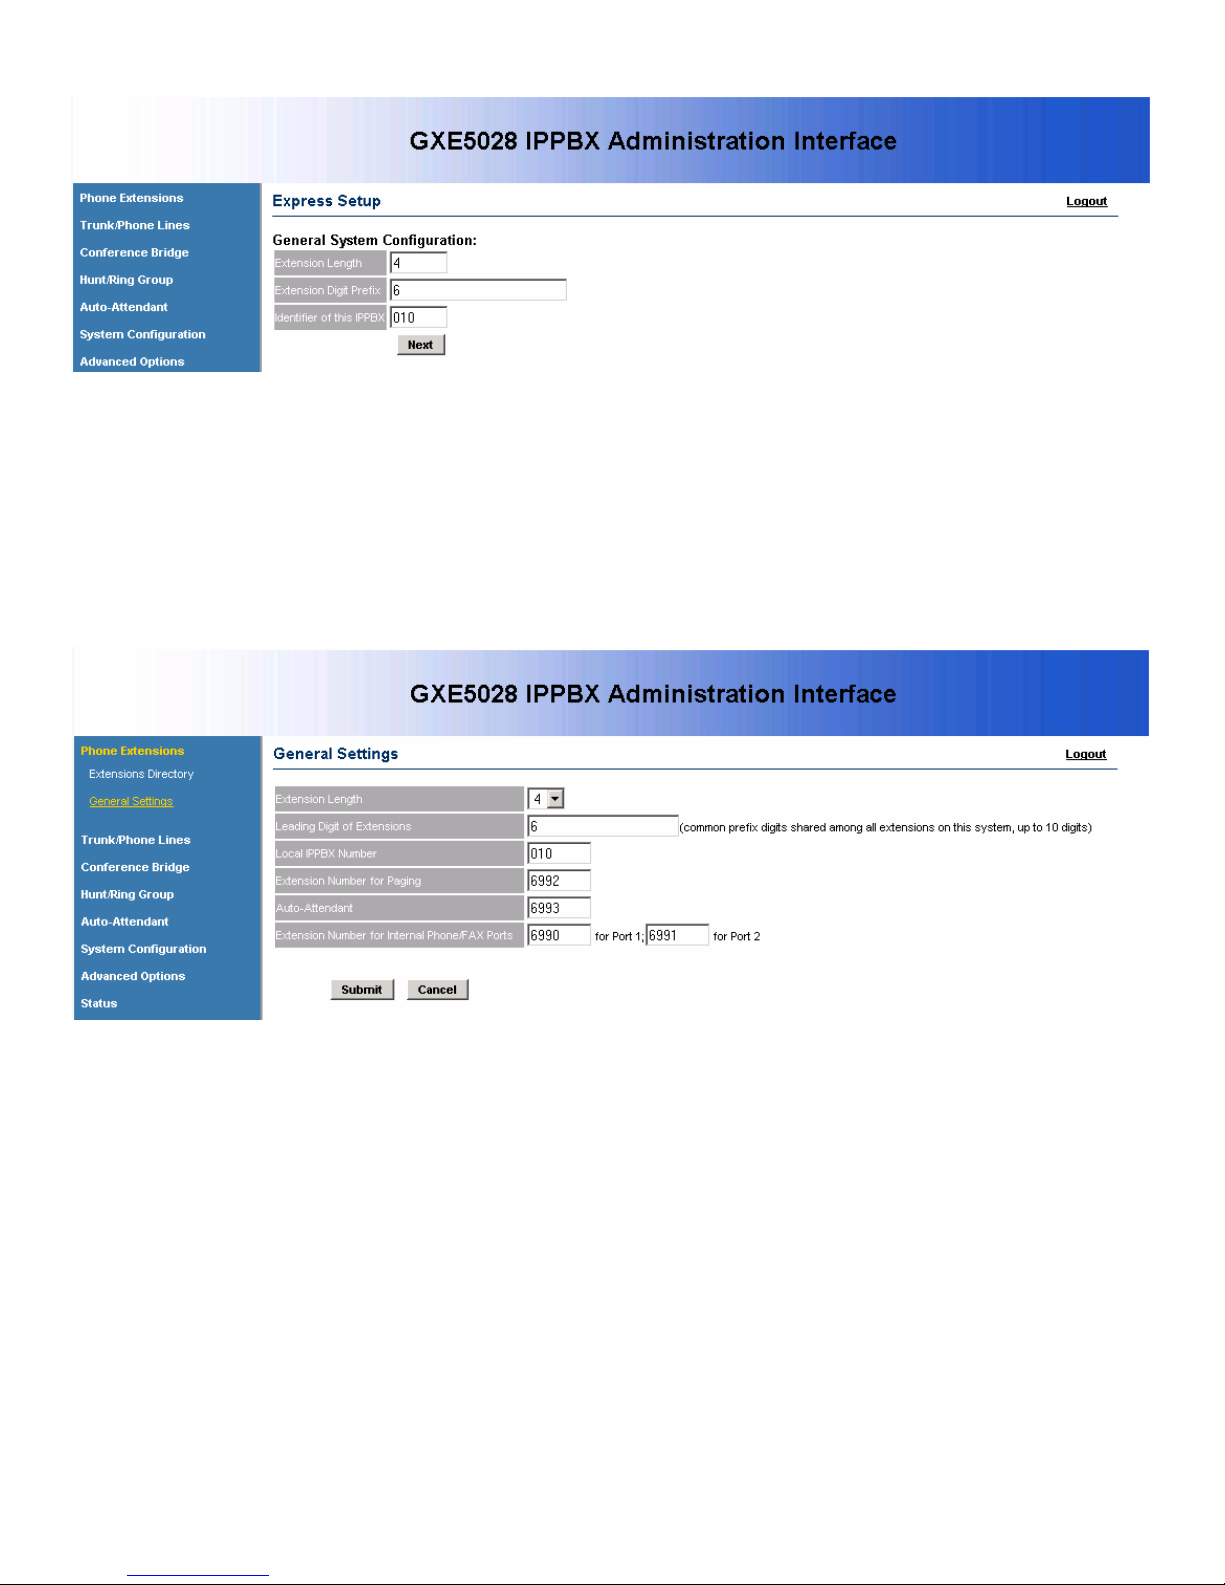
2. Administering Extensions on the GXE
Extensions for the internal users can be created from the Express Setup menu of a factory-default
GXE, or from the Phone Extensions menu at any time. This can be local users in the internal
network, or even remote users connecting over the open Internet. This flexibility allows users to have
their office extension with them virtually anywhere, keeping accessibility to personnel high without
incurring any PSTN toll charges for the worker at home or the road-warrior.
The Express Setup provides a quick wizard to complete initial setup of all extensions on a new
system, including auto-provisioning of the phones. The Phone Extensions menu allows you to add,
batch add, modify, reboot, delete and batch delete extensions.
- Using the Express Setup wizard to create extensions and auto-provision phones.
4
Version .02
GXE502x User Manual 2/26/2008
The Express Setup wizard will allow you to set various system extensions on the GXE and
create your phone extensions. It will also auto-provision your phones with the extensions
you create. Please refer to the GXE Quick Start Guide for detailed instructions on setting
up your GXW with the Express Setup wizard.
- Using the Phone Extensions menu to create, modify, view, and delete extensions.
In the General Settings section, the following settings can be set.
Extension Length: all extensions must have the number of digits specified here.
Leading Digit of Extensions: all extensions must begin with this digit.
Local IPPBX Number: a unique identifier number for this local GXE system.
Extension Number for Paging: users may dial this number for group paging.
Auto-Attendant: set the extension to reach the auto-attendant menu here.
Extension Number for Internal Phone/FAX ports: Set the extension number for the TEL1
and TEL2 FXS ports on the back of the GXE here.
When finished, click on the Submit button to save your changes or Cancel to discard.
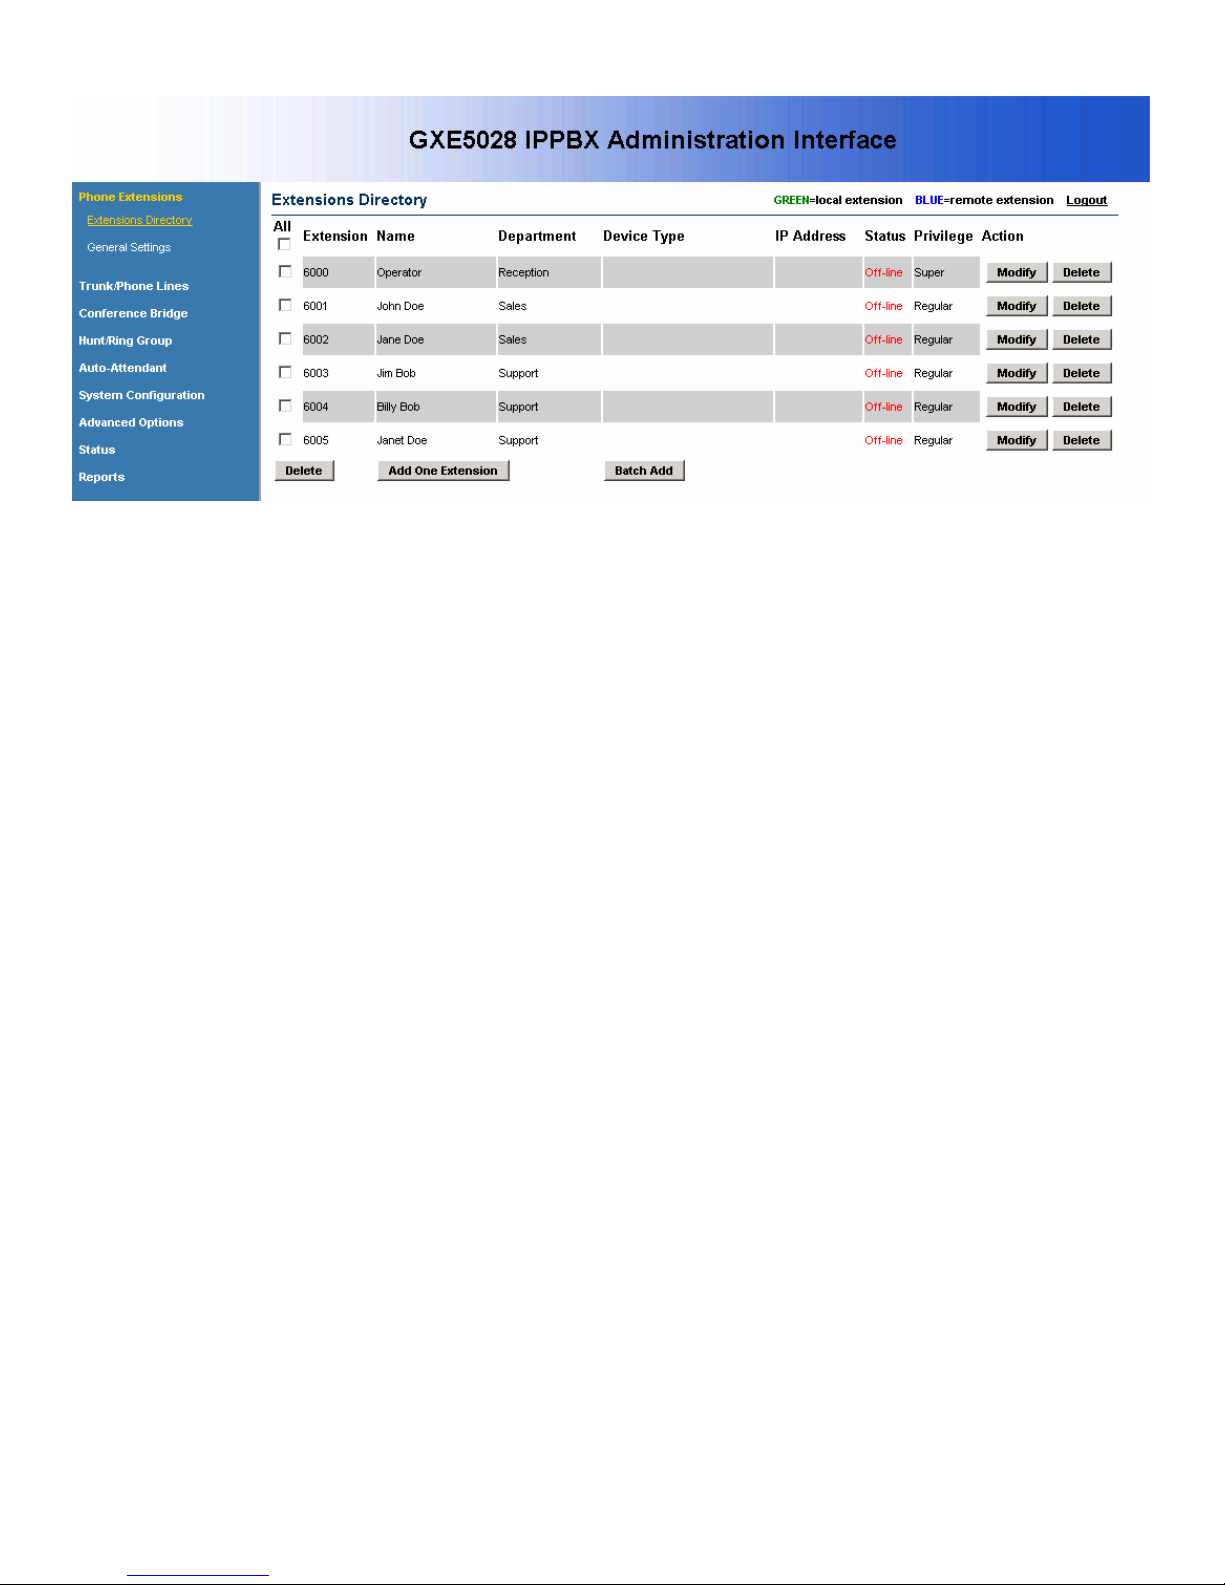
In the Extensions Directory section, all SIP phone extensions configured on the GXE, their
details, and their registration status are displayed. The following actions can be performed
in this section.
Version .02
5
GXE502x User Manual 2/26/2008
Add an extension: Click on the Add One Extension button. The extension details page
will be displayed, allowing you to set all of the extension’s settings. When done, click on
the Submit button to add the extension or Cancel to go back.
Batch add extensions: Click on the Batch Add button. The next page allows you to
specify the range of extensions to add, as well as some general extension settings to
apply to them. You may go back to the extensions directory and modify the extensions
to set extension-specific settings. When done, click on the Submit button to add the
extensions or Cancel to go back.
Modify and/or reboot a SIP extension: Click on the Modify button to the right of the row
displaying information for the extension you wish to modify. The extension details page
will be displayed, allowing you to modify all of the ext ension’s settings. To reboot the
phone, set the Reboot Peer setting to “Yes”. When done, click on the Submit button to
modify and/or reboot the extension or Cancel to go back.
Delete: Click on the Delete button on the far right of the row displaying the information
for the extension you wish to delete. You will be prompted for confirmation via a dialog
box; click OK to confirm or Cancel to go back.
Batch delete: Delete multiple extensions in one step by checking each checkbox of all
extensions to be deleted, and clicking on the Delete button below the column of
checkboxes. To check all displayed extensions on the current page, check the
uppermost checkbox, labeled as “All”. Note that this only affects extensions on the
current page; extensions on other pages will not be deleted. You will be prompted for
confirmation via a dialog box; click OK to confirm or Cancel to go back.
- Busy Lamp Field and Message Waiting Indication
Busy Lamp Field (BLF) support and Message Waiting Indication (MWI) support are enabled
on the GXE. New voicemail messages will automatically trigger an MWI light on phones
that support it to notify the user of new voicemail messages. To monitor the statuses of
other users on the GXE, configure BLF keys on an IP phone to the extension numbers of
Version .02
6
GXE502x User Manual 2/26/2008
the users to be monitored. The GXE will trigger the BLF keys to signal when the monitored
user is idle, has a call ringing, or is busy.
3. Configuring Trunks on the GXE
PSTN trunks via the FXO ports, SIP trunks, and SIP-based PSTN trunk gateways can be configured
on the GXE in the Trunk/Phone Lines menu. Also, the FXO and FXS port line electrical settings can
be configured here as well. This will allow users on the GXE to call destinations anywhere through
the trunks configured on the GXE.
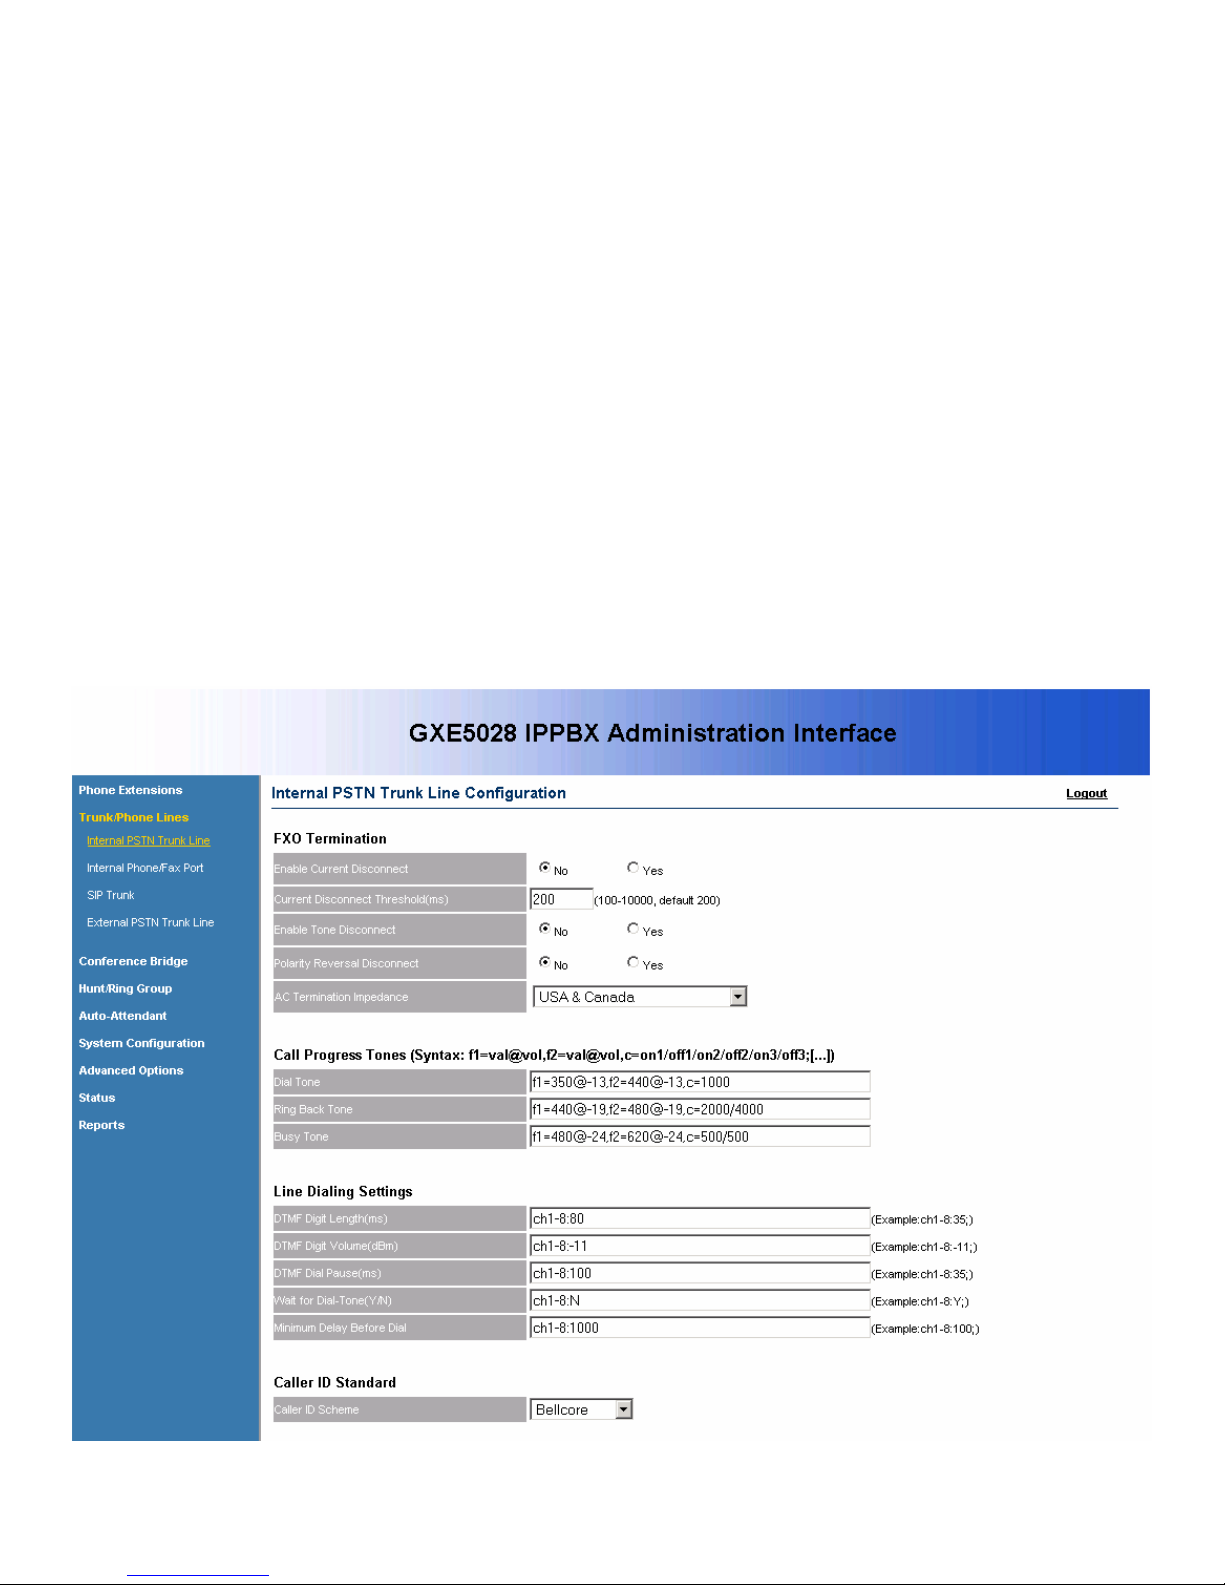
- Configuring internal PSTN trunks via FXO ports
In the Internal PSTN Trunk Line section, the FXO ports on the back of the GXE can be
configured to interface with and send/receive calls to/from the PSTN.
Compatibility with PSTN lines can be achieved by adjusting the following types of settings.
The default settings should function in most cases, depending on your regional PSTN line
characteristics.
Version .02
7
GXE502x User Manual 2/26/2008
FXO Termination: Specify line disconnect signaling and impedance.
Call Progress Tones: Configure tones to match regional settings.
Line Dialing Settings: Adjust line dialing properties to adhere to PSTN line requirements.
Caller ID Standard: Set caller ID handling to match PSTN settings.
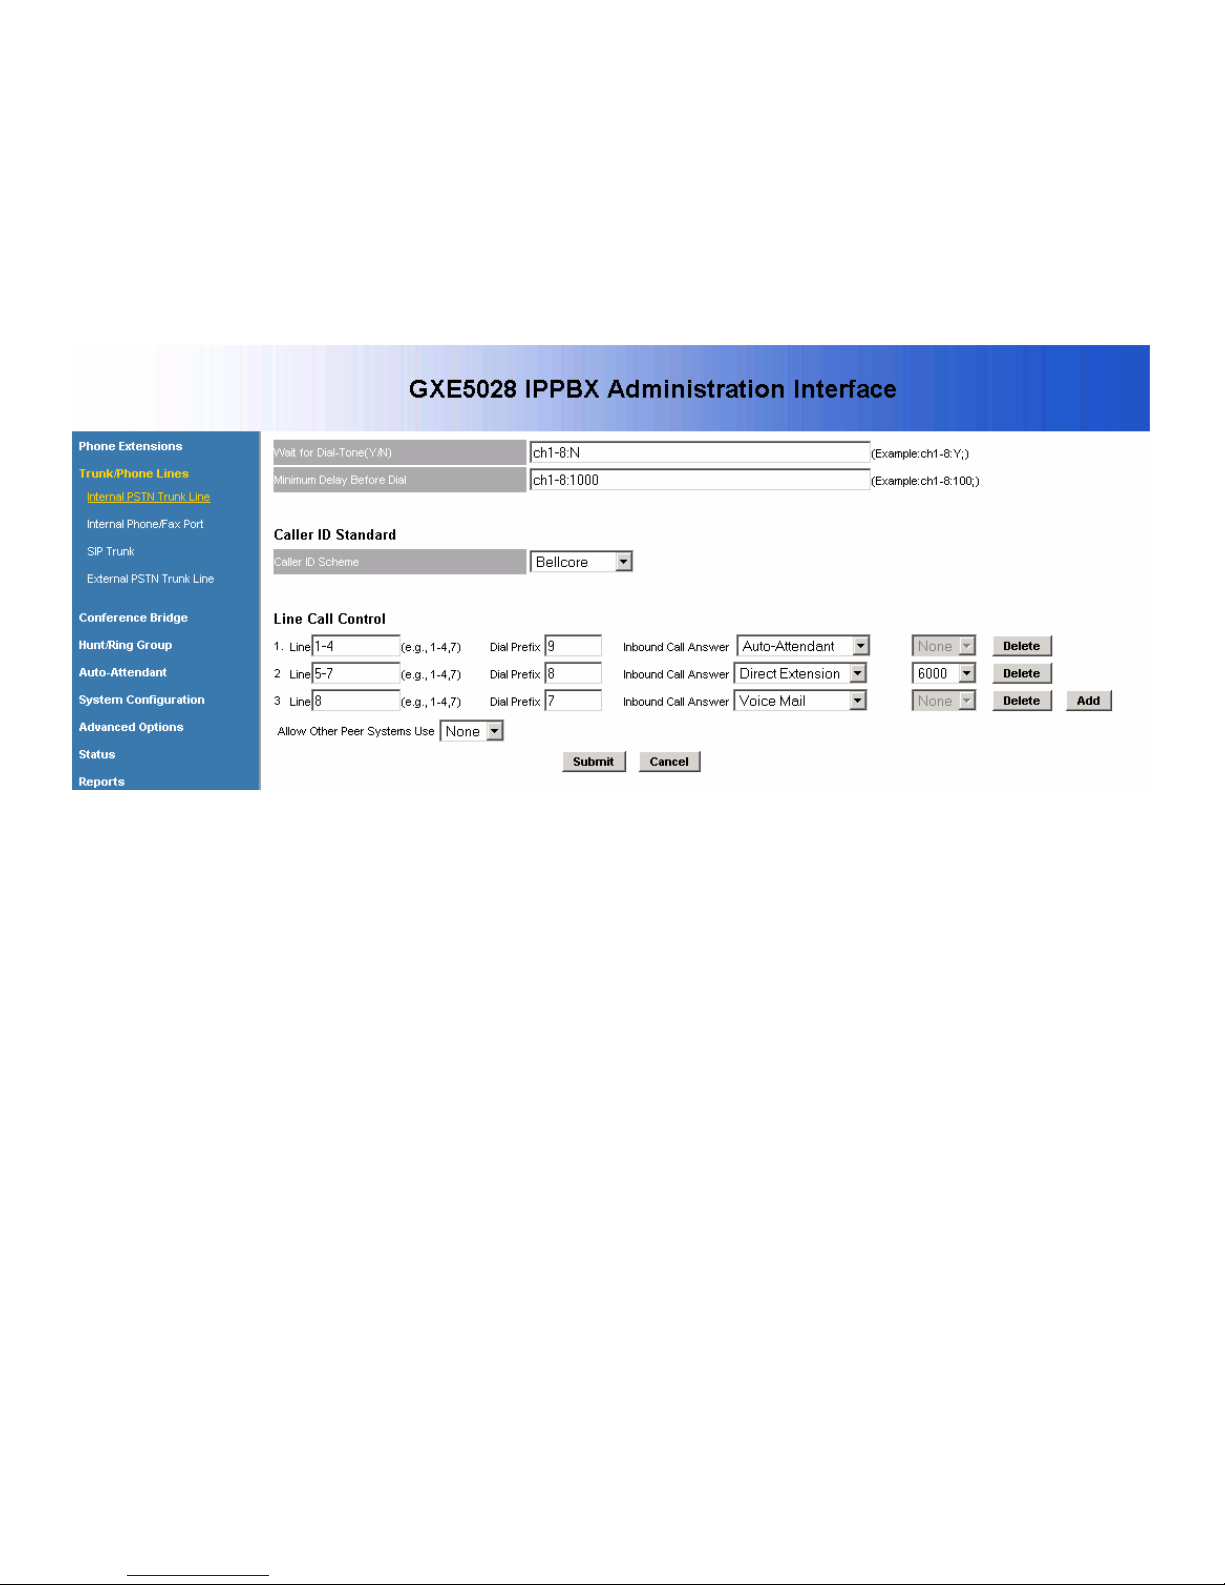
The following Line Call Control settings allow you to specify how inbound and outbound
calls are to be handled.
Line: Specify a port or a range of ports to apply the same line call control rule to.
Dial Prefix: Configure the prefix digit on outbound calls to specify this trunk. When the
call is sent out via this trunk, the prefix digit is removed.
Inbound Call Answer: In the first drop-down box of each row, select the type of
destination for inbound calls on this trunk. Select the exact destination of that type in
the second drop-down box, if applicable.
Delete: Delete an existing line call control rule.
More: Allow another line call control rule to be set.
Allow Other IPPBX Use: Allow other peered IPPBXs to dial through the local GXEs
internal PSTN trunks.
When finished, click on the Submit button to save your changes or Cancel to discard.
- Configuring internal phone/fax devices via FXS ports
In the Internal Phone/Fax Port section, the line electrical and DTMF signaling settings of
the FXS ports on the back of the GXE can be configured for compatibility with analog
phone/fax devices. The extension numbers for these ports are set in the Phone
Extensions menu, under the General Settings section.
Version .02
8
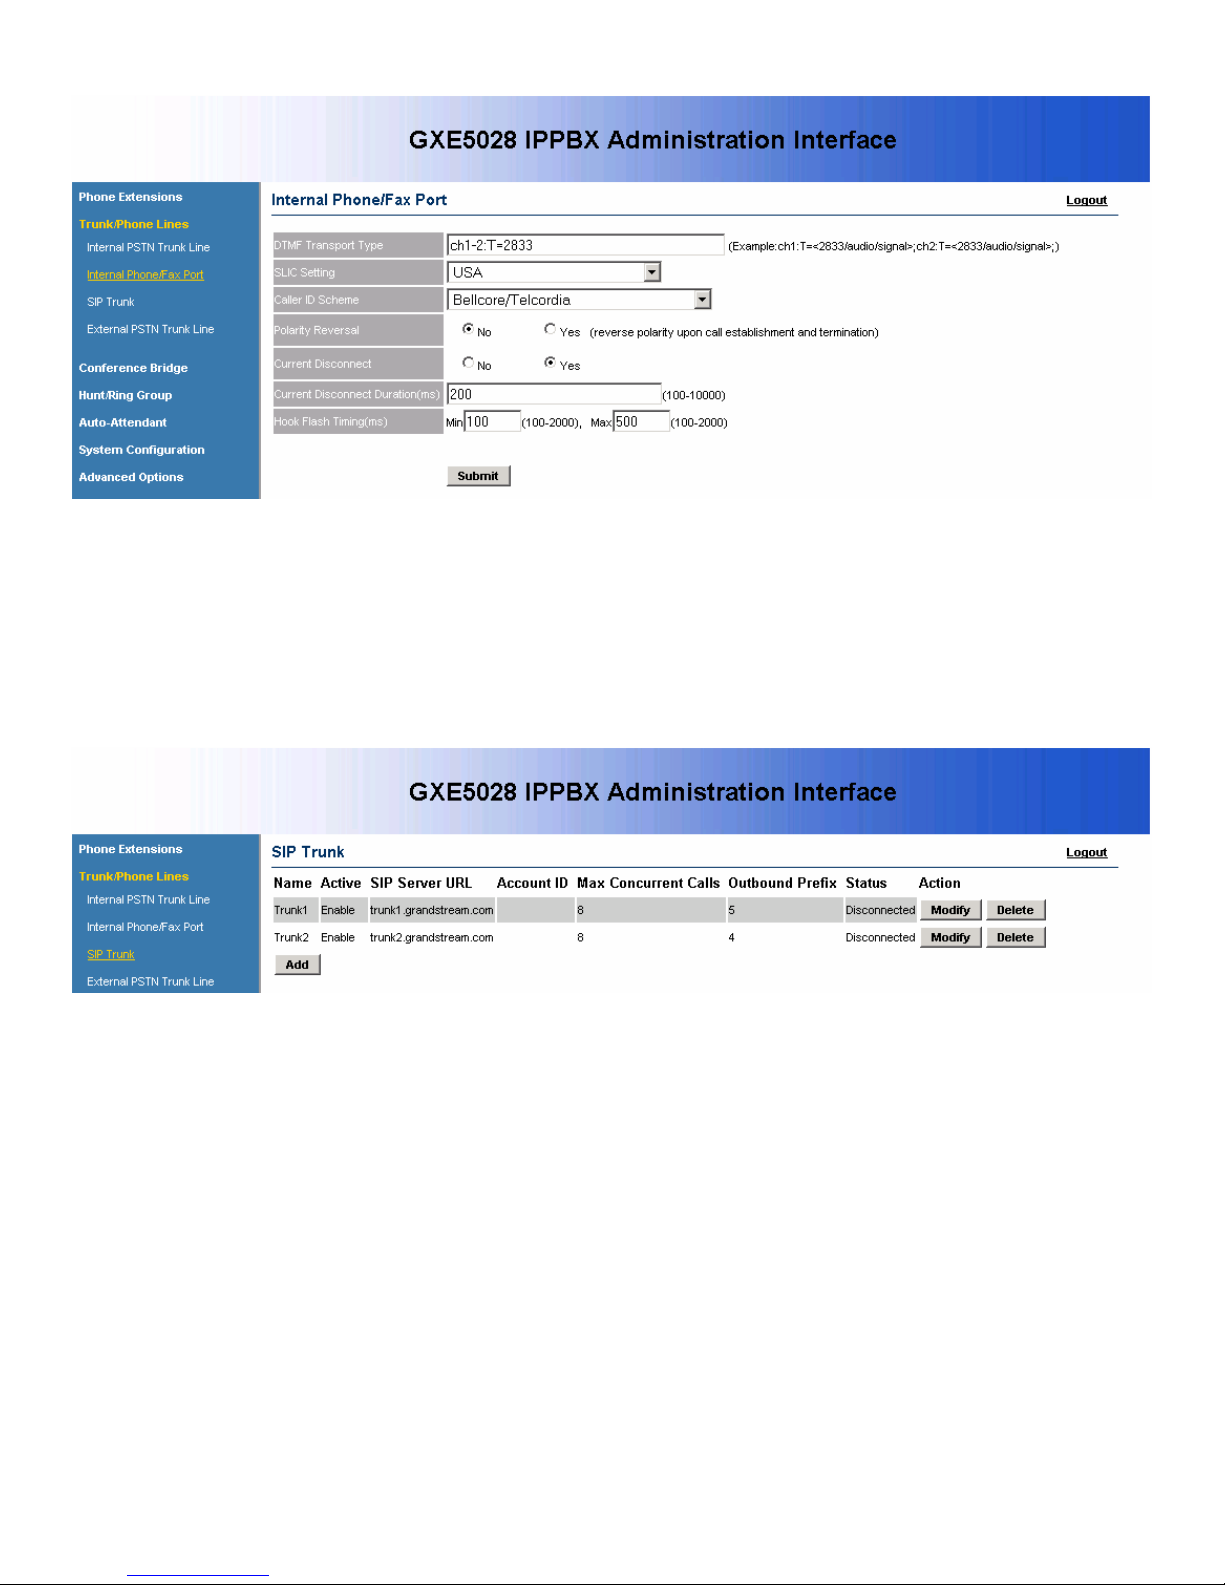
When finished, click on the Submit button to save your changes.
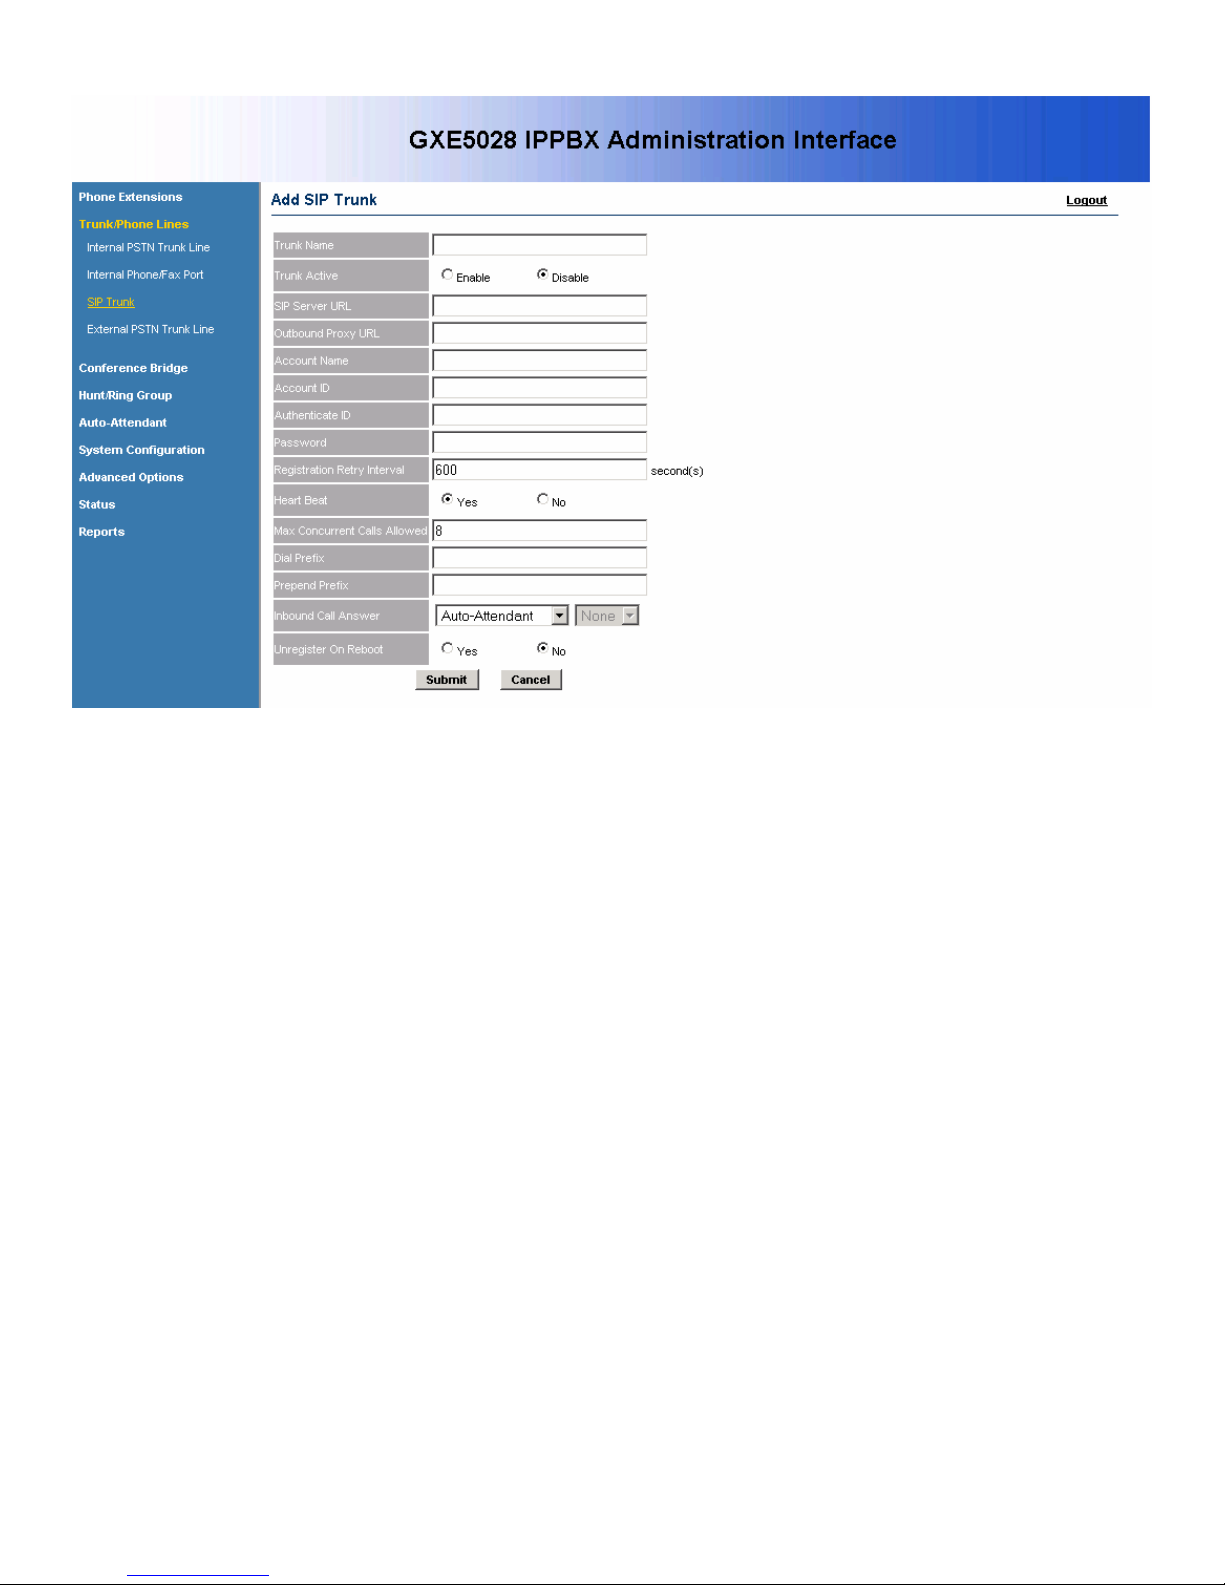
- Configuring SIP trunks
In the SIP Trunk section, SIP trunks can be viewed, created, or modified. All configured
SIP trunks as well as their details and current status are displayed. The following actions
can be performed in this section.
GXE502x User Manual 2/26/2008
Version .02
Add: Click on the Add button. The SIP trunk details page will be displayed, allowing
you to enter SIP account registration information.
9
GXE502x User Manual 2/26/2008
Enable the trunk: Enter a descriptive name in the Trunk Name field, and set Trunk
Active to Enable.
Set SIP registration: Enter the SIP server and, if available, outbound proxy
information along with SIP account and password details. Set the registration
expiration time in the Registration Retry Interval setting, and set Heart Beat to Yes to
Enable or disable availability detection of the remote end (requires compatibility on
the remote end)..
Outbound call handling: Set the Max Concurrent Calls Allowed to prevent too many
concurrent attempts to send calls out this trunk.
Set the Dial Prefix digit to specify an outbound call to be dialed through this trunk.
When the call is sent out via this trunk, the dial prefix digit is removed.
The Prepend Prefix setting allows a prefix to be automatically added by the GXE to
the outbound dialed digits.
Inbound call handling: Set the destination to route incoming calls on this trunk to.
Set Unregister on Reboot to Yes if the SIP server allows it.
When done, click on the Submit button to add the extension or Cancel to go back.
Version .02
10
GXE502x User Manual 2/26/2008
Modify: Click on the Modify button to the right of the row displaying information for the
SIP trunk you wish to modify. The SIP trunk details page will be displayed, allowing you
to modify all of the SIP trunk’s settings. When done, click on the Submit button to save
your changes or Cancel to go back.
Delete: Click on the Delete button on the far right of the row displaying the information
for the SIP trunk you wish to delete. You will be prompted for confirmation via a dialog
box; click OK to confirm or Cancel to go back.
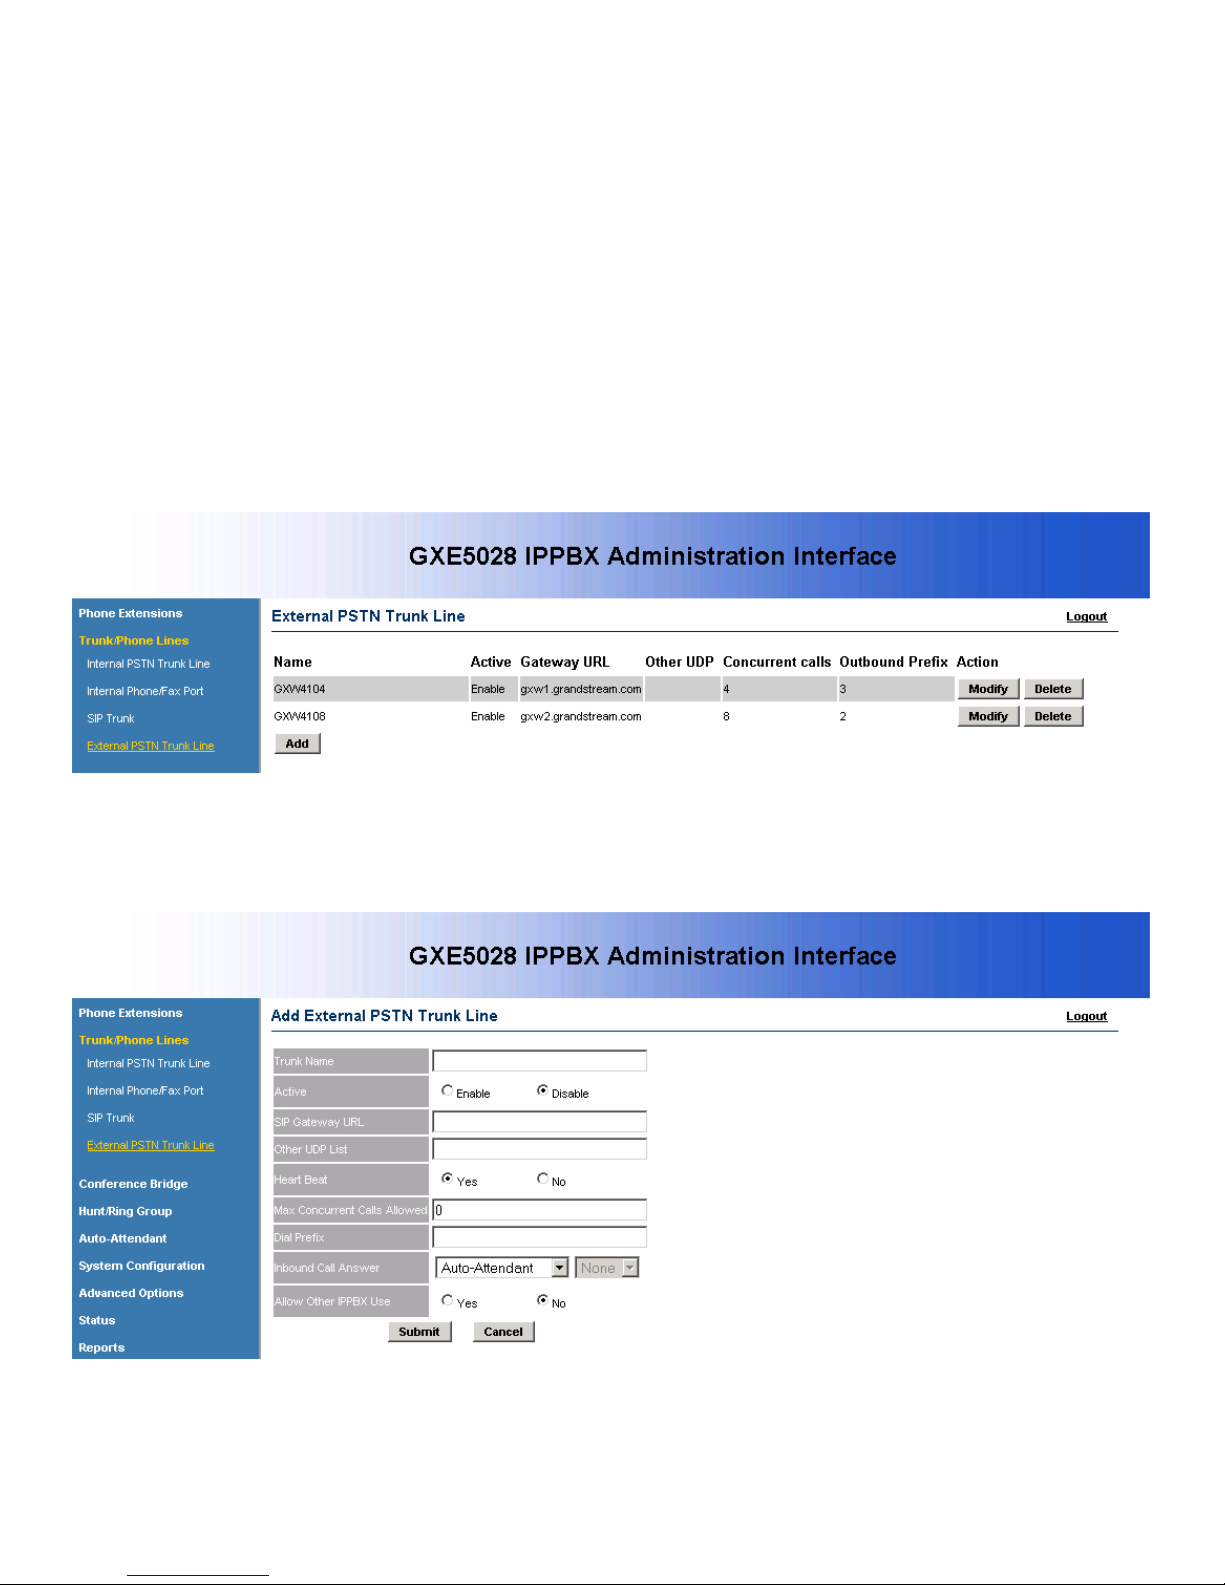
- Configuring external PSTN trunk gateways via SIP
In the External PSTN Trunk Line section, external PSTN trunk gateways can be viewed,
created, or modified. All configured external PSTN trunks as well as their details and
current status are displayed. The following actions can be performed in this section.
Add: Click on the Add button. The external PSTN trunk details page will be displayed,
allowing you to enter SIP peer connection information to connect with the external
PSTN trunk gateway.
Enable the trunk: Enter a descriptive name in the Trunk Name field, and set Trunk
Active to Enable.
Version .02
11
 Loading...