

Grandstream Networks GVC3202 Administration Manual

http://arttel.ru
Grandstream Networks, Inc.
GVC3200/GVC3202 Video Conference System for AndroidTM
Administration Guide
http://arttel.ru/shop/videokonferentsii/grandstream-gvc3202

Firmware Version 1.0.1.48
GVC3200/GVC3202 Administration Guide
Page 1 of 71
http://arttel.ru
GVC3200/GVC3202 Administration Guide
Index
CHANGE LOG ........................................................................................... 6
FIRMWARE VERSION 1.0.1.48 ............................................................................................................ 6
FIRMWARE VERSION 1.0.1.5 .............................................................................................................. 6
WELCOME ................................................................................................. 7
PRODUCT OVERVIEW ............................................................................ 11
SAFETY COMPLIANCES .................................................................................................................... 13
WARRANTY ......................................................................................................................................... 13
GVC3200/GVC3202 LCD SETTINGS ...................................................... 15
ACCOUNT ........................................................................................................................................... 15
ACCOUNTS .................................................................................................................................. 15
CODEC ......................................................................................................................................... 16
SYSTEM .............................................................................................................................................. 17
LANGUAGE & INPUT................................................................................................................... 17
DATE & TIME................................................................................................................................ 17
POWER MANAGER ..................................................................................................................... 18
SITE NAME .................................................................................................................................. 18
STORAGE .................................................................................................................................... 19
APPS ............................................................................................................................................ 19
ACCOUNTS .................................................................................................................................. 20
WEB ACCESS .............................................................................................................................. 20
SECURITY .................................................................................................................................... 20
MAINTENANCE ................................................................................................................................... 21
UPGRADE .................................................................................................................................... 21
TROUBLESHOOTING.................................................................................................................. 21
FACTORY RESET ........................................................................................................................ 22
REBOOT ....................................................................................................................................... 22
NETWORK ........................................................................................................................................... 22
BLUETOOTH ................................................................................................................................ 22
ETHERNET .................................................................................................................................. 23
Wi-Fi (GVC3200 ONLY) ................................................................................................................ 23
PROXY ......................................................................................................................................... 23
VPN............................................................................................................................................... 24
VLAN ............................................................................................................................................ 24
http://arttel.ru/shop/videokonferentsii/grandstream-gvc3202

Firmware Version 1.0.1.48
GVC3200/GVC3202 Administration Guide
Page 2 of 71
http://arttel.ru
LLDP ............................................................................................................................................. 25
802.1X .......................................................................................................................................... 25
AUDIO .................................................................................................................................................. 25
VOLUME ....................................................................................................................................... 25
RINGTONE ................................................................................................................................... 26
AUDIO PRIORITY ........................................................................................................................ 26
VIDEO .................................................................................................................................................. 26
PERIPHERAL ...................................................................................................................................... 27
HDMI SETTINGS .......................................................................................................................... 27
CAMERA ...................................................................................................................................... 28
DEVICE MANAGER ..................................................................................................................... 28
VGA IN .......................................................................................................................................... 29
STATUS ............................................................................................................................................... 29
ACCOUNT .................................................................................................................................... 29
PERIPHERAL ............................................................................................................................... 29
NETWORK ................................................................................................................................... 30
SYSTEM ....................................................................................................................................... 31
REMOTE CONTROL .................................................................................................................... 31
GVC3200/GVC3202 WEB GUI SETTINGS .............................................. 33
ACCESSING GVC3200/GVC3202 WEB GUI ..................................................................................... 33
SAVING CHANGES ............................................................................................................................. 34
DEFINITIONS ...................................................................................................................................... 34
TOOLBAR ............................................................................................................................................ 35
SETTINGS ........................................................................................................................................... 36
SETTINGS/SIP/GENERAL ........................................................................................................... 36
SETTINGS/SIP/NETWORK ......................................................................................................... 37
SETTINGS/SIP/SIP ...................................................................................................................... 38
SETTINGS/SIP/CODEC ............................................................................................................... 42
SETTINGS/SIP/CALL ................................................................................................................... 46
SETTINGS/NETWORK SETTINGS ............................................................................................. 49
SETTINGS/PERIPHERAL ............................................................................................................ 52
SETTINGS/CALL FEATURES ...................................................................................................... 52
SETTINGS/GENERAL SETTINGS .............................................................................................. 53
SETTINGS/SECURITY SETTINGS ............................................................................................. 55
MAINTENANCE ................................................................................................................................... 55
MAINTENANCE/UPGRADE ......................................................................................................... 55
MAINTENANCE/RECORDING .................................................................................................... 58
MAINTENANCE/TIME & LANGUAGE ......................................................................................... 58
MAINTENANCE/TROUBLESHOOTING ...................................................................................... 59
MAINTENANCE/REBOOT ........................................................................................................... 61
http://arttel.ru/shop/videokonferentsii/grandstream-gvc3202

Firmware Version 1.0.1.48
GVC3200/GVC3202 Administration Guide
Page 3 of 71
http://arttel.ru
CONTACTS.......................................................................................................................................... 61
CONTACTS/LDAP ........................................................................................................................ 61
STATUS ............................................................................................................................................... 62
STATUS/ACCOUNT STATUS ....................................................................................................... 62
STATUS/PERIPHERAL STATUS .................................................................................................. 63
STATUS/NETWORK STATUS ...................................................................................................... 63
STATUS/SYSTEM INFO ............................................................................................................... 63
STATUS/REMOTE CONTROL ..................................................................................................... 64
FIRMWARE UPDATE ............................................................................... 65
NO LOCAL FIRMWARE SERVER....................................................................................................... 65
UPGRADE VIA TFTP/HTTP SERVER ................................................................................................ 66
PROVISIONING AND CONFIGURATION FILE DOWNLOAD ............................................................ 66
REMOTE CONTROL UPGRADE ........................................................................................................ 67
FACTORY RESET .................................................................................... 69
RESET VIA LCD .................................................................................................................................. 69
RESET VIA WEB UI ............................................................................................................................. 70
RESET VIA RESET HOLE ................................................................................................................... 70
EXPERIENCING THE GVC3200/GVC3202 .............................................. 71
http://arttel.ru/shop/videokonferentsii/grandstream-gvc3202

Firmware Version 1.0.1.48
GVC3200/GVC3202 Administration Guide
Page 4 of 71
http://arttel.ru
Table of Tables
GVC3200/GVC3202 Administration Guide
Table 1: GVC3200/GVC3202 Technical Specifications ............................................................................... 11
Table 2: GVC3200/GVC3202 Web Access ................................................................................................. 35
http://arttel.ru/shop/videokonferentsii/grandstream-gvc3202

Firmware Version 1.0.1.48
GVC3200/GVC3202 Administration Guide
Page 5 of 71
http://arttel.ru
Table of Figures
GVC3200/GVC3202 Administration Guide
Figure 1: GVC3200/GVC3202 Settings Screen .......................................................................................... 15
Figure 2: GVC3200/GVC3202 Web GUI - Login ........................................................................................ 33
Figure 3: Web UI Tool Bar ........................................................................................................................... 35
Figure 4: Web UI Virtual Remote Control.................................................................................................... 35
Figure 5: GVC3200 Web UI Status->Peripheral Status .............................................................................. 63
Figure 6: GVC3202 Web UI Status->Peripheral Status .............................................................................. 63
Figure 7: Configure Firmware Server Path ................................................................................................. 66
Figure 8: Factory Reset via LCD ................................................................................................................. 70
Figure 9: Web UI - Factory Reset ............................................................................................................... 70
Figure 10: Web UI - Factory Reset Confirmation ........................................................................................ 70
http://arttel.ru/shop/videokonferentsii/grandstream-gvc3202

Firmware Version 1.0.1.48
GVC3200/GVC3202 Administration Guide
Page 6 of 71
http://arttel.ru
CHANGE LOG
This section documents significant changes from previous versions of the GVC3200/GVC3202 user
manuals. Only major new features or major document updates are listed here. Minor updates for
corrections or editing are not documented here.
FIRMWARE VERSION 1.0.1.48
Added GVC3202 in the document
Added option “SIP User-Agent” in web UI. [SIP User-Agent]
Added option “Filter Characters” in web UI. [Filter Characters]
Added option “Secondary SIP Server” in web UI. [Secondary SIP Server]
Added option “Tertiary SIP Server” in web UI. [Tertiary SIP Server] [Tertiary SIP Server] [Tertiary SIP
Server] [Tertiary SIP Server]
Added option “RTP IP Filter” in web UI. [RTP IP Filter]
Added Opus codec. [Preferred Vocoder] [Opus Payload Type]
Added option “Video FEC Mode” in web UI. [Video FEC Mode]
Added option “Presentation Video Frame Rate”. [Presentation Video Frame Rate]
Added option “BFCP Transport Protocol” in web UI. [BFCP Transport Protocol]
Added option “Turn Server Username” “TURN Server Password” in web UI. [TURN Server Username]
[TURN Server Password]
Added option “Assign NTP Server Address 2” in web UI. [Assign NTP Server Address 2]
Added LDAP Contacts support. [CONTACTS/LDAP]
Separated firmware server and config server configuration on the device.
[MAINTENANCE/UPGRADE]
Added option “Use First Matching Vocoder in 200OK SDP”. [Use First Matching Vocoder in 200OK
SDP]
Added proxy settings under LCD settings->Network. [PROXY]
Added option “Audio Priority” in LCD settings->Audio. [AUDIO PRIORITY]
Added option “HDMI Color Mode” under LCD settings->Peripheral->HDMI settings.
[HDMI SETTINGS]
Added option “Codec Negotiation Priority”. [Codec Negotiation Priority]
Added option “Send SIP Log”. [Send SIP Log]
FIRMWARE VERSION 1.0.1.5
This is the initial version.
http://arttel.ru/shop/videokonferentsii/grandstream-gvc3202

Firmware Version 1.0.1.48
GVC3200/GVC3202 Administration Guide
Page 7 of 71
http://arttel.ru
WELCOME
Thank you for purchasing Grandstream GVC3200/GVC3202 AndroidTM Video Conferencing System. This
document introduces the LCD settings, web UI settings and advanced configurations of
GVC3200/GVC3202. To learn the basic configuration and how to use GVC3200/GVC3202, please visit
http://www.grandstream.com/support to download the latest "GVC3200/GVC3202 User Guide".
GVC3200/GVC3202 is a ground-breaking solution that offers small-to-medium businesses a revolutionary
video conferencing system with unprecedented flexibility and the power of support for multiple popular
video conferencing protocols and platforms right out of the box. The SIP-based GVC3200/GVC3202
supports Grandstream’ s robust IPVideoTalk cloud platform for plug and play video conferencing while
also being interoperable with any 3rd party SIP video conferencing platform - thus offering a great option
to expand or implement a 3rd party platform. Additionally, since it is based on AndroidTM 4.4, the
GVC3200/GVC3202 offers full access to all video conferencing apps in the Google PlayTM Store.
The GVC3200/GVC3202 sports an innovative, patent-pending embedded MCU that supports
conferencing with local mixing between SIP and other protocols:
The GVC3200 supports 9-way conferencing with local mixing between SIP and other protocols.
The GVC3202 supports 3-way conferencing with local mixing between SIP and other protocols.
In comparison to Grandstream’s GVC3200, the GVC3202 offers a slightly lower capacity option for
businesses looking for up to 3-way video-conferencing and support for up to 2 Full HD monitors.
The GVC3200/GVC3202 eliminates the traditional barriers to video conferencing and sets a new bar for
business-class video conferencing solutions by offering industry-leading flexibility, interoperability, system
compatibility, application richness and ease of use.
http://arttel.ru/shop/videokonferentsii/grandstream-gvc3202

Firmware Version 1.0.1.48
GVC3200/GVC3202 Administration Guide
Page 8 of 71
http://arttel.ru
--------------------------------------------------------------------------------------------------------------------------------------------
Caution:
Changes or modifications to this product not expressly approved by Grandstream, or operation of this
product in any way other than as detailed by this User Manual, could void your manufacturer warranty.
Warning:
Please do not use a different power adaptor with GVC3200/GVC3202 as it may cause damage to the
products and void the manufacturer warranty.
--------------------------------------------------------------------------------------------------------------------------------------------
This document is subject to change without notice. The latest electronic version of this user manual is
available for downloading here:
http://www.grandstream.com/support
Reproduction or transmittal of the entire or any part, in any form or by any means, electronic or print, for
any purpose without the express written permission of Grandstream Networks, Inc. is not permitted.
http://arttel.ru/shop/videokonferentsii/grandstream-gvc3202

Firmware Version 1.0.1.48
GVC3200/GVC3202 Administration Guide
Page 9 of 71
http://arttel.ru
--------------------------------------------------------------------------------------------------------------------------------------------
FCC Caution:
Any Changes or modifications not expressly approved by the party responsible for compliance could void
the user's authority to operate the equipment.
This device complies with part 15 of the FCC Rules. Operation is subject to the following two conditions:
(1) This device may not cause harmful interference, and (2) this device must accept any interference
received, including interference that may cause undesired operation.
Note: This equipment has been tested and found to comply with the limits for a Class B digital device,
pursuant to part 15 of the FCC Rules. These limits are designed to provide reasonable protection against
harmful interference in a residential installation. This equipment generates uses and can radiate radio
frequency energy and, if not installed and used in accordance with the instructions, may cause harmful
interference to radio communications. However, there is no guarantee that interference will not occur in a
particular installation. If this equipment does cause harmful interference to radio or television reception,
which can be determined by turning the equipment off and on, the user is encouraged to try to correct the
interference by one or more of the following measures:
—Reorient or relocate the receiving antenna.
—Increase the separation between the equipment and receiver.
—Connect the equipment into an outlet on a circuit different from that to which the receiver is connected.
—Consult the dealer or an experienced radio/TV technician for help.
This transmitter must not be co-located or operating in conjunction with any other antenna or transmitter.
For operation within 5.15 ~ 5.25GHz / 5.47 ~5.725GHz frequency range, it is restricted to indoor
environment. The band from 5600-5650MHz will be disabled by the software during the manufacturing
and cannot be changed by the end user. This device meets all the other requirements specified in Part
15E, Section 15.407 of the FCC Rules.
Radiation Exposure Statement:
This equipment complies with FCC radiation exposure limits set forth for an uncontrolled environment.
This equipment should be installed and operated with minimum distance 20cm between the radiator &
your body.
--------------------------------------------------------------------------------------------------------------------------------------------
http://arttel.ru/shop/videokonferentsii/grandstream-gvc3202

Firmware Version 1.0.1.48
GVC3200/GVC3202 Administration Guide
Page 10 of 71
http://arttel.ru
http://arttel.ru/shop/videokonferentsii/grandstream-gvc3202
Firmware Version 1.0.1.48
GVC3200/GVC3202 Administration Guide
Page 11 of 71
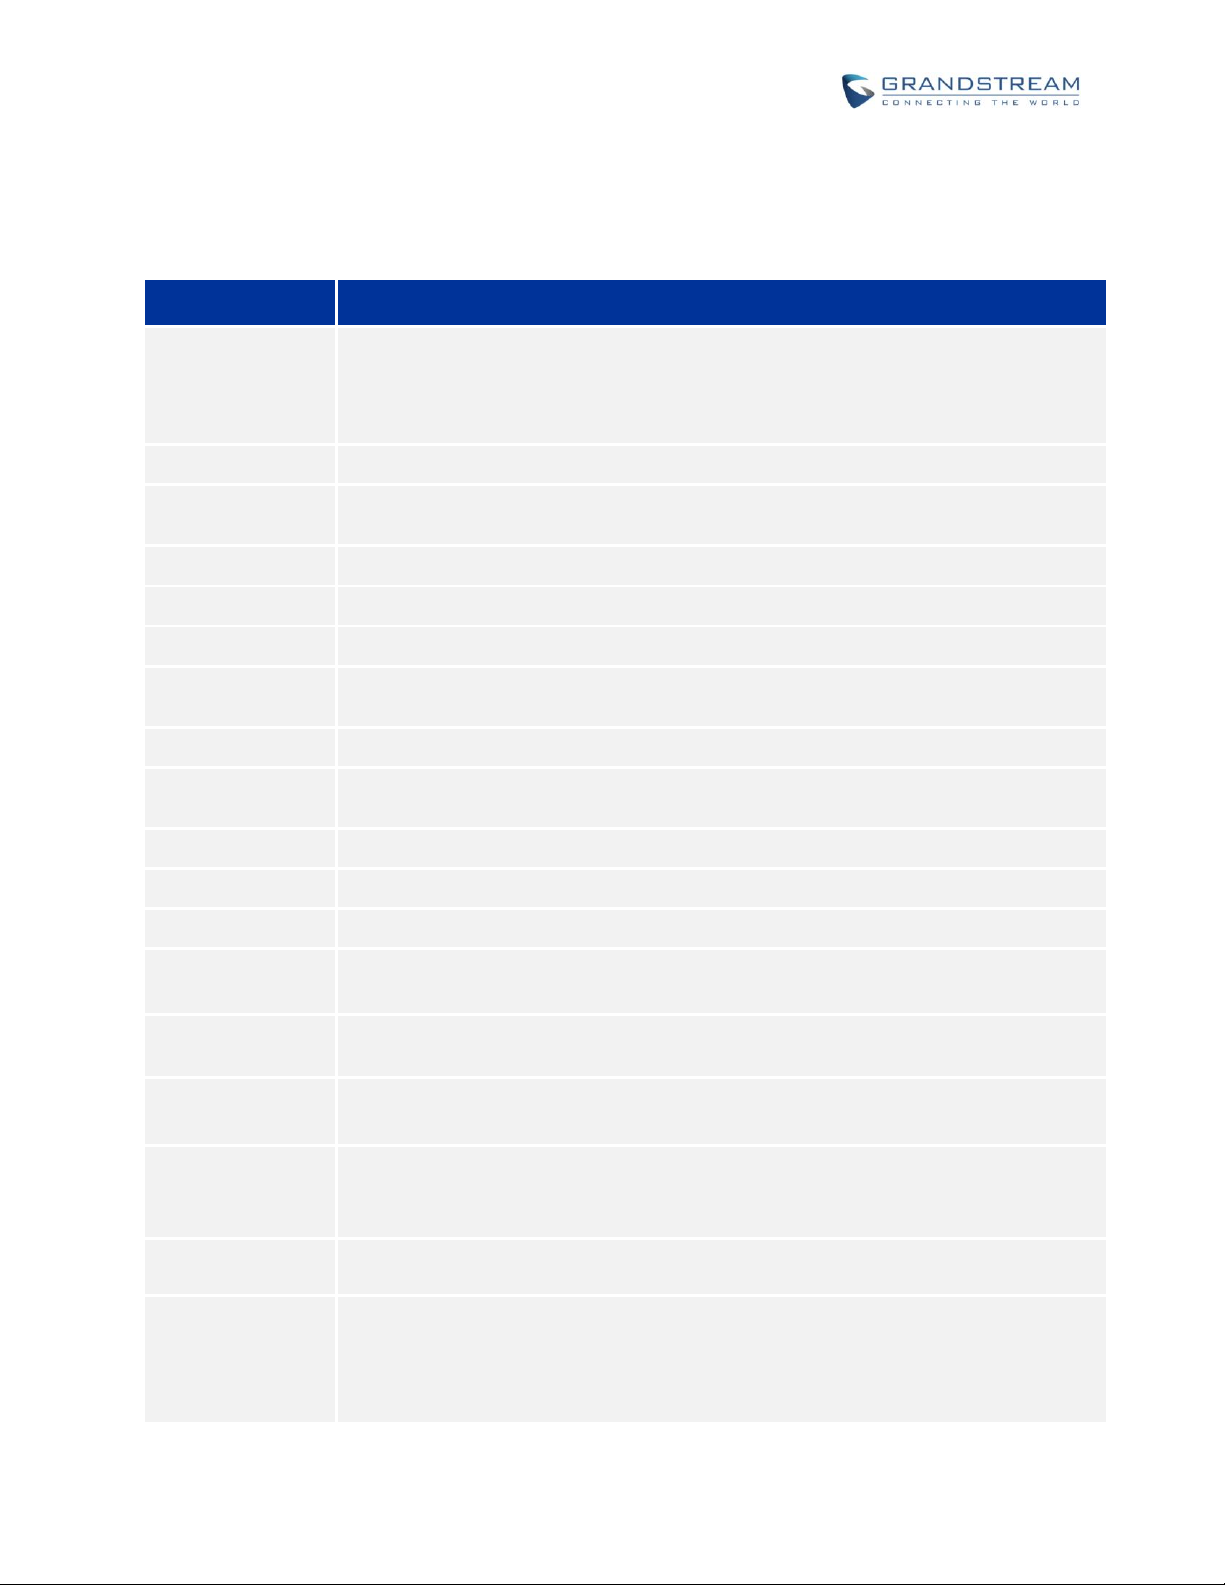
Specification
Description
Protocols/
Standards
SIP RFC3261, BFCP, TIP (pending), RTP/RTCP, HTTP/HTTPS, ARP, ICMP, DNS
(A record, SRV, NAPTR), DHCP, PPPoE, SSH, TFTP, NTP, STUN, LLDP-MED,
LDAP, TR-069, 802.1x, TLS, SRTP, TCP/IP/UDP, IPv6 (pending), FEC, FECC,
H.323 (pending: H.323, H.245, H.225, H.235, H.241, H.460)
Camera
1/3” 2 Megapixel CMOS 1920H x 1080V@30fps
Lens
GVC3200: 12 x optical zoom, +/-23° tilt, +/- 90° pan, 70°(W)*- 6.3° (T) field of view
GVC3202: 9 x optical zoom, +/-23° tilt, +/- 90° pan, 70°(W)*- 6.3° (T) field of view
Network Interface
1 x RJ45 10/ 100/ 1000 Mbps port
Wi-Fi
GVC3200 only: Integrated dual-band 802.11 a/b/g/n (2.4GHz & 5GHz)
Bluetooth
Yes, integrated. Bluetooth 4.0 + EDR
Video Outputs
GVC3200: 3 x HDMI up to 1080p with CEC
GVC3202: 2 x HDMI up to 1080p with CEC
Video Input
1 x VGA/1 x HDMI with resolution up to 1080p
Microphone/
Speaker
External MIC/Speaker, built-in MIC, cascadable external MIC/speaker (pending)
Remote Control
Bluetooth remote control with multi-touch touchpad
Auxiliary Ports
1 x USB 2.0, SD, external speaker port, reset pin
Graphic Display
OLED with 128x32 resolution
Voice Codecs
G.711μ/a, G.722 (wide-band), G.726-32, iLBC (pending), Opus, G.722.1, G.722.1c
(pending), in-band and out-of-band DTMF (In audio, RFC2833, SIP INFO)
Video Codecs
H.264 BP/MP/HP, H.323, video resolution up to 1080p, frame rate up to 30fps,
bitrate up to 4Mbps
People Video
Resolution
1080p from 512 Kbps, 720p from 384 Kbps, 4SIF/4CIF from 128 Kbps,
SIF/CIF/QSIF/QCIF/SQSIF/SQCIF from 64 Kbps
Content Video
Resolution
Input: VGA, SVGA, XGA, WXGA, WXGA, SXGA, 1440×900, 720p, 1600×1200,
1080p (HDMI), up to 60fps;
Encoding: 1280×720, 1920×1080
Output
Resolution
720p, 1080p
Embedded MCU
GVC3200: Up to 4-way 1080p conference, 5-way 720p conference, 9-way VGA
conference
GVC3202: Up to 2-way 1080p conference, 3-way 720p conference, 3-way VGA
conference
http://arttel.ru
PRODUCT OVERVIEW
Table 1: GVC3200/GVC3202 Technical Specifications
http://arttel.ru/shop/videokonferentsii/grandstream-gvc3202

Firmware Version 1.0.1.48
GVC3200/GVC3202 Administration Guide
Page 12 of 71
Dual-Stream
BFCP, people video (up to 1080p@30fps) + content video (up to 1080p@15fps,
720p@30fps)
Audio Features
AEC, ANS, AGC, PLC, CNG/VAD
Video Features
FEC, dynamic display layout, picture-in-picture, picture-outside-picture, digital
caption (pending)
Platform Bridging
Bridge SIP calls with any Android VoIP apps such as Skype, Skype for Business,
Google Hangouts and more
Telephony
Features
Hold, transfer, forward (unconditional/no-answer/busy), call park/pickup, 9-way
audio/video conference for GVC3200 and 3-way audio/video conference for
GVC3202, downloadable XML phone book, LDAP, call waiting, call history, flexible
dial plan, personalized music ringtones, server redundancy & fail-over
Sample
Applications
Skype, Google Hangouts, Skype for Business, Web browser, Facebook, Twitter,
YouTube, Google calendar, mobile phone data import/export via Bluetooth, etc.
API/SDK available for advanced custom application development
Application
Deployment
Allows Android 4.4.2 compliant applications to be deployed in the device with
provisioning control
QoS
Layer 2 QoS (802.1Q, 802.1p) and Layer 3 (ToS, DiffServ, MPLS) QoS
Security
User and administrator level passwords, MD5 and MD5-sess based authentication,
256-bit AES encrypted configuration file, TLS, 128/256-bit SRTP, HTTPS, 802.1x
media access control
Multi-Language
English, German, Italian, French, Spanish, Portuguese, Russian, Turkish, Polish,
Chinese, Korean, Japanese, and more
Upgrade/
Provisioning
Firmware upgrade via TFTP / HTTP / HTTPS or local HTTP upload, mass
provisioning using TR-069 or AES encrypted XML configuration file
Power & Green
Energy Efficiency
Universal power adapter included: Input 100-240VAC 50-60Hz; Output 12VDC/5A
(60W)
Package Content
- GVC3200:
GVC3200 video conference system, external USB speaker/MIC, remote control,
universal power supply, network cable (1.5 meters), USB extension cable (5
meters), mounting kit, 4 HDMI cables (one 1.5-meter cable, two 3-meter cables and
one 5-meter cable), 2 AAA batteries, lens cover, quick installation guide, brochure,
GPL license
- GVC3202:
GVC3202 video conference system, external USB speaker/MIC, remote control,
universal power supply, network cable (1.5 meters), USB extension cable (5
meters), mounting kit, 3 HDMI cables (one 1.5-meter cable, one 3-meter cables and
one 5-meter cable), 2 AAA batteries, lens cover, quick installation guide, brochure,
GPL license
Temperature and
Humidity
Operation: 0°C to 40°C, Storage: -10°C to 60°C, Humidity: 10% to 90% Noncondensing
http://arttel.ru
http://arttel.ru/shop/videokonferentsii/grandstream-gvc3202

Firmware Version 1.0.1.48
GVC3200/GVC3202 Administration Guide
Page 13 of 71
Compliance
FCC: Part 15 (CFR 47) Class B; UL 60950 (power adapter), Part 15C, Part 15E.407,
Part 2.1091
CE: EN55022 Class B, EN55024, EN61000-3-2, EN61000-3-3, EN60950-1,
EN62479, RoHS, EN301893, EN62311
RCM: AS/NZS CISPR22/24; AS/NZS 60950; AS/NZS 4268
http://arttel.ru
SAFETY COMPLIANCES
GVC3200/GVC3202 complies with FCC/CE and various safety standards. GVC3200/GVC3202 power
adapter is compliant with the UL standard. Use the universal power adapter provided with
GVC3200/GVC3202 package only. The manufacturer’s warranty does not cover damages to the device
caused by unsupported power adapters.
WARRANTY
If GVC3200/GVC3202 is purchased from a reseller, please contact the company where the device is
purchased for replacement, repair or refund. If the device is purchased directly from Grandstream, please
contact Grandstream Support for a RMA (Return Materials Authorization) number before the product is
returned. Grandstream reserves the right to remedy warranty policy without prior notification.
http://arttel.ru/shop/videokonferentsii/grandstream-gvc3202

Firmware Version 1.0.1.48
GVC3200/GVC3202 Administration Guide
Page 14 of 71
This page intentionally left blank
http://arttel.ru
http://arttel.ru/shop/videokonferentsii/grandstream-gvc3202
Firmware Version 1.0.1.48
GVC3200/GVC3202 Administration Guide
Page 15 of 71
http://arttel.ru
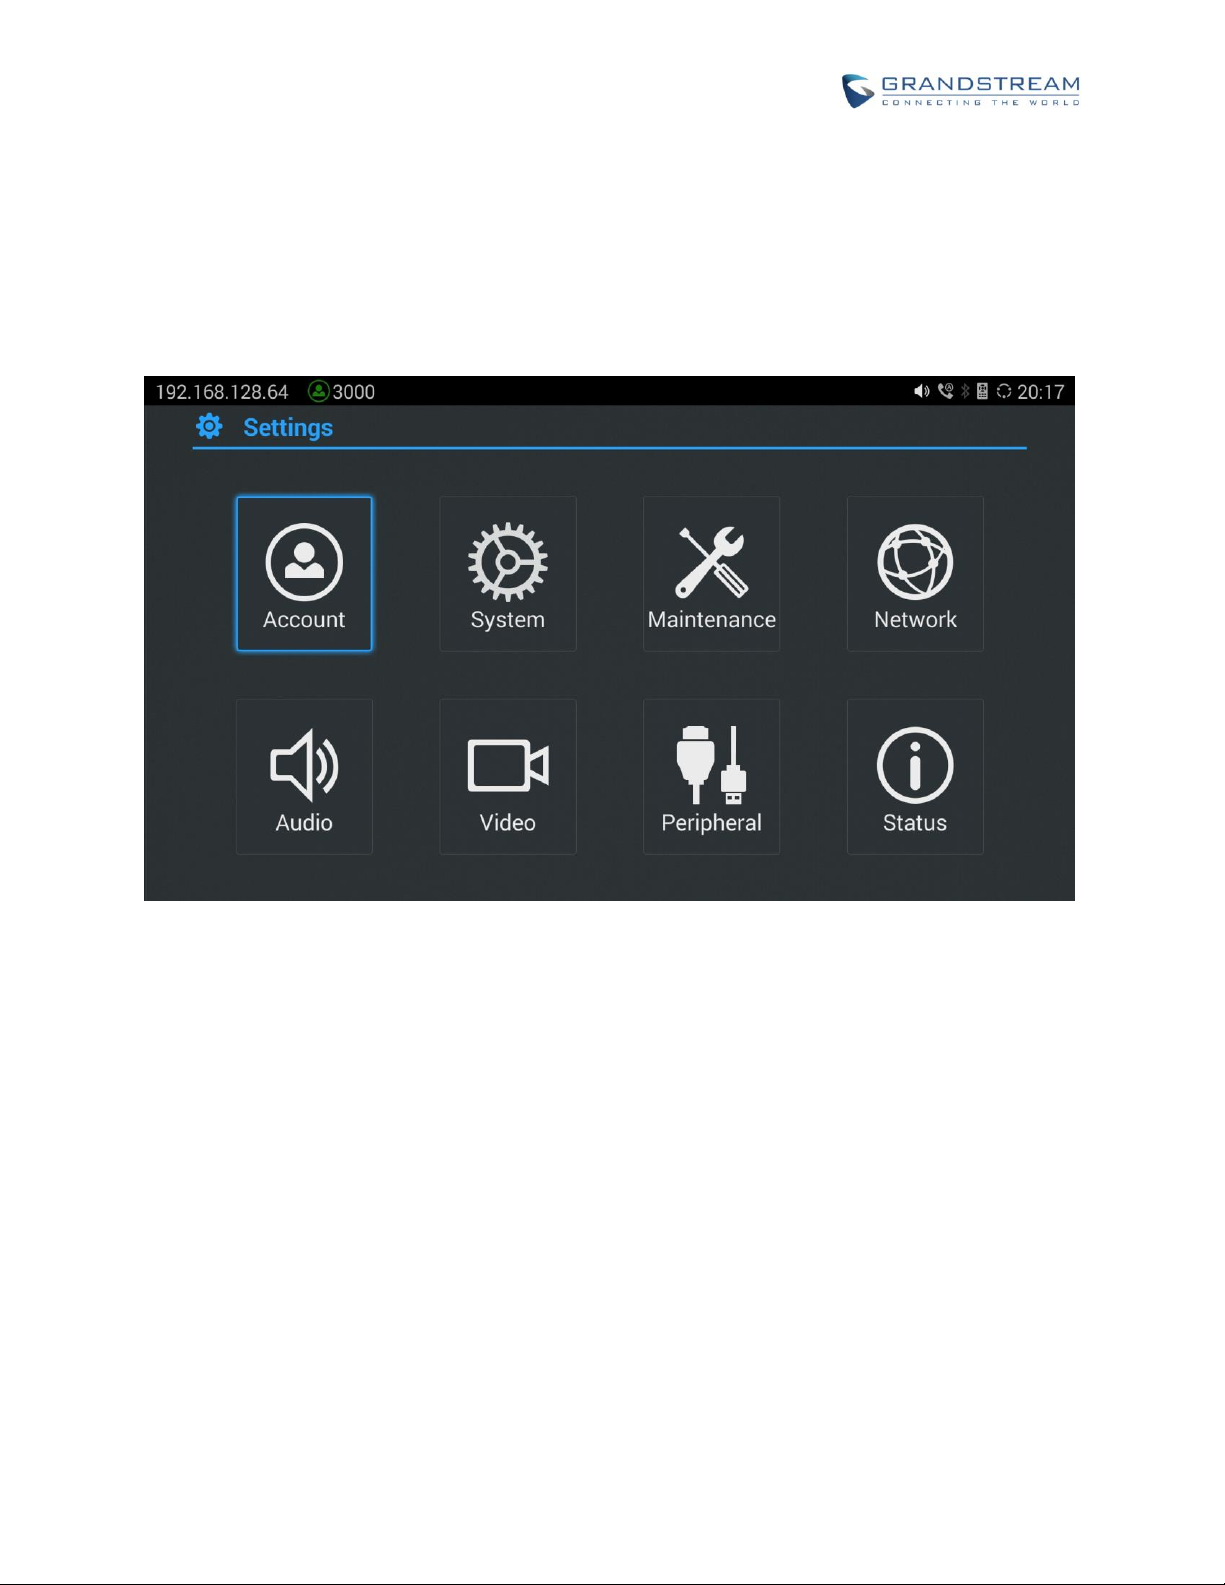
GVC3200/GVC3202 LCD SETTINGS
GVC3200/GVC3202 LCD MENU provides easy access to the Settings on the device. Most of the settings
from Web UI could be configured on the local LCD settings as well.
Figure 1: GVC3200/GVC3202 Settings Screen
ACCOUNT
ACCOUNTS
Account
Select the account to be configured. The users can select the SIP account or the built-in BlueJeans
account to configure here.
Account Active
This field indicates whether the account is active. If disabled, GVC3200/GVC3202 will not send
registration information to the SIP server.
Account Name
The name associated with the account to be displayed on the upper left corner of LCD.
SIP Server
The URL or IP address, and port of the SIP server. This is provided by your VoIP service provider
http://arttel.ru/shop/videokonferentsii/grandstream-gvc3202

Firmware Version 1.0.1.48
GVC3200/GVC3202 Administration Guide
Page 16 of 71
http://arttel.ru
(ITSP).
Secondary SIP Server
The URL or IP address, and port of the secondary SIP server. This is provided by your VoIP service
provider (ITSP).
Tertiary SIP Server
The URL or IP address, and port of the third SIP server. This is provided by your VoIP service
provider (ITSP).
SIP User ID
This is the SIP User ID provided by your VoIP service provider (ITSP). It's usually in the form of digits
similar to phone number or actually a phone number.
SIP Authentication ID
SIP service subscriber's Authenticate ID used for authentication. It can be identical to or different from
the SIP User ID.
SIP Authentication Password
The account password required for GVC3200/GVC3202 to authenticate with the ITSP (SIP) server
before the account can be registered.
Voice Mail Access Number
This parameter allows you to access voice messages by entering voice mailbox or dialing access
number.
Display Name
This is the SIP server subscriber's name (optional) that will be used for Caller ID display. This function
is available when supported by SIP server.
CODEC
Please refer to section SETTINGS/SIP/CODEC for more descriptions of the options below.
Account
Select the account to be configured. The users can select the SIP account or the built-in BlueJeans
account to configure here.
Preferred Vocoder
Select preferred vocoder for the account to use during the call. Please note the actual codec being
used in the call is a negotiation result between the GVC3200/GVC3202 and the remote party.
Use First Matching Vocoder in 200OK SDP
Configure whether to use the first matching vocoder in the sent 200OK SDP as the codec.
Enable Video FEC
Enable video FEC for the SIP account.
H.264 Image Size
Configure H.264 image size for the video call.
Video Bit Rate
http://arttel.ru/shop/videokonferentsii/grandstream-gvc3202

Firmware Version 1.0.1.48
GVC3200/GVC3202 Administration Guide
Page 17 of 71
http://arttel.ru
Configure video bit rate for the video call.
Video Frame Rate
Configure video frame rate for the video call.
Disable Presentation
Enable or disable presentation during call.
Presentation H.264 Image Size
Configure the presentation H.264 image size.
Presentation Video Bit Rate
Configure the presentation video bit rate during the call.
Presentation Video Frame Rate
Configure the presentation video frame rate during the call.
Enable FECC
Enable or disable FECC to configure remote camera during video call.
SRTP Mode
Enable or disable SRTP for the call.
SYSTEM
LANGUAGE & INPUT
Language
Tap to open a list of language options for the device to display on LCD.
Select Default Input Method
This will set the default input method. It can be set to AndroidTM keyboard or GoogleTM Pinyin input
method. Before setting Google Pinyin as default method, please select the check box for Google
Pinyin first under "Select Input Method".
Select Input Method
Select other available method. Only selected methods will be listed under “Select Default Input
Method” for the users to choose.
DATE & TIME
Assign NTP Server Address
Assign the URL or IP address of NTP server. The device will obtain date and time from the server to
synchronize date and time with NTP server.
Set Date
Manually set the current date for the device, the date configured manually will be erased if the device
is rebooted.
Select Time Zone
http://arttel.ru/shop/videokonferentsii/grandstream-gvc3202

Firmware Version 1.0.1.48
GVC3200/GVC3202 Administration Guide
Page 18 of 71
http://arttel.ru
Set specific time zone for the device. If DHCP Option 2 is activated for web UI configuration, the
device will skip this setting and directly use the time zone sent by DHCP Option 2.
Set Time
Manually set the current time for the device, the time configured manually will be erased if the device
is rebooted.
Use 24-hour Format
Check/uncheck to display the time using 24-hour time format or not. For example, in 24-hour format,
13:00 will be displayed instead of 1:00 pm
Select Date Format
Select the format of year, month and day for the date to be displayed. For example, 12/31/2015,
31/12/2015, 2015/12/31.
POWER MANAGER
Enter Sleep Mode
Select the interval before the device enters sleep mode. If the device is in idle during this interval, it
will enter sleep mode. Once the device enters sleep mode, the display monitor will not have any
display and web UI of the device is not available. The available intervals are 1 minute, 5 minutes, 10
minutes, 15 minutes, 30 minutes and 60 minutes. The default setting is 30 minutes. To wake up the
device from sleep mode, press the POWER key on the remote control.
SITE NAME
The configured site name will be displayed on call screen.
Transparency
Select the background transparency for the site name display. The user can select Opaque, 5%, 10%,
15% or 20%. The default setting is "Opaque".
Site Name
Configure the site name to be imposed on the video of local video.
Display Position
Configure the site name's position to be at the Upper Left Corner, Upper Right Corner, Lower Left
Corner or Lower Right Corner on the video. The default setting is "Upper Left Corner".
Display Duration
Configure the duration to display the site name. The user can select Do No Display, 1 Minute, 5
Minute, 10 Minutes or Always. The default setting is “Always”.
Horizontal Offset
Slide left or right to adjust the horizontal position from 0 to 96 for the site to display on the screen. The
default setting is 0.
http://arttel.ru/shop/videokonferentsii/grandstream-gvc3202

Firmware Version 1.0.1.48
GVC3200/GVC3202 Administration Guide
Page 19 of 71
http://arttel.ru
Vertical Offset
Slide up or down to adjust the vertical position from 0 to 96 for the site to display on the screen.
The default setting is 0.
Font Color
Select the color in which the site name is displayed. The default color is white.
Font Size
Select the font size from smallest to largest for the site name to display. The default value is Medium.
Bold
Configure whether the site name is displayed in bold. The default setting is "Disabled".
STORAGE
Enable Media Scanning on SD
Once enabled, GVC3200/GVC3202 will automatically scan media files in SD card when SD card is
inserted or GVC3200/GVC3202 is powered on.
Enable Media Scanning on USB
Once enabled, GVC3200/GVC3202 will automatically scan media files in USB storage device when
USB device is inserted of the GVC3200/GVC3202 is powered on.
Internal Storage
Display GVC3200/GVC3202 Internal storage space.
Erase SD Card
Clear all data in the SD card plugged into GVC3200/GVC3202.
Unmount SD Card
If SD card is plugged in, unmount the SD card before unplugging the SD card from
GVC3200/GVC3202.
Erase USB Storage
Clear all data in the USB SD card plugged into GVC3200/GVC3202.
Unmount USB Storage
If USB storage device is plugged in, unmount the SD card before unplugging the SD card from
GVC3200/GVC3202.
APPS
Users could find all build-in apps such as FileManager, Call History and etc, as well as the installed apps
from GS Market or Google Play here. For built-in apps, users can select the app, force stop or clear data
for the app. If the user selects an installed app here, users can uninstall the app from there.
http://arttel.ru/shop/videokonferentsii/grandstream-gvc3202

Firmware Version 1.0.1.48
GVC3200/GVC3202 Administration Guide
Page 20 of 71
http://arttel.ru
ACCOUNTS
Add Account
Add a Google, Skype, Skype for Business or Facebook account to GVC3200/GVC3202. Tap on "+"
button to select account and fill in contact information. Once the account is associated, the contacts
can be synced up on GVC3200/GVC3202.
WEB ACCESS
Disable SSH
The default setting is "No". If set to "Yes", the device will not allow SSH access to the device. The
default setting “No” is recommended.
Access Method
Select HTTP or HTTPS for Web access.
Port
Configure the port number for HTTP or HTTPS. By default, HTTP uses port 80 and HTTPS uses port
443.
Admin Password
Set or change administrator's password. This field is case sensitive. The maximum length is 32
characters. The default admin password is “admin”. Only administrator has access to advanced
settings page in web UI. It is recommended to change the default admin password in initial setup.
User Password
Set or change user password. This field is case sensitive. The maximum length is 32 characters. The
default user password is 123. The user with user login can access certain pages in web UI. It is
recommended to change the default user password in initial setup.
SECURITY
Device Administrators
View or deactivate device administrators.
Unknown Sources
Allow installation of apps from unknown sources, for example external SD card or USB storage
device plugged in GVC3200/GVC3202. The default setting is "No", which means only allowing
installing apps from GS market or Google Play. Please note that Apps from unknown sources may
cause security or compatibility issues.
Verify Apps
If set to "No", the device may install apps that could harm GVC3200/GVC3202 without warning. The
default setting is "Yes".
Credential Storage – Trusted Credentials
http://arttel.ru/shop/videokonferentsii/grandstream-gvc3202

Firmware Version 1.0.1.48
GVC3200/GVC3202 Administration Guide
Page 21 of 71
http://arttel.ru
Display trusted CA certificates.
Credential Storage - Install from SD Card
Install trusted certificates from SD card. If the certificate file is stored in SD card plugged in
GVC3200/GVC3202, click on this option and select the certificate file from the SD card directory to
install it to GVC3200/GVC3202.
Clear Credentials
Clear all certificates on GVC3200/GVC3202.
MAINTENANCE
UPGRADE
Firmware Upgrade and Configuration File Detection
Select when to upgrade or initiate provisioning. Users can select “Always Check When Bootup”,
“When F/W Prefix/Suffix Changes” or “Skip the Firmware Check”.
Firmware Upgrade Mode
Select upgrade mode for firmware upgrading. Users could set to TFTP, HTTP or HTTPS. The default
setting is HTTP.
Firmware HTTP/HTTPS Username
Type the username if the HTTP/HTTPS for the firmware server uses the user authentication mode.
Firmware HTTP/HTTPS Password
Type the password if the HTTP/HTTPS for the firmware server uses the user authentication mode.
Firmware Server Path
Configure the server path for the firmware server.
Config Upgrade Mode
Select upgrade mode for config file provisioning. Users could set to TFTP, HTTP or HTTPS. The
default setting is HTTP.
Config HTTP/HTTPS Username
Type the username if the HTTP/HTTPS for the config server uses the user authentication mode.
Config HTTP/HTTPS Password
Type the password if the HTTP/HTTPS for the config server uses the user authentication mode.
Config Server Path
Configure the server path for the config file server.
TROUBLESHOOTING
IP Ping
Type in IP address or domain name in Target Host, then press red shortcut key on the remote control
to start Ping. The ping result shows in "Output Result".
http://arttel.ru/shop/videokonferentsii/grandstream-gvc3202
 Loading...