

Page 1

Grandstream Networks, Inc.
GXP2200
GUI Customization Guide
Grandstream Networks, Inc.
www.grandstream.com
Page 2

Index
INTRODUCTION ........................................................................................ 2
OVERVIEW ............................................................................................................................................ 2
GUI CONFIG TOOL MENU ................................................................................................................... 2
GUI CONFIG TOOL EMBEDDED HTTP SERVER ............................................................................... 3
HOW TO CUSTOMIZE GXP2200 LCD GUI .......................................................................................... 4
CONFIGURATION GUIDE .......................................................................... 6
APP SETTINGS ..................................................................................................................................... 6
EXAMPLE: ADD 3rd PARTY APP FROM LOCAL PC .................................................................... 7
CONTACTS SETTINGS ........................................................................................................................ 8
LAYOUT SETTINGS .............................................................................................................................. 8
SCREEN SETTINGS ............................................................................................................................. 9
SCREENSAVER SETTINGS ............................................................................................................... 10
LANGUAGE AND KEYBOARD SETTINGS ........................................................................................ 11
OTHER SETTINGS ............................................................................................................................. 12
EXPERIENCING THE GXP2200 .............................................................. 14
Table of Figures
Figure 1: GUI CONFIG TOOL MENU ........................................................................................................... 2
Figure 2: HTTP SERVER ON ....................................................................................................................... 3
Figure 3: GXP2200 WEB GUI CONFIGURATION ........................................................................................ 4
Figure 4: TURN OFF HTTP SERVER ........................................................................................................... 4
Figure 5: APP SETTINGS ............................................................................................................................. 6
Figure 6: ADD 3rd PARTY APP - STEP 1 ..................................................................................................... 7
Figure 7: ADD AN APP - STEP 2 .................................................................................................................. 7
Figure 8: ADD AN APP - STEP 3 .................................................................................................................. 7
Figure 9: CONTACTS SETTINGS ................................................................................................................ 8
Figure 10: LAYOUT SETTINGS .................................................................................................................... 9
Figure 11: SCREEN SETTINGS ................................................................................................................. 10
Figure 12: SCREENSAVER SETTINGS ..................................................................................................... 11
Figure 13: LANGUAGE AND KEYBOARD SETTINGS .............................................................................. 12
Figure 14: OTHER SETTINGS ................................................................................................................... 13
FIRMWARE 1.0.3.6 GXP2200 GUI CUSTOMIZATION GUIDE Page 1 of 14
Page 3
INTRODUCTION
OVERVIEW
Grandstream GXP2200 Enterprise Multimedia Phone for Android
loaded with tremendous value for web-integrated business communications as well as capability for
advanced custom applications development and personalization. Based on AndroidTM operating system
2.3, GXP2200 allows users to customize the GUI desktop layout as well as GUI configuration on the phone,
offering users with flexibility and control. The GUI configuration includes displaying/hiding certain
applications, configuring parameters on the phone with specific configuration items, controlling the display
appearance and enabling/disabling some applications and much more.
This document describes how to use the Grandstream Graphical GUI Customization Tool to customize the
GXP2200 GUI settings and applications. This tool allows users to do the following on applications running
on the GXP2200.
Turn on/off applications
Add new folders for applications
Personalize phone display
Set up parameters
The Grandstream GXP2200 Graphical GUI Customization Tool is available for downloading from the
following link:
http://www.grandstream.com/tools/gui_customization_tool_v3.2.zip
TM
is an innovative smart desk phone
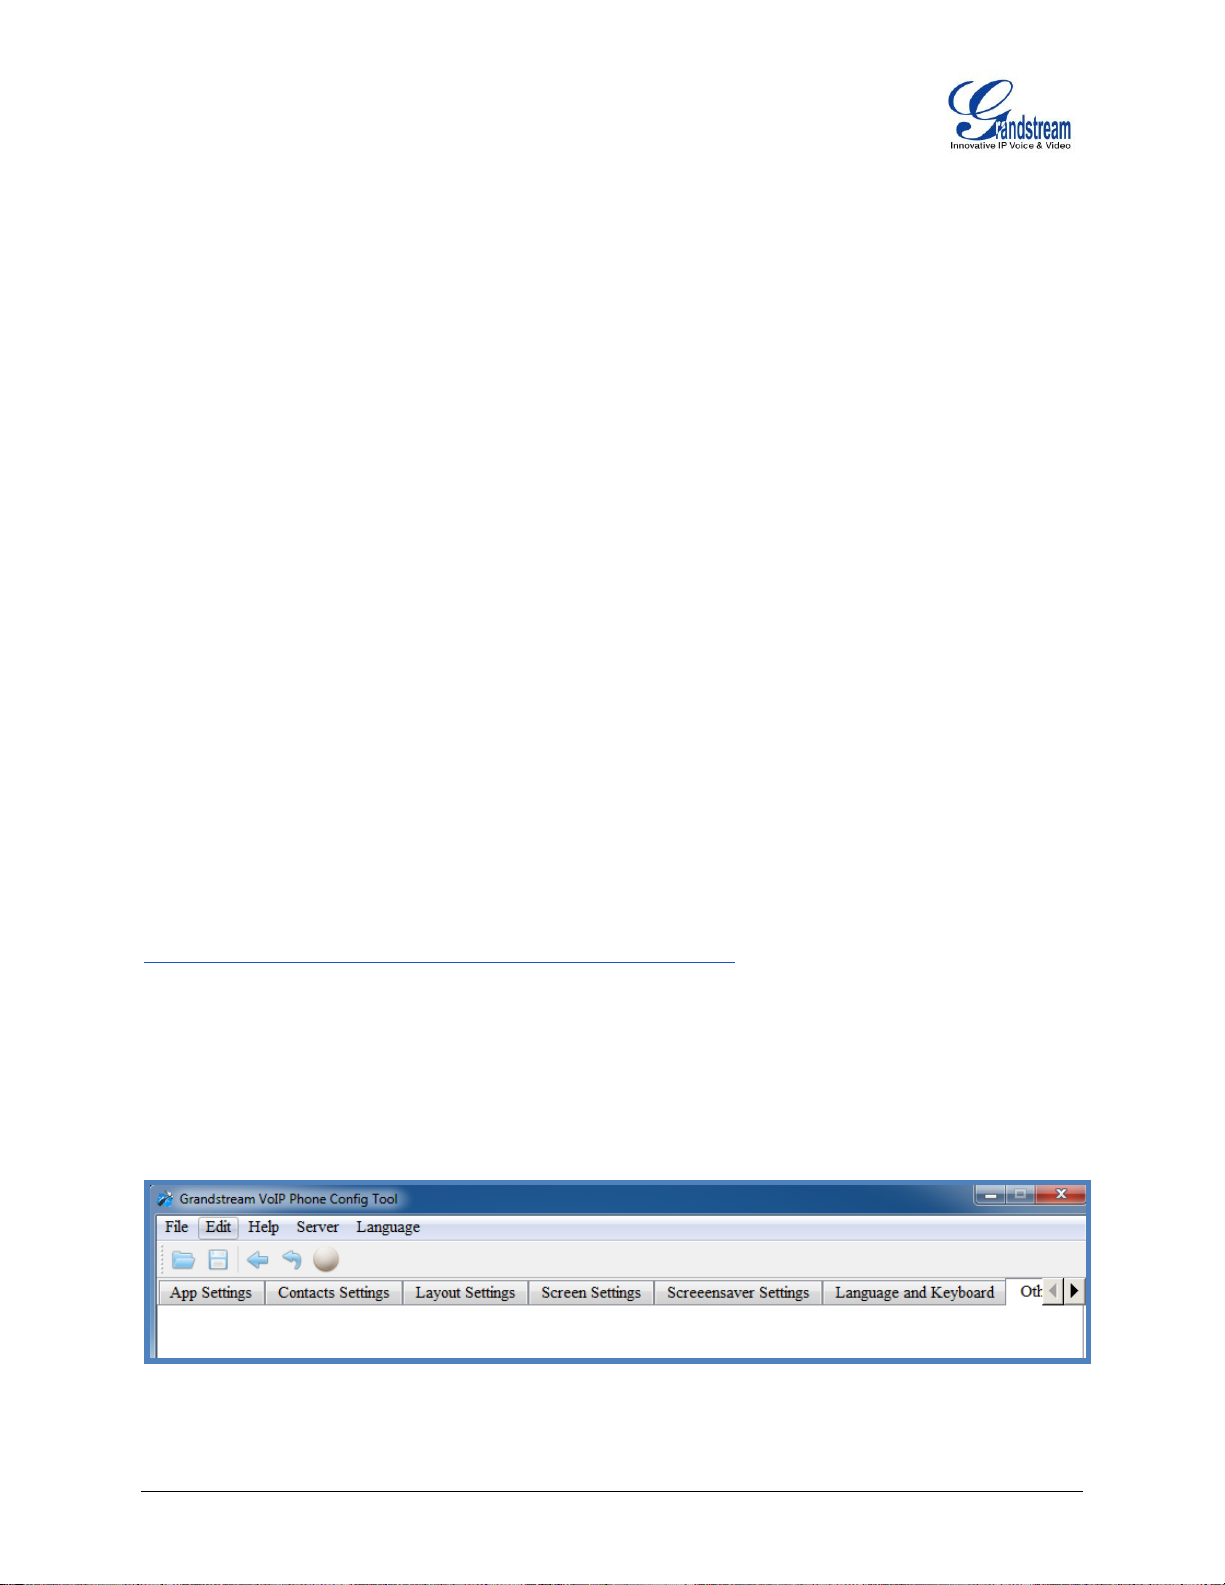
GUI CONFIG TOOL MENU
On the top menu bar of the GUI Config Tool, users could click on the buttons to do the following:
Figure 1: GUI CONFIG TOOL MENU
FIRMWARE 1.0.3.6 GXP2200 GUI CUSTOMIZATION GUIDE Page 2 of 14
Page 4
Open gxp2200cust file.
Save the configuration to gxp2200cust file
Go back to the home page of the GUI Config Tool
Reset the configuration on the current setting window.
Turn on HTTPD server.
GUI CONFIG TOOL EMBEDDED HTTP SERVER
The GUI Config Tool has a built-in HTTP server. The generated gxp2200cust file will be saved under
directory "GuiConfigTool_3.2" and the HTTP server will point the downloading path to the directory.
Follow the steps below to configure the GXP2200 to download the gxp2200cust file from the built-in HTTP
server.
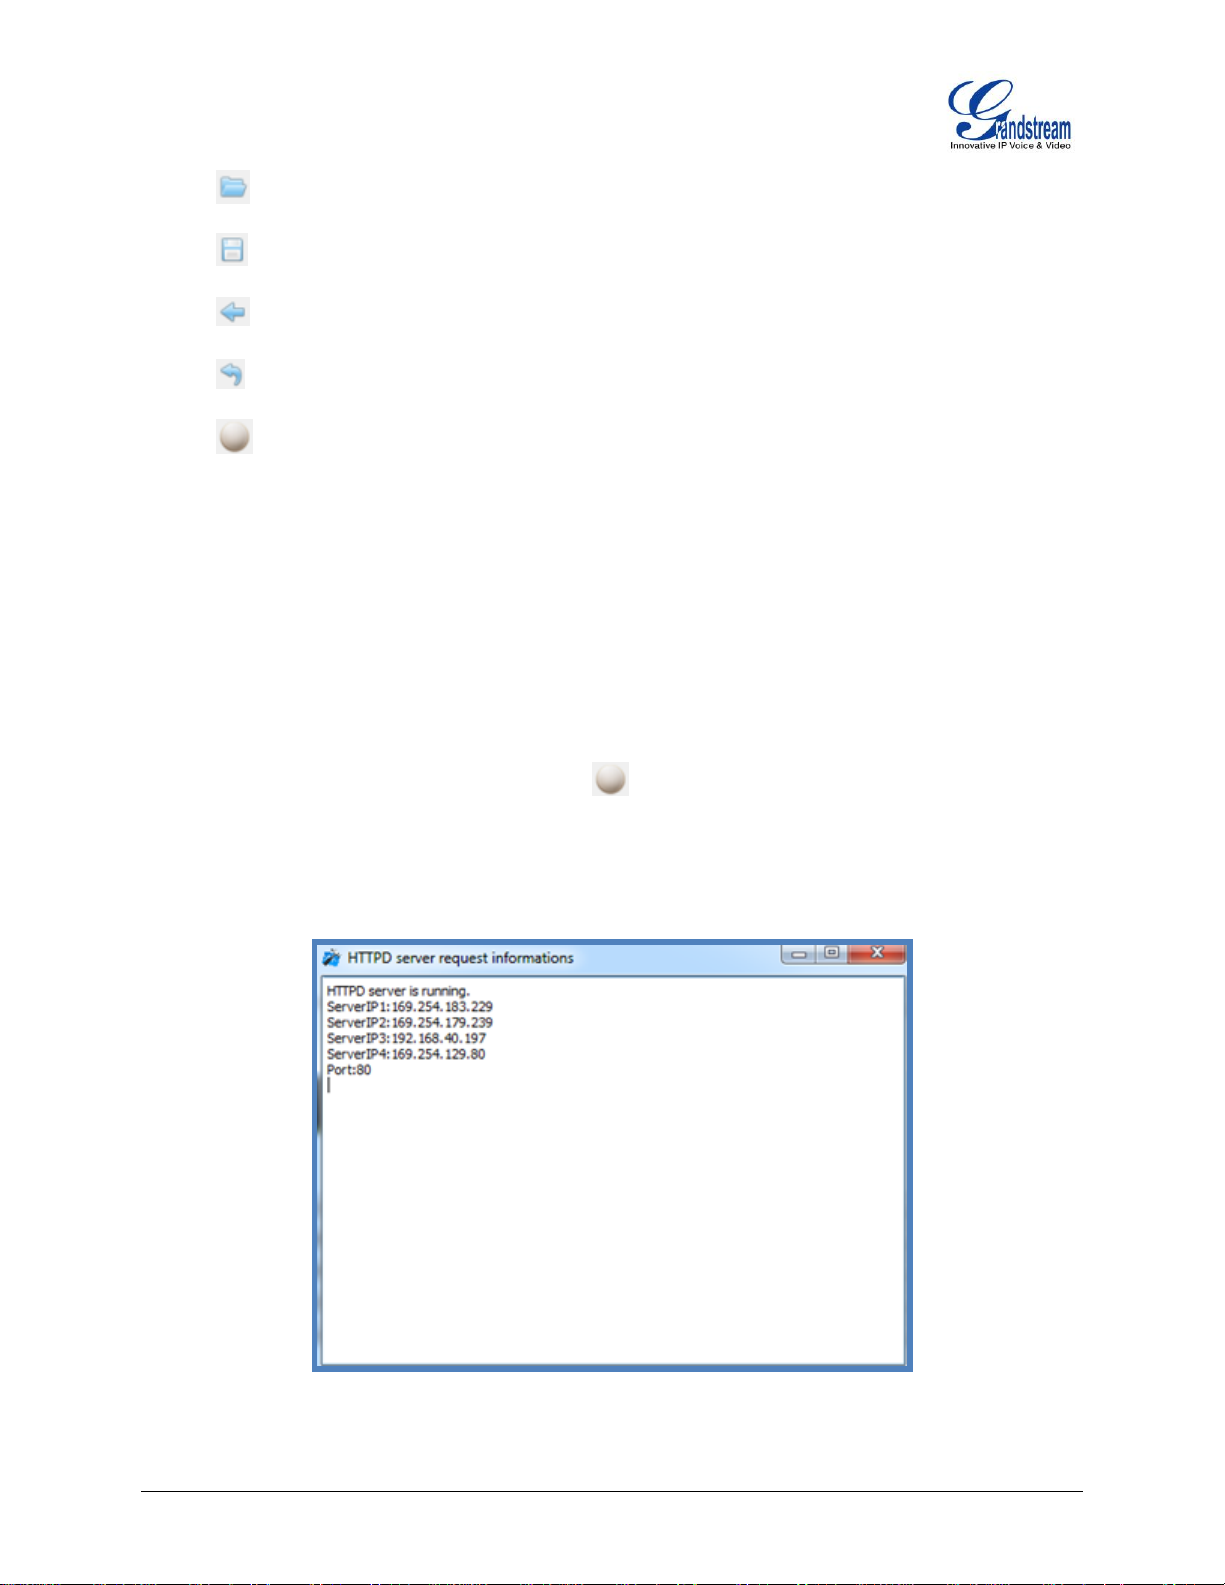
1. After saving the gxp2200cust file, click on button to start the HTTP server.
2. The HTTPD server request information window will show. All the detected IP address from your
PC's network card will be displayed. In the figure below, ServerIP3: 192.168.40.197 is the valid IP
address of the HTTP server.
Figure 2: HTTP SERVER ON
FIRMWARE 1.0.3.6 GXP2200 GUI CUSTOMIZATION GUIDE Page 3 of 14
Page 5
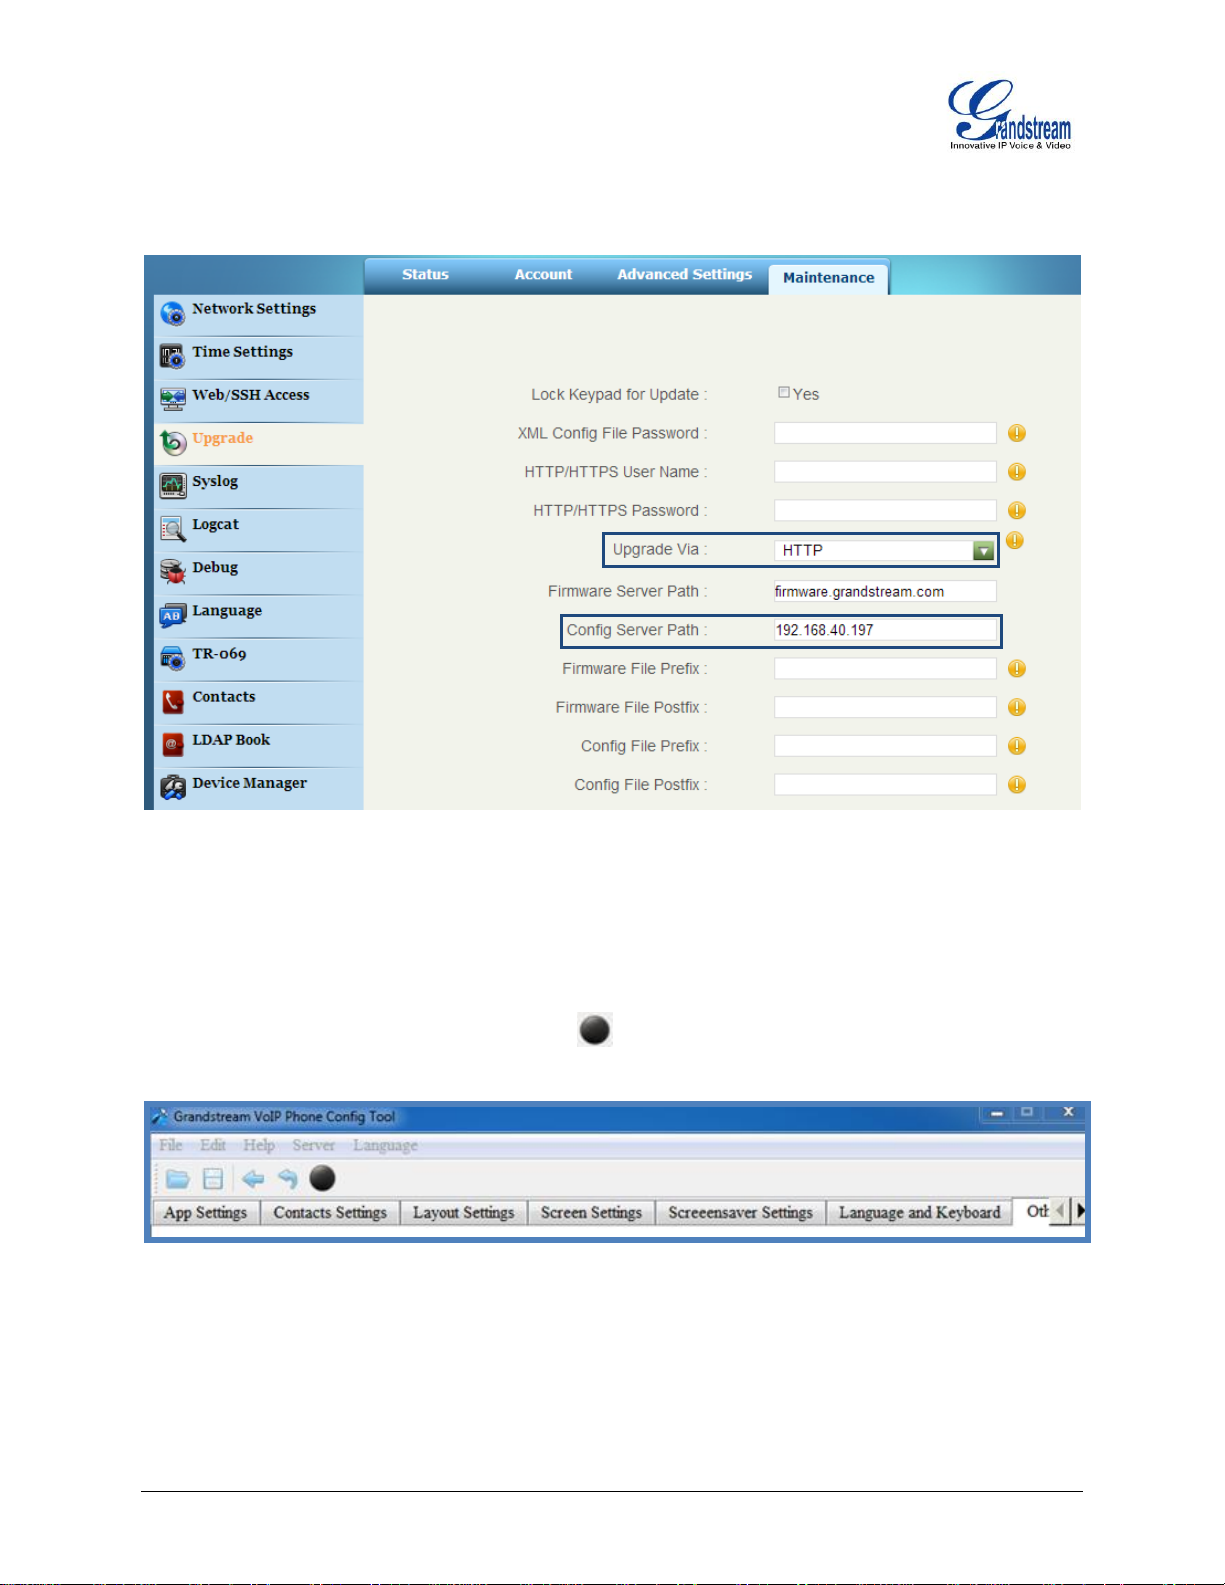
3. Go to GXP2200 web GUI->Maintenance->Upgrade, configure "192.168.40.197" as the "Config
Server Path" and select "Upgrade Via" as "HTTP". Save and reboot the phone.
Figure 3: GXP2200 WEB GUI CONFIGURATION
4. The file sending log will be displayed in the HTTPD server request information window.
5. Once the GXP2200 finishes downloading the gxp2200cust file, it will reboot again with the new
GUI display.
6. To turn the HTTP server off, click on the button.
Figure 4: TURN OFF HTTP SERVER
HOW TO CUSTOMIZE GXP2200 LCD GUI
1. Unzip the tool package. Double click on "Grandstream VoIP Phone Config Tool.exe" to start up the
FIRMWARE 1.0.3.6 GXP2200 GUI CUSTOMIZATION GUIDE Page 4 of 14
Page 6

tool. Single click on GXP2200 picture to get into the GXP2200 GUI customization interface.
2. Set up the configurations and parameters in each tab of the tool.
3. Generate the GXP2200 custom file "gxp2200cust" by clicking on "File"->"Save". The tool also
allows users to import and edit the existing custom files.
4. The generated gxp2200cust file will be saved under the directory of GuiConfigTool_3.2 by default.
The tool has an embedded HTTP server which can be turned on by clicking on button. It
points the server directory to the gxp2200cust file. For centralized development, users could also
put the generated file to your own HTTP/TFTP/HTTPS server.
5. Point the phone's config server path to the directory on the server where the custom file locates. If
users uses the tool's embedded HTTP server, point the phone's config server path to the PC's IP
address, which will be displayed in the HTTPD server window once the server is turned on.
6. Reboot the phone to trigger the GXP2200 to send out request for gxp2200cust file. The phone will
reboot again once successfully downloading the gxp2200cust file.
7. After booting up, the GXP2200 will display the customized GUI.
Note:
Before starting using the GUI Customization, please upgrade your GXP2200 to the latest firmware version.
The firmware release information can be found in the following link:
http://www.grandstream.com/support/firmware
FIRMWARE 1.0.3.6 GXP2200 GUI CUSTOMIZATION GUIDE Page 5 of 14
Page 7

CONFIGURATION GUIDE
APP SETTINGS
The figure below shows the "App Settings" section on the GUI Config Tool. Users could configure the
following for the applications and widgets on the GXP2200.
Click on the checkbox to enable or disable the application or widget to be loaded on the GXP2200.
Create folders. Right click on the App Settings panel and select "addSubmenu" to create a folder.
It will be displayed on the top of the list.
Edit menu layout structure by dragging the applications into folders. Widgets (e.g., Weather
Widget) cannot be placed into a folder.
Add an application. Right click on the App Settings panel and select "add3rdApp". Select an icon
and the apk file from your local PC to upload to the GUI Config Tool.
Figure 5: APP SETTINGS
FIRMWARE 1.0.3.6 GXP2200 GUI CUSTOMIZATION GUIDE Page 6 of 14
Page 8

EXAMPLE: ADD 3rd PARTY APP FROM LOCAL PC
1. Right click on the App Settings panel and select "add3rdApp".
Figure 6: ADD 3rd PARTY APP - STEP 1
2. In the prompted dialog window, select icon and fill in the Display Name for the app. Then click on
"Browse" to select the apk file from local PC.
Figure 7: ADD AN APP - STEP 2
3. Click on "Add" to upload the apk file. It will be added into the list.
Figure 8: ADD AN APP - STEP 3
FIRMWARE 1.0.3.6 GXP2200 GUI CUSTOMIZATION GUIDE Page 7 of 14
Page 9

CONTACTS SETTINGS
The following figure shows the "Contacts Settings" section in the GUI Config Tool. In this section,
parameters for phonebook downloading, import and export can be set up for the GXP2200.
Figure 9: CONTACTS SETTINGS
LAYOUT SETTINGS
The figure below shows the "Layout Settings" section in the GUI Config Tool. Users could customize the
following for the GXP2200 desktop layout.
Select the screen to be configured by clicking on the page number on the right panel.
Select the current screen as home screen by clicking on the "HomePage" button.
Click on "Delete" button to delete the current screen.
Click on "+" button to add a new screen.
FIRMWARE 1.0.3.6 GXP2200 GUI CUSTOMIZATION GUIDE Page 8 of 14
Page 10

For each screen, select "Add Icon" or "Add Widget" on the top. Then directly drag and place the
application/widget icon from the bottom list to the desktop. If the application or widget has been
disabled in "App Settings" section, it has to be enabled/loaded first if placed on the screen.
Right click to remove the app or widget icon from the desktop.
Figure 10: LAYOUT SETTINGS
SCREEN SETTINGS
This section configures the desktop background picture on the GXP2200. Users could select the
pre-loaded picture from the right panel, or upload customized pictures from local PC.
Note:
The recommended picture size is 640 x 272. If the uploaded picture is too large, the GUI Config Tool will
automatically process the picture and the actual effect on the GXP2200 may be different from the original
file.
FIRMWARE 1.0.3.6 GXP2200 GUI CUSTOMIZATION GUIDE Page 9 of 14
Page 11

Figure 11: SCREEN SETTINGS
SCREENSAVER SETTINGS
This section configures the screen saver settings on the GXP2200 (see figure below). The options are the
same as in GXP2200 LCD settings->Display->Screensaver Settings.
FIRMWARE 1.0.3.6 GXP2200 GUI CUSTOMIZATION GUIDE Page 10 of 14
Page 12

Figure 12: SCREENSAVER SETTINGS
LANGUAGE AND KEYBOARD SETTINGS
This section configures language and keyboard settings on the GXP2200.
Configure the language to be used on the GXP2200.
Configure the input method to be used on the GXP2200.
Import language from local PC.
FIRMWARE 1.0.3.6 GXP2200 GUI CUSTOMIZATION GUIDE Page 11 of 14
Page 13

Figure 13: LANGUAGE AND KEYBOARD SETTINGS
OTHER SETTINGS
This section configures the system settings widget (5x1) if added on the GXP2200. Users could select the
order of the system settings options on the widget.
FIRMWARE 1.0.3.6 GXP2200 GUI CUSTOMIZATION GUIDE Page 12 of 14
Page 14

Figure 14: OTHER SETTINGS
FIRMWARE 1.0.3.6 GXP2200 GUI CUSTOMIZATION GUIDE Page 13 of 14
Page 15

EXPERIENCING THE GXP2200
Please visit our website: http://www.grandstream.com to receive the most up- to-date updates on firmware
releases, additional features, FAQs, documentation and news on new products.
We encourage you to browse our product related documentation, FAQs and User and Developer Forum
for answers to your general questions. If you have purchased our products through a Grandstream
Certified Partner or Reseller, please contact them directly for immediate support.
Our technical support staff is trained and ready to answer all of your questions. Contact a technical support
member or submit a trouble ticket online to receive in-depth support.
Thank you again for purchasing Grandstream Enterprise Application phone, it will be sure to bring
convenience and color to both your business and personal life.
* Android is a trademark of Google Inc.
FIRMWARE 1.0.3.6 GXP2200 GUI CUSTOMIZATION GUIDE Page 14 of 14
 Loading...