

Page 1

Grandstream Networks, Inc.
126 Brookline Ave, 3rd Floor
Boston, MA 02215 USA
Tel : +1 (617) 566 – 9300
Fax: +1 (617) 249 – 1987
www.grandstream.com
GXP1610
Small Business IP Phone
Quick Installation Guide
For Warranty and RMA information, please visit
www.grandstream.com
Page 2

Content
English......................................................... 1
简体中文..................................................... 6
Español....................................................... 11
Français...................................................... 16
Deutsch....................................................... 21
Italiano........................................................ 26
Polski.......................................................... 31
Português................................................... 36
Русскй.................................................... ....41
Page 3

EN
The GXP1610 is not pre-congured to support or
carry emergency calls to any type of hospital, law
enforcement agency, medical care unit (“Emergency
Service(s)”) or any other kind of Emergency Service.
You must make additional arrangements to access
Emergency Services. It is Your responsibility to purchase SIP-compliant Internet telephone service,
properly congure the GXP1610 to use that service,
and periodically test your conguration to conrm
that it works as You expect. If You do not do so, it
is Your responsibility to purchase traditional wireless
or landline telephone services to access Emergency
Services.
GRANDSTREAM DOES NOT PROVIDE CONNECTIONS TO EMERGENCY SERVICES VIA THE
GXP1610. NEITHER GRANDSTREAM NOR ITS
OFFICERS, EMPLOYEES OR AFFILIATES MAY
BE HELD LIABLE FOR ANY CLAIM, DAMAGE, OR
LOSS, AND YOU HEREBY WAIVE ANY AND ALL
SUCH CLAIMS OR CAUSES OF ACTION ARISING
FROM OR RELATING TO YOUR INABILITY TO
USE THE GXP1610 TO CONTACT EMERGENCY
SERVICES, AND YOUR FAILURE TO MAKE ADDITIONAL ARRANGEMENTS TO ACCESS EMERGENCY SERVICES IN ACCORDANCE WITH THE
IMMEDIATELY PRECEDING PARAGRAPH.
PRECAUTIONS:
WARNING: Please DO NOT power cycle the GXP1610 when the
LED lights are ashing during system boot up or rmware upgrade.
You may corrupt rmware images and cause the unit to malfunction.
WARNING: Use only the power adapter included in the GXP1610
package. Using an alternative non-qualied power adapter may
damage the unit.
OVERVIEW:
GXP1610 is a Small Business IP phone that features a single SIP account, up to 2 call appearances, 132x48 graphical
LCD, 3 XML programmable context-sensitive soft keys, dual
network ports and 3-way conference. The GXP1610 suports
superb full-duplex hands-free speakerphone with HD audio,
advanced security protection for privacy, and compatible
with Grandstream UCM Features.
PACKAGE CONTENTS:
5 V
1 x Phone Main
Case
1 x Phone Cord
1 x Handset
1 x Phone Stand
1 x 5V Power
Adapter
1 x Quick Installation Guide
1 x Ethernet
Cable
PHONE SETUP:
Wall mount holes
are available on
stand
1 2
Page 4
Slots for the phone
stand if placing the
phone on a at surface
Installing the Phone (Phone Stand):
When installing the phone stand, attach the phone stand to the back
of the phone in the dedicated slots (pictured above).
Installing the Phone (Wall Mount):
1. After attaching the phone stand, attach the phone to wall via the
wall mount holes.
2. Pull out the tab from the handset rest (See gure below).
3. Rotate the tab and plug it back into the slot with the extension up to
hold the handset while the phone is mounted on the wall.
Handset Rest
Tab with extension up
Tab with extension down
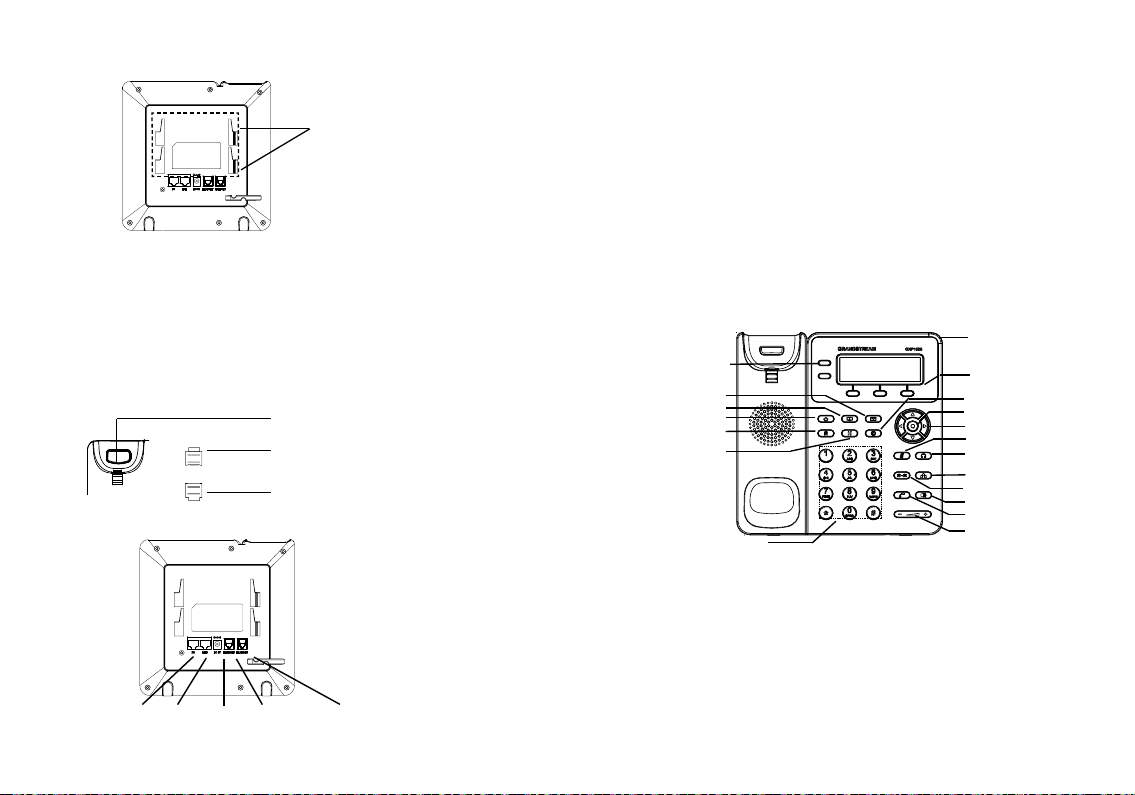
CONNECTING THE PHONE:
Power
PC Port
LAN Port
Headset Port
3
Handset Port
To setup the GXP1610, follow the steps below:
1. Connect the handset and main phone case with the phone cord.
2. Connect the LAN port of the phone to the RJ-45 socket of a hub/
switch or a router (LAN side of the router) using the Ethernet cable.
3. Connect the 5V DC output plug to the power jack on the phone;
plug the power adapter into an electrical outlet.
4. The LCD will display provisioning or rmware upgrade information.
Before continuing, please wait for the date/time display to show up.
5. Using the phone embedded web server or keypad conguration
menu, you can further congure the phone using either a static IP
or DHCP.
Tips For Using the Keypad:
Message Waiting
Line Key
Message
Phonebook
HOME Button
Page/Intercom
Hold
Standard Keypad
1. To access the MENU, press the round MENU button.
2. Navigate the menu by using the UP/DOWN and LEFT/RIGHT buttons.
3. Press the round MENU button to conrm a menu selection.
4. The phone automatically exits MENU mode when there is an incoming call, the phone goes off-hook, or when the MENU mode is
left idle for 60 seconds.
Indicator
Softkey
Record
Menu/OK key
Navigation keys
Mute
Headset
Conference
Transfer
Speaker
Send
Volume
4
Page 5

PHONE CONFIGURATION:
Congure the GXP1610 Using a Web Browser:
1. Ensure your phone is powered up and connected to the Internet.
2. Press the MENU button to access the phone menu.
3. Press the “down” arrow button to “Status” and press MENU button
to check the IP address.
4. Type the phone’s IP address in your PC browser. (See gure below)
5. The default administrator username and password are “admin”;
the default end-user username is “user“ and the password is “123”.
Congure the GXP1610 using the Keypad:
1. Make sure the phone is idle.
2. Press the MENU button to access the keypad MENU to congure
the phone.
3. Select MENU->Cong, to congure settings for SIP Proxy, Outbound Proxy, SIP User ID, SIP Auth ID, SIP Password.
4. Follow MENU options to congure the basic features of the phone.
For example: the IP address if using a static IP. For details, please
check GXP1610 User Manual.
5. Please contact your ITSP (Internet Telephony Service Provider)
for additional settings that may be necessary to congure the phone.
Note: For the detailed user manual, please download from:
http://www.grandstream.com/support
5
ZH
GXP1610不预设对医院,执法机构,医疗中心
(急救服务)以及各种紧急服务的紧急通话服务。
用户必须自行设定紧急通话功能。用户必须自
行购买SIP兼容的网络电话服务,正确的设定
GXP1610使用该服务,并定期测试您的配置以
确保GXP1610如预期工作,否则请购买传统无
线或有线电话服务来拨打紧急通话。
Grandstream Networks公司的 GXP1610不支持
紧急通话服务。Grandstream Networks 公司、
其管理者和员工以及其相关机构对此所造成的
任何索赔、损失或者损害都不负有任何法律追
究责任。在此,您将无权对任何以及所有由于
无法通过GXP1610拨打紧急电话以及没有遵照
前段文字描述而造成紧急通话失败的事件提出
诉讼。
6
Page 6

注意事项:
警告: 请不要在设备启动未完成LED灯闪烁的时候或设备的升级软件
的过程中断开电源,因为如刚才所述的操作会导致话机本身的程序损
坏,进而导致设备无法启动。
警告: 请使用设备包装中的电源,因为使用其他没有经过认证的替代
电源适配器有可能对设备造成损害。
产品概览:
GXP1610是一款功能丰富的中小型商务或者家庭IP电话。它支持单
个SIP账号,2条线路通讯,132x48图形化LCD显示屏,3个XML可
编程软按键,2个10/100 Mbps自适应交换式以太网接口以及三方会
议。GXP1610具有丰富完备的电话功能。它支持自动配置、先进的
安全隐私保护设置。它广泛兼容其它第三方SIP设备及主要SIP/NGN/
IMS平台。对于追求性价比的企业用户来说,GXP1610将是理想的
选择。
设备包装清单:
支架插槽
安装电话 (桌面):
将支架插入电话背面的支架插槽中。用户可以使用两排插槽中的一
排,不同的插槽用于不同的倾斜角度。
安装电话 (墙体):
话机手柄插槽
凸出处向上
GXP1610话机(1台)
网线 (1根)
安装电话:
7
电话手柄(1个)
手柄连线(1根)
位于支架上的墙孔
支架 (1个)
5 V
电源适配器
快速安装手册(1本)
凸出处向下
1. 将支架插入电话背面的支架插槽后,通过支架上的墙孔将电话固定
在墙上;
2. 如上图中所示,将话机手柄槽下方的扣机零件取出;
3. 将该零件倒转,然后重新插入原处。此时零件凸出处在外,当电话
使用墙体支架固定在墙上时,手柄可以垂直地稳定扣入手柄槽中,不
会滑落。
电话的连接:
PC端口
网络连接端口 5V电源
耳机 手柄
8
Page 7

连线步骤:
1. 用手柄连线连接电话手柄和电话主机;
2. 用网线连接电话的网络接口和外部网络接口(如:集线器或交换
机上的RJ-45网络接口);
3. 用电源适配器连接电话电源接口和交流电源插座;
4. 电话屏幕将会显示设备启动或固件升级信息。请耐心等待至时间/
日期显示;
5. 话机启动后,用户可以在主菜单或WEB浏览器进一步设置静态IP
或者DHCP,从而获得网络连接。
使用GXP1610键盘:
信息指示灯
线路键
信息
通讯录
HOME 键
对讲
保持
标准键盘
软按键
录音
菜单/确认键
导航键
静音
耳机
会议
转接
免提
发送
音量
1. 当电话处于空闲状态,按下菜单/确定按键进入菜单选项;
2. 使用方向选择按键 “上”“下”“左”“右”选择菜单选项;
3. 按下菜单/确定按键确定选项;
4. 当有来电进入,提起电话手柄、使用免提键或者电话处于菜单状态
中60秒之后,电话将自动退出菜单选项。
电话的配置:
通过WEB浏览器配置GXP1610 :
1. 请确保电话的电源及网络连接;
2. 按下菜单/确定按键进入菜单选项;
9
3. 使用“向下”方向键选择“状态”,按下菜单/确定按键,此时电
话屏幕显示话机IP地址;
4. 在您电脑浏览器中输入话机IP地址(电话和您的电脑必须在同一个
网段);
5. 如下图所示,请输入用户名和密码登陆。默认管理员用户名和密码
是“admin”;默认终端用户名和密码分别是“user“和“123”。
通过键盘配置GXP1610 :
1. 确保电话处于空闲状态;
2. 按下菜单/确定按键进入菜单选项;.
3. 选择菜单->设置->账号,输入SIP服务器、SIP用户名、密码等账号
信息,注册新的SIP账号;
4. 在菜单选项中进行电话其他设置。如,设置电话的静态IP地址。请
参考GXP1610产品用户手册获得更多详细配置信息;
5. 如有其他需要的设置,请联系您的服务提供商。
备注:欲获取详细的话机使用信息,请在以下链接中下载用户手册:
http://www.grandstream.com/support
10
Page 8

ES
El GXP1610 no esta pre-congurado para soportar o realizar llamadas de emergencia a ningún tipo de hospital,
agencia policial, unidad de cuidado medico o cualquier otro
servicio de emergencia. Es su responsabilidad contratar un
servicio de telefonía de Internet compatible con el proto-
colo SIP, congurar el GXP1610 para utilizar dicho servicio
y periódicamente probar esta conguración para conrmar
que este trabajando como usted espera. Si este requisito
no es completado, es su responsabilidad contratar un ser-
vicio de telefonía ja o celular para tener acceso a servicios
de emergencia.
GRANDSTREAM NO PROVEE CONEXIONES A SERVICIOS DE EMERGENCIA A TRAVÉS DEL GXP1610. NI
GRANDSTREAM NI NINGUNO DE SUS ACCIONISTAS,
EMPLEADOS O AFILIADOS SON RESPONSABLES DE
NINGUNA DEMANDA, DAÑO O PERDIDA QUE ESTO
PUEDA OCASIONAR Y MEDIANTE ESTE COMUNICADO
USTED RENUNCIA A CUALQUIER RECLAMO O CONSECUENCIA PROVENIENTE O RELACIONADO DE LA
INHABILIDAD DE CONTACTAR SERVICIOS DE EMERGENCIAS CON EL GXP1610 Y SU FALTA DE NO HABER
HECHO LOS ARREGLOS DE LUGAR PARA ACCESAR
ESTOS SERVICIOS DE EMERGENCIA DE ACUERDO
CON EL PÁRRAFO ANTERIOR.
PRECAUCIONES:
CUIDADO:
parpadeando durante el reinicio o actualizando del rmware. Se puede corromper los archivos causando que el equipo no se comporte
correctamente.
Por favor NO apague el GXP1610 cuando la luz este
CUIDADO: Use solamente el adaptador de corriente incluido con
el GXP1610. Usar uno alternativo puede dañar el equipo.
INFORMACIÓN GENERAL:
El GXP1610 es un teléfono IP para PYMES que cuenta con una
sola cuenta SIP, hasta dos llamadas activas, pantalla LCD graca
de 132X48, 3 teclas de funciones programables sensibles al contexto XML, dos puertos de red y conferencia de 3 vías. El GXP1610
soporta un magnico altavoz de dos vías, avanzada protección de
seguridad para privacidad y compatibilidad con funciones de la UCM
Grandstream.
CONTENIdO:
5 V
1 x Base Principal
1 x Cable de Red
1 x Auricular
1 x Cable Telefónico
1 x Adaptador de
Alimentación de 5V
1 x Guia de Insta-
lación Rapida
1 x Soporte de Teléfono
INSTALACIÓN dEL TELEFONO:
Instalando El Teléfono (Soporte de Teléfono) :
Cuando instale el soporte del teléfono, conecte el soporte del teléfono en la parte posterior del teléfono en las ranuras correspondientes.
Los agujeros para
el montaje de pared
están disponibles en
la base
11
12
Page 9

Ranuras para el pedestal del telefono en
caso de colocar el
telefono sobre una
supercie plana
Instalando El Teléfono (Montura de Pared):
1. Después de colocar la base, ajuste el teléfono a la pared usando
los oricios de montura.
2. Tire de la lengüeta del soporte del auricular. (Véase la gura de
abajo).
3. Gire la lengüeta y vuelva a conectarla en la ranura con la extensión hacia arriba para sostener el auricular cuando el teléfono está
montado en la pared (Véase la gura de abajo).
Soporte de Auricular
Lengüeta con extensión
hacia arriba
Lengüeta con extensión
hacia abajo
CONECTANdO EL TELéFONO:
Puerto
Auricular
13
Puerto PC
Puerto LAN
Aliment
ación
-
Puerto de Recep
tor de Cabeza
Para congurar el GXP1610 siga los siguientes pasos:
1. Conecte el auricular y la base principal con el cable de teléfono.
2. Conecte el puerto LAN del teléfono a la toma RJ-45 de un hub/
switch o un router (del lado LAN del router) mediante El cable de
Red.
3. Conecte el enchufe de 5V DC a la salida de alimentación del teléfono, enchufe el adaptador de alimentación a una toma de corriente
eléctrica.
4. La pantalla LCD mostrará información de aprovisionamiento o ac-
tualización de rmware. Antes de continuar, por favor esperar hasta
que muestre a la fecha/hora.
5. Utilizando el servidor Web del teléfono o el menú de conguración
del teclado, usted podrá congurar el teléfono a través de una direc-
ción IP estática o DHCP.
Consejos para usar el Teclado:
Indicador de Men-
Teclas de Linea
Mensaje
Agenda telefónica
Tecla de HOME
Voceo/Intercom
Retener
Teclado Estándar
1. Para acceder al menú, pulse el botón MENU de forma redondeada.
2. Navegue por el menú usando las teclas ARRIBA/ABAJO e IZQUIERDA/DERECHA.
3. Presione el botón redondo MENU para conrmar una selección
del menú.
4. El teléfono saldrá automáticamente del modo MENU cuando haya
una llamada entrante, el teléfono sea descolgado, o cuando el modo
MENU es dejado inactivo durante 60 segundos.
saje en Espera
Teclas Program
ables
Registro
Tecla de Menu / OK
Teclas de Navegación
Silenciar
Receptor de Cabeza
Conferencia
Transferencia
Altavoz
Enviar
Volumen
-
14
Page 10

CONFIGURACIÓN dEL TELéFONO:
Congurando el GXP1610 usando su navegador de
Internet:
1. Asegúrese de que su teléfono está encendido y conectado a Internet.
2. Presione el botón de MENÚ para acceder al menú del teléfono.
3. Presione el botón de fecha “Abajo” para ver el estado “Estado” y
presione el botón MENÚ para ver la dirección IP del teléfono.
4. Escriba la dirección IP del teléfono en el navegador de su PC
(Véase la gura de abajo).
5. El nombre de usuario y contraseña de administrador predetermi-
nado es “admin”; el nombre de usuario para usuario nal es “user” y
la contraseña “123”.
Congurar el GXP1610 usando el teclado:
1. Asegúrese de que el teléfono esté en estado inactivo.
2. Pulse el botón “MENU” para acceder a las opciones del menú para
congurar el teléfono.
3. Seleccione MENÚ->Cong, para congurar los ajustes del proxy
SIP, Proxy de salida, ID de usuario SIP, ID de Auth SIP y Contraseña
SIP.
4. Siga las opciones de MENU para congurar las funciones básicas
del teléfono - por ejemplo: La Dirección IP, en caso de usar una dirección IP estática. Para obtener más información, consulte el Manual
del usuario del GXP1610.
5. Por favor contacte a su PSI (Proveedor de Servicio de Internet)
para los ajustes adicionales que sean necesarios para congurar el
teléfono.
Nota: Para obtener el manual de usuario, favor haga click aquí:
http://www.grandstream.com/support
FR
Le GXP1610 n’est pas préconguré pour prendre en charge
ou acheminer les appels d’urgence adressés aux hôpitaux,
organismes chargés de l’application de la loi, centres de
soins médicaux (« service(s) d’urgence ») ou tout autre
type de service d’urgence. Vous devez prendre des dispositions supplémentaires pour assurer l’accès aux services
d’urgence. Il est de votre responsabilité de vous abonner
à un service de téléphonie Internet conforme au protocole
SIP, de congurer correctement le GXP1610 pour utiliser
ce service, et de tester périodiquement votre conguration
pour vous assurer qu’elle fonctionne comme prévu. Si vous
ne le faites pas, vous devez vous abonner à un service de
téléphonie sans l ou xe traditionnel pour accéder aux services d’urgence.
GRANDSTREAM NE FOURNIT PAS DE CONNEXIONS
AUX SERVICES D’URGENCE VIA LE GXP1610. NI
GRANDSTREAM, NI SES DIRIGEANTS, EMPLOYES
OU SOCIETES AFFILIEES NE PEUVENT ETRE TENUS
RESPONSABLES POUR TOUTE RECLAMATION, TOUT
DOMMAGE OU PERTE, ET VOUS RENONCEZ PAR LES
PRESENTES A TOUTE RECLAMATION OU TOUT MOTIF
D’ACTION EN JUSTICE DÉCOULANT OU LIE A VOTRE
INCAPACITE D’UTILISER LE GXP1610 POUR CONTACTER LES SERVICES D’URGENCE, ET TOUTE NEGLIGENCE DE VOTRE PART QUANT A PRENDRE DES DISPOSITIONS SUPPLEMENTAIRES POUR ACCEDER AUX
SERVICES D’URGENCE CONFORMÉMENT À L’ALINÉA
PRÉCÉDENT.
1615
Page 11

PRéCAUTIONS:
AvERTISSEMENT: Ne redémarrez pas le GXP1610 lorsque les
LEDs clignotent durant l’initialisation ou la mise à jour du rmware.
Ça peut corrompre le rmware et causer un dysfonctionnement de
l’équipement.
AvERTISSEMENT:
clus dans le pack du GXP1610. L’utilisation d’un boitier d’alimentation
Utilisez seulement le boitier d’alimentation in-
alternative non qualié peut endommager l’équipement.
APERÇU:
Le GXP1610 est un simple téléphone IP pour entreprise qui dispose
d’un compte SIP unique, allant jusqu’à 2 représentations d’appel,
écran LCD de 132x48, 3 touches logicielles programmables via
XML, double ports Ethernet et conférences à 3 voies. Le GXP1610
supporte une qualité audio HD et full-duplex en utilisant le hautparleur, protection de la vie privée avec une sécurité avancée, et
compatible avec les fonctionnalités de l’UCM Grandstream.
CONTENU dU PACK :
5 V
1 x Boîtier principal
1 x Câble
téléphonique
1 x Combiné
1 x Support
du téléphone
1 x 5V Adaptateur secteur
1 x Guide
d’installation rapide
1 x Câble
Ethernet
INSTALLATION dU TéLéPHONE:
Des Trous pour montage mural sont disponibles sur le socle.
Fentes pour le berceau
du téléphone s’il est à
mettre sur une surface
plane.
Installation du téléphone (Support du téléphone) :
Lors de l’installation du stand de téléphone, xer le support du téléphone à l’arrière du téléphone dans les emplacements dédiés.
Installation du Téléphone (Support Mural):
1. Après avoir attaché le support du téléphone, attachez le téléphone
au mur via les orices du socle de montage mural.
2. Tirez la languette du support du combiné (Voir gure ci-dessous).
3. Pivotez la languette et rebranchez-la dans la fente en gardant son
appui vers le haut pour tenir le combiné lorsque le téléphone est xé
au mur.
Appui du combiné
Languette avec appui
vers le haut
Languette avec appui
vers le bas
CONNECTER LE TéLéPHONE:
Port PC
Port LAN
Alimentation
Port Casque
Port Combiné
1817
Page 12

Pour congurer le GXP1610, suivez les étapes ci-dessous:
1. Connectez le combiné et la base principale du téléphone en utilisant le cordon téléphonique.
2. Connectez le port LAN du téléphone à la prise RJ-45 d’un hub /
switch ou routeur (côté LAN du routeur) via le câble Ethernet.
3. Connectez l’adaptateur d’alimentation dans le port 5V DC du téléphone. Branchez l’autre extrémité à une prise électrique.
4. L’écran LCD afchera les informations concernant le provisionnement et la mise à jour du rmware. Avant de continuer, veuillez
patienter jusqu’à ce que vous voyez la date et l’heure au niveau de
1. Vériez que votre téléphone est sous tension et connecté à Internet.
2. Appuyez sur le bouton MENU pour accéder au menu du téléphone.
3. Appuyez sur la touche èche descendante pour atteindre « statut
», et appuyez sur le bouton MENU pour vérier l’adresse IP.
4. Saisissez l’adresse IP du téléphone dans le navigateur de votre
PC (Voir gure ci-dessous).
5. Le mot de passe d’administrateur par défaut est “admin”, le mot de
passe “user” par défaut est “123”.
l’écran.
5. Vous pouvez congurer davantage les options d’adressage IP statique et/ou dynamique en utilisant l’interface web du téléphone ou
bien le clavier téléphonique.
Conseils d’utilisation du clavier:
Indicateur de mes
Touches Lignes
Message
Répertoire
Touche HOME
Page/Intercom
Mise en attente
Clavier standard
sage en attente
Touches contextuels
Enregistrement
Touche Menu/OK
Touches de naviguation
Muet
Casque
Conférence
Transfert
Haut-parleur
Envoyer
Volume
1. Pour accéder au MENU, appuyez sur la touche ronde MENU.
2. Naviguez dans le menu en utilisant les èches HAUT/BAS et DR-
OITE/GAUCHE.
3. Appuyez sur le bouton MENU pour conrmer la sélection.
4. Le téléphone automatiquement quitte le MENU s’il y’ a un appel
entrant, s’il est décroché, ou bien si le menu principale est inactif
pour 60 secondes.
CONFIGURATION dU TELEPHONE:
Congurer le GXP1610 en utilisant l’interface Web:
-
Conguration du GXP1610 en utilisant le clavier du téléphone:
1. Assurez-vous que le téléphone est inactif.
2. Appuyez sur le bouton MENU pour accéder au menu du téléphone.
3. Sélectionnez Menu->cong, pour congurer les paramètres du
Proxy SIP, Proxy extérieur, Identicateur de l’utilisateur SIP, Identicateur d’authentication SIP et le mot de passe
4. Suivez les options du menu pour congurer les fonctionnalités
du téléphone - par exemple: l’adresse IP si vous utilisez une adresse IP statique. Pour plus de détails, veuillez consulter le manuel
d’utilisation du GXP1610.
5. Veuillez contactez votre Fournisseur d’accès Internet pour les
paramètres supplémentaires qui peuvent être nécessaires pour con-
gurer le téléphone.
Note: Pour plus de détails, veuillez consulter le manuel d’utilisation
sur: http://www.grandstream.com/support
19 20
Page 13

DE
Im GXP1610 sind keine Notfallrufnummern voreingestellt
oder vorkonguriert. Das GXP1610 tätigt keine automatischen Anrufe zu medizinischen, sozialen oder juristischen
Hilfs- oder Serviceorganisationen. Die Anbindung an derartige Einrichtungen muss separat eingestellt bzw. zur Verfügung gestellt werden. Es liegt in der Verantwortung des
Nutzers, einen SIP-konformen Internet-Telefon-Service zu
buchen, der die Nutzung der örtlichen und überregionalen
Notrufnummern sicherstellt. Bietet der SIP-Anbieter diesen
Service nicht, liegt es in der Verantwortung des Nutzers,
einen analogen bzw. alternativen Telefonanschluss zusätzlich bereit zu stellen, um eine telefonische Anbindung für
Notfälle sicherstellen zu können.
GRANDSTREAM STELLT MIT DEM GXP1610 KEINE
VERBINDUNG ZU NOTFALLRUFNUMMER ODER DIE
ANBINDUNG AN NOTFALLZENTREN ZUR VERFÜGUNG.
WEDER GRANDSTREAM, NOCH GRANDSTREAM
MITARBEITER, ANGESTELLTE ODER SONSTIGE
FIRMEANGEHÖRIGE SIND FÜR DIE ANDBINDUNG
DES GXP1610 AN EINEN MEDIZINISCHEN SERVICE
ODER ANDEREN NOTFALLDIENST ZUSTÄNDIG, BZW.
VERANTWORTLICH.ES OBLIGT ALLEINIG IN DER VERANTWORTUNG DER GXP1610 NUTZER BZW. DER
GXP1610 BESITZER, FÜR EINE NETZANBINDUNG ZU
SORGEN, WELCHE DIE NUTZUNG VON MEDIZINISCHEN ODER ANDEREN NOTFALLRUFNUMMERN SICHERSTELLT.
21
VORSICHTSMAßNAHMEN:
WARNUNG:
der ein, wenn die LED-Lichter während der Systemauadung oder
der Firmware-Aktualisierung blinken. Die Firmware-Bilder können
dadurch fehlerhaft werden, sowie die Störfunktionen des Geräts
werden dadurch ermittelt.
Schalten Sie bitte das GXP1610 NICHT aus und wie-
WARNUNG: Verwenden Sie nur den im GXP1610 Paket einge-
schlossenen Netzadapter. Die Verwendung eines alternativen, nicht
geeigneten Netzadapters kann vielleicht das Gerät beschädigen.
ÜBERBLICK:
Das GXP1610 ist ein einfaches IP-Telefon der Einsteigerklasse. Es
ermöglicht zwei parallele Gespräche, kann eine SIP Identität verwalten und bietet drei XML programmierbare, kontextsensitive Softtasten. Auf dem 132x48 Pixel großen LCD Display sind alle wichtigen Informationen klar und übersichtlich erkennbar. Ferner bietet
das GXP1610 zwei Netzwerkports, hervorragende Echounterdrückung im Freisprechmodus, umfangreiche Funktionen in Verbindung
mit der Grandstream UCM Serie sowie die Möglichkeit, eine DreierKonferenz zu initiieren.
LIEFERUMFANG:
5 V
1 x Telefonhaupt-
gehäuse
1 x Telefon-kabel
1 x Hörer
1 x KurzInstallationsanleitung
1 x 5V Netzadapter
TELEFONINSTALLATION:
1 x Ethernet
-kabel
1 x Telefon-Montage
Die Befestigungslöcher zur Wandmontage sind im
Standfuss integriert.
22
Page 14

Montage-Aufnahme zur Befestigung des Standfußes, wenn das
Telefon auf eine
ebene Unterlage
gestellt wird.
Telefoninstallation (Telefonstandplatz):
Zur Montage des Standfußes stecken Sie diesen in die dafür vorgesehenen Aussparungen an der Rückseite des Telefons.
Telefoninstallation (Wandhalterung):
1. Nach Anbringen der Halterung am Telefon können Sie dieses an
den vorgesehenen Montagelöchern an der Wand befestigen.
2. Ziehen Sie den Schieber an der Hörerauage (Bitte die untere
Skizze beachten).
3. Stecker drehen und ihn wieder in die Einbaustelle einstecken um
den Hörer festzuhalten, während das Telefon an die Wand angebracht wird.
Hörergabel
Stecker mit Ansatzstück auf
Stecker mit Ansatzstück runter
TELEFON ANSCHLIESSEN:
PC-Anschluss
LAN-An
schluss
-
Kopfhörer-
Netz
Anschluss
HörerAnschluss
Für das GXP1610-Setup folgen Sie den Schritten unten:
1. Schließen Sie den Hörer und das Haupttelefongehäuse an die
Telefonschnur an.
2. Schließen Sie den LAN-Anschluss des Telefons an die RJ-45
Steckdose eines Netzknotens/Schalters oder eines Routers (LANSeite des Routers), unter Verwendung des Ethernet-Kabels an.
3. Schließen Sie den 5V DC-Ausgangsstecker an die Energiensteckfassung am Telefon an; stecken Sie den Netzadapter in einen elektrischen Anschluss ein.
4. Das LCD-Display zeigt Informationen zur Bereitstellung
zum Firmware-Upgrade an. Warten Sie, bevor Sie fortfahren, bis die
Datums-/Zeitanzeige erscheint.
5. Mit dem eingebetteten Webserver- Tastenfeldkongurationsmenü
können Sie das Telefon mittels statischem IP oder DHCP weiter kon-
gurieren.
Tipps zum Gebrauch des Tastenfeldes:
Leitungstasten
Nachricht
Telefonbuch
HOME-Taste
Page/Intercom
Halten
Standard-Tasten
1. Um auf das Menü zuzugreifen, betätigen Sie die runde MENÜ-
Taste.
2. Navigieren Sie mit den Tasten NACH OBEN/NACH UNTEN bzw.
LINKS/RECHTS durch das Menü.
3. Um eine Menüauswahl zu bestätigen, betätigen Sie die runde
MENÜ-Taste.
4. Das Telefon verlässt den MENÜ-Modus automatisch, wenn ein
Anruf eingeht, das Telefon nicht richtig aufgelegt ist oder wenn Sie
im MENÜ-Modus 60 Sekunden keine Taste betätigen.
Nachrichtenanzeige
Soft-Tasten
Aufzeichnung
Menü / Bestätigung
staste (OK Taste)
Navigationstasten
Stumm
Hör-Sprecheinheit
Konferenz
Verbinden
Lautsprecher
Senden
Lautstärke
oder
-
2423
Page 15

KONFIGURIERUNG dES TELEFONS:
Konguration des GXP1610 mittels Web-Browser:
1. Versichern Sie dass das Telefon angestellt ist und mit dem Internet
verbunden.
2. Durch drücken der Menü-Taste gelangen Sie in das Menü des
Telefons.
3. Die Statusanzeige erhalten Sie durch drücken der Pfeil „nach
unten“ Taste, durch drücken der MENÜ-Taste wird die IP-Adresse
angezeigt.
4. Die IP-Adresse des Telefons in den Browser des PCs eingeben
(siehe Abbildung rechts).
5. Der voreingestellte Administrator-Benutzername sowie das voreingestellte Passwort ist jeweils „admin“, der voreingestellte NutzerBenutzername ist „user“, das Passwort ist „123“.
Das GXP1610 per Tastenfeld kongurieren:
1. Stellen Sie sicher, dass das Telefon im Bereitschaftsmodus ist.
2. Greifen Sie über die Taste MENÜ auf die Menüoptionen zur Kon-
guration des Telefons zu.
3. Auswahl MENÜ->Kong., zur Konguration von SIP Proxy, Outbound Proxy, SIP Nutzer-ID, SIP Authentizierungs-ID, SIP Pass-
wort.
4. Folgen Sie den MENÜ-Optionen, um die Basismerkmale des Tele-
fons zu kongurieren. Beispiel: IP-Adresse, wenn ein statisches IP
verwendet wird. Für Einzelheiten konsultieren Sie bitte das Benutzerhandbuch zur GXP1610.
5. Bitte wenden Sie sich an Ihren ITSP (Internet Telefon Service Provider) für weit ere Einstellungen, die möglicherweise nötig sind, um
das Telefon zu kongurieren.
Bemerkung: Das ausführliche Benutzerhandbuch kann geladen
werden von: http://www.grandstream.com/support
25
IT
GXP1610 non è precongurato per supportare o effettuare
chiamate di emergenza a qualsiasi tipo di ospedale, struttura giudiziaria, unità di assistenza medica (“Servizi di emergenza”) o a qualsiasi altro tipo di servizio di emergenza. È
necessario effettuare accordi supplementari per accedere
ai Servizi di emergenza. E’ a Vostra esclusiva responsabilità acquistare servizi di telefonia internet conformi con SIP,
congurare GXP1610 correttamente per usare tale servizio
ed effettuare test periodici della congurazione per assicu-
rarsi che funzioni in modo idoneo. Se non si effettua ciò,
è Vostra responsabilità acquistare servizi telefonici ssi o
wireless tradizionali per accedere ai Servizi di emergenza.
GRANDSTREAM NON FORNISCE COLLEGAMENTI AI
SERVIZI DI EMERGENZA ATTRAVERSO GXP1610. NÈ
GRANSTREAM NÈ I SUOI RESPONSABILI, DIPENDENTI
O AFFILIATI POSSONO ESSERE RITENUTI RESPONSABILI DI QUALSIASI RECLAMO, DANNO O PERDITA,
E DI QUALSIASI AZIONE LEGALE DERIVANTE DA TALI
RECLAMI O CAUSE IN RELAZIONE ALL’IMPOSSIBILITÀ
DI USARE IL GXP1610 PER CHIAMATE AI SERVIZI O DI
STRINGERE ACCORDI SUPPLEMENTARI PER ACCEDERE AI SERVIZI DI EMERGENZA IN CONFORMITÀ AL
PARAGRAFO PRECEDENTE.
26
Page 16

PRECAUZIONI:
AvvERTENZA:
LED lampeggiano durante l’avvio del sistema o l’aggiornamento del
rmware. Ciò potrebbe comportare il danneggiamento del rmware
e il malfunzionamento dell’unità.
NON spegnere/accendere il GXP1610 mentre i
AvvERTENZA: Usare solo l’alimentatore incluso nella confezi-
one del GXP1610. L’uso di un alimentatore alternativo non idoneo
potrebbe danneggiare l’unità.
PANORAMICA:
GXP1610 è un telefono IP per piccole imprese dotato di un account
SIP singolo, no a 2 modalità di chiamata, LCD graco 132x48, 3
tasti funzione sensibili al contesto programmabili in XML, due porte
di rete e conferenza a 3. Il GXP1610 supporta uno stupefacente altoparlante vivavoce full-duplex con audio HD, protezione sicurezza
avanzata per la privacy ed è compatibile con le funzionalità UCM
Grandstream.
CONTENUTO dELLA CONFEZIONE:
5 V
1 x Case PrincipaleTelefono
1 x Cavo Ethernet
1 x Ricevitore
1 x Cavo Telefonico
1 x Alimentatore 5V
1 x Guida rapida
di installazione
1 x Supporto
Telefono
MONTAGGIO TELEFONO:
Sul supporto sono disponibili i fori per il montaggio a parete
Alloggiamenti per il
supporto del telefono
per posizionare il tele-
fono su una supercie
piana
Installazione del telefono (supporto telefono):
Per installare il supporto telefono, ssare il supporto al retro del telefono negli alloggiamenti dedicati. (immagine in alto)
Installazione del telefono (montaggio a parete):
1. Dopo aver montato il supporto del telefono, montare il telefono al
muro tramite le apposite asole di montaggio.
2. Estrarre l’aletta dal resto del ricevitore. (Vedere la gura sottostante)
3. Ruotare l’aletta e riposizionarla nell’alloggiamento con l’estensione
verso l’alto in modo da poter sostenere il ricevitore mentre il telefono
è montato a parete.`
CONNESSIONE dEL TELEFONO:
Porta PC
Porta LAN
Alimentazione
Supporto ricevitore
Aletta con estensione
verso l’alto
Aletta con estensione
verso il basso
Porta per
auricolare
Porta
ricevitore
2827
Page 17

Per impostare il GXP1610, seguire la seguente procedura:
1. Collegare il ricevitore e il case principale del telefono con il cavo
telefonico.
2. Collegare la porta LAN del telefono alla presa RJ-45 di un hub o di
un router (lato LAN del router) usando un cavo ethernet.
3. Collegare il jack dell’alimentatore all’uscita 5V CC sul telefono;
collegare l’alimentatore a una presa elettrica.
4. Lo schermo LCD visualizzerà le informazioni per l’aggiornamento
di rmware o provisioning. Prima di proseguire, attendere che appaia
il display Data/Ora.
5. Grazie all’uso del menu di congurazione della tastiera o del
server web è possibile congurare ulteriormente il telefono con IP
statico o DHCP.
Consigli per l’uso della tastiera:
Tasti linea
Messaggio
Rubrica
Tasti HOME
Cercapersone/
Interfono
Tenere in linea
Tastierino standard
1. Per accedere al MENU, premere il pulsante tondo MENU.
2. Spostarsi all’interno del menu utilizzando i pulsanti SU/GIÙ e DESTRA/SINISTRA.
3. Per confermare una selezione, premere il pulsante tondo MENU.
4. Quando arriva una chiamata, quando si sgancia il ricevitore o
quando la modalità MENU viene lasciata inattiva per 60 secondi, il
telefono esce automaticamente dalla modalità MENU.
29
Indicatore Messaggio in attesa
Tasti funzione
Registrazione
Tasto Menu/OK
Tasti per la
navigazione
Silenzia
Cufa
Conferenza
Trasferimento
Altoparlante
Invia
Volume
CONFIGURAZIONE dEL TELEFONO:
Congurazione del GXP1610 mediante un browser
web:
1. Assicurarsi che il telefono sia in corrente e collegato a internet.
2. Premere il pulsante MENU per accedere al menu del telefono.
3. Premere la freccia “giù” no a “Stato”, premere quindi il pulsante
MENU per vericare l’indirizzo IP.
4. Digitare l’indirizzo IP del telefono nel browser del vostro PC (Ve-
dere la gura sottostante).
5. Il nome utente e la password amministratore predenita sono
“admin”; il nome utente per l’utente nale predenito è “user” e la
password è “123”.
Come congurare il GXP1610 utilizzando la tastiera:
1. Assicurarsi che il telefono sia inattivo.
2. Premere il pulsante “MENU” per accedere alle opzioni che consen-
tono di congurare il telefono.
3. Selezionare MENU->Congurazione per congurare le impostazi-
oni Proxy SIP, Proxy in uscita, ID utente SIP, Id Aut SIP, Password
SIP.
4. Seguire le opzioni del MENU per congurare le caratteristiche di
base del telefono, per esempio: l’indirizzo IP, nel caso in cui venga
utilizzato un IP statico. Per i dettagli, vericare il Manuale d’Uso per
la GXP1610.
5. Contattare il vostro ITSP (fornitore servizi di telefonia internet) per
le impostazioni supplementari che possono essere necessarie per la
congurazione del telefono.
Nota: Scaricare il manuale utente dettagliato da:
http://www.grandstream.com/support
30
Page 18

PL
Urządzenie GXP1610 nie jest wstępnie skongurowane
do obsługi lub wykonywania połączeń alarmowych do szpitali, organów ochrony porządku publicznego, jednostek
opieki medycznej (zwanych dalej „służbami ratunkowymi”)
ani jakichkolwiek innych służb ratunkowych. Aby uzyskać
dostęp do służb ratunkowych, konieczne jest wprowadzenie dodatkowych ustawień. Użytkownik jest odpowiedzialny
za zakup usługi telefonii internetowej zgodnej z protokołem
SIP, odpowiednią kongurację urządzenia GXP1610
umożliwiającą korzystanie z tej usługi oraz okresowe testy
konguracji w celu sprawdzenia, czy działa ona zgodnie z
oczekiwaniami. W przypadku niewykonania tych czynności
użytkownik jest odpowiedzialny za zakup tradycyjnych bezprzewodowych lub przewodowych usług telefonicznych w
celu uzyskania dostępu do służb ratunkowych.
FIRMA GRANDSTREAM NIE ZAPEWNIA MOŻLIWOŚCI
POŁĄCZENIA ZE SŁUŻBAMI RATUNKOWYMI ZA
POŚREDNICTWEM URZĄDZENIA GXP1610. FIRMA
GRANDSTREAM, JEJ KIEROWNICTWO, PRACOWN-
ICY ANI PODMIOTY STOWARZYSZONE NIE MOGĄ
BYĆ POCIĄGNIĘTE DO ODPOWIEDZIALNOŚCI Z
TYTUŁU JAKICHKOLWIEK ROSZCZEŃ, SZKÓD LUB
STRAT, A UŻYTKOWNIK NINIEJSZYM ZRZEKA SIĘ
WSZELKICH TEGO TYPU ROSZCZEŃ I PODSTAW
POWÓDZTWA WYNIKAJĄCYCH LUB POWIĄZANYCH
Z NIEMOŻNOŚCIĄ UŻYCIA URZĄDZENIA GXP1610
W CELU NAWIĄZANIA KONTAKTU ZE SŁUŻBAMI RA-
TUNKOWYMI I NIEWPROWADZENIEM DODATKOWYCH
USTAWIEŃ UMOŻLIWIAJĄCYCH UZYSKANIE DOSTĘPU
DO SŁUŻB RATUNKOWYCH ZGODNIE Z INFORMACJA-
MI W POPRZEDNIM AKAPICIE.
31
ŚRODKI OSTROŻNOŚCI:
PRZESTROGA: NIE NALEŻY wyłączać i włączać urządzenia
GXP1610, gdy diody LED migają podczas rozruchu systemu lub
aktualizacji oprogramowania układowego. Może to spowodować
uszkodzenie obrazów oprogramowania układowego i nieprawidłową
pracę urządzenia.
PRZESTROGA:Należy korzystać wyłącznie z zasilacza dołą-
czonego do zestawu urządzenia GXP1610. Użycie innego, nieodpowiedniego zasilacza może spowodować uszkodzenie urządzenia.
OPIS URZĄDZENIA:
GXP1610 to telefon IP dla małych rm obsługujący jedno
konto SIP i do 2 połączeń, dysponujący wyświetlaczem
LCD o rozdzielczości 132x48, 3 klawiszami kontekstowymi
z możliwością programowania w języku XML, dwoma portami sieciowymi i oferujący możliwość tworzenia konferencji
dla 3 użytkowników. Urządzenie GXP1610 oferuje wysokiej
jakości pełnodupleksowy tryb głośnomówiący z dźwiękiem
w rozdzielczości HD, zaawansowane zabezpieczenia prywatnych danych oraz zgodność z funkcjami urządzeń
Grandstream UCM.
ZAWARTOŚĆ OPAKOWANIA:
5 V
1 x jednostka
główna telefonu
1 x przewód
telefoniczny
1 x słuchawka
1 x podstawka
na telefon
1 x zasilacz 5 V
1 x kabel Ethernet
1 x Przewodnik
szybkiej instalacji
INSTALACJA TELEFONU:
Otwory do montażu na
ścianie znajdują się w
podstawce
32
Page 19

Miejsca na podstawkę
na telefon w przypadku
umieszczania telefonu
na płaskiej powierzchni
Instalacja telefonu (podstawka na telefon):
Instalując podstawkę na telefon, należy przymocować podstawkę do
odpowiednich miejsc w tylnej części telefonu (pokazane wyżej).
Instalacja telefonu (montaż na ścianie):
1. Po zamocowaniu podstawki na telefon przymocuj telefon do
ściany, wykorzystując otwory do montażu na ścianie.
2. Wyciągnij zaślepkę z podpórki słuchawki.
3. Obróć zaślepkę i włóż ją z powrotem do gniazda, kierując
przedłużenie do góry, tak aby utrzymywało ono słuchawkę, gdy telefon jest zamontowany na ścianie (zob. rysunek po prawej).
Podpórka słuchawki
Zaślepka z przedłużeniem
skierowanym do góry
Zaślepka z przedłużeniem
skierowanym na dół
PODŁĄCZANIE TELEFONU:
Port podłączania
do komputera
Port LAN
Zasilanie
Port zestawu
słuchawkowego
Port słuchawki
Aby skongurować urządzenie GXP1610, należy postępować zgodnie z poniższymi instrukcjami:
1. Podłącz słuchawkę do głównej jednostki telefonu za pomocą prze-
wodu telefonicznego.
2. Podłącz kabel Ethernet do portu LAN w telefonie i gniazda RJ-45
przełącznika/koncentratora lub routera (strona LAN routera).
3. Podłącz wtyczkę wyjściową napięcia 5 V prądu stałego do gniazda
zasilania w telefonie; podłącz zasilacz do gniazda elektrycznego.
4. Na wyświetlaczu LCD wyświetlony zostanie ekran ładowania
lub informacja o aktualizacji oprogramowania układowego. Przed
kontynuacją należy poczekać na wyświetlenie daty i godziny.
5. Przy użyciu wbudowanego w telefonie serwera sieciowego lub
menu konguracji na klawiaturze można dokonać dalszej kongu-
racji telefonu z wykorzystaniem statycznego adresu IP lub DHCP.
Wskazówki dotyczące korzystania z klawiatury:
Klawisz linii
Wiadomość
Książka telefoniczna
Klawisz HOME
Strona/interkom
Wstrzymanie
Standardowa klawiatura
1. Aby uzyskać dostęp do MENU, naciśnij okrągły przycisk MENU.
2. Do nawigacji w menu służą przyciski GÓRA/DÓŁ i LEWO/PRA-
WO.
3. Naciśnij okrągły przycisk MENU, aby potwierdzić wybór w menu.
4. W przypadku połączenia przychodzącego, podniesienia słuchawki
lub pozostawienia trybu MENU przez 60 sekund bez wykonywania
żadnych czynności wyjście z trybu MENU nastąpi automatycznie.
Wskaźnik oczekującej
wiadomości
Klawisz programowy
Nagrywaj
Klawisz Menu/OK
Klawisze nawigacji
Wycisz
Słuchawka
Konferencja
Przekieruj
Głośnik
Wyślij
Głośność
3433
Page 20

KONFIGURACJA TELEFONU:
Konguracja urządzenia GXP1610 przy użyciu
przeglądarki internetowej:
1. Upewnij się, że telefon jest włączony i połączony z Internetem.
2. Naciśnij przycisk MENU, aby wejść do menu telefonu.
3. Naciskaj przycisk strzałki w dół, aż zostanie zaznaczona pozycja
„Status”, a następnie naciśnij przycisk MENU, aby sprawdzić adres
IP.
4. Wpisz adres IP telefonu w przeglądarce na komputerze. (Zob. rysunek po prawej)
5. Domyślna nazwa użytkownika i hasło dla administratora to „admin”; domyślna nazwa użytkownika końcowego to „user”, a hasło
to „123”.
PT
O GXP1610 não é pré-congurado para suportar ou
realizar chamadas de emergência a qualquer tipo de
hospital, agência policial, unidade de atendimento
médico (“Serviço (s) de emergência”), ou qualquer
outro tipo de serviço de emergência. Você deverá
tomar providências adicionais para acessar serviços
de emergência. É da sua responsabilidade adquirir
serviço de telefonia via Internet compatível com o
protocolo SIP, congurar corretamente o GXP1610
para usar esse serviço e periodicamente testar a
conguração para conrmar que ele funciona como
você espera. Se você não zer isso, é da sua re-
sponsabilidade adquirir os serviços tradicionais de
telefones celulares ou xos para acessar serviços de
emergência.
Konguracja urządzenia GXP1610 przy użyciu klawiatury:
1. Upewnij się, że telefon jest w stanie bezczynności.
2. Naciśnij przycisk MENU, aby uzyskać dostęp do MENU klawiatury
w celu skongurowania telefonu.
3. Wybierz MENU->Konguracja, aby skongurować ustawienia
dla serwera proxy SIP, serwera proxy ruchu wychodzącego, ID
użytkownika SIP, ID uwierzytelniania SIP oraz hasła SIP.
4. W kolejnych opcjach MENU skonguruj podstawowe funkcje
telefonu. Na przykład: adres IP w przypadku używania statycznego
adresu IP. Więcej szczegółów można znaleźć w Instrukcji obsługi
urządzenia GXP1610.
5. Skontaktuj się z dostawcą usług telefonii internetowej (ITSP) w
celu omówienia dodatkowych ustawień niezbędnych do konguracji
telefonu.
Uwaga: Szczegółową instrukcję obsługi można pobrać pod adresem:
http://www.grandstream.com/support
35
GRANDSTREAM NÃO FORNECE CONEXÕES
A SERVIÇOS DE EMERGÊNCIA ATRAVÉS DO
GXP1610. NEM GRANDSTREAM, NEM OS SEUS
DIRIGENTES, EMPREGADOS OU AFILIADOS
PODEM SER RESPONSÁVEIS POR QUALQUER
RECLAMAÇÃO, DANO OU PERDA, E VOCÊ,
NESTE ATO, RENUNCIA QUAISQUER E TODAS
REIVINDICAÇÕES OU MOTIVOS DE ACÇÃO
RESULTANTES DA OU RELATIVA À SUA INCAPACIDADE DE USAR O GXP1610 PARA CONTATAR SERVIÇOS DE EMERGÊNCIA E POR NÃO
FAZER ARRANJOS ADICIONAIS PARA ACEDER
AOS SERVIÇOS DE EMERGÊNCIA, SEGUNDO O
PARÁGRAFO IMEDIATAMENTE ANTERIOR.
36
Page 21

PRECAUÇÕES:
ATENÇÃO: Por favor não desligue o GXP1610 quando as luzes
LED estão piscando durante a inicialização do sistema ou atualiza-
ção de rmware. Poderá corromper a imagem de rmware e causar
avaria da unidade.
AvISO: Use apenas o adaptador de corrente incluído na embala-
gem do GXP1610. Usar um adaptador não-qualicado em alternativa pode possivelmente danicar o aparelho.
RESUMO:
GXP1610 é um telefone IP para pequenas empresas, que
possui uma única conta SIP, pode estar presente num máx-
imo de duas chamadas, LCD gráco 132x48, 3 teclas XML
programáveis sensíveis ao contexto, duas portas de rede
e conferência de 3-vias. O GXP1610 faculta um soberbo
viva-voz com dúplex completo e com áudio HD, proteção de
segurança avançada para efeitos de privacidade, e é compatível com as funcionalidades do Grandstream UCM.
CONTEÚdO dA EMBALAGEM:
5 V
Aberturas para base
de suporte, caso
coloque o telefone
sobre área plana
Instalação do Telefone (Base de Suporte):
Ao instalar o suporte do telefone, ligue o suporte à parte detrás do
telefone nas ranhuras dedicadas para o efeito.
Instalação do Telefone (Montagem na Parede):
1. Depois de encaixar o telefone à base, monte o telefone na parede
usando os buracos da base para o efeito.
2. Puxe a guia do descanso do auscultador.
3. Gire o guia e coloque-o novamente na abertura, agora com a unha
voltada para cima e assim segurar o auscultador enquanto o telefone
estiver montado na parede.
Descanso de Auscultador
Guia com unha para cima
1 x Telefone
1 x Cordão
Telefônico
1 x Auscultador
1 x Base de Suporte para Telefone
1 x 5V Adaptador
de Corrente
1 x Guia de Instalação
Rápido
1 x Cabo de
Ethernet
LIGANdO O TELEFONE:
Guia com unha para baixo
INSTALAÇÃO dO TELEFONE:
Orifícios para montagem na parede estão
disponíveis na base
de suporte
Porta PC
Porta LAN
Corrente
Porta para
Fone de Ouvido
Porta para Aus
cultador de Mao
-
37 38
Page 22

Para congurar o GXP1610, siga os passos abaixo:
1. Ligue o auscultador ao telefone, usando o cordão telefônico.
2. Conecte a porta LAN do telefone à porta RJ-45 de um hub / switch
ou umrouter (lado LAN do router) através do cabo Ethernet.
3. Ligue a cha de saída de 5V DC à tomada de corrente no telefone;
conecte o adaptador de alimentação a uma tomada elétrica.
4. O LCD exibirá informação sobre provisionamento ou de atualiza-
ção de rmware. Antes de continuar, aguarde pelo aparecimento da
data / hora na tela.
5. Utilizando o servidor de Web incorporado no telefone ou o menu
de conguração do teclado, você pode congurar ainda mais o tele-
fone usando um IP estático ou DHCP.
Dicas para Usar o Teclado:
Indicador de Mensa-
Tecla para Linha
Mensagem
Contactos
Tecla HOME
Anúncio/Interfone
Espera
Teclado Padrão
gem em Espera
Tecla de função
Gravar
Tecla Menu/OK
Teclas de Navegação
Mudo
Fone de Ouvido
Conferência
Transferência
Alto-falante
Enviar
Volume
1. Para acessar o menu, pressione o botão redondo de MENU.
2. Navegue pelo menu usando os botões CIMA / BAIXO e ESQUERDO / DIREITO.
3. Pressione o botão redondo de MENU para conrmar a seleção
do menu.
4. O telefone sai automaticamente do modo MENU quando há uma
chamada, o telefone é tirado do gancho, ou quando o modo de
MENU está inativo por 60 segundos.
39
CONFIGURAÇÃO dO TELEFONE :
Para Congurar o
GXP1610 Usando Web Browser:
1. Assegure que o seu telefone está ligado e conectado à Internet.
2. Pressione o botão de MENU para entrar no menu do telefone.
3. Pressione o botão MENU para acessar o menu do telefone.
4. Digite o endereço IP do telefone no browser do seu PC. (Veja a
gura à direita)
5. O nome do usuário e a senha predenidos para o administrador
são ambas “admin”; para o usuário nal o nome predenido é “user”
e a senha predenida é “123”.
Para Congurar o
GXP1610 Usando Web Browser:
1. Assegure que o seu telefone está inativo.
2. Pressione o botão de MENU para acessar o menu do teclado e
congurar o telefone.
3. Selecione MENU-> Cong, para denir congurações para SIP
Proxy, Outbound Proxy, SIP User ID, SIP Auth ID, senha SIP.
4. Siga opções de menu para congurar parametros básicos do telefone. Por exemplo: o endereço IP se estiver usando um IP estático.
Para mais informações, por favor, verique o Manual do Usuário
para GXP1610.
5. Por favor entre em contato com seu ITSP (Provedor VoIP) para
instruções adicionais que possam ser necessárias para congurar
o telefone.
Nota: Para o manual do usuário detalhado, faça download a partir
de: http://www.grandstream.com/support
40
Page 23

RU
GXP1610 предварительно не сконфигурирован для
поддержки или переноса экстренных звонков в какиелибо больницы, правоохранительные органы, отделения
медицинской помощи (“Экстренная (-ые) Служба (-ы)”),
или какие-либо другие Экстренные службы. Следует
выполнить дополнительные действия для доступа к
Экстренным Службам. Вы ответственны за подключение
SIP-совместимой интернет-телефонной службы,
правильную настройку GXP1610 для ее использования,
а также периодическое тестирование Вашей
конфигурации для проверки ее работы в соответствии
с Вашими требованиями. Если Вы это не сделаете, Вы
будете ответственны за подключение традиционных
беспроводных или проводных телефонных служб для
доступа к Экстренным Службам.
GRANDSTREAM НЕ ПРЕДОСТАВЛЯЕТ СОЕДИНЕНИЯ С
ЭКСТРЕННЫМИ СЛУЖБАМИ ПОСРЕДСТВОМ GXP1610.
GRANDSTREAM, ЕГО СЛУЖАЩИЕ, РАБОТНИКИ И
ОТДЕЛЕНИЯ НЕ НЕСУТ ОТВЕТСТВЕННОСТИ ЗА ПРЕТЕНЗИИ,
УЩЕРБ ИЛИ УТРАТУ, И ВЫ НАСТОЯЩИМ ОТКАЗЫВАЕТЕСЬ
ОТ КАКИХ-ЛИБО ЗАЯВЛЕНИЙ ИЛИ ИСКОВЫХ ОСНОВАНИЙ,
ПРОИСТЕКАЮЩИХ ИЗ ВАШЕЙ НЕСПОСОБНОСТИ
ИСПОЛЬЗОВАТЬ GXP1610 ДЛЯ СВЯЗИ С ЭКСТРЕННЫМИ
СЛУЖБАМИ И НЕПРИНЯТИЯ С ВАШЕЙ СТОРОНЫ МЕР ПО
ОБЕСПЕЧЕНИЮ ДОСТУПА К ЭКСТРЕННЫМ СЛУЖБАМ В
СООТВЕТСТВИИ С ВЫШЕСЛЕДУЮЩИМ ПАРАГРАФОМ.
МЕРЫ ПРЕДОСТОРОЖНОСТИ:
ВНИМАНИЕ:
когда LED светодиоды мигают в процессе загрузки телефона или
обновления программного обеспечения. Это может привести к
повреждению программного обеспечения и стать причиной
неисправности.
ВНИМАНИЕ:
включен в поставку с GXP1610. Использование сторонних
источников питания может вызвать поломку устройства.
Пожалуйста НЕ ВЫКЛЮЧАТЕ питание GXP1610
Используйте только источник питания, который
ОБЗОР:
GXP1610 представляет собой IP-телефон для малого бизнеса,
поддерживающий один SIP аккаунт, до двух звонков, оснащенный
графическим ЖК-дисплеем 132x48, 3 XML- программируемыми
контекстно-зависимыми клавишами, двойным сетевым
портом, и поддержкой режима конференции до 3-х участников.
GXP1610 сочетает в себе микрофон превосходного качества
для одновременной двухсторонней связи с громкоговорителем,
расширенные функции защиты и конфиденциальности и
совместимость с UCM компании Grandstream.
КОМПЛЕКТ ПОСТАВКИ:
5 V
1 x GXP1610
1 x Телефонная
трубка
1 x Телефонный шнур1 x Ethernet - кабель 1 x Подставка под телефон
1 x Источник
питания 5V
1 x Краткие
руководства по
установке
УСТАНОВКА ТЕЛЕФОНА:
На подставке
имеются гнезда для
крепления телефона
на стену.
41
42
Page 24

Подготовка телефона к включению:
1.Подключите телефонную трубку к телефону с помощью
Слоты для настольного
крепления телефона
телефонного шнура.
2.Подключите телефон к Вашей IP сети, для этого соедините
Ethernet — кабелем разъем RJ-45 телефона с коммутатором/
свичем.
3.Подключите разъем источника питания 5V к телефону, а затем
сам источник питания подключите к электрической розетке.
Установка телефона (Подставка) :
При установке подставки телефона, прикрепить её к задней
части телефона через специальные разъёмы.
Установка телефона (Крепление на стену):
1. После установки стойки, закрепите телефон на стене с
помощью отверстий для настенного крепления.
2. Вынуть контакт из гнезда телефонной трубки. (см. рис. ниже)
3. Переверните язычок и вставьте его обратно в гнездо, так,
чтобы он мог удерживать телефонную трубку в вертикальном
положении.
Трубка положена
Контакт с расширением
вверх
Контакт с расширением
вниз
ПОДКЛЮЧЕНИЕ ТЕЛЕФОНА:
4.На дисплее отобразится процесс загрузки или информация
об обновлении программного обеспечения. Дождитесь пока на
дисплее не отобразится дата/время и только потом начинайте
процесс настройки.
5.Используя встроенный веб сервер или меню телефона
вы можете настроить статический IP или указать получение
автоматически IP адрес через DHCP.
Советы по использованию клавиатуры:
Индикатор ожидания
сообщения
Линейные клавиши
Сообщение
Телефонная книга
Клавиша HOME
Страница/
Селекторная связь
Удержание
Стандартная клавиатура
1. Для доступа к меню нажмите круглую клавишу меню.
Программируемые
клавиши
Запись
Клавиша Menu/OK
Навигационные
клавиши
Трубка
Выключить звук
Конференция
Передать
Динамик
Отправить
Громкость
2. Для выбора пунктов меню используйте клавиши со стрелками.
3. Для входа в подменю используйте клавишу меню.
4. Телефон автоматически выйдет из меню если поступит
входящий звонок, будет поднята трубка или проистечению 60
секунд простоя.
Порт ПК
Порт LAN
Сеть
Порт
гарнитуры
Порт трубки
43 44
Page 25

КОНФИГУРАЦИЯ ТЕЛЕФОНА:
Настройка телефона через веб-броузер:
1.Проверьте подключен ли Ваш телефон к питанию и к IP сети.
2. Нажать кнопку MENU для входа в меню телефона.
3. Нажать кнопку MENU для входа в меню телефона.
4.В адресной строке веб-броузера пропишите IP адрес
телефона.(см. рис. справа)
5.Имя администратора по умолчанию - “admin”; имя конечного
пользователя - “user”, пароль - “123”.
Настройка телефона GXP1610 с использованием
меню:
1.Убедитесь что телефон находится в бездействующем
состоянии.
2.Нажмите клавишу “MENU” для доступа к меню.
3.Выбрать MENU->Cong для выбора настроек для SIP-прокси,
исходящего прокси-сервера, идентификации SIP-пользователя,
идентификации авторизации SIP, пароля SIP.
4.Также в меню телефона можно настроить другие базовые
настройки телефона. Например, статический либо динамический
IP адрес. Для более подробной информации обратитесь к
руководству пользователя.
5.Обратитесь к Вашему провайдеру услуг Internet-телефонии
для того, чтобы получить дополнительные настройки.
ПРИМЕЧАНИЕ: Руководство пользователя можно скачать по
этой ссылке:
http://www.grandstream.com/support
45
 Loading...