

Grandstream GXP1160, GXP1165 User Manual

Grandstream Networks, Inc.
GXP1160/GXP1165
Small-Medium Business IP Phone
GXP1160/GXP1165 USER MANUAL

GXP1160/GXP1165 User Manual
Index
GNU GPL INFORMATION .......................................................................... 5
CHANGE LOG ........................................................................................... 6
FIRMWARE VERSION 1.0.5.2 .............................................................................................................. 6
WELCOME ................................................................................................. 7
PRODUCT OVERVIEW .............................................................................. 8
FEATURE HIGHTLIGHTS ..................................................................................................................... 8
GXP1160/GXP1165 TECHNICAL SPECIFICATIONS ........................................................................... 8
INSTALLATION ........................................................................................ 10
EQUIPMENT PACKAGING ................................................................................................................. 10
CONNECTING YOUR PHONE ........................................................................................................... 10
SAFETY COMPLIANCES .................................................................................................................... 11
WARRANTY ......................................................................................................................................... 11
USING THE GXP1160/GXP1165 .............................................................. 13
GETTING FAMILAR WITH THE LCD .................................................................................................. 13
GETTING FAMILAR WITH THE KEYPAD ........................................................................................... 14
MAKING PHONE CALLS..................................................................................................................... 15
HANDSET, SPEAKER AND HEADSET MODE ........................................................................... 15
2 CALLS WITH 1 SIP ACCOUNT ................................................................................................. 15
COMPLETING CALLS.................................................................................................................. 16
MAKING CALLS USING IP ADDRESSES ................................................................................... 17
ANSWERING PHONE CALLS ............................................................................................................ 19
RECEIVING CALLS...................................................................................................................... 19
DO NOT DISTURB ....................................................................................................................... 19
DURING A PHONE CALL .................................................................................................................... 19
CALL WAITING/CALL HOLD ....................................................................................................... 19
MUTE ............................................................................................................................................ 20
CALL TRANSFER ........................................................................................................................ 20
3-WAY CONFERENCING ............................................................................................................ 21
VOICE MESSAGES (MESSAGE WAITING INDICATOR) ........................................................... 23
CALL FEATURES ................................................................................................................................ 23
FIRMWARE VERSION 1.0.5.2 GXP1160/GXP1165 USER MANUAL Page 2 of 59

CUSTOMIZED LCD SCREEN & XML ................................................................................................. 25
CONFIGURATION GUIDE ........................................................................ 26
CONFIGURATION VIA KEYPAD ......................................................................................................... 26
CONFIGURATION VIA WEB BROWSER ........................................................................................... 30
DEFINITIONS ...................................................................................................................................... 30
STATUS PAGE DEFINITIONS ..................................................................................................... 31
ACCOUNT PAGE DEFINITIONS ................................................................................................. 31
SETTINGS/BASIC SETTINGS PAGE .......................................................................................... 39
SETTINGS/ADVANCED SETTINGS PAGE ................................................................................. 43
NAT SETTINGS ................................................................................................................................... 50
PUBLIC MODE .................................................................................................................................... 50
EDITING CONTACTS AND CLICK-TO-DIAL ...................................................................................... 51
UPGRADING AND PROVISIONING ........................................................ 55
UPGRADE VIA KEYPAD MENU ......................................................................................................... 55
UPGRAGE VIA WEB GUI .................................................................................................................... 55
NO LOCAL TFTP/HTTP SERVERS .................................................................................................... 56
CONFIGURATION FILE DOWNLOAD ................................................................................................ 56
RESTORE FACTORY DEFAULT SETTI NG S ........................................... 58
EXPERIENCING THE GXP1160/GXP1165 .............................................. 59
Table of Tables
GXP1160/GXP1165 User Manual
Table 1: GXP1160/GXP1165 TECHNICAL SPECIFICATIONS ..................................................................... 8
Table 2: GXP1160/GXP1165 EQUIPMENT PACKAGING .......................................................................... 10
Table 3: GXP1160/GXP1165 CONNECTORS ............................................................................................ 11
Table 4: GXP1160/GXP1165 DISPLAY DEFINITIONS ............................................................................... 13
Table 5: GXP1160/GXP1165 LCD ICONS .................................................................................................. 13
Table 6: GXP1160/GXP1165 KEYPAD DEFINITIONS ............................................................................... 14
Table 7: CALL FEATURES .......................................................................................................................... 23
Table 8: GXP1160/GXP1165 CONFIGURATION MENU ............................................................................ 26
FIRMWARE VERSION 1.0.5.2 GXP1160/GXP1165 USER MANUAL Page 3 of 59

Ta b le of Figures
GXP1160/GXP1165 Use r Manual
Figure 1: GXP1160/GXP1165 Ports ............................................................................................................ 10
Figure 2: GXP1160/GXP1165 Keypad MENU Flow .................................................................................... 29
Figure 3: GXP1160/GXP1165 Web GUI - Contacts .................................................................................... 52
Figure 4: GXP1160/GXP1165 Click-to-Dial ................................................................................................. 53
GUI Interface Examples
GXP1160/GXP1165 User Manual
http://www.grandstream.com/products/gxp_series/general/documents/gxp21xx_gui.zip
1. Screenshot of Configurat ion Login Pa ge
2. Screenshot of Status Page
3. Screenshot of Basic Setting Config urati on Pa ge
4. Screenshot of Advanced User Configuration Page
5. Screenshot of SIP Account Configuration Page
6. Screenshot of Saved Configuration Changes Page
7. Screenshot of Reboot Page
FIRMWARE VERSION 1.0.5.2 GXP1160/GXP1165 USER MANUAL Page 4 of 59

GNU GPL INFORMATION
GXP1160/GXP1165 firmware contains third-party software licensed under the GNU General Public
License (GPL). Gran dstream uses software under the s pecific terms of the GPL. Please see t he GNU
General Public License (GPL) for the exact terms and conditions of the license.
Grandstream GNU GPL related source code can be downloaded from Grandstream web site from:
http://www.grandstream.com/support/faq/gnu_gpl.
FIRMWARE VERSION 1.0.5.2 GXP1160/GXP1165 USER MANUAL Page 5 of 59

CHANGE LOG
This section docum ents signif icant chan ges from previous versions of GXP1160/GXP1165 user manuals.
Only major new features or major document updates are listed here. Minor updates for corrections or
editing are not documented here.
FIRMWARE VERSION 1.0.5.2
• This is the initial version.
FIRMWARE VERSION 1.0.5.2 GXP1160/GXP1165 USER MANUAL Page 6 of 59

WELCOME
Thank you for purchasing Grandstream GXP1160/GXP1165 Small-Medium Business IP Phone.
GXP1160/GXP1165 is a next generation small-to-medium business IP phone that features single SIP
account, up to 2 ca ll ap pea r ances , a 1 28 x 40 graphical LCD, 3 XML programmable context-sensit ive s oft
keys, dual network ports with integrated PoE (GXP1165 only), 3-way conference, and Electronic Hook
Switch (EHS) with Plantronics headset. The GXP1160/1165 delivers superior audio quality, rich and
leading edge telephony features, personalized information and customizable application service,
automated provisioning for easy deployment, advanced security protection for privacy, and broad
interoperability with m os t 3rd party SIP devices and leadin g SIP/NGN /IM S platforms . It is a perf ect c hoice
for small-to-medium businesses looking for a high quality, feature rich IP phone with highly affordable cost.
Caution:
Changes or modifications to this product not expres sly approved by Grandstream, or operation of this
product in any way other than as detailed by this User Manual, could void your manufacturer warranty.
Warning:
Please do not use a diff erent power ada ptor with th e GX P1160/GXP1165 as it may cause dam age to the
products and void the manufacturer warranty.
This document is s ubject to change without no tice. The latest electronic version of this user manual is
available for download here:
http://www.grandstream.com/support
Reproduction or transm ittal of the entire or an y part, in any form or b y any means, electronic or print, f or
any purpose without the express written permission of Grandstream Networks, Inc. is not permitted.
FIRMWARE VERSION 1.0.5.2 GXP1160/GXP1165 USER MANUAL Page 7 of 59

PRODUCT OVERVIEW
SIP RFC3261, TCP/IP/UDP, RTP/RTCP, HTT P/HTTPS, ARP/RARP, ICMP, DN S
1 SIP account, 3 XML programmable context sensitive soft keys, 5
Navigation/Menu/Volume keys, 9 dedicated function keys for PHONEBOOK,
band), iLBC,
FEATURE HIGHTLIGHTS
• 128 x 40 pixel graphical LCD display;
• Single SIP account, up to 2 call appearances, 3 XML programmable context-sensitive soft keys, 3-way
conference;
• Phonebook with up to 500 contacts and call history with up to 200 records;
• Automated personal information ser vice (e.g., local weather ), personali zed music s ing tone/ring bac k
tone;
• Dual switched auto-sensing 10/100Mbps network ports, integrated PoE (GXP1165 only);
• Automated provision ing using TR-069 or AES encr ypted XML configuration file, SRTP and TLS for
advanced security protection, 802,1x for media access control.
GXP1160/GXP1165 TECHNICAL SPECIFICATIONS
Table 1: GXP1160/GXP1165 TECHNICAL SPECIFICATIONS
Protocols and
Standards
Network Interfaces Dual switched 10/100Mbps ports, integrated PoE (GXP1165 only)
Graphic Display 128 x 40 graphical LCD display
Feature Keys
Voice Codec
Te leph ony Fe atures
Headset Jack RJ9, supporting Electronic Hook Switch (EHS) with Plantronics headsets
Base Stand Yes, 1 angle position available
(A record, SRV, NAPTR), DHCP, PPPoE, TFTP, NTP, STUN, SIMPLE, TR-069,
802.1x, IPv6
MESSAGE (with LED indicator), HOLD, TRANSFER, CONFERENCE, FLASH,
SPEAKERPHON E, VO LUME, SEND/REDIAL
Support for G.723.1, G.729A/B, G.711u/a, G.726-32, G.722 (widein-band and out-of-band DTMF (in audio, RFC2833, SIP INFO)
Hold, transfer, forward, 3-way conference, downloadable phone book (XML, LDAP,
up to 500 items), call waitin g, call log (up to 200 rec ords), off-hook auto dial, auto
answer, click-to-dial, flexible dial plan, ho t-desking, pers onalized music r ingtones,
server redundancy and fail-over
FIRMWARE VERSION 1.0.5.2 GXP1160/GXP1165 USER MANUAL Page 8 of 59

Wall Mountable Yes
sess based
English, German, Italian, French, Spanish, Portuguese, Russian, Croatian,
069 or
QoS Layer 2 (802.1Q, 802.1p) and Layer 3 (ToS, DiffServ, MPLS) QoS
User and administrator level passwords, MD5 and MD5-
Security
authentication, AES encrypted configuration file, SRTP, TLS, 802.1x media access
control
Multi-language
Upgrade and
Provisioning
Power and Green
Energy Efficiency
Physical
Temperature and
Humidity
Package Content
Compliance
Simplified and T raditional Chinese, K or ea n, Japanese and etc
Firmware upgrade via TFTP/HTTP/HTTPS, mass provisioning using TR-
AES encrypted XML configuration file
Universal power adapter included
Input: 100-240VAC 50-60Hz
Output: +5VDC, 800mA
Integrated Power-over-Ethernet (802.3af, GXP1165 only)
Max power consumption 2.5W (universal power adapter) or 3W (PoE)
Unit dimension: 154mm (W) x 200mm (L) x 79mm (D) (handset onhook)
Unit weight: 0.6kg
Package weight: 1.03kg
Operating: 32-104oF / 0-40oC, 10-90% (non-condensing)
Storage: 14-140oF / -10-60oC
GXP1160/GXP1165 phone, handset with cord, base stand, universal power supply,
network cable, quick start guide
FCC Part 15 (CFR 47) Class B; EN55022 Class B, EN55024, EN61000-3-2,
EN61000-3-3, EN60950-1; AS/NZS CISPR 22 Class B, AS/NZS CISPR 24, RoHS;
UL 60950 (power adapter)
FIRMWARE VERSION 1.0.5.2 GXP1160/GXP1165 USER MANUAL Page 9 of 59
EQUIPMENT PACKAGING
INSTALLATION
Table 2: GXP1160/GXP1165 EQUIPMENT PACKAGING
Main Case
Handset
Phone Cord
Power Adaptor
Ethernet Cable
Phone Sta n d
Quick Sta rt Guide
CONNECTING YOUR PHONE
Yes (1)
Yes (1)
Yes (1)
Yes (1)
Yes (1)
Yes (1)
Yes (1)
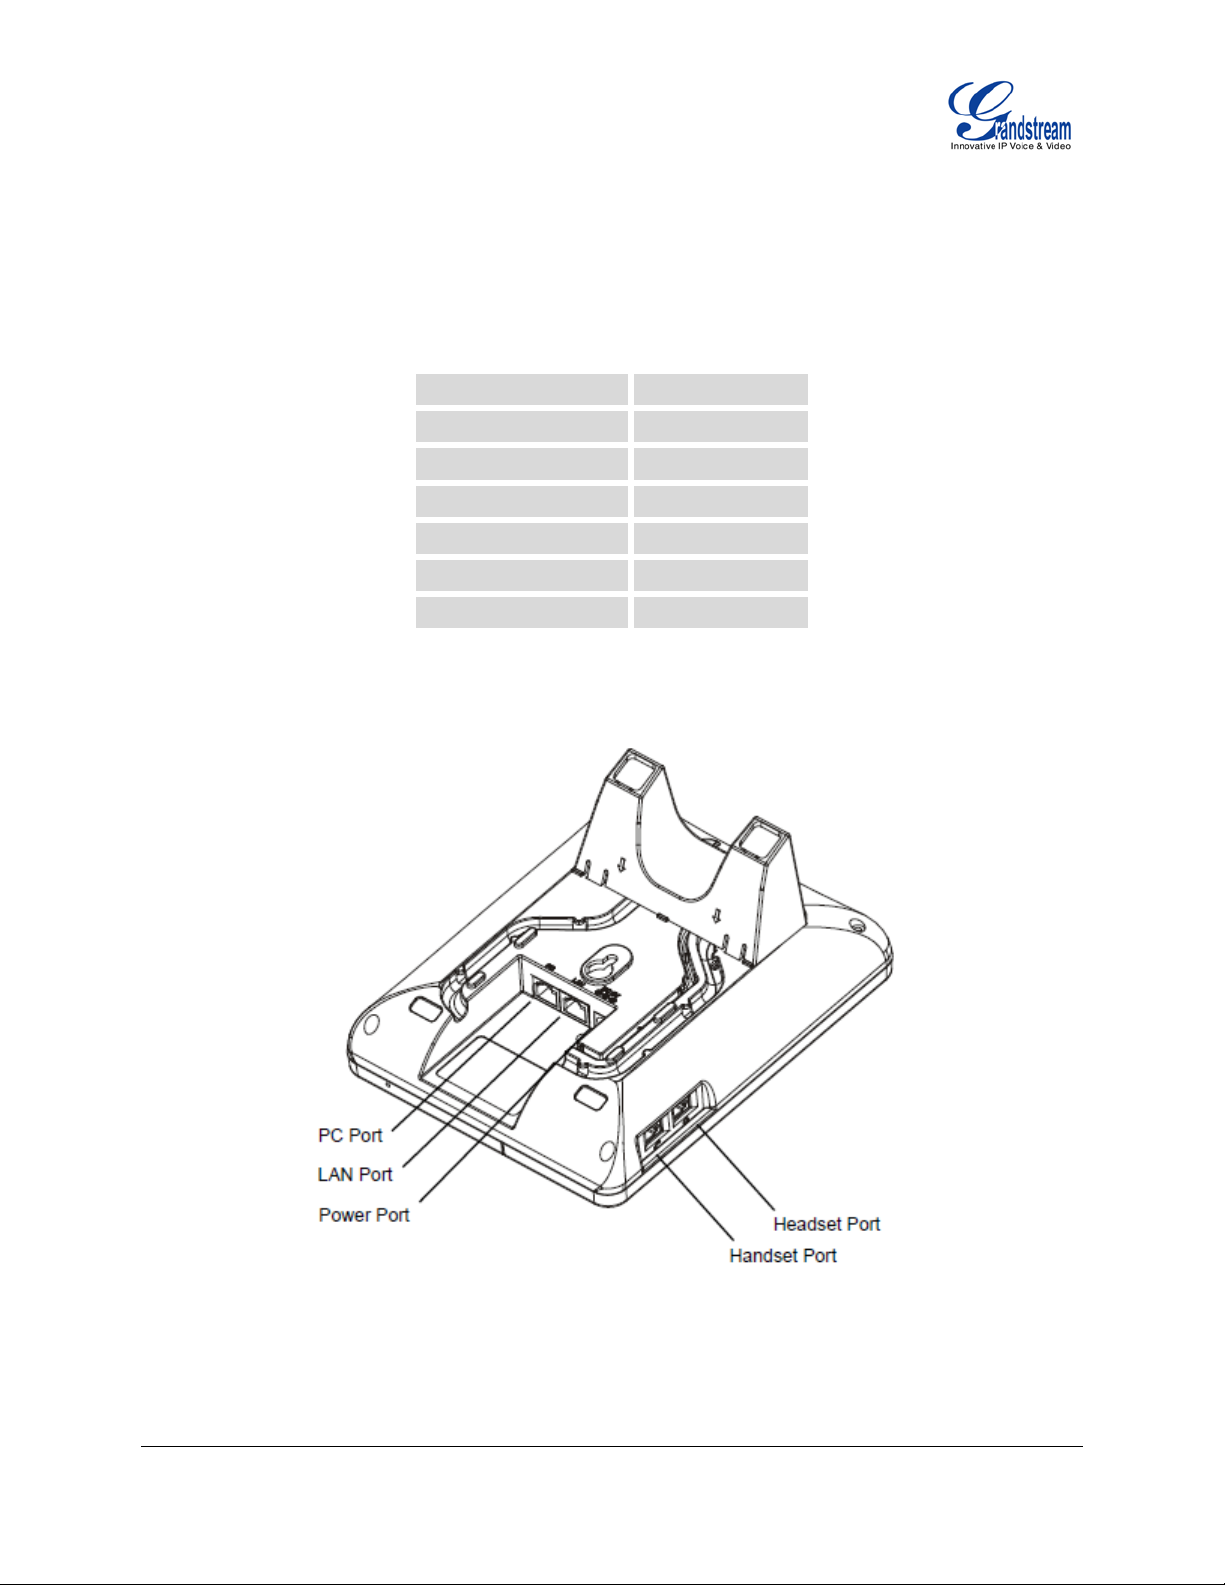
Figure 1: GXP1160/GXP1165 Ports
FIRMWARE VERSION 1.0.5.2 GXP1160/GXP1165 USER MANUAL Page 10 of 59

Switch) with
Table 3: GXP1160/GXP1165 CONNECTORS
Handset Port
Headset Port
LAN Port
PC Port
Power Jack
To set up the GXP1160/GXP1165, follow the steps below:
1. Attach the phone stand to the back of the phone where there are slots;
2. Connect the handset and main phone case with the phone cord;
3. Connect the L AN port of the phone to the RJ -45 socket of a hub/s witch or a router (LAN side of the
router) using the Ethernet cable;
4. Connect the 5V DC output plug to the power jack on the phone; plug the power adapter into an
electrical outlet. If PoE switch is used on GXP1165 in step 3, this step could be skipped;
5. The LCD will display provisioning or f irmware u pgrade inform ation. Bef ore contin uing, pl ease wa it for
the date/time display to show up;
6. Using the k e ypad configurat ion menu or phone's em bedded web s erver (Web GUI) by enter ing the I P
address in web browser, you can further configure the phone.
RJ9 handset connector port
RJ9 headset connector port, supporting EHS (Electronic Hook-
Plantronics headsets
10/100Mbps RJ-45 port connecting to Ethernet, integrated PoE (GXP1165 only)
10/100Mbps RJ-45 port for PC connection
5V DC Power connector port
SAFETY COMPLIANCES
The GXP1160/GXP1165 phone complies with FCC/CE and various safety standards. The
GXP1160/GXP1165 power adapter is compliant with the UL s tandard. Use the universa l power adapter
provided with the GXP1160/GXP1165 package only. The manufacturer’s warranty does not cover
damages to the phone caused by unsupported power adapter s .
WARRANTY
If the GXP1160/GXP1165 phone was purc hased from a reseller, please contact the com pany where the
phone was purchased for replacement, repair or refund. If the phone was purchased directly from
Grandstream, contac t the Grandstream Sales a nd Service Representative f or a RMA (Return Materi als
FIRMWARE VERSION 1.0.5.2 GXP1160/GXP1165 USER MANUAL Page 11 of 59

Authorization) num ber bef ore the prod uct is returned. Grandstream reserves the right to remed y warranty
policy without prior notificati on.
Warning: Use the pow er adapter provided with the phone. D o not use a different power adapter as this
may damage the phone. This type of damage is not covered under warranty.
FIRMWARE VERSION 1.0.5.2 GXP1160/GXP1165 USER MANUAL Page 12 of 59

USING THE GXP1160/GXP1165
GETTING FAMILAR WITH THE LCD
GXP1160/GXP1165 has a dynamic and custom izable screen. The sc reen displays differentl y depending
on whether the phone is idle or in use ( active). The fo llowing table describ es the items displa yed on the
GXP1160/GXP1165 idle screen.
Table 4: GXP1160/GXP1165 DISPLAY DEFINITIONS
DATE AND TIME
LOGO NAME
NETWORK STATUS
STATUS BAR
SOFTKEYS
Displays the current date and time. It c an be synchronized with Internet time
servers.
Displays company logo name. This logo name can be customized via xml screen
customization. The maximum size for logo name is 26 characters in English
(approximately).
Shows the status of net work in the middle of the screen. It will ind icate whether
the network is down or starting.
Shows the status of the phone for registration status, call features and etc, using
icons as shown in the next table.
The softkeys are context s ensitive an d will change depending on the status of
the phone. Typical functions assigned to softkeys are:
• NextScr: Toggles among idle scr een, weather information, IP Address
and extension number;
• Headset: Onhook/offhook using headset; or toggle to headset mode;
• FwdAll: Unconditionally forwards the calls to another number;
• Missed: Shows unanswered calls to this phone;
• Redial: Redials the last dialed out number.
Table 5: GXP1160/GXP1165 LCD ICONS
FIRMWARE VERSION 1.0.5.2 GXP1160/GXP1165 USER MANUAL Page 13 of 59
Registration Status: Registered.
Registration Status: Not Registered.
Handset Status.
OFF - handset on hook
ON - handset off hook
Speaker Status.
OFF - speaker off
ON - speaker on
Headset Status.
OFF - headset off
ON - headset on
DND Status.
OFF - Do Not Disturb disabled
ON - Do Not Disturb enabled
Call Forward Status.
OFF - Call Forward feature disabled
ON - Call Forward feature enabled
MUTE Status.
OFF - The active call is not muted
ON - The active call is muted
SRTP Status.
OFF - SRTP is not used
ON - SRTP is used
GETTING FAMILAR WITH THE KEYPAD
The following table describes the buttons used on the GXP1160/GXP1165 keypad.
Table 6: GXP1160/GXP1165 KEYPAD DEFINITIONS
FIRMWARE VERSION 1.0.5.2 GXP1160/GXP1165 USER MANUAL Page 14 of 59
Place active call on hold, or resume the call on hold.
Transfer an active call to another number.
Establish 3-way conference with other 2 parties.
Bring up a new line; or answer the second incoming call.
Speaker.
Send/Redial.
• Send. Enter the digits and then press Send to dial out the number;
• Redial. Redial when there is a previously dialed call.
Voicemail. Press to retrieve voice mails.
Phonebook. Brings phonebook on screen.
Navigation Keys/Menu.
• Press the 4 navigation keys to move up/down/left/right;
• Press the round button in the center to enter Keypad Configuration
MENU when phone is in idle;
• The round button "MENU" can also be used as ENTER key when in
Keypad Configuration.
Volume. Press "-" or "+" to adjust the volume.
0 - 9, *, #
Standard p h o n e keypad.
MAKING PHONE CALLS
HANDSET, SPEAKER AND HEADSET MODE
The GXP1160/GXP1165 allows users to switch among handset, speak er or headset when m aking calls.
Press the Hook Switch to s witch to hands et; press the Headset softkey to switch to headset; or press the
Speaker button
2 CALLS WITH 1 SIP ACCOUNT
GXP1160/GXP1165 can support up to two lines "virtually" mapped to one SIP account. By picking up the
handset, the GXP1160/GXP1165 will be in off hook state and the dial tone will be heard. To make a call,
to switch to speaker.
FIRMWARE VERSION 1.0.5.2 GXP1160/GXP1165 USER MANUAL Page 15 of 59

dial out the number with the current line.
During the call, users can press the FLASH key to hold the current call and make/answer another call. If
they are 2 calls established, users can switch the two lines by pressing the FLASH key.
COMPLETING CALLS
There are several ways to complete a call on GXP1160/GXP1165.
• On hook dialing. Enter the number when the phone is on hook and then send out.
When the phone is in idle, enter the number to be dialed out;
Take handset off hook; or
Press Speaker button; or
Press Headset softkey with headset plugged in;
The call will be dialed out.
• Off hook and dial. Off hook the phone, enter the number and send out.
Take handset off hook; or
Press Speaker button; or
Press Headset softkey with headset plugged in;
You shall hear dial tone after off hook;
Enter the number;
Press SEND key
or # to dial out.
• Redial. Redial the last dialed number.
Take handset off hook; or
Press Speaker button; or
Press Headset softkey with headset plugged in; or
When the phone is in idle;
Press SEND key
, or the REDIAL softkey.
• Via Call History. Dial the number logged in phone's call history.
Press MENU button to bring up the main menu;
Enter Call Histor y and select "Answered Calls ", "Missed Ca lls", "Transferred Calls" or "Forwarded
Calls";
Select the entry you would like to call using the navigation "UP" and "DOWN" arrow keys;
FIRMWARE VERSION 1.0.5.2 GXP1160/GXP1165 USER MANUAL Page 16 of 59

Press SEND key to dial out.
• Via Phonebook. Dial the number from the phonebook.
Press MENU button to bring up the main menu;
Select and enter Phonebook;
Select the phonebook en try you would like to call us ing the navigation "UP" and "DOWN " arrow
keys;
Press SEND key
to dial out.
• Via Page/Intercom.
Take handset off hook; or
Press Speaker button; or
Press Headset softkey with headset plugged in;
You shall hear dial tone after off hook;
Press MENU button to switch the call screen from "Line x: Caller DIAL" to "Line x: Caller Paging";
Enter the number;
Press SEND key
or # to dial out.
Note:
• After entering the number, the phone waits for the No Key Entry Timeout (Default timeout is 4 seconds,
configurable via Web GU I) before dialing out. Press S END key
or # ke y to override the No
Key Entry Timeout;
• If digits have been entered after handset is off hook, the SEND k ey will works as SEND instead of
REDIAL;
• By default, # can be used a s SEND t o di al t he number out. Users could disable it by setting "Use # as
Dial Key" to "No" from Web GUI->Account page;
• For Paging/Intercom, if the SIP Server/PBX supports the feature and has Paging/Intercom feature
code set up already, users might not necessaril y need toggle to paging mode in the c all screen on
GXP1160/GXP1165. Simply dial the feature code with extension as a normal call.
MAKING CALLS USING IP ADDRESSES
Direct IP Call a llo ws t wo p hones to talk to e ach ot her in an ad-h oc f ashion withou t a SI P proxy. VoIP calls
FIRMWARE VERSION 1.0.5.2 GXP1160/GXP1165 USER MANUAL Page 17 of 59

can be made between two phones if:
• Both phones have public IP addresses; or
• Both phones are on the same LAN/VPN using private or public IP addresses; or
• Both phones can be conn ected throu gh a router us ing pub lic or privat e IP addresses (with necess ary
port forwarding or DMZ).
To make a direct IP call, please follow the steps below:
• Press MENU button to bring up main menu;
• Select "Direct IP Call" using the navigation arrow keys;
• Press MENU to enter the Direct IP Call mode;
• Input the 12-digit target IP address (Please see example below);
• Press the "More" softkey to make sure the softkey selection "IPv4" or "IPv6" is correctly selected
depending on your network environment;
• Press "OK" softkey to dial.
For example:
If the target IP address is 1 92.168.1 .60 and the p ort is 50 62 ( i.e., 192.16 8.1.60: 5062) , in put th e fol lowin g:
192*168*1*60#5062. The * key represents the dot (.), the # key represents colon (:). Wait for about 4
seconds and the phone will initiate the call.
Quick IP Call Mode:
The GXP1160/GXP1165 also supports Quick IP Call mode. This enables the phone to make direct IP calls
using only the last f ew digits (last octet) of the target phone's IP address. This is possible only if both
phones are under the s ame LAN/ VPN. This sim ulates a PBX function us ing the CMS A/CD without a SIP
server. Controlled static IP usage is recommended.
To enable Quick IP Call Mode, go to GXP1160/GXP1165 Web GUI->Advanced Setting page, set "Use
Quick IP Call Mode" to "Yes". Click on "Update" on the bottom of the Web GUI page to take the change. To
make Quick IP Call, tak e the p hone off hook fir st. Then dial #xxx where x is 0-9 and xxx<255. Press # or
SEND and a direct IP call to aaa.bbb.ccc.XXX will be completed. "aaa.bbb.ccc" is from the local IP address
regardless of subnet mask. The number #xx or #x are also valid. The leading 0 is not required (but it's OK).
For example:
• 192.168.0.2 calling 192.168.0.3 -- dial #3 followed by # or “SEND”;
• 192.168.0.2 calling 192.168.0.23 -- dial #23 followed by # “SEND”;
FIRMWARE VERSION 1.0.5.2 GXP1160/GXP1165 USER MANUAL Page 18 of 59
 Loading...