

c u t t i n g e d g e d e s i g n
Instructions for assembly and use • Montage- und Gebrauchsanweisung • Notice technique montage et utilisation • Инcтрукция по монтажу и обслуживанию • Instrucción de Montaje y Servicio • Manuale di Montaggio e Uso
260
SHOWER BASKET
KORB FÜR DIE DUSCHKABINE
PANIER PORTE-SAVON POUR LA CABINE DE DOUCHE • КОРЗИНКА ДЛЯ ДУШЕВОЙ КАБИНЫ
CESTA PARA CABINA DE DUCHA • CESTELLO PER LA CABINA DOCCIA
Dear Customer
Thank you for choosing our
product. We hope the item you
have purchased can fulll all
your expectations our products
are technologically advanced
and designed on the basis of our
many years of experience in the
production of sanitary ttings.
GB D F
Sehr geehrte Damen und Herre
Wir bedanken uns für die
Wahl unseres Produktes. Wir
hoffen, dass wir mit unserem
technologisch fortgeschrittenen
Produkt, dass auf Basis mehrjährigen Erfahrungen bei der
Produktion von Sanitärarmaturen entwickelt wurde, Ihre Erwartungen erfüllt haben.
Cher client
Nous vous remercions pour
savoir choisi notre produit. Nous
sommes certains de pouvoir satisfaire pleinement à vos attentes
grâce à notre riche ore de produits d’un niveau technologique
avancé qui résulte de notre longue expérience en fabrication de
la robinetterie et des accessoires
des salles de bains.
Уважаемые господа
Благодарим за выбор нашего продукта Надеемся что
полностью удовлетворим
Ваши ожидания, вводя в эксплуатацию технологически
усовершен ствованное изделие, запроектированное
на базе многолетнего опыта
в области производства санитарной арматуры.
RUS
Muy Seńores Míos
Les agradecemos por elegir
nuestro producto. Esperamos
que cumplamos Sus deseos entre
gándoles un producto de una
tecnología avanzada, diseńado
a base de la experiencia de muchos ańos en la producción de
accesorios sanitarios.
E I
Cari Clienti
Vi ringraziamo per aver scelto il nostro prodotto. Speriamo,
di aver soddisfatto completamente le Vostre aspettative, offrendo Vi un prodotto tecnologicamente avanzato, progettato in
base ad una esperienza di molti
anni nell’ambito di produzione
degli accessori sanitari.
ATTENTION!
ATTENTION!
For care, use soft towel with soap and water only!
Under no circumstances should you use any chemicals.
Pour le nettoyage utiliser seulement une serviette douce, du savon et de l’eau!
En aucun cas n’utiliser les produits chimiques quelconques!
Para el cuidado, utilice solamente una toalla suave con jabón y aqua!
ATENCIÓN!
Bajo ninguna circunstancia no use productos químicos.
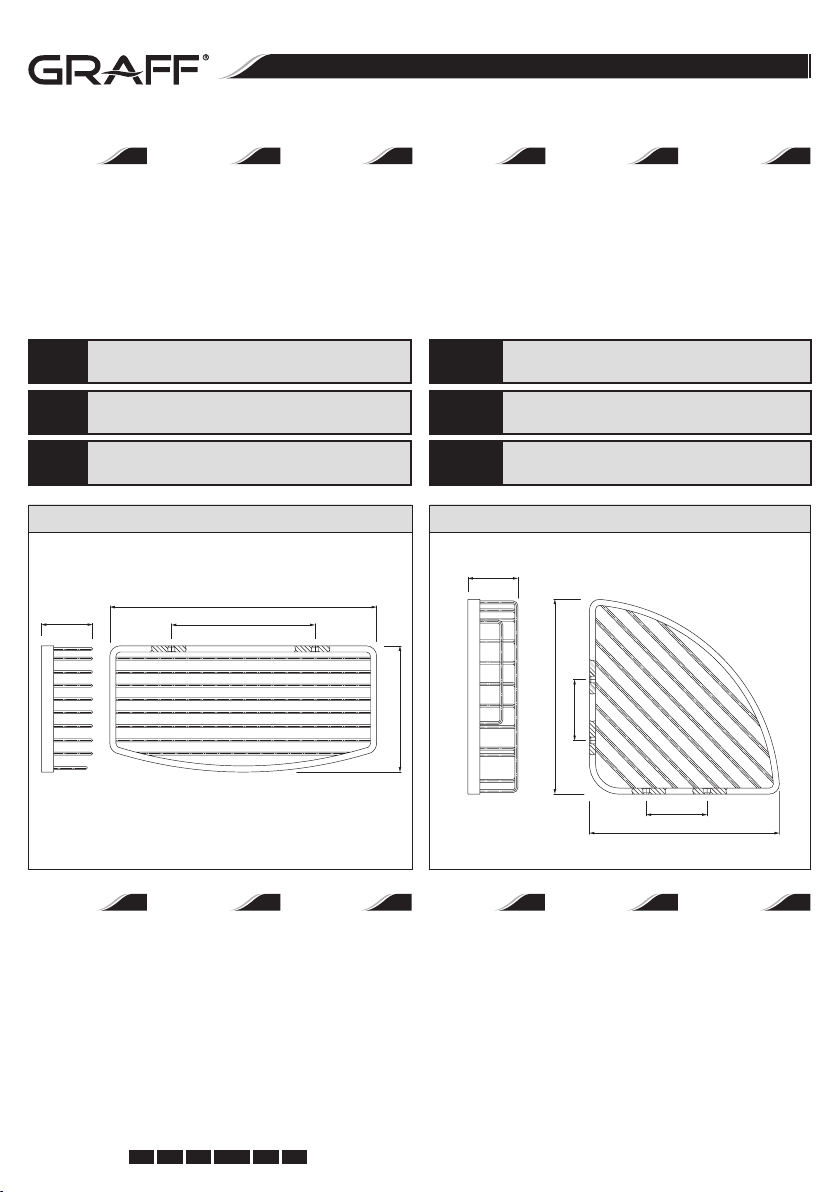
2373400 (PC), 2373410 (SN) 2373500 (PC), 2373510 (SN)
50
The following tools are
needed for installation:
l masonry drill ø6mm,
l electric drill,
l Philips screwdriver,
l spirit level.
~140
GB D F
Für die Montage werden
folgende Werkzeuge
benötigt:
l Betonbohrer ø6mm,
l Bohrmaschine,
l Kreuzschraubendreher,
l Wasserwaage.
An d’eectuer le montage, les outils suivants sont
nécessaires:
l un foret à béton ø6mm,
l une perceuse,
l une croix-tournevis,
l un niveau à bulle.
ACHTUNG!
ВНИМАНИЕ!
ATTENZIONE!
123
Для монтажа
нужны следующие
инструменты:
l сверло для бетон
ø6мм,
l дрель,
l крестовая отвертка,
l уровень.
Verunreinigungen bitten wir mittels Wasser mit Seife und mit weichem
Lappen beseitigen! In keinem Falle chemische Mittel verwenden.
Загрязнения следует удалять водой с мылом и мягкой тряпочкой!
Ни в коем случае нельзя применять химические средства.
Attenzione! Si prega di pulire usando acqua e sapone ed un panno morbido!
In nessun caso usare detergenti chimici.
50
193
~61
~61
193
RUS
Para el montaje se necesitan las herramientas:
l brocas para hormigón
ø6mm,
l taladradora,
l destornillador phillips,
l nivel.
E I
Per il montaggio servono i
seguenti attrezzi:
l punta per il calcestruzzo
ø6mm,
l trapano,
l cacciavite a croce,
l isoipsa.
IOG 2373.40
GB D F RUS E I
1
Rev. 1 April 2010
c u t t i n g e d g e d e s i g n
Instructions for assembly and use • Montage- und Gebrauchsanweisung • Notice technique montage et utilisation • Инcтрукция по монтажу и обслуживанию • Instrucción de Montaje y Servicio • Manuale di Montaggio e Uso
SHOWER BASKET
KORB FÜR DIE DUSCHKABINE
PANIER PORTE-SAVON POUR LA CABINE DE DOUCHE • КОРЗИНКА ДЛЯ ДУШЕВОЙ КАБИНЫ
CESTA PARA CABINA DE DUCHA • CESTELLO PER LA CABINA DOCCIA
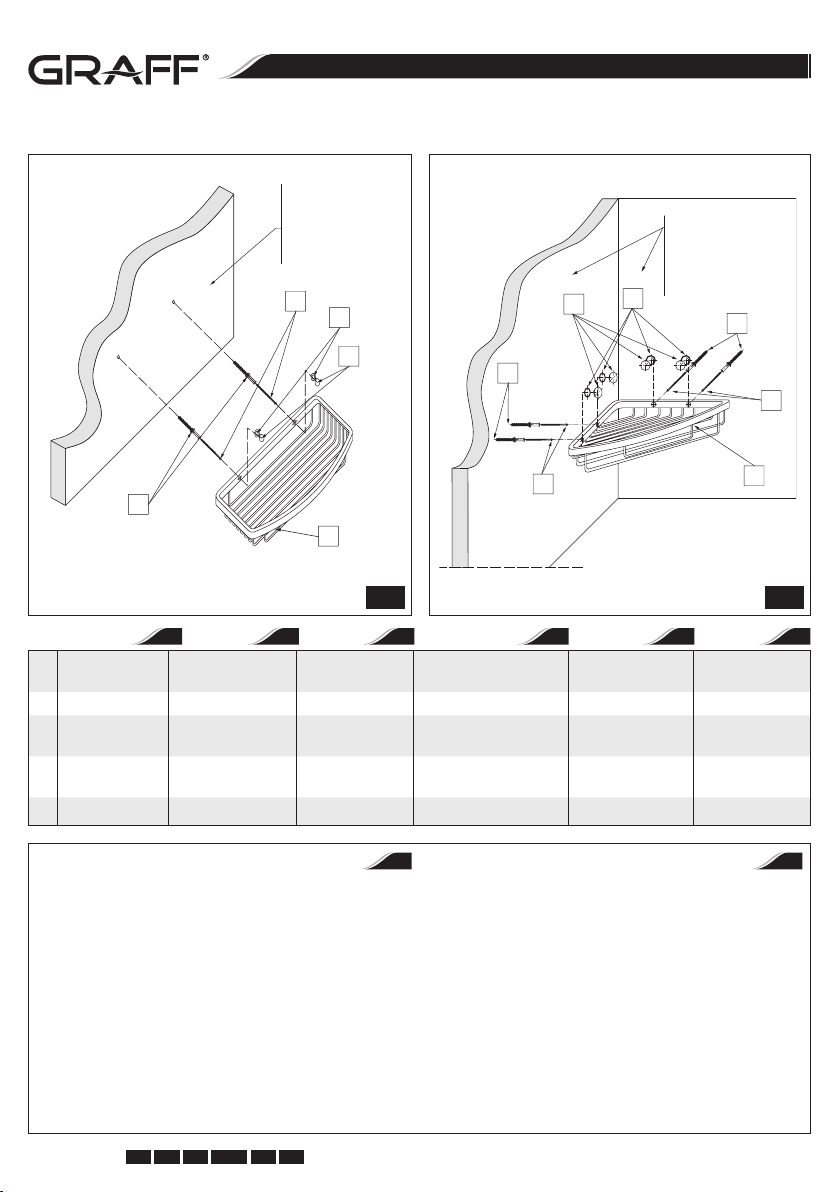
Finished wall
Ausbauwand
Panneau de nition
Отделочная стенка
Pared de acabado
Parete di nitura
B
3
2
Finished wall
Ausbauwand
Panneau de nition
Отделочная стенка
Pared de acabado
Parete di nitura
3
A
2
A
B
A
1
1 2
GB D
Corner basket
1
/oblong basket
2 Cap (4 pcs.)
3 5x0.9 O-ring (4 pcs.)
A Ø6x30 peg (4 pcs.)
B
3.5x40 screw (4 pcs.)
OBLONG BASKET INSTALLATION – see g. 1
CORNER BASKET INSTALLATION – see g. 2
1. Taking the user’s needs into account, select an appropriate
place on the wall for the installation of the basket.
2. Mark the locations of 4 holes (according to spacing of openings in the basket).
3. Drill 4 Ø6mm holes in the previously marked places. If installing the basket on ceramic tiles, drill Ø6mm holes in the
grout join (if possible).
4. Insert a rawlplug (A) into the drilled holes. Position the basket (1) above the holes in the wall, then insert and screw in
the screws (B). Tighten all screws.
5. Insert O-rings (3) onto caps (2) and the press the caps (2)
into the holes.
Eckkorb
/Längsko rb
Blindpla tte (4 Stck.) Bouchon (4 pi èces) Заглушк а (4 шт.) Obtura dor (4 unid.) Tappi (4 pezzi)
O-Ring 5x 0,9 (4 Stck.)
Dübel Ø6x 30 (4 Stk.)
Schraub e 3,5x40 (4 Stk.) Vis 3,5x40 (4 piè ces) Винт 3,5x40 (4 шт.) Tornillo 3,5x40 (4 unid .) Vite 3,5x40 (4 pez zi)
Porte -savon d’angle
/Porte -savon allongé
Joint tor ique 5x0,9
(4 pièces)
Cheville Ø 6x30
(4 pièces)
B
F
Угловая кор зинка
/продолгов атая корзинка
O-ринг 5x 0,9 (4 шт.)
Штифт Ø6x 30 (4 шт.)
GB D
MONTAGE DES LÄNGSKORBES – sieh Abb. 1
MONTAGE DES ECKKORBES – sieh Abb. 2
1. Wählen Sie eine entsprechende Stelle an der Wand für die
Korbmontage. Berücksichtigen Sie die Bedürfnisse der Be-
nutzer.
2. Markieren Sie die Stelle für 4 Önungen (gemäß Lochabstand im Korb).
3. 4 Ø6mm - Löcher an früher markierten Stellen bohren. Bei
der Montage an den Fliesen sind Ø6mm-Önungen in der
Fuge zu bohren (falls es möglich ist).
4. In die Löcher die Spreizdübel (A) einsetzen. Den Korb (1)
über die Wandlöcher positionieren und danach die Schrauben (B) anziehen. Alle Schrauben anziehen.
Die O-Ringe (3) auf die Verschlussstopfen (2) aufsetzen und
5.
dann die Verschlussstopfen (2) in die Önungen hineindrücken.
RUS
Cesta de e squina
/Cesta ala rgada
Junta tór ica 5x0,9
(4 unid.)
Pasador Ø 6x30
(4 unid.)
E I
1
Cestello a ngolare
/Cestello o blungo
O-rin g 5x0,9 (4 pezzi)
Tassello Ø6x 30
(4 pezzi)
GB D F RUS E I
2IOG 2373.40 Rev. 1 April 2010

c u t t i n g e d g e d e s i g n
Instructions for assembly and use • Montage- und Gebrauchsanweisung • Notice technique montage et utilisation • Инcтрукция по монтажу и обслуживанию • Instrucción de Montaje y Servicio • Manuale di Montaggio e Uso
SHOWER BASKET
KORB FÜR DIE DUSCHKABINE
PANIER PORTE-SAVON POUR LA CABINE DE DOUCHE • КОРЗИНКА ДЛЯ ДУШЕВОЙ КАБИНЫ
CESTA PARA CABINA DE DUCHA • CESTELLO PER LA CABINA DOCCIA
MONTAGE DU PORTE-SAVON ALLONGÉ – voir g. 1
MONTAGE DU PORTE-SAVON D’ANGLE – voir g. 2
1. Choisissez sur le mur un endroit approprié pour le montage
du porte-savon, en tenant compte des besoins des utilisateurs.
2. Marquez les endroits pour 4 percées (en accord avec l’espacement des ouvertures sur le porte-savon).
3. Percez 4 ouvertures de Ø6mm aux endroits préalablement
marqués. En cas d’installation sur du carrelage, percez les
ouvertures de Ø6mm dans l’emboîture (si possible).
4. Insérez les chevilles (A) dans les ouvertures percées. Placez
le panier porte-savon (1) au-dessus des ouvertures murales,
ensuite insérez et vissez les vis (B). Ajustez toutes les vis.
5. Placez les joints toriques (3) sur les bouchons (2), ensuite
enfoncez les bouchons (2) dans les ouvertures.
MONTAJE DE LA CESTA DE ESQUINA – ver la g. 1
MONTAJE DE LA CESTA ALARGADA – ver la g. 2
1. Escoja el sitio adecuado para montar la cesta, tomando en
cuenta las necesidades de sus usuarios.
2. Marque puntos para 4 taladros (según el espaciamiento entre oricios en la cesta).
3. Taladre 4 oricios de Ø6mm en los puntos anteriormente
marcados. En caso de montar en baldosas cerámicas, tala-
dre oricios de Ø6mm en la junta (si es posible).
4. Introduzca los pasadores de expansión (A) en los taladros
preparados. Coloque la cesta (1) por encima de los oricios
en la pared, luego introduzca y enrosque los tornillos (B).
Apriete todos los tornillos.
5. Meta las juntas tóricas (3) en los obturadores (2), luego
apriete los obturadores (2) en los taladros.
F
МОНТАЖ ПРОДОЛГОВАТОЙ КОРЗИНКИ – см. рис. 1
МОНТАЖ УГЛОВОЙ КОРЗИНКИ – см. рис. 2
1. Выбери подходящее место на стене под монтаж корзинки, принимая во внимание требования пользователей.
2. Отметь места под 4 отверстия (в соответствии с расстоянием между отверстиями в корзинке).
3. Высверли 4 отверстия Ø6мм в ранее отмеченных местах. В случае монтажа на керамической плитке: высверли отверстие Ø6мм в расшивке (если это возможно).
4. Вложи дюбеля (A) в высверленные отверстия. Вставь
корзинку (1) над отверстиями в стене, а затем вложи
и привинти винты (B). Затяни все винты.
5. Установи o-ринги (3) на заглушки (2), a затем вдави заглушки (2) в отверстия.
E I
MONTAGGIO CESTELLO OBLUNGO – vedi g. 1
MONTAGGIO CESTELLO ANGOLARE – vedi g. 2
1. Scegli sul muro un posto adatto per il montaggio del cestello, prendendo in considerazione i bisogni degli utenti.
2. Segna i posti per 4 fori (in conformità al posizionamento dei
fori del cestello).
3. Esegui 4 fori Ø6mm nel posto segnato precedentemente.
In caso di montaggio sopra le piastrelle ceramiche esegui
i fori di Ø6mm nella fuga (se possibile).
4. Metti i tasselli ad espansione (A) nei fori eseguiti. Disponi
il cestello (1) sopra i fori nel muro, e di seguito metti e avvita le viti (B). Serra tutte le viti.
5. Metti gli o-ring (3) sui tappi (2), ed in seguito metti premen-
do i tappi (2) nei fori.
RUS
Cleaning the outer coating:
• dirt or stains on the external surfaces of the product result-
ing from scale deposits should be removed bywashing the
product with soapy water only. Scale deposits should be dissolved with vinegar then thesurface rinsed with clean water
and rubbed dry with a soft cloth;
• under no circumstances should the surface of the product
be cleaned with coarse cloths or cleaningagents containing
abrasive materials or acids;
• plastic or lacquered parts must not be cleaned with chemi-
cals containing alcohol, disinfectants orsolvents.
GB D F RUS E I
GB D
Reinigung der Oberächen:
• schmutz oder Flecken, die Folge der Steinablegung auf den
Oberächen sind, durch das Durchspülen der Armatur nur
mit Wasser mit Seife beseitigen, zur Lösung den Essig anwenden, danach die Oberäche mit klarem Wasser durchspülen
und mit trockener Lappe wischen;
• in keinem Fall die Oberäche mit rauhen Lappen oder mit
Renigungsmitteln, die Schmiersubstanzen oder Lösungsmittel enthalten, reinigen;
• zur Reinigung der Kunststoelemente und der lackierten
Elemente keine Mittel mit Alkohol, Desinfektions- oder Lösungsmitteln benutzen.
3IOG 2373.40 Rev. 1 April 2010

c u t t i n g e d g e d e s i g n
Instructions for assembly and use • Montage- und Gebrauchsanweisung • Notice technique montage et utilisation • Инcтрукция по монтажу и обслуживанию • Instrucción de Montaje y Servicio • Manuale di Montaggio e Uso
SHOWER BASKET
KORB FÜR DIE DUSCHKABINE
PANIER PORTE-SAVON POUR LA CABINE DE DOUCHE • КОРЗИНКА ДЛЯ ДУШЕВОЙ КАБИНЫ
CESTA PARA CABINA DE DUCHA • CESTELLO PER LA CABINA DOCCIA
Nettoyage des surfaces externes:
• Éliminez les salissures et les taches occasionnées par les
dépôts calcaires sur les surfaces externes duproduit en nettoyant la batterie seulement avec de l’eau et du savon, utilisez du vinaigre pour dissoudreles dépôts calcaires , rincez
ensuite la surface avec de l’eau pure, puis séchez avec un
chion doux;
• En aucun cas il ne faut nettoyer la surface du produit avec un
chion abrasif ou avec des nettoyantscontenant des agents
abrasifs et de l’acide;
• Pour nettoyer les parties en matières plastiques vernies, il est
interdit d’utiliser des agents contenant del’alcool, des désinfectants ou des solvants.
Limpieza de las supercies exteriores:
• la suciedad o las manchas que se produjeron a causa de de-
positar el sarro en las supercies exteriores de la producto
hay que quitarlas lavando la producto sólo con el agua y el
jabón, para diluir el sarro use vinagre, después enjuague la
supercie con el agua limpia y séquela con un trapo suave;
• en cualquier caso no se puede limpiar la supercie de la pro-
ducto con trapos ásperos o medios de limpieza que contienen abrasivos y ácidos;
• para limpiar las partes hechas de materias plásticas y barniza-
das no se puede usar medios que contienen alcohol, sustancias desinfectante o disolventes.
GUARANTEE:
GB D
The guarantee conditions are contained on a separate sheet.
IN THE EVENT OF A PROBLEM:
e-mail: gra@gra-mixers.com
GARANTIE:
Les conditions de garantie se trouvent dans une feuille
séparée.
EN CAS DE PROBLEME:
e-mail: gra@gra-mixers.com
GARANTÍA:
Las condiciones de la garantía se encuentran en otra hoja
EN CASO DE PROBLEMAS:
e-mail: gra@gra-mixers.com
F
Очистка наружных поверхностей:
• загрязнение или пятна, возникшие в результате оседания
камня на внешних поверхностях продукта, смывать
исключительно водой с мылом, для растворения камня
применять уксус, затем промыть поверхность чистой
водой и досуха вытереть мягкой тряпочкой;
• ни в каком случае нельзя чистить поверхность продукта
шероховатыми тряпочками или чистящими средствами с
содержанием абразивных компонентов и кислот;
• для чистки элементов, выполненных из пластмассы или
лакированных, запрещается использовать средства,
содержащие алкоголь, дезинфици-рующие средства или
растворители.
E I
Pulizia del rivestimento esterno:
• lo sporco e le macchie, formatesi in conseguenza della sedi-
mentazione del calcare sulla supercie esterna del prodotto,
eliminare lavando la batteria unicamente con acqua e sapone, per sciogliere il calcare usare l’aceto, poi sciacquare la
supercie con acqua pura e asciugare per fettamente con un
panno morbido;
• non utilizzare in alcun caso per la pulizia del prodotto, panni
scabri o detergenti contenenti sostanze abrasive e acide;
• per la pulizia delle parti di materie plastiche e verniciate non
utilizzare detergenti contenenti alcol, disinfettanti o solventi.
GARANTIE:
Die Gewährleistungsbedingungen sind auf dem separaten
Blatt.
SOLLTEN PROBLEME AUFTRETEN wenden Sie sich an uns
e-mail: graff@graff-mixers.com
F
ГАРАНТИЯ:
Гарантийные условия на отдельном листе.
ЕСЛИ ВОЗНИКНЕТ ПРОБЛЕМА:
e-mail: gra@gra-mixers.com
E I
GARANZIA:
Le condizioni di garanzia sono indicate sul foglio separato.
NEL CASO IN CUI SI VERIFICHINO PROBLEMI:
e-mail: gra@gra-mixers.com
RUS
RUS
GB D F RUS E I
4IOG 2373.40 Rev. 1 April 2010
 Loading...