

Page 1
Electronic timer GB
If button 3 is kept pressed, the left side of the display changes
minutes, up to the value of 99 50 (meaning 99 minutes and 50
seconds). If the button is not released, the display digits will
change to read 1 40, which means that the reading format was
changed to 1 hour and 40 minutes.
In short: when setting the period, shorter than 1h 40 min. the
left side of the display indicates minutes and the right one
seconds. Likewise, if the selected period is longer, the left side
displays hours and the right one minutes.
Once the desired period of operation is selected, the time
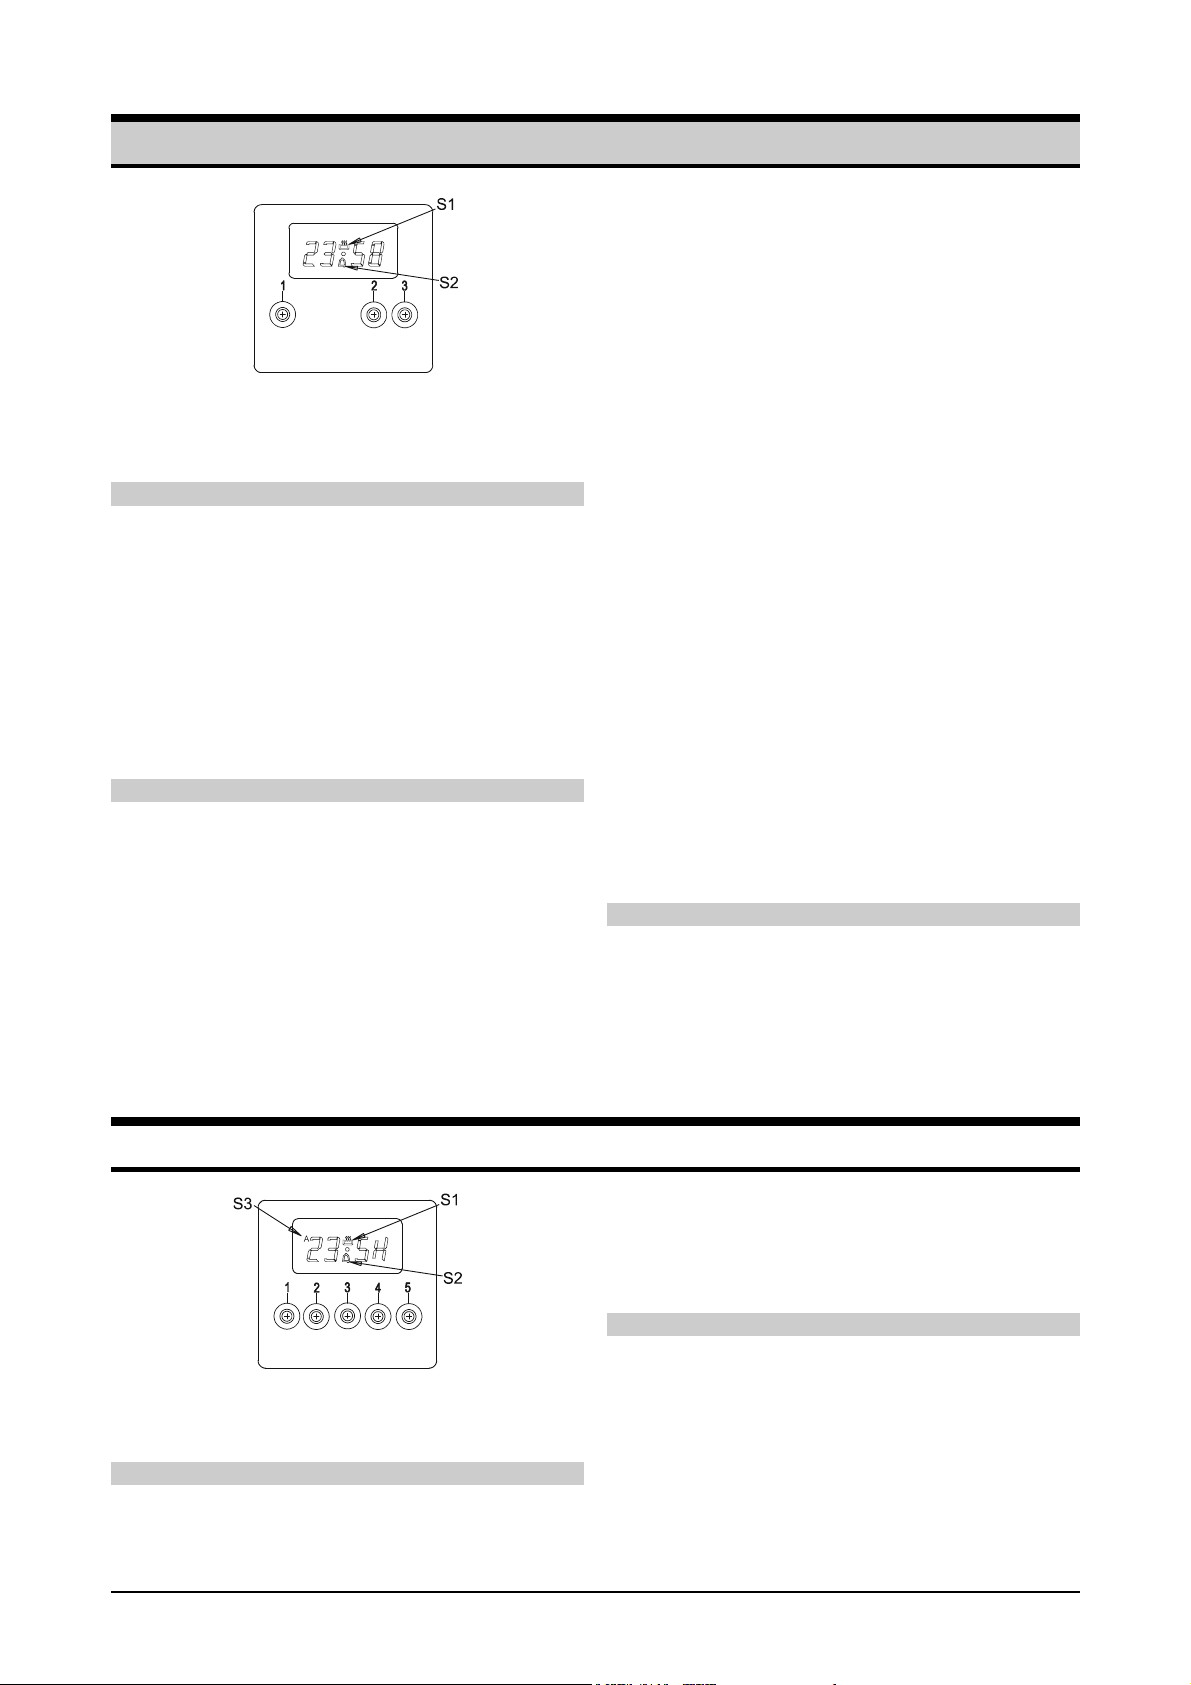
1 current time / conventional (manual) operation
button
2 minus (-) button
3 plus (+) button
Setting the current time
After connecting the appliance to the mains the display
indicates 0 00. Press button 1. The current time is set by
pressing buttons 2 and 3. The clock starts running 7 seconds
after the last touch of any button. The symbol S1 is on,
indicating that the clock has been set to manual (conventional)
mode.
Current time may be corrected anytime (except when the
symbol S2 is active). Press the button 1 and then change the
setting using buttons 2 and 3. After pressing the buttons 2 or 3
allow a 7 second lapse for the clock to adjust to the new
setting.
Note: keeping buttons 2 or 3 pressed speeds up the setting
process on the display.
Winter/summer time setting
Keep the button 1 pressed for about 4 seconds. The display
indicating hours starts flashing. By pressing buttons 2 or 3
make adequate changes. Only hours may be changed, the
settings of minutes and hidden seconds are not affected!
Wait for 7 seconds for the display to stop flashing and starts
indicating the correct current time of day.
Setting the operation interval
Press the button 3, display indicates 0 00 and the symbol S1 is
on, if it has not been switched on earlier. The symbol indicates
that the clock has been set for the immediate use of the oven.
Press button 3 once again and the display indicates 0 10, and
the symbol S2 appears. This symbol indicates the operation
interval of the oven. By pressing button 3 select the desired
period of operation in steps of 10 seconds. Maximum possible
period to be set is 10 hours.
countdown starts after the 7 second lapse. In case the selected
period is shorter or equal to 99 minutes and 50 seconds, the
countdown intervals will be of 1 second, and if the selected
period exceeds 99 minutes and 50 seconds the time will be
counted down in 1 minute steps.
In case the period needs to be reset to zero during the
countdown, keep the button 2 pressed for as long as the
display reaches 0 00 and the symbol S1 turns off. By pressing
any button again the clock is set to the conventional (manual)
operation mode, and the symbol S1 is active again.
The expiry of the set period is signaled by the alarm, which is
switched off automatically after 7 minutes, if it was not
switched off before by pressing any of the buttons.
When the sound alarm is triggered, the display indicates the
current time and the symbols S1 and S2 are off. In this
moment the oven is switched off. In case the sound alarm is
stopped by pressing any button, the symbol S1 reappears.
If you wish to terminate roasting the oven must be
switched off!
Sound alarm volume
When all functions are off (symbol S2 is off) it is possible to
select 3 different volume settings of the sound signal. Keep the
button 2 pressed and the first volume level is sounded.
Release and press again for the next volume level, etc. The
last selected level is stored as default. Volume level may be
reset anytime.
Using the clock in combination with oven
To use the clock in combination with oven, the first step is
to switch the oven on and set the desired baking mode
and the temperature. Only after that you may proceed
setting the clock functions. After the completion of baking
switch the oven off.
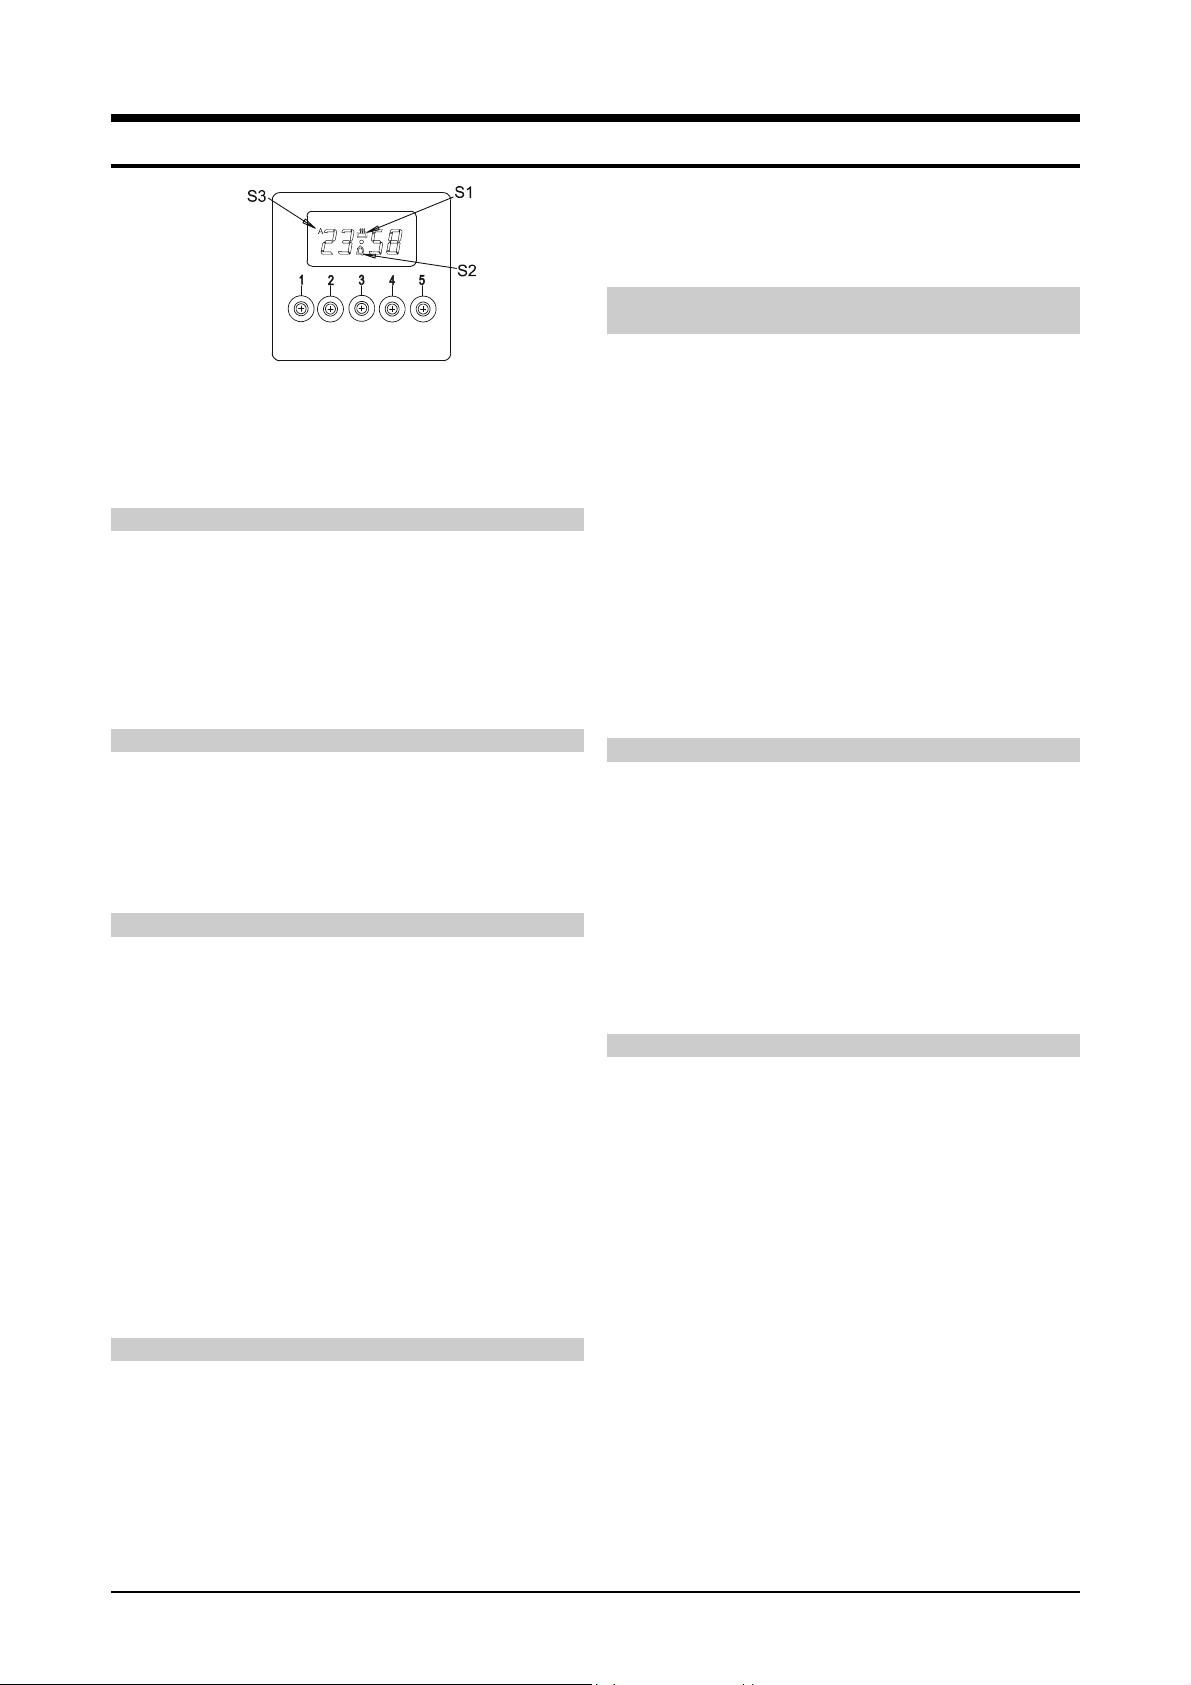
Electronic timer
1 alarm timer
2 operation time
3 end of operation
Setting the current time
After connecting the appliance to the mains the display
indicates flashing 0 00 and the symbol S3. The current time is
obtained by pressing buttons 2 and 3 simultaneously and
4 minus (-) button
5 plus (+) button
setting the correct time by pressing buttons 4 and 5. The clock
starts running 7 seconds after the last touch of any button. The
symbol S1 is on, indicating that the clock has been set to
manual (conventional) mode.
Note: keeping buttons 4 or 5 pressed speeds up the setting
process on the display.
Setting the conventional (manual) operation
Press the buttons 2 and 3 simultaneously. All actual running
programs are hereby cancelled (the symbol S3 is deleted if it
was active). Symbol S1 becomes active (if it was not already
on), which means that the clock is set to the conventional
(manual) mode of operation.
If you wish to terminate roasting the oven must be
switched off!
Instructions for Use
11
Page 2

Setting the conventional (manual) operation
Press the buttons 2 and 3 simultaneously. All actual running
programs are hereby cancelled (the symbol S3 is deleted if it
was active). Symbol S1 becomes active (if it was not already
on), which means that the clock is set to the conventional
(manual) mode of operation.
Semi-automatic operation with the defined period
Press button 2, the display indicates 0 00 and the symbol S1 is
on. Set the desired period by pressing buttons 4 and 5. The
symbol S3 appears. The period of operation may be selected
in steps of 1 minute. Maximum possible period to be set is 10
hours.
Once the desired period of operation is selected, the time
countdown starts after the 7 second lapse. The display
indicates the current time.
The remaining time may be checked by pressing button 2 and it
may be corrected with buttons 4 or 5.
The expiry of the set period is signaled by the alarm, which is
switched off automatically after 7 minutes, if it was not
switched off before by pressing buttons 1, 2 or 3. The symbol
S1 is off and the symbol S3 flashes. In this moment the oven is
switched off.
Simultaneous pressing of buttons 2 and 3 switches off the
symbol S3. Symbol S1 reappears and the clock is set to
conventional (manual) mode.
If you wish to terminate roasting the oven must be
switched off!
Semi-automatic operation with the end of operation
Press button 3 and keep it pressed. The display indicates the
current time. Set the desired end of operation time by pressing
buttons 4 and 5 (naturally, the end time must be greater than
the current time). The symbol S3 appears.
Once the current time reaches the preset end of operation
time, this is signaled by the sound alarm, which is switched off
automatically after 7 minutes, if it was not switched off before
by pressing buttons 1, 2 or 3. The symbol S1 is off and the
symbol S3 flashes. In this moment the oven is switched off.
Press simultaneously buttons 2 and 3 and the symbol S3 is
off. Symbol S1 reappears and the clock is set to the
conventional (manual) operation.
If you wish to terminate roasting the oven must be
switched off!
Once the desired alarm time is selected, the time countdown
starts after the 7 second lapse. The display indicates the
current time.
The remaining time may be checked by pressing the button 1
and it may be corrected with buttons 4 or 5.
The expiry of the set period is signaled by the alarm, which is
switched off automatically after 7 minutes, if it was not
switched off before by pressing buttons 1, 2 or 3. The symbol
S2 is off.
Sound alarm volume
When all functions are off (only the current time is displayed) it
is possible to select 3 different volume settings of the sound
signal. Keep the button 4 pressed and the first volume level is
sounded. Release and press again for the next volume level,
etc.
The last selected level is stored as default. Volume level may
be reset anytime.
Deleting all timer adjustments
All the time settings except the alarm timer may be deleted at
any time by pressing simultaneously buttons 2 and 3. Preset
programs are automatically cancelled and the clock returns to
the conventional (manual) mode.
Using the clock in combination with oven
To use the clock in combination with oven, the first step is
to switch the oven on and set the desired baking mode
and the temperature. Only after that you may proceed
setting the clock functions. After the completion of baking
switch the oven off.
Automatic operation with the preset period and the
end of operation
Press button 2 and by pressing buttons 4 and 5 adjust the
period of operation. Then press button 3 and the display
indicates the nearest possible end of operation time. Set the
desired end of operation time by pressing buttons 4 and 5. The
symbol S1 is off if the end time is greater than the current time
+ the preset period of operation.
The oven starts operating automatically according to the preset
times.
Example
Current time = 12:00, operation interval was set at 1:30 and the
end of operation at 14:00. This means that the oven will start
operating at 12:30.
Errors in setting the time
If the selected end time falls shorter than the current time +
period of operation, this is signaled by the sound alarm and the
flashing symbol S3. Preset times have to be corrected and
adjusted (the best procedure is to press simultaneously
buttons 2 and 3 and put the clock in the conventional mode,
then repeat the complete procedure).
Alarm timer
To activate the timer, press button 1. This timer functions only
as a warning signal and does not switch off the oven.
Set the desired time by pressing buttons 4 and 5. Symbol S2
is on.
12
Instructions for Use
Page 3
Electronic timer with the sensor probe
Automatic operation with the preset period and the
end of operation
1 alarm timer
2 operation time
3 end of operation
Setting the current time
After connecting the appliance to the mains the display
indicates flashing 0 00 and the symbol S3. The current time is
obtained by pressing buttons 2 and 3 simultaneously and
setting the correct time by pressing buttons 4 and 5. The clock
starts running 7 seconds after the last touch of any button. The
symbol S1 is on, indicating that the clock has been set to
manual (conventional) mode.
Note: keeping buttons 4 or 5 pressed speeds up the setting
process on the display.
Setting the conventional (manual) operation
Press the buttons 2 and 3 simultaneously. All actual running
programs are hereby cancelled (the symbol S3 is deleted if it
was active). Symbol S1 becomes active (if it was not already
on), which means that the clock is set to the conventional
(manual) mode of operation.
If you wish to terminate roasting the oven must be
switched off!
Semi-automatic operation with the defined period
Press button 2, the display indicates 0 00 and the symbol S1 is
on. Set the desired period by pressing buttons 4 and 5. The
symbol S3 appears. The period of operation may be selected
in steps of 1 minute. Maximum possible period to be set is 10
hours.
Once the desired period of operation is selected, the time
countdown starts after the 7 second lapse. The display
indicates the current time.
The remaining time may be checked by pressing button 2 and it
may be corrected with buttons 4 or 5.
The expiry of the set period is signaled by the alarm, which is
switched off automatically after 7 minutes, if it was not
switched off before by pressing buttons 1, 2 or 3. The symbol
S1 is off and the symbol S3 flashes. In this moment the oven is
switched off.
Simultaneous pressing of buttons 2 and 3 switches off the
symbol S3. Symbol S1 reappears and the clock is set to
conventional (manual) mode.
If you wish to terminate roasting the oven must be
switched off!
Semi-automatic operation with the end of operation
Press button 3 and keep it pressed. The display indicates the
current time. Set the desired end of operation time by pressing
buttons 4 and 5 (naturally, the end time must be greater than
the current time). The symbol S3 appears.
Once the current time reaches the preset end of operation
time, this is signaled by the sound alarm, which is switched off
automatically after 7 minutes, if it was not switched off before
by pressing buttons 1, 2 or 3. The symbol S1 is off and the
symbol S3 flashes. In this moment the oven is switched off.
4 minus (-) button
5 plus (+) button
Alarm timer
Programmed roasting with the sensor probe
Press simultaneously buttons 2 and 3 and the symbol S3 is off.
Symbol S1 reappears and the clock is set to the conventional
(manual) operation.
If you wish to terminate roasting the oven must be
switched off!
Press button 2 and by pressing buttons 4 and 5 adjust the
period of operation. Then press button 3 and the display
indicates the nearest possible end of operation time. Set the
desired end of operation time by pressing buttons 4 and 5. The
symbol S1 is off if the end time is greater than the current time
+ the preset period of operation.
The oven starts operating automatically according to the preset
times.
Example
Current time = 12:00, operation interval was set at 1:30 and the
end of operation at 14:00. This means that the oven will start
operating at 12:30.
Errors in setting the time
If the selected end time falls shorter than the current time +
period of operation, this is signaled by the sound alarm and the
flashing symbol S3. Preset times have to be corrected and
adjusted (the best procedure is to press simultaneously
buttons 2 and 3 and put the clock in the conventional mode,
then repeat the complete procedure).
To activate the timer, press button 1. This timer functions only
as a warning signal and does not switch off the oven.
Set the desired time by pressing buttons 4 and 5. Symbol S2
is on.
Once the desired alarm time is selected, the time countdown
starts after the 7 second lapse. The display indicates the
current time.
The remaining time may be checked by pressing the button 1
and it may be corrected with buttons 4 or 5.
The expiry of the set period is signaled by the alarm, which is
switched off automatically after 7 minutes, if it was not
switched off before by pressing buttons 1, 2 or 3. The symbol
S2 is off.
This option allows the setting of the inner temperature of meat
core. The available temperature span is between 30 and 99°C.
The inner temperature of meat is measured by sensor probe.
Probe connection
Connect the probe plug to the mains socket and stick the
probe to the roast. The mains socket is located at the upper
left corner of the oven. Before plugging in the probe remove
the metal cap from the socket, and replace it after use.
CAUTION!
Make sure the probe does not touch the heater during roasting!
This way of roasting is suitable for larger chunks of meat,
possibly boneless. Bones make it difficult to measure the
temperature precisely and often give wrong readings. Rabbits
and poultry are not recommended for probe roasting.
Recommended inner temperatures of meat core
Roast pork: 85°C
Roast beef: 80°C
Roast veal: 75°C
Roast tenderloin: 40-55°C
Procedure
• Connect the probe and stick it inside the roast. Left side of
the display indicates the actual temperature and the right
Instructions for Use
13
Page 4

side indicates the preset desired temperature, say 80°C. The
temperature may be changed by pressing buttons 4 and 5. If
for example the desired temperature was set to 75°C, and
the actual temperature is 30°C, the display will read 30 75.
• Switch the oven on: by using appropriate buttons set the
heating mode and roasting temperature.
• The oven starts to operate immediately (roasting is initiated),
and the probe measures the rising temperature.
• Once the preset temperature of the meat center is reached,
the oven stops operating and this is signaled by the sound
alarm which may be switched off by pressing any of the
buttons.
• Switch the oven off, otherwise it will be switched on
again after certain time (when the actual temperature of
food drops under the desired preset temperature), since
this is the way the system sustains the desired
temperature.
• Pull the probe from meat and disconnect it from the mains.
The display starts indicating the current time.
Using the sensor probe in combination with timer
functions (recommended for experienced users)
The sensor probe may be used also in combination with the
preset cooking period, preset end of cooking time, or with the
automatic operation, already described in preceding
paragraphs.
However, the user should respect the following tips:
• With the preset period of operation, the oven will be
switched off upon the expiry of the preset time, although
the actual temperature of meat might yet not have reached
the preset one. Therefore the preset period of operation
should be set somewhat longer than the time necessary to
reach the desired temperature.
• Likewise, this applies also to the function of preset end of
roasting and for the automatic operation.
Such combinations are advisable when the user has acquired
certain experience regarding the
cooking periods required for particular types and quantities of
food at a particular preset temperatures.
At any rate it is always advisable to set the cooking period to
some extent longer than the actual necessary time, and use
the automatic cooking function.
Note: When the probe is on, the display always indicates the
actual and the desired temperature. If for example, the roasting
period is preset, after 7 second lapse the display will return to
indicate the temperature.
CAUTION!
Use only the sensor probe designed for this particular type
of oven.
Sound alarm volume
When all functions are off (only the current time is displayed) it
is possible to select 3 different volume settings of the sound
signal. Keep the button 2 pressed and the first volume level is
sounded. Release and press again for the next volume level,
etc.
The last selected level is stored as default. Volume level may
be reset anytime.
Deleting all timer adjustments
All the time settings except the alarm timer may be deleted at
any time by pressing simultaneously buttons 2 and 3. Preset
programs are automatically cancelled and the clock returns to
the conventional (manual) mode.
Using the clock in combination with oven
To use the clock in combination with oven, the first step is
to switch the oven on and set the desired baking mode
and the temperature. Only after that you may proceed
setting the clock functions. After the completion of baking
switch the oven off.
Electronic timer
1 current time / conventional (manual) operation
button
2 minus (-) and plus (+) button
Setting the current time
After connecting the appliance to the mains the display
indicates flashing 0 00. The current time is set by turning
button 1 to the left or right and releasing it (the symbol S1 is
on, indicating that the clock has been set to manual
(conventional) mode), and by turning button 2 either in the
direction "+" or "-".
Current time may be corrected anytime (except when the
symbol S2 is active) by turning button 1 to the left or right and
releasing it, and selecting the new time by turning button 2 to
the direction "+" or "-". After setting the time allow a 7 second
lapse for the clock to adjust to the new setting.
Note: keeping the button 2 in position "+" or "-" speeds up the
setting process on the display.
Winter/summer time setting
Keep the button 1 turned left or right for about 4 seconds. The
display indicating hours starts flashing. By turning button 2 in
the direction "+" or "-" make adequate changes. Only hours
may be changed, the settings of minutes and hidden seconds
are not affected!
Wait for 7 seconds for the display to stop flashing and starts
indicating the correct current time of day.
Setting the period of operation
Turn button 2 in the direction "+" or "-" and release it to lock
back in the neutral position. The display indicates 0 00 and the
symbol S1 is on, if it has not been switched on earlier.
Turn button 2 once again in the direction "+" and keep it in that
position. The display indicates 0 10, and the symbol S2
appears, indicating the period of operation of the oven. By
keeping button 2 in this position select the desired period of
operation in steps of 10 seconds. The left side of the display
changes in 10 second intervals until it reaches the value 99 50
(indicating 99 minutes and 50 seconds). Maximum possible
period to be set is 10 hours.
If button 2 is not released, the display digits will change to read
1 40, which means that the reading format was changed to 1
hour and 40 minutes.
In short: when setting the period, shorter than 1h 40 min the
left side of the display indicates minutes and the right one
seconds. Likewise, if the selected period is longer, the left side
displays hours and the right one minutes.
Once the desired period of operation is selected, the time
countdown starts after the 7 second lapse. In case the selected
period is shorter or equal to 99 minutes and 50 seconds, the
countdown intervals will be of 1 second, and if the selected
period exceeds 99 minutes and 50 seconds the time will be
counted down in 1 minute steps.
In case the period needs to be reset to zero during the
countdown, keep the button 2 turned towards the position "-"
for as long as the display reaches 0 00 and the symbols S1
and S2 are turned off. By turning button 2 again towards the
position "-" and releasing it, the clock is reset to the
conventional (manual) operation mode.
14
Instructions for Use
Page 5

The expiry of the set period is signaled by the alarm, which is
switched off automatically after 7 minutes, if it was not
switched off before by turning any of the buttons.
When the sound alarm is triggered, the display indicates the
current time and the symbols S1 and S2 are off. In this
moment the oven is switched off. In case the sound alarm is
stopped by turning any button to either direction, the symbol S1
reappears.
If you wish to terminate roasting the oven must be
switched off!
Using the clock in combination with oven
Sound alarm volume
When all functions are off (symbol S2 is off) it is possible to
select 3 different volume settings of the sound signal. Keep the
button 2 turned towards the position "-" and the first volume
Electronic timer with the sensor probe
Semi-automatic operation with the defined period
1 function button
2 minus (-) and plus (+) button
Description of symbols:
position ‘manual’
position ‘timer’
position ‘period of operation’
position ‘end’
position ‘probe’
Button 1 settings
Various functions of button 1 are selected by turning it to the
desired position and pushing it towards the appliance. This way
the particular function is activated. Display then turns back to
current time (except when using the probe, when both the
actual and the selected temperatures of food are displayed all
the time).
Particular function can be recalled by presing again button 1.
Setting the current time
After connecting the appliance to the mains the display
indicates flashing 0 00 and the flashing symbol S3. Press
button 1 and turn it to the position 'manual', and set the current
time by turning the button 2 towards "+" or "-" The clock starts
running 7 seconds after the last touch of any button. The
symbol S1 is on, indicating that the clock has been set to
manual (conventional) mode.
Note: keeping button 2 turned towards the position "+" or "-"
speeds up the setting process on the display.
Caution: In case you fail to set the current time within 7
seconds following the plugging of the appliance to mains
power, it will start running automatically. If you now turn button
2 in the ‘+’ direction, current time stops flashing, but symbol
S3 is still flashing. You can now set the current time as follows:
− Turn button 1 to the position "current time" and then back to
"manual".
− Set current time with button 2 (symbol S3 is off, symbol S1
is on).
Repeat the same procedure in case of power failure, or in case
of changing the time of day.!
Setting the conventional (manual) operation
Press button 1 and turn it to the position 'manual'. All actual
running programs are hereby cancelled (the symbol S3 is
deleted if it was active). Symbol S1 becomes active (if it was
Semi-automatic operation with the end of operation
level is sounded. Release it and turn again in the same
direction for the next volume level, etc.
The last selected level is stored as default. Volume level may
be reset anytime.
To use the clock in combination with oven, the first step is
to switch the oven on and set the desired baking mode
and the temperature. Only after that you may proceed
setting the clock functions. After the completion of baking
switch the oven off.
not already on), which means that the clock is set to the
conventional (manual) mode of operation.
Press button 1 and turn it to the position 'period of operation'.
The display indicates 0 00 and the symbol S1 is on. Set the
desired period by turning button 2 towards the position "+" or
"-". The symbol S3 appears. The period of operation may be
selected in steps of 1 minute. Maximum possible period to be
set is 10 hours.
Once the desired period of operation is selected, the time
countdown starts after the 7 second lapse, the display switches
to current time.
You may now correct or change the remaining time with button
2, if you press button 1 in position 'period of operation'.
Once the desired period of operation is selected, the time
countdown starts after the 7 second lapse. If button 1 remains
in the position "manual" the display indicates the countdown
time.
The remaining time may be checked by turning button 2, while
button 1 must remain in the position "period of operation".
The expiry of the set period is signaled by the alarm, which is
switched off automatically after 7 minutes, if it was not
switched off before by turning button 1 into any position other
than the present one. The symbol S1 is off and the symbol S3
flashes. In this moment the oven is switched off. After pressing
button 1 and turning it to the position 'manual', symbol S3 goes
off and symbol S1 is lit, clock is set for manual operation.
After turning the button 1 into the position "manual" the symbol
S3 turns off and the symbol S1 reappears. The clock is set to
conventional (manual) mode.
If you wish to terminate roasting the oven must be
switched off!
Press button 1 and turn it to the position 'end'. Turn button 1 to
the position "end". The display indicates the current time. Set
the desired end of operation time by turning button 2 towards
the position "+" or "-" (naturally, the end time must be greater
than the current time). The symbol S3 appears. The display
indicates current time 7 seconds after the setting process is
completed.
Once the current time reaches the preset end of operation
time, this is signaled by the sound alarm, which is switched off
automatically after 7 minutes, if it was not switched off before
by turning button 1 to any direction. The symbol S1 is off and
the symbol S3 flashes. In this moment the oven is switched off.
After turning the button 1 into the position "manual" the symbol
S3 turns off and the symbol S1 reappears. The clock is set to
conventional (manual) mode. After pressing button 1 and
turning it to the position 'manual', symbol S3 goes off and
symbol S1 is on, clock is set for manual operation.
If you wish to terminate roasting the oven must be
switched off!
Instructions for Use
15
Page 6

Automatic operation with the preset period and the
end of operation
Press button 1 and turn it to the position 'period of operation'.
By turning button 2 to position '+' or '-' set the period of
operation.
Then press button 1 and turn it to the position 'end'; display
indicates nearest possible end of operation time. Turn button 1
to the position "period of operation" and by turning button 2
towards "+" or "-" set the period of cooking.
Then turn button 1 into the position "end" and the display
indicates the nearest possible end of operation time. Set the
desired end of operation time by turning button 1 towards "+"
or "-". The symbol S1 is off if the end time is greater than the
current time + the preset period of operation.
The oven starts operating automatically according to the preset
times.
Example
Current time = 12:00, operation interval was set at 1:30 and the
end of operation at 14:00. This means that the oven will start
operating at 12:30.
Errors in setting the time
If the selected end time falls shorter than the current time +
period of operation, this is signaled by the sound alarm and the
flashing symbol S3. Preset times have to be corrected and
adjusted (the best procedure is to press and turn button 1 to
the position "manual" and repeat the complete procedure).
Alarm timer
To activate the timer, press and turn button 1 to the position
"timer". This timer functions only as a warning signal and does
not switch off the oven off.
Set the desired time by turning button 2 towards "+" or "-".
Symbol S2 is on.
Once the desired alarm time is selected, the time countdown
starts after the 7 second lapse and display returns to current
time.
The remaining time may be corrected with button 2, if you
press button 1 in the position "period of operation".
If button 1 remained in the position "timer" the display indicates
the countdown of preset time.
The expiry of the set period is signaled by the alarm, which is
switched off automatically after 7 minutes, if it was not
switched off before by turning button 1 in any other position.
The symbol S2 is off.
Programmed roasting with the sensor probe
This option allows the setting of the inner temperature of meat
core. The available temperature span is between 30 and 99°C.
The inner temperature of meat is measured by sensor probe.
Probe connection
Connect the probe plug to the mains socket and stick the
probe to the roast. The mains socket is located at the upper
left corner of the oven. Before plugging in the probe remove
the metal cap from the socket, and replace it after use.
CAUTION!
Make sure the probe does not touch the heater during roasting!
This way of roasting is suitable for larger chunks of meat,
possibly boneless. Bones make it difficult to measure the
temperature precisely and often give wrong readings. Rabbits
and poultry are therefore not recommended for probe roasting.
Recommended inner temperatures of meat core
Roast pork: 85°C
Roast beef: 80°C
Roast veal: 75°C
Roast tenderloin: 40-55°C
Procedure
• Connect the probe and stick it inside the roast. Left side of
the display indicates the actual temperature and the right
side indicates the preset desired temperature, say 80°C.
Turn button 1 to the position "probe", and adjust the desired
temperature by turning button 2 towards "+" or "-". If for
example the desired temperature was set to 75°C, and the
actual temperature is 30°C, the display will read 30 75.
• Switch the oven on: by using appropriate buttons set the
heating mode and roasting temperature.
• The oven starts to operate immediately (roasting is initiated),
and the probe measures the rising temperature.
• Once the preset temperature of the meat center is reached,
the oven stops operating and this is signaled by the sound
alarm which may be switched off by activating any of the
buttons.
• Switch the oven off, otherwise it will be switched on
again after certain time (when the actual temperature of
food drops under the desired preset temperature), since
this is the way the system sustains the desired
temperature.Pull the probe from meat and disconnect it
from the mains. The display starts indicating the current
time.
Using the sensor probe in combination with timer
functions (recommended for experienced users)
The sensor probe may be used also in combination with the
preset cooking period, preset end of cooking time, or with the
automatic operation, already described in preceding
paragraphs.
However, the user should respect the following tips:
• With the preset period of operation, the oven will be
switched off upon the expiry of the preset time, although
the actual temperature of meat might yet not have reached
the preset one. Therefore the preset period of operation
should be set somewhat longer than the time necessary to
reach the desired temperature.
• Likewise, this applies also to the function of preset end of
roasting and for the automatic operation.
Such combinations are advisable when the user has acquired
certain experience regarding the cooking periods required for
particular types and quantities of food at a particular preset
temperatures.
At any rate it is always advisable to set the cooking period to
some extent longer than the actual necessary time, and use
the automatic cooking function.
Note: when the probe is on, the display always indicates the
actual and the desired temperature. If for example, the roasting
period is preset, after 7 second lapse the display will return to
indicate the temperature.
CAUTION!
Use only the sensor probe designed for this particular type
of oven.
Sound alarm volume
When all functions are off (only the current time is displayed) it
is possible to select 3 different volume settings of the sound
signal. Press and turn button 1 to the position "manual" and
wait for 7 seconds. If button 2 is accidentally turned prior the
expiry of this period, the current time will be altered! Next, turn
button 2 towards "-" and keep it in this position. The first
volume level is sounded. Release button 2 and turn again
towards "-" for the next volume level, etc.
The last selected level is stored as default. Volume level may
be reset anytime.
Deleting all timer adjustments
All the time settings except the alarm timer may be deleted at
any time by pressing and turning button 1 to the position
"manual". Preset programs are automatically cancelled and the
clock returns to the conventional (manual) mode.
Using the clock in combination with oven
To use the clock in combination with oven, the first step is
to switch the oven on and set the desired baking mode
and the temperature. Only after that you may proceed
setting the clock functions. After the completion of baking
switch the oven off.
16
Instructions for Use
Page 7

Electronic timer
The electronic timer is used to program the oven operation
time from 00 to 24 hours.
Use of timer
• Current time of day
• Preset stop of oven operation
• Alarm timer.
Setting the current time
• After connecting the appliance to the mains, or in case of
power failure, the display intermitently flashes 0 00 and
AUTO.
• Press both "+" and "-" buttons simultaneously. The display
indicates time 0.00 and the symbol AUTO is flashing.
• The current time is set by pressing buttons "+" and "-" (first
press of either button sets the time automatically to 12.00).
• The clock starts running a few seconds after the last touch of
any button.
Correction of current time
• Current time may be corrected anytime, except when the
preset stop of the oven is active.
• Press the buttons "+" and "-" simultaneously. By pressing
either of these buttons change the time setting of the clock.
• After a few second lapse the clock starts to tick according to
the new setting.
Setting the preset stop time of the oven
• Turn the program selector to select the appropriate operation
mode and temperature of the oven.
• Press the "+" or "-" button, the display indicates 0.00 and
the "pot" symbol is illuminated.
• By pressing buttons "+" or "-" set the desired period of oven
operation.
• Once the operation period is set, the symbol »AUTO«
illuminates.
A few seconds after the last touch of buttons »+« or »-» the
display indicates current time, and both symbols »pot« and
»AUTO« are illuminated. The clock starts to countdown the
preset time. During the preset operation of the oven you may
randomly change the stop time.
• When the preset time has expired, the timer switch stops the
oven operation. This is signalled by the beep, symbol »pot«
goes off, symbol »AUTO« starts flashing. The sound signal
goes off automatically after 2 minutes, or you may switch it
off by pressing buttons "+" or "-" .
• Note: symbol »AUTO« is still flashing, which means that the
oven is still off. If you press buttons "+" or "-" again, the
timer switch is on again.
• Return the program selector button to its original position.
Alarm timer
This timer functions only as a warning signal. The setting
procedure is identical as setting the oven operation stop time,
but it does not switch off the oven.
WE RESERVE THE RIGHT TO ALTER THE SPECIFICATIONS WITH NO INFLUENCE ON THE
OPERATION OF THE APPLIANCE.
Instructions for Use
17
 Loading...