

Page 1

GRIP
LET’S GET STARTED
Page 2
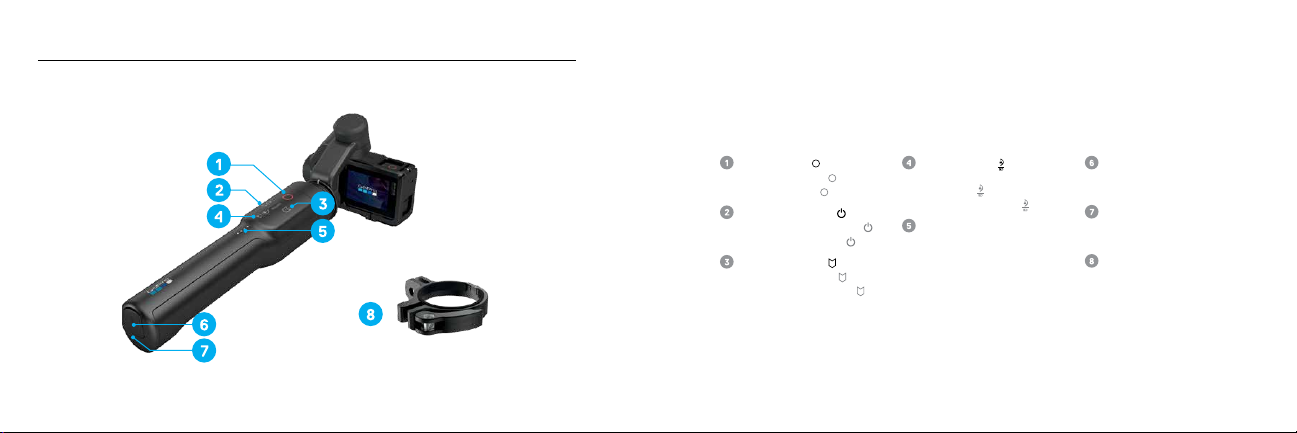
KARMA™ GRIP / KARMA GRIP / KARMA GRIP
Shutter Button [ ]
Bouton Obturateur [
Botón Obturador [
Power/Mode Button [ ]
Bouton Alimentation/Mode [
Botón Encender/Modo [
HiLight Tag Button [ ]
Bouton Balise HiLight [
Botón Etiqueta de énfasis [
Camera not included. / Caméra non incluse. / No incluye la cámara.
]
]
]
]
]
]
Tilt Lock Button [ ]
Bouton Verrouillage de
l’inclinaison [
Botón Fijar inclinación [
Battery Status Lights
Témoins d’état de la batterie
Luces de estado de la batería
Charging Port
]
]
Port de chargement
Puerto de carga
Tether Point
Point d’attache pour dragonne
Punto de sujeción
Mounting Ring
Anneau de fixation
Mounting Ring
Page 3
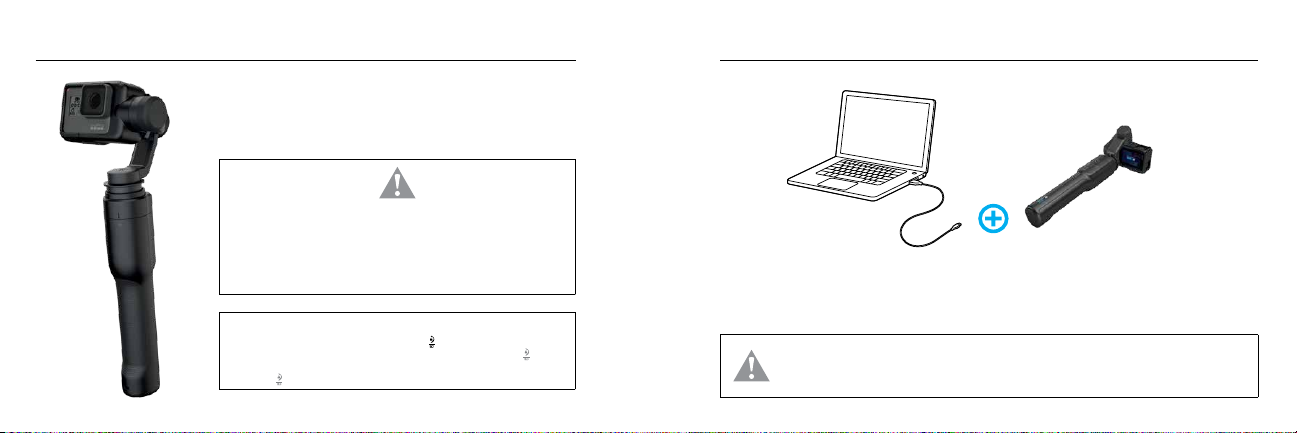
STEP 1: ASSEMBLE / ASSEMBLAGE / ENSAMBLAJE STEP 2: CHARGE / CHARGEMENT / CARGA
Open the harness a nd inser t a came ra.
Ouvrez le harnais et insérez une ca méra. / Ab ra el arné s e inser te
la cámara.
WARNING: Karma Grip is a sensitive instrument.To prevent damage, do not expose Karma Grip
to liquids, submerge in water, or subject to vibrations or shaking.
AVERTISSEMENT : Le Karma Grip est un instrument sensible. Pour éviter de l’endommager,
ne l’exposez pas aux liquides, ne l’immergez pas et ne le soumettez pas à des vibrations ou à des
secousses. / ADVERTENCIA: El Karma Grip es una herramienta sensible. Para evitar daños, no
sumerja el Karma Grip en agua ni lo exponga a líquidos, vibraciones o sacudidas.
PRO TIP / CONSEIL DE PRO / CONSEJO PROFESIONAL
When the grip is powered off, press the Tilt Lock button [
Lorsque la po ignée est éteint, appuyez su r le bouton Verrouillage de l’inclinaison [
vérifier l’état d e la batterie. / Cuando l a empuñadura esté apag ado, presione el botón Fi jar
inclinación [
]para ver el esta do de la batería.
] to see the battery status.
] pour
Charge the battery. The battery status lights indicate the charge level.
Chargez la b atterie. Le s témoins d ’état de la b atterie in diquent le niveau d e charge. / C argue la ba tería.
Las luces de estad o de la batería indic an el nivel d e carga.
WARNING: To prevent damage to the stabilizer, charge Karma Grip through the handle with the included USB-C cable.Stabilizer cannot
be charged directly. / AVERTISSEMENT : Pour éviter d’endommager le stabilisateur, chargez le Karma Grip en connectant le câble
USB-C fourni à la poignée. Le stabilisateur ne peut pas être chargé directement. / ADVERTENCIA: Para evitar daños en el estabilizador,
cargue el Karma Grip desde la empuñadura con el cable USB-C incluido. No se puede cargar el estabilizador directamente.
Page 4

STEP 3: CAPTURE / CAPTUREZ / CAPTURE
Press the Power/Mode button [ ] to power
on the system.
Appuyez su r le bouton Alimentation/Mode [
pour all umer le sys tème. / Presione el botó n
Encender/Modo [
]
] para encender el sistema.
Press the Power/Mode button [
the mode.
Appuyez su r le bouton Alimentation/Mode [
pour sélectionner un mode. / Presione el botón
Encender/Modo [
deseado.
] para seleccionar el modo
] to select
Press the Sh utter button [ ] to start and
]
stop recording.
Appuyez su r le bouton Obturateur [
lancer et arrêter l’enregistrement. / Presione el
botón Obturador [
la grabación.
] para iniciar o detener
] pour
Press and h old the Power/Mode button [
to power off.
Maintenez l e bouton Alimentation/Mode [
enfoncé pour éteindre le système. / Mantenga
presionado el botón Encender/Modo [
para apagarlo.
]
]
]
Page 5

ADJUSTING THE CAMERA ANGLE / RÉGLAGE DE L’ANGLE DE
LA CAMÉRA / AJUSTE DEL ÁNGULO DE LA CÁMARA
To capture an obje ct above/be low the horizon: While holding
down the Tilt L ock [ ] bu tton, move the handle up or down to
the desire d position, then rel ease the b utton to lock the angle.
To follow an object: D ouble -click th e Tilt Lo ck
To cancel eithe r setting a bove: Press th e Tilt Lo ck
Pour capturer un objet situé au-dessus/en dessous de l’horizon :
Tout en maintenant le bouton Verrouillage de l’inclinaison [ ]
enfoncé, dé placez l a poignée vers le ha ut ou le bas dans la po sition
souhaité e, puis rel âchez le b outon pou r verrouiller l’angle. P our
suivre un objet : Double-cli quez sur le b outon Verrouillage de
l’inclinaison [
Appuyez su r le bouton Verrouillage de l’inclinaison [
capturar u n objeto por e ncima/deb ajo del ho rizonte: Mientras
mantiene presionado el botón Fijar inclinación [
empuñadura hacia arriba o abajo hasta alcanzar la posición deseada;
luego de je de pres ionar el b otón para fij ar el áng ulo. Para se guir un
objeto: Presione dos veces el botón Fijar inclinación [
cancelar las configuraciones anteriores: Presione el botón Fijar
inclinación [
]. Pour ann uler l’un des ré glage s ci-des sus :
].
[ ] button.
[ ] button.
]. / Para
], mueva la
]. Para
USING THE GRIP WITH A MOUNT / UTILISATION DE LA POIGNÉE
AVEC UNE FIXATION / CÓMO USAR LA EMPUÑADURA CON
UN SOPORTE
Unlock th e grip han dle and the
mounting ring.
Déverroui llez la poignée du
manche et l ’anneau de f ixation.
/ Desacople la empuñadura del
mango del anillo de montaje.
Slide the m ounting ring onto
the handle.
Insérez l’anneau de fixation sur
la poign ée. / Desl ice el anillo de
montaje en la empuñadura.
Slide the stabilizer into the handl e
and lock the collar, then lock the
mounting ring.
Insérez le stabilisateur dans la
poignée et verrouillez le collier,
puis l’anne au de fixation. / Desl ice
el estabilizador en la empuñadura
y asegure e l collar ín; luego f ije el
anillo de montaje.
Page 6

HELP / AIDE / AYUDA
GOPRO CARE
You break it, we’ll rep lace it. Fo r details , visit
shop.gopro.com/care.
Vous cassez, n ous remp laçon s. Pour en s avoir
plus, ren dez-vous sur shop.gopro.com/care. /
Si lo rompe, lo reempl azamos . Para obtene r más
detalles , visite shop.gopro.com/care.
Safety Info / Informations de sécurité / Información de seguridad
Before first use, carefully read Important Product + Safety Instructions.
Lisez attentivement les Instructions produit et sécurité importantes avant la
première utilisation. / Antes del primer uso, lea con atención las Instrucciones
importantes de producto y seguridad.
ADDITIONAL RESOURCES
For tutorial videos, user manuals and more,
visit gopro.com/yourkarma.
Accédez à d es tutorie ls vidéo, à d es
manuel s de l’utilis ateur et plus e ncore su r
gopro.com/yourkarma. / Para acceder
a videos tutoriales, manuales del usuario
y más, visi te gopro.com/yourkarma.
See the list of country certifications in Important Product + Safety Instructions.
Consultez la liste des homologations par pays dans les Instructions produit et
sécurité importantes. / Consulte la lista de certificaciones por país en las
Instrucciones importantes de producto y seguridad.
Page 7

130-12663-000 REVA
 Loading...