

Page 1

USER MANUAL
Page 2

/ Table of Contents
The Ba sics
Getting Started
Camera Status Screen
Camera Menus
Camera Modes
Navigating Settings Menus
Video Mode
3
4
5
6
6
6
7
Photo Mode
Setup Mode
Protune
Transferring Files to a C omputer
Omni Files and GoPro Soware
Smar t Remote
Battery
7
7
8
9
9
9
9
Important Messages
Troubleshooting
Customer Support
Trademarks
Regulatory Information
10
10
10
10
10
2
Page 3
/ The Basics
OMNI SYNC RIG
8
9
10
11
8
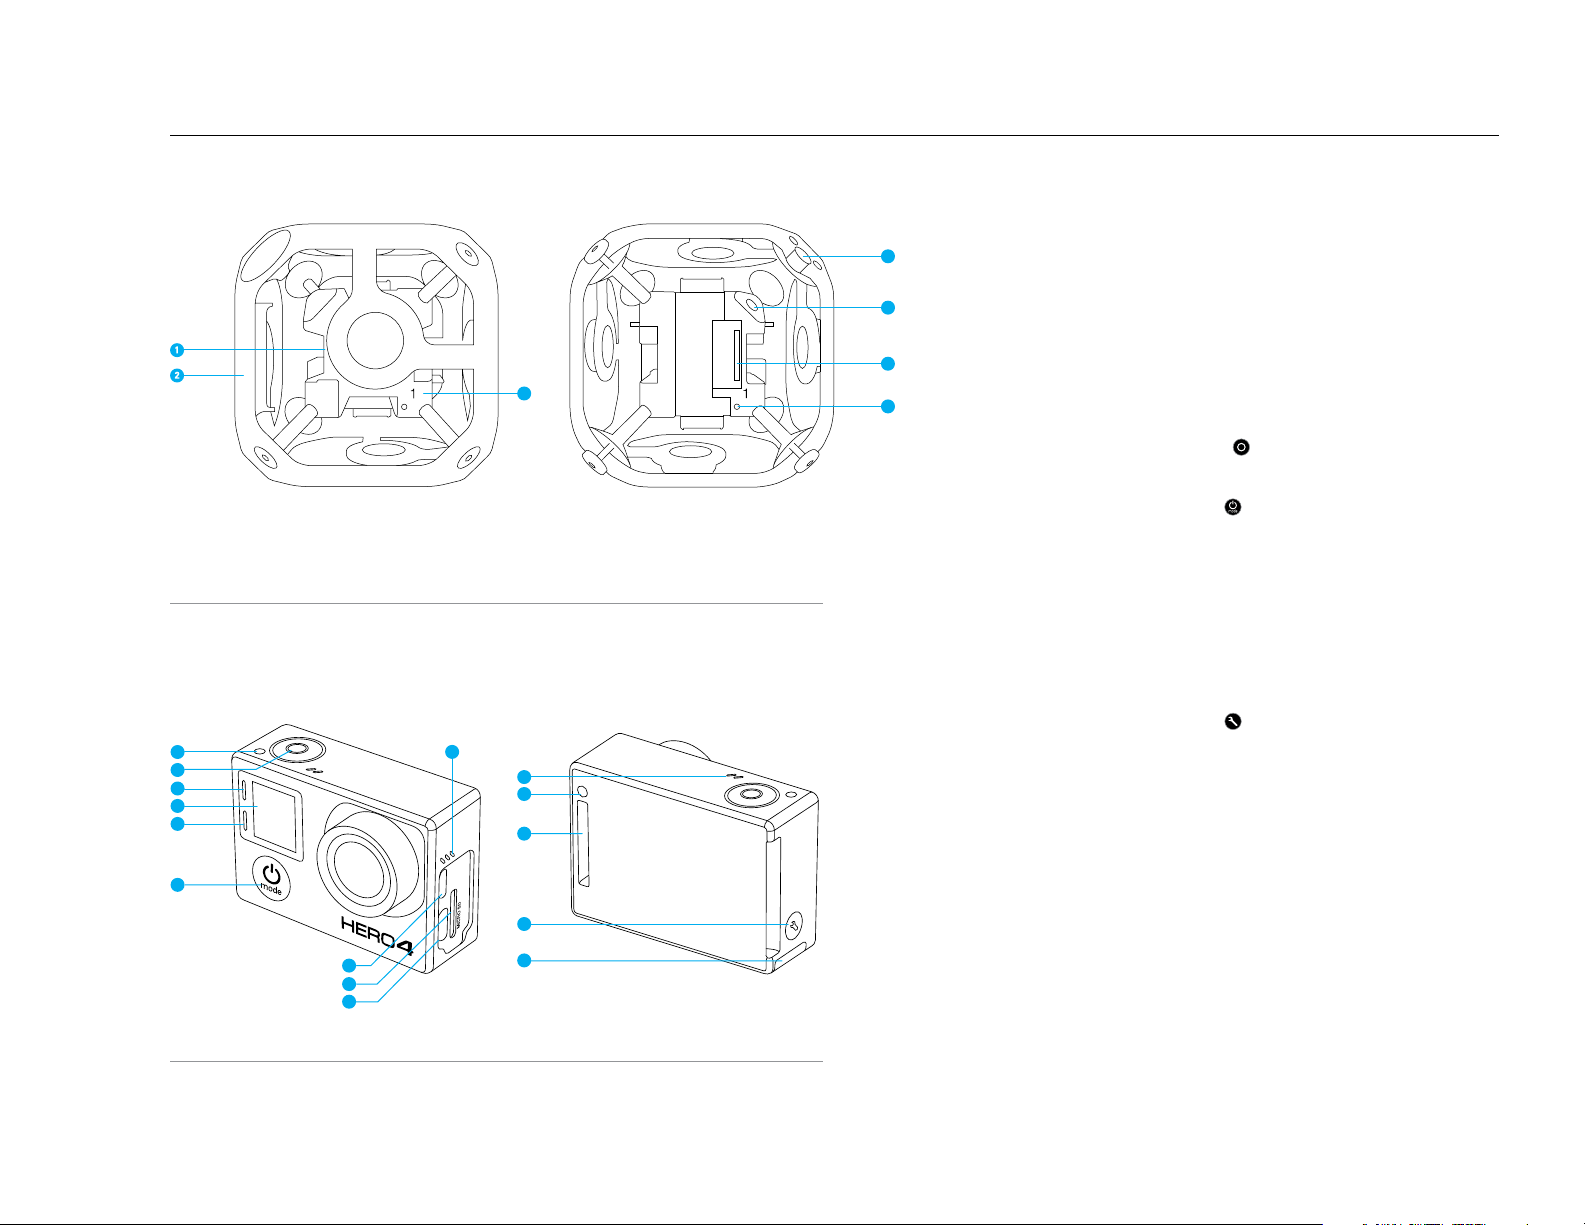
1. Inner Cube (Synchronizer)
2. Frame (6x Outer Panel s)
4
3. Camera Position In dicator (1-6)
4. Mounting Corner (1/4-20
5
Threaded In sert, 1x Top
under re movable Corner Ca p,
1x Bo tto m)
6
3
7
5. Power Connector
(2.5mm x 5.5mm)
6. HEROBus Con nector (30 -pin)
7. Ar ray Camer a Status Light
8. Camera Status Lig ht (red)
9. Shutter/Select Button [
]
10. Wireless Status Light (blue)
11. Camera Status Screen
12. Power/Mode B utton [ ]
13. Micro HDMI Port
(cable not included)
14. microSD Card Slot
15. Mini-USB Port
(supp orts composite A /V
cable/3.5mm stereo mic adapter,
not included)
16. Audio Alert
17. Microphone
18. HEROPort
19. Settings/Tag Button [
16
17
8
18
20. Battery Door
]
12
CAMERA
19
13
14
15
20
3
Page 4

/ Getting Started
MEMORY CARDS
HERO4 Black requires a microSD, microSDHC, or microSDXC memory card.
The card must have a mini mum rating of C lass 10 or UHS-I, a nd a capacity
of 32GB or 6 4GB. Visit gopro.com/help for the l ist of GoPro-tested
microSD cards.
NOTICE: Use care wh en handlin g memory c ards. Avoid liquids , dust
and debris. As a precaution, power off the camera before inserting or
removing the ca rd. Check manufa cturer gui delines regarding use in
acceptable temperature ranges.
WARNING: Us e caution w hen using you r GoPro as par t of your active
lifest yle. Always be aware o f your surro undings to avo id injury to
yoursel f and others .
Abide by a ll local law s when using yo ur GoPro and r elated moun ts and
accessories, including all privacy laws, which may restrict recording in
certain areas.
ROLE OF THE PRIMARY CAMERA
The camera that is con nected to the inne r cube and marked with 1 is
refer red to as the primar y camera. All other camer as are referred to as
secondary cameras.
2. Confirm tha t all cameras are using the same version of ar ray firmwar e.
To obtain the lates t array firm ware for Omni, visit gopro.com/help
and log in to the Omni Support Hu b. If you need to create a su pport hub
account, follow these instructions: https://community.gopro.com/
html/assets/GoProOmniSupportHub.pdf
3. Complete th ese steps for each ca mera:
a. Use the included hex key to loos en (but not remove) the screws on
one of the panels.
b. Gently pull t he panel off of the fram e.
c. Conne ct a camera to the HEROBus con nector on the inne r cube.
SUPP LYING POW ER TO THE RIG
You have two option s for powerin g the rig: external p ower or the
camera batteries.
NOTICE: Do not switc h from one power source to anoth er (camera
batteries to external power o r external p ower to camera batte ries) without
first powerin g off the cameras. Fail ure to follow this guideline can lead to
unexpecte d powering off, interr upted recor dings, and erratic Omni b ehavior.
Powering the Rig w ith External Power
For extended r ecording t ime, power the rig with an exter nal power so urce.
1. Be sure that the batter y for the exte rnal power unit is cha rged.
2. Remove the bat teries from the cameras .
3. Connect the powe r cable to the p ower conne ctor.
NOTICE: Do not conne ct a high-voltage po wer source to O mni. Omni
requi res 5V input , but can be pow ered using a 12V to 5V step-down
converter, such as the Switronix XP-DV-5GP. The Om ni power conn ector is a
2.5mm x 5.5mm pola rity plug. The step-down converter ha s an 8A rating .
Powering the Rig w ith Camera Batteries + Charging in the Rig
With these opt ions, you ca n charge the c amera bat teries without removing
the ca meras from the rig.
• Using USB cables, co nnect the camer a USB ports to the USB hub
(avail able with th e All Inclusi ve Omni pack age).
• Use the power conne ctor to conn ect the ext ernal power to the
inner cube.
The camera status lights turn on du ring charg ing and turn off when
charging is complete.
Powering the Rig w ith Camera Batteries + Charging Outside of the Rig
With this optio n, you must re move the cameras from the ri g.
1. Inser t the battery into the cam era.
The pr imary ca mera contro ls all cameras in the array for the se functi ons:
• Power s all cameras on/off
• Conn ects to th e Smart Remote so that all came ras can be
controlled remotely
• Displays Array Re ady when the system is read y for use
• Displays Array Error when one of the secondary cameras experiences
an error
ASSEMBLING THE ARRAY
Installing the Cameras
The All Inclusive Omni packa ge ships with the cam eras alrea dy instal led. If
you want to re-in stall a cam era or if you have the Rig Only version of Omni,
follow the step s below.
1. Confir m that all cameras a re HERO4 Black came ras. Othe r GoPros are
not sup ported.
d. Align the outer panel with the lens, then gently slide the panel onto
the lens and move the cor ners into place.
e. Tighten the s crews in a star patte rn.
6. Tighten the s crews for th e panel.
7. Repeat steps 3-6 for th e remaining c ameras.
2. Connect the cam era to a computer, USB hub, or other USB c harging
adapter using the inc luded USB ca ble. The camera status lig ht turns on
duri ng charging and tur ns off when charging i s complete.
When c harging with a compu ter, be sure that the c omputer is co nnected
to a power source. If the camera st atus light do es not turn on , use a
different USB port.
For more batter y informa tion, see Battery (page 9).
4
Page 5

/ Getting Started / Camera Status Screen
WARNING: Us e caution w hen using you r GoPro as par t of your active
lifest yle. Always be aware o f your surro undings to avo id injury to
yoursel f and others .
Abide by a ll local law s when using yo ur GoPro and r elated moun ts and
accessories, including all privacy laws, which may restrict recording in
certain areas.
MOUNTING OMNI
1. If you wa nt to use the top 1/4-20 threaded in sert, unscrew the corn er cap.
2. Use a 1/4”-20 screw wi th the threa ded inser t on the top or bottom of the
rig (ne ar the power connec tor) to atta ch Omni to a monopod or ot her
suitable mounting solution.
NOTICE: When remov ing Omni fro m a monopod or other mounting
solution, disconn ect the power connector fi rst to avoid da maging the
connection.
POWERING ON + OFF ALL CAMER AS IN THE ARRAY
To Power On All Cameras:
Press the Power/Mode butto n [ ] on the
prima ry camera. The c amera sta tus lights fl ash
three times and the sound ind icator emit s three
beeps. The pr imary ca mera powers up, follo wed
by the secondary cameras. When Array Ready
disa ppears, yo u can begin capturing video or photos.
The ar ray is prope rly configured if the camer a mode
icon and AR alternate in t he upper le of t he camera
status screen.
If Array Error appears on th e primary camer a’s status screen, see Array Error
(p age 10 ).
To Power Off All C amera s:
Press and hol d the Power/Mode button [ ] on the primar y camera for two
seco nds. The camera status li ghts flash s everal time s and the sound indi cator
emits seven beeps.
Your HERO4 Black features a s tatus scre en that displays the
following information:
1. Camera Mode/FOV
(field of view)
2. Resolution/fps
(frames per second )
™
3. Protune
(if on)
4. Number of Files Captured
5. Available T ime on Memor y Card
6. Wireless ( if on)
7. Battery Life
5
Page 6

/ Camera Menus
Beeps
Color
Date/Time
Delete
Exposure Value
Compensation
Field of View
Frame s Per Second
Interval
ISO Limit
LEDs
Megapixels
Photo
Protune
Setup Mode
Sharpness
Spot Meter
Time Lapse Vi deo
Video Format
Video Mode
Video Resolution
White Balance
Wireless
/ Camera Modes
The HER O4 Black fea tures three camer a modes. To cycle through the
modes, pres s the
Power/Mode button [
Video Record video o r time lapse v ideo
Photo Capture single photos
Setup Adjust general camera settings
]
.
/ Navigating Settings Menus
Each mode has its own settin gs menu. Follow the in structions bel ow on
your ca mera or the Smart Remote to nav igate the set tings menus.
For info rmation ab out connecting t he Smart Remote to your HERO4 Black
came ras, see th e Smart Remote User Gui de at gopro.com/help.
TO NAVIGATE SET TINGS MENUS:
1. Verif y that the cam era is in the desired c amera mode. To cycle bet ween
the modes, press the
2. Press the Settings/Tag button [ ] to open t he setting s menu for that
mode.
3. Use the Power/Mode button [
4. Press the Shutter/Select button [
withi n a setting. To select an o ption, leave t he option hig hlighted when
you move t o another sc reen.
5. To go back to t he previous s creen or exit the settings menu, pre ss the
Settings/Tag button [
Power/Mode button [
] to cyc le through the setti ngs.
].
]
.
] to cyc le through the options
6
Page 7

Video mode contains two ca pture modes: Vide o and Time La pse Video.
Capture Mode Description
Video (default) Captures video.
Time Lapse Vi deo
CAPTURING VIDEO
1. Verif y that the cam era is in Video mode. If need ed, press the
Mode butto n [
2. If necessa ry, select a differe nt video capture mode (Vi deo or
Time Lapse Vi deo):
a. Press the Settings/ Tag button [
b. Press the Shutter/Select button [ ] repeate dly until you get to
the de sired captu re mode.
c. Press the Settings/Tag button [
icon fo r the selected capture mod e appears in the upp er le on your
camera status screen.
3. Press the Shutter/Select button [
came ra status lights fla sh while the c amera is recordin g.
4. To stop ca pturing, p ress the Shutter/Select button [
status light s flash thre e times and th e camera be eps three times.
If the memory card is f ull or the bat tery is out of power, your camera
autom atically stops rec ording. Your vi deo is saved b efore the ca mera
pow ers off.
VIDEO SETTINGS
The capture mode that you sele ct in Video mode determines the setting s
that appear in the rest of the men u.
For ins truc tions on how to change the following settings, see Navigating
Settings Menus (page 6).
PRO TIP: To open th e settings m enu for the current mode, press the
Settings/Tag button [
INTERVAL
The Interva l setting ap plies to Time Lapse V ideo. Inter val determines
the am ount of time that pass es between e ach captured fra me. Availabl e
inter vals ran ge from 2 seco nds (default) to 60 se conds.
Interval Examples
2 seconds Busy s treet corner
5-10 seconds Sunset
10-60 seconds
Note: Time Laps e Video is not supp orted for 1440p 50 and 60 fps .
Creates video from frames captured at specific
inter vals. Time Lapse Video is captured without
audio. Protune
] to change to Video mode.
].
Lengthy activities, such as
construction projects
™
is not av ailable in t his captur e mode.
] to open t he settin gs menu.
] to close the set tings menu. The
]. The c amera beeps once a nd the
]. The c amera
Power/
CAPTURE RESOLUTION, FPS, AND FOV
With Omni, each HERO4 Black camera c aptures vid eo at the following
resolutions:
Video
Resolution
2.7K 4:3 30/25 Wide 2704x2028, 4:3
144 0p 60/50 Wide 1920x1440, 4:3
High-Performance Video Modes, Camera Temperatures, and
Battery Performance
Whe n capturing vide o at 2.7K 4:3, it is n ormal for th e cameras to b ecome
warm a nd use more po wer.
If a camera gets too hot, a message appears on th e screen ind icating
that th e cameras is shutting down. The camera s tops recordin g, saves
your video, an d powers off. If thi s happens with a cam era in Omni, let your
came ra sit and cool for 20 minutes befo re attempting to use it a gain.
For extended r ecording t ime, capture shorter vide o clips or remo ve the
batteries from all camera s and use an ex ternal powe r source with the
power connector on the rig.
PROTUNE
For det ails abou t Protune set tings, see Protune (page 8).
FPS
(NTSC/
PAL)
FOV Screen Resolution
/ Photo Mode
Photo mode c ontains on e capture mode: Single photo.
CAPTURING PHOTOS
1. Verif y that the cam era is in Photo mode. If need ed, press the
Mode butto n [
2. Press the Shutter/Select button [ ] . The camer a beeps two times,
the ca mera statu s lights flash and th e counter on th e camera st atus
scre en increas es by one.
PHOTO SETTINGS
For ins truc tions on how to change the following settings, see Navigating
Settings Menus (page 6).
PRO TIP: To open th e settings m enu for the current mode, press the
Settings/Tag button [
MEGAPIXELS
The HER O4 Black ca ptures photos at 12MP.
] to change to Photo mode.
].
Power/
/ Photo Mode/ Video Mode
SPOT METER
Spot Meter lets you capture photo s from a dark sp ace while pointing t he
camera into a br ighter setting, such a s when recording the outdoors
from within a ca r. When Spot Meter is turned on, [
came ra status sc reen. The o ptions for this setting are off (d efault) and on.
PROTUNE
For det ails abou t Protune set tings, see Protune (page 8).
] appears on the
/ Setup Mode
Setup mode contains settings for w ireless an d settings to custom ize your
came ra . For instr uctions o n how to change the foll owing settings, see
Navigating Settings Menus (page 6).
WIRELESS
For Omn i, this sett ing applie s only to the prima ry camer a. Wireles s must be
off for al l secondary ca meras.
When t he primar y camera’s Wir eless is on, a W ireless sta tus icon app ears
on the c amera status scre en and the blue wirel ess lights o n the camer a
blin k intermi ttently. T he default setting f or Wireless i s off.
Setting Description
PAIR
MODE
PRO TIP: If you forgot your camera’s name o r password, use th e Camera
Reset setting ( Reset Wi-Fi option) in the primary camera’s Setup mode to
reset t hem to the def aults. Th e default password is goprohero.
DEFAULT MODE
You can select th e capture mo de that appe ars when th e camera pow ers on.
The options are Video, Time Lapse Video and Single P hoto.
LEDS
This setting determ ines which camer a status lights (red ) to activate. The
options for this setti ng are 4 (top, bottom, fro nt, back), 2 (f ront and bac k),
or off (none). The de fault setti ng is 4.
Note: The Wirel ess status ligh t (blue) is always a ctivated unle ss you selec t off for this settin g.
BEEPS
You can set t he volume for t he sound ind icators to be 100% (defau lt), 70%
or off.
Lets yo u pair your primary camer a to a GoPro
remote. For more information, see Smart Remote
(page 9).
Aer pa iring, Mod e lets you connect t he
prima ry camera to a GoPro remote.
7
Page 8

/ Setup Mode
VIDEO FORMAT
The Vi deo Format s etting governs frame rates for recording and pla yback
when v iewing vid eo on a TV/HDTV.
Setting Description
NTSC (default) Viewing video in Nor th Americ a
PAL
DATE/TIME
This setting lets you set the date and tim e. If the battery is removed
from the camera for an extended period of time, you must reset the
date and tim e.
DELETE
This setting lets you d elete the last file, or delete all files and fo rmat
the memory c ard. Deleti ng all files is useful a er you trans fer your files to
your computer a nd want to make r oom on your mem ory card for more
content. LED lights bl ink until the o peration is complete.
NOTICE: If you select All/Format , the memor y card is refo rmatted , which
deletes ever y file on the car d. If you sele ct this option from the primary
came ra, memor y cards in all cameras are reformatted.
CAMERA RESET
With this sett ing, you can r eset your camera’s set tings or username
and password.
Setting Description
Reset De faults
Reset Wi-Fi
Viewing video on a PAL TV/HDTV (most te levisions
outside of North America)
Returns all settings to their d efault valu es. This
option retain s the Date/Time setting, th e camera’s
name a nd wireless passw ord, and rem ote
control pairing.
Reset s the camer a's name and password to t he
defaults. T he default p assword is goprohero.
/ Protune
PROTUNE BENEFITS
Protune unlocks the camer a’s full potential, yielding stu nning imag e quality
and ci nema-ca liber vide o optimized for profes sional prod uctions .
Protune is compatible with professio nal color cor rection tools, G oPro
sow are and othe r video edit ing soware.
PROTUNE
The options fo r this setting are off (de fault) and o n. When Protune is on,
PT appears on the came ra status sc reen. Protune is ava ilable for all vide o
and photo resolutions.
WHITE BALANCE
White b alance ad justs the ov erall color tone of videos based on th e
environmental conditions.
Note: Array ca mera firmware do es not offer the Auto wh ite balance sel ection. Be su re to choose the
appropriate white balance for your scene.
Setting Description
3000K
5500K
6500K Cool light (overcast co nditions)
Native (default)
COLOR
Color lets you adjust the color profile of your video and photos.
Setting Description
GoPro C olor
Flat (default)
Warm light (incandescent or sunrise/sunset
lighting)
Slightly cool light (cool fluores cent or avera ge
daylight)
Minimally color-corrected file from the image
sens or that allow s for more prec ise adjust ments in
post-production
Provides GoPro color-corrected profile (same great
color a s when Protune is off)
Provi des a neutra l color profile t hat can be colorcorrected t o better match footag e captured with
other e quipment, offerin g more flexibil ity in postproductio n. Due to its lo ng curve, Flat captures
more details in shadows and h ighlights.
ISO LIMIT
ISO Limit adjusts th e camera’s sen sitivity i n low-light en vironment s, and
creates a bala nce between brig htness and resulti ng image nois e. Image
noise r efers to the degree of graininess in t he image.
Setting Resulting Quality
6400
3200
1600 (default)
800
400
Brighter video in low light, hig hest
image noise
Brighter video in low light, increased
image noise
Moderately bright video in lo w light,
moderate image noise
Darke r video in low light, marginal
image noise
Darke r video in low light, minimum
image noise
SHARPNESS
Shar pness cont rols the sha rpness of your video foota ge.
Sharpness Setting Resulting Quality
High (default) Ultra-sharp video
Medium Moderately sharp video
Low Soer video
EXPOSURE VALUE COMPENSATION (EV COMP)
Exposure Valu e Compens ation affec ts the brig htness of your video.
Adjus ting this set ting can im prove image quality when sh ooting in
environments with contrasting lighting conditions.
Settings
-2.0 -1. 5 -1.0 -0.5 0 (defa ult) +0.5 +1.0 +1. 5 +2.0
PRO TIP: Exposure Value Com pensation adjusts brightness within the
existing ISO Limit. If b rightnes s has alread y reached t he ISO Limit in a
low-light environment, increasing the Exposure Value Compensation
does not have any effect .
RESET
This o ption reset s all Protune settin gs to their def ault values.
8
Page 9

/ Transferring Files to a Computer / Battery
Remove t he microSD cards from the ca meras.
1. Comp lete these steps for ea ch microSD card:
a. Connect the car d reader to you r computer.
b. Insert th e microSD card into th e reader.
c. Transfer your files to your computer.
d. If appropr iate, delete th e files from your cards .
NOTICE: Be sure to ba ck up your files b efore deleting them.
/ Omni Files and GoPro Soware
Files record ed with Omni a re optimized f or use with GoP ro Omni Importer.
This a pplication offers u nique functionality for Omni files: fas t previewing,
color correc tion, imag e stabilization, fi le export, and med ia management
tools.
You can al so use Omni files with GoPro Auto pano Video Pro so ware for
adva nced stitc hing, stabilizing, and V R content publishin g. Content cr eated
using t he GoPro Omni Impor ter and GoPro A utopano Video Pro c an be used
with Go Pro VR (availa ble for iOS
For more inform ation, visit kolor.com and refer to the user manua ls for
these apps.
Note: Omni re cordings were n ot designed to wo rk with the GoPro Ap p (mobile or deskt op), Quik™,
or Splice.
©
and Android ) and GoPro VR for desktop.
MAXIMIZING BATTERY LIFE
The ba ttery ico n on the came ra screen bl inks when t he batter y drops below
10%. If the ba ttery in any of the camera s reaches 0% w hile record ing, the
came ra saves the file and th e array powers off.
Extreme col d temperatu res can dec rease battery life. To maxim ize battery
life in cold cond itions, keep the camera in a warm place prior to use.
CHARGING INFORMATION
The ba ttery cha rges to 100% in app roximately t wo hours whe n using
GoPro’s USB-compatibl e Wall or Auto Cha rger (both sold sepa rately).
When c harging with a compu ter, be sure that the c omputer is co nnected to
a power s ource. If the c amera stat us light does not turn o n, use a different
USB por t.
The in cluded lit hium-ion batter y comes par tially charged. No damage
occurs to the c amera or bat tery if use d prior to a full charge.
You can al so charge the battery outside t he camera using the HERO4 Dual
Battery Charger (sold separately).
/ Smart Remote
The Smart Remote can control your cameras from up to 600’ (180m) away in
optimal conditions with a clear line of sight between the Smart Remote and
the Omni. To use the Smart Remote with Omni, pair it only with the primary
camera. You can then control all 6 cameras remotely.
For info rmation ab out connecting t he Smart Remote to your HERO4 Black
came ras, see th e Smart Remote User Gui de at gopro.com/help.
Note: You cannot u se more than one Sm art Remote with O mni or control mo re than one Omni wi th a
Smart Remote.
REMOVING THE BATTERY FROM THE CAMERA
The HER O4 Black batter y is designed to have a tig ht fit to maximize
reliability in high-vibration activities.
To Remove the Battery:
1. Open the batte ry door by placin g your thumb in the ind entation in t he
battery do or (on the botto m of the camera) and sl iding it to the l e. Allow
the do or to open.
2. Grasp the ba ttery pull-tab a nd remove the b attery f rom the came ra.
WARNING: Us ing a wall char ger other th an a GoPro Wall C harger can
damage t he GoPro bat tery and co uld result in fir e or leakage . Only
use charg ers marked: Outpu t 5V 1A. If you do n ot know the vo ltage
and curre nt of your char ger, use the inclu ded USB cabl e to charge th e
camera f rom your comp uter.
thoroughly before using it again. Do not d ry the camer a or battery with an
exter nal heat source such as a microwave oven or hair dr yer. Damage to
the ca mera or battery ca used by contact with liquid is not covered under
the warranty.
WARNING: Do n ot drop, dis assembl e, open, crus h, bend,
deform , puncture , shred, micr owave, incine rate or paint t he camera
or the bat tery, if it is rem ovable. Do no t insert fo reign objec ts into
any openi ng on the came ra. Do not us e the camera o r the batter y if it
has been da maged— for example, i f cracked, pu nctured or harmed b y
water. Disas sembling or punc turing the b attery (wh ether integ rated or
removab le) can cause an ex plosion or fire.
Do not store your batter y with metal o bjects, such as coins, keys or
necklaces . If the batter y terminals come in conta ct with metal objects,
this may cause a fire.
BATTERY DISPOSAL
Most rechargeable lithium-ion batteries (whether removable or integrated into
the ca mera) are cl assified a s non-haz ardous wa ste a nd are safe fo r disp osal
in the normal municipal was te stream. Many lo calities ha ve laws i n place
requiring battery recycling. Check your lo cal laws to make sure that
you c an dispos e of rech argeable batteries in your regular trash. To safely
dispose of lithium-ion batteries, protect terminals from exposure to other
metal w ith packing , masking or electr ical tape so they do n ot cause a fire
while being transported.
Lithium-ion batteries, however, do contain recyclable materials and
are accepted for recycling by the Rechargeable Battery Recycling
Corporation’s (RBRC) Batter y Recycling Progr am. We encourage
you to visit Call2Recycle at call2re cycle.org or call 1-800-BATTERY
in Nor th Americ a to find a convenient recycli ng location.
Never dispose of a battery in a fire because it may explode.
WARNING: Only use manufacturer-recommended replacement
batteri es for your ca mera.
BATTE RY STORAGE AND HANDLING
The camera contains sensitive components, including the battery. Avoid
exposing your c amera and battery to very cold or ver y hot temperatures.
Low or high temperature conditions may tempor arily shorten the battery
life or c ause the c amera to tem porarily s top worki ng prop erl y. Avoi d
dramatic changes in temperature or h umidity when using the camera, as
cond ensation may form on or withi n the camera.
Do not turn on your camera if it is wet. If your ca mera is already on,
turn it off and remove the batter y immediately. Allow the camera to dr y
9
Page 10

/ Impor tant Messages
MICROSD CARD MESSAGES
If you ca nnot captu re video, one of the mic roSD cards may be mis sing, full ,
or experiencing an error.
NO SD
FULL Card i s full. Delete files or swap car d.
SD ERR
PRO TIP: Reformat you r microSD cards befo re each shooting ses sion to
ensure that th e cards rema in in good condition .
ARRAY ERROR
FILE REPAIR ICON
TEMPERATURE ICON
No card present. The camera requires a
microSD, microSDHC or microSDXC card (sold
sepa rately) to ca pture video s.
Camera is una ble to read ca rd formatting.
Reformat the card in the camer a.
If Array Error appears on th e primary camer a, check th e
seco ndary ca meras for er rors and improper connection s.
To identify the secondary camera that is experiencing the
error, refer to its light on th e inner cube.
• No light on th e inner cube:
• The came ra has no battery in stalled or t he batter y
needs charging
• The came ra is not runn ing array c amera firmw are or
is running a different firmware version than the other
came ras in the ar ray
• Red light on in the inn er cube is bli nking:
• The came ra has no microSD card
• The came ra’s microSD ca rd has an error
Be sure to resolve any issues befo re attempting to reco rd.
If your l ast video fil e was corru pted during record ing, the
came ra display s the File Repa ir icon while it tries to r epair
the file. When this proce ss is finishe d, press any button to
continue using the camera.
The Temperature icon ap pears on the c amera status
scre en when the c amera becomes too h ot and needs
to cool d own. If this happen s with a camera in Omni, let
it sit an d cool for 20 minutes befo re attempti ng to use it
again . Your cam era was desi gned to iden tify cond itions of
overh eating and i s designed to respon d accordin gly.
/ Troubleshooting / Trademarks
MY GOPRO WON’T POWER ON
Make sure the ca mera’s batter y is charge d or the arra y is connec ted to an
external power supply.
CAMER AS IN OMNI WON’T RECORD
Chec k the camer as for errors:
• If the primary camera has a problem, the camer a status scr een displa ys
a mess age descr ibing the problem. For more in formation ,
see Impor tant Messages ( pag e 10).
• If one of the second ary came ras has a problem, th e primary camer a
displ ays Array Error and the ca mera statu s light on the primar y camera
flash es rapidly. Fo r more inform ation, see Array Error (pag e 10).
MY OMNI ISN’T BEHAVING A S EXPECTED
This issue is o en caused by switching from one pow er source to an other
when t he camera is powere d on. To switch fro m camera batteries to
exter nal power (or ex ternal pow er to batteries), you mus t first power off
the camera.
MY GOPRO WON’T RESPOND WHEN I PRESS A BUTTON
Press and hol d the
came ra. This res et saves all of your content and settings, and p owers off
your camera.
I FORGOT MY CAMER A’S USERNAME OR PASSWORD
To reset the u sername a nd password to the default s, go to Setup mode.
Press the
Press the
the Shutter/Select button [
the pa ssword is reset to goprohero.
I WANT TO RESET MY GOPRO SETTINGS TO THE DEFAULTS
In Setup mode, selec t Camera Res et, and then selec t Reset Defaults.
This o ption does not reset th e Date/Time o r your camer a’s user name and
wireless password.
I POWERED OFF MY GOPRO, BUT THE BLUE LIGHT IS
STILL BLINKING
The bl ue light indi cates that Wireless is on. To turn off Wireless, press
and ho ld the Settings/Tag button [
For more answe rs to commonly asked q uestions , see
gopro.com/help.
Power/Mode button [ ] for 8 seconds to reset your
Power/Mode button [ ] repea tedly to cyc le to Camera Reset.
Power/Mode button [ ] to cyc le to Reset Wi-Fi, and th en press
] to sele ct it. The camera name is reset, and
] for four secon ds.
GoPro, HERO, the GoPro logo, the GoPro Be a HERO logo, Protune,
SuperView, and Wear It. Mount It. Love It. are trad emarks or regis tered
trad emarks of GoPro, Inc. in the US and inter nationally. Other names and
mark s are the prop erty of their respective owners.
/ Regulatory Information
To see the co mplete list of countr y certific ations, refer to the Important
Product + Sa fety Instr uctions i ncluded with Omni or visit gopro.com/help.
/ Customer Support
GoPro is dedic ated to providing the best possible service. To reach GoPro
Customer Support, visit gopro.com/help.
130-16786-000 REVA
10
 Loading...