

Page 1
USER MANUAL + WARRANTY INFO
Page 2

TABLE OF CONTENTS
Accessories 4
Mounts 5
HD HERO2 Features 6
Firmware Update 8
Basics 8
Join the GoPro party at facebook.com/goprocamera
to see what other GoPro owners are capturing with
their GoPros. Share some of your own footage and
contribute to the GoPro movement
2 3
!
Camera Modes 11
Advanced Menu Settings 17
Additional Menu Settings 24
Storage/SD Cards 30
System Requirements 31
Transferring Files 32
Battery Life 34
Important Warning Messages 36
Camera Assembly 37
FCC Statement 43
Warranty 44
Customer Support 45
Page 3
WEAR IT. MOUNT IT. LOVE IT. MORE AT GOPRO.COM
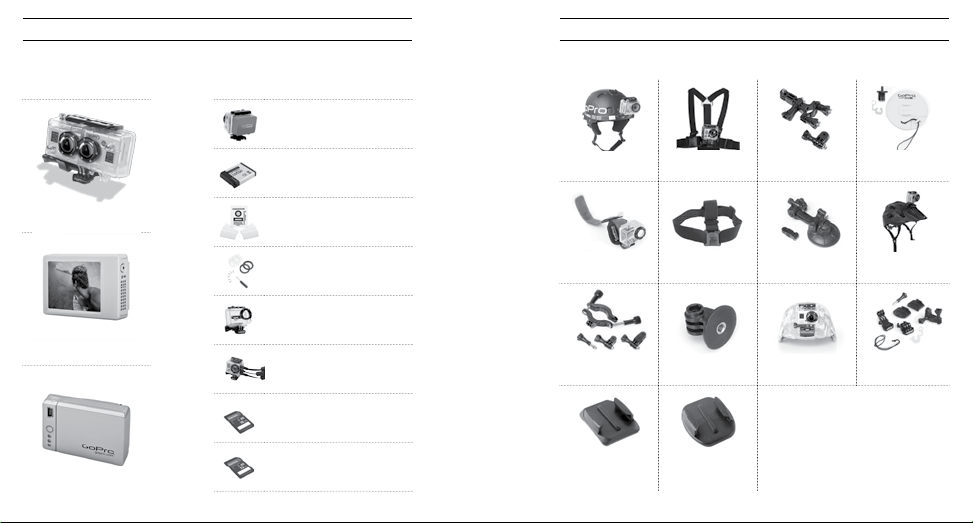
PREMIUM
ACCESSORIES
3D HERO® System
™
LCD BacPac
Battery BacPac
™
CORE
ACCESSORIES
Floaty Backdoor
Rechargeable Li-Ion Battery
Anti-Fog Inserts
Lens Replacement Kit
Replacement HD Housing
HD Skeleton Housing
16GB SD Memory Card
32GB SD Memory Card
MOUNTS
Helmet Front
Mount
HD Wrist Housing Head Strap Suction Cup Mount Vented Helmet
Roll Bar Mount Tripod Mount Military Helmet
Curved Adhesive
Mounts
Chest Mount
Harness
Flat Adhesive
Mounts
Handlebar Seatpost
Mount
Mount
Surf HERO
Mounting Kit
Strap
Grab Bag of
Mounts
4 5
Page 4
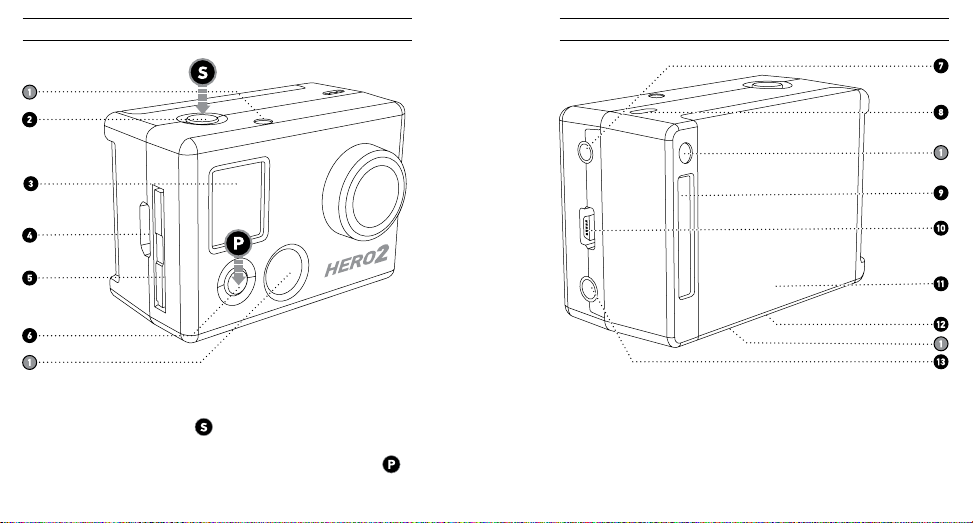
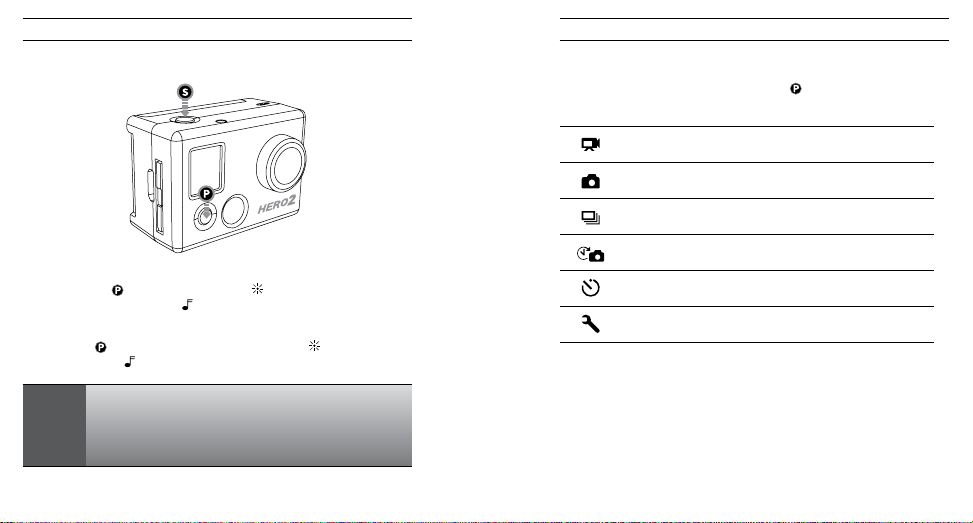
HD HERO2 FEATURES
HD HERO2 FEATURES
1. LED Recording Lights
2. SHUTTER/SELECT Button
3. LCD Status Screen
6 7
4. HDMI Port
(cable not included)
5. SD Card Slot
6. POWER/MODE Button
7. 2.5mm Composite Port
(cable not included)
8. Microphone
9. HERO Port
10. USB Port (file transfer/charging)
11. Battery Door
12. Buzzer
(located on camera bottom)
13. 3.5mm External Mic Input
Page 5
USING YOUR HD HERO2: BASICSFIRMWARE UPDATE
GoPro releases new camera features through firmware updates.
Visit gopro.com/firmware to download the latest updates.
DEFAULT SETTINGS SNAPSHOT
Out of the box, your
default settings:
HD HERO2
camera is configured with the following featured
USING YOUR HD HERO2: BASICS
Camera Mode: Video
GETTING STARTED
Before using the HD HERO2 for first time:
1. Insert a SD memory card into the SD card slot.
Your
HD HERO2
higher rated cards are recommended).
See STORAGE/SD CARDS for more information.
2. Install the battery into your HD HERO2 camera.
3. Charge the battery.
The lithium-ion battery included with your
charged. For a full charge, use the USB cable to plug the camera into a power
source such as a computer or USB charging device. No damage will occur to
your battery if you are not able to charge it before using your camera.
See BATTERY LIFE for more information.
8 9
is compatible with SD + SDHC memory cards (Class 4 or
HD HERO2
ships only partially
Video Resolution: 960p-30fps
Field of View: 170º Wide
Still Photo Resolution: 11 Megapixels
Time Lapse Interval: 1 second
Power Up Mode: Video
See SETTINGS MENU for more information on the camera’s default settings
and instructions on how to change them.
Page 6
POWERING ON AND OFF
USING YOUR HD HERO2: CAMERA MODESUSING YOUR HD HERO2: BASICS
OVERVIEW
Once the
HD HERO2
recording modes and settings menu in the following order:
is powered on, each press of will cycle through the camera’s
To power ON the HD HERO2:
Press and release
flash three times and the Buzzer
. The LED Recording Light on the front of the camera will
To power OFF the HD HERO2:
Press and hold
times and the Buzzer
for two seconds. The LED Recording Light will flash seven
will emit seven quick beeps.
You can c hange th e
One Bu tton Mode , which se ts the cam era to imm ediatel y
PRO
begi n record ing once it i s powered o n.
TIP:
will emit three short beeps.
HD HERO2
def ault sett ings to sta rt in
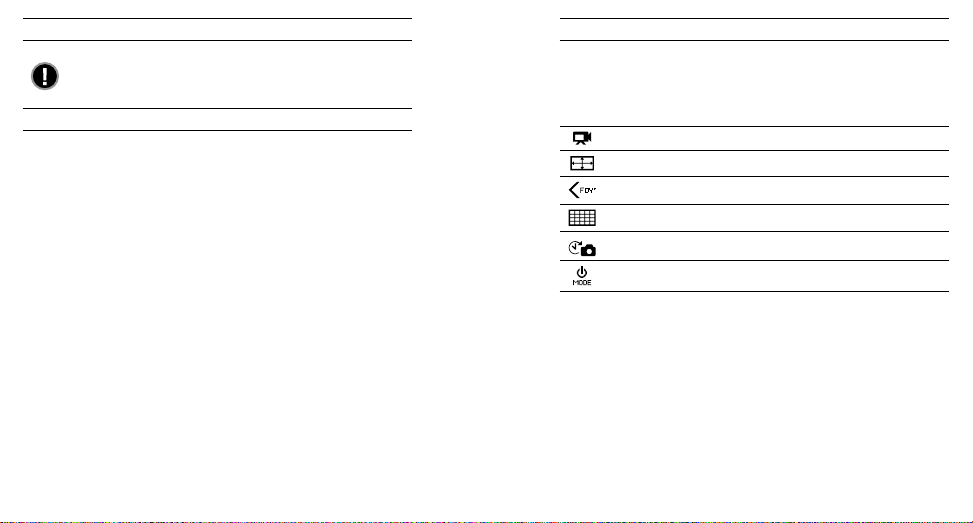
VIDEO
PHOTO
BURST
TIME LAPSE
SELF TIMER
SETTINGS
Each camera mode can be changed in the Settings menu.
See ENTERING THE SETTINGS MENU for more information.
Record video
Take sing le photos
Take 10 photo s in 1 second
Take a phot o every 0. 5, 1, 2, 5, 10, 30, and 60 se conds
Take a sing le photo a er a 10-seco nd countd own
Chan ge the ca mera’s con figurat ion
See ONE BUTTON MODE for more information.
10 11
Page 7
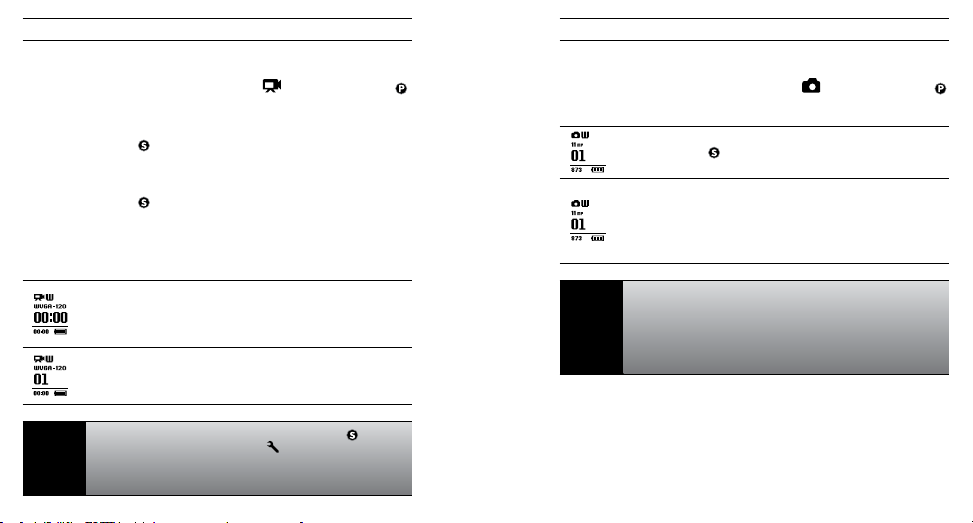
RECORDING VIDEO
Verify that the camera is in Video Mode, indicated by on the LCD. If not, press
repeatedly until the camera displays the Video Mode icon.
• To begin recording video:
Press and release
Recording Light will flash while recording continues.
• To stop recording:
Press and release
the camera will emit three beeps to indicate recording has stopped.
HD HERO2
will automatically stop recording when either the SD card is full or the
battery runs out of power. Your video will be saved before the camera powers off.
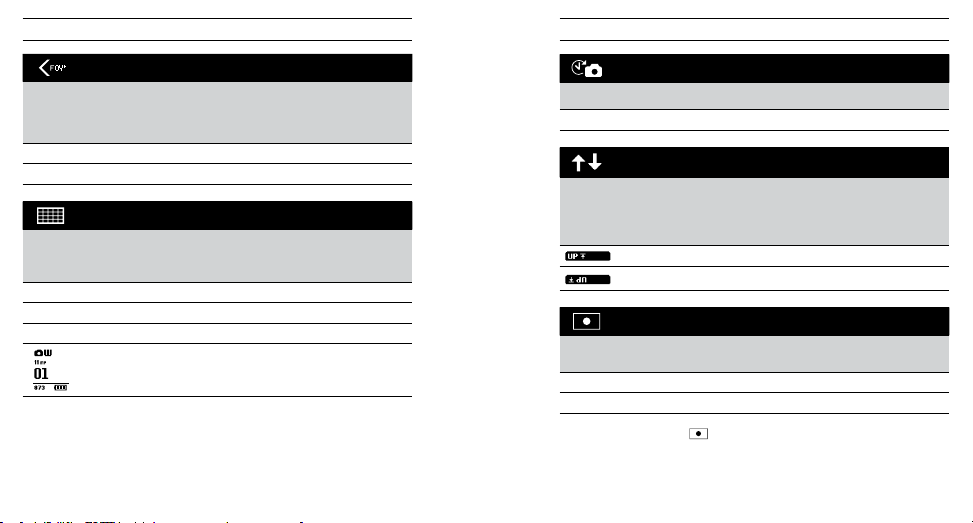
While recording video, the LCD will display the currently selected
video resolution, lens field of view (FOV), the elapsed time of the
current recording, and the remaining recording time determined
by the free space on your SD card.
When recording is stopped, the LCD shows the number of video
files stored on the SD card in place of the elapsed recording time.
. The camera will emit one beep and the LED
. The LED Recording Light will flash three times and
USING YOUR HD HERO2: CAMERA MODESUSING YOUR HD HERO2: CAMERA MODES
TAKING SINGLE PHOTOS
Verify that the camera is in Photo Mode, indicated by on the LCD. If not, press
repeatedly until the camera displays the Photo Mode icon.
To take a photo:
Press and release
Recording Light will flash once to indicate a photo has been taken.
In Photo mode:
The LCD screen will display your currently selected photo
resolution (11MP, 8MP or 5MP), the number of photos stored on
your SD card, and the number of photos that can be taken before
the card is full.
If you t hink your S D card will fi ll up befo re you are ab le to
tran sfer you r files, sel ect the 5M P option un der the Ph oto
PRO
sett ings men u. 5MP files ar e smalle r than 11MP file s,
TIP:
allo wing your S D card to sto re more pho tos.
See PHOTO RESOLUTION MODES for more information.
. The camera will beep once and the LED
Whe n the came ra is set to On e Button Mo de, hold
two se conds to e nter the Se ttings
PRO
quic kly turn OF F One Butto n Mode.
TIP:
See ONE BUTTON MODE for more information.
12 13
scr een, whe re you can
for
Page 8

USING YOUR HD HERO2: CAMERA MODESUSING YOUR HD HERO2: CAMERA MODES
PHOTO BURST MODE
In Photo Burst Mode, the camera will take 10 photos in 1 second.
• Verify the camera is in Burst Mode, indicated by
If not, press
• Press and release once to take a photo burst of ten photos over one
second. The LED Recording Light will flash and the camera will beep 10
times to indicate the photos have been taken.
PRO
TIP:
14 15
repeatedly until the camera displays the Burst Mode icon.
As in Photo Mode, the LCD screen will display your currently
selected photo resolution (11MP, 8MP or 5MP), the number of
photos stored on your SD card, and the number of photos that
can be taken before the card is full.
Compared to single Photo Mode, Burst Mode gives you 10
times as many chances to capture that “can’t miss” moment.
on the LCD screen.
TIME LAPSE PHOTO MODE
Time Lapse Photo Mode is used to take a series of photos at 0.5, 1, 2, 5, 10,
30 or 60 second intervals (when using 0.5 seconds, it is recommended to use a
class 10 or higher SD card).
See TIME LAPSE PHOTO MODE in advanced settings for instructions on how
to change the interval setting.
• Verify the camera is in Time Lapse Mode, indicated by
screen. If not, press repeatedly until the camera displays the Time
Lapse Mode icon.
• Press the
Recording Light will flash each time a photo is taken.
• Press
will flash three times and the camera will emit three beeps to indicate Time
Lapse has stopped.
button once to begin taking Time Lapse photos. The LED
once to stop taking Time Lapse photos. The LED Recording Light
As in Photo Mode, the LCD screen will display your currently
selected photo resolution (11MP, 8MP or 5MP), the number of
photos stored on your SD card, and the number of photos that
can be taken before the card is full.
on the LCD
Page 9
USING YOUR HD HERO2: CAMERA MODES ADVANCED MENU SETTINGS
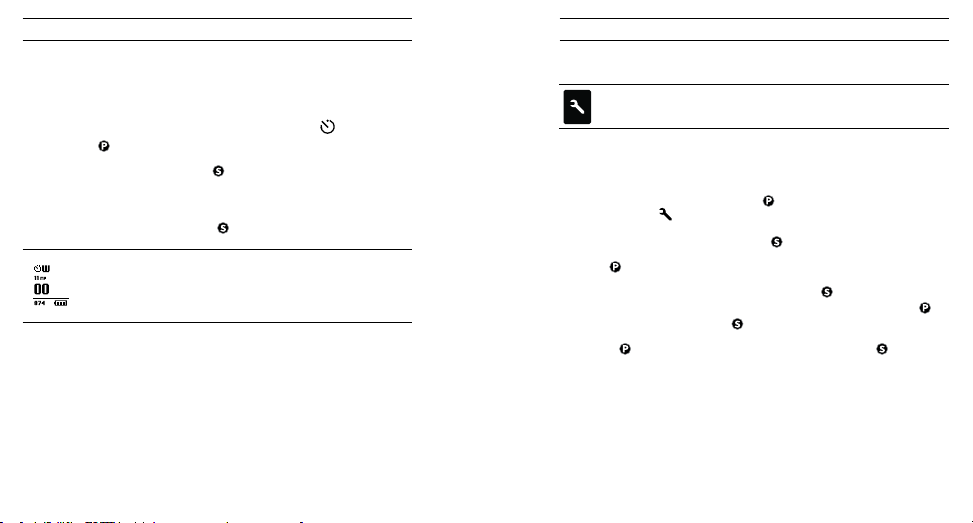
SELFTIMER MODE
In Self-Timer Mode, the
10-second countdown.
• Verify that the camera is in Self-Timer Mode, indicated by
not, press repeatedly until the camera displays the Self-Timer Mode icon.
• To take a photo, press and release
Recording Light will flash during the countdown, ending with a series of
rapid beeps and flashes just before the photo is taken.
• To stop the countdown timer, press
16 17
HD HERO2
will take a single photo at the end of a
on the LCD. If
. The camera will beep and the LED
.
As in Photo Mode, the LCD screen will display your currently
selected photo resolution (11MP, 8MP or 5MP), the number of
photos stored on your SD card, and the number of photos that
can be taken before the card is full.
ENTERING THE SETTINGS MENU
Using the Settings Menu, many of the functions of the
be customized based on your shooting needs.
To access your HD HERO2 settings:
1. Make sure your camera is powered ON.
2. Cycle through camera modes using
the SETTINGS
3. To enter into the Settings Menu, press
4. Use
5. Every settings mode has a list of options. Press to enter into a specific
mode. The option which is currently active will be highlighted. Press
toggle through the list. Press
6. Press to cycle to the next camera setting mode or press
current option list again.
icon.
to toggle through each camera setting mode.
until the LCD Status Screen shows
.
to select highlighted option and exit list.
HD HERO2
to display
can
to
Page 10
ADVANCED MENU SETTINGSADVANCED MENU SETTINGS
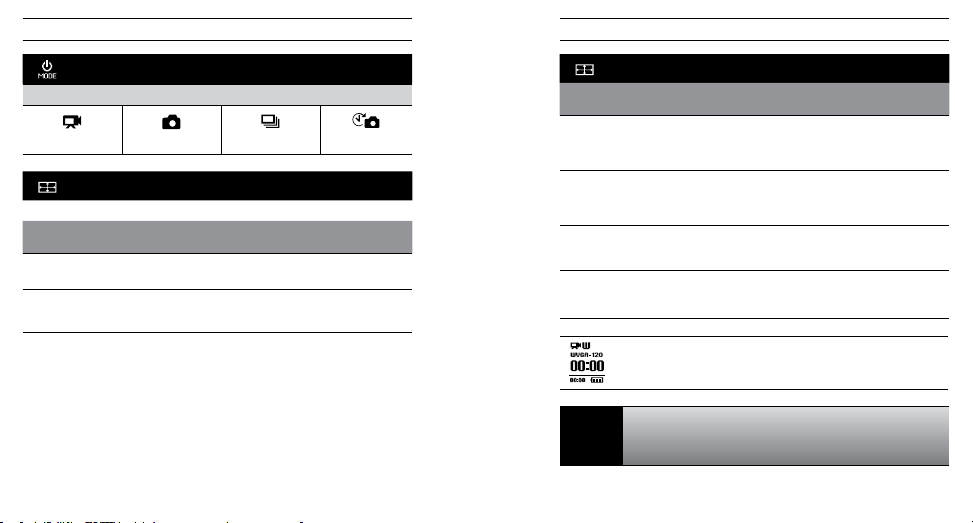
DEFAULT MODE AT POWER UP
Select which camera mode is active (or default) when you power on your camera.
VIDEO (Default) PHOTO BURST TIME LAPSE
VIDEO RESOLUTION MODES
Your HD HERO2 camera shoots the following video resolutions:
Resolution/
FPS
1080-30 170º / 127º 1920x1080
960-48
(Slow motion)
960-30
(Default)
Field of View Screen
170º
wide angle
170º
wide angle
Resolution
1280x960
1280x960
Best Use
Highest resolution.
This resolution provides the widest
top-to-bottom and side-to-side viewing
area. Great for slow motion.
This resolution provides the widest
top-to-bottom and side-to-side
viewing area.
VIDEO RESOLUTION MODES : CONT’D
Resolution/
FPS
720-60
(Slow motion)
720-30 170º
WVGA-120
(Super slow
motion)
WVGA-60
(Super slow
motion)
PRO
TIP:
Field of View Screen
170º
wide angle
wide angle
170º
wide angle
170º
wide angle
When you are using the camera in Video Mode, the currently
selected video resolution appears on the LCD Status Screen
beneath the Video mode icon.
Consider using 960-48 when wearing camera on a helmet or
a chest harness to see your handlebars when biking, or knees
and skis when skiing.
Resolution
1280x720
1280x720
848x480
848x480
Best Use
For mounting on vehicles or gear
when a max side-to-side wide angle is
desired but vertical viewing area is not
as important. Great for slow motion.
For mounting on vehicles or gear
when a max side-to-side wide angle is
desired but vertical viewing area is not
as important.
For smaller data files. This is standard
definition resolution. Great for super
slow motion.
For smaller data files. This is
standard definition resolution.
Great for slow motion.
18 19
Page 11
ADVANCED MENU SETTINGSADVANCED MENU SETTINGS
FIELD OF VIEW MODES
When recording video in 1080p, you can set the camera to shoot in the default
wide-angle (170º) or a medium-wide angle (127º) field of view.
See VIDEO RESOLUTION MODES for more information.
WIDE 170º (Default)
MEDIUM
127º
PHOTO RESOLUTION MODES
The
HD HERO2
Changing this setting effects photos taken in Photo, Burst, Self Timer and Time
Lapse Modes.
11MP
8MP
5MP
20 21
can take photos in either 11MP, 8MP or 5MP resolutions.
(Default)
When you are using the camera in one of the photo modes, the
currently selected photo resolution appears on the LCD beneath
the Photo Mode icon.
Note: The Spot Meter icon
TIME LAPSE MODES
You can select a wide range of time intervals for your Time Lapse Mode photos.
Choose between 0.5, 1 (Default), 2, 5, 10, 30 and 60 seconds.
UPSIDE DOWN VIDEO/IMAGE MODE
If you need to mount your camera upside down, you can set the camera to save
the photo or video upside down so that it appears right side up when you review
it on your computer or TV. This eliminates the need to “flip” the photo or video
later on your computer.
(Default) Camera right side up
Camera upside down
SPOT METER SETTINGS
Turn on the Spot Meter when you are filming from a dark space into a brighter
setting, like when filming outdside a windshield from inside a car.
OFF (Default)
ON
when Spot Metering is on.
is displayed in the upper-right corner of the LCD
Page 12
ADVANCED MENU SETTINGSADVANCED MENU SETTINGS
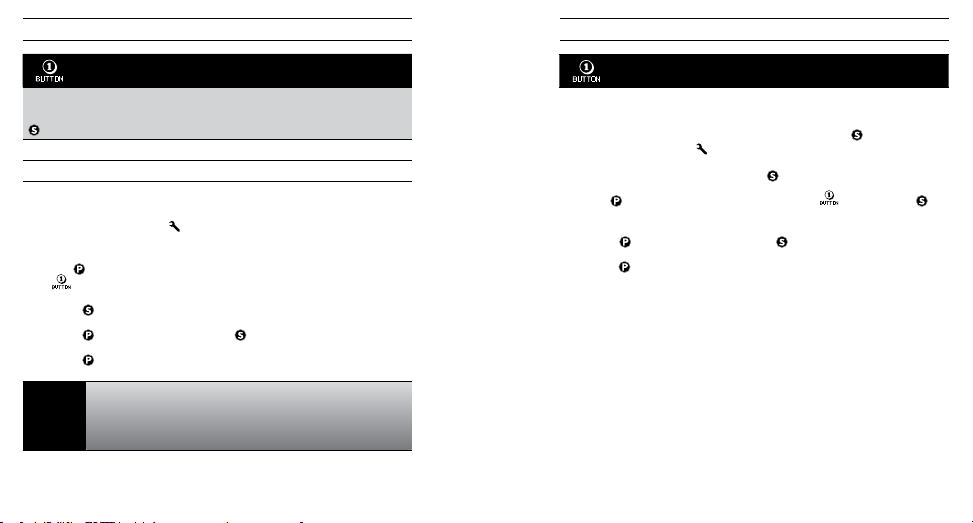
ONE BUTTON MODE
One Button Mode forces the camera to automatically begin recording in its
default power up mode once the camera is ON. When One Button Mode is ON,
is disabled. To stop recording, you must turn your camera OFF.
OFF (Default)
ON
To turn One Button Mode ON:
1. Access the Settings Menu ( See ENTERING THE SETTINGS MENU for
more information.)
2. Use to cycle through the settings menus until the One Button Mode
menu appears.
3. Press
to access the One Button Mode menu.
4. Press
once to select ON and press once to confirm selection.
5. Press
to cycle through settings menu. Select and press EXIT.
In One Button Mode, the camera is either “on and recording” or
powered OFF. This simplifies camera operation when loaning
PRO
the camera to a friend or when you know you only want to shoot
TIP:
in one mode.
22 23
To turn One Button Mode OFF:
ONE BUTTON MODE CONT’D:
1. While the camera is ON and recording, press and hold
until the settings icon
2. Enter the settings menu by pressing
3. Use
to cycle through the settings menu until appears. Press to
enter One Button Mode menu.
4. Press
once to select OFF and press to confirm selection.
5. Press
to cycle through the settings menu. Select and press EXIT.
appears.
.
for two seconds
Page 13
ADDITIONAL MENU SETTINGSADDITIONAL MENU SETTINGS
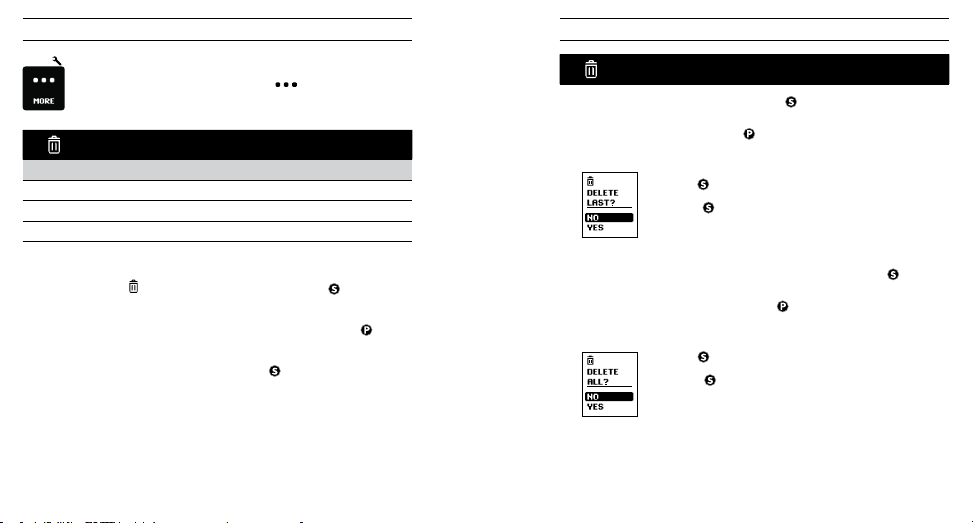
MORE MENU SETTINGS
To access additional settings, enter MORE menu. The following
settings are found in this subsection:
DELETE
Delete last file or delete all files and reformat SD card.
CANCEL (Default)
LAST
ALL/
REFORMAT
To delete the last file saved:
1. With the Delete
the delete list.
2. Within the delete menu you can toggle through the list by using
choose one of the following options:
• CANCEL: To cancel out of delete, Press
settings menu.
24 25
settings menu screen displayed, press to enter into
to
and return to the main
DELETE CONT’D:
• LAST: To delete the last file saved, Press
LCD will display a confirmation menu. Within this menu you can toggle
through the menu options using
The menu options are:
NO: Press to cancel and return to the main settings menu.
YES: Press
• ALL/Format SD Card: To delete all files on the SD Card, press to select
menu. The LCD will display a confirmation menu. Within this menu you can
toggle through the menu options using
The menu options are:
NO: Press to cancel and return to the main settings menu
YES: Press
the delete all process, the LED lights will continue to blink
until formatting is complete.
to select yes. The last file saved will be deleted.
to select yes. All files will be deleted. During
to select menu option. The
.
.
Page 14
ADDITIONAL MENU SETTINGSADDITIONAL MENU SETTINGS
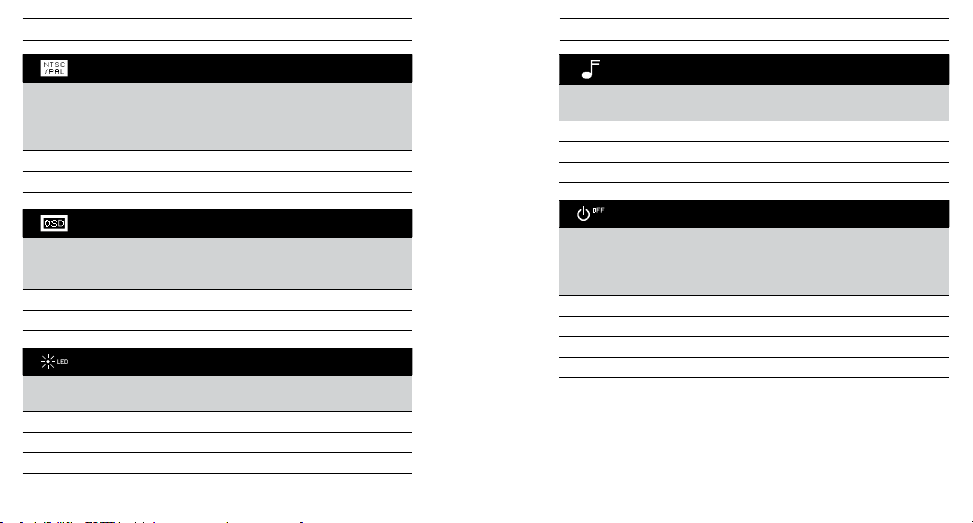
NTSC / PAL
This setting controls both the video recording frame rate and playback of
video from the camera when viewing on a TV. Select NTSC if viewing on a
TV in North America. Choose PAL if viewing on a PAL TV (most televisions
outside of North America) or if viewing on a PAL TV in any region.
NTSC (Default)
PAL
ON SCREEN DISPLAY OSD
Select if you would like to display or hide the recording icons and information
on your video screen (when displaying live video on a TV screen or using the
™
LCD BacPac
). OFF will hide icons and ON will display icons.
OFF (Default)
ON
LED LIGHTS
You can choose between having all 4 LED lights active, only 2 LED lights
active (front and back) or turn OFF all the LED lights.
You can change volume level of the camera’s beep to be soer than the
default or silent for stealth mode.
100% (Default)
70%
OFF
Program the camera to automatically turn OFF aer a specific period of
inactivity (when no videos or photos are being taken and no buttons have been
pressed). If you set the camera to MANUAL, you will need to manually turn your
camera OFF.
MANUAL (Default)
60
120sec
300sec
CAMERA SOUND
AUTO POWER OFF
sec
4 (Default)
2
OFF
26 27
Page 15

ADDITIONAL MENU SETTINGS
ADDITIONAL MENU SETTINGS
DATE / TIME / MONTH
You can set the camera’s internal clock to ensure that your video and photo
files are saved with the correct date/time information. You will need to adjust
the date/time information if the battery is removed from the camera for an
extended period of time.
Month / Day / Year Hour / Minute
1. Press
repeatedly until Date/Time/Month appears on the LCD.
2. Press
to begin setting the date and time.
3. The LCD will show the Date/Time/Month setting menu with the Month field
highlighted. Press
4. Use
to cycle through the list until the correct month is highlighted.
5. Press
to select the highlighted month.
6. The Date/Time/Month setting menu will appear on the LCD. Press
highlight the Day field and press
7. Again use
8. Repeat this process for the Year, Hour and Minute.
PRO
TIP:
28 29
to access the list of months (1 to 12).
to access the list of days (1 to 31).
to highlight the correct day and to select it.
The Date/Time/Month fields are abbreviated. For example, the
month is MM, day is DD, Year is YY, hour is HH, minute is MM.
once to
From the EXIT screen, press
EXIT SETTINGS MENU
to return to the camera’s default camera mode.
Page 16

STORAGE/SD CARDS
The
HD HERO2
capacity SD and SDHC memory cards. While all speed cards will work in the
camera, GoPro recommends higher speed cards (labeled as Class 4 or higher)
when shooting HD video. GoPro recommends using name brand SDHC cards for
maximum reliability in high vibration activities.
To insert a SD card: To remove a SD card:
1. Insert SD card into the SD card slot
2. The SD card will click into place
30 31
camera is compatible with 2GB, 4GB, 8GB, 16GB and 32GB
1. Place your fingernail against the
with the SD card label facing the
front of the camera.
once it is fully inserted.
edge of the SD card and lightly
press it further into the camera.
2. The card will spring out from the
camera far enough for you to
pull it out.
The
HD HERO2
OS X 10.5 or later.
System Requirements for full High Definition 1080p and 720p 60fps playback:
WINDOWS MAC
Microso Windows® Vista 7+ Mac OS® X 10.4.11 or later
3.2GHz Pentium 4 or faster 2.0GHz Intel Core Duo or faster
DirectX 9.0c or later At least 2GB of system RAM
Video card with at least 128MB of RAM Video card with at least 128MB of RAM
At least 2GB of system RAM
camera is compatible with Microso® Vista, 7 or later and Mac
If you are having problems achieving smooth playback on your
computer, the
PRO
High Definition TV with an HDMI port using a mini-HDMI cable or
TIP:
via composite cable (not included). The
provides very smooth playback on an HDTV.
SYSTEM REQUIREMENTS
HD HERO2
camera can also plug directly into a
HD HERO2
camera itself
Page 17

TRANSFERRING FILES
TO TRANSFER VIDEO AND PHOTO FILES TO A COMPUTER
On a PC:
1. Connect the camera to a computer with the included USB cable.
2. Turn on the camera by pressing
3. On your PC, double click My Computer and locate the “Removable Disk”
icon. If you do not see it, close the My Computer folder and then reopen it.
The “Removable Disk” icon should appear.
4. Double click the “Removable Disk” icon.
5. Double click the “DCIM” folder icon.
6. Double click the “100GOPRO” icon.
7. Your photo and video files will be in the “100GOPRO” folder.
8. Copy/Move files to the computers hard drive and then select video/photo
for playback from desktop/hard drive.
On a Mac:
1. Plug the camera into your Mac with the included USB cable.
2. Turn on camera on by pressing
3. The Mac will recognize the camera as an external hard drive. Double click
the icon for the external drive to access your video and photo files.
4. Copy/Move files to the computers hard drive and then select video/photo
for playback from desktop/hard drive.
IMPORTANT TIP FOR MAC USERS: When deleting files from your SD card you
must empty the trash before removing the SD card or unplugging the camera.
If you do not empty your trash the photo and video files will not be completely
erased from your SD card.
32 33
.
.
TO VIEW PHOTOS AND VIDEO ON A TV OR HDTV
Using an HDMI cable (not included), plug your HD HERO2 camera into your TV. You
can also use the composite port and a composite cable (not included).
Once connected:
With the camera powered ON, navigate to the Playback Setting
. Press to enter the Playback menu.
using
Within the playback menu, use
select each item.
Video:
Photo: Displays all photo files on the SD card.
All (Default): Displays all photo and video files on the SD card.
Exit: Exits the playback menu.
PRO TIP:
To Forward, press To Fast Forward, hold down
To Reverse, press
To Exit playback at anytime, eject the
HDMI/Composite cable from the camera
NOTE: Make sure your camera is set to the correct NTSC (North America)
or PAL (outside North America) video settings or your camera will not work
properly with your TV. You must also have an SD card with recorded information
loaded into your HD HERO2 camera. If there are no video or photo files stored
on your SD card you will see a
See NTSC/PAL for more information.
The menu list options are:
Displays all video files on the SD card. During playback, volume
adjustment can be made via the TV. Playback will begin automatically.
No Video, No Photo
TRANSFERRING FILES
to toggle through the menu list. Use to
To Rewind, hold down
To Navigate back to the menu list while in playback,
hold down both and together for 3 seconds
, or
No Files
message.
Page 18

BATTERY LIFE
Fully charged, the
of video recording time in 720p30. The LCD displays the battery meter
every camera mode so that you can monitor how much power remains in the
battery. The battery meter will blink when the battery drops below 20% charge.
Spare batteries and additional charging accessories are available at gopro.com
and from authorized GoPro resellers.
CHARGING BATTERY
The LCD’s battery icon will blink when the battery drops below 20%. If you are
recording when the battery reaches 0%, the camera will save the file and turn OFF.
To charge the battery:
The camera’s battery will charge to 80% charge in 1-2 hours and 100% in four
hours (depending on USB power output). It will charge to 80% in one hour and
100% in two hours when using GoPro’s 1000mAh USB-compatible wall or car
charger. Learn more about GoPro’s 1000mAh chargers at gopro.com.
34 35
HD HERO2
’s battery will provide approximately 2.5 hours
1. Connect the camera to a computer
or USB power supply with the
included USB cable.
2. LED remains ON while the battery
is charging.
3. LED will turn OFF when the battery
is fully charged.
in
USING THE CAMERA WHILE CHARGING
You can charge the camera’s battery while recording video or taking photos.
Simply plug the camera into any USB-based wall, car, or phone charger to
charge the
HD HERO2
GoPro’s 1 amp (1000mAh) charger for maximum charging performance while
the camera is in use.
camera while recording video or photos. It is best to use
REMOVING THE BATTERY FROM THE CAMERA
The
HD HERO2
high vibration activities. In most cases it is not necessary to remove the battery.
To remove the battery:
battery is designed to have a very tight fit to maximize reliability in
1. Remove the battery door by placing your thumb on the indentation in the
battery door (on the bottom of the camera) and firmly pressing it away from
the camera.
2. Squeeze both sides of the battery and pull it out of the camera. It is
intentionally not easy to do, but the battery will come out.
BATTERY LIFE
Page 19

IMPORTANT WARNING MESSAGES
“NO SD” MESSAGE ON THE LCD
“NO SD” indicates that there is no SD card present. The
requires an SD card to record video or take photos.
See STORAGE/SD CARDS for more information.
FILE REPAIR ICON ON THE LCD
If you see the File Repair icon, your video file was corrupted during
recording for some reason. Press any button and the camera will
repair the file.
HD HERO2
CAMERA ASSEMBLY
ASSEMBLING THE CAMERA
The
HD HERO2
constructed of polycarbonate and stainless steel for ultimate durability.
To assemble the camera into the housing:
camera housing is waterproof to 197 feet / 60 meters and
TEMPERATURE WARNING ICON ON THE LCD
The Temperature Warning icon will appear on the LCD when the
camera has become too hot and needs to cool down. Simply let it sit
and cool before attempting to use it again. Your camera will not allow
itself to overheat —so do not worry, as no damage has occurred.
36 37
1. Place the camera into the housing.
2. Close the housing door.
3. Hook latch under groove on the backdoor.
4. Push down on thumb latch until it locks into place.
Page 20

CAMERA ASSEMBLY
Your
HD HERO2
skeleton. To swap out a backdoor, click the door off its hinge. To attach the other
backdoor, click it back on the hinge.
The Skeleton backdoor (non-waterproof)
provides better sound quality by allowing
more sound to reach the camera’s
microphone. It also reduces wind noise
at speeds up to 100mph when mounted
on helmets, motorcycles, bike and other
fast-moving vehicles. Use this backdoor
only when water damage is not a risk.
This backdoor is also recommended for
use inside vehicles.
38 39
housing comes with two types of backdoors—waterproof and
Skeleton Backdoor Waterproof Backdoor
The waterproof backdoor makes
the housing waterproof to 197
feet / 60 meters. Use this door
when you need to protect the
camera from water and other
environmental hazards.
Apply RAIN-X or a similar anti-beading solution to the housing
lens to prevent water-spots from forming when using your
PRO
camera in rain or water. When RAIN-X is not available,
TIP:
periodically licking your lens is a good backup solution.
SWAPPING HOUSING DOORS
Your HD HERO2 housing comes with two types of backdoors—waterproof
and skeleton.
To swap out a backdoor:
1. Open the backdoor of the housing so that it is hanging downwards.
2. Pull downwards on the backdoor until it snaps free from the hinge.
3. Line up replacement backdoor into the hinge opening.
4. Push upwards on the backdoor until it clicks into place.
CAMERA ASSEMBLY
Page 21

CAMERA ASSEMBLY
PREVENTING WATER DAMAGE TO YOUR CAMERA
The rubber seal that lines the camera housing forms a waterproof barrier that
protects your
the rubber seal of the camera housing clean. A single hair or grain of sand can
cause a leak.
Aer every use in salt water, you will need to rinse the outside of the housing
with non-salt water and dry. Not doing this can eventually cause corrosion of
the hinge pin and salt buildup in seal, which can cause failure.
To clean the seal, rinse it in fresh water and shake it dry (drying with a cloth can
cause lint to compromise the seal). Re-install it into the grooves in the backdoor
of the housing.
WARNING: Failure to follow these steps each time you use your HD HERO2 can
result in leaks that damage or destroy your camera. Your warranty does not
cover water damage resulting from user error.
HD HERO2
in wet and underwater conditions. You must keep
ATTACHING YOUR CAMERA TO MOUNTS
To attach your
buckle, thumb screw and other hardware depending on the mount you are
using. For more information on mounts, visit gopro.com/support.
Attachment
Buckle
HD HERO2
camera to a mount, you will need an attachment
Thumb Screw Waterhousing Complete Unit
USING CURVED OR FLAT ADHESIVE MOUNTS
The curved and flat adhesive mounts make it easy to attach the camera to
curved and flat surfaces of helmets, vehicles and gear. With the attachment
buckle the assembled camera housing can be clicked ON / OFF the secured
adhesive mounts.
Flat Adhesive Mount Curved Adhesive Mount
40 41
CAMERA ASSEMBLY
Page 22

CAMERA ASSEMBLY FCC STATEMENT
PRO TIPS: ATTACHING ADHESIVE MOUNTS
Clean the surface first. Be sure to carefully clean the surface where you will
be attaching your adhesive mount. Wax, oil, dirt and other debris will reduce
adhesion, which can result in a weak bond and the risk of losing your camera
if the bond fails.
Only attach a mount in room temperature conditions. The mount’s adhesive
will not bond properly if applied in cold or damp environments, though it is
entirely safe to use in cold conditions. For best results, attach your mount 24
hours before use in cold environments to ensure the strongest hold.
Surfaces. The adhesive mounts can only be mounted to a smooth surface.
Porous or textured surfaces will not provide for a proper bond. When
applying the mount, firmly press mount into place ensuring full contact over
entire surface area. Allow at least 24 hours for full bond strength.
Drying time. For best results, attach your mount at a minimum of 24 hrs
before use.
Modifications not approved by the party responsible for compliance could void
user’s authority to operate the equipment. This equipment has been tested and
found to comply with the limits for Class B digital device, pursuant to part 15 of
the FCC Rules. These limits are designed to provide reasonable protection against
harmful interference in a residential installation. This equipment generates and can
radiate radio frequency energy and, if not installed and used in accordance with the
instructions, may cause harmful interference to radio or television reception, which
can be determined by turning the equipment on and off
The user is encouraged to try to correct the interference by one or more of the
following measures:
• Reorient or relocate the receiving antenna.
• Increase the separation between the equipment and the receiver.
• Connect the equipment into an outlet on a circuit different from that to
which the receiver is connected.
• Consult the dealer or an experienced radio/TV technician for help.
.
LOCKING PLUG
This locking plug is designed for high impact sports like surfing
or skiing where significant impact can occur. The locking plug
locks the attachment buckle’s fingers in place, helping to prevent
accidental housing release from mounts.
42 43
Page 23

WARRANTY
This product is guaranteed against manufacturing defects for one (1) year
from the original date of purchase. GoPro’s sole obligation in the event of such
defects during this period is to repair or replace the defective part or product
with a comparable part or product at GoPro’s sole discretion. Except for such
replacement, the sale, or other handling of this product is without warranty,
condition or other liability even though the defect or loss is caused by negligence
or other fault. Damage resulting from use, accident, or normal wear and tear
is not covered by this or any warranty. GoPro assumes no liability for any
accident, injury, death, loss, or other claim related to or resulting from the use
of this product. In no event shall GoPro be liable for incidental or consequential
damages relating to or resulting from the use of this product or any of its parts.
Because of possible user resealing error, this product is not warranted against
water housing leakage or any resulting damage.
Visit gopro.com for more information.
44 45
GoPro is dedicated to providing you with the best
possible service. To contact GoPro’s Customer
Support Team, visit: gopro.com/support
CUSTOMER SUPPORT
Page 24

MANUEL DE L’UTILISATEUR ET
INFORMATIONS RELATIVES
À LA GARANTIE
FRANÇAIS
Page 25

TABLE DES MATIÈRES
Accessoires 50
Supports 51
Fonctionnalités du HD HERO2 52
Mise à jour du micrologiciel 54
Les bases 55
Venez faire la fête avec GoPro sur facebook.com/
goprocamera pour voir les images prises sur
des GoPro par leurs propriétaires. Nous vous
encourageons à nous faire parvenir vos propres
images et à contribuer au mouvement GoPro.
48 49
Modes de la caméra 57
Configurations de menu avancées 63
Configurations supplémentaires 70
Archivage / cartes SD 76
Configurations requises 77
Transfert de fichiers 78
Durée de charge de la batterie 80
Messages d’avertissement importants 82
Montage de la caméra 83
Déclaration relative à la FCC 89
Garantie 90
Assistance clientèle 91
Page 26

PORTEZLA. ATTACHEZLA. AIMEZLA. POUR EN SAVOIR PLUS, CONSULTEZ GOPRO.COM
HAUT DE
GAMME
Système 3D HERO
LCD BacPac
Battery BacPac
ACCESSOIRES
DE BASE
Couvercle arrière flottant
Batterie rechargeable Li-Ion
®
™
™
Accessoires antibuée
Kit de remplacement d’objectif
Boîtier HD de rechange
Boîtier squelette HD
Carte de mémoire SD 16 GB
Carte de mémoire SD 32 GB
SUPPORTS
Support de montage
avant pour casque
Boîtier à porter au
poignet HD
Support de montage
sur barre de
renversement
Supports de
montage adhésifs
incurvés
Harnais de montage
sur la poitrine
Sangle de tête
Support de montage
sur trépied
Supports adhésifs
plats
Support pour
guidon /selle
Support de montage
à ventouse
Support de montage
sur casque militaire
Kit de montage
Surf HERO
Sangle de casque
à aération
Supports de
montage assortis
50 51
Page 27

FONCTIONNALITÉS DU HD HERO2
FONCTIONNALITÉS DU HD HERO2
1. Voyants d’enregistrement DEL
2. Bouton d’obturateur / de sélection
(SHUTTER/SELECT)
3. Écran d’état LCD
52 53
4. Port HDMI
(câble non compris)
5. Fente de carte SD
6. Bouton d’allumage / de mode
(POWER/MODE)
7.
Port composite de 2,5 mm
(câble non compris)
8. Microphone
Port HERO
9.
10.
Port USB
(transfert / chargement de fichier)
11.
Couvercle de la batterie
12.
Sonnerie
(située sur le dessous de la caméra)
13. E
ntrée de mic. extérieur de de 3,5 mm
Page 28

GoPro diffuse les nouvelles fonctionnalités de la caméra au moyen
de mises à jour du micrologiciel. Consultez gopro.com/firmware
pour télécharger les mises à jour les plus récentes.
UTILISER VOTRE HD HERO2 : LES BASESMISE À JOUR DU MICROLOGICIEL
VUE D’ENSEMBLE DES CONFIGURATIONS PAR DÉFAUT
Lorsque vous la sortez de sa boîte, votre caméra HD HERO2 est configurée de
la manière suivante par défaut :
UTILISER VOTRE HD HERO2 : LES BASES
POUR COMMENCER
Avant de vous servir de la
1. Insérez une carte de mémoire SD dans la fente de la carte SD.
Votre HD HERO2 est compatible avec les cartes de mémoire SD + SDHC
(cartes de classe 4 ou de catégorie supérieure recommandées).
Voir
ARCHIVAGE
2. Installez la batterie dans votre caméra HD HERO2
3. Chargez la batterie
La batterie au lithium-ion comprise dans votre HD HERO2 est
expédiée seulement partiellement chargée. Pour une charge complète,
servez-vous du câble USB pour brancher la caméra dans une source
d’alimentation telle qu’un ordinateur ou un appareil de chargement par
USB. Votre batterie ne sera pas endommagée si vous ne pouvez pas la
charger avant d’utiliser votre caméra.
Voir
BATTERIE
54 55
HD HERO2
pour la première fois :
pour toute information complémentaire.
.
.
pour toute information complémentaire.
Mode caméra Video
Résolution vidéo 960p-30 ips
Champ de vision 170º grand angle
Résolution des images fixes 11 megapixels
Intervalle de vues accélérées 1 seconde
Mode allumage (POWER UP) Video
Voir le MENU DE CONFIGURATIONS pour en savoir plus sur les
configurations de la caméra par défaut et pour consulter des instructions
pour les modifier.
Page 29

UTILISER VOTRE HD HERO2 : LES BASES
ALLUMER ET ÉTEINDRE LA CAMÉRA
UTILISER VOTRE HD HERO2 : MODES DE LA CAMÉRA
VUE D’ENSEMBLE
Lorsque la caméra
de passer au mode d’enregistrement de la caméra suivant et aux menus de
configurations dans l’ordre suivant :
HD HERO2
est allumée, chaque pression sur permet
Pour allumer la HD HERO2 :
Appuyez sur
caméra clignote trois fois et l’appareil produit 3 bips sonores courts.
Pour éteindre la HD HERO2 :
Maintenez appuyé
clignote sept fois et l’appareil émet sept bips sonores rapides.
et relâchez-le. Le voyant d’enregistrement DEL à l’avant de la
pendant deux secondes. Le voyant d’enregistrement DEL
Vous pouvez modifier les configurations par défaut de la
HERO2
PRO
TIP:
pour commencer au mode Un Bouton, par lequel la
caméra commence immédiatement à enregistrer dès qu’elle
est allumée.
HD
VIDÉO
PHOTO
RAFALE BURST
ACCÉLÉRÉ
RETARDATEUR
CONFIGURATIONS
Chaque mode de la caméra est associé à des configurations par défaut qui
peuvent être modifiées dans le menu de configurations.
Voir
MENU DE CONFIGURATIONS
Enre gistrem ent de vid éos HD et SD ( WVGA)
Pris e de vue un ique
Pris e de 10 photos en 1 s econd e
Pris e d’une pho to toutes le s 0,5, 1, 2, 5, 10, 30, ou
60 sec ondes
Pris e d’une seu le photo a près un com pte à rebo urs
de 10 seco ndes
Modifi cation d es configu rations d e la camé ra
pour en savoir plus.
Voir le MODE UN BOUTON pour plus d’informations.
56 57
Page 30

UTILISER VOTRE HD HERO2 : MODES DE LA CAMÉRAUTILISER VOTRE HD HERO2 : MODES DE LA CAMÉRA
ENREGISTRER DES VIDÉOS
Vérifiez que la caméra est en mode Vidéo, ce qui est indiqué par .. sur l’écran LCD.
Dans la cas contraire, appuyez sur
affiche l’icône du mode vidéo.
• Pour commencer à enregistrer une vidéo :
Appuyez sur . La caméra émet un bip et le voyant DEL d’enregistrement
clignote une fois par seconde pendant l’enregistrement.
• Pour interrompre l’enregistrement :
Appuyez sur et relâchez-le. Le voyant DEL d’enregistrement clignote trois
fois et la caméra émet trois bips sonores pour indiquer que l’enregistrement
est interrompu.
2
s’arrête automatiquement d’enregistrer lorsque la carte SD est pleine ou
HD HERO
la batterie épuisée. Votre vidéo sera sauvegardée avant que la caméra ne s’éteigne.
Lorsque l’on enregistre une vidéo, l’écran LCD affiche la résolution
vidéo sélectionnée, le champ de vision de l’objectif (FOV), le temps
d’enregistrement écoulé, et le temps d’enregistrement restant en
fonction de l’espace restant sur votre carte SD
Lorsque l’on arrête l’enregistrement, l’écran LCD affiche le nombre
de fichiers vidéo enregistrés dans la carte SD au lieu du temps
d’enregistrement écoulé
CONSEIL
58 59
Lorsque la caméra est réglée en mode Un bouton, tenez pendant
deux secondes pour accéder à l’écran des configurations Un Bouton,
DES
dans lequel vous pouvez rapidement inactiver le mode Un Bouton.
PROS
Voir le MODE UN BOUTON pour toute information complémentaire.
à plusieurs reprises jusqu’à ce que la caméra
.
.
PRENDRE UNE SEULE PHOTO
Vérifiez que la caméra est en mode Photo, ce qui est indiqué sur l’écran LCD.
Si ce n’est pas le cas, appuyez sur
affiche l’icône de mode Photo.
Pour prendre une photo :
Appuyez sur
d’enregistrement clignote une fois pour indiquer que l’on a pris
une photo.
En mode photo :
L’écran LCD affiche la résolution photo que vous avez alors
sélectionnée (11MP, 8MP ou 5MP), le nombre de photos
enregistrées dans votre carte SD, et le nombre de photos que
l’on peut prendre avant que la carte ne soit pleine.
Si vous pensez que votre carte SD se remplira avant que vous
CONSEIL
puissiez transférer vos fichiers, choisissez l’option 5MP sous le
menu de configurations photo. Les fichiers 5MP sont plus petits
DES
que les fichiers 11MP de sorte que vous pouvez emmagasiner
PROS
plus de photos dans votre carte SD.
Voir
PHOTO
à plusieurs reprises jusqu’à ce que la caméra
. La caméra émet un bip sonore et le voyant DEL
pour toute information complémentaire.
Page 31

UTILISER VOTRE HD HERO2 : MODES DE LA CAMÉRAUTILISER VOTRE HD HERO2 : MODES DE LA CAMÉRA
MODE PHOTOS EN RAFALES BURST
En mode Burst, la caméra prend 10 photos en 1 seconde.
• Vériez que la caméra est en mode Burst, indiqué sur l’écran LCD. Dans
le cas contraire, appuyez sur
caméra affiche l’icône du mode Burst.
• Appuyez une fois sur
Le voyant DEL d’enregistrement clignote trois fois et la caméra émet dix
bips sonores pour indiquer que l’on a pris les photos.
Comme dans le mode Photo, l’écran LCD affiche la résolution
photo alors sélectionnée (11MP, 8MP ou 5MP), le nombre de
photos enregistrées dans votre carte SD, et le nombre de photos
que l’on peut prendre avant que la carte ne soit pleine.
CONSEIL
60 61
En comparaison avec le mode à une seule photo, le mode
DES
Burst vous donne 10 fois plus de chances de capturer ce
PROS
moment « à ne pas manquer ».
à plusieurs reprises jusqu’à ce que la
pour prendre dix photos en rafale en une seconde.
MODE ACCÉLÉRÉ CHRONOPHOTOGRAPHIE
Le mode accéléré permet de prendre une série de photos à des intervalles de
0,5, 1, 2, 5, 10, 30, 60 secondes.
Voir INTERVALLES DE PRISES DE VUES EN ACCÉLÉRÉ dans les
configurations avancées pour consulter des instructions relatives au changement
du choix des intervalles.
• Vériez que la caméra est en mode accéléré indiqué sur l’écran LCD.
Dans le cas contraire, appuyez sur
la caméra affiche l’icône du mode accéléré.
• Appuyez sur
d’enregistrement clignote à chaque fois que l’on prend une photo.
• Appuyez une fois sur
Le voyant DEL d’enregistrement clignote à trois reprises et la caméra émet
trois bips pour indiquer que le mode accéléré a pris fin.
une fois pour lancer le mode accéléré. Le voyant DEL
pour cesser de prendre des photos en accéléré.
Comme en mode Photo, l’écran LCD affiche la résolution photo
que vous avez choisie (11MP, 8MP ou 5MP), le nombre de photos
archivées dans votre carte SD et le nombre de photos que l’on
peut prendre avant que la carte ne soit pleine.
à plusieurs reprises jusqu’à ce que
Page 32

UTILISER VOTRE HD HERO2 : MODES DE LA CAMÉRA
MODE RETARDATEUR
En mode retardateur, le HD HERO2 prend une seule photo à la fin d’un compte
à rebours de 10 secondes.
• Vériez que la caméra est un mode retardateur, indiqué sur le LCD. Dans le
cas contraire, appuyez sur
affiche l’icône du mode retardateur.
• Pour prendre une photo, appuyez sur
un bip et le voyant DEL d’enregistrement clignote pendant le compte à
rebours, pour finir par une série de bips rapides et de clignotements juste
avant de prendre la photo.
• Pour arrêter le retardateur du compte à rebours, appuyez sur
Comme en mode Photo, l’écran LCD affiche la résolution de votre
photo alors sélectionnée (11MP, 8MP ou 5MP), le nombre de
photos enregistrées sur votre carte SD, et le nombre de photos
que l’on peut prendre avant que la carte ne soit pleine.
62 63
à plusieurs reprises jusqu’à ce que la caméra
et relâchez-le. La caméra émet
.
ACCÈS AU MENU DES CONFIGURATIONS
Pour accéder aux configurations de votre HD HERO2 :
1. Vérifiez que votre caméra est allumée.
2. Passez d’un mode à l’autre de la caméra en vous servant du
3. Pour accéder au Menu de Configurations, appuyez sur
4. Servez-vous du
5. Chaque mode de configuration comporte une liste d’options. L’option
6. Appuyez sur
CONFIGURATIONS DE MENU AVANCÉES
Beaucoup des fonctions du HDHERO2 peuvent être personnalisées
en fonction de vos besoins dans le menu de configurations.
que l’écran d’état LCD affiche l’icône des CONFIGURATIONS.
caméra à l’autre.
active sera mise en surbrillance. Appuyez sur
un mode spécifique. L’option alors en cours sera en surbrillance. Appuyez
sur
pour passer d’une option à l’autre de la liste. Appuyez sur pour
sélectionner l’option en surbrillance et sortir de la liste.
suivant ou appuyez sur
pour passer de chaque mode de configuration de la
pour passer accéder à
pour passer au mode de configuration de la caméra
pour afficher de nouveau la liste d’options.
jusqu’à ce
.
Page 33

CONFIGURATIONS DE MENU AVANCÉESCONFIGURATIONS DE MENU AVANCÉES
MODE PAR DÉFAUT À L’ALLUMAGE
Choisissez le mode de caméra actif (ou par défaut) lorsque vous allumez
votre caméra.
VIDÉO
(Default) PHOTO
RAFALE ACCÉLÉRÉ
MODES DE RÉSOLUTION VIDÉO
Votre caméra HD HERO2 enregistre dans les résolutions vidéo suivantes :
Resolution/
ips
1080-30 170
960-48
(Ralenti)
960-30
(Défaut)
Champ de
vision
º
/ 127º 1920x1080
170º
Grand angle
170º
Grand angle
Résolution
de l’écran
1280x960
1280x960
Meilleure utilisa
Résolution la plus élevée.
Cette résolution offre le plus grand
champ de vision de haut en bas et d’un
côté à l’autre. Parfait pour le ralenti.
Cette résolution offre le plus grand
champ de vision de haut en bas et d’un
côté à l’autre.
Resolution/
ips
720-60
(ralenti)
720-30 170º
WVGA-120
(Super
ralenti)
WVGA-60
(Super
ralenti)
MODES DE RÉSOLUTION VIDÉO : SUITE
Champ de
vision
170º
Grand angle
Grand angle
170º
Grand angle
170º
Grand angle
Lorsque vous utilisez la caméra en mode Vidéo, la résolution
vidéo sélectionnée apparaît sur l’écran d’état LCD sous l’icône
de mode vidéo.
CONSEIL
Envisagez d’utiliser 960-48 lorsque vous portez une caméra
sur un casque ou un harnais de poitrine pour voir votre guidon
DES
lorsque vous faites de la bicyclette, ou vos genoux et vos skis
PROS
lorsque vous skiez.
Résolution
de l’écran
1280x720
1280x720
848x480
848x480
Meilleure utilisa
À monter sur des véhicules ou du matériel
lorsque l’on veut un angle maximal d’un
côté à l’autre, mais que le champ de vision
vertical n’est pas aussi important.
À monter sur des véhicules ou du
matériel lorsque l’on veut un angle
maximal d’un.
Pour les fichiers de données plus petits,
il s’agit de la résolution de définition
standard. Parfait pour les images très
ralenties.
Pour les fichiers de données plus petits.
Il s’agit de la résolution définition
standard. Parfait pour le ralenti.
64 65
Page 34

CONFIGURATIONS DE MENU AVANCÉESCONFIGURATIONS DE MENU AVANCÉES
MODES DE CHAMP DE VISION
Lorsque vous enregistrez une vidéo en 1080p, vous pouvez régler la caméra
pour prendre des vues en grand angle par défaut (170º) ou en semi grand
angle (127º).
Voir CHOIX DE LA RÉSOLUTION DE LA VIDÉO pour toute information
complémentaire.
GRAND ANGLE 170º (Défaut)
ANGLE MOYEN 127º
MODES DE RÉSOLUTIONS PHOTO
Le HD HERO2 peut prendre des photos aux résolutions 11MP, 8MP ou 5MP.
La modification de ces réglages affecte les photos prises en mode Photo,
Rafale, Retardateur et Accéléré.
11MP
8MP
5MP
66 67
(Défaut)
Lorsque vous utilisez la caméra dans l’un des modes photo, la
résolution de photo alors sélectionnée s’affiche sur l’écran LCD
sous l’icône du mode photo.
Vous pouvez sélectionner une large gamme d’intervalles pour vos photos en
mode Accéléré.
Choisir entre 0,5 (Défaut), 1, 2, 5, 10, 30 et 60 secondes.
Si vous devez monter votre caméra la tête en bas, vous pouvez régler la caméra
pour enregistrer la photo ou la vidéo la tête en bas, pour qu’elle apparaisse à
l’endroit lorsque vous l’affichez sur votre ordinateur ou votre TV. Ceci élimine le
besoin de « retourner » la photo ou la vidéo plus tard sur votre ordinateur.
Allumez le spotmètre lorsque vous filmez d’un espace sombre vers un espace
plus clair, comme par exemple lorsque vous filmez l’extérieur à partir de
l’intérieur d’une voiture, à travers le pare-brise.
OFF (Défaut)
ON
Note : L’icône du spotmètre s’affiche dans le coin supérieur droit de l’écran LCD
MODES ACCÉLÉRÉS
MODE VIDÉO / IMAGE INVERSÉE
Caméra à l’endroit. (Défaut)
Caméra à l’envers.
RÉGLAGES DU SPOTMÈTRE
lorsque la fonction de spotmètre est active.
Page 35

CONFIGURATIONS DE MENU AVANCÉESCONFIGURATIONS DE MENU AVANCÉES
MODE UN BOUTON
Le mode Un Bouton contraint la caméra à commencer à enregistrer
automatiquement dans son mode par défaut à l’allumage lorsque la caméra
est allumée. Lorsque le mode Un Bouton est allumé,
interrompre l’enregistrement, vous devez éteindre votre caméra..
OFF (Défaut)
ON
To turn One-Button Mode ON:
1. Accédez au menu des réglages. ( Voir MENU DES CONFIGURATIONS pour
en savoir plus).
2. Servez-vous du
jusqu’à ce que le menu du mode Un Bouton s’affiche.
3. Appuyez sur
4. Appuyez sur
confirmer la sélection.
5. Appuyez sur
le menu. Choisissez une configuration et appuyez sur EXIT.
68 69
pour passer d’une configuration à l’autre dans le menu
pour accéder au menu du mode Un Bouton.
une fois pour sélectionner ON et appuyez sur une fois pour
pour passer d’une configuration à l’autre dans
est inactif. Pour
CONSEIL
Pour inactiver le mode Un Bouton :
1. Lorsque la caméra est allumée et enregistre, appuyez sur
2. Accédez au menu des configurations en appuyant sur
3. Servez-vous du
4. Appuyez sur
5. Appuyez sur
En Mode Un Bouton, la caméra est « allumée et en
enregistrement » ou éteinte. Ceci simplifie le fonctionnement de
DES
la caméra lorsqu’on prête l’appareil à un ami ou lorsque l’on sait
PROS
qu’on veut prendre des vues en un seul mode.
MODE UN BOUTON : SUITE:
secondes jusqu’à ce que l’icône des configurations apparaisse.
.
ce que le bouton s’affiche. Appuyez sur
Un Bouton.
la sélection.
configurations. Sélectionnez et appuyez sur EXIT.
pour passer d’une configuration du menu à l’autre jusqu’à
pour accéder au menu du mode
une fois pour choisir OFF et appuyez sur pour confirmer
pour passer d’une option à l’autre dans le menu de
pendant deux
Page 36

CONFIGURATIONS SUPPLÉMENTAIRESCONFIGURATIONS SUPPLÉMENTAIRES
CONFIGURATIONS SUPPLÉMENTAIRES
Pour accéder aux configurations supplémentaires, accédez au menu
MORE. Les réglages suivants sont offerts dans cette sous-section :
EFFACER
Effacer le dernier fichier ou effacer tous les fichiers et reformater la carte SD.
CANCEL (Default)
LAST
ALL/REFORMAT
Pour effacer le dernier fichier enregistré :
1. Lorsque l’écran du menu d’effacement des configurations s’affiche, appuyez sur
pour accéder à la liste d’effacement.
2. Dans le menu d’effacement, vous pouvez passez d’une option à l’autre dans la
liste à l’aide du
• CANCEL : Pour sortir du menu d’effacement, appuyez sur et retournez
au menu des configurations principal.
70 71
pour choisir l’une des options suivantes :
EFFACER: SUITE
• LAST: Pour effacer le dernier fichier enregistré, appuyez sur
une option de menu. L’écran LCD affichera un menu de confirmation. Dans ce
menu, vous pouvez passer d’une option à l’autre du menu à l’aide de
NO : Appuyez sur
configurations principal.
YES : Appuyez sur
Le dernier fichier enregistré sera effacé.
• ALL/Format SD Card : Pour effacer tous les fichiers sur la carte SD,
appuyez sur
confirmation. Dans ce menu, vous pouvez passer d’une option à l’autre du
menu à l’aide du
pour choisir le menu. L’écran LCD affichera un menu de
. Les options du menu sont les suivantes :
NO : Appuyez sur
configurations principal.
YES : Appuyez sur
seront effacés. Pendant le processus d’effacement, les
voyants DEL continuent à clignoter jusqu’ à ce que le
formatage soit terminé.
pour annuler et retourner au menu des
pour choisir Oui.
pour annuler et retourner au menu des
pour choisir Oui. Tous les fichiers
pour choisir
.
Page 37

CONFIGURATIONS SUPPLÉMENTAIRESCONFIGURATIONS SUPPLÉMENTAIRES
NTSC / PAL
Ce réglage contrôle à la fois le nombre d’images par seconde lors de
l’enregistrement et la lecture de la vidéo de la caméra sur un poste de
télévision. Choisissez NTSC si le visionnage s’effectue sur une télévision
en Amérique du Nord, PAL s’il s’agit d’une télévision PAL (la plupart des
télévisions à l’extérieur de l’Amérique du Nord).
NTSC (Défaut)
PAL
AFFICHAGE À L’ÉCRAN
Choisissez cette option si vous souhaitez afficher ou cacher les icônes
d’enregistrement et les informations correspondantes sur votre écran vidéo
(par exemple lorsque vous affichez une vidéo en direct sur un écran de
télévision ou utilisez l’écran LCD BacPac™). L’option OFF dissimule les icônes
et ON affiche les icônes.
OFF (Défaut)
ON
VOYANTS DEL
Vous pouvez choisir entre l’activation des 4 voyants DEL, de seulement 2
voyants DEL (à l’avant et à l’arrière), et l’inactivation de tous les voyants DEL.
4 (Défaut)
2
OFF (Inactif)
72 73
Vous pouvez modifier le niveau sonore du bip de la caméra pour qu’il soit
moins fort que le réglage par défaut, ou le régler au mode silencieux :
100% (Défaut)
70%
OFF
Programmez la caméra pour qu’elle s’éteigne automatiquement après une
période particulière d’inactivité (lorsque l’on ne prend pas de vidéos ou de photos
et lorsque l’on n’a appuyé sur aucun bouton). Si vous réglez la caméra sur
MANUAL (manuel) vous devrez l’éteindre manuellement.
MANUAL
60
120sec
300sec
SON DE LA CAMÉRA
ALLUMAGE/ARRÊT AUTO
(Défaut)
sec
Page 38

CONFIGURATIONS SUPPLÉMENTAIRESCONFIGURATIONS SUPPLÉMENTAIRES
DATE / HEURE / MOIS
Vous pouvez régler l’horloge interne de la caméra pour veiller à ce que vos
fichiers vidéo et photo soient enregistrés avec les informations de date et
d’heure correctes.
Mois / Jour / Année Heure / Minute
1. Appuyez sur
s’affichent sur l’écran LCD.
2. Appuyez sur
3. L’écran LCD affiche le menu de réglage des Date/Heure/ Mois, le champ du mois en
surbrillance. Appuyez sur
4. Servez-vous du
le mois correct soit mis en surbrillance.
5. Appuyez sur
6. Le menu de configuration Date/Heure/Mois s’affiche sur l’écran LCD. Appuyez
sur
7. Servez-vous de nouveau du
8. Réitérer ce processus pour l’année, les heures et les minutes.
CONSEIL
DES
PROS
74 75
à plusieurs reprises jusqu’à ce que les Date / Heure / Mois
pour commencer à régler l’heure et la date.
pour accéder à la liste des mois (1 à 12)
pour passer d’une option à l’autre dans la liste jusqu’à ce que
pour sélectionner le mois en surbrillance.
ur accéder à la liste des jours (1 à 31).
pour le sélectionner.
Les champs Date/Heure/Mois sont abrégés. Par exemple, le mois
est MM, le jour DD, l’année YY, l’heure figure sous la forme HH, les
minutes MM.
pour mettre en surbrillance le jour correct et de
.
À partir de l’écran EXIT (quitter), appuyez sur
caméra par défaut.
QUITTER LE MENU DES CONFIGURATIONS
pour retourner au mode de la
Page 39

ARCHIVAGE / CARTES SD CONFIGURATIONS REQUISES
La caméra
HD HERO2
8 GB, 16 GB et 32 GB, ainsi qu’avec les cartes mémoires SD et SDHC. Toutes
les cartes quelle qu’en soit la vitesse fonctionnent avec la caméra, mais GoPro
recommande des cartes de la plus grande vitesse (dont l’étiquette porte la
mention Classe 4 ou supérieure) pour l’enregistrement de vidéo en HD. GoPro
recommande l’utilisation de cartes SDHC de marque pour une fiabilité maximale
et lors d’activités produisant de fortes vibrations.
Pour insérer une carte SD : Pour retirer une carte SD :
1. Insérez la carte SD dans la fente de
la carte SD avec l’étiquette dirigée
vers l’avant de la caméra.
2. La carte SD s’emboîte en place
avec un clic une fois qu’elle est
totalement insérée.
76 77
est compatible avec des cartes mémoires de 2 GB, 4 GB,
1. Mettez votre ongle contre le
bord de la carte SD et appuyez
légèrement pour l’enfoncer dans
la caméra.
2. La carte s’éjecte de la caméra
suffisamment pour qu’on puisse
l’en retirer.
La caméra
HD HERO2
ultérieure et Mac OS X 10.5 ou une version ultérieure.
Configurations requises pour une lecture en haute définition totale à 1080p et
720p 60 ips :
WINDOWS MAC
Microso Windows® Vista 7+ Mac OS® X v10.4.11 ou version
3.2 GHz Pentium 4 ou plus rapide 2.0 GHz Intel Core Duo ou plus rapide
Direct X 9.0c ou version ultérieure Au moins 2 GB de RAM système
Carte vidéo avec au moins 128 MB
de RAM
Au moins 2 GB de RAM système
CONSEIL
DES
PROS
est compatible avec Microso® Vista, 7 ou autre version
ultérieure
Carte vidéo avec au moins 128 MB
de RAM
Si vous rencontrez des difficultés lors de la lecture sur votre
ordinateur, la caméra HD HERO2 peut également se brancher
directement sur une télévision haute définition avec un port
HDMI, à l’aide du câble mini-HDMI ou d’un câble composite (non
compris). La caméra HD HERO2 permet également une lecture de
très bonne qualité sur une télévision HD.
Page 40

TRANSFERT DE FICHIERS
POUR TRANSFÉRER DES FICHIERS VIDÉO ET PHOTOS VERS
UN ORDINATEUR :
Sur un PC :
1. Connectez la caméra à un ordinateur à l’aide du câble USB compris.
2. Allumez la caméra en appuyant sur
3. Sur votre PC, cliquez deux fois sur Mon ordinateur et localisez l’icône de
« Disque amovible ». Si vous ne la voyez pas, fermez le répertoire Mon
ordinateur et rouvrez-le. L’icône « Disque amovible » doit apparaître.
4. Cliquez deux fois sur l’icône « Disque amovible ».
5. Cliquez deux fois sur l’icône du répertoire « DCIM ».
6. Cliquez deux fois sur l’icône « 100GOPRO ».
7. Vos fichiers photo et vidéo se trouvent dans le répertoire « 100GOPRO ».
8. Copiez/Déplacez les fichiers vers le disque dur de l’ordinateur et
sélectionnez vidéo/photo pour la lecture à partir d’un bureau/disque dur.
Sur un Mac :
Branchez la caméra dans votre Mac à l’aide du câble USB livré avec l’appareil.
1.
2. Allumez la caméra en appuyant sur .
3. Le Mac identifie la caméra comme un disque dur externe. Cliquez deux
fois sur l’unité externe pour accéder à vos fichiers vidéo et photo.
4. Copiez/déplacez les fichiers vers le disque dur de l’ordinateur et
sélectionnez vidéo/photo pour la lecture à partir du bureau / du disque dur.
CONSEIL IMPORTANT POUR LES UTILISATEURS DE MAC : Lors de
l’effacement de fichiers de votre carte SD, vous devez vider la poubelle avant de
retirer la carte SD ou de débrancher la caméra. Si vous ne videz pas votre poubelle,
les fichiers vidéo et photos ne seront pas complètement effacés de votre carte SD.
78 79
.
POUR VISIONNER DES PHOTOS ET VIDÉOS SUR UNE TÉLÉVISION
OU UNE TÉLÉVISION HD
À l’aide du câble HDMI fourni, branchez votre caméra HD HERO2 dans votre
télévision. Vous pouvez également vous servir du port composite et d’un câble
composite (non compris). Une fois qu’elle est connectée :
Allumez la caméra et naviguez vers la configuration de lecture dans les écrans de
choix des modes. Appuyez sur
Dans le menu de lecture, servez-vous de pour passer d’une option à l’autre de la liste
de menu. Servez-vous de
de menu sont :
Video : Affiche tous les fichiers vidéo sur la carte SD. Pendant la lecture, on peut régler
le volume par l’intermédiaire de la télévision. La lecture commencera automatiquement.
Photo : Affiche tous les fichiers photos sur la carte SD.
All (Tous, valeur par défaut) : Affiche tous les fichiers photo et vidéo sur la carte SD.
CONSEIL DES PROS
Pour le défilement vers l’avant, appuyez sur
Pour le défilement arrière, appuyez sur
Pour quitter la relecture au moment de votre choix,
éjectez le câble HDMI/Composite de la caméra
NOTE: Make sure your camera is set to the correct NTSC (North America) or PAL
(Outside North America) video settings or your camera will not work properly with
your TV. You must also have an SD card with recorded information loaded into your
HD HERO2 camera. If there are no video or photo files stored on your SD card you
will see a No Video, No Photo, or No Files message.
Voir NTSC/PAL pour toute information complémentaire.
pour sélectionner chaque option. Les options de la liste
TRANSFERT DE FICHIERS
pour entrer dans le menu de lecture.
Pour le défilement rapide vers l’avant,
appuyé
maintenez
Pour rembobiner, maintenez
Pour revenir à la liste de menu en
relecture, maintenez appuyez à la fois
et pendant 3 secondes
appuyé
Page 41

DURÉE DE CHARGE DE LA BATTERIE
Lorsqu’elle est totalement chargée, la batterie de la caméra
d’enregistrer environ 2,5 heures de vidéo en 720p30. L’écran LCD affiche la
charge de la batterie dans tous les modes caméra, pour que vous puissiez
contrôler l’énergie restant dans la batterie. L’indicateur de charge de la batterie
clignote lorsque celle-ci est inférieure à 20 %.
Des batteries de rechange et des accessoires de chargement supplémentaires
sont en vente sur gopro.com et auprès de distributeurs autorisés GoPro.
CHARGEMENT DE LA BATTERIE
L’icône de la batterie clignote lorsque sa charge est inférieure à 20 %. Si vous
êtes en train d’enregistrer lorsque la charge de la batterie atteint 0 %, la caméra
sauvegarde le fichier et s’éteint.
Pour charger la batterie :
La batterie de la caméra se charge à 80 % en 1 à 2 heures et à 100 % en quatre
heures (en fonction du type de prise USB). Elle se charge à 80 % en une heure et
100 % en deux heures lorsque l’on utilise un chargeur mural ou pour automobile
compatible avec USB de 1000 mAh. Pour en savoir plus sur les chargeurs GoPro
de 1000 mAh, consultez GoPro.com.
80 81
1. Reliez la caméra à un ordinateur ou une
source d’électricité USB à l’aide du câble
USB livré avec l’appareil.
2. Le voyant DEL reste allumé lorsque la
batterie est en chargement.
3. Le voyant DEL s’éteint lorsque la
batterie est totalement chargée.
HD HERO2
permet
DURÉE DE CHARGE DE LA BATTERIE
UTILISATION DE LA CAMÉRA PENDANT LE CHARGEMENT
Vous pouvez charger la batterie de la caméra lors de l’enregistrement de vidéos
ou de la prise de photos. Il vous suffit pour cela de brancher la caméra dans tout
chargeur mural, pour automobile ou téléphone USB pour charger la caméra HD
HERO2 pendant l’enregistrement de vidéos ou de photos. Il est préférable d’utiliser
le chargeur GoPro d’1 amp (1 000 mAh) pour obtenir les meilleurs résultats de
chargement pendant que la caméra est en utilisation.
RETRAIT DE LA BATTERIE DE LA CAMÉRA
La batterie
HD HERO2
son compartiment pour une fiabilité optimale lors d’activités produisant de fortes
vibrations. Dans la plupart des cas, il n’est pas nécessaire de retirer la batterie.
Pour retirer la batterie :
est conçue pour se loger de manière très ajustée dans
1. Retirez le couvercle du compartiment de la batterie en mettant votre pouce
sur l’indentation du couvercle (sur le dessous de la caméra) et appuyez
fermement pour l’extraire de la caméra.
2. Appuyez sur les deux côtés de la batterie et tirez-la hors de la caméra. On a
intentionnellement fait en sorte que cela ne soit pas facile, mais la batterie
sort de son compartiment.
Page 42

MESSAGES D’AVERTISSEMENT IMPORTANTS
MESSAGE NO SD SUR L’ÉCRAN LCD
« NO SD » indique qu’il n’y a pas de carte SD dans l’appareil. La
HD HERO2
doit être pourvue d’une carte SD pour enregistrer des
vidéos ou prendre des photos.
Voir UTILISATION DE CARTES DE MÉMOIRE SD ci-dessus pour
en savoir plus.
MONTAGE DE LA CAMÉRA
Le boîtier de la caméra HD HERO2 est étanche à 197 pieds / 60 mètres et est
fabriqué en polycarbonate et en acier inoxydable pour une durabilité optimale.
Pour monter la caméra dans le boîtier :
MONTAGE DE LA CAMÉRA
ICÔNE DE RÉPARATION DE FICHIER SUR
L’ÉCRAN LCD
Si vous voyez l’icône de réparation de fichier, votre fichier vidéo
a été corrompu pendant l’enregistrement pour une raison
quelconque. Appuyez sur n’importe quel bouton et la caméra
réparera le fichier.
ICÔNE D’ALERTE DE TEMPÉRATURE SUR
1. Placez la caméra dans le boîtier.
2. Fermez le couvercle du boîtier.
3. Accrochez le loquet sous la rainure du couvercle arrière.
4. Poussez sur le loquet jusqu’à ce qu’il soit assujetti en place.
L’ÉCRAN LCD
L’icône d’alerte de température s’affiche sur l’écran LCD lorsque la
caméra est trop chaude et doit refroidir. Il suffit pour cela de la laisser
refroidir avant de la réutiliser. Votre caméra ne peut pas surchauffer.
Ne vous inquiétez donc pas, aucun dommage n’est intervenu.
82 83
Page 43

MONTAGE DE LA CAMÉRA
Votre boîtier
HD HERO2
squelette. Pour changer le couvercle, faites-le sortir de ses charnières. Pour attacher
l’autre couvercle arrière, remettez-le sur les charnières.
Couvercle arrière étanche
Le couvercle arrière squelette (non
étanche) offre un son de meilleure
qualité dans la mesure où celui-ci peut
plus facilement atteindre le microphone
de la caméra. Il permet également de
réduire le bruit du vent à des vitesses
pouvant aller jusqu’à 100 mph (160 km
/ h) lorsque l’appareil est monté sur des
casques, des motos, des bicyclettes
et d’autres véhicules en déplacement
rapide. N’utilisez ce couvercle arrière
que lorsqu’il n’existe pas de risque de
dommage dus à l’eau. Ce couvercle
arrière est également recommandé pour
une utilisation à l’intérieur de véhicules.
84 85
est pourvu de deux types de couvercle — étanche et
Couvercle arrière squelette
Le couvercle arrière étanche protège
le boîtier de l’eau jusqu’à 197
pieds / 60 mètres. Servez-vous de
ce couvercle lorsque vous devez
protéger la caméra de l’eau et
d’autres dangers de l’environnement.
PRÉVENTION DE DOMMAGES À VOTRE CAMÉRA
DUS À L’EAU
Le joint de caoutchouc à l’intérieur du boîtier de la caméra forme une barrière
étanche qui protège votre
Vous devez faire en sorte que le joint de caoutchouc du boîtier de la caméra
reste propre. Un simple cheveu ou un grain de sable peut provoquer une fuite.
Après chaque utilisation dans une eau salée, vous devrez rincer l’extérieur
du boîtier avec de l’eau douce et le sécher. Dans le cas contraire, la charnière
risque de finir par rouiller et le sel de s’accumuler dans les joints, ce qui peut
provoquer des défaillances.
Pour nettoyer le joint, rincer-le dans de l’eau fraîche et secouez-le pour le
sécher (le séchage avec un chiffon risque de déposer des peluches sur le joint
et de compromettre son intégrité). Réinstallez le joint dans les rainures du
couvercle arrière du boîtier. MISE EN GARDE : Si vous ne respectez pas ces
étapes après chaque utilisation de votre
endommagent ou détruisent votre caméra. Votre garantie ne couvre pas les
dommages dus à l’eau en raison d’une erreur de l’utilisateur.
CONSEIL
DES
PROS
HD HERO2
Appliquez RAIN-X ou une solution semblable permettant de
prévenir le dépôt de gouttelettes sur l’objectif du boîtier pour éviter
la formation de marques d’eau lors de l’utilisation de votre caméra
sous la pluie ou dans l’eau. Si l’on ne dispose pas de RAIN-X, il peut
s’avérer utile de lécher périodiquement votre objectif.
MONTAGE DE LA CAMÉRA
dans des conditions humides et sous l’eau.
HD HERO2
, il est possible que des fuites
Page 44

MONTAGE DE LA CAMÉRA MONTAGE DE LA CAMÉRA
ÉCHANGE DES COUVERCLES DU BOÎTIER
Le boîtier de votre
Pour changer le couvercle arrière :
HD HERO2
a deux types de couvercles, un étanche et un squelette.
FIXATION DE LA CAMERA AUX SUPPORTS
DE MONTAGE
Pour attacher votre caméra HD HERO2 à un support de montage, vous aurez
besoin d’une boucle d’attache (Fig 1), d’une vis à serrage à main (Fig 2) et
d’autres outils en fonction du support que vous utilisez. Pour en savoir plus sur
les supports de montage, consultez : gopro.com/support.
Boucle Vis à serrage
1. Ouvrez le couvercle arrière du boîtier de sorte qu’il pende vers le bas.
2. Tirez vers le bas sur le couvercle arrière jusqu’à ce qu’il se détache de la charnière.
3. Alignez le nouveau couvercle arrière avec l’ouverture de la charnière.
4. Poussez vers le haut sur le couvercle arrière jusqu’à ce qu’il s’emboîte en place.
86 87
UTILISATION DE SUPPORTS DE MONTAGE
ADHÉSIFS INCURVÉS OU PLATS
Les supports incurvés et plats facilitent la fixation de la caméra aux surfaces
incurvées ou plates de casques, de véhicules et d’équipements. Avec la boucle
de fixation, le boîtier de la caméra assemblé peut être attaché et détaché des
supports de montage adhésifs assujettis.
Support de fixation plat Support de fixation incurvé
à main
Boîtier pour
utilisation dans
l’eau
Appareil complet
Page 45

MONTAGE DE LA CAMÉRA
CONSEIL DES PROS : FIXATION DES SUPPORTS ADHÉSIFS
Nettoyez d’abord la surface. Veillez à bien nettoyer la surface sur laquelle
vous attacherez votre support de montage adhésif. La cire, l’huile, la saleté
et les autres débris limitent et affaiblissent l’adhésion, et vous risquez de
perdre votre caméra en cas de perte de l’adhésion.
N’attachez un support de montage qu’à température ambiante. L’adhésif
du support de montage ne s’attachera pas correctement s’il est appliqué
dans un environnement froid ou humide. Il peut être utilisé sans danger
dans le froid. Pour obtenir de meilleurs résultats, attachez votre support
de montage 24 heures avant l’utilisation dans un environnement froid pour
obtenir la meilleure adhésion possible.
Surfaces. Les supports de montage adhésifs ne peuvent être fixés que sur une
surface lisse. Les surfaces poreuses ou à texture n’offrent pas une adhésion
suffisante. Lorsque vous appliquez le support de montage, appuyez fermement
le support en place pour qu’il soit entièrement en contact avec la surface.
Laissez sécher au moins 24 heures pour que l’adhésion soit maximale.
Délai de séchage : Pour obtenir de meilleurs résultats, attachez votre
support de montage au moins 24 heures avant l’utilisation.
Des modifications non approuvées par la partie responsable de la conformité
sont susceptibles d’annuler le droit de l’utilisateur à utiliser l’équipement.
Cet équipement a été testé et déterminé en conformité avec les limites des
appareils numériques de catégorie B, en vertu de la 15e partie des Règlements
de la FCC. Ces limites sont conçues pour offrir une protection raisonnable contre
les interférences nuisibles dans une installation résidentielle. Cet équipement
produit et peut diffuser une énergie par fréquence radio, et s’il n’est pas installé
et utilisé conformément aux instructions, peut provoquer des interférences
nuisibles à la réception radio ou télévision, ce que l’on peut déterminer en
allumant et en éteignant l’appareil.
L’utilisateur est encouragé à essayer de corriger les interférences en ayant
recours à une ou plusieurs des mesures suivantes :
• Réorientation ou relocalisation de l’antenne réceptrice.
• Augmentation de la séparation entre l’équipement et le récepteur.
• Connexion de l’équipement à une prise sur un circuit différent de celle
auquel le récepteur est relié.
DÉCLARATION RELATIVE À LA FCC
FICHE DE VERROUILLAGE
Cett e fiche de ve rrouill age est co nçue pou r les spor ts à fort
impa ct tels q ue le surf o u le ski dan s lesque ls des ch ocs
impo rtant s sont poss ibles. El le perme t de fixer les doig ts de la
bouc le de fixat ion en pla ce et de limi ter les ris ques d’é jectio n
accidentelle du boîtier des supports.
88 89
Page 46

GARANTIE
Ce produit est garanti contre tout défaut de fabrication pendant un (1) an à
compter de la date originale d’achat. La seule obligation de GoPro en cas de
défaut de ce type pendant ce délai est de réparer ou remplacer la pièce ou
le produit présentant le défaut par une pièce ou un produit comparable à la
seule appréciation de GoPro. Sauf pour ce remplacement, la vente, ou toute
autre manipulation de ce produit s’effectue sans garantie, condition ou autre
responsabilité, même si le défaut ou la perte est causé(e) par la négligence ou
une autre faute. Les dommages résultant de l’utilisation, d’un accident ou de
l’usure normale ne sont pas couverts par cette garantie, ni aucune garantie.
GoPro n’assume aucune responsabilité en cas d’accident, de blessure, de décès,
de perte, ou de toute autre demande liée à ou résultant de l’utilisation de ce
produit. GoPro ne saurait en aucun cas assumer de responsabilité en cas de
dommage accessoire ou indirect lié à ou résultant de l’utilisation de ce produit
ou de toute pièce de celui-ci. Dans la mesure où une erreur de l’utilisateur est
possible lors de la pose du joint d’étanchéité, ce produit n’est pas garanti contre
les fuites d’eau à l’intérieur du boîtier, ou tout dommage en résultant.
Consultez gopro.com pour toute information complémentaire.
90 91
GoPro entend vous offrir le meilleur service possible.
Pour contacter le service d’assistance clientèle de
GoPro, consultez : gopro.com/support
ASSISTANCE CLIENTÈLE
Page 47

Learn about more GoPro products at: gopro.com
130-00037 REVB
Please Recycle.
 Loading...