


Ethernet Control Center

OPERATION MANUAL
GodexLAN for Wireless LAN & Ethernet Module
Operation Manual
Version
Issue Date
P/N
: GodexLAN
: Rev. E
: 2012.07.12
: 920-061510-00

1. PRODUCT OVERVIEW ............................................................................ 1
1-1. General Description .......................................................................................................................... 1
1-2. Ethernet Module Specifications......................................................................................................... 2
1-3. Wireless LAN Module Specifications ................................................................................................ 3
1-4. Product CD ........................................................................................................................................ 3
2. THE CONTROL CENTER ........................................................................ 4
2-1. Get the Control Center from CD ........................................................................................................ 4
2-2. Using the Control Center ................................................................................................................... 4
2-3. System menu .................................................................................................................................... 5
3. NETWORK CONFIGURATION ................................................................ 6
3-1. Setting up Local Windows Printer Driver .......................................................................................... 6
3-2. Connecting the Hardware ................................................................................................................. 6
3-3. Wireless Connection ......................................................................................................................... 7
3-3-1. Preliminary .............................................................................................................................. 7
3-3-2. Set Wireless Configuration Using Network Printer Server Control Center ............................. 8
3-3-3. Set Wireless Configuration Using Server’s Web Pages ....................................................... 10
3-4. Assigning an IP Address to the Server ........................................................................................... 14
3-4-1. Preliminary ............................................................................................................................ 14
3-4-2. Setting the IP Address Using the Control Center ................................................................. 15
3-4-3. Setting the IP Address Using the Server’s Web Pages ........................................................ 17
4. THE SERVER’S WEB PAGES ............................................................... 19
4-1. Introduction ...................................................................................................................................... 19
4-2. Using the Server’s Web Pages ....................................................................................................... 19
4-2-1. Displaying Server Status ...................................................................................................... 19
4-2-2. Setting up Server Configuration............................................................................................ 20
5. TROUBLESHOOTING ........................................................................... 27
5-1. Q & A ............................................................................................................................................... 27
5-2. Firewall ............................................................................................................................................ 27
6. RESTORE FACTORY DEFAULTS ........................................................ 28
7. UPGRADE SERVER FIRMWARE .......................................................... 29

1. Product Overview
1-1. General Description
Network Printer Server is designed to connect your printers to your network, allowing all network users
access to these shared printers. This Server provides the following features and benefits:
Reliability: The Server provides high performance and reliability combined with low power
consumption.
Flexibility: The Server supports print sharing in all major computer systems and environments.
Easy to Install: The Server installs, operates, and is managed in a reliable and easy fashion.
Security: You can assign administrator name and password to restrict login.
Monitoring: The Server’s web pages and user software allow you to continuously monitor the status of
connected printer devices.
Future Proof: The firmware stored in the Server’s Flash memory can be upgraded over the network.
This allows you to quickly update and enhance its operational features when new Server software
becomes available.
To fully benefit from this document, you should be familiar with basic networking principles. The instructions
described in this manual are based on the settings in a new Server. To reload the Factory Parameters, you
can reset this Server back to Factory Default, which will restore most of the settings. For details, please refer
to the chapter “Restore Factory Defaults”.
Software Operation Manual 1
1-2. Ethernet Module Specifications
ITEM
Description
CPU
SD
RAM
Flash Memory
Connector
Standard
Protocol
Server
Setup
Security
Connector
Standard
POWER
LED LAMP
DIMENSIONS
WEIGHT
OTHERS
Pin 1
Pin 3
Pin 5
Pin 7
Pin 2
Pin 4
Pin 6
Pin 8
32-bits RDC(x86), 133 MHz
4M Bytes
2M Bytes
RJ-45 Connector
IEEE 802.3 10/100Base-Tx (Auto-Sense)
ETHERNET
USB Port
ENVIRONMENT
USB Port connector pin assignment:
Vbus
GND
ARP, IP, UDP, TCP, HTTP, DHCP, FTP, SNMP, SMTP
TCP Server ; UDP Server
HTTP Browser Setup (IE & Netscape)
Setup Password & Connect Password
Dual row 8-pin header
USB 2.0 Host mode, Full speed 12M bps
DC 5V, 300mA
SYS(PWR) , LAN-100 MBPS, LAN –10MBPS
Operating Temp: 0℃~50℃
Storage Temp : -10℃~70℃
95 x 51.5 x 20 mm ( W x D x H )
100 gm
Watch Dog Function, Firmware On-lined Updated Via Ethernet
D+
D-
GND
+5V
+5V(RLY)
GND
Software Operation Manual 2
1-3. Wireless LAN Module Specifications
ITEM
Description
CPU
SDRAM
Flash Memory
Standard
Network
TX Power
Protocol
Server
Setup
Security
Connector
Standard
Function
Connector
Standard
POWER
LED LAMP
DIMENSIONS
WEIGHT
OTHERS
Pin 1
Pin 3
Pin 5
Pin 7
Pin 2
Pin 4
Pin 6
Pin 8
32-bits RDC(x86) , 133 MHz, miniPCI
16M Bytes
2M Bytes
IEEE 802.11b/g, 2.4GHz, DSSS
Data Speed
Wireless LAN
Ethernet
USB Port
ENVIRONMENT
USB Port connector pin assignment:
RX Sensitivity
Security
Vbus
GND
802.11b : 1, 2, 5.5, 11 Mbps
802.11g : 6, 9, 12, 18, 24, 36, 48, 54 Mbps
Infrastructure, Ad-Hoc
802.11b : ~15 dBm; 802.11g : ~12 dBm
802.11b : -80 dBm@11 Mbps, Packed Error Rate 8%
802.11g : -65 dBm @ 54 Mbps, PER 10%
ARP, IP, UDP, TCP, HTTP, DHCP, FTP, SNMP, SMTP
TCP Server ; UDP Server
802.11b : WEP64-128bit
802.11g : WPA-PSK / WPA2-PSK with TKIP/AES
HTTP Browser Setup (IE & Netscape)
Setup Password & Connect Password
RJ-45 Connector
IEEE 802.3 10/100Base-Tx (Auto-Sense)
Support Wireless LAN setup configuration and Alertnative Wireless LAN
Dual row 8-pin header connector
Host mode, Full speed 12M bps
DC 5V, 500mA
SYS(PWR), LAN/WLAN
Operating Temp : 0℃~45℃
Storage Temp : -10℃~70℃
95 x 70 x 20 mm ( W x D x H )
185 gm
Watch Dog Function, Firmware On-lined Updated Via Ethernet
D+
D-
+5V
GND
+5V(RLY)
GND
1-4. Product CD
This CD provides easy-to-use Control Center software and the User’s Manual. The Control Center is
available on the CD or from official website. This Server can be configured and managed from its internal
web pages or from the Control Center. These web pages or PC tools offer you a management tool suitable
for all supported network environments.
Software Operation Manual 3
2. The Control Center
2-1. Get the Control Center from CD
1. Insert the included CD into the personal computer.
2. Go to "Control Center" folder and double click the "Setup Control Center.exe" icon to install the program
to your personal computer.
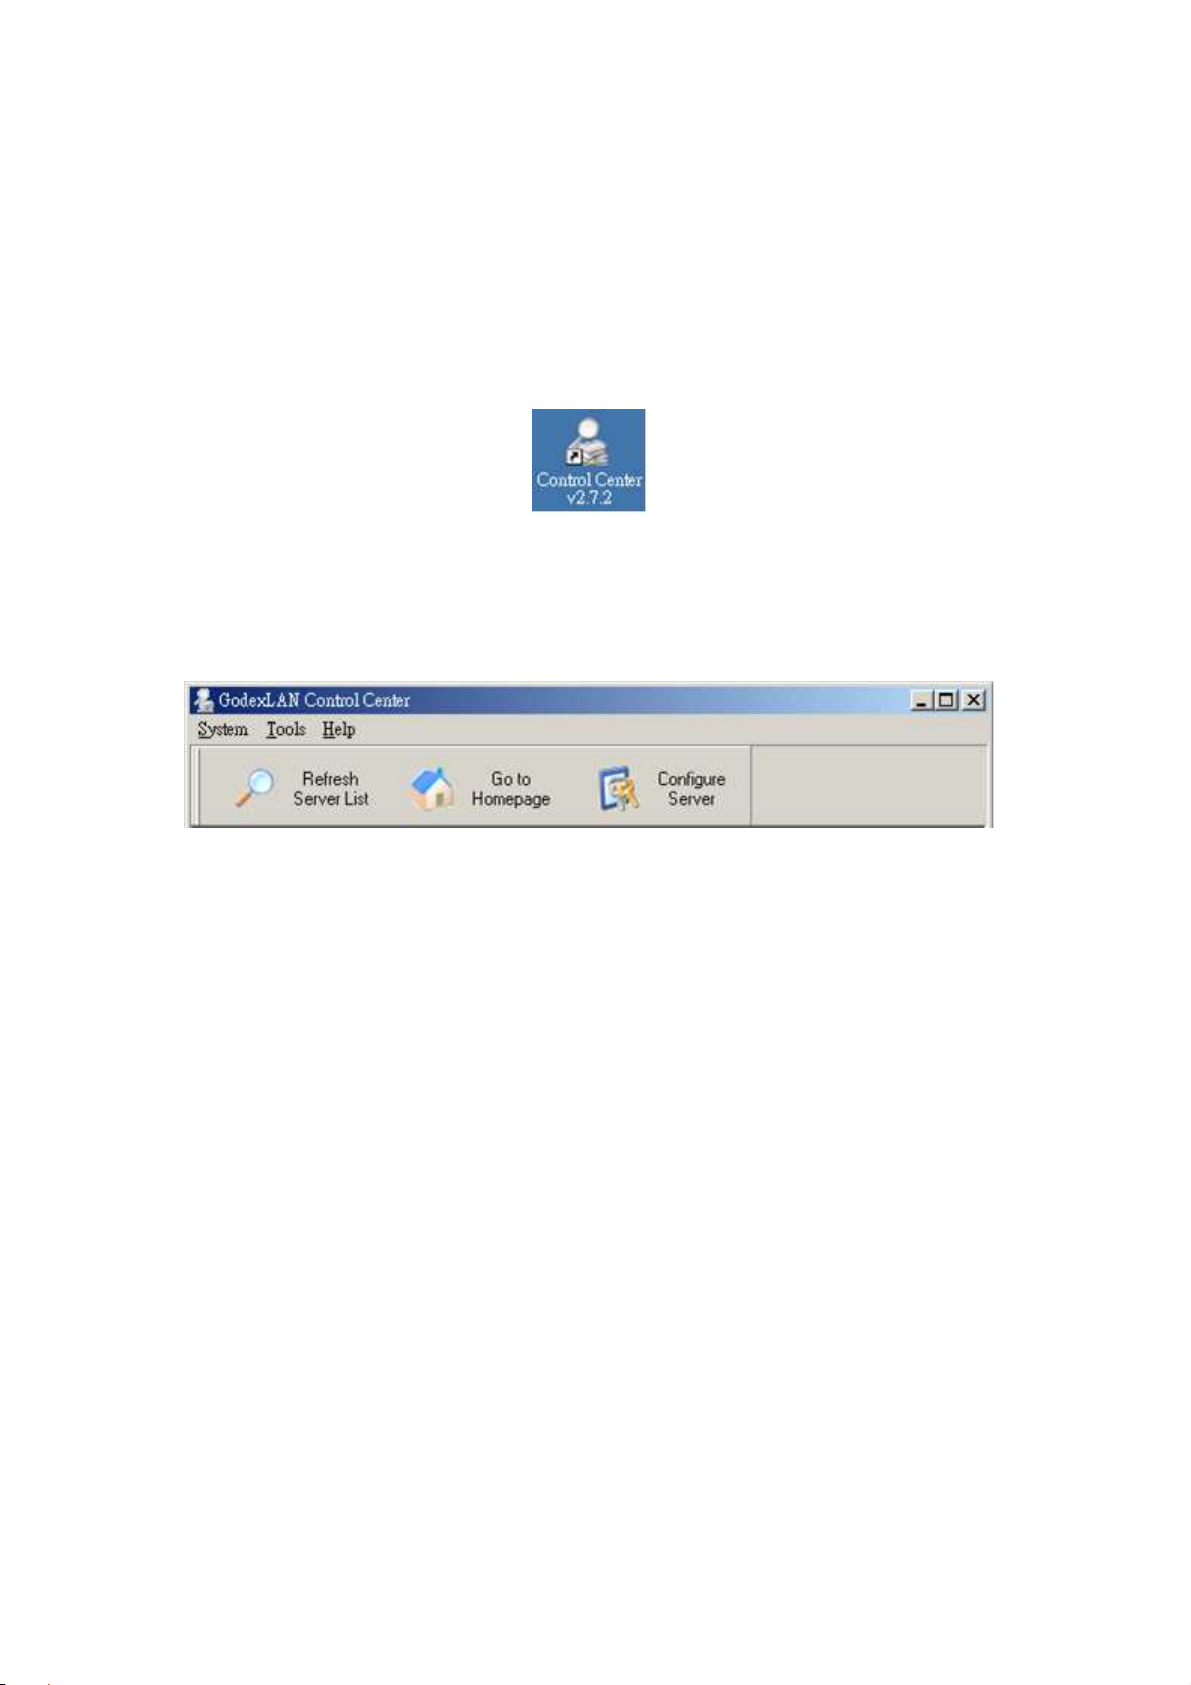
3. After the installation is completed, please click the "Control Center" icon to start the program.
2-2. Using the Control Center
You can use the following tools to help you use the server:
Refresh Server List: renew to auto search the existing servers on the network.
Go to Homepage: go to the web pages of the highlighted print server.
Configure Server: configure the highlighted printer server.
*Note 1: You can also right-click the mouse button on the highlighted print server to get the “Configure
Server” and “Go to Homepage” functions.
*Note2: You can also double-click on the highlighted server to get the “Configure Server” function.
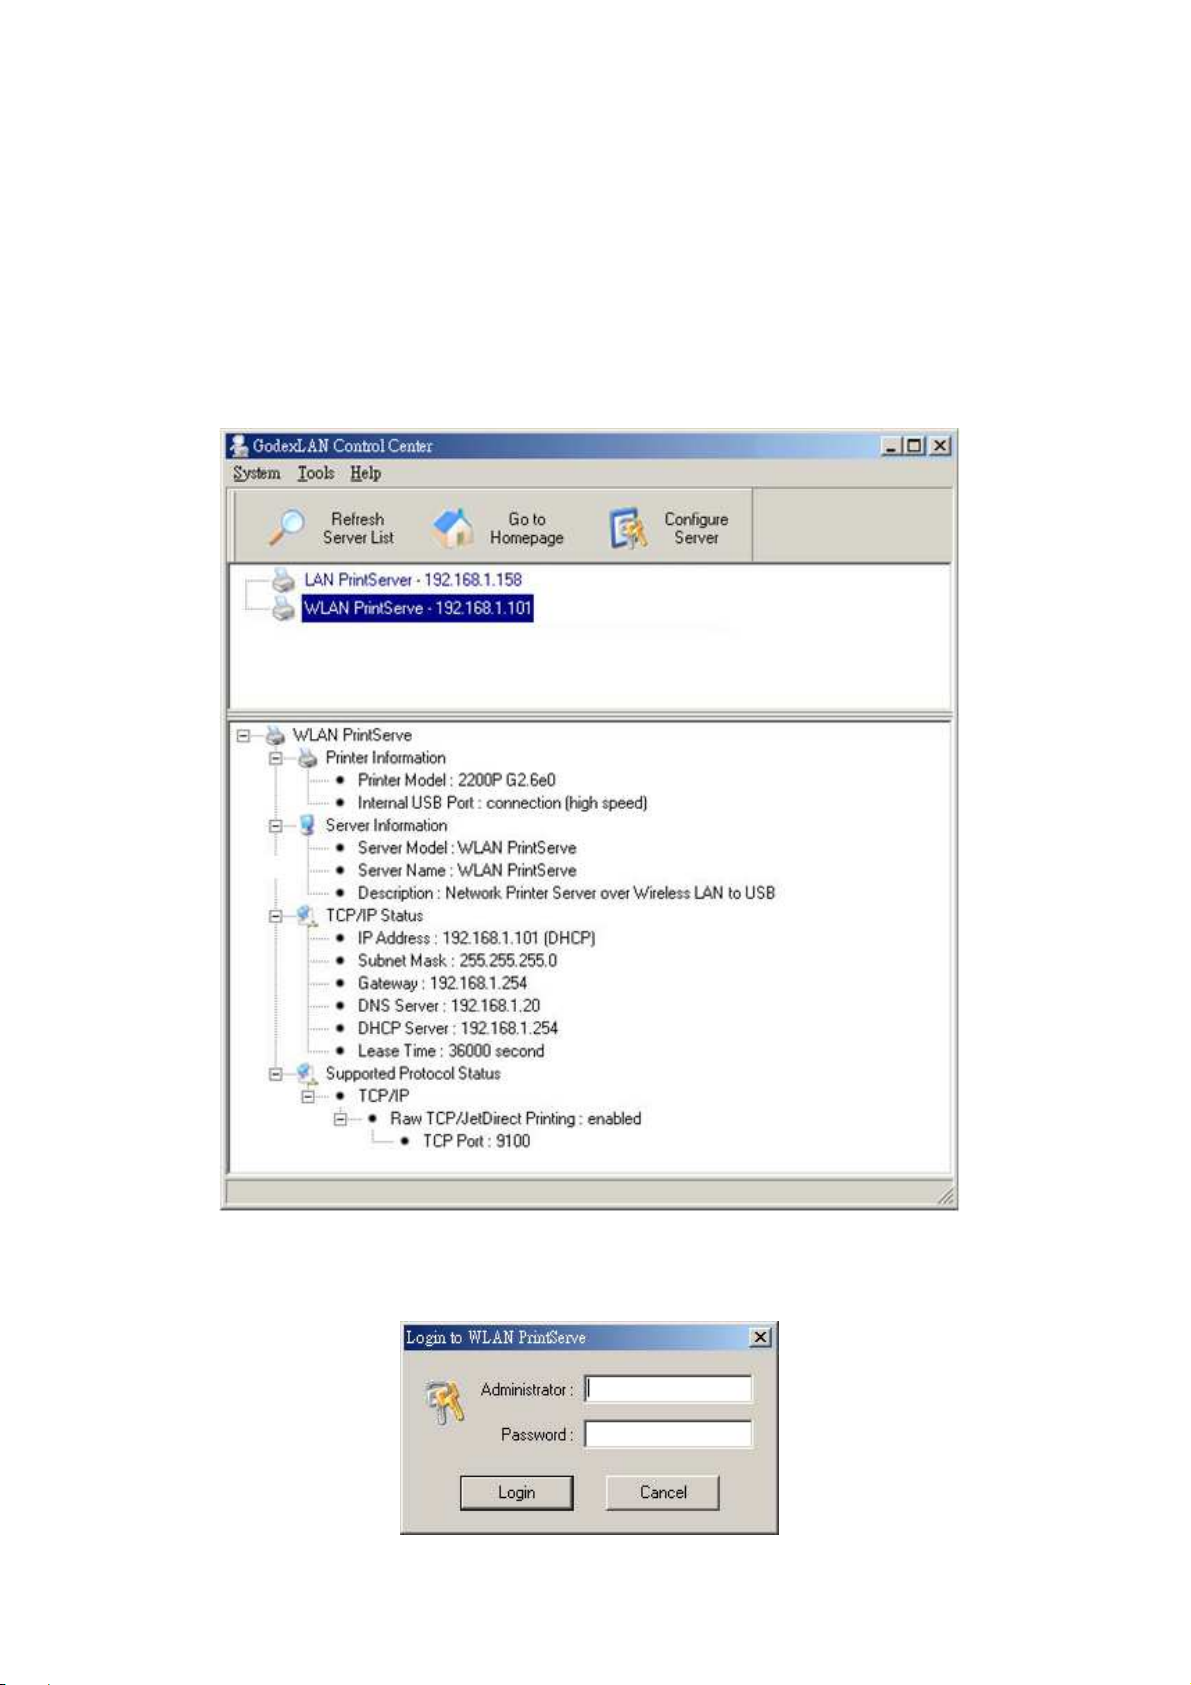
Displaying Server Status
You can start the Control Center and click on a server to see its status which includes Printer Information,
Server Information, TCP/IP status, and Supported Protocols.
Setting up Server Configuration
Click the “Configure Server” button to setup the highlighted print server. Then type the administrator ID and
password to login.
TCP/IP: You have to set the Server’s TCP/IP configuration to connect TCP/IP network. Please see the
chapter of Network Configuration for more details.
Wireless: Set the wireless connection configurations. Please see the Wireless Connection section in
the chapter of Network Configuration for more details.
Software Operation Manual 4
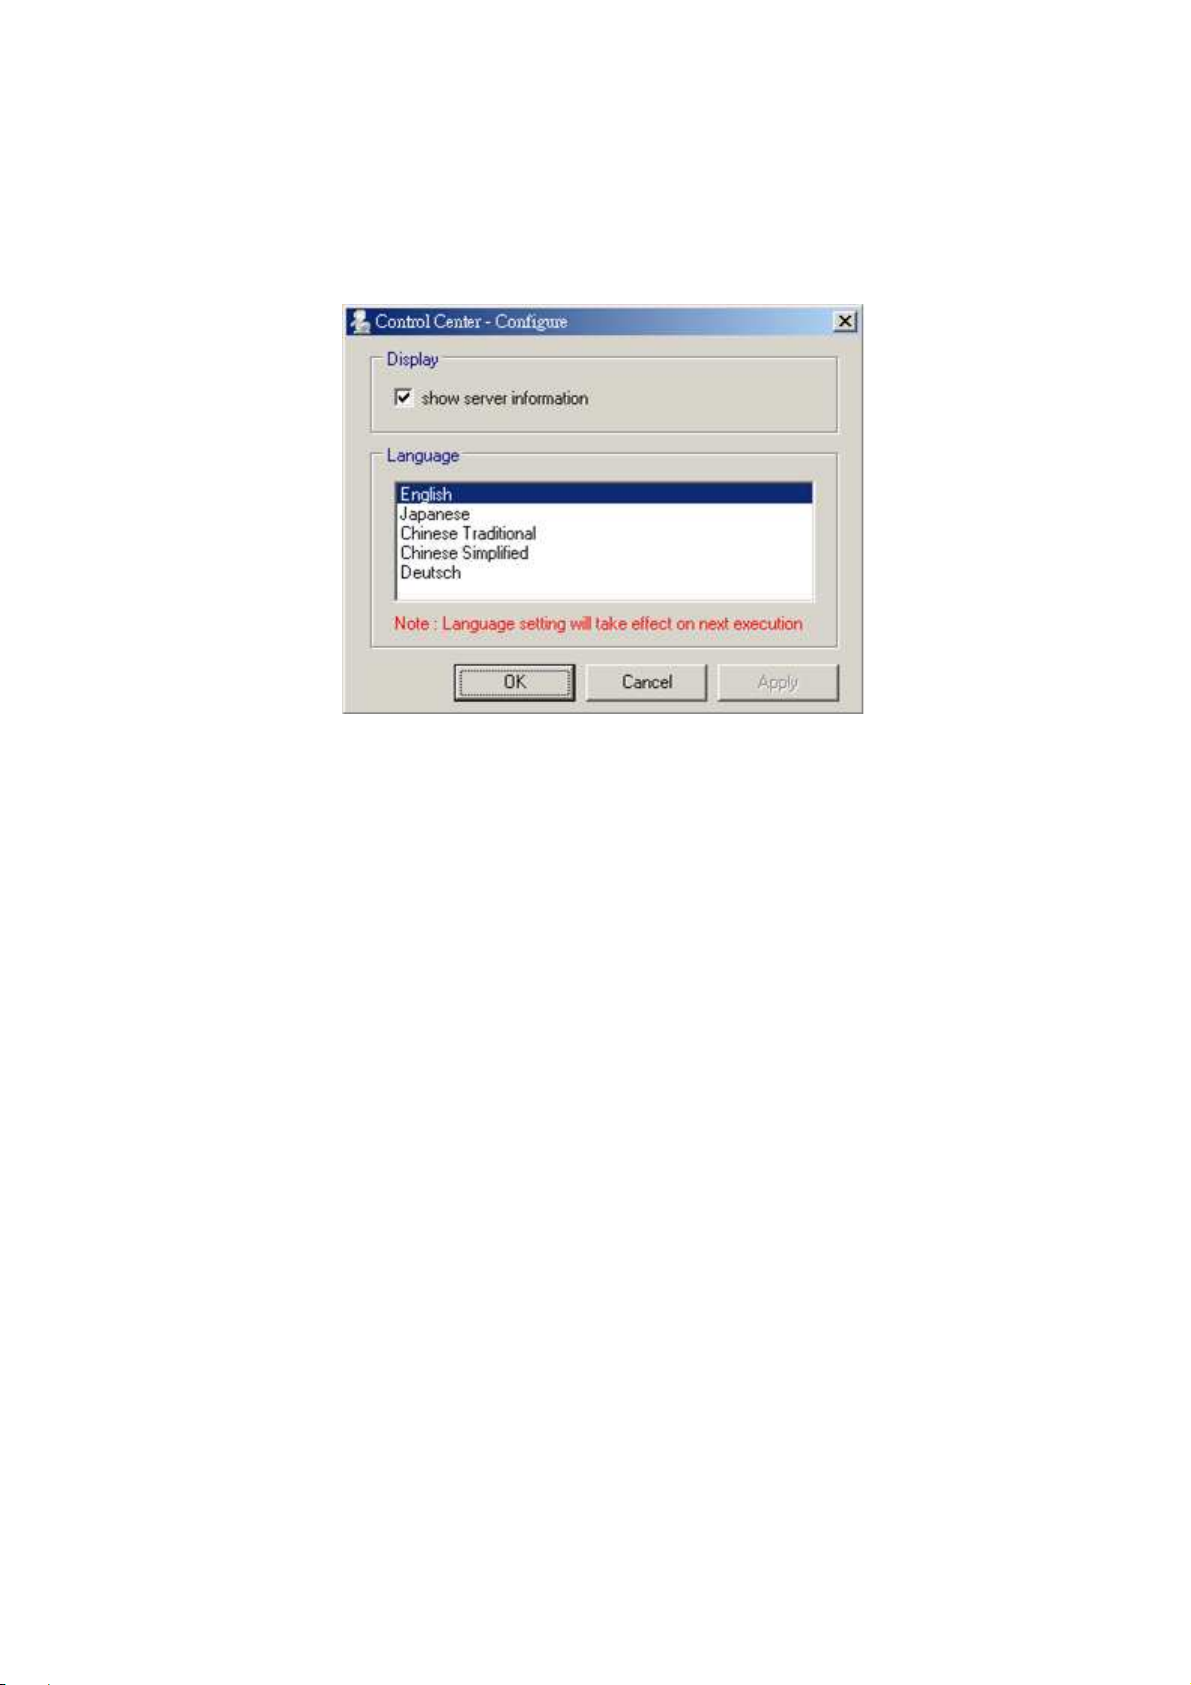
2-3. System menu
System: Select the "Exit" item to close the Control Center.
Tools: Select "Configuration" item to configure the Control Center. The configuration includes server
information setting and language setting.
Help: To display the version information of Control Center.
Quitting the Control Center
There are two ways to close the Control Center. The first way is clicking the “X” box (close box) at the top
right corner of the window. The second way is choosing “Exit” item in the “System” menu in the Control
Center.
Software Operation Manual 5
3. Network Configuration
3-1. Setting up Local Windows Printer Driver
You are advised to install your Windows printer driver in advance. For most printers, you can install the
printer drivers with the following procedure:
1. Click Start, click Control Panel, click Printers and Other Hardware, and then click Printers and Faxes.
2. Double click Add Printer to start the Add Printer Wizard, and then click Next.
3. Click Local printer, clear the Automatically detect and install my Plug-n-Play printer check box to avoid
having to wait for the completion of another printer search, and then click Next. If you leave this option
selected, Windows will attempt to find the printer itself and figure out what kind it is. If Windows does not
find the printer, the wizard will continue as described in this task.
4. Select a Windows driver for your printer. Click Next.
5. Choose whether you want to share the printer with other network users. Do you want to print a test page?
Select the appropriate radio button and click Next and Finish.
3-2. Connecting the Hardware
1. Turn off the printer.
2. Connect the Ethernet module to the network with a twisted-pair category 5 cable, 10baseT or
100baseTX.
3. Turn on the printer and make sure it is ready for use.
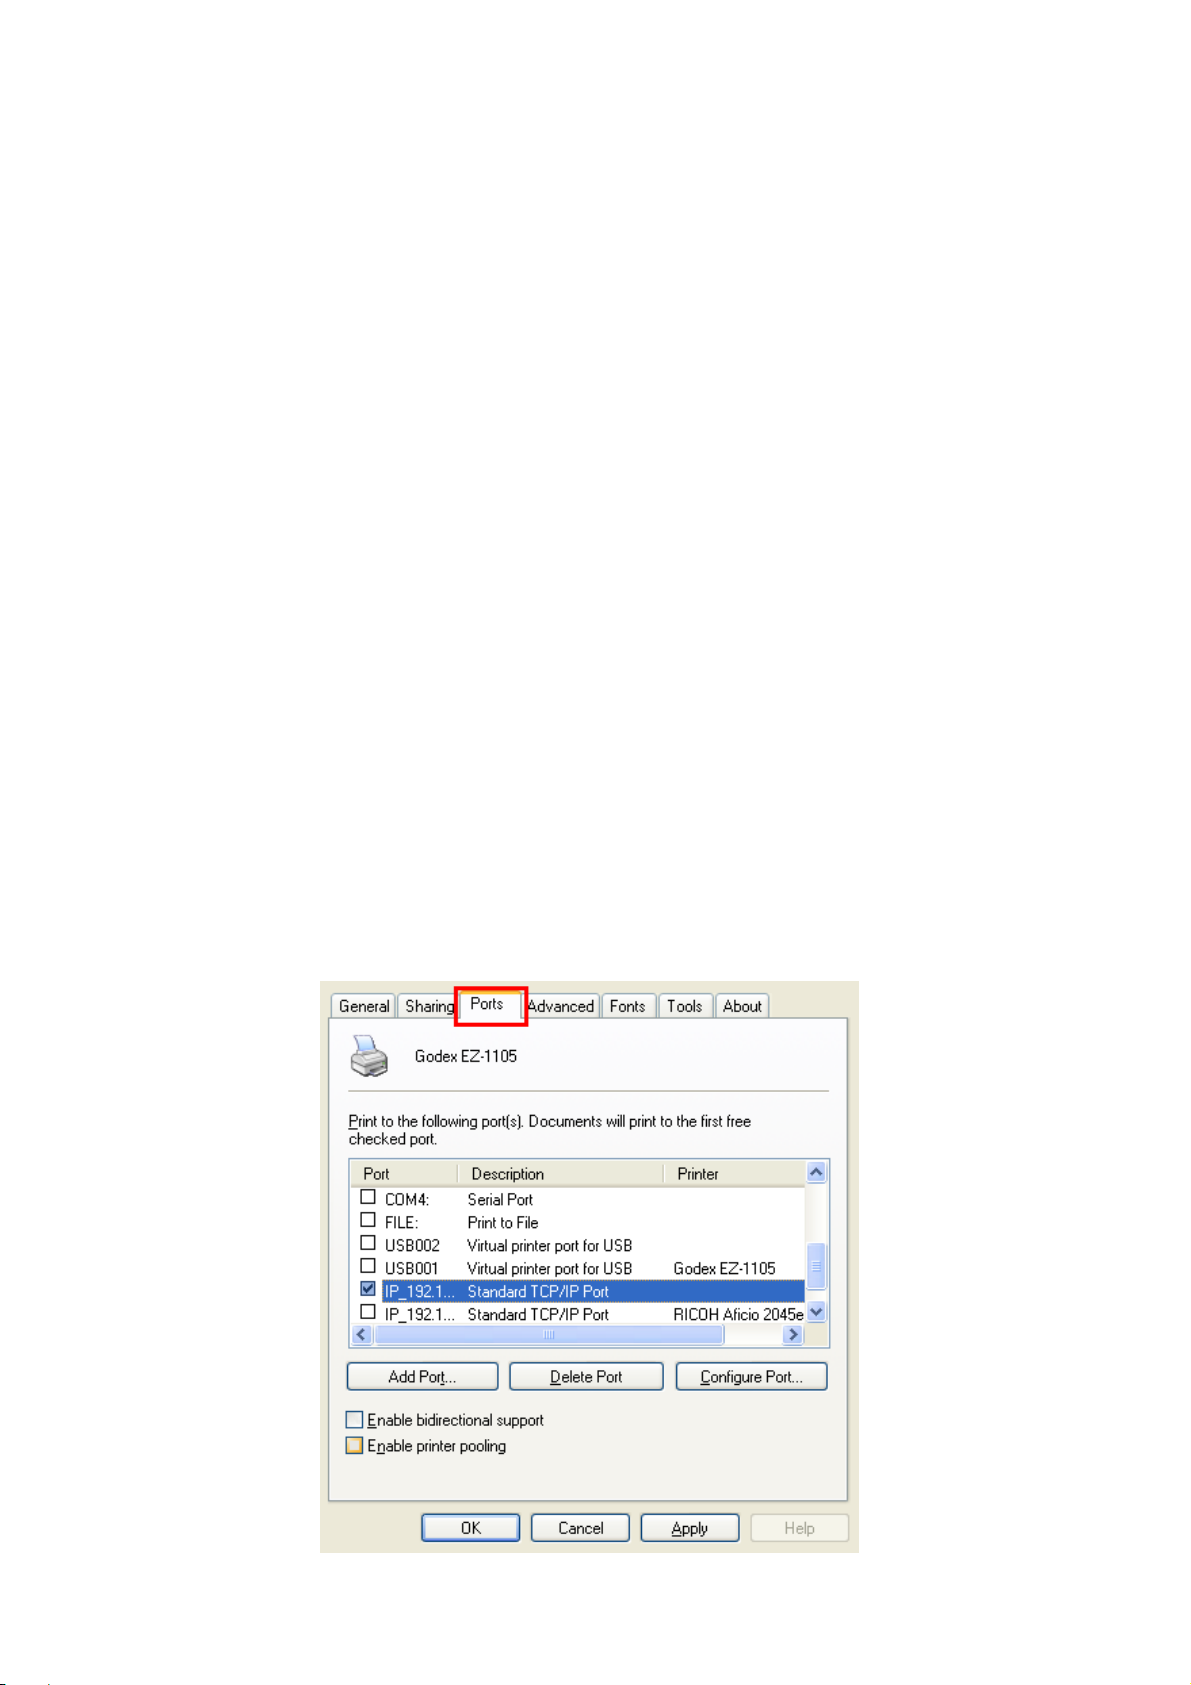
* Note: If you need to connect the printer via LPR protocol, please go to Windows printer setting page and go
to "Ports" setting. Select TCP/IP port from ports list and click "Configure Port".
Software Operation Manual 6
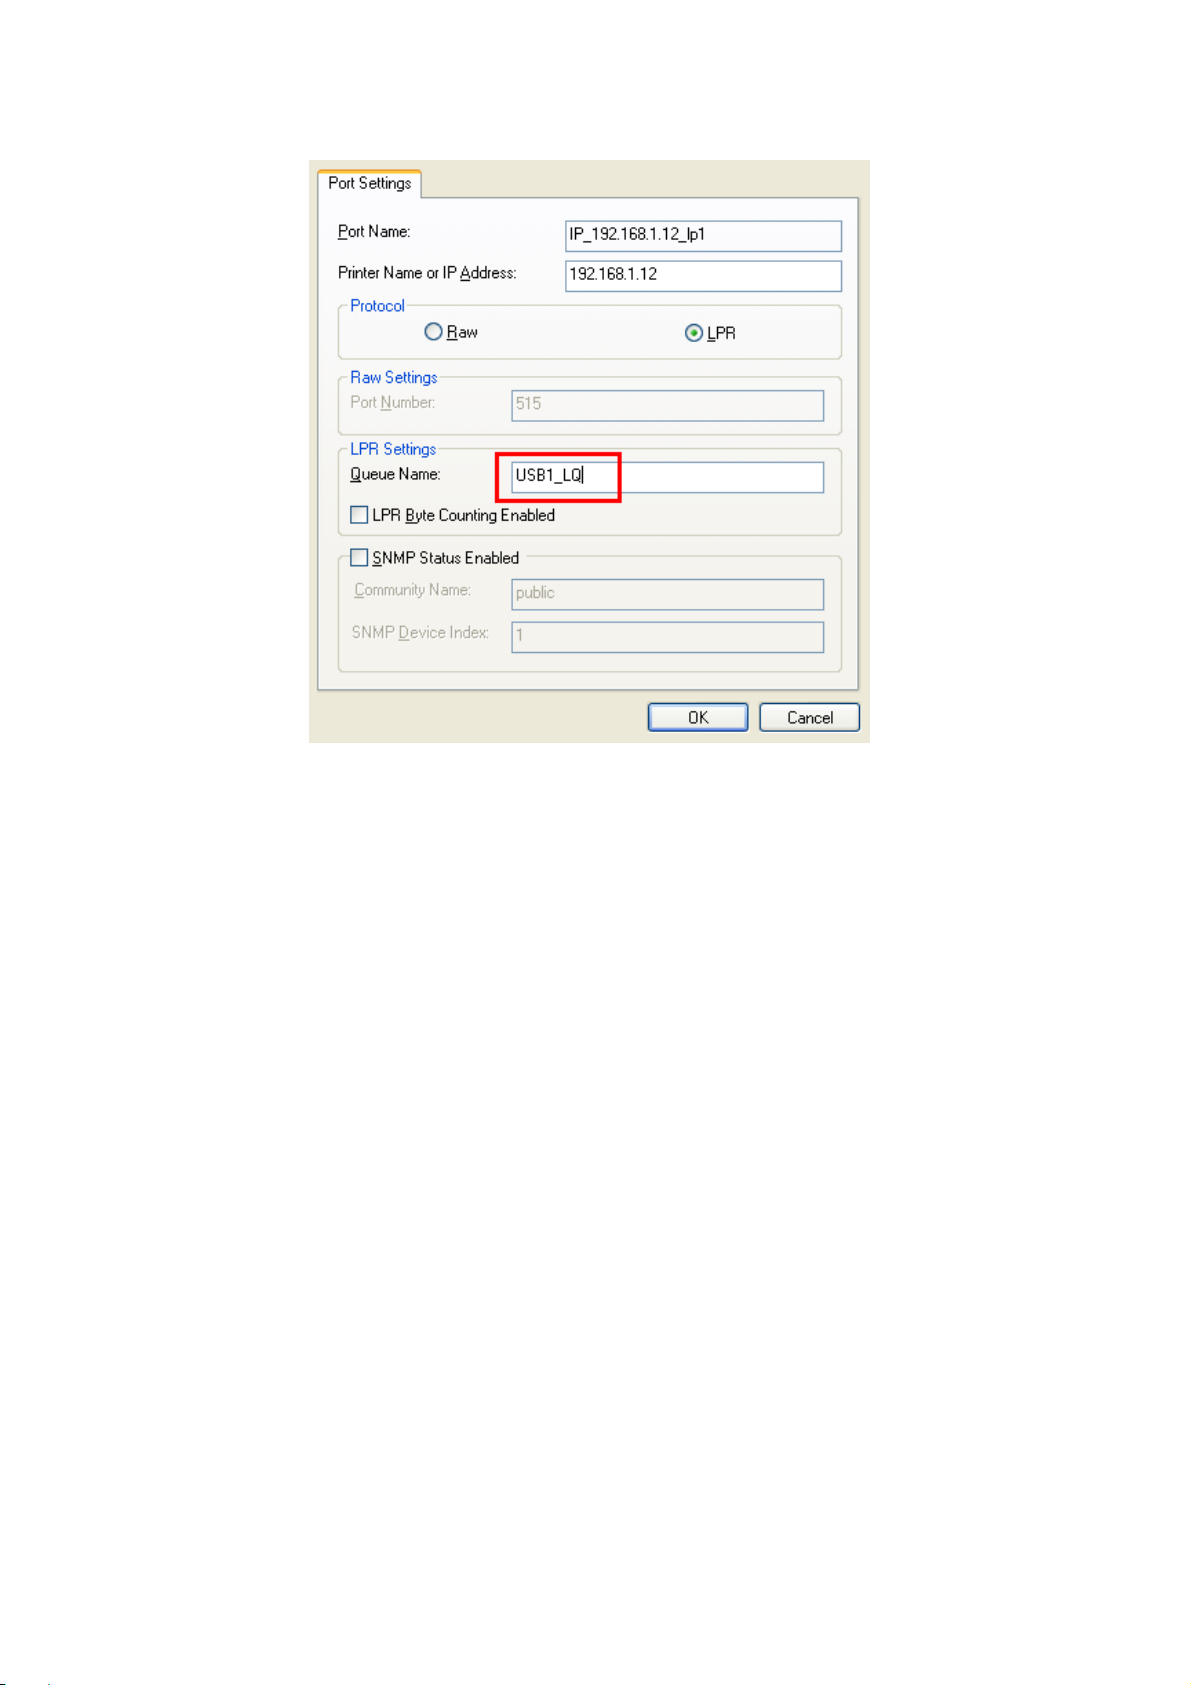
On "Port Settings", change the "Protocol" to "LPR". And the "Queue Name" setting must be "USB1_LQ" to
connect your printer properly.
3-3. Wireless Connection
3-3-1. Preliminary
Before you can access wireless network, wireless parameters should be set correctly. You have to
setup the first wireless parameter set through LAN (wired) connection.
Wireless access can be set as:
1. Infrastructure (station) mode, which need an access point to route network messages, or
2. Ad-hoc mode, which connect nearby wireless PC/devices with the same SSID (Service Set ID).
Wireless access can be secured by WEP64, WEP128, or WPA-PSK / WPA2-PSK with TKIP/AES.
In infrastructure mode, if network administrator wants to change any security related parameters,
Network Printer Server should be changed first, and then access point. If parameters mismatch
causes wireless access is not allowed, you have to modify those parameters through LAN connection.
In infrastructure mode, the maximal transfer rate is 54 MBits depending on access point’s capability.
In ad-hoc mode, only 802.11b (the maximal transfer rate is 11 MBits) is allowed by specification.
Software Operation Manual 7
3-3-2. Set Wireless Configuration Using Network Printer Server Control Center
1. Install the "Control Center" program to your PC. Network Printer Server Control Center is available in the
product CD of Ethernet or Wireless LAN module.
2. Start the Network Printer Server Control Center and an Auto-searching Network Printer Server window
will appear.
*If the wireless parameters are not correct or not set yet, you have to use LAN to access Network Printer
Server.
3. If the tool finds Network Printer Servers in your local area network, then you have to select a server from
the server list.
4. Double click the highlighted server (or click the “Configure Server” button) and type the server’s
administrator (default: admin) and password (default: admin).
Software Operation Manual 8
 Loading...