

Page 1

GS270/GS270plus
You can also find the user guide
online on your smartphone
Page 2

Contents
Contents
Overview . . . . . . . . . . . . . . . . . . . . . . . . . . . . . . . . . . . . . . . . . . . . . . . . . . . . . . . . . . . . . . . . . . . . . . . . . . . . . 3
Gigaset GS270 . . . . . . . . . . . . . . . . . . . . . . . . . . . . . . . . . . . . . . . . . . . . . . . . . . . . . . . . .
Start screen . . . . . . . . . . . . . . . . . . . . . . . . . . . . . . . . . . . . . . . . . . . . . . . . . . . . . . . . . . . .
Illustration in the user guide . . . . . . . . . . . . . . . . . . . . . . . . . . . . . . . . . . . . . . . . . . . . . . . . . .
Safety precautions . . . . . . . . . . . . . . . . . . . . . . . . . . . . . . . . . . . . . . . . . . . . . . . . . . . . . . .
Getting started . . . . . . . . . . . . . . . . . . . . . . . . . . . . . . . . . . . . . . . . . . . . . . . . . . . . . . . . . . . . . . . . . . . . . . . 9
Using the device . . . . . . . . . . . . . . . . . . . . . . . . . . . . . . . . . . . . . . . . . . . . . . . . . . . . . . . . . . . . . . . . . . . . . 13
Getting to know your device . . . . . . . . . . . . . . . . . . . . . . . . . . . . . . . . . . . . . . . . . . . . . . . . . .
Configuring the start screens . . . . . . . . . . . . . . . . . . . . . . . . . . . . . . . . . . . . . . . . . . . . . . . . .
Notifications . . . . . . . . . . . . . . . . . . . . . . . . . . . . . . . . . . . . . . . . . . . . . . . . . . . . . . . . . . .
Apps . . . . . . . . . . . . . . . . . . . . . . . . . . . . . . . . . . . . . . . . . . . . . . . . . . . . . . . . . . . . . .
Downloads . . . . . . . . . . . . . . . . . . . . . . . . . . . . . . . . . . . . . . . . . . . . . . . . . . . . . . . . . . . .
Fingerprint sensor . . . . . . . . . . . . . . . . . . . . . . . . . . . . . . . . . . . . . . . . . . . . . . . . . . . . . . .
“Do not disturb” . . . . . . . . . . . . . . . . . . . . . . . . . . . . . . . . . . . . . . . . . . . . . . . . . . . . . . . .
Additional functions . . . . . . . . . . . . . . . . . . . . . . . . . . . . . . . . . . . . . . . . . . . . . . . . . . . . . . . . .
Communication . . . . . . . . . . . . . . . . . . . . . . . . . . . . . . . . . . . . . . . . . . . . . . . . . . . . . . . . .
Making calls . . . . . . . . . . . . . . . . . . . . . . . . . . . . . . . . . . . . . . . . . . . . . . . . . . . . . . . . . . .
Contacts . . . . . . . . . . . . . . . . . . . . . . . . . . . . . . . . . . . . . . . . . . . . . . . . . . . . . . . . . . . . . . .
Messages (SMS/MMS) . . . . . . . . . . . . . . . . . . . . . . . . . . . . . . . . . . . . . . . . . . . . . . . . . . . . . . . .
Settings . . . . . . . . . . . . . . . . . . . . . . . . . . . . . . . . . . . . . . . . . . . . . . . . . . . . . . . . . . .
Device . . . . . . . . . . . . . . . . . . . . . . . . . . . . . . . . . . . . . . . . . . . . . . . . . . . . . . . . . . . . .
Security . . . . . . . . . . . . . . . . . . . . . . . . . . . . . . . . . . . . . . . . . . . . . . . . . . . . . . . . . . . .
Accounts and location detection . . . . . . . . . . . . . . . . . . . . . . . . . . . . . . . . . . . . . . . . . . . . . . . . . . . .
Apps . . . . . . . . . . . . . . . . . . . . . . . . . . . . . . . . . . . . . . . . . . . . . . . . . . . . . . . . . . . . . .
Network connections . . . . . . . . . . . . . . . . . . . . . . . . . . . . . . . . . . . . . . . . . . . . . . . . . . . . . . . .
System . . . . . . . . . . . . . . . . . . . . . . . . . . . . . . . . . . . . . . . . . . . . . . . . . . . . . . . . . . . . .
Appendix . . . . . . . . . . . . . . . . . . . . . . . . . . . . . . . . . . . . . . . . . . . . . . . . . . . . . . . . . . .
Customer service . . . . . . . . . . . . . . . . . . . . . . . . . . . . . . . . . . . . . . . . . . . . . . . . . . . . . . . .
Manufacturer's advice . . . . . . . . . . . . . . . . . . . . . . . . . . . . . . . . . . . . . . . . . . . . . . . . . . . . . . . .
Icons . . . . . . . . . . . . . . . . . . . . . . . . . . . . . . . . . . . . . . . . . . . . . . . . . . . . . . . . . . . . .
Index . . . . . . . . . . . . . . . . . . . . . . . . . . . . . . . . . . . . . . . . . . . . . . . . . . . . . . . . . . . . . . . . . . . . . . . . . . . . . . . . 81
. . . . . . . . . . . . . . . . 3
. . . . . . . . . . . . . . . . 4
. . . . . . . . . . 5
. . . . . . . . . . . . . 6
. . . . . . . . 13
. . . . . . . . . 18
. . . . . . . . . . . . . . . 20
. . . . . . . . . . . . . . . . . . . . 22
. . . . . . . . . . . . . . . 27
. . . . . . . . . . . . . . 27
. . . . . . . . . . . . . . . 29
. . . . . . . . . 30
. . . . . . . . . . . . 33
. . . . . . . . . . . . . . . 33
. . . . . . . . . . . . . . . 38
. . . . . . . . . 42
. . . . . . . . . . . . . . . . . . 46
. . . . . . . . . . . . . . . . . . . 46
. . . . . . . . . . . . . . . . . . . 53
. . 58
. . . . . . . . . . . . . . . . . . . . 61
. . . . . . . . . 63
. . . . . . . . . . . . . . . . . . . 73
. . . . . . . . . . . . . . . . 76
. . . . . . . . . . . . . . 76
. . . . . . . . . 76
. . . . . . . . . . . . . . . . . . . . 79
Not all functions described in the user guide are available in all countries or from all
network providers.
2
Page 3
Gigaset GS270
132 4
6
7
8
9
10
11
12
13
14
5
Gigaset GS270
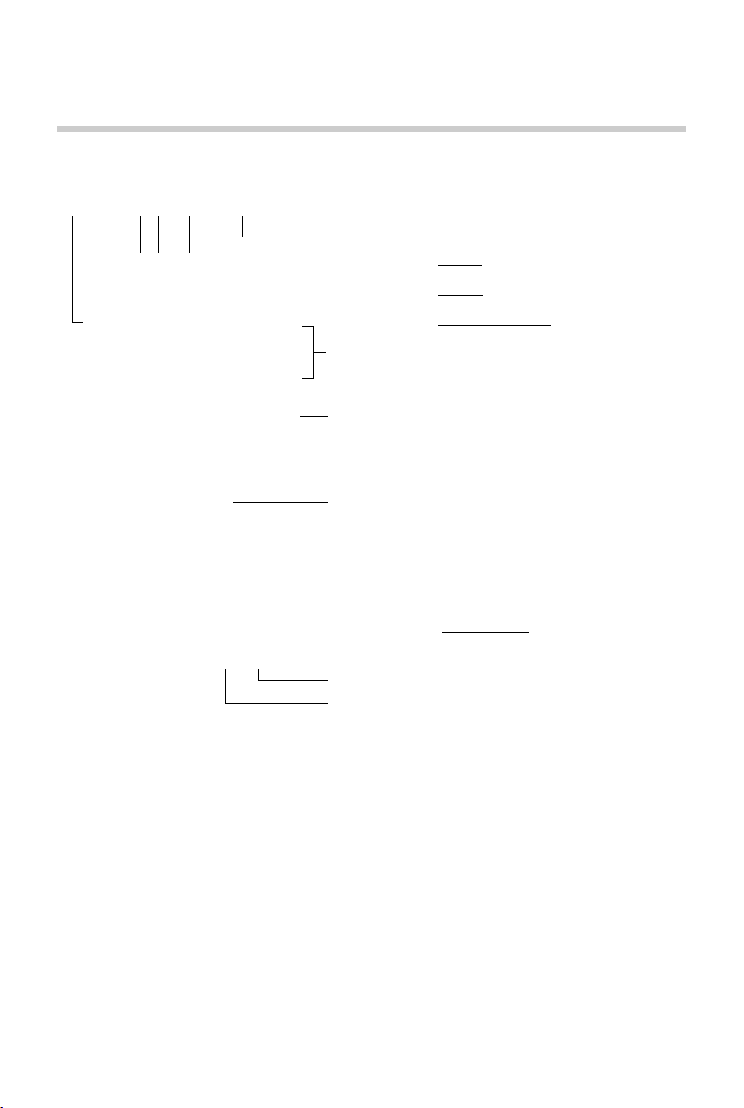
Overview
1 SIM/SD card slot 11 Rear camera
2 Message LED 12 Flash / torch
3 Front camer
4 Receiver 14 Speaker
5 Headset connector (3
6 Volume button (top: +
7 On/Off button
8 Tou c hs c re e n
9 Microphone
10 Micro-USB socket
a 13 Fingerprint sensor
.5 mm jack)
, bottom: –)
3
Page 4

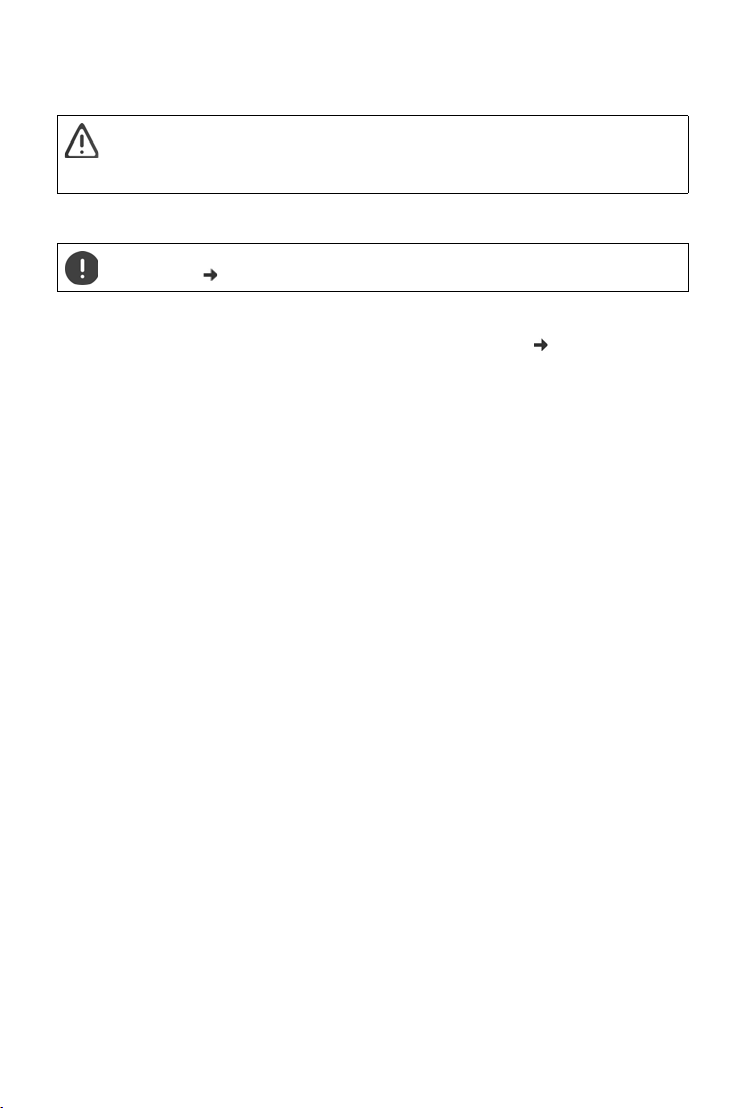
Start screen
Notifications and Status bar
Icons show the arrival of notifications and
various states ( p. 79)
Access to notifications ( p. 20)
Access to quick settings ( p. 16)
Navigation buttons ( p. 16)
Favourites bar
Access to the App menu and frequently
used apps ( p. 18)
Start screen display
Number of start screens / position of the
current start screen ( p. 20)
Area for apps and widgets
They can be placed anywhere ( p. 18)
Google search ( p. 15)
Start screen
4
Page 5

Illustration in the user guide
Icons
Warnings, the non-adherence to which can result in damage to devices or personal
injury.
Important information regarding function and appropriate handling or functions
that could generate costs.
Prerequisite for carrying out the following action.
Additional helpful information.
Procedures
Example: Change the time for transitioning to the idle status
¤ Settings Device – Display Sleep Select time
Step Follow this procedure
¤ Tap the icon in the middle of the Favourites bar. The App menu
¤ Settings Tap the Settings app. The Settings menu opens.
¤ Device – Display In the Device area, tap Display.
¤ Sleep Tap Sleep.
¤ Select time Tap the required time
opens.
Note: You can skip this step if the app you want to open is on a
start screen.
= Selected, = Not selected
5
Page 6
Safety precautions
Safety precautions
Please read these instructions carefully. Failure to comply presents a risk of injury and damage to
vice, as well as breaches of applicable laws.
a de
Please explain the contents of this document as well as the potential risks associated with using
is device to your children.
th
General information
Dispose of used mobile telephones in line with the instructions (Chapter Waste and environmen-
protection p. 77).
tal
• For your own safety, only use original, approved accessories from Gigaset for your mobile phone. Using
incompatible accessories can damage the mobile phone and entail hazardous situations. Original accessories can be purchased from Gigaset Customer Service (see Customer service
• The mobile phone is not waterproof. The device or its accessories must therefore not be kept or charged
in damp environments (in bathrooms, shower rooms or kitchens, for example). Rain, moisture or any liquid
can contain minerals which can cause the electrical circuitr y to corrode. There is a risk of electric shock, fire
or damage when the device is being charged.
• Permitted temperature range for charging and operation: 0-40°C.
High temperatures can shorten the life of electronic devices and damage the battery; plastic parts can
deform or melt. Using or keeping the mobile phone in refrige rated areas can result in condensation on the
inside of the telephone which will destroy the electronic circuitry.
• The mobile phone must not be used or kept in dusty or dirty places. Dust can be a reason for the mobile
phone to malfunction.
• Switch off your mobile phone when in potentially explosive areas and observe all warning signs. Poten-
tially explosive areas also include places where switching off vehicle engines is normally recommended. It
is at these kinds of places that flying sparks can be the cause of explosions or fires with resulting injuries,
and there may be a risk to life.
These areas include petrol stations, chemical factories, transport and storage systems for hazardous chemicals, spaces under ship decks, areas in which the air contains chemical substances or fine particles (such
as dust or metal powder particles).
• Short-circuiting, disassembling and modifying the mobile phone are not permitted because they present
a risk of injury, electric shock, fire or damage to the charger.
• The USB connection must be established with USB version 2.0 or higher.
• If the mobile telephone becomes hot, changes colour or shape or leaks whilst being used, charged or at
any other time, contact Gigaset Customer Service immediately.
Battery and charging
• The battery is built-in. Do not disassemble, weld and/or modify the battery. Do not keep the mobile tele-
phone where it is exposed to strong mechanical effects.
• The battery electrolyte coming into contact with eyes can cause a loss of eyesight. If elec trolyte does enter
an eye, please do not rub the eye with a hand. Immediately wash the affected eye thoroughly with clear
water and consult a doctor. The electrolyte coming into contact with skin (or clothing) presents a risk of
skin burns. Immediately wash the skin or clothing thoroughly with soap and clear water, and consult a
doctor if required.
• The temperature of the mobile phone rises during the charging process. Do not store the mobile tele-
phone in the same place as flammable products as this poses a risk of fire.
• Do not charge the battery for longer than 12 hours.
• Only charge the device indoors. Whilst the phone is charging, do not use the phone for calls or dial any
numbers.
• The socket must be easily accessible during the charging process.
• Electrical storms pose a risk of electric shocks.
• Do not use the charger when the power cable is damaged because this poses a risk of electric shock and
fire.
p. 76).
6
Page 7

Safety precautions
Headset
High volumes can impair hearing. Listening to music or conversation with headphones set to a
olume can be unpleasant and permanently impair hearing.
loud v
To prevent loss of hearing, do not have the volume turned up too high for long periods.
• If you wear headphones whilst out walking or running, please ensure that the cord does not wrap itself
around your body or objects on your person.
• Only wear headphones in dry environments. The static electricit y which builds up on the headphones can
discharge via your ears as an electric shock. The static electricity can discharge if you touch the headphones with your hand or touch bare metal before connecting with the mobile phone.
Use in hospitals / medical devices
• The function of medical equipment near your mobile phone can be impaired. Bear in mind the technical
conditions of the environment in question (such as in doctors’ surgery).
• If you use a medical device such as a pacemaker, please consult the manufacturer of the product before
using your mobile phone. You will be provided information on the sensitivity of the device to external,
high-frequency energy sources.
• Heart pacemakers, implantable cardioverter defibrillators:
Whe n you swit ch on your m obil e pho ne, en sure that the distance between the phone and an implant is at
least 152 mm. To reduce potential interference, use the mobile phone on the opposite side to the implant.
Please switch the mobile phone off immediately if interference occurs. Do not keep the mobile phone in
a shirt pocket.
• Hearing aids, cochlear implants:
Some digital wireless devices can interfere with hearing aids and cochlear implants. Please consult the
manufacturers of these products if interference occurs.
• Other medical devices:
If you and the people around you use other medical devices, please contact the relevant manufacturer for
information on whether such devices are protected from radio frequency signals in the environment. You
can also consult your doctor about this.
Emergency calls
• Make sure the mobile phone is switched on and connected to the GSM network. Enter the emergency
number as required and speak.
• Tell the person at the emergency call centre your location.
• Do not end the conversation until the person at the emergency call centre asks you to.
Children and pets
• Keep the mobile phone, chargers and accessories out of the reach of children and pets. Children and/or
pets can swallow the small parts, posing a risk of suffocation and other hazards. A child may only use the
mobile phone under the supervision of an adult.
Playing games
• Playing games on the mobile phone for long periods may mean assuming an unhealthy body posture.
Take a 15 minute break every hour. Stop immediately if you feel unwell during game play. Consult a doctor
straight away if your condition persists.
Aeroplanes, vehicles and road safety
• Switch off your mobile phone in aeroplanes.
Please observe applicable restrictions and regulations. Wireless devices can interfere with the function of
aeronautical equipment. Follow the instructions issued by flight personnel when using your mobile
phone.
• The absolute priority for every vehicle driver and everyone in a vehicle is safety on the roads and for road
users.
Using a mobile phone whilst driving can be distracting and therefore lead to dangerous situations. You
can also be violating applicable laws.
7
Page 8

Safety precautions
SIM card, memory card and data connector cable
• Do no t remov e the c ard fro m the m obile p hone w hilst data is being sent o r recei ved as t his pr esents a risk
of data loss and damage to the mobile phone or memory card.
• Charges might apply when establishing Internet connections via the SIM card.
Defective devices
• The installation and repair of products are the sole preserves of qualified maintenance personnel.
• Dispose of faulty devices carefully or have them repaired by our Customer Service team. These devices
could interfere with other wireless services.
• Careless handling of the mobile phone, such as dropping it, can shatter the display and damage the elec-
tronic circuitry and sensitive parts inside.
• Do not use the device if the display is cracked or shattered. Fragments of glass or plastic can injure hands
and face.
• In the event of malfunction of your mobile phone, batter y or accessories, please contact a Gigaset Service
Centre for an inspection.
Other important information
• Never point the flash light directly at the eyes of people or animals. Pointing a flash light too near to human
eyes poses a risk of temporary loss of eyesight or impairment of vision.
• The dev ice c an h eat up w hen r unn ing powe r-i nten siv e ap ps o r pro gra ms fo r lo nge r per iod s. T his i s no rma l
and has no bearing on the performance of the device.
• When the device warms up, please put it aside for a while and stop the program you were running. Coming
into contact with a hot device can cause minor skin irritations such as redness.
• Do not apply lacquer to the mobile phone. Lacquer and paint can damage the parts of the mobile phone
and may cause malfunction.
8
Page 9
Getting started
SIM 2SIM 1 SDSIM 1
or
Getting started
Contents of the package
• A Gigaset GS270 smartphone
• A battery
• A charger cable with power adapter
Getting started
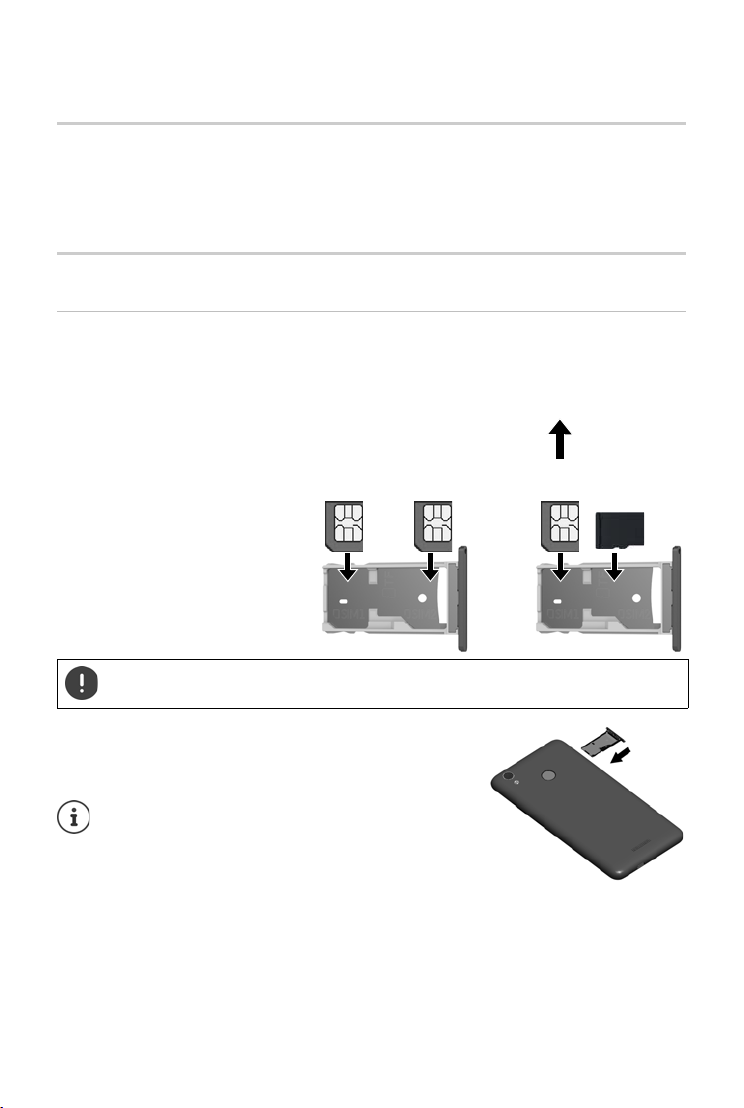
Inserting SIM and SD cards
You can insert two nano SIM cards or one nano SIM card and one micro SD card in the smartphone.
¤ Open the SIM/SD card slot. To do this, poke a pointed
implement into the small opening on the SIM/SD card slot
and press.
¤ Pull out the card slot.
¤ Place the nano SIM card(s) / micro
SD card in the card slot.
Do not exert any force when inserting the SIM or the memory card because doing so
t damage the card slot.
migh
¤ Replace the SIM/SD card slot and push down until it clicks
into place .
The device detects SD cards with a storage capacity of 32 GB. Higher capacity cards (to 128 GB) can
b
e u sed i f for mat ted o n th e GS2 70 ( not f rom a PC) .
9
Page 10

Getting started
Charging the battery
¤ Plug the Micro-USB connector of the charger cable
provided into the Micro-USB socket of the smartphone
¤ Connect the power adapter to the USB connector of the
charger cable and connect it to the power source.
The device is charged once the charge icon in the Status
bar is filled completely.
So your phone does not discharge during set-up, keeping it connected to the power
ecommended until set-up is complete.
is r
Switching on the device
¤ Press and hold the On/Off button.
When you are requested to unlock the SIM card,
¤ use the keypad to enter the PIN of the SIM card
When switching on the device for the fi
initial configuration.
rst time, a wizard starts which guides you through the
Wizard for configuring the device
When you switch on your phone for the first time, you are automatically guided through the
most important configuration steps.
< Back: Check and change as required settings already configured.
Next > Apply the setting on the screen and jump to the next screen.
Skip Configure the setting later.
Selecting the language
The set language is displayed.
¤ Select another language as required tap
10
Page 11
Getting started
Inserting SIM cards
This screen is only shown when no SIM card is inserted:
¤ Insert card now ( p. 9)
Insert SIM card later: Sk
Establishing a WLAN connection
Wireless networks (WLANs) in range are displayed.
ip
¤ Tap the required WLAN Enter the WLAN password Connect . . . A connection to the
selected WLAN is established
Setting up a Google account
Logging in to the existing Google account
¤ Enter the email address and password of your Google account.
or
Creating a new account
¤ Enter the email address and password for a new Google account.
Entering a name
You can enter a name to personalise apps.
¤ Enter First name and as required Surname using the keypad Next
Setting up email
Gmail is set up once you log in to your Google account.
This is where you can set up email addresses for other mail accounts
in the Gmail app.
. The mails are also displayed
¤ Select provider Enter access details Next
If you do not want to set up any more email accounts: Not no
w
11
Page 12

Getting started
Setting up protection for the phone
Protect your smartphone from unauthorised use.
Fingerprint
¤ Add fingerprint Next . . . A wizard opens to guide you through the necessary steps.
Additional information p. 27
or
PIN, pattern or password
¤ Configure PIN, pattern or password Next Select Pattern | PIN | Password Next
Specify whether the selected protection applies also for starting the device
¤ Enter pattern, PIN or password Next Repeat Confirm
Settings for notifications
¤ Select how notifications are displayed when the phone is locked Next
Using Google services
Various services are displayed.
¤ Use the switch to enable/disable the service you want to use Next
Performing this step also means you accept the conditions of use and data protection
declaration of Google.
Settings for the start screen
The start screen is displayed. You can specify various settings for the start screen.
¤ Touch and hold the wallpaper on the start screen
Changing the wallpaper:
¤ Wallpapers . . . Images saved on the device are displayed Select the wallpaper Tap
Choose wallpaper from
Making widgets available on the start screen:
¤ Widgets . . . The available widgets are displayed Touch and hold the required widget . . .
The start screen is displayed Position the widget and release it at the r
equired position
Your smartphone is now ready to use.
12
Page 13
Getting to know your device
Using the device
Getting to know your device
Switching the device on and off
Switching on
¤ Press and hold the On/Off button Unlock the display if required (if a display lock is set up
to protect against unauthorised starting) . . . The device is started
Display lock: p. 53
Unlocking the SIM card
¤ Enter the PIN for the SIM card OK
Removing notifications (if available)
Clear notification:
Deal with notification later:
Notifications p. 20
When a display lock is set up to protect against unauthorised use
¤ Unlock the display . . . The start screen is displayed
Display lock: p. 53
Switching off
¤ Press and hold the On/Off button Tap Power off OK
¤ Swipe to the left or right
¤ Swipe upwards to the Notifications bar
You can also switch the smartphone to Ae
wireless functions, the other device functions remain available.
Switching on and off at certain times
Automatically switch the smartphone on and off at certain times.
roplane mode. This only disables the
¤ Settings System – Schedule power on & off Enable/disable the functions
with the switches Tap the time currently set for switching on and off . . .
Set the time at which you want to switch the device on or off:
¤ Time Set the time OK
Select the days on which the schedule is to apply:
¤ Repeat Select the days OK
Save the setting: Done
Before you can use the device after autom
SIM card and the display.
13
12:32
atic switch-on, you must unlock the
Page 14

Getting to know your device
Switching the device to and ending idle mode
Switching the device to idle mode
¤ Briefly press the On/Off button
If the device is not used for a defined time,
Setting the period of inactivity for transitioning to idle mode
it automatically switches to idle mode.
¤ Settings Device – Display Sleep Select period
Ending idle mode
¤ Briefly press the On/Off button Remove any notifications as required Unlock the display
Some apps can be accessed directly from idle mode with a fingerprint ( p. 27) or
code ( p. 23).
Using the touchscreen
Movements and gestures for using the touchscreen:
Tapping
¤ Briefly touch the screen with your finger
Examples:
Start an app, and select function or setting: tap the element
Enter text: Tap a text field . . . A keypad is shown
Touching and holding
¤ Keep your finger on an element until it responds.
Dragging and releasing
¤ Touch and hold the element Move your finger across the screen to the place required
Release the element
Example: Moving apps on the start screen
Swiping or dragging
¤ Move your finger quickly across the screen without stopping
Example: Switching between the start screens
Double tapping
¤ Tap the screen twice quickly in succession.
Example: Zooming. Only possible for special screens (such as websites or maps).
Zoom in:
Zoom back out:
¤ Tap twice quickly in succession
¤ Tap twice again
14
Page 15
Getting to know your device
Spreading apart / pinching together your fingers
¤ Place two or more fingers on the screen at the same time
Zoom in:
Zoom out:
Example: Scaling screen content. Only possible for special screens (such as Google Maps and
Chr
ome).
¤ Spread your fingers apart
¤ Pinch your fingers together
Start screen
A start screen is displayed when you switch on or unlock the
device, and no app is open.
Elements on the start screen p. 4
You can create several start screens and configure them as you
wish - t
o be able to quickly access favourite apps and content
( p. 18).
Returning to the start screen from any user situation
¤ Tap the Navigation button . . . The start screen which
was open last time is displayed
Switching between start screens
¤ Swipe left or right to the required start screen.
Browse smartphone and Internet
At the top of every start screen is Google search, enabling you to search on your smartphone and
browse the Internet.
Entering a search term
¤ Tap the Sea rch bar Enter a search term using the keypad
Search using voice entry
¤ Tap the Microphone icon Speak your search term into the microphone
Additional information
15
Google Help
Page 16

Getting to know your device
Switching between start screens and apps
At the bottom of every screen are three Navigation buttons:
Opens the screen last viewed, even if it belongs to another app. You can go back several
imes (only as far as the start screen).
t
Opens the start screen which was open last time.
Opens an overview of the apps and browser tabs used last time.
Open an app:
Close an app:
When the Navigation buttons are not shown: Tap the bottom of the screen
¤ Tap it
¤ Swipe the app left or right
Quick settings
The quick settings enable you to access frequently used settings from all user situations, such as
screen lighting, WLAN, Bluetooth and similar settings.
Opening the quick settings
¤ From the Status bar, swipe down . . . The most important quick settings are displayed
¤ Swipe down again, or tap in the top right . . . More quick settings are displayed Swipe
left/right to display all the quick settings
Icons of the quick settings p.
79
Enabling and disabling a function
¤ Tap the setting . . . Settings are white when enabled and not shown when disabled
Changing a setting
Settings for which there are more options (e.g. WLAN or Bluetooth) have a small arrow next to
the name.
¤ Tap the name under the icon Change the setting as required
Editing quick settings
You can make available more quick settings, remove any not used and rearrange the icons.
¤ Tap Edit . . . Quick settings not being used are shown at the bottom Touch and keep your
finger on the icon, and drag it to the required position
Finish editing: Tap in the top left
Restore to default settings: Tap Rese
16
t
Page 17
Getting to know your device
Setting vibration and ringtone with the On/Off button
¤ Press and hold the On/Off button
Enable ringtone Enable vibration
Disable ringtone
The currently selected setting is underlined.
¤ Tap the setting you want to enable
Writing and editing text
Use the Google keypad to write text.
Opening the keypad
¤ Tap a place where text can be entered
You can enter letters, digits and special characters.
Switching between entry of letters and digits / special
c
haracters: Tap
Adding text
Entering letters and symbols:
Entering uppercase letters:
Enabling/disabling Caps Lock:
Showing umlauts:
Whilst text is being entered, suggestions from the keypad dictionary are shown above the
keypad.
Using a suggestion:
¤ Tap a key
¤ Tap the shift key ( )
¤ Double tap the shift key ( )
¤ Touch and hold the key
¤ Tap the word . . . The word is included and a space is
inserted automatically
Editing text
Positioning the cursor:
Moving the cursor:
Selecting text:
Deleting a character:
Cutting and copying text:
Pasting text:
17
¤ Tap the place in the text where you want to position
the cursor
¤ Swipe left or right on the text
¤ Touch and hold a word Select more or less text
with tabs on both sides
¤ Touch and hold the backspace key
¤ Touch and hold the text Tap Cut or Copy
¤ Touch and hold the cursor Tap Paste
Page 18
Configuring the start screens
Changing the keypad settings
You can change various keypad settings, such as the language for the keypad assignment, the
response to keypresses and the keypad design.
¤ Settings Personal – Languages& input Virtual keyboard Android key-
board
Setting voice entry
If an app permits it, you can also enter text by speaking into the microphone. The function is
enabled by default.
Enable/disable voice input:
¤ Settings Personal – Languages& input Virtual keyboard Manage
keyboards Enable/disable G
Voice input settings:
oogle Voice input with the switch
¤ Settings Personal – Languages& input Virtual keyboard Google Voice
input
Configuring the start screens
You can create several start screens and configure them as you wish - to be able to quickly access
favourite apps and content.
Tailoring the Favourites bar
At the bottom of every start screen is the Favourites bar, from which you are able to quickly
access the apps you use most frequently.
Opening the menu with all the apps: Tap the icon in the middle
The apps in the App menu are in alphabetical order.
Scrolling through the list: Swipe up or down
Removing apps from the Favourites bar
¤ Touch and hold an app in the Favourites bar
¤ Drag the app to the Remove button at the top of the screen and release your finger
or
¤ Drag it to somewhere else on the screen and release your finger
Adding an app
¤ Select the required app Touch and hold the app . . . The start screen is shown in the
background Drag the app to a free space in the Favourites bar and release your finger.
18
Page 19
Configuring the start screens
Changing the wallpaper
¤ Touch and hold the wallpaper Tap Wallpapers Select an image from the predefined
backgrounds or your own photo from My p
More wallpaper images can be downloaded from Google Play.
Adding an app to a start screen
hotos Tap Set wallpaper
¤ Open the App menu Look for the required app Touch and hold the app . . . Drag
the app to a free space in a start screen and release your finger
Adding a widget to a start screen
Widgets are components that are specifically intended to be displayed on a start screen,
e.g. a clock, a calendar extract for the current day, an important entry from the contact list or a
dir
ect dial.
¤ Touch and hold a free space on a start screen Tap Widgets
¤ Touch and hold the required widget . . . Images for the start screen are shown in the
background Drag the widget to a free place on a start screen and release your finger
The sizes of some widgets can be changed:
¤ Touch and hold a widget Release your finger . . . If the size of the widget can be changed,
you see a dotted frame on the edges Change the size of the widget by dragging the dots
Once the correct size is set: Tap anywhere outside the widget
Moving apps and widgets
¤ Touch and hold an app or widget on a start screen Drag the app or widget to the required
position and release your finger, or
release your finger
drag it to the left or right to another start screen and
Creating folders for apps
¤ Touch and hold an app on a start screen Drag the app icon over another app icon
Adding apps:
¤ Touch and hold an app Drag it to the folder
Renaming a folder:
¤ Open the folder Tap th e name . . . The keypad opens Delete the old name Enter
the new name
Removing an app or widget
¤ Touch and hold an app or widget on a start screen Drag it up to option Remove and
release your finger
19
Page 20
Notifications
Adding, rearranging and removing start screens
The number of start screens set up is shown by dots above the Favourites. The bigger dot
indicates the position of the current start screen.
Adding start screens
¤ Touch and hold an app Drag the app all the way to the right until a blank start
screen is shown Release your finger . . . A new start screen is created and the app is placed
on it
Rearranging start screens
¤ Touch and hold a free space on a start screen . . . Images for the start screens are displayed in
the background Touch and hold an image for a start screen Drag it to th e left or right to
the required position and release your finger
Removing a start screen
¤ Remove all apps and widgets from a start screen (by deleting them or moving them to
another start screen) . . . When the last app or widget has been removed, the start screen is
ed
delet
Notifications
Notifications inform you about various events, such as the arrival of a new voice message or
email, appointments or wake-up calls.
Notifications are displayed as follows:
• In the Notifications bar: Swipe over the screen from the top down
An icon in the Notifications bar denot
• On the lock screen: when the phone starts and when returning from idle mode
• At the top of the screen whilst you are doing something else on your phone, such as reading
an email or watching a video
Changing the settings for d
Flashing of the Message LED also indicates the following events:
isplaying notifications: p. 21
• New email
• New message (SMS/MMS)
• Missed call
• Appointment notification
• Alarm
es which notifications are available ( p. 79).
20
Page 21
Notifications
Dealing with notifications
Viewing and responding to notifications
¤ Tap the notification . . . The contents of the message are displayed in the associated app. If
there are several possible apps, you can select one.
Which information is displayed and which actions are
triggers a notification.
Some apps allow actions to respond to a notification. You can for example reply directly to a
, switch off a wake-up call or show on the map the meeting place for an appointment.
mail
Changing the display options of the app for notifications: p. 22
possible depend on the app which
Deleting and resetting notifications
Deleting a notification:
¤ Swipe the notification to the left or right
Deleting all notifications on the Notifications screen:
¤ Scroll down to the end of the notifications Clear all
Resetting a notification on the lock screen or at the top of the screen to read it later:
¤ Swipe the notification up
Settings for notifications
Changing the default notification sound
¤ Settings Device – Sound Default notification ringtone Select notification
sound OK
No notification sound: Select None (first entry in the list)
• If you do not wish to be disturbed, you can mute your device. No notification
sound is then played.
Use the “Do not disturb” function to mute your device p. 29
• In some apps, sound and vibration settings for notifications can be set directly in
the app from the Settings menu.
• If the volume for the ringtone is reduced down to Vibration mode ( p. 47), the
device vibrates for notifications instead of playing a sound. The smartphone
continues to vibrate for notifications for which Vibration mode is already selected.
21
Page 22
Apps
Changing the settings for app notifications
Specify how and when notifications for an app are displayed
¤ Settings Device – Apps . . . All apps are displayed Select app
Notifications Enable/disable the required option with the switch
Check the settings for all apps
¤ Settings Device – Notifications . . . All apps are displayed
Filter the display by notification settings:
¤ Tap next to All apps Tap one of the settings (e. g. Blocked or 'Do not disturb' turned
on. . . . Only the apps for which this setting applies are shown
Notifications on the lock screen
The following settings are available for the lock screen:
• Don't show notifications at all
• Show all notification content
• Hide sensitive notification content
You can configure these settings differently for individu
for all apps.
Default setting for all apps:
al apps or use them as default settings
¤ Settings Device – Notifications Tap On the lock screen Select the
required option
App-specific setting:
¤ Settings Device – Apps . . . All apps are displayed Select an app
Notifications On the
lock screen Select the required option
Apps
The apps available on the device are stored in the App menu. The device is supplied with a
number of default apps. Additional apps from your mobile operator are installed as soon as you
insert a SIM card.
You can download and install more apps, or disable and uninstall existing apps.
You can place frequently used apps directly on a start screen ( p. 19), and the four
most important apps in the Favourites bar ( p. 18).
22
Page 23
Apps
Opening and exiting apps
Opening an app from the App menu
The start screen is open. If not: Ta p
¤ Tap . . . All apps are displayed (sorted alphabetically) Tap the app you want to open
Quick access to apps
If the device is in idle mode, you can open an app using the letter code.
Smart Features and the letter code for the app are enabled.
Enabling/disabling Smart Features
¤ Settings Users – Smar t Gestures Gesture functions Enable/disable Smart
Gestures with the switch
Enabling/disabling letter codes
¤ Settings Users – Smart Gestures Gesture functions Enable/disable the
switch next to the required letter code
The following letters are available as codes: c, e, w, o, m, s, z and v. Some letters are already
assi
gned to apps. The apps assigned are within square brackets. You can change this default
assignment. For codes not assigned by default, there is nothing within the brackets.
Assigning an app
¤ Tap the entry for the required code . . . The list of available apps is displayed Select the app
you want
Opening an app with the help of code
¤ With the device in idle mode, write a big letter for the app code on the display If the display
is locked, unlock it . . . The app opens
Switching between apps
¤ Tap in the Navigation bar . . . Recently used apps are displayed Tap the app you want
to open
Navigation bar: p. 16
23
Page 24
Apps
Ending/exiting apps
Exiting an app
¤ Tap in the Navigation bar . . . The start screen is displayed. The app stays open and is
included in the app overview.
Ending an app
¤ Tap in the Navigation bar . . . The app overview is displayed Swipe an app left or right
. . . The app is ended
Ending all the apps: Scroll all the way up Clear all
Installing/uninstalling apps
Installing new apps
Downloading apps from Google Play:
¤ Play Store . . . The Google Play Store is opened Look for the app you want
Open the app screen Install
Uninstalling or disabling apps
You can delete apps you no longer need from the device.
You can uninstall apps you have downloaded. They a
Apps preinstalled on the device (system apps) can be disabled but not completely removed.
Disabled apps are not show on the device.
re completely removed from the device.
Disabling a system app can cause problems with other apps.
¤ Settings Device – Apps Select an app you want to uninstall Uninstall /
Disable
or (for apps which can be uninstalled)
¤ Touch and hold the app you want to uninstall Drag it to Uninstall and release your
finger
Show system apps and processes:
¤ Settings Device – Apps Tap Show system
24
Page 25
Preinstalled default Google apps
The smartphone makes available many of the default apps from Google, including:
Search Browse Internet and search smartphone
Chrome Browser for surfing on the Internet
Gmail Receive, write and send emails
Apps
Maps Look for and find out about places in al
You Tu be Play YouTube videos and playlists
Drive Store data centrally
Play Music Listen to the radio
Play Movies & TV Watch films and series
Hangouts Communicate with friends with voice calls, messages and videos
Photos Save and manage photos centrally
Video calls Make calls with video view
Play Store Download apps
More information on Google apps Google Help
l corners of the globe
Using two apps at the same time
Split screen mode enables you to display two apps next to or above each other on the screen,
and to work with both apps in parallel.
Both apps support the function.
Starting Split screen mode
Selecting the first app
¤ Open the first app from a start screen or the App menu Tap in the Navigation bar
Touch and hold the title line of the app D rag u p (o r to t he si de i f you are h old ing t he d evic e
horizontally) and release . . . The app is shown at the top (or on the side) at half its size.
The icon is now displayed in the Navigation bar.
Selecting the second app
¤ Tap . . . The start screen is opened Open the second app from a start screen or the App
menu . . . The app is loaded into the second screen area
or
¤ In the list of recently used apps in the second screen area, tap the title of the second app . . .
The app is loaded into the second screen area
25
Page 26
Apps
Changing the second app
¤ Tap Select a different app from a start screen or the App menu
or
¤ Tap Tap the title of a different app
Ending Split screen mode
¤ Touch and hold the icon
or
¤ Drag the black bar between the two apps all the way up/down or left/right . . . The second
app is ended and the device returns to Default mode
Protection from harmful apps
Downloading apps from sources other than Google Play
If you want to download apps from sources other than Google Play, you must permit it explicitly.
Apps from unknown sources can represent a security risk for your smartphone.
A download can corrupt your smartphone, and personal details c
go missing.
an be misused or
¤ Settings Users – Security Enable the Unknown sources switch . . . You can
now install apps from other sources
Enabling Verify apps
When the function is enabled, your device verifies apps when being installed, and regularly
searches the device for potentially harmful apps.
¤ Settings Users – Google Security Verif y ap ps – Enable the Scan device for
security threats switch
The following actions are possible when you install an app which is not from Google Play:
• Recommendation not to install the app.
• Installation of the app is blocked when there is a threat to the security of the device.
• Information on the app’s identification is sent to Google, such as protocol information,
URLs connected to the app, the device ID, its operating system version and the IP address.
Apps installed on the device are checked regularly. If a potential harmful app is detected, the
ap
p check can take the following actions:
• Recommend that you uninstall the app immediately.
• Remove an app which is known to be insecure.
26
Page 27

Improving the detection of harmful apps
Downloads
The Scan de
If the function is enabled, Google also receives anonymous information on all apps installed
which are not from the Google Play Store. This helps Google to provide better protection for
users against harmful apps.
vice for security threats function is enabled.
¤ Settings Users – Google Security Verify ap ps Enable the Improve
harmful app detection switch
This option might not work for all apps beca
function to prevent their apps being subjected to verification.
use developers are able to disable this
Downloads
You can download files from websites onto your device. Downloaded files are stored mainly in
the Downloads app.
Content such as music, TV programs and books are generally not stored in
Do
wnloads but in the app with which the download was performed.
Working with downloaded files
¤ Downloads
Sorting entries:
Opening a file:
Deleting a file:
Sharing a file:
¤ Tap Select sort criterion
¤ Tap the file
¤ Touch and hold the file Tap
¤ Touch and hold the file Tap
Fingerprint sensor
The device has a fingerprint sensor. It enables for example the device to be unlocked using a
fingerprint, purchases to be authorised, you to register with certain apps and opening of a
contact quickly from idle mode.
Setting up the fingerprint
¤ Settings Users – Fingerprint Fingerprint Manager . . . A wizard opens which
guides you through the necessary steps Next
When a display lock is set up: Enter the pattern, PIN or password
If a display lock is not yet set up: Set u
27
p screen lock ( p. 53)
Page 28

Fingerprint sensor
Pattern, PIN and password are alternatives to the fingerprint.
The alternative method must be used in the following cases:
• The fingerprint is not recognised after several attempts
• For editing fingerprint settings
• When it has been more than 48 hours since the alternative method was used for
unlocking
Scanning a fingerprint
¤ Place your finger onto the sensor on the back of the device. Hold the device as you will also
hold it later for unlocking. Ne
xt
¤ Keep tapping the sensor until the Finge rprint ad ded! message is shown. Keep changing the
position of your finger.
Ending the scan: Done
Add more fingerprints Ad
You can add up to five fingerprints. They are saved as Finger 1 to Finger 5.
Note that all those who add their fingerprints ar
authorise purchases with your account.
Fingerprints are stored securely and never outside the device.
d another
e able to unlock the phone and
Changing a fingerprint name
Assign a suitable name for the fingerprint, e.g. “Index finger left”.
¤ Settings Users – Fin gerprint Fingerprint Manager Use the alternative
method for unlocking (pattern, PIN or password) Touch and hold the name Enter
the new name in the text field (max. 15 characters) OK
Quick start of functions
Select the functions to be started with prolonged pressing on the fingerprint sensor. Possible
functions: Open the camera, take a photo from the viewfinder screen of the camera, accept a call
and cancel a wake-up call.
¤ Settings Users – Fin gerprint Enable/disable required function with switch
The settings apply for all registered fingerprints.
Using a fingerprint
If an action can be authorised with a fingerprint, the icon or alternative pattern is displayed,
for example when a display lock with fingerprint is set up or an app is locked.
¤ Tap the fingerprint sensor with a finger which has been scanned Repeat the process as
required
The alternative method is enabled automatically if the fingerprint is n
attempts.
28
ot recognised after several
Page 29

“Do not disturb”
“Do not disturb”
The “Do not disturb” function mutes the device. It does not ring or vibrate. It prevents for
example the phone ringing at night and during meetings, and all interruptions apart from a
wake-up call. You can choose between three modes:
Total silence (total silenc
No ringtones, no vibrating, no audible signalling
for music, videos, games or other media.
Alarms only
Signalising of wake-up calls, also the sound f
turned on.
Priority only
Signalising of important notifications, also the sound
media is turned on.
Important notifications are messages from apps with setting Tr
Further events can be defined as important interruptions, such as calls from certain people.
e)
of wake-up calls or notifications, no sound
or music, videos, games or other media is
for music, videos, games or other
eat as priority ( p. 22).
“Do not disturb” can also be enabled automatically in
Defining the rules: p. 48
line with defined rules.
Enabling “Do not disturb”
¤ From the Status bar, swipe down . . . . . . The quick settings are displayed Tap Do not
disturb
¤ Select the required mode (Total silence / Alarms only / Priority onl y) Specify how long the
setting is to apply (Unt
Done . . . The following icon is displayed in the Status bar:
Total silence: / Ala
You can also set the Ala
il you turn this off or use +/– to choose a time period in hours)
rms only, Priority only:
rms only mode as follows:
¤ With the display enabled, keep the Quiet button on the right of the device pressed
until the volume has reached the lowest setting Press the Quiet button again
. . . The Ala
rms only mode is enabled
Disabling “Do not disturb”
¤ From the Status bar, swipe down using two fingers . . . The quick settings are displayed Tap
the or icon . . . All signals are turned on again and the icon is displayed
or
¤ Press the Quiet button on the right of the device Tap End now Set the volume as
required
Disabling “Do not disturb” for certain apps
¤ Settings Device – Notifications . . . All apps are displayed Select the app
Enable the switch next to O
permitted in mode Priority only
verride Do Not Disturb . . . Notifications for this app are
29
Page 30

Additional functions
Specifying important interruptions
Specify events which are to be signalled acoustically in the Priority only mode.
¤ From the Status bar, swipe down . . . . . . The quick settings are displayed Tap Do not
disturb M
Reminders, Eve
Messages and calls are not signalled acoustically by default (setting Non
setting:
ore settings Priority only allows Enable/disable events for Alarms,
nts and Repeat callers with the switch
e). To change the
¤ Tap Messages / Calls Select the required option (From anyone, From contacts only,
From starred contacts only)
Selected contacts are denoted as favourites in the contact list ( p. 41).
Additional functions
Setting up multiple users
You can enable the device for more users. All users receive a separate area they can set up
themselves, such as own start screen, apps, accounts and contacts. Different user icon colours
denote different users.
Setting up users
¤ Settings Device – Personal . . . All available users are displayed Add user
OK
or from the quick settings:
¤ Swipe down the toolbar using two fingers Tap . . . All available users are displayed
The Setup Wizard is opened.
¤ Configure user-specific settings with the Wizard.
dd user OK
A
Switching user
¤ Swipe down the toolbar using two fingers Ta p . . . All available users are displayed
Tap the required user . . . The settings for the selected user are loaded
It is only possible to set up new users f
The updating of apps is possible and applicable for all users.
rom the Settings menu of the main user.
Creating screenshots
Take a screenshot of the smartphone as an image, and edit, share and send it.
Taking a screenshot
¤ Open the screen for which you want to create a screenshot.
¤ Press the On/Off and Volume buttons at the bottom at the same time.
30
Page 31

Additional functions
or
¤ Use three fingers to swipe over the screen from the top down or bottom up
The 3 touch points function is enabled.
¤ Settings Users – Smart features Gestures Enable the switch
next to 3 touch points
The screen content is stored in the internal memory of the device. The icon is displayed in
the Notifications bar.
Viewing a screenshot
¤ Swipe the Notifications bar down Tap notification Screenshot captured. . . . The
screenshot is displayed
If more than one app is available for editing images, such as Ph
desired app
Screenshots can be edited with app resources.
For more detailed information on the app Photos
otos and Gallery: Select the
Google Help
Sending files between a computer and the smartphone
Use a USB cable to send photos, music, ringtones and other files between a computer and the
smartphone.
A computer detects the device connected v
ia USB. It is linked in as a drive.
Connecting the USB cable
¤ Use the USB cable provided to connect the phone to
a computer . . . The icon is displayed in the
Notifications bar.
Transferring files
For data interchange with a Mac: Android File T
computer.
ransfer is installed and started on the
¤ Swipe the Notifications bar down Tap the USB notification Select Trans fer f iles
Windows: A
Use drag-and-drop to move files as for other external drives
Mac: Th
move the files
31
utomatic drive detection is opened on the computer Open Windows Explorer
e Android File Transfer window is opened on the computer Use Drag-and-Drop to
Page 32

Additional functions
Managing music
Use the Music Manager to upload music from the computer to the Google Play media library.
For information on managing music with Google Play Music:
Google Help
Printing
Apps with a print function enable you to print from your device.
A printer is available which is able to receive data over a WLAN connection or
mobile network.
Printing via apps
The procedure for printing depends on the used app.
¤ Open the menu from icon or Ta p Printing
Printing the screen content: Take a screenshot ( p. 30) and then print it.
Adding, enabling and disabling printers
¤ Settings System – Printing
Adding the print service:
¤ Add service Select the print service Install
Enabling/disabling the print service:
¤ Select the print service Enable/disable it with the On/Off switch
32
Page 33

Making calls
Communication
Making calls
To make calls, use the Phone app. It is in the Favourites bar on the start screen by default
( p. 18).
Making a call
¤ Phone . . .
Enter the number
¤ Tap . . . The dialpad is shown Type in the phone number Tap
Whilst a number is being entered, contacts with a potential matching phone number
are displayed. If there are no matching entries, you can add the entered number to
the contact list.
Using a phone number from a contact
¤ Tap . . . The contact list opens Select an entry . . . All phone numbers stored for the
contact are shown Tap the required phone number
p. 38
Using a phone number of a favourite contact
¤ Tap . . . The Favourites list opens Tap the required contact . . . The main phone number
of the contact is selected
p. 41
Using a phone number from the call log
¤ Tap . . . The call log opens Tap the required phone number
p. 37
Dialling a number with fast access
The number is set up as a fast access number ( p. 36)
¤ Tap touch and hold the fast access key (2-9) to which the number is assigned.
Ending a call
¤ Tap
C
alls can also be initiated from some other apps or widgets, such as from the
Contacts app.
33
Page 34

Making calls
Incoming calls
With an incoming call, the phone number of the caller is displayed, if available. Information on
the contact or the Caller ID is also displayed.
Accepting a call
Display lock enabled:
No display lock:
cting a call
Reje
Display lock enabled:
No display lock:
Rejecting a call and sending an SMS to the caller
¤ Touch the white circle and drag it to the right to the green circle
¤ Tap Answer
¤ Touch the white circle and drag it to the left to the red circle
¤ Tap Dismiss
¤ Touch the white circle and swipe it upwards to the message icon Select a predefined
quick response or write your own message OK . . . The caller receives a message with the
selected text
Changing predefined messages p. 36
If your mobile network operator has set up a mailbox for you, callers whose calls have
been rejected by you can leave a message.
If you accept a call whilst talking to somebody else, the current call is put on hold.
Options during a call
Showing the dialpad during a call
¤ Tap
Switching between headset, speaker and connected Bluetooth headset
¤ Tap
Muting and switching back on the microphone
¤ Tap /
Interrupting and continuing a call
¤ Tap
Recording a call
¤ Tap Start recording . . . A red dot under the Options bar flashes during the recording
End recording: ST
OP RECORDING
Tell the person you are talking to that the call is being recorded.
Listening to a recorded call:
¤ File Manager Internal storage PhoneRecord Tap the required sound file
The date and time of the recording are part of the name of the sound file.
34
Page 35

Making calls
Consultation, call swapping
¤ Tap Add call Enter the number for a second person or select this person from the
contacts Tap . . . The call is initiated. The first call is put on hold.
The current call with phone number is shown at the bottom of the screen, and the call on hold
as On hold.
Switching between calls (call swapping):
¤ Tap On hold . . . The call on hold becomes the active call
Merging two calls into a conference call
One call active, one call on hold.
¤ Tap Merge calls . . . The calls are merged
Ending a conference call: Tap Manage conference . . . The phone numbers of those
taking part are displayed Tap next to the number to no longer take part in the conference
call
Making calls over WLAN
Make calls over WLAN and the Internet instead of the mobile network.
Your mobile network operator supports calls over WLAN and/or using SIP telephony.
Additional charges may apply. Contact your mobile network operator for more
information.
Using a WLAN call function of a mobile network operator:
¤ Phone Tap Settings Calls Enable/disable the Wi-Fi Calling option with
the switch
If this option is not available, the function is not supported by your mobile network
operator.
To make calls over WLAN, use the VoIP service from the mobile network operator (SIP):
¤ Phone Tap Settings Calling accounts Use SIP calling
You may need to provide more details on the SIP account
35
Page 36

Making calls
Call settings
Display of caller name in the call log and contact list of the Phone app
¤ Phone Tap . Settings Display options . . .
Specify how calls are sorted:
¤ Sort by select First name or Surname
Specify how the names of contacts are displayed:
¤ Name format select First name first or Surname first
Setting tones and vibration
¤ Phone Tap Settings Sounds and vibration . . .
Changing the ringtone: Phone ringtone Select ringtone OK
Vibrate for incoming calls: Enable option Als
Tones when tapping the dialpad: Enable option Di
Other settings for sounds via the app Settings p. 47
o vibrate for calls
alpad tones
Setting up fast access
You can assign a phone number to a key between 2-9 which will be dialled immediately when
you touch and hold the key ( p. 33).
¤ Phone Tap Speed dial . . . an entry is displayed for each key (1-9). The Mailbox
is assigned to key 1.
¤ Tap on the entry for the key to be used for fast access.
¤ Tap on the entry field enter the number Add
or
¤ Tap Select the number from the Contact List
Editing quick SMS responses
If you do not want to accept a call, you can send a predefined SMS instead ( p. 34).
Editing automatically sent SMS text:
¤ Phone Tap Settings Quick responses . . . Four predefined messages are
listed Tap a reply Edit the reply OK
Blocking incoming numbers
Protect yourself against unwanted calls and texts.
¤ Phone Tap Settings Call blocking . . . Blocked numbers are listed
36
Page 37

Making calls
Add a number:
¤ Add number Enter the number BLOCK
Enable the number again:
¤ Tap next to the number UNBLOCK
Using TTY for calls
In TTY mode (Telephone Typewriter), those with speech and hearing impediments can
communicate by entering text on a smartphone.
The smartphone is connected to a special teletypewriter or other TTY service
via USB.
Enabling TTY mode:
¤ Phone Ta p Settings Accessibility TTY mode Select the mode required
TTY (full mode) See the call as text and hear it as audio.
TTY HCO Hear what the other person is saying, reply by entering text
TTY VCO See as text what the other person is saying, reply by speaking
Network-dependent settings
You can, depending on your mobile network operator, use additional network services such as
a mailbox, Call divert and Call waiting. You can set up, and enable and disable as required, these
services from the Settings menu in the Phone app.
¤ Phone Tap Settings Calling accounts Tap the SIM card of the operator
whose network services you want to edit
Call log
The call log shows all outgoing, accepted and missed calls.
Showing the call log
¤ Phone Tap . . . The calls are listed with phone number, place and date. Arrow icons
show the types of calls:
Missed call
Accepted call
Outgoing call
Showing call details
¤ Tap call Call details . . . Information on the call is displayed, such as time and duration
37
Page 38

Contacts
Contacting the caller
¤ Phone Tap . . .
Calling:
Sending an SMS:
Adding a phone number to the contacts
¤ Tap next to the entry
¤ Tap the cal l Send message Enter a message Tap
¤ Phone Tap Tap the call Add to contact or Create a new contact
Deleting calls from the call log
¤ Phone Tap . . .
Deleting a call: Tap the call Call details Tap
Deleting more than one call:
¤ Tap Calls list Tap Delete . . . Checkboxes are shown next to the entries
Select the entries to delete Tap Confirm with OK
Deleting all entries:
¤ Tap Calls list Tap Clear call history Confirm with OK
Contacts
You can use the Contacts app to enter and organise all information on your contacts, such
as different numbers, address, mail address and much mor
app, access the information and make it available where it is needed.
e. Other apps, such as the Phone
Using contacts
If you require frequent access to the contacts, move the Contacts app to the start screen
( p. 18).
Viewing contacts
¤ Contacts . . . The contacts are listed in alphabetical order.
Only showing favourite and frequently used contacts: Tap Favo urit es
Specify how the contacts are sorted:
¤ Tap Settings Sort by Select First name or Surname
Specify how the names of contacts are displayed:
¤ Tap Settings Name format Select First name first or Surname first
38
Page 39

Contacts
Contacts can be stored at different places - lo cally on the smartphone, on the SIM card
or in the Cloud of an account.
Narrowing down the display of contacts to one source: Tap Contacts to
display Select the required display
Using a contact for communication
Calling a contact, sending an email or SMS to a contact.
¤ Contacts Scroll through the list and select the required contact Select an action . . .
Calling:
Sending an SMS:
Sending an email:
Grouping contacts
You can group contacts into contact groups . You can then for example send a group SMS or
a group email to the members of a group. Different
Friends.
¤ Tap the number or . . . The call is initiated
¤ Tap . . . Enter the text message Tap
¤ Tap the mail address or Write the email Tap
groups are predefined, such as Family and
¤ Contacts Tap Groups . . . Existing groups are listed
Creating a new group:
¤ Tap Select the account with which the group is to be synchronised Tap Group
name Enter the name Tap
Adding a contact to a group:
¤ Tap the group Tap Edit Tap . . . All contacts belonging to the account are
listed Tick the checkboxes next to the contacts to be assigned to the group OK
Tap
A contact can belong to more than one group.
Removing a contact from a group:
¤ Tap the group Tap Edit Tap next to the contact Tap
Deleting a contact group:
¤ Contacts Tap Groups Select group Tap Delete OK
Adding contacts
If you have set up a Google account, you can also set up and manage your contacts
from your computer. The contacts are automatically synchronised with the
smartphone.
39
Page 40

Contacts
Creating a contact
¤ Contacts Tap Enter name, phone number and other details for the
contact Tap
Importing/exporting contacts
Contacts can be exported from any location and be imported into a different location, e.g. the
contacts stored on the SIM card can be imported into your Google account, and the contacts of
the Google account can be stored as vCards in the device’s internal memory.
¤ Contacts Tap Import/Export Select the source for the export Next
Select the destination for the import Next . . . The contacts of the source directory are
displayed Select the contacts to export OK
Importing contacts from a VCF file:
¤ Use a USB cable to connect the device to a computer Copy the vCard or VCF file to the
device’s internal storage ( p. 31) Select Internal shared storage as the source for the
import
Editing contacts
Editing contact details
¤ Contacts Select the contact to edit Tap
¤ Tap the field you wish to edit Change the contents Tap
or
¤ Scroll down Tap More fields Fill in the required fields Tap
Editing the ME entry
The first entry in the contact list is called Me. This is where you define details about yourself. If
you have already entered a name for personalising your smartphone when getting started, this
name is assigned to the Me entry.
You can add more information to this name.
¤ From the Status bar, use two fingers to swipe down . . . The quick settings are displayed Tap
the profile icon of the ME entry More settings Select the profile Enter the
details OK
or
¤ Contacts Select the Me entry Tap Edit the contact Tap
40
Page 41

Contacts
Adding contacts to Favourites
Add people you contact frequently to your Favourites. Favourites are shown in a separate list
( p. 38).
¤ Contacts Select a contact Tap . . . The contact is listed in the All contacts list as
well as in Fav ouri tes
Creating a special ringtone for a contact
¤ Contacts Select a contact Tap Tap Set ringtone Select the
ringtone OK
Diverting calls from a contact to the mailbox
¤ Contacts Select a contact Tap Tap All calls to voicemail
Deleting contacts
¤ Contacts Select a contact Tap Delete OK
Deleting more than one contact at the same time:
¤ Touch and hold the first contact . . . Checkboxes are displayed next to the contact entries
Select all the contacts you want to delete Tap Delete OK
Linking contacts
Merge multiple contact entries for a person in one contact.
¤ Contacts Touch and hold the contact you want to merge with others Select the
checkboxes next to the contacts to be merged with the first contact Tap Link
or
¤ Contacts Open the contact Tap Tap Link Select the contact to
merge
Cancelling a link
¤ Open the linked contact Tap Tap Unlink
41
Page 42

Messages (SMS/MMS)
Messages (SMS/MMS)
To send and receive messages, use the Messages app. I t is in the Favou rites b ar on th e star t
screen by default ( p. 18).
Instead of Me
¤ Messages Tap Settings Default SMS app Select another SMS app OK
ssages, use another app as the default app for interchanging messages.
At least one other SMS app is installed.
Help on the Mes
sages app:
¤ Messages Tap Settings Help & feedback
Information on the app settings is also here.
Sending and replying to messages
Sometimes apps send text messages using
de tect s ev ery atte mpt b y an app to se nd a n SMS in yo ur n ame. A wa rnin g is disp laye d
when there is a suspicion that an SMS entails additional charges. Text messages can
be discarded, or sent anyway, in these cases.
Writing an SMS
A text message (SMS) can comprise a maximum of 160 characters. If you enter more characters,
the message is sent in several sub-messages (if this function is supported by your mobile
network operator).
billable Premium services. Android
¤ Messages . . . The list of conversations is displayed
Message in an existing conversation: Tap the conversation
Create a new conversation: Tap
¤ Enter the phone number, name or email address . . . Whilst you are doing so, matching
contacts from the contact list are suggested Tap a suggestion or continue with your entry
or
¤ Select one or more contacts to whom to send the message
Enter a message: Enter the text
nserting a Smiley (Emoticon)
I
¤ Whilst entering the text, tap to the right of the text field Select the icon
Back to the keypad: Tap
Saving a message as a draft
¤ Whilst entering a text message, tap . . . The message is stored in the list of conversations
as a draft
Continue with your entry: Ta p this conve rsati on.
42
Page 43

Messages (SMS/MMS)
Writing an MMS
Multimedia messages (MMS) can contain text, images, voice messages, camera pictures or
videos, preconfigured stickers (animated symbols) and information about a location.
¤ When writing a message, tap to the left of the text field Select the required
attachment(s) . . .
Stickers
¤ Tap . . . Stickers are displayed Select a sticker
Load more stickers: Scroll down Do
Pictures and videos
wnload
¤ Tap . . . Available pictures and videos are displayed Select a picture or video
Creating new pictures and videos with the camera
¤ Tap . . . The camera opens
Enable Full screen mode: Tap
Record a video: Tap
Start a recording: Tap
Voice me ssage s
¤ Tap . . . A microphone icon is displayed Touch and hold the icon Record your voice
message Release the icon
Voice messages are not stored on the device.
Map with location
¤ Tap . . . A map in which your current location is entered is displayed
¤ Confirm location
or: Drag the map up, move the location and select another position
The files appended are displayed in the message.
Show preview: Tap the attachment
Delete attachment: Tap the x in the top right
Sending a message
¤ Write a text or multimedia message Ta p . . . The message is sent
Back to the list of conversations: Tap
The message is the start of a conversation. It is stored in the message list under the name or
one number of the recipient. Respons es from the message recipient are displayed in the same
ph
conversation.
43
Page 44

Messages (SMS/MMS)
Responding to received messages
When a new message arrives, the Message LED flashes, you receive a notification and the
icon is shown in the Notifications bar.
¤ Tap the notification . . . The message opens
or
¤ Messages . . . The list of conversation s is displayed Tap the conversation with the new
message
¤ Enter the reply Tap
Reading and managing messages
Reading messages
¤ Messages . . . The list of conversations is displayed Tap a conversation . . . All
messages in this conversation are displayed in chronological order
Managing messages
¤ Touch and hold the message . . . An options bar is shown at the top Select an option . . .
Sharing a message:
¤ Tap . . . Apps with which you can edit and forward the message are shown, such as other
Messengers, email and Google Drive.
Forwarding a message to a contact or another recipient:
¤ Tap Select a recipient or start a new conversation Send with
Copying message text:
¤ Tap . . . The text is copied to cache. You can use it for any text entry.
Displaying more information on the message and sender:
¤ Tap . . . Detailed information depending on the message is displayed
Saving MMS pictures and videos
on the device:
¤ Tap . . . The picture is saved in the internal device memory under Pictures/Messages
Deleting a message from a conversation:
¤ Tap Confirm with Delete
Searching in messages
¤ Messages Tap Enter the search term . . . Messages in which text matching
the search term occurs are displayed
44
Page 45

Messages (SMS/MMS)
Managing conversation
¤ Messages . . . The list of conversations is displayed Touch and hold one or more
conversations
. . . All conversations selected are denoted by . An options bar is shown at the top Select
the required option . . .
Deleting conversions
¤ Tap Confirm with Delete
Enabling/disabling notifications
The default setting is that you receive a notification when a new message arrives. You can disable
notifications for certain contacts.
Disable notification: Tap
Re-enable notification: Tap
Archiving conversations
Archived conversations are no longer shown on the start screen of the app, but you can still read
them.
¤ Tap . . . The conversations selected are archived
Open archive: Tap Ar
Retrieve conversations from the archive: Touch and hold the conversations Tap . . .
The conversations are displayed again on the start screen
Blocking conversations
If you do not want to receive any more calls or messages from certain contacts, you can block
them.
chived . . . The conversations archived are displayed
¤ Tap BLOCK . . . There is no longer notification of calls and messages from the contacts
selected
Cancelling a block for contact: Ta p Bloc
UNBLOCK
ked contacts Ta p next to the number
45
Page 46

Device
Settings
Device
Language
Change the language for the displays.
¤ Settings Personal – Languages& input Languages . . . All available
languages are displayed in a list. The language being
Make available other languages:
¤ Add a language Scroll through the list and select the language Select the country . . .
The language is included in the list
Select language:
¤ Touch and hold the entry Drag up and release
Delete language from list:
¤ Tap Remove Select the languages to delete Tap OK
Display
Brightness
Change the screen brightness or adapt it the surroundings.
¤ From the Status bar, swipe down using two fingers . . . The quick settings are opened
or
¤ Settings Device – Display Brightness level
used at the moment is at the very top.
¤ Set the brightness level with the slider bar
Automatically adapting the brightness level depending on the ambient light available
¤ Tick the AUTO checkbox next to the slider bar
Font size
Change the display size of text.
¤ Settings Device – Display Font size Select the font size
46
Page 47

Device
Display orientation
Set what the screen content does when you rotate the device.
¤ Settings Device – Display When device is rotated Select Rotate the
contents of the screen or Stay in portrait view
This option is not available when the option "Auto-rotate screen" is disabled in the
accessibility feature settings.
Tones and volume
Volume
Change the volume for ringtone, music and alarm.
Using the Volume button
¤ Press the Volume button on the right-hand
side of the device . . . The slider bar for the
lume opens Tap the arrow on the right
vo
next to the slider bar Set the volume using
the slider bar
From the Settings menu
¤ Settings Device – Sound Set ringtone, media and alarm volumes with slider
bars
Enabling/disabling vibration
Disabling the ringtone, enabling vibration:
¤ Press the bottom of the Volume button until the ringtone volume reaches the lowest setting
and the device vibrates . . . The icon is displayed in the Status bar
Enabling the ringtone and vibration:
¤ Settings Device – Sound Enable/disable option Also vibrate for calls with
the switch
Ringtones
Changing the default ringtone
¤ Settings Device – Sound Phone ringtone Select a ringtone OK
Adding new ringtones
Ringtone apps: Download and install ringtone apps from the Google Play Store
Transferring a music file (MP3) from a computer:
¤ Use the USB cable provided to connect the device to a computer p. 31
¤ Transfer the MP3 music file to folder Ringtones
47
Page 48

Device
Setting rules for automatic muting
Automatically mute the smartphone at certain times (”Do not disturb").
¤ Settings Device – Sound Do not disturb Automatic rules
Muting tones at certain times
¤ Select standard rule Weeknight, Weekend or Event Change the settings for the rule as
required Enable/disable the rule with the On/Off switch
or create a separate rule
¤ Tap Add rule Tap Time rule Enter the rule name OK Set the day, start time and
end time Select the Do not disturb mode Enable/disable the rule with the On/Off
switch
“Do not disturb” mode p. 29
Muting a tone during events and meetings
¤ Tap Add rule Tap Event rule Enter the rule name OK Select the option
During events for:
than one account with calendar events
Where reply is: Select the events to which the rule
with “Yes” or “Perhaps”, or have not confirmed at all)
Do not disturb: Select the “Do not disturb” mode (Total sile nce, Alarms only, Priority
only ( p. 29)
Enabling a rule
Select the account to which the rule applies when you are using more
applies (events you have confirmed
¤ Enable/disable a rule with the On/Off switch
Mute the smartphone manually if required p. 29
Setting keypad tones
You are using the standard Android keypad.
¤ Settings Personal – Languages& input Virtual keyboard Android
keyboard Preferences Enable/disable option Sound on keypress and/or Vibrate on
keypress with the switch
Enabling/disabling other tones
Set whether tones are sounded or the device vibrates when the dialpad is used - for every touch
when the display lock is enabled.
¤ Settings Device – Sound Other sounds Enable/disable the required
option with the switch
48
Page 49

Device
Power management
To prolong the life of your smartphone as long as possible, the device has various ways to make
best possible use of the battery capacity.
Showing the battery charge level
The icon in the Status bar shows the charge level ( p. 79).
Showing the charge level next to the battery icon in %:
¤ Settings Device – Battery Enable/disable function Battery Percentage with
the switch
Showing the power consumption
¤ From the Status bar, swipe down Tap the battery icon . . . The current charge level
(in %), usage since the last full charge and the r
or
emaining battery life are displayed
¤ Settings Device – Battery . . . Information on system component usage is also
displayed (e.g. Sc
More information: Tap the graphic or the system component required
reen, Mobile standby, Wi-Fi)
When the device is being charged, the remaini
instead of the usage time remaining.
ng time to charge level “Full” is shown
Using Power Save mode
Save power until the device can be charged again.
Some of the device’s functions are limited in Power Save mode:
• Google Maps Navigation cannot be used.
• The vibration function, location services and most background data are restricted.
• Email, SMS/MMS and other apps requiring the synchronisation function are only updated
when opened.
Enabling/disabling Power save mode:
¤ From the Status bar, swipe down Tap the battery icon Enable/disable the Battery
saver func
or
tion with the switch
¤ Settings Device – Battery Battery saver Enable/disable the function with
the switch
Automatically enabling Power save mode for low charge level
¤ Settings Device – Battery Battery saver Turn on automatically Never
or for a charge level of 5% or 15%
When Power Save mode is enabled, the upper and lower areas of the screen are
shown in orange.
Power Save mode ends automatically when the device is being charged.
49
Page 50

Device
Using Intelligent Power Save mode
In Intelligent power save mode in standby, unused peripherals are disabled and system
performance is optimised.
¤ Settings Device – Battery Enable/disable the function with the switch
Other power consumption settings
Power saving by changing the settings for system components.
¤ Settings Device – Battery . . .
Change the display settings:
¤ Screen Reduce the screen brightness and/or screen timeout
¤ Brightness level Lower the brightness
¤ Phone idle Select a shorter time
Enable Flight mode:
¤ Mobile standby Switch to aeroplane mode to save power in areas with no mobile
coverage Enable Flight mode with the switch
Disable WLAN when not used:
¤ Wi-Fi Turn off Wi-Fi when not using it or when it isn't available Disable WLAN with the
switch
Storage
The device differentiates between permanent device storage (which can be extended with an
SD card) and main memory. The permanent storage area is for data such as music and photos.
Main memory is temporary storage used by the device to run apps and the overall system.
Device storage management without SD card
Check the available storage capacity and memory usage of apps.
¤ Settings Device – Storage . . . The total storage capacity available, and that
being used at the mome nt, are displayed, as well as a list of components using storage capacity
Show more information: Tap an entry
50
Page 51

Device
Device storage management with SD card
The device detects SD cards with a storage capacity of 32 GB. Higher capacity cards
(to 128 GB) can be used if formatted on the Gigaset GS270 (not from a PC).
¤ Settings Device – Storage . . .
Specifying where personal information is stored:
¤ Select Internal storage or SD card
Checking the available storage capacity and memory usage of apps:
¤ In the lower area of the screen next to , tap Internal storage
Ejecting an SD card:
¤ Next to SD card..., tap . . . The SD card is disabled. It can no longer be used as memory and
the information on the card is no longer available.
Using the SD card again:
¤ Tap SD card ... Mount
Insert SD card p. 9
Freeing up device memory
¤ Uninstall apps which are not used ( p. 24)
¤ Delete saved photos and videos and/or save them in the Cloud (e.g. using Google Photos)
¤ Remove downloaded music, films and other media
¤ Empty/clear the cache or data for individual apps ( p. 61)
Main memory
Your device might not work perfectly if not enough main memory is available.
Displaying main memory usage:
¤ Settings Device – Memory . . . Main memory usage is shown in relation to a
selected time period
Selecting another time period:
¤ Tap Time in the header Select a time period
Checking which apps are running and are using main memory:
¤ Tap Memory used by apps . . . All apps are shown with their usage
Sorting by usage: Tap Sort by max. use
Exiting an app to free up main memory:
¤ Select an app Tap Force stop
51
Page 52

Device
Accessibility features
For those with disabilities, there are a number of useful settings for adapting the usage of the
smartphone to personal needs.
¤ Settings System – Accessibility Enable/disable or set up the required
function
Captions
Enable subtitles for the device, and configure settings for voice, text size and subtitle style.
Magnification gesture
Use enlargement movements to temporarily increase the size of content on the screen.
Font size
Use a larger font for text on the display.
Display size
Show screen elements larger.
Click after cursor stops moving
Enable acoustic notification when the cursor
High-contrast text
Use black or white as the text colour depending
Power button ends call
nd calls by pressing the On/Off button.
E
Auto-rotate screen
Automatically switch between landscape or portrait view when the smartphone is rotated.
Speak passwords
When entering passwords, receive spoken feedback from TalkBack.
Enabled: Password characters are spoken out so as to be audible, just like all other entered
characters.
Disabled: Password characters can only be heard over a headset.
Large mouse cursor
Enlarge cursor.
Mono audio
Connect the channels for audio playback.
Accessibility shortcut
Quickly enable the accessibility featur
If A
ccessibility shortcut is enabled, start the accessibility features as follows:
stops.
on the original text colour.
es without looking at the screen.
¤ Keep the On/Off button pressed until you hear a tone or the device vibrates Use two
fingers to touch and hold the screen until a confirmation signal sounds.
Quick boot
Quick boot the accessibility features using the On/Off button.
Text-to-speech output
Configure comprehensive settings for speech output.
52
Page 53

Security
Touch & hold delay
Change the time after which “Touch and hold” is enabled on touching the screen.
Colour inversion
Swapping of colour values. For example, black text on a white screen becomes white text on
a black screen.
Colour correction
Compensate the effects of colour blindness.
More information on accessibility features is available from: Google Help
Security
Display lock
The display lock protects the device from unauthorised use. When you switch the device on or
enable the display, you are prompted to unlock the device.
The display lock becomes active after a defined tim
A pattern, PIN or password is used as the display lock.
It is also possible to use a fingerprint as a display lock ( p. 27). In this case, the
display lock set up serves as the alternative method.
Setting up a display lock when getting started.
Setting up a display lock
As long as there is no display lock set up, the function is displayed at the top when
y
ou open the app Settings.
¤ Screen lock Set up a display lock using the fingerprint manager ( p. 27)
or: tap Fo
rget
e af ter the device has sw itched to idle mode.
Settings Users – Security Screen lock Enter the PIN, pattern or password if
you have already specified a lock S
None . . . No security
Swipe . . . The display can be unlocked by swiping over the screen
Pattern, PI
N, Password
elect the method . . .
¤ Select option Require pattern to start device if the requirement is for the device to prompt
unlocking at the start Continue
For Pa
ttern:
¤ Draw the pattern - join together at least four dots Continue Repeat the pattern
Confirm
For PI
N:
¤ Enter at least four letters or digits Continue Repeat the PIN OK
53
Page 54

Security
For Password:
¤ Enter at least four letters or digits Continue Repeat the password OK
Settings for the display lock
¤ Settings Personal – Security Tap next to Screen lock Make the setting
Entering a lock screen message
Enter the text to be displayed when the screen lock is enabled, such as your name and address,
or an emergency message. All those picking up the phone can read the message without
unlocking the smartphone.
¤ Lock screen message Enter the text Save
Showing/hiding the pattern
Only for a display lock with pattern. When entering the pattern to unlock the device, the pattern
is shown as a line by default. You are able to change this for security reasons.
¤ Enable/disable the switch next to Make pattern visible
Setting the time for automatic display lock
The display lock is enabled once the device has been in idle mode for a certain time.
¤ Automatically lock Select the duration of idle mode
Enabling the display lock when switching on and off
¤ Enable/disable the switch next to Power button instantly locks
The settings for Automatically lock and Power button instantly locks can be
cancelled with Smart Lock.
Automatically unlocking the device with Smart Lock
Smart Lock enables the smartphone to be unlocked automatically under certain circumstances,
such as when you have it on you or are at home.
A display lock is set up.
Smart Lock must be enabled in Trust agents:
¤ Settings Users – Security Trust agents
Configuring Smart Lock:
¤ Settings Users – Security Smart Lock
More information on Smart Lock: Google Help
Screen pinning
When you pass on the smartphone to someone else, you can restrict its usage to a single app.
For this, you pin a certain view of this app.
54
Page 55

Security
Enabling/disabling screen pinning
¤ Settings Users – Security Advanced – Screen-pinning Enable/disable the
function with the switch
¤ Use the switch to specify whether the PIN, pattern or password needs to be entered to unpin
the screen.
Pinning the screen
¤ Open the screen to be pinned Tap the Navigation button Swipe up until you can
see the pin icon Tap the icon OK
Unpinning the screen
¤ Touch and hold at the same time the and Navigation buttons Enter the PIN,
pattern or password as required . . . The screen is unpinned
SIM card lock
The SIM card lock prevents unauthorised use of the device. For every locked SIM card, the PIN
must be entered when the device is started.
The PIN lock is enabled when the device is purchased. The PIN is available from your mobile
etwork operator.
n
¤ Settings Users – Security Set up SIM card lock When there are two SIM
cards, select the provider of the SIM card from the header
Enabling/disabling the SIM card lock:
¤ Enable/disable the switch next to Lock SIM card Enter the valid PIN OK
Changing the PIN:
¤ Change SIM PIN Enter the valid PIN OK Enter the new 4-digit PIN OK
App permissions
When downloading an app from Google Play, specify the functions and data to which this app
has access, e.g. to contacts or your location.
You can check and change permissions for apps
management, you have quick access to all permissions granted to apps on the device.
Permissions when installing apps
Many apps downloaded from Play Store request access to particular information before
installation. For apps developed for Android 6.0 and higher, you can grant or deny permissions
on initial use.
Information on app permissions in the Google Play Store:
• On the “Permissions” screen for an app in the Play Store, you can check which permissions
the app requires and then decide whether you want to install it. Scroll down to the very end
of the app description.
55
on your device. With App permissions
Page 56

Security
• For many apps, all permissions are displayed in Google Play before installation. You can use
this information to decide whether you want to install the apps.
• Some apps are installed without any prompts about permissions. You are then able to grant
or deny individual permissions when using the apps for the first time.
• Permissions might be changed when apps are updated automatically. When using for the
first time a function which requests a new permission, you might have to grant or deny
access to this data or function.
• If you want to check all updates before an installation, disable the automatic updates option
in the Play Store.
For certain apps: In the menu under My apps and games
For all apps: In the menu under Settings
Enabling/disabling permissions for apps on the smartphone
¤ Settings Device – Apps . . . All installed apps are listed
Setting the permissions for an app:
¤ Select the app for which you want to change the permissions Permissi ons . . . All
meaningful permissions for the app are displayed Grant/deny the required permissions
with the switch
Displaying all permissions in detail:
¤ Tap All permissions
Setting all apps with certain permissions:
¤ Tap App permissions . . . All possible permissions are displayed Select a
permission Grant/deny a permission for the required apps with the switch
If you revoke or do not grant permissions for an app, it might not work properly.
Android Device Manager
If you have lost your smartphone, you can use the Android Device Manager to locate it, ring it,
lock it and delete data on it.
The device is registered with a Google account ( p. 58)
Location detection is enabled ( p. 60).
Enabling/disabling monitoring b
y the Android Device Manager:
¤ Settings Personal – Google Security Android Device Manager Enable/
disable functions Loc
switches
Check whether the Android Device Manager can locate the device:
ate device remotely and Lock and delete data remotely with the
¤ Log in to your Google account on android.com/devicemanager and see whether your device
is displayed
56
Page 57

Security
You can also install the Android Device Manager on mobile devices, such as your
smartphone or a tablet (downloaded from Google Play).
Device administrators
Device administrators are apps authorised to create a connection to your smartphone and to
exchange data, for synchronisation for example. You can authorise this by setting up an account
hosted by a business service, such as for an email, calendar or business app.
¤ Settings Users – Security Device administrators . . . A list of device
administrators is displayed Tick the checkboxes next to the apps to be allowed as device
administrators
Displaying device administrator information:
¤ Touch and hold a service in the list
If you disable a device administrator, you revoke the permission of associated
services to synchronise data on your phone.
Google services (Gmail, contacts, calendar, etc.) are not treated as device
administrators. Permissions for these services to make changes on the smartphone
are managed from the Google account settings.
Certificates
Digital certificates are used to identify your smartphone in secure network connections. You
require a certificate for VPN or WLAN connections for example, or for authentication with email
servers, browsers or other apps. Some certificates are already stored on your phone by default.
You can install further certificates.
Supported formats:
• DER coded X.509 certificates with file extensions .CRT and .CER.
• X.509 certificates in PKCS#12 keystore files with file extensions .P12 and .PFX. If you install a
certificate from a PKCS#12 keystore file, the corresponding private key certificates or
certification authority (CA) certificates are also installed.
Files with different file extensions cannot be installed. Change the file extension if required.
Managing certificates
¤ Settings Users – Security Trusted credentials
The installed certificates are displayed.
System: Contains all certificates issued by a cer tification authority (CA) that are permanently
User: Contains all CA certificates you have installed yourself, when installing a client
If a certificate is corrupt or you do not trust a certificate, you can disable or delete it.
installed in the write-protected memory of your phone.
certificate for example.
¤ Tap a certificate . . . Information on the certificate is displayed Scroll down
57
Page 58

Accounts and location detection
System certificate: Disable/Enable OK
User certificate: Remo
reinstalled if required
ve OK . . . The certificate is deleted permanently and needs to be
Installing client and CA certificates
Install additional certificates from an SD card, internal storage, the Download folder or
Google Drive.
¤ Save a certificate or keystore file on one of the media mentioned above.
¤ Settings Users – Security Install from SD card Open the menu
Select the certificate location Tap the file name of the required certificate or keystore
Enter the keystore password OK Enter the certificate name OK
CA certificates upon which client certificat
A display lock with high security level must be set (with PIN or password) if you want to
install certificates. You might be prompted to set a display lock ( p. 53).
es are based are also installed.
Accounts and location detection
Accounts
Use one or more accounts to use personal information such as contacts, pictures and mailbox on
multiple devices. An account enables synchronisation of the information and makes it available
to all registered devices.
Account types
Google account
You need a Google account for Google services such as Gmail™, Google+™ or YouTube™, and for
downloading apps from Google Play™. When you log in with a Google account, emails, contacts,
appointments and other information assigned to this account are automatically synchronised
with your device. You can set up a new account on the smartphone or log in the smartphone to
an existing account.
Email account
If you do not use the Google account for your email, you need to register your smartphone with
y
our mail server. POP3 and IMAP mail servers are supported.
You can still use the Gmail ap
Managing emails with the Gmail app: Use an account type with icon
Managing emails with the Ema
You require information on the service the account uses, such as server address, user
name and password. The phone must be able to establish an Internet connection
over WLAN.
58
p to receive and send emails.
il app: Use an account type with icon
Page 59

Accounts and location detection
Exchange account
You set up an Exchange account to synchronise contacts, calendar, tasks and emails with
Microsoft Outlook™.
Adding an account
¤ Settings Personal – Accounts Add account Tap the type of account you
want to add Enter the account details. Follow the instructions on the screen
Removing an account
When an account is removed from a device, all associated content is also removed,
such as emails, contacts and settings.
¤ Settings Personal – Accounts Tap the account to be deleted Tap
Remove account
Synchronising
You can specify how apps synchronise messages, emails and other current data in your Google
account.
Google apps are automatically synchronised with the Google account as standard. You can
ble and disable automatic synchronisation for individual Google apps.
ena
Apps which are not from Google cannot be synchronised using a Google account.
Look in the respective settings menu for these apps for a synchronisation option.
Enabling/disabling automatic synchronisation
Setting synchronisation for individual apps:
¤ Settings Persona l – Accounts Google Select an account if several are set
up . . . A list of Google apps with the time of most recent synchronisation is displayed
Enable/disable synchronisation of an app with the relevant switch
Setting synchronisation for a Google account:
¤ Settings Personal – Accounts Tap Enable/disable the Auto-syn c data
option
Disabling automatic synchronisation prolongs the battery life. Enable automatic
synchronisation again if you want to continue after charging the battery.
59
Page 60

Accounts and location detection
Manually synchronising an account
In manual synchronisation, the data of all Google apps is updated, including all apps with
automatic synchronisation disabled.
¤ Settings Personal – Accounts Google S elect an account if more than one
is set up Sync now
Location detection
Apps with Location detection permission can use the device’s location information to offer
location-specific services, such as check-in options, traffic information and nearby restaurants.
Enabling/disabling location detection
¤ From the Status bar, swipe down using two fingers . . . The quick settings are displayed
Tap
or
¤ Settings Personal – Location Enable/disable the function with the switch
Changing location mode
Different sources for location detection of the device are used depending on mode.
• High accuracy
GPS, WLAN, mobile networks and other sensors are used to determine the location of your
device as accurately as possible.
• Battery saving
The device determines its location using sources which require little power, such as WLAN
and mobile networks.
• Device only
Only GPS is used. The location service from Google is not used. This mode potentially
requires more power and is slower.
Location detection enabled:
¤ Settings Personal – Location Mode Select the mode
Checking location detection by apps
Check which apps are currently accessing your location, or have recently accessed your location.
¤ Settings Personal – Location . . . In Recent location requests is a list of apps
which have recently accessed the location of the device.
Managing location history
When Location history is enabled, Google can also determine the device's location when no
Google app is active. Location history information is stored in your Google account for all
devices assigned to the account.
¤ Settings Personal – Location Google-Location History
60
Page 61

Apps
or
¤ Settings Personal – Google Location Google-Location History
The screen is the starting point for all activities pertaining to the location history. You can for
example switch off the location history for individual or all devices, view locations visited over a
certain period, show information on locations visited or delete all your location history
information.
For information on location history Google Help
Apps
Detailed information on working with apps p. 22
Default app
If you have several apps with identical functions, you can select which app is used as standard
for an action. For example, if you have downloaded from Google Play a different calendar or
another app for making calls, you can make these the default apps.
Selecting a default app for an action
If multiple apps are available for an action and a default app is not defined, you are prompted to
select an app.
¤ Tap the app you want to use.
¤ Select whether this app is used Just once or Always for the action.
If you select Alway
s, the app is set as the default app for all actions of this type.
Resetting the default app
¤ Settings Device – Apps . . . All installed apps are listed Select the app for
which Always was selected before for an action Open by default Clear defaults
If you then restart the action, you are prompted again as to which app to use.
Specifying the default app for a frequently used function
For some functions, you can select a default app at any time without performing a
corresponding action.
¤ Settings Device – Apps Tap Different functions are displayed under
Default Select the function . . . If there are several apps for this function, they are displayed
Select the app
Changing app settings
Check the current app settings and change them as required.
61
Page 62

Apps
¤ Settings Device – Apps Select an app
Which settings are available depends on the respective app.
Uninstall / Disable
Uninstall app from device / disable app p. 24
Force stop
Stops the app including all background processes. This is a sensible action when an app no
longer responds for example, or is running in the background and is using too many system
resources (such as memory). The app can easily be started again from the App menu.
Storage
Internal storage used by the app.
Freeing up storage: Tap Storage Clear data
Freeing up temporary app memory: Tap Storage Clear cache
Data usage
Data volume downloaded or uploaded by the app over the mobile data network or WLAN
( p. 66).
Permi ssions
Apps and system resources the app is permitted to access ( p. 56)
Notifications
Specify the procedure for app notifications ( p. 21)
Open by default
Specify how the app is to proceed with links.
Battery
Battery usage since the last full charge ( p. 49).
Memory
Average memory usage in the device’s temporary main memory over the last three hours
( p. 49).
More settings are in the respective app in menu Settings. Access to the settings is
dependent on the app, from , or the icon.
General app settings
Checking and changing the permissions and default values for apps.
¤ Settings Device – Apps Tap
App permissions
Granting and revoking app permissions ( p. 55).
Opening links
Specify how apps are to proceed with links.
Default
If several apps with identical function are available, select which one is used by default
( p. 61).
62
Page 63

Network connections
Advanced – Special access
Contains detailed information on the access capabilities of apps to data and system
resources.
Resetting app settings
Reset all the changes made to app settings.
¤ Settings Device – Apps Tap Reset app preferences
Network connections
The smartphone can establish connections to mobile networks, WLANs and other devices via
Bluetooth.
Mobile networks
To make and receive calls with the smartphone over a mobile network, you require a SIM card
from the relevant mobile network operator. Refer to your mobile contract for which services are
available, and which terms and conditions apply.
You can insert two SIM cards into your device, i.e
time.
Editing settings
¤ Settings Wireless & networks – More Mobile networks
. you can use two mobile networks at the same
If two SIM cards are inserted into the device, the Mobile network settings screen
contains a tab for each SIM card Select the appropriate tab as required.
Data roaming
Permit the sending of data by the device over mobile networks of other operators whilst you
are in a region where the network of your operator is not available.
Additional charges can be incurred by data roaming (depending on your mobile
contract).
Preferred networks
Select a preferred mobile network when you are not in the area of your mobile network
or.
operat
Preferred network type
Select the preferred mobile standard, such as LTE, 3G or 2G. The smartphone uses the
net
work with the best availability as standard.
Enhanced 4G LTE Mode
Improve speech quality and other communication.
Access point names
Your mobile network operator can use these settings to determine the correct IP address for
y
our device, and so establish a secure connection for your device.
63
Page 64

Network connections
Operator
Select your provider from the networks available.
Using two SIM cards
¤ Settings Wireless & networks – SIM cards . . . Detected SIM cards in
slots 1 and 2 are displayed
Enabling and disabling a SIM card: Enable/disable the switch
Showing information:
¤ Tap an entry . . . The name of the SIM card, the colour used for the card, the mobile network
operator and the phone number are displayed. You can change the name and display colour.
Specify the preferred SIM card for the following functions:
• Mobile data
Only one SIM card can be used for mobile data transmission.
• Calls
You can specify one SIM card for all outgoing calls, or be prompted for which SIM card to use
before every call.
You might need to perform the assignment anew when you insert a new SIM card or
swap out an existing one.
WLAN
Use the smartphone to establish a connection to a WLAN, and use the connection to send data
and to surf the Internet.
A connection is established automatically if the sma
WLAN and the WLAN function is enabled.
rtphone is within range of a registered
Enabling/disabling the WLAN function
¤ From the Status bar, swipe down using two fingers . . . The quick settings are displayed Tap
the WLAN icon
or
¤ Settings Wireless & networks – Wi-Fi Disable/enable WLAN with the On/Off
switch
When WLAN is enabled, the icon is displayed in the Status bar
strength on four levels. Little arrows in the icon
To prolong the battery life, disable the WLAN function when you are not using it.
WLAN is disabled in Flight mode.
show when data is being sent.
. The icon shows the signal
Establishing a connection to a WLAN
¤ From the Status bar, swipe down using two fingers . . . The quick settings are displayed Tap
the arrow under the WLAN icon
or
64
Page 65

Network connections
¤ Settings Wireless & networks – Wi-Fi
. . . All WLANs within range are displayed.
Networks protected by a password have a lock next to the icon. Networks without a lock icon
are public hot spots.
¤ Tap the required WLAN Enter the network password Connect . . . If the connection
is successful, Connected is displayed under the network name
WLANs registered for the smartphone are shown in the Sa
currently out of range and no connection is established.
Showing saved WLANs: Ta p S
aved networks
ved networks list, even if they are
Adding more WLANs
WLANs which do not send their name (the SSID) or are not within range are not displayed in the
WLAN list. They can still be saved with name and password. The connection is established if the
WLAN is within range.
¤ Settings Wireless & networks – Wi-Fi Tap Add a netwo rk Enter
the network name (SSID) and security details Save . . . The network is included in the
Saved networks list
Removing a WLAN
If the requirement is for the device to not automatically connect to a saved WLAN, the WLAN can
be removed from the list of saved networks.
¤ Settings Wireless & networks – Wi-Fi Tap Saved networks Tap th e
saved network to be removed Forge t
Viewing WLAN details
¤ Settings Wireless & networks – Wi-Fi Tap the network name of a connected
WLAN . . . Information on the connection is displayed, such as signal strength, connection
status and transmission rate
Changing the network settings:
¤ Touch and hold the network name Modify network
Deleting a network: Fo
Connection configuration
Align the network settings to the requirements of the WLAN to be used to establish a
connection.
rget network
¤ Settings Wireless & networks – Wi-Fi Touch and hold the network name
Modify network Tap the down arrow next to Advanced options . . .
Proxy
If a connection to a WLAN is established over a proxy: Tap Proxy
Manually entering the proxy details: Man
65
ual Enter the data Save
Page 66

Network connections
Automatic proxy configuration: Autom. proxy config. Enter the URL of a PAC file
Save
A Proxy Auto Config (PAC) file enables a web browser to automatically find the right
oxy server for a required URL.
pr
DHCP
When there is no active DHCP server in the WLAN: Tap DHCP Static Enter the
network configuration data Sa
ve
Advanced options
¤ Settings Wireless & networks – Wi-Fi Tap Advanced Select option
. . .
Digital certificates are used to identify the device for WLAN access. You can install additional
certificates if not all those required are available.
¤ Install certificates Select the source for the certificate
Certificates p. 57
Establish a connection between the device and other Wi-Fi Direct-enabled devices.
¤ Wi-Fi Direct . . . WiFi Direct-enabled devices or groups within range are displayed Select
the required device or group
Registration at a WLAN Access Poi
nt with the WPS Push function.
¤ WPS Push Button Enable WPS Push function at the Access Point . . . The connection is
established
Registration at a WLAN Access Point with personal identification number (PIN).
¤ WPS Pin Entry . . . T he WP S P IN of th e d ev ic e i s d is pl aye d En te r W PS PI N a t t he Acc es s P oi nt
. . . The connection is established
Data usage
The data usage is the amount of data uploaded or downloaded by the device over a certain
period over the mobile data connection or WLAN. Most tariffs include a restriction of data
volume. So as not to incur any additional costs, you can check the data usage of the device and
limit it as required.
Checking data usage
¤ Settings Wireless & networks – Data usage
Data usage in the mobile network is displayed in a bar - for a certain time period and in relation
to the warning limit for mobile data usage.
The data volume transferred so far within
The data volume sent over WLAN within the time period set is shown in Wi-Fi data usage.
Show further information, such as the apps involved in data usage:
the time period set is displayed in Mobile data usage.
¤ Tap Mobile data usage or Wi-Fi data usage . . . More information is displayed, such as the
apps involved in data usage.
66
Page 67

Network connections
Display another time period:
¤ Tap the arrow next to the time period displayed
Change the billing period for mobile data usage:
¤ Mobile data usage Tap Select the start of the monthly billing period Billing
cycle Se
Setting a limit and warning for mobile data usage
Entering a data limit
Enter the maximum data volume made available by your provider as a data limit. Once the limit
set for data usage is reached, mobile data usage is disabled automatically. You receive a
notification.
t
¤ Mobile data usage Tap Enable function Set data limit with the switch OK
¤ Tap Data limit Switch between Megabyte (MB) and Gigabyte (GB) as required
Change the value Set
. . . The limit is entered into the M
Re-enabling data usage:
obile data usage graphic.
¤ Mobile data usage Tap Disable function Set data limit with the switch OK
Data transmission can now incur costs.
Setting a warning for data usage
Set a value for data volume usage at which you want to receive a warning.
¤ Settings Wireless & networks – Data usage . . .
¤ Tap the bar Change the value Set
or
¤ Mobile data usage Tap Data warning Change the value Set
. . . You receive a notification once the value set for the data volume is reached.
Enabling/disabling your mobile data connection
When you disable data transmission over the mobile network, actions with high data usage
(such as the updating of apps) are only performed when there is a connection to a WLAN.
¤ From the Status bar, swipe down . . . The quick settings are displayed Tap / ( =
enabled)
or
¤ Settings Wireless & networks – Data usage Enable/disable data
transmission with the switch next to Mo
Some of the functions only work with limit
is disabled.
67
bile data
ed functionality when mobile data usage
Page 68

Network connections
Enabling/disabling Data save mode
Mobile data usage is reduced when Data save mode is enabled. Most apps and services can only
retrieve background data over WLAN.
¤ From the Status bar, use two fingers to swipe down . . . The quick settings are displayed
Tap / ( = enabled)
or
¤ Settings Wireless & networks – Data usage Data Saver Enable/disable
the function with the switch
Restricting background data can impact the per
you receive no more notifications until the app is opened the next time.
Permit the sending of backg
To prevent certain apps and services from not working properly in Data save mode and without
a WLAN, y
using mobile data.
ou can specify that these apps and services can continue to retrieve background data
round data of apps when no WLAN is available
formance of the app. For example,
¤ Settings Wireless & network s – Data usage Data Saver Unrestricted data
access Enable/disable permission for app or service with the switch
Other ways to reduce data usage
Disabling automatic synchronisation
When automatic synchronisation is enabled, the dat
contacts and appointments).
Disabling automatic synchronisation: p. 59
Disabling data roaming
If the network of your mobile network operator is not a
to use the networks of other operators.
a of apps is updated automatically (such as
vailable, data roaming enables the device
¤ Settings Wireless & networks – More Mobile networks Enable/disable
the option with the switch next to Data roaming
Data roaming can entail additional costs, bu
establish an Internet connection.
t is in some places the only way to
Bluetooth
Use the smartphone to establish a connection to a Bluetooth device.
If you are using a Bluetooth device for the first time
by the Pairing process to enable a secure connection between the two devices. Then the
connection is established automatically.
, it must first be coupled with the smartphone
Enabling/disabling Bluetooth
¤ From the Status bar, swipe down using two fingers . . . The quick settings are displayed Tap
the Bluetooth icon
or
68
Page 69

Network connections
¤ Settings Wireless & networks – Bluetooth Disable/enable Bluetooth with
the On/Off switch
When Bluetooth is enabled, the icon is displayed in the Status bar.
The device can be seen by all nearby devices with Bluetooth function.
To prolong the battery life, disable the Bluetooth function when you are not using it.
Bluetooth is disabled in Flight mode.
Pairing
Before you can connect a phone or tablet to a Bluetooth device, you must perform a pairing
between these devices. After a pairing is performed, the devices keep this status until the pairing
is ended.
¤ Settings Wireless & networks – Bluetooth . . . Bluetooth devices available in
the vicinity are displayed Tap the name of the required Bluetooth device Follow the
subsequent instructions on the screen to complete the pairing . . . If performed successfully,
the device is included in the Paired devices list
If requested to enter a password, try the popular 0000 and 1234 passwords, or read
the documentation for the Bluetooth device.
Changing the names of connected Bluetooth devices or ending pairing
¤ Settings Wireless & networks – Bluetooth In the Paired devices list, tap
next to the Bluetooth device
Changing name: Enter the name of the device OK
Ending a pairing: Fo
rget
Changing the Bluetooth name of the smartphone
The smartphone can be seen by other Bluetooth devices under name Gigaset GS270. You can
change this name.
¤ Settings Wirele ss & netwo rks – Bluetooth Tap Rename this device
Enter the new device name Rename
Displaying data transmission information
¤ Settings Wirele ss & netwo rks – Bluetooth Tap Show files received . . .
Data received via Bluetooth is displayed
Flight mode
WLAN, mobile networks and Bluetooth are disabled in Flight mode.
¤ From the Status bar, swipe down using two fingers . . . The quick settings are displayed Tap
the Flight mode icon
or
69
Page 70

Network connections
¤ Settings Wireless & networks – More Aeroplane mode Enable/disable
Flight Mode with the switch
or
¤ Press and hold the On/Off button Tap Aeroplane mode OK
When Flight mode is enabled, the icon is displayed in the Status bar.
Virtual Private Networks (VPN)
A Virtual Private Network (VPN) enables you to connect the smartphone to your private or a
company network. When you are out and about and have access to a WLAN, use the VPN
connection to surf free of eavesdroppers, to make free calls over your landline number, and to
access your mailbox or data in the company network.
A VPN server is set up in the private or company network.
A VPN client is preinstalled on the smartphone. You need the configuration details of the VPN to
set up a VPN connection.
You might require another VPN client for the VPN with which you want to connect the
smartphone. Various VPN apps are available from the Google Play Store. Once you
have installed a VPN app, configuration is done via the app.
Adding a VPN
¤ Settings Wireless & networks – More VPN Tap Enter the
configuration details Save
Establishing a connection to a VPN
¤ Settings Wireless & networks – More VPN . . . The VPNs set up are listed
Select a VPN Enter Username and Password Connect
Once the device is connected to a VPN, the icon is shown in the Status bar.
Ending a VPN connection
¤ From the Status bar, swipe down using two fingers . . . The quick settings are opened Next
to Network may be monitored, tap the icon Next to the VPN to be disconnected, tap
Disconnect
Deleting a VPN
¤ Settings Wireless & networks – More VPN . . . The VPNs set up are listed
Next to the VPN to be deleted, tap Forget
70
Page 71

Network connections
Editing VPN settings
¤ Settings Wirele ss & netwo rks – More VPN Next to the VPN to be c hanged,
tap Edit the VPN settings Save
If you are using a VPN app, it is opened and you can make the required changes.
Enabling/disabling “always-on” VPN
With some VPNs, the device remains always connected when the VPN connection is not active.
This is a sensible option when moving between insecure public WLANs.
Enabling “always-on” VPN:
¤ When registering with a VPN, select option Save account information
¤ Tap Always-on VPN Select the VPN OK
You receive a notification that “always-on” VPN
“always-on” VPN is down.
Disabling “always-on” VPN:
is enabled, and when the connection to an
¤ Tap Always-on VPN None OK
Onc
e you have set up a VPN from an app, the option Always-on VPN is not displayed.
Tethering with WLAN hotspot, Bluetooth or USB
With mobile WLAN hotspots, Bluetooth tethering and USB tethering, you can enable the data
connection of the smartphone to other devices. For example, use a smartphone connection to
surf the Internet with your notebook.
Using hotspot or tethering connections might entail additional charges.
Contact your mobile operator as required.
Hotspots and tethering require high levels of battery power.
¤ Connect the smartphone to a power source when using hotspot and tethering.
¤ Disable hotspot and tethering when you do not need them.
Enabling and disabling WLAN hotspot
Set up your own device as a WLAN hotspot.
¤ Settings Wireless & networks – More Tethering & portable hotspot Wi-
Fi hotspot Enable/disable the function with the switch
When the hotspot is enabled, the icon is displayed in the Status bar.
The icon is displayed in the Notifications bar. T
is displayed in the message.
71
he number of connected and blocked users
Page 72

Network connections
Changing WLAN hotspot settings
Change the network name, security, password and frequency band for access points.
¤ Settings Wireless & networks – More Tethering & portable hotspot Wi-
Fi hotspot Set up Wi-Fi hotspot Change the required option Save
Connecting a device to the WLAN hotspot
Showing the network name and password on the smartphone:
¤ Settings Wireless & networks – More Tethering & portable hotspot Wi-
Fi hotspot Set up
password are displayed
Connecting to the hotspot on the other device:
Wi-Fi hotspot Tap Show password . . . The network name and
¤ Open the list of WLANs within range Select network with the network name of the
hotspot Enter the password for the hotspot Connect.
Setting up and using Bluetooth tethering
Share the Internet connection with other devices via Bluetooth.
The mobile data connection is active p. 67
¤ Carry out pairing between the smartphone and the device with which you want to share the
Internet connection ( p. 69)
¤ Set up the other device so that it establishes a network connection over Bluetooth. For more
information, read the instructions for the device.
Enabling and disabling the Internet connection
of the phone via Bluetooth tethering:
¤ Settings Wireless & networks – More Tethering & portable hotspot
Enable/disable the Bluet
an Internet connection with the other device
ooth tethering function with the switch . . . You can now establish
Setting up and using USB tethering
Share the Internet connection with another device over a USB cable.
The
mobile data connection is active p. 67
¤ Use a USB cable to connect the smartphone to another device . . . The USB icon is
displayed in the Notifications bar Open message over USB connection and ensure that
USB for file transfer or
Enabling/disabling USB tethering:
USB for photo transfer is set ( p. 31)
¤ Settings Wireless & networks – More Tethering & portable hotspot
Enable/disable the USB t
Internet connection with the other device
When USB tethering is enabled, the icon is displayed in the Notifications bar.
72
ethering function with the switch . . . You can now establish an
Page 73

System
USB tethering is disabled permanently if you unplug the USB cable.
USB tethering is not available on Mac computers.
System
Date and time
¤ Settings System – Date & time . . .
Automatic setting
The date and time are set automatically using a time server:
¤ Automatic date & time Select the source (network or GPS)
or: Disable it and set the date and time manually
Manual setting
¤ Set date Select a date in the calendar OK
¤ Set time Drag the hour display to the correct position OK
Use the outer ring for 12-hour display
Use the inner and outer rings for 24-hour display
¤ Tap the minutes display of the time displayed Drag the pointer to the correct
position OK
Setting the time zone
The time zone is set automatically by default. Selecting the time zone yourself:
¤ Disable the switch next to Automatic time zone Tap Select time zone Select the time
zone from the list
Setting the date and time format
Displaying the time in 24-hour format (e.g. 18:30) / 12-hour format (6:30 pm):
¤ Enable/disable the switch next to Use 24-hour format
Changing the date format:
¤ Tap Select date format Select the date format
73
Page 74

System
Software updates
Checking the Android version
¤ Settings System – About emulated device . . . The current version is displayed
under Android version
Downloading Android updates
You will be informed when a new Android system update is available for your device.
Updates use up power and entail high data volumes.
So before an installation, check the battery charge level ( p. 49) and data usage
( p. 66). Connect the device to the power if required and establish a WLAN
connection.
Installing an update after receiving a notification
Display not locked:
Display locked:
Start the installation:
Installing an update without receiving a notification
¤ From the Notifications bar, swipe down Ta p th e updat e
notification
¤ Double tap the update notification on the lock screen
¤ Tap Download
¤ Settings System – About emulated device System updates . . . The system
is checked
If there is a more up-to-date version: Ta p Do
wnload
Backing up and restoring the system
Backing up data and settings
Use the Android Backup Service to backup data linked to one or more Google accounts. If you
have to swap your device or delete data, you can restore the data from every Google account
backed up beforehand.
The following data is backed up:
• Google calendar settings
• WLAN networks and passwords
• Wallpaper of start screens
• Gmail settings
• Apps installed with Google Play (apps backed up in the Play Store app)
• Screen settings (i.e. brightness and sleep mode)
• Language and input settings
• Date and time
• Settings and data of third party apps (different depending on app)
74
Page 75

System
The Android Backup Service is not used by all apps. Not all data might be backed up
or restored for certain apps.
¤ Settings Personal – Backup & reset Back up my data Enable/disable the
function with the switch Back with
Setting up a backup account:
¤ Backup account Add account Enter the PIN, pattern or password Enter the account
details
You can set up more than one backup account.
Restoring data and settings
Restore data backed up with the Android Backup Service.
¤ Settings Personal – Backup & reset Enable/disable the switch next to
Automatic restore
Resetting network settings
Reset WLAN, mobile and Bluetooth data.
¤ Settings Personal – Backup & reset Network settings reset Reset
settings
Deleting DRM licenses
If you have received and installed DRM licenses to use videos, music and electronic documents,
you can delete these licenses (DRM = Digital Rights Management).
¤ Settings Personal – Backup & reset DRM reset OK
Resetting the device to the default settings
You can remove all personal data when you pass on the device to another person.
When resetting the device to the default settings
downloaded apps, music, photos, etc. are removed and registration to the Google
account is cancelled.
, the internal storage is cleared,
¤ Settings Personal – Backup & reset Factory data re set Reset phone
75
Page 76

Customer service
Appendix
Customer service
Spare parts and accessories for your product are available from www.gigaset.com.
Help is available from
Exclusion of liability
The display is made up of pixels. Each pixel consists of three sub-pixels (red, green, blue).
It may be the case that a sub-pixel is missing or has a colour deviation.
A warranty claim is only valid if the maximum number of permitted pixel errors is exceeded.
Description Maximum number of permit
Colour illuminated sub-pixels 1
Dark sub-pixels 1
Total number of coloured and dark sub-pixels 1
www.gigaset.com/service.
ted pixel errors
Signs of wear on the display and casing
Certain content and services which can be accessed us ing this device are the property of third parties and are
otected by copyrights, patents, trademarks and/or other laws for the purpose of safeguarding intellectual
pr
property. Such content and services are provided solely for non-commercial, private usage. You may not use
content or services which has/have not been authorised by the owner of particular content or a service provider. Without limiting the generality of the foregoing, except as expressly specified by the owner of the content or the service provider, the modification, reproduction, dissemination, uploading, publication, transmission, translation, sale, creation of
not permitted in any form and on any medium.
derived works, distribution of content or services shown on this device are
are excluded from the warranty.
Manufacturer's advice
Authorisation
This device is intended for use within the European Economic Area and Switzerland. If used in other countries,
it must first be approved nationally in the country in question.
Country-specific requirements have been taken into consideration.
Hereby, Gigaset Communications GmbH declares that the
ance with Directive 2014/53/EU.
The full text of the EU declaration of conformity is available at the following internet address:
www.gigaset.com/docs.
This declaration could also be available
rations of Conformity” files.
Therefore please check all of these files.
in the "International Declarations of Conformity" or “European Decla-
radio equipment type Gigaset GS270 is in compli-
76
Page 77

Manufacturer's advice
Waste and environmental protection
Correct disposal of this product
(Directive for electric and electronic equipment (WEEE))
(Applicable in countries with waste separation systems)
This label on the product, accessory or in documentat
accessories (such as charger, headphones and USB cable) ma
To avert potential environmental harm and health ri
responsibly with the aim of encouraging sustainable reuse of raw materials.
Private users should turn to the dealers from where they bought their products, or contact the authorities
esponsible, who are able to provide information on where parts can be taken for disposal in an environmen-
r
tally friendly manner.
Commercial users should please contact the
ment.
This product and the electronic accessory parts may n
This “WEEE” is compatible with the RoHS Directive.
ir suppliers and check the general terms of their purchase agree-
Correct disposal of batteries in this product
(Applicable in countries with waste separation systems)
This label on the battery, in the manual or on th e packaging denotes that the batteries in this product
may not be disposed of in household waste.
Not disposing of batteries properly m
environment.
To protect natural resources and encourage environmentally responsible reuse of material resources, please
rate batteries from other waste streams and dispose of them at your local, free collection point for used
sepa
batteries.
eans the substances inside pose a health risk and a risk to the
ion indicates that the product and its electron ic
y not be disposed of in household waste.
sks from unmanaged waste disposal, recycle
ot be disposed of with other commercial waste.
77
Page 78

Manufacturer's advice
Technical data
Frequency and bands
Freque ncy Bands maximum power
2G 1900 MHz 29,6 dBm
1800 MHz 29,7 dBm
850 MHz 32,5 dBm
900 MHz 32,5 dBm
3G B1 22,8 dBm
B8 22,5 dBm
4G B1 21,5 dBm
B3 21,6 dBm
B7 21,5 dBm
B8 21,6 dBm
B20 21,5 dBm
WLAN 11B:18.5dBm
BT 8,2 dBm
About radiation
Information on SAR certification (specific absorption rate)
THIS DEVICE SATISFIES THE INTERNATIONAL DIRECTIVES FOR EXPOSURE BY RADIO WAVES.
Your mobile device has been developed so as not to exceed internationally recommended exposure thresh-
olds for radio waves.
These directives have been specified by an independent scientific organisation (ICNIRP) and include a high
gin of safety which should guarantee the safety of all regardless of age and state of health. The directives
mar
on exposure to radio waves use a unit called the specific absorption rate (SAR). The SAR threshold for mobile
devices is 2.0 W/kg. The highest SAR values in the ICNIRP Directives for this device model:
Highest SAR value for this phone model and measurement conditions
SAR for head 0.562 W/kg (10g)
SAR for wearing on body 1.356 W/kg (10g)
The SAR values for wearing on the body are determined at
directives for wearing on the body, the device should be positioned at least this distance away from the body.
11G:14.1dBm 11N:14.9dBm
a distance of 5 mm. To comply with the HF exposure
78
Page 79

Icons
/
/ //
/
/ //
/
/
///
/
/
/
/
/
Status bar and quick settings
Battery charge status / battery is charging
WLAN connection enabled. The receive quality is shown on four levels.
WLAN connection disabled.
Bluetooth enabled / disabled
Mobile connection enabled. The receive quality is shown on four levels.
Mobile connection disabled / no SIM card inserted
VPN connection active
Data connection enabled / disabled
/ Data save mode enabled / disabled
Flight mode enabled / disabled
Portrait view set / automatic rotation of screen possible
Ringtone: Highest volume / Switched off / Vibration only
Tor ch s wit che d on /of f
Location detection permitted / not permitted
"Do not disturb" function:
Disabled / Alarms only, Priority only / Total silence
WLAN hotspot activated
Icons
79
Page 80

Icons
/
/
/
Notifications
App authorisation management
Missed call
New text message
New email
New SD card detected
. . . Other app-specific notifications
Screenshot created
USB cable connected / USB tethering enabled
WLAN hotspot activated
Multiple tethering connections activated (USB and/or WLAN)
Data downloaded / data uploaded
Turbo download enabled
Update for Google available / Google apps updated
80
Page 81

Index
Numerics
2G . . . . . . . . . . . . . . . . . . . . . . . . . . . . . . . . . 63
3G . . . . . . . . . . . . . . . . . . . . . . . . . . . . . . . . . 63
4G LTE . . . . . . . . . . . . . . . . . . . . . . . . . . . . . . 63
A
Accessibility features . . . . . . . . . . . . . . . . . . . . 52
Quickly enable . . . . . . . . . . . . . . . . . . . . . . 52
Account . . . . . . . . . . . . . . . . . . . . . . . . . . . . . 58
Add . . . . . . . . . . . . . . . . . . . . . . . . . . . . . . 59
Remove . . . . . . . . . . . . . . . . . . . . . . . . . . . 59
Synchronise . . . . . . . . . . . . . . . . . . . . . . . . 59
Account types . . . . . . . . . . . . . . . . . . . . . . . . . 58
Adding the print service . . . . . . . . . . . . . . . . . . 32
Android Device Manager . . . . . . . . . . . . . . . . . 56
Android version
Checking
. . . . . . . . . . . . . . . . . . . . . . . . . . 74
Update. . . . . . . . . . . . . . . . . . . . . . . . . . . .74
App
Data usage
Default. . . . . . . . . . . . . . . . . . . . . . . . . . . . 61
Detecting harmful. . . . . . . . . . . . . . . . . . . . 27
Disable . . . . . . . . . . . . . . . . . . . . . . . . . . . . 24
Email . . . . . . . . . . . . . . . . . . . . . . . . . . . . . 58
End . . . . . . . . . . . . . . . . . . . . . . . . . . . . . . 24
Exit . . . . . . . . . . . . . . . . . . . . . . . . . . . . . . 24
Force stop. . . . . . . . . . . . . . . . . . . . . . . . . .62
Install. . . . . . . . . . . . . . . . . . . . . . . . . . . . .24
Install from other source . . . . . . . . . . . . . . . 26
Move on start screen . . . . . . . . . . . . . . . . . . 19
On start screen . . . . . . . . . . . . . . . . . . . . . . 19
Open last time . . . . . . . . . . . . . . . . . . . . . .16
Personalise . . . . . . . . . . . . . . . . . . . . . . . . . 11
Quick access. . . . . . . . . . . . . . . . . . . . . . . . 23
Security . . . . . . . . . . . . . . . . . . . . . . . . . . . 26
Set letter code for quick access. . . . . . . . . . . 23
Store in folder on screen . . . . . . . . . . . . . . . 19
Uninstall. . . . . . . . . . . . . . . . . . . . . . . . . . . 24
Unknown source. . . . . . . . . . . . . . . . . . . . . 26
Using two apps in parallel . . . . . . . . . . . . . . 25
Verif y . . . . . . . . . . . . . . . . . . . . . . . . . . . . . 26
App notifications. . . . . . . . . . . . . . . . . . . . . . . 22
App permissions . . . . . . . . . . . . . . . . . . . . . . . 55
Granting/Denying. . . . . . . . . . . . . . . . . . . . 56
On installation . . . . . . . . . . . . . . . . . . . . . . 55
App settings . . . . . . . . . . . . . . . . . . . . . . . . . . 61
Reset . . . . . . . . . . . . . . . . . . . . . . . . . . . . . 63
Apps
Contacts
Downloads . . . . . . . . . . . . . . . . . . . . . . . . . 27
File manager. . . . . . . . . . . . . . . . . . . . . . . . 34
Messages . . . . . . . . . . . . . . . . . . . . . . . . . . 42
Phone . . . . . . . . . . . . . . . . . . . . . . . . . . . . 33
Settings . . . . . . . . . . . . . . . . . . . . . . . . . . . 46
Arranging start screens . . . . . . . . . . . . . . . . . . 20
. . . . . . . . . . . . . . . . . . . . . . . . . 62
. . . . . . . . . . . . . . . . . . . . . . . . . . . 38
Index
Audio profile
Selection from On/Off button
Authorisation . . . . . . . . . . . . . . . . . . . . . . . . . 76
B
Battery
Charging
. . . . . . . . . . . . . . . . . . . . . . . . . . 10
Disposal. . . . . . . . . . . . . . . . . . . . . . . . . . . 77
Battery charge level . . . . . . . . . . . . . . . . . . . . 49
Blocking incoming numbers . . . . . . . . . . . . . . 36
Bluetooth
Change name of your own device
Change names of connected devices . . . . . . 69
Enable/disable . . . . . . . . . . . . . . . . . . . . . . 68
End pairing . . . . . . . . . . . . . . . . . . . . . . . . 69
Pairing. . . . . . . . . . . . . . . . . . . . . . . . . . . . 69
Tet he r in g . . . . . . . . . . . . . . . . . . . . . . . . . . 72
Brightness . . . . . . . . . . . . . . . . . . . . . . . . . . . 46
Adapt to ambient conditions . . . . . . . . . . . . 46
C
Call
. . . . . . . . . . . . . . . . . . . . . . . . . . . . 34
Accept
Delete from call log. . . . . . . . . . . . . . . . . . . 38
End . . . . . . . . . . . . . . . . . . . . . . . . . . . . . . 33
Initiate. . . . . . . . . . . . . . . . . . . . . . . . . . . . 33
Initiate from call log . . . . . . . . . . . . . . . . . . 38
Initiate from contact . . . . . . . . . . . . . . . . . . 39
Reject . . . . . . . . . . . . . . . . . . . . . . . . . . . . 34
Reject with SMS . . . . . . . . . . . . . . . . . . . . . 34
Call account . . . . . . . . . . . . . . . . . . . . . . . . . . 37
Call details . . . . . . . . . . . . . . . . . . . . . . . . . . . 37
Call log . . . . . . . . . . . . . . . . . . . . . . . . . . . . . 37
Call back caller . . . . . . . . . . . . . . . . . . . . . . 38
Delete calls . . . . . . . . . . . . . . . . . . . . . . . . 38
Call swapping . . . . . . . . . . . . . . . . . . . . . . . . . 35
Calls, sort sequence in the Phone app. . . . . . . . 36
Camera
Front
. . . . . . . . . . . . . . . . . . . . . . . . . . . . . . 3
Rear. . . . . . . . . . . . . . . . . . . . . . . . . . . . . . . 3
Certificate . . . . . . . . . . . . . . . . . . . . . . . . . . . 57
Delete . . . . . . . . . . . . . . . . . . . . . . . . . . . . 57
Enable/disable . . . . . . . . . . . . . . . . . . . . . . 57
Install from SD card. . . . . . . . . . . . . . . . . . . 58
Show list . . . . . . . . . . . . . . . . . . . . . . . . . . 57
WLAN . . . . . . . . . . . . . . . . . . . . . . . . . . . . 66
Charge icon . . . . . . . . . . . . . . . . . . . . . . . . . . 10
Conference call. . . . . . . . . . . . . . . . . . . . . . . . 35
Configuration . . . . . . . . . . . . . . . . . . . . . . . . . 10
Configuration wizard. . . . . . . . . . . . . . . . . . . . 10
Connecting the USB cable . . . . . . . . . . . . . 10, 31
Connection
Bluetooth
Data usage. . . . . . . . . . . . . . . . . . . . . . . . . 66
Headset . . . . . . . . . . . . . . . . . . . . . . . . . . . . 3
Mobile. . . . . . . . . . . . . . . . . . . . . . . . . . . . 63
. . . . . . . . . . . . . . . . . . . . . . . . . 68
. . . . . . . . . . . 17
. . . . . . . . 69
81
Page 82

Index
VPN . . . . . . . . . . . . . . . . . . . . . . . . . . . . . . 70
WLAN. . . . . . . . . . . . . . . . . . . . . . . . . . . . . 64
Connector
Micro-USB
Consultation . . . . . . . . . . . . . . . . . . . . . . . . . . 35
Contact
Add to Favourites
Add to group . . . . . . . . . . . . . . . . . . . . . . . 39
Call . . . . . . . . . . . . . . . . . . . . . . . . . . . . . . 39
Create . . . . . . . . . . . . . . . . . . . . . . . . . . . . 40
Delete . . . . . . . . . . . . . . . . . . . . . . . . . . . . 41
Delete more than one . . . . . . . . . . . . . . . . . 41
Divert call to mailbox. . . . . . . . . . . . . . . . . . 41
ME entry. . . . . . . . . . . . . . . . . . . . . . . . . . . 40
Set ringtone . . . . . . . . . . . . . . . . . . . . . . . . 41
Contact group. . . . . . . . . . . . . . . . . . . . . . . . . 39
Contacts . . . . . . . . . . . . . . . . . . . . . . . . . . . . .38
Group . . . . . . . . . . . . . . . . . . . . . . . . . . . . 39
Import/Export. . . . . . . . . . . . . . . . . . . . . . . 40
Link . . . . . . . . . . . . . . . . . . . . . . . . . . . . . . 41
Name format . . . . . . . . . . . . . . . . . . . . . . . 38
Sorting. . . . . . . . . . . . . . . . . . . . . . . . . . . . 38
Contents of the package . . . . . . . . . . . . . . . . . . 9
Conversation. . . . . . . . . . . . . . . . . . . . . . . . . . 43
Block . . . . . . . . . . . . . . . . . . . . . . . . . . . . . 45
Delete . . . . . . . . . . . . . . . . . . . . . . . . . . . . 45
Create screenshot . . . . . . . . . . . . . . . . . . . . . . 30
Creating folders for apps . . . . . . . . . . . . . . . . . 19
Customer care . . . . . . . . . . . . . . . . . . . . . . . . . 76
Customer service . . . . . . . . . . . . . . . . . . . . . . .76
D
Data
Backup
Restore. . . . . . . . . . . . . . . . . . . . . . . . . . . . 75
Data connection
Check usage
Enable . . . . . . . . . . . . . . . . . . . . . . . . . . . . 71
Enable/disable . . . . . . . . . . . . . . . . . . . . . . 67
Data loaded via Bluetooth . . . . . . . . . . . . . . . . 69
Data roaming . . . . . . . . . . . . . . . . . . . . . . . . . 63
Data save mode. . . . . . . . . . . . . . . . . . . . . . . . 68
Data usage . . . . . . . . . . . . . . . . . . . . . . . .62, 66
Limit . . . . . . . . . . . . . . . . . . . . . . . . . . . . . 67
Reduce. . . . . . . . . . . . . . . . . . . . . . . . . . . . 68
Warni ng . . . . . . . . . . . . . . . . . . . . . . . . . . . 67
Date and time
Set automatically
Set manually. . . . . . . . . . . . . . . . . . . . . . . . 73
Date format . . . . . . . . . . . . . . . . . . . . . . . . . .73
Default app. . . . . . . . . . . . . . . . . . . . . . . . . . . 61
Default settings . . . . . . . . . . . . . . . . . . . . . . . . 75
Deleting data remotely . . . . . . . . . . . . . . . . . . 56
Deleting DRM licenses . . . . . . . . . . . . . . . . . . . 75
Device
Configuration
Locate . . . . . . . . . . . . . . . . . . . . . . . . . . . . 56
Lock remotely . . . . . . . . . . . . . . . . . . . . . . .56
Ring remotely . . . . . . . . . . . . . . . . . . . . . . . 56
Switch on . . . . . . . . . . . . . . . . . . . . . . . . . . 10
. . . . . . . . . . . . . . . . . . . . . . . . . . 3
. . . . . . . . . . . . . . . . . . . . 41
. . . . . . . . . . . . . . . . . . . . . . . . . . . . 74
. . . . . . . . . . . . . . . . . . . . . . . . 66
. . . . . . . . . . . . . . . . . . . . 73
. . . . . . . . . . . . . . . . . . . . . . . 10
Device administrator. . . . . . . . . . . . . . . . . . . . 57
Device Manager . . . . . . . . . . . . . . . . . . . . . . . 56
Device storage . . . . . . . . . . . . . . . . . . . . . . . . 50
DHCP, in WLAN . . . . . . . . . . . . . . . . . . . . . . . . 66
Dialpad . . . . . . . . . . . . . . . . . . . . . . . . . . . . . 33
Dialpad tones. . . . . . . . . . . . . . . . . . . . . . . . . 48
Enable in Phone app. . . . . . . . . . . . . . . . . . 36
Display
Brightness
Idle mode . . . . . . . . . . . . . . . . . . . . . . . . . 14
Larger font . . . . . . . . . . . . . . . . . . . . . . . . . 52
Rotate . . . . . . . . . . . . . . . . . . . . . . . . . . . . 47
Display lock . . . . . . . . . . . . . . . . . . . . . . . . . . 53
Automatic . . . . . . . . . . . . . . . . . . . . . . . . . 54
Passwo rd . . . . . . . . . . . . . . . . . . . . . . . . . . 54
Patter n . . . . . . . . . . . . . . . . . . . . . . . . . . . 53
PIN . . . . . . . . . . . . . . . . . . . . . . . . . . . . . . 53
Replacement for fingerprint . . . . . . . . . . . . 27
Display size . . . . . . . . . . . . . . . . . . . . . . . . . . 52
Disposal. . . . . . . . . . . . . . . . . . . . . . . . . . . . . 77
Do not disturb . . . . . . . . . . . . . . . . . . . . . . . . 29
Disable . . . . . . . . . . . . . . . . . . . . . . . . . . . 29
Enable . . . . . . . . . . . . . . . . . . . . . . . . . 29, 30
Only permit important interruptions . . . . . . 29
Silent. . . . . . . . . . . . . . . . . . . . . . . . . . . . . 29
Specify important interruptions . . . . . . . . . . 30
Wake-up function only . . . . . . . . . . . . . . . . 29
Double tapping . . . . . . . . . . . . . . . . . . . . . . . 14
Download . . . . . . . . . . . . . . . . . . . . . . . . . . . 27
Download file from the Internet. . . . . . . . . . . . 27
Draft, SMS . . . . . . . . . . . . . . . . . . . . . . . . . . . 42
Drag . . . . . . . . . . . . . . . . . . . . . . . . . . . . . . . 14
E
Email account
Set up from Settings
Set up with wizard . . . . . . . . . . . . . . . . . . . 11
Emergency message . . . . . . . . . . . . . . . . . . . . 54
Emoticon in SMS. . . . . . . . . . . . . . . . . . . . . . . 42
Enabling/disabling notifications for messages. . 45
Enter a name for personalising . . . . . . . . . . . . . 11
Environment . . . . . . . . . . . . . . . . . . . . . . . . . 77
Exchange account. . . . . . . . . . . . . . . . . . . . . . 59
Exclusion of liability . . . . . . . . . . . . . . . . . . . . 76
Export of contacts. . . . . . . . . . . . . . . . . . . . . . 40
F
Favourite, in contacts . . . . . . . . . . . . . . . . . . . 41
Favo urit es ba r. . . . . . . . . . . . . . . . . . . . . . . . . . 4
Tailoring . . . . . . . . . . . . . . . . . . . . . . . . . . 18
File manager . . . . . . . . . . . . . . . . . . . . . . . . . 34
Fingerprint
Alternative method
For the quick start of functions . . . . . . . . . . 28
Name . . . . . . . . . . . . . . . . . . . . . . . . . . . . 28
Processing . . . . . . . . . . . . . . . . . . . . . . . . . 28
Set up from Settings . . . . . . . . . . . . . . . . . . 27
Set up with wizard . . . . . . . . . . . . . . . . . . . 12
Using. . . . . . . . . . . . . . . . . . . . . . . . . . . . . 28
Finger print sensor. . . . . . . . . . . . . . . . . . . . 3, 27
. . . . . . . . . . . . . . . . . . . . . . . . . 46
. . . . . . . . . . . . . . . . . . 58
. . . . . . . . . . . . . . . . . . 27
82
Page 83

Index
Flash . . . . . . . . . . . . . . . . . . . . . . . . . . . . . . . . 3
Flight mode . . . . . . . . . . . . . . . . . . . . . . . . . . 69
Font size . . . . . . . . . . . . . . . . . . . . . . . . . .46, 52
For multimedia messages, see MMS
For text messages, see SMS
For the screen lock, refer to the Display lock
Func tion
Enabling/disabling with quick settings
Quick start with fingerprint . . . . . . . . . . . . . 28
G
Google account. . . . . . . . . . . . . . . . . . . . . . . . 58
Set up with wizard. . . . . . . . . . . . . . . . . . . . 11
Google apps . . . . . . . . . . . . . . . . . . . . . . . . . . 25
Google keypad . . . . . . . . . . . . . . . . . . . . . . . . 17
Google search . . . . . . . . . . . . . . . . . . . . . . . . .15
Google services . . . . . . . . . . . . . . . . . . . . . . . . 58
Enable/disable with wizard . . . . . . . . . . . . . 12
H
Handsfree mode . . . . . . . . . . . . . . . . . . . . . . . 34
Headset connection. . . . . . . . . . . . . . . . . . . . . . 3
Help . . . . . . . . . . . . . . . . . . . . . . . . . . . . . . . . 76
Help on the Messages app . . . . . . . . . . . . . . . . 42
Hotspot . . . . . . . . . . . . . . . . . . . . . . . . . . . . .71
I
Icons
Notifications
Quick settings. . . . . . . . . . . . . . . . . . . . . . . 79
Status bar . . . . . . . . . . . . . . . . . . . . . . . . . . 79
User guide . . . . . . . . . . . . . . . . . . . . . . . . . . 5
Idle mode
Enable
End . . . . . . . . . . . . . . . . . . . . . . . . . . . . . . 14
Set period of inactivity. . . . . . . . . . . . . . . . . 14
Import of contacts . . . . . . . . . . . . . . . . . . . . . . 40
Important interruptions . . . . . . . . . . . . . . . . . . 30
Importing vCards . . . . . . . . . . . . . . . . . . . . . . 40
Install CA certificate . . . . . . . . . . . . . . . . . . . . . 58
Install client certificate . . . . . . . . . . . . . . . . . . . 58
Installation, app. . . . . . . . . . . . . . . . . . . . . . . . 24
Intelligent power save mode . . . . . . . . . . . . . . 50
K
Keypad . . . . . . . . . . . . . . . . . . . . . . . . . . . . . . 17
Keypad settings. . . . . . . . . . . . . . . . . . . . . . . .18
Keypad tones . . . . . . . . . . . . . . . . . . . . . . . . . 48
L
Language
Setting from Settings menu
Setting with wizard . . . . . . . . . . . . . . . . . . . 10
Letter codes for quick access to apps. . . . . . . . . 23
Listening to a recorded call . . . . . . . . . . . . . . . . 34
Location detection . . . . . . . . . . . . . . . . . . . . . 60
Location history . . . . . . . . . . . . . . . . . . . . . . . 60
Location mode . . . . . . . . . . . . . . . . . . . . . . . . 60
Lock screen message . . . . . . . . . . . . . . . . . . . . 54
LT E . . . . . . . . . . . . . . . . . . . . . . . . . . . . . . . . . 63
. . . . . . . . . . . . . . . . . . . . . . . . 80
. . . . . . . . . . . . . . . . . . . . . . . . . . . . 14
. . . . . 16
. . . . . . . . . . . . . 46
M
Main memory. . . . . . . . . . . . . . . . . . . . . . . . . 50
Usage . . . . . . . . . . . . . . . . . . . . . . . . . . . . 51
Making calls . . . . . . . . . . . . . . . . . . . . . . . . . . 33
Over the Internet . . . . . . . . . . . . . . . . . . . . 35
Over WLAN . . . . . . . . . . . . . . . . . . . . . . . . 35
Using headset . . . . . . . . . . . . . . . . . . . . . . 34
Using speaker . . . . . . . . . . . . . . . . . . . . . . 34
Memory
Freeing up
Message bar . . . . . . . . . . . . . . . . . . . . . . . . . . . 4
Message LED . . . . . . . . . . . . . . . . . . . . . . . . . 20
Messages . . . . . . . . . . . . . . . . . . . . . . . . . . . . 42
Define settings with wizard . . . . . . . . . . . . . 12
Manage . . . . . . . . . . . . . . . . . . . . . . . . . . . 44
Read . . . . . . . . . . . . . . . . . . . . . . . . . . . . . 44
Microphone . . . . . . . . . . . . . . . . . . . . . . . . . . . 3
Muting . . . . . . . . . . . . . . . . . . . . . . . . . . . 34
Micro-USB socket . . . . . . . . . . . . . . . . . . . . . . . 3
MMS
Create
Search all . . . . . . . . . . . . . . . . . . . . . . . . . . 44
Mobile network . . . . . . . . . . . . . . . . . . . . . . . 63
Music
Managing
Setting the volume. . . . . . . . . . . . . . . . . . . 47
Muting
From quick settings
Using rules . . . . . . . . . . . . . . . . . . . . . . . . . 48
N
Name format
Contact in Contacts app
Contact in Phone app . . . . . . . . . . . . . . . . . 36
Navigation buttons . . . . . . . . . . . . . . . . . . . 4, 16
Network connections . . . . . . . . . . . . . . . . . . . 63
Network services . . . . . . . . . . . . . . . . . . . . . . 37
Notification . . . . . . . . . . . . . . . . . . . . . . . . . . 20
Clear . . . . . . . . . . . . . . . . . . . . . . . . . . . . . 21
Reset . . . . . . . . . . . . . . . . . . . . . . . . . . . . . 21
Sound . . . . . . . . . . . . . . . . . . . . . . . . . . . . 21
Vibration mode . . . . . . . . . . . . . . . . . . . . . 21
View . . . . . . . . . . . . . . . . . . . . . . . . . . . . . 21
Notifications
Settings
Notifications bar
Open
Number
Enter from keypad
Numbers
Block
O
On/Off button . . . . . . . . . . . . . . . . . . . . . . . . . 3
Open the App menu . . . . . . . . . . . . . . . . . . . . . 5
P
Pairing . . . . . . . . . . . . . . . . . . . . . . . . . . . . . . 69
Ending. . . . . . . . . . . . . . . . . . . . . . . . . . . . 69
. . . . . . . . . . . . . . . . . . . . . . . . . 51
. . . . . . . . . . . . . . . . . . . . . . . . . . . . 43
. . . . . . . . . . . . . . . . . . . . . . . . . 32
. . . . . . . . . . . . . . . . . . 29
. . . . . . . . . . . . . . . 38
. . . . . . . . . . . . . . . . . . . . . . . . . . . 21
. . . . . . . . . . . . . . . . . . . . . . . . . . . . . 20
. . . . . . . . . . . . . . . . . . . 33
. . . . . . . . . . . . . . . . . . . . . . . . . . . . . 36
83
Page 84

Index
Password
Display lock . . . . . . . . . . . . . . . . . . . . . . . . 54
Set up with wizard. . . . . . . . . . . . . . . . . . . . 12
Patter n
Display lock
Set up with wizard. . . . . . . . . . . . . . . . . . . . 12
Visible / not visible . . . . . . . . . . . . . . . . . . . 54
Permissions for apps . . . . . . . . . . . . . . . . . . . . 55
Phone number
Add to contacts from call log
PIN
Display lock
Set up with wizard. . . . . . . . . . . . . . . . . . . . 12
PKCS#12 keystore files . . . . . . . . . . . . . . . . . . . 57
Power consumption. . . . . . . . . . . . . . . . . . . . . 49
Power Save mode . . . . . . . . . . . . . . . . . . . . . . 49
Power save mode
Enable automatically
Preferred SIM card . . . . . . . . . . . . . . . . . . . . . . 64
Premium S MS . . . . . . . . . . . . . . . . . . . . . . . . . 42
Printing . . . . . . . . . . . . . . . . . . . . . . . . . . . . . 32
Protection against unauthorised use . . . . . . . . . 53
Protection from unauthorised use
Set up with wizard
Proxy, WLAN . . . . . . . . . . . . . . . . . . . . . . . . . .65
Q
Quick access to apps . . . . . . . . . . . . . . . . . . . . 23
Quick response
Edit
Send . . . . . . . . . . . . . . . . . . . . . . . . . . . . . 34
Quick settings . . . . . . . . . . . . . . . . . . . . . . . . . 16
Icons . . . . . . . . . . . . . . . . . . . . . . . . . . . . . 79
Quick start of function with fingerprint . . . . . . . 28
R
Radiation . . . . . . . . . . . . . . . . . . . . . . . . . . . . 78
Recording a call. . . . . . . . . . . . . . . . . . . . . . . . 34
Resetting network settings. . . . . . . . . . . . . . . . 75
Responses to SMS/MMS . . . . . . . . . . . . . . . . . . 44
Ringtone
Change
Set for contact . . . . . . . . . . . . . . . . . . . . . . 41
Volum e . . . . . . . . . . . . . . . . . . . . . . . . . . . 47
Ringtone volume
Setting from Settings menu
Roaming. . . . . . . . . . . . . . . . . . . . . . . . . . . . . 63
S
SAR certification . . . . . . . . . . . . . . . . . . . . . . . 78
Scaling screen content . . . . . . . . . . . . . . . . . . . 15
Screen content
Create screenshot
Rotate . . . . . . . . . . . . . . . . . . . . . . . . . . . . 47
Screen pinning . . . . . . . . . . . . . . . . . . . . . . . . 54
SD card
Ejecting
Insert . . . . . . . . . . . . . . . . . . . . . . . . . . . . . . 9
Storage capacity . . . . . . . . . . . . . . . . . . . . . 51
. . . . . . . . . . . . . . . . . . . . . . . . 53
. . . . . . . . . . . . 38
. . . . . . . . . . . . . . . . . . . . . . . . 53
. . . . . . . . . . . . . . . . . . 49
. . . . . . . . . . . . . . . . . . . . 12
. . . . . . . . . . . . . . . . . . . . . . . . . . . . . . 36
. . . . . . . . . . . . . . . . . . . . . . . . 36, 47
. . . . . . . . . . . . . 47
. . . . . . . . . . . . . . . . . . . . 30
. . . . . . . . . . . . . . . . . . . . . . . . . . . 51
Using again . . . . . . . . . . . . . . . . . . . . . . . . 51
Using as memory extension. . . . . . . . . . . . . 51
Search . . . . . . . . . . . . . . . . . . . . . . . . . . . . . . 15
Send email to contact . . . . . . . . . . . . . . . . . . . 39
Set large font . . . . . . . . . . . . . . . . . . . . . . . . . 52
Silent
Enable from "Do not disturb"
SIM card
. . . . . . . . . . . . . . . . . . . . . . . . . . . . . . 9
Insert
Preferred . . . . . . . . . . . . . . . . . . . . . . . . . . 64
Unlock. . . . . . . . . . . . . . . . . . . . . . . . . . . . 13
Using two . . . . . . . . . . . . . . . . . . . . . . . . . 64
SIM card lock . . . . . . . . . . . . . . . . . . . . . . . . . 55
Smart Features
3 touch points
Enable/disable . . . . . . . . . . . . . . . . . . . . . . 23
Quick access to apps. . . . . . . . . . . . . . . . . . 23
Smart Lock . . . . . . . . . . . . . . . . . . . . . . . . . . . 54
Smiley in SMS . . . . . . . . . . . . . . . . . . . . . . . . . 42
SMS
Billable
Draft . . . . . . . . . . . . . . . . . . . . . . . . . . . . . 42
Save as draft. . . . . . . . . . . . . . . . . . . . . . . . 42
Search all . . . . . . . . . . . . . . . . . . . . . . . . . . 44
Send to a contact . . . . . . . . . . . . . . . . . . . . 39
Write . . . . . . . . . . . . . . . . . . . . . . . . . . . . . 42
SMS/MMS . . . . . . . . . . . . . . . . . . . . . . . . . . . 42
Respond to . . . . . . . . . . . . . . . . . . . . . . . . 44
Send . . . . . . . . . . . . . . . . . . . . . . . . . . . . . 43
Software update. . . . . . . . . . . . . . . . . . . . . . . 74
Sort sequence, Phone app. . . . . . . . . . . . . . . . 36
Sorting sequence, contacts . . . . . . . . . . . . . . . 38
Speaker . . . . . . . . . . . . . . . . . . . . . . . . . . . . . . 3
Split screen mode . . . . . . . . . . . . . . . . . . . . . . 25
Spread apart / pinch together your fingers . . . . 15
Start screen . . . . . . . . . . . . . . . . . . . . . . . . . . 15
Add . . . . . . . . . . . . . . . . . . . . . . . . . . . . . . 20
Add, remove, move apps. . . . . . . . . . . . . . . 19
Add, remove, move widgets . . . . . . . . . . . . 19
Change wallpaper . . . . . . . . . . . . . . . . . . . 19
Configuration. . . . . . . . . . . . . . . . . . . . . . . 18
Overview. . . . . . . . . . . . . . . . . . . . . . . . . . . 4
Remove . . . . . . . . . . . . . . . . . . . . . . . . . . . 20
Return to . . . . . . . . . . . . . . . . . . . . . . . . . . 15
Settings in the wizard . . . . . . . . . . . . . . . . . 12
Switching. . . . . . . . . . . . . . . . . . . . . . . . . . 15
Start screen display . . . . . . . . . . . . . . . . . . . . . . 4
Status bar. . . . . . . . . . . . . . . . . . . . . . . . . . . . . 4
Storage capacity
Assignment
Available . . . . . . . . . . . . . . . . . . . . . . . . . . 50
Storage, permanent . . . . . . . . . . . . . . . . . . . . 50
Storage, temporary . . . . . . . . . . . . . . . . . . . . . 50
Subtitles. . . . . . . . . . . . . . . . . . . . . . . . . . . . . 52
Swipe or drag . . . . . . . . . . . . . . . . . . . . . . . . . 14
Switching off . . . . . . . . . . . . . . . . . . . . . . . . . 13
Switching on . . . . . . . . . . . . . . . . . . . . . . 10, 13
Switching on and off . . . . . . . . . . . . . . . . . . . . 13
According to schedule . . . . . . . . . . . . . . . . 13
. . . . . . . . . . . . . . . . . . . . . . 31
. . . . . . . . . . . . . . . . . . . . . . . . . . . 42
. . . . . . . . . . . . . . . . . . . . . . . . 50
. . . . . . . . . 29, 30
84
Page 85

Index
All rights reserved. Rights of modification reserved.
Synchronisi ng . . . . . . . . . . . . . . . . . . . . . . . . . 59
System
T
Tap . . . . . . . . . . . . . . . . . . . . . . . . . . . . . . . . . 14
Tet he r in g
Tex t
Tex t-to -spe ech ou tpu t . . . . . . . . . . . . . . . . . . . 52
The ME entry in contacts . . . . . . . . . . . . . . . . . 40
Time format . . . . . . . . . . . . . . . . . . . . . . . . . . 73
Time ser ver. . . . . . . . . . . . . . . . . . . . . . . . . . . 73
Time zone . . . . . . . . . . . . . . . . . . . . . . . . . . . . 73
Tor ch . . . . . . . . . . . . . . . . . . . . . . . . . . . . . . . . 3
Tou ch a nd ho ld . . . . . . . . . . . . . . . . . . . . . . . . 14
Transferring files to/from a computer . . . . . . . . 31
Trust agents . . . . . . . . . . . . . . . . . . . . . . . . . . 54
TTY mode. . . . . . . . . . . . . . . . . . . . . . . . . . . . 37
Two SIM c ards . . . . . . . . . . . . . . . . . . . . . . . . . 64
U
Update . . . . . . . . . . . . . . . . . . . . . . . . . . . . . . 74
USB tethering . . . . . . . . . . . . . . . . . . . . . . . . . 72
User
Using the touchscreen . . . . . . . . . . . . . . . . . . . 14
V
Verification of apps . . . . . . . . . . . . . . . . . . . . . 26
Vibration
. . . . . . . . . . . . . . . . . . . . . . . . . . . . 74
Backup
Restore. . . . . . . . . . . . . . . . . . . . . . . . . . . . 75
Update. . . . . . . . . . . . . . . . . . . . . . . . . . . .74
. . . . . . . . . . . . . . . . . . . . . . . . . . 72
Bluetooth
USB . . . . . . . . . . . . . . . . . . . . . . . . . . . . . . 72
. . . . . . . . . . . . . . . . . . . . . . . . . . . 46
Font size
Writing and editing . . . . . . . . . . . . . . . . . . . 17
. . . . . . . . . . . . . . . . . . . . . . . . . . . . 30
Set up
Switch . . . . . . . . . . . . . . . . . . . . . . . . . . . . 30
Enable/Disable in Phone app
Setting from Settings menu . . . . . . . . . . . . . 47
Setting from Volume button. . . . . . . . . . . . . 47
. . . . . . . . . . . . 36
Virtual Private Network, see VPN
Volu me
Setting from Settings menu
Setting from Volume button . . . . . . . . . . . . 47
Volume bu tton . . . . . . . . . . . . . . . . . . . . . . . . . 3
VPN . . . . . . . . . . . . . . . . . . . . . . . . . . . . . . . . 70
Add . . . . . . . . . . . . . . . . . . . . . . . . . . . . . . 70
End connection . . . . . . . . . . . . . . . . . . . . . 70
Establish connection. . . . . . . . . . . . . . . . . . 70
W
Wake-up alarm, volume. . . . . . . . . . . . . . . . . . 47
Wallpaper
Widget . . . . . . . . . . . . . . . . . . . . . . . . . . . . . . 19
Wi-Fi Direct . . . . . . . . . . . . . . . . . . . . . . . . . . 66
WLAN
WPS PIN . . . . . . . . . . . . . . . . . . . . . . . . . . . . . 66
WPS Push button . . . . . . . . . . . . . . . . . . . . . . 66
X
X.509 certificate . . . . . . . . . . . . . . . . . . . . . . . 57
Z
Zooming . . . . . . . . . . . . . . . . . . . . . . . . . . . . 14
. . . . . . . . . . . . . . . . . . . . . . . . . . . 19
Change
Set with wizard. . . . . . . . . . . . . . . . . . . . . . 12
Change size . . . . . . . . . . . . . . . . . . . . . . . . 19
Move on start screen. . . . . . . . . . . . . . . . . . 19
On start screen . . . . . . . . . . . . . . . . . . . . . . 19
Position on start screen . . . . . . . . . . . . . . . . 12
. . . . . . . . . . . . . . . . . . . . . . . . . . . . . . 65
Add
Certificate . . . . . . . . . . . . . . . . . . . . . . . . . 66
Configuration. . . . . . . . . . . . . . . . . . . . . . . 65
DHCP . . . . . . . . . . . . . . . . . . . . . . . . . . . . 66
Enable/disable . . . . . . . . . . . . . . . . . . . . . . 64
Establish connection. . . . . . . . . . . . . . . 11, 64
Establish connection with wizard. . . . . . . . . 11
Hotspot . . . . . . . . . . . . . . . . . . . . . . . . . . . 71
Proxy . . . . . . . . . . . . . . . . . . . . . . . . . . . . . 65
Remove . . . . . . . . . . . . . . . . . . . . . . . . . . . 65
. . . . . . . . . . . . . 47
85
Page 86

Issued by
Gigaset Communications GmbH
Frankenstr. 2a, D-46395 Bocholt
© Gigaset Communications GmbH 2017
Subject to availability.
All rights reserved. Rights of modification reserved.
www.gigaset.com
Google, Android, Google Play and other brands are trademarks of Google Inc.
 Loading...